TestNG was developed by a famous programmer named “Cedric Beust”. It is distributed under Apache Software License and is easily available to download. TestNG requires JDK 7 or higher. TestNG is a testing framework inspired by JUnit and NUnit, but introduces some new functionalities that make it more powerful and easier to use.
Serenity BDD is an open-source library that aims to make the idea of living documentation a reality.
What is Rest Assured?
Rest Assured is one of the most powerful libraries for testing RESTful API using Java language. Rest-Assured is a Java-based library that is used to test RESTful Web Services. This library behaves like a headless Client to access REST web services. The rest-Assured library also provides the ability to validate the HTTP Responses received from the server.
Prerequisite
Java 17 installed
Maven installed
Eclipse or IntelliJ installed
Dependency List
Java 17
Maven – 3.9.5
Serenity – 4.0.18
Serenity Rest Assured – 4.0.18
Rest Assured – 5.3.2
JUnit – 4.13.2
Maven Surefire Plugin – 3.1.2
Maven Failsafe Plugin – 3.1.2
Maven Compiler Plugin – 3.11.0
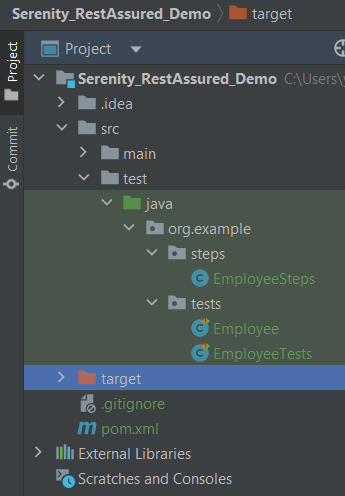
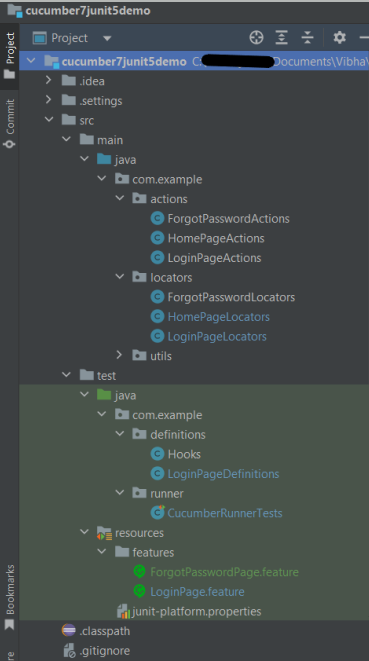
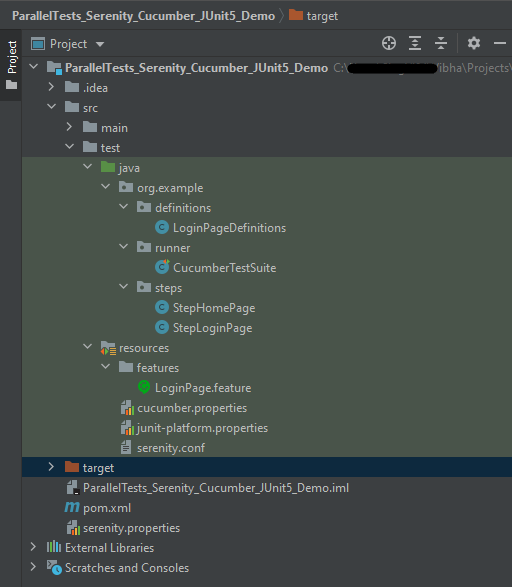
Project Structure
Implementation Steps
Step 1 – Update the Properties section in Maven pom.xml
Step 4 – Create the Test Code in src/java/testdirectory
There are 2 ways to create the same test. One approach is to have a Definition file that contains all the test code as shown below.
package org.example.tests;

import io.restassured.response.Response;
import net.serenitybdd.rest.SerenityRest;
import org.json.JSONObject;
import org.junit.Test;

import static org.hamcrest.Matchers.equalTo;

public class Employee {
    private static final String URL = "https://reqres.in/api";
    public Response response;

    int id = 2;

    @Test
    public void verifyValidUser() {

        response = SerenityRest
                .given()
                .contentType("application/json")
                .header("Content-Type", "application/json")
                .when()
                .get(URL + "/users/" + id);

        SerenityRest.restAssuredThat(response -> response.statusCode(200)
                .body("data.id", equalTo(2))
                .body("data.email", equalTo("janet.weaver@reqres.in"))
                .body("data.first_name", equalTo("Janet"))
                .body("data.last_name", equalTo("Weaver")));

    }

    @Test
    public void verifyCreateUser() {
        JSONObject data = new JSONObject();

        data.put("name", "Test");
        data.put("job", "Test Architect");

        response = SerenityRest
                .given()
                .contentType("application/json")
                .header("Content-Type", "application/json")
                .body(data.toString())
                .when()
                .post(URL + "/users");

        SerenityRest.restAssuredThat(response -> response.statusCode(201)
                .body("name", equalTo("Test"))
                .body("job", equalTo("Test Architect")));

    }

}
Another approach is that all tests are split into reusable blocks called “steps“. The main principle of the BDD approach is that we are trying to keep complexity to a high-level human-readable level. First of all, let’s create a separate package to keep our steps. It is always better to keep them separate as it shows which classes contain reusable components. It is better to make steps smaller. So let’s make separate reusable steps from our tests:
package org.example.steps;

import io.restassured.response.Response;
import net.serenitybdd.annotations.Step;
import net.serenitybdd.rest.SerenityRest;
import org.json.JSONObject;

import static org.hamcrest.Matchers.equalTo;

public class EmployeeSteps {
    private static final String URL = "https://reqres.in/api";
    public Response response;

    @Step("Search user by id {0}")
    public void sendUser(int id) {
        response = SerenityRest
                .given()
                .contentType("application/json")
                .header("Content-Type", "application/json")
                .when()
                .get(URL + "/users/" + id);

    }

    @Step("Create a new user")
    public void createUser() {

        JSONObject data = new JSONObject();

        data.put("name", "Test");
        data.put("job", "Test Architect");

        response = SerenityRest
                .given()
                .contentType("application/json")
                .header("Content-Type", "application/json")
                .body(data.toString())
                .when()
                .post(URL + "/users");

    }

    @Step("Verify the status code {0}")
    public void verifyStatusCode(int expectedStatusCode) {
        SerenityRest.restAssuredThat(response -> response.statusCode(expectedStatusCode));
    }

    @Step("Verify the user id {0}")
    public void verifyId(int expectedId) {
        SerenityRest.restAssuredThat(response -> response.body("data.id", equalTo(expectedId)));
    }

    @Step("Verify the user first name {0}")
    public void verifyFirstName(String expectedFirstName) {

        SerenityRest.restAssuredThat(response -> response.body("data.first_name", equalTo(expectedFirstName)));
    }

    @Step("Verify the user last name {0}")
    public void verifyLastName(String expectedLastName) {
        SerenityRest.restAssuredThat(response -> response.body("data.last_name", equalTo(expectedLastName)));
    }

    @Step("Verify the user email {0}")
    public void verifyEmail(String expectedEmail) {
        SerenityRest.restAssuredThat(response -> response.body("data.email", equalTo(expectedEmail)));
    }

    @Step("Verify the new user name {0}")
    public void verifyNewUserName(String expectedName) {
        SerenityRest.restAssuredThat(response -> response.body("name", equalTo(expectedName)));
    }

    @Step("Verify the new user job {0}")
    public void verifyNewUserJob(String expectedJob) {
        SerenityRest.restAssuredThat(response -> response.body("job", equalTo(expectedJob)));
    }

}
Now our steps are ready. Let’s refactor the main class with our tests:
One more important thing we added is the “@RunWith(SerenityRunner.class)” annotation on top of the class. As we have now organized our structure to meet some basic Serenity principles, we are ready to run the test using Serenity. This time (after we added the mentioned annotation) these tests will be run using the “SerenityRunner”. For that we can use exactly the same command to run our tests:
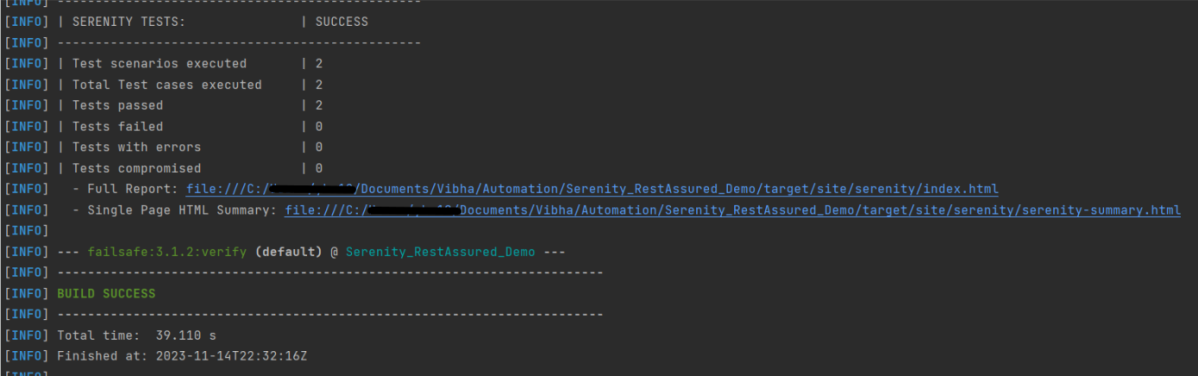
mvn clean verify
The output of the above program is
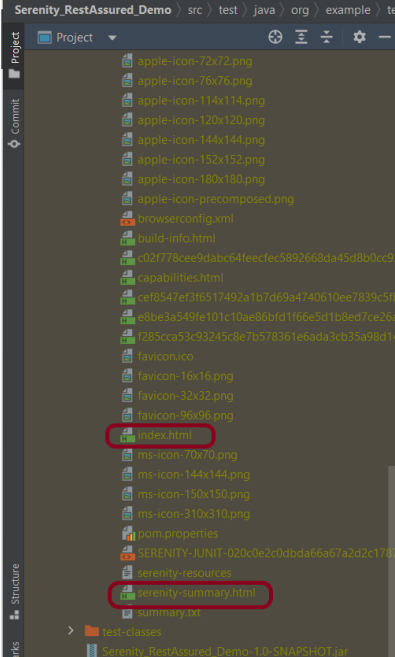
In the console, you should find printed messages for tests to start. At the same time under the target directory you can find the HTML-generated report we were talking about before:
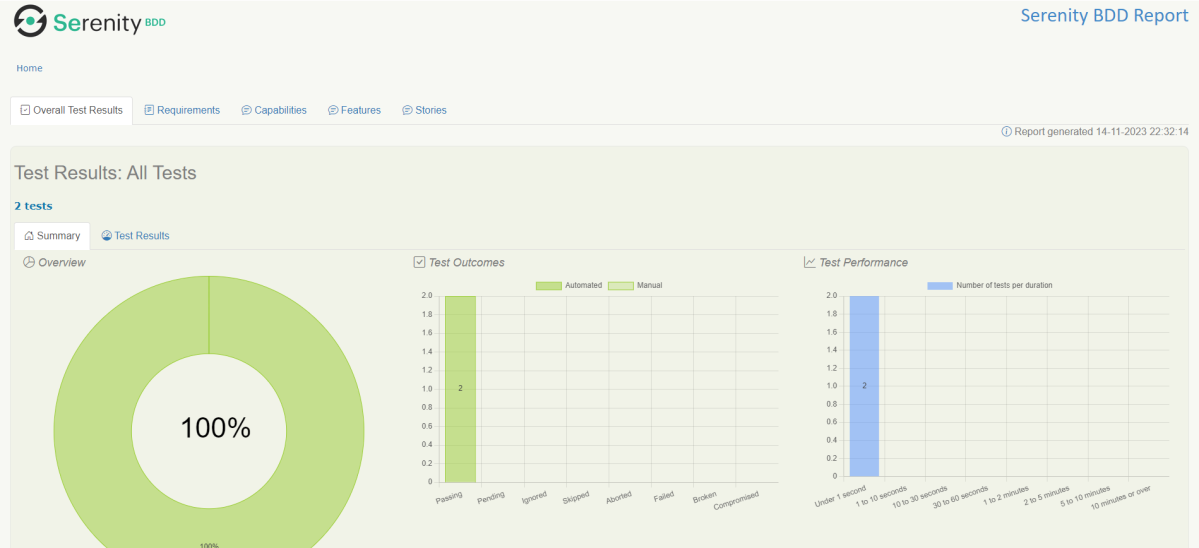
You can open the report in any browser:
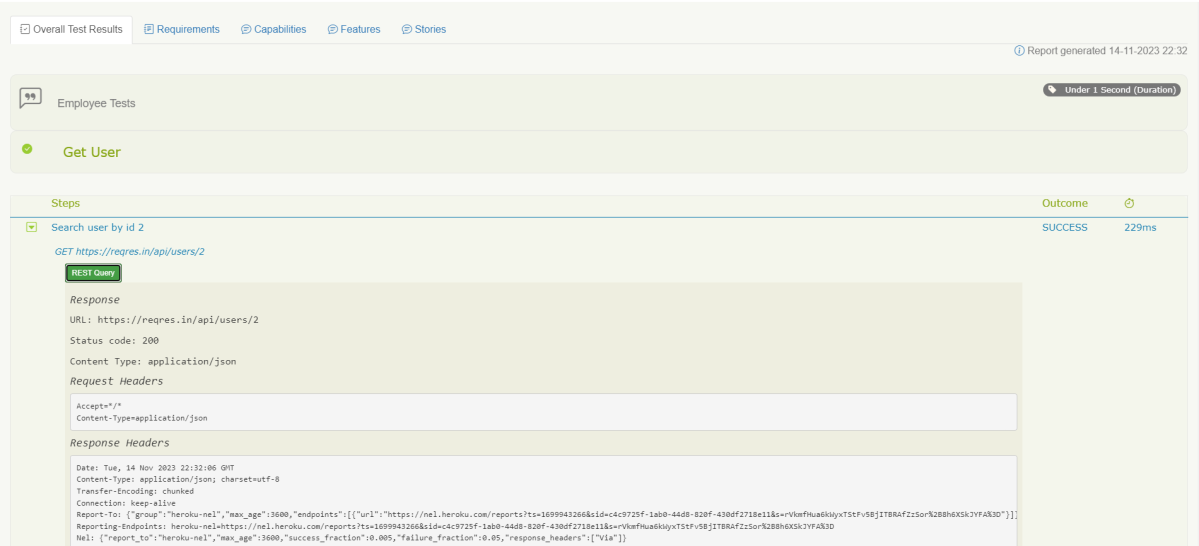
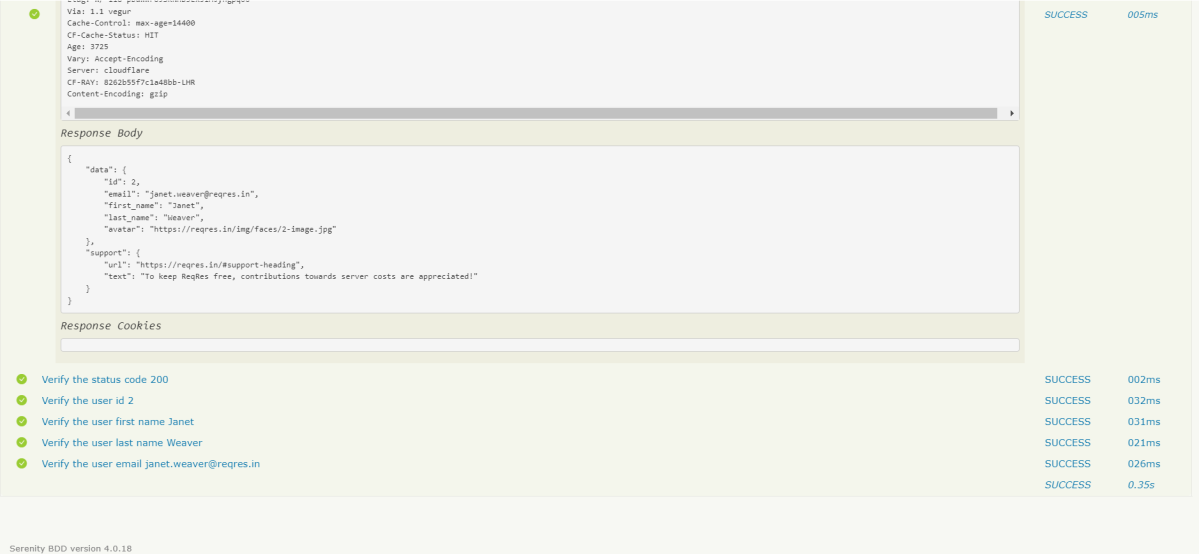
If you click on any test you should see a detailed description of the test steps:
One of the most important features of the Serenity and REST Assured integration is that by using detailed reporting, you can easily validate all requests and response details even if you are not adding any logs inside tests. Like the example above, for each executed REST request you can click the button “REST Query” and get a detailed request and response description:
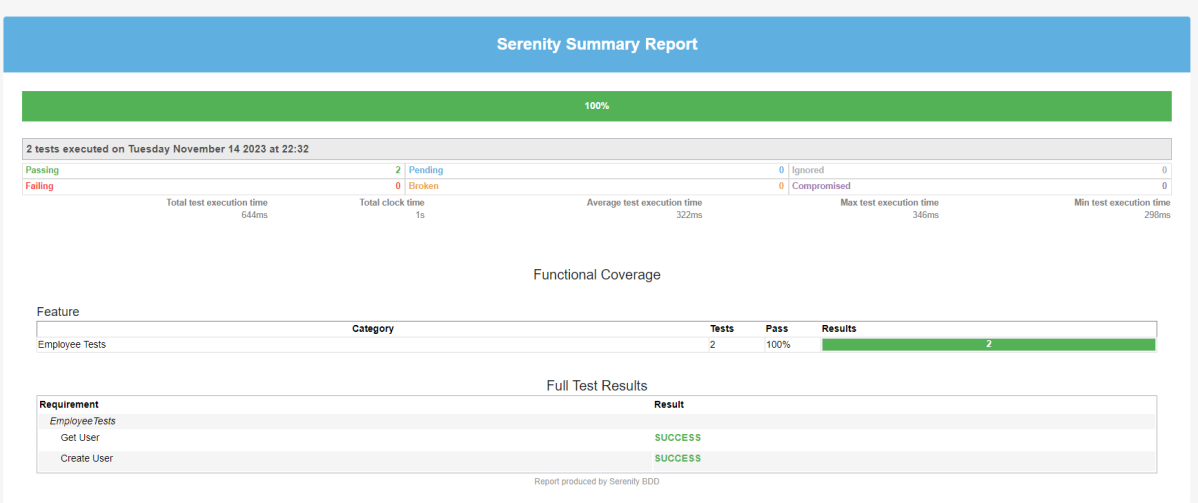
There is another very useful Serenity Report – Serenity Symmary.html
As you can see, Serenity and REST Assured provide you with a wonderful combination. REST Assured keeps API testing clean and easy to maintain, while Serenity gives you outstanding test reporting and flexibility in running and grouping your tests inside a test suite.
We are done! Congratulations on making it through this tutorial and hope you found it useful! Happy Learning!!
I have created a lot of tutorials on creating Test Frameworks by integrating JUnit4 with Selenium, Cucumber, Serenity, Rest API, Springboot. This tutorial explain the steps to Integrate Cucumber7 with JUnit5.
JUnit 5 is composed of several different modules from three different sub-projects.
Cucumber and Selenium need Java to be installed on the system to run the tests. Click here to know How to install Java.
Step 2 – Download and setup Eclipse IDE on the system
The Eclipse IDE (integrated development environment) provides strong support for Java developers, which is needed to write Java code. Click here to know How to install Eclipse.
Step 3 – Setup Maven
To build a test framework, we need to add a number of dependencies to the project. It is a very tedious and cumbersome process to add each dependency manually. So, to overcome this problem, we use a build management tool. Maven is a build management tool that is used to define project structure, dependencies, build, and test management. Click here to know How to install Maven.
The Cucumber Eclipse plugin is a plugin that allows eclipse to understand the Gherkin syntax. The Cucumber Eclipse Plugin highlights the keywords present in Feature File. Click here to know more – Install Cucumber Eclipse Plugin.
Step 7 – Create a feature file in src/test/resources
Below is a sample feature file. Feature file should be saved as an extension of .feature. Add the test scenarios in this feature file. I have added sample test scenarios. The test scenarios are written in Gherkins language.
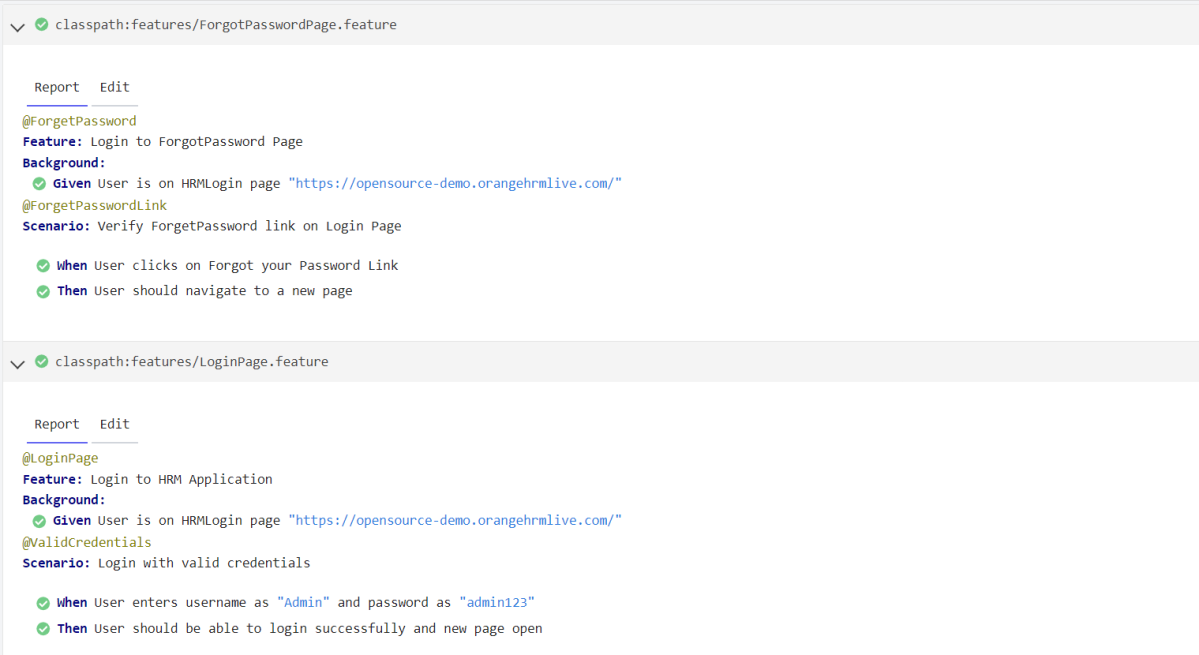
LoginPage.feature
@LoginPage
Feature: Login to HRM Application

Background:
    Given User is on HRMLogin page "https://opensource-demo.orangehrmlive.com/"

   @ValidCredentials
   Scenario: Login with valid credentials

    When User enters username as "Admin" and password as "admin123"
    Then User should be able to login successfully and new page open

   @InvalidCredentials
   Scenario Outline: Login with invalid credentials

    When User enters username as "<username>" and password as "<password>"
    Then User should be able to see error message "<errorMessage>"

  Examples:
  | username   | password    | errorMessage                      |
  | Admin        | admin12$$  | Invalid credentials               |
  | admin$$     | admin123    | Invalid credentials               |
  | abc123        | xyz$$           | Invalid credentials               |


  @FaceBookLink
  Scenario: Verify FaceBook Icon on Login Page

    Then User should be able to see FaceBook Icon

  @LinkedInLink
  Scenario: Verify LinkedIn Icon on Login Page

    Then User should be able to see LinkedIn Icon
ForgetPasswordPage.feature
@ForgetPassword
Feature: Login to ForgotPassword Page

  Background:
    Given User is on HRMLogin page "https://opensource-demo.orangehrmlive.com/"

  @ForgetPasswordLink
  Scenario: Verify ForgetPassword link on Login Page

    When User clicks on Forgot your Password Link
    Then User should navigate to a new page
Step 8 – Create cucumber.properties file in src/test/resources
We need to create the junit-platform.properties file in the src/test/resources folder. Using a property file for reporting is quite helpful if you want to define several different properties.
cucumber.publish.enabled=true
Step 9 – Create a Helper class in src/main/java
We have used Page Object Model with Cucumber and TestNG. Create a Helper class where we are initializing the web driver, initializing the web driver wait, defining the timeouts, and creating a private constructor of the class, it will declare the web driver, so whenever we create an object of this class, a new web browser is invoked.
import java.time.Duration;
import org.openqa.selenium.WebDriver;
import org.openqa.selenium.chrome.ChromeDriver;
import io.github.bonigarcia.wdm.WebDriverManager;
import org.openqa.selenium.chrome.ChromeOptions;

public class HelperClass {

	 private static HelperClass helperClass;

	    private static WebDriver driver;
	    public final static int TIMEOUT = 5;

	     private HelperClass() {

	        WebDriverManager.chromedriver().setup();
			ChromeOptions options = new ChromeOptions();
			options.addArguments("--start-maximized");
	        driver = new ChromeDriver(options);
	        driver.manage().timeouts().implicitlyWait(Duration.ofSeconds(TIMEOUT));
	     }

	    public static void openPage(String url) {
	        driver.get(url);
	    }

	    public static WebDriver getDriver() {
	        return driver;
	    }

	    public static void setUpDriver() {

	        if (helperClass==null) {

	            helperClass = new HelperClass();
	        }
	    }

	    public static void tearDown() {

	        if(driver!=null) {
	             driver.quit();
	        }

	       helperClass = null;
	   }

	}
Step 10 – Create Locator classes in src/main/java
Create a locator class for each page that contains the detail of the locators of all the web elements. Here, I’m creating 3 locator classes – LoginPageLocators, HomePageLocators,and ForgotPasswordLocators.
LoginPageLocators
import org.openqa.selenium.WebElement;
import org.openqa.selenium.support.FindBy;

public class LoginPageLocators {

	@FindBy(name = "username")
    public WebElement userName;

    @FindBy(name = "password")
    public WebElement password;

    @FindBy(id = "logInPanelHeading")
    public WebElement titleText;

    @FindBy(xpath = "//*[@id='app']/div[1]/div/div[1]/div/div[2]/div[2]/form/div[3]/button")
    public WebElement login;

    @FindBy(xpath = "//*[@id='app']/div[1]/div/div[1]/div/div[2]/div[2]/div/div[1]/div[1]/p")
    public  WebElement errorMessage;

    @FindBy(xpath = "//*[@href='https://www.linkedin.com/company/orangehrm/mycompany/']")
    public  WebElement linkedInIcon;

    @FindBy(xpath = "//*[@href='https://www.facebook.com/OrangeHRM/']")
    public  WebElement faceBookIcon;

    @FindBy(xpath = "//*[@id='app']/div[1]/div/div[1]/div/div[2]/div[2]/form/div[4]/p")
    public  WebElement ForgotYourPasswordLink;

}
HomePageLocators
import org.openqa.selenium.WebElement;
import org.openqa.selenium.support.FindBy;

public class HomePageLocators {

	@FindBy(xpath = "//*[@id='app']/div[1]/div[2]/div[2]/div/div[1]/div[1]/div[1]/h5")
	public  WebElement homePageUserName;

}
ForgotPasswordLocators
import org.openqa.selenium.WebElement;
import org.openqa.selenium.support.FindBy;

public class ForgotPasswordLocators {

	@FindBy(xpath = "//*[@id='app']/div[1]/div[1]/div/form/h6")
    public WebElement ForgotPasswordHeading;

}
Step 11 – Create Action classes in src/main/java
Create the action classes for each web page. These action classes contain all the methods needed by the step definitions. In this case, I have created 2 action classes – LoginPageActions, HomePageActions, and ForgotPasswordActions.
LoginPageActions
In this class, the very first thing will do is to create the object of the LoginPageLocators class so that we should be able to access all the PageFactory elements. Secondly, create a public constructor of LoginPageActions class.
import org.openqa.selenium.support.PageFactory;
import com.example.locators.LoginPageLocators;
import com.example.utils.HelperClass;

public class LoginPageActions {

	LoginPageLocators loginPageLocators = null;

    public LoginPageActions() {

    	this.loginPageLocators = new LoginPageLocators();

		PageFactory.initElements(HelperClass.getDriver(),loginPageLocators);
	}

	// Set user name in textbox
    public void setUserName(String strUserName) {
    	loginPageLocators.userName.sendKeys(strUserName);
    }

    // Set password in password textbox
    public void setPassword(String strPassword) {
    	loginPageLocators.password.sendKeys(strPassword);
    }

    // Click on login button
    public void clickLogin() {
    	loginPageLocators.login.click();
    }

    // Get the title of Login Page
    public String getLoginTitle() {
        return loginPageLocators.titleText.getText();
    }

    // Get the title of Login Page
    public String getErrorMessage() {
        return loginPageLocators.errorMessage.getText();
    }

    // LinkedIn Icon is displayed
    public Boolean getLinkedInIcon() {

        return loginPageLocators.linkedInIcon.isDisplayed();
    }

    // FaceBook Icon is displayed
    public Boolean getFaceBookIcon() {

        return loginPageLocators.faceBookIcon.isDisplayed();
    }

    // Click on Forget Your Password link
    public void clickOnForgetYourPasswordLink() {

    	loginPageLocators.ForgotYourPasswordLink.click();
    }

    public void login(String strUserName, String strPassword) {

        // Fill user name
        this.setUserName(strUserName);

        // Fill password
        this.setPassword(strPassword);

        // Click Login button
        this.clickLogin();

    }
}
HomePageActions
import org.openqa.selenium.support.PageFactory;
import com.example.locators.HomePageLocators;
import com.example.utils.HelperClass;

public class HomePageActions {

	HomePageLocators homePageLocators = null;

	public HomePageActions() {

		this.homePageLocators = new HomePageLocators();

		PageFactory.initElements(HelperClass.getDriver(),homePageLocators);
    }

    // Get the User name from Home Page
    public String getHomePageText() {
        return homePageLocators.homePageUserName.getText();
    }

}
ForgotPasswordActions
import org.openqa.selenium.support.PageFactory;
import com.example.locators.ForgotPasswordLocators;
import com.example.utils.HelperClass;

public class ForgotPasswordActions {

	ForgotPasswordLocators forgotPasswordLocators = null;

	public ForgotPasswordActions() {

		this.forgotPasswordLocators = new ForgotPasswordLocators();

		PageFactory.initElements(HelperClass.getDriver(),forgotPasswordLocators);
    }


    // Get the Heading of Forgot Password page
    public String getForgotPasswordPageText() {
        return forgotPasswordLocators.ForgotPasswordHeading.getText();
    }
}
Step 12 – Create a Step Definition file in src/test/java
Create the corresponding Step Definition file of the feature file.
LoginPageDefinitions
import org.junit.jupiter.api.Assertions;
import com.example.actions.ForgotPasswordActions;
import com.example.actions.HomePageActions;
import com.example.actions.LoginPageActions;
import com.example.utils.HelperClass;
import io.cucumber.java.en.Given;
import io.cucumber.java.en.Then;
import io.cucumber.java.en.When;

public class LoginPageDefinitions{

	LoginPageActions objLogin = new LoginPageActions();
    HomePageActions objHomePage = new HomePageActions();
    ForgotPasswordActions objForgotPasswordPage = new ForgotPasswordActions();

    @Given("User is on HRMLogin page {string}")
    public void loginTest(String url) {

    	HelperClass.openPage(url);

    }

    @When("User enters username as {string} and password as {string}")
    public void goToHomePage(String userName, String passWord) {

        // login to application
        objLogin.login(userName, passWord);

        // go the next page

    }

    @When("User clicks on Forgot your Password Link")
    public void goToForgotYourPasswordPage() {

    	objLogin.clickOnForgetYourPasswordLink();

    }

    @Then("User should be able to login sucessfully and new page open")
    public void verifyLogin() {

        // Verify home page
        Assertions.assertTrue(objHomePage.getHomePageText().contains("Employee Information"));

    }

    @Then("User should be able to see error message {string}")
    public void verifyErrorMessage(String expectedErrorMessage) {

        // Verify home page
    	Assertions.assertEquals(objLogin.getErrorMessage(),expectedErrorMessage);

    }

    @Then("User should be able to see LinkedIn Icon")
    public void verifyLinkedInIcon( ) {

    	Assertions.assertTrue(objLogin.getLinkedInIcon());
    }

    @Then("User should be able to see FaceBook Icon")
    public void verifyFaceBookIcon( ) {

    	Assertions.assertTrue(objLogin.getFaceBookIcon());
    }

    @Then("User should navigate to a new page")
    public void verfiyForgetYourPasswordPage() {

   	Assertions.assertEquals(objForgotPasswordPage.getForgotPasswordPageText(), "Reset Password");
    }

}
Step 13 – Create Hook class in src/test/java
Create the hook class that contains the Before and After hook to initialize the web browser and close the web browser.
import org.openqa.selenium.OutputType;
import org.openqa.selenium.TakesScreenshot;
import com.example.utils.HelperClass;
import io.cucumber.java.After;
import io.cucumber.java.Before;
import io.cucumber.java.Scenario;

public class Hooks {

	@Before
    public static void setUp() {

       HelperClass.setUpDriver();
    }

	@After
	public static void tearDown(Scenario scenario) {

		//validate if scenario has failed
		if(scenario.isFailed()) {
			final byte[] screenshot = ((TakesScreenshot) HelperClass.getDriver()).getScreenshotAs(OutputType.BYTES);
			scenario.attach(screenshot, "image/png", scenario.getName());
		}

		HelperClass.tearDown();
	}
}
Step 14 – Create a Cucumber Test Runner class in src/test/java
Cucumber needs a TestRunner class to run the feature files. It is suggested to create a folder with the name of the runner in the src/test/java directory and create the Cucumber TestRunner class in this folder. Below is the code of the Cucumber TestRunner class.
import static io.cucumber.junit.platform.engine.Constants.GLUE_PROPERTY_NAME;
import org.junit.platform.suite.api.ConfigurationParameter;
import org.junit.platform.suite.api.IncludeEngines;
import org.junit.platform.suite.api.SelectClasspathResource;
import org.junit.platform.suite.api.Suite;

@Suite
@IncludeEngines("cucumber")
@SelectClasspathResource("com.example")
@ConfigurationParameter(key = GLUE_PROPERTY_NAME, value = "com.example")

public class CucumberRunnerTests  {

}
Step 15 – Run the tests from Maven or Command Line
Use the below command to run the tests.
mvn clean verify
Step 16 – Cucumber Report Generation
Below is the image of the Cucumber Report generated using the Cucumber Service.
Jenkins is a self-contained, open-source automation server that can be used to automate all sorts of tasks related to building, testing, and delivering or deploying software.
Jenkins can be installed through native system packages, Docker, or even run standalone by any machine with a Java Runtime Environment (JRE) installed.
Cucumber is a BDD Tool, and Selenium WebDriver is used for the automation of web applications. Imagine we need to build a test framework. This framework can be used by businesses to understand the test scenarios. It can also test the web application. This can be achieved by integrating Cucumber with Selenium. I’m going to use TestNG as the Test Automation tool for assertions. In the previous tutorial, I used Cucumber with Page Object Model. To know more about this, please refer to this tutorial – Page Object Model with Selenium, Cucumber, and TestNG.
In this tutorial, I’ll create a BDD Framework for the testing of web applications. I will use Cucumber, Selenium WebDriver, Maven and TestNG.
Cucumber and Selenium need Java to be installed on the system to run the tests. Click here to know How to install Java.
Step 2 – Download and setup Eclipse IDE on the system
The Eclipse IDE (integrated development environment) provides strong support for Java developers, which is needed to write Java code. Click here to know How to install Eclipse.
Step 3 – Setup Maven
To build a test framework, we need to add a number of dependencies to the project. It is a very tedious and cumbersome process to add each dependency manually. So, to overcome this problem, we use a build management tool. Maven is a build management tool that is used to define project structure, dependencies, build, and test management. Click here to know How to install Maven.
The Cucumber Eclipse plugin is a plugin that allows eclipse to understand the Gherkin syntax. The Cucumber Eclipse Plugin highlights the keywords present in Feature File. Click here to know more – How to install Cucumber Eclipse Plugin
Group Id – com.example Artifact Id – Cucumber_TestNG_Demo Version – 0.0.1-SNAPSHOT Package – com. example. Cucumber_TestNG_Demo
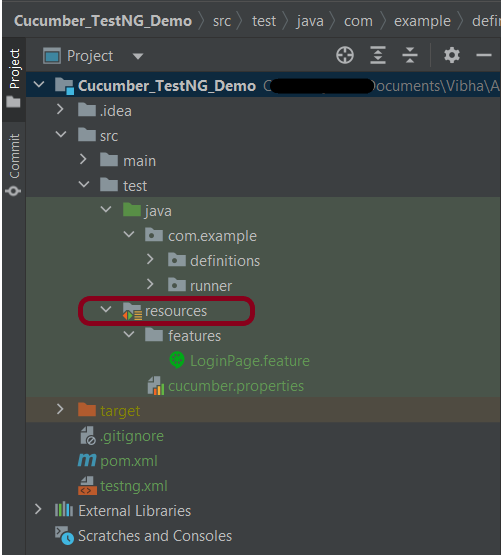
Step 7 – Create source folder src/test/resources to create test scenarios in Feature file
When a new Maven Project is created, it has 2 folders – src/main/java and src/test/java as shown below image. To create test scenarios, we need a new source folder called – src/test/resources. To create this folder, right-click on your maven project ->select New ->Java, and then Source Folder.
Step 8 – Add Selenium, TestNG, and Cucumber dependencies to the project
Add the below-mentioned Selenium, TestNG, and Cucumber dependencies to the project.
Step 9 – Add Maven Compiler Plugin and SureFire Plugin
The compiler plugin is used to compile the source code of a Maven project. This plugin has two goals, which are already bound to specific phases of the default lifecycle:
If you don’t add a compiler plugin to the POM.xml, the build will fail. This happens when you try to run the tests through Maven. Then the build will fail with the below message.
Step 10 – Create a feature file under src/test/resources/features
It is recommended to create a features folder in the src/test/resources directory. Create all the feature files in this features folder. Feature file should be saved as an extension of .feature. The test scenarios in the Feature file are written in Gherkins language. Add the test scenarios in this feature file. I have added sample test scenarios.
Feature: Login to HRM Application

Background:
   Given User is on HRMLogin page "https://opensource-demo.orangehrmlive.com/"

   @ValidCredentials
   Scenario: Login with valid credentials

    When User enters username as "Admin" and password as "admin123"
    Then User should be able to login sucessfully and new page open

   @InvalidCredentials
   Scenario Outline: Login with invalid credentials

    When User enters username as "<username>" and password as "<password>"
    Then User should be able to see error message "<errorMessage>"

  Examples:
   | username   | password     | errorMessage                       |
   | Admin        | admin12$$   | Invalid credentials               |
   | admin$$     | admin123     | Invalid credentials               |
   | abc123        | xyz$$           | Invalid credentials               |
Step 11 – Create the step definition class in src/test/java
Create the step definition class corresponding to the feature file to test the scenarios in the src/test/java directory. The StepDefinition files should be created in this definitionsdirectory within the folder called definitions.
Below is the step definition of the LoginPage feature file.
package com.example.definitions;

import io.cucumber.java.After;
import io.cucumber.java.Before;
import io.cucumber.java.en.Given;
import io.cucumber.java.en.Then;
import io.cucumber.java.en.When;
import io.github.bonigarcia.wdm.WebDriverManager;
import org.openqa.selenium.By;
import org.openqa.selenium.WebDriver;
import org.openqa.selenium.chrome.ChromeDriver;
import org.openqa.selenium.chrome.ChromeOptions;
import org.testng.Assert;
import java.time.Duration;

public class LoginPageDefinitions {
    private static WebDriver driver;
    public final static int TIMEOUT = 5;

    @Before
    public void setUp() {

        ChromeOptions options = new ChromeOptions();
        options.addArguments("--start-maximized");
        driver = new ChromeDriver(options);
        driver.manage().timeouts().implicitlyWait(Duration.ofSeconds(TIMEOUT));

    }

    @Given("User is on HRMLogin page {string}")
    public void loginTest(String url) {

        driver.get(url);

    }

    @When("User enters username as {string} and password as {string}")
    public void goToHomePage(String userName, String passWord) {

        // login to application
        driver.findElement(By.name("username")).sendKeys(userName);
        driver.findElement(By.name("password")).sendKeys(passWord);
        driver.findElement(By.xpath("//*[@class='oxd-form']/div[3]/button")).submit();

    }

    @Then("User should be able to login successfully and new page open")
    public void verifyLogin() {

        String homePageHeading = driver.findElement(By.xpath("//*[@class='oxd-topbar-header-breadcrumb']/h6")).getText();

        //Verify new page - HomePage
        Assert.assertEquals(homePageHeading, "Dashboard");

    }

    @Then("User should be able to see error message {string}")
    public void verifyErrorMessage(String expectedErrorMessage) {

        String actualErrorMessage = driver.findElement(By.xpath("//*[@class='orangehrm-login-error']/div[1]/div[1]/p")).getText();

        // Verify Error Message
        Assert.assertEquals(actualErrorMessage, expectedErrorMessage);

    }

    @After
    public void teardown() {

        driver.quit();
    }

}
assertThat() and containsString are imported from package:-
Step 12 – Create a TestNG Cucumber Runner classin src/test/java
We need to create a class called Runner class to run the tests. This class will use the TestNG annotation @RunWith(), which tells TestNG what is the test runner class. TestRunner should be created under src/test/java within the folder called runner.
Below is the code for the Cucumber Runner Class.
import io.cucumber.testng.AbstractTestNGCucumberTests;
import io.cucumber.testng.CucumberOptions;

@CucumberOptions(tags = "", features = {"src/test/resources/features/LoginPage.feature"}, glue = {"com.example.definitions"},
                 plugin = {})

public class CucumberRunnerTests extends AbstractTestNGCucumberTests {

}
AbstractTestNGCucumberTests – Runs each cucumber scenario found in the features as a separate test.
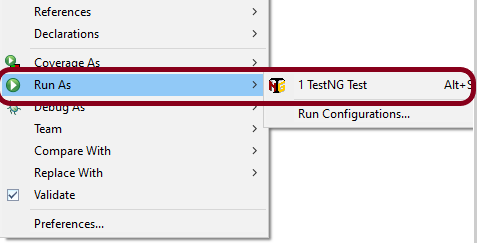
Step 13 – Test Execution through TestNG
Go to the Runner class and right-click “Run As TestNG Test”. The tests will run as TestNG tests. This is for Eclipse.
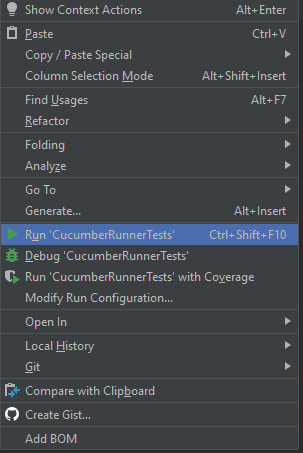
In case you are using IntelliJ, then select “Run CucumberRunner Tests“.
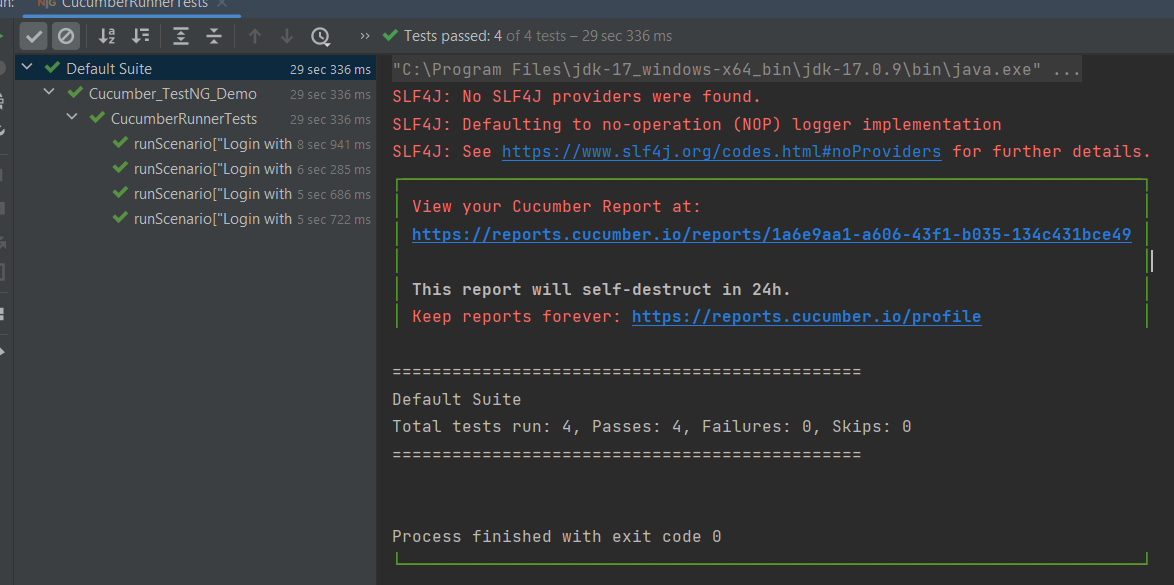
This is what the execution console will look like in Eclipse.
Step 14 – Run the tests from TestNG.xml
Create a TestNG.xml as shown below and run the tests as TestNG.
Below is an example of testng.xml.
<?xml version="1.0" encoding="UTF-8"?>
<!DOCTYPE suite SYSTEM "https://testng.org/testng-1.0.dtd">
<suite name="Suite">
  <test  name="Cucumber with TestNG Test">
    <classes>
      <class name="com.example.runner.CucumberRunnerTests"/>
    </classes>
  </test> <!-- Test -->
</suite> <!-- Suite -->
Step 15 – Run the tests from the Command Line
Run the below command in the command prompt to run the tests and to get the test execution report.
mvn clean test
The execution screen looks like something as shown below.
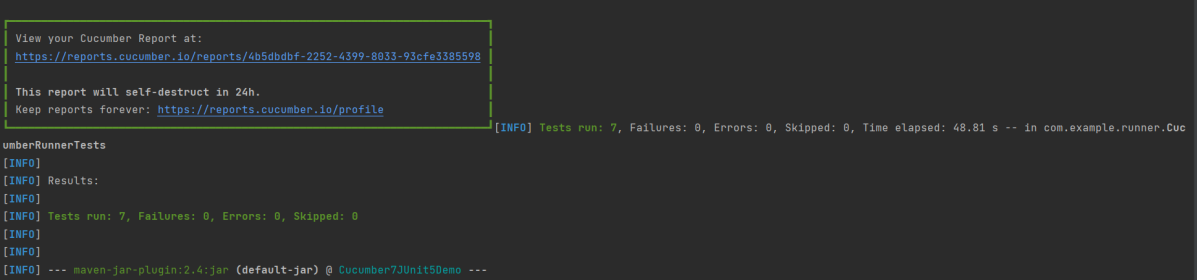
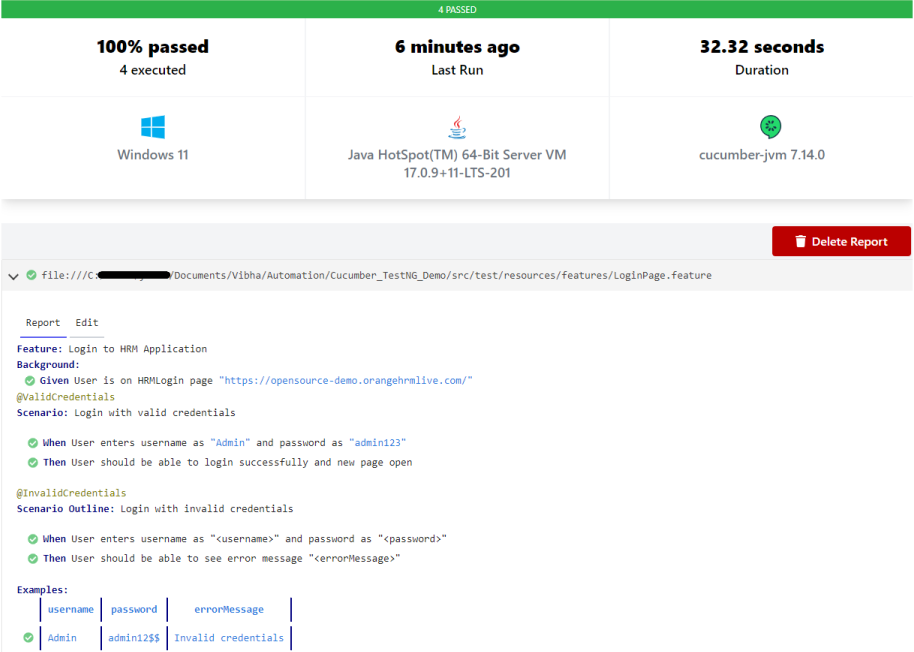
Step 16 – Cucumber Report Generation
Add cucumber.properties under src/test/resources and add the below instructions in the file.
cucumber.publish.enabled=true
Below is the image of the Cucumber Report generated using the Cucumber Service.
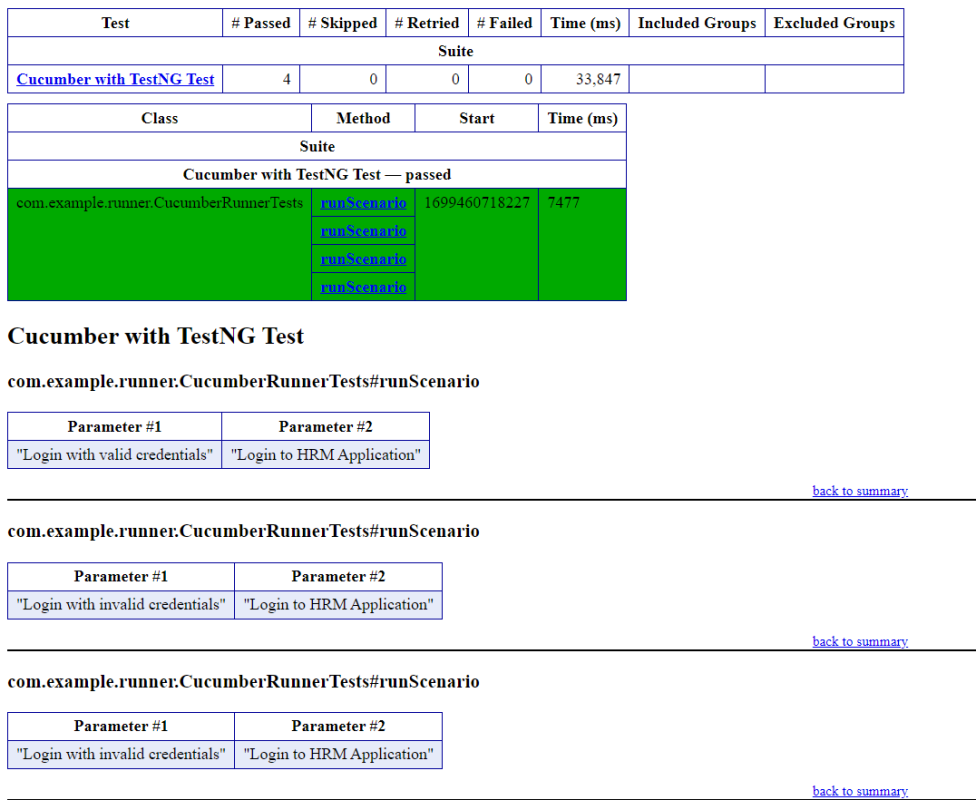
Step 17 – TestNG Report Generation
TestNG generates various types of reports under the test-output or target folder like emailable-report.html, index.html, testng-results.xml.
We are interested in the ‘emailable-report.html’ report. Open “emailable-report.html“, as this is an HTML report, and open it with the browser. The below image shows emailable-report.html.
emailable-report.html
Index.html
TestNG also produces “index.html” report, and it resides under the test-output folder. The below image shows the index.html report.
CI/CD Integration:
Integrating BDD tests with Continuous Integration and Continuous Deployment (CICD) pipelines helps automate the testing process. Tools like Jenkins, GitLab CI, or GitHub Actions can be configured easily. They run BDD tests automatically during the build process. Here’s how:
Configure the CICD Pipeline:Set up the pipeline to build the project, run tests, and create reports.
Run Tests: Ensure the pipeline runs your BDD tests using Maven or Gradle.
Publish Reports: Configure the pipeline to show test results, so you can easily see if there are any issues.
Troubleshooting Tips:
1. Maven Dependencies Not Resolved: The dependencies for Cucumber, Selenium, or TestNG are not resolving in your project. Make sure your pom.xml is correctly configured and the Maven repository has the latest dependencies. Run mvn clean install to force update dependencies. Also, check if you have internet access and the correct settings in your Maven configuration.
2. TestNG XML File Setup: TestNG tests are not running as expected, or the test results are incorrect. Double-check your `testng.xml` configuration to ensure that the correct test classes, packages, or methods are included. Make sure annotations like `@Test` are correctly used in your test classes.
3. Cucumber Features Not Recognized: Cucumber feature files aren’t recognized by your test runner. Verify your `CucumberOptions` in the test runner class points to the correct `features` path and `glue` path for step definitions. Make sure your feature files have the correct `.feature` extension and contain valid Gherkin syntax.
In the previous tutorial, I explained theSerenity BDD with Cucumber for Web Application using Junit4. In this tutorial, I will explain the parallel execution of Cucumber Scenarios with Serenity and JUnit5. This tutorial gives a clear picture of the initial setup of a BDD Framework.
Starting with version 3.6.0 is possible to run the Cucumber scenarios in parallel.
We need to mention these in the junit-platform.properties to run the Cucumber scenarios parallelly.
Step 2 – Download and setup Eclipse IDE on the system
The Eclipse IDE (integrated development environment) provides strong support for Java developers which is needed to write Java code. Click here to know How to install Eclipse.
Step 3 – Setup Maven and create a new Maven Project
Group Id – org.example Artifact Id – ParallelTests_Serenity_Cucumber_Junit5_Demo Version – 0.0.1-SNAPSHOT Package – org.example. ParallelTests_Serenity_Cucumber_Junit5_Demo
Step 4 – Update Properties section in Maven pom.xml
Step 7 – Create a feature file in src/test/resources
The purpose of the Feature keyword is to provide a high-level description of a software feature and to group related scenarios. To know more about the Feature files, please refer this tutorial.
Feature: Login to HRM

  @ValidCredentials
  Scenario: Login with valid credentials

    Given User is on Home page
    When User enters username as "Admin"
    And User enters password as "admin123"
    Then User should be able to login successfully

  @InValidCredentials
  Scenario: Login with invalid credentials

    Given User is on Home page
    When User enters username as "Admin1"
    And User enters password as "Admin123"
    Then User should be able to see error message "Invalid credentials"

  @BlankUsername
  Scenario: Login with blank username

    Given User is on Home page
    When User enters username as ""
    And User enters password as "Admin123"
    Then User should be able to see error message "Required" below username
Step 8 – Create the Step pages for StepDefinition class
In Serenity, tests are broken down into reusable steps. An important principle behind Serenity is the idea that it is easier to maintain a test that uses several layers of abstraction to hide the complexity behind different parts of a test. So, in Step class, we will declare the locators of the web elements and the actions performed on these web elements.
There are multiple ways to identify a web element on the web page – one of the ways is to use @FindBy or $(By.).
I prefer to use @FindBy as I do need not to find the same element multiple times. Using @FindBy, I have identified a web element and defined a WebElementFacacde for the same which is reusable.
Step 9 – Create the Step Definition class or Glue Code
A Step Definition is a Java method with an expression that links it to one or more Gherkin steps. When Cucumber executes a Gherkin step in a scenario, it will look for a matching step definition to execute. You can have all of your step definitions in one file, or in multiple files.
LoginPageDefinitions
package org.example.definitions;

import io.cucumber.java.en.Given;
import io.cucumber.java.en.Then;
import io.cucumber.java.en.When;
import net.serenitybdd.annotations.Steps;
import org.example.steps.StepHomePage;
import org.example.steps.StepLoginPage;
import static org.junit.jupiter.api.Assertions.*;

public class LoginPageDefinitions {

    @Steps
    StepLoginPage loginPage;

    @Steps
    StepHomePage homePage;

    @Given("User is on Home page")
    public void openApplication() {
        loginPage.open();

    }

    @When("User enters username as {string}")
    public void enterUsername(String userName) {
        loginPage.inputUserName(userName);
    }

    @When("User enters password as {string}")
    public void enterPassword(String passWord) {
        loginPage.inputPassword(passWord);

        loginPage.clickLogin();
    }

    @Then("User should be able to login successfully")
    public void clickOnLoginButton() {

        assertTrue(homePage.getHomPageTitle().contains("Dashboard"));
    }

    @Then("User should be able to see error message {string}")
    public void unsuccessfulLogin(String expectedErrorMessage) {

        String actualErrorMessage = loginPage.errorMessage();
        assertEquals(expectedErrorMessage, actualErrorMessage);
    }

    @Then("User should be able to see error message {string} below username")
    public void missingUsername (String expectedErrorMessage) {

        String actualErrorMessage = loginPage.missingUsernameErrorMessage();
        assertEquals(expectedErrorMessage, actualErrorMessage);
    }

}
Assertions in JUnit-Jupiter are imported from the below package:-
import static org.junit.jupiter.api.Assertions.*;
Step 10 – Create a Serenity-Cucumber Runner class
Cucumber runs the feature files via JUnit and needs a dedicated test runner class to actually run the feature files.
import static io.cucumber.junit.platform.engine.Constants.GLUE_PROPERTY_NAME;
import org.junit.platform.suite.api.ConfigurationParameter;
import org.junit.platform.suite.api.IncludeEngines;
import org.junit.platform.suite.api.SelectClasspathResource;
import org.junit.platform.suite.api.Suite;

@Suite
@IncludeEngines("cucumber")
@SelectClasspathResource("org.example")
@SelectClasspathResource("/features")
@ConfigurationParameter(key = GLUE_PROPERTY_NAME, value = "org.example")
public class CucumberTestSuite {

}
Step 11 – Create cucumber.properties file under src/test/resources (optional)
This is an optional step. Cucumber of version 6.7 and above provides the functionality to generate a beautiful cucumber report. For this, it is needed to add a file cucumber.properties under src/test/resources.
cucumber.publish.enabled = true
Step 12 – Create junit-platform.properties in src/test/resources
Step 13 – Create serenity.conf file under src/test/resources
The serenity configuration file is used to configure the drivers so the test cases can run successfully. This file contains an operating system-specific binary. The binary file sits between your test and the browser. It acts as an intermediary, an interface between your tests and the browser you are using.
You can also configure the webdriver.base.url property for different environments in the serenity.conf configuration file.
webdriver {
    driver = chrome
}

serenity.browser.maximized = true

#
# Define drivers for different platforms. Serenity will automatically pick the correct driver for the current platform
#

environments {
  default {
    webdriver.base.url = "https://opensource-demo.orangehrmlive.com/"
  }
  dev {
    webdriver.base.url = "https://opensource-demo.orangehrmlive.com/dev"
  }
  staging {
    webdriver.base.url = "https://opensource-demo.orangehrmlive.com/staging"
  }
  prod {
    webdriver.base.url = "https://opensource-demo.orangehrmlive.com/prod"
  }
}
Step 14 – Create serenity.properties file at the root of the project
serenity.project.name = Parallel Execution of Cucumber Scenarios with Serenity
Step 15 – Run the tests from Command Line
Open the command line and go to the location wherethe pom.xml of the project is present and type the below command.
mvn clean verify
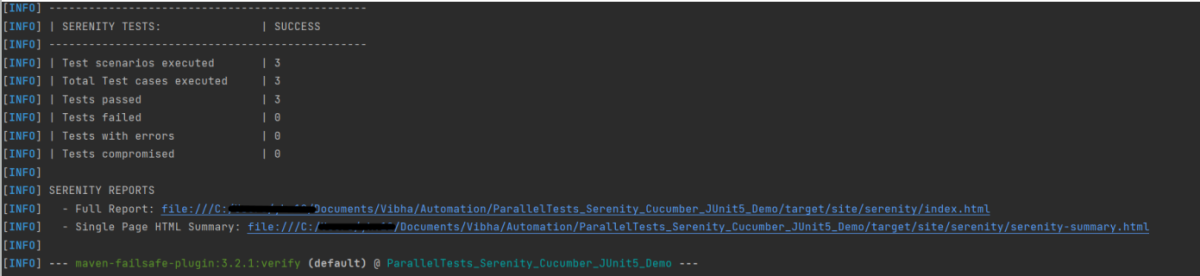
Below is the test result of the test execution.
Step 16 – Run the tests from CucumberRunner
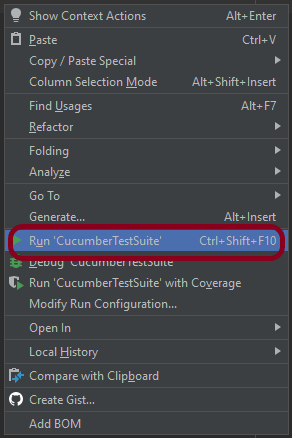
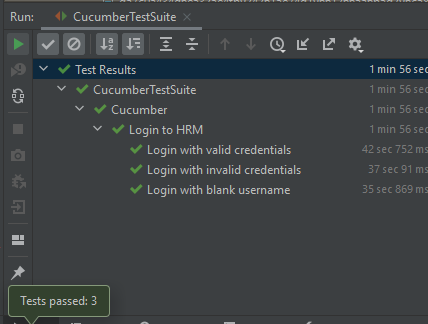
Right-click on the Ruuner class (CucumberTestSuite) and select Run ‘CucumberTestSuite’. (This is an image of IntelliJ Runner class).
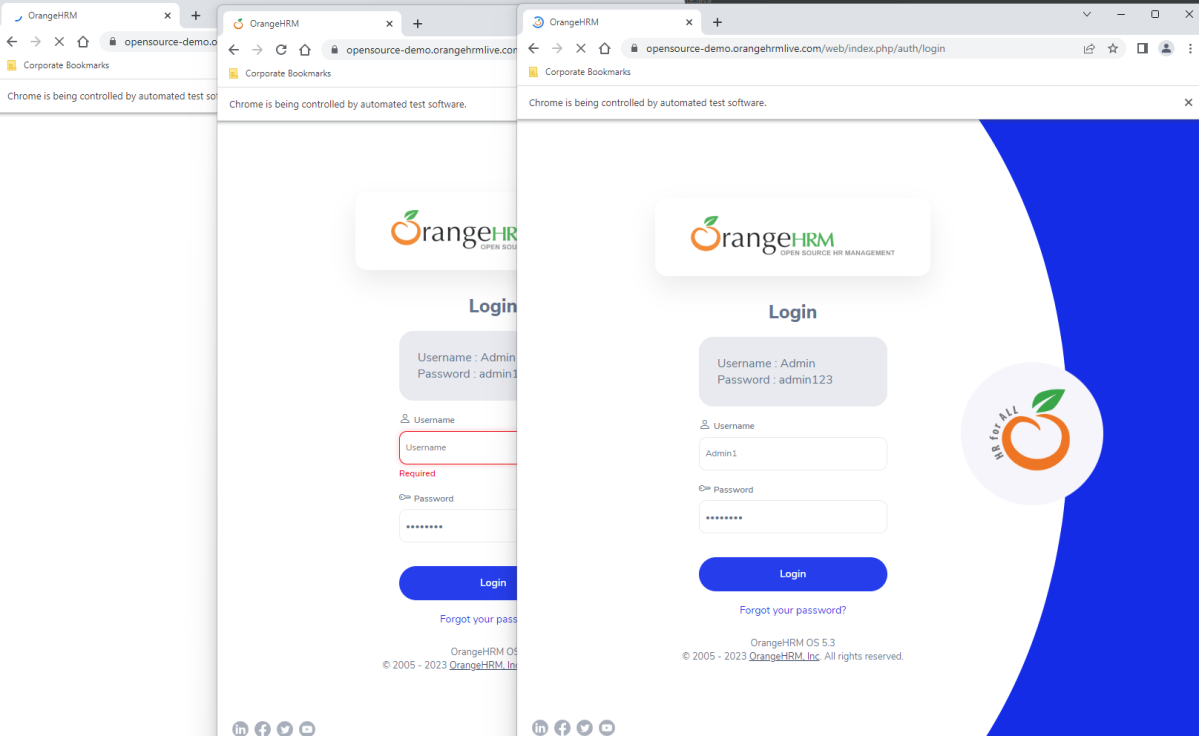
The below image shows that 3 browsers open simultaneously.
Below is the test result of the test execution.
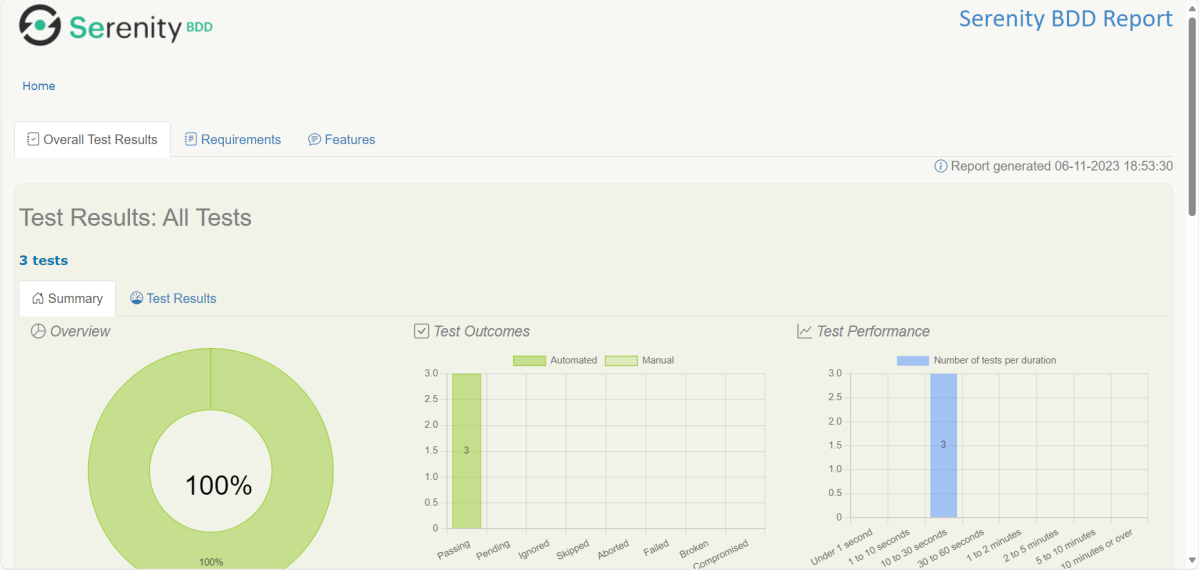
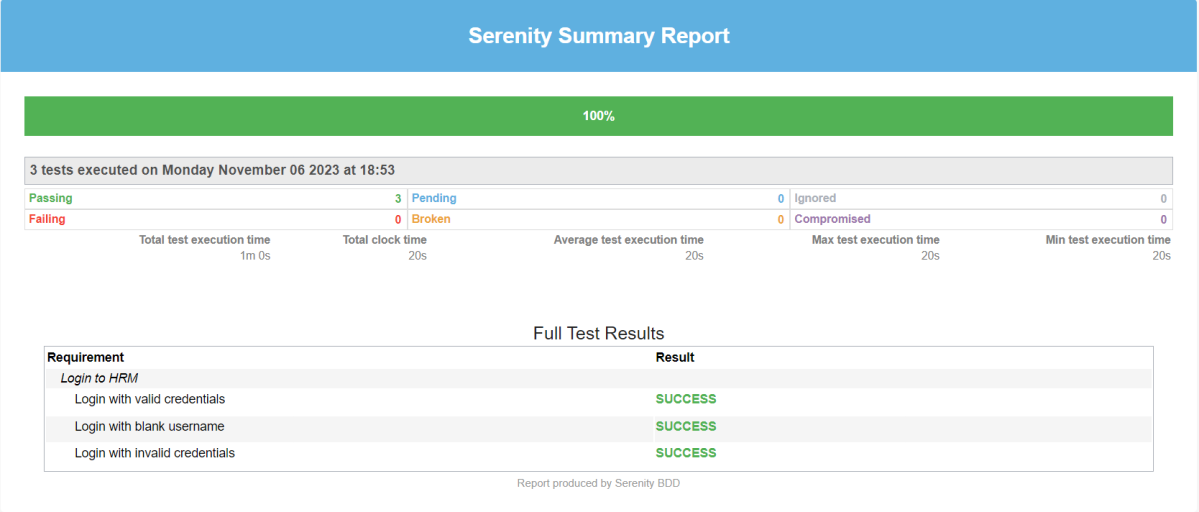
Step 17 – Serenity Report Generation
The best part about Serenity is the report generation by it. The Reports contain all possible types of information, you can think of with minimal extra effort. There is multiple types of reports are generated. We are interested in index.html and serenity-summary.html. To know more about Serenity Reports, please refer to tutorials for Index.html and Serenity-Summary.html. Below is the new Serenity Report.
Index.html
serenity-summary.html
If you want to control the number of browsers open in the test, then add the below-mentioned parameters in the junit-platform.properties:
Here, count=3 is the number of browsers that will open.
Please also remove <useUnlimitedThreads>true</useUnlimitedThreads> from pom.xml.
Note: While .fixed.max-pool-size effectively limits the maximum number of concurrent threads, Cucumber does not guarantee that the number of concurrently executing scenarios will not exceed this. This is from JUnit-Platform documentation.
We are done! Congratulations on making it through this tutorial and hope you found it useful! Happy Learning!!
Serenity BDD is an open-source library that aims to make the idea of living documentation a reality. Serenity BDD helps you write cleaner and more maintainable automated acceptance and regression tests faster. Serenity also uses the test results to produce illustrated, narrative reports that document and describe what your application does and how it works. Serenity tells you not only what tests have been executed, but more importantly, what requirements have been tested
Serenity BDD is an open-source library that aims to make the idea of living documentation a reality.
Serenity BDD helps you write cleaner and more maintainable automated acceptance and regression tests faster. Serenity also uses the test results to produce illustrated, narrative reports that document and describe what your application does and how it works. Serenity tells you not only what tests have been executed, but more importantly, what requirements have been tested.
What is SpringBoot Application?
Spring Boot is an open-source micro framework that provides Java developers with a platform to get started with an auto-configurable production-grade Spring application.
Comes with embedded HTTP servers like Tomcat orJetty to test web applications.
Adds many plugins that developers can use to work with embedded and in-memory databases easily. Spring allows you to easily connect with database and queue services like Oracle, PostgreSQL, MySQL, MongoDB, Redis, Solr, ElasticSearch, Rabbit MQ, and others.
Prerequisite
Serenity seamlessly supports Cucumber 6 and Cucumber 7. However, this flexibility requires a little tweaking in the build dependencies. For the Maven project, you need to do the following:
Add serenity-cucumber dependency
Add Springboottest dependency to start up an application context to be used in a test.
Add Junit-Vintage dependency as it is needed for spring boot application of version 2.4 and above with JUnit4.
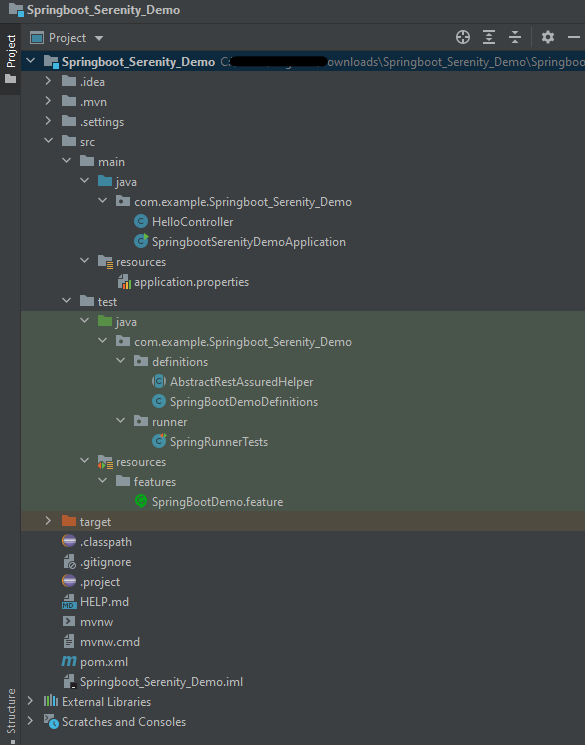
Project Directory Structure
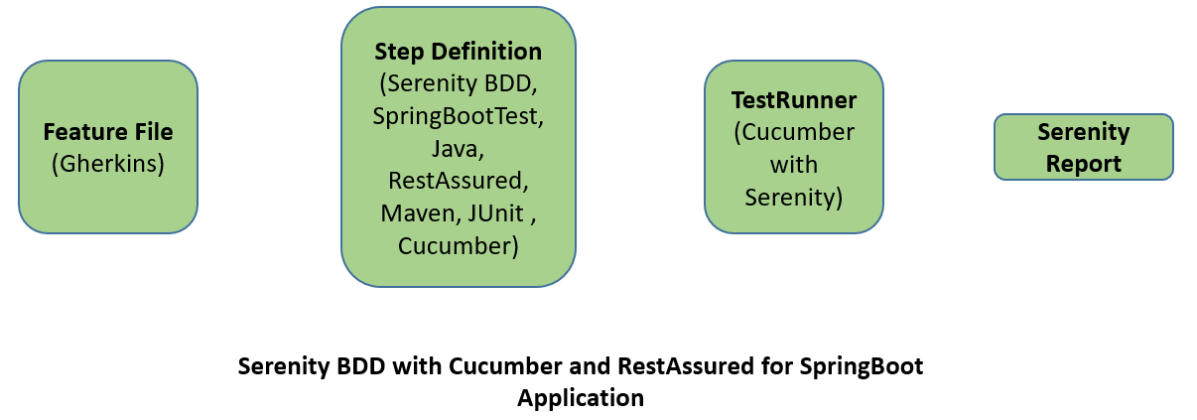
Relationship between SpringBoot, Serenity BDD, Cucumber and Rest Assured
Implementation Steps
Create a source folder – src/test/resources to create test scenarios in the Feature file
AddSpringBoot, Serenity, Cucumber,and JUnit4 dependencies to the project
Create a feature file under src/test/resources
Create the StepDefinition and Helper classes.
Create a Serenity Runner class in the src/test/java directory
Run the tests from JUnit
Run the tests from Command Line
Serenity Report Generation
CucumberReport Generation
Step 1 – Create a source folder – src/test/resources
Right-click on the test directory and select New->Directory and select resources (Maven Source Directories). Create a source folder – src/test/resources to create test scenarios in the Feature file
Step 2 – Add SpringBoot, Serenity, Cucumber, and JUnit4 dependencies to the project
We have added SpringBootTest, Serenity, Cucumber, JUnit4, and JUnit Vintage.
Step 3 – Create a feature file under src/test/resources
Below is an example of a feature file which shows a sample test scenario.
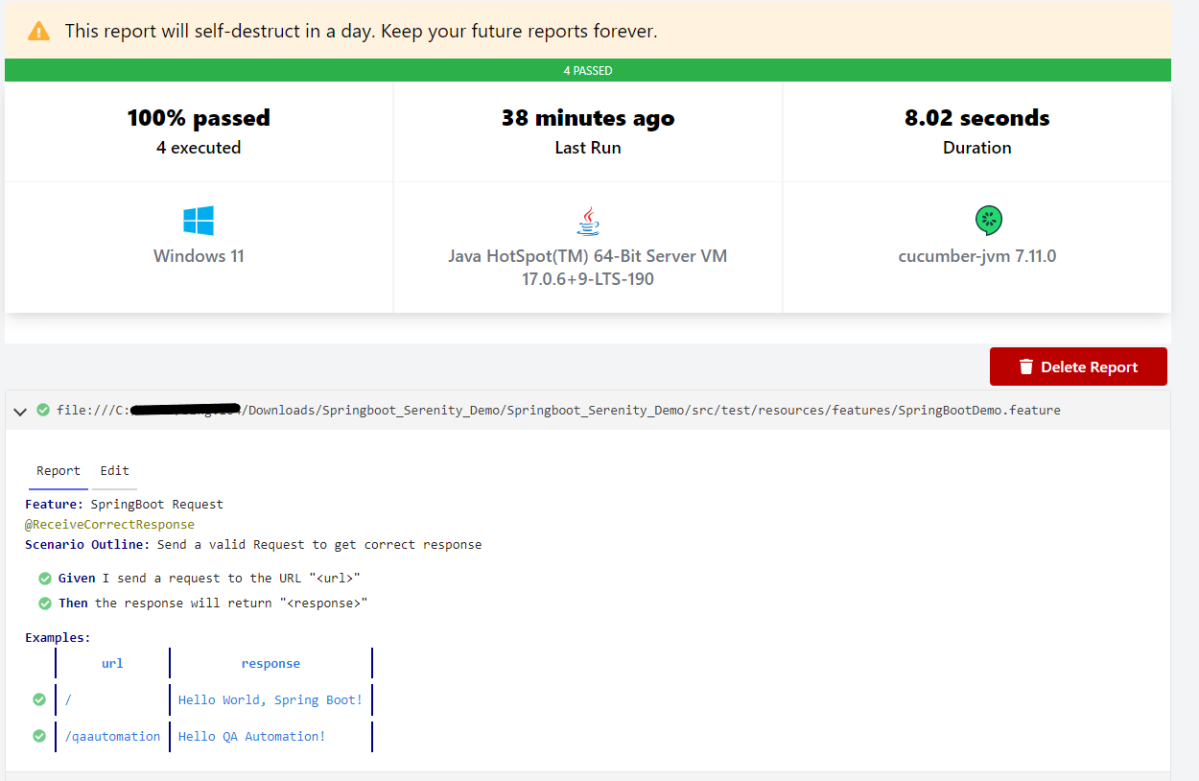
Feature: SpringBoot Request

@ReceiveCorrectResponse

   Scenario Outline: Send a valid Request to get correct response
    Given I send a request to the URL "<url>"
    Then the response will return "<response>"

   Examples:
   | url             | response                   |
   | /               | Hello World, Spring Boot!  |
   | /qaautomation   | Hello QA Automation!       |
The test class mentioned below (AbstractRestAssuredHelper) contains integration tests for the spring boot rest controller mentioned. This test class:
uses @SpringBootTest annotation which loads the actual application context.
uses WebEnvironment.RANDOM_PORT to create and run the application at some random server port.
@LocalServerPort gets the reference of the port where the server has started. It helps in building the actual request URIs to mimic real client interactions.
Step 4 – Create the StepDefinition and Helper classes
Below is the code of the StepDefinition and Helper class. These classes are created in the src/test/java directory.
This class sends the request and receives a response after performing the GET operation. Here, the validation of the response also takes place by asserting the expected and actual response
To use Rest-assured, Serenity provides the class SerenityRest
import org.junit.Assert;
import io.cucumber.java.en.Given;
import io.cucumber.java.en.Then;
import io.restassured.response.Response;
import net.serenitybdd.rest.SerenityRest;
import net.thucydides.core.annotations.Steps;

public class SpringBootDemoDefinitions {

	@Steps
    AbstractRestAssuredHelper helper;
    private Response response;

    @Given("I send a request to the URL {string}")
    public void iSendARequest(String endpoint) throws Exception  {
         response = helper.getAnonymousRequest().contentType("application/json")
                    .header("Content-Type", "application/json").when().get(endpoint);
    }

    @Then("the response will return {string}")
    public void extractResponse(String Expected ) {
          SerenityRest.restAssuredThat(response -> response.statusCode(200));
          String Actual = response.asString();
          Assert.assertEquals(Expected, Actual);
    }
}
Step 5 – Create a Serenity Runner class in the src/test/java directory
We cannot run a Feature file on its own in cucumber-based framework. We need to create a Java class that will run the Feature File. It is the starting point for JUnit to start executing the tests. TestRunner class is created under src/ test/java. When you run the tests with serenity, you use the CucumberWithSerenitytest runner. If the feature files are not in the same package as the test runner class, you also need to use the @CucumberOptionsclass to provide the root directory where the feature files can be found.
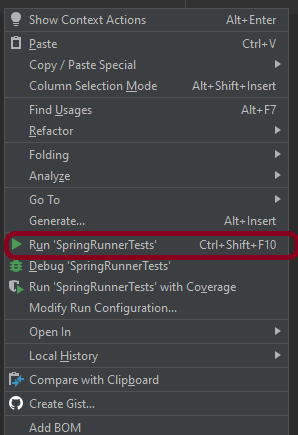
You can run the tests from SpringRunnerTests class. Right-click on the class and select Run ‘SpringRunnerTests’.
Step 7 – Run the tests from Command Line
Run the tests from the command line by using the below command
mvn clean verify
The output of the above program is
The test execution status is shown below:
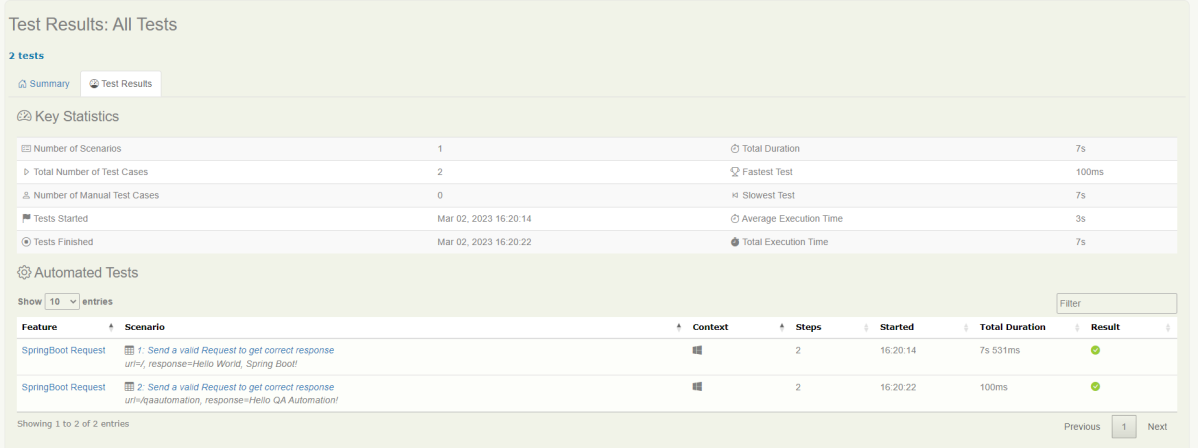
Step 8 – Serenity Report Generation
By default, the test report generated by Serenity is placed under target/site/serenity/index.html. Below is the sample Serenity Report.
Go to the Test Results tab and we can see all the test scenarios.
Step 9 – CucumberReport Generation
Cucumber Report can be generated by adding publish=true in SpringRunnerTests as shown in the above example. Click on the link provided in the execution status.
4. To generate a JUnit Report in Jenkins, we need to download the JUnit Plugin. Please refer to this tutorial to install the plugin – How to install Plugins in Jenkins
Implementation Steps
Step 1: Start the Jenkins server
Start the Jenkins server open the browser and navigate to the below endpoint
In the General section, enter the project description in the Description box.
Select a custom workspace and provide the full path of the project.
Select Source Code Management as None if the project is locally present on the machine
Step 3: Build Steps
In the Build Steps section, select Invoke top-level Maven targets.
The Build Steps window will extend. Mention the below details:-
Maven Version – MAVEN_HOME
Goals – clean test
Click on the Advanced button.
Step 4: Provide the full path to pom.xml
Specify the full path to pom.xml in POM.
Step 5: Select “Publish JUnit test result report” from “Post Build Actions”
Scroll down to “Post Build Actions” and click on the “Add Post Build Actions” drop-down list. Select “Publish JUnit test result report“.
Enter the Result Path as “**/target/surefire-reports/*.xml”.
Click on the Applyand Save buttons.
We have created a new Maven project “JUnitReport_Demo” with the configuration to run the Selenium with JUnit Tests and also to generate JUnit Report after execution using Jenkins.
Step 6: Execute the tests
Let’s execute it now by clicking on the “Build Now” button.
Right-click on Build Number (here in my case it is #2).
Click on Console Output to see the result.
Step 7: View the JUnit Report
Once the execution is completed, we could see a link to view the “Test Report“.
Below is the summary of the Test Execution.
This way, we could generate JUnit Report using Jenkins.
Congratulations on making it through this tutorial and hope you found it useful! Happy Learning!! Cheers!!
In the last tutorial, I explained How to test POST Request using Rest Assured. In this tutorial, I will automate a PATCH Request using Rest Assured. I will verify the status code, line of Status, and content of the Response.
To set up a basic Rest Assured Maven Project, click here and Gradle project, click here.
Add the below-mentioned dependencies to the pom.xml.
The HTTP PATCH request method applies partial modifications to a resource.
Difference between PUT and PATCH Method
PUT is a method of modifying resources where the client sends data that updates the entire resource.
PATCH is a method of modifying resources where the client sends partial data that is to be updated without modifying the entire data.
Below are the steps to test a PATCH Request using Rest Assured:
The steps to test the PATCH request are similar to the PUT request.
Below is the example for the test to PATCH method. (Non BDD)
import io.restassured.RestAssured;
import io.restassured.http.ContentType;
import io.restassured.response.Response;
import io.restassured.response.ValidatableResponse;
import io.restassured.specification.RequestSpecification;
import org.junit.Test;
import static org.hamcrest.CoreMatchers.equalTo;

public class Patch_NonBDDDemo {

    RequestSpecification requestSpecification;
    Response response;
    ValidatableResponse validatableResponse;

    @Test
    public void updateUser() {

        String jsonString = "{\"name\": \"William\"}";

        RestAssured.baseURI = "https://reqres.in/api/users/2";

        // Create a request specification
        requestSpecification = RestAssured.given();

        // Setting content type to specify format in which request payload will be sent.
        requestSpecification.contentType(ContentType.JSON);

        // Adding body as string
        requestSpecification.body(jsonString);

        // Calling PATCH method
        response = requestSpecification.patch();

        // Let's print response body.
        String responseString = response.prettyPrint();

        /*
         * To perform validation on response, we need to get ValidatableResponse type of
         * response
         */
        validatableResponse = response.then();

        // Get status code
        validatableResponse.statusCode(200);

        // It will check if status line is as expected
        validatableResponse.statusLine("HTTP/1.1 200 OK");

        // Check response - name attribute
        validatableResponse.body("name", equalTo("William"));

    }
}