Last Updated On
In the last tutorial, I explained How to test POST Request using Rest Assured. In this tutorial, I will automate a PUT Request using Rest Assured. I will verify the status code, line of Status, and content of the Response.
To set up a basic Rest Assured Maven Project, click here and Gradle project, click here.
Add the below-mentioned dependencies to the pom.xml.
<dependency>
      <groupId>junit</groupId>
      <artifactId>junit</artifactId>
      <version>4.13.1</version>
      <scope>test</scope>
</dependency>

<dependency>
      <groupId>io.rest-assured</groupId>
      <artifactId>rest-assured</artifactId>
      <version>5.3.2</version>
      <scope>test</scope>
</dependency>
What is the PUT Method?
The HTTP PUT API is primarily used to update existing resources. If the resource does not exist, then API may decide to create a new resource or not (Depending on API development). If a new resource has been created by the PUT API, the origin server MUST inform the user agent via the HTTP response code 201 (Created) response, and if an existing resource is modified, either the 200 (OK) or 204 (No Content) response codes SHOULD be sent to indicate successful completion of the request. To learn more about Rest API, please click here.
Below are the steps to test a PUT Request using Rest Assured:
The steps to test the PUT request are similar to the POST request. The only difference is that in POST we send a request to create a new resource, whereas here we have a resource and I will update the detail of the already existing resource. To know about the steps and various imports used in the below example, please refer to the tutorial for POST Request.
Below is the response received for Employee with id 2.
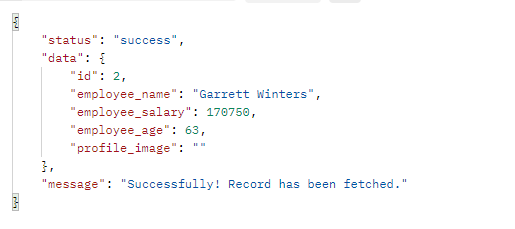
I want to change the employee_salary to 99999. Below is the example for the test to update employee_salary.
import io.restassured.RestAssured;
import io.restassured.http.ContentType;
import io.restassured.response.Response;
import io.restassured.response.ValidatableResponse;
import io.restassured.specification.RequestSpecification;
import org.junit.Test;
import static org.hamcrest.CoreMatchers.equalTo;

public class PUT_NonBDDDemo {

    RequestSpecification requestSpecification;
    Response response;
    ValidatableResponse validatableResponse;

    @Test
    public void updateUser() {

        String jsonString = "{\"id\": 2,\r\n"
                + "        \"employee_name\": \"Garrett Winters\",\r\n"
                + "        \"employee_salary\": 99999,\r\n"
                + "        \"employee_age\": 63,\r\n"
                + "        \"profile_image\": \"\"}";

        RestAssured.baseURI = "https://dummy.restapiexample.com/api/v1/update/2";

        // Create a request specification
        requestSpecification = RestAssured.given();

        // Setting content type to specify format in which request payload will be sent.
        requestSpecification.contentType(ContentType.JSON);

        // Adding body as string
        requestSpecification.body(jsonString);

        // Calling PUT method
        response = requestSpecification.put();

        // Let's print response body.
        String responseString = response.prettyPrint();

        /*
         * To perform validation on response, we need to get ValidatableResponse type of
         * response
         */
        validatableResponse = response.then();

        // Get status code
        validatableResponse.statusCode(200);

        // It will check if status line is as expected
        validatableResponse.statusLine("HTTP/1.1 200 OK");

        // Check response - name attribute
        validatableResponse.body("data.employee_salary", equalTo(99999));

        // Check response - message attribute
        validatableResponse.body("message", equalTo("Successfully! Record has been updated."));

    }
}
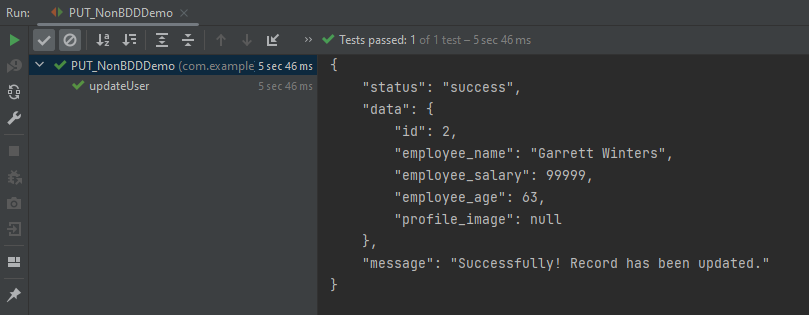
The output of the above program is
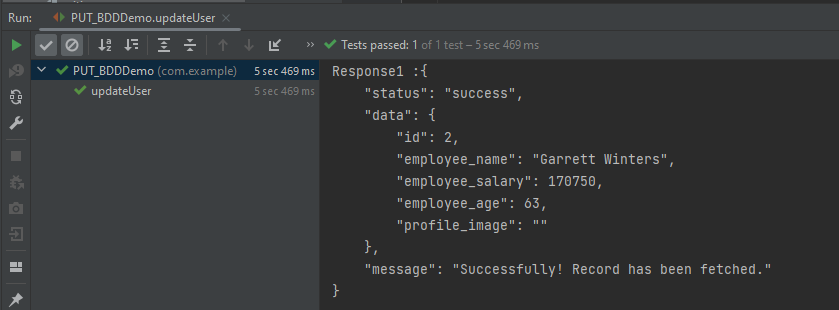
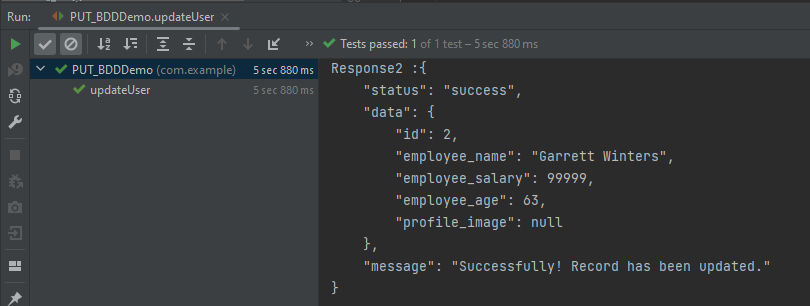
Now, let us convert the same test into BDD format. In the below example, in the first part, we have retrieved the details of the employee with ID 2, and in the second part, we have updated the value of employee_salary to 99999.
import io.restassured.http.ContentType;
import io.restassured.response.Response;
import io.restassured.response.ValidatableResponse;
import io.restassured.specification.RequestSpecification;
import org.junit.Test;
import static io.restassured.RestAssured.given;
import static org.hamcrest.CoreMatchers.equalTo;

public class PUT_BDDDemo {

    RequestSpecification requestSpecification;
    Response response;
    ValidatableResponse validatableResponse, validatableResponse1;

    @Test
    public void updateUser() {

        // To get the detail of employee with id 2
        validatableResponse = given()
                .baseUri("https://dummy.restapiexample.com/api/v1/employee/2")
                .contentType(ContentType.JSON)
                .when()
                .get()
                .then()
                .assertThat().statusCode(200);

        System.out.println("Response1 :" + validatableResponse.extract().asPrettyString());

        String jsonString = "{\"id\": 2,\r\n"
                + "        \"employee_name\": \"Garrett Winters\",\r\n"
                + "        \"employee_salary\": 99999,\r\n"
                + "        \"employee_age\": 63,\r\n"
                + "        \"profile_image\": \"\"}";

        // Update employee_salary
        validatableResponse1 = given()
                .baseUri("https://dummy.restapiexample.com/api/v1/update/2")
                .contentType(ContentType.JSON)
                .body(jsonString)
                .when()
                .put()
                .then()
                .assertThat().statusCode(200)
                .body("data.employee_salary", equalTo(99999))
                .body("message", equalTo("Successfully! Record has been updated."));

        System.out.println("Response2 :" + validatableResponse1.extract().asPrettyString());

    }

}
The output of the above program is
Congratulations on making it through this tutorial and hope you found it useful! Happy Learning!! Cheers!!

[RemoteTestNG] detected TestNG version 7.4.0
Response1:{
“status”: “success”,
“data”: {
“id”: 2,
“employee_name”: “Garrett Winters”,
“employee_salary”: 170750,
“employee_age”: 63,
“profile_image”: “”
},
“message”: “Successfully! Record has been fetched.”
}
FAILED: updateUser
java.lang.AssertionError: 1 expectation failed.
Expected status code <200> but was <429>.
at java.base/jdk.internal.reflect.DirectConstructorHandleAccessor.newInstance(DirectConstructorHandleAccessor.java:62)
at java.base/java.lang.reflect.Constructor.newInstanceWithCaller(Constructor.java:502)
at java.base/java.lang.reflect.Constructor.newInstance(Constructor.java:486)
at org.codehaus.groovy.reflection.CachedConstructor.invoke(CachedConstructor.java:73)
at org.codehaus.groovy.runtime.callsite.ConstructorSite$ConstructorSiteNoUnwrapNoCoerce.callConstructor(ConstructorSite.java:108)
at org.codehaus.groovy.runtime.callsite.CallSiteArray.defaultCallConstructor(CallSiteArray.java:57)
at org.codehaus.groovy.runtime.callsite.AbstractCallSite.callConstructor(AbstractCallSite.java:263)
at org.codehaus.groovy.runtime.callsite.AbstractCallSite.callConstructor(AbstractCallSite.java:277)
at io.restassured.internal.ResponseSpecificationImpl$HamcrestAssertionClosure.validate(ResponseSpecificationImpl.groovy:512)
at io.restassured.internal.ResponseSpecificationImpl$HamcrestAssertionClosure$validate$1.call(Unknown Source)
at io.restassured.internal.ResponseSpecificationImpl.validateResponseIfRequired(ResponseSpecificationImpl.groovy:696)
at io.restassured.internal.ResponseSpecificationImpl.this$2$validateResponseIfRequired(ResponseSpecificationImpl.groovy)
at java.base/jdk.internal.reflect.DirectMethodHandleAccessor.invoke(DirectMethodHandleAccessor.java:103)
at java.base/java.lang.reflect.Method.invoke(Method.java:580)
at org.codehaus.groovy.runtime.callsite.PlainObjectMetaMethodSite.doInvoke(PlainObjectMetaMethodSite.java:43)
at org.codehaus.groovy.runtime.callsite.PogoMetaMethodSite$PogoCachedMethodSiteNoUnwrapNoCoerce.invoke(PogoMetaMethodSite.java:198)
at org.codehaus.groovy.runtime.callsite.PogoMetaMethodSite.callCurrent(PogoMetaMethodSite.java:62)
at org.codehaus.groovy.runtime.callsite.AbstractCallSite.callCurrent(AbstractCallSite.java:185)
at io.restassured.internal.ResponseSpecificationImpl.statusCode(ResponseSpecificationImpl.groovy:135)
at io.restassured.specification.ResponseSpecification$statusCode$0.callCurrent(Unknown Source)
at io.restassured.internal.ResponseSpecificationImpl.statusCode(ResponseSpecificationImpl.groovy:143)
at io.restassured.internal.ValidatableResponseOptionsImpl.statusCode(ValidatableResponseOptionsImpl.java:89)
at qaautomationexpert.PutEmployeesBDDEmployee.updateUser(PutEmployeesBDDEmployee.java:38)
at java.base/jdk.internal.reflect.DirectMethodHandleAccessor.invoke(DirectMethodHandleAccessor.java:103)
at java.base/java.lang.reflect.Method.invoke(Method.java:580)
at org.testng.internal.MethodInvocationHelper.invokeMethod(MethodInvocationHelper.java:133)
at org.testng.internal.TestInvoker.invokeMethod(TestInvoker.java:598)
at org.testng.internal.TestInvoker.invokeTestMethod(TestInvoker.java:173)
at org.testng.internal.MethodRunner.runInSequence(MethodRunner.java:46)
at org.testng.internal.TestInvoker$MethodInvocationAgent.invoke(TestInvoker.java:824)
at org.testng.internal.TestInvoker.invokeTestMethods(TestInvoker.java:146)
at org.testng.internal.TestMethodWorker.invokeTestMethods(TestMethodWorker.java:146)
at org.testng.internal.TestMethodWorker.run(TestMethodWorker.java:128)
at java.base/java.util.ArrayList.forEach(ArrayList.java:1596)
at org.testng.TestRunner.privateRun(TestRunner.java:794)
at org.testng.TestRunner.run(TestRunner.java:596)
at org.testng.SuiteRunner.runTest(SuiteRunner.java:377)
at org.testng.SuiteRunner.runSequentially(SuiteRunner.java:371)
at org.testng.SuiteRunner.privateRun(SuiteRunner.java:332)
at org.testng.SuiteRunner.run(SuiteRunner.java:276)
at org.testng.SuiteRunnerWorker.runSuite(SuiteRunnerWorker.java:53)
at org.testng.SuiteRunnerWorker.run(SuiteRunnerWorker.java:96)
at org.testng.TestNG.runSuitesSequentially(TestNG.java:1212)
at org.testng.TestNG.runSuitesLocally(TestNG.java:1134)
at org.testng.TestNG.runSuites(TestNG.java:1063)
at org.testng.TestNG.run(TestNG.java:1031)
at org.testng.remote.AbstractRemoteTestNG.run(AbstractRemoteTestNG.java:115)
at org.testng.remote.RemoteTestNG.initAndRun(RemoteTestNG.java:293)
at org.testng.remote.RemoteTestNG.main(RemoteTestNG.java:91)
===============================================
Default test
Tests run: 1, Failures: 1, Skips: 0
===============================================
===============================================
Default suite
Total tests run: 1, Passes: 0, Failures: 1, Skips: 0
===============================================
LikeLike
updateUser test failed with status code 429 which is intermittent issue with the api, not with the test code. You can try this test couple of times, it should work.
LikeLike