Serenity BDD is an open-source library that aims to make the idea of living documentation a reality. Serenity BDD helps you write cleaner and more maintainable automated acceptance and regression tests faster. Serenity also uses the test results to produce illustrated, narrative reports that document and describe what your application does and how it works. Serenity tells you not only what tests have been executed, but more importantly, what requirements have been tested
In this tutorial, I will explain the use of Hooks in Cucumber.
What is a Hook in Cucumber?
Hooks are blocks of code that can run at various points in the Cucumber execution cycle. They are typically used for setup and teardown of the environment before and after each scenario. These hooks do not impact the scenarios or steps for which they are used. We can declare hooks in any class.
Why do we use Hooks?
There are scenarios where we have to perform some prerequisite steps before executing the test scenarios, like initiating a WebDriver, setting up database connection, setting up Test Data, and setting up browser cookies.
Similarly, there are some conditions that need to be done after completing the execution of test scenarios like killing the web driver, closing database connections, clearing the test data, clearing browser cookies, and so on.
Scenario hooks
Scenario hooks run for every scenario. There are 2 types of Scenario Hooks – @After and @Before
Before Before hooks run before the first step of each scenario.
Syntax:
@Before
	public void setup() {

        System.out.println("------------------Before Executing-------------------------");
        WebDriverManager.chromedriver().setup();
        ChromeOptions chromeOptions = new ChromeOptions();
        chromeOptions.addArguments("--start-maximized");
        driver = new ChromeDriver(chromeOptions);
        driver.manage().timeouts().implicitlyWait(5, TimeUnit.SECONDS);
	}
After After hooks run after the last step of each scenario, even when the step result is failed, undefined, pending, or skipped.
Syntax:
@After
	public void close() {
		driver.close();
		System.out.println("---------------After Executing---------------------------");
	}
Here is an example of Hooks – @Before and @After in a Cucumber program.
import io.cucumber.java.After;
import io.cucumber.java.Before;
import io.cucumber.java.en.Given;
import io.cucumber.java.en.Then;
import io.cucumber.java.en.When;
import io.github.bonigarcia.wdm.WebDriverManager;
import org.openqa.selenium.By;
import org.openqa.selenium.WebDriver;
import org.openqa.selenium.chrome.ChromeDriver;
import org.openqa.selenium.chrome.ChromeOptions;
import java.util.concurrent.TimeUnit;
import static org.hamcrest.CoreMatchers.containsString;
import static org.hamcrest.MatcherAssert.assertThat;

public class LoginPageDefinitions {
    WebDriver driver;

    @Before
    public void setup() {

        System.out.println("------------------Before Executing-------------------------");
        WebDriverManager.chromedriver().setup();
        ChromeOptions chromeOptions = new ChromeOptions();
        chromeOptions.addArguments("--start-maximized");
        driver = new ChromeDriver(chromeOptions);
        driver.manage().timeouts().implicitlyWait(5, TimeUnit.SECONDS);
    }

    @Given("User is on HRMLogin page")
    public void userOnHomePage() {
        System.out.println("Open Website");
        driver.get("https://opensource-demo.orangehrmlive.com/");
    }

    @When("User enters username as {string}")
    public void entersUsername(String userName){
        System.out.println("Enter username");
        driver.findElement(By.name("username")).sendKeys(userName);

    }


    @When("User enters password as {string}")
    public void entersPassword(String passWord) {
        System.out.println("Enter passWord");
        driver.findElement(By.name("password")).sendKeys(passWord);
        driver.findElement(By.xpath("//*[@id='app']/div[1]/div/div[1]/div/div[2]/div[2]/form/div[3]/button")).submit();

    }


    @Then("User should be able to login successfully")
    public void successfulLogin() throws InterruptedException {
        String newPageText = driver.findElement(By.xpath("//span[@class='oxd-topbar-header-breadcrumb']/h6")).getText();
        System.out.println("newPageText:" + newPageText);
        assertThat(newPageText, containsString("Dashboard"));
    }

    @After
    public void close() {
        driver.quit();
        System.out.println("--------------------After Executing-----------------------");
    }
}
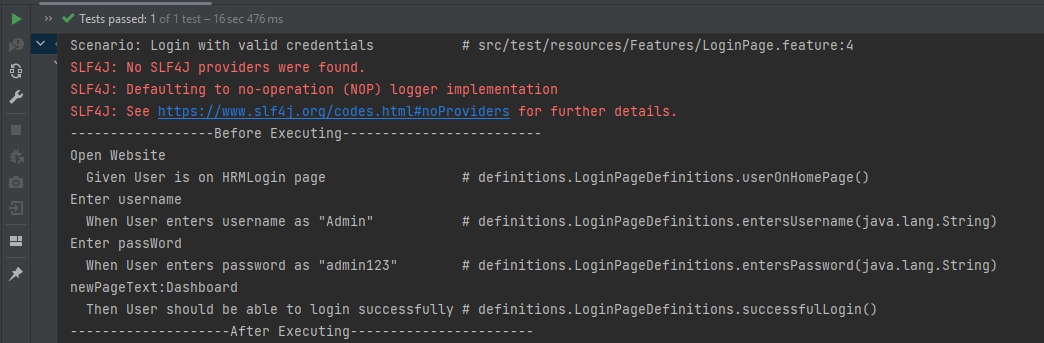
The output of the above program is
At the start of execution, @Before annotation is setting up the web driver to execute the test.
After setting up the web driver, the Given, When, and Then statements will be executed.
Now, at last, @After hook will close the web driver.
Step hooks
Step hooks are invoked before and after a step. The hooks have ‘invoke around’ semantics. This means that if a BeforeStep hook is executed, the AfterStep hooks will also be executed regardless of the result of the step.
@BeforeStep – As the name suggests, it is executed before the execution of each step.
Syntax:
@BeforeStep
	public void beforeStepTest() {
		System.out.println("--------------BeforeStep Executing---------------");
	}
@AfterStep – As the name suggests, it is executed after the successful execution of each step. If a step does not pass, the following step and its hooks will be skipped.
Syntax:
@AfterStep
	public void afterStepTest() {
		System.out.println("--------------------AfterStep Executing---------------------");
	}
The complete program is shown below:
import io.cucumber.java.After;
import io.cucumber.java.AfterStep;
import io.cucumber.java.Before;
import io.cucumber.java.BeforeStep;
import io.cucumber.java.en.Given;
import io.cucumber.java.en.Then;
import io.cucumber.java.en.When;
import io.github.bonigarcia.wdm.WebDriverManager;
import org.openqa.selenium.By;
import org.openqa.selenium.WebDriver;
import org.openqa.selenium.chrome.ChromeDriver;
import org.openqa.selenium.chrome.ChromeOptions;
import java.util.concurrent.TimeUnit;
import static org.hamcrest.CoreMatchers.containsString;
import static org.hamcrest.MatcherAssert.assertThat;

public class LoginPageDefinitions {
    WebDriver driver;

    @Before
    public void setup() {

        System.out.println("------------------Before Executing-------------------------");
        WebDriverManager.chromedriver().setup();
        ChromeOptions chromeOptions = new ChromeOptions();
        chromeOptions.addArguments("--start-maximized");
        driver = new ChromeDriver(chromeOptions);
        driver.manage().timeouts().implicitlyWait(5, TimeUnit.SECONDS);
    }

    @BeforeStep
    public void beforeStepTest() {
        System.out.println("--------------BeforeStep Executing---------------");
    }

    @Given("User is on HRMLogin page")
    public void userOnHomePage() {
        System.out.println("Open Website");
        driver.get("https://opensource-demo.orangehrmlive.com/");
    }

    @When("User enters username as {string}")
    public void entersUsername(String userName){
        System.out.println("Enter username");
        driver.findElement(By.name("username")).sendKeys(userName);

    }

    @When("User enters password as {string}")
    public void entersPassword(String passWord) {
        System.out.println("Enter passWord");
        driver.findElement(By.name("password")).sendKeys(passWord);
        driver.findElement(By.xpath("//*[@id='app']/div[1]/div/div[1]/div/div[2]/div[2]/form/div[3]/button")).submit();

    }

    @Then("User should be able to login successfully")
    public void successfulLogin() throws InterruptedException {
        String newPageText = driver.findElement(By.xpath("//span[@class='oxd-topbar-header-breadcrumb']/h6")).getText();
        System.out.println("newPageText:" + newPageText);
        assertThat(newPageText, containsString("Dashboard"));
    }

    @AfterStep
    public void afterStepTest() {
        System.out.println("--------------------AfterStep Executing---------------------");
    }

    @After
    public void close() {
        driver.quit();
        System.out.println("--------------------After Executing-----------------------");
    }
}
The output of the above program is
At the start of execution, @Before annotation is setting up the web driver to execute the test.
After setting up the web driver, @BeforeStep is executed before executing the first step.
After the execution of the first step (Given), @AfterStep is executed.
Here, it can be seen that there are 4 steps and for each step, there is a combination of @BeforeStep and @AfterStep.
That’s it! Congratulations on making it through this tutorial and hope you found it useful! Happy Learning!! Cheers!!
BDD is a set of practices that helps to reduce the rework caused by misunderstanding or vague requirements, narrow the communication gaps between the development team, testing team, and customers, and promote continuous communication among them. Cucumber is one such open-source tool, which supports Behaviour Driven Development(BDD). In simple words, Cucumber can be defined as a testing framework, driven by plain English. It serves as documentation, automated tests, and a development aid – all in one.
Cucumber Introduction, Installation, and Configuration
Serenity BDD is an open-source library that aims to make the idea of living documentation a reality.
Serenity BDD helps you write cleaner and more maintainable automated acceptance and regression tests faster. Serenity also uses the test results to produce illustrated, narrative reports that document and describe what your application does and how it works. Serenity tells you not only what tests have been executed, but more importantly, what requirements have been tested.
What is SpringBoot Application?
Spring Boot is an open-source micro framework that provides Java developers with a platform to get started with an auto-configurable production-grade Spring application.
Comes with embedded HTTP servers like Tomcat orJetty to test web applications.
Adds many plugins that developers can use to work with embedded and in-memory databases easily. Spring allows you to easily connect with database and queue services like Oracle, PostgreSQL, MySQL, MongoDB, Redis, Solr, ElasticSearch, Rabbit MQ, and others.
Prerequisite
Serenity seamlessly supports Cucumber 6 and Cucumber 7. However, this flexibility requires a little tweaking in the build dependencies. For the Maven project, you need to do the following:
Add serenity-cucumber dependency
Add Springboottest dependency to start up an application context to be used in a test.
Add Junit-Vintage dependency as it is needed for spring boot application of version 2.4 and above with JUnit4.
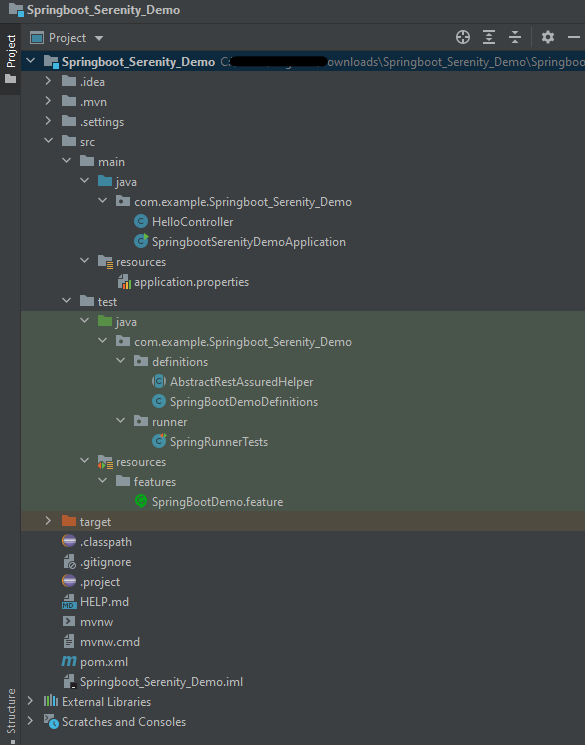
Project Directory Structure
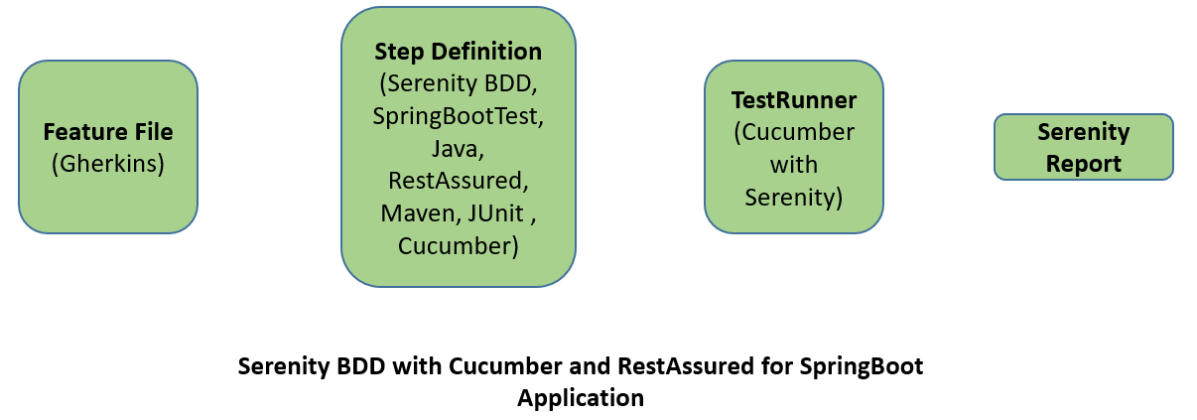
Relationship between SpringBoot, Serenity BDD, Cucumber and Rest Assured
Implementation Steps
Create a source folder – src/test/resources to create test scenarios in the Feature file
AddSpringBoot, Serenity, Cucumber,and JUnit4 dependencies to the project
Create a feature file under src/test/resources
Create the StepDefinition and Helper classes.
Create a Serenity Runner class in the src/test/java directory
Run the tests from JUnit
Run the tests from Command Line
Serenity Report Generation
CucumberReport Generation
Step 1 – Create a source folder – src/test/resources
Right-click on the test directory and select New->Directory and select resources (Maven Source Directories). Create a source folder – src/test/resources to create test scenarios in the Feature file
Step 2 – Add SpringBoot, Serenity, Cucumber, and JUnit4 dependencies to the project
We have added SpringBootTest, Serenity, Cucumber, JUnit4, and JUnit Vintage.
Step 3 – Create a feature file under src/test/resources
Below is an example of a feature file which shows a sample test scenario.
Feature: SpringBoot Request

@ReceiveCorrectResponse

   Scenario Outline: Send a valid Request to get correct response
    Given I send a request to the URL "<url>"
    Then the response will return "<response>"

   Examples:
   | url             | response                   |
   | /               | Hello World, Spring Boot!  |
   | /qaautomation   | Hello QA Automation!       |
The test class mentioned below (AbstractRestAssuredHelper) contains integration tests for the spring boot rest controller mentioned. This test class:
uses @SpringBootTest annotation which loads the actual application context.
uses WebEnvironment.RANDOM_PORT to create and run the application at some random server port.
@LocalServerPort gets the reference of the port where the server has started. It helps in building the actual request URIs to mimic real client interactions.
Step 4 – Create the StepDefinition and Helper classes
Below is the code of the StepDefinition and Helper class. These classes are created in the src/test/java directory.
This class sends the request and receives a response after performing the GET operation. Here, the validation of the response also takes place by asserting the expected and actual response
To use Rest-assured, Serenity provides the class SerenityRest
import org.junit.Assert;
import io.cucumber.java.en.Given;
import io.cucumber.java.en.Then;
import io.restassured.response.Response;
import net.serenitybdd.rest.SerenityRest;
import net.thucydides.core.annotations.Steps;

public class SpringBootDemoDefinitions {

	@Steps
    AbstractRestAssuredHelper helper;
    private Response response;

    @Given("I send a request to the URL {string}")
    public void iSendARequest(String endpoint) throws Exception  {
         response = helper.getAnonymousRequest().contentType("application/json")
                    .header("Content-Type", "application/json").when().get(endpoint);
    }

    @Then("the response will return {string}")
    public void extractResponse(String Expected ) {
          SerenityRest.restAssuredThat(response -> response.statusCode(200));
          String Actual = response.asString();
          Assert.assertEquals(Expected, Actual);
    }
}
Step 5 – Create a Serenity Runner class in the src/test/java directory
We cannot run a Feature file on its own in cucumber-based framework. We need to create a Java class that will run the Feature File. It is the starting point for JUnit to start executing the tests. TestRunner class is created under src/ test/java. When you run the tests with serenity, you use the CucumberWithSerenitytest runner. If the feature files are not in the same package as the test runner class, you also need to use the @CucumberOptionsclass to provide the root directory where the feature files can be found.
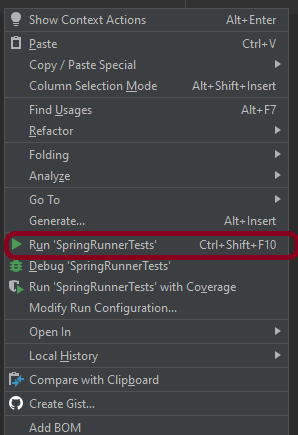
You can run the tests from SpringRunnerTests class. Right-click on the class and select Run ‘SpringRunnerTests’.
Step 7 – Run the tests from Command Line
Run the tests from the command line by using the below command
mvn clean verify
The output of the above program is
The test execution status is shown below:
Step 8 – Serenity Report Generation
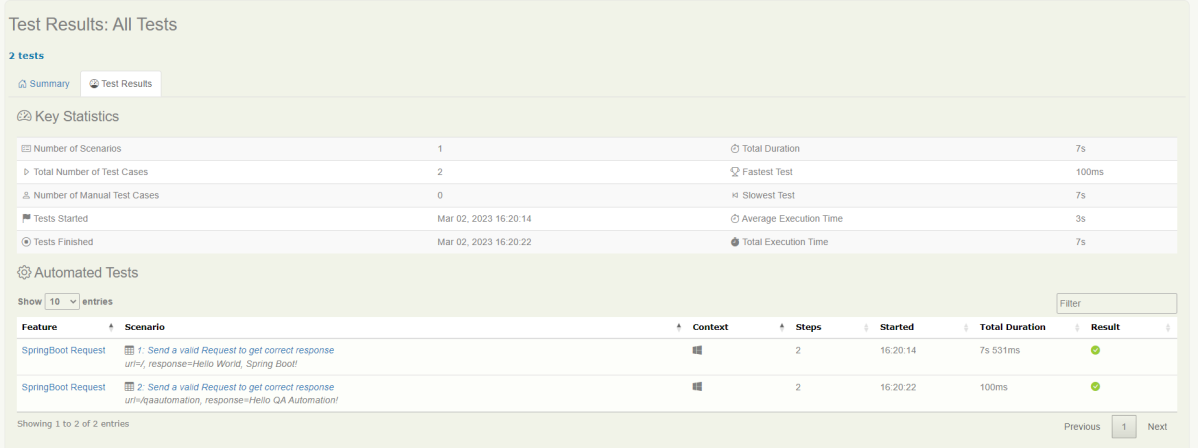
By default, the test report generated by Serenity is placed under target/site/serenity/index.html. Below is the sample Serenity Report.
Go to the Test Results tab and we can see all the test scenarios.
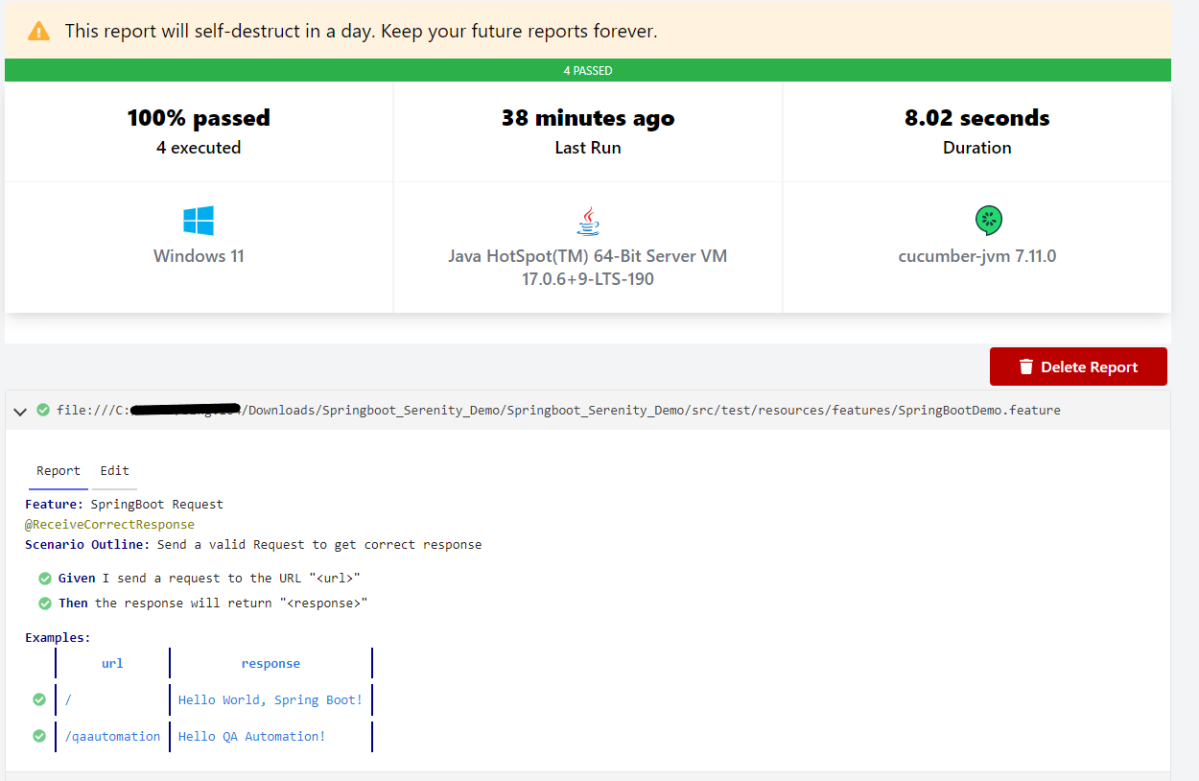
Step 9 – CucumberReport Generation
Cucumber Report can be generated by adding publish=true in SpringRunnerTests as shown in the above example. Click on the link provided in the execution status.
The previous tutorial explained the Integration of Cucumber with Selenium and TestNG. Sometimes, inconsistent test results are common as a result of an unstable environment like network issue or Database down and soon. A few tests may fail for no obvious reason and then rerun successfully. We are sometimes required to run only failed test cases after bug fixes to verify fixes quickly. We will learn how to rerun failed test cases in the Cucumber with TestNG project in this post.
Cucumber provides a rerun plugin option in the Runner class. This option generates a file. The file contains information about the failed tests.
Now, let us add a rerun plugin to the Cucumber Runner class. Here, we are creating a failedrerun.txt file that contains the information about the failed test. This file will be created under the target folder.
import io.cucumber.testng.AbstractTestNGCucumberTests;
import io.cucumber.testng.CucumberOptions;

@CucumberOptions(tags = "", features = "src/test/resources/features/LoginPage.feature",
        glue = "com.example.definitions",
        plugin =  {
        "pretty",
        "rerun:target/rerun.txt" // Saves paths of failed scenarios
    }
)
public class RunnerTests extends AbstractTestNGCucumberTests {
}
Create a Second Runner Class
The next step is to run failed test scenarios existing in the text file. We need to create a class similar to our runner class. This class will contain the location of the file that we want to execute. It will rerun our failed scenarios. In the ‘features’ variable, you need to mention the failedrerun.txt file, and don’t forget that you must mention the ‘@’ symbol before the file path.
import io.cucumber.testng.AbstractTestNGCucumberTests;
import io.cucumber.testng.CucumberOptions;

@CucumberOptions(tags = "",
        features = "@target/rerun.txt",
        glue = "com.example.definitions",
        plugin =  {
                "pretty"
        }
)

public class RunnerTestsFailed extends AbstractTestNGCucumberTests {
}
Mention both Test Runner details in the testng.xml.
<?xml version="1.0" encoding="UTF-8"?>
<!DOCTYPE suite SYSTEM "https://testng.org/testng-1.0.dtd">
<suite name="Suite">
    <test  name="Cucumber with TestNG Test">
        <classes>
            <class name="com.example.runner.RunnerTests"/>
            <class name="com.example.runner.RunnerTestsFailed"/>
        </classes>
    </test> <!-- Test -->
</suite> <!-- Suite -->
Run the tests using the below-mentioned command
mvn clean test
After running the tests from the command line, first, all the tests will be executed. If any test fails, a failedrerun.txt file will be generated that includes the details about the failed tests.
In the below screenshot, we can see that a scenario starting at line 25 has failed.
The first round of execution ends. Then, Cucumber Runner goes to the second runner. It runs the failed tests that are mentioned in failedrerun.txt.
We can see that 2 separate reports are generated here.
The first Cucumber Report shows that out of 5 tests, 1 test failed.
The second Cucumber Report shows that the one failed test is rerun again, and it again failed.
Cucumber is not an API automation tool, but it works well with other API automation tools.
There are 2 most commonly used Automation Tools for JVM to test API – Rest-Assured and Karate. In this tutorial, I will use RestAssured with Cucumber and JUnit4 for API Testing.
REST Assured is a Java library that provides a domain-specific language (DSL) for writing powerful, maintainable tests for RESTful APIs. REST Assured can be used easily in combination with existing unit testing frameworks, such as JUnit and TestNG. Rest assured, no matter how complex the JSON structures are, Rest Assured has methods to retrieve data from almost every part of the request and response.
What is Cucumber?
Cucumber is one such open-source tool, which supports Behaviour Driven Development(BDD). In simple words, Cucumber can be defined as a testing framework, driven by plain English. It serves as documentation, automated tests, and development aid – all in one.
Each scenario is a set of steps that the Cucumber must complete. Cucumber validates the software’s compliance with the specification and generates a report indicating success or failure for each scenario.
The cucumber must adhere to some basic syntax rules known as Gherkin in order to comprehend the scenarios.
In this tutorial, I will explain creating a framework for the testing of Rest API in Cucumber BDD.
This framework consists of:
Cucumber – 7.18.0
Java 17
JUnit – 4.13.2
Maven – 3.9.6
Rest Assured – 5.4.0
Maven Compiler – 3.13.0
Project Structure
Implementation Steps
Step 1 – Download and Install Java
Cucumber and Rest-Assured need Java to be installed on the system to run the tests. Click here to know How to install Java.
Step 2 – Download and setup Eclipse IDE on the system
The Eclipse IDE (integrated development environment) provides strong support for Java developers. Click here to know How to install Eclipse.
Step 3 – Setup Maven
To build a test framework, we need to add several dependencies to the project. Click here to know How to install Maven.
Step 4 – Create a new Maven Project
File -> New Project-> Maven-> Maven project-> Next -> Enter Group ID & Artifact ID -> Finish
Step 5 – Install the Cucumber Eclipse plugin for the Eclipse project(Eclipse Only)
The Cucumber plugin is an Eclipse plugin that allows eclipse to understand the Gherkin syntax. Cucumber Eclipse Plugin highlights the keywords present in Feature File. To install Cucumber Eclipse Plugin, please refer to this tutorial – How to install Cucumber Eclipse Plugin.
Step 6 – Create source folder src/test/resources
Create source folder src/test/resources to create test scenarios in the Feature file.
A new Maven Project is created with 2 folders – src/main/java and src/test/java. To create test scenarios, we need a new source folder called – src/test/resources. To create this folder, right-click on your maven project ->select New ->Java and then Source Folder.
Mention the source folder name as src/test/resources and click the Next button. This will create a source folder under your new Maven project as shown in the below image.
Step 7 – Add Rest-Assured and Cucumber dependencies to the project
You should place rest-assured before the JUnit dependency declaration in your pom.xml / build.gradle to make sure that the correct version of Hamcrest is used. REST Assured includes JsonPath and XmlPath as transitive dependencies.
The compiler plugin is used to compile the source code of a Maven project. This plugin has two goals, which are already bound to specific phases of the default lifecycle:
Step 9 – Create a feature file under src/test/resources
Create a folder with name features. Now, create the feature file in this folder. The feature file should be saved with extension .feature. This feature file contains the test scenarios created to test the application. The Test Scenarios are written in Gherkins language in the format of Given, When, Then, And, But.
Below is an example of a Test Scenario where we are using the GET method to get the information from the API.
Feature: Validation of get method

  @GetUserDetails
  Scenario Outline: Send a valid Request to get user details

    Given I send a request to the URL to get user details
    Then the response will return status <statusCode> and id <id> and email "<employee_email>" and first name "<employee_firstname>" and last name "<employee_lastname>"

    Examples:
    | statusCode | id  | employee_email          | employee_firstname | employee_lastname |
    | 200        | 2   | janet.weaver@reqres.in  | Janet              | Weaver            |
Step 10 – Create the Step Definition class or Glue Code for the Test Scenario
StepDefinition acts as an intermediate to your runner and feature file. It stores the mapping between each step of the scenario in the Feature file. So when you run the scenario, it will scan the step definition file to check the matched glue or test code.
import io.cucumber.java.en.Given;
import io.cucumber.java.en.Then;
import io.restassured.http.ContentType;
import io.restassured.response.ValidatableResponse;

import static io.restassured.RestAssured.given;
import static org.hamcrest.Matchers.equalTo;

public class APIDemoDefinitions {
    private ValidatableResponse validatableResponse;
    private String endpoint = "https://reqres.in/api/users/2";

    @Given("I send a request to the URL to get user details")
    public void sendRequest(){
        validatableResponse = given().contentType(ContentType.JSON)
                .when().get(endpoint).then();

        System.out.println("Response :"+validatableResponse.extract().asPrettyString());
    }

    @Then("the response will return status {int} and id {int} and email {string} and first name {string} and last name {string}")
    public void verifyStatus(int expectedStatusCode, int expectedId, String expectedEmail, String expectedFirstName, String expectedLastName){

        validatableResponse.assertThat().statusCode(expectedStatusCode);

        validatableResponse.assertThat().body("data.id",equalTo(expectedId));

        validatableResponse.assertThat().body("data.email",equalTo(expectedEmail));

        validatableResponse.assertThat().body("data.first_name",equalTo(expectedFirstName));

        validatableResponse.assertThat().body("data.last_name",equalTo(expectedLastName));

    }
}
In order to use REST assured effectively it’s recommended to statically import methods from the following classes:
There is another way to perform these assertions. We can use multiple body assertions together.
@Then("the response will return status {int} and id {int} and email {string} and first name {string} and last name {string}")
    public void verifyStatus(int expectedStatusCode, int expectedId, String expectedEmail, String expectedFirstName, String expectedLastName){

   validatableResponse.assertThat().statusCode(expectedStatusCode).body("data.id",equalTo(expectedId)).and()
                .body("data.email",equalTo(expectedEmail)).body("data.first_name",equalTo(expectedFirstName))
                .body("data.last_name",equalTo(expectedLastName));
Step 11 – Create a JUnit Cucumber Runner class
A runner will help us to run the feature file and act as an interlink between the feature file and StepDefinition Class.
import io.cucumber.junit.Cucumber;
import io.cucumber.junit.CucumberOptions;
import org.junit.runner.RunWith;

@RunWith(Cucumber.class)
@CucumberOptions(features= {"src/test/resources"}, glue= {"com.example.stepdefinitions"})
public class CucumberRunnerTests {
}
Note:- The name of the Runner class should end with Test otherwise we can’t run the tests using Command-Line.
Step 12 – Run the tests from JUnit
You can execute the test script by right-clicking on TestRunner class -> Run As JUnit (Eclipse).
You can execute the test script by right-clicking on TestRunner class -> Run CucumberRunnerTests (IntelliJ).
Step 13 – Run the tests from the Command Line
Run the below command in the command prompt to run the tests and to get the test execution report.
mvn clean test
The output of the above program is
Step 14 – Cucumber Report Generation
To get Cucumber Test Reports, add cucumber.properties under src/test/resources and add the below instruction in the file.
cucumber.publish.enabled=true
We are done! Congratulations on making it through this tutorial and hope you found it useful! Happy Learning!!
Cucumber tests are grouped into features. A Feature file is one in which we store a description of the features and scenarios to be tested. It is used to provide a high-level description of test scenarios and group-related scenarios. A Feature File is an entry point to the Cucumber tests.
The first keyword in the Feature file is the Feature keyword, followed by: and short text that describes the feature.
You can add free-form text underneath the Feature to add more description.
These description lines are ignored by Cucumber at runtime, but are available for reporting (They are included by default in HTML reports).
The name and the optional description have no special meaning to Cucumber. Their purpose is to provide a place for you to document important aspects of the feature, such as a brief explanation and a list of business rules (general acceptance criteria).
The free format description for Feature ends when you start a line with the keyword Example or Scenario Outline (or their alias keywords).
You can place tags above Feature to group related features, independent of your file and directory structure.
A simple feature file consists of the following keywords/parts −
FeatureFile Name – Name of the feature under test. For example, here is LoginPage.feature
Feature − Describe the feature under test, like here “Login to HRM Application”
Scenario− What is the test scenario we want to test
Given − Prerequisite before the test steps get executed.
When − Specific condition that should match to execute the next step.
Then − What should happen if the condition mentioned in WHEN is satisfied
And/But – If we have several Given’s, When’s, or Then’s, then we can use And /But
Steps to create a Feature file
Step 1 – Create a new Maven project.
Step 2 – Add cucumber-java dependency to the POM.xml.
Step 3 – It is suggested to create the Feature files in the src/test/resources source folder. By default, this folder is not present. So, first, create a Source Folder named src/test/resources. Right-click on the project, and select New → Source Folder.
Provide the name to the Source Folder and click on the Finish button.
This creates a new Source Folder.
Step 4 –We want all our Feature files to be present inside a folder. So, create a new folder with the name Features in the src/test/resources folder.
Right-click on the src/test/resources folder, and select New →Package. Provide the name of Features to the package and click the Finish button.
Step 5 – Create a Feature file in the features package.
Right-click on the Feature folder, select New ->File and mention the name LoginPage.feature. Click the Finish button. (Remember to add .feature at the end of the file, otherwise, this feature file will be just an ordinary plain text file).
The below image is an example of the new feature file created. This sample feature file gives an idea how what an actual Feature file should look like.
Below is an example of a valid feature file.
@LoginPage
Feature: Login to HRM Application

   @ValidCredentials
   Scenario: Login with valid credentials

   Given User is on HRMLogin page "https://opensource-demo.orangehrmlive.com/"
    When User enters username as "Admin" and password as "admin123"
    Then User should be able to login successfully and new page open
Tags are a great way to organize Features and Scenarios. By default, Cucumber executes all the scenarios present in a Feature File. If you want to run a specific scenario from the feature file, then a tag can be used. It allow flexible execution of scenarios or features based on specific tags.
Tags can be declared as below:-
 @TagName
   Scenario: Test the scenario
Here,
@: It is a symbol used to declare a tag. TagName: It is the name of a specific test.
In the below example, there are 2 feature files – LoginPage.feature and DashboardPage.feature. LoginPage.feature contains 4 different scenarios with different tags, whereas DashboardPage.feature contains 3 different scenarios.
LoginPage.feature
Feature: Login to HRM Application

  Background:
    Given User is on Login page

  @ValidCredentials
  Scenario: Login with valid credentials

    When User enters username as "Admin"
    And User enters password as "admin123"
    Then User should be able to login successfully

  @InValidCredentials
  Scenario: Login with invalid credentials

    When User enters username as "Admin123"
    And User enters password as "admin123"
    Then User should see an error message "Invalid credentials"

  @InValidCredentials
  Scenario: Login with invalid username and valid password

    When User enters username as "1234"
    And User enters password as "admin123"
    Then User should see an error message "Invalid credentials"

  @InValidCredentials @SpecialCharacters
  Scenario: Login with special characters

    When User enters username as "$$$$"
    And User enters password as "%%%%%"
    Then User should see an error message "Invalid credentials"
DashboardPage.feature
Feature: Dashboard page validation

  Background:
    Given User is on Login page
    When User enters username as "Admin"
    And User enters password as "admin123"
    Then User should be able to login successfully

  @ValidQuickLaunch
  Scenario Outline: Login with valid credentials to check QuickLanuch options

    Then there are valid QuickLaunch options '<options>'

    Examples:
      | options                  |
      | Assign Leave             |
      | Leave List               |
      | Timesheets               |
Running a single Cucumber Tag
import io.cucumber.junit.Cucumber;
import io.cucumber.junit.CucumberOptions;
import org.junit.runner.RunWith;
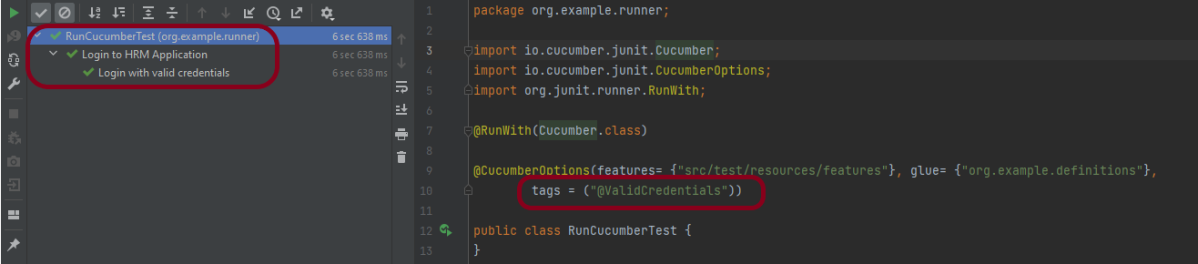
@RunWith(Cucumber.class)
@CucumberOptions(features= {"src/test/resources/features"},
glue= {"org.example.definitions"},
tags = ("@ValidCredentials"))
public class RunCucumberTest {
}
In the above example, only 1 scenario is tagged as @ValidCredentials in both the feature file, so it is executed.
The output of the above program is
Tags can be placed above Feature, Scenario, Scenario Outline, and Examples.
A feature or Scenario can have as many tags. However, each tag should be separated by a blank space.
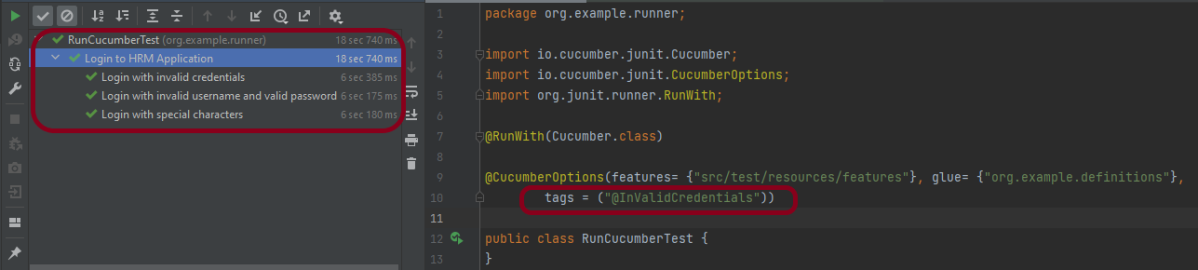
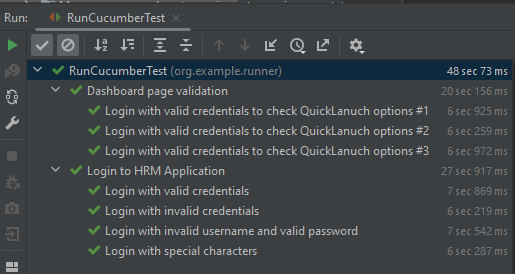
How to execute Cucumber Tag that runs multiple scenarios
Let us consider a situation where a tag (@InValidCredentials) has multiple test scenarios, and you use this tag in the Runner class, then all the test scenarios associated with this tag will execute.
import io.cucumber.junit.Cucumber;
import io.cucumber.junit.CucumberOptions;
import org.junit.runner.RunWith;

@RunWith(Cucumber.class)
@CucumberOptions(features= {"src/test/resources/features"},
            glue= {"org.example.definitions"},
            tags = ("@InValidCredentials"))

public class RunCucumberTest {
}
The output of the above program is
How to execute Multiple Cucumber Tags
The testing through multiple tags can be done by using two operators:
OR operator
AND operator
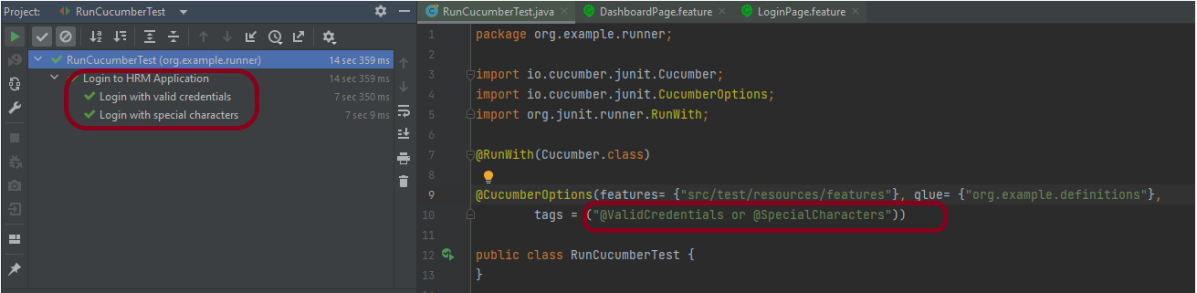
OR operator
OR means scenarios that are tagged either with @BlankCredentials or @InvalidCredentials will execute. The syntax is mentioned below:
import io.cucumber.junit.Cucumber;
import io.cucumber.junit.CucumberOptions;
import org.junit.runner.RunWith;

@RunWith(Cucumber.class)
@CucumberOptions(features= {"src/test/resources/features"},
             glue= {"org.example.definitions"},
             tags = ("@ValidCredentials or @SpecialCharacters"))

public class RunCucumberTest {
}
In the above example, we have 1 scenario that is tagged as @ValidCredentials whereas another one tagged as @SpecialCharacters. So, atotal of 2 scenarios are executed.
The output of the above program is
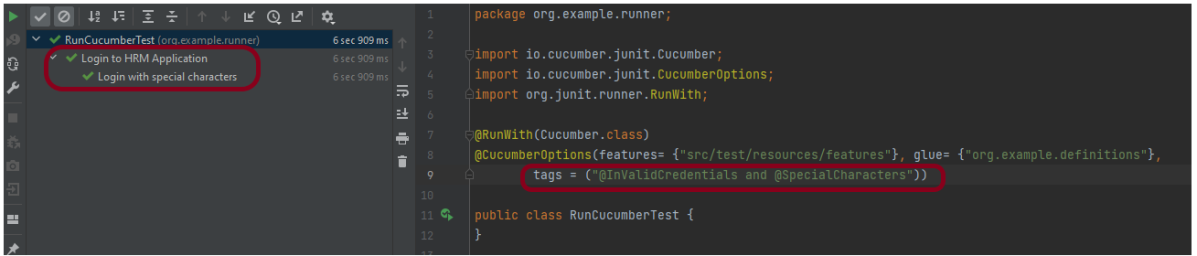
AND operator
Suppose you want to test an application with multiple test cases and if the first test case is failed in the application, we do not want to test the second test case. The syntax is mentioned below:
In the previous tutorial, I explained the Page Object Model with Selenium, Cucumber and JUnit. In this tutorial, I’ll create a BDD Framework for web application testing. I will use the Page Object Model with Selenium, Cucumber, and TestNG.
The Page Object model is an object design pattern in Selenium, where web pages are represented as classes, the various elements on the page are defined as variables in the class and all possible user interactions can then be implemented as methods in the class.
What is Cucumber?
Cucumber is one such open-source tool, which supports Behavior Driven Development(BDD). In simple words, Cucumber can be defined as a testing framework, driven by plain English. It serves as documentation, automated tests, and development aid – all in one.
Dependency List
Cucumber Java – 7.18.1
Cucumber TestNG – 7.18.1
Java 17
Maven – 3.9.6
Selenium – 4.23.0
TestNG – 7.10.2
Maven Compiler – 3.13.0
Maven Surefire – 3.3.1
Project Structure
Implementation Steps
Step 1- Download and Install Java
Cucumber and Selenium need Java to be installed on the system to run the tests. Click here to learn How to install Java.
Step 2 – Setup Maven
To build a test framework, we need to add a number of dependencies to the project. Click here to learn How to install Maven.
Step 3 – Install Cucumber Eclipse Plugin(Only for Eclipse)
The cucumber plugin is an Eclipse plugin that allows eclipse to understand the Gherkin syntax. When we are working with cucumber we will write the feature files that contain Feature, Scenario, Given, When, Then, And, But, Tags, Scenario Outline, and Examples. By default, eclipse doesn’t understand these keywords so it doesn’t show any syntax highlighter. Cucumber Eclipse Plugin highlights the keywords present in Feature File. Refer to this tutorial to get more detail – How to setup Cucumber with Eclipse.
Step 4 – Create a new Maven Project
To create a new Maven project, go to the File -> New Project-> Maven-> Maven project-> Next -> Enter Group ID & Artifact ID -> Finish.
Step 5 – Create source folder src/test/resources to create test scenarios in the Feature file
A new Maven Project is created with 2 folders – src/main/javaand src/test/java. To create test scenarios, we need a new source folder called – src/test/resources. To create this folder, right-click on test directory ->select New ->Directory, and then it shows Maven Source Directories as resources as shown below.
Double-click on the resources directory and a new source directory under your new Maven project is created as shown in the below image.
Step 6 – Add Selenium, TestNG, and Cucumber dependencies to the project
Add below mentioned Selenium, TestNG, and Cucumber dependencies to the project.
Step 7 – Add Maven Compiler Plugin and Surefire Plugin
The compiler plugin is used to compile the source code of a Maven project. This plugin has two goals, which are already bound to specific phases of the default lifecycle:
Step 8 – Create a feature file in the src/test/resources
Create a folder with name features. Now, create the feature file in this folder. The feature file should be saved with the extension .feature. This feature file contains the test scenarios created to test the application. The Test Scenarios are written in Gherkins language in the format of Given, When, Then, And, But.
Below is an example of Test Scenarios in the feature file. I have failed one test scenario intentionally – @MissingUsername.
Feature: Login to HRM Application

  Background:
    Given User is on HRMLogin page "https://opensource-demo.orangehrmlive.com/"

  @ValidCredentials
  Scenario: Login with valid credentials

    When User enters username as "Admin" and password as "admin123"
    Then User should be able to login successfully and new page open

  @InvalidCredentials
  Scenario Outline: Login with invalid credentials

    When User enters username as "<username>" and password as "<password>"
    Then User should be able to see error message "<errorMessage>"

    Examples:
      | username   | password  | errorMessage           |
      | Admin      | admin12$$ | Invalid credentials    |
      | admin$$    | admin123  | Invalid credentials    |
      | abc123     | xyz$$     | Invalid credentials    |

  @MissingUsername @FailedTest
  Scenario: Login with blank username

    When User enters username as " " and password as "admin123"
    Then User should be able to see a message "Required1" below Username
Step 9 – Create the classes for locators, actions, and utilities in src/main/java
Create folders – actions, locators, and utils in src/main/java.
Create a Java Class for each page where define WebElements as variables using Annotation @FindBy. Create another Java class that contains methods for actions performed on WebElements. Here, I’m going to create 2 classes for locators – LoginPageLocatorsand HomePageLocators as well as 2 classes for actions – LoginPageActionsand HomePageActions
TheLocator class contains WebElements which are identified by @FindByannotation as shown below:-
Action class contains methods for the action to be performed on the web elements identified in the locator class.
The initElements is a static method of PageFactory class that is used to initialize all the web elements located by @FindBy annotation. Only after the WebElements are initialized, they can be used in the methods to perform actions.
public Login(WebDriver driver) {
           this.driver = driver;
           // This initElements method will create all WebElements
           PageFactory.initElements(driver, this);
     }
Below is the sample code of the LoginPageLocators.
import org.openqa.selenium.WebElement;
import org.openqa.selenium.support.FindBy;

public class LoginPageLocators {

	@FindBy(name = "username")
    public WebElement userName;

    @FindBy(name = "password")
    public WebElement password;

    @FindBy(xpath = "//*[@id='app']/div[1]/div/div[1]/div/div[2]/div[2]/form/div[1]/div/span")
    public WebElement missingUsernameErrorMessage;

    @FindBy(xpath = "//*[@id='app']/div[1]/div/div[1]/div/div[2]/div[2]/form/div[3]/button")
    public WebElement login;

    @FindBy(xpath = "//*[@id='app']/div[1]/div/div[1]/div/div[2]/div[2]/div/div[1]/div[1]/p")
    public  WebElement errorMessage;

}
Below is the sample code for the HomePageLocators.
import org.openqa.selenium.WebElement;
import org.openqa.selenium.support.FindBy;

public class HomePageLocators {

	  @FindBy(xpath = "//span[@class='oxd-topbar-header-breadcrumb']/h6")
	  public  WebElement homePageUserName;

}
Create the action classesfor each web page. These action classes contain all the methods needed by the step definitions. In this case, I have created 2 action classes – LoginPageActions, HomePageActions
LoginPageActions
import org.example.locators.LoginPageLocators;
import org.example.utils.HelperClass;
import org.openqa.selenium.support.PageFactory;

public class LoginPageActions {

    LoginPageLocators loginPageLocators = null;

    public LoginPageActions() {

        this.loginPageLocators = new LoginPageLocators();

        PageFactory.initElements(HelperClass.getDriver(),loginPageLocators);
    }

    // Get the error message when username is blank
    public String getMissingUsernameText() {
        return loginPageLocators.missingUsernameErrorMessage.getText();
    }

    // Get the Error Message
    public String getErrorMessage() {
        return loginPageLocators.errorMessage.getText();
    }

    public void login(String strUserName, String strPassword) {

        // Fill user name
        loginPageLocators.userName.sendKeys(strUserName);

        // Fill password
        loginPageLocators.password.sendKeys(strPassword);

        // Click Login button
        loginPageLocators.login.click();

    }
HomePageActions
import org.example.locators.HomePageLocators;
import org.example.utils.HelperClass;
import org.openqa.selenium.support.PageFactory;

public class HomePageActions {

    HomePageLocators homePageLocators = null;

    public HomePageActions() {

        this.homePageLocators = new HomePageLocators();
        PageFactory.initElements(HelperClass.getDriver(),homePageLocators);
    }

    // Get the User name from Home Page
    public String getHomePageText() {
        return homePageLocators.homePageUserName.getText();
    }

}
Create a Helper class where we are initializing the web driver, initializing the web driver wait, defining the timeouts, and creating a private constructor of the class, it will declare the web driver, so whenever we create an object of this class, a new web browser is invoked.
package com.example.utils;

import java.time.Duration;
import org.openqa.selenium.WebDriver;
import org.openqa.selenium.chrome.ChromeDriver;
import io.github.bonigarcia.wdm.WebDriverManager;
import org.openqa.selenium.chrome.ChromeOptions;

public class HelperClass {

	 private static HelperClass helperClass;

	    private static WebDriver driver;
	    public final static int TIMEOUT = 5;

	     private HelperClass() {

	        WebDriverManager.chromedriver().setup();
			ChromeOptions options = new ChromeOptions();
			options.addArguments("--start-maximized");
	        driver = new ChromeDriver(options);
	        driver.manage().timeouts().implicitlyWait(Duration.ofSeconds(TIMEOUT));
	     }

	    public static void openPage(String url) {
	        driver.get(url);
	    }

	    public static WebDriver getDriver() {
	        return driver;
	    }

	    public static void setUpDriver() {

	        if (helperClass==null) {

	            helperClass = new HelperClass();
	        }
	    }

	    public static void tearDown() {

	        if(driver!=null) {
	             driver.quit();
	        }

	       helperClass = null;
	   }

	}
Step 10 – Create a StepDefinition class in src/test/java
Create a Java Class called Definition where we will create the Test Code related to the Given, When, Then of Feature file in src/test/java.
Now, we need to create the Step Definition of the Feature File – LoginPageDefinitions.java.
import io.cucumber.java.en.Given;
import io.cucumber.java.en.Then;
import io.cucumber.java.en.When;
import org.example.actions.HomePageActions;
import org.example.actions.LoginPageActions;
import org.example.utils.HelperClass;
import org.testng.Assert;

public class LoginPageDefinitions {

    LoginPageActions objLogin = new LoginPageActions();
    HomePageActions objHomePage = new HomePageActions();

    @Given("User is on HRMLogin page {string}")
    public void loginTest(String url) {

        HelperClass.openPage(url);

    }

    @When("User enters username as {string} and password as {string}")
    public void goToHomePage(String userName, String passWord) {

        // login to application
        objLogin.login(userName, passWord);

    }

    @Then("User should be able to login successfully and new page open")
    public void verifyLogin() {

        // Verify home page
        Assert.assertTrue(objHomePage.getHomePageText().contains("Dashboard"));

    }

    @Then("User should be able to see error message {string}")
    public void verifyErrorMessage(String expectedErrorMessage) {

        // Verify error message
        Assert.assertEquals(objLogin.getErrorMessage(),expectedErrorMessage);

    }

    @Then("User should be able to see a message {string} below Username")
    public void verifyMissingUsernameMessage(String message) {

        Assert.assertEquals(objLogin.getMissingUsernameText(),message);
    }

}
Step 11 – Create a Hook class in src/test/java
Create thehook class that contains the Before and After hook to initialize the web browser and close the web browser. I have added the code to take the screenshot of the failed scenario in @After Hook.
Below is the code for the Hooks class.
import org.openqa.selenium.OutputType;
import org.openqa.selenium.TakesScreenshot;
import com.example.utils.HelperClass;
import io.cucumber.java.After;
import io.cucumber.java.Before;
import io.cucumber.java.Scenario;

public class Hooks {

	@Before
    public static void setUp() {

       HelperClass.setUpDriver();
    }

	@After
	public static void tearDown(Scenario scenario) {

		//validate if scenario has failed
		if(scenario.isFailed()) {
			final byte[] screenshot = ((TakesScreenshot) HelperClass.getDriver()).getScreenshotAs(OutputType.BYTES);
			scenario.attach(screenshot, "image/png", scenario.getName());
		}

		HelperClass.tearDown();
	}
}
Step 12 – Create a TestNG Cucumber Runner classin the src/test/java
Cucumber needs a TestRunner class to run the feature files. It is suggested to create a folder with the name of the runner in the src/test/java directory and create the Cucumber TestRunner class in this folder. Below is the code of the Cucumber TestRunner class.
Below is the code for CucumberRunnerTests class.
import io.cucumber.testng.AbstractTestNGCucumberTests;
import io.cucumber.testng.CucumberOptions;

@CucumberOptions(tags = "", features = "src/test/resources/features/LoginPage.feature", glue = "com.example.definitions",
        plugin = {})

public class CucumberRunnerTests extends AbstractTestNGCucumberTests {
}
Note:- The name of the Runner class should end with Test otherwise we can’t run the tests using Command Line.
Step 13 – Run the tests from TestNG
You can execute the test script by right-clicking on TestRunner class -> Run As TestNG. (Eclipse)
In the case of the IntelliJ project, right-click on the runner class and select Run ‘CucumberRunnerTests’.
The output of the above program is
Step 14 – Run the tests from testng.xml
Create a testng.xml as shown below and run the tests as TestNG.
<?xml version="1.0" encoding="UTF-8"?>
<!DOCTYPE suite SYSTEM "https://testng.org/testng-1.0.dtd">
<suite name="Suite">
    <test  name="Cucumber with TestNG Test">
        <classes>
            <class name="com.example.runner.CucumberRunnerTests"/>
        </classes>
    </test> <!-- Test -->
</suite> <!-- Suite -->
The testng.xml is highlighted below:
Step 15 – Run the tests from Command Line
Run the below command in the command prompt to run the tests and to get the test execution report.
mvn clean test
The output of the above program is
Step 16 – Cucumber Report Generation
To get Cucumber Test Reports, add cucumber.properties under src/test/resources and add the below instruction in the file.
cucumber.publish.enabled=true
Below is the image of the Cucumber Report generated using the Cucumber Service.
In the above example, as we can see, one of the tests has failed. So, when a test fails, we have written the code to take a screenshot of the failed step. The Attached Image shows the image of the failed test. You can click on that to see the screenshot.
Step 17 – TestNG Report Generation
TestNG generates various types of reports under the target->surefire-reports folder like emailable-report.html, index.html, testng-results.xml.
We are interested in the “emailable-report.html” report. Open “emailable-report.html“, as this is an HTML report, and open it with the browser. The below image shows emailable-report.html.
emailable-report.html
Index.html
TestNG also produces an “index.html” report. The below image shows the index.html report.
JUnit is an open source Unit Testing Framework for JAVA. JUnit is a simple framework to write repeatable tests. It is an instance of the xUnit architecture for unit testing frameworks.