Last Updated On
As we know, Cucumber is a BDD Tool and Selenium Webdriver is used for the automation of web applications. Imagine we need to build a test framework that can be used by businesses to understand the test scenarios and as well can test the web application. This can be achieved by integrating Cucumber with Selenium.
In this tutorial, I’ll create a BDD Framework for the testing of web applications using Selenium Webdriver.
Table of Contents
- Dependency List
- Implementation Steps
- Download and Install Java
- Download and setup Eclipse IDE on the system
- Setup Maven
- Install Cucumber Eclipse Plugin (Only for Eclipse)
- Create a new Maven Project
- Create source folder src/test/resources
- Add Selenium and Cucumber dependencies to the project
- Add Maven Compiler Plugin
- Create a feature file (LoginPage.feature)
- Create the step definition class
- Create a Cucumber Runner class under src/test/java
- Test Execution through JUnit
- Run the tests from Command Line
- Cucumber Report Generation
Dependency List:
- Cucumber – 7.14.0
- Java 17
- JUnit – 4.13.2
- Maven – 3.9.5
- Selenium – 4.15.0
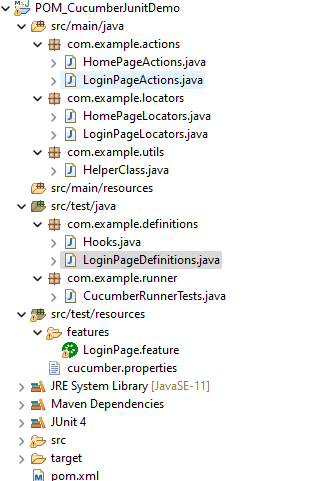
Project Structure

Implementation Steps
The above steps are explained in detail.
Step 1- Download and Install Java
Cucumber and Selenium need Java to be installed on the system to run the tests. Click here to know How to install Java.
Step 2 – Download and setup Eclipse IDE on the system
The Eclipse IDE (integrated development environment) provides strong support for Java developers. The Eclipse IDE for Java Developers distribution is designed to support standard Java development. It includes support for the Maven and Gradle build system and support for the Git version control system. Click here to know How to install Eclipse.
Step 3 – Setup Maven
To build a test framework, we need to add a number of dependencies to the project. It is a very tedious and cumbersome process to add each dependency manually. So, to overcome this problem, we use a build management tool. Maven is a build management tool that is used to define project structure, dependencies, build, and test management. Click here to know How to install Maven.
Step 4 – Install Cucumber Eclipse Plugin (Only for Eclipse)
The cucumber plugin is an Eclipse plugin that allows eclipse to understand the Gherkin syntax. When we are working with cucumber we will write the feature files that contain Feature, Scenario, Given, When, Then, And, But, Tags, Scenario Outline, and Examples. By default, eclipse doesn’t understand these keywords so it doesn’t show any syntax highlighter. Cucumber Eclipse Plugin highlights the keywords present in Feature File. Refer to this tutorial to get more detail – How to setup Cucumber with Eclipse.
Step 5 – Create a new Maven Project
Click here to know How to create a Maven project
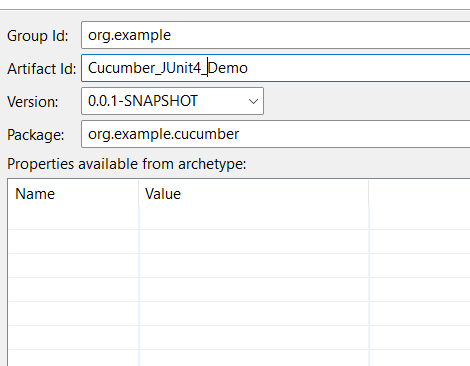
Below is the Maven project structure. Here,
Group Id – org.example
Artifact Id – Cucumber_JUnit4_Demo
Version – 0.0.1-SNAPSHOT
Package – cucumber
Maven Dependency (pom.xml) looks like something shown below for a new Maven project.

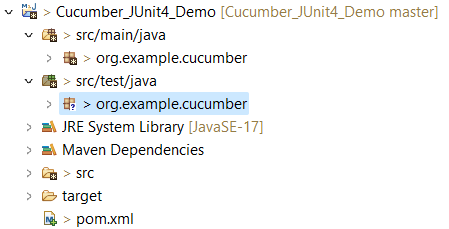
Step 6 – Create source folder src/test/resources
When a new Maven Project is created, it has 2 folders – src/main/java and src/test/java. To create test scenarios, we need a new source folder called – src/test/resources. To create this folder, Right-click on your Maven project ->select New ->Java, and then Source Folder. The Feature file is created in the src/test/resources source folder.
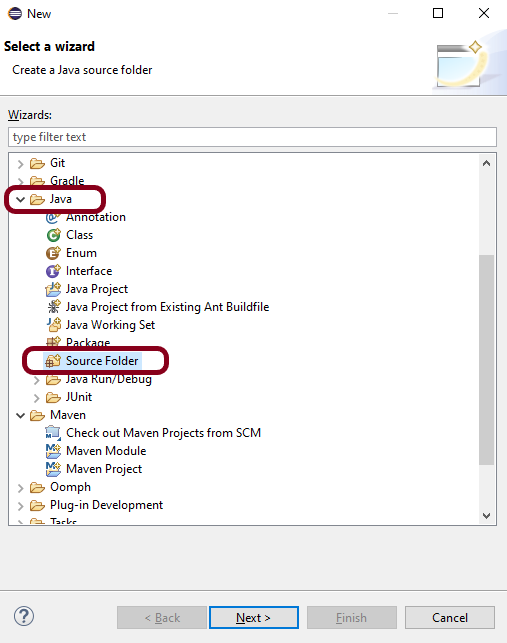
Mention the source folder name as src/test/resources and click the Next button. This will create a source folder under your new Maven project, as shown in the below image.

Step 7 – Add Selenium and Cucumber dependencies to the project
Add the below-mentioned Selenium and Cucumber dependencies to the project.
<properties>
    <project.build.sourceEncoding>UTF-8</project.build.sourceEncoding>
    <cucumber.version>7.14.0</cucumber.version>
    <selenium.version>4.15.0</selenium.version>
    <junit.version>4.13.2</junit.version>
    <maven.compiler.plugin.version>3.11.0</maven.compiler.plugin.version>
    <maven.surefire.plugin.version>3.2.1</maven.surefire.plugin.version>
    <maven.compiler.source.version>17</maven.compiler.source.version>
    <maven.compiler.target.version>17</maven.compiler.target.version>
  </properties>

  <dependencies>

    <dependency>
      <groupId>io.cucumber</groupId>
      <artifactId>cucumber-java</artifactId>
      <version>${cucumber.version}</version>
    </dependency>

    <dependency>
      <groupId>io.cucumber</groupId>
      <artifactId>cucumber-junit</artifactId>
      <version>${cucumber.version}</version>
      <scope>test</scope>
    </dependency>

    <!-- Selenium -->
    <dependency>
      <groupId>org.seleniumhq.selenium</groupId>
      <artifactId>selenium-java</artifactId>
      <version>${selenium.version}</version>
    </dependency>

    <!-- JUnit4 -->
    <dependency>
      <groupId>junit</groupId>
      <artifactId>junit</artifactId>
      <version>${junit.version}</version>
      <scope>test</scope>
    </dependency>
  </dependencies>
Step 8 – Add Maven Compiler Plugin
The compiler plugin is used to compile the source code of a Maven project. This plugin has two goals, which are already bound to specific phases of the default lifecycle:
- compile – compile main source files
- testCompile – compile test source files
<build>
    <plugins>
      <plugin>
        <groupId>org.apache.maven.plugins</groupId>
        <artifactId>maven-compiler-plugin</artifactId>
        <version>${maven.compiler.plugin.version}</version>
        <configuration>
          <source>${maven.compiler.source.version}</source>
          <target>${maven.compiler.target.version}</target>
        </configuration>
      </plugin>
      <plugin>
        <groupId>org.apache.maven.plugins</groupId>
        <artifactId>maven-surefire-plugin</artifactId>
        <version>${maven.surefire.plugin.version}</version>
      </plugin>
    </plugins>
  </build>
</project>
The complete pom.xml will look like the below image
<project xmlns="http://maven.apache.org/POM/4.0.0" xmlns:xsi="http://www.w3.org/2001/XMLSchema-instance"
  xsi:schemaLocation="http://maven.apache.org/POM/4.0.0 http://maven.apache.org/xsd/maven-4.0.0.xsd">
  <modelVersion>4.0.0</modelVersion>

  <groupId>org.example</groupId>
  <artifactId>Cucumber_JUnit4_Demo</artifactId>
  <version>1.0-SNAPSHOT</version>
  <packaging>jar</packaging>

  <name>Cucumber_JUnit4_Demo</name>
  <url>http://maven.apache.org</url>

  <properties>
    <project.build.sourceEncoding>UTF-8</project.build.sourceEncoding>
    <cucumber.version>7.14.0</cucumber.version>
    <selenium.version>4.15.0</selenium.version>
    <junit.version>4.13.2</junit.version>
    <maven.compiler.plugin.version>3.11.0</maven.compiler.plugin.version>
    <maven.surefire.plugin.version>3.2.1</maven.surefire.plugin.version>
    <maven.compiler.source.version>17</maven.compiler.source.version>
    <maven.compiler.target.version>17</maven.compiler.target.version>
  </properties>

  <dependencies>

    <dependency>
      <groupId>io.cucumber</groupId>
      <artifactId>cucumber-java</artifactId>
      <version>${cucumber.version}</version>
    </dependency>

    <dependency>
      <groupId>io.cucumber</groupId>
      <artifactId>cucumber-junit</artifactId>
      <version>${cucumber.version}</version>
      <scope>test</scope>
    </dependency>

    <!-- Selenium -->
    <dependency>
      <groupId>org.seleniumhq.selenium</groupId>
      <artifactId>selenium-java</artifactId>
      <version>${selenium.version}</version>
    </dependency>

    <!-- JUnit4 -->
    <dependency>
      <groupId>junit</groupId>
      <artifactId>junit</artifactId>
      <version>${junit.version}</version>
      <scope>test</scope>
    </dependency>
  </dependencies>

  <build>
    <plugins>
      <plugin>
        <groupId>org.apache.maven.plugins</groupId>
        <artifactId>maven-compiler-plugin</artifactId>
        <version>${maven.compiler.plugin.version}</version>
        <configuration>
          <source>${maven.compiler.source.version}</source>
          <target>${maven.compiler.target.version}</target>
        </configuration>
      </plugin>
      <plugin>
        <groupId>org.apache.maven.plugins</groupId>
        <artifactId>maven-surefire-plugin</artifactId>
        <version>${maven.surefire.plugin.version}</version>
      </plugin>
    </plugins>
  </build>
</project>
Step 9 – Create a feature file (LoginPage.feature)

Feature file should be saved as an extension of .feature. Add the test scenarios in this feature file. I have added sample test scenarios. In this feature file, I have created a scenario for successful login and another one for a failed login. The test scenarios are written in the Gherkins language. A feature file contains all the test scenarios and is placed in src/test/resources/features.
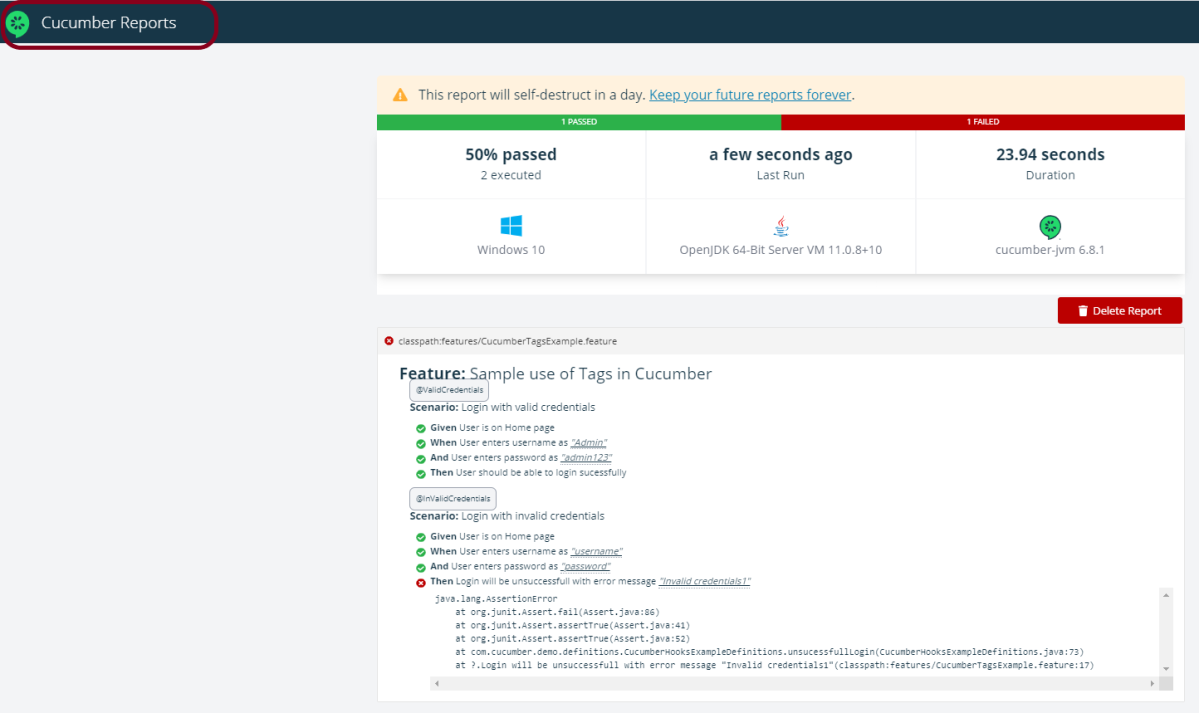
Feature: Login to HRM Application

   @ValidCredentials
   Scenario: Login with valid credentials

    Given User is on Home page
    When User enters username as "Admin"
    And User enters password as "admin123"
    Then User should be able to login sucessfully

   @InValidCredentials
   Scenario: Login with invalid credentials

    Given User is on Home page
    When User enters username as "username"
    And User enters password as "password"
    Then Login will be unsuccessfull with error message "Invalid credentials"
Step 10 – Create the step definition class
The StepDefinition class is created in src/test/java. The StepDefinition class contains the test code corresponding to the steps of Test Scenario in the Feature File.

It is recommended to create a package with a name such as org.example.cucumber.stepdefinitions in src/test/java and create the step definition java file corresponding to the feature files in that package
package org.example.definitions;

import java.time.Duration;

import org.junit.Assert;
import org.openqa.selenium.By;
import org.openqa.selenium.WebDriver;
import org.openqa.selenium.chrome.ChromeDriver;
import org.openqa.selenium.chrome.ChromeOptions;

import io.cucumber.java.After;
import io.cucumber.java.Before;
import io.cucumber.java.en.Given;
import io.cucumber.java.en.Then;
import io.cucumber.java.en.When;

public class LoginStepdefinitions {

	WebDriver driver;

	@Before
    public void setUp() {

        ChromeOptions options = new ChromeOptions();
        options.addArguments("--start-maximized");
        driver = new ChromeDriver(options);
        driver.manage().timeouts().implicitlyWait(Duration.ofSeconds(5));

    }

    @Given("User is on Home page")
    public void userOnHomePage() {

        driver.get("https://opensource-demo.orangehrmlive.com/");
    }

    @When("User enters username as {string}")
    public void entersUsername(String userName)  {

        System.out.println("Username Entered");
        driver.findElement(By.name("username")).sendKeys(userName);


    }

    @When("User enters password as {string}")
    public void entersPassword(String passWord)  {

        System.out.println("Password Entered");
        driver.findElement(By.name("password")).sendKeys(passWord);
        driver.findElement(By.xpath("//*[@class='oxd-form']/div[3]/button")).submit();
    }

    @Then("User should be able to login sucessfully")
    public void sucessfullLogin()  {

    	 String homePageHeading = driver.findElement(By.xpath("//*[@class='oxd-topbar-header-breadcrumb']/h6")).getText();

         //Verify new page - HomePage
         Assert.assertEquals("Dashboard",homePageHeading);

    }

    @Then("Login will be unsuccessfull with error message {string}")
    public void unsucessfullLogin(String expectedErrorMessage)  {

    	 String actualErrorMessage = driver.findElement(By.xpath("//*[@class='orangehrm-login-error']/div[1]/div[1]/p")).getText();

         // Verify Error Message
         Assert.assertEquals( expectedErrorMessage, actualErrorMessage);

    }

    @After
    public void teardown() {

        driver.quit();
    }

}
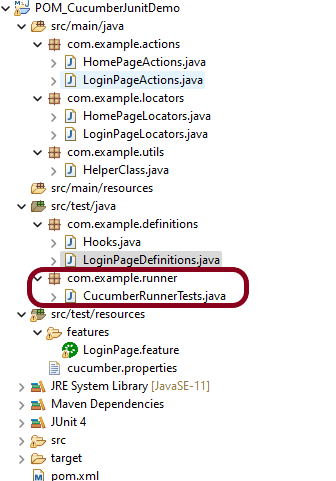
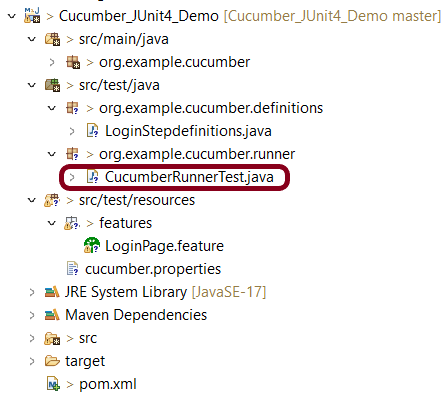
Step 11 – Create a Cucumber Runner class under src/test/java
It is recommended to create a package with a name such as org.example.cucumber.runner in src/test/java and create the CucumberRunnerTest (Runner) java file corresponding to that package.
We need to create a class called Runner class to run the tests. This class will use the JUnit annotation @RunWith(), which tells JUnit what is the test runner class.
package org.example.cucumber.runner;

import org.junit.runner.RunWith;

import io.cucumber.junit.Cucumber;
import io.cucumber.junit.CucumberOptions;

@RunWith(Cucumber.class)
@CucumberOptions(features = {
        "src/test/resources/features/LoginPage.feature" }, glue = "org.example.cucumber.definitions")

public class CucumberRunnerTest {

}
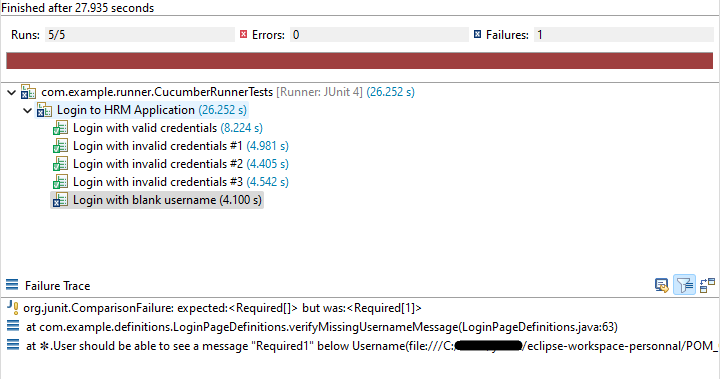
Step 12 – Test Execution through JUnit
Go to Runner class and right-click Run As JUnit. The tests will run as JUnit tests.

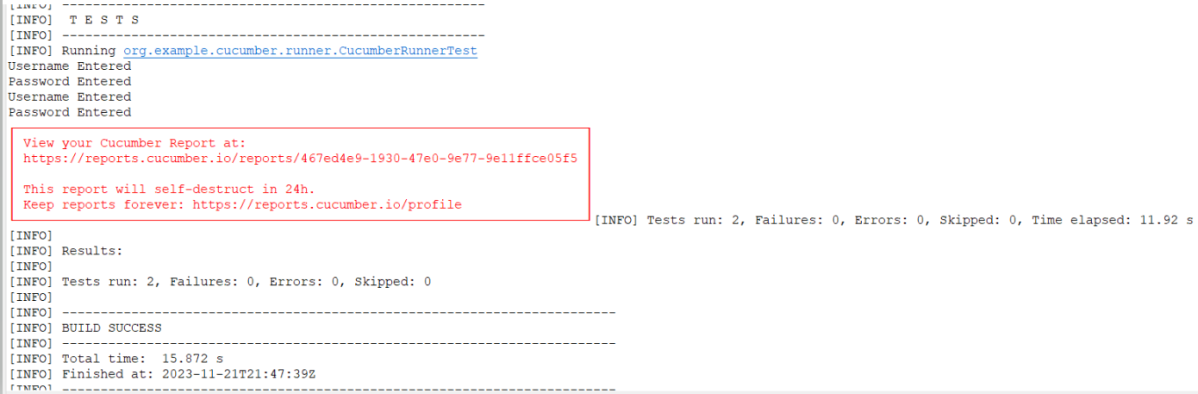
Step 13 – Run the tests from Command Line
Run the below command in the command prompt to run the tests and to get the test execution report.
mvn clean test
The execution screen looks like something as shown below
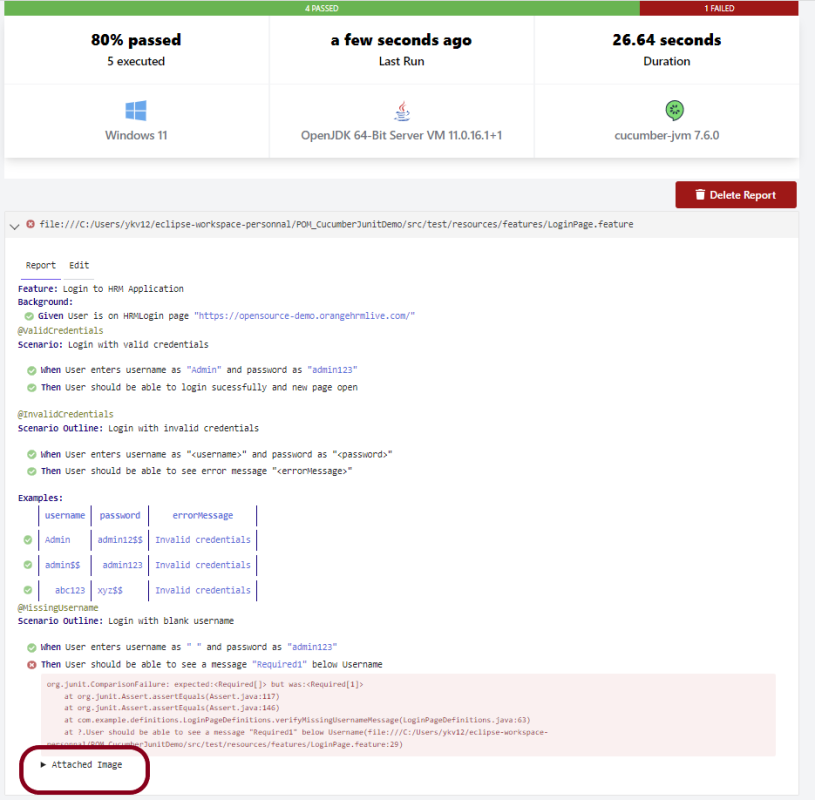
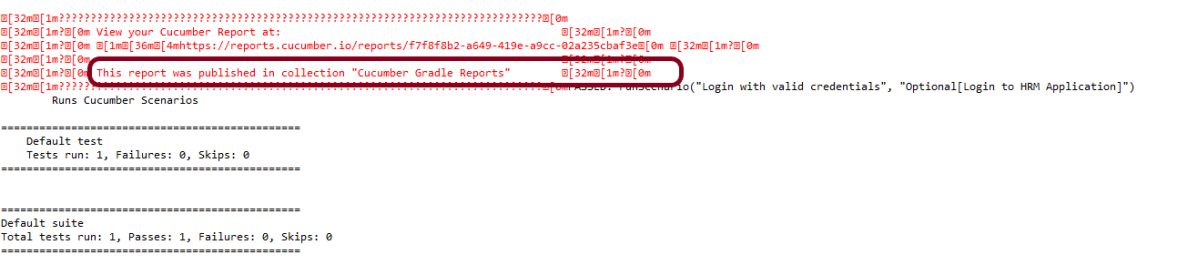
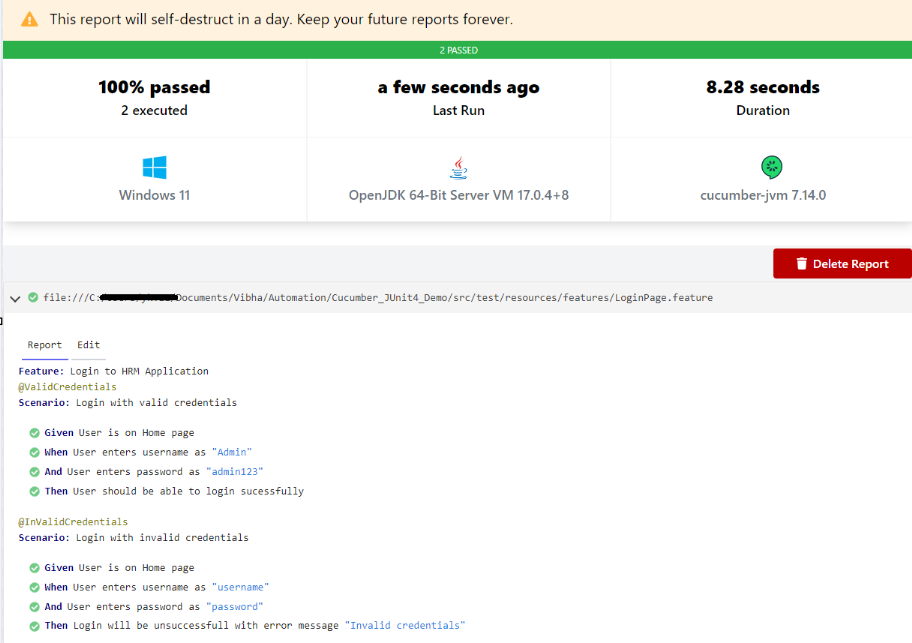
Step 14 – Cucumber Report Generation
To get Cucumber Test Reports, add cucumber.properties under src/test/resources and add the below instruction in the file
cucumber.publish.enabled=true
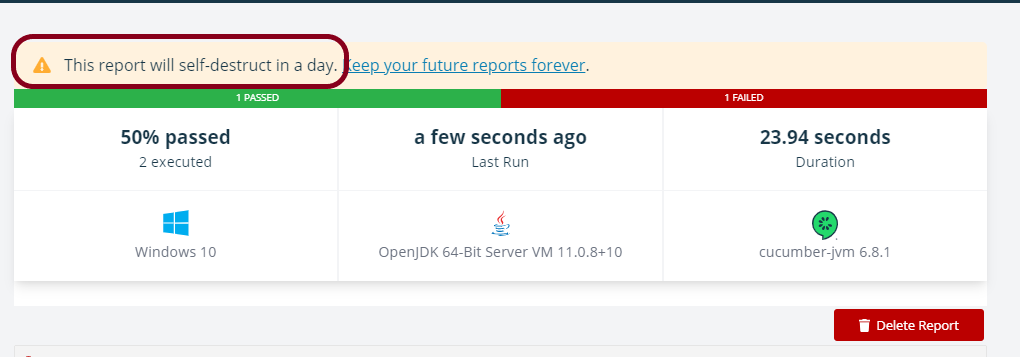
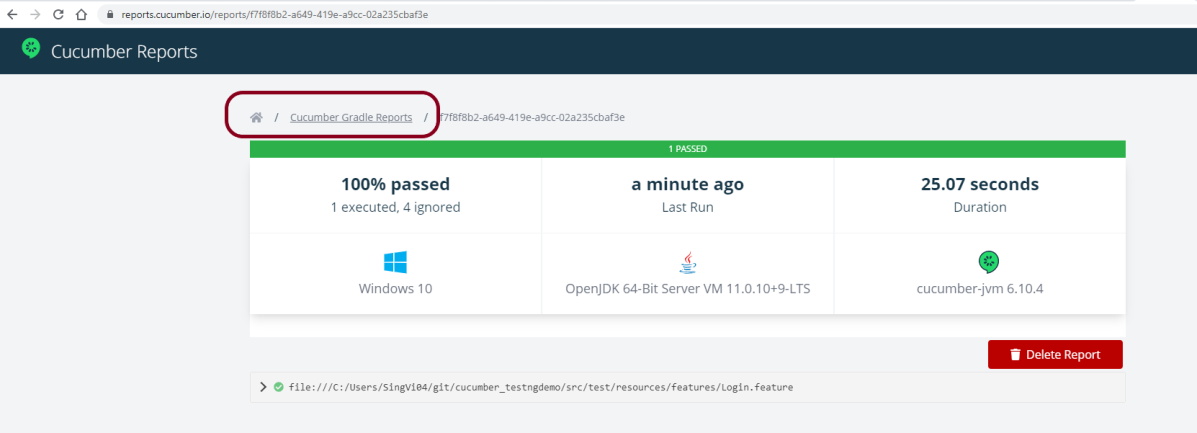
Below is the image of the Cucumber Report generated using the Cucumber Service
That’s it! Congratulations on making it through this tutorial and hope you found it useful! Happy Learning!!