Jenkins is a self-contained, open-source automation server that can be used to automate all sorts of tasks related to building, testing, and delivering or deploying software.
Jenkins can be installed through native system packages, Docker, or even run standalone by any machine with a Java Runtime Environment (JRE) installed.
Jenkin’s installed and started on the computer. The current Jenkins version is – 2.361.2
To generate HTML Report in Jenkins, we need to download HTML Publisher Plugin. Please refer to this tutorial to install the plugin – How to install Plugins in Jenkins.
Implementation Steps
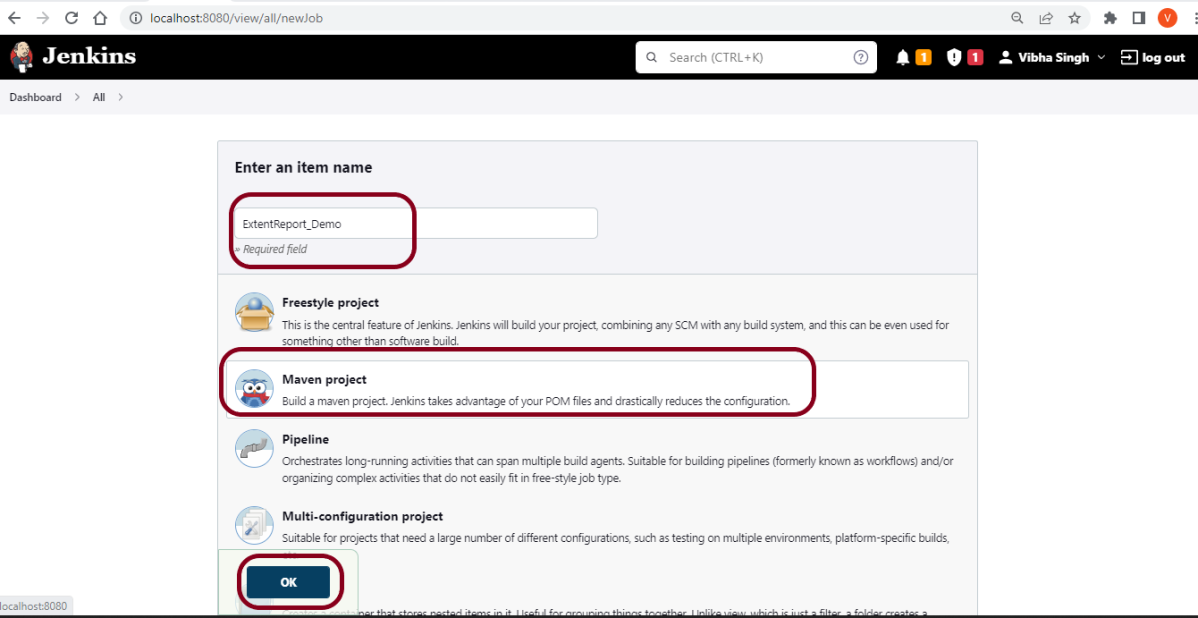
Step 1: Create a new Maven project
Give the Name of the project – ExtentReport_Demo
Click on the Maven project.
Click on the OK button.
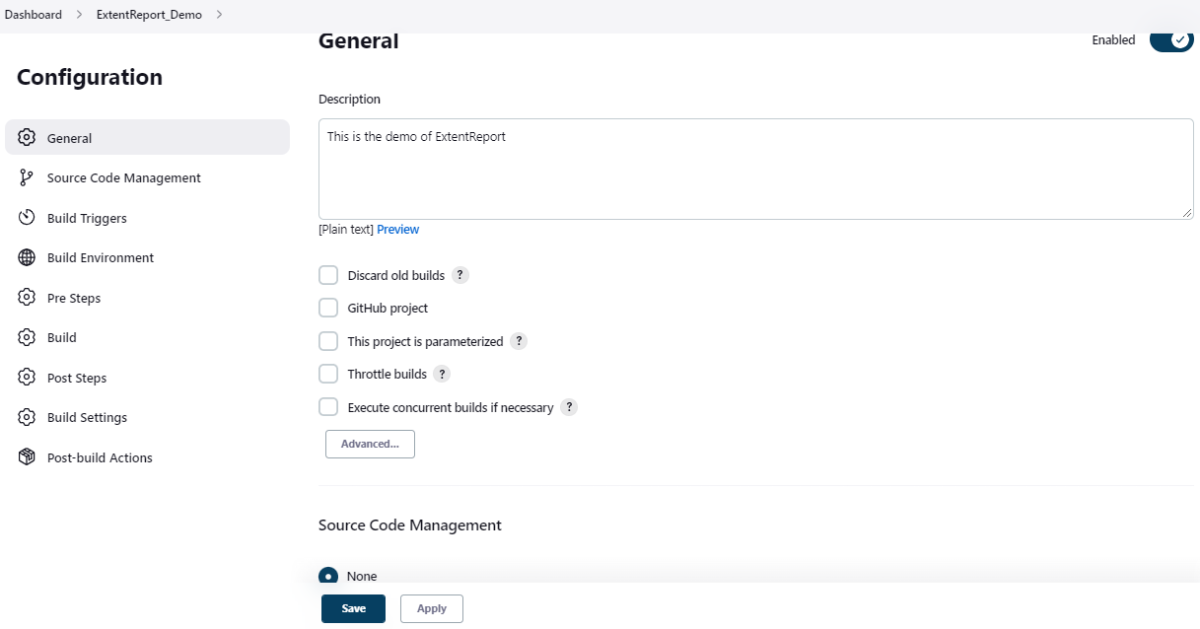
In the General section, enter the project description in the Description box.
Select Source Code Management as None if the project is locally present on the machine.
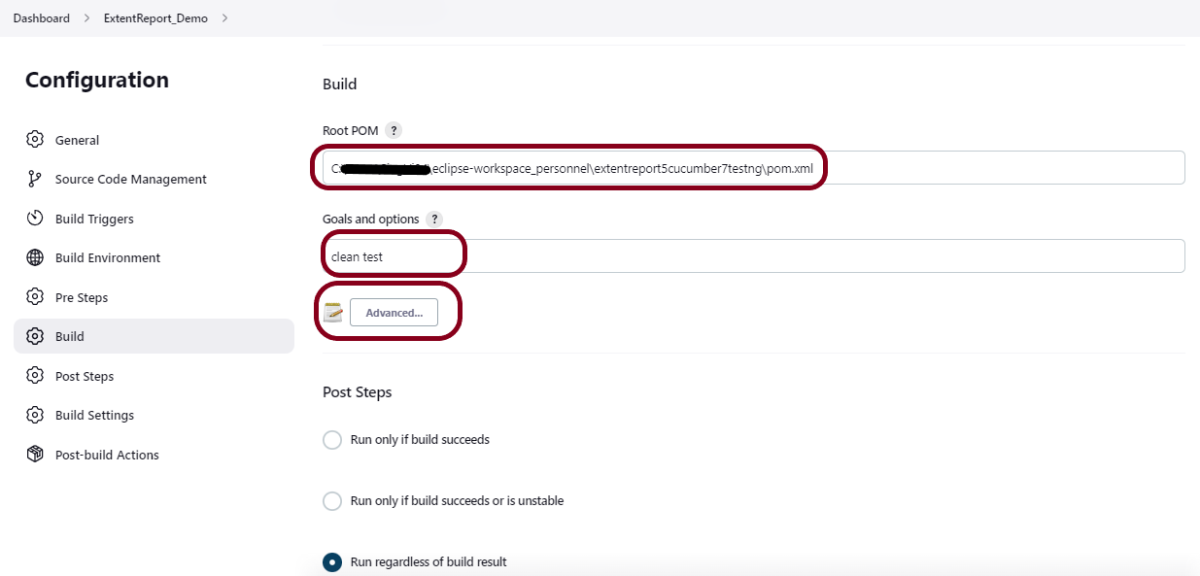
Step 2: Build Management
Go to the Build section of the new job.
In the Root POM textbox, enter the full path to pom.xml
In the Goals and options section, enter “clean test site”
Here, I have used the Selenium project with JUnit, so to see the complete project, please refer to this tutorial – How to generate JUnit4 Report.
Click on the Advanced button.
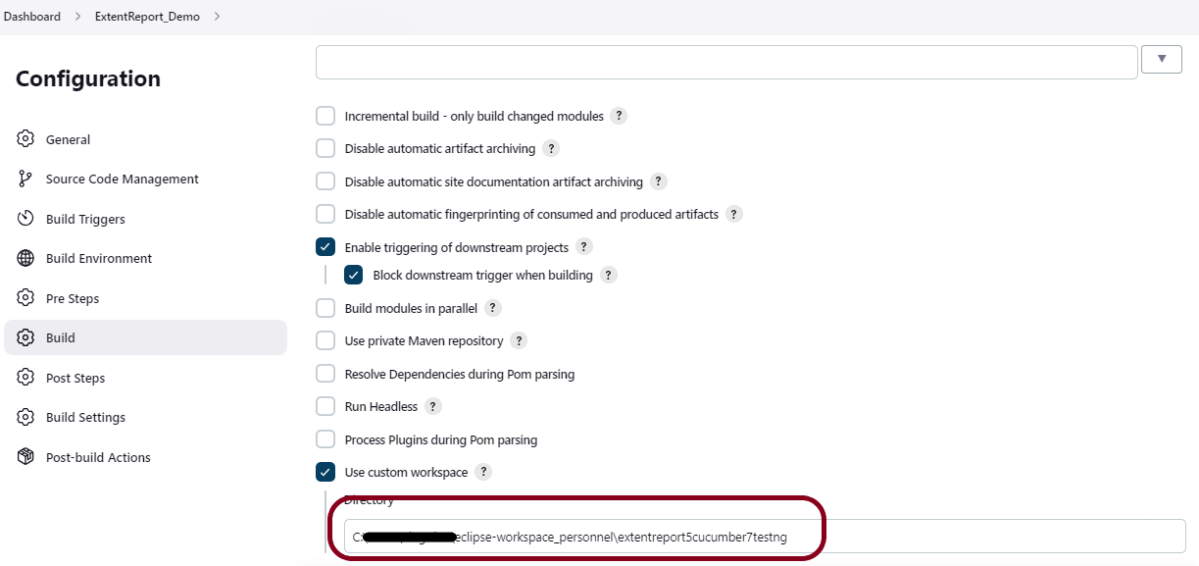
Step 3: Select a custom workspace
Mention the full path of the project in the directory.
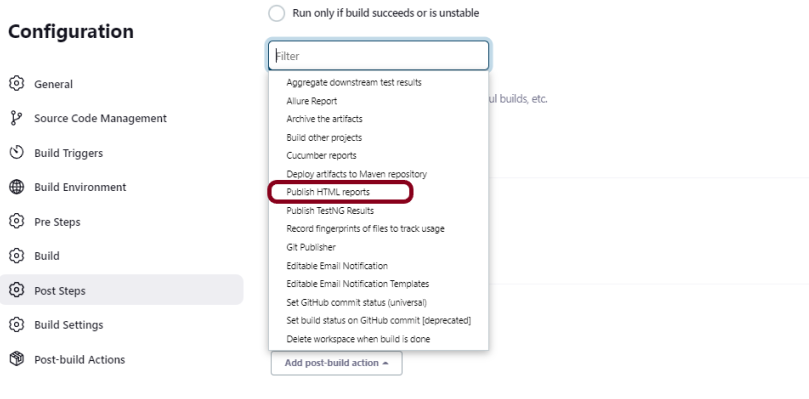
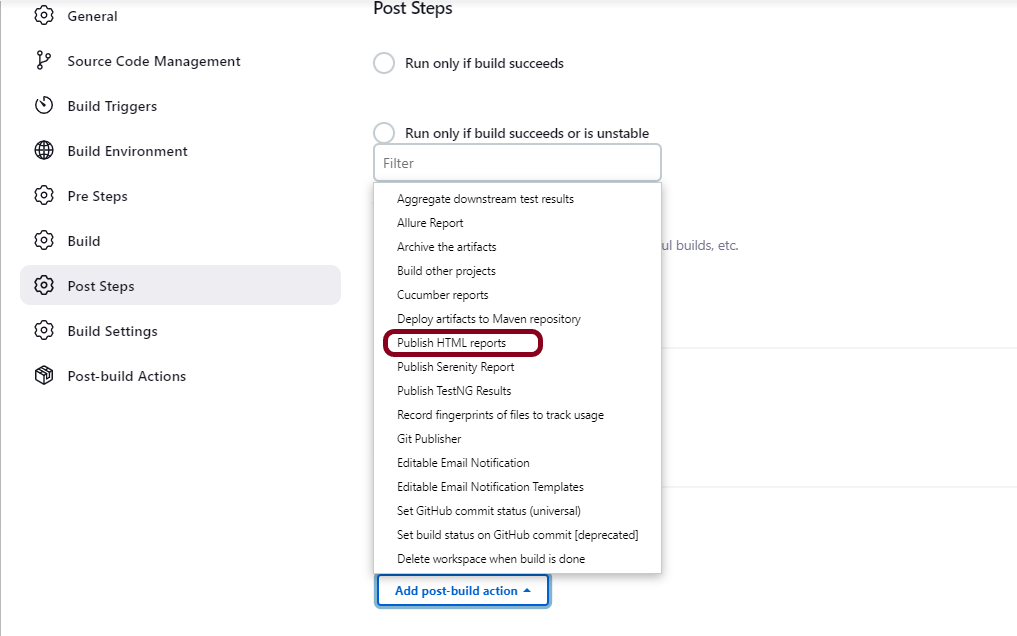
Step 4: Select “Publish HTML reports” from “Post Build Actions”
Scroll down to “Post Build Actions” and click on the “Add Post Build Actions” drop-down list. Select “Publish HTML reports“.
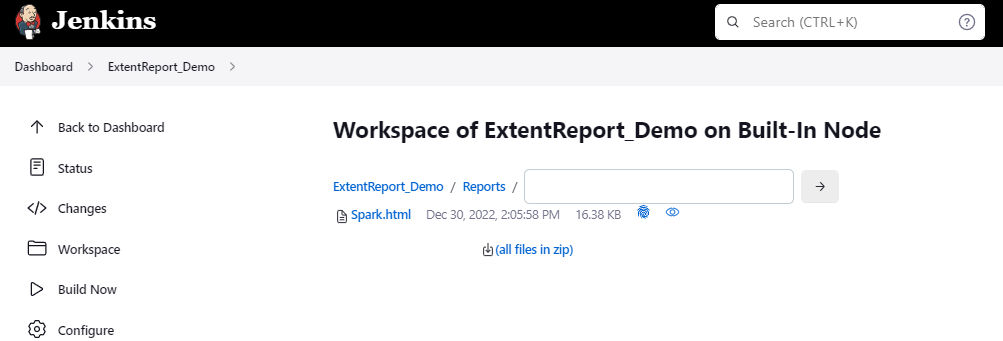
If you want to see where the report is saved in Jenkins, go to the Dashboard ->ExtentReport_Demo project -> Workspace ->target -> Reports -> Spark.html.
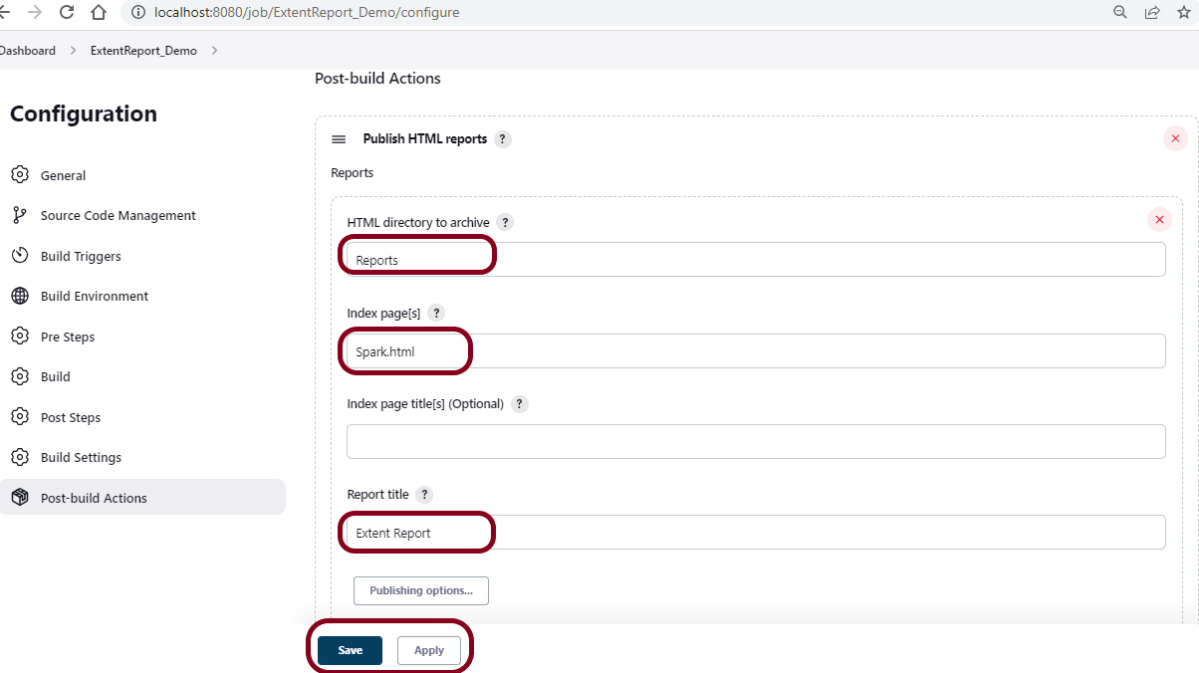
Enter the HTML directory to archive – Reports, Index page[s] – Spark.html, and Report title – Extent Report.
Click on the Apply and Save buttons.
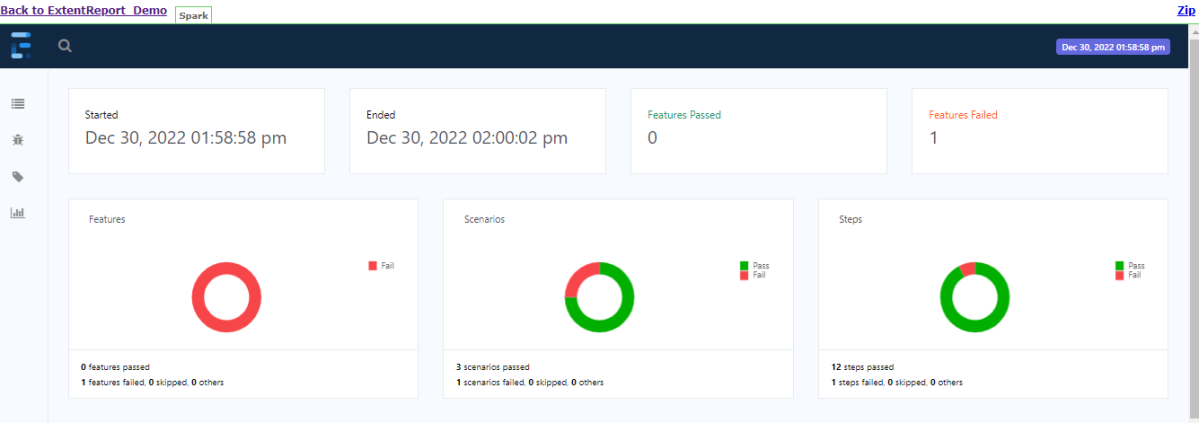
We have created a new Maven project “ExtentReport_Demo” with the configuration to run the Cucumber, and Selenium with TestNG Tests and also to generate HTML Report after execution using Jenkins.
Step 5: Execute the tests
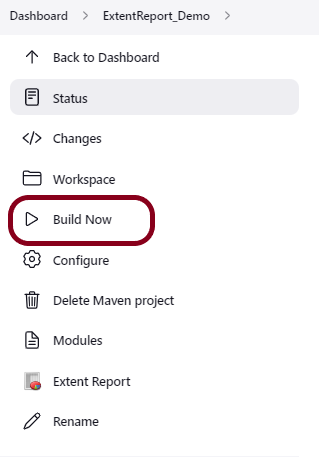
Let’s execute it now by clicking on the “Build Now” button.
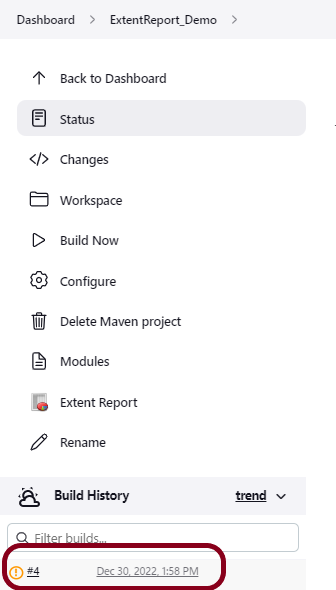
Right-click on Build Number (here in my case it is #4).
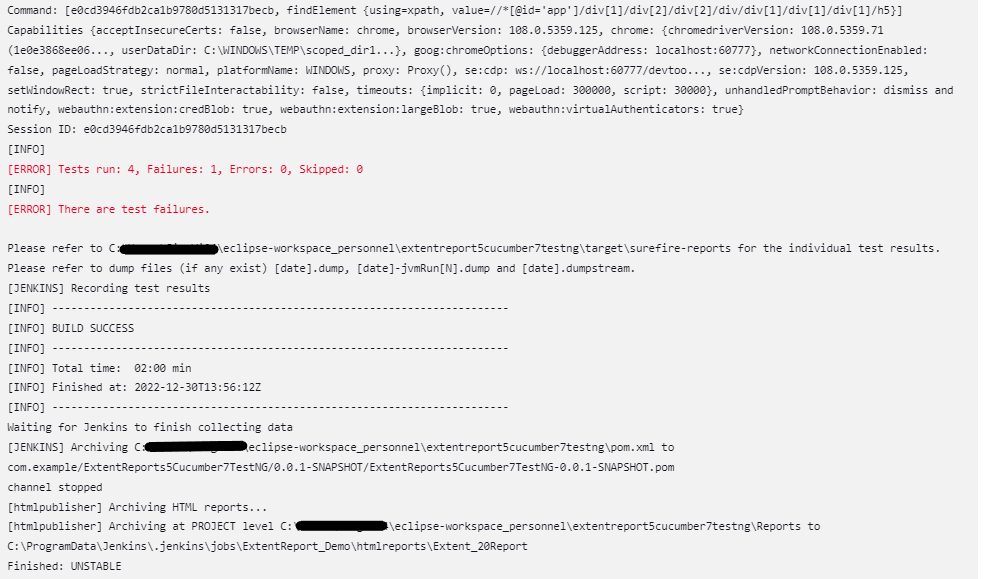
Click on Console Output to see the result.
Step 6: View the Extent Report
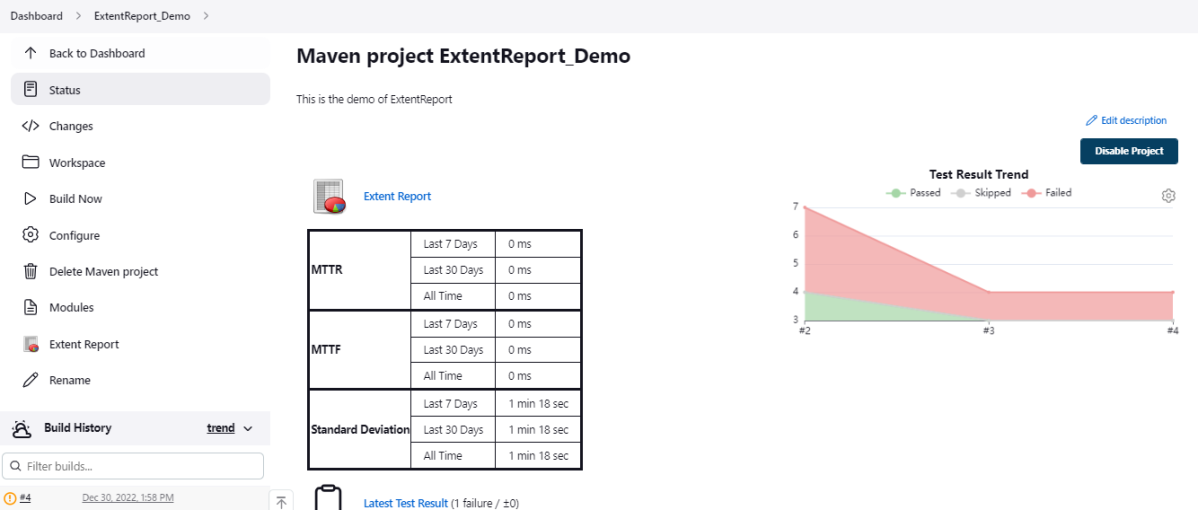
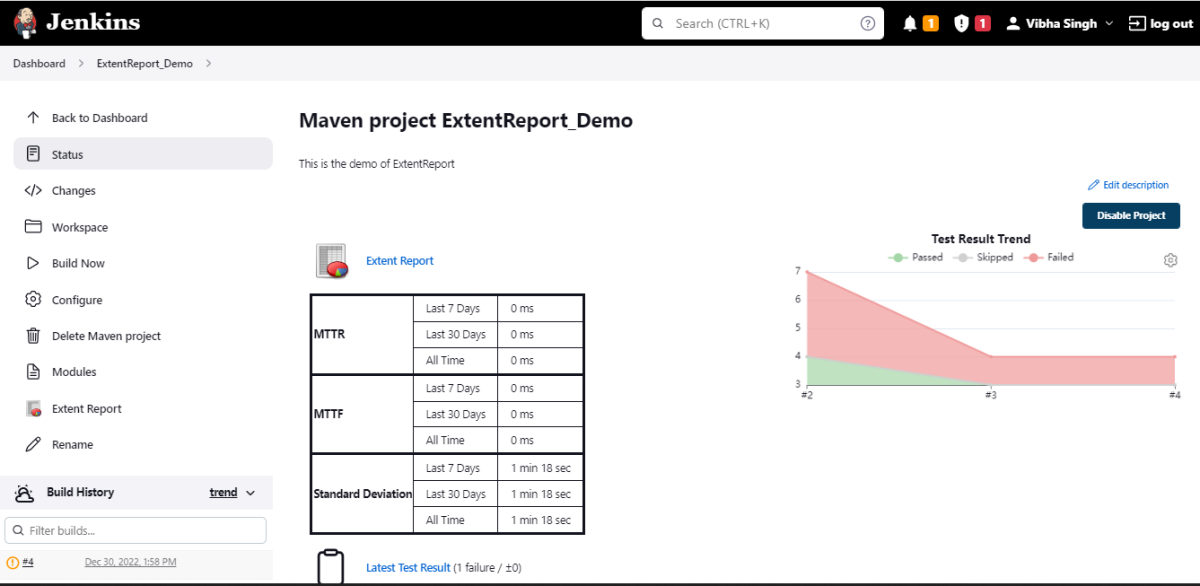
Once the execution is completed, click on go “Back to Project“, and we can see a link to view the “Extent Report“.
We can see here that the Extent Report link is displayed in the Console.
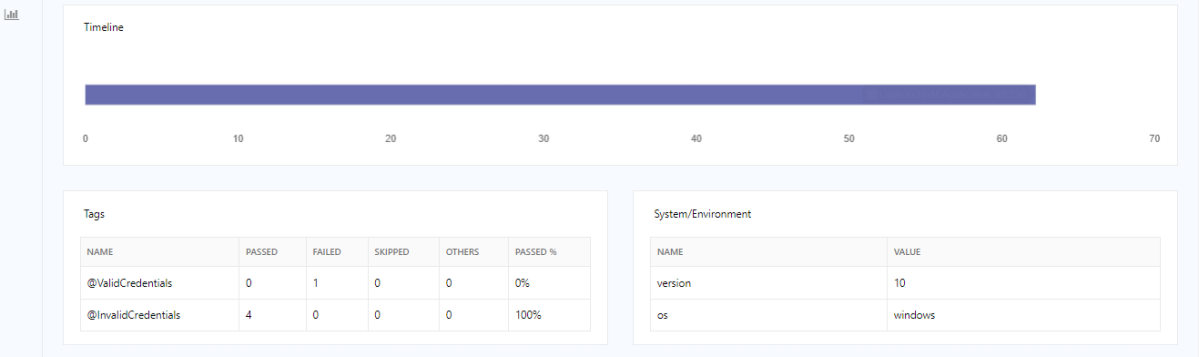
Below is the Extent Report generated in Jenkins.
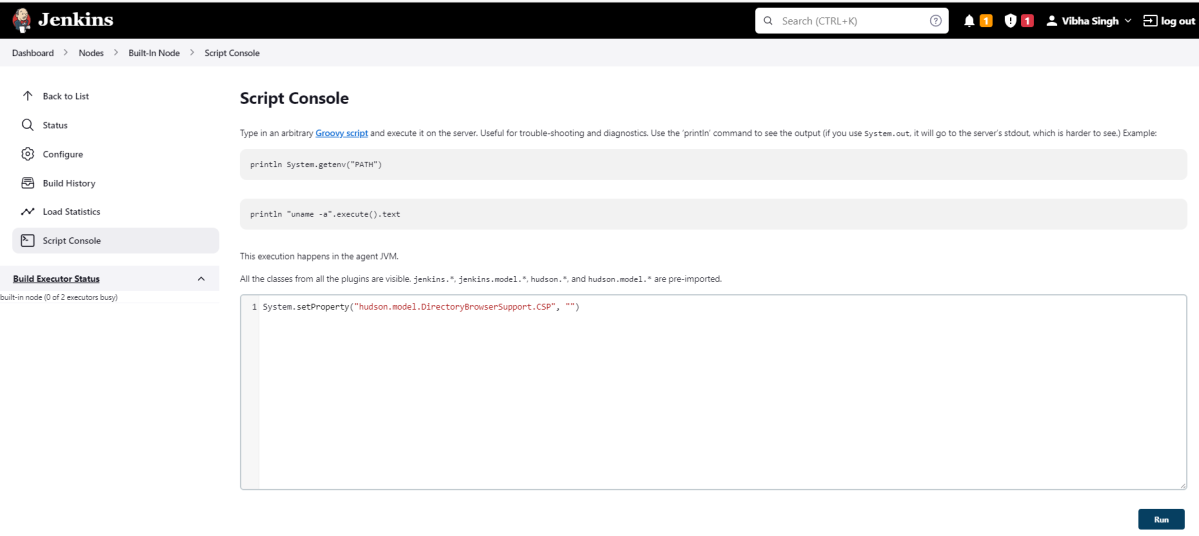
Tip: If you don’t see the Report UI intact, then you need to configure a simple Groovy script. For that, go to Dashboard–>Manage Jenkins–>Script Console and add the script as:
4. To generate a JUnit Report in Jenkins, we need to download the JUnit Plugin. Please refer to this tutorial to install the plugin – How to install Plugins in Jenkins
Implementation Steps
Step 1: Start the Jenkins server
Start the Jenkins server open the browser and navigate to the below endpoint
In the General section, enter the project description in the Description box.
Select a custom workspace and provide the full path of the project.
Select Source Code Management as None if the project is locally present on the machine
Step 3: Build Steps
In the Build Steps section, select Invoke top-level Maven targets.
The Build Steps window will extend. Mention the below details:-
Maven Version – MAVEN_HOME
Goals – clean test
Click on the Advanced button.
Step 4: Provide the full path to pom.xml
Specify the full path to pom.xml in POM.
Step 5: Select “Publish JUnit test result report” from “Post Build Actions”
Scroll down to “Post Build Actions” and click on the “Add Post Build Actions” drop-down list. Select “Publish JUnit test result report“.
Enter the Result Path as “**/target/surefire-reports/*.xml”.
Click on the Applyand Save buttons.
We have created a new Maven project “JUnitReport_Demo” with the configuration to run the Selenium with JUnit Tests and also to generate JUnit Report after execution using Jenkins.
Step 6: Execute the tests
Let’s execute it now by clicking on the “Build Now” button.
Right-click on Build Number (here in my case it is #2).
Click on Console Output to see the result.
Step 7: View the JUnit Report
Once the execution is completed, we could see a link to view the “Test Report“.
Below is the summary of the Test Execution.
This way, we could generate JUnit Report using Jenkins.
Congratulations on making it through this tutorial and hope you found it useful! Happy Learning!! Cheers!!
Provide username and password and click on Sign in.
Step 5: Download and Install Maven Plugin
Click on the Manage Jenkins.
Choose Manage Plugins.
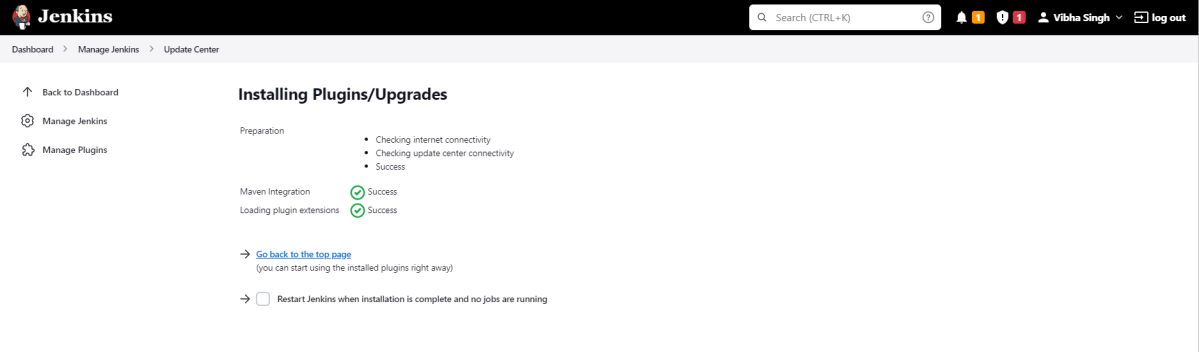
Step 6: Add the Maven Integration plugin
On the Plugins Page, go to the Available option
Select the Maven Integration Plugin
Click on Install without restart. The plugin will take a few moments to finish downloading depending on your internet connection, and will be installed automatically.
You can also select the option Download now and Install after the restartbutton. In which plugin is installed after the restart
You will be shown a “No updates available” message if you already have the Maven plugin installed.
The plugin “Maven Integration” has been installed successfully.
Step 7: Restart Jenkins
Click on the checkbox “Restart Jenkins when installation is complete when no jobs are running“.
The Jenkins is being restarted, It is about to restart.
Again, log in to Jenkins UI.
Step 8: Create a new project using the Maven project plugin
Give the Name of the project – SeleniumTestNG_MavenDemo.
Click on the Maven project.
Click on the OK button.
In the General section, enter the project description in the Description box.
Step 9: Build Management
Go to the Buildsection of the new job.
In the Root POMtextbox, enter the full path to pom.xml
In the Goals and options section, enter “clean test”
Click on the Apply and Savebuttons.
We have created a new Maven project “SeleniumTestNG_MavenDemo” with the configuration to run the Selenium with TestNG Tests
Step 10: Execute the tests
Click on the Build Now link. Maven will build the project. It will then have TestNG execute the test cases.
To see the current status of the execution, click on the “console output“.
Congratulations on making it through this tutorial and hope you found it useful! Happy Learning!! Cheers!!
Step 1 – Verify that the plugin is present in Available option in Plugin Manager
Login to Jenkins UI.
Provide a username and password and click on the Sign-in Button.
Click on the Manage Jenkins. Choose Manage Plugins.
On the Plugin Manager Page, go to the Available option and type Serenity or any plugin of your choice. Here we can see that Serenity is present in the Available option.
Step 2 – Go to Jenkins CLI
Click on the Manage Jenkins. Choose Jenkins CLI.
Step 3 – Download Jenkins CLI
Download jenkins-cli.jar from the Jenkins CLI page as shown in the image.
Step 4 – Run the Jenkins CLI command
Open Windows or PowerShell command line and go to the location where the jenkins-cli.jar file is placed on your machine.
In the previous tutorial, I discussed the Jenkins pipeline. This tutorial will discuss the steps to create the Jenkins pipeline for Selenium tests. This is an important step in CI/CD.
3. To generate a HTML Report in Jenkins, we need to download the HTML Publisher Plugin. Please refer to this tutorial to install the plugin – How to generate HTML Reports in Jenkins
Implementation Steps
Step 1: Create a new pipeline project
Give the Name of the project – Selenium_PipelineDemo.
Click on the pipeline project.
Click on the OK button.
In the General section, enter the project description in the Description box.
Step 2: Scroll down to Pipeline
From the Definition field, choose the “Pipeline script from SCM” option. This option instructs Jenkins to obtain your Pipeline from Source Control Management (SCM), which will be your locally cloned Git repository.
From the SCM field, choose Git.
The “Repositories” section contains the “Repository URL” and “Credentials“.
In the Repository URL field, specify the directory path of the GitLab/GitHub project.
In the Credentials field, specify the username and password needed to log in to GitLab/GitHub.
In this case, I have the project present in GitLab and using it.
Step 3: Create Jenkinsfile
Create and save a new text file with the name Jenkinsfile at the root of the project in the GitLab repository. Here, we are using the Selenium project with TestNG. To learn more about the Integration of Selenium with TestNG, please refer to this tutorial – Integration of Selenium and TestNG.
For this tutorial, we are using Declarative syntax. The sample example is given below:
Here, I have used emailable-report.html, you can also use index.html and that report will be published.
pipeline {
    agent any

    stages {
        stage('Test') {
            steps {
                bat "mvn -D clean test"
            }

            post {
                // If Maven was able to run the tests, even if some of the test
                // failed, record the test results and archive the jar file.
                success {
                   publishHTML([
                       allowMissing: false,
                       alwaysLinkToLastBuild: false,
                       keepAll: false,
                       reportDir: 'target/surefire-reports/',
                       reportFiles: 'emailable-report.html',
                       reportName: 'HTML Report',
                       reportTitles: '',
                       useWrapperFileDirectly: true])
                }
            }
        }
    }
}
Step 4: Specify branches to build a section under Repositories
Branch Specifier – */master (This is my main branch)
ScriptPath – Jenkinsfile
Click on the Apply and Save buttons.
We have created a new Maven project “Selenium_PipelineDemo” with the configuration to run the Selenium Test with TestNG.
Step 5: Execute the tests
Let’s execute it now by clicking on the “Build Now” button.
Right-click on Build Number (here in my case it is #11) and click on Console Output to see the result.
Below is the test execution summary.
Step 6: Pipeline Steps
Once the execution is completed, and we want to see the Pipeline Steps, click on the Pipeline Steps mentioned on the left side of the page.
Step 7: View the Report
Once the execution is completed, go back to “Selenium_PipelineDemo”. We can see below that the HTML Report is generated.
We could see a link to view ‘HTML Reports’. Click on the HTML Reports. It displays the emailable-report.html Report.
Tip: If you don’t see the Report UI intact, then you need to configure a simple groovy script. For that, go to Dashboard–>Manage Jenkins–>Script Console and add the script as:
Jenkin’s installed and started on the computer. The current Jenkins version is – 2.361.2
Implementation Steps
To generate HTML Report in Jenkins, we need to download HTML Publisher Plugin. Please refer to this tutorial to install the plugin – How to install Plugins in Jenkins.
Step 1: Create a new Maven project
Give the Name of the project – HTMLReport_Demo
Click on the Maven project.
Click on the OK button.
In the General section, enter the project description in the Description box.
Select Source Code Management as None if the project is locally present on the machine.
Step 2: Build Management
Go to the Build section of the new job.
In the Root POM textbox, enter the full path to pom.xml
In the Goals and Options section, enter “clean test site“
Here, I have used the Selenium project with JUnit, so to see the complete project, please refer to this tutorial – How to generate JUnit4 Report.
Click on the Advanced button.
Step 3: Select a custom workspace
Mention the full path of the project in the directory.
Step 4: Select “Publish HTML reports” from “Post Build Actions”
Scroll down to “Post Build Actions” and click on the “Add Post Build Actions” drop-down list. Select “Publish HTML reports“.
If you want to see where the report is saved in Jenkins, go to the Dashboard ->HTMLReport_Demo project -> Workspace ->target -> site -> surefire-report.html.
Enter the below details to publish HTML reports
HTML directory to archive – target/site/
Index page[s] – surefire-report.html
Report title – HTML Report
Click on the Apply and Save buttons.
We have created a new Maven project “HTMLReport_Demo” with the configuration to run the Selenium with JUnit4 Tests and also to generate HTML Report after execution using Jenkins.
Step 5: Execute the tests
Let’s execute it now by clicking on the “Build Now” button.
Right-click on Build Number (here in my case it is #2).
Click on Console Output to see the result.
Step 6: View the HTML Report
Once the execution is completed, click on go “Back to Project“, and we can see a link to view the “HTML Report“.
We can see here that the HTML Report link is displayed in the Console.
Below is the HTML Report generated in Jenkins.
We can see that the HTML Report does not look very pretty. The reason is that CSS is stripped out because of the Content Security Policy in Jenkins.
We can customize the Content Security Policy in Jenkins. But keep in mind that it should be done after checking with the Security team in your organization. This is a workaround solution. I can’t emphasize enough that this is not a standard practice.
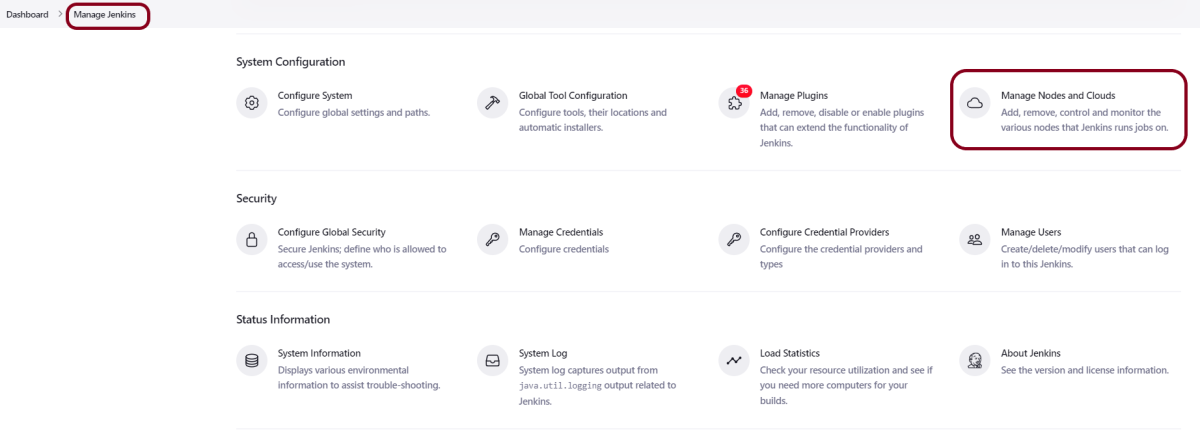
Go to Manage Jenkins -> Manage Nodes and Clouds.
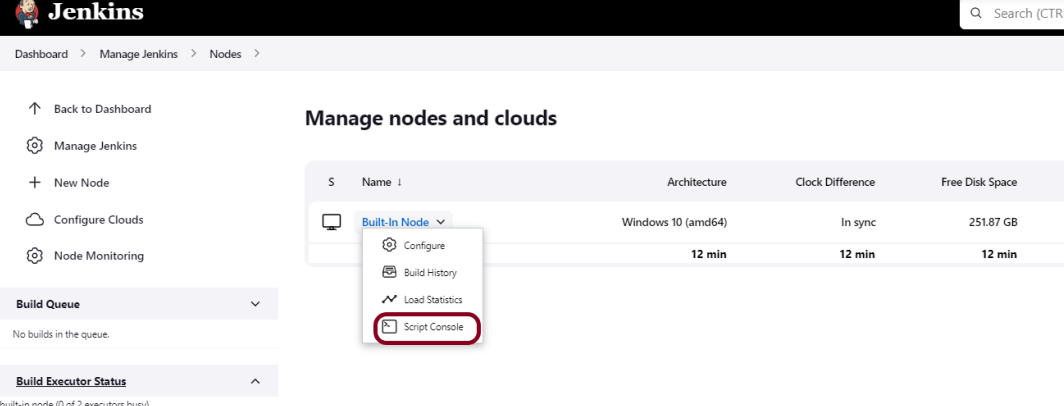
Click on the Script Console option.
Type in the following command and Press Run. If you see the output as ‘Result:’ then the protection is disabled. Re-run your build and you can see that the new HTML files archived will have the CSS enabled.
Let’s first have a look at the Jenkins task scheduling setup. You don’t need to be familiar with Linux’s command line environment to understand it, but it resembles the cron syntax quite a bit.
Five fields that are separated by whitespace make up a scheduling item. By adding more than one entry, you can schedule a job for more than one time.
Minute
Hour
Day of Month
Month
Day of week
MINUTE (0-59), HOUR (0-23), DAY (1-31), MONTH (1-12), DAY OF THE WEEK (0-6)
Each field can contain an exact value or use a set of special expressions:
The asterisk * indicates all valid values. So, a job that runs every day has a * in the third field.
A dash separates ranges of values. For example, a job that runs every hour from 9:00 a.m. to 5:00 p.m. would have 9-17 in the second field.
Intervals are specified with a slash /. A job that runs every 15 minutes has H/15 in the first field. Note that the H in the first field has a special meaning. If you wanted a job to run every 15 minutes, you could configure it as 0/15, which would make it run at the start of every hour. However, if you configure too many jobs this way, you can overload your Jenkins controller. Ultimately, the H tells Jenkins to pick a minute based on a hash of the job name.
Finally, you can specify multiple values with a comma. So, a job that runs Monday, Wednesday, and Friday would have 1,3,5 in the fifth field.
Here are the several special predefined values that can be used to substitute the expressions in Jenkins cron.
Entry
Description
Description
@yearly
Run at any time during the year
H H H H *
@annually
Run at any time during the year
H H H H *
@monthly
Run at any time during the month
H H H * *
@weekly
Run at any time during the week
H H * * H
@daily
Run at any time during the day
H H * * *
@hourly
Run at any time during the hour
H * * * *
Here are the most common examples of cron job schedules that can be found in almost any crontab on Linux (use H in the examples below to spread the load evenly in Jenkins):
Schedule
Job
* * * * *
Run cron job every minute
H/5 * * * *
Run cron job every 5 minutes
H/30 * * * *
Run cron job every 30 minutes
0 * * * *
Run cron job every hour
0 H/3 * * *
Run cron job every 3 hours
0 13 * * *
Run cron job every day at 1pm
30 2 * * *
Run cron job every day at 2:30 am
0 0 * * *
Run cron job every day at midnight
0 0 * * 0
Run cron job every Sunday
0 0 * * 1
Run cron job every Monday
0 0 1 * *
Run cron job every first day of every month
0 0 1 1 *
Run cron job every first of January every year
Add a Schedule to a Jenkins Job
Step 1: Create a new project using the Maven project plugin
In the General section, enter the project description in the Description box.
Step 2: Go to the Build section of the new job
In the Root POM textbox, enter the full path to pom.xml
In the Goals and options section, enter “clean test”
Click on the Applyand Save buttons.
Step 3: Go to the Build Triggers
Select the Build periodically option and mention the schedule.
This will open the scheduling text area.
H/5 * * * *
This schedule means that the job will run every 5 minutes.
Click on the Apply and Save buttons.
Step 4: Verify the Build History
Here is a screenshot of a couple of builds on our system. The timestamps show that you’ve scheduled a job to run every five minutes.
Below is the Build History.
In this post, we covered Jenkin’s job scheduling abilities, and we covered how to configure jobs for different intervals.
The previous tutorial has explained how to install it onto a Windows 10 system and create a Maven orGradle project in Jenkins. Jenkins and GitHub are two powerful tools on their own, but what about using them together? In this tutorial, learn about the benefits of a Jenkins GitHub integration and how to set up the integration on your own.
GitHub is a web-based version control system and collaboration platform for developers. It is the center around which all things involving git revolve. GitHub allows software developers and engineers to create remote, public-facing repositories on the cloud for free. Once you’ve set up a repository on GitHub, you can copy it to your device, add and modify files locally, then “push” your changes back to the repository where your changes display for the public.
What is Jenkins?
Jenkins is a well-known open-source tool that aids in the implementation of Continuous Integration (CI) and Continuous Deployment/Continuous Delivery (CD) processes by automating parts of the software development pipeline such as building, testing, and deployment.
Jenkins Version Used – 2.361.2
In this version of Jenkins, Git Plugin is already installed. If the Git Plugin is not installed, then follow the below steps to add Git Plugin in Jenkins.
Step 1: Open your dashboard
Click on the Manage Jenkins button on your Jenkins dashboard:
Step 2: Select Manage Plugins
Click on the Manage Jenkins. Choose Manage Plugins.
Step 3: Add Git Plugin
On the Plugins Page, go to the Available option.
Select the GIT Plugin
Click on Install without restart.The plugin will take a few moments to finish downloading depending on your internet connection, and will be installed automatically.
You can also select the option Download now and Install after the restart button. In which plugin is installed after the restart
You will be shown a “No updates available” message if you already have the Git plugin installed.
In my case, Git Plugin is already installed, so you can’t see it in the Available Plugin.
Step 4: Verify Git Plugin is installed
Once the plugins have been installed, Go to Manage Jenkinson your Jenkins dashboard. You will see your plugins listed among the rest.
How to Integrate Jenkins With GitHub
Step 1: Create a new project using the Maven project plugin
Give the Name of the project.
Click on the Maven project.
Click on the OK button.
In the General section, enter the project description in the Description box.
Click on create new jobs.
Enter the item name, select the job type, and click OK. We shall create a Maven project as an example.
Step 2: Describe the project in the description section
In the General section, enter the project description in the Description box.
Step 3 – Source Code Management section
You will see a Git option under Source Code Managementif your Git plugin has been installed in Jenkins.
Enter the Git repository URL to pull the code from GitHub. Enter the credentials to log in to GitHub.
I have already set up the credentials to log in to GitHub. For first-time users, click on the Add button and select Jenkins.
Add the username and password used to log in to GitHub. Click on the “Add” button.
Note:- Please make sure that Git is installed on your local machine. To install Git on your local machine, go to this tutorial –How to install Git on Windows 10.
Step 4: Build Management
Go to the Build section of the new job.
In the Root POM textbox, enter pom.xml
In the Goals and Options section, enter “clean test“
Step 5: Select “Publish TestNG Results” from “Post Build Actions”
Scroll down to “Post Build Actions” and click on the “Add Post Build Actions” drop-down list. Select “Publish TestNG Results“. In my case, the project is set up to generate TestNG Report, so I have selected TestNG. But if your project uses any other reporting option, please select that from the dropdown.
Enter TestNG XML Report Pattern as “**target/surefire-reports/testng-results.xml” and click on the “Apply” and “Save” button.
We have created a new project “GitHub_Demo” with the configuration to run TestNG Tests and also to generate TestNG Reports after execution using Jenkins.
Step 6: Execute the tests
Let’s execute it now by clicking on the “Build Now” button.
Right-click on Build Number (here in my case it is #1) and click on Console Output to see the result.
Below is the screenshot of the Console Output. It displays all the information regarding the execution of the tests.
Step 7: View the TestNG Report
Once the execution is completed, we could see a link to view “TestNG Results“.
Click on the TestNG Results. It displays the summary of the tests.
This way, we could integrate GitHub in Jenkins.
Congratulations on making it through this tutorial and hope you found it useful! Happy Learning!! Cheers!!
Jenkin’s installed and started on the computer. The current Jenkins version is – 2.361.2
Implementation Steps
To generate HTML Report in Jenkins, we need to download HTML Publisher Plugin. Please refer to this tutorial to install the plugin – How to install Plugins in Jenkins.
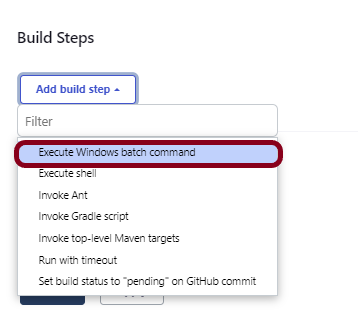
Step 1: Create a new FreeStyle project
Give the Name of the project – RobotFramework_Demo
Click on the Maven project.
Click on the OK button.
In the General section, enter the project description in the Description box.
Step 2: Select a custom workspace
Mention the full path of the project in the Use custom workspace.
Select Source Code Management as None if the project is locally present on the machine.
We can customize Content Security Policy in Jenkins. But keep in mind that it should be done after checking with the Security team in your organization. This is a workaround solution. I can’t emphasize enough that this is not a standard practice.
Go to Manage Jenkins -> Manage Nodes and Clouds.
Click on the Script Console option.
Type in the following command and Press Run. If you see the output as ‘Result:’ then the protection is disabled. Re-Run your build and you can see that the new HTML files archived will have the CSS enabled.