Git is a Distributed Version Control System (VCS)which is originally developed in 2005 by Linus Torvalds (Creator of Linux) and is open source, i.e. freely available to use. It is the most popular and most used version control tool right now. A staggering number of software projects rely on Git for version control, including commercial projects as well as open source.
In this tutorial, we will change the remote repository URL of a project.
Imagine we have our project repository codebase in a specific hosting provider like GitLab. Our management has decided to migrate to another hosting provider like GitHub. In that case, we need to change the remote repository URL.
Steps to Follow:
1. Navigate to the local repository directory where you want to update the remote URL.
2. Open your terminal or command prompt.
3. Use the following command to view the current remote URLs associated with your repository:
git remote -v
4. Identify the name of the remote repository for which you want to change the URL (e.g., origin). Here, I want to push the code to GitHub. So, will change the URL to GitHub one.
5. To change the URL, use the “git remote set-url” command followed by: – The name of the remote repository. – The new URL that you want to set.
GitHub serves as a collaborative platform that supports version control, code collaboration, automated testing, and issue tracking, all of which are crucial elements in the software testing process. It promotes transparency, collaboration, and efficiency in the development and testing workflows.
CI/CD pipelines have contributed to the success of the DevOps cycle in all software development projects. This is a holistic process that bridges development and operations. Continuous integration helps development teams deploy code efficiently, and continuous delivery automates code deployment.
Implementation Steps
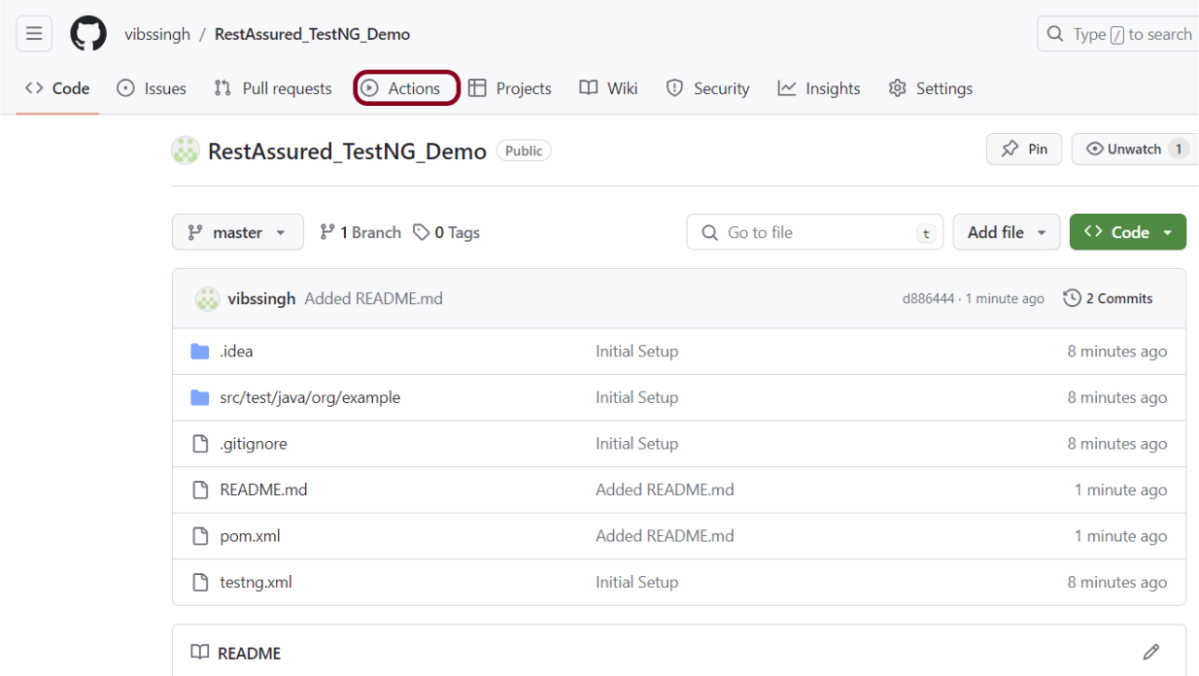
Step 1 – Create GitHub Actions and Workflows
I have a repository available in GitHub – RestAssured_TestNG_Demo as shown in the below image. Go to the “Actions” tab. Click on the “Actions” tab.
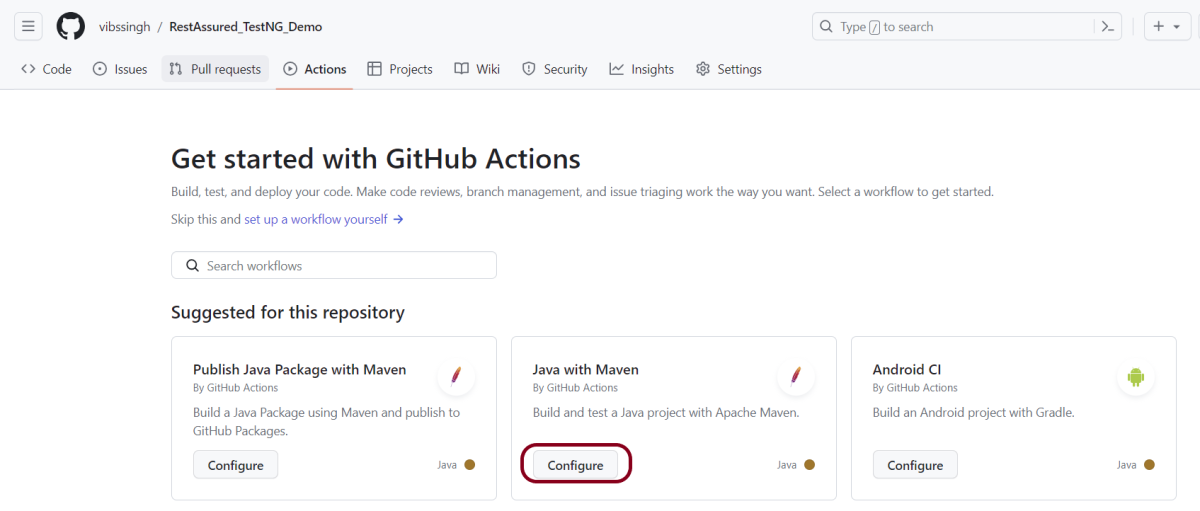
Step 2 – Select the type of Actions
You will see that GitHub recommends Actions depending on the project. In our case, it is recommending actions suitable for a Java project. I have selected the “Java with Maven” option as my project is built in Maven.
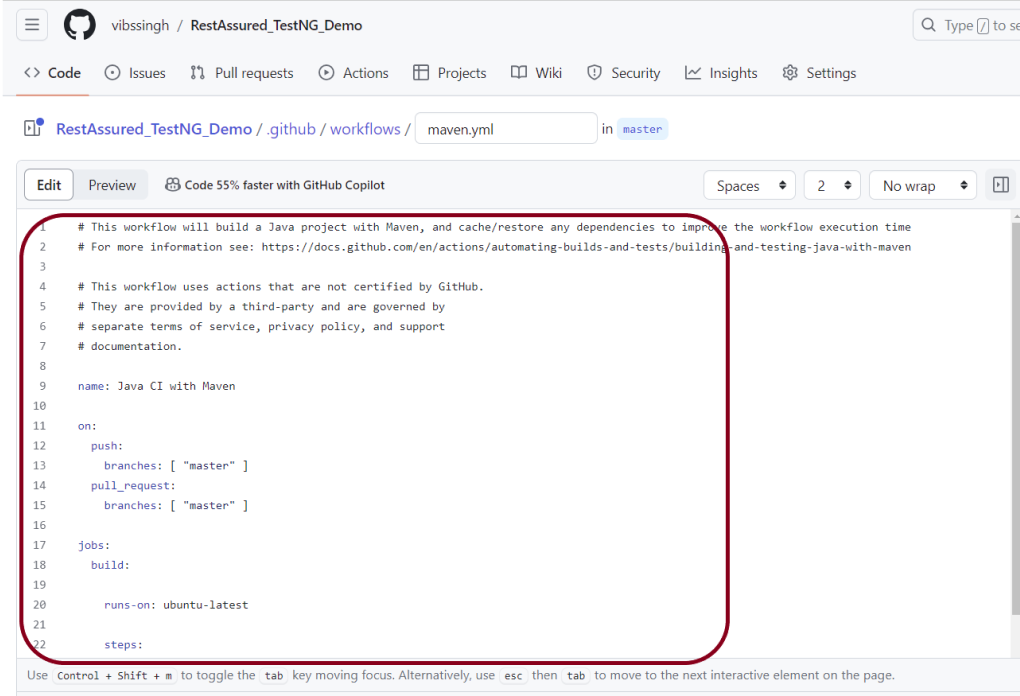
Step 3 – Generation of Sample pipeline
If you choose an existing option, it will automatically generate a .yaml for the project as shown below.
We will replace the current workflow with the following yml file as shown below:
name: Rest API Tests using Rest Assured with TestNG

on:
  push:
    branches: [ "main" ]
  pull_request:
    branches: [ "main" ]

jobs:
  build:

    runs-on: ubuntu-latest

    steps:
    - uses: actions/checkout@v4
    - name: Set up JDK 17
      uses: actions/setup-java@v4
      with:
        java-version: '17'
        distribution: 'temurin'
        cache: maven

    - name: Test Execution
      run: mvn clean test

    - name: Test Report Generation
      uses: actions/upload-artifact@v4
      if: success() || failure()
      with:
          name: TestNG Report                 # Name of the folder
          path: target/surefire-reports/      # Path to test results
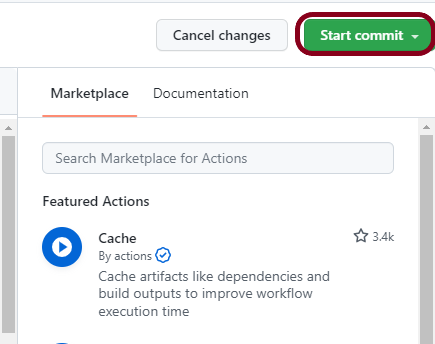
Step 4 – Commit the changes
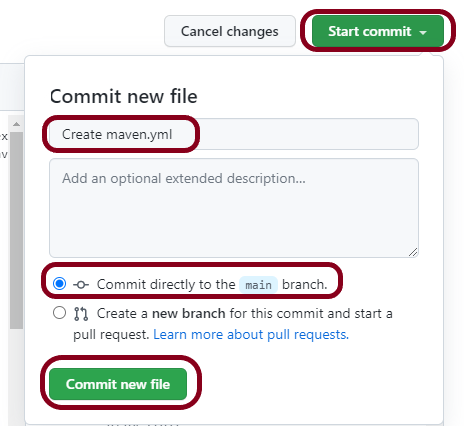
After the changes, hit the “Start Commit” button.
This will give the option to add a description for the commit. It will also enable the user to commit either to the main branch or commit to any other branch that exists in the project. Click on the “Commit new file” button to set up the workflow file.
It will create a maven.yml file as shown below in the project.
Step 5 – Verify that the workflow is running
Next, head over to the “Actions” tab, and you will see your YAML workflow file present under the tab. The yellow sign represents that the job is in the queue.
In Progress – When the job starts building and running, you will see the status change from “Queued” to “in progress”.
Passed – If the build is successful, you will see a green tick mark.
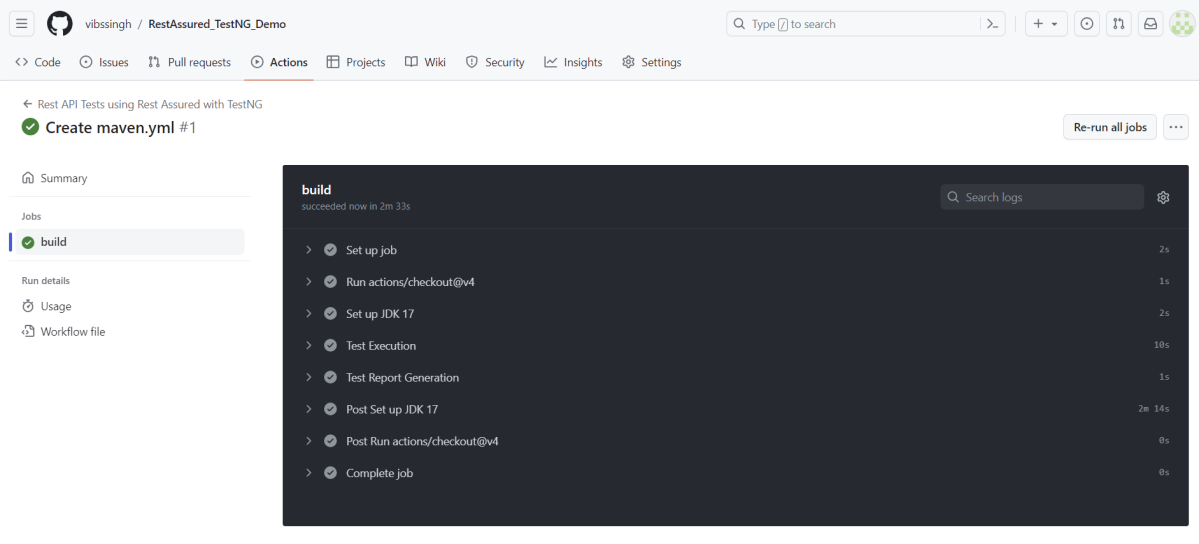
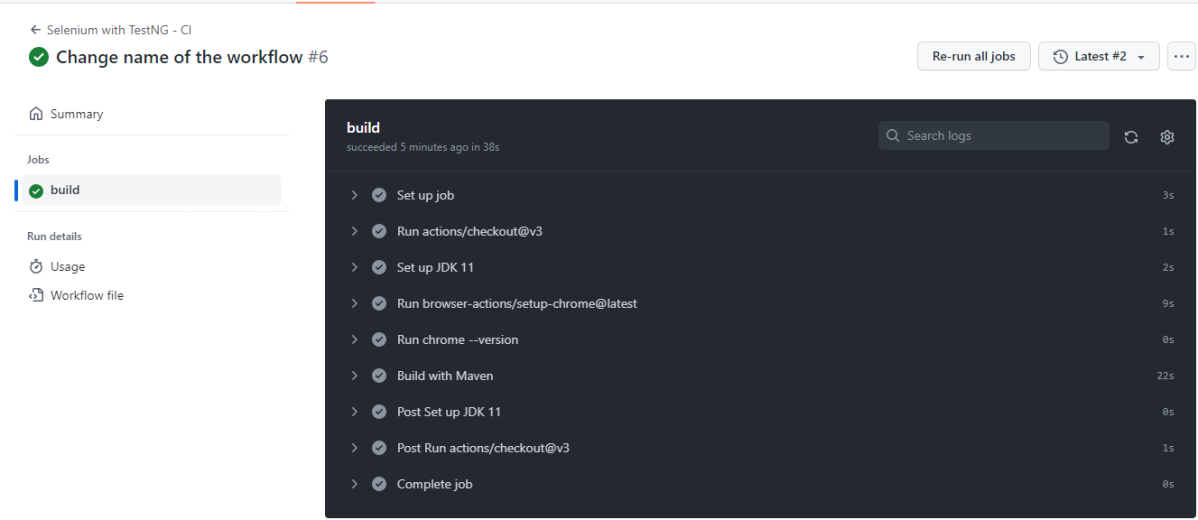
Below is the execution log.
Click on the workflow and the below screen is displayed. It shows the status of the run of the workflow, the total time taken to run the workflow, and the name of the .yml file.
Below shows all the steps of the workflow.
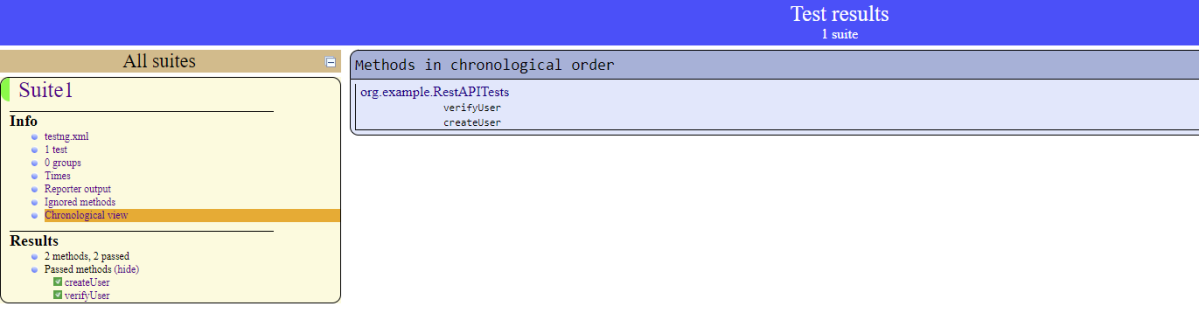
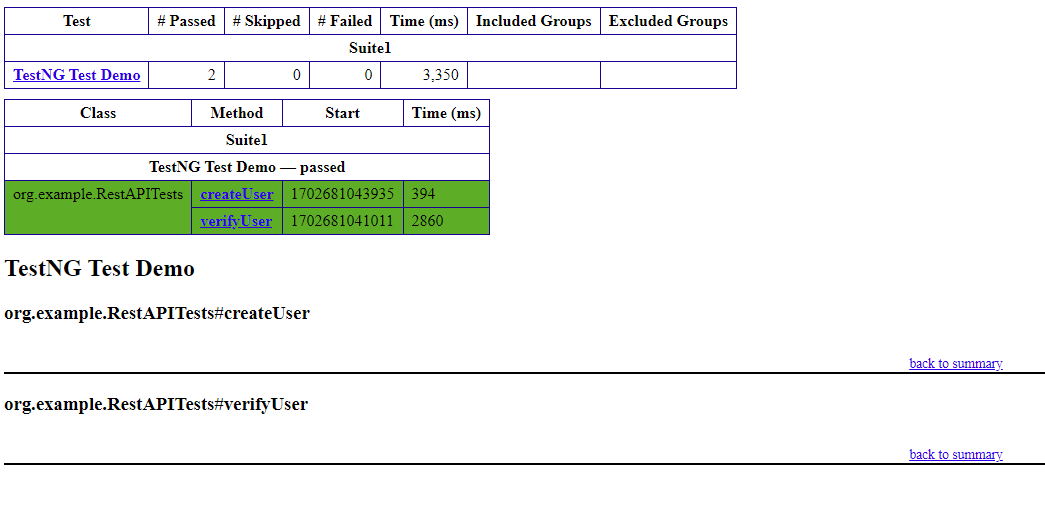
Step 6 – Published TestNG Report on GitHub
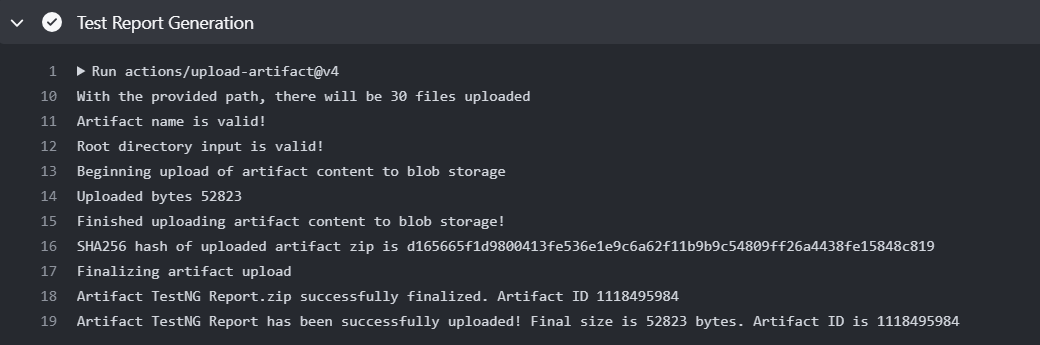
From the logs of the Workflow, you can see that the Test Report step was executed successfully.
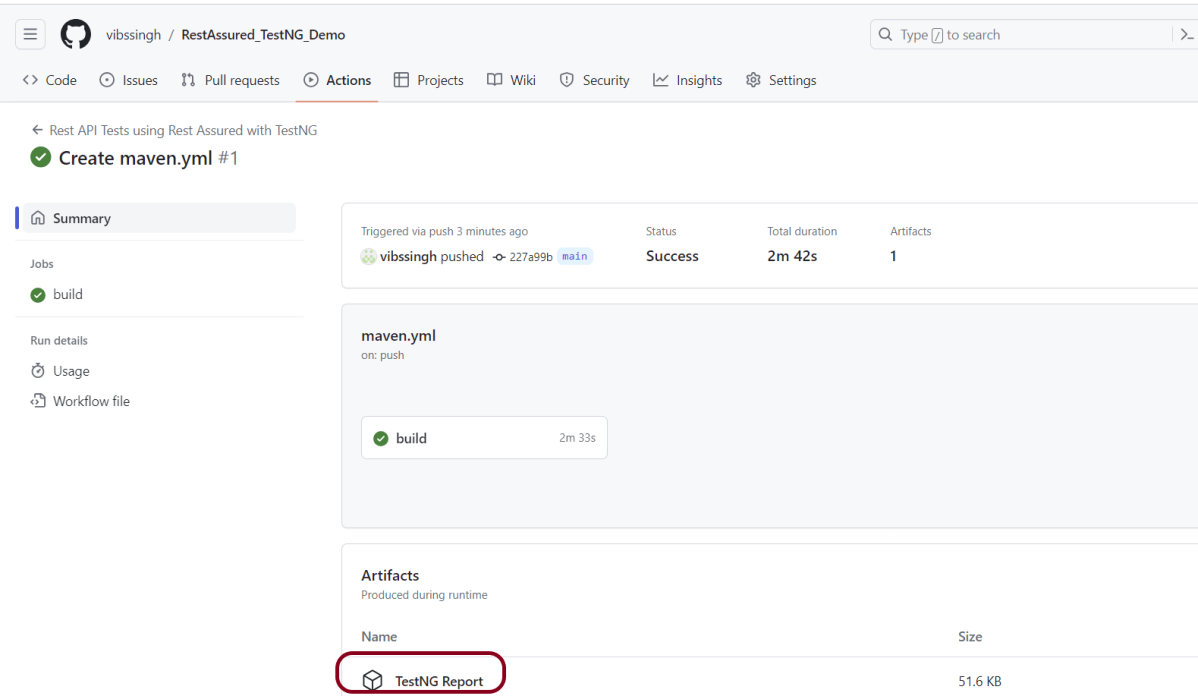
Once the pipeline run, a TestNG Report folder will be generated as shown in the below image:
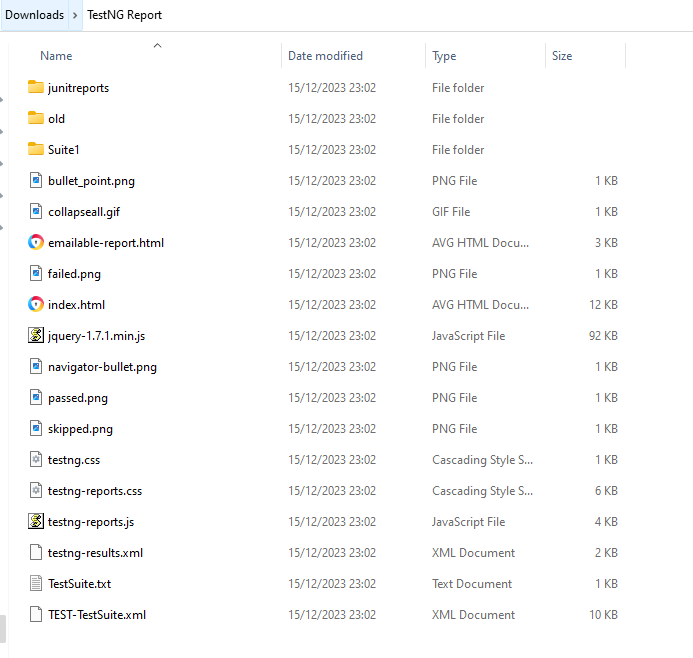
When we click on the folder TestNG Report, a zipped file will be downloaded, and we can extract it to see all the files contained within it.
The flexible aspects of Selenium WebDrivers and GitHub Actions enable users to create powerful, fast, and efficient automated testing workflows in CI/CD environments.
CI/CD pipelines have contributed to the success of the DevOps cycle in all software development projects. This is a holistic process that bridges development and operations. Continuous integration helps development teams deploy code efficiently, and continuous delivery automates code deployment.
Important points
1. The Serenity Web tests need to run in the headless mode. As we are using Chrome browser, use the below code in the serenity.config:
headless.mode = true
2. Install Chrome browser in ubuntu. Use the below code:
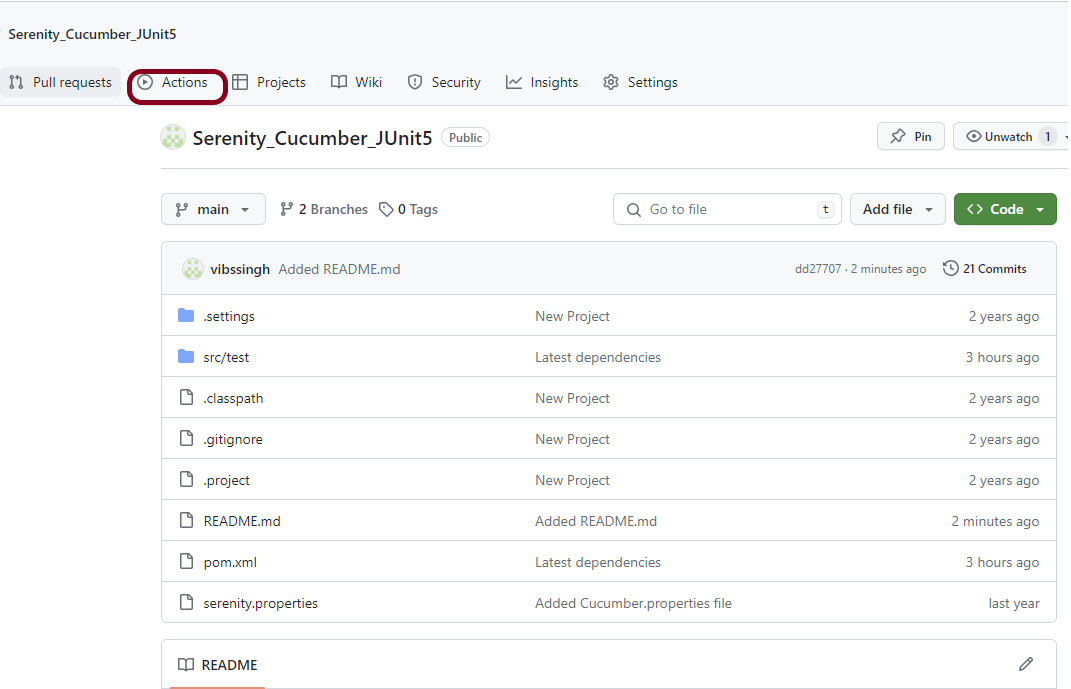
I have a repository available in GitHub – Serenity_Cucumber-JUnit5 as shown in the below image. Go to the “Actions” tab. Click on the “Actions” tab.
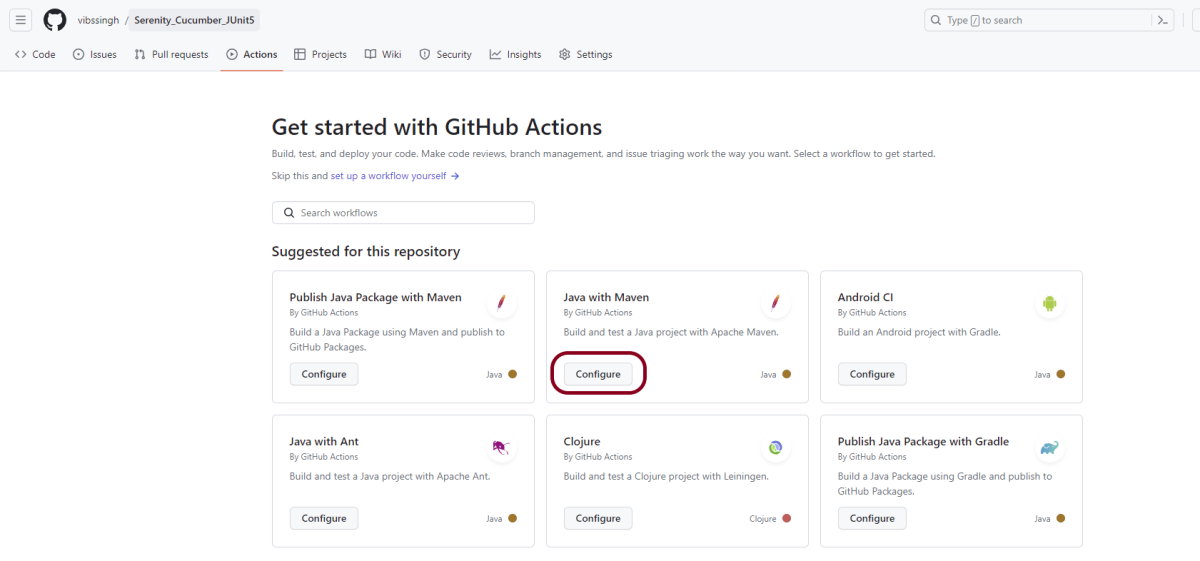
Step 2 – Select the type of Actions
You will see that GitHub recommends Actions depending on the project. In our case, it is recommending actions suitable for a Java project. I have selected the “Java with Maven” option as my project is built in Maven.
Step 3 – Generation of Sample pipeline
If you choose an existing option, it will automatically generate a .yaml for the project as shown below.
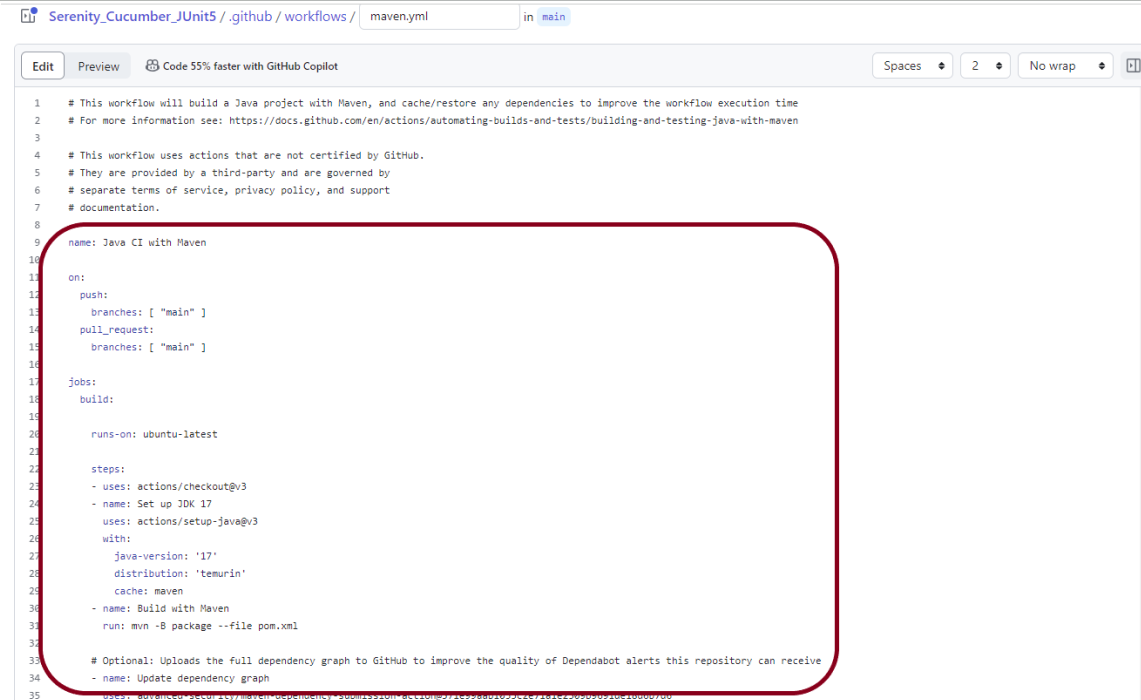
We will replace the current workflow with the following yml file as shown below:
name: Serenity Tests in GitHub
on:
push:
branches: [ "main" ]
pull_request:
branches: [ "main" ]
jobs:
build:
runs-on: ubuntu-latest
steps:
- uses: actions/checkout@v4
- name: Set up JDK 17
uses: actions/setup-java@v4
with:
java-version: '17'
distribution: 'temurin'
cache: maven
    - uses: browser-actions/setup-chrome@latest
    - run: chrome --version
- name: Build with Maven
run: mvn clean verify
- name: Test Report Generation
uses: actions/upload-artifact@v4
if: success() || failure()
with:
name: Serenity Report # Name of the folder
path: target/site/serenity/ # Path to test results
Step 4 – Commit the changes
After the changes, hit the “Start Commit” button.
This will give the option to add a description for the commit. It will also enable the user to commit either to the main branch or commit to any other branch that exists in the project. Click on the “Commit new file” button to set up the workflow file.
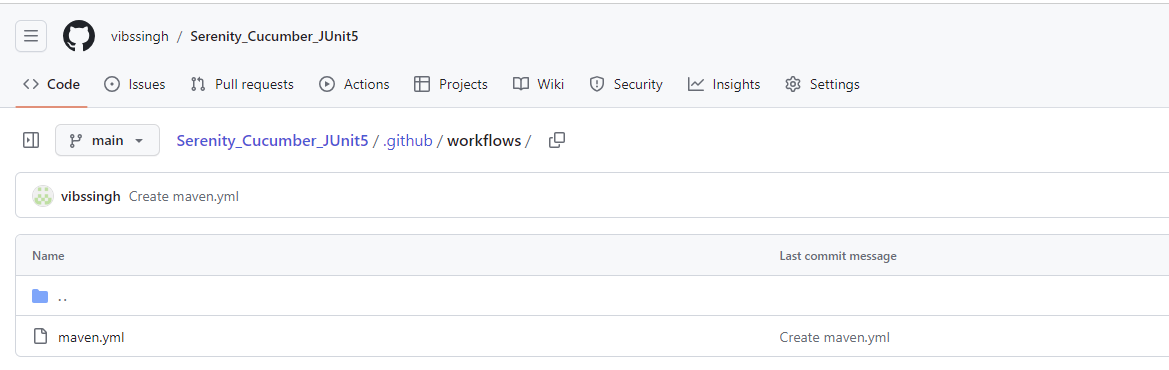
It will create a maven.yml file as shown below in the project.
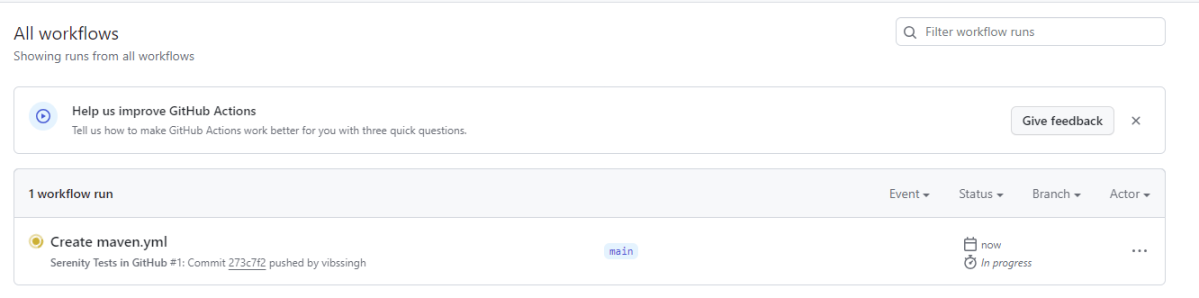
Step 5 – Verify that the workflow is running
Next, head over to the “Actions” tab, and you will see your YAML workflow file present under the tab. The yellow sign represents that the job is in the queue.
In Progress – When the job starts building and running, you will see the status change from “Queued” to “in progress”.
Passed – If the build is successful, you will see a green tick mark.
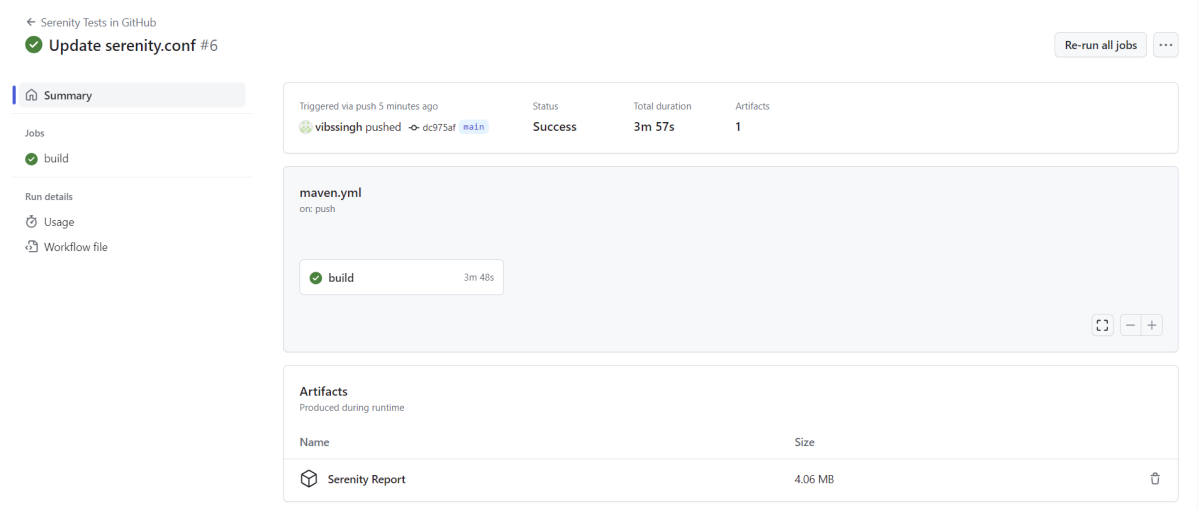
Click on the workflow and the below screen is displayed. It shows the status of the run of the workflow, the total time taken to run the workflow, and the name of the .yml file.
Below shows all the steps of the workflow.
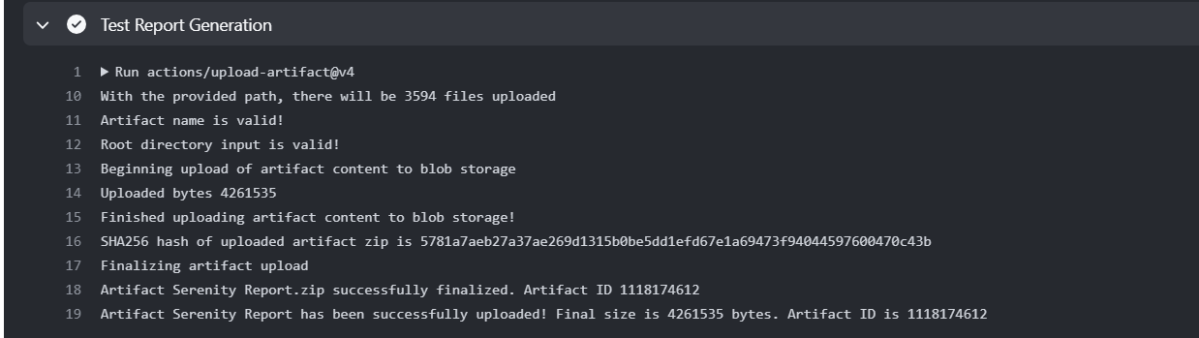
Step 6 – Published Serenity Report on GitHub
From the logs of the Workflow, you can see that the Test Report step was executed successfully.
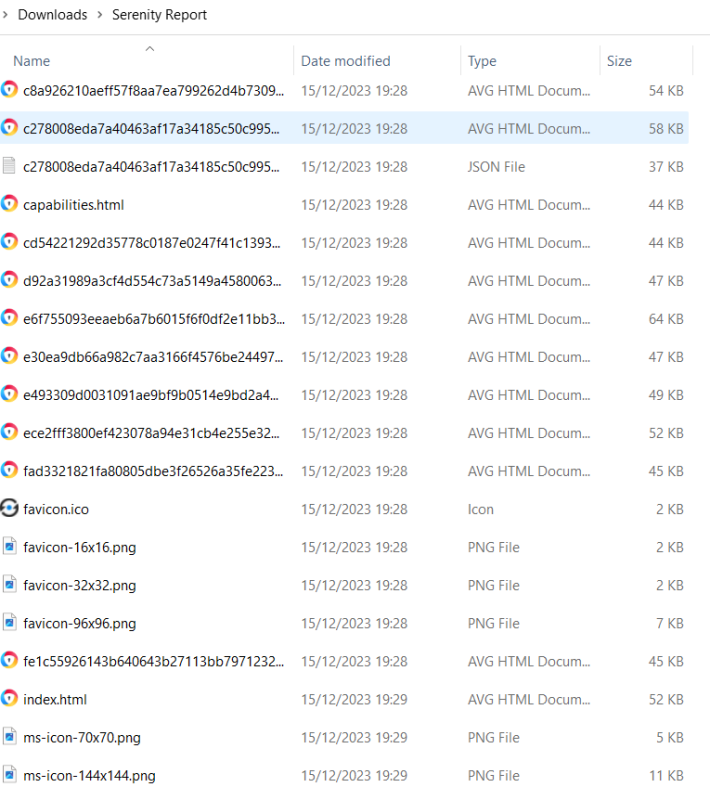
Once the pipeline run, a Serenity Report folder will be generated as shown in the below image:
When we click on the folder Serenity Report, a zipped file will be downloaded, and we can extract it to see all the files contained within it.
Open the folder and we will see all the files including index.html and others.
git stash temporarily stashes or shelves the changes made in the working copy so that we can work on something else and later apply these changes.
Imagine a situation where you are working on updating a feature, but suddenly there is a production bug in the existing functionality of the feature that needs to be fixed immediately. So, we need to switch to a bug fix and leave working on the update work. As the update work is not completed, we can stash these changes and work on the bug fix. Later, we can re-apply our stashed changes back to the code.
The git stash command can stash the uncommitted changes (both staged and unstaged), save them away for later use, and then revert them from your working copy.
How to reapply stashed changes?
To re-apply the stashed changes, use this command
git stash pop
This command removes the changes from your stash and reapplies them to your working copy.
Alternatively, you can reapply the changes to your working copy and keep them in your stash with :
git stash apply
Stashing untracked or ignored files
If a new file is created and not staged, then git stash is not going to stash that file.
Adding the -u option (or –include-untracked) tells git stash to also stash your untracked files:
git stash -u
Congratulation!! We have learned about stash in GIT.
GitLab is a single application that spans the entire software development lifecycle. GitLab is an open-source project maintained by GitLab Inc with over 3,000 contributors. We can install and self-manage the GitLab Community Edition which is fully open-source under an MIT license. GitLab also provides an Enterprise Edition that has additional features built upon the open-source edition.
GitLab’s application offers functionality to collaboratively plan, build, secure, and deploy software as a complete DevOps Platform.
Create an empty repo in GitLab:
Step 1– Login to GitLab using your username and password.
Step 2– In the dashboard, click the blue New project button. This opens the New project page.
Step 3 – SelectCreate a blank project.
Step 4– A new page will open. Provide the following information on that page:
1.Project Name – Mention the name of your project in the Project name field – GitTest.
2.Project slug – When a name is added, the Project slug auto-populates. This is the URL path for your project that the GitLab instance uses.
3. Project description (optional) – This field enables you to enter a description for your project’s dashboard, which helps others understand what your project is about.
4. Visibility Level – Select the appropriate Visibility Level for your project. I have selected private option.
5. I’m not checking ReadMe option as I already have a ReadMe file in my project.
Select the Create Projectbutton.
We can see that a new empty project is created in the GitLab as shown below.
Step 5– For every remote repo, you will get a unique URL as highlighted below. This URL is used to push the local changes to this remote repo. Type the below command in GitBash:
Now run the Git push command as shown above. It will ask for your GitLab credentials in a new window as shown below. Please provide the username and password used to log in to GitLab.
Now we can see we have successfully pushed the local changes to the remote repository. Let’s go to GitLab and verify the latest changes. All the files fromthe local GIT Repositoryare moved to GitLab Remote Repository.
I hope this tutorial has helped you to set up a new project in GitLab and push the local changes to GIT Remote Repository.
GitLab automatically enables CI/CD pipelines for new projects. It’s just a matter of adding a new configuration file called .gitlab-ci.yml to your code repository with instructions for GitLab on what to run. So simply create the following basic workflow in your main repository directory and commit it:
By default, GitLab will have CI/CD pipelines and Auto DevOps enabled for all projects. What this means is that, when you push code to the repository, GitLab will automatically trigger the pipeline.
Step 3 – Create a .gitlab-ci.yml file in the project in GitLab
There are many ways to create a new file in GitLab. One of the ways is to create a file as shown in the below image. I have already created .gitlab-ci.yml in the project, which can be seen in the image.
It is a YAML file where you configure specific instructions for GitLab CI/CD. In the.gitlab-ci.yml, we can define:
The scripts you want to run.
Other configuration files and templates you want to include.
Dependencies and caches.
The commands you want to run in sequence and those you want to run in parallel.
The location to deploy your application to.
Whether you want to run the scripts automatically or trigger any of them manually.
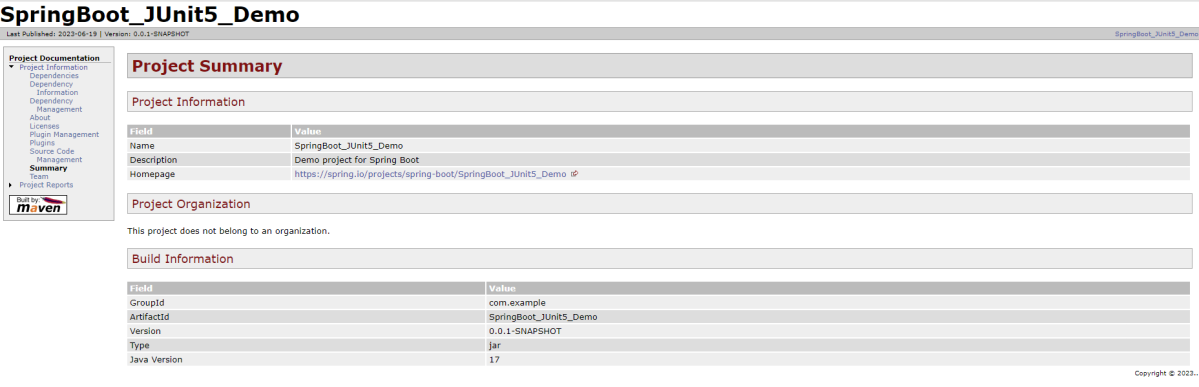
Below is a sample example to run the SpringBoot project (Maven) in the GitLab pipeline.
image: maven:3.8.5-openjdk-17

stages:
  - test

variables:
  MAVEN_OPTS: "-Dmaven.repo.local=.m2/repository"

test:
  stage: test
  allow_failure: true

# Run the tests
  script:
    - echo "Executing SpringBoot scenarios with maven"
    - mvn clean test site

# Store artifacts
  artifacts:
    when: always
    name: "SpringBoot Report"
    paths:
    - target/site/*
    expire_in: 24 h
Image – maven:3.8.5-openjdk-17 is used in this test. It is a docker image for Maven and have Java 17 installed in it.
Pipeline configuration begins with jobs. Jobs are the most fundamental element of a .gitlab-ci.yml file.
Jobs are:
Defined with constraints stating under what conditions they should be executed.
Top-level elements with an arbitrary name and must contain at least the script clause.
Not limited in how many can be defined.
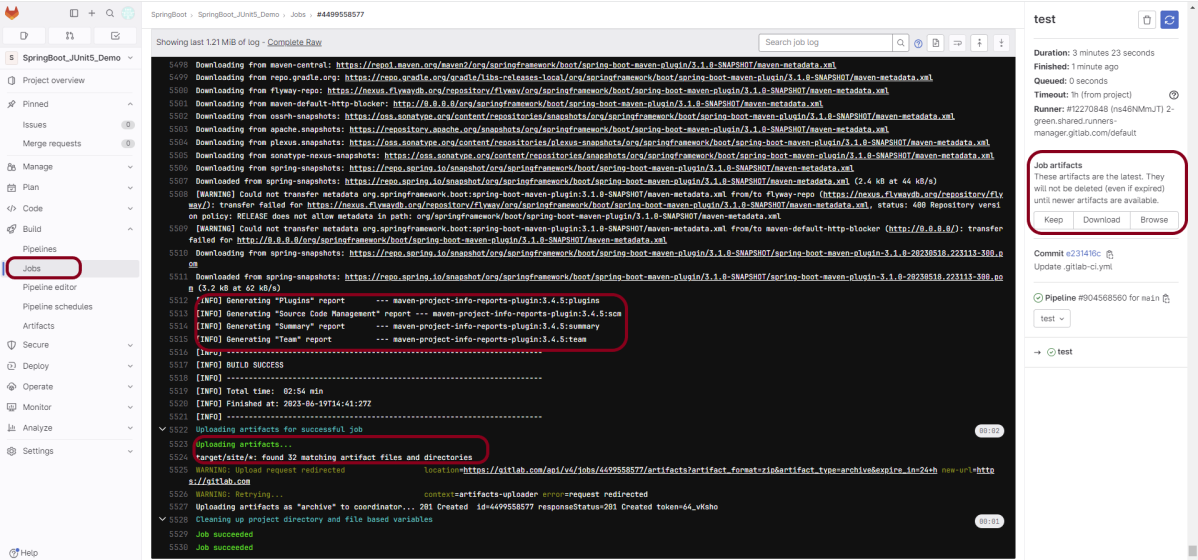
Jobs can output an archive of files and directories. This output is known as a job artifact. The expire_in keyword determines how long GitLab keeps the job artifacts. Here, it shows 24 hrs to retain the artifacts.
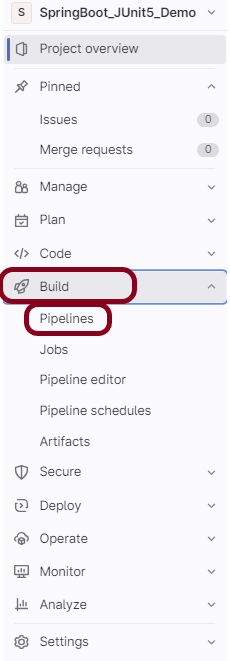
Step 4 – View GitLab Pipeline
Now, when a new change is committed, a pipeline kicks off and it runs all the tests. To view the pipeline, go to the left panel and click on the Build option. There are a number of sub-options in the Build option, click on the Pipelines.
Step 5 – Run the tests in the GitLab pipeline
The below image shows that the tests are running in the GitLab pipeline.
Step 6 – Manually run the tests in the GitLab pipeline
Whenever there is a new change committed, the pipeline runs automatically. Imagine the scenario when we need to run the pipeline without any new change. This can be done by clicking on the button “Run pipeline”.
Step 7 – Check the status of the pipeline
Once the Status of the pipeline changes to either failed or passed, that means the tests are already executed.
As you can see, the Status is passed, its green colour. This means all the tests present in the test suite are executed and passed. If any test fails in the test suite, the final execution status will be brown. The reason for the brown colour is we have mentioned allow_failure: true.
Below shows the execution status report in the GitLab pipeline.
As I have added an artifact also in the .gitalb-ci.yml, which is highlighted in the image. This artifact creates a folder with the name “Serenity_Report”and the reports in this folder come from the path /target/site. This artifact gives us the option to download the reports or browse the report. This report will be available for 24 hours only as mentioned in the gitlab-ci.yml.
Step 8 – Download the report
Once, will click on the download button, it will download “SpringBoot_Report.zip”. Unzip the folder and it looks like something as shown below:
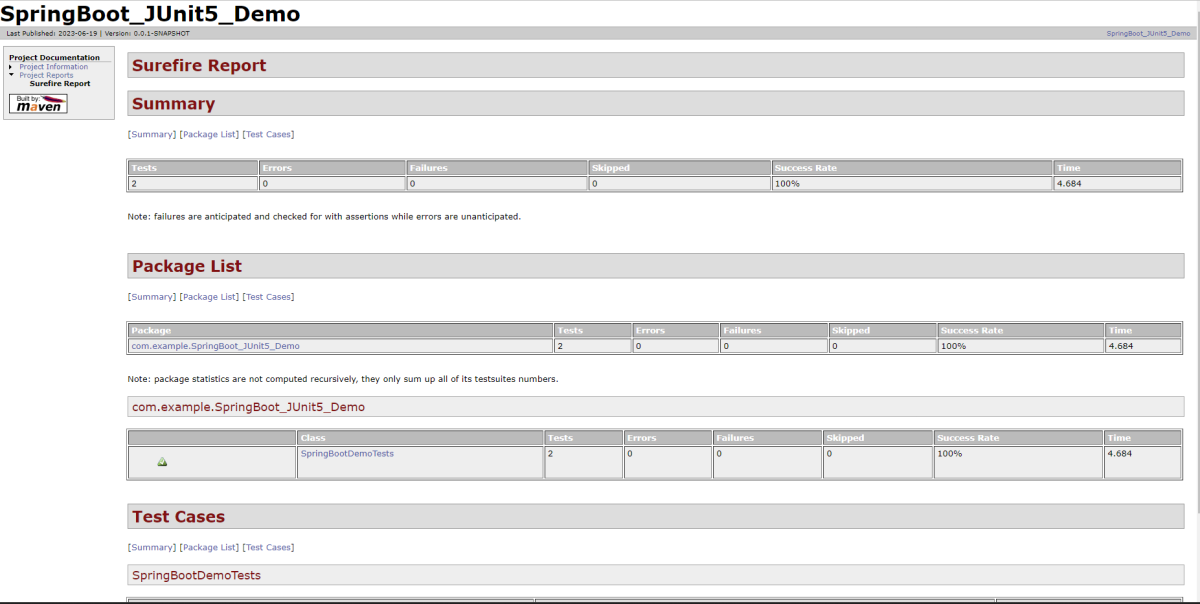
Example of SureFire-Report.html
Example of Project Summary Report
Congratulations. This tutorial has explained the steps to run Serenity tests in GitLab CI/CD. Happy Learning!!
The previous tutorial has explained how to install it onto a Windows 10 system and create a Maven orGradle project in Jenkins. Jenkins and GitHub are two powerful tools on their own, but what about using them together? In this tutorial, learn about the benefits of a Jenkins GitHub integration and how to set up the integration on your own.
GitHub is a web-based version control system and collaboration platform for developers. It is the center around which all things involving git revolve. GitHub allows software developers and engineers to create remote, public-facing repositories on the cloud for free. Once you’ve set up a repository on GitHub, you can copy it to your device, add and modify files locally, then “push” your changes back to the repository where your changes display for the public.
What is Jenkins?
Jenkins is a well-known open-source tool that aids in the implementation of Continuous Integration (CI) and Continuous Deployment/Continuous Delivery (CD) processes by automating parts of the software development pipeline such as building, testing, and deployment.
Jenkins Version Used – 2.361.2
In this version of Jenkins, Git Plugin is already installed. If the Git Plugin is not installed, then follow the below steps to add Git Plugin in Jenkins.
Step 1: Open your dashboard
Click on the Manage Jenkins button on your Jenkins dashboard:
Step 2: Select Manage Plugins
Click on the Manage Jenkins. Choose Manage Plugins.
Step 3: Add Git Plugin
On the Plugins Page, go to the Available option.
Select the GIT Plugin
Click on Install without restart.The plugin will take a few moments to finish downloading depending on your internet connection, and will be installed automatically.
You can also select the option Download now and Install after the restart button. In which plugin is installed after the restart
You will be shown a “No updates available” message if you already have the Git plugin installed.
In my case, Git Plugin is already installed, so you can’t see it in the Available Plugin.
Step 4: Verify Git Plugin is installed
Once the plugins have been installed, Go to Manage Jenkinson your Jenkins dashboard. You will see your plugins listed among the rest.
How to Integrate Jenkins With GitHub
Step 1: Create a new project using the Maven project plugin
Give the Name of the project.
Click on the Maven project.
Click on the OK button.
In the General section, enter the project description in the Description box.
Click on create new jobs.
Enter the item name, select the job type, and click OK. We shall create a Maven project as an example.
Step 2: Describe the project in the description section
In the General section, enter the project description in the Description box.
Step 3 – Source Code Management section
You will see a Git option under Source Code Managementif your Git plugin has been installed in Jenkins.
Enter the Git repository URL to pull the code from GitHub. Enter the credentials to log in to GitHub.
I have already set up the credentials to log in to GitHub. For first-time users, click on the Add button and select Jenkins.
Add the username and password used to log in to GitHub. Click on the “Add” button.
Note:- Please make sure that Git is installed on your local machine. To install Git on your local machine, go to this tutorial –How to install Git on Windows 10.
Step 4: Build Management
Go to the Build section of the new job.
In the Root POM textbox, enter pom.xml
In the Goals and Options section, enter “clean test“
Step 5: Select “Publish TestNG Results” from “Post Build Actions”
Scroll down to “Post Build Actions” and click on the “Add Post Build Actions” drop-down list. Select “Publish TestNG Results“. In my case, the project is set up to generate TestNG Report, so I have selected TestNG. But if your project uses any other reporting option, please select that from the dropdown.
Enter TestNG XML Report Pattern as “**target/surefire-reports/testng-results.xml” and click on the “Apply” and “Save” button.
We have created a new project “GitHub_Demo” with the configuration to run TestNG Tests and also to generate TestNG Reports after execution using Jenkins.
Step 6: Execute the tests
Let’s execute it now by clicking on the “Build Now” button.
Right-click on Build Number (here in my case it is #1) and click on Console Output to see the result.
Below is the screenshot of the Console Output. It displays all the information regarding the execution of the tests.
Step 7: View the TestNG Report
Once the execution is completed, we could see a link to view “TestNG Results“.
Click on the TestNG Results. It displays the summary of the tests.
This way, we could integrate GitHub in Jenkins.
Congratulations on making it through this tutorial and hope you found it useful! Happy Learning!! Cheers!!
The flexible aspects of Selenium WebDrivers and GitHub Actionsenable users to create powerful, fast, and efficient automated testing workflows in CI/CD environments.
CI/CD pipelines have contributed to the success of the DevOps cycle in all software development projects. This is a holistic process that bridges development and operations. Continuous integration helps development teams deploy code efficiently, and continuous delivery automates code deployment.
Important points
1. We don’t need to think about the Chromedriver.exe we are using WebDriver Manager to handle that instead of adding it to our project like the example:
WebDriverManager.chromedriver().setup();
From Selenium 4.6.0 onwards, we don’t need to add WebDriverManager dependency explicitly to the project, because Selenium has added an inbuilt tool to handle the drivers.
2. The Selenium tests need to run in the headless mode. As we are using Chrome browser, use the below code:
          ChromeOptions options = new ChromeOptions();
          options.addArguments("--no-sandbox");
          options.addArguments("--disable-dev-shm-usage");
          options.addArguments("--headless");
	      driver = new ChromeDriver(options);
3. Install Chrome browser in ubuntu. Use the below code:
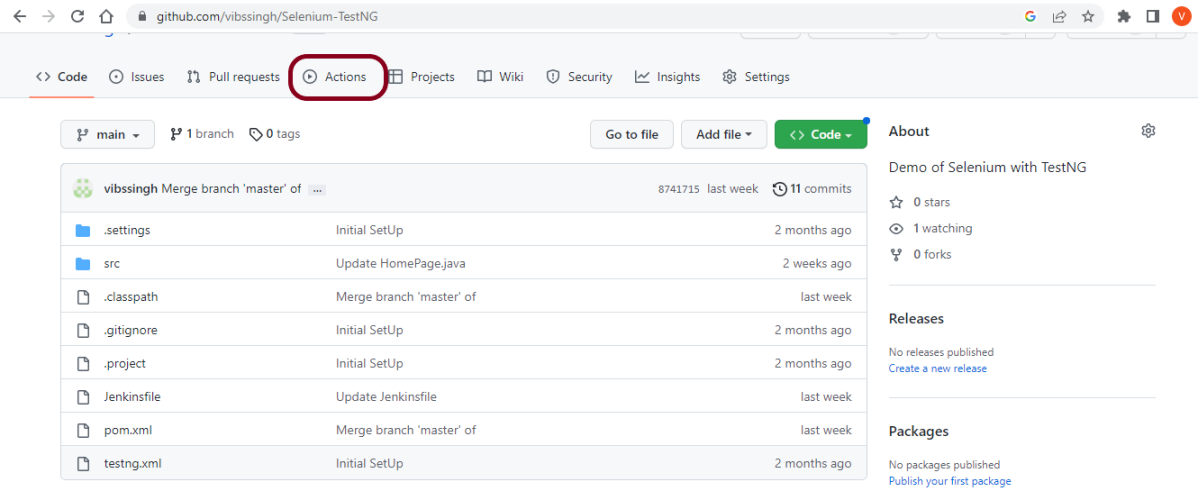
I have a repository available in GitHub – Selenium-TestNG as shown in the below image. Go to the “Actions” tab. Click on the “Actions” tab.
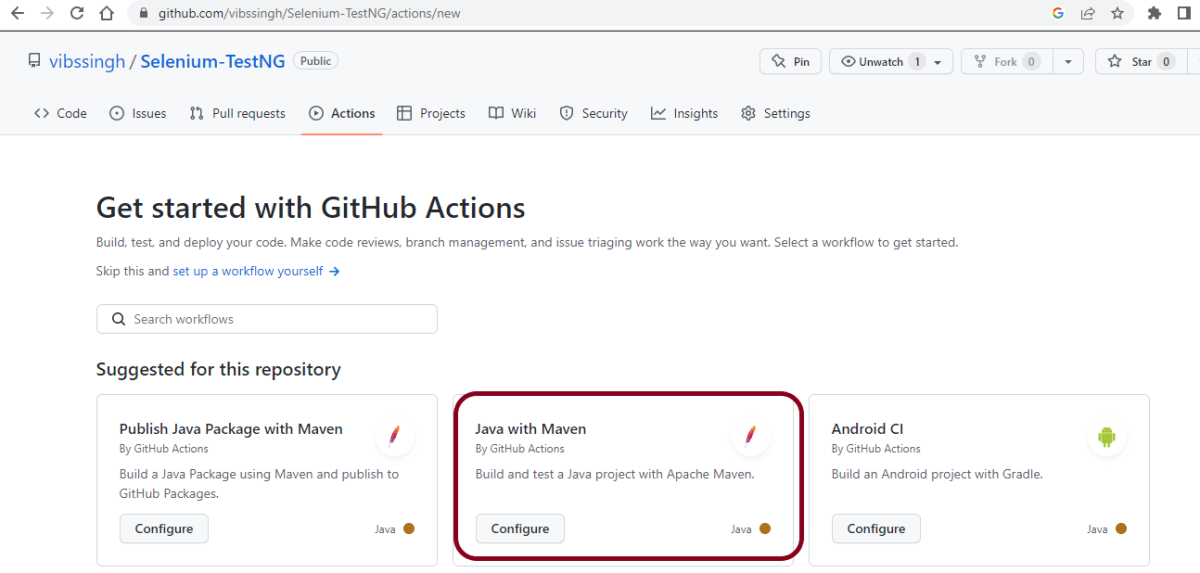
Step 2 – Select the type of Actions
You will see that GitHub recommends Actions depending on the project. In our case, it is recommending actions suitable for a Java project. I have selected the “Java with Maven” option as my project is built in Maven.
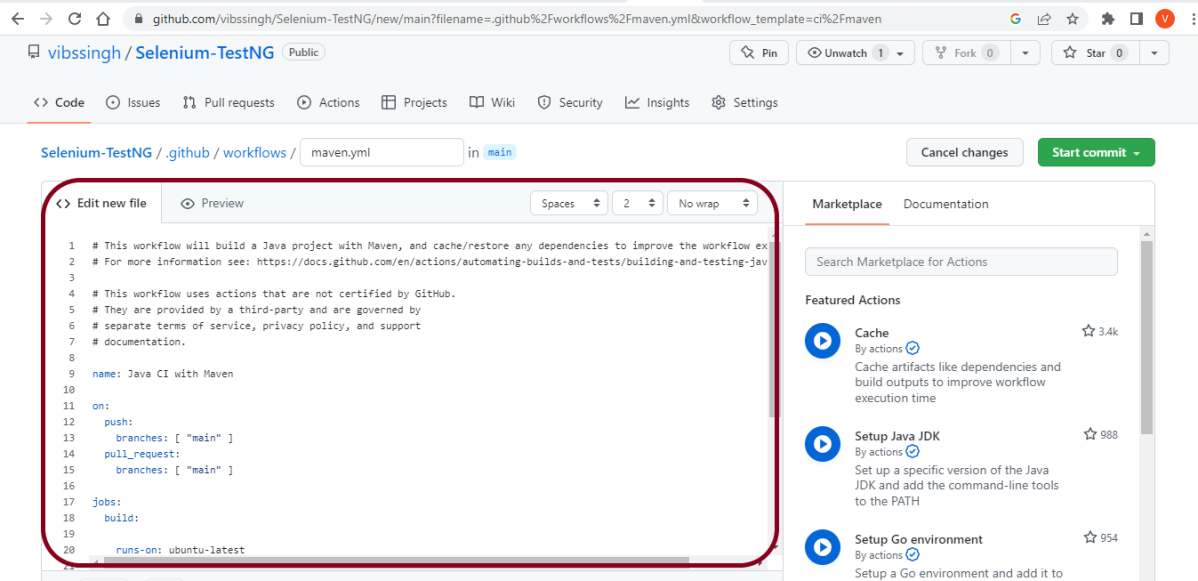
Step 3 – Generation of Sample pipeline
If you choose an existing option, it will automatically generate a .yaml for the project as shown below.
We will replace the current workflow with the next yml file as shown below:
name: Selenium with TestNG - CI
on:
push:
branches: [ "main" ]
pull_request:
branches: [ "main" ]
jobs:
build:
runs-on: ubuntu-latest
steps:
- uses: actions/checkout@v3
- name: Set up JDK 17
uses: actions/setup-java@v3
with:
java-version: '17'
distribution: 'temurin'
cache: maven
    - uses: browser-actions/setup-chrome@latest
    - run: chrome --version
- name: Build with Maven
run: mvn -B clean test
The workflow file usually consists of the below attributes:
name: Java CI with Maven
Name of workflow: This is an optional attribute.The name of the workflow is denoted by the keyword “name”. If you wish to include multiple CI jobs in your project, it is recommended to name each one appropriately.
on: [push] :
On attribute – This attribute is mandatory and specifies the trigger for this workflow. There are several actions you can include such as push, pull request, release, etc. for more information on the events, check the official guide here.
jobs:
Under the jobs attribute, groups together all the jobs that run in the workflow.
runs-on: ubuntu-latest
Configures the job to run on the latest version of an Ubuntu Linux runner. This means that the job will execute on a fresh virtual machine hosted by GitHub
steps:
Under this option, the actions used by the particular workflow, and the multiple jobs that would run under the workflow are mentioned. These jobs run in parallel. If you want to run the jobs in the order in the CI pipelines, you must add the “needs” attribute. It is crucial to ensure that every workflow has at least one job. In our sample workflow, we only have one job as shown in image above.
uses: actions/checkout@v3
The uses keyword specifies that this step will run v3 of the actions/checkout action. This is an action that checks out your repository onto the runner, allowing you to run scripts or other actions against your code (such as build and test tools). You should use the checkout action any time your workflow will run against the repository’s code.
This step uses the actions/setup-java@v3 action to install the specified version of the Java (this example uses v17).
Step 4 – Commit the changes
After the changes, hit the “Start Commit” button.
This will give the choice to add a description for the commit. It will also allow the user to commit either to the main branch or commit to any other branch that exists in the project. Click on the “Commit new file” button to set up the workflow file.
Step 5 – Verify that the workflow is running
Next, head over to the “Actions” tab, and you will see your YAML workflow file available under the tab. The yellow sign represents that the job is in the queue.
In Progress – When the job starts building and running, you will see the status change from “Queued” to “in progress”.
Passed – If the build is successful, you will see a green tick mark.
Click on the workflow and the below screen is displayed. It shows the status of the run of the workflow, the total time taken to run the workflow, and the name of the .yml file.
Below are all the steps of the workflow.
Failed – In case the build has failed, then there will be a red cross mark.
GitHub is a web-based version control system and collaboration platform for developers. It is the centre around which all things involving git revolve. GitHub allows software developers and engineers to create remote, public-facing repositories on the cloud for free. Once you’ve set up a repository on GitHub, you can copy it to your device, add and modify files locally, and then “push” your changes back to the repository where your changes are displayed for the public.