The previous tutorial has explained the committing of the changes in the GIT. This tutorial explains the creation of a new branch in GIT.
Branching is a feature available in most modern version control systems. Git branches are effectively a pointer to a snapshot of the changes. When we want to add a new feature or fix a bug, it is advisable to create a new branch to encapsulate the changes. This helps you to clean up the future’s history before merging it. Git branches are an essential part of the everyday workflow. Git does not copy files from one directory to another, it stores the branch as a reference to a commit.
A branch represents an independent line of development. The git branch command allows us to create a new branch, and rename and delete the branch.
It’s important to understand that branches are just pointers to commits. When you create a branch, all Git needs to do is create a new pointer, it doesn’t change the repository in any other way. To create a branch, use this command:
git checkout -b branchName
Let me explain how to create a new branch with the help of an example:-
Step 1– Create a new GIT Repository – GitTest.
Step 2 – Right-click and click on Git Bash Here to open GitBash at that place.
Step 3 – GIT Repo has already committed files – Index.txt, ReadMe.txt, .gitignore. Create a GIT local branch – feature/customerDetails.
git checkout -b feature/customerDetails
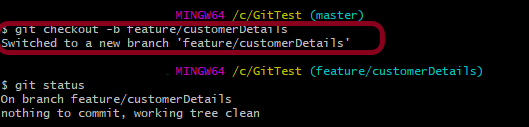
Now, the branch is changed from master to feature/customerDetail.
Step 4 – Update the already committed Index.txt file. Later, type git add . to stage the file to GIT Staging area. Then, commit the Index.txt file.
echo -en "\n A new page for Customer is added." >>Index.txt
cat Index.txt
git status
git add.
git commit -m "Updated Index.txt file with Customer Detail"

Step 5 – Below command shows that the updated Index.txt is committed in new branch feature/customerDetails
git status
Step 6 – Type the below command to go back to the master branch.
git checkout master
Step 7 – Open Index.txt file in the master branch. It shows that there is no change in this file, as the changes were done in another new branch. To get the latest changes in the master branch, we need to merge the new local branch (feature/customerDetails) to the master branch.

To delete a branch, use the below command:
git branch -d feature/customerDetails

As the branch hasn’t been merged, the above command output an error message as shown in the above image.
To delete the branch forcefully, even if the changes are unmerged. Below is the command:
git branch -D feature/customerDetails
To rename the current branch, use the below command:
git branch -m feature/newCustomer

To get the list of all the branches, use the below command:
git branch -a

Congratulations on making it through this tutorial and hope you found it useful! Happy Learning!! Cheers!!
