BDD is a set of practices that helps to reduce the rework caused by misunderstanding or vague requirements, narrow the communication gaps between the development team, testing team, and customers, and promote continuous communication among them. Cucumber is one such open-source tool, which supports Behaviour Driven Development(BDD). In simple words, Cucumber can be defined as a testing framework, driven by plain English. It serves as documentation, automated tests, and a development aid – all in one.
Cucumber Introduction, Installation, and Configuration
In this tutorial, we will use the constructor injection technique to share web driver instances in multiple-step definitions using PicoContainer.
Why do we need Dependency Injection in Cucumber?
A new Framework is built that contains several Page Objects, Step Definitions, Feature files, and Helper Classes. Eventually, new Feature Files will be added that contain the steps that are already present in the existing Step Definition files. In this case, we will prefer to use the existing Step Definitions instead of creating new ones. But, Cucumber does not support Inheritance means it does not allow extending classes that contain Step Definitions or Hooks (@After, @Before, etc.). Now, Dependency Injection comes into the picture.
In Cucumber, if we want to share the state between multiple-step definition files, we will need to use dependency injection (DI). There are several options: PicoContainer, Spring, OpenEJB, etc. If you’re not already using DI, then it is recommended to use PicoContainer. Otherwise, use the one that’s already in use, because you should only have one.
To use PicoContainer, add the following dependency to the POM.xml
Imagine there are 2 feature files. These feature files are using the same browser initialization and website. Now, instead of creating the browser initialization twice for 2 feature files, why not create a Common Class and mention these details in that class and using DI, call this class in the main Step Definition classes.
Feature File 1 – HomePage.feature
Below is the example of feature file 1.
Feature: Home page validation

Background:
   Given User Navigates to HRM login page
   And User login with valid credentials

   @ValidQuickLaunch
   Scenario Outline: Login with valid credentials to check QuickLanuch options

   When User is in Dashboard page
     Then there are valid QuickLaunch options '<options>'

    Examples:
        | options                  |
        | Assign Leave             |
        | Leave List               |
        | Timesheets               |


    @ValidLegendOptions
    Scenario Outline: Login with valid credentials to check Manu Options

   When User is in Dashboard page
     Then there are valid Legend options '<legendOptions>'

    Examples:
        | legendOptions               |
        | Not assigned to Subunits    |
        | Administration              |
        | Client Services             |
Feature File 2 – LoginPage.feature
Below is the example of feature file 2.
Feature: Login to HRM Application

   @ValidCredentials
   Scenario: Login with valid credentials

    Given User is on Home page
    When User enters username as "Admin"
    And User enters password as "admin123"
    Then User should be able to login sucessfully
Next, create a new class that holds the common data. For example:
public class ApplicationHooks {

	private WebDriver driver;

	@Before
	public void setUp() {
		setDriver();
	}

	public void setDriver() {

		WebDriverManager.chromedriver().setup();
		driver = new ChromeDriver();
		driver.manage().window().maximize();
		driver.get("https://opensource-demo.orangehrmlive.com/");
	}

	public WebDriver getDriver() {
		return driver;
	}

	@After
	public void tearDown() {
		getDriver().quit();
	}
}
Then, in each of your step definition files that you want to use this common data, you can add a constructor that takes Step Data as an argument. This is where the injection occurs. For example:
LoginDefinition
public class LoginDefinition {

	private ApplicationHooks hooks;

	public LoginDefinition(ApplicationHooks hooks) {

		this.hooks = hooks;
	}

	@Given("User is on Home page")
	public void userOnHomePage() {

		System.out.println("Home Page is opened");
	}

	@When("User enters username as {string}")
	public void entersUsername(String userName) throws InterruptedException {

		System.out.println("Username Entered");
		hooks.getDriver().findElement(By.name("txtUsername")).sendKeys(userName);

	}

	@When("User enters password as {string}")
	public void entersPassword(String passWord) throws InterruptedException {

		System.out.println("Password Entered");
		hooks.getDriver().findElement(By.name("txtPassword")).sendKeys(passWord);

		hooks.getDriver().findElement(By.id("btnLogin")).submit();
	}

	@Then("User should be able to login sucessfully")
	public void sucessfullLogin() throws InterruptedException {

		String newPageText = hooks.getDriver().findElement(By.id("welcome")).getText();
		System.out.println("newPageText :" + newPageText);
		Assert.assertTrue(newPageText.contains("Welcome"));

	}
}
HomeDefinition
public class HomePageDefinition {

	ApplicationHooks hooks;

	public HomePageDefinition(ApplicationHooks hooks) {
		this.hooks = hooks;
	}

	@Given("User Navigates to HRM login page")
	public void userOnHomePage() {

		System.out.println("HRM login Page is opened");
	}

	@Given("User login with valid credentials")
	public void entersCredentials() throws InterruptedException {

		hooks.getDriver().findElement(By.name("txtUsername")).sendKeys("Admin");
	hooks.getDriver().findElement(By.name("txtPassword")).sendKeys("admin123");
		hooks.getDriver().findElement(By.id("btnLogin")).submit();

	}

	@When("User is in Dashboard page")
	public void verifyDashboardPage() {

		String dashboardTitle = hooks.getDriver().findElement(By.id("welcome")).getText();
		Assert.assertTrue(dashboardTitle.contains("Welcome"));

	}

	@Then("there are valid QuickLaunch options {string}")
	public void verifyQuickLinks(String options) throws InterruptedException {

		switch (options) {
		case "Assign Leave":
			String linkOne = hooks.getDriver()
					.findElement(By.xpath(
							"//*[@id='dashboard-quick-launch-panel-menu_holder']/table/tbody/tr/td[1]/div/a/span"))
					.getText();
			Assert.assertEquals(linkOne, options);

			break;
		case "Leave List ":
			String linkTwo = hooks.getDriver()
					.findElement(By.xpath(
							"//*[@id='dashboard-quick-launch-panel-menu_holder']/table/tbody/tr/td[2]/div/a/span"))
					.getText();
			Assert.assertEquals(linkTwo, options);
			Thread.sleep(1000);
			break;

		case "Timesheets":
			String linkThree = hooks.getDriver()
					.findElement(By.xpath(
							"//*[@id='dashboard-quick-launch-panel-menu_holder']/table/tbody/tr/td[3]/div/a/span"))
					.getText();
			Assert.assertEquals(linkThree, options);
			break;

		default:
			break;
		}

	}

	@Then("there are valid Legend options {string}")
	public void verifyMenuOptions(String options) throws InterruptedException {

		switch (options) {
		case "Not assigned to Subunits":
			String linkOne = hooks.getDriver()
					.findElement(
							By.xpath("//*[@id='div_legend_pim_employee_distribution_legend']/table/tbody/tr[1]/td[2]"))
					.getText();
			Assert.assertEquals(linkOne, options);
			break;

		case "Administration":
			String linkTwo = hooks.getDriver()
					.findElement(
							By.xpath("//*[@id='div_legend_pim_employee_distribution_legend']/table/tbody/tr[2]/td[2]"))
					.getText();
			Assert.assertEquals(linkTwo, options);
			break;

		case "Client Services":
			String linkThree = hooks.getDriver()
					.findElement(
							By.xpath("//*[@id='div_legend_pim_employee_distribution_legend']/table/tbody/tr[3]/td[2]"))
					.getText();
			Assert.assertEquals(linkThree, options);
			break;
		default:
			break;

		}
	}
}
Create a Test Runner Class to execute the tests.
import org.junit.runner.RunWith;

import io.cucumber.junit.Cucumber;
import io.cucumber.junit.CucumberOptions;

@RunWith(Cucumber.class)

@CucumberOptions(features= {"src/test/resources"}, glue= {"com.cucumber"})
public class RunCucumberTest {

}
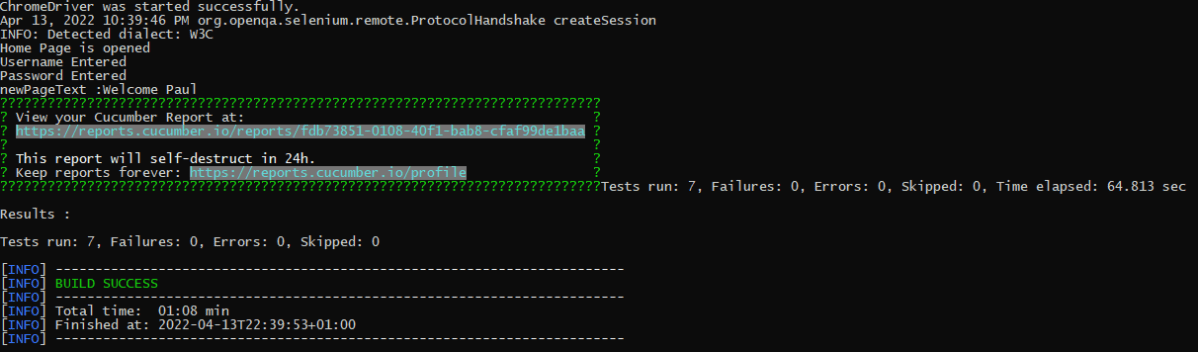
Execute the tests either through JUnit Runner or Command-Line using maven.
The test Report can be accessed from the link provided in the execution status:
We are done! Congratulations on making it through this tutorial and hope you found it useful! Happy Learning!!
In this tutorial, I will explain Parallel Testing usingCucumber with JUnit4.
Cucumber-JVM allows parallel execution across multiple threads since version 4.0.0. There are several options to incorporate this built-in feature in a Cucumber project. You can do so by using JUnit, TestNG, or CLI.
Cucumber can be executed in parallel using JUnit and Maven test execution plugins.
In JUnit, thefeature files are run in parallel rather than in scenarios, which means all the scenarios in a feature file will be executed by the same thread. You can use either Maven Surefire or Failsafe plugin to execute the runner. In this tutorial, I’m using the Maven Surefire plugin.
Create a Maven project in your favorite IDE using the cucumber-archetype or by adding Cucumber dependencies to the POM as detailed here and Junit dependencies here. To know more about How to set up a Cucumber Maven project with Eclipse, please refer to this tutorial – Cucumber Tutorial – How to setup Cucumber with Eclipse.
Below is the structure of the project.
Step 2 – Update the Properties section in Maven pom.xml
Step 5 – Create a feature folder in src/test/resources
Add 2 feature files – LoginPage.feature and ForgotPasswordPage.feature in the features folder present in src/test/resources.
LoginPage.feature
Feature: Login to HRM Application

  Background:
    Given User is on Home page

  @ValidCredentials
  Scenario: Login with valid credentials - Feature 1, Scenario - 1

    When User enters username as "Admin" and password as "admin123"
    Then User should be able to login successfully

  @InvalidCredentials
  Scenario Outline: Login with invalid credentials - Feature 1, Scenario - 2

    When User enters username as "<username>" and password as "<password>"
    Then User should be able to see error message "<errorMessage>"

    Examples:
      | username    | password   | errorMessage                      |
      | Admin       | admin12$$  | Invalid credentials               |
      | admin$$     | admin123   | Invalid credentials               |
      | abc123      | xyz$$      | Invalid credentials               |
      |             | xyz$$      | Invalid credentials               |
ForgotPasswordPage.feature
Feature: Forgot Password Page

  Background:
    Given User is on Home page

  @BackFunctionality
  Scenario: Validate the cancel functionality - Feature 2, Scenario - 1

    When User clicks on Forgot your password? link
    Then User should be able to navigate to Reset Password page
    And User clicks on Cancel button to go back to Login Page

  @ResetFunctionality
  Scenario: Validate the Reset Password functionality - Feature 2, Scenario - 2

    When User clicks on Forgot your password? link
    Then User should be able to navigate to Reset Password page
    And User clicks on Reset Password button and provide username as "abc1234"
    And Verify the message "Reset Password link sent successfully"
Step 6 – Create the Page Object Model classes of LoginPage and ForgotPasswordPage feature files
Page Object Model class contains all the locators and the actions performed on these locators for the particular class to improve the readability and maintainability of the code.
Below are the Page Object Model classes for these feature files.
LoginPage
import org.openqa.selenium.By;
import org.openqa.selenium.WebDriver;

public class LoginPage {

    public WebDriver driver;

    By userName = By.name("username");
    By passWord = By.name("password");
    By login = By.xpath("//*[@id='app']/div[1]/div/div[1]/div/div[2]/div[2]/form/div[3]/button");
    By errorMessage = By.xpath("//*[@id='app']/div[1]/div/div[1]/div/div[2]/div[2]/div/div[1]/div[1]/p");
    By forgotPasswordLink = By.xpath("//*[@id='app']/div[1]/div/div[1]/div/div[2]/div[2]/form/div[4]/p");
    By loginPageTitle = By.xpath("//*[@id='app']/div[1]/div/div[1]/div/div[2]/h5");

    public LoginPage(WebDriver driver) {
        this.driver = driver;
    }

    public String getErrorMessage() {
        return driver.findElement(errorMessage).getText();
    }

    public void login(String strUserName, String strPassword) {

        // Fill user name
        driver.findElement(userName).sendKeys(strUserName);

        // Fill password
        driver.findElement(passWord).sendKeys(strPassword);

        // Click Login button
        driver.findElement(login).click();

    }

    // Click on Forgot Password link
    public void clickOnForgotPasswordLink() {
        driver.findElement(forgotPasswordLink).click();
    }

    //Get Login Page Title
    public String getLoginPageTitle() {
        return driver.findElement(loginPageTitle).getText();
    }
}
HomePage
import org.openqa.selenium.By;
import org.openqa.selenium.WebDriver;

public class HomePage {

    public WebDriver driver;

    public HomePage(WebDriver driver) {
        this.driver = driver;
    }

    By homePageUserName = By.xpath("//*[@id='app']/div[1]/div[1]/header/div[1]/div[1]/span/h6");

    public String getHomePageText() {
        return driver.findElement(homePageUserName).getText();
    }
}
ForgotPasswordPage
import org.openqa.selenium.By;
import org.openqa.selenium.WebDriver;

public class ForgotPasswordPage {

    WebDriver driver;

     By forgotPasswordPageTitle = By.xpath("//*[@id='app']/div[1]/div[1]/div/form/h6");
     By cancelBtn = By.xpath("//*[@id='app']/div[1]/div[1]/div/form/div[2]/button[1]");
     By resetPasswordBtn = By.xpath("//*[@id='app']/div[1]/div[1]/div/form/div[2]/button[2]");
     By userName = By.name("username");
     By resetMessage = By.xpath("//*[@id='app']/div[1]/div[1]/div/h6");

    public ForgotPasswordPage(WebDriver driver) {
        this.driver = driver;
    }

    // Get the Title of ForgotPage
    public String getForgotPageText() {
        return driver.findElement(forgotPasswordPageTitle).getText();
    }

    // Click Cancel Button
    public void clickOnCancelBtn() {
         driver.findElement(cancelBtn).click();
    }

    // Click ResetPassword Button
    public void clickOnRestPasswordBtn() {
        driver.findElement(resetPasswordBtn).click();
    }

    // Type username in TextBox
    public void TypeOnUsernameTextBox(String username) {
        driver.findElement(userName).sendKeys(username);
    }

    // Get Message
    public String getRestMessage() {
        return driver.findElement(resetMessage).getText();
    }
}
PageObjectManager – This class creates the object of all the above-mentioned Page Object Model classes. This an optional class. If you want you can create the objects in StepDefinition class also.
public class PageObjectManager {

    public LoginPage loginPage;
    public HomePage homePage;
    public ForgotPasswordPage forgotPasswordPage;
    public WebDriver driver;


    public PageObjectManager(WebDriver driver)
    {
        this.driver = driver;
    }

    public LoginPage getLoginPage()
    {

        loginPage= new LoginPage(driver);
        return loginPage;
    }

    public HomePage getHomePage()
    {
        homePage = new HomePage(driver);
        return homePage;
    }

    public ForgotPasswordPage getForgotPasswordPage()
    {
        forgotPasswordPage = new ForgotPasswordPage(driver);
        return forgotPasswordPage;
    }
}
Step 7 – Create the Step Definition classes for both feature files or Glue Code
Below is the Step Definition for LoginPage.feature.
import org.example.pageObjects.HomePage;
import org.example.pageObjects.LoginPage;
import org.example.pageObjects.PageObjectManager;
import org.example.utils.TestSetUp;
import io.cucumber.java.en.Given;
import io.cucumber.java.en.Then;
import io.cucumber.java.en.When;
import org.junit.Assert;

public class LoginPageDefinitions {

    TestSetUp setUp;
    public PageObjectManager pageObjectManager;
    public LoginPage loginPage;
    public HomePage homePage;


    public LoginPageDefinitions(TestSetUp setUp)  {
        this.setUp = setUp;
        this.loginPage = setUp.pageObjectManager.getLoginPage();
        this.homePage= setUp.pageObjectManager.getHomePage();
    }

    @Given("User is on Home page")
    public void loginTest()  {
        setUp.baseTest.WebDriverManager().get("https://opensource-demo.orangehrmlive.com/");

    }

    @When("User enters username as {string} and password as {string}")
    public void goToHomePage(String userName, String passWord) {

        // login to application
        loginPage.login(userName, passWord);

        // go the next page

    }

    @Then("User should be able to login successfully")
    public void verifyLogin() {

        // Verify home page
        Assert.assertTrue(homePage.getHomePageText().contains("Dashboard"));

    }

    @Then("User should be able to see error message {string}")
    public void verifyErrorMessage(String expectedErrorMessage) {

        // Verify home page
        Assert.assertEquals(loginPage.getErrorMessage(),expectedErrorMessage);

    }

}
Below is the Step Definition for ForgotPasswordPage.feature.
import io.cucumber.java.en.Then;
import io.cucumber.java.en.When;
import org.example.pageObjects.ForgotPasswordPage;
import org.example.pageObjects.LoginPage;
import org.example.pageObjects.PageObjectManager;
import org.example.utils.TestSetUp;
import org.junit.Assert;


public class ForgotPasswordPageDefinitions {

    TestSetUp setUp;
    PageObjectManager pageObjectManager;
    public LoginPage loginPage;
    public  ForgotPasswordPage forgotPasswordPage;

    public ForgotPasswordPageDefinitions(TestSetUp setUp) {
        this.setUp = setUp;
        this.loginPage = setUp.pageObjectManager.getLoginPage();
        this.forgotPasswordPage = setUp.pageObjectManager.getForgotPasswordPage();
    }

    @When("User clicks on Forgot your password? link")
    public void forgotPasswordLink() {

        loginPage.clickOnForgotPasswordLink();

    }

    @Then("User should be able to navigate to Reset Password page")
    public void verifyForgotPasswordPage() {

        Assert.assertEquals(forgotPasswordPage.getForgotPageText(),"Reset Password");

    }

    @Then("User clicks on Cancel button to go back to Login Page")
    public void verifyCancelBtn() {

        forgotPasswordPage.clickOnCancelBtn();
        Assert.assertEquals(loginPage.getLoginPageTitle(),"Login");

    }

    @Then("User clicks on Reset Password button and provide username as {string}")
    public void verifyResetPasswordBtn(String username) {

        forgotPasswordPage.TypeOnUsernameTextBox(username);
        forgotPasswordPage.clickOnRestPasswordBtn();

    }

    @Then("Verify the message {string}")
    public void verifyMessage(String message) {

        //  ForgotPasswordPage forgotPasswordPage = setUp.pageObjectManager.getForgotPasswordPage();
        Assert.assertEquals(forgotPasswordPage.getRestMessage(),message);

    }
}
Step 8 – Create the Hook Class and Dependency Injection class (TestSetUp) and BaseTest class
Below is the code for the ApplicationHook Class.
import io.cucumber.java.After;
import io.cucumber.java.AfterStep;
import io.cucumber.java.Scenario;
import org.example.utils.TestSetUp;
import org.openqa.selenium.OutputType;
import org.openqa.selenium.TakesScreenshot;
import org.openqa.selenium.WebDriver;

public class ApplicationHooks {

 public TestSetUp setUp;

    public ApplicationHooks(TestSetUp setUp) {
        this.setUp = setUp;
    }

    @After
    public void tearDown( )  {
        setUp.baseTest.WebDriverManager().quit();
    }

    @AfterStep
    public void addScreenshot(Scenario scenario) {

        WebDriver driver =  setUp.baseTest.WebDriverManager();
        if(scenario.isFailed()) {
            final byte[] screenshot = ((TakesScreenshot) driver).getScreenshotAs(OutputType.BYTES);
            scenario.attach(screenshot, "image/png", "image");
        }

    }

}
Below is the code for the Dependency Injection class. In Cucumber, if we want to share the state between multiple-step definition files, we will need to use dependency injection (DI).
import org.openqa.selenium.WebDriver;
import org.openqa.selenium.WebElement;
import pageObjects.PageObjectManager;

public class TestSetUp {

    public WebElement errorMessage;
    public WebElement homePageUserName;
    public PageObjectManager pageObjectManager;
    public BaseTest baseTest;

    public TestSetUp()  {

        baseTest = new BaseTest();
        pageObjectManager = new PageObjectManager(baseTest.WebDriverManager());

    }
}
BaseTest class is used to initialize the WebDriver.
import io.github.bonigarcia.wdm.WebDriverManager;
import org.openqa.selenium.WebDriver;
import org.openqa.selenium.chrome.ChromeDriver;
import java.time.Duration;

public class BaseTest {

    public WebDriver driver;
    public final static int TIMEOUT = 10;

    public WebDriver WebDriverManager ()  {


        if (driver == null) {

            WebDriverManager.chromedriver().setup();
            driver = new ChromeDriver();
            driver.manage().timeouts().implicitlyWait(Duration.ofSeconds(TIMEOUT));
            driver.manage().window().maximize();
            driver.get(url);

        }
        return driver;
    }
}
Step 9 – Create a Test Runner to run the tests
import io.cucumber.junit.Cucumber;
import io.cucumber.junit.CucumberOptions;
import org.junit.runner.RunWith;

@RunWith(Cucumber.class)
@CucumberOptions(tags = "", features = "src/test/resources/features", glue = "org.example.definitions")

public class CucumberRunnerTests  {

}
Step 10 – Cucumber Report Generation
To get Cucumber Test Reports, add cucumber.properties in src/test/resources and add the below instruction in the file.
cucumber.publish.enabled=true
Step 11 – Execute the tests from the command line
mvn clean test
Below is the execution screen. There are two feature files.
When we invoke the test through Maven, the surefire plugin executes the Feature files parallelly. Here, LoginPage has 5 scenarios and ForgotPasswordPage has 2 scenarios. So, initially when the execution will start 1 scenario from both the tests will be executed parallelly and then again one test from each feature will execute. Later, we will be left with 4 scenarios in the LoginPage feature file, so the scenario will run sequentially of the LoginPage feature file.
All the tests of a particular feature file are executed together as feature files are run in parallel, not scenarios.
Step 12 – Difference between Parallel tests and Non-Parallel Tests
Parallel Tests
Below is the Cucumber Report generated for parallel tests.
When the tests are run as JUnit tests from CucumberRunnerTests, then the tests are executed sequentially.
We are done! Congratulations on making it through this tutorial and hope you found it useful! Happy Learning!!