Gradle is an open-source build automation tool that is designed to be flexible enough to build almost any type of software. Gradle runs on the JVM and you must have a Java Development Kit (JDK) installed to use it. Several major IDEs allow you to import Gradle builds and interact with them: Android Studio, IntelliJ IDEA, Eclipse, and NetBeans.
Selenium needs Java to be installed on the system to run the tests. Click here to know How to install Java.
Step 2 – Download and setup Eclipse IDE on the system
The Eclipse IDE (integrated development environment) provides strong support for Java developers. Click here to know How to install Eclipse.
Step 3 – Setup Gradle
To build a test framework, we need to add several dependencies to the project. This can be achieved by any build tool. I have used Gradle Build Tool. Click here to know How to install Gradle.
Step 4 – Create a new Gradle Project
Below are the steps to create the Gradle project from command line.
Step 5 – Add Selenium and TestNG dependencies to the Gradle project
dependencies {
    // Use TestNG framework, also requires calling test.useTestNG() below
    testImplementation 'org.testng:testng:7.10.0'

    // This dependency is used by the application.
    implementation libs.guava
    implementation 'org.seleniumhq.selenium:selenium-java:4.24.0'
}
Step 6 – Add Gradle Test Task to build.gradle
tasks.named('test') {
    // Use TestNG for unit tests.
    useTestNG() {
    useDefaultListeners = true
	outputDirectory = file("$projectDir/TestNG_Reports")
   }
 reports.html.setDestination(file("$projectDir/GradleReports"))
}
The complete gradle.build looks like something shown below.
/*
 * This file was generated by the Gradle 'init' task.
 *
 * This generated file contains a sample Java application project to get you started.
 * For more details on building Java & JVM projects, please refer to https://docs.gradle.org/8.10/userguide/building_java_projects.html in the Gradle documentation.
 */

plugins {
    // Apply the application plugin to add support for building a CLI application in Java.
    id 'java'
}

repositories {
    // Use Maven Central for resolving dependencies.
    mavenCentral()
}

dependencies {
    // Use TestNG framework, also requires calling test.useTestNG() below
    testImplementation 'org.testng:testng:7.10.0'

    // This dependency is used by the application.
    implementation libs.guava
    implementation 'org.seleniumhq.selenium:selenium-java:4.24.0'
}

// Apply a specific Java toolchain to ease working on different environments.
java {
    toolchain {
        languageVersion = JavaLanguageVersion.of(17)
    }
}

tasks.named('test') {
    // Use TestNG for unit tests.
    useTestNG() {
        useDefaultListeners = true
        outputDirectory = file("$projectDir/TestNG_Reports")
    }
    reports.html.setDestination(file("$projectDir/GradleReports"))
}
Step 7 – Create Test Code under src/test/java
Let us write the code to test a web application. I have created 3 tests and out of 3, 1 test will fail intentionally.
package org.example;

import org.openqa.selenium.By;
import org.openqa.selenium.WebDriver;
import org.openqa.selenium.chrome.ChromeDriver;
import org.openqa.selenium.chrome.ChromeOptions;
import org.testng.Assert;
import org.testng.annotations.AfterMethod;
import org.testng.annotations.BeforeMethod;
import org.testng.annotations.Test;

import java.time.Duration;

public class LoginTests {

    WebDriver driver;

    @BeforeMethod
    public void setUp() {

        ChromeOptions options = new ChromeOptions();
        driver = new ChromeDriver(options);
        driver.manage().timeouts().implicitlyWait(Duration.ofSeconds(10));
        driver.manage().window().maximize();
        driver.get("https://opensource-demo.orangehrmlive.com/");

    }

    @Test(description = "This test validates error message when credentials are incorrect", priority = 0)
    public void verifyIncorrectCredentials() {

        driver.findElement(By.name("username")).sendKeys("Admin");
        driver.findElement(By.name("password")).sendKeys("admin123$$");
        driver.findElement(By.xpath("//*[@class='oxd-form']/div[3]/button")).submit();

        String actualErrorMessage = driver.findElement(By.xpath("//*[@class='orangehrm-login-error']/div/div/p")).getText();

        // Verify Error Message
        Assert.assertEquals(actualErrorMessage,"Invalid credentials");

    }

    @Test(description = "This test will fail", priority = 1)
    public void verifyBlankCredentials() {

        driver.findElement(By.name("username")).sendKeys("");
        driver.findElement(By.name("password")).sendKeys("admin123$$");
        driver.findElement(By.xpath("//*[@class='oxd-form']/div[3]/button")).submit();

        String actualErrorMessage = driver.findElement(By.xpath("//*[@class='oxd-form-row']/div/span")).getText();

        // Verify Error Message
        Assert.assertEquals(actualErrorMessage,"Invalid credentials");

    }

    @Test(description = "This test validates  successful login to Home page", priority = 2)
    public void verifyLoginPage() {

        driver.findElement(By.name("username")).sendKeys("Admin");
        driver.findElement(By.name("password")).sendKeys("admin123");
        driver.findElement(By.xpath("//*[@class='oxd-form']/div[3]/button")).submit();

        String homePageHeading = driver.findElement(By.xpath("//*[@class='oxd-topbar-header-breadcrumb']/h6")).getText();

        //Verify new page - HomePage
        Assert.assertEquals(homePageHeading,"Dashboard");

    }

    @AfterMethod
    public void tearDown() {

        driver.quit();
    }
}
Step 8 – Create testng.xml
Right-click on the project and select TestNG and select Convert to TestNG.
<?xml version="1.0" encoding="UTF-8"?>
<!DOCTYPE suite SYSTEM "https://testng.org/testng-1.0.dtd">
<suite name="Suite">
  <test name="Selenium Tests with TestNG">
    <classes>
      <class name="org.example.LoginTests"/>
    </classes>
  </test> <!-- Test -->
</suite> <!-- Suite -->
Step 9 – Run the tests from TestNG
Right-Click on the testng.xml and select Run As TestNG Suite.
The output of the above tests in Eclipse Console is as shown below.
This also generates a folder with the name test-output that contains the TestNG reports like index.html,emailable-report.html.
Step 10 – Run the tests from Command Line
To run the tests from the command line, use the below-mentioned command.
gradle clean test
The output of the above program is
Step 11 – TestNG and Gradle Report generation
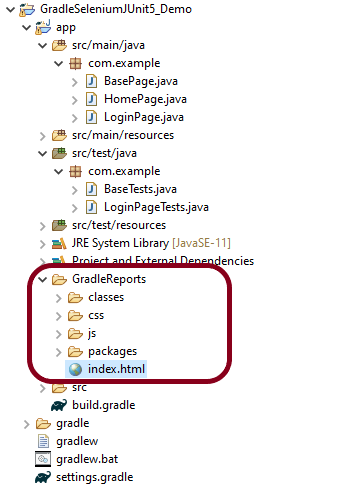
Once the test execution is finished, refresh the project. We will see 2 folders – GradleReports and TestNG_ Reports.
Gradle Reports
This folder contains index.html.
Right-click on index.html and select open with Web Browser. This report shows the summary of all the tests executed. As you can see that Failed tests are selected (highlighted in blue), so the name of the test failed along with the class name is displayed here.
TestNG Reports
Go to TestNG_Reports folder and right-click and open emailable-report.html.
Index.html
Congratulations on making it through this tutorial and hope you found it useful! Happy Learning!! Cheers!!
Environment variables JAVA_HOME and GRADLE_HOME are correctly configured
This framework consists of:
Java 11
JUnit Jupiter – 5.8.2
JUnit Jupiter Engine – 5.8.2
Gradle – 7.3.3 (Build Tool)
Selenium – 4.3.0
Steps to set up Gradle Java Project for Selenium and JUnit5
Download and Install Java on the system
Download and setup Eclipse IDE on the system
Setup Gradle on System
Create a new Gradle Project
Add Selenium and JUnit5 dependencies to the Gradle project
Create Pages and Test Code for the pages
Run the tests from Command Line
Gradle Report generation
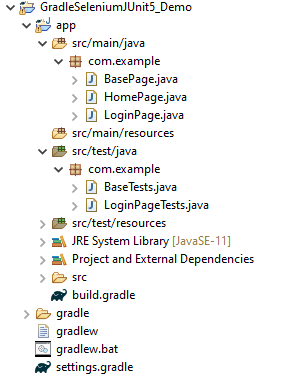
Project Structure
Implementation Steps
Step 1- Download and Install Java
Selenium needs Java to be installed on the system to run the tests. Click here to know How to install Java.
Step 2 – Download and setup Eclipse IDE on the system
The Eclipse IDE (integrated development environment) provides strong support for Java developers. Click here to know How to install Eclipse.
Step 3 – Setup Gradle
To build a test framework, we need to add several dependencies to the project. This can be achieved by any build tool. I have used Gradle Build Tool. Click here to know How to install Gradle.
Step 5 – Add Selenium and JUnit5 dependencies to the Gradle project
/*
 * This file was generated by the Gradle 'init' task.
 *
 */

plugins {
    // Apply the application plugin to add support for building a CLI application in Java.
    id 'application'
}

repositories {
    // Use Maven Central for resolving dependencies.
    mavenCentral()
}

java {
    sourceCompatibility = 11
    targetCompatibility = 11
}

dependencies {
    // Use JUnit Jupiter for testing.
    testImplementation 'org.junit.jupiter:junit-jupiter:5.8.2'
    testRuntimeOnly 'org.junit.jupiter:junit-jupiter-engine:5.8.2'

    implementation 'com.google.guava:guava:30.1.1-jre'
    implementation 'org.seleniumhq.selenium:selenium-java:4.4.0'
    implementation 'io.github.bonigarcia:webdrivermanager:5.3.0'
}

application {
    // Define the main class for the application.
    mainClass = 'com.example.App'
}

tasks.named('test') {
    // Use JUnit Platform for unit tests.
    useJUnitPlatform()  {
    }

 testLogging {
        events "passed", "skipped", "failed"
        showStandardStreams = true
    }

    systemProperties System.properties
    reports.html.setDestination(file("$projectDir/GradleReports"))
}
Step 6 – Create Pages and Test Code for the pages
We have used PageFactory model to build the tests. I have created a package named pages and created the page classes in that folder. Page class contains the locators of each web element present on that particular page along with the methods of performing actions using these web elements.
This is the BasePage that contains the PageFactory.initElements.
import org.openqa.selenium.WebDriver;
import org.openqa.selenium.support.PageFactory;

public class BasePage {

	  public WebDriver driver;

	  public BasePage(WebDriver driver) {
		  this.driver = driver;
		  PageFactory.initElements(driver,this);
	}

}
Below is the code for LoginPage and HomePage
LoginPage
import org.openqa.selenium.WebDriver;
import org.openqa.selenium.WebElement;
import org.openqa.selenium.support.FindBy;

public class LoginPage extends BasePage{

	 public LoginPage(WebDriver driver) {
		 super(driver);
    }

	@FindBy(name = "username")
    public WebElement userName;

    @FindBy(name = "password")
    public WebElement password;

    @FindBy(xpath = "//*[@id='app']/div[1]/div/div[1]/div/div[2]/div[2]/form/div[1]/div/span")
    public WebElement missingUsernameErrorMessage;

    @FindBy(xpath = "//*[@id='app']/div[1]/div/div[1]/div/div[2]/div[2]/form/div[1]/div/span")
    public WebElement missingPasswordErrorMessage;

    @FindBy(xpath = "//*[@id='app']/div[1]/div/div[1]/div/div[2]/div[2]/form/div[3]/button")
    public WebElement login;

    @FindBy(xpath = "//*[@id='app']/div[1]/div/div[1]/div/div[2]/div[2]/div/div[1]/div[1]/p")
    public  WebElement errorMessage;

    public String getMissingUsernameText() {
        return missingUsernameErrorMessage.getText();
    }

    public String getMissingPasswordText() {
        return missingPasswordErrorMessage.getText();
    }

    public String getErrorMessage() {
        return errorMessage.getText();
    }

    public void login(String strUserName, String strPassword) {

    	userName.sendKeys(strUserName);
    	password.sendKeys(strPassword);
    	login.click();

    }

}
HomePage
import org.openqa.selenium.WebDriver;
import org.openqa.selenium.WebElement;
import org.openqa.selenium.support.FindBy;

public class HomePage extends BasePage {

	public HomePage(WebDriver driver) {
		super(driver);
	}

	  @FindBy(xpath = "//*[@id='app']/div[1]/div[2]/div[2]/div/div[1]/div[1]/div[1]/h5")
	  public  WebElement homePageUserName;

	    public String getHomePageText() {
	       return homePageUserName.getText();
   }

}
Here, we have BaseTests Class also which contains the common methods needed by other test pages.
import java.time.Duration;
import org.junit.jupiter.api.AfterEach;
import org.junit.jupiter.api.BeforeEach;
import org.openqa.selenium.WebDriver;
import org.openqa.selenium.chrome.ChromeDriver;
import io.github.bonigarcia.wdm.WebDriverManager;

public class BaseTests {

	public WebDriver driver;
	public final static int TIMEOUT = 10;

	@BeforeEach
    public void setup() {
    	WebDriverManager.chromedriver().setup();
	    driver = new ChromeDriver();
	    driver.manage().window().maximize();
	    driver.get("https://opensource-demo.orangehrmlive.com/");
	    driver.manage().timeouts().implicitlyWait(Duration.ofSeconds(TIMEOUT));

    }

    @AfterEach
    public void tearDown() {
        driver.quit();
    }

}
LoginPageTests
import org.junit.jupiter.api.Test;
import org.junit.jupiter.params.ParameterizedTest;
import org.junit.jupiter.params.provider.CsvSource;
import static org.junit.jupiter.api.Assertions.assertEquals;
import org.junit.jupiter.api.Disabled;

public class LoginPageTests extends BaseTests{

    @ParameterizedTest
    @CsvSource({
            "admin$$,admin123",
            "Admin,admin123!!",
            "admin123,Admin",
            "%%%%%,$$$$$$"})
    public void invalidCredentials(String username, String password) {

	    LoginPage objLoginPage = new LoginPage(driver);
    	objLoginPage.login(username, password);

    	// Verify Error Message
    	 assertEquals("Invalid credentials",objLoginPage.getErrorMessage());

    }

    @Test
    public void validLogin() {

	    LoginPage objLoginPage = new LoginPage(driver);
    	objLoginPage.login("Admin", "admin123");

    	HomePage objHomePage = new HomePage(driver);

    	// Verify Home Page
    	 assertEquals("Employee Information",objHomePage.getHomePageText());

    }

    @Test
    public void missingUsername() {

	    LoginPage objLoginPage = new LoginPage(driver);
    	objLoginPage.login("", "admin123");

    	// Verify Error Message
   	     assertEquals("Invalid credentials",objLoginPage.getMissingUsernameText());

    }

    @Test @Disabled
    public void missingPassword() {

	    LoginPage objLoginPage = new LoginPage(driver);
    	objLoginPage.login("admin", "");

    	// Verify Error Message
   	     assertEquals("Invalid credentials",objLoginPage.getMissingPasswordText());

    }

}
Step 7 – Run the tests from Command Line
Note:- As you can see, my project has two parts – GradleSeleniumJUnit5_Demo and app.
Go to the app project and run the tests, using the below command.
gradle clean test
The output of the above program is
Step 8 – Gradle Report generation
Once the test execution is finished, refresh the project. We will see a folder – GradleReports. This report is generated when the tests are executed through the command line.
This folder contains index.html.
Right-click on index.html and select open with Web Browser. This report shows the summary of all the tests executed. As you can see that Failed tests are selected (highlighted in blue), so the name of the test failed along with the class name is displayed here.
This report contains detailed information about the failed test, which is shown below.
This shows the list of all the tests – passed, failed, or ignored.
The previous tutorial explained the Integration of Cucumber with Selenium and JUnit4 in a Maven Project. This tutorial explains the test automation framework based on Gradle, Cucumber, Selenium, and JUnit4.
Pre Requisite:
Java 8 or above installed
Eclipse or IntelliJ IDE installed
Gradle Installed
Environment variables JAVA_HOME and GRADLE_HOME are correctly configured
In this tutorial, I’ll create a BDD Framework for the testing of web applications using Cucumber, and Selenium WebDriver with JUnit4. This framework consists of:-
Cucumber Java- 7.6.0
Cucumber JUnit– 7.6.0
Java 11
JUnit4 – 4.13.2
Gradle – 7.5.1
Selenium – 4.3.0
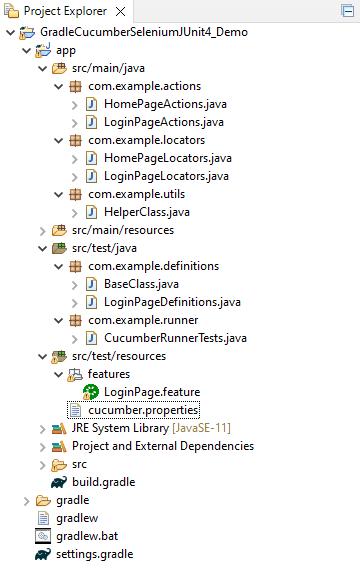
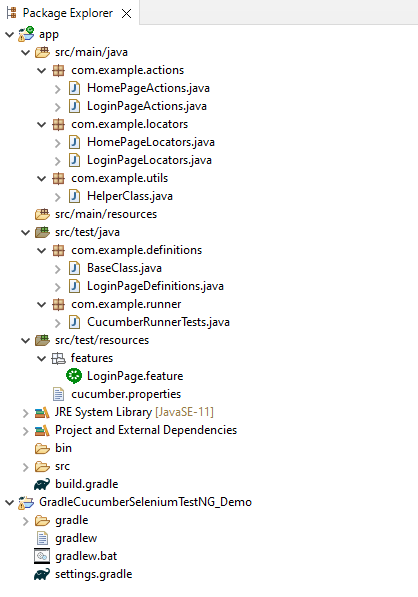
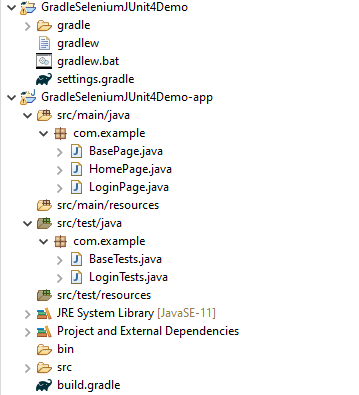
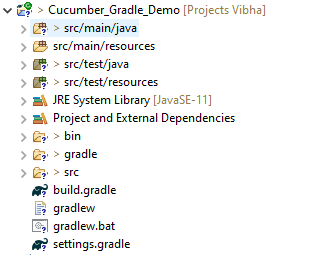
Project Structure
Steps to set up Cucumber Test Automation Framework with Selenium and TestNG
Download and Install Java on the system
Download and setup Eclipse IDE on the system
Install and setup Gradle
Install Cucumber Eclipse Plugin (For Eclipse IDE)
Create a new Gradle Project
Add Selenium, JUnit4, and Cucumberdependencies to the build.gradle
Create a featurefile under src/test/resources
Create the classes for locators, actions, and utilitiesin src/main/java
Create the Step Definition class or Glue Code in src/test/java
Create a Hook class to contain the initialization and closing of the browser in src/test/java
Create a JUnit4 Cucumber Runnerclass in src/test/java
Run the tests from Command Line
Cucumber Report Generation
Implementation Steps
Step 1- Download and Install Java
Cucumber and Selenium need Java to be installed on the system to run the tests. Click here to know How to install Java.
Step 2 – Download and setup Eclipse IDE on the system
The Eclipse IDE (integrated development environment) provides strong support for Java developers. Click here to know How to install Eclipse.
Step 3 – Setup Maven
To build a test framework, we need to add a number of dependencies to the project. Click here to know How to install Maven.
Step 4 – Install Cucumber Eclipse Plugin
The cucumber plugin is an Eclipse plugin that allows eclipse to understand the Gherkin syntax. When we are working with cucumber we will write the feature files that contain Feature, Scenario, Given, When, Then, And, But, Tags, Scenario Outline, and Examples. By default, eclipse doesn’t understand these keywords so it doesn’t show any syntax highlighter. Cucumber Eclipse Plugin highlights the keywords present in Feature File. Refer to this tutorial to get more detail – How to setup Cucumber with Eclipse.
Step 5 – Create a new Gradle Project
Below are the steps to create the Gradle project from the command line.
Step 6 – Add Selenium, JUnit4, and Cucumber dependencies to the build.gradle
Add below mentioned Selenium, JUnit4, and Cucumber dependencies to the project.
/*
 * This file was generated by the Gradle 'init' task.
 *
 */

plugins {
    // Apply the application plugin to add support for building a CLI application in Java.
    id 'application'
}

repositories {
    // Use Maven Central for resolving dependencies.
    mavenCentral()
}

java {
    sourceCompatibility = 11
    targetCompatibility = 11
}

dependencies {

    testImplementation 'io.cucumber:cucumber-java:7.6.0'
    testImplementation 'io.cucumber:cucumber-junit:7.6.0'

    // Use JUnit test framework.
    testImplementation 'junit:junit:4.13.2'

    // This dependency is used by the application.
    implementation 'com.google.guava:guava:30.1.1-jre'
    implementation 'org.seleniumhq.selenium:selenium-java:4.4.0'
    implementation 'io.github.bonigarcia:webdrivermanager:5.3.0'
}

application {
    // Define the main class for the application.
    mainClass = 'com.example.App'
}

configurations {
    cucumberRuntime {
        extendsFrom testImplementation
    }
}

task cucumber() {
    dependsOn assemble, testClasses
    doLast {

        javaexec {
            main = "io.cucumber.core.cli.Main"
            classpath = configurations.cucumberRuntime + sourceSets.main.output + sourceSets.test.output

            args = ['--plugin', 'pretty',
            '--glue', 'com.example.definitions', 'src/test/resources'
            ]
        }

    }
}
Step 7 – Create a feature file in the src/test/resources directory
Create a folder with name features. Now, create the feature file in this folder. The feature file should be saved with the extension .feature. This feature file contains the test scenarios created to test the application. The Test Scenarios are written in Gherkins language in the format of Given, When, Then, And, But.
Feature: Login to HRM Application
Background:
Given User is on HRMLogin page "https://opensource-demo.orangehrmlive.com/"
@ValidCredentials
Scenario: Login with valid credentials
When User enters username as "Admin" and password as "admin123"
Then User should be able to login sucessfully and new page open
@InvalidCredentials
Scenario Outline: Login with invalid credentials
When User enters username as "<username>" and password as "<password>"
Then User should be able to see error message "<errorMessage>"
Examples:
| username | password | errorMessage |
| Admin | admin12$$ | Invalid credentials |
| admin$$ | admin123 | Invalid credentials |
| abc123 | xyz$$ | Invalid credentials |
| $$$$$$ | %%%%% | Invalid credentials |
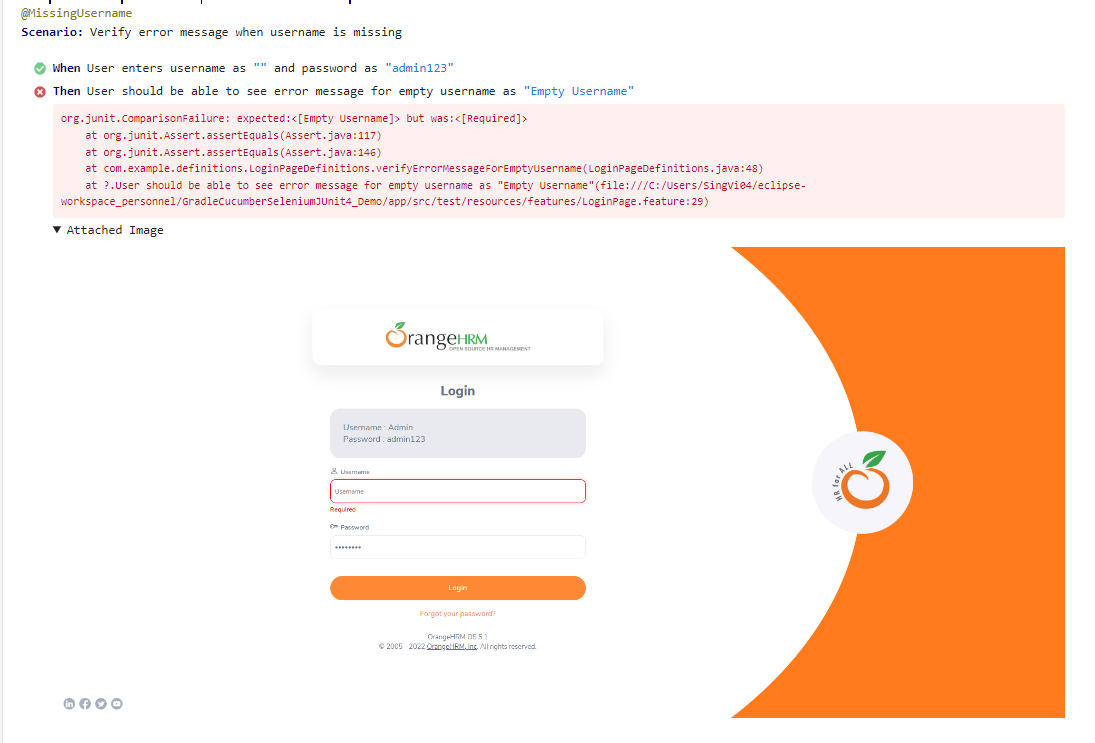
@MissingUsername @FailedTest
Scenario: Verify error message when username is missing
When User enters username as "" and password as "admin123"
Then User should be able to see error message for empty username as "Empty Username"
Step 8 – Create the classes for locators, actions, and utilities in src/main/java
Below is the sample code of the LoginPageLocators.
import org.openqa.selenium.WebElement;
import org.openqa.selenium.support.FindBy;

public class LoginPageLocators {

	@FindBy(name = "username")
    public WebElement userName;

    @FindBy(name = "password")
    public WebElement password;

    @FindBy(xpath = "//*[@id='app']/div[1]/div/div[1]/div/div[2]/div[2]/form/div[3]/button")
    public WebElement login;

    @FindBy(xpath = "//*[@id='app']/div[1]/div/div[1]/div/div[2]/div[2]/div/div[1]/div[1]/p")
    public  WebElement errorMessage;

    @FindBy(xpath = "//*[@id='app']/div[1]/div/div[1]/div/div[2]/div[2]/form/div[1]/div/span")
    public WebElement missingUsernameErrorMessage;

}
Below is the sample code for the HomePageLocators.
import org.openqa.selenium.WebElement;
import org.openqa.selenium.support.FindBy;

public class HomePageLocators {

	   @FindBy(xpath = "//*[@id='app']/div[1]/div[2]/div[2]/div/div[1]/div[1]/div[1]/h5")
	   public  WebElement homePageUserName;

}
Create the action classes for each web page. These action classes contain all the methods needed by the step definitions. In this case, I have created 2 action classes – LoginPageActions and HomePageActions.
LoginPageActions
import org.openqa.selenium.support.PageFactory;
import com.example.locators.LoginPageLocators;
import com.example.utils.HelperClass;

public class LoginPageActions {

	LoginPageLocators loginPageLocators = null;

    public LoginPageActions() {

    	this.loginPageLocators = new LoginPageLocators();
		PageFactory.initElements(HelperClass.getDriver(),loginPageLocators);
	}

    public void login(String strUserName, String strPassword) {

        // Fill user name
    	loginPageLocators.userName.sendKeys(strUserName);

        // Fill password
    	loginPageLocators.password.sendKeys(strPassword);

        // Click Login button
    	loginPageLocators.login.click();

    }

    // Get the error message when invalid credentials are provided
    public String getErrorMessage() {
        return loginPageLocators.errorMessage.getText();
    }

   // Get the error message when username is blank
   public String getMissingUsernameText() {
        return loginPageLocators.missingUsernameErrorMessage.getText();
    }
}
HomePageActions
import org.openqa.selenium.support.PageFactory;
import com.example.locators.HomePageLocators;
import com.example.utils.HelperClass;

public class HomePageActions {

	HomePageLocators homePageLocators = null;

	public HomePageActions() {

		this.homePageLocators = new HomePageLocators();

		PageFactory.initElements(HelperClass.getDriver(),homePageLocators);
    }


    // Get the User name from Home Page
    public String getHomePageText() {
        return homePageLocators.homePageUserName.getText();
    }

}
Create a Helper class where we are initializing the web driver, initializing the web driver wait, defining the timeouts, and creating a private constructor of the class, it will declare the web driver, so whenever we create an object of this class, a new web browser is invoked.
import java.time.Duration;
import org.openqa.selenium.WebDriver;
import org.openqa.selenium.chrome.ChromeDriver;
import io.github.bonigarcia.wdm.WebDriverManager;

public class HelperClass {

	private static HelperClass helperClass;
	private static WebDriver driver;
    public final static int TIMEOUT = 10;

	 private HelperClass() {

			WebDriverManager.chromedriver().setup();
	    	driver = new ChromeDriver();
	        driver.manage().timeouts().implicitlyWait(Duration.ofSeconds(TIMEOUT));
	        driver.manage().window().maximize();

	 }

    public static void openPage(String url) {
        driver.get(url);
    }

	public static WebDriver getDriver() {
		return driver;
	}

	public static void setUpDriver() {

		if (helperClass==null) {

			helperClass = new HelperClass();
		}
	}

	 public static void tearDown() {

		 if(driver!=null) {
			 driver.close();
			 driver.quit();
		 }

		 helperClass = null;

	 }
}
Step 9 – Create the Step Definition class or Glue Code in src/test/java
Now, we need to create the Step Definition of the Feature File
LoginPageDefinitions.java
import org.junit.Assert;
import com.example.actions.HomePageActions;
import com.example.actions.LoginPageActions;
import com.example.utils.HelperClass;
import io.cucumber.java.en.Given;
import io.cucumber.java.en.Then;
import io.cucumber.java.en.When;

public class LoginPageDefinitions {

	LoginPageActions objLogin = new LoginPageActions();
    HomePageActions objHomePage = new HomePageActions();

    @Given("User is on HRMLogin page {string}")
    public void loginTest(String url) {

    	HelperClass.openPage(url);
    }

    @When("User enters username as {string} and password as {string}")
    public void goToHomePage(String userName, String passWord) {

        objLogin.login(userName, passWord);
    }

    @Then("User should be able to login sucessfully and new page open")
    public void verifyLogin() {

        Assert.assertTrue(objHomePage.getHomePageText().contains("Employee Information"));
    }

    @Then("User should be able to see error message {string}")
    public void verifyErrorMessageForInvalidCredentials(String expectedErrorMessage) {

        Assert.assertEquals(expectedErrorMessage,objLogin.getErrorMessage());
    }

    @Then("User should be able to see error message for empty username as {string}")
    public void verifyErrorMessageForEmptyUsername(String expectedErrorMessage) {

        Assert.assertEquals(expectedErrorMessage,objLogin.getMissingUsernameText());

    }
}
Step 10 – Create a Hook class to contain the initialization and closing of the browser in src/test/java
import org.openqa.selenium.OutputType;
import org.openqa.selenium.TakesScreenshot;
import com.example.utils.HelperClass;
import io.cucumber.java.After;
import io.cucumber.java.Before;
import io.cucumber.java.Scenario;

public class BaseClass {

	@Before
    public static void setUp() {

       HelperClass.setUpDriver();
    }

	@After
	public static void tearDown(Scenario scenario) {


		//validate if scenario has failed
		if(scenario.isFailed()) {
			final byte[] screenshot = ((TakesScreenshot) HelperClass.getDriver()).getScreenshotAs(OutputType.BYTES);
			scenario.attach(screenshot, "image/png", scenario.getName());
		}

		HelperClass.tearDown();
	}
}
Step 11 – Create a JUnit Cucumber Runner class in src/test/java
Cucumber needs a TestRunner class to run the feature files. It is suggested to create a folder with the name of the runner in the src/test/java directory and create the Cucumber TestRunner class in this folder. Below is the code of the Cucumber TestRunner class.
import org.junit.runner.RunWith;
import io.cucumber.junit.Cucumber;
import io.cucumber.junit.CucumberOptions;

@RunWith(Cucumber.class)
@CucumberOptions(tags = "", features = {"src/test/resources/features/LoginPage.feature"}, glue = {"com.example.definitions"})

public class CucumberRunnerTests {

}
Step 12 – Run the tests from Command Line
Run the below command in the command prompt to run the tests and to get the test execution report.
gradle cucumber
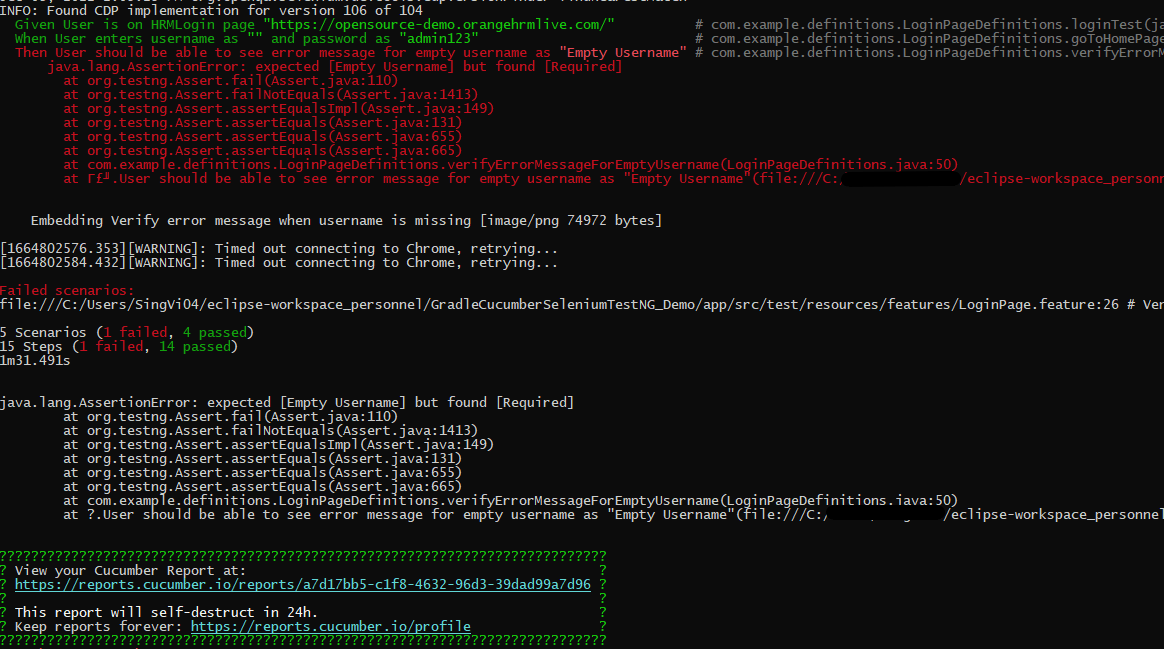
The output of the above program is
Step 13 – Cucumber Report Generation
To get Cucumber Test Reports, add cucumber.properties under src/test/resources and add the below instruction in the file
cucumber.publish.enabled=true
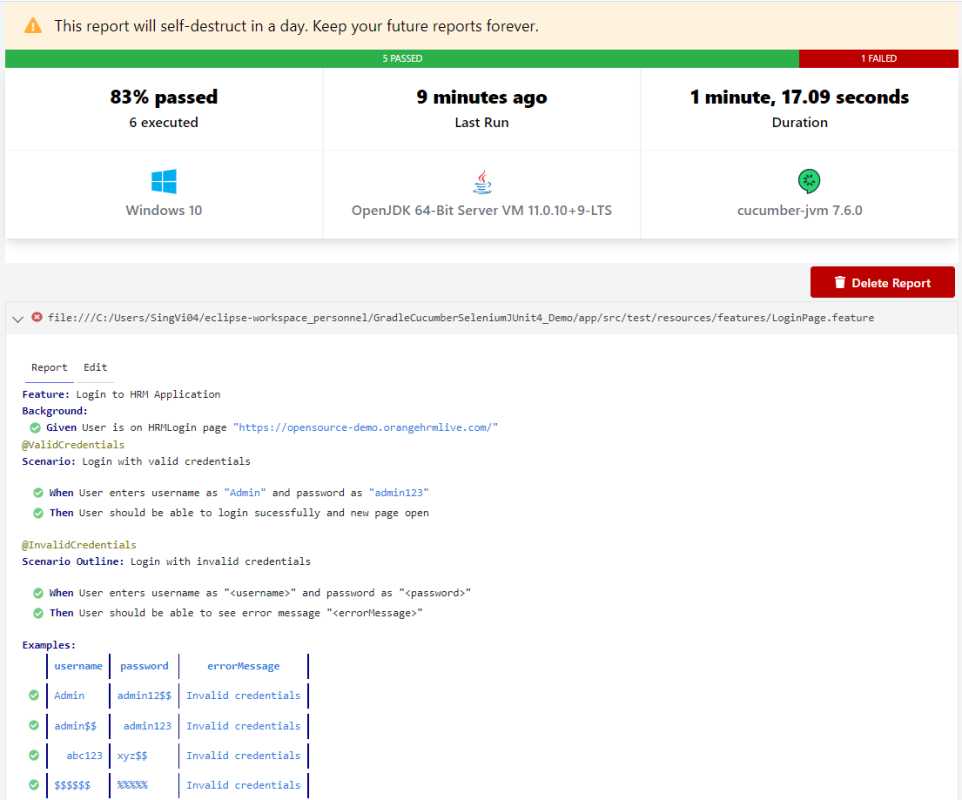
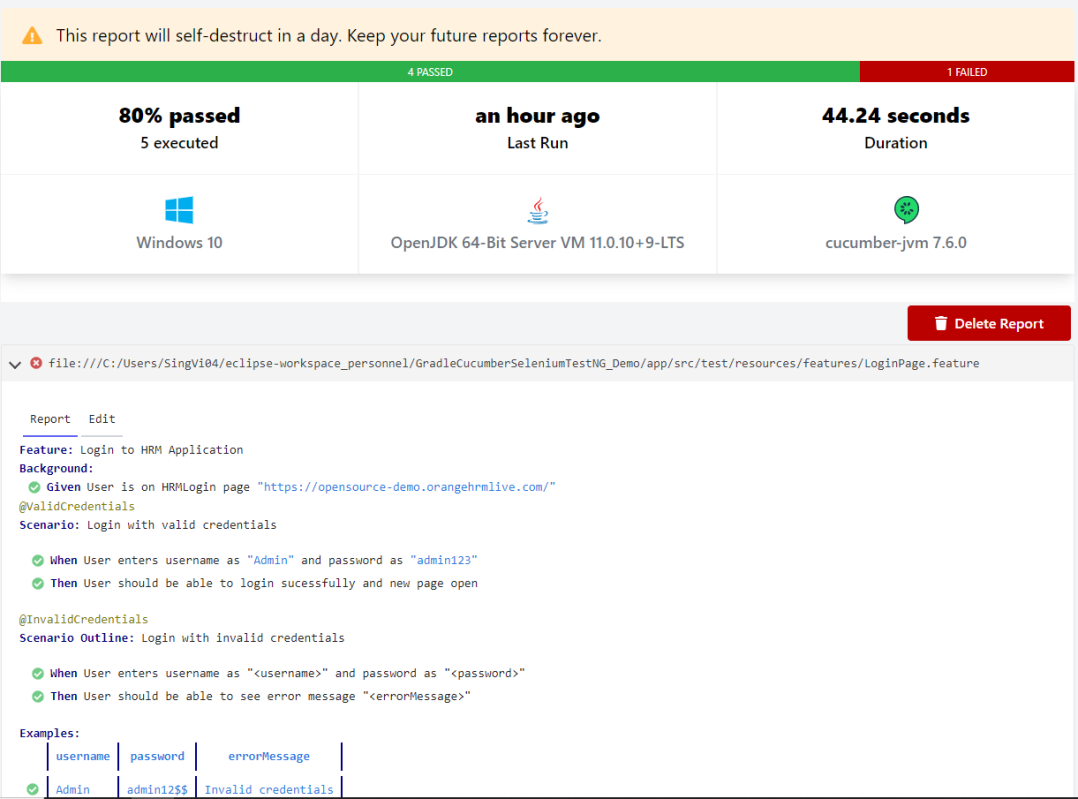
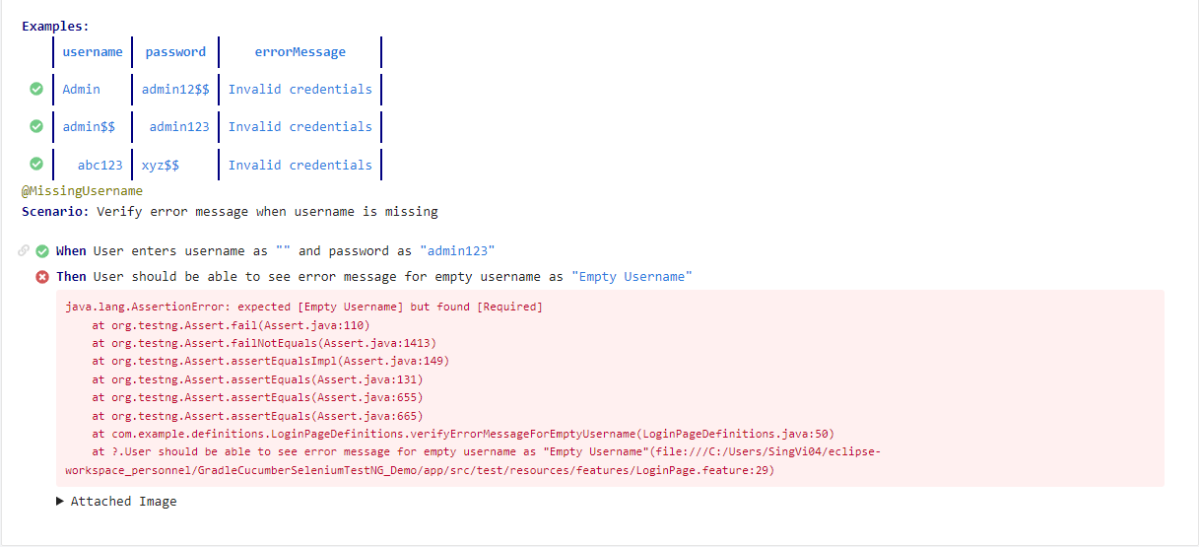
Below is the image of the Cucumber Report generated using the Cucumber Service.
In the above example, as we can see, one of the tests has failed. So, when a test fails, we have written the code to take a screenshot of the failed step. The highlighted box above shows the image of the failed test. You can click on that to see the screenshot.
Congratulations on making it through this tutorial and hope you found it useful! Happy Learning!! Cheers!!
The previous tutorial explained the Integration of Cucumber with Selenium and TestNG in a Maven Project. This tutorial explains the test automation framework based on Gradle, Cucumber, Selenium, and TestNG.
Pre Requisite:
Java 8 or above installed
Eclipse or IntelliJ IDE installed
Gradle Installed
Environment variables JAVA_HOME and GRADLE_HOME are correctly configured
In this tutorial, I’ll create a BDD Framework for the testing of web applications using Cucumber, and Selenium WebDriver with TestNG. This framework consists of:-
Cucumber Java- 7.6.0
Cucumber TestNG – 7.6.0
Java 11
TestNG – 7.6.0
Gradle – 7.5.1
Selenium – 4.3.0
Project Structure
Steps to set up Cucumber Test Automation Framework with Selenium and TestNG
Download and Install Java on the system
Download and setup Eclipse IDE on the system
Install and setup Gradle
Install Cucumber Eclipse Plugin (For Eclipse IDE)
Create a new Gradle Project
Add Selenium, TestNG, and Cucumberdependencies to the build.gradle
Create a featurefile under src/test/resources
Create the classes for locators, actions and utilitiesin src/main/java
Create the Step Definition class or Glue Code in src/test/java
Create a Hook class to contain the initialization and closing of browser in src/test/java
Create a TestNG Cucumber Runnerclass in src/test/java
Run the tests from Command Line
Cucumber Report Generation
Implementation Steps
Step 1- Download and Install Java
Cucumber and Selenium need Java to be installed on the system to run the tests. Click here to know How to install Java.
Step 2 – Download and setup Eclipse IDE on the system
The Eclipse IDE (integrated development environment) provides strong support for Java developers. Click here to know How to install Eclipse.
Step 3 – Setup Maven
To build a test framework, we need to add a number of dependencies to the project. Click here to know How to install Maven.
Step 4 – Install Cucumber Eclipse Plugin
The cucumber plugin is an Eclipse plugin that allows eclipse to understand the Gherkin syntax. When we are working with cucumber we will write the feature files that contain Feature, Scenario, Given, When, Then, And, But, Tags, Scenario Outline, and Examples. By default, eclipse doesn’t understand these keywords so it doesn’t show any syntax highlighter. Cucumber Eclipse Plugin highlights the keywords present in Feature File. Refer to this tutorial to get more detail – How to setup Cucumber with Eclipse.
Step 5 – Create a new Gradle Project
Below are the steps to create the Gradle project from the command line.
/*
 * This file was generated by the Gradle 'init' task.
 *
 * This generated file contains a sample Java application project to get you started.
 */

plugins {
    // Apply the application plugin to add support for building a CLI application in Java.
    id 'application'
    id 'io.qameta.allure' version '2.11.0'
}

repositories {
    // Use Maven Central for resolving dependencies.
    mavenCentral()
}

java {
    sourceCompatibility = 11
    targetCompatibility = 11
}

dependencies {

    // Use TestNG framework, also requires calling test.useTestNG() below
    testImplementation 'io.cucumber:cucumber-java:7.6.0'
    testImplementation 'io.cucumber:cucumber-testng:7.6.0'

     //TestNG
      testImplementation 'org.testng:testng:7.6.0'

     //Others
     implementation 'com.google.guava:guava:31.0.1-jre'
     implementation 'org.seleniumhq.selenium:selenium-java:4.4.0'
     implementation 'io.github.bonigarcia:webdrivermanager:5.3.0'
}

application {
    // Define the main class for the application.
    mainClass = 'com.example.App'
}

tasks.named('test') {
    // Use TestNG for unit tests.
    useTestNG()
}

configurations {
    cucumberRuntime {
        extendsFrom testImplementation
    }
}

task cucumber() {
    dependsOn assemble, testClasses
    doLast {
        javaexec {

            main = "io.cucumber.core.cli.Main"
            classpath = configurations.cucumberRuntime + sourceSets.main.output + sourceSets.test.output
            args = ['--plugin', 'pretty',
            '--glue', 'com.example.definitions', 'src/test/resources']
        }
    }
}
Step 7 – Create a feature file in the src/test/resources directory
Create a folder with name features. Now, create the feature file in this folder. The feature file should be saved with the extension .feature. This feature file contains the test scenarios created to test the application. The Test Scenarios are written in Gherkins language in the format of Given, When, Then, And, But.
Below is an example of the Feature File.
Feature: Login to HRM Application

Background:
   Given User is on HRMLogin page "https://opensource-demo.orangehrmlive.com/"

   @ValidCredentials
   Scenario: Login with valid credentials

    When User enters username as "Admin" and password as "admin123"
    Then User should be able to login sucessfully and new page open

   @InvalidCredentials
   Scenario Outline: Login with invalid credentials

    When User enters username as "<username>" and password as "<password>"
    Then User should be able to see error message "<errorMessage>"

  Examples:
  | username   | password  | errorMessage                      |
  | Admin      | admin12$$ | Invalid credentials               |
  | admin$$    | admin123  | Invalid credentials               |
  | abc123     | xyz$$     | Invalid credentials               |


   @MissingUsername
   Scenario: Verify error message when username is missing

    When User enters username as "" and password as "admin123"
    Then User should be able to see error message "Empty Username"
Step 8 – Create the classes for locators, actions and utilities in src/main/java
Below is the sample code of the LoginPageLocators.
import org.openqa.selenium.WebElement;
import org.openqa.selenium.support.FindBy;

public class LoginPageLocators {

	@FindBy(name = "username")
    public WebElement userName;

    @FindBy(name = "password")
    public WebElement password;

    @FindBy(xpath = "//*[@id='app']/div[1]/div/div[1]/div/div[2]/div[2]/form/div[3]/button")
    public WebElement login;

    @FindBy(xpath = "//*[@id='app']/div[1]/div/div[1]/div/div[2]/div[2]/div/div[1]/div[1]/p")
    public  WebElement errorMessage;

    @FindBy(xpath = "//*[@id='app']/div[1]/div/div[1]/div/div[2]/div[2]/form/div[1]/div/span")
    public WebElement missingUsernameErrorMessage;

}
Below is the sample code for the HomePageLocators.
import org.openqa.selenium.WebElement;
import org.openqa.selenium.support.FindBy;

public class HomePageLocators {

	   @FindBy(xpath = "//*[@id='app']/div[1]/div[2]/div[2]/div/div[1]/div[1]/div[1]/h5")
	   public  WebElement homePageUserName;

}
Create the action classes for each web page. These action classes contain all the methods needed by the step definitions. In this case, I have created 2 action classes – LoginPageActions and HomePageActions .
LoginPageActions
import org.openqa.selenium.support.PageFactory;
import com.example.locators.LoginPageLocators;
import com.example.utils.HelperClass;

public class LoginPageActions {

	LoginPageLocators loginPageLocators = null;

    public LoginPageActions() {

    	this.loginPageLocators = new LoginPageLocators();

		PageFactory.initElements(HelperClass.getDriver(),loginPageLocators);
	}

    public void login(String strUserName, String strPassword) {

    	loginPageLocators.userName.sendKeys(strUserName);
    	loginPageLocators.password.sendKeys(strPassword);
    	loginPageLocators.login.click();

    }

    // Get the error message when invalid credentials are provided
    public String getErrorMessage() {
        return loginPageLocators.errorMessage.getText();
    }


   // Get the error message when username is blank
   public String getMissingUsernameText() {
        return loginPageLocators.missingUsernameErrorMessage.getText();
    }
}
HomePageActions
import org.openqa.selenium.support.PageFactory;

import com.example.locators.HomePageLocators;
import com.example.utils.HelperClass;

public class HomePageActions {

	HomePageLocators homePageLocators = null;

	public HomePageActions() {

		this.homePageLocators = new HomePageLocators();

		PageFactory.initElements(HelperClass.getDriver(),homePageLocators);
    }

    // Get the User name from Home Page
    public String getHomePageText() {
        return homePageLocators.homePageUserName.getText();
    }

}
Create a Helper class where we are initializing the web driver, initializing the web driver wait, defining the timeouts, and creating a private constructor of the class, it will declare the web driver, so whenever we create an object of this class, a new web browser is invoked.
import java.time.Duration;
import org.openqa.selenium.WebDriver;
import org.openqa.selenium.chrome.ChromeDriver;
import io.github.bonigarcia.wdm.WebDriverManager;

public class HelperClass {

	private static HelperClass helperClass;
	private static WebDriver driver;
    public final static int TIMEOUT = 10;

	 private HelperClass() {

			WebDriverManager.chromedriver().setup();
	    	driver = new ChromeDriver();
	        driver.manage().timeouts().implicitlyWait(Duration.ofSeconds(TIMEOUT));
	        driver.manage().window().maximize();

	 }


    public static void openPage(String url) {
        driver.get(url);
    }


	public static WebDriver getDriver() {
		return driver;
	}

	public static void setUpDriver() {

		if (helperClass==null) {

			helperClass = new HelperClass();
		}
	}

	 public static void tearDown() {

		 if(driver!=null) {
			 driver.close();
			 driver.quit();
		 }

		 helperClass = null;
	 }

}
Step 9 – Create the Step Definition class or Glue Code in src/test/java
Now, we need to create the Step Definition of the Feature File – LoginPageDefinitions.java.
import org.testng.Assert;
import org.testng.SkipException;
import com.example.actions.HomePageActions;
import com.example.actions.LoginPageActions;
import com.example.utils.HelperClass;
import io.cucumber.java.en.Given;
import io.cucumber.java.en.Then;
import io.cucumber.java.en.When;

public class LoginPageDefinitions {

	LoginPageActions objLogin = new LoginPageActions();
    HomePageActions objHomePage = new HomePageActions();

    @Given("User is on HRMLogin page {string}")
    public void loginTest(String url) {

    	HelperClass.openPage(url);

    }

    @When("User enters username as {string} and password as {string}")
    public void goToHomePage(String userName, String passWord) {

        objLogin.login(userName, passWord);

    }

    @Then("User should be able to login sucessfully and new page open")
    public void verifyLogin() {

        Assert.assertTrue(objHomePage.getHomePageText().contains("Employee Information"));

    }

    @Then("User should be able to see error message {string}")
    public void verifyErrorMessageForInvalidCredentials(String expectedErrorMessage) {

        Assert.assertEquals(objLogin.getErrorMessage(),expectedErrorMessage);

    }


    @Then("User should be able to see error message for empty username as {string}")
    public void verifyErrorMessageForEmptyUsername(String expectedErrorMessage) {
    	       Assert.assertEquals(objLogin.getMissingUsernameText(),expectedErrorMessage);

    }

}
Step 10 – Create a Hook class to contain the initialization and closing of the browser in src/test/java
Below is the example of the Hook class where we initialize the browser as well as close the browser at the end of the execution.
import org.openqa.selenium.OutputType;
import org.openqa.selenium.TakesScreenshot;
import com.example.utils.HelperClass;
import io.cucumber.java.After;
import io.cucumber.java.Before;
import io.cucumber.java.Scenario;

public class BaseClass {

	@Before
    public static void setUp() {

       HelperClass.setUpDriver();
    }


	@After
	public static void tearDown(Scenario scenario) {

		//validate if scenario has failed
		if(scenario.isFailed()) {
			final byte[] screenshot = ((TakesScreenshot) HelperClass.getDriver()).getScreenshotAs(OutputType.BYTES);
			scenario.attach(screenshot, "image/png", scenario.getName());
		}

		HelperClass.tearDown();
	}
}
Step 11 – Create a TestNG Cucumber Runner class in src/test/java
Cucumber needs a TestRunner class to run the feature files. It is suggested to create a folder with the name of the runner in the src/test/java directory and create the Cucumber TestRunner class in this folder. Below is the code of the Cucumber TestRunner class.
import io.cucumber.testng.AbstractTestNGCucumberTests;
import io.cucumber.testng.CucumberOptions;

@CucumberOptions(tags = "", features = {"src/test/resources/features/LoginPage.feature"}, glue = {"com.example.definitions"})

public class CucumberRunnerTests extends AbstractTestNGCucumberTests {

}
Step 12 – Run the tests from Command Line
Run the below command in the command prompt to run the tests and to get the test execution report.
gradle cucumber
The output of the above program is
Step 13 – Cucumber Report Generation
To get Cucumber Test Reports, add cucumber.properties under src/test/resources and add the below instruction in the file.
cucumber.publish.enabled=true
Below is the image of the Cucumber Report generated using the Cucumber Service.
In the above example, as we can see, one of the tests has failed. So, when a test fails, we have written the code to take a screenshot of the failed step. The highlighted box above shows the image of the failed test. You can click on that to see the screenshot.
Congratulations on making it through this tutorial and hope you found it useful! Happy Learning!! Cheers!!
Steps to set up Gradle Java Project for Selenium and TestNG
Download and Install Java on the system
Download and setup Eclipse IDE on the system
Setup Gradle on System
Create a new Gradle Project
Add Selenium and JUnit4 dependencies to the Gradle project
Create Pages and Test Code for the pages
Run the tests from JUnit
Run the tests from Command Line
Gradle Report generation
Project Structure
Implementation Steps
Step 1- Download and Install Java
Selenium needs Java to be installed on the system to run the tests. Click here to know How to install Java.
Step 2 – Download and setup Eclipse IDE on the system
The Eclipse IDE (integrated development environment) provides strong support for Java developers. Click here to know How to install Eclipse.
Step 3 – Setup Gradle
To build a test framework, we need to add several dependencies to the project. This can be achieved by any build tool. I have used Gradle Build Tool. Click here to know How to install Gradle.
Step 5 – Add Selenium and JUnit4 dependencies to the Gradle project
plugins {
    // Apply the application plugin to add support for building a CLI application in Java.
    id 'application'
}

repositories {
    // Use Maven Central for resolving dependencies.
    mavenCentral()
}

java {
    sourceCompatibility = 11
    targetCompatibility = 11
}

dependencies {
    // Use JUnit test framework.
    testImplementation 'junit:junit:4.13.2'

    // This dependency is used by the application.
    implementation 'com.google.guava:guava:30.1.1-jre'
    implementation 'org.seleniumhq.selenium:selenium-java:4.4.0'
    implementation 'io.github.bonigarcia:webdrivermanager:5.3.0'
}

application {
    // Define the main class for the application.
    mainClass = 'com.example.App'
}

test {
    useJUnit {

    }

    testLogging {
        events "passed", "skipped", "failed"
        showStandardStreams = true
    }

    systemProperties System.properties
    reports.html.setDestination(file("$projectDir/GradleReports"))
}
Step 6 – Create Pages and Test Code for the pages
We have used PageFactory model to build the tests. I have created a package named pages and created the page classes in that folder. Page class contains the locators of each web element present on that particular page along with the methods of performing actions using these web elements.
This is the BaseClass that contains the PageFactory.initElements.
import org.openqa.selenium.WebDriver;
import org.openqa.selenium.support.PageFactory;

public class BasePage {

      public WebDriver driver;

      public BasePage(WebDriver driver) {
          this.driver = driver;
          PageFactory.initElements(driver,this);
    }

}
Below is the code for LoginPage and HomePage
LoginPage
import org.openqa.selenium.WebDriver;
import org.openqa.selenium.WebElement;
import org.openqa.selenium.support.FindBy;

public class LoginPage extends BasePage{

     public LoginPage(WebDriver driver) {
         super(driver);

    }

    @FindBy(name = "username")
    public WebElement userName;

    @FindBy(name = "password")
    public WebElement password;

    @FindBy(xpath = "//*[@id='app']/div[1]/div/div[1]/div/div[2]/div[2]/form/div[1]/div/span")
    public WebElement missingUsernameErrorMessage;

    @FindBy(xpath = "//*[@id='app']/div[1]/div/div[1]/div/div[2]/div[2]/form/div[1]/div/span")
    public WebElement missingPasswordErrorMessage;

    @FindBy(xpath = "//*[@id='app']/div[1]/div/div[1]/div/div[2]/div[2]/form/div[3]/button")
    public WebElement login;

    @FindBy(xpath = "//*[@id='app']/div[1]/div/div[1]/div/div[2]/div[2]/div/div[1]/div[1]/p")
    public  WebElement errorMessage;

   // Get the error message when password is blank
    public String getMissingPasswordText() {
        return missingPasswordErrorMessage.getText();
    }

   // Get the error message when username is blank
   public String getMissingUsernameText() {
        return missingUsernameErrorMessage.getText();
    }

    // Get the Error Message
    public String getErrorMessage() {
        return errorMessage.getText();
    }

    public void login(String strUserName, String strPassword) {

        userName.sendKeys(strUserName);
        password.sendKeys(strPassword);
        login.click();
    }

}
HomePage
import org.openqa.selenium.WebDriver;
import org.openqa.selenium.WebElement;
import org.openqa.selenium.support.FindBy;

public class HomePage extends BasePage {

    public HomePage(WebDriver driver) {
        super(driver);
    }

     @FindBy(xpath = "//*[@id='app']/div[1]/div[2]/div[2]/div/div[1]/div[1]/div[1]/h5")
      public  WebElement homePageUserName;

      // Get the User name from Home Page
        public String getHomePageText() {
           return homePageUserName.getText();
   }

}
Here, we have BaseTests Class also, which contains the common methods needed by other test pages.
import java.time.Duration;
import org.junit.After;
import org.junit.Before;
import org.openqa.selenium.WebDriver;
import org.openqa.selenium.chrome.ChromeDriver;
import io.github.bonigarcia.wdm.WebDriverManager;

public class BaseTests {

	public WebDriver driver;
	public final static int TIMEOUT = 10;


	@Before
    public void setup() {
    	WebDriverManager.chromedriver().setup();
	    driver = new ChromeDriver();
	    driver.manage().window().maximize();
	    driver.get("https://opensource-demo.orangehrmlive.com/");
	    driver.manage().timeouts().implicitlyWait(Duration.ofSeconds(TIMEOUT));

    }

    @After
    public void tearDown() {
        driver.quit();
    }

}
LoginTests
import org.junit.Assert;
import org.junit.Ignore;
import org.junit.Test;

public class LoginTests extends BaseTests{

    @Test
    public void invalidCredentials() {

	    LoginPage objLoginPage = new LoginPage(driver);
    	objLoginPage.login("Admin", "admin123$$");

    	// Verify Error Message
    	 Assert.assertEquals("Invalid credentials",objLoginPage.getErrorMessage());

    }

    @Test
    public void gotoHomePage() {

	    LoginPage objLoginPage = new LoginPage(driver);
    	objLoginPage.login("Admin", "admin123");

    	HomePage objHomePage = new HomePage(driver);

    	// Verify Home Page
    	 Assert.assertEquals("Employee Information",objHomePage.getHomePageText());

    }

    @Test
    public void missingUsername() {

	    LoginPage objLoginPage = new LoginPage(driver);
    	objLoginPage.login("", "admin123");

    	// Verify Error Message
   	     Assert.assertEquals("Invalid credentials",objLoginPage.getMissingUsernameText());


    }

    @Test @Ignore
    public void missingPassword() {

	    LoginPage objLoginPage = new LoginPage(driver);
    	objLoginPage.login("admin", "");

    	// Verify Error Message
   	     Assert.assertEquals("Invalid credentials",objLoginPage.getMissingPasswordText());

    }

}
Step 7 – Run the tests from JUnit
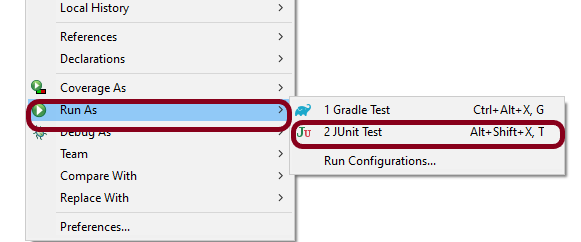
Right-click on the Tests and select Run As -> JUnit Test
The output of the above program is shown below.
Step 8 – Run the tests from Command Line
Note:- As you can see, my project has two parts – GradleSeleniumJUnit4Demo and GradleSeleniumJUnit4Demo-app.
Go to the app project and run the tests, using the below command
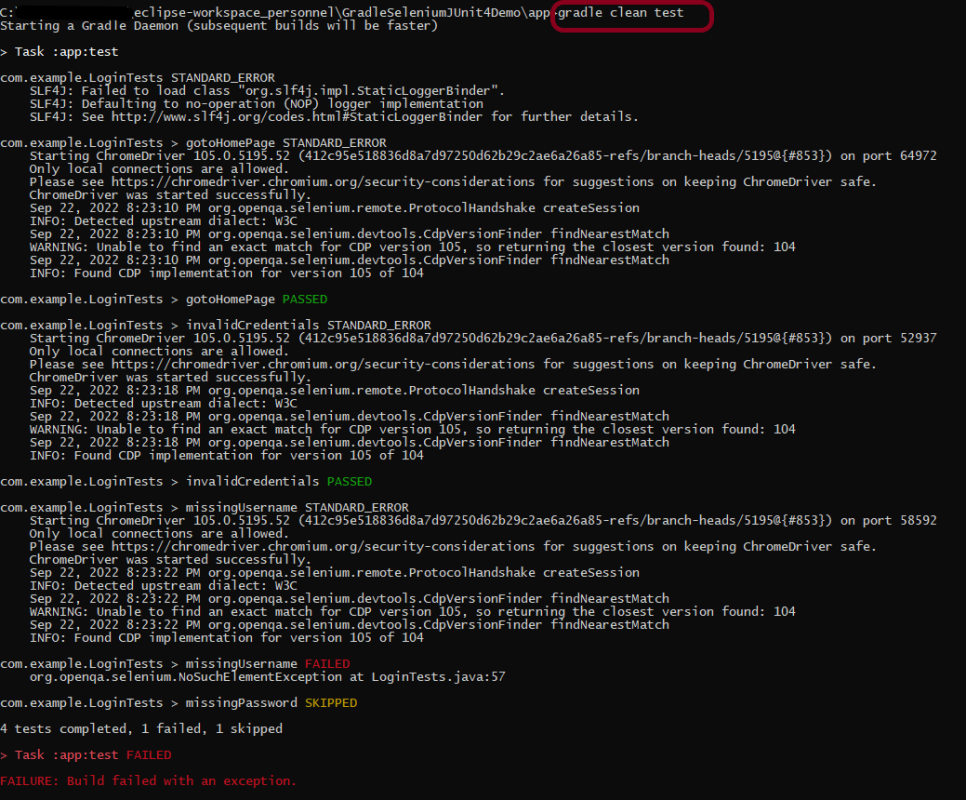
gradle clean test
The output of the test execution is
Step 9 – Gradle Report generation
Once the test execution is finished, refresh the project. We will see a folder – GradleReports. This report is generated when the tests are executed through the command line.
This folder contains index.html.
Right-click on index.html and select open with Web Browser. This report shows the summary of all the tests executed. As you can see that Failed tests are selected (highlighted in blue), so the name of the test failed along with the class name is displayed here.
Congratulations on making it through this tutorial and hope you found it useful! Happy Learning!! Cheers!!
The implementation of a test framework is considered successful and effective, if the test framework supports test execution in multiple ways. The tests in a Gradle Cucumber Framework can be executed as JUnit Tests, Gradle Tests and Gradle commands from Command Line.
In this tutorial, I will explain to run Gradle tests from Command Line.
Versions Used
Cucumber – 7.5.0
Java – 11
JUnit – 4.13.2
Rest Assured – 4.3.3
To execute tests using JUnit Tests and Gradle Tests, we need to create a JUnit TestRunner.
Steps to follow
Create a Gradle Java Project.
Add Rest-Assured and Cucumber dependencies to the Gradle project
Add Configuration to build.gradle
Add Gradle Cucumber Task to build.gradle
Create a feature file under src/test/resources
Create the Step Definition class or Glue Code for the Test Scenario
Run the tests from Command Line
Step 1 – Create a Gradle project
Step 2 – Add the below-mentioned dependencies in the Gradle project inbuild.gradle.
plugins {
    // Apply the java-library plugin to add support for Java Library

    id 'java-library'

}

repositories {
    // Use jcenter for resolving dependencies.
    // You can declare any Maven/Ivy/file repository here.
    jcenter()
    mavenCentral()
}

dependencies {
    // This dependency is exported to consumers, that is to say found on their compile classpath.
    api 'org.apache.commons:commons-math3:3.6.1'

    // This dependency is used internally, and not exposed to consumers on their own compile classpath.
    implementation 'com.google.guava:guava:29.0-jre'

    // Use JUnit test framework
    testImplementation 'junit:junit:4.13'
    testImplementation 'io.cucumber:cucumber-java:6.6.1'
    testImplementation 'io.cucumber:cucumber-junit:6.6.1'
    testImplementation 'io.rest-assured:rest-assured:4.3.3'
}
Here, task cucumber will execute all the tests present in the project irrespective of the number of feature files and scenarios within the feature file.
Step 5 – Create a feature file under src/test/resources
I have created 2 sample feature files – API_GetExample.feature and API_PostExample.feature.
Below is the API_GetExample.feature
@getexample
Feature: Validation of get method

  @GetUserDetails
  Scenario Outline: Send a valid Request to get user details

  Given I send a request to the URL to get user details
  Then the response will return status 200 and id <id> and salary <employee_salary> and name "<employee_name>" and age <employee_age> and message "<message>"

Examples:
    |id  |employee_salary|employee_name |employee_age  |message                                  |
    |1   |320800         |Tiger Nixon   |61            |Successfully! Record has been fetched.   |


  @GetAllUsers
  Scenario Outline: Send a valid Request to get the details of all the users

  Given I send a request to the URL to get the details of all the users
  Then the response will return status 200 and message "<message>"

Examples:
      |message                                  |
      | Successfully! All records has been fetched.   |
API_PostExample.feature
@postexample
Feature: Validation of POST method

  @CreateUser
  Scenario Outline: Send Request to create a user

  Given I send a request to the URL to create a new user
  Then the response will return status 200 and name "<employee_name>" and message "<message>"

Examples:
    |employee_name |message                                |
    |posttest      |Successfully! Record has been added.   |
1. Run Test from Command Line
1. Open the command prompt and change the directory to the project location.
cd C:\Users\Vibha\Projects\Vibha_Personal\Cucumber_Gradle_Demo
2. All feature files should be in src/test/resources and create the Cucumber Runner class as CucumberRunnerTest. Note:- The Runner class name should end with Test to execute the tests from Command Line
2. Running all Feature files or Tests from Command Line
The below command will run all the tests present in the project. As you can see, there are 2 feature files – API_GetExample.feature contains 2 scenarios, and API_PostExample.feature contains 1 scenario.
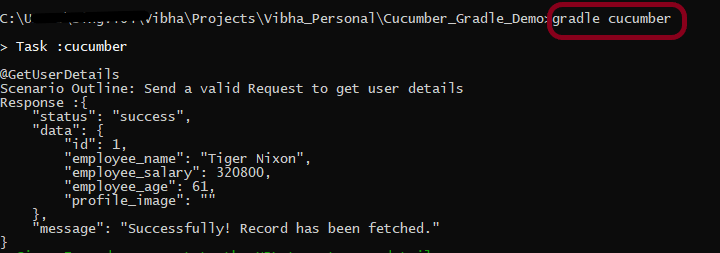
gradle cucumber
The below screenshot shows that Task: Cucumber is triggered.
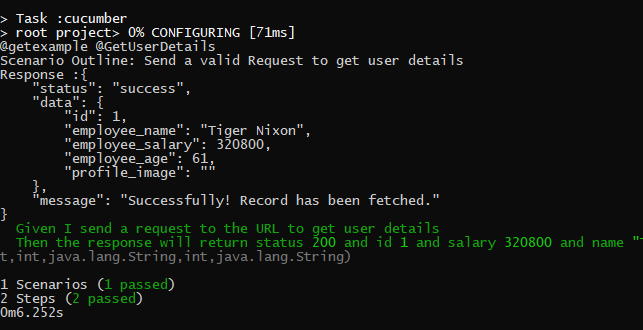
The below screenshot shows that the tests are executed and the status of the tests.
3. Running a Feature file from Command Line
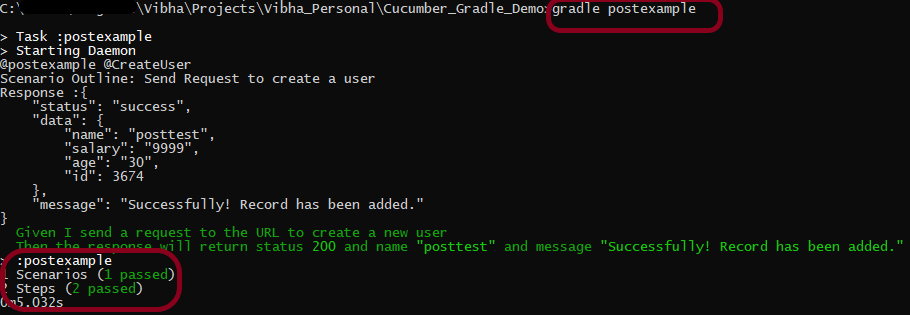
To run a particular feature, create a task – postexample for that feature in the build.gradle as shown in the below example.
Use the below-mentioned command to run the tests tagged with tag = GetUserDetails.
gradle cucumber -P tags=@GetUserDetails
5. Running a group of tests from Command Line
Below is the feature file
@getexample
Feature: Validation of get method

  @GetUserDetails @SmokeTest
  Scenario Outline: Send a valid Request to get a user details

  Given I send a request to the URL to get user details
  Then the response will return status 200 and id <id> and salary <employee_salary> and name "<employee_name>" and age <employee_age> and message "<message>"

Examples:
    |id  |employee_salary|employee_name |employee_age  |message                                  |
    |1   |320800         |Tiger Nixon   |61            |Successfully! Record has been fetched.   |

  @GetAllUsers
  Scenario Outline: Send a valid Request to get the details of all the users

  Given I send a request to the URL to get the details of all the users
  Then the response will return status 200 and message "<message>"

Examples:
    |message                                        |
    | Successfully! All records has been fetched.   |


  @GetInvalidUsers @SmokeTest
  Scenario Outline: Send a valid Request to get the details of the invalid users

  Given I send a request to the URL to get the details of the invalid user
  Then the response will return status 200 and message "<message>"

Examples:
    | message                                  |
    | Successfully! Record has been fetched.   |

  @GetInvalidUsers
  Scenario Outline: Send a valid Request to get the details of the user with id 0

  Given I send a request to the URL to get the details of the user with id 0
  Then the response will return status 200 and message "<message>" and error "<errorMessage>"

Examples:
    | message             | errorMessage  |
    | Not found record.   | id is empty   |

  @Test3
  Scenario: Test 3

  Given I send a request to the URL to get the details of the user3
  Then the response will return successfully


  @Test4
  Scenario: Test 4

  Given I send a request to the URL to get the details of the user4
  Then the response will return successfully
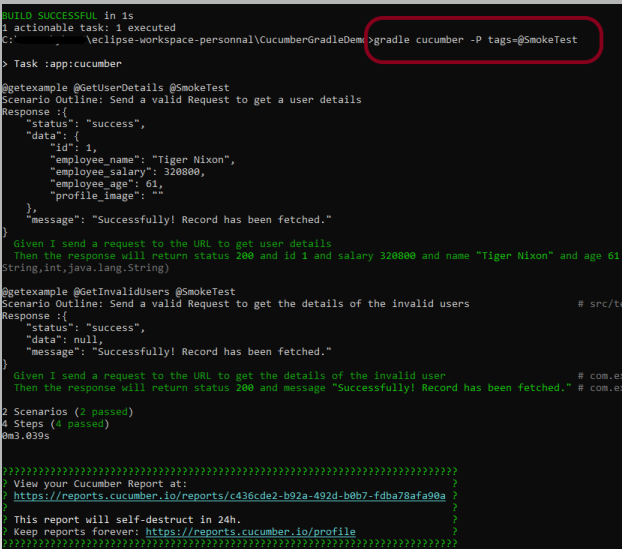
I want to run 2 tests – @GetUserDetails and @GetInvalidUsers. I can create a task with the name of @SmokeTest and assign these scenarios wit h the same tag. The task will look like as shown below:
6. Skipping the execution of a group of tests from Command Line
In the below feature file, I have marked 4 tests as “@Ignore” and 2 are valid.
Feature: Validation of get method

  @GetUserDetails @SmokeTest
  Scenario Outline: Send a valid Request to get a user details

  Given I send a request to the URL to get user details
  Then the response will return status 200 and id <id> and salary <employee_salary> and name "<employee_name>" and age <employee_age> and message "<message>"

Examples:
    |id  |employee_salary|employee_name |employee_age  |message                                  |
    |1   |320800         |Tiger Nixon   |61            |Successfully! Record has been fetched.   |


  @GetAllUsers @Ignore
  Scenario Outline: Send a valid Request to get the details of all the users

  Given I send a request to the URL to get the details of all the users
  Then the response will return status 200 and message "<message>"

Examples:
    |message                                        |
    | Successfully! All records has been fetched.   |


  @GetInvalidUsers @SmokeTest @Ignore
  Scenario Outline: Send a valid Request to get the details of the invalid users

  Given I send a request to the URL to get the details of the invalid user
  Then the response will return status 200 and message "<message>"

Examples:
    | message                                  |
    | Successfully! Record has been fetched.   |

  @GetInvalidUsers @Ignore
  Scenario Outline: Send a valid Request to get the details of the user with id 0

  Given I send a request to the URL to get the details of the user with id 0
  Then the response will return status 200 and message "<message>" and error "<errorMessage>"

Examples:
    | message             | errorMessage  |
    | Not found record.   | id is empty   |

  @Test3 @Ignore
  Scenario: Test 3

  Given I send a request to the URL to get the details of the user3
  Then the response will return successfully


  @Test4
  Scenario: Test 4

  Given I send a request to the URL to get the details of the user4
  Then the response will return successfully
Add the below-mentioned tag in the build.gradle.
def tags = (findProperty('tags') == null) ? 'not @Ignore' : findProperty('tags') + ' and not @Ignore'
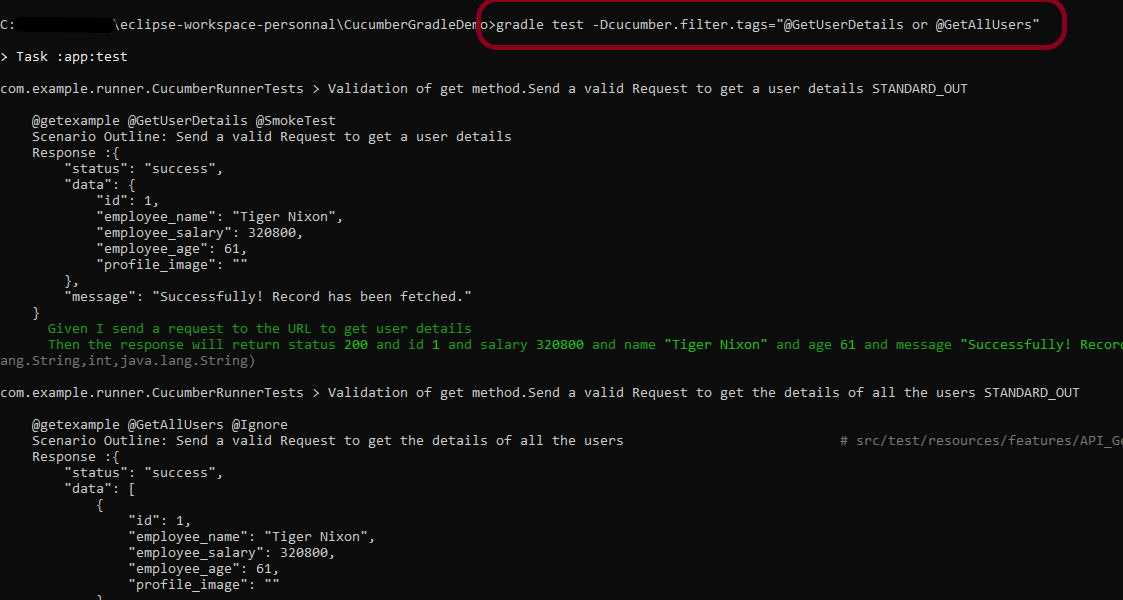
Use the below-mentioned command to run the tests.
gradle cucumber
The program will execute only 2 tests and will skip the rest 4 tests. The output of the above program is
If I use the tag @SmokeTest here in the command line, then it will run all the tests tagged with @SmokeTest, but will ignore the tests tagged with @Ignore. So, in this case, it will run only 1 test – @GetUserDetails.
Step 1- Create a Project Folder and change the directory path to the folder where we want to save the latest files created post creation of the project. Here, I have created a folder – GradleIntelliJDemoFromCMD and changed the directory path.
cd C:\Users\Vibha\Projects\Vibha_Personal\GradleIntelliJDemoFromCMD
Step 2 – Open the Terminal in IntelliJ.
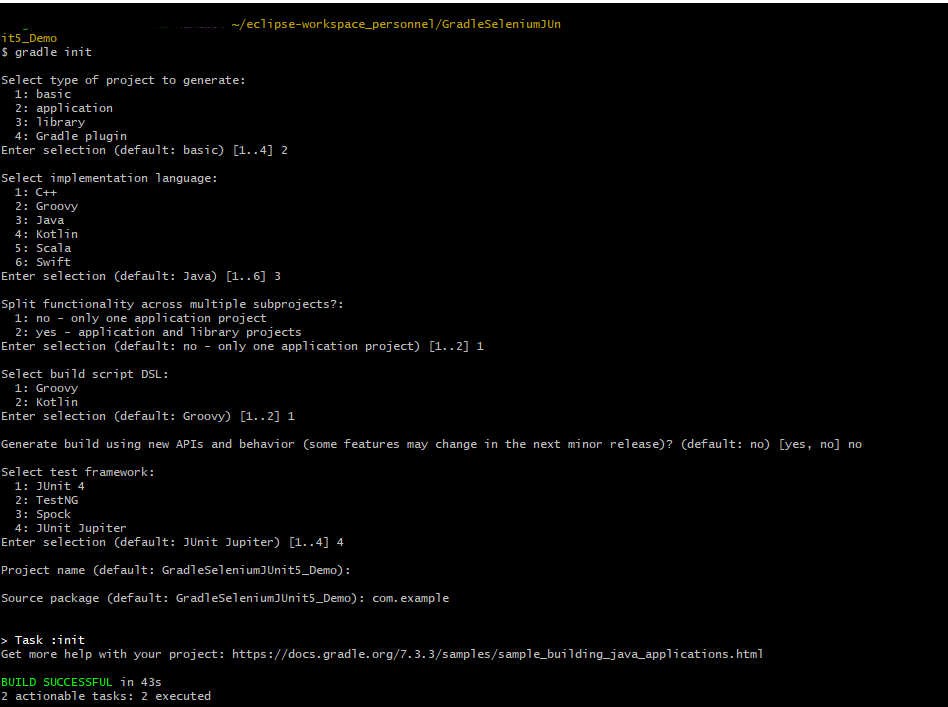
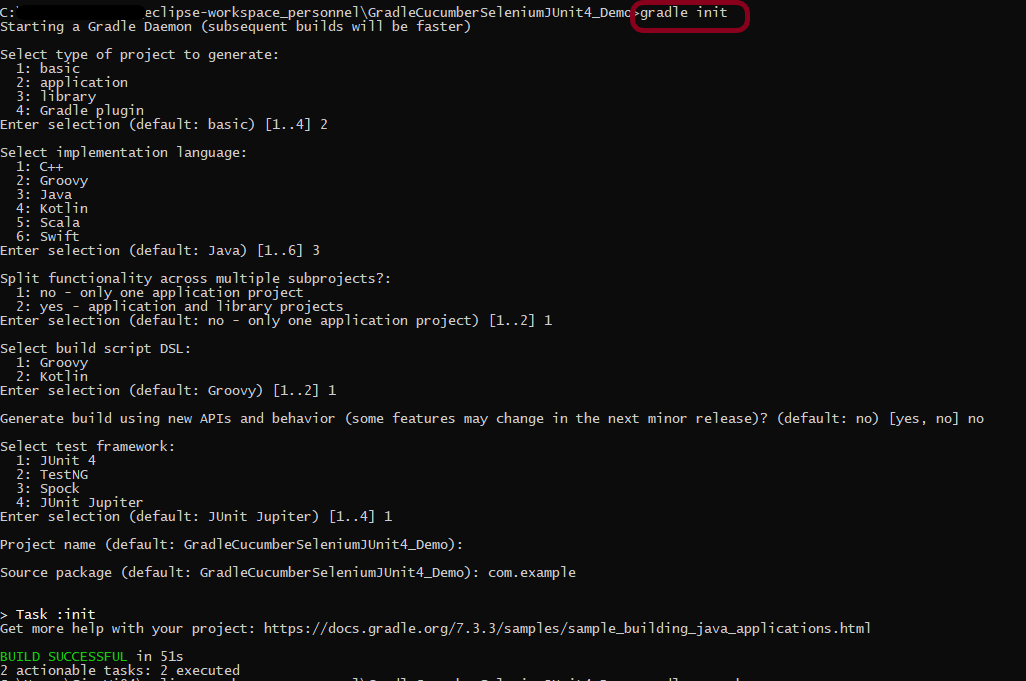
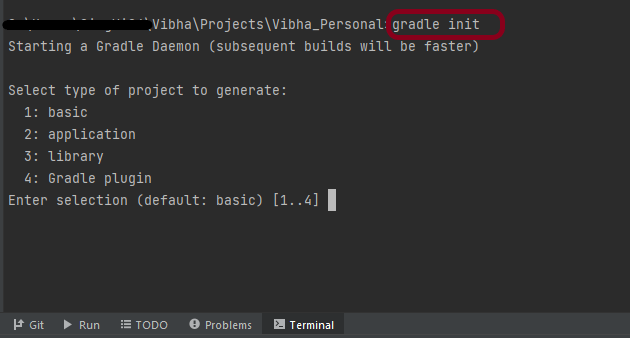
Step 3 – Gradle comes with a built-in task, called init , that initializes a new Gradle project in an empty folder. The init task uses the (also built-in) wrapper task to create a Gradle wrapper script, gradlew. Type the below command and press ENTER.
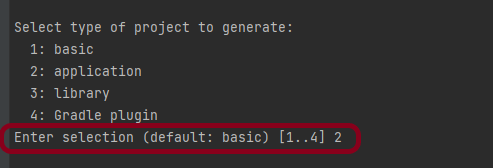
Step 4 – Select the type of project to generate. I’m selecting the application option as if I select basic, it won’t create a src directory. Type 2 and press ENTER.
Step 5 – Select implementation language. This is a Java project, so TYPE 3(Java) and press ENTER.
Step 6 – Select build script DSL (Domain Specific Language) – As in Maven POM.xml (XML) is created to build a script file, here we can use Groovy or Kotlin to build the script file. Type 1 (Groovy) and press ENTER.
Step 7 – Select Test Framework – There are 4 different test frameworks. Depending on your requirement, select an option. I have selected 1 (JUnit 4) and press ENTER.
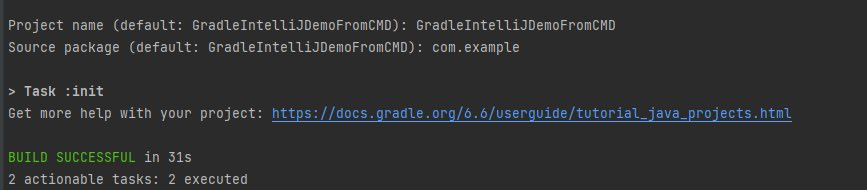
Step 8 – It needs the Project name and Source Package name. If I won’t provide the project name, it will take by default my current folder name which is Gradle_Project. Similarly, if I won’t provide the Source Package name, then it will provide the current project name as Source Package Name.
Project name – GradleIntelliJDemoFromCMD Source Package – com.example
Press ENTER. init script will run and create a Gradle project. You can see as the build is successfull.
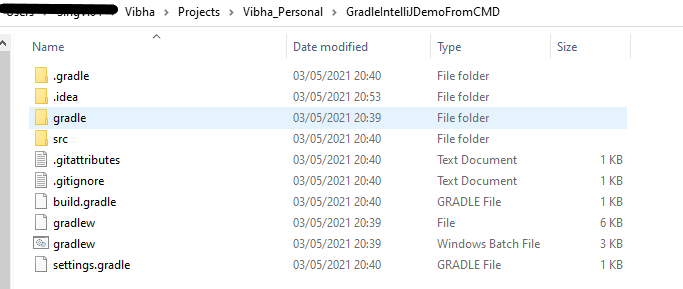
Step 9 – The project is created and placed under the folder GradleIntelliJDemoFromCMD as shown below.
This project structure will have below mentioned files:-
In the previous tutorial, I have explainedhow to create a Java Gradle project in IntelliJ. In this tutorial, I will explain about creating a Java Gradle project Eclipse. I have used Gradle 6.6 to create the project.
Steps to follow:-
Step 1 – To create a new project – Click on the “New” and then select – “Project”.
Step 2 – Select the “Gradle Project”and click on the “Next” button.
Step 3 – A welcome screen will appear. You can uncheck the box – Show the welcome page the next time the wizard appears. This is optional. Click the NEXTbutton.
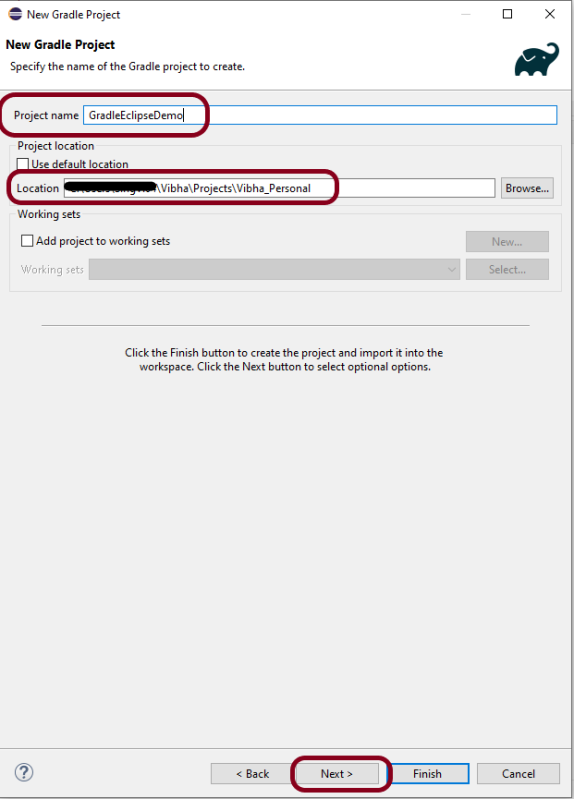
Step 4 – Below the screen will appear. Mention the “Project Name – GradleEclipseDemo”. Mention the location where we want to save the project in the system. Click the NEXTbutton.
Step 5 – Options screen appear. Make sure you use Gradle version 6.6 to create Gradle project in Eclipse for Version: 2021- 03 (4.19.0).
Note:- If you will try to use version higher than 6.6, then Gradle project structure will have a Gradle project with the nested project with a lib subproject in it.
Step 6 – Verify the Gradle Version and Gradle project structure name.
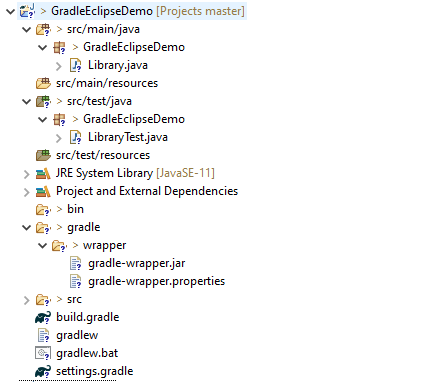
Step 7 – Below is the structure of Gradle project. The init task generates the new project with the following structure:-
Settings file to define build name and subprojects – settings.gradle
Build script of lib project – build.gradle
Default Java source folder – src/main/java
Default Java test source folder – src/test/java
Step 8– Below is the structure and content of the build.gradle.
/*
 * This file was generated by the Gradle 'init' task.
 *
 * This generated file contains a sample Java Library project to get you started.
 * For more details take a look at the Java Libraries chapter in the Gradle
 * User Manual available at https://docs.gradle.org/6.6/userguide/java_library_plugin.html
 */

plugins {
    // Apply the java-library plugin to add support for Java Library
    id 'java-library'
}

repositories {
    // Use jcenter for resolving dependencies.
    // You can declare any Maven/Ivy/file repository here.
    jcenter()
}

dependencies {
    // This dependency is exported to consumers, that is to say found on their compile classpath.
    api 'org.apache.commons:commons-math3:3.6.1'

    // This dependency is used internally, and not exposed to consumers on their own compile classpath.
    implementation 'com.google.guava:guava:29.0-jre'

    // Use JUnit test framework
    testImplementation 'junit:junit:4.13'
}
plugins – Apply the java-library plugin for API and implementation separation.
jcenter – Use JCentral for resolving dependencies. JCenter is a central repository on JFrog Bintray platform for finding and sharing popular JVM language packages in Maven format
api – This dependency is exported to consumers, that is to say found on their compile classpath.
implementation – This dependency is used internally, and not exposed to consumers on their own compile classpath.
testImplementation – Use JUnit test framework.
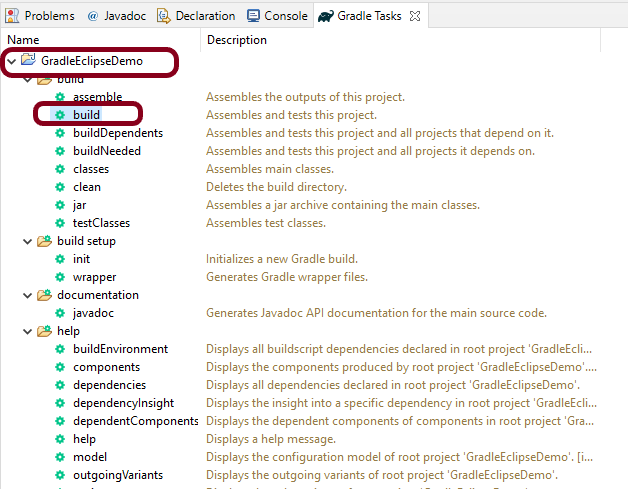
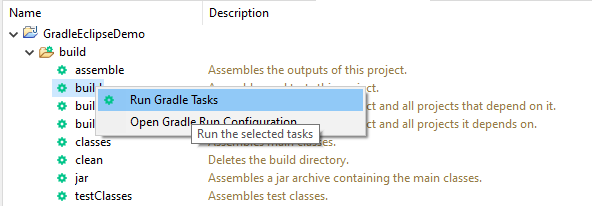
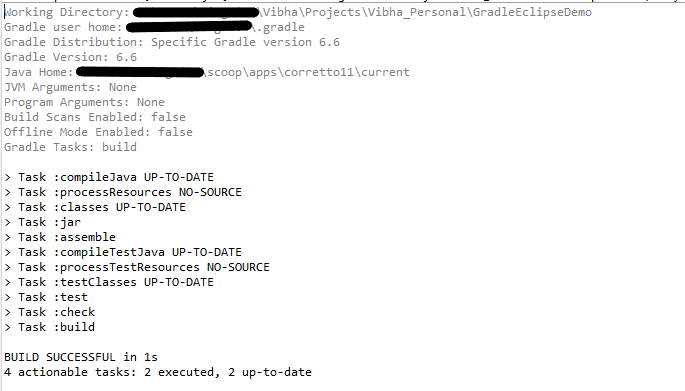
Step 9 – To check if the project is created successfully. In gradle tasks tab -> navigate to the project -> expand build folder -> right click on build -> Select Run Gradle tasks.
This will be the output of the Gradle Run.
That’s it. We have successfully created a Gradle Java project in Eclipse.
Congratulations on making it through this tutorial and hope you found it useful! Happy Learning!! Cheers!!
In this tutorial, I will explain How to install Gradle on Windows.
Steps to follow:-
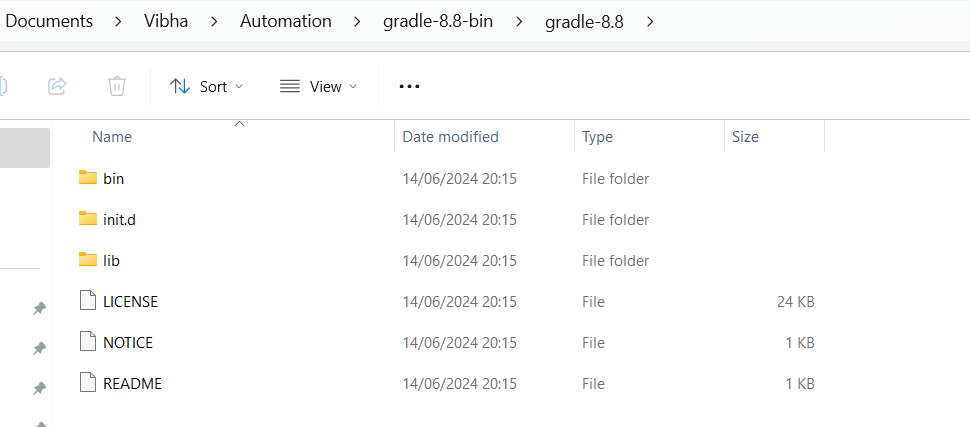
Step 1 – To install Gradle on window, we need to download Gradle from Official Gradle Site. I am downloading gradle-8.8.
Step 2 – Create a new directory Documents\Vibha\Automationwith File Explorer.
Step 3 – Copy the extracted files under C:\Users\ykv12\Documents\Vibha\Automation\gradle-8.8-bin. Below is the image of the folder.
Step 4 – We need to configure GRADLE_HOMEenvironment variable. Type – “View Adva” in the search option and we will see the option – View Advanced system setting.
Step 5 – In System Properties dialog, select Advancedtab and click on the Environment Variables button.
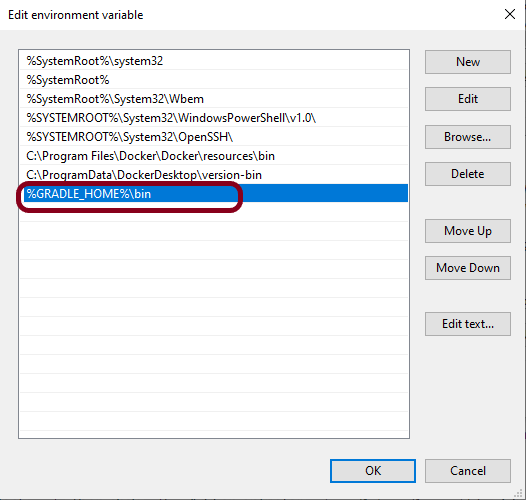
Step 6 – In “Environment variables” dialog, System variables, Clicks on the New button and add a GRADLE_HOMEvariable .
Step 7 – Below is the image which shows addition of Environment Variables.
Step 8 – Add %GRADLE_HOME%\bin (full path till bin where gradle is placed on your machine) to Path. Click New Button present in System Variable and add GRADLE_HOME\bin.
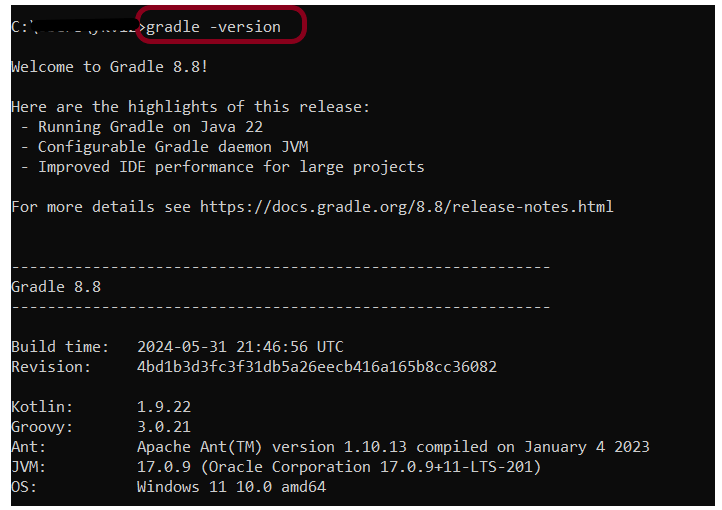
How to verify if Gradle is install properly on your machine
Open command prompt and type gradle -version, then the screen should look something like below screen.
That’s it! We have installed Gradle.
Congratulations on making it through this tutorial and hope you found it useful! Happy Learning!! Cheers!!