‘Iterator’ is an interface which belongs to collection framework. It allows us to traverse the collection, access the data element and remove the data elements of the collection.
java.util package has public interface Iterator and contains three methods:
boolean hasNext(): It returns true if Iterator has more element to iterate.
Object next(): It returns the next element in the collection until the hasNext()method return true. This method throws ‘NoSuchElementException’ if there is no next element.
void remove(): It removes from the underlying collection the last element returned by this iterator (optional operation). This method can be called only once per call to next(). The behavior of an iterator is unspecified if the underlying collection is modified while the iteration is in progress in any way other than by calling this method.
forEachRemaining– Performs the given action for each remaining element until all elements have been processed or the action throws an exception. Actions are performed in the order of iteration, if that order is specified. Exceptions thrown by the action are relayed to the caller.
Below is an example of use of Iterator. The iterator() method is used to get an iterator for any collection:
public class IteratorDemo {

   public static void main(String[] args) {

		ArrayList<String> cars = new ArrayList<String>();
		cars.add("Audi");
		cars.add("BMW");
		cars.add("Ford");
		cars.add("Duster");

		// Get the iterator
		Iterator<String> it = cars.iterator();

		// Print the first item
		System.out.println("First element from list :"+it.next());

	}
}

Output
First element from list :Audi
Looping through Collection
In the below example, we are looping through the collection using hasNext() and next() methods of Iterator.
public class IteratorDemo {

	 public static void main(String[] args) {

		ArrayList<String> cars = new ArrayList<String>();
		cars.add("Audi");
		cars.add("BMW");
		cars.add("Ford");
		cars.add("Duster");

		// Get the iterator
		Iterator<String> iterator = cars.iterator();

		System.out.println("List elements : ");

		while (iterator.hasNext())
			System.out.print(iterator.next() + " ");

		System.out.println();
	}
}

Output
List elements :
Audi BMW Ford Duster
Removing elements from Collection
Iterators are designed to easily change the collections that they loop through. The remove() method can remove items from a collection while looping. In the below example, I’m deleting the items whose reminder are not 0.
public class IteratorDemo {

	 public static void main(String[] args) {

		ArrayList<Integer> numbers = new ArrayList<Integer>();
		numbers.add(20);
		numbers.add(8);
		numbers.add(10);
		numbers.add(50);

        // Get the iterator
		Iterator<Integer> it = numbers.iterator();

		System.out.println("List of Numbers : ");
		while (it.hasNext()) {

			Integer i = it.next();

			if (i / 10 == 0) {
				it.remove();
			}
		}
		System.out.println(numbers);
	}

}

Output
List of Numbers :
[20, 10, 50]
I hope you are cleared about Iterators now. Enjoy learning. Cheers!!
A HashMap stores items in “key/value”pairs, and you can access them by an index of another type (e.g. a String).
One object is used as a key (index) to another object (value). It can store different types: String keys and Integer values, or the same type, like String keys and String values. We need to import java.util.HashMap or its superclass in order to use the HashMap class and methods.
It is not an ordered collection, which means it does not return the keys and values in the same order in which they have been inserted into the HashMap.
HashMap<String, String> employeeDetail = new HashMap<String, String>();

HashMap<String, String> employeeDetail = new HashMap<>();

HashMap<String, Integer> employeeDetail = new HashMap<String, Integer>();
Add Items
Below is an example where we are adding items to HashMap by using put() method.
import java.util.HashMap;

public class HashMap_Demo {
    public static void main(String[] args) {

        /* This is how to declare HashMap of key and Value as String  */
        HashMap<String, String> employeeDetail = new HashMap<String, String>();

        // Add keys and values (Name, Designation)
        employeeDetail.put("Tim", "DBA");
        employeeDetail.put("Dong", "SDET");
        employeeDetail.put("Nisha", "BA");
        employeeDetail.put("Ulana", "Dev");

        System.out.println("Detail of Employees :" + employeeDetail);
    }

}
The output of the above program is
Below is an example where we are adding items to HashMap by using put() method.
Here, the key is String, and the Value is Integer.
import java.util.HashMap;

public class HashMap_Demo {
    public static void main(String[] args) {

        // Combination of String(key) and Integer(value)
        HashMap<String, Integer> employeeAge = new HashMap<String, Integer>();

        // Add keys and values (Name, Age)
        employeeAge.put("Tim", 25);
        employeeAge.put("Dong", 26);
        employeeAge.put("Nisha", 29);
        employeeAge.put("Ulana", 34);

        System.out.println("Age of Employees :" + employeeAge);
    }

}
The output of the above program is
Access an Item
To access a value in the HashMap, use the get() method and refer to its key:-
import java.util.HashMap;

public class HashMap_Demo {
    public static void main(String[] args) {

        // Combination of String(key) and Integer(value)
        HashMap<String, Integer> employeeAge = new HashMap<String, Integer>();

        // Add keys and values (Name, Age)
        employeeAge.put("Tim", 25);
        employeeAge.put("Dong", 26);
        employeeAge.put("Nisha", 29);
        employeeAge.put("Ulana", 34);

        System.out.println("Age of Employees :"+ employeeAge);

        // Access a value
        System.out.println("Access Value of Key Nisha :" + employeeAge.get("Nisha"));
    }
}
The output of the above program is
Remove an Item
To remove an item, use the remove() method and refer to the key:
import java.util.HashMap;

public class HashMap_Demo {
    public static void main(String[] args) {

        // Combination of String(key) and Integer(value)
        HashMap<String, Integer> employeeAge = new HashMap<String, Integer>();

        // Add keys and values (Name, Age)
        employeeAge.put("Tim", 25);
        employeeAge.put("Dong", 26);
        employeeAge.put("Nisha", 29);
        employeeAge.put("Ulana", 34);

        System.out.println("Age of Employees :" + employeeAge);

        // To remove an item, use the remove() method and refer to the key
        employeeAge.remove("Ulana");
        System.out.println("List of Employee after removing Ulana :" + employeeAge);
    }
}
The output of the above program is
To remove all items, use the clear()method:-
import java.util.HashMap;

public class HashMap_Demo {
    public static void main(String[] args) {

        // Combination of String(key) and Integer(value)
        HashMap<String, Integer> employeeAge = new HashMap<String, Integer>();

        // Add keys and values (Name, Age)
        employeeAge.put("Tim", 25);
        employeeAge.put("Dong", 26);
        employeeAge.put("Nisha", 29);
        employeeAge.put("Ulana", 34);

        System.out.println("Age of Employees :" + employeeAge);

        // To remove all items, use the clear() method:
        employeeAge.clear();
        System.out.println("List of Employes after clear:" + employeeAge);
    }
}
The output of the above program is
Checking whether HashMap is empty or not
We are using isEmpty() method of the HashMap class to perform this check.
import java.util.HashMap;

public class HashMap_Demo {
    public static void main(String[] args) {

        /* This is how to declare HashMap */
        HashMap<String, String> employeeDetail = new HashMap<String, String>();

        // Add keys and values (Name, Designation)
        employeeDetail.put("Tim", "DBA");
        employeeDetail.put("Dong", "SDET");
        employeeDetail.put("Nisha", "BA");
        employeeDetail.put("Ulana", "Dev");

        System.out.println("Detail of Employees :" + employeeDetail);

        // Checking whether HashMap is empty or not
        System.out.println("Is HashMap Empty? " + employeeDetail.isEmpty());

        // Delete all items from HasMap
        employeeDetail.clear();
        System.out.println("Is HashMap Empty now? " + employeeDetail.isEmpty());
    }
}
The output of the above program is
Check if a particular key exists in HashMap
We will be using containsKey() method of the HashMap class to perform this check. This method returns a boolean value.
import java.util.HashMap;

public class HashMap_Demo {
    public static void main(String[] args) {

        /* This is how to declare HashMap */
        HashMap<String, String> employeeDetail = new HashMap<String, String>();

        // Add keys and values (Name, Designation)
        employeeDetail.put("Tim", "DBA");
        employeeDetail.put("Dong", "SDET");
        employeeDetail.put("Nisha", "BA");
        employeeDetail.put("Ulana", "Dev");

        System.out.println("Detail of Employees :" + employeeDetail);

        // Check if a particular key exists in HashMap
        boolean flag = employeeDetail.containsKey("Nisha");
        System.out.println("Key Nisha exists in HashMap? : " + flag);

        boolean flag1 = employeeDetail.containsKey("Shawn");
        System.out.println("Key Shawn exists in HashMap? : " + flag1);
    }
}
The output of the above program is
Check if a particular value exists in HashMap
We will be using containsValue()method of the HashMap class to perform this check.
import java.util.HashMap;

public class HashMap_Demo {
    public static void main(String[] args) {

        /* This is how to declare HashMap */
        HashMap<String, String> employeeDetail = new HashMap<String, String>();

        // Add keys and values (Name, Designation)
        employeeDetail.put("Tim", "DBA");
        employeeDetail.put("Dong", "SDET");
        employeeDetail.put("Nisha", "BA");
        employeeDetail.put("Ulana", "Dev");

        System.out.println("Detail of Employees :" + employeeDetail);

        // Check if a particular value exists in HashMap
        boolean valueExists = employeeDetail.containsValue("Dev");
        System.out.println("String Dev exists in HashMap? : " + valueExists);

        boolean valueNotExists = employeeDetail.containsValue("Test");
        System.out.println("String Test exists in HashMap? : " + valueNotExists);
    }
}
The output of the above program is
We are done! Congratulations on making it through this tutorial and hope you found it useful! Happy Learning!!
Selects the specified property in a parent object.
[‘property’]
Selects the specified property in a parent object. Be sure to put single quotes around the property name.Tip: Use this notation if the property name contains special characters such as spaces, or begins with a character other than A..Za..z_.
[n]
Selects the n-th element from an array. Indexes are 0-based.
[index1,index2,…]
Selects array elements with the specified indexes. Returns a list.
..property
Recursive descent: Searches for the specified property name recursively and returns an array of all values with this property name. Always returns a list, even if just one property is found.
*
Wildcard selects all elements in an object or an array, regardless of their names or indexes.
[start:end] [start:]
Selects array elements from the start index and up to, but not including, end index. If end is omitted, selects all elements from start until the end of the array. Returns a list.
[:n]
Selects the first n elements of the array. Returns a list.
[-n:]
Selects the last n elements of the array. Returns a list.
[?(expression)]
Selects all elements in an object or array that match the specified filter. Returns a list.
[(expression)]
Script expressions can be used instead of explicit property names or indexes. An example is [(@.length-1)] which selects the last item in an array. Here, length refers to the length of the current array rather than a JSON field named length.
@
Used in filter expressions to refer to the current node being processed.
Below is the sample JSON which I am using for extraction examples. I have saved this file in resources/Payloads as test.json.
{
    "store": {
        "book": [
            {
                "category": "reference",
                "author": "Nigel Rees",
                "title": "Sayings of the Century",
                "price": 8.95
            },
            {
                "category": "fiction",
                "author": "Evelyn Waugh",
                "title": "Sword of Honour",
                "price": 12.99
            },
            {
                "category": "fiction",
                "author": "Herman Melville",
                "title": "Moby Dick",
                "isbn": "0-553-21311-3",
                "price": 8.99
            },
            {
                "category": "fiction",
                "author": "J. R. R. Tolkien",
                "title": "The Lord of the Rings",
                "isbn": "0-395-19395-8",
                "price": 22.99
            }
        ],
        "bicycle": {
            "color": "red",
            "price": 19.95
        }
    },
    "expensive": 10
}
To extract all books present in the store:-
String allBooks = JsonPath.read(jsonString, "$..*").toString();
System.out.println("--------------- All books in the store --------------");
System.out.println(allBooks);
The complete program looks like as shown below:
import com.jayway.jsonpath.JsonPath;
public class JsonPath_Demo {

    public static void main(String args[]) {

        String jsonString = new String(Files.readAllBytes(Paths.get("src/test/resources/Payloads/test.json")));

        String allBooks = JsonPath.read(jsonString, "$..*").toString();
        System.out.println("--------------- All books in the store --------------");
        System.out.println(allBooks);
    }
}
The output of the above program is
Below are examples that show how to extract different nodes from a JSON Body. I have used the above JSON Body for these examples.
 // All bicycles in the store
String allBicycles = JsonPath.read(jsonString, "$..bicycle").toString();
System.out.println("--------------- All bicycles in the store ---------------");
System.out.println(allBicycles);

// The number of books
String noOfBooks = JsonPath.read(jsonString, "$..book.length()").toString();
System.out.println("--------------- The number of books ---------------");
System.out.println(noOfBooks);

// The authors of all books
String authors = JsonPath.read(jsonString, "$.store.book[*].author").toString();
System.out.println("--------------- Author of all Books ---------------");
System.out.println(authors);

// All authors
String allAuthors = JsonPath.read(jsonString, "$..author").toString();
System.out.println("--------------- All Authors ---------------");
System.out.println(allAuthors);

// All details of the store
String store = JsonPath.read(jsonString, "$.store.*").toString();
System.out.println("--------------- All details of the store ---------------");
System.out.println(store);

// Price of store
String storePrice = JsonPath.read(jsonString, "$.store..price").toString();
System.out.println("--------------- price of store ---------------");
System.out.println(storePrice);
The output of the above program is
Below are the examples where I have extracted specific book (nodes) from the JSON body.
// Third book
String thirdBook = JsonPath.read(jsonString, "$..book[2]").toString();
System.out.println("--------------- third book ---------------");
System.out.println(thirdBook);

// first Last Book
String firstLastBook = JsonPath.read(jsonString, "$..book[-1]").toString();
System.out.println("--------------- first Last Book ---------------");
System.out.println(firstLastBook);

// first two Books
String firstTwoBooks = JsonPath.read(jsonString, "$..book[0,1]").toString();
System.out.println("--------------- first Two Books ---------------");
System.out.println(firstTwoBooks);

// books from index 0 (inclusive) until index 2 (exclusive)
String booksRange = JsonPath.read(jsonString, "$..book[:2]").toString();
System.out.println("--------------- books from index 0 (inclusive) until index 2 (exclusive) ---------------");
System.out.println(booksRange);

// All books from index 1 (inclusive) until index 2 (exclusive)
String booksRange1 = JsonPath.read(jsonString, "$..book[1:2]").toString();
System.out.println("------------ All books from index 1 (inclusive) until index 2 (exclusive) -----------");
System.out.println(booksRange1);

// Book number one from tail
String bottomBook = JsonPath.read(jsonString, "$..book[1:]").toString();
System.out.println("--------------- Book number one from tail ---------------");
System.out.println(bottomBook);
The output of the above program is
Filters are logical expressions used to filter arrays. Below are examples of a JSONPath expression with the filters.
// All books in store expensive than 10
String expensiveBook = JsonPath.read(jsonString, "$.store.book[?(@.price > 10)]").toString();
System.out.println("--------------- All books in store costlier than 10 ---------------");
System.out.println(expensiveBook);

// All books in store that are not "expensive"
String notExpensiveBook = JsonPath.read(jsonString, "$..book[?(@.price <= $['expensive'])]").toString();
System.out.println("--------------- All books in store that are not expensive ---------------");
System.out.println(notExpensiveBook);

// All books in store that are equal to price 8.95
String comparePrice = JsonPath.read(jsonString, "$.store.book[?(@.price == 8.95)]").toString();
System.out.println("--------------- All books in store that are not expensive ---------------");
System.out.println(comparePrice);

// All books matching regex (ignore case)
String regxExample = JsonPath.read(jsonString, "$..book[?(@.author =~ /.*REES/i)]").toString();
System.out.println("--------------- All books matching regex (ignore case) ---------------");
System.out.println(regxExample);

// All books with price equal to mentioned list of prices
String priceList = JsonPath.read(jsonString, "$..book[?(@.price in ['12.99', '8.99'])]").toString();
System.out.println("--------------- All books with price equal to mentioned list of prices ---------------");
System.out.println(priceList);

// All books with price NOT equal to mentioned list of prices
String excludePriceList = JsonPath.read(jsonString, "$..book[?(@.price nin ['12.99', '8.99'])]").toString();
System.out.println("---------- All books with price NOT equal to mentioned list of prices ---------");
System.out.println(excludePriceList);

// All books with specified substring (case-sensitive)
String substringExample = JsonPath.read(jsonString, "$..book[?(@.author contains 'Melville')]").toString();
System.out.println("--------------- All books with specified substring (case-sensitive) ---------------");
System.out.println(substringExample);

// All books with an ISBN number
String specificBook = JsonPath.read(jsonString, "$..book[?(@.isbn)]").toString();
System.out.println("--------------- All books with an ISBN number ---------------");
System.out.println(specificBook);
The output of the above program is
We are done! Congratulations on making it through this tutorial and hope you found it useful! Happy Learning!!
In the last tutorial, I explained How to test POST Request using Rest Assured where the request body is in String Format. In this tutorial, I will create a request body using JSON Object in Rest Assured. This request body can be used for POST or PUT operations.
In the previous post, you must have observed that I had hard-coded the JSON request body in a string format. It is not a good practice if you have a dynamic payload or want to create a payload at run time or parameterized one. It is always recommended to create a payload in a way that is easy to maintain. You should manage, update, and retrieve value from it easily. This can be achieved by JSONObjector JSONArray.
A JSONObjectis an unordered collection of key and value pairs, resembling Java’s native Map implementations. JSON stores data as a key-value pair. The key is the left side and the value is the right side, and a semicolon is used to separate both. One key-value pair is separated from another key-value pair using a comma (,).
The internal form is an object having the get and opt methods for accessing the values by name and put methods for adding or replacing values by name. The values can be any of these types:Boolean, JSONArray, JSONObject, Number, String, or JSONObject.NULL object.
To create a request body using JSON Object, we need to add a Maven dependency.
JSONObjectexposes an API similar to Java’s Map interface. Below is an example of creating a request from a JSON Object. Here, Id is the auto-generated attribute. We are using the put() method and supply the key and value as an argument. I am using a logger just to print the JSON body in the Console.
import io.restassured.RestAssured;
import io.restassured.http.ContentType;
import org.json.JSONObject;
import org.junit.Test;
import static org.hamcrest.Matchers.equalTo;

public class Json_Demo {

    @Test
    public void passBodyAsJsonObject() {

        JSONObject data = new JSONObject();

        data.put("employee_name", "MapTest");
        data.put("profile_image", "test.png");
        data.put("employee_age", "30");
        data.put("employee_salary", "11111");

        RestAssured
                .given()
                .contentType(ContentType.JSON)
                .body(data.toString())
                .log().all()

                .when()
                .post("https://dummy.restapiexample.com/api/v1/create")

                .then()
                .assertThat().statusCode(200)
                .body("data.employee_name", equalTo("MapTest"))
                .body("data.employee_age", equalTo("30"))
                .body("data.employee_salary", equalTo("11111"))
                .body("data.profile_image", equalTo("test.png"))
                .body("message", equalTo("Successfully! Record has been added."))
                .log().all();

    }
}
The request body will look as shown below:-
The texts produced by the toString() methods strictly conform to the JSON syntax rules.
.body(data.toString())
The above one is a simple JSON Request Body. Let’s take an example of a Complex Request Body or nested Request Body.
We need to create two JSONObject here. One will hold overall key-value pairs, and another JSONObject will hold only employee_details key-value pairs.
Below is an example that shows how to create a complex JSON request body using JSONObject.
@Test
public void passBodyAsJsonObjectDemo() {

   //First JSONObject
	JSONObject data = new JSONObject();

	data.put("profile_image", "test.png");

    //Second JSONObject
	JSONObject detail = new JSONObject();

	detail.put("updated_message", "Details of New Resource");
	detail.put("employee_age", "30");

	data.put("employee_details", detail);

	data.put("employee_name", "MapTest");
	data.put("employee_salary", "11111");

	RestAssured
        .given()
               .contentType(ContentType.JSON)
               .body(data.toString())
               .log().all()

		.when()
              .post("http://dummy.restapiexample.com/api/v1/create")

		.then()
               .assertThat().statusCode(200)
               .body("data.employee_name", equalTo("MapTest"))
			   .body("data.employee_details.employee_age", equalTo("30"))
			   .body("data.employee_details.updated_message", equalTo("Details of New Resource"))
			   .body("data.employee_salary", equalTo("11111")).body("data.profile_image", equalTo("test.png"))
				.body("message", equalTo("Successfully! Record has been added."))
                .log().all();
	}
}
The request body will look as shown below:-
We are done. Congratulations on making it through this tutorial and hope you found it useful! Happy Learning!!
In the previous tutorial, I have provided the Introduction of Rest Assured. In this tutorial, I will explain how to setup basic Rest Assured Gradle project in Eclipse IDE. Before going through this tutorial, it is recommended to go through previous tutorial to know about Rest Assured.
What is Gradle?
Gradle is an open-source build automation tool that is designed to be flexible enough to build almost any type of software. A build automation tool is used to automate the creation of applications. The building process includes compiling, linking, and packaging the code. The process becomes more consistent with the help of building automation tools.
Steps to setup Rest Assured Gradle Project in Eclipse
Download and Install Java on the system
Download and setup Eclipse IDE on the system
Setup Gradle on System
Create a new Gradle Project
Add Rest-Assured dependencies to the project
Step 1- Download and Install Java
Rest-Assured needs Java to be installed on the system to run the tests. Check if Java is installed on your machine or not by using the below command on Command Prompt.
Step 2 – Download and setup Eclipse IDE on the system
The Eclipse IDE (integrated development environment) provides strong support for Java developers. If Eclipse IDE is already not present on your system, then click here to know How to install Eclipse.
Step 3 – Setup Gradle
To build a test framework, we need to add several dependencies to the project. This can be achieved by any build Tool. I have used Gradle Build Tool. Click here to know How to install Gradle.
Step 4 – Create a new Gradle Project
To know, in detail, how to create a Gradle project in Eclipse, refer to this link.
File ->New Project ->Gradle Project ->Next.
Provide projectname and location where you want to save the project on your system. Click the Finish Button.
Verify the Gradle Version and Gradle project structure name. Click the Finish Button.
Below is the structure of the new Gradle project.
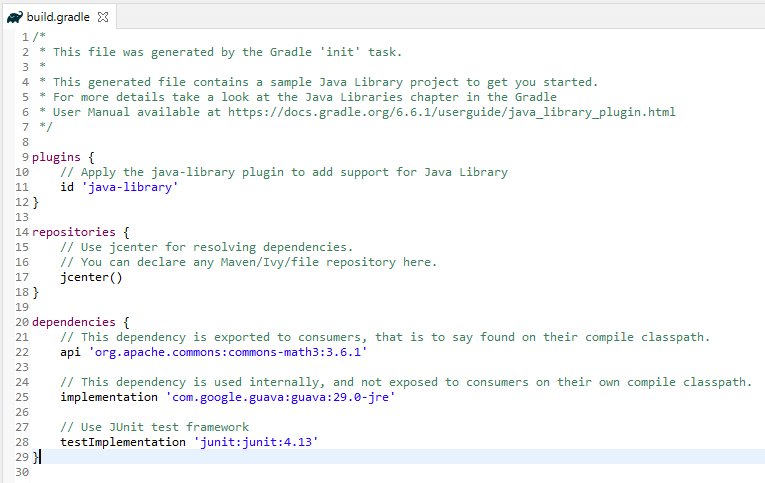
Below is the structure and content of the build.gradle of the new project.
Step 5 – Add Rest-Assured dependencies to the project
Add Rest-Assured, JSON Schema Validator, and JUnit dependencies to the project.
    // Use rest assured
    testImplementation 'io.rest-assured:rest-assured:4.3.3'
    testImplementation 'io.rest-assured:json-schema-validator:4.3.3'
Step 6 – Below are the Rest Assured, json schema validator, junit jar files present under Maven Dependencies.
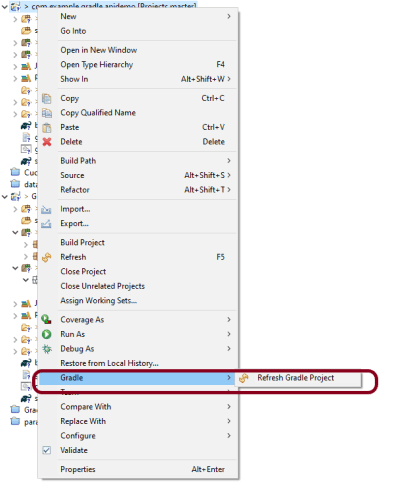
Make sure you right-click on project -> Select Gradle ->Refresh Gradle Project. It is needed to see the new jar files in the project.
That’s it! Congratulations on making it through this tutorial and hope you found it useful! Happy Learning!! Cheers
In the previous tutorial, I have explained about How to add Formulas in Excel in Java. In this tutorial, I will explain How to customize the style of cells in Excel in Java using Apache POI.
I’m using Apache POI to write data to the excel file. To download and install Apache POI, refer here.
If you are using maven, then you need to add below dependency in pom.xml.
In the previous tutorial, I explained about creating a new Excel file and writing data in that new Excel file using Java. In this tutorial, I will explain How to open and update existing Excel files in Java.
I’m using Apache POI to write data to the Excel file. To download and install Apache POI, refer here.
If you are using Maven, then you need to add the below dependency in pom.xml.
To know more about various interfaces and classes for managing Excel, pleaserefer to this tutorial.
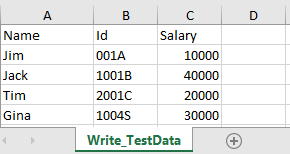
In the below example, I have an existing Excel with the name “EmployeeDetails.xlsx”.
This is Excel which I am going to update. I will add 2 rows below the last row in Excel.
Below is a complete example of updating the data in existing Excel. One thing we need to note here is that we can update the Excel file only when we close it first.
import java.io.File;
import java.io.FileInputStream;
import java.io.FileOutputStream;
import java.io.IOException;
import org.apache.poi.xssf.usermodel.XSSFCell;
import org.apache.poi.xssf.usermodel.XSSFRow;
import org.apache.poi.xssf.usermodel.XSSFSheet;
import org.apache.poi.xssf.usermodel.XSSFWorkbook;

public class ExcelFileUpdateExample {

	public static void main(String[] args) {

		try {

			FileInputStream fis = new FileInputStream(new File("EmployeeDetails.xlsx"));

			// Create object of XSSFWorkbook class
			XSSFWorkbook workbook = new XSSFWorkbook(fis);

			// Create object of XSSFWorkbook class
			XSSFSheet sheet = workbook.getSheet("Write_TestData");

			Object[][] bookData = { { "SeleniumTest", "0000A", 9999 }, { "JavaTest", "0000B", 9990 }, };

			// Get last row in Sheet
			int rowCount = sheet.getLastRowNum();

			for (Object[] Book : bookData) {

				// Create row for all the new data
				XSSFRow row = sheet.createRow(++rowCount);

				int columnCount = 0;

				// Create new cell for each row
				XSSFCell cell = row.createCell(columnCount);

				for (Object field : Book) {

					cell = row.createCell(columnCount++);
					if (field instanceof String) {
						cell.setCellValue((String) field);
					} else if (field instanceof Integer) {
						cell.setCellValue((Integer) field);
					}
				}

			}

			fis.close();

			// Write the workbook in file system
			FileOutputStream outputStream = new FileOutputStream("EmployeeDetails.xlsx");
			workbook.write(outputStream);
			System.out.println("Excel is updated successfully");

			// Close the workbook
			workbook.close();
			outputStream.close();

		} catch (IOException e) {
			e.printStackTrace();
		}
	}

}
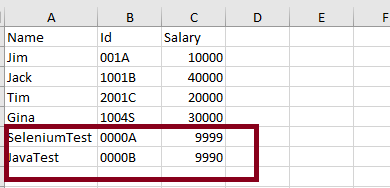
The output of the above program is
Below is the updated Excel.
Update a specific cell in the Excel file
In the below example, I will update the value in a specific cell. As you can see in the above image, I will update, 1004S to “Updated Value”. Below is the code snippet for the same.
import java.io.File;
import java.io.FileInputStream;
import java.io.FileOutputStream;
import java.io.IOException;
import org.apache.poi.ss.usermodel.CellType;
import org.apache.poi.xssf.usermodel.XSSFCell;
import org.apache.poi.xssf.usermodel.XSSFSheet;
import org.apache.poi.xssf.usermodel.XSSFWorkbook;
public class UpdateExcelDemo {
public static void main(String[] args) {
try {
// Create an object of FileInputStream class to read excel file
FileInputStream fis = new FileInputStream(new File("EmployeeDetails.xlsx"));
// Create object of XSSFWorkbook class
XSSFWorkbook workbook = new XSSFWorkbook(fis);
// Read excel sheet by sheet name
XSSFSheet sheet = workbook.getSheet("Write_TestData");
// Print data present at row 0 column 2
System.out.println(sheet.getRow(4).getCell(1).getStringCellValue());
// Get the Cell at index 3 from the above row
XSSFCell cell = sheet.getRow(4).getCell(1);

cell.setCellType(CellType.STRING);
cell.setCellValue("Updated Value");
// Write the output to the file
FileOutputStream fileOut = new FileOutputStream(new File("EmployeeDetails.xlsx"));
workbook.write(fileOut);
System.out.println("Id column in Excel is updated successfully");
fileOut.close();
// Closing the workbook
workbook.close();
} catch (IOException e) {
e.printStackTrace();
}
}
}
The output of the above program is
Below is the updated Excel.
That’s it! Well done.
Congratulations on making it through this tutorial and hope you found it useful! Happy Learning!! Cheers!!
Cucumber and Rest-Assured need Java to be installed on the system to run the tests. Click here to learn How to install Java.
Step 2 – Download and setup Eclipse IDE on the system
The Eclipse IDE (integrated development environment) provides strong support for Java developers. Click here to learn How to install Eclipse.
Step 3 – Setup Gradle
To build a test framework, we need to add several dependencies to the project. This can be achieved by any build tool. I have used the Gradle Build Tool. Click here to learn How to install Gradle.
Step 4 – Create a new Gradle Project
To create a new Gradle project, go to the top left side and select File -> New Project -> Gradle -> Gradle project -> Next ->Enter Project Name and Project Location ->Next ->Select Gradle Version ->Next ->Review the Configuration -> Finish.
Step 5 – Add Rest-Assured and Cucumber dependencies to the Gradle project
This syntax is used for Gradle 5.0 and higher.
dependencies {
    // This dependency is exported to consumers, that is to say found on their compile classpath.
    api 'org.apache.commons:commons-math3:3.6.1'

    // This dependency is used internally, and not exposed to consumers on their own compile classpath.
    implementation 'com.google.guava:guava:29.0-jre'

    testImplementation 'io.cucumber:cucumber-java:6.8.1'
    testImplementation 'io.cucumber:cucumber-junit:6.8.1'
    testImplementation 'io.rest-assured:rest-assured:4.3.3'
If you are using Gradle 4.10.3 or older, use the below dependency block to build.gradle.
Once you have added dependencies, configurations, and Gradle cucumber task, Right-click on the project, Hover to the Gradle option, and click Refresh Gradle Project. Eclipse does not automatically update the classpath of the build.gradle file is updated. Select GradleRefresh Gradle Project from the context menu of the project or from your build.gradle file for that.
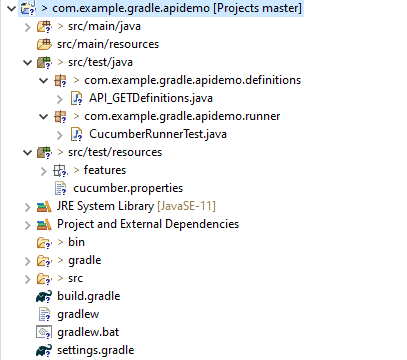
Step 8 – Create a feature file under src/test/resources
A new Gradle Project is created with 4 folders – src/main/java, src/main/resources, src/test/java and src/test/resources. Features are created under the src/test/resources directory. Create a folder with name features. Now, create the feature file in this folder. The feature file should be saved with the extension .feature. This feature file contains the test scenarios created to test the application. The Test Scenarios are written in Gherkins language in the format of Given, When, Then, And, But.
Below is an example of a Test Scenario where we are using the GET method to get the information from the API.
Feature: Validation of get method

@GetUserDetails
  Scenario Outline: Send a valid Request to get user details

  Given I send a request to the URL to get user details
  Then the response will return status 200 and id <id> and salary <employee_salary> and name "<employee_name>" and age <employee_age> and message "<message>"

Examples:
    |id  |employee_salary|employee_name |employee_age  |message                                  |
    |1   |320800         |Tiger Nixon   |61            |Successfully! Record has been fetched.   |
Step 9 – Create the Step Definition class or Glue Code for the Test Scenario
Step Definition acts as an intermediate to your runner and feature file. It stores the mapping between each step of the scenario in the Feature file. So when you run the scenario, it will scan the step definition file to check the matched glue or test code.
import io.restassured.http.ContentType;

import io.restassured.response.ValidatableResponse;

import static io.restassured.RestAssured.given;
import static org.hamcrest.Matchers.equalTo;

import io.cucumber.java.en.Given;
import io.cucumber.java.en.Then;

public class API_GETDefinitions {


    private ValidatableResponse validatableResponse;

    private String endpoint = "http://dummy.restapiexample.com/api/v1/employee/1";

    @Given("I send a request to the URL to get user details")
    public void sendRequest(){
        validatableResponse = given().contentType(ContentType.JSON)
                .when().get(endpoint).then();

        System.out.println("Response :"+validatableResponse.extract().asPrettyString());
    }


    @Then("the response will return status {int} and id {int} and salary {int} and name {string} and age {int} and message {string}")
    public void verifyStatus(int statusCode, int id, int emp_Salary, String emp_name, int emp_age, String message ){

        validatableResponse.assertThat().statusCode(statusCode);

        validatableResponse.assertThat().body("data.id",equalTo(id));

        validatableResponse.assertThat().body("data.employee_salary",equalTo(emp_Salary));

        validatableResponse.assertThat().body("data.employee_name",equalTo(emp_name));

        validatableResponse.assertThat().body("data.employee_age",equalTo(emp_age));

        validatableResponse.assertThat().body("message",equalTo(message));

    }
}
In order to use REST assured effectively, it’s recommended to statically import methods from the following classes:
A runner will help us to run the feature file and act as an interlink between the feature file and step definition Class. To know more about Runner, refer to this link.
import org.junit.runner.RunWith;

import io.cucumber.junit.Cucumber;
import io.cucumber.junit.CucumberOptions;

@RunWith(Cucumber.class)

@CucumberOptions(plugin ="pretty",features= {"src/test/resources/features/API_GET.feature"}, glue= {"com.example.gradle.apidemo"})

public class CucumberRunnerTest {

}
Step 11 – Run the tests from JUnit
You can execute the test script by right-clicking on the Test Runner class -> Run As JUnit.
Step 12 – Run the tests from the Command Line
Run the following Gradle task from the directory path wherebuild.gradlefile is located. To know more about this report, refer here.
gradle cucumber
Below is the screenshot of the execution of Cucumber tests in Command-Line.
Step 13 – Cucumber Report Generation
To get Cucumber Test Reports, add cucumber.properties under src/test/resources and add the below instruction in the file.
cucumber.publish.enabled=true
Below is the image of the Cucumber Report.
We are done! Congratulations on making it through this tutorial and hope you found it useful! Happy Learning!!
In this tutorial, I will explain Parallel Testing usingCucumber with JUnit4.
Cucumber-JVM allows parallel execution across multiple threads since version 4.0.0. There are several options to incorporate this built-in feature in a Cucumber project. You can do so by using JUnit, TestNG, or CLI.
Cucumber can be executed in parallel using JUnit and Maven test execution plugins.
In JUnit, thefeature files are run in parallel rather than in scenarios, which means all the scenarios in a feature file will be executed by the same thread. You can use either Maven Surefire or Failsafe plugin to execute the runner. In this tutorial, I’m using the Maven Surefire plugin.
Create a Maven project in your favorite IDE using the cucumber-archetype or by adding Cucumber dependencies to the POM as detailed here and Junit dependencies here. To know more about How to set up a Cucumber Maven project with Eclipse, please refer to this tutorial – Cucumber Tutorial – How to setup Cucumber with Eclipse.
Below is the structure of the project.
Step 2 – Update the Properties section in Maven pom.xml
Step 5 – Create a feature folder in src/test/resources
Add 2 feature files – LoginPage.feature and ForgotPasswordPage.feature in the features folder present in src/test/resources.
LoginPage.feature
Feature: Login to HRM Application

  Background:
    Given User is on Home page

  @ValidCredentials
  Scenario: Login with valid credentials - Feature 1, Scenario - 1

    When User enters username as "Admin" and password as "admin123"
    Then User should be able to login successfully

  @InvalidCredentials
  Scenario Outline: Login with invalid credentials - Feature 1, Scenario - 2

    When User enters username as "<username>" and password as "<password>"
    Then User should be able to see error message "<errorMessage>"

    Examples:
      | username    | password   | errorMessage                      |
      | Admin       | admin12$$  | Invalid credentials               |
      | admin$$     | admin123   | Invalid credentials               |
      | abc123      | xyz$$      | Invalid credentials               |
      |             | xyz$$      | Invalid credentials               |
ForgotPasswordPage.feature
Feature: Forgot Password Page

  Background:
    Given User is on Home page

  @BackFunctionality
  Scenario: Validate the cancel functionality - Feature 2, Scenario - 1

    When User clicks on Forgot your password? link
    Then User should be able to navigate to Reset Password page
    And User clicks on Cancel button to go back to Login Page

  @ResetFunctionality
  Scenario: Validate the Reset Password functionality - Feature 2, Scenario - 2

    When User clicks on Forgot your password? link
    Then User should be able to navigate to Reset Password page
    And User clicks on Reset Password button and provide username as "abc1234"
    And Verify the message "Reset Password link sent successfully"
Step 6 – Create the Page Object Model classes of LoginPage and ForgotPasswordPage feature files
Page Object Model class contains all the locators and the actions performed on these locators for the particular class to improve the readability and maintainability of the code.
Below are the Page Object Model classes for these feature files.
LoginPage
import org.openqa.selenium.By;
import org.openqa.selenium.WebDriver;

public class LoginPage {

    public WebDriver driver;

    By userName = By.name("username");
    By passWord = By.name("password");
    By login = By.xpath("//*[@id='app']/div[1]/div/div[1]/div/div[2]/div[2]/form/div[3]/button");
    By errorMessage = By.xpath("//*[@id='app']/div[1]/div/div[1]/div/div[2]/div[2]/div/div[1]/div[1]/p");
    By forgotPasswordLink = By.xpath("//*[@id='app']/div[1]/div/div[1]/div/div[2]/div[2]/form/div[4]/p");
    By loginPageTitle = By.xpath("//*[@id='app']/div[1]/div/div[1]/div/div[2]/h5");

    public LoginPage(WebDriver driver) {
        this.driver = driver;
    }

    public String getErrorMessage() {
        return driver.findElement(errorMessage).getText();
    }

    public void login(String strUserName, String strPassword) {

        // Fill user name
        driver.findElement(userName).sendKeys(strUserName);

        // Fill password
        driver.findElement(passWord).sendKeys(strPassword);

        // Click Login button
        driver.findElement(login).click();

    }

    // Click on Forgot Password link
    public void clickOnForgotPasswordLink() {
        driver.findElement(forgotPasswordLink).click();
    }

    //Get Login Page Title
    public String getLoginPageTitle() {
        return driver.findElement(loginPageTitle).getText();
    }
}
HomePage
import org.openqa.selenium.By;
import org.openqa.selenium.WebDriver;

public class HomePage {

    public WebDriver driver;

    public HomePage(WebDriver driver) {
        this.driver = driver;
    }

    By homePageUserName = By.xpath("//*[@id='app']/div[1]/div[1]/header/div[1]/div[1]/span/h6");

    public String getHomePageText() {
        return driver.findElement(homePageUserName).getText();
    }
}
ForgotPasswordPage
import org.openqa.selenium.By;
import org.openqa.selenium.WebDriver;

public class ForgotPasswordPage {

    WebDriver driver;

     By forgotPasswordPageTitle = By.xpath("//*[@id='app']/div[1]/div[1]/div/form/h6");
     By cancelBtn = By.xpath("//*[@id='app']/div[1]/div[1]/div/form/div[2]/button[1]");
     By resetPasswordBtn = By.xpath("//*[@id='app']/div[1]/div[1]/div/form/div[2]/button[2]");
     By userName = By.name("username");
     By resetMessage = By.xpath("//*[@id='app']/div[1]/div[1]/div/h6");

    public ForgotPasswordPage(WebDriver driver) {
        this.driver = driver;
    }

    // Get the Title of ForgotPage
    public String getForgotPageText() {
        return driver.findElement(forgotPasswordPageTitle).getText();
    }

    // Click Cancel Button
    public void clickOnCancelBtn() {
         driver.findElement(cancelBtn).click();
    }

    // Click ResetPassword Button
    public void clickOnRestPasswordBtn() {
        driver.findElement(resetPasswordBtn).click();
    }

    // Type username in TextBox
    public void TypeOnUsernameTextBox(String username) {
        driver.findElement(userName).sendKeys(username);
    }

    // Get Message
    public String getRestMessage() {
        return driver.findElement(resetMessage).getText();
    }
}
PageObjectManager – This class creates the object of all the above-mentioned Page Object Model classes. This an optional class. If you want you can create the objects in StepDefinition class also.
public class PageObjectManager {

    public LoginPage loginPage;
    public HomePage homePage;
    public ForgotPasswordPage forgotPasswordPage;
    public WebDriver driver;


    public PageObjectManager(WebDriver driver)
    {
        this.driver = driver;
    }

    public LoginPage getLoginPage()
    {

        loginPage= new LoginPage(driver);
        return loginPage;
    }

    public HomePage getHomePage()
    {
        homePage = new HomePage(driver);
        return homePage;
    }

    public ForgotPasswordPage getForgotPasswordPage()
    {
        forgotPasswordPage = new ForgotPasswordPage(driver);
        return forgotPasswordPage;
    }
}
Step 7 – Create the Step Definition classes for both feature files or Glue Code
Below is the Step Definition for LoginPage.feature.
import org.example.pageObjects.HomePage;
import org.example.pageObjects.LoginPage;
import org.example.pageObjects.PageObjectManager;
import org.example.utils.TestSetUp;
import io.cucumber.java.en.Given;
import io.cucumber.java.en.Then;
import io.cucumber.java.en.When;
import org.junit.Assert;

public class LoginPageDefinitions {

    TestSetUp setUp;
    public PageObjectManager pageObjectManager;
    public LoginPage loginPage;
    public HomePage homePage;


    public LoginPageDefinitions(TestSetUp setUp)  {
        this.setUp = setUp;
        this.loginPage = setUp.pageObjectManager.getLoginPage();
        this.homePage= setUp.pageObjectManager.getHomePage();
    }

    @Given("User is on Home page")
    public void loginTest()  {
        setUp.baseTest.WebDriverManager().get("https://opensource-demo.orangehrmlive.com/");

    }

    @When("User enters username as {string} and password as {string}")
    public void goToHomePage(String userName, String passWord) {

        // login to application
        loginPage.login(userName, passWord);

        // go the next page

    }

    @Then("User should be able to login successfully")
    public void verifyLogin() {

        // Verify home page
        Assert.assertTrue(homePage.getHomePageText().contains("Dashboard"));

    }

    @Then("User should be able to see error message {string}")
    public void verifyErrorMessage(String expectedErrorMessage) {

        // Verify home page
        Assert.assertEquals(loginPage.getErrorMessage(),expectedErrorMessage);

    }

}
Below is the Step Definition for ForgotPasswordPage.feature.
import io.cucumber.java.en.Then;
import io.cucumber.java.en.When;
import org.example.pageObjects.ForgotPasswordPage;
import org.example.pageObjects.LoginPage;
import org.example.pageObjects.PageObjectManager;
import org.example.utils.TestSetUp;
import org.junit.Assert;


public class ForgotPasswordPageDefinitions {

    TestSetUp setUp;
    PageObjectManager pageObjectManager;
    public LoginPage loginPage;
    public  ForgotPasswordPage forgotPasswordPage;

    public ForgotPasswordPageDefinitions(TestSetUp setUp) {
        this.setUp = setUp;
        this.loginPage = setUp.pageObjectManager.getLoginPage();
        this.forgotPasswordPage = setUp.pageObjectManager.getForgotPasswordPage();
    }

    @When("User clicks on Forgot your password? link")
    public void forgotPasswordLink() {

        loginPage.clickOnForgotPasswordLink();

    }

    @Then("User should be able to navigate to Reset Password page")
    public void verifyForgotPasswordPage() {

        Assert.assertEquals(forgotPasswordPage.getForgotPageText(),"Reset Password");

    }

    @Then("User clicks on Cancel button to go back to Login Page")
    public void verifyCancelBtn() {

        forgotPasswordPage.clickOnCancelBtn();
        Assert.assertEquals(loginPage.getLoginPageTitle(),"Login");

    }

    @Then("User clicks on Reset Password button and provide username as {string}")
    public void verifyResetPasswordBtn(String username) {

        forgotPasswordPage.TypeOnUsernameTextBox(username);
        forgotPasswordPage.clickOnRestPasswordBtn();

    }

    @Then("Verify the message {string}")
    public void verifyMessage(String message) {

        //  ForgotPasswordPage forgotPasswordPage = setUp.pageObjectManager.getForgotPasswordPage();
        Assert.assertEquals(forgotPasswordPage.getRestMessage(),message);

    }
}
Step 8 – Create the Hook Class and Dependency Injection class (TestSetUp) and BaseTest class
Below is the code for the ApplicationHook Class.
import io.cucumber.java.After;
import io.cucumber.java.AfterStep;
import io.cucumber.java.Scenario;
import org.example.utils.TestSetUp;
import org.openqa.selenium.OutputType;
import org.openqa.selenium.TakesScreenshot;
import org.openqa.selenium.WebDriver;

public class ApplicationHooks {

 public TestSetUp setUp;

    public ApplicationHooks(TestSetUp setUp) {
        this.setUp = setUp;
    }

    @After
    public void tearDown( )  {
        setUp.baseTest.WebDriverManager().quit();
    }

    @AfterStep
    public void addScreenshot(Scenario scenario) {

        WebDriver driver =  setUp.baseTest.WebDriverManager();
        if(scenario.isFailed()) {
            final byte[] screenshot = ((TakesScreenshot) driver).getScreenshotAs(OutputType.BYTES);
            scenario.attach(screenshot, "image/png", "image");
        }

    }

}
Below is the code for the Dependency Injection class. In Cucumber, if we want to share the state between multiple-step definition files, we will need to use dependency injection (DI).
import org.openqa.selenium.WebDriver;
import org.openqa.selenium.WebElement;
import pageObjects.PageObjectManager;

public class TestSetUp {

    public WebElement errorMessage;
    public WebElement homePageUserName;
    public PageObjectManager pageObjectManager;
    public BaseTest baseTest;

    public TestSetUp()  {

        baseTest = new BaseTest();
        pageObjectManager = new PageObjectManager(baseTest.WebDriverManager());

    }
}
BaseTest class is used to initialize the WebDriver.
import io.github.bonigarcia.wdm.WebDriverManager;
import org.openqa.selenium.WebDriver;
import org.openqa.selenium.chrome.ChromeDriver;
import java.time.Duration;

public class BaseTest {

    public WebDriver driver;
    public final static int TIMEOUT = 10;

    public WebDriver WebDriverManager ()  {


        if (driver == null) {

            WebDriverManager.chromedriver().setup();
            driver = new ChromeDriver();
            driver.manage().timeouts().implicitlyWait(Duration.ofSeconds(TIMEOUT));
            driver.manage().window().maximize();
            driver.get(url);

        }
        return driver;
    }
}
Step 9 – Create a Test Runner to run the tests
import io.cucumber.junit.Cucumber;
import io.cucumber.junit.CucumberOptions;
import org.junit.runner.RunWith;

@RunWith(Cucumber.class)
@CucumberOptions(tags = "", features = "src/test/resources/features", glue = "org.example.definitions")

public class CucumberRunnerTests  {

}
Step 10 – Cucumber Report Generation
To get Cucumber Test Reports, add cucumber.properties in src/test/resources and add the below instruction in the file.
cucumber.publish.enabled=true
Step 11 – Execute the tests from the command line
mvn clean test
Below is the execution screen. There are two feature files.
When we invoke the test through Maven, the surefire plugin executes the Feature files parallelly. Here, LoginPage has 5 scenarios and ForgotPasswordPage has 2 scenarios. So, initially when the execution will start 1 scenario from both the tests will be executed parallelly and then again one test from each feature will execute. Later, we will be left with 4 scenarios in the LoginPage feature file, so the scenario will run sequentially of the LoginPage feature file.
All the tests of a particular feature file are executed together as feature files are run in parallel, not scenarios.
Step 12 – Difference between Parallel tests and Non-Parallel Tests
Parallel Tests
Below is the Cucumber Report generated for parallel tests.
When the tests are run as JUnit tests from CucumberRunnerTests, then the tests are executed sequentially.
We are done! Congratulations on making it through this tutorial and hope you found it useful! Happy Learning!!
Step 1- Create a Project Folder and change the directory path to the folder where we want to save the latest files created post creation of the project. Here, I have created a folder – GradleIntelliJDemoFromCMD and changed the directory path.
cd C:\Users\Vibha\Projects\Vibha_Personal\GradleIntelliJDemoFromCMD
Step 2 – Open the Terminal in IntelliJ.
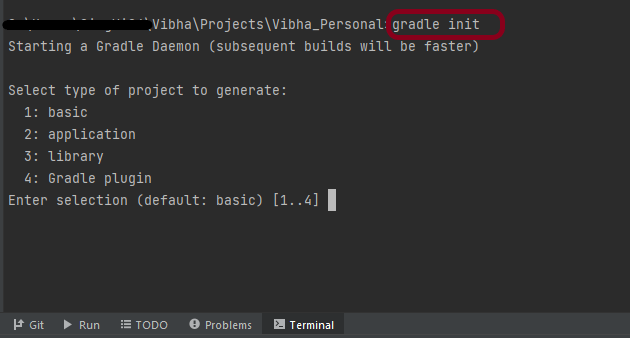
Step 3 – Gradle comes with a built-in task, called init , that initializes a new Gradle project in an empty folder. The init task uses the (also built-in) wrapper task to create a Gradle wrapper script, gradlew. Type the below command and press ENTER.
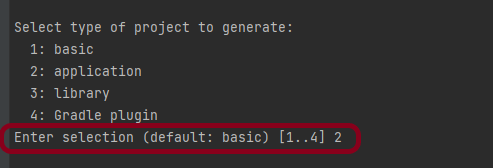
Step 4 – Select the type of project to generate. I’m selecting the application option as if I select basic, it won’t create a src directory. Type 2 and press ENTER.
Step 5 – Select implementation language. This is a Java project, so TYPE 3(Java) and press ENTER.
Step 6 – Select build script DSL (Domain Specific Language) – As in Maven POM.xml (XML) is created to build a script file, here we can use Groovy or Kotlin to build the script file. Type 1 (Groovy) and press ENTER.
Step 7 – Select Test Framework – There are 4 different test frameworks. Depending on your requirement, select an option. I have selected 1 (JUnit 4) and press ENTER.
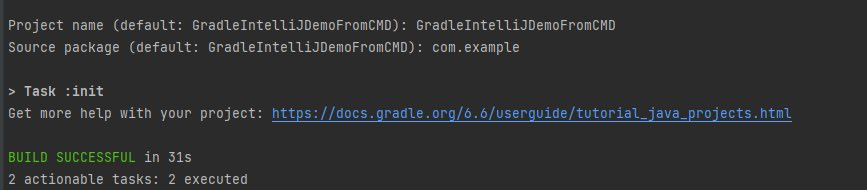
Step 8 – It needs the Project name and Source Package name. If I won’t provide the project name, it will take by default my current folder name which is Gradle_Project. Similarly, if I won’t provide the Source Package name, then it will provide the current project name as Source Package Name.
Project name – GradleIntelliJDemoFromCMD Source Package – com.example
Press ENTER. init script will run and create a Gradle project. You can see as the build is successfull.
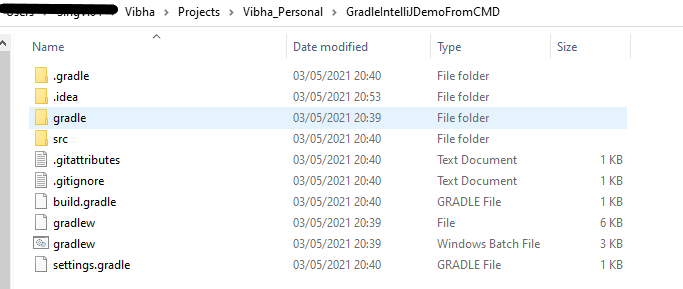
Step 9 – The project is created and placed under the folder GradleIntelliJDemoFromCMD as shown below.
This project structure will have below mentioned files:-