In this tutorial, I will explain about Manual Tests in Serenity JUnit5.
You can annotate @Test not @Steps as @Manual.
In contrast to Junit4 a test method annotated with @Manual will actually be executed. This allows to further specify the example using @Step methods and show them the report.
Below is an example where tests are annotated with @Manual with description.
@SerenityTest
public class LoginTests {

	@Managed
	WebDriver driver;

	@Steps
	StepLoginPage loginPage;

	@Steps
	StepDashboardPage dashPage;

	@Steps
	StepForgetPasswordPage forgetpasswordPage;

	@Test
	@Title("Login to application should be successful")
	public void sucessfulLogin() {

		// Given
		loginPage.open();

		// When
		loginPage.inputUserName("Admin");
		loginPage.inputPassword("admin123");
		loginPage.clickLogin();

		// Then
		dashPage.loginVerify();
	}

	@Test
	@Title("Login to application should be unsuccessful with error message")
	public void unsucessfulLogin() throws InterruptedException {

		// Given
		loginPage.open();

		// When
		loginPage.inputUserName("abc");
		loginPage.inputPassword("abc12");
		loginPage.clickLogin();

		// Then
		String actualErrorMessage = loginPage.errorMessage();
		assertEquals("Invalid credentials", actualErrorMessage);
	}

	@Test
	@Manual
	void manualDefault() {
		loginPage.manualStep();
	}

	@Test
	@Manual(result = TestResult.SUCCESS)
	void manualSuccess() {
		loginPage.manualStep();
	}

	@Test
	@Manual(result = TestResult.COMPROMISED)
	void manualCompromised() {
		loginPage.manualStep();
	}

	@Test
	@Manual(result = TestResult.ERROR)
	void manualError() {
		loginPage.manualStep();
	}

	@Test
	@Manual(result = TestResult.ERROR, reason = "A reason for the error")
	void manualErrorWithReason() {
		loginPage.manualStep();
	}

	@Test
	@Manual(result = TestResult.FAILURE)
	void manualFailure() {
		loginPage.manualStep();
	}

	@Test
	@Manual(result = TestResult.IGNORED)
	void manualIgnored() {
		loginPage.manualStep();
	}

	@Test
	@Manual(result = TestResult.PENDING)
	void manualPending() {
		loginPage.manualStep();
	}

	@Test
	@Manual(result = TestResult.SKIPPED)
	void manualSkipped() {
		loginPage.manualStep();
	}

	@Test
	@Manual(result = TestResult.UNDEFINED)
	void manualUndefined() {
		loginPage.manualStep();
	}

	@Test
	@Manual(result = TestResult.UNSUCCESSFUL)
	void manualUnsuccessful() {
		loginPage.manualStep();
	}

}
StepLoginPage.java
public class StepLoginPage extends PageObject {

	@FindBy(name = "txtUsername")
	WebElementFacade username;

	@FindBy(name = "txtPassword")
	WebElementFacade password;

	@FindBy(name = "Submit")
	WebElementFacade submitButton;

	@FindBy(id = "spanMessage")
	WebElementFacade errorMessage;

	@FindBy(id = "forgotPasswordLink")
	WebElementFacade linkText;

	@Step("Enter Username")
	public void inputUserName(String userName) {
		username.sendKeys((userName));
	}

	@Step("Enter Password")
	public void inputPassword(String passWord) {
		password.sendKeys((passWord));
	}

	@Step("Click Submit Button")
	public void clickLogin() {
		submitButton.click();
	}

	@Step("Error Message on unsuccessful login")
	public String errorMessage() {
		String actualErrorMessage = errorMessage.getText();
		System.out.println("Actual Error Message :" + actualErrorMessage);
		return actualErrorMessage;
	}

	@Step("Manual Test Step")
	public void manualStep() {

		System.out.println("Verify various status of manual step");

	}

}
StepDashboardPage.java
public class StepDashboardPage extends PageObject {

	@FindBy(id = "welcome")
	WebElementFacade dashboardText;

	@Step("Successful login")
	public void loginVerify() {
		String dashboardTitle = dashboardText.getText();
		assertThat(dashboardTitle, containsString("Welcome"));
	}
}
Execute these tests by using the below command in commandline.
mvn clean verify
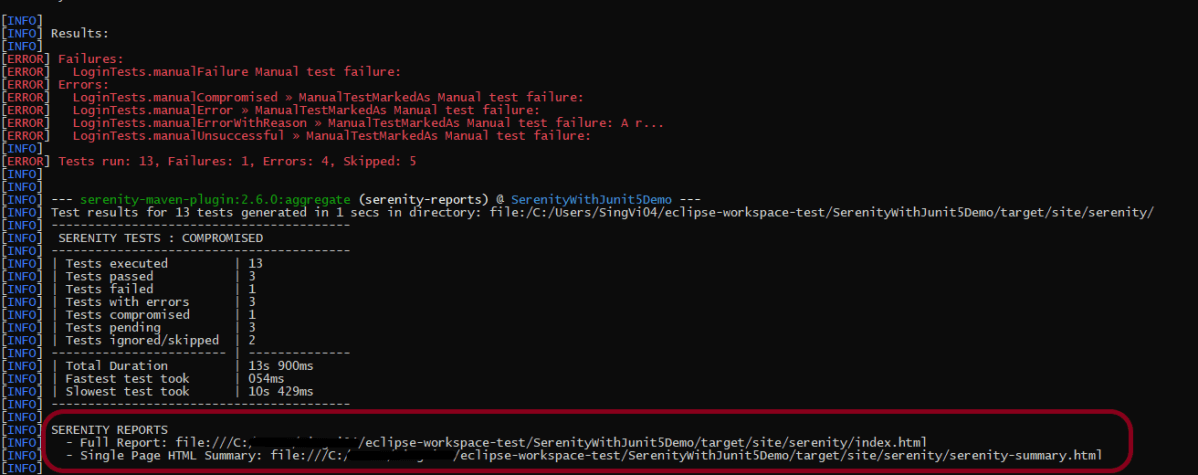
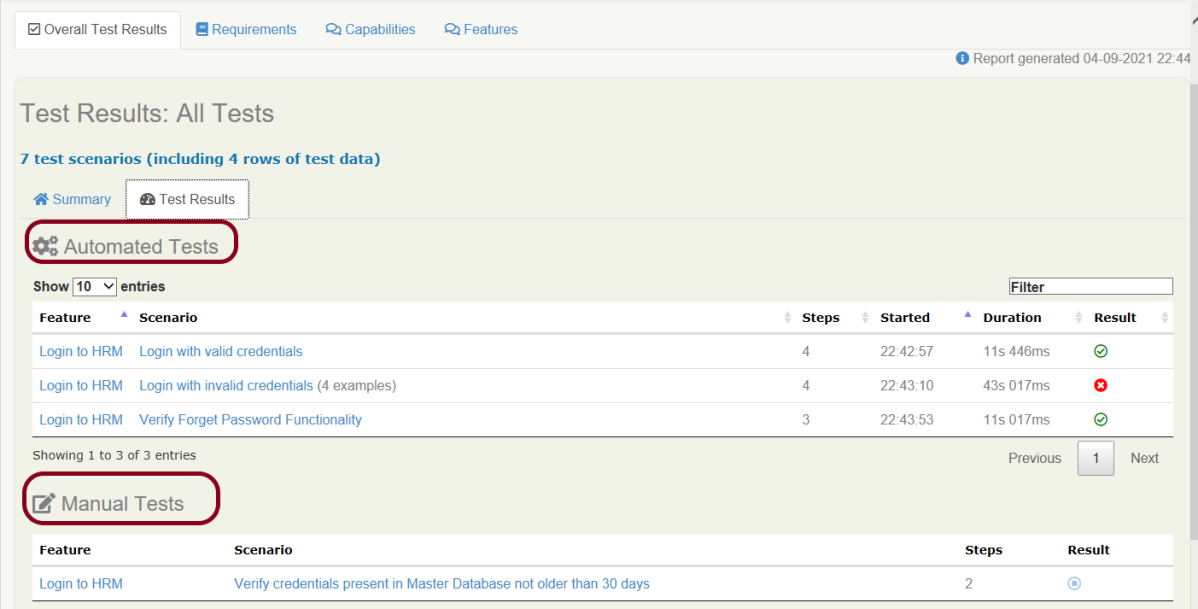
There are two automated tests and rest all are Manual tests. We have Manual Test marked as Default, SUCCESS, COMPROMISED, ERROR, FAILURE, IGNORED, PENDING, SKIPPED, UNDEFINED and UNSUCCESSFUL.
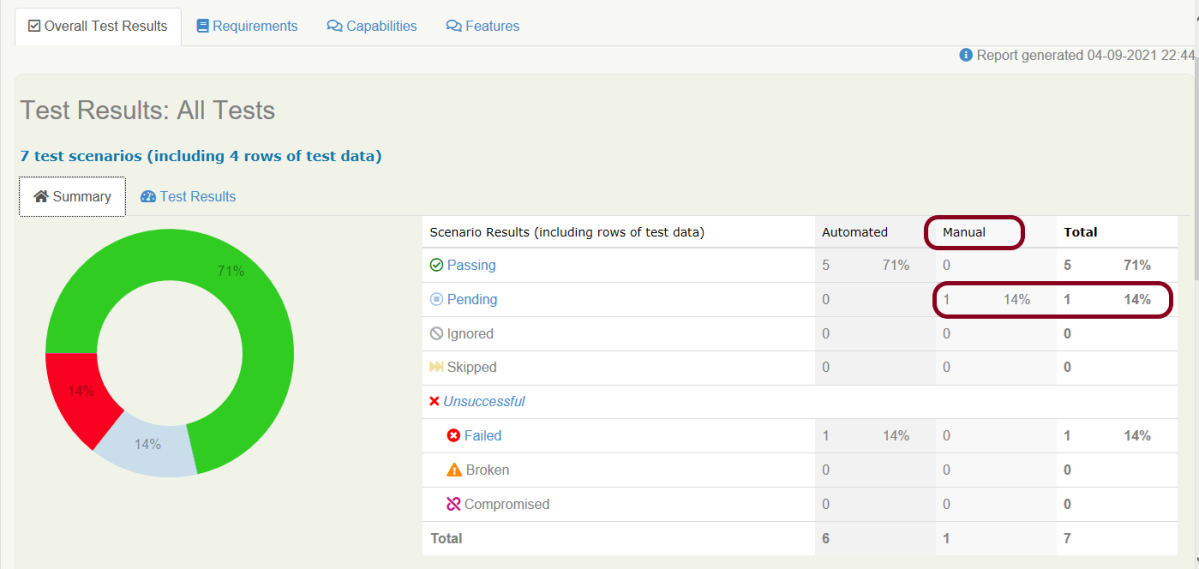
The execution status looks like as shown below.
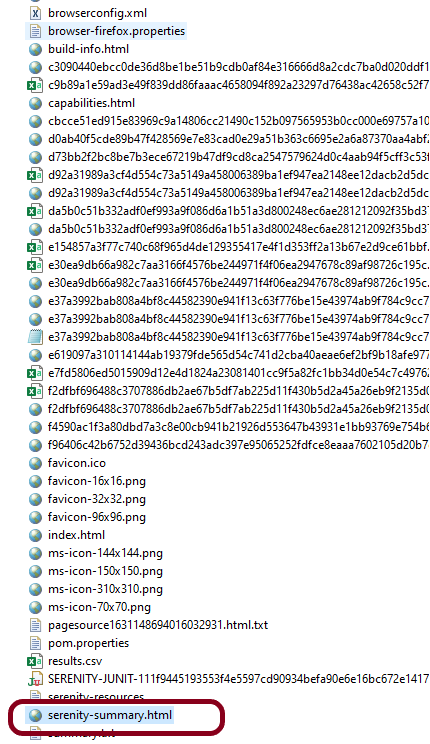
The reports are generated under /target/site/serenity. There are 2 types of Reports are generated – index.html and serenity-summary.html. To know how to generate Serenity Reports, please refer tutorials for index.html and serenity-summary.html.
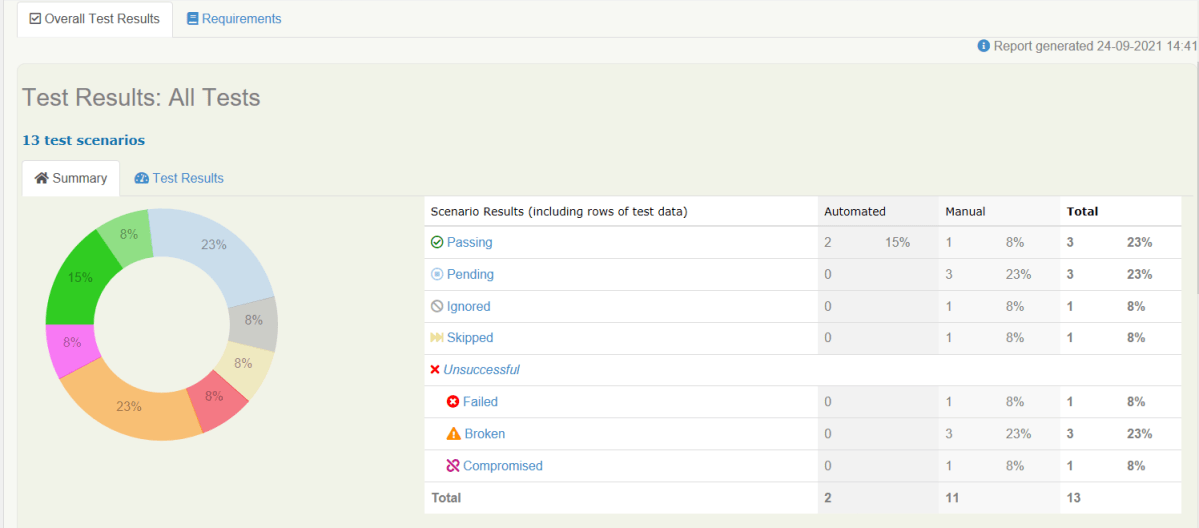
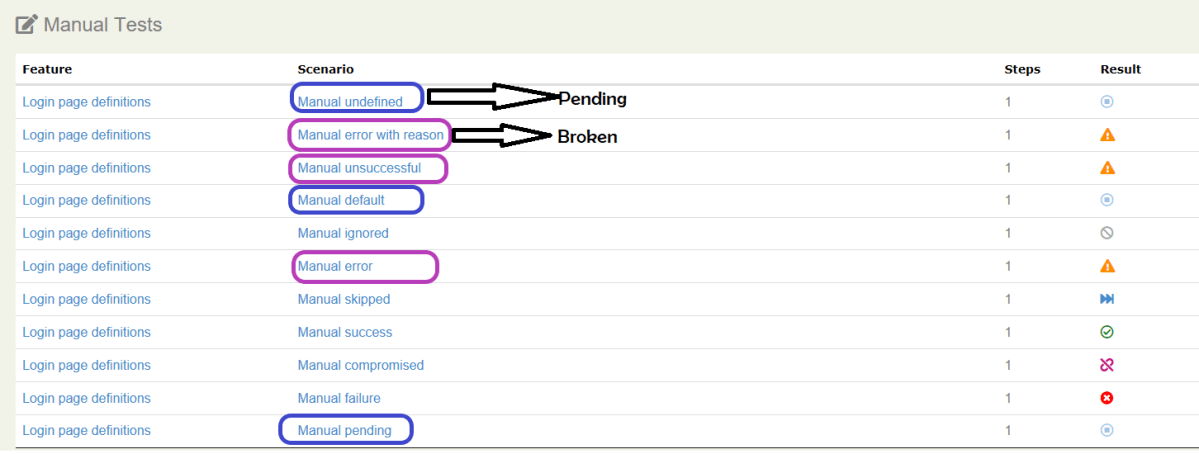
By default, @manual scenarios are marked as pending in the Serenity reports.
All scenarios highlighted by blue color are Pending ones whereas pink color are Broken ones.
Serenity-Summary.html
We are done! Congratulations on making it through this tutorial and hope you found it useful! Happy Learning!!
Serenity provides a wide range of options to manage screenshots in the report. By default, Serenity has set option serenity.take.screenshots=BEFORE_AND_AFTER_EACH_STEP, which means the screenshot is saved before and after each step as shown in the below image. Before this tutorial, refer to the previous tutorial on How to generate Serenity Report.
However, recording many screenshots can slow down test execution. So, maybe we like to record the screenshot of failed steps in the scenario. To achieve this flexibility, configure serenity.take.screenshots property inserenity.properties file.
There are various other types of options for managing screenshots in Serenity Report. This property can take the following values:
FOR_EACH_ACTION: Saves a screenshot at every web element action (like click(), typeAndEnter(), type(), typeAndTab() etc.).
BEFORE_AND_AFTER_EACH_STEP: Saves a screenshot before and after every step.
AFTER_EACH_STEP: Saves a screenshot after every step
FOR_FAILURES: Saves screenshots only for failing steps.
DISABLED: Doesn’t save screenshots for any steps.
In the below option, I have used FOR_FAILURES option in the serenity.properties file.
Below is the screenshot of the passed test case. We can see that there is no screenshot attached to any of the test steps.
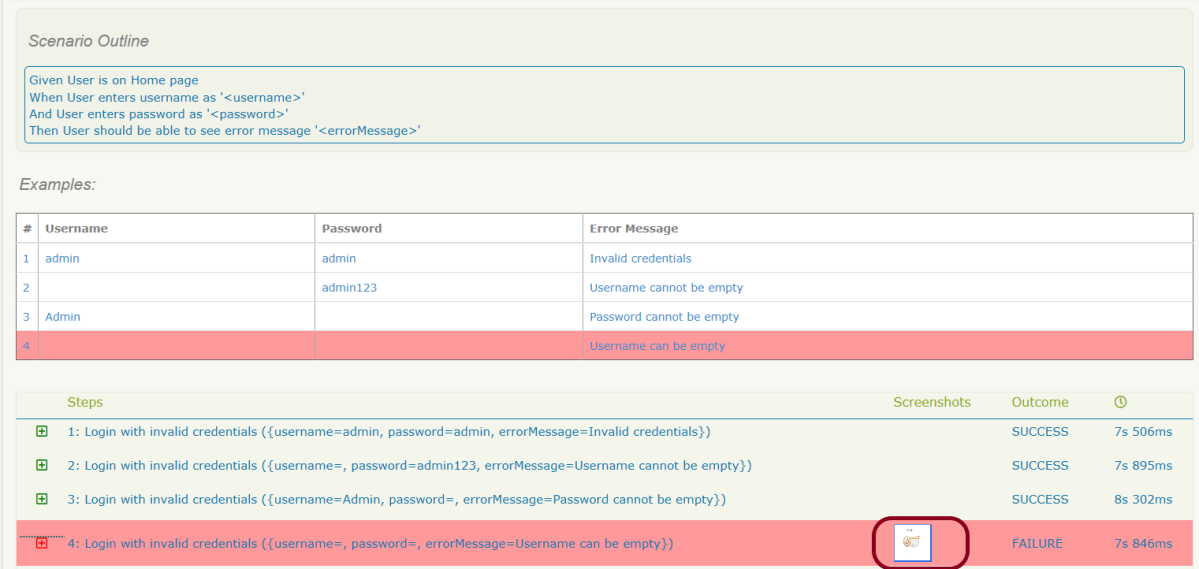
Below is the screenshot of the failed test case. We can see that there is a screenshot attached to the failed test step only, not all the test steps. In below example, it is a scenario outline with four different test data. Out of four, only one set of test data has failed. So, the screenshot is generated for the failed step of that particular test data.
We are done! Congratulations on making it through this tutorial and hope you found it useful! Happy Learning!!
In the previous tutorial, I explained how to mention Manual Test Cases in Serenity Report. In this tutorial, I will explain how to attach test evidence to manual tests. Before this tutorial, I suggest you to refer the tutorial which explain How to generate Serenity Report.
It is always advisable to attach screenshots or other files to our manual test reports as additional evidence, specially for failed scenarios. The @manual-test-evidence tag allows you to do just this. You can either include a link to an external site, as shown here:
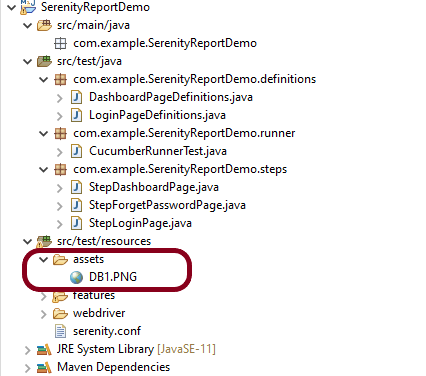
Mentioning the path of evidence in the test is not a very good way to attach test evidence to the manual tests. An alternative approach and favorable one is to place the image in the src/test/resources/assets folder and include a relative link to this file (starting with “assets/“):
    @manual
    @manual-result:failed
    @manual-last-tested:sprint-1
    @manual-test-evidence:assets/DB1.PNG
    Scenario: Verify different credentials are provided to Admin, Dev and QA to access Master Database

    Given User is connected to Master Database
    Then Different credentials are provided to Admin, Business, Dev and QA to access Master Database
Test Evidence is only displayed if the @manual-last-tested annotation is defined in serenity.properties.
serenity.project.name = Serenity and Cucumber Report Demo
current.target.version = sprint-1
Execute the test suite by using the below command
mvn clean verify
As we the the Serenity Reports (index.html and serenity-summary.html) are generated under target/site/serenity.
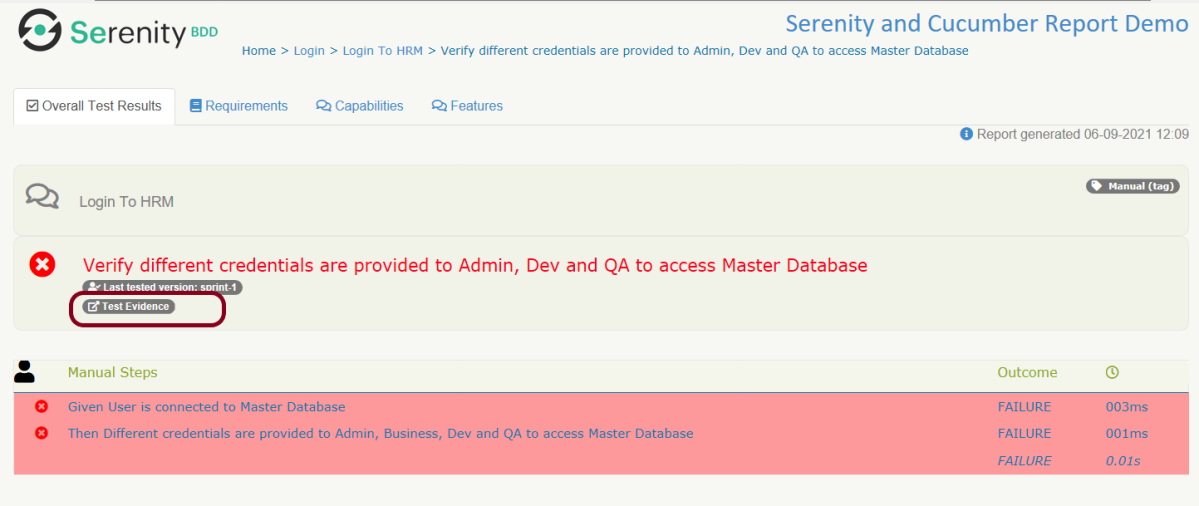
Below is the sample index.html report which has test evidence attached to the manual test.
You can see that there is a new tag with name – Test Evidence. This is the screenshot I have placed under assets folder.
Click on the link and a new page with the screesnhot placed under assets folder opens.
Congratulations. You are able to attach the test evidence to manual tests in Serenity Report. Hope you enjoyed this tutorial. Cheers!!
Step 2 – Download and setup Eclipse IDE on the system
The Eclipse IDE (integrated development environment) provides strong support for Java developers. Click here to know How to install Eclipse.
Step 3 – Setup Gradle
To build a test framework, we need to add several dependencies to the project. This can be achieved by any build tool. I have used Gradle Build Tool. Click here to know How to install Gradle. Click here to know How to create a Gradle Java project.
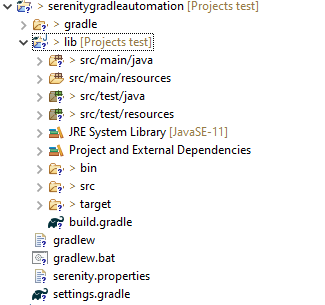
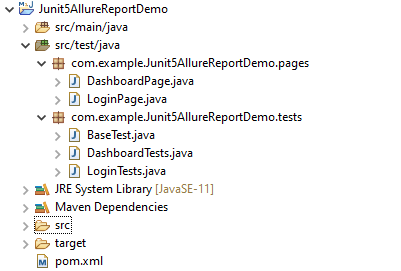
Below is the structure of the Gradle project.
Step 4 – Update repositories, plugin, and dependencies to the Gradle project
Step 5 – Create a feature file under src/test/resources
AFeature File is an entry point to the Cucumber tests. This is a file where you will describe your tests in Descriptive language (Like English). A feature file can contain a scenario or can contain many scenarios in a single feature file. Feature file Below is an example of a Feature file.
Feature: Employee Details


  @GetValidUserDetails
  Scenario Outline: Send a Request to get valid user details

  Given I send a request to the URL <id> to get user details
  Then the response will return statuscode <status> and id <id> and salary <employee_salary> and name '<employee_name>' and age <employee_age> and message '<message>'

  Examples:
    |id  |status  |employee_salary|employee_name |employee_age  |message                                  |
    |1   |200     |320800         |Tiger Nixon   |61            |Successfully! Record has been fetched.   |

  @GetInvalidUserDetails
  Scenario Outline: Send a Request to get invalid user details

  Given I send a request to the URL <id> to get user details
  Then the response will return statuscode <statusCode> and status '<statusMessage>' and and message '<message>'

  Examples:
    |id     |statusCode  |statusMessage    |message                                  |
    |9999   |200         |success          |Successfully! Record has been fetched.   |
Step 6 – Create the Step Definition class or Glue Code for the Test Scenario
The steps definition file stores the mapping between each step of the test scenario defined in the feature file with a code of the function to be executed. So, now when Cucumber executes a step of the scenario mentioned in the feature file, it scans the step definition file and figures out which function is to be called.
public class EmployeeDefinitions {

	private static final String URL = "http://dummy.restapiexample.com/api/v1/employee/";
	public Response response;

	@Given("I send a request to the URL {int} to get user details")
	public void sendRequest(int id) {

		response = SerenityRest.given().contentType("application/json").header("Content-Type", "application/json")
				.when().get(URL + id);
	}

	@Then("the response will return statuscode {int} and id {int} and salary {int} and name {string} and age {int} and message {string}")

	public void verifyValidUser(int statusCode, int id, int salary, String name, int age, String message) {
		SerenityRest.restAssuredThat(response -> response.statusCode(statusCode).and().body("data.id", equalTo(id))
				.and().body("data.employee_salary", equalTo(salary)).and().body("data.employee_name", equalTo(name))
				.and().body("data.employee_age", equalTo(age)).and().body("message", equalTo(message)));

	}

	@Then("the response will return statuscode {int} and status {string} and and message {string}")
	public void verifyInalidUser(int statusCode, String statusMessage, String message) {
		SerenityRest.restAssuredThat(response -> response.statusCode(statusCode).and()
				.body("status", equalTo(statusMessage)).and().body("message", equalTo(message)));

	}
}
Step 7 – Create a Serenity Cucumber Runner class
Cucumber runs the feature files via JUnit and needs a dedicated test runner class to actually run the feature files. When you run the tests with Serenity, you use theCucumberWithSerenity test runner. You also need to use the @CucumberOptionsclass to provide the root directory where the feature files can be found.
import org.junit.runner.RunWith;

import io.cucumber.junit.CucumberOptions;
import net.serenitybdd.cucumber.CucumberWithSerenity;

@RunWith(CucumberWithSerenity.class)
@CucumberOptions(plugin = { "pretty" }, features = "lib/src/test/resources/features/Employee.feature", glue = {
		"serenitygradlerestautomation.definitions" })

public class SerenityRunnerTest {
}
Step 8 – Create serenity.properties file at the root of the project
serenity.project.name = Serenity and Gradle Rest Assured Demo
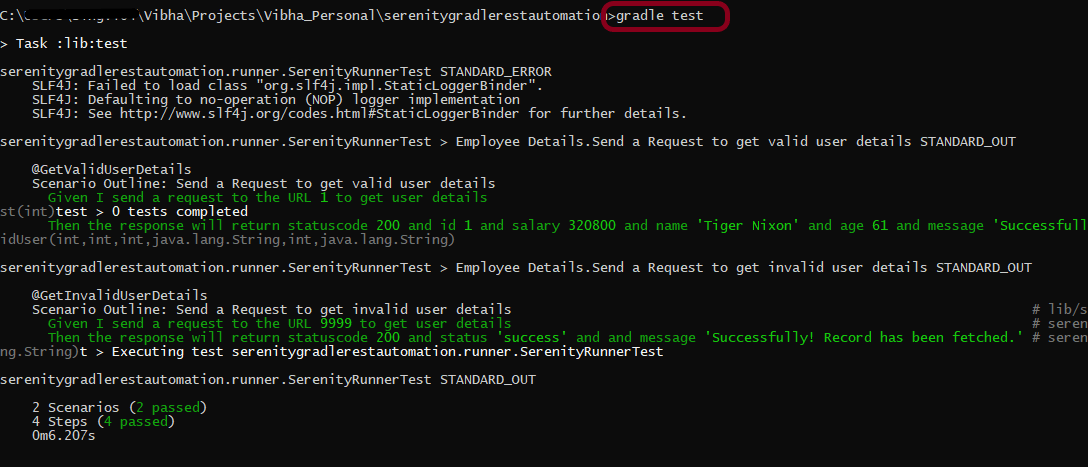
Step 9 – Run the tests through command line, which generates Serenity Report
Open the command line and go to the location where gradle.build of the project is present and type the below command.
gradle test
The Serenity report is generated under /lib/target/site/serenity.
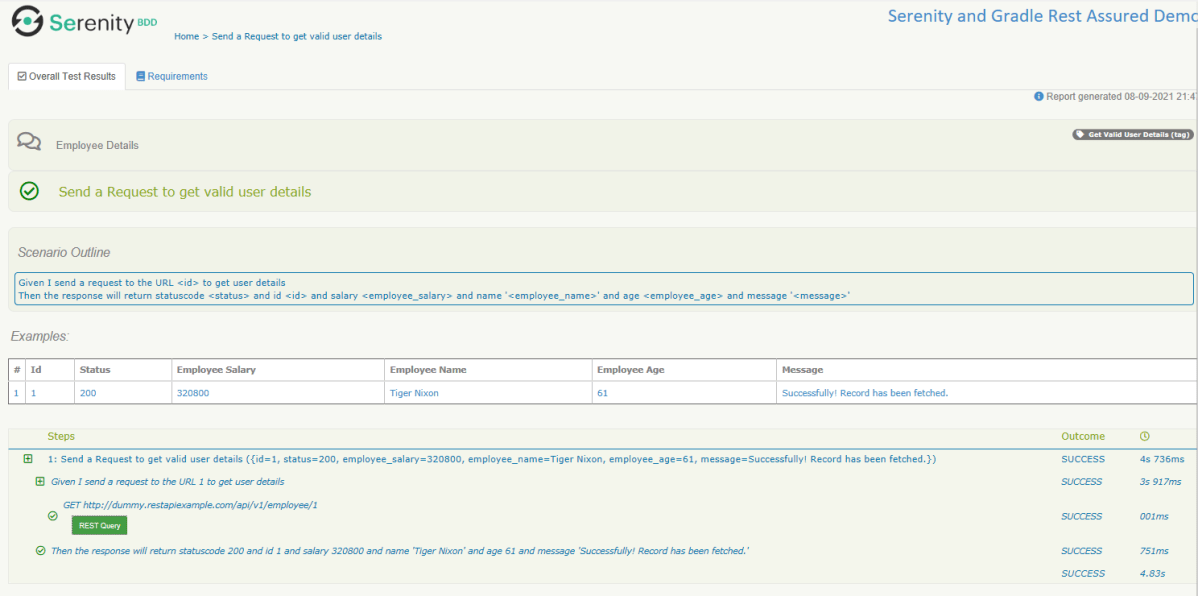
Index.html
Overall Test Results Section provides the details about all the Test Scenario, like the time taken by each test step, the status of each test step, and soon.
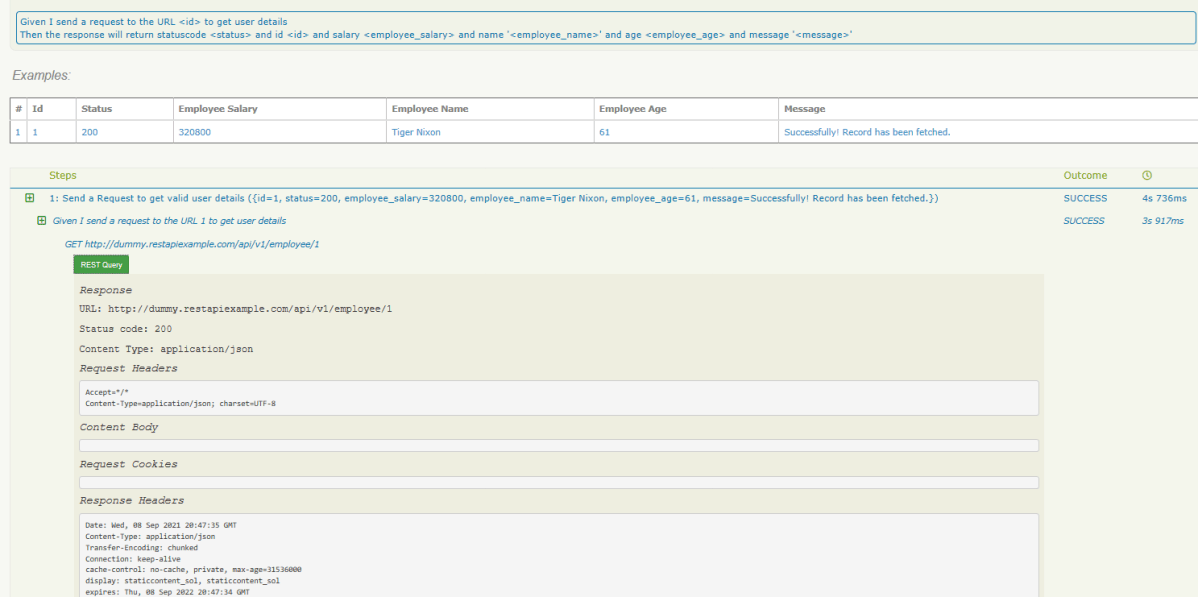
In this report, you can see the request as well as response details in the report.
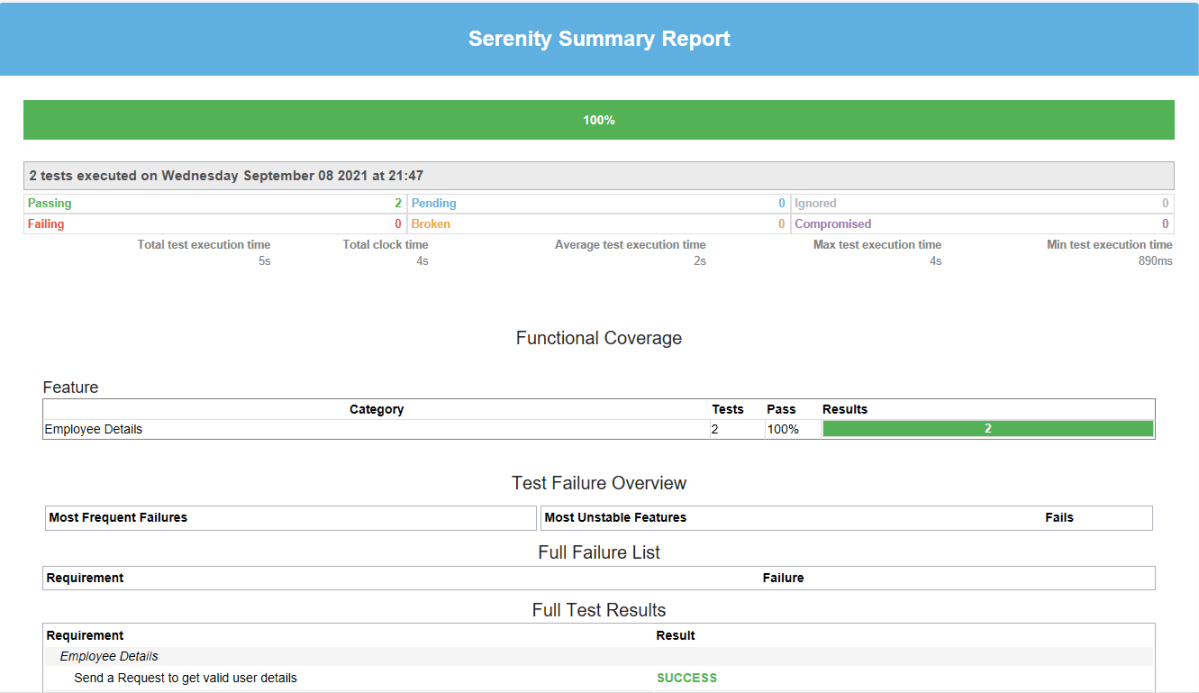
Step 10 – Generate Single Page HTML Report
As we have already mentioned the dependencies of a single-page-report in build.gradle, we can generate an emailable serenity report that contains the summary of test execution.
gradle reports
Serenity Summary Report (single-page-report.html) is placed under lib\target\site\serenity.
We are done! Congratulations on making it through this tutorial and hope you found it useful! Happy Learning!!
Cucumber is primarily and traditionally used for automating executable specifications. But with Serenity BDD, you can add special tags to indicate that a scenario represents a manual test case.
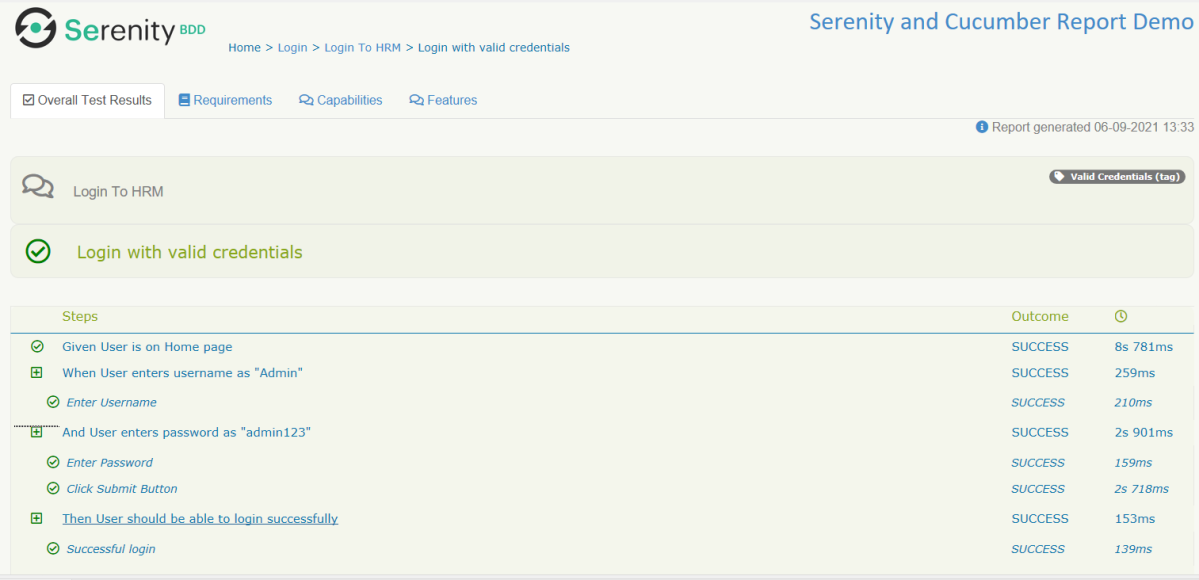
You can flag any Cucumber scenario as manual simply by using the @manual tag. In the below example, I have tagged a scenario as “@manual”. The last scenario is tagged as “manual”. By default, @manual scenarios are marked as pending in the Serenity reports.
Feature: Login to HRM

   @ValidCredentials
   Scenario: Login with valid credentials

    Given User is on Home page
    When User enters username as "Admin"
    And User enters password as "admin123"
    Then User should be able to login successfully

    @InValidCredentials
    Scenario Outline: Login with invalid credentials

    Given User is on Home page
    When User enters username as '<username>'
    And User enters password as '<password>'
    Then User should be able to see error message '<errorMessage>'

   Examples:
    |username  |password  |errorMessage                    |
    |admin     |admin     |Invalid credentials             |
    |          |admin123  |Username cannot be empty        |
    |Admin     |          |Password cannot be empty        |
    |          |          |Username can be empty        |

   @ForgetPassword
   Scenario: Verify Forget Password Functionality

    Given User is on Home page
    When User clicks on Forgot your password link
    Then User should be able to see new page which contains Reset Password button

   @manual
   Scenario: Verify credentials present in Master Database not older than 30 days

    Given User is connected to Master Database
    Then Username "Admin" and password "admin123" are present in Master Database not older than 30 days
Execute the test suite using below command
mvn clean verify
The scenario marked with @manual tag will now appear as a Manual test case in the Serenity report (Index.html). To know how to create Serenity Report, click here.
We can indicate a different result by adding the @manual-result tag as shown here:
A passing test: @manual-result:passed A failing test: @manual-result:failed A compromised test: @manual-result:compromised
If we want to record the result of a manual test, we should include both the @manual and the @manual-result tags.
   @manual
   @manual-result:passed
   Scenario: Verify credentials present in Master Database not older than 30 days

   Given User is connected to Master Database
   Then Username "Admin" and password "admin123" are present in Master Database not older than 30 days

   @manual
   @manual-result:failed
   Scenario: Verify different credentials are provided to Admin, Dev and QA to access Master Database

   Given User is connected to Master Database
   Then Different credentials are provided to Admin, Business, Dev and QA to access Master Database
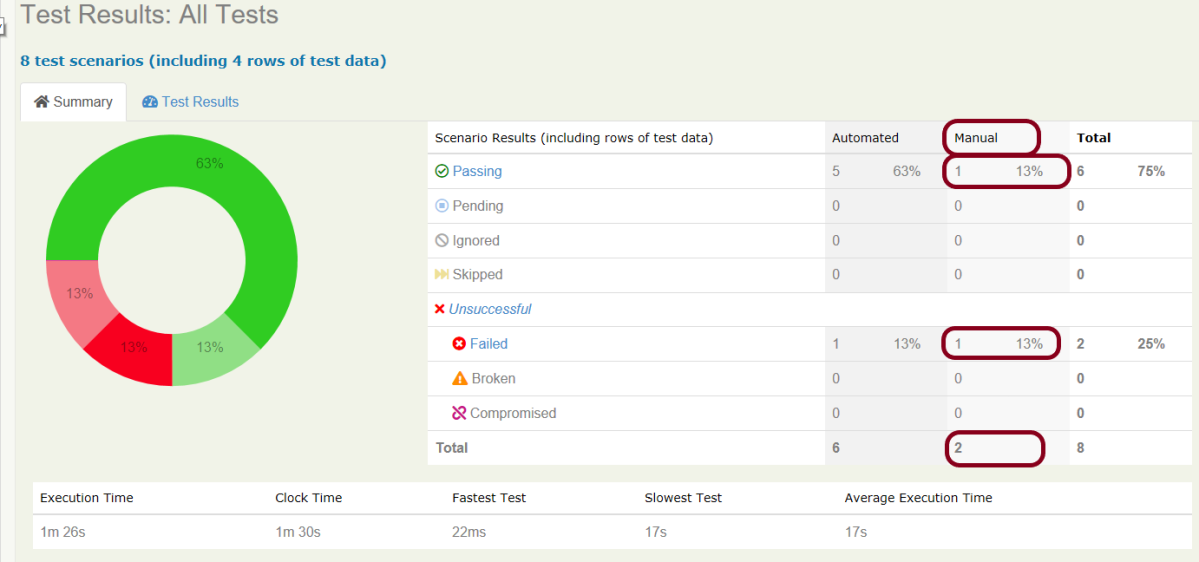
This image shows that there are 2 manual tests. I have marked one manual test as passed and another one as failed which is clearly shown in this image.
How to update Manul Test Results
In the below example, we are considering that the team is working on Sprint-1. We have executed the manual tests and marked the status in the feature file as shown below.
  @manual
  @manual-result:passed
  @manual-last-tested:sprint-1
  Scenario: Verify credentials present in Master Database not older than 30 days

  Given User is connected to Master Database
  Then Username "Admin" and password "admin123" are present in Master Database not older than 30 days

  @manual
  @manual-result:failed
  @manual-last-tested:sprint-1
  Scenario: Verify different credentials are provided to Admin, Dev and QA to access Master Database

  Given User is connected to Master Database
  Then Different credentials are provided to Admin, Business, Dev and QA to access Master Database
In the Serenity properties , the team also records the current version (or sprint number):
serenity.project.name = Serenity and Cucumber Report Demo
current.target.version = sprint-1
Now, execute the feature file. This is how the report look like.
Now, we are in next sprint. Update the value of current.target.version in serenity.properties file.
serenity.project.name = Serenity and Cucumber Report Demo
current.target.version = sprint-2
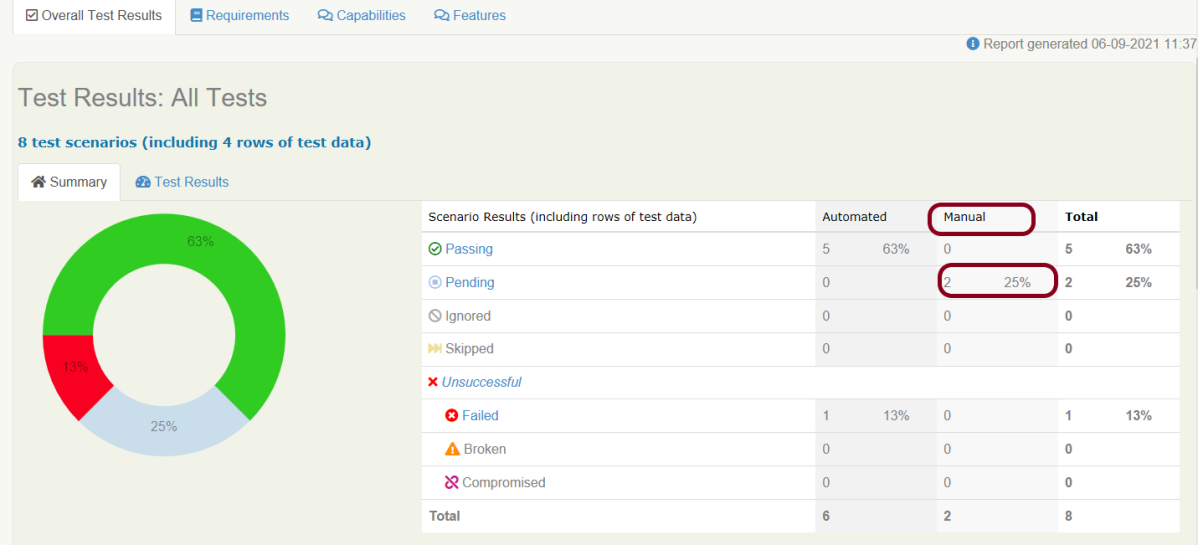
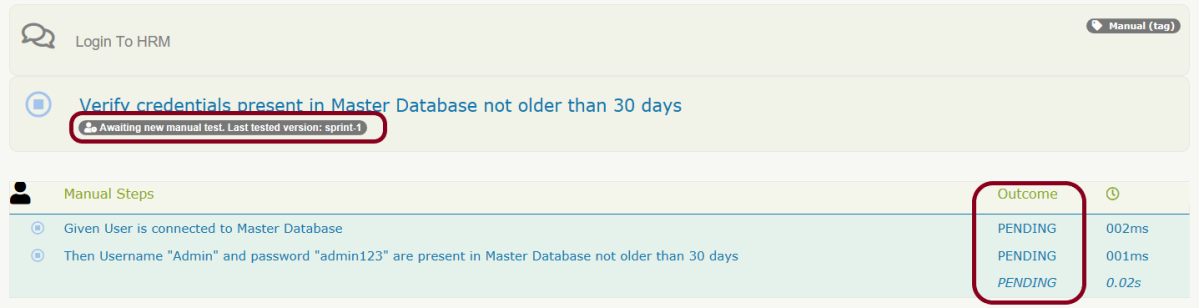
Now, when the manual scenario is processed, it will be marked as pending, with a note indicating that a new manual test is required:
Both the maual tests which were marked as pass and fail are now pending tests as shown in the image.
We are done! Congratulations on making it through this tutorial and hope you found it useful! Happy Learning!!
In this tutorial, I will explain creating a framework for the testing of Web Applications in Cucumber BDD.
Pre-Requisite
Java 11 installed
Gradle installed
Eclipse or IntelliJ installed
This framework consists of:
Serenity – 2.6.0
Serenity Cucumber – 2.6.0
Java 11
JUnit – 4.13.2
Gradle – 7.2
Steps to setup Gradle Java Project for Web Application using Serenity, Cucumber6 and JUnit4
Download and Install Java on the system
Download and setup Eclipse IDE on the system
Setup Gradle on System and create a new Gradle Project
Update repositories, plugins, and dependencies to the Gradle project
Create a feature file under src/test/resources
Create the Step Definition class or Glue Code for the Test Scenario
Create a Serenity Cucumber Runnerclass
Create serenity.conffile under src/test/resources
Create serenity.properties file at the root of the project
Run the tests through commandline which generates Serenity Report
Step 1- Download and Install Java
Cucumber and Rest-Assured need Java to be installed on the system to run the tests. Click here to know How to install Java.
Step 2 – Download and setup Eclipse IDE on system
The Eclipse IDE (integrated development environment) provides strong support for Java developers. Click here to know How to install Eclipse.
Step 3 – Setup Gradle
To build a test framework, we need to add several dependencies to the project. This can be achieved by any build Tool. I have used Gradle Build Tool. Click here to know How to install Gradle. Click here to know How to create a Gradle Java project. Below is the structure of the Gradle project.
Step 4 – Update repositories, plugin, and dependencies to the Gradle project
Step 5 – Create a feature file under src/test/resources
AFeature Fileis an entry point to the Cucumber tests. This is a file where you will describe your tests in Descriptive language (Like English). A feature file can contain a scenario or can contain many scenarios in a single feature file. Below is an example of Feature file.
Feature: Login to HRM

   @ValidCredentials
   Scenario: Login with valid credentials

    Given User is on Home page
    When User enters username as "Admin"
    And User enters password as "admin123"
    Then User should be able to login successfully
Step 6 – Create the Step Definition class or Glue Code for the Test Scenario
The steps definition file stores the mapping between each step of the test scenario defined in the feature file with a code of the function to be executed. So, now when Cucumber executes a step of the scenario mentioned in the feature file, it scans the step definition file and figures out which function is to be called.
Create a StepDefinition class for LoginPage.feature
public class LoginPageDefinitions {

    @Steps
    StepLoginPage loginPage;

    @Steps
    StepDashboardPage dashPage;

    @Steps
    StepForgetPasswordPage forgetpasswordPage;

    @Given("User is on Home page")
    public void openApplication() {
        loginPage.open();
        System.out.println("Page is opened");
    }

    @When("User enters username as {string}")
    public void enterUsername(String userName) {
        System.out.println("Enter Username");
        loginPage.inputUserName(userName);
    }

    @When("User enters password as {string}")
    public void enterPassword(String passWord) {
        loginPage.inputPassword(passWord);

        loginPage.clickLogin();
    }

    @Then("User should be able to login successfully")
    public void clickOnLoginButton() {
        dashPage.loginVerify();
    }

}
Serenity Step Libraries integrate smoothly into Cucumber Step Definition files; all you need to do is to annotate a step library variable with the @Steps annotation. Methods that represent a business task or action (inputUserName()), and that will appear in the reports as a separate step, are annotated with the @Step annotation. Here, I have created two StepClasses – StepLoginPage and StepDashboardPage
public class StepLoginPage extends PageObject {

    @Step("Enter Username")
    public void inputUserName(String userName) {
        $(By.name("txtUsername")).sendKeys((userName));
    }

    @Step("Enter Password")
    public void inputPassword(String passWord) {
        $(By.name("txtPassword")).sendKeys((passWord));
    }

    @Step("Click Submit Button")
    public void clickLogin() {
        $(By.name("Submit")).click();
    }

}
StepDashboardPage
public class StepDashboardPage extends PageObject {

    @Step("Successful login")
    public void loginVerify() {
        String dashboardTitle = $(By.id("welcome")).getText();
        assertThat(dashboardTitle, containsString("Welcome"));
    }
}
Step 7 – Create a Serenity Cucumber Runner class
import org.junit.runner.RunWith;

import io.cucumber.junit.CucumberOptions;
import net.serenitybdd.cucumber.CucumberWithSerenity;

@RunWith(CucumberWithSerenity.class)
@CucumberOptions(plugin = {}, features = "lib/src/test/resources/features", glue = "serenitygradleautomation.definitions")

public class CucumberTestSuite {

}
Step 8 – Create serenity.conf file under src/test/resources
Serenity.conf file is used to specify various features like the type of webdriver used, various test environments, run tests in headless mode, and many more options.
In the previous tutorial, I explained the Generation of Serenity Report (index.html) using Cucumber6 and JUnit. Index.html report that acts both as a test report and living documentation for the product. It has various views like Overall Test Status, Requirement View, Capabilities View, and Features View.
Sometimes it is useful to be able to send a short summary of the test outcomes via email. Serenity allows us to generate a single-page, self-contained HTML summary report, containing an overview of the test results, and a configurable breakdown of the status of different areas of the application.
Pre-Requisite
Java 11 installed
Maven installed
Eclipse or IntelliJ installed
This framework consists of:
Java 11
Maven – 3.8.1
Serenity – 2.6.0
Serenity Maven – 2.6.0
Serenity Cucumber6 – 2.6.0
JUnit – 4.13.2
Maven Surefire Plugin – 3.0.0-M5
Maven Failsafe Plugin – 3.0.0-M5
Maven Comiler Plugin – 3.8.1
Implementation Steps
Update Properties section in Maven pom.xml
Add repositories and pluginRepository to Maven pom.xml
Add Serenity, Serenity Cucumber and JUnitdependencies to POM.xml
Update Build Section of pom.xml
Create source folder – src/test/resources and features folder within src/test/resources to create test scenarios in Feature file
Create theStep Definition class or Glue Code
Create a Serenity-Cucumber Runner class
Create serenity.conf file under src/test/resources
Createserenity.properties file in the root of the project
Run the tests through commandline which generates Serenity Report
To know about Step 1 to 3, please refer here. These steps are the same for Index.html report and emailable report.
Now, add the below-mentioned plugin. These reports are configured in the Serenity Maven plugin, where you need to do two things. First, you need to add a dependency for the serenity-emailer module in the plugin configuration. Then, you need to tell Serenity to generate the email report when it performs the aggregation task.
I have provided the location of Firefoxdriver through the command line. I believe this is the best way to run the test. We can hard-code the path in the test code or in serenity.conf file. In that case, you don’t need to provide the location of Firefoxdriver through command line. You can use the below command.
mvn verify
The output of the above program is
This image shows that two different types of reports are generated by Serenity – Full Report (index.html) and Single Page HTML Summary ( serenity-summary.html ).
This emailable report is called serenity-summary.html. This is generated under site/serenity/ serenity-summary.html
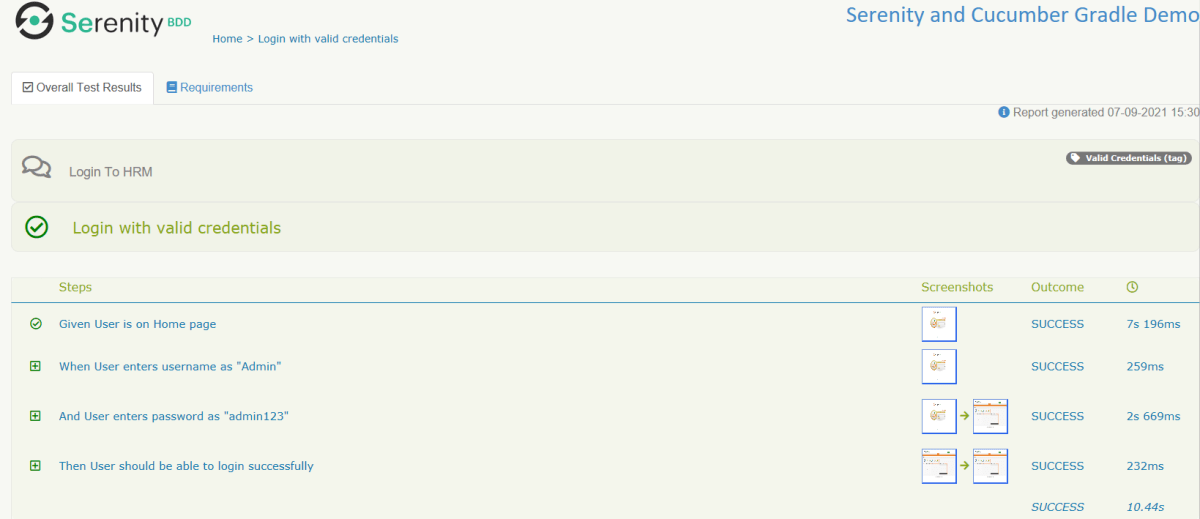
You can see a sample of such a report here:
As you can see in the above execution status, out of six tests, one test failed. The same information is displayed in the report.
This report provides a summary of the test execution.
The Functional Coverage section lets us highlight key areas of your application. By default, this section will list test results for each Feature. But we can configure the report to group results by other tags as well.
We are done! Congratulations on making it through this tutorial and hope you found it useful! Happy Learning!!
Below is the sample project which uses Selenium and JUnit4 which is used to generate an Allure Report.
We have 2 pages. Below is the code for Login Page which contains all the web elements and methods related to that web elements.
Note:- This is a sample code. There could be the probability that XPath would have changed. So, the tests won’t run as expected and please keep this in mind.
public class LoginPage {

	WebDriver driver;

	By userName = By.name("txtUsername");

	By password = By.name("txtPassword");

	By titleText = By.id("logInPanelHeading");

	By login = By.id("btnLogin");

	By errorMessage = By.id("spanMessage");

	public LoginPage(WebDriver driver) {
		this.driver = driver;
	}

	// Set user name in textbox
	public void setUserName(String strUserName) {
		driver.findElement(userName).sendKeys(strUserName);
	}

	// Set password in password textbox
	public void setPassword(String strPassword) {
		driver.findElement(password).sendKeys(strPassword);
	}

	// Click on login button
	public void clickLogin() {
		driver.findElement(login).click();
	}

	@Step("Verify title of Login Page")
	public void verifyPageTitle() {
		String loginPageTitle = driver.findElement(titleText).getText();
		assertTrue(loginPageTitle.contains("LOGIN Panel"));
	}

	/* Failed Test */
	@Step("Verify error message when invalid credentail is provided")
	public void verifyErrorMessage() {
		String invalidCredentialErrorMessage = driver.findElement(errorMessage).getText();
		assertTrue(invalidCredentialErrorMessage.contains("Incorrect Credentials"));
	}

	@Step("Enter username and password")
	public void login(String strUserName, String strPasword) {

		// Fill user name
		this.setUserName(strUserName);

		// Fill password
		this.setPassword(strPasword);

		// Click Login button
		this.clickLogin();

	}
}
assertTrue() is imported from the below JUnit package for assertion.
public class DashboardPage {

	WebDriver driver;

	By dashboardPageTitle = By.id("welcome");

	By assignLeaveOption = By.cssSelector(
			"#dashboard-quick-launch-panel-menu_holder > table > tbody > tr > td:nth-child(1) > div > a > span");

	By leaveListOption = By.cssSelector(
			"#dashboard-quick-launch-panel-menu_holder > table > tbody > tr > td:nth-child(2) > div > a > span");

	By timesheetsOption = By.cssSelector(
			"#dashboard-quick-launch-panel-menu_holder > table > tbody > tr > td:nth-child(3) > div > a > span");

	By applyLeaveOption = By.cssSelector(
			"#dashboard-quick-launch-panel-menu_holder > table > tbody > tr > td:nth-child(4) > div > a > span");

	public DashboardPage(WebDriver driver) {
		this.driver = driver;

	}

	@Step("Verify title of Dashboard page")
	public void verifyDashboardPageTitle() {
		String DashboardPageTitle = driver.findElement(dashboardPageTitle).getText();
		assertTrue(DashboardPageTitle.contains("Welcome"));
	}

	@Step("Verify Assign Leave Quick Launch Options on Dashboard page")
	public void verifyAssignLeaveOption() {
		String QuickLaunchOptions = driver.findElement(assignLeaveOption).getText();
		assertTrue(QuickLaunchOptions.contains("Assign Leave"));
	}

	@Step("Verify Leave List Quick Launch Options on Dashboard page")
	public void verifyLeaveListOption() {
		String LeaveListQuickLaunchOption = driver.findElement(leaveListOption).getText();
		assertTrue(LeaveListQuickLaunchOption.contains("Leave List"));
	}

	@Step("Verify Assign Leave Quick Launch Options on Dashboard page")
	public void verifytimesheetsOption() {
		String timesheetsOptionQuickLaunchOption = driver.findElement(timesheetsOption).getText();
		assertTrue(timesheetsOptionQuickLaunchOption.contains("Timesheets"));
	}

	@Step("Verify Leave List Quick Launch Options on Dashboard page")
	public void verifyApplyLeaveOption() {
		String applyLeaveQuickLaunchOptions = driver.findElement(applyLeaveOption).getText();
		assertTrue(applyLeaveQuickLaunchOptions.contains("Apply Leave"));
	}

}
Test Classes related to various Pages
BaseTest.java
public class BaseTest {

	public static WebDriver driver;
	LoginPage objLogin;
	DashboardPage objDashboardPage;

	@Step("Start the application")
	@BeforeEach
	public void setup() {
		System.setProperty("webdriver.gecko.driver",
				"C:\\Users\\Vibha\\Software\\geckodriver-v0.26.0-win64\\geckodriver.exe");
		driver = new FirefoxDriver();
		driver.manage().window().maximize();
		driver.manage().timeouts().implicitlyWait(10, TimeUnit.SECONDS);
		driver.get("https://opensource-demo.orangehrmlive.com/");
	}

	@Step("Stop the application")
	@AfterEach
	public void close() {
		driver.close();
	}
}
@BeforeEach is used to signal that the annotated method should be executed before each @Test, @RepeatedTest, @ParameterizedTest, @TestFactory, and @TestTemplate method in the current test class. It is imported from:-
import org.junit.jupiter.api.BeforeEach;
@AfterEach is used to signal that the annotated method should be executed after each@Test, @RepeatedTest, @ParameterizedTest, @TestFactory, and @TestTemplatemethod in the current test class. It is imported from:-
import org.junit.jupiter.api.AfterEach;
LoginTests.java
@Epic("Web Application Regression Testing using JUnit5")
@Feature("Login Page Tests")
public class LoginTests extends BaseTest {

	LoginPage objLogin;
	DashboardPage objDashboardPage;

	@Severity(SeverityLevel.NORMAL)
	@Test
	@Description("Test Description : Verify the title of Login Page")
	@Story("Title of Login Page")
	public void verifyLoginPage() {

		// Create Login Page object
		objLogin = new LoginPage(driver);

		// Verify login page text
		objLogin.verifyPageTitle();
	}

	@Severity(SeverityLevel.BLOCKER)
	@Test
	@Description("Test Description : Login Test with invalid credentials")
	@Story("Unsuccessful Login to Application")
	public void invalidCredentialTest() {

		// Create Login Page object
		objLogin = new LoginPage(driver);
		objLogin.login("test", "test123");

		// Verify login page text
		objLogin.verifyErrorMessage();

	}

}
DashboardTests.java
package com.example.Junit5AllureReportDemo.tests;

import org.junit.jupiter.api.Test;

import com.example.Junit5AllureReportDemo.pages.DashboardPage;
import com.example.Junit5AllureReportDemo.pages.LoginPage;

import io.qameta.allure.Description;
import io.qameta.allure.Epic;
import io.qameta.allure.Feature;
import io.qameta.allure.Severity;
import io.qameta.allure.SeverityLevel;
import io.qameta.allure.Story;

@Epic("Web Application Regression Testing using JUnit5")
@Feature("Dashboard Page Tests")
public class DashboardTests extends BaseTest {

	LoginPage objLogin;
	DashboardPage objDashboardPage;

	@Severity(SeverityLevel.BLOCKER)
	@Test
	@Description("Test Description : Verify title of Dashboard page")
	@Story("Title of Dashboard Page")
	public void dashboardTitleTest() {

		objLogin = new LoginPage(driver);

		// login to application
		objLogin.login("Admin", "admin123");

		// go the dashboard page
		objDashboardPage = new DashboardPage(driver);

		objDashboardPage.verifyDashboardPageTitle();

	}

	@Severity(SeverityLevel.BLOCKER)
	@Test
	@Description("Test Description : Verify Assign Leave Option in Quick Link Menu")
	@Story("Validation of Assign Leave Option")
	public void assignLeaveOptionTest() {

		objLogin = new LoginPage(driver);

		// login to application
		objLogin.login("Admin", "admin123");

		// go the dashboard page
		objDashboardPage = new DashboardPage(driver);

		objDashboardPage.verifyAssignLeaveOption();

	}

	@Severity(SeverityLevel.BLOCKER)
	@Test
	@Description("Test Description : Verify Apply Leave Option in Quick Link Menu")
	@Story("Validation of Apply Leave Option")
	public void applyLeaveOptionTest() {

		objLogin = new LoginPage(driver);

		// login to application
		objLogin.login("Admin", "admin123");

		// go the dashboard page
		objDashboardPage = new DashboardPage(driver);

		objDashboardPage.verifyApplyLeaveOption();

	}

	@Severity(SeverityLevel.BLOCKER)
	@Test
	@Description("Test Description : Verify Leave List Option in Quick Link Menu")
	@Story("Validation of Leave List Option")
	public void leaveListOptionTest() {

		objLogin = new LoginPage(driver);

		// login to application
		objLogin.login("Admin", "admin123");

		// go the dashboard page
		objDashboardPage = new DashboardPage(driver);

		objDashboardPage.verifyLeaveListOption();

	}

	@Severity(SeverityLevel.BLOCKER)
	@Test
	@Description("Test Description : Verify Timesheets Option in Quick Link Menu")
	@Story("Validation of Timesheets Option")
	public void timesheetsOptionTest() {

		objLogin = new LoginPage(driver);

		// login to application
		objLogin.login("Admin", "admin123");

		// go the dashboard page
		objDashboardPage = new DashboardPage(driver);

		objDashboardPage.verifyTimesheetsOption();

	}

}
Step 5 – Run the Test and Generate Allure Report
To run the tests, use the below command
mvn clean test
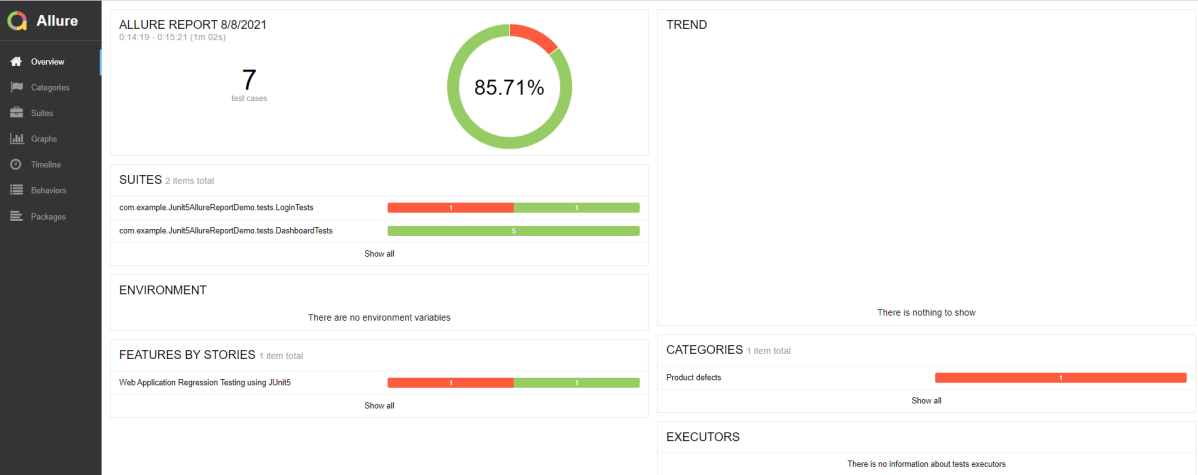
In the below image, we can see that one test failed and six passed out of seven tests.
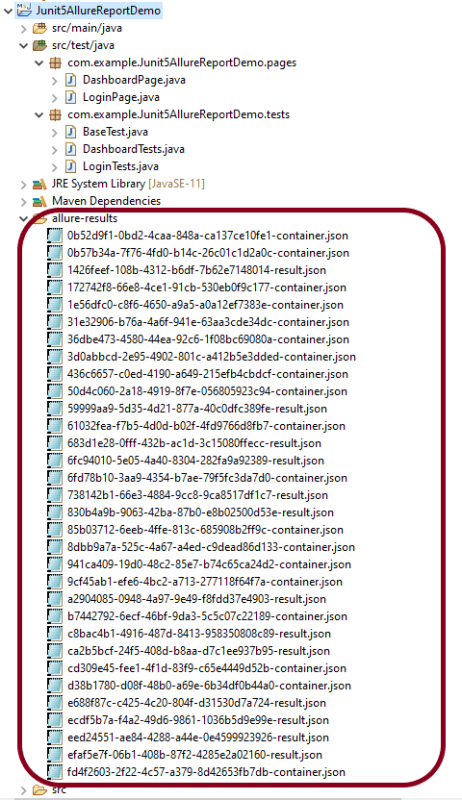
This will create the allure-results folder with all the test reports. These files will be used to generate Allure Report.
To create Allure Report, use the below command
allure serve
This will generate the beautiful Allure Test Report as shown below.
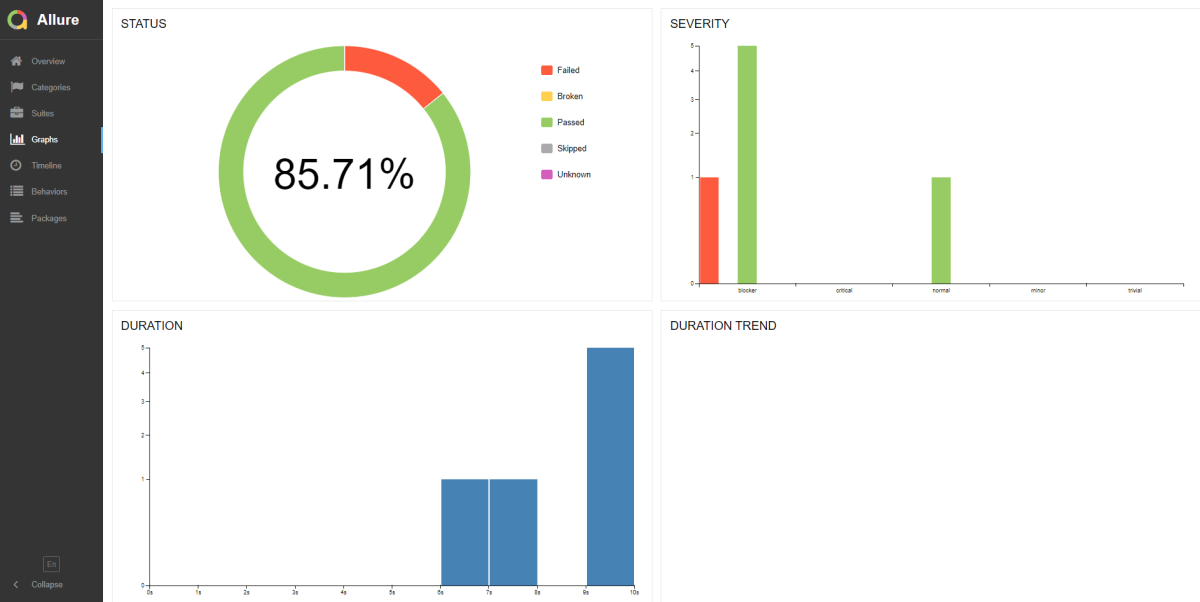
Allure Report Dashboard
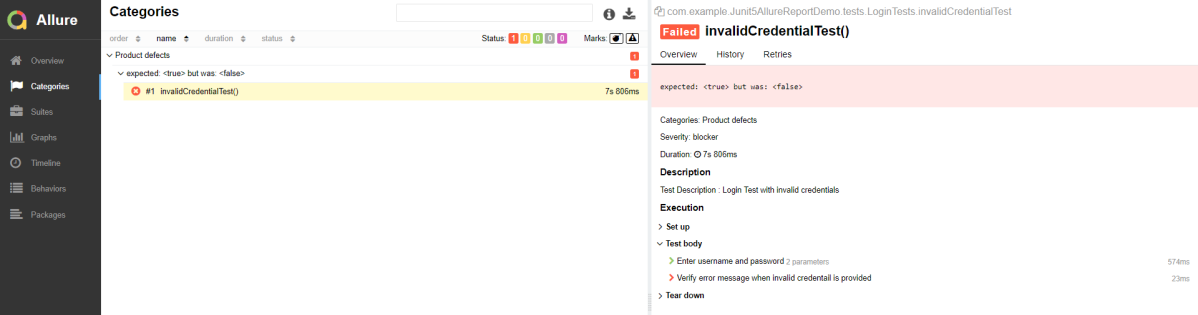
Categories in Allure Report
The categories tab gives you a way to create custom defect classifications to apply for test results. There are two categories of defects – Product Defects (failed tests) and Test Defects (broken tests).
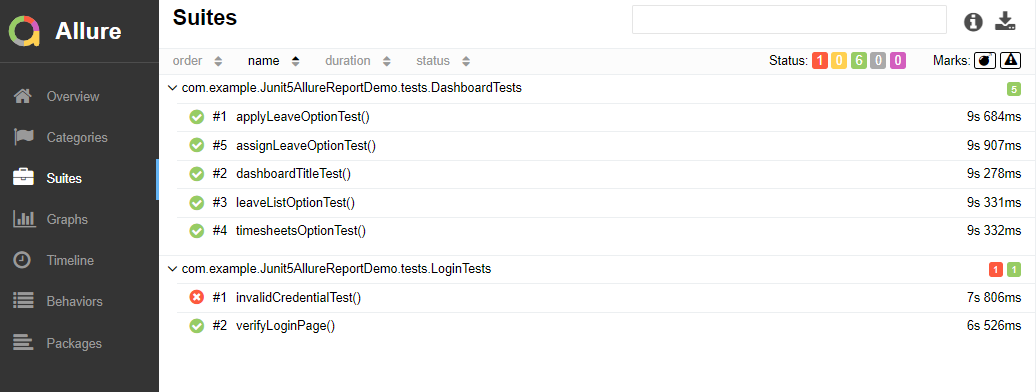
Suites in Allure Report
On the Suites tab a standard structural representation of executed tests, grouped by suites and classes can be found.
Graphs in Allure Report
Graphs allow you to see different statistics collected from the test data: status breakdown or severity and duration diagrams.
Timeline in Allure Report
Timeline tab visualizes retrospective of tests execution, allure adaptors collect precise timings of tests, and here on this tab they are arranged accordingly to their sequential or parallel timing structure.
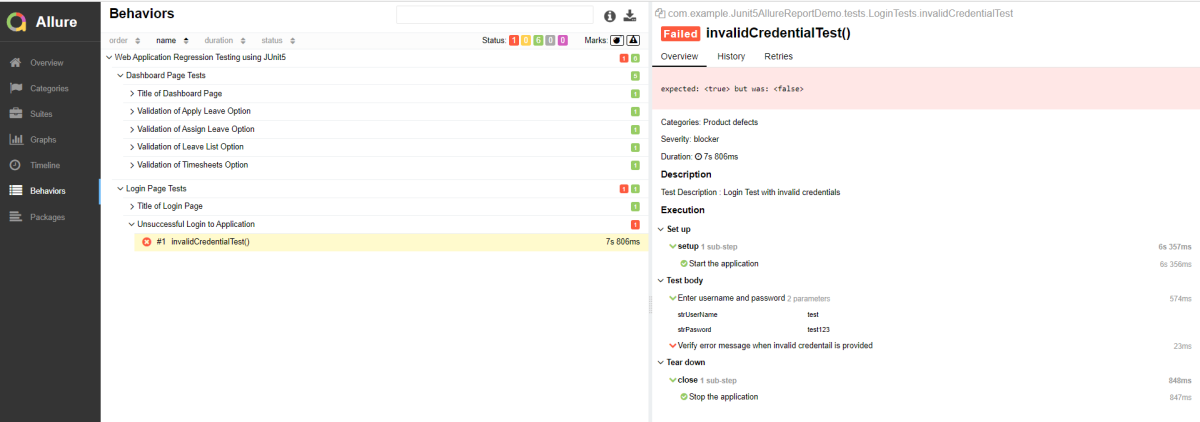
Behaviors of Allure Report
This tab groups test results according to Epic, Feature, and Story tags.
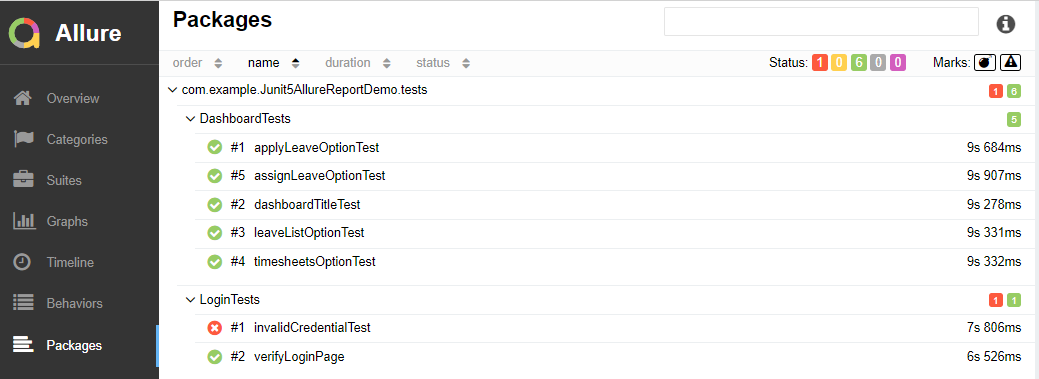
Packages in Allure Report
Packages tab represents a tree-like layout of test results, grouped by different packages.
We are done! Congratulations on making it through this tutorial and hope you found it useful! Happy Learning!!