Borders often serve as important visual cues, such as indicating focus states, hover effects, or validation results (e.g., turning red for an error). Borders can change dynamically based on interactions (e.g., clicking a button will change its border color). Ensuring these responses occur as expected is key in testing interactive web elements.
To find the border color of web element in Selenium (Java), use the getCssValue method. We will use the `getCssValue` to extract properties like `border-color`.
org.openqa.selenium.support.Color.
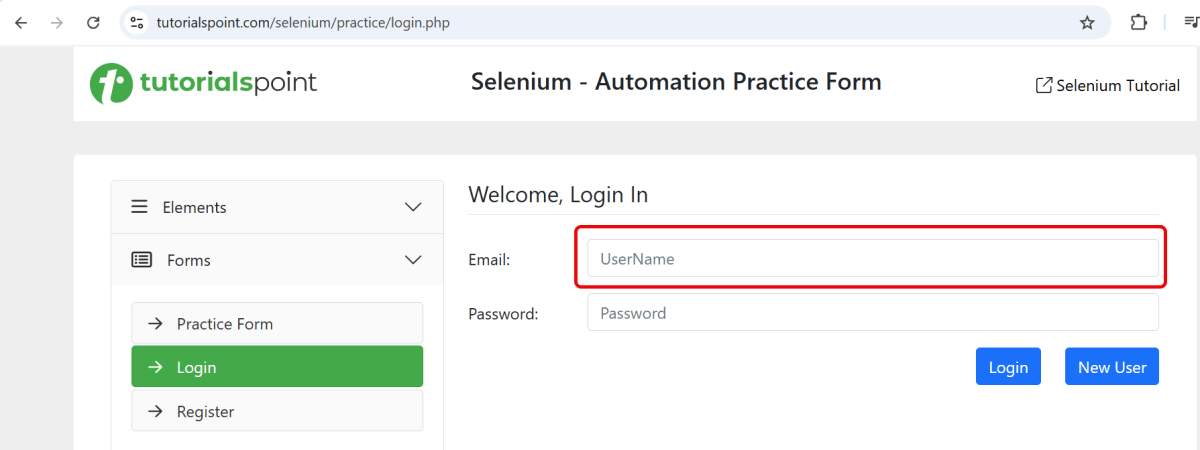
In the below example, we want to find the border color of the highlighted text.
Below is the Selenium program that find the border color of a web element.
import org.openqa.selenium.By;
import org.openqa.selenium.WebDriver;
import org.openqa.selenium.WebElement;
import org.openqa.selenium.chrome.ChromeDriver;
import org.openqa.selenium.chrome.ChromeOptions;
import org.openqa.selenium.support.Color;

import java.time.Duration;

public class Border_Example {

    public static void main(String args[]) {

        ChromeOptions chromeOptions = new ChromeOptions();
        WebDriver driver = new ChromeDriver(chromeOptions);
        driver.manage().timeouts().implicitlyWait(Duration.ofSeconds(10));
        driver.manage().window().maximize();

        try {
            driver.get("https://www.tutorialspoint.com/selenium/practice/login.php");

            // identify the element
            WebElement nameBox = driver.findElement(By.xpath("//*[@id='email']"));

            // get element border color in rgb format
            String nameBoxBorderColor = nameBox.getCssValue("border-color");
            System.out.println("RGB code for border color: " + nameBoxBorderColor);

            // convert rgb to hex using Color class
            String hexColor = Color.fromString(nameBoxBorderColor).asHex();
            System.out.println("Hex format for element Border-Color is: " + hexColor);

            // convert rgb to rgba using Color class
            String rgbaColor = Color.fromString(nameBoxBorderColor).asRgba();
            System.out.println("RGBA format for element Border-Color is: " + rgbaColor);

            // Retrieve the border color value for each side
            String borderTopColor = nameBox.getCssValue("border-top-color");
            String borderRightColor = nameBox.getCssValue("border-right-color");
            String borderBottomColor = nameBox.getCssValue("border-bottom-color");
            String borderLeftColor = nameBox.getCssValue("border-left-color");

            // Print the retrieved border colors
            System.out.println("Border Top Color: " + borderTopColor);
            System.out.println("Border Right Color: " + borderRightColor);
            System.out.println("Border Bottom Color: " + borderBottomColor);
            System.out.println("Border Left Color: " + borderLeftColor);

        } finally {
            // Closing browser
            driver.quit();
        }
    }
}
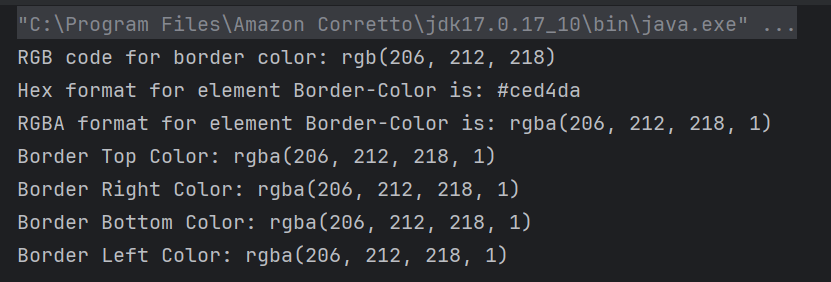
The output of the above program is
Explanation:
1. Set Up Chrome Options and WebDriver
ChromeOptionsis created. A ChromeDriverobject driveris created to control the Chrome browser. implicitlyWaitis set to 10 seconds to wait for elements to be present before throwing an exception. The browser window is maximized for better visibility during the test.
ChromeOptions chromeOptions = new ChromeOptions();
WebDriver driver = new ChromeDriver(chromeOptions);
driver.manage().timeouts().implicitlyWait(Duration.ofSeconds(10));
driver.manage().window().maximize();
2. Navigate to the Webpage
The get() method of driveris used to navigate to the specified URL.
The getCssValue method retrieves the border color of the element in RGB format.
 // get element border color in rgb format
String nameBoxBorderColor = nameBox.getCssValue("border-color");
System.out.println("RGB code for border color: " + nameBoxBorderColor);
5. Convert Color Formats
RGB to Hex:Color.fromString(rgbaColor).asHex() converts the RGB color to hexadecimal format. RGB to RGBA:Color.fromString(rgbaColor).asRgba() converts the RGB color to RGBA format for additional representation.
// convert rgb to hex using Color class
String hexColor = Color.fromString(nameBoxBorderColor).asHex();
System.out.println("Hex format for element Border-Color is: " + hexColor);

// convert rgb to rgba using Color class
String rgbaColor = Color.fromString(nameBoxBorderColor).asRgba();
System.out.println("RGBA format for element Border-Color is: " + rgbaColor);
6. Retrieve border color of each side
Use getCssValue to retrieve each part of the border color to determine the color on each side.
The finallyblock ensures that the browser is closed irrespective of whether the test passes or fails, using driver.quit()to close all browser windows and end the session.
// Close the browser
driver.quit();
Summary:
Initialize a WebDriver and direct it to interact with your target webpage.
Identify the desired web element using suitable locators.
Retrieve and print out the CSS values for border color using getCssValue with attribute “border-color”.
Use getCssValue to retrieve each part of the border color. This helps determine the color on each side. Use attributes “border-right-color”, “border-bottom-color”, “border-top-color” and “border-left-color”.
That’s it! Congratulations on making it through this tutorial and hope you found it useful! Happy Learning!!
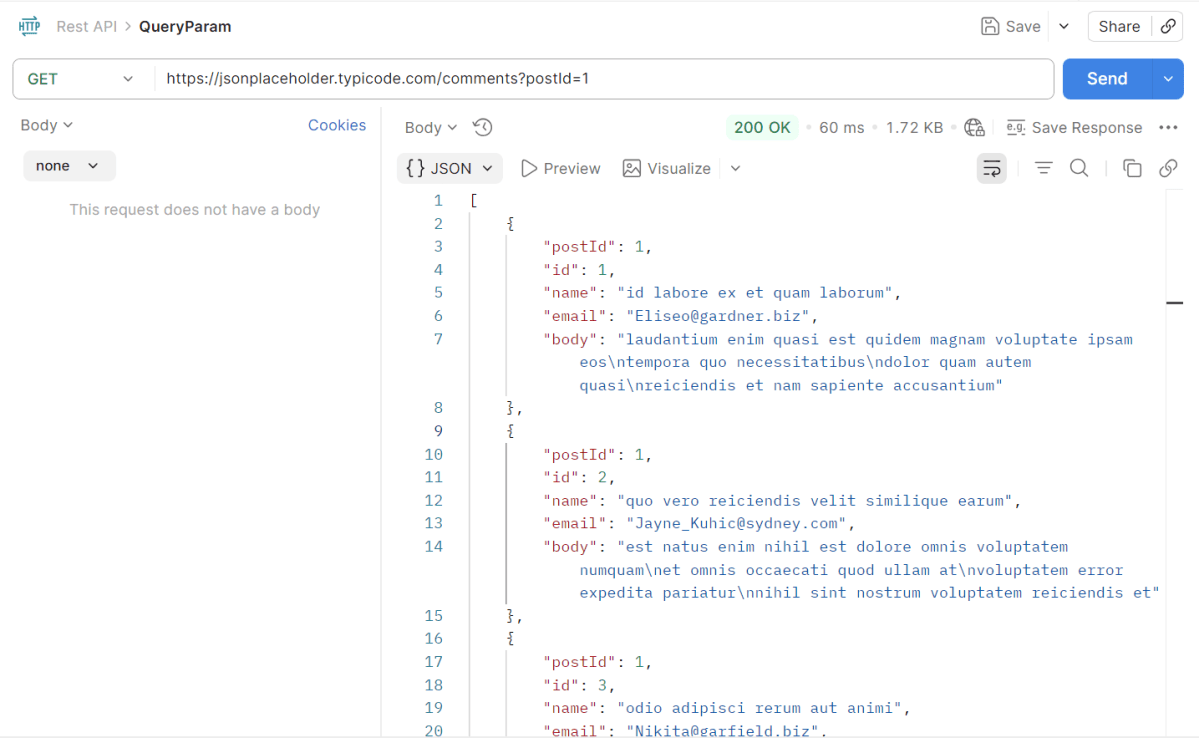
Query parameters are a way to pass information to an API flexibly and simply. They are added to the end of the API endpoint URL as a series of key-value pairs. To append query params to the end of a URL, a ‘?’ Is added followed immediately by a query parameter.
Handling HTTP query parameters in Playwright typically involves setting up your request with the desired parameters before navigating to a URL. Playwright provides methods to easily construct and use URLs with query parameters.
The following prerequisites are required to be installed on the machine to begin with a smooth setup and installation.
Java 11 or higher
IntelliJ IDE or any other IDE to create a project
Maven
Dependency List
Playwright – 1.57.0
Java 17
Maven – 3.9.6
TestNG – 7.11.0
Maven Compiler Plugin – 3.15.0
Maven Surefire Plugin – 3.5.4
Implementation Steps
1. Create a new Maven Project
The first step in setup is to create a new Maven project. I will be using IntelliJ in this tutorial. The following steps need to be followed to create a new Maven project :
Open IntelliJ, Navigate to File >> New >> Project
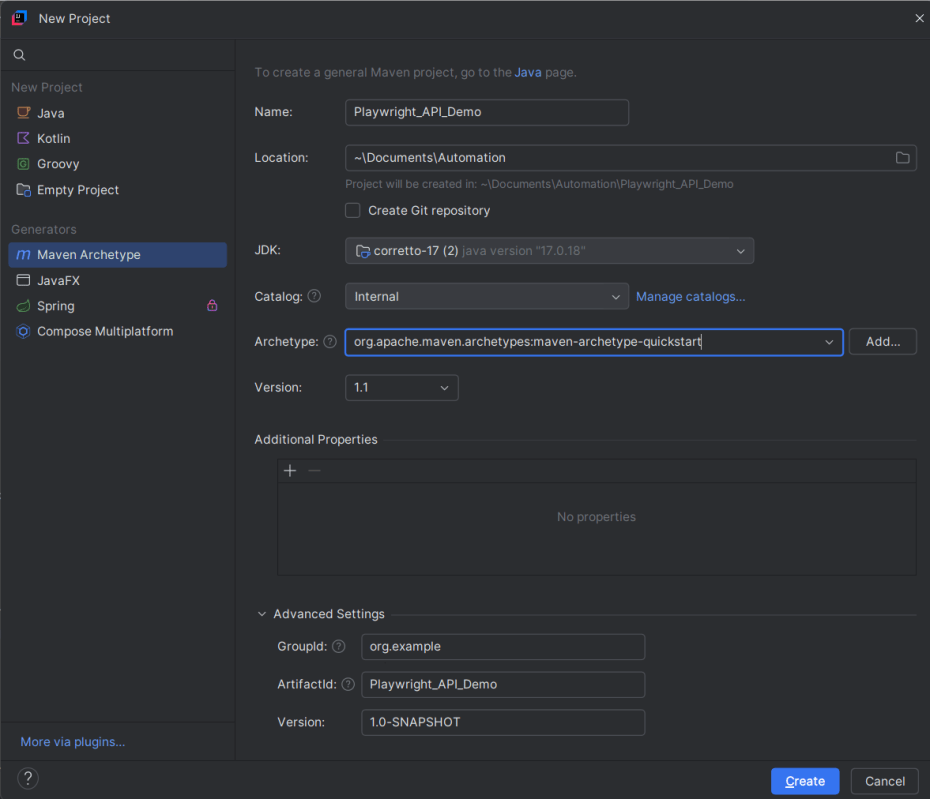
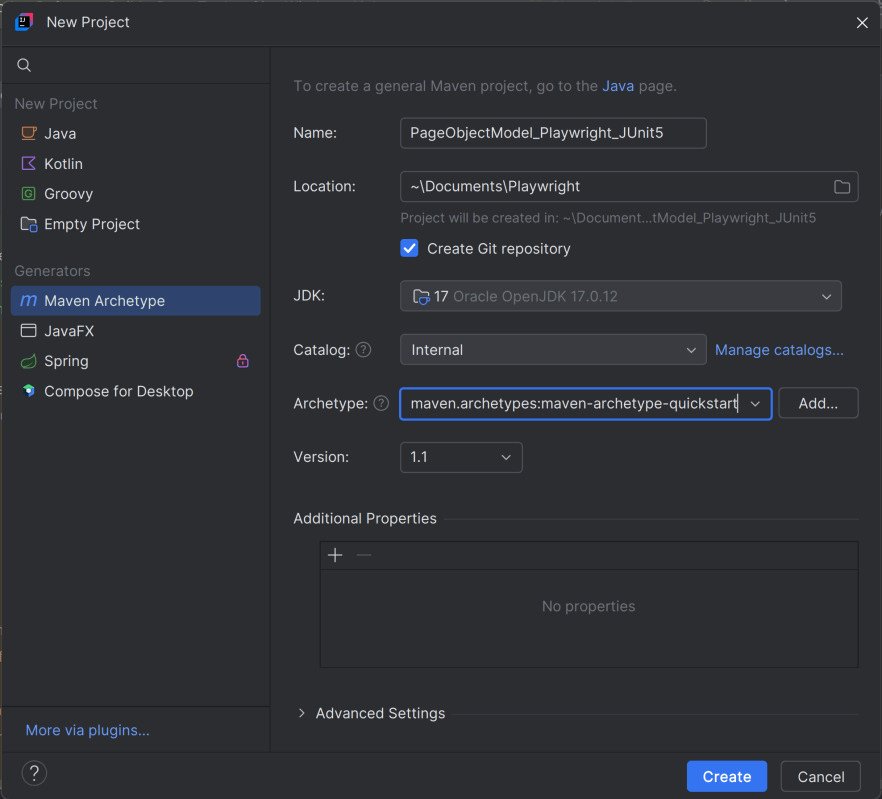
2. In the New Project window, enter the following details:
Name of the Project – Playwright_API_Demo
Location/path where the project needs to be saved – Documents/Playwright (my location)
Select JDK version — I am using JDK 17
Archetype — Search for quickstart and select maven-archetype-quickstartfrom the results
Click on the Create button to create the project.
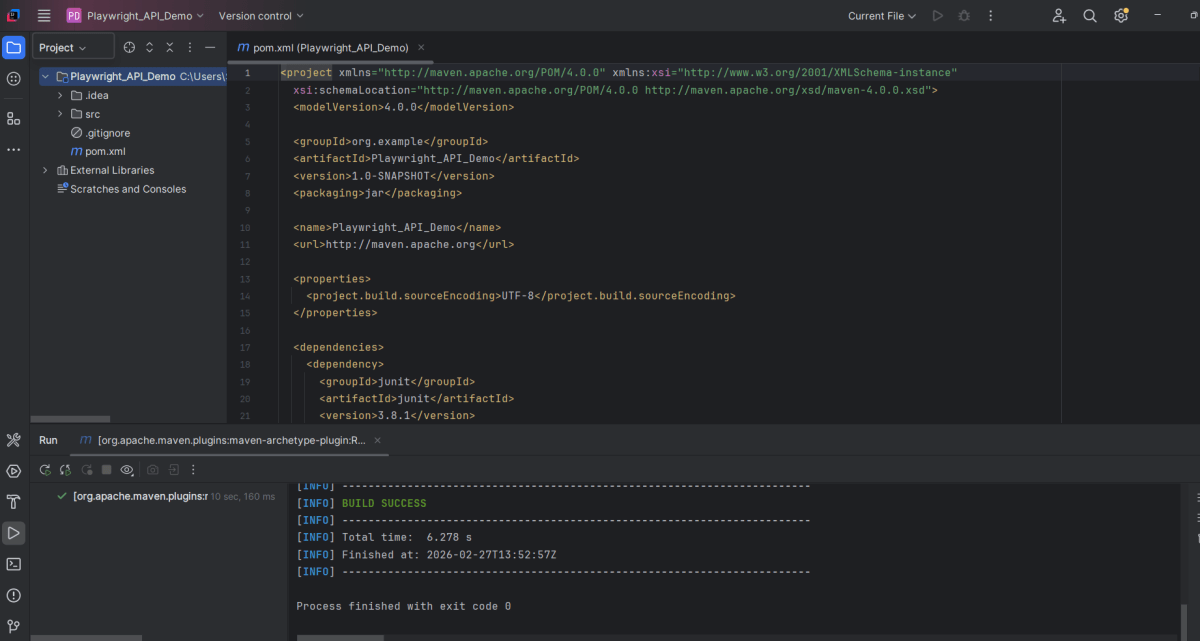
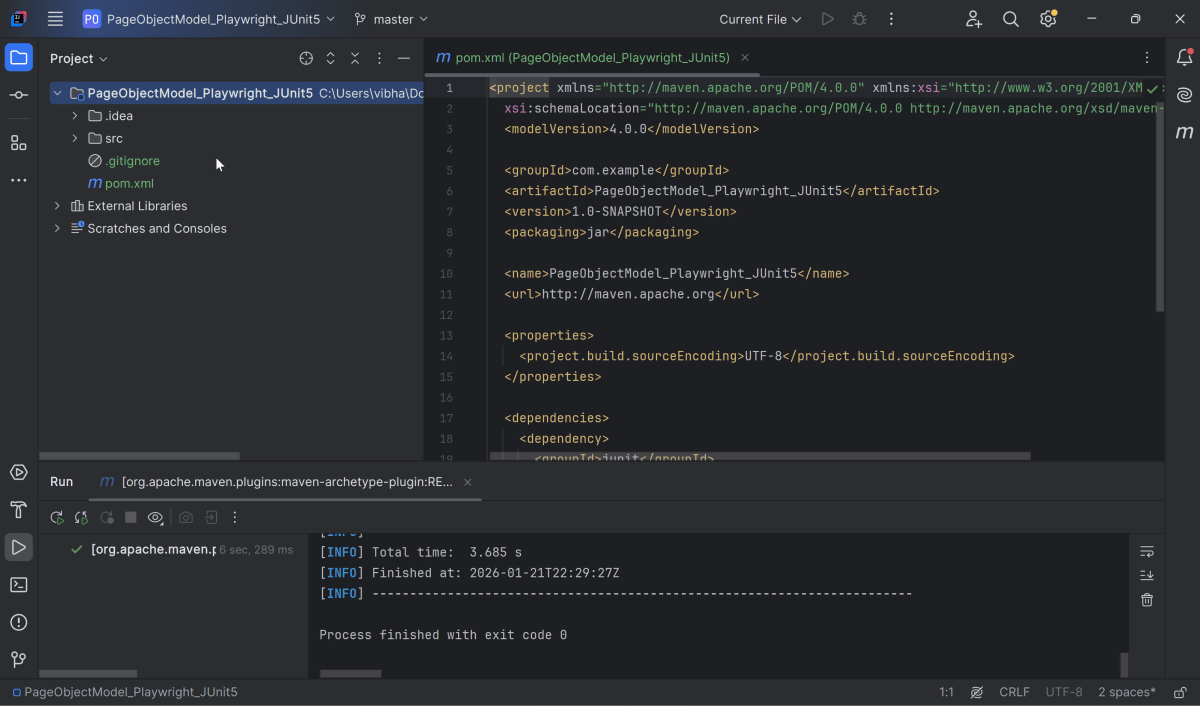
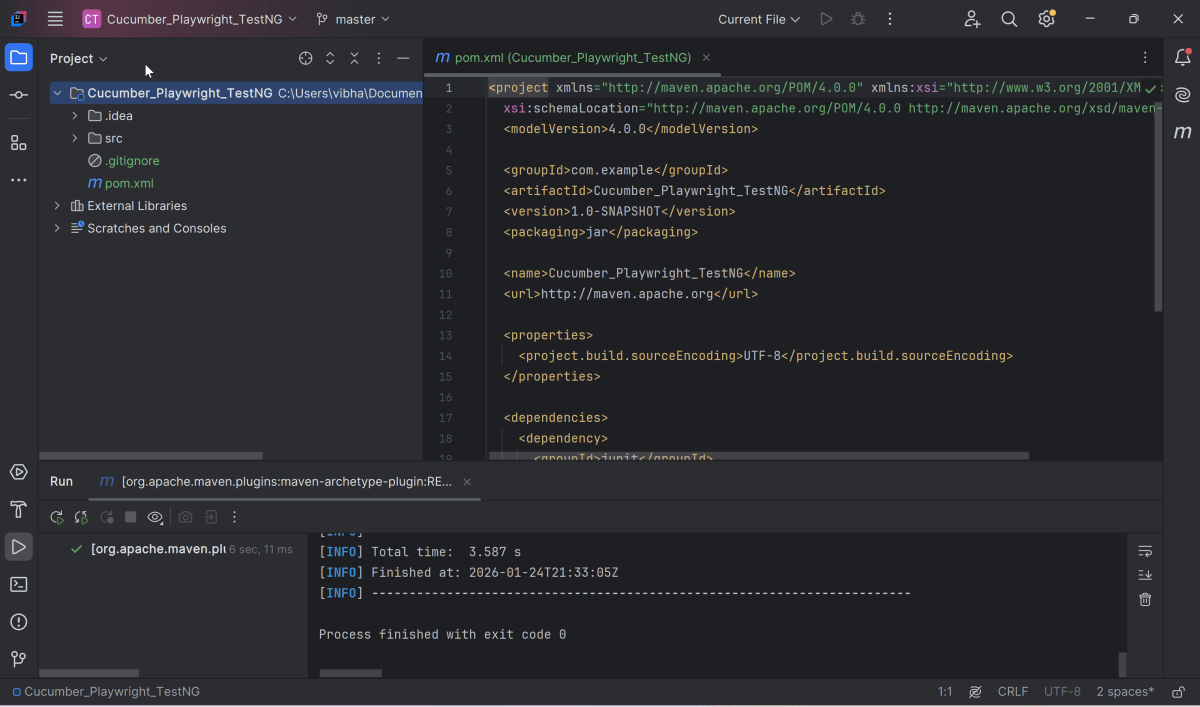
This will create a project as shown below in the IntelliJ.
2. Setup Playwright with Java and TestNG
Add the Playwright and TestNG dependencies to the pom.xml. The latest dependency can be found from here.
After adding the dependency, refresh the project. We can see that the Playwright jar files are downloaded in External Libraries.
3. Create API tests
Create Setup Methods
@BeforeMethod: This annotation indicates that `setUp()` will run before each test method, ensuring that the Playwright environment and API request context are properly initialized.
createAPIRequestContext(): Sets up the API request context with a base URL (`https://jsonplaceholder.typicode.com`) and common headers (like “Accept: application/json”) that will be used for all requests.
`@AfterMethod`: Ensures that resources are properly disposed of after every test method execution by calling `request.dispose()` and `playwright.close()`. This avoids resource leaks and ensures clean execution for subsequent tests.
  @AfterMethod
    void tearDown() {
        if (request != null) {
            request.dispose();
        }
        if (playwright != null) {
            playwright.close();
        }
    }
Query Parameter
The corresponding API Test in Playwright Framework.
 @Test
    public void getCommentsByPostId() {

        // GET /comments?postId=1
        APIResponse response = request.get("/comments",
                RequestOptions.create().setQueryParam("postId", "1"));

        Assert.assertEquals(response.status(), 200, "Expected 200 for GET /comments?postId=1");

        String body = response.text();
        System.out.println("GET Response: " + body);

        Gson gson = new Gson();
        JsonObject[] posts = gson.fromJson(body, JsonObject[].class);

        Assert.assertTrue(posts.length > 0, "Expected at least one post for postId=1");
        Assert.assertEquals(posts[0].get("postId").getAsInt(), 1, "Expected postId=1 in first result");
        Assert.assertEquals(posts[0].get("id").getAsInt(), 1, "Expected id=1 in first result");
        Assert.assertEquals(posts[0].get("email").getAsString(), "Eliseo@gardner.biz", "Expected email is incorrect for first result" + posts[0].get("email").getAsString());
    }
Explanation
1.Sending an API GET Request
Sends an HTTP GET request to the `/comments` endpoint with a query parameter `postId` set to `“1”`.
Verifies that the response status code is 200 (OK).
Assert.assertEquals(response.status(), 200, "Expected 200 for GET /comments?postId=1");
3. Read the response body
Prints the entire response content to the console for debugging or logging.
String body = response.text();
System.out.println("GET Response: " + body);
4. Parsing the JSON Response
Parses the response body into an array of `JsonObject`. This assumes the API returns a JSON array of objects, each representing a comment.
Gson gson = new Gson();
JsonObject[] posts = gson.fromJson(body, JsonObject[].class);
5. Validate the Response data
Checks that there is at least one comment in the response, indicating the API return is not empty.
Assert.assertTrue(posts.length > 0, "Expected at least one post for postId=1");
Verifies that the `postId` in the first comment object is `1`.
Verifies that the `id` in the first comment object is `1`.
Verifies that the `email` in the first comment object is `Eliseo@gardner.biz`.
Assert.assertEquals(posts[0].get("postId").getAsInt(), 1, "Expected postId=1 in first result");
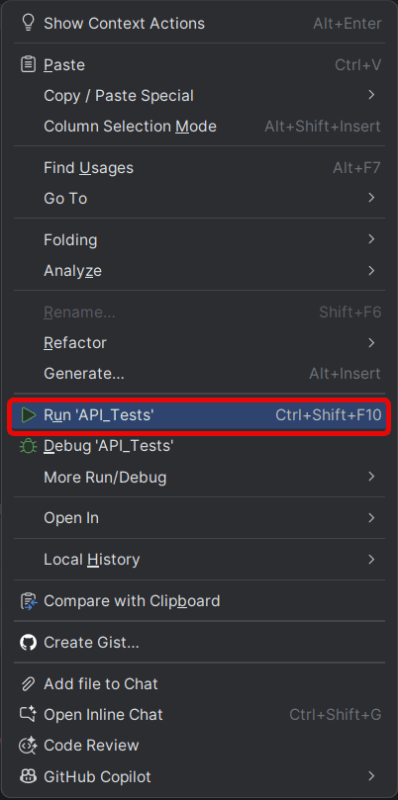
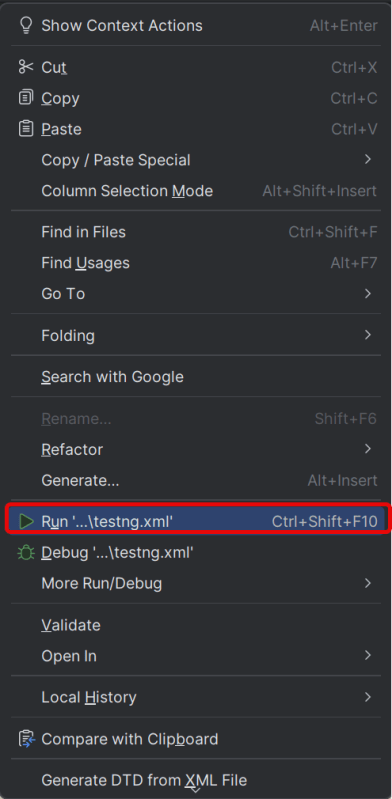
4. Test Execution through IntelliJ
Go to the Test class and right-click and select Run ‘API_Tests’. The tests will run as IntelliJ tests.
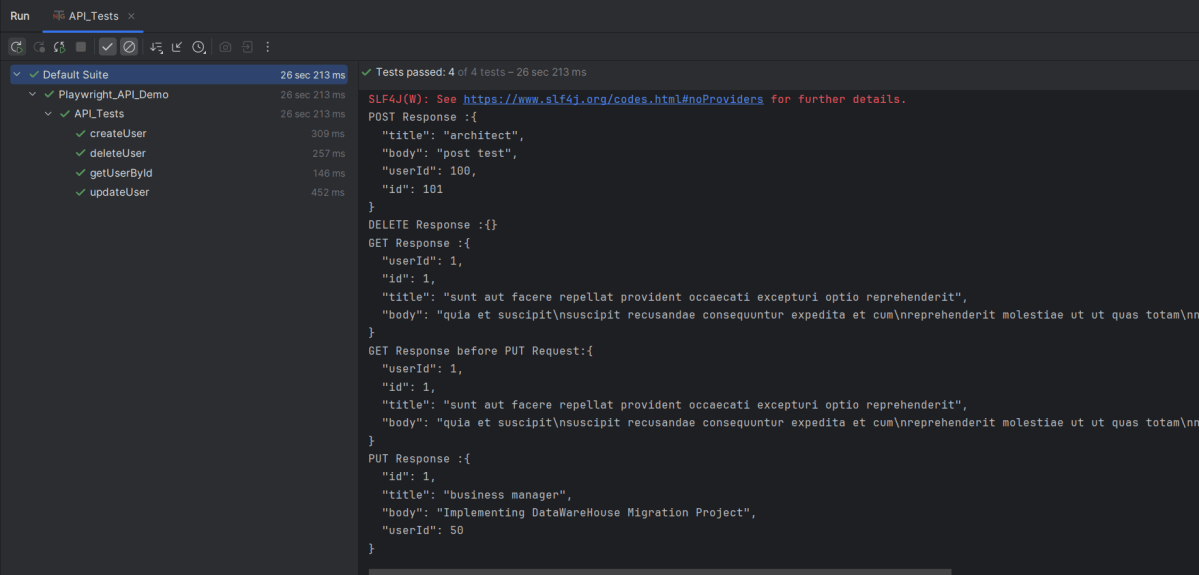
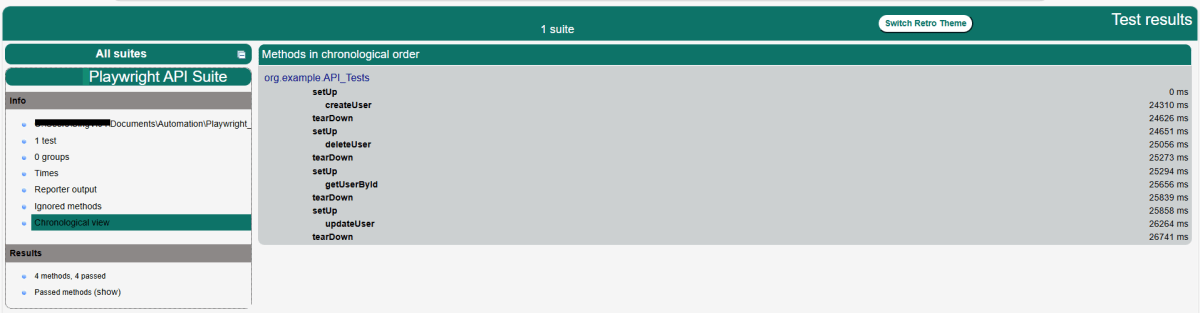
Below is the test execution result.
5. Run the tests using the command line
Use the below command to run the tests using the command line.
mvn clean test
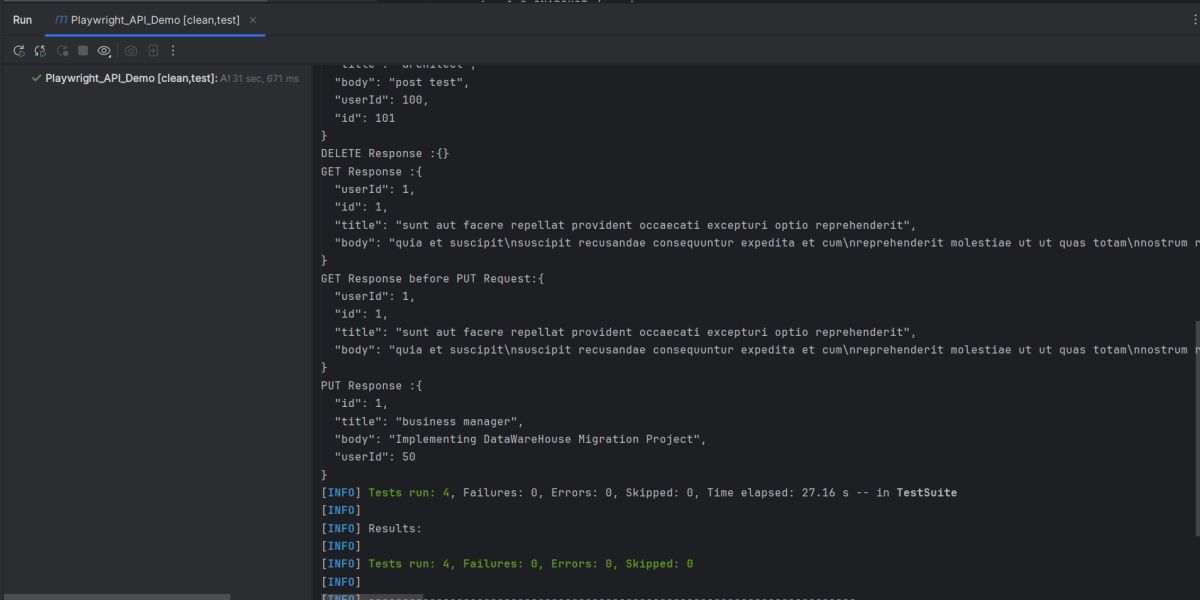
The output of the above program is
6. TestNG Report Generation
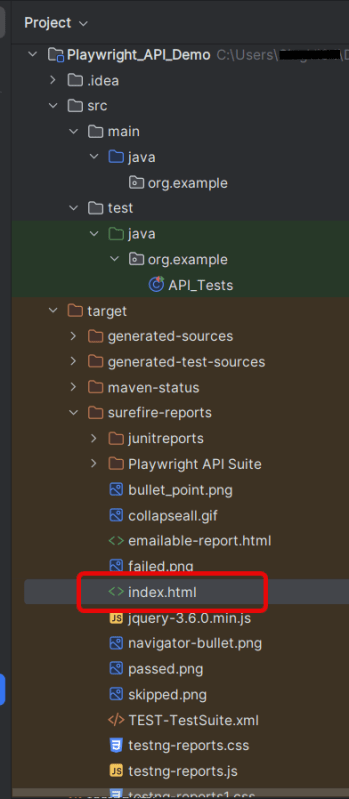
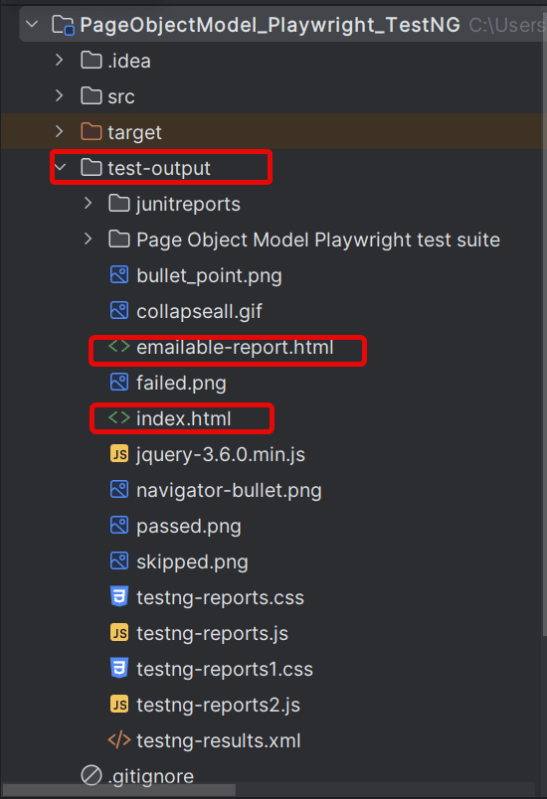
TestNG creates a target directory that contains index.html report.
Right-click on the index.html and open it in the browser.
Summary
Playwright: Utilized for its ability to handle HTTP requests and execute browser interactions. This code leverages Playwright for making API calls rather than web UI interactions.
Gson: Simplifies the parsing of JSON responses into Java objects, allowing easy assertion of specific fields.
TestNG: Provides the testing framework features such as test annotations and assertions used to validate the API responses.
An HTTP request is a message sent by a client (usually a web browser or a tool like cURL or Postman) to a server, requesting a resource or action to be performed. This is a fundamental part of the Web’s client-server communication model. The HTTP protocol defines how requests and responses are formatted and transmitted over the Internet.
System requirements
The following prerequisites are required to be installed on the machine to begin with a smooth setup and installation.
Java 11 or higher
IntelliJ IDE or any other IDE to create a project
Maven
Dependency List
Playwright – 1.57.0
Java 17
Maven – 3.9.6
TestNG – 7.11.0
Maven Compiler Plugin – 3.15.0
Maven Surefire Plugin – 3.5.4
Implementation Steps
1. Create a new Maven Project
The first step in setup is to create a new Maven project. I will be using IntelliJ in this tutorial. The following steps need to be followed to create a new Maven project :
Open IntelliJ, Navigate to File >> New >> Project
2. In the New Project window, enter the following details:
Name of the Project – Playwright_API_Demo
Location/path where the project needs to be saved – Documents/Playwright (my location)
Select JDK version — I am using JDK 17
Archetype — Search for quickstart and select maven-archetype-quickstartfrom the results
Click on the Create button to create the project.
This will create a project as shown below in the IntelliJ.
2. Setup Playwright with Java and TestNG
Add the Playwright and TestNG dependencies to the pom.xml. The latest dependency can be found from here.
After adding the dependency, refresh the project. We can see that the Playwright jar files are downloaded in External Libraries.
3. Create API tests in
Create Setup Methods
@BeforeMethod: This annotation indicates that setUp() will run before each test method, ensuring that the Playwright environment and API request context are properly initialized.
createAPIRequestContext(): Sets up the API request context with a base URL (https://jsonplaceholder.typicode.com) and common headers (like “Accept: application/json”) that will be used for all requests.
@AfterMethod: Ensures that resources are properly disposed of after every test method execution by calling request.dispose()and playwright.close(). This avoids resource leaks and ensures clean execution for subsequent tests.
  @AfterMethod
    void tearDown() {
        if (request != null) {
            request.dispose();
        }
        if (playwright != null) {
            playwright.close();
        }
    }
GET Request
What is GET Request?
The GET HTTP method requests a representation of the specified resource. Requests using GET should only be used to request data and shouldn’t contain a body.
The corresponding API Test in Playwright Framework.
@Test
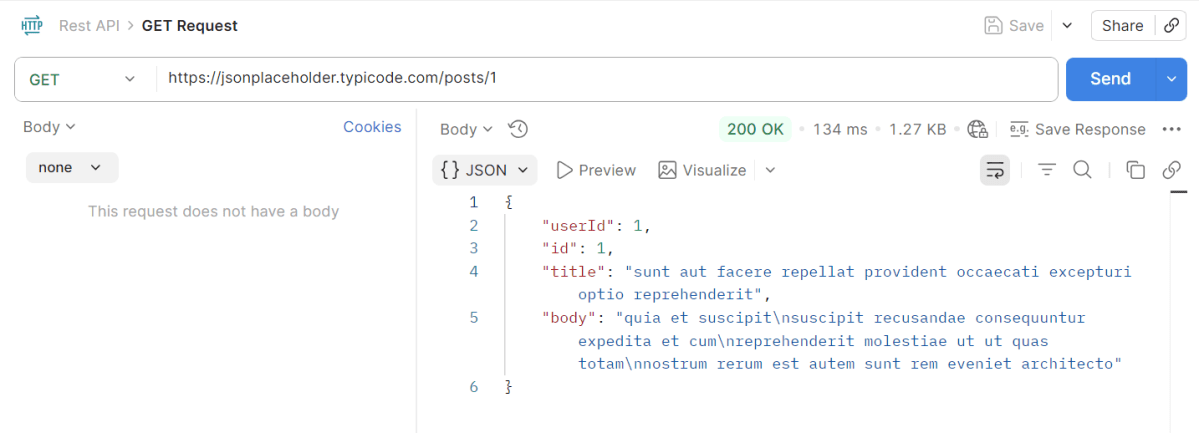
public void getUserById() {
APIResponse response = request.get("/posts/1");
System.out.println("GET Response :" + response.text());
Assert.assertEquals(response.status(), 200, "Expected 200 for GET /posts/1");
Gson gson = new Gson();
JsonObject jsonResponse = gson.fromJson(response.text(), JsonObject.class);
Assert.assertEquals(jsonResponse.get("userId").getAsInt(), 1, "Expected userId=1 in response body");
Assert.assertEquals(jsonResponse.get("id").getAsInt(), 1, "Expected id=1 in response body");
}
Explanation
We sends a GET request to retrieve a specific post.
Verifies that the response status code is 200 (OK).
Parses the response JSON to check for expected values (`userId` and `id` both equal to 1).
POST Request
What is POST Request?
The POST HTTP method sends data to the server. The type of the body of the request is indicated by the Content-Type header
@Test
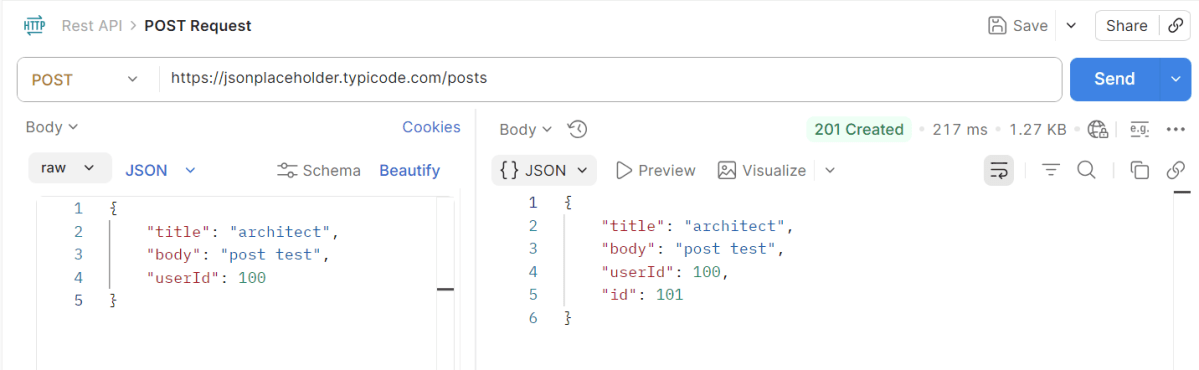
public void createUser() {
Map<String, Object> payload = new HashMap<>();
payload.put("title", "architect");
payload.put("body", "post test");
payload.put("userId", 100);
APIResponse response = request.post("/posts", RequestOptions.create().setData(payload));
System.out.println("POST Response :" + response.text());
Assert.assertEquals(response.status(), 201, "Expected 201 for POST /users");
Gson gson = new Gson();
JsonObject body = gson.fromJson(response.text(), JsonObject.class);
Assert.assertEquals(body.get("title").getAsString(), "architect");
Assert.assertEquals(body.get("body").getAsString(), "post test");
Assert.assertEquals(body.get("userId").getAsInt(), 100);
Assert.assertNotNull(body.get("id"), "Expected id in create response");
}
Explanation
Constructs a payload for creating a new post and sends a POST request.
Verifies that the response status code for successful creation (201).
Parses the response and asserts that the payload values match the expected results, ensuring the ID field is not null, indicating successful resource creation.
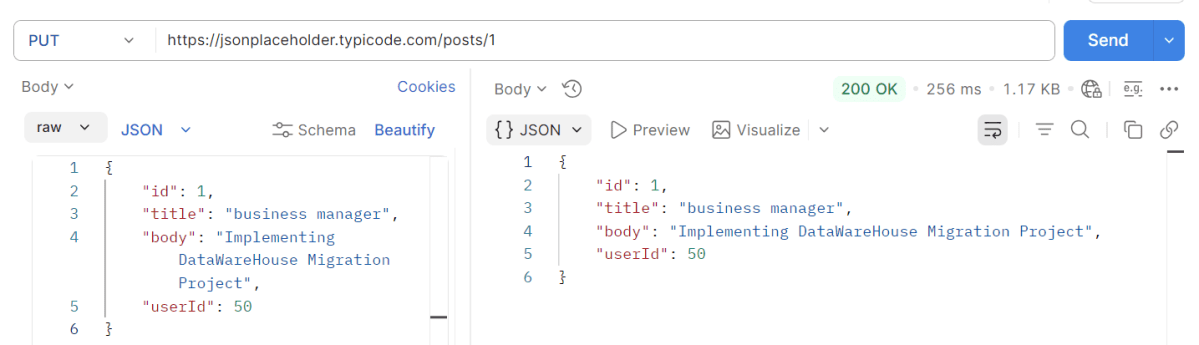
PUT Request
What is PUT Request?
The PUT HTTP method creates a new resource or replaces a representation of the target resource with the request content.
 @Test
    public void updateUser() {

        APIResponse response = request.get("/posts/1");
        System.out.println("GET Response before PUT Request:" + response.text());
        Assert.assertEquals(response.status(), 200, "Expected 200 for GET /posts/1");


        Map<String, Object> payload = new HashMap<>();
        payload.put("id", 1);
        payload.put("title", "business manager");
        payload.put("body", "Implementing DataWareHouse Migration Project");
        payload.put("userId", 50);

        APIResponse response1 = request.put("/posts/1", RequestOptions.create().setData(payload));
        System.out.println("PUT Response :" + response1.text());
        Assert.assertEquals(response1.status(), 200, "Expected 200 for PUT /posts/1");

        Gson gson = new Gson();
        JsonObject body = gson.fromJson(response1.text(), JsonObject.class);
        Assert.assertEquals(body.get("title").getAsString(), "business manager");
        Assert.assertEquals(body.get("body").getAsString(), "Implementing DataWareHouse Migration Project");
        Assert.assertEquals(body.get("userId").getAsInt(), 50);
        Assert.assertNotNull(body.get("id"), "Expected id in create response");

    }
Explanation
Retrieves a post using a GET request to ensure it exists.
Constructs a payload with updated information and sends a PUT request to modify the post.
Verifies that the response status code is 200 to verify successful update.
Verifies that the response JSON contains updated values as specified in the payload.
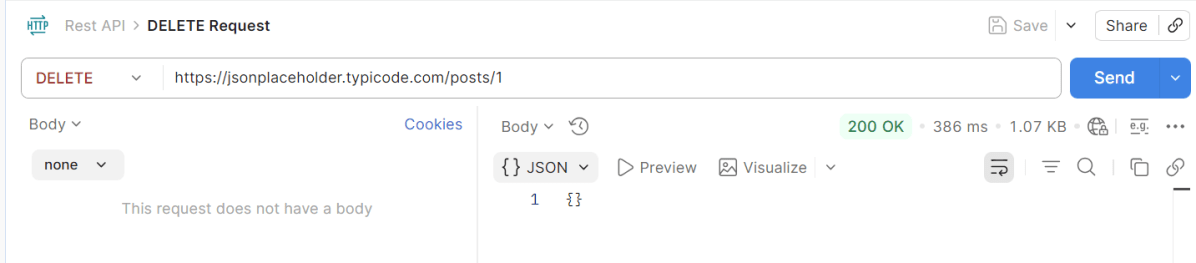
DELETE Request
What is Delete Request?
The DELETE HTTP method asks the server to delete a specified resource. Requests using DELETE should only be used to delete data and shouldn’t contain a body.
Confirms the successful deletion by checking for a 200 response status code.
7. Test Execution through IntelliJ
Go to the Test class and right-click and select Run ‘API_Tests’. The tests will run as IntelliJ tests.
Below is the test execution result.
8. Run the tests using the command line
Use the below command to run the tests using the command line.
mvn clean test
The output of the above program is
9. TestNG Report Generation
TestNG creates a target directory that contains index.html report.
Right-click on the index.html and open it in the browser.
Summary:
Playwright: Utilized for its ability to handle HTTP requests and execute browser interactions. This code leverages Playwright for making API calls rather than web UI interactions.
Gson: Simplifies the parsing of JSON responses into Java objects, allowing easy assertion of specific fields.
TestNG: Provides the testing framework features such as test annotations and assertions used to validate the API responses.
In this tutorial, I will explain how to IntegrateAllure Report 3 with Playwright, Java Cucumber, and JUnit5.
Before starting, make sure to install Allure on your machine. Refer to this tutorial to install allure – What is Allure Report?.
Why Combine Playwright, Cucumber, JUnit5 and Allure?
Playwright provides modern, robust automation for testing web apps across Chromium, Firefox, and WebKit.
Cucumber enables BDD, allowing tests to be written in a natural language format using Gherkin syntax.
Allure Report generates easy-to-understand and aesthetically pleasing test reports, enhancing the feedback loop.
JUnit 5 provides powerful features like parameterized tests, extensions, and a modular architecture for organized and manageable test suites, parallel execution
Together, they empower teams to write readable tests, run them across multiple browsers, and analyze results visually.
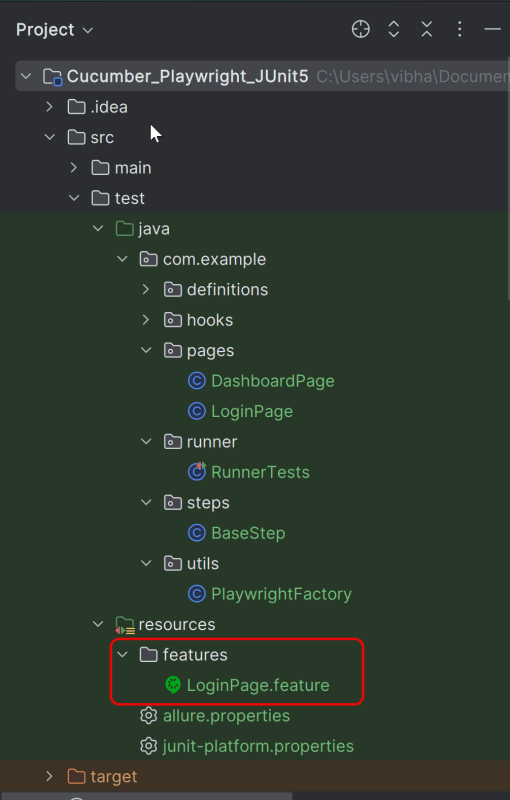
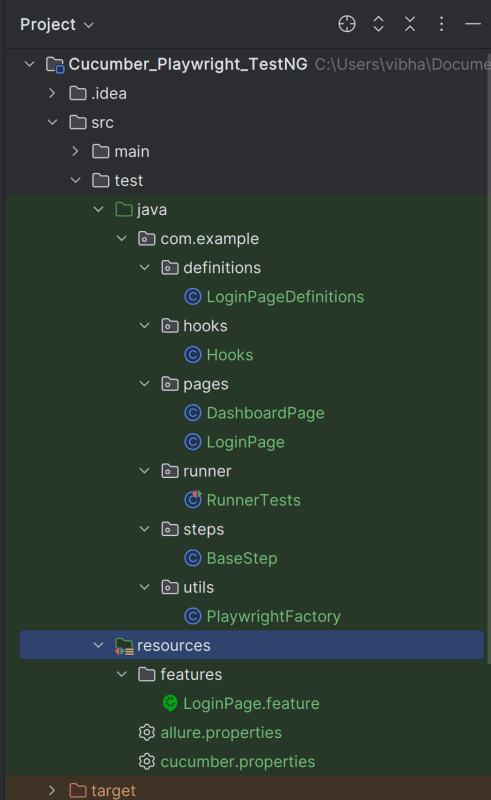
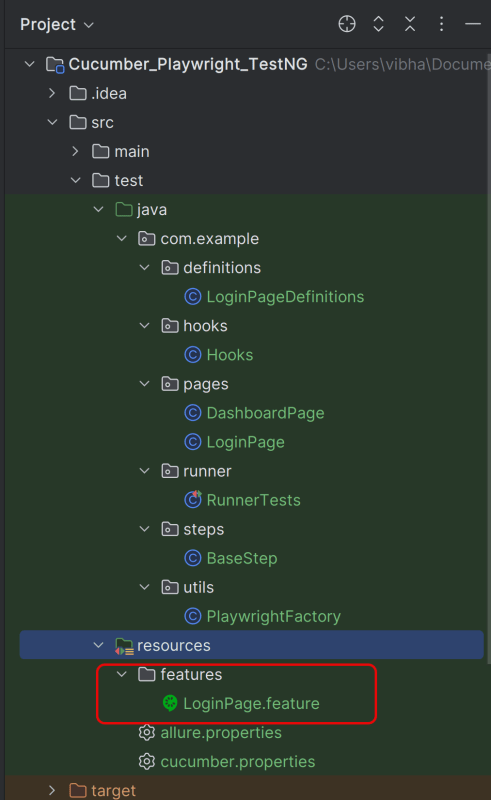
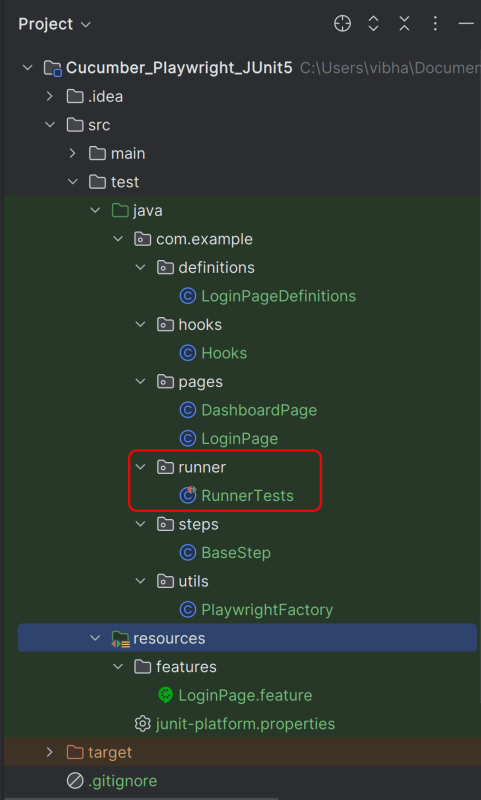
Create a folder – features within src/test/resources to create test scenarios in the Feature file.
Feature file should be saved as an extension of .feature. Add the test scenarios in this feature file. I have added sample test scenarios. In this feature file. The test scenarios are written in Gherkinslanguage.
@allure.label.parent_suite:WebInterface
@allure.label.sub_suite:Login Page
@allure.label.owner:Vibha
Feature: Login to HRM Application
Background:
Given User is on HRMLogin page "https://opensource-demo.orangehrmlive.com/"
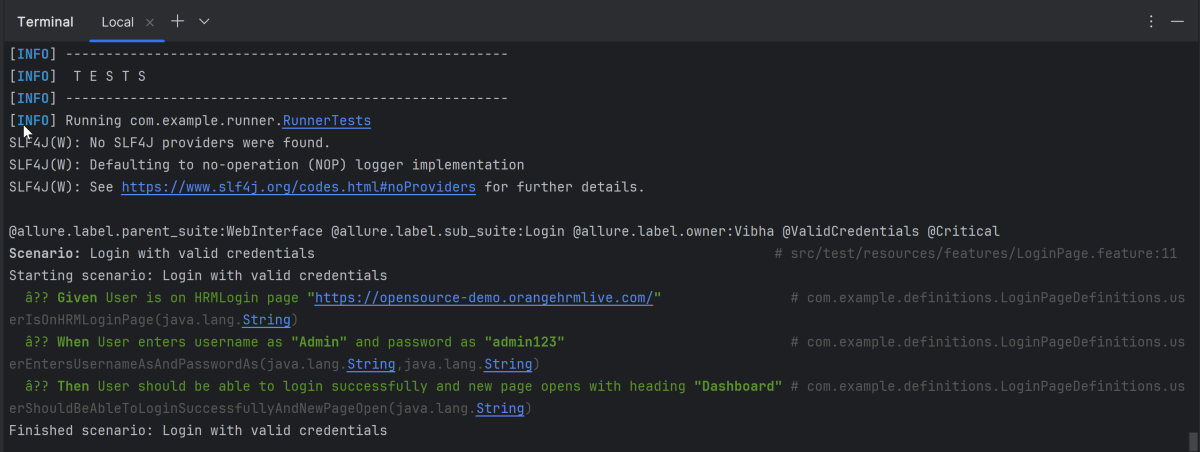
@ValidCredentials @Critical
Scenario: Login with valid credentials
When User enters username as "Admin" and password as "admin123"
Then User should be able to login successfully and new page opens with heading "Dashboard"
@InvalidCredentials @High
Scenario Outline: Login with invalid credentials
When User enters username as "<username>" and password as "<password>"
Then User should be able to see error message "<errorMessage>"
Examples:
| username | password | errorMessage |
| Admin | admin12$$ | Invalid credentials |
| admin$$ | admin123 | Invalid credentials |
| abc123 | xyz$$ | Invalid credentials |
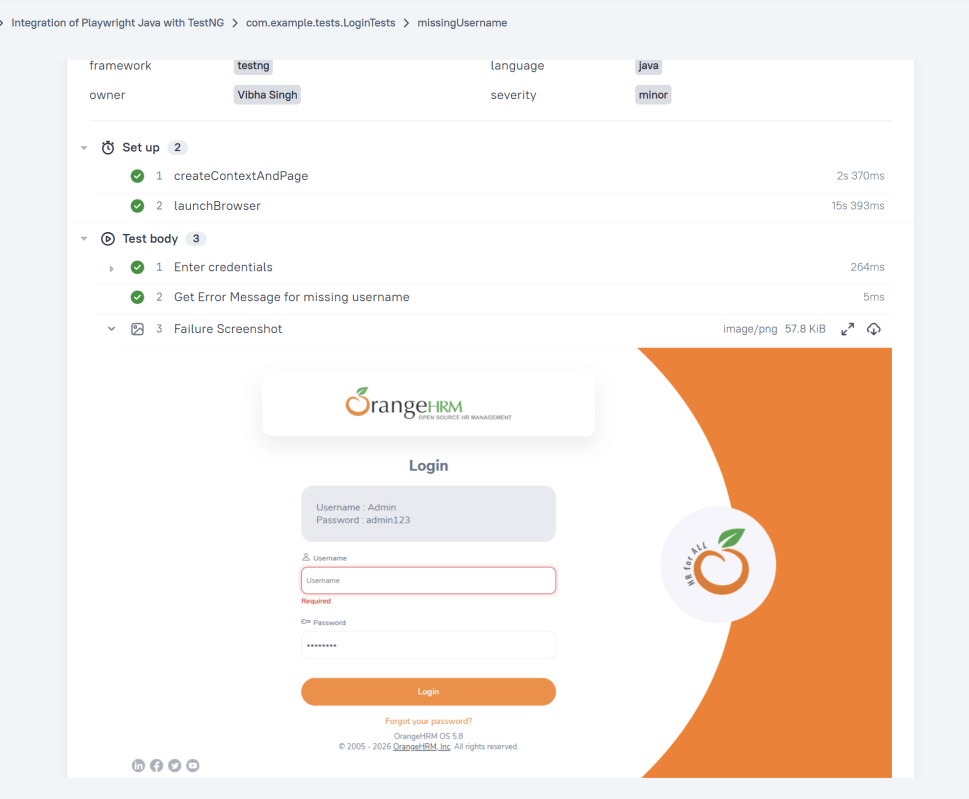
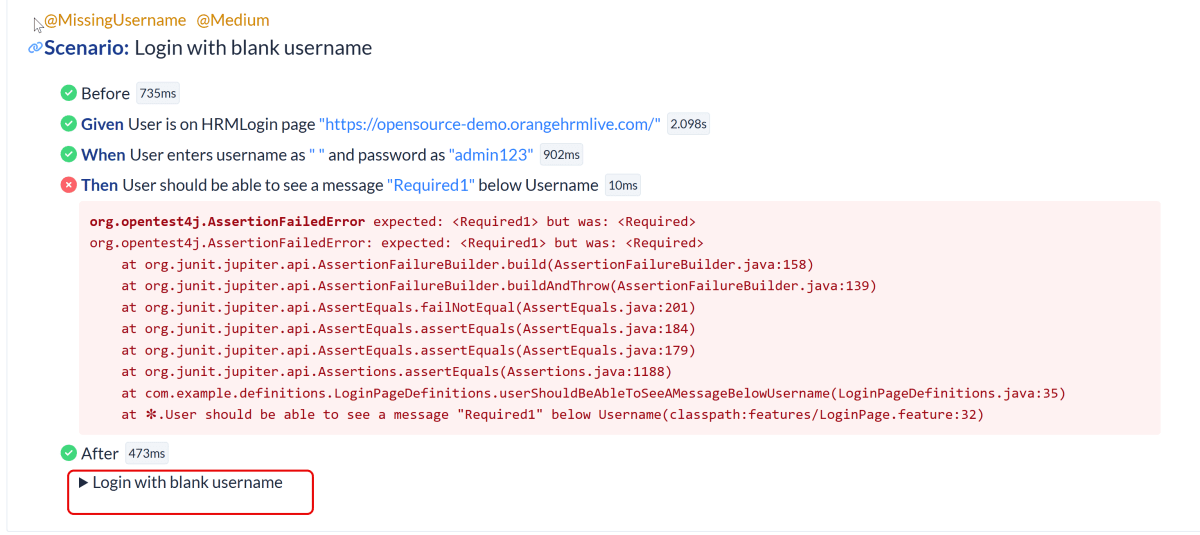
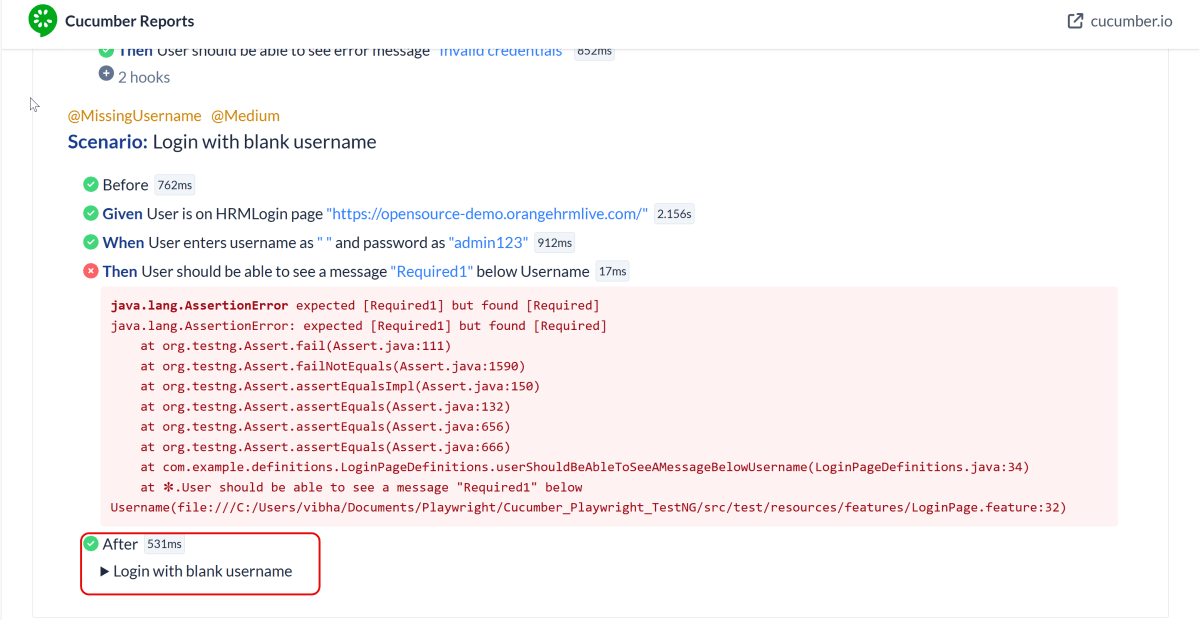
@MissingUsername @Medium
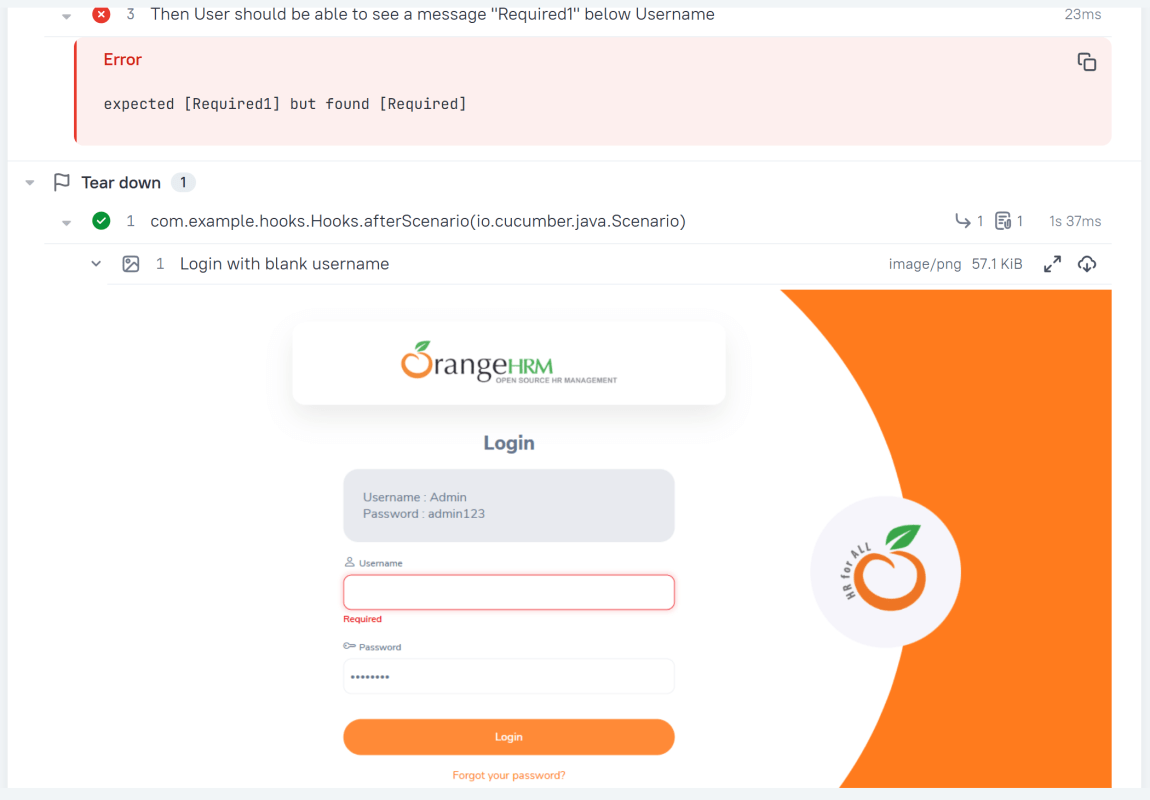
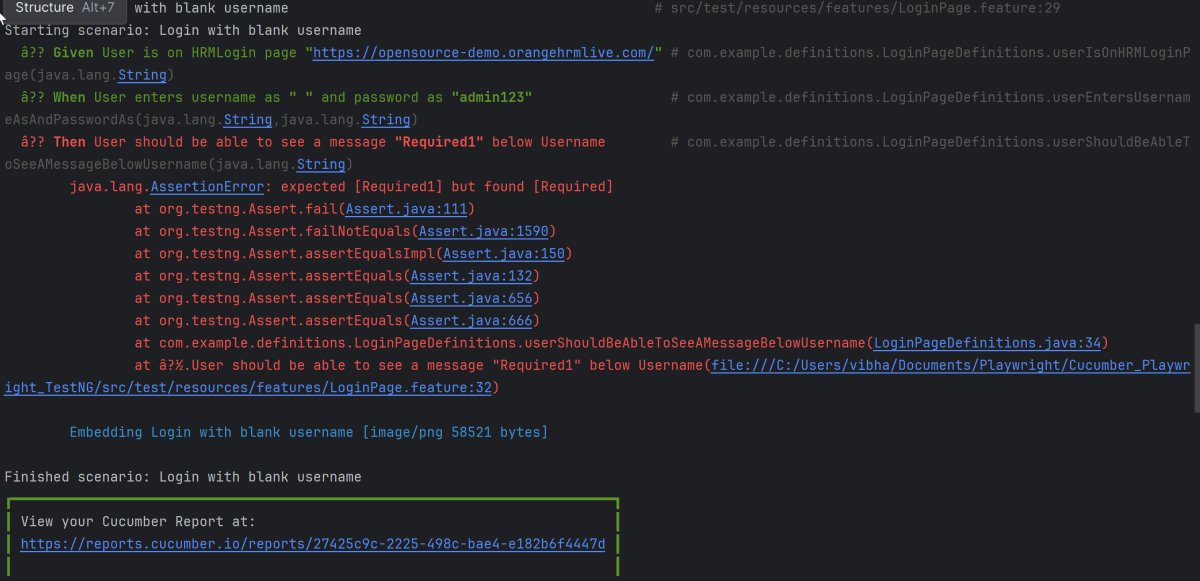
Scenario: Login with blank username
When User enters username as " " and password as "admin123"
Then User should be able to see a message "Required1" below Username
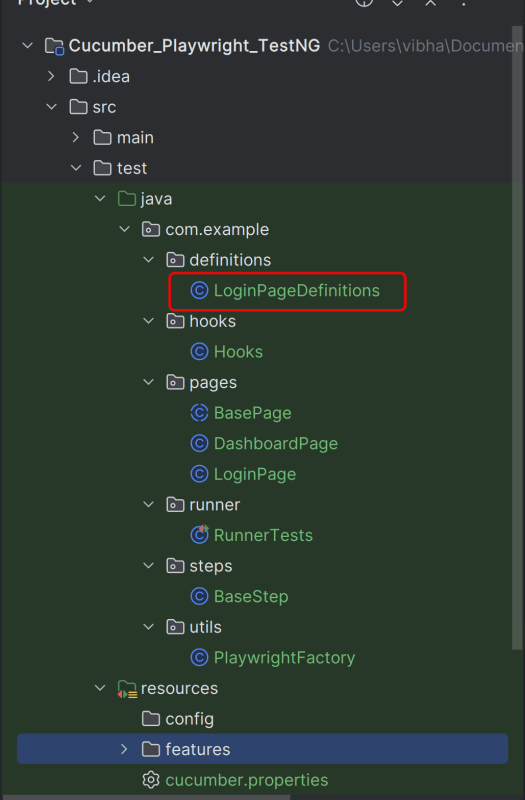
7. Create the step definition class in src/test/java
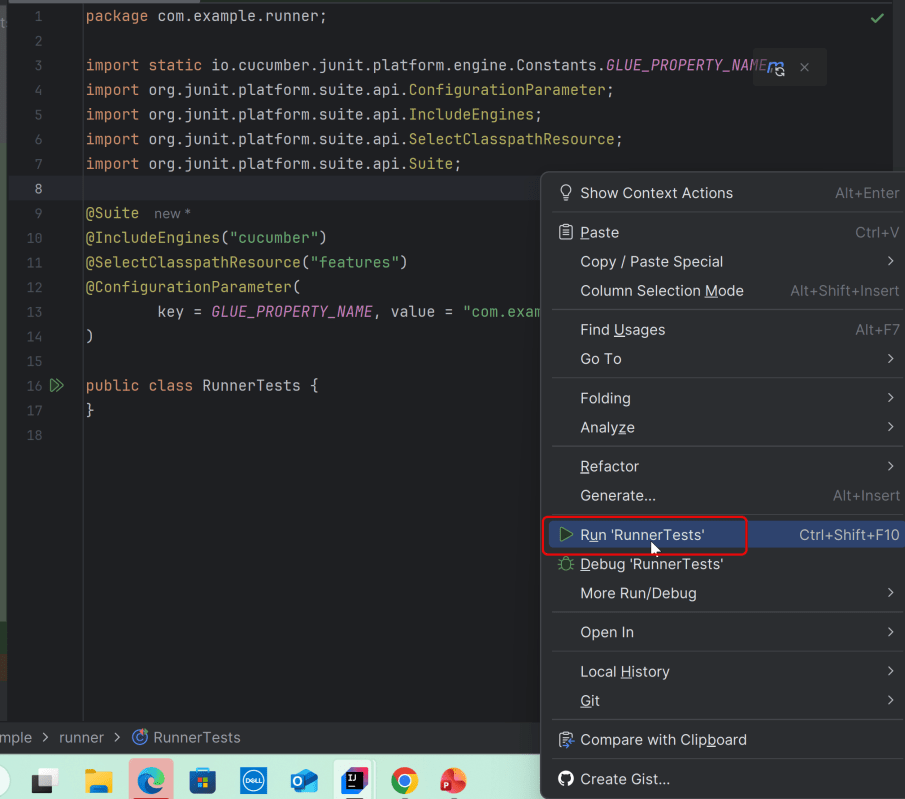
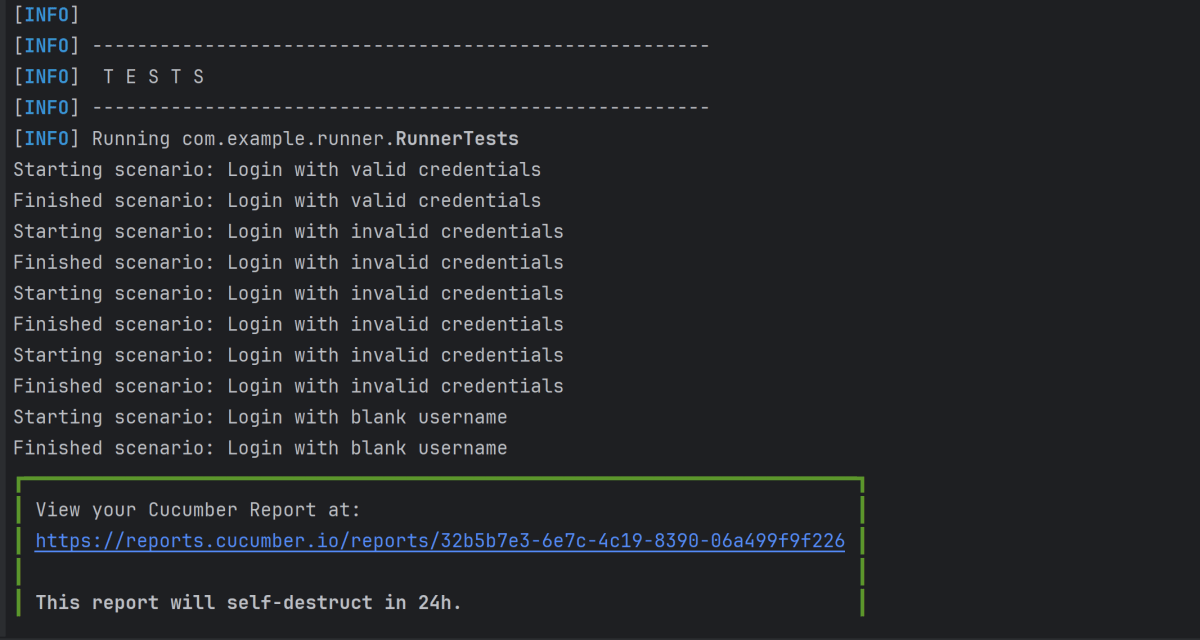
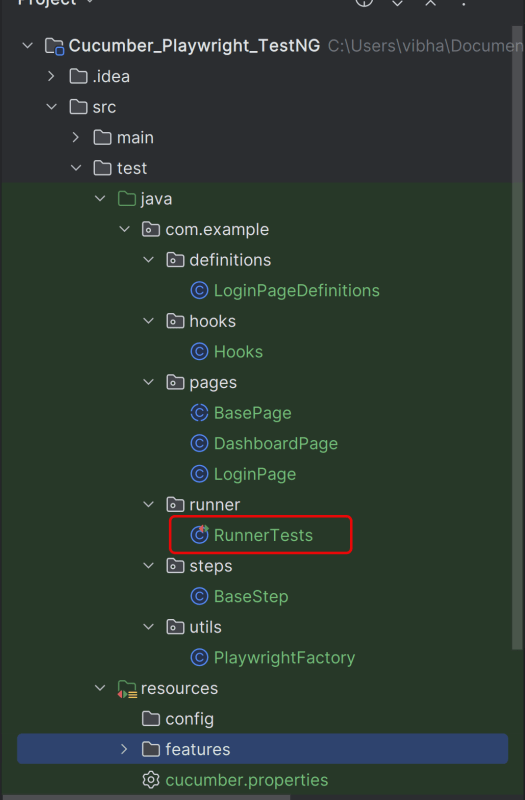
8. Create a JUnit Cucumber Runner class
This JUnit 5 runner configures and launches Cucumber scenarios by selecting feature files, defining glue code packages, and executing them via the Cucumber engine on the JUnit Platform.
Add Allure Report plugin in the Test Runner to generate the Allure Report.
import static io.cucumber.junit.platform.engine.Constants.GLUE_PROPERTY_NAME;

import org.junit.platform.suite.api.ConfigurationParameter;
import org.junit.platform.suite.api.IncludeEngines;
import org.junit.platform.suite.api.SelectClasspathResource;
import org.junit.platform.suite.api.Suite;

@Suite
@IncludeEngines("cucumber")
@SelectClasspathResource("features")
@ConfigurationParameter(
        key = GLUE_PROPERTY_NAME,
        value = "com.example"
)


public class RunnerTests {
}
1. @Suite – Marks this class as a JUnit 5 test suite. Acts as the entry point for test execution
2. @IncludeEngines(“cucumber”) – Tells JUnit Platform to use the Cucumber engine
3. @SelectClasspathResource(“features”) – Specifies the location of feature file
4. @ConfigurationParameter – Tells Cucumber where to find step definitions and hooks
9. Specify Allure Plugin in junit-platform.properties
Specify the allure plugin in junit-platform.properties which should be placed in src/test/resources:
Allure, by default, saves test results in the project’s root directory. However, it is recommended to store your test results in the build output directory.
To configure this, create an allure.properties file and place it in the test resources directory of your project, which is typically located at src/test/resources:
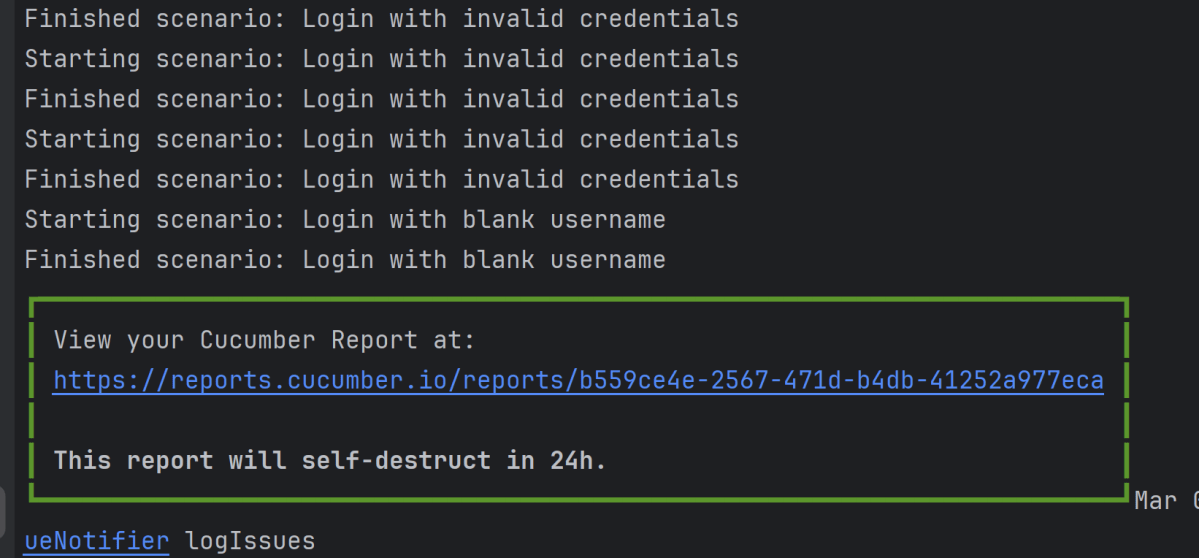
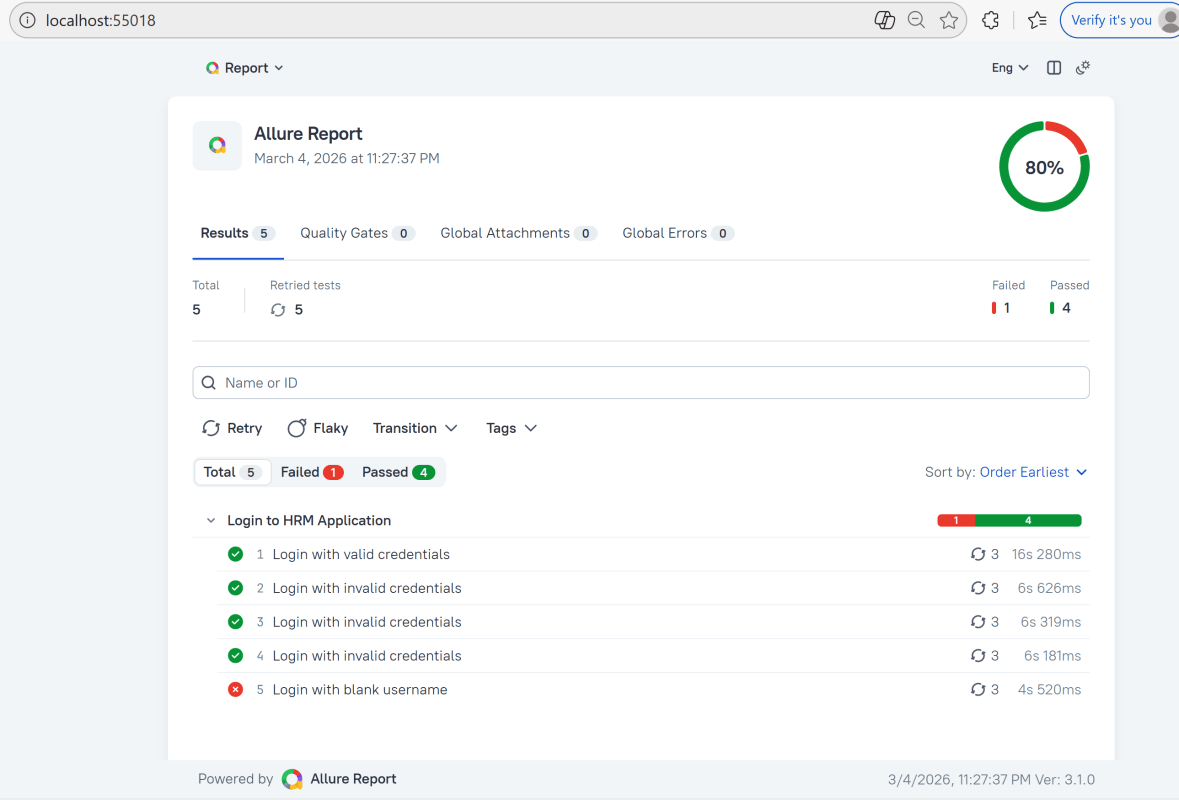
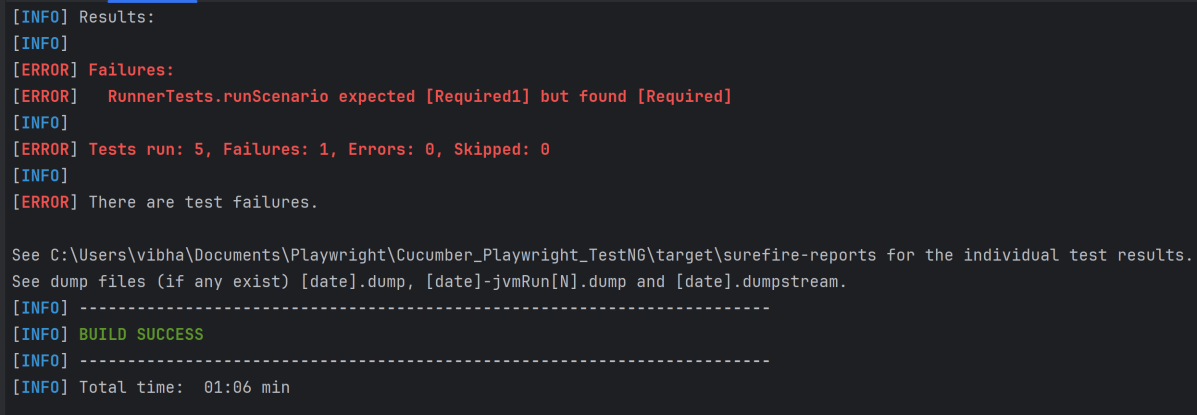
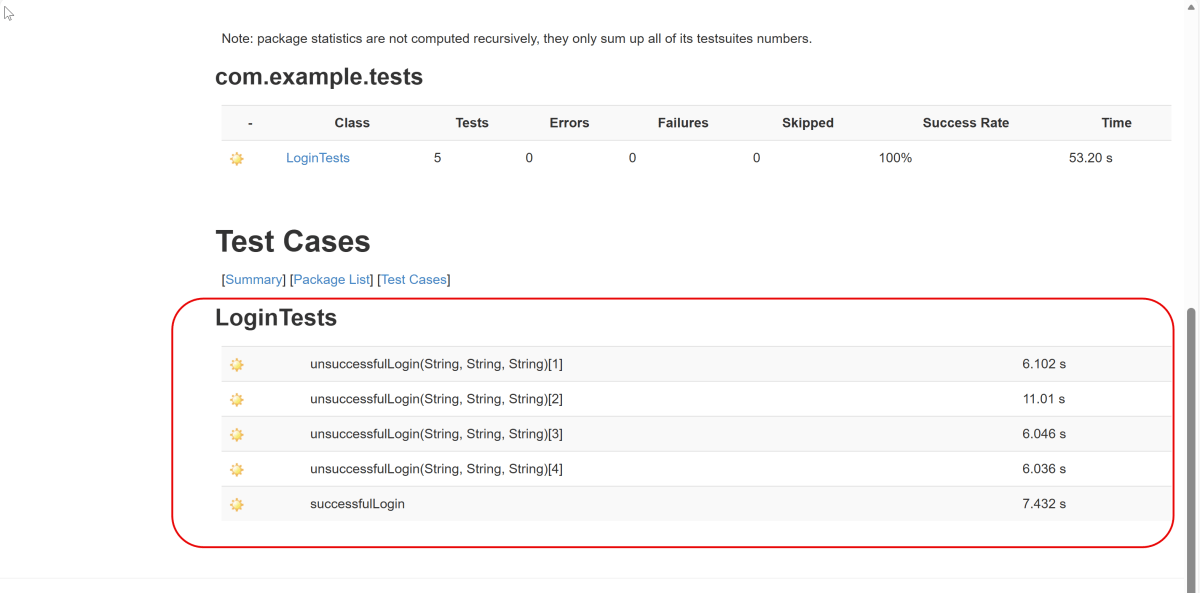
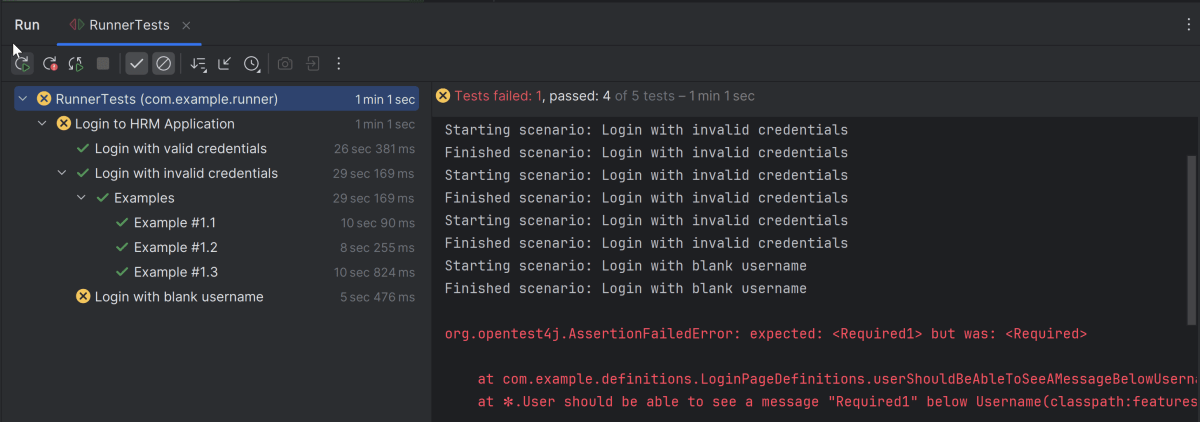
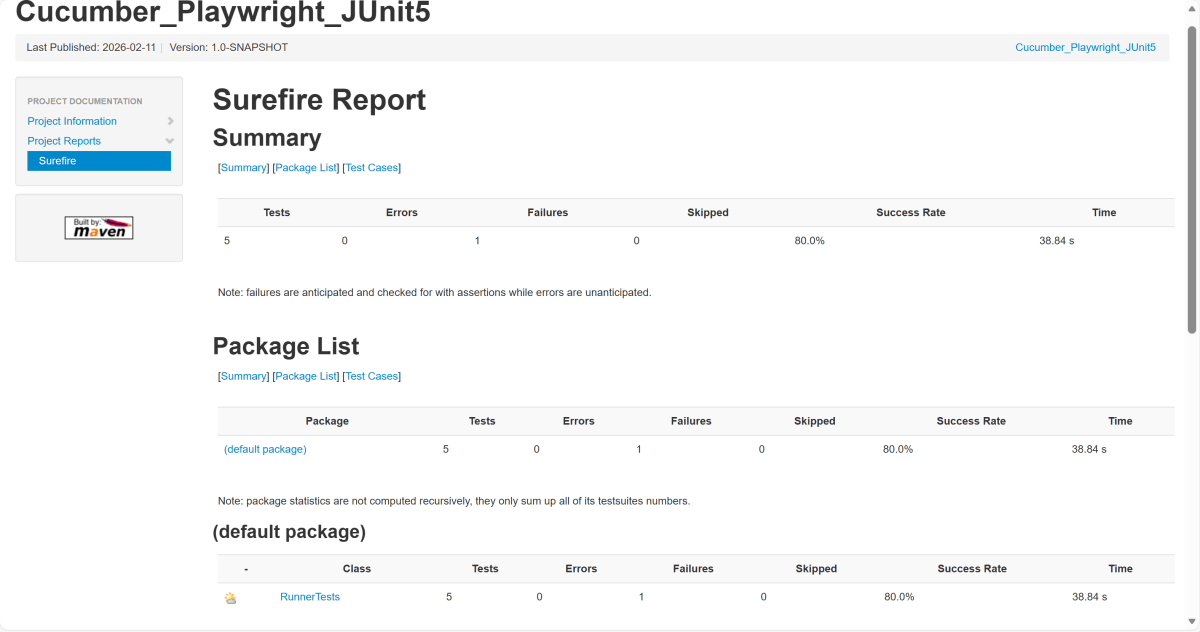
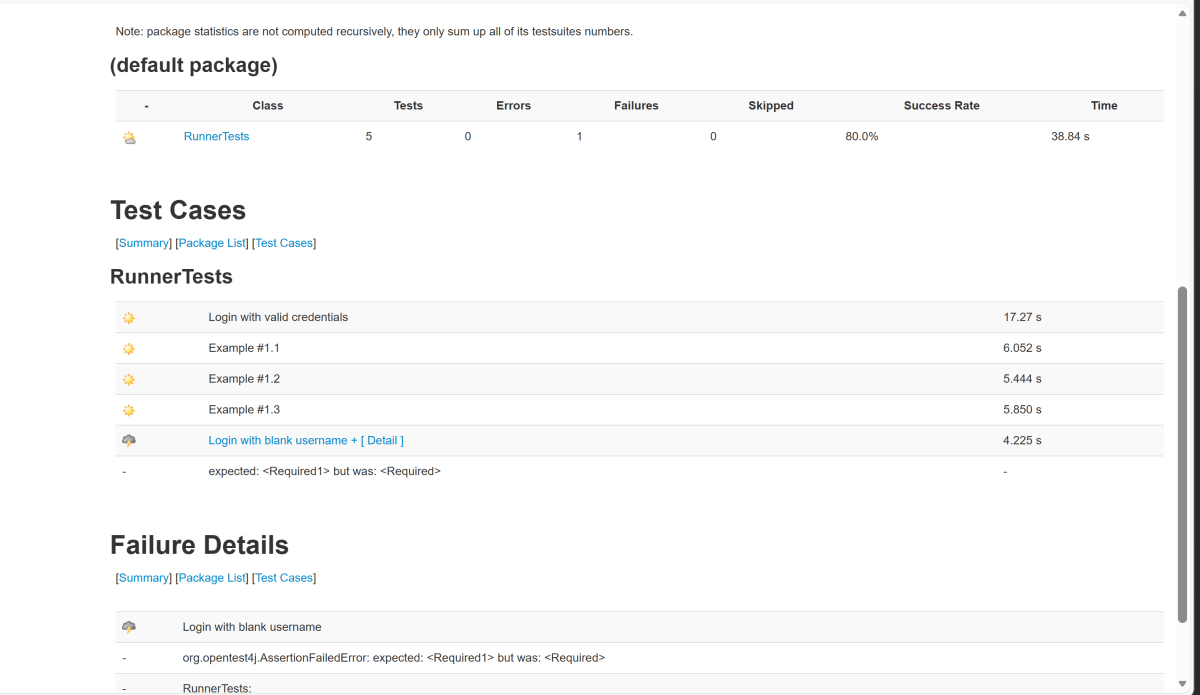
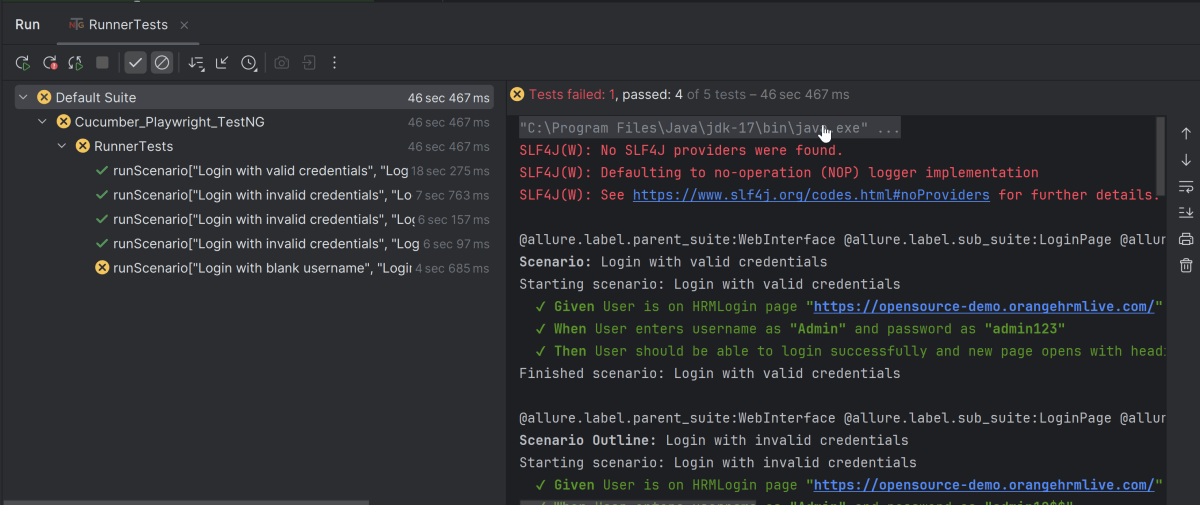
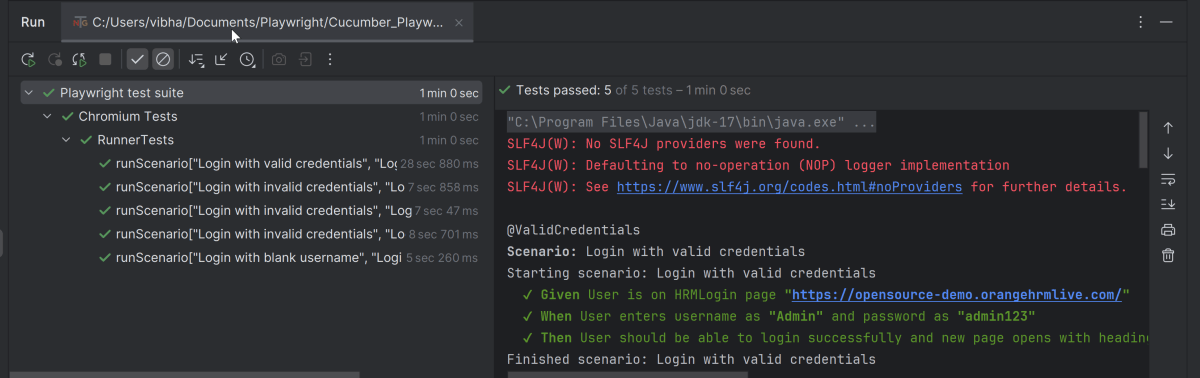
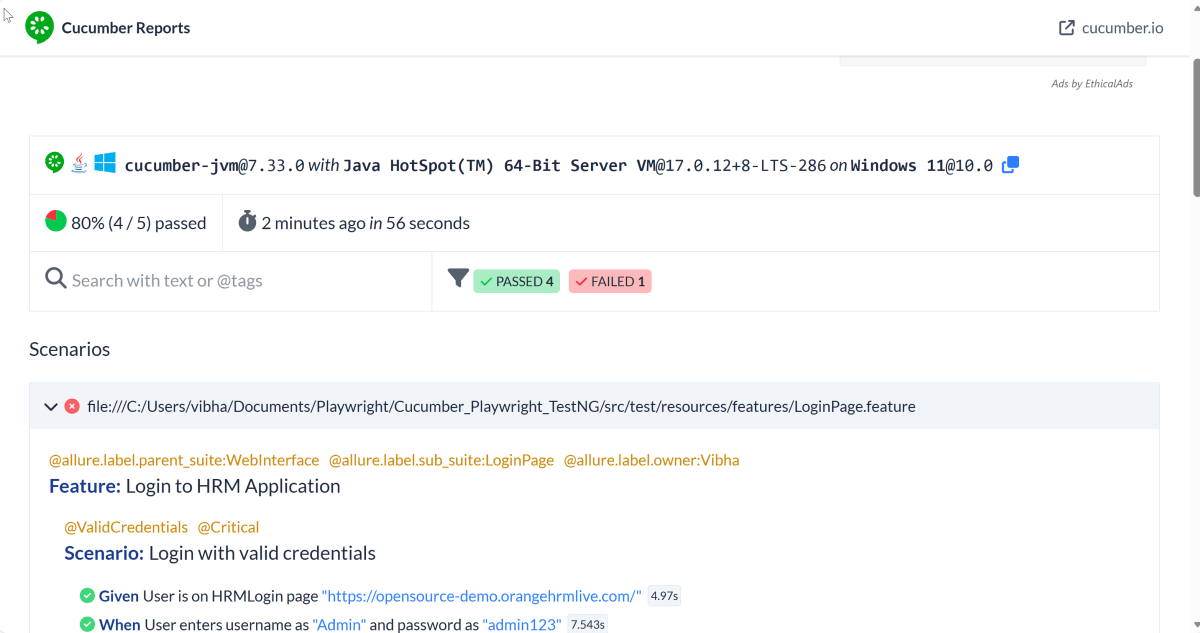
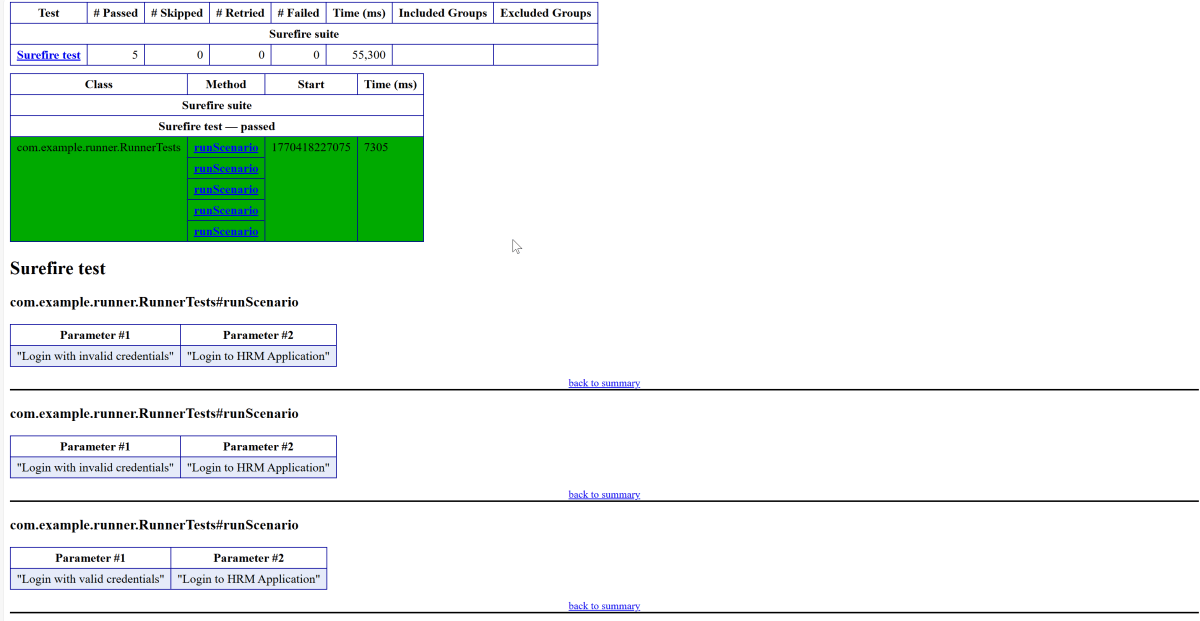
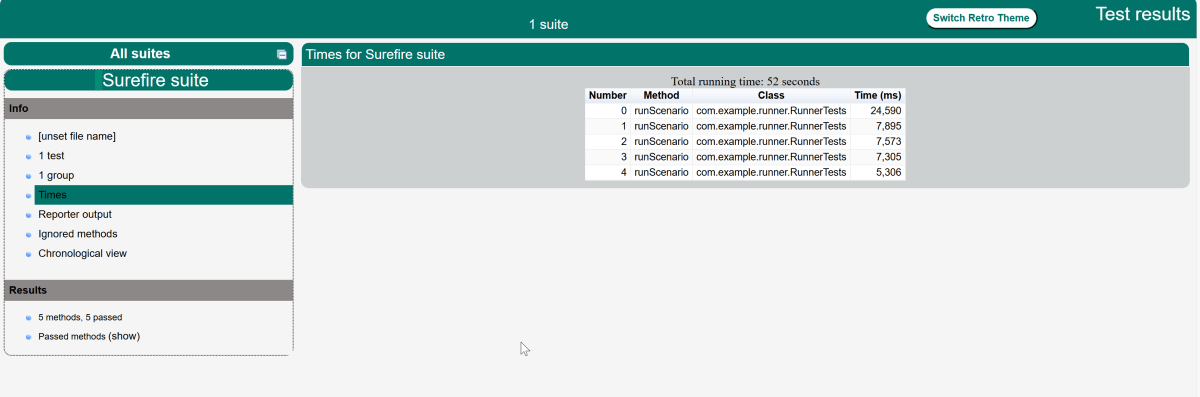
In the image below, we can see that one test failed and four passed out of five tests.
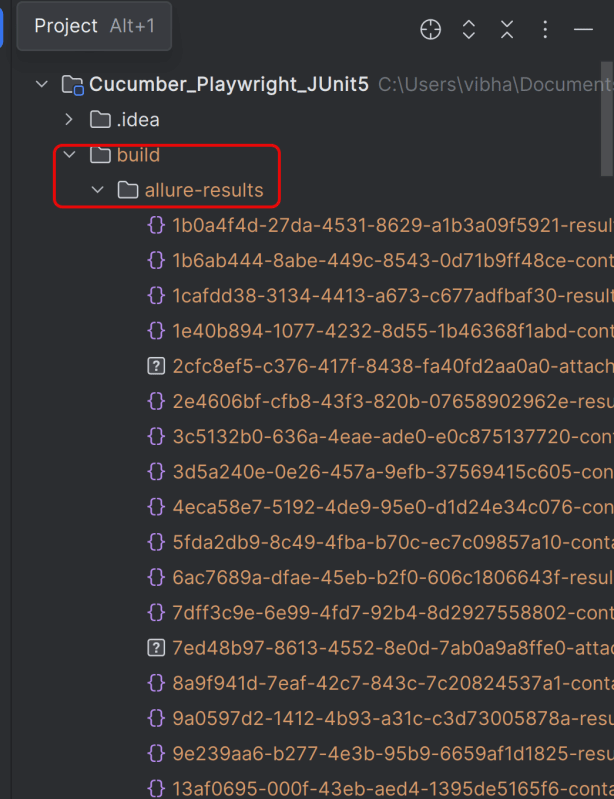
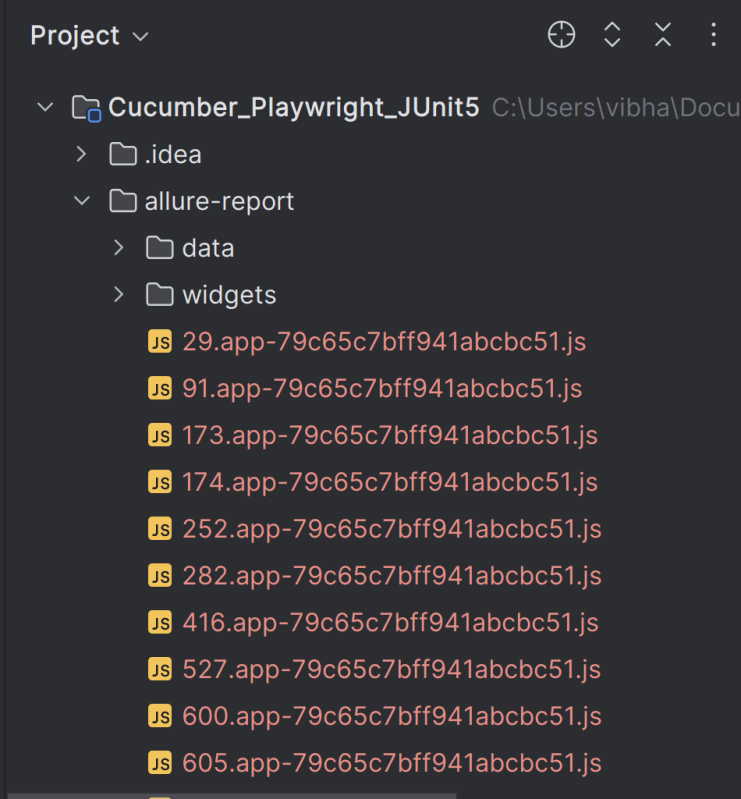
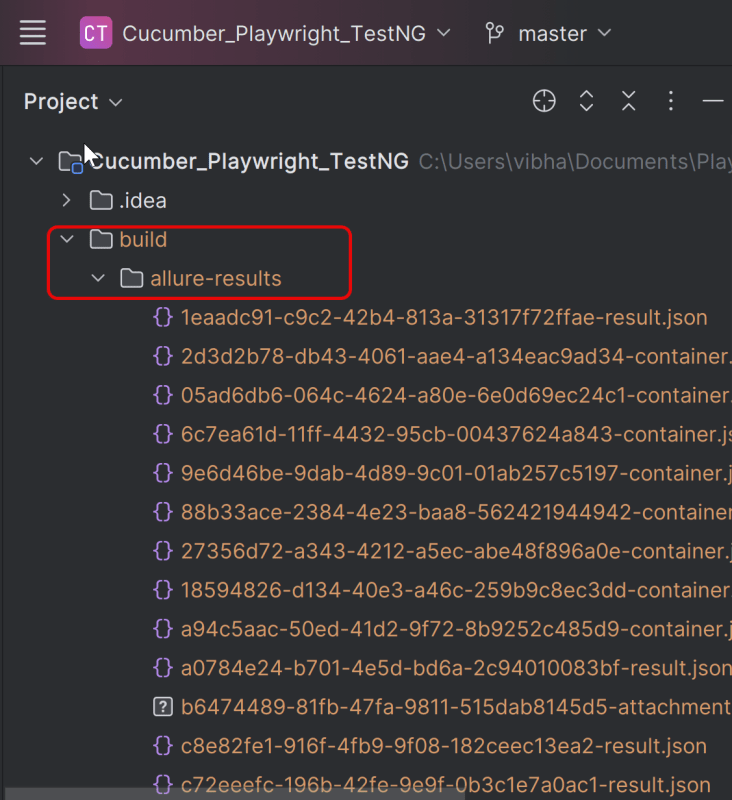
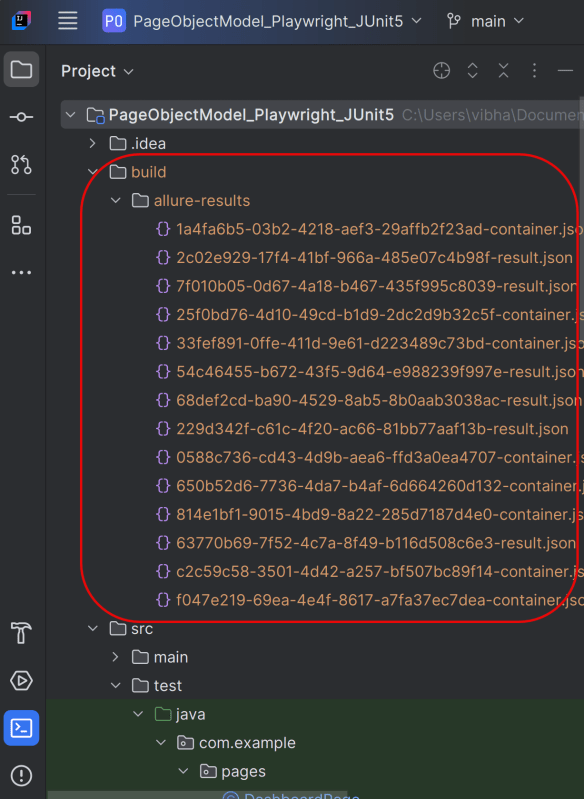
This will create the allure-results folder with all the test reports within build folder. These files will be used to generate Allure Report.
12. How to Generate a Report
allure generate processes the test results and saves an HTML report into the allure-report directory. To view the report, use the allure open command.
allure serve creates the same report as allure generate, then automatically opens the main page of the report in a web browser.
Use the command below to generate the Allure Report
allure serve build/allure-results
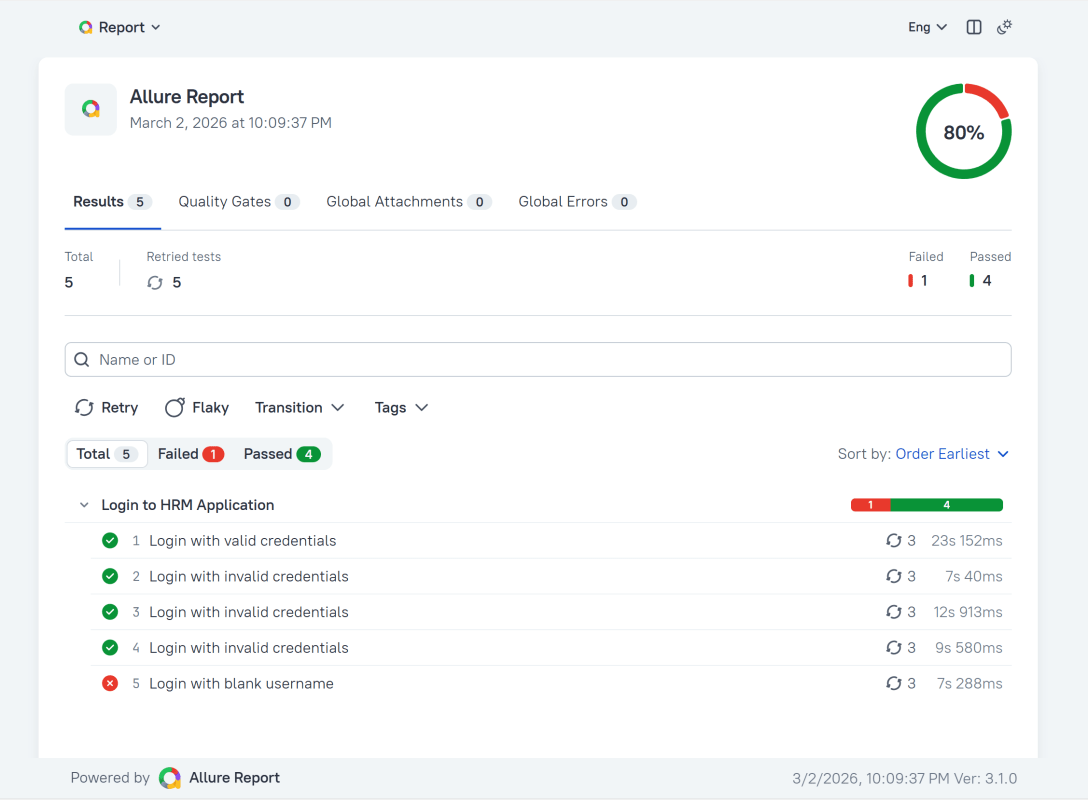
This will generate the beautiful Allure Test Report as shown below.
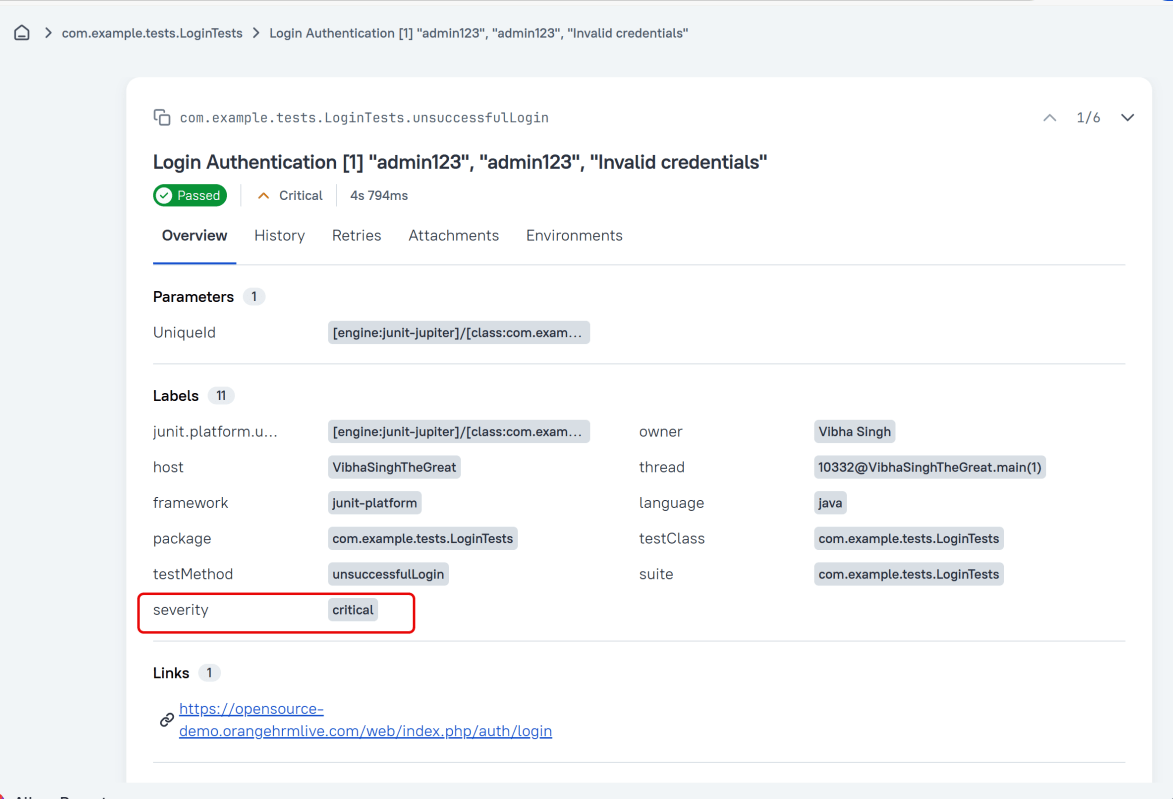
13. How to View a Report
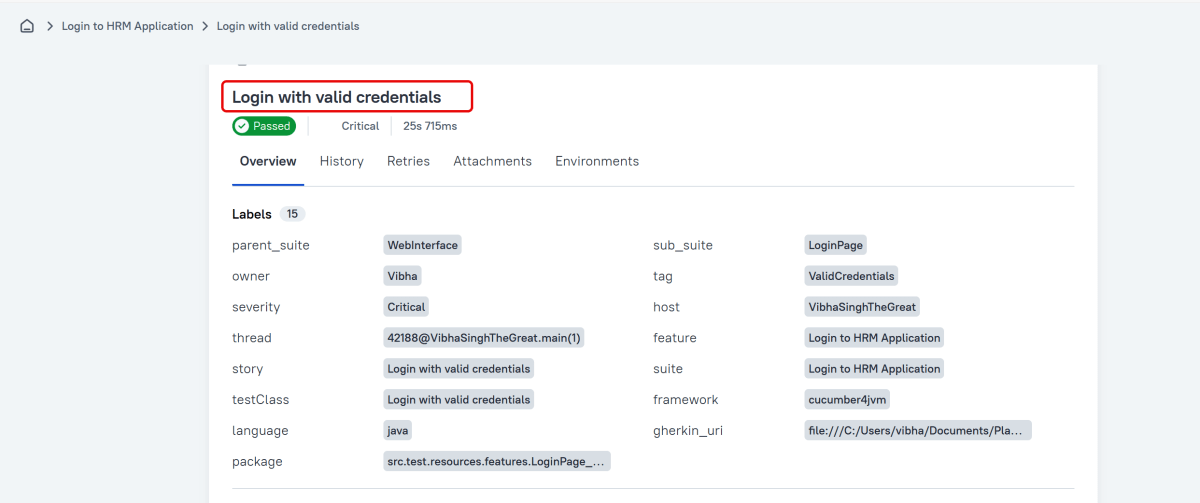
Test reports generated with Allure Report are basically small HTML websites intended to be viewed in a web browser.
Title
A human-readable title of the test. If not provided, the function name is used instead.
Tags
Any number of short terms the test is related to. Usually it’s a good idea to list relevant features that are being tested. Tags can then be used for filtering.
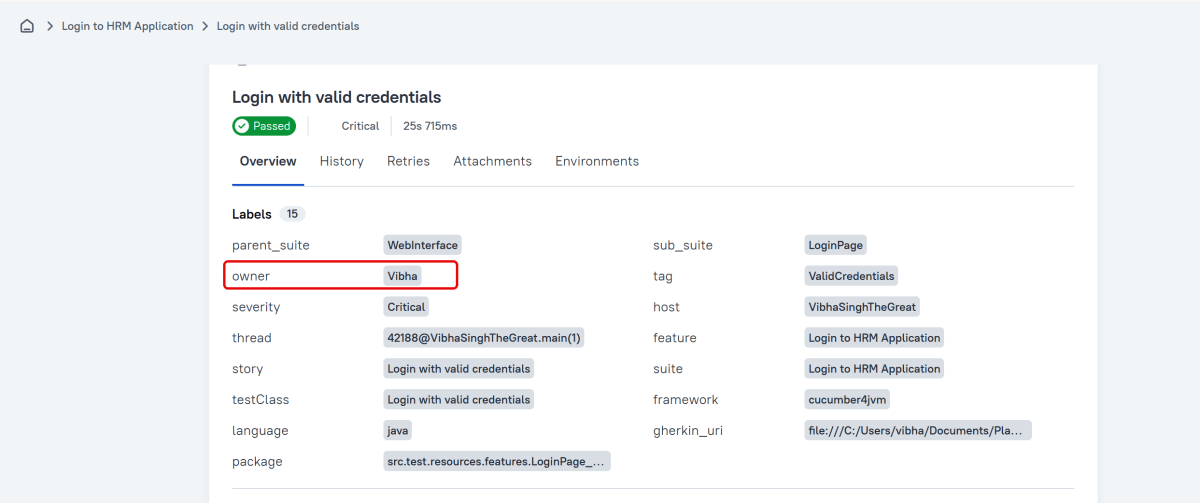
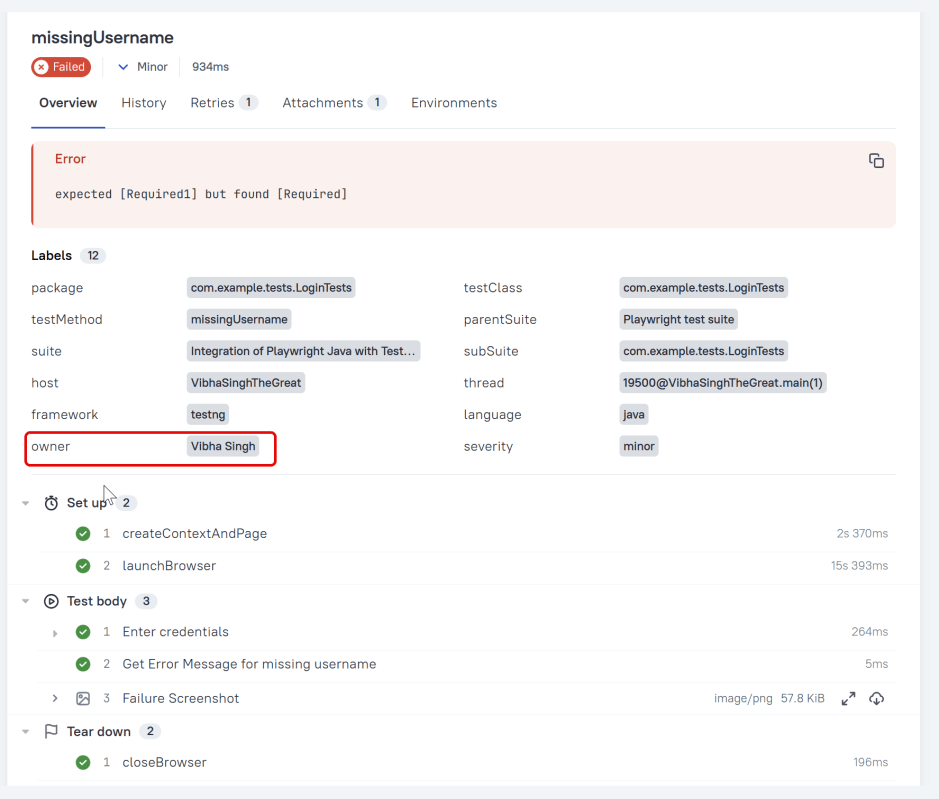
Owner
The team member who is responsible for the test’s stability. For example, this can be the test’s author, the leading developer of the feature being tested, etc.
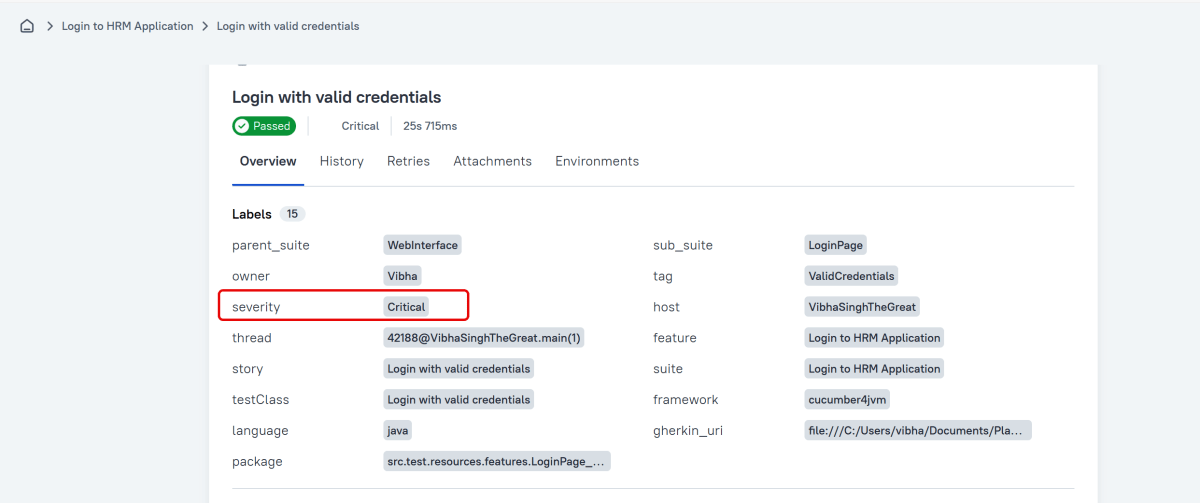
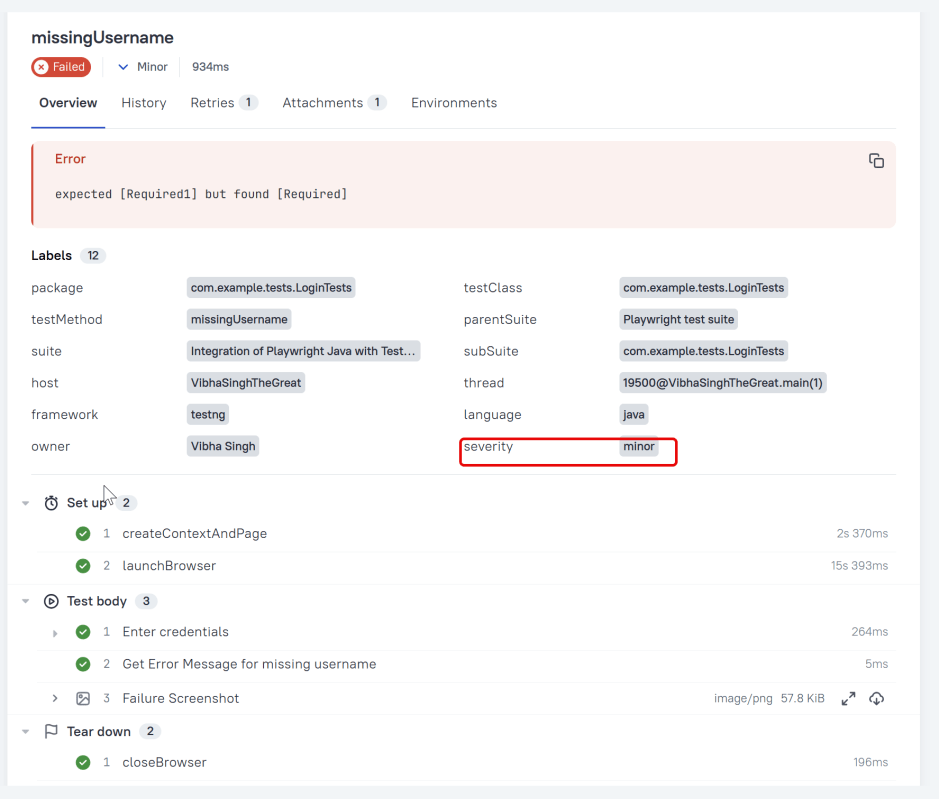
Severity
A value indicating how important the test is. This may give the future reader an idea of how to prioritize the investigations of different test failures.
Allowed values are: “trivial”, “minor”, “normal”, “critical”, and “blocker”.
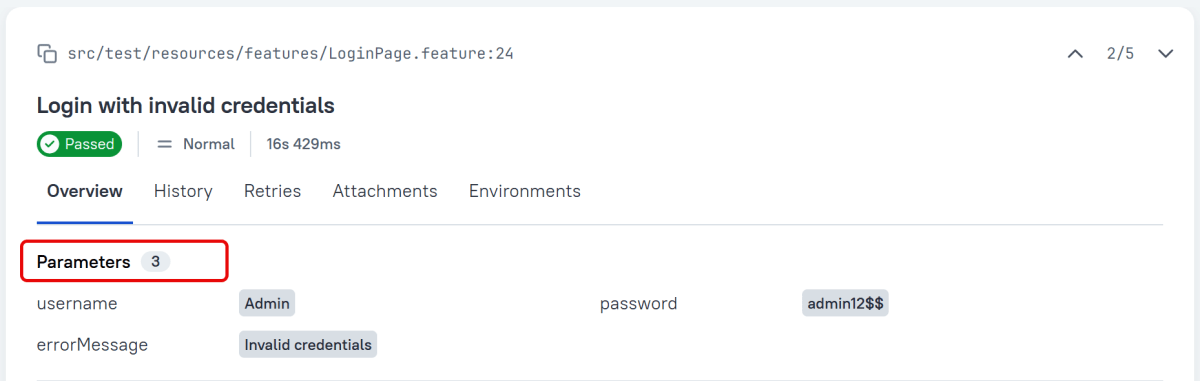
Support for Scenario Outlines
Allure Cucumber-JVM provides complete support for Scenario Outlines, a feature of Cucumber-JVM that allows for parametrized tests. No special setup is needed to take advantage of this capability within Allure.
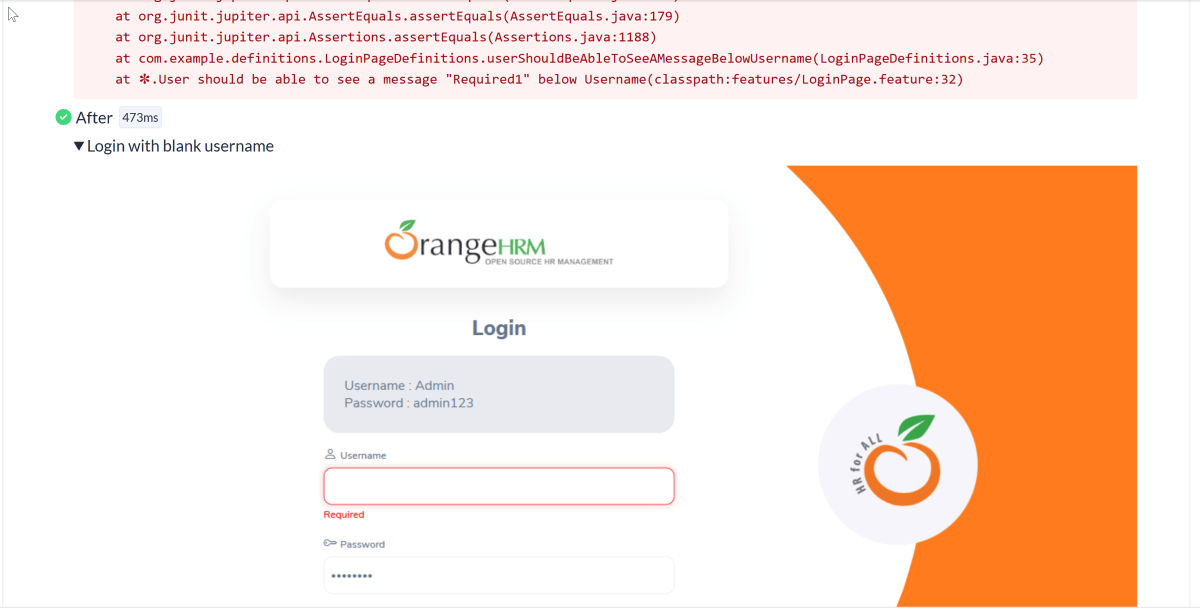
Attachment
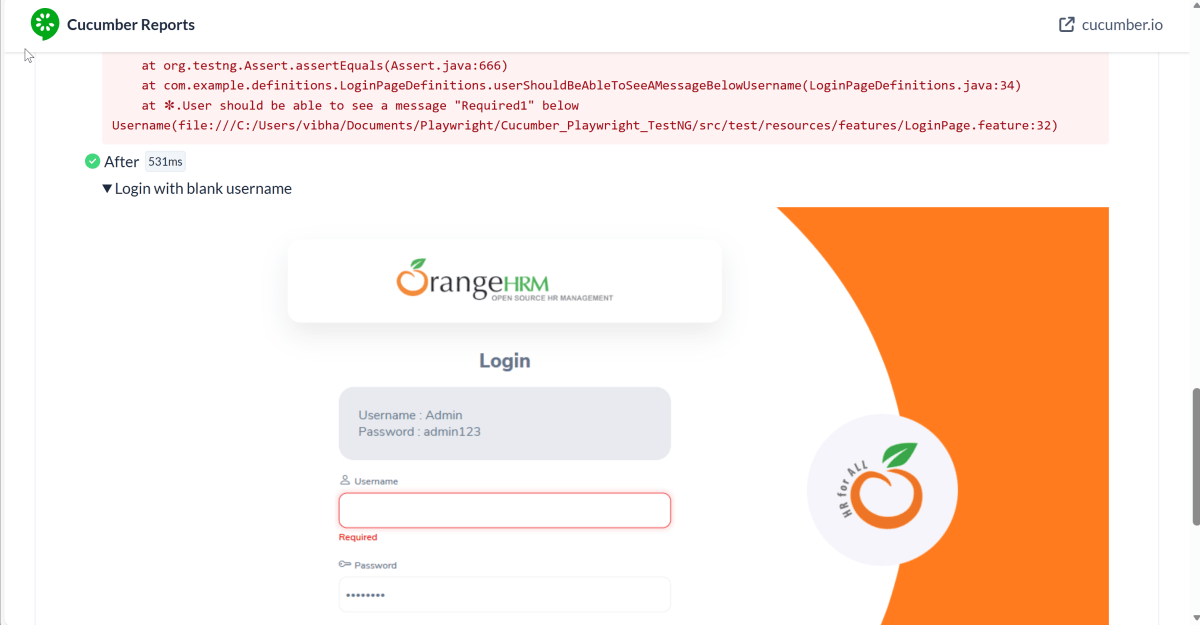
In Allure reports, you have the ability to attach various types of files, which can greatly enhance the comprehensibility of the report. A common practice is to attach screenshots that capture the state of the user interface at specific moments during test execution.
Allure Cucumber-JVM offers multiple methods for creating attachments, whether from pre-existing files or from content generated on-the-fly.
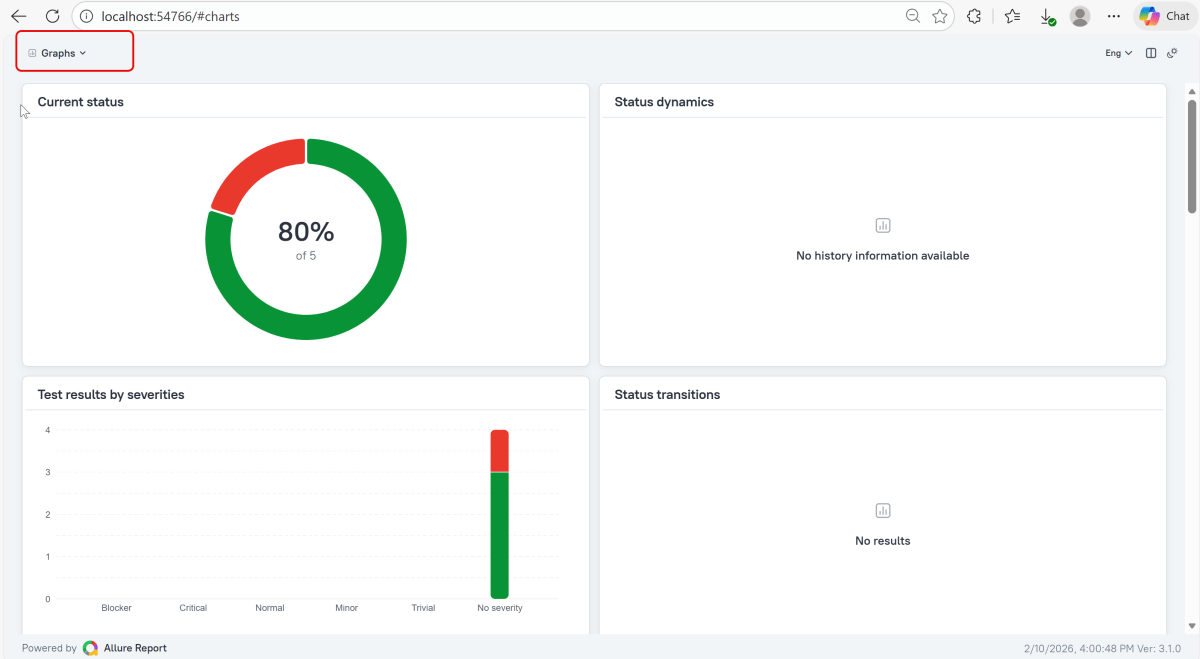
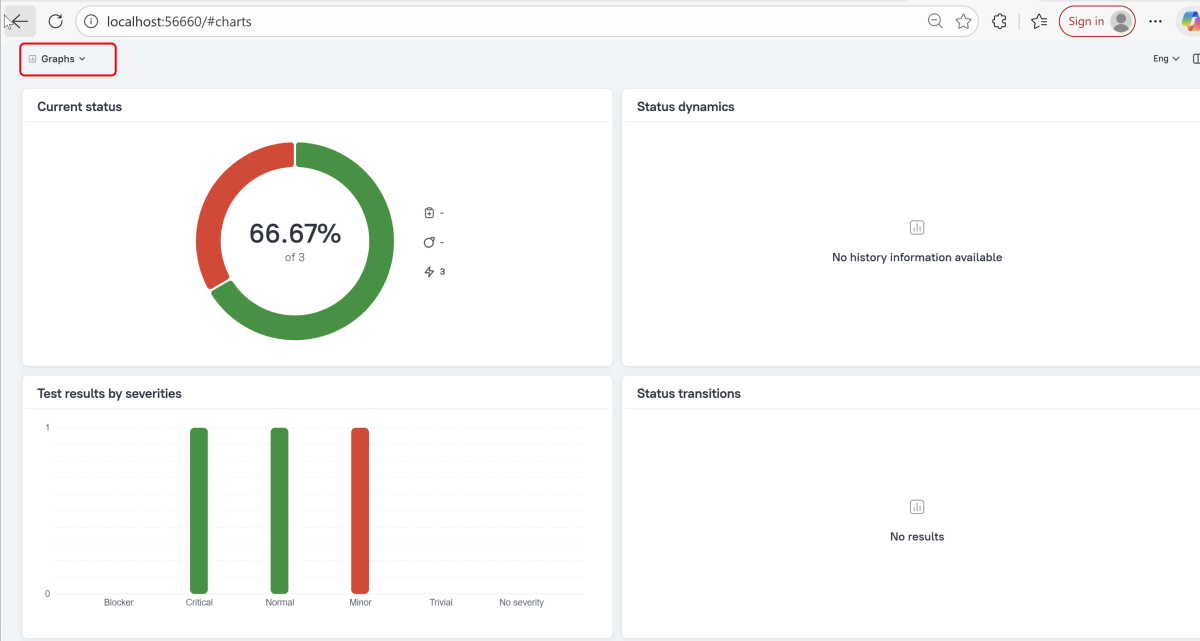
Graphs in Allure Report
Graphs allow you to see different statistics collected from the test data: status breakdown or severity and duration diagrams.
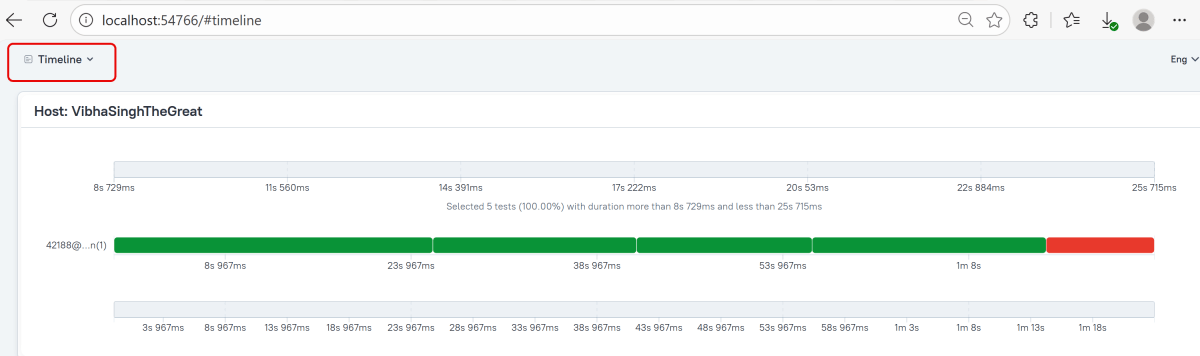
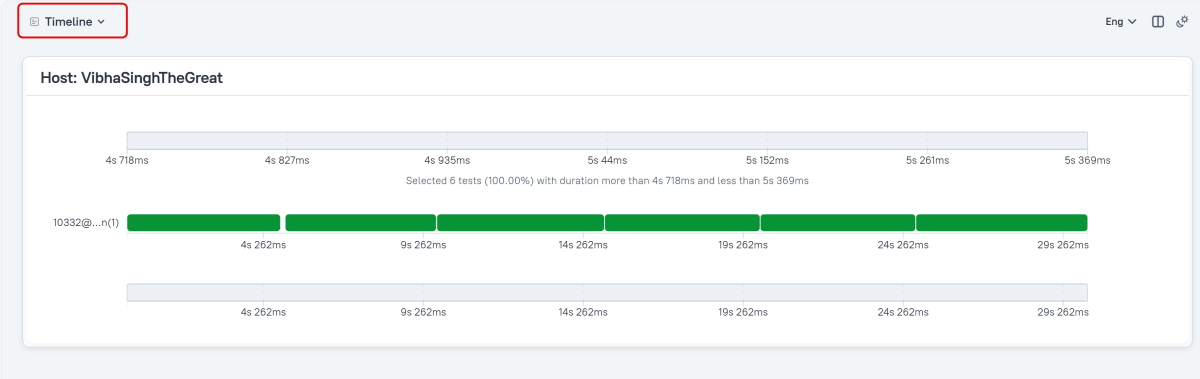
Timeline in Allure Report
The timeline tab visualizes retrospective test execution, allure adaptors collect precise timings of tests, and here on this tab, they are arranged accordingly to their sequential or parallel timing structure.
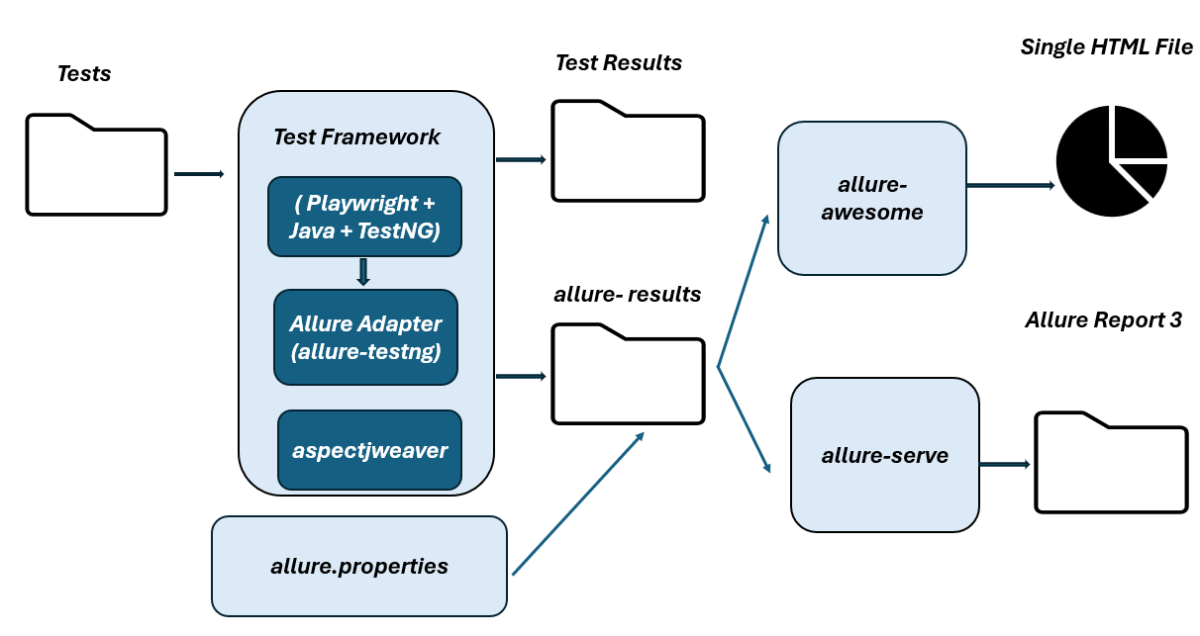
Generate Reports with the Allure Awesome Plugin
Allure 3 Report also features an advanced report generator plugin – Allure Awesome. It supports additional configuration options, such as generating the report as a single HTML file, setting the theme, custom branding and language of the generated report, and taking known issues into account.
To manually generate a customized Allure Awesome report, use the awesome command:
allure awesome build/allure-results
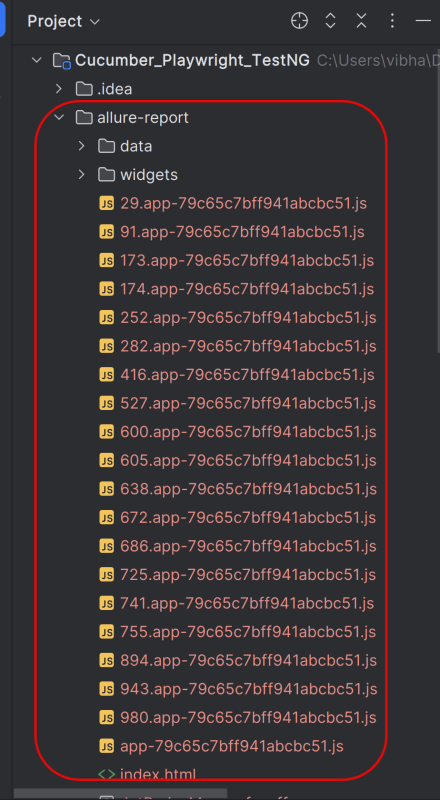
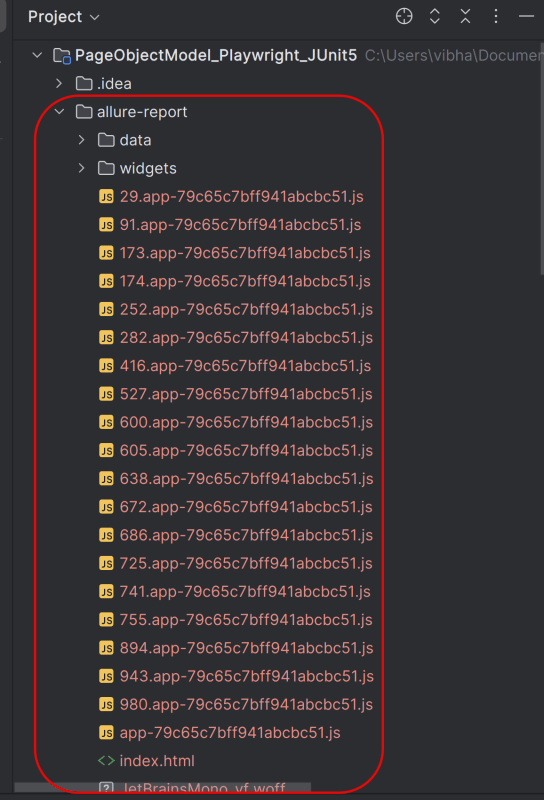
This will create the allure-report folder with all the test files and index.html report.
Open “index.html“, as this is an HTML report, and open it with the browser. The below image shows index.html.
Right click on index.html->Open In ->Browser ->Edge( any browser).
Summary:
1.Add required dependencies – Include Playwright, JUnit 5, and Allure JUnit5 in pom.xml, and configure the Allure Maven plugin.
2. Write Cucumber Scenarios in Feature File – Define the feature files using Gherkin syntax (.feature) and place them in the appropriate directory (src/test/resources/features).
3. Implement Step Definitions – Create step definitions in Java to connect the Gherkin scenarios to Playwright actions. Ensure these are correctly annotated with Cucumber’s annotations.
4. Create Test Runner – Setup a TestNG runner that combines Cucumber options and ensures Allure configurations are included.
5. Configure Allure Reporting – Utilize Allure annotations like @AllureFeature and @AllureStory within your tests to categorize and logically group test cases. Create an allure.properties file in src/test/resources with necessary configurations like resultsDirectory and linkPattern.
6. Execute Tests and Generate Reports – Execute mvn clean test, then run allure serve allure-results to build and open the HTML report.
Congratulations!! We have integrated an allure report with Playwright, Java Cucumber, and TestNG. I hope this tutorial is useful to you.
Create a folder – features within src/test/resources to create test scenarios in the Feature file.
Feature file should be saved as an extension of .feature. Add the test scenarios in this feature file. I have added sample test scenarios. In this feature file. The test scenarios are written in Gherkinslanguage.
@allure.label.parent_suite:WebInterface
@allure.label.sub_suite:Login Page
@allure.label.owner:Vibha

Feature: Login to HRM Application

  Background:
    Given User is on HRMLogin page "https://opensource-demo.orangehrmlive.com/"

  @ValidCredentials @Critical
  Scenario: Login with valid credentials

    When User enters username as "Admin" and password as "admin123"
    Then User should be able to login successfully and new page opens with heading "Dashboard"

  @InvalidCredentials @High
  Scenario Outline: Login with invalid credentials

    When User enters username as "<username>" and password as "<password>"
    Then User should be able to see error message "<errorMessage>"

    Examples:
      | username   | password  | errorMessage           |
      | Admin      | admin12$$ | Invalid credentials    |
      | admin$$    | admin123  | Invalid credentials    |
      | abc123     | xyz$$     | Invalid credentials    |

  @MissingUsername @Medium
  Scenario: Login with blank username

    When User enters username as " " and password as "admin123"
    Then User should be able to see a message "Required1" below Username
7. Create the step definition class in src/test/java
8. Create a TestNG Cucumber Runner class
We need to create a class called Runner class to run the tests. This class will use the TestNG annotation @Test, which tells TestNG what is the test runner class.
Add Allure Report plugin in the Test Runner to generate the Allure Report.
Note:- @Test annotation marks this class as part of the test. So, if we will remove this annotation, the Allure Report executesCucumberRunnerTests as a separate test suite, so there will be duplicate results.
9. Create testng.xml for the project
<?xml version = "1.0"encoding = "UTF-8"?>
<!DOCTYPE suite SYSTEM "http://testng.org/testng-1.0.dtd">
<suite name = "Suite1">
    <test name = "Test Demo">
        <classes>
            <class name = "com.example.runner.CucumberRunnerTests"/>
        </classes>
    </test>
</suite>
10. Specifying Allure Results location
Allure, by default, saves test results in the project’s root directory. Still, it is recommended to store your test results in the build output directory.
To configure this, create an allure.properties file and place it in the test resources directory of your project, which is typically located at src/test/resources:
In the image below, we can see that one test failed and four passed out of five tests.
This will create the allure-results folder with all the test reports within build folder. These files will be used to generate Allure Report.
12. How to Generate a Report
allure generate processes the test results and saves an HTML report into the allure-report directory. To view the report, use the allure open command.
allure serve creates the same report as allure generate, then automatically opens the main page of the report in a web browser.
Use the command below to generate the Allure Report
allure serve build/allure-results
This will generate the beautiful Allure Test Report as shown below.
13. How to View a Report
Test reports generated with Allure Report are basically small HTML websites intended to be viewed in a web browser.
Title
A human-readable title of the test. If not provided, the function name is used instead.
Tags
Any number of short terms the test is related to. Usually it’s a good idea to list relevant features that are being tested. Tags can then be used for filtering.
Owner
The team member who is responsible for the test’s stability. For example, this can be the test’s author, the leading developer of the feature being tested, etc.
Severity
A value indicating how important the test is. This give the future reader an idea of how to prioritize the investigations of different test failures.
Allowed values are: “trivial”, “minor”, “normal”, “critical”, and “blocker”.
Support for Scenario Outlines
Allure Cucumber-JVM provides complete support for Scenario Outlines, a feature of Cucumber-JVM that allows for parametrized tests. No special setup is needed to take advantage of this capability within Allure.
Attachment
In Allure reports, you have the ability to attach various types of files, which can greatly enhance the comprehensibility of the report. A common practice is to attach screenshots that capture the state of the user interface at specific moments during test execution.
Allure Cucumber-JVM offers multiple methods for creating attachments, whether from pre-existing files or from content generated on-the-fly.
Graphs in Allure Report
Graphs allow you to see different statistics collected from the test data: status breakdown or severity and duration diagrams.
Timeline in Allure Report
The timeline tab visualizes retrospective test execution, allure adaptors collect precise timings of tests, and here on this tab, they are arranged accordingly to their sequential or parallel timing structure.
Generate Reports with the Allure Awesome Plugin
Allure 3 Report also features an advanced report generator plugin – Allure Awesome. It supports additional configuration options, such as generating the report as a single HTML file, setting the theme, custom branding and language of the generated report, and taking known issues into account.
To manually generate a customized Allure Awesome report, use the awesome command:
allure awesome build/allure-results
This will create the allure-report folder with all the test files and index.html report.
Open “index.html“, as this is an HTML report, and open it with the browser. The below image shows index.html.
Right click on index.html->Open In ->Browser ->Edge( any browser).
Summary:
1.Add required dependencies – Include Playwright, TestNG, and Allure TestNG in pom.xml, and configure the Allure Maven plugin.
2. Write Cucumber Scenarios in Feature File – Define the feature files using Gherkin syntax (.feature) and place them in the appropriate directory (src/test/resources/features).
3. Implement Step Definitions – Create step definitions in Java to connect the Gherkin scenarios to Playwright actions. Ensure these are correctly annotated with Cucumber’s annotations.
4. Create Test Runner – Setup a TestNG runner that combines Cucumber options and ensures Allure configurations are included.
5. Configure Allure Reporting – Utilize Allure annotations like @AllureFeature and @AllureStory within your tests to categorize and logically group test cases. Create an allure.properties file in src/test/resources with necessary configurations like resultsDirectory and linkPattern.
6. Execute Tests and Generate Reports – Execute mvn clean test, then run allure serve allure-results to build and open the HTML report.
Congratulations!! We have integrated an allure report with Playwright, Java Cucumber, and TestNG. I hope this tutorial is useful to you.
In this blog we will be utilizing Playwright Java for the execution of Parameterized Tests. We can parameterize tests using JUnit5 or TestNG. Here, we are using JUnit5 to parameterize the tests.
Parameterized testing is a testing technique. In this technique, the same test method is executed multiple times with different input values. It also has varying expected results.
Instead of writing many separate tests, you write one test and pass different data to it.
Why Parameterized testing is important?
1. Increased Test Coverage: Parameterized testing allows a single test method to run multiple times with different datasets. This ensures that various scenarios, inputs, and edge cases are covered, leading to thorough testing of the application’s functionality.
2. Maintainability: A parameterized test reduces code duplication since the same test logic is applied across different input data. This means fewer test scripts need maintenance. Any changes to the test logic affect all test cases using that method at the same time.
3. Scalability: Tests can be easily scaled by augmenting the set of input data. This helps account for new test scenarios. There is no need for rewriting test logic.
4. Improving Design Quality: Using parameterized tests encourages designing tests that focus on core logic. They foster better test architecture and design practices. These practices can handle diverse scenarios effectively.
Parameterized Tests using JUnit5
JUnit 5 offers robust support for parameterized testing through the @ParameterizedTest annotation. This feature allows us to run a single test method multiple times, each time with a different set of parameters. One of the ways to specify these parameters is by using the @CsvSource annotation.
The @CsvSource annotation allows us to specify the parameter values directly as a list of comma-separated values (CSV) within parentheses. Each line of CSV represents one set of input parameters for the test method.
The following prerequisites are required to be installed on the machine to begin with a smooth setup and installation.
Java 11 or higher
IntelliJ IDE or any other IDE to create a project
Maven
Browsers on which tests need to be run, like Chrome, Firefox, etc.
Implementation Steps
1. Create a new Maven Project
The first step in setup is to create a new Maven project. I will be using IntelliJ in this tutorial. The following steps need to be followed to create a new Maven project :
Open IntelliJ, Navigate to File >> New >> Project
2. In the New Project window, enter the following details:
Name of the Project – PageObjectModel_Playwright_JUnit5
Location/path where the project needs to be saved – Documents/Playwright (my location)
Select JDK version — I am using JDK 17
Archetype — Search for “quickstart” and select maven-archetype-quickstart from the results
Click on the Create button to create the project.
This will create a project as shown below in the IntelliJ.
2. Setup Playwright with Java and JUnit5
Add the Playwright and JUnit5 dependencies to the pom.xml. The latest dependency can be found from here.
After adding the dependency, refresh the project. We will see that the Playwright jar files are downloaded in External Libraries.
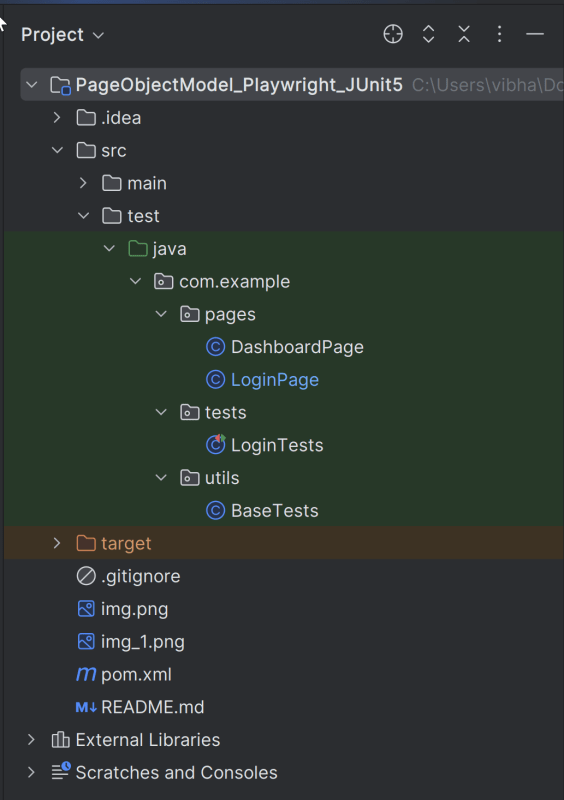
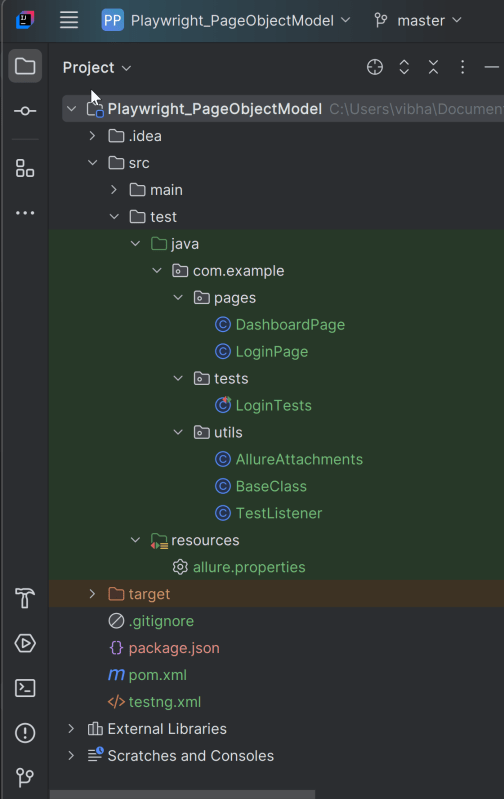
3. Project Structure for Maintainability
Creating a well-organized project structure is crucial for maintaining a scalable and efficient automation framework.
Page Classes (src/main/java/.../pages/): Each web page in your application should have a corresponding page class. This class encapsulates all the functionalities of the web page, following the Page Object Model.
Utility Classes (src/main/java/.../utils/): These classes can include various utilities like configuration readers, helper methods for common tasks, etc.
Test Classes (src/test/java/.../tests/): Here, you write your actual test cases, utilizing the page classes.
Maven Configuration (pom.xml): This file manages project dependencies, plugins, and other configurations.
4. Creating Page Object Classes
Page classes serve as an interface to a web page’s UI elements. Each page class corresponds to a page in your application, encapsulating the actions that can be performed on that page.
Identify the UI Elements: Determine all the elements on the web page that your test will interact with, such as text boxes, buttons, and links.
Define Selectors:Store the selectors for these elements in your page class. It’s a best practice to externalize these selectors, but for simplicity, we’ll define them directly in the class.
Implement Actions:Create methods for each action that can be performed on the page, like entering text, clicking buttons, etc.
Creating LoginPage Class
import com.microsoft.playwright.Page;
public class LoginPage {
private Page page;
//Locators
private final String usernameLocator = "input[name='username']";
private final String passwordLocator = "input[name='password']";
private final String submitButton = "button[type='submit']";
private final String errorMessage = "//p[contains(@class, 'oxd-text oxd-text--p oxd-alert-content-text')]";
//Constructor
public LoginPage(Page page){
this.page = page;
}
public void login(String username, String password) {
page.fill(usernameLocator,username);
page.fill(passwordLocator,password);
page.click(submitButton);
}
public String getErrorMessage(){
return page.textContent(errorMessage);
}
}
Creating DashboardPage Class
package org.example.pages;
import com.microsoft.playwright.Page;
public class DashboardPage {
private Page page;
//Locators
private final String dashboardHeading = "//h6[contains(@class, 'oxd-topbar-header-breadcrumb-module')]";
//Constructor
public DashboardPage(Page page) {
this.page = page;
}
// Methods
public String getHeading() {
return page.textContent(dashboardHeading);
}
}
5. Write the Test Scripts
Create a Test files under src/test/java. Use these page classes in your test scripts to perform end-to-end scenarios. This will keep your tests clean and focused on logic rather than details about the UI elements.
A typical test class includes:
Setup Method:Initializes the Playwright browser and other prerequisites before each test.
Test Methods: Individual test cases, each representing a different scenario.
Teardown Method:Closes the browser and performs any cleanup after each test.
Creating BaseTests
This class contains the common variables and methods used throughout the project, like setup and teardown methods.
package org.example.utils;
package com.example.utils;
import com.microsoft.playwright.*;
import org.junit.jupiter.api.*;
// Subclasses will inherit PER_CLASS behavior.
@TestInstance(TestInstance.Lifecycle.PER_CLASS)
public class BaseTests {
// Shared between all tests in the class.
static Playwright playwright;
static Browser browser;
// New instance for each test method.
BrowserContext context;
protected Page page;
@BeforeAll
public static void launchBrowser() {
playwright = Playwright.create();
browser = playwright.chromium().launch(new BrowserType.LaunchOptions().setHeadless(false));
}
@AfterAll
public static void closeBrowser() {
playwright.close();
}
@BeforeEach
public void createContextAndPage() {
context = browser.newContext();
page = context.newPage();
page.navigate("https://opensource-demo.orangehrmlive.com/web/index.php/auth/login");
}
@AfterEach
public void closeContext() {
context.close();
}
}
Explanation
In JUnit you can initialize Playwright and Browser in @BeforeAll method and destroy them in @AfterAll. Use @TestInstance(TestInstance.Lifecycle.PER_CLASS) annotation to make JUnit create one instance of a class for all test methods within that class (by default each JUnit will create a new instance of the class for each test method). Store Playwright and Browser objects in instance fields. They will be shared between tests. Each instance of the class will use its own copy of Playwright.
1. Playwright playwright:
Initialized to manage the browser automation session, allowing interactions with different browsers.
2. Browser browser:
Declared to store the browser instance that will be shared across test methods within the class.
Playwright playwright;
Browser browser = null;
3. BrowserContext context:
Created anew for each test method to simulate independent browser sessions. This ensures that the browser state doesn’t carry over between tests.
4. Page page:
Represents a single tab or window in a browser used for performing actions and assertions.
BrowserContext context;
Page page;
5. @BeforeAll launchBrowser():
This method is annotated with @BeforeAll, indicating it runs once before any test methods in the current class. The browser is launched in non-headless mode (setHeadless(false)), meaning an actual browser window is opened.
This method runs before each test method in the class, as indicated by the @BeforeEach annotation. It creates a new BrowserContext and a Page, ensuring each test runs in a clean, isolated state. The method also navigates to a login page (“https://opensource-demo.orangehrmlive.com/web/index.php/auth/login”), setting up the initial state for each test.
Runs after each test method, annotated with @AfterMethod. Closes the BrowserContext, effectively closing the browser tab and cleaning up resources.
@AfterAll
public static void closeBrowser() {
playwright.close();
}
8. @AfterEach closeContext()
Runs once after all test methods in the current class have executed, as indicated by the @AfterEach annotation. Closes the Playwright instance, freeing up all resources used for automation.
@AfterEach
public void closeContext() {
context.close();
}
Creating a Login Page Test Class:
We will be automating the following test scenario using Playwright Java and run them in Chromium
Verify that the user is able to login to the application successfully.
Verify the invalid username generates error message “Invalid credentials” for multiple set of incorrect credentials.
package com.example.tests;
import com.example.pages.DashboardPage;
import com.example.pages.LoginPage;
import com.example.utils.BaseTests;
import org.junit.jupiter.api.Assertions;
import org.junit.jupiter.api.Test;
public class LoginTests extends BaseTests {
@ParameterizedTest
    @CsvSource({
            "admin123,admin123,Invalid credentials",
            "admin,admin12,Invalid credentials",
            "Admin,1234,Invalid credentials",
            "12345,%^$£56,Invalid credentials"
    })
    public void unsuccessfulLogin(String username, String password, String expectedErrorMessage) {

        LoginPage loginPage = new LoginPage(page);
        loginPage.login(username,password);
        String actualErrorMessage = loginPage.getErrorMessage();
        Assertions.assertEquals(expectedErrorMessage, actualErrorMessage, "");

   }
@Test
public void successfulLogin() {
LoginPage loginPage = new LoginPage(page);
loginPage.login("Admin","admin123");
DashboardPage dashboardPage = new DashboardPage(page);
String actualHeading = dashboardPage.getDashboardPageHeading();
Assertions.assertEquals("Dashboard",actualHeading, "Unable to login to the application");
}
}
Explanation
1. successfulLogin
This method enters correct credentials and login to the application.
2. unsuccessfulLogin
This method enter the invalid username and password and click on the Submit button. Then, it assert that the error message generated by the application is equal to “Invalid credentials”. Below code is used to parameterize the tests.
@CsvSource – This annotation specifies the input data for the parameterized test. Each line within the annotation is a pair of input strings followed by an expected result string, separated by commas.
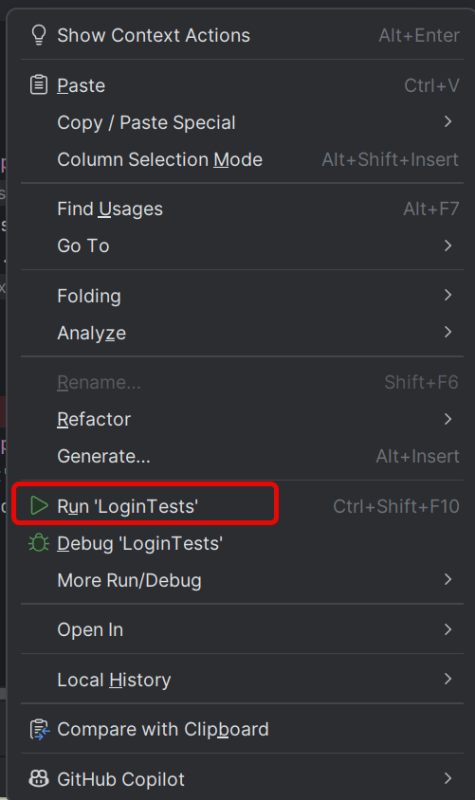
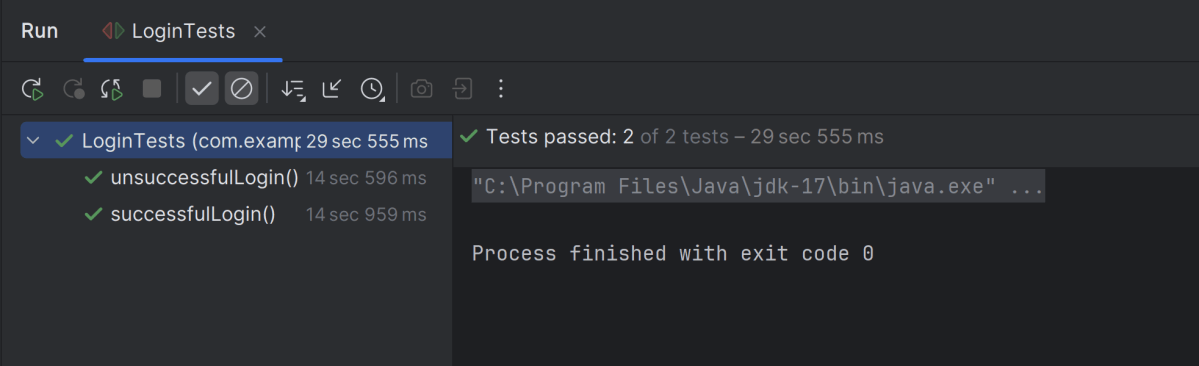
Go to the Test class and right-click and select Run ‘LoginTests’. The tests will run as JUnit5 tests (in IntelliJ).
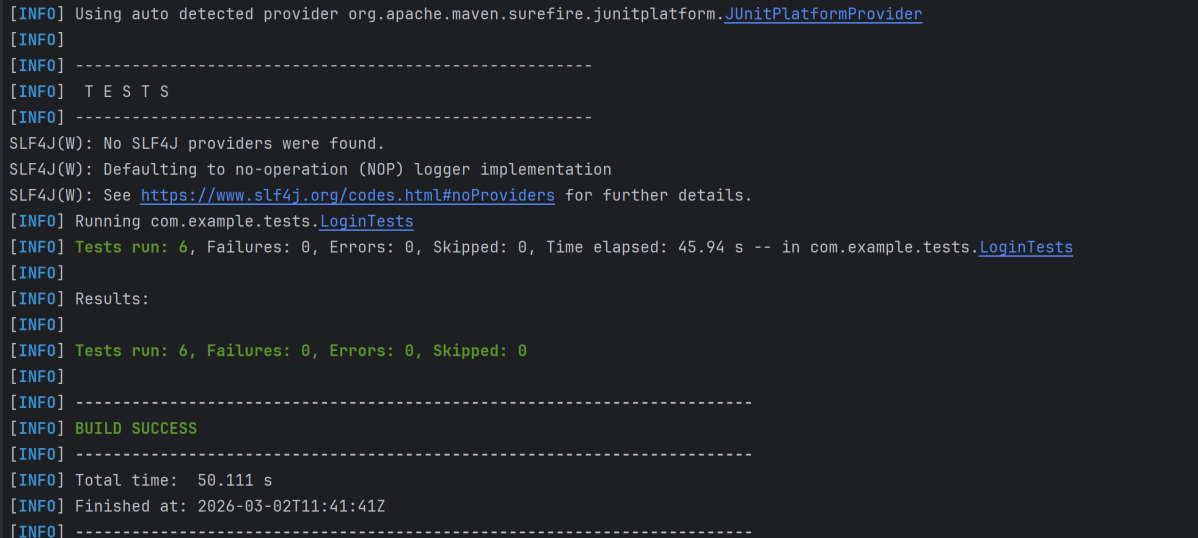
Below is the test execution result.
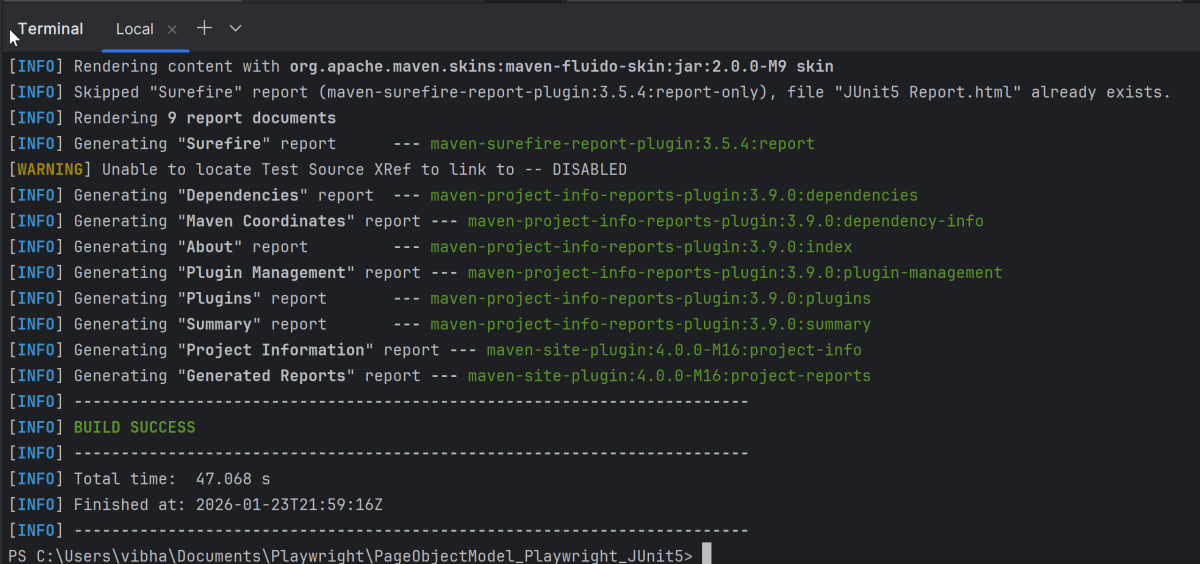
8. Run the tests using the command line
Use the below command to run the tests using the command line.
mvn clean test site
The output of the above program is
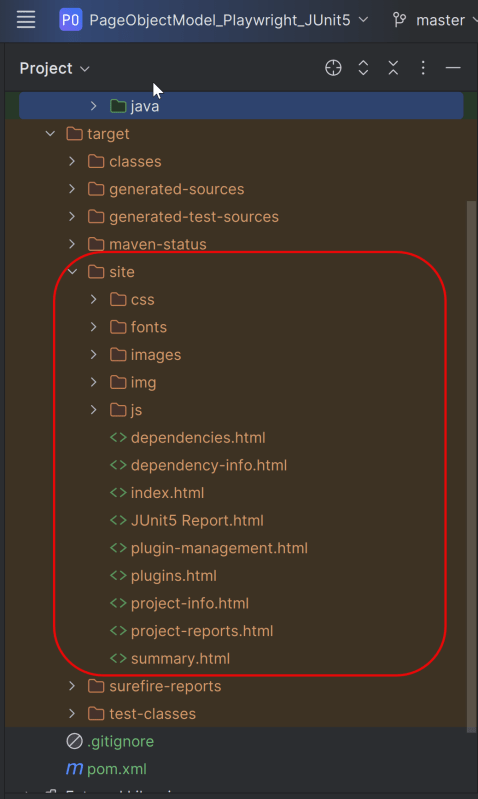
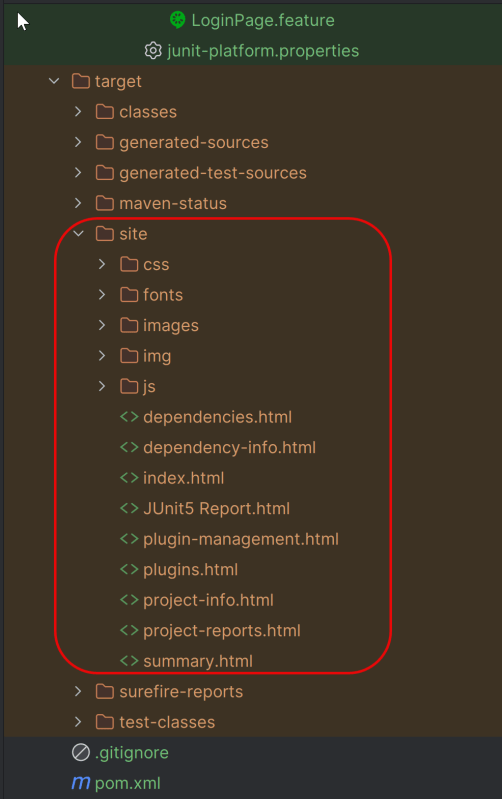
9. JUnit5 Report Generation
Maven Site Plugin creates a folder – site under the target directory.
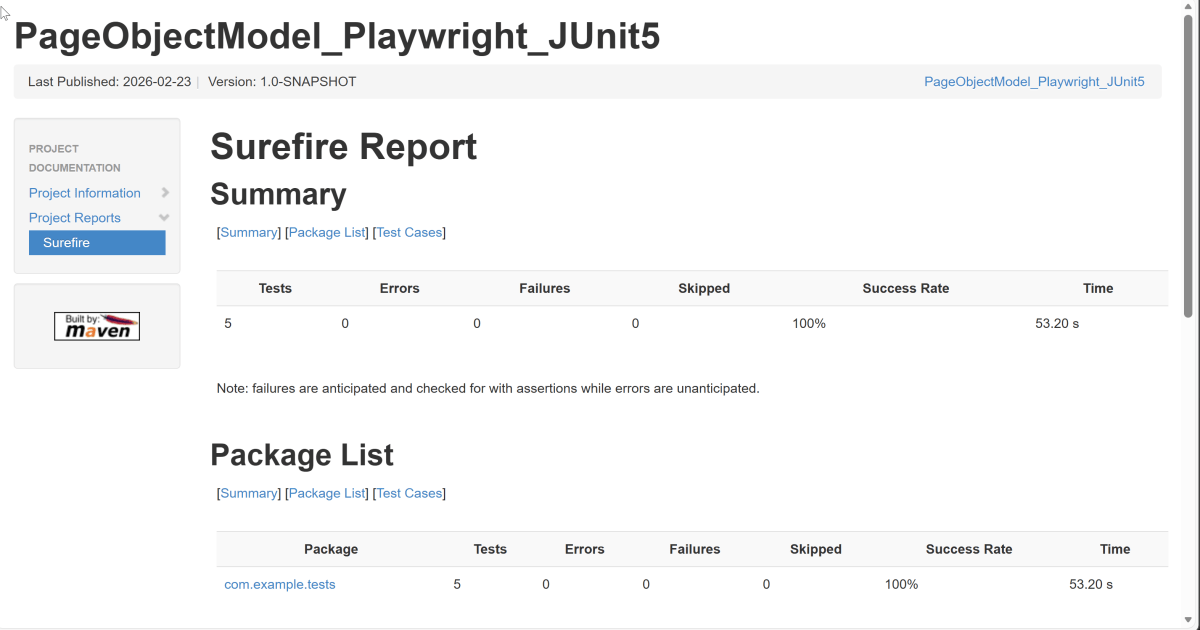
Right-click on the Junit5 Report.html and open it in the browser.
Summary:
1. Utilize the `@ParameterizedTest` annotation to indicate that a method is a parameterized test.
2. Use the `@ValueSource`, `@CsvSource`, `@CsvFileSource`, or custom `@MethodSource` annotations to provide different sets of input data for each test run.
3. @CsvSource: Allows us to provide comma-separated values directly in the annotation for more complex parameter sets.
In this tutorial, I will explain how to IntegrateAllure Report 3 with Playwright, Javaand JUnit5.
What is an Allure Report?
Allure Framework is a flexible, lightweight, multi-language test report tool. It shows a very concise representation of what has been tested in a neat web report form. It also allows everyone participating in the development process to extract maximum useful information from the everyday execution of tests.
package com.example.pages;
import com.microsoft.playwright.Locator;
import com.microsoft.playwright.Page;
import io.qameta.allure.Step;
public class LoginPage {
private final Page page;
// Locators
private final Locator usernameLocator;
private final Locator passwordLocator;
private final Locator submitLocator;
private final Locator invalidCredentialsLocator;
private final Locator missingUsernameErrorMessageLocator;
public LoginPage(Page page) {
this.page = page;
this.usernameLocator = page.locator("input[name='username']");
this.passwordLocator = page.locator("input[name='password']");
this.submitLocator = page.locator("button[type='submit']");
this.invalidCredentialsLocator = page.locator("//p[contains(@class, \"oxd-text oxd-text--p oxd-alert-content-text\")]");
this.missingUsernameErrorMessageLocator = page.locator("//span[contains(@class, 'oxd-text oxd-text--span oxd-input-field-error-message oxd-input-group__message')]");
}
@Step("Enter credentials")
public void login(String user, String pass){
usernameLocator.fill(user);
passwordLocator.fill(pass);
submitLocator.click();
}
@Step("Get Error Message for invalid credentials")
public String getErrorMessage () {
return invalidCredentialsLocator.textContent();
}
@Step("Get Error Message for missing username")
public String getMissingUsernameErrorMessage () {
return missingUsernameErrorMessageLocator.textContent();
}
}
DashboardPage
package com.example.pages;
import com.microsoft.playwright.Locator;
import com.microsoft.playwright.Page;
import io.qameta.allure.Step;
public class DashboardPage {
private Page page;
private final Locator headingLocator;
public DashboardPage(Page page){
this.page = page;
this.headingLocator = page.locator("//h6[contains(@class, \"oxd-topbar-header-breadcrumb-module\")]");
this.assignLeaveLocator = page.locator("//[contains(@text, \"Assign Leave\")]");
this.leaveListLocator = page.getByTitle("Leave List");
}
@Step("Get Heading of Dashboard page")
public String getDashboardPageHeading() {
return headingLocator.textContent();
}
}
4. Create the utility package in src/test/java
BaseClass
This class contains the common variables and methods used throughout the project, like setup and teardown methods.
package com.example.utils;
import com.microsoft.playwright.*;
import org.junit.jupiter.api.*;
// Subclasses will inherit PER_CLASS behavior.
@TestInstance(TestInstance.Lifecycle.PER_CLASS)
public class BaseTests {
// Shared between all tests in the class.
static Playwright playwright;
static Browser browser;
// New instance for each test method.
BrowserContext context;
protected Page page;
@BeforeAll
public static void launchBrowser() {
playwright = Playwright.create();
browser = playwright.chromium().launch(new BrowserType.LaunchOptions().setHeadless(false));
}
@AfterAll
public static void closeBrowser() {
playwright.close();
}
@BeforeEach
public void createContextAndPage() {
context = browser.newContext();
page = context.newPage();
page.navigate("https://opensource-demo.orangehrmlive.com/web/index.php/auth/login");
}
@AfterEach
public void closeContext() {
context.close();
}
}
5. Write the Test Scripts
Create a Test files under src/test/java. Use these page classes in your test scripts to perform end-to-end scenarios. This will keep your tests clean and focused on logic rather than details about the UI elements.
We will be automating the following test scenario using Playwright Java and run them in Chromium.
Verify the invalid username generates error message “Invalid credentials” with different set of invalid test data.
Verify that the user is able to login to the application successfully.
Creating a Login Page Test Class:
package com.example.tests;
import com.example.pages.DashboardPage;
import com.example.pages.LoginPage;
import com.example.utils.BaseTests;
import org.junit.jupiter.api.Assertions;
import org.junit.jupiter.api.Test;
import org.junit.jupiter.params.ParameterizedTest;
import org.junit.jupiter.params.provider.CsvFileSource;
import io.qameta.allure.Description;
import io.qameta.allure.Issue;
import io.qameta.allure.Link;
import io.qameta.allure.Owner;
import io.qameta.allure.Severity;
import io.qameta.allure.TmsLink;
import org.junit.jupiter.api.DisplayName;
import static io.qameta.allure.SeverityLevel.CRITICAL;
public class LoginTests extends BaseTests {
@ParameterizedTest
@CsvFileSource(files = "src/test/resources/testData/credentials.csv", numLinesToSkip = 1)
@DisplayName("Login Authentication")
@Description("This test attempts to log into the website using a incorrect username and a password. Fails if any error happens.")
@Severity(CRITICAL)
@Owner("Vibha Singh")
@Link(name = "Website", url = "https://opensource-demo.orangehrmlive.com/web/index.php/auth/login")
@Issue("AUTH-123")
@TmsLink("TMS-456")
public void unsuccessfulLogin(String username, String password, String expectedErrorMessage) {
LoginPage loginPage = new LoginPage(page);
loginPage.login(username,password);
String actualErrorMessage = loginPage.getErrorMessage();
Assertions.assertEquals(expectedErrorMessage, actualErrorMessage, "Incorrect error message is displayed");
}
@Test
@DisplayName("Successful Login Authentication")
@Description("This test attempts to log into the website using a correct username and a password. Fails if any error happens.")
@Severity(CRITICAL)
@Owner("Vibha Singh")
@Link(name = "Website", url = "https://opensource-demo.orangehrmlive.com/web/index.php/auth/login")
@Issue("AUTH-124")
@TmsLink("TMS-460")
public void successfulLogin() {
LoginPage loginPage = new LoginPage(page);
loginPage.login("Admin","admin123");
DashboardPage dashboardPage = new DashboardPage(page);
String actualHeading = dashboardPage.getDashboardPageHeading();
Assertions.assertEquals("Dashboard",actualHeading, "Unable to login to the application");
}
}
Use the @Description() annotation to set a description statically or use the description() method to set it dynamically in runtime.
@Description("This test attempts to log into the website using a invalid login and a password that result in error")
6. Specifying Allure Results location
Allure, by default, saves test results in the project’s root directory. However, it is recommended to store your test results in the build output directory.
To configure this, create an junit-platform.properties file and place it in the test resources directory of your project, which is typically located at src/test/resources:
This will create the allure-results folder with all the test reports within build folder. These files will be used to generate Allure Report.
8. How to Generate an Allure Report
allure generate processes the test results and saves an HTML report into the allure-report directory. To view the report, use the allure open command.
allure serve creates the same report as allure generate, then automatically opens the main page of the report in a web browser.
Use the command below to generate the Allure Report
allure serve build/allure-results
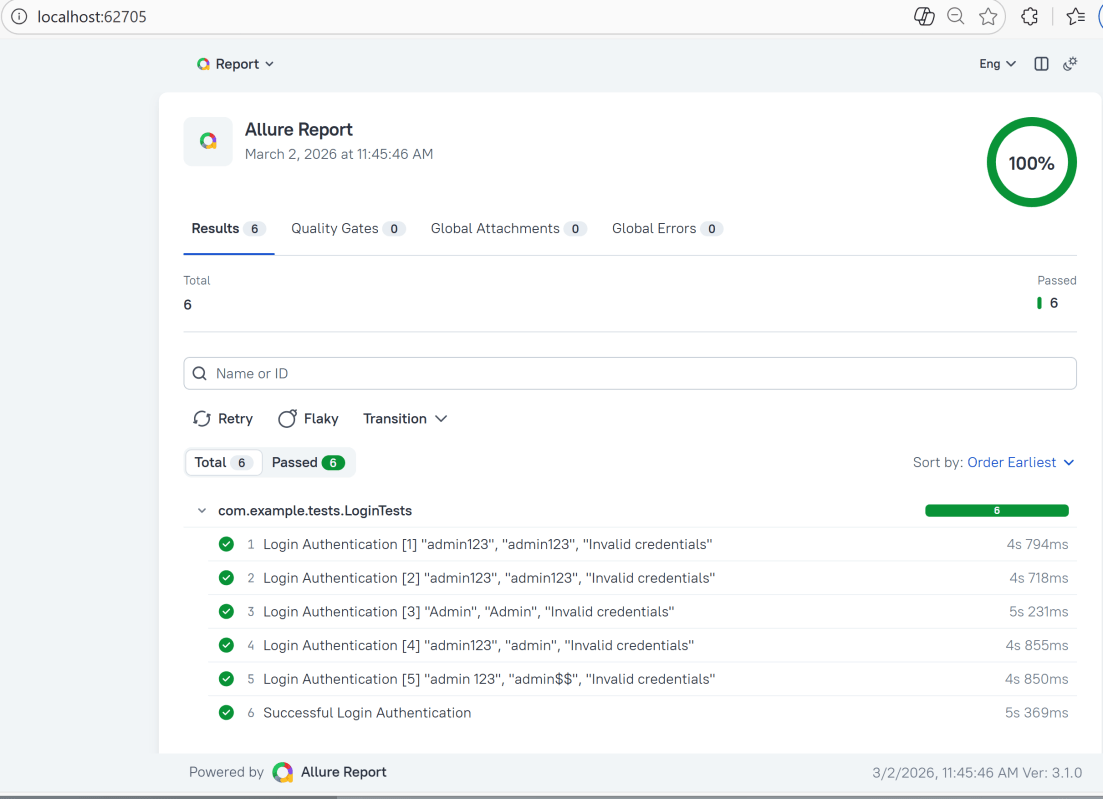
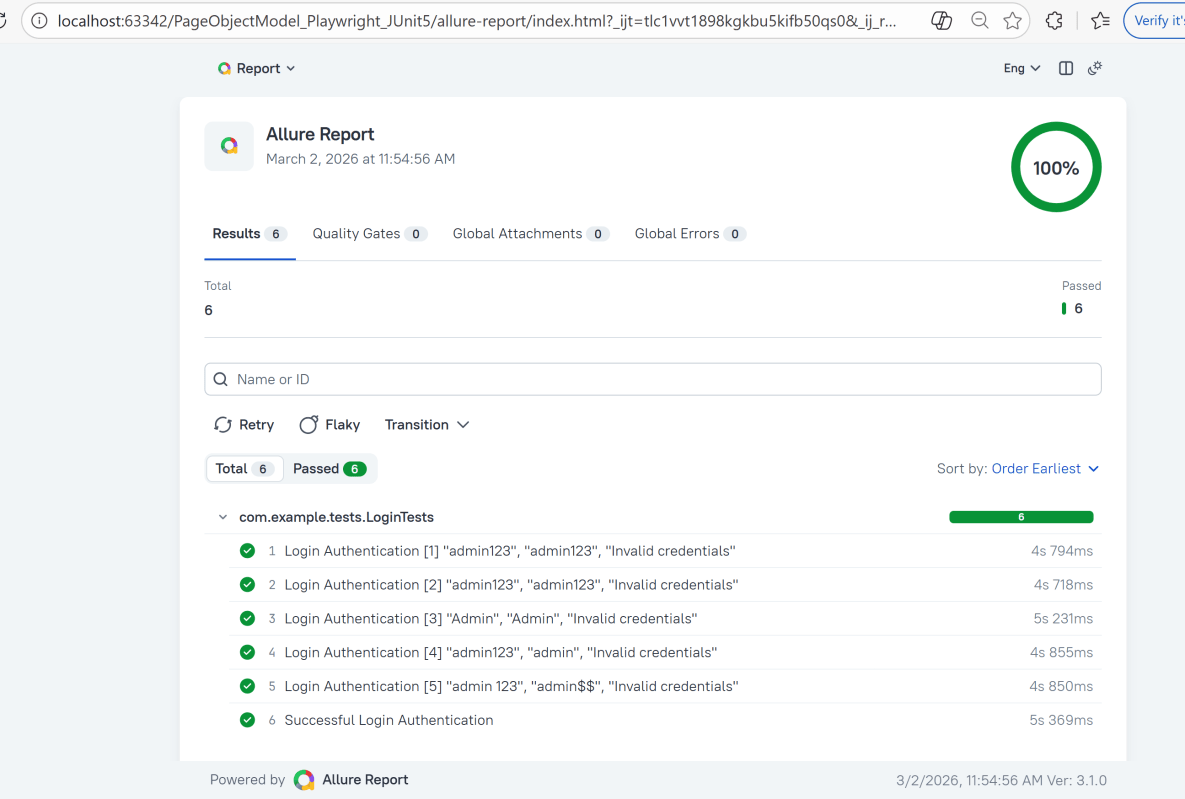
This will generate the beautiful Allure Test Report as shown below.
9. How to View a Report
Test reports generated with Allure Report are basically small HTML websites intended to be viewed in a web browser.
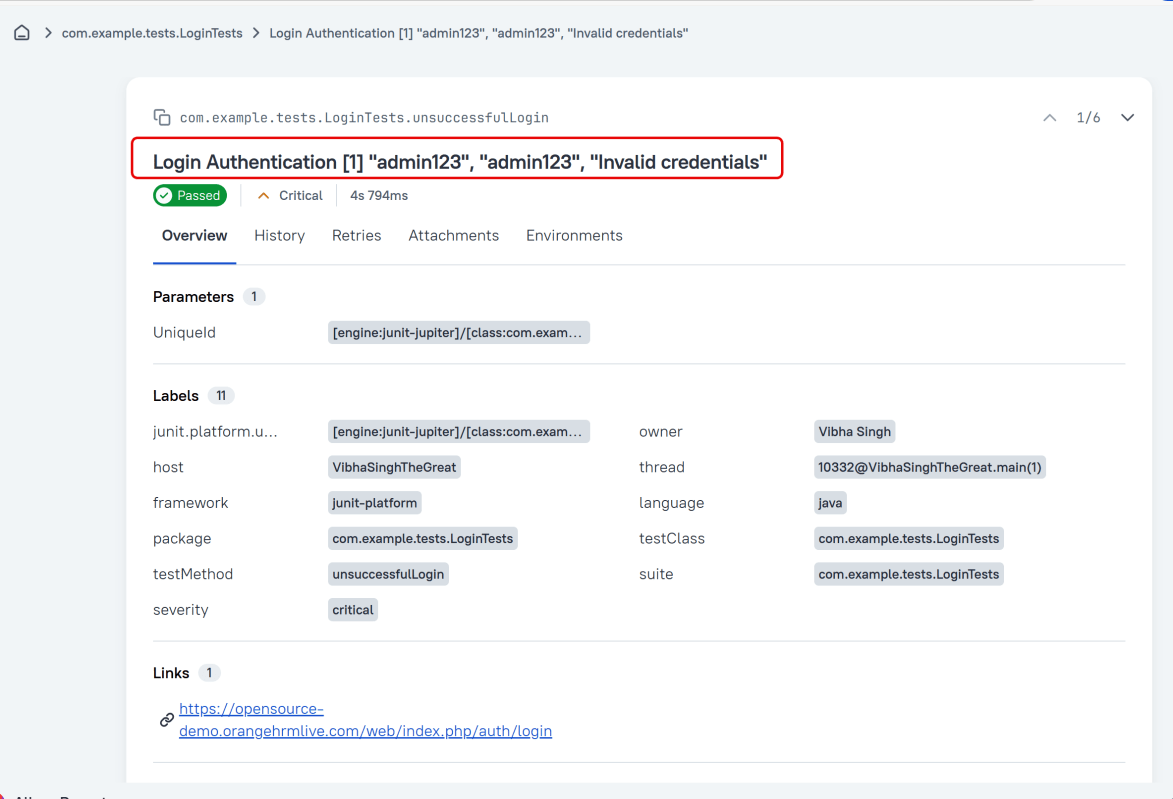
Title
A human-readable title of the test. If not provided, the function name is used instead.
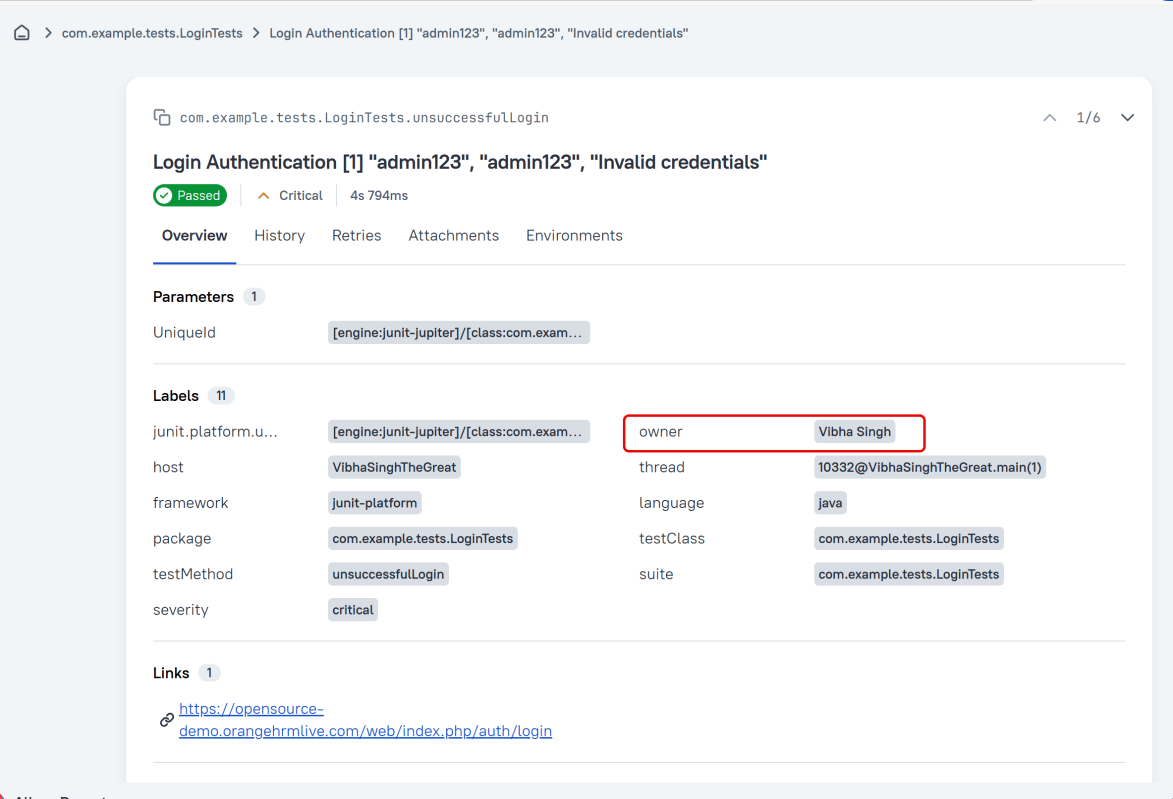
Owner
The team member who is responsible for the test’s stability. For example, this can be the test’s author, the leading developer of the feature being tested, etc.
Severity
A value indicating how important the test is. This may give the future reader an idea of how to prioritize the investigations of different test failures.
Allowed values are: “trivial”, “minor”, “normal”, “critical”, and “blocker”.
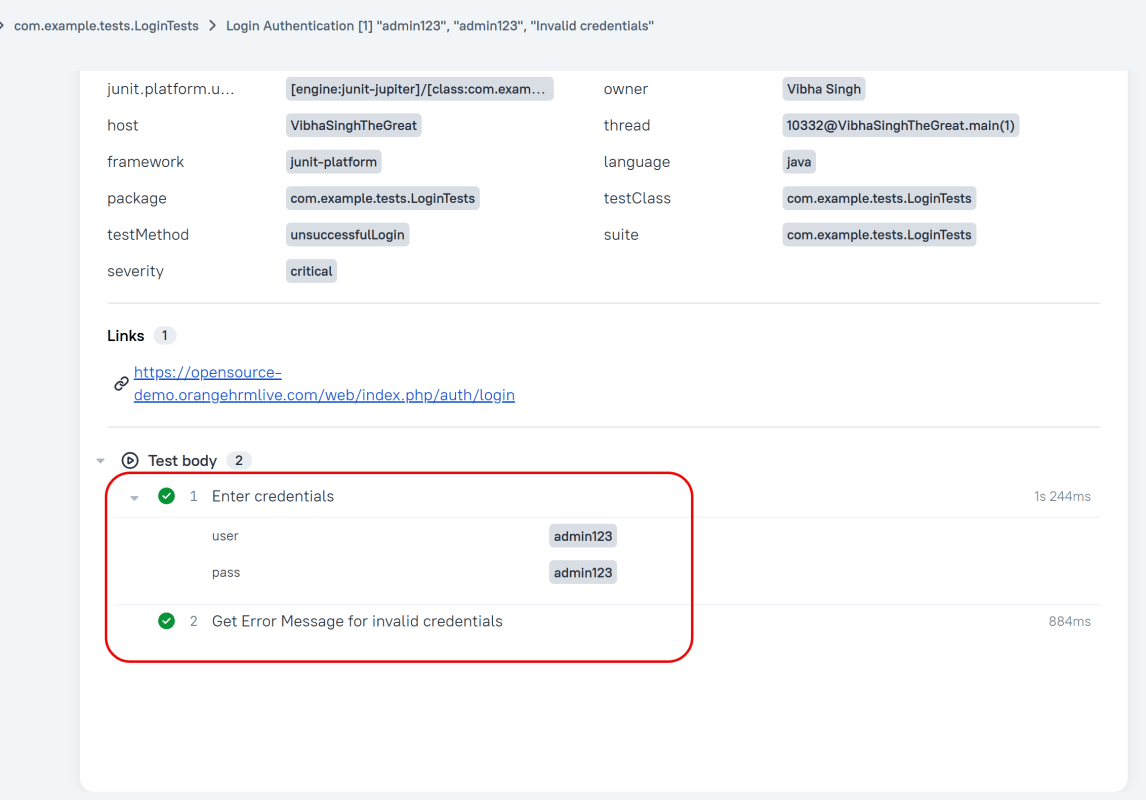
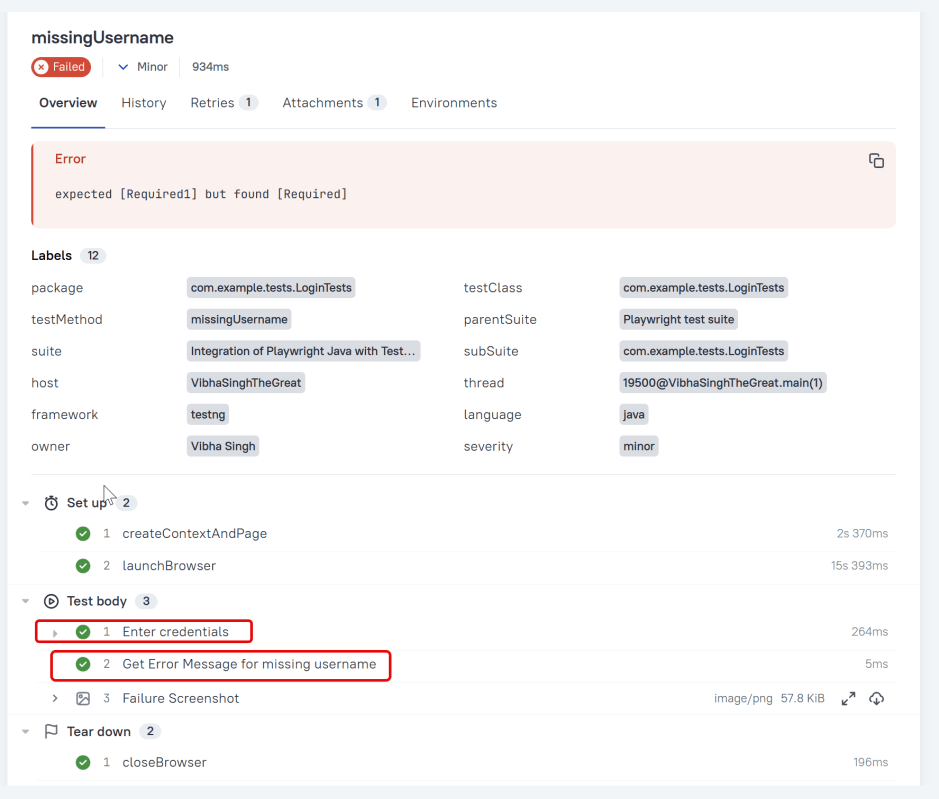
Steps
Allure JUnit 5 provides three ways of creating steps and sub-steps: “annotated steps”, “lambda steps” and “no-op steps”
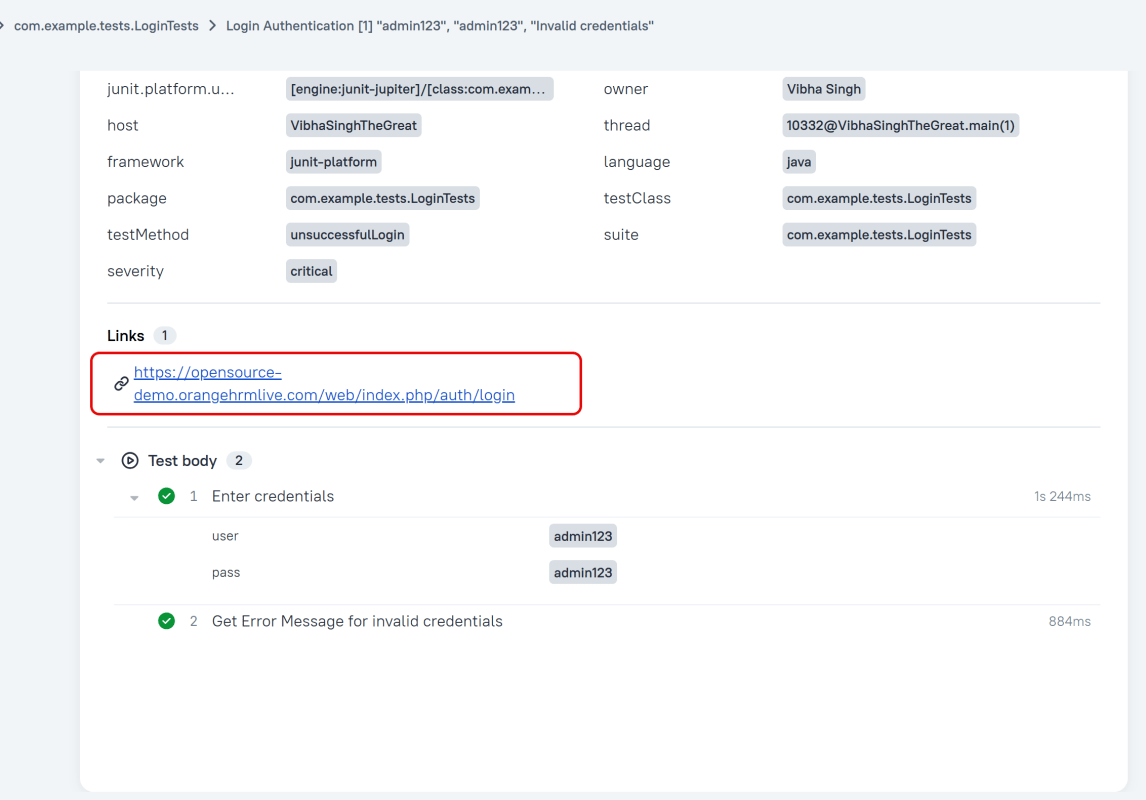
Links
We can provide list of links to webpages that may be useful for a reader investigating a test failure.
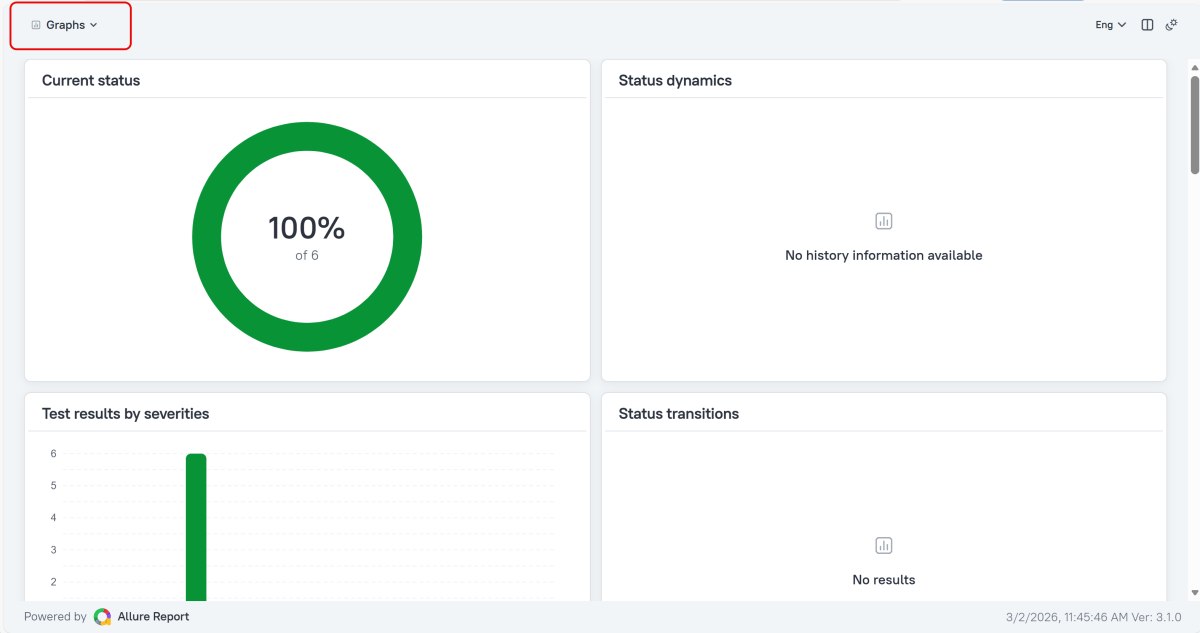
Graphs in Allure Report
Graphs allow you to see different statistics collected from the test data: status breakdown or severity and duration diagrams.
Timeline in Allure Report
The timeline tab visualizes retrospective test execution. Allure adaptors collect precise timings of tests. Here on this tab, they are arranged according to their sequential or parallel timing structure.
Generate Reports with the Allure Awesome Plugin
Allure 3 Report also features an advanced report generator plugin – Allure Awesome. It supports additional configuration options, such as generating the report as a single HTML file, setting the theme, custom branding and language of the generated report, and taking known issues into account.
To manually generate a customized Allure Awesome report, use the awesome command:
allure awesome build/allure-results
This will create the allure-report folder with all the test files and index.html report.
Open “index.html“, as this is an HTML report, and open it with the browser. The below image shows index.html.
Right click on index.html->Open In ->Browser ->Edge( any browser).
Summary:
Add required dependencies – Include Playwright, JUnit 5, and Allure JUnit5 in pom.xml, and configure the Allure Maven plugin.
Write Test Case – Implement test cases using JUnit 5 syntax, leveraging Playwright for browser-based actions. Use annotations like @Test, @BeforeEach and @AfterEach to structure your tests.
Enable JUnit 5 extension auto-detection – Create src/test/resources/junit-platform.properties and turn on extension autodetection.
Annotate tests & capture artifacts – Use Allure annotations (@Epic, @Feature, @Story, @Severity, @Description), log steps with Allure.step, and attach screenshots or other files.
Execute Tests and Generate Reports – Execute mvn clean test, then run allure serve allure-results to build and open the HTML report.
Congratulations!! We have integrated an allure report with Playwright, Java, and JUnit5. I hope this tutorial is useful to you.
In this tutorial, I will explain how to IntegrateAllure Report 3 with Playwright, Javaand TestNG.
What is an Allure Report?
Allure Framework is a flexible, lightweight, multi-language test report tool. It shows a very concise representation of what has been tested in a neat web report form. It also allows everyone participating in the development process to extract maximum useful information from the everyday execution of tests.
AllureAttachment class is created to attach binary data (the screenshot) to the currently running test in the Allure lifecycle. This gives a central attachment library for the framework.
package com.example.utils;
import io.qameta.allure.Attachment;
public abstract class AllureAttachments {
@Attachment(value = "Failure Screenshot", type = "image/png")
public static byte[] attachScreenshot(byte[] screenshot) {
return screenshot;
}
}
BaseClass
This class contains the common variables and methods used throughout the project, like setup and teardown methods.
package com.example.utils;
import com.microsoft.playwright.*;
import org.testng.annotations.*;
public class BaseClass {
// Shared between all tests in this class.
Playwright playwright;
Browser browser = null;
// New instance for each test method.
BrowserContext context;
public Page page;
public Page getPage() {
return page;
}
@BeforeClass
public void launchBrowser() {
playwright = Playwright.create();
browser = playwright.chromium().launch(new BrowserType.LaunchOptions().setHeadless(false));
}
@BeforeMethod
public void createContextAndPage() {
context = browser.newContext();
page = context.newPage();
page.navigate("https://opensource-demo.orangehrmlive.com/web/index.php/auth/login");
}
@AfterMethod
public void closeContext() {
context.close();
}
@AfterClass
public void closeBrowser() {
playwright.close();
}
}
TestListener
This class is a TestNG failure hook. Its job is to automatically capture a Playwright screenshot when a test fails. The screenshot is then attached to the Allure report.
By implementing ITestListener, we are plugging into the TestNG test lifecycle. That means this class gets called automatically whenever a test fails.
package com.example.utils;

import com.microsoft.playwright.Page;
import org.testng.ITestListener;
import org.testng.ITestResult;

public class TestListener implements ITestListener {

     @Override
    public void onTestFailure(ITestResult result) {
        System.out.println("❌ onTestFailure triggered");
        Page page = BaseClass.getPage();
        if (page != null) {
            byte[] screenshot = page.screenshot();
            AllureAttachments.attachScreenshot(screenshot);
        }
    }
}
5. Write the Test Scripts
Create a Test files under src/test/java. Use these page classes in your test scripts to perform end-to-end scenarios. This will keep your tests clean and focused on logic rather than details about the UI elements.
We will be automating the following test scenario using Playwright Java and run them in Chromium.
Verify the invalid username generates error message “Invalid credentials”
Verify that the user is able to login to the application successfully.
Verify the missing username generates error message “Required1”. This test will fail
Creating a Login Page Test Class:
package com.example.tests;

import com.example.pages.DashboardPage;
import com.example.pages.LoginPage;
import com.example.utils.BaseClass;
import com.example.utils.TestListener;
import io.qameta.allure.Description;
import io.qameta.allure.Owner;
import io.qameta.allure.Severity;
import org.testng.Assert;
import org.testng.annotations.Listeners;
import org.testng.annotations.Test;
import static io.qameta.allure.SeverityLevel.*;

public class LoginTests extends BaseClass {

    @Test
    @Description("This test attempts to log into the website using a invalid login and a password that result in error")
    @Severity(NORMAL)
    @Owner("Vibha Singh")
    public void unsuccessfulLogin() {
        LoginPage loginPage = new LoginPage(page);
        loginPage.login("abc","abc");
        String actualErrorMessage = loginPage.getErrorMessage();
        Assert.assertEquals(actualErrorMessage, "Invalid credentials");
   }

    @Test
    @Description("This test attempts to log into the website using a valid login and a password")
    @Severity(CRITICAL)
    @Owner("Vibha Singh")
    public void successfulLogin() {
        LoginPage loginPage = new LoginPage(page);
        loginPage.login("Admin","admin123");
        DashboardPage dashboardPage = new DashboardPage(page);
        String actualHeading = dashboardPage.getDashboardPageHeading();
        Assert.assertEquals(actualHeading, "Dashboard");
    }

    @Test
    @Description("This test attempts to log into the website using a blank login and a password that result in error")
    @Severity(MINOR)
    @Owner("Vibha Singh")
    public void missingUsername() {
        LoginPage loginPage = new LoginPage(page);
        loginPage.login("","admin123");
        String actualErrorMessage = loginPage.getMissingUsernameErrorMessage();
        Assert.assertEquals(actualErrorMessage, "Required1");
    }

}
Use the @Description() annotation to set a description statically or use the description() method to set it dynamically in runtime.
@Description("This test attempts to log into the website using a invalid login and a password that result in error")
6. Create testng.xml for the project
Mention the listener in the testng.xml. This is used for all the test classes.
<?xml version="1.0" encoding="UTF-8"?>
<!DOCTYPE suite SYSTEM "http://testng.org/testng-1.0.dtd">
<suite name="Playwright test suite">

    <listeners>
        <listener class-name="com.example.utils.TestListener"/>
    </listeners>

    <test name="Integration of Playwright Java with TestNG">
    <classes>
        <class name="com.example.tests.LoginTests">

        </class>
    </classes>
    </test>
</suite>
7. Specifying Allure Results location
Allure, by default, saves test results in the project’s root directory. However, it is recommended to store your test results in the build output directory.
To configure this, create an allure.properties file and place it in the test resources directory of your project, which is typically located at src/test/resources:
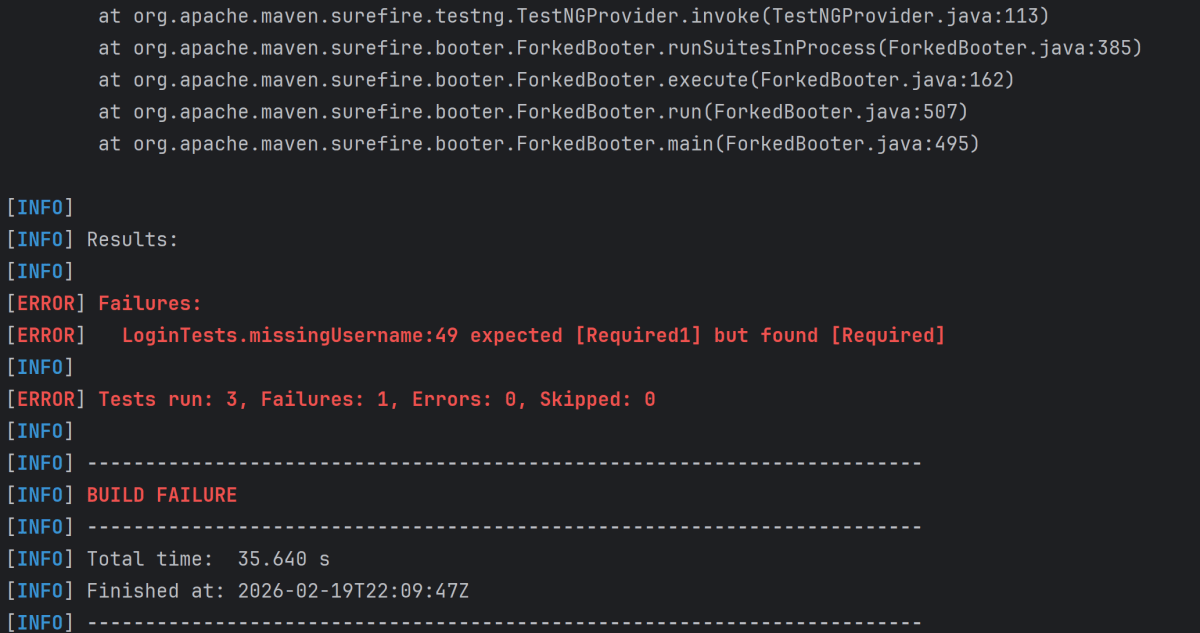
In the image below, we can see that one test failed and four passed out of three tests.
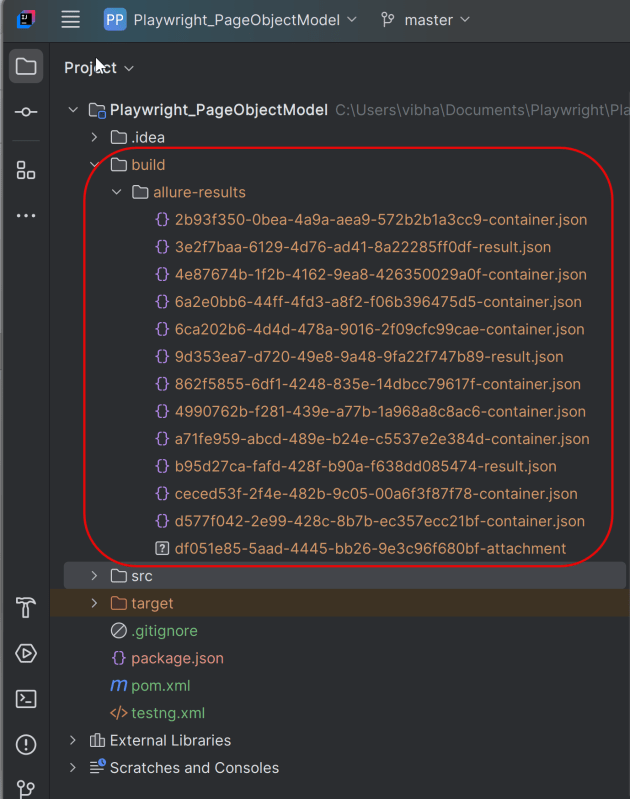
This will create the allure-results folder with all the test reports within build folder. These files will be used to generate Allure Report.
9. How to Generate an Allure Report
allure generate processes the test results and saves an HTML report into the allure-report directory. To view the report, use the allure open command.
allure serve creates the same report as allure generate, then automatically opens the main page of the report in a web browser.
Use the command below to generate the Allure Report
allure serve build/allure-results
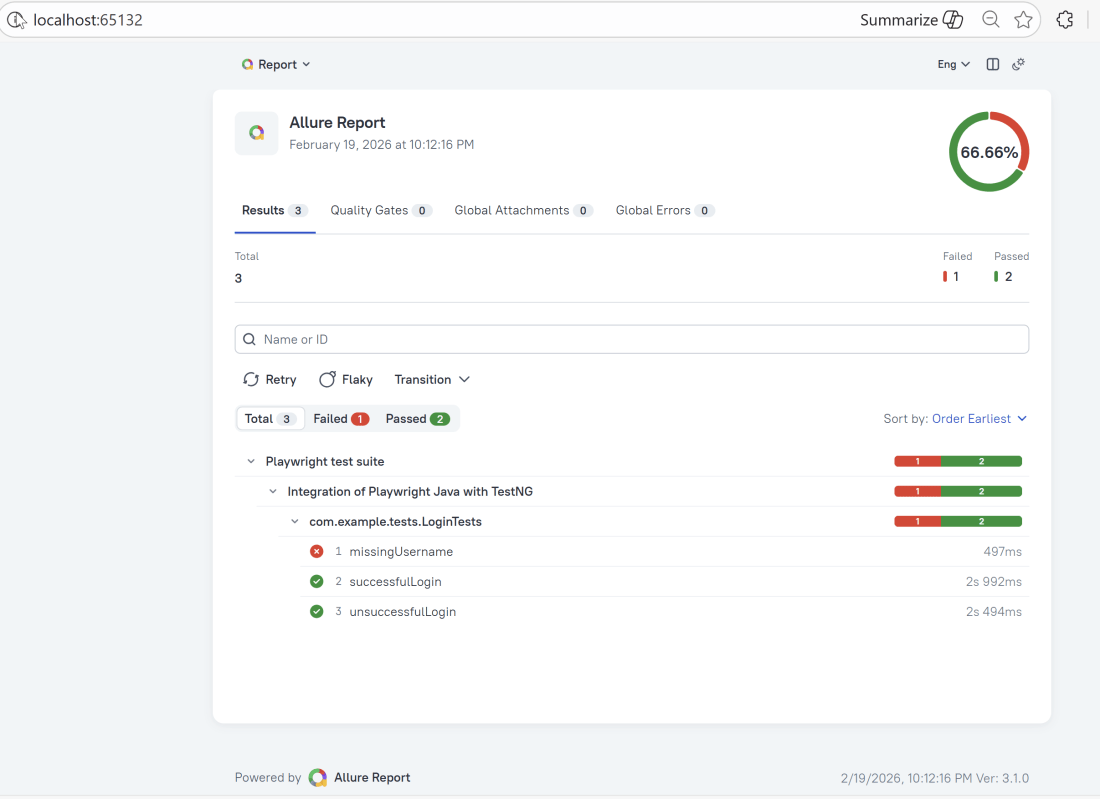
This will generate the beautiful Allure Test Report as shown below.
10. How to View a Report
Test reports generated with Allure Report are basically small HTML websites intended to be viewed in a web browser.
Title
A human-readable title of the test. If not provided, the function name is used instead.
Owner
The team member who is responsible for the test’s stability. For example, this can be the test’s author, the leading developer of the feature being tested, etc.
Severity
A value indicating how important the test is. This may give the future reader an idea of how to prioritize the investigations of different test failures.
Allowed values are: “trivial”, “minor”, “normal”, “critical”, and “blocker”.
Steps
Allure TestNG provides three ways of creating steps and sub-steps: “annotated steps”, “lambda steps” and “no-op steps”. Define a test step with the given name.
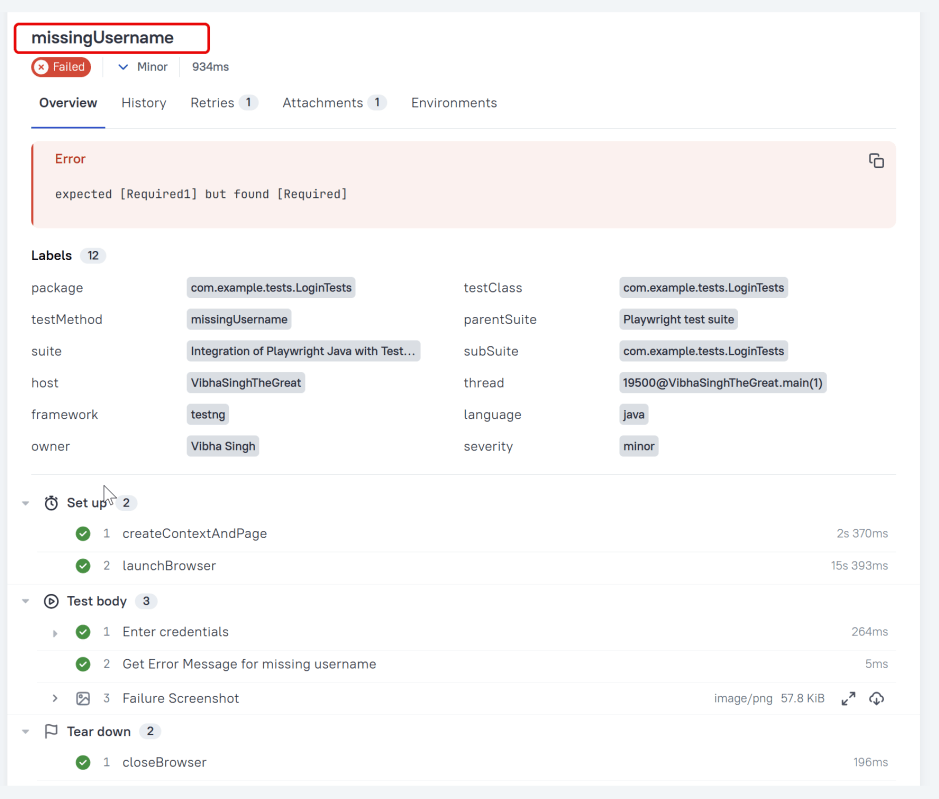
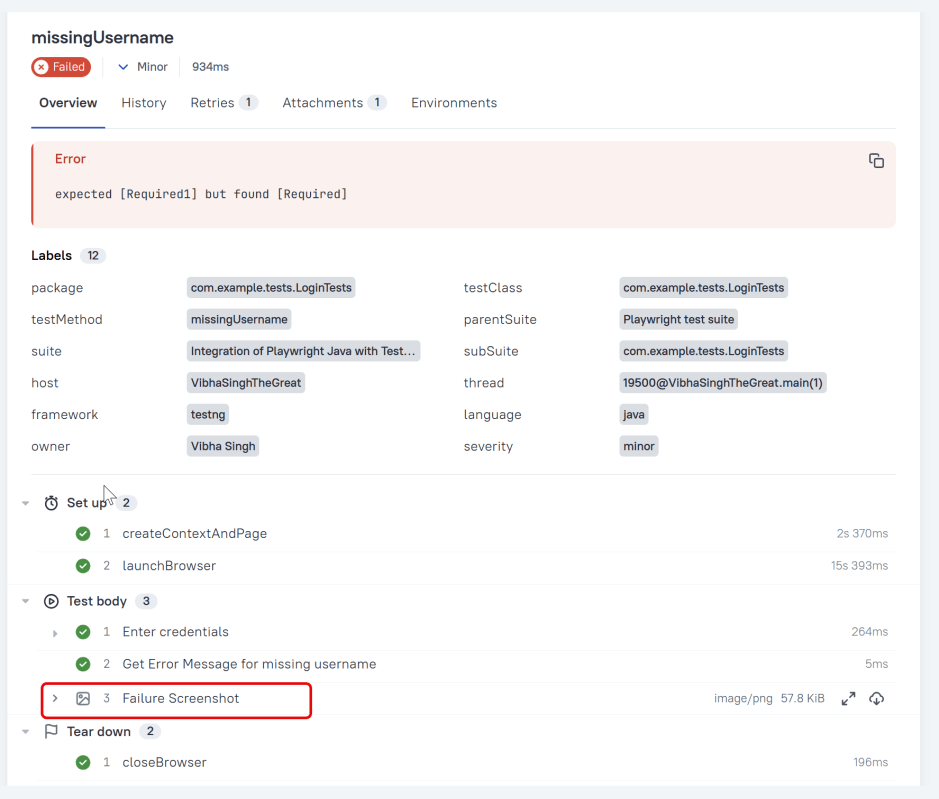
Attachment
We can attach any sorts of files to your Allure report. Allure TestNG provides various ways to create an attachment, both from existing files or generated dynamically. To create an attachment using the Annotations API, define a method that returns some data and annotate it with @Attachment. Call the method at any point during your test.
Click on the highlighted portion and we can see the screenshot of the failed test.
Graphs in Allure Report
Graphs allow you to see different statistics collected from the test data: status breakdown or severity and duration diagrams.
Timeline in Allure Report
The timeline tab visualizes retrospective test execution. Allure adaptors collect precise timings of tests. Here on this tab, they are arranged according to their sequential or parallel timing structure.
Generate Reports with the Allure Awesome Plugin
Allure 3 Report also features an advanced report generator plugin – Allure Awesome. It supports additional configuration options, such as generating the report as a single HTML file, setting the theme, custom branding and language of the generated report, and taking known issues into account.
To manually generate a customized Allure Awesome report, use the awesome command:
allure awesome build/allure-results
Congratulations!! We have integrated an allure report with Cucumber, Selenium, and TestNG. I hope this tutorial is useful to you.
Playwright is integrated with Java, Cucumber, and Junit5. This integration creates a robust and scalable test automation framework for modern web applications. It is a BDD-driven framework.
Page Object Model (POM) is a design pattern used in test automation. It enhances test maintenance and reduces code duplication. In this pattern, web pages are represented as classes. The various elements on the page are defined as variables in the class. All possible user interactions can then be implemented as methods in the class.
What is Cucumber?
Cucumber is Behavior Driven Development (BDD). It is a methodology that integrates non-technical stakeholders, testers, and developers into the same conversation. This is achieved by using clearly defined specifications.
In behavior-driven development with Cucumber, test cases are written in Gherkin syntax. They use a Given-When-Then structure. This structure closely mirrors user stories and business rules.
Benefits of Using Cucumber with Playwright
1. Readable, business-friendly tests: Cucumber’s Gherkin syntax (Given–When–Then) makes test scenarios easy to understand for non-technical stakeholders, bridging the gap between QA, developers, and business teams.
2. Better Test Maintainability: With standardized step definitions and modularized test architecture, scaling up your test suite is effortless. Altering the suite won’t harm the entire framework.
3. Clear reporting and traceability: Cucumber’s reports map test results directly to feature files. They map directly to scenarios. This makes it easier to track coverage and failures against requirements.
4. Cross-browser and cross-platform coverage: When combined with Playwright, Cucumber scenarios can be executed across Chromium, Firefox, and WebKit without changing feature files
5. Scales well in CI/CD pipelines: The combination supports parallel execution. It offers tagging and selective test runs. This makes it suitable for continuous testing in CI environments.
What is JUnit5?
JUnit5 is a test execution engine. It discovers and runs Cucumber tests. It enhances integration testing with advanced annotations, nested tests, and parameterized testing. It simplifies test execution in Maven, Gradle, and Spring Boot with better assertions, Java dependency injection, and parallel execution.
System requirements
The following prerequisites are required to be installed on the machine to begin with a smooth setup and installation.
Java 11 or higher
IntelliJ IDE or any other IDE to create a project
Maven
Browsers on which tests need to be run, like Chrome, Firefox, etc.
Cucumber is installed
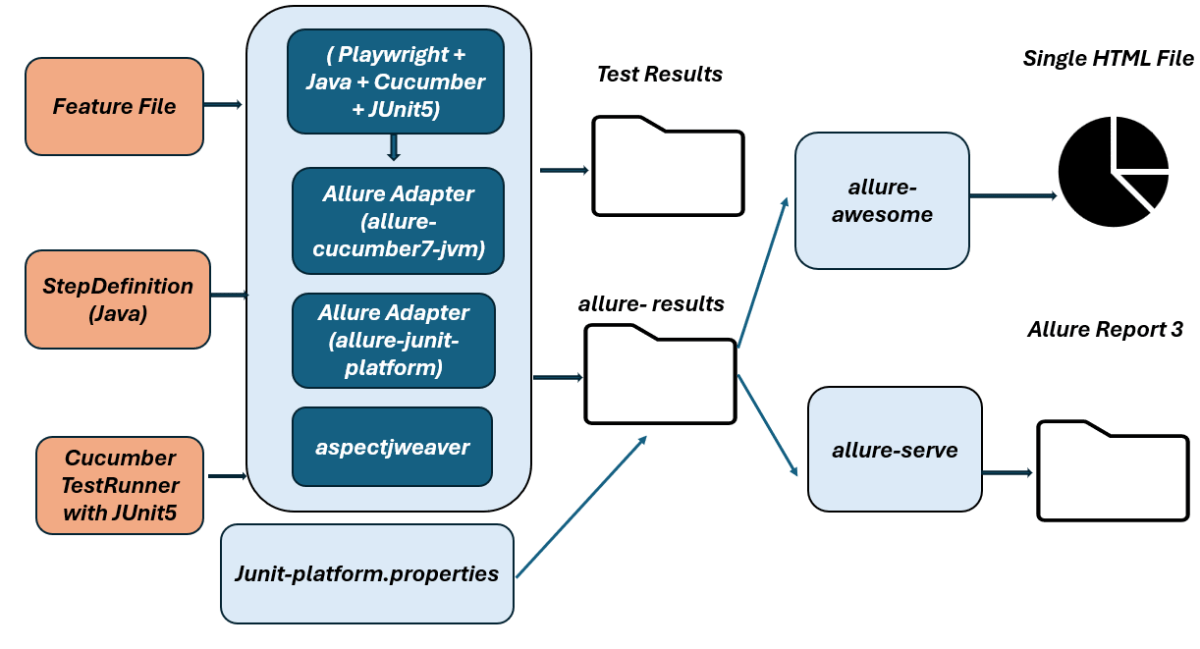
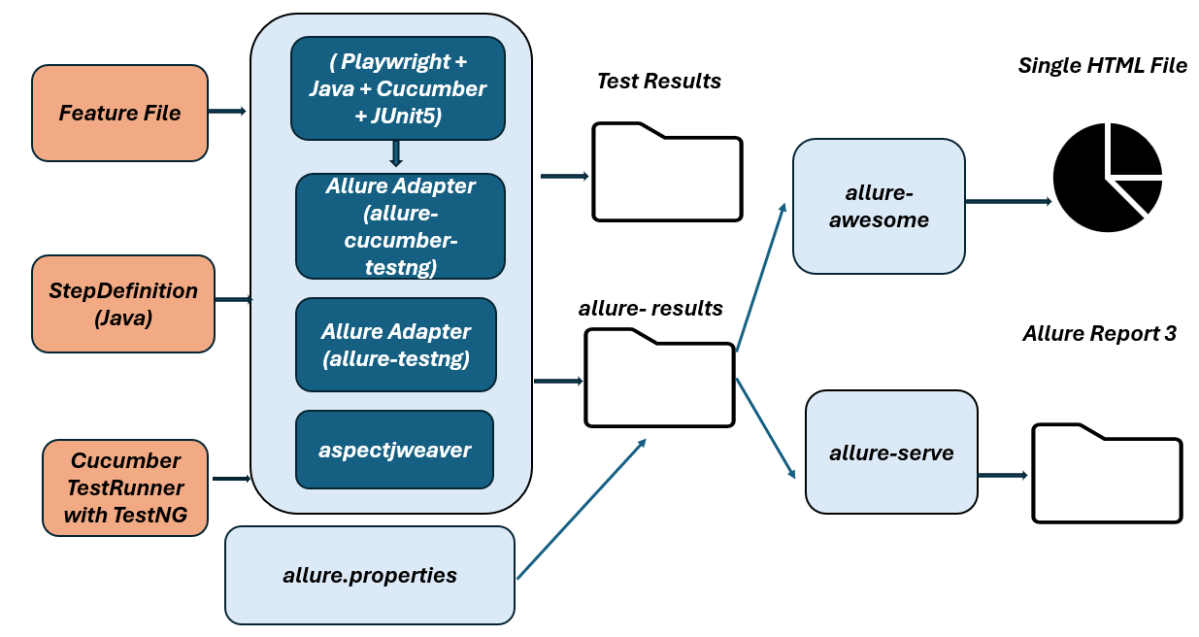
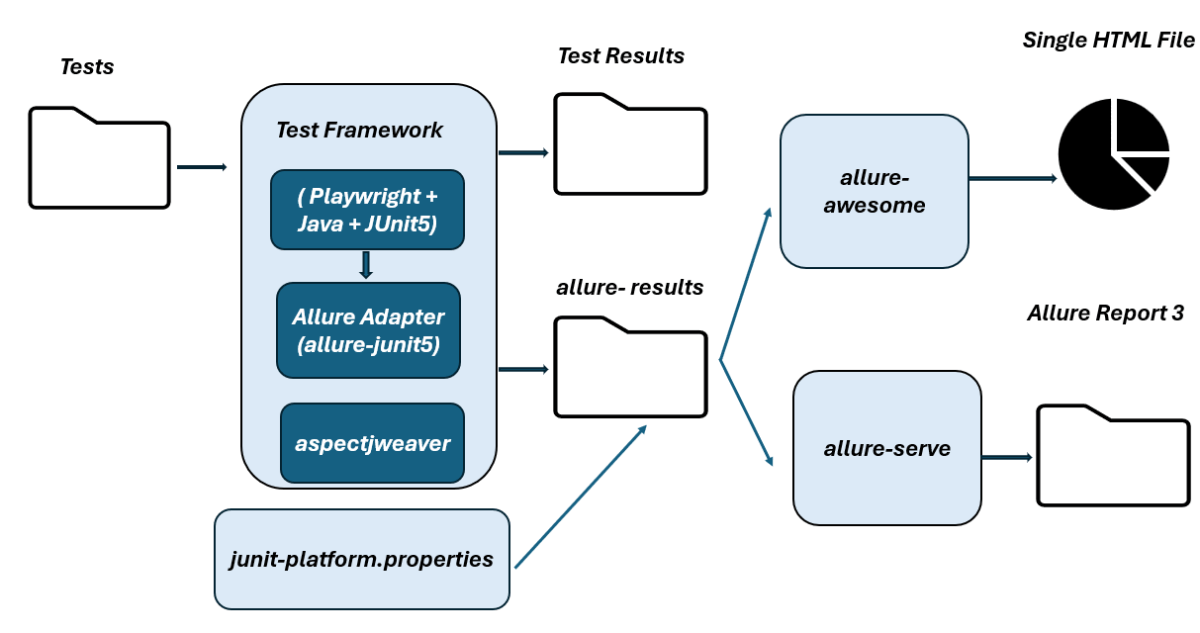
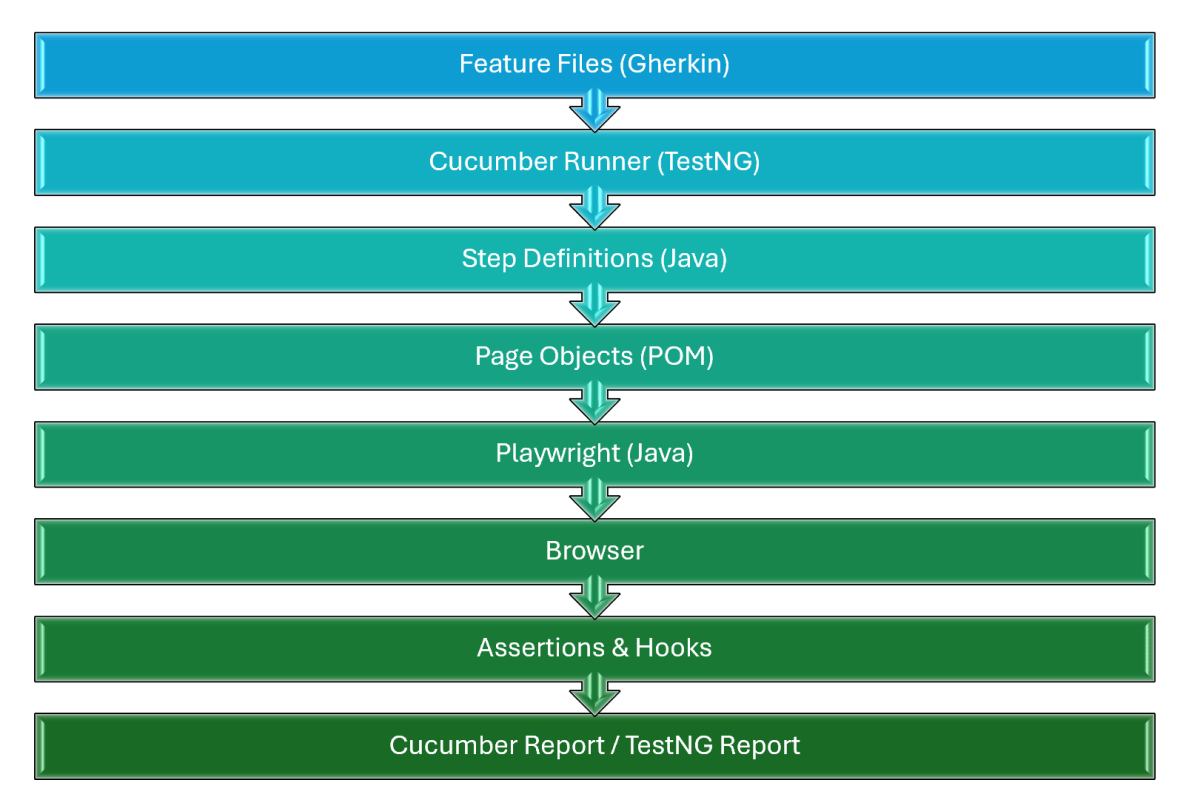
High-Level Architecture
Setting Up Cucumber BDD Framework with Playwright and JUnit5
1. Create a new Maven Project
The first step in setup is to create a new Maven project. I will be using IntelliJ in this tutorial. The following steps need to be followed to create a new Maven project :
Open IntelliJ, Navigate to File >> New >> Project
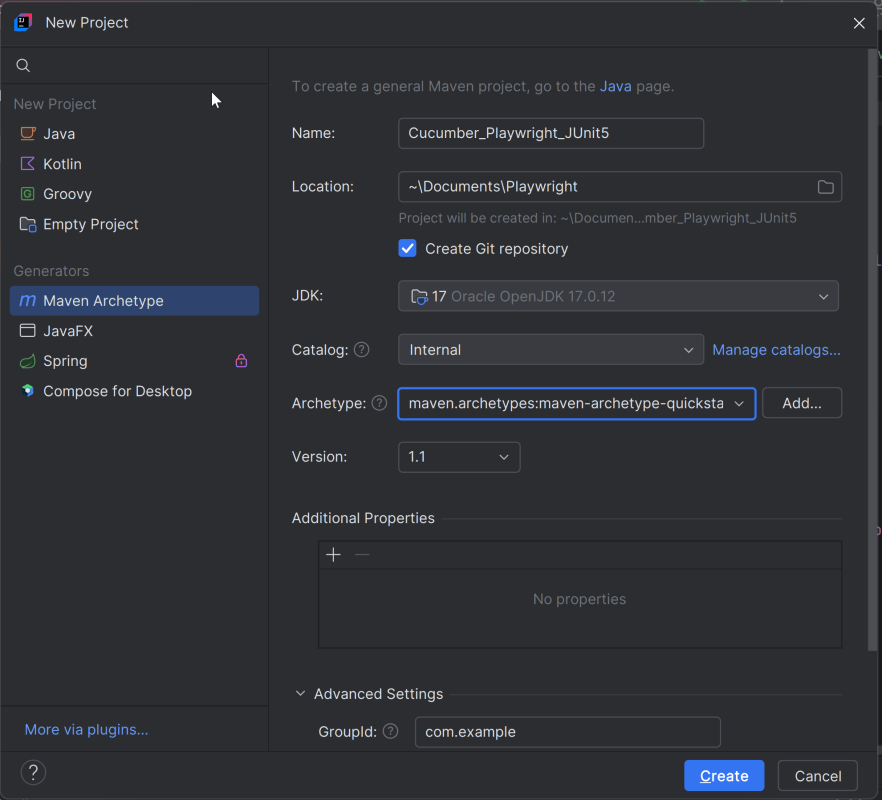
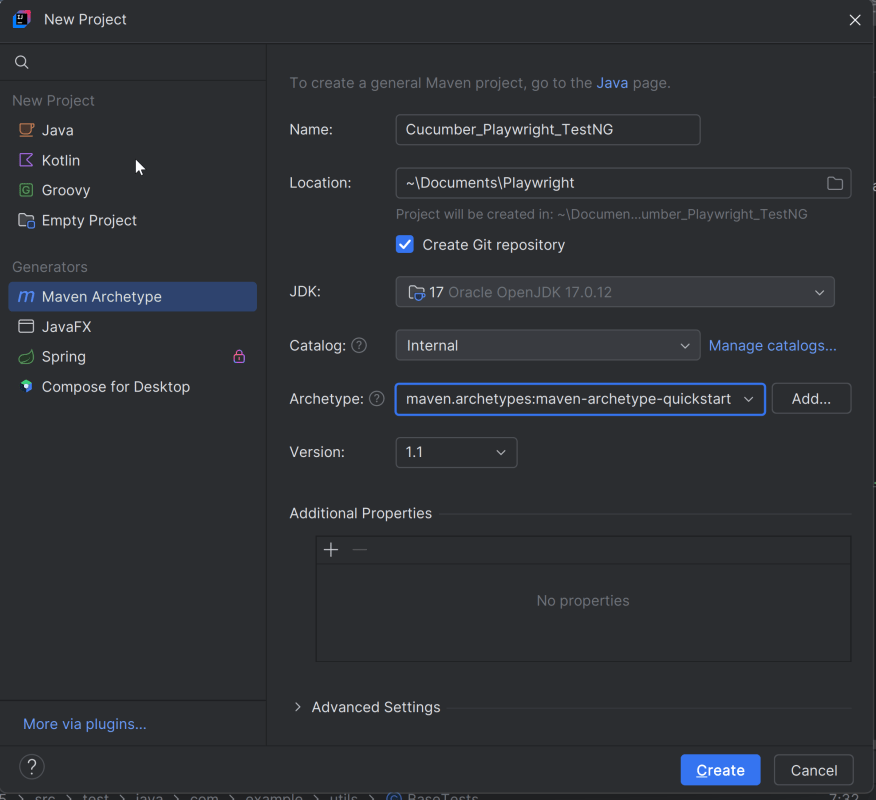
2. In the New Project window, enter the following details:
Name of the Project – Cucumber_Playwright_JUnit5
Location/path where the project needs to be saved – Documents/Playwright (my location)
Select JDK version — I am using JDK 17
Archetype — Search for “quickstart” and select maven-archetype-quickstartfrom the results
Click on the Create button to create the project.
This will create a a new project in IntelliJ.
2. Set Up the Environment
2.1 Add the Cucumber, Playwright Java, and JUnit5 dependencies
Add the Cucumber, Playwright Java, and JUnit5 dependencies to the pom.xml. The latest dependency can be found here.
The compiler plugin is used to compile the source code of a Maven project. This plugin has two goals, which are already bound to specific phases of the default lifecycle:
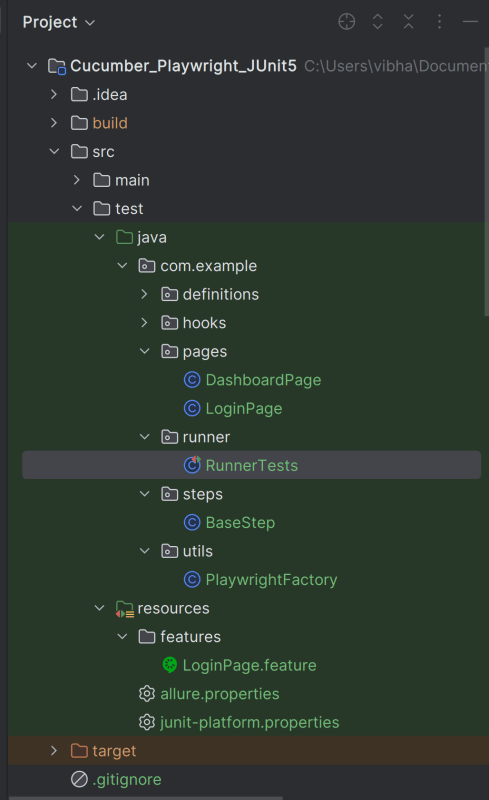
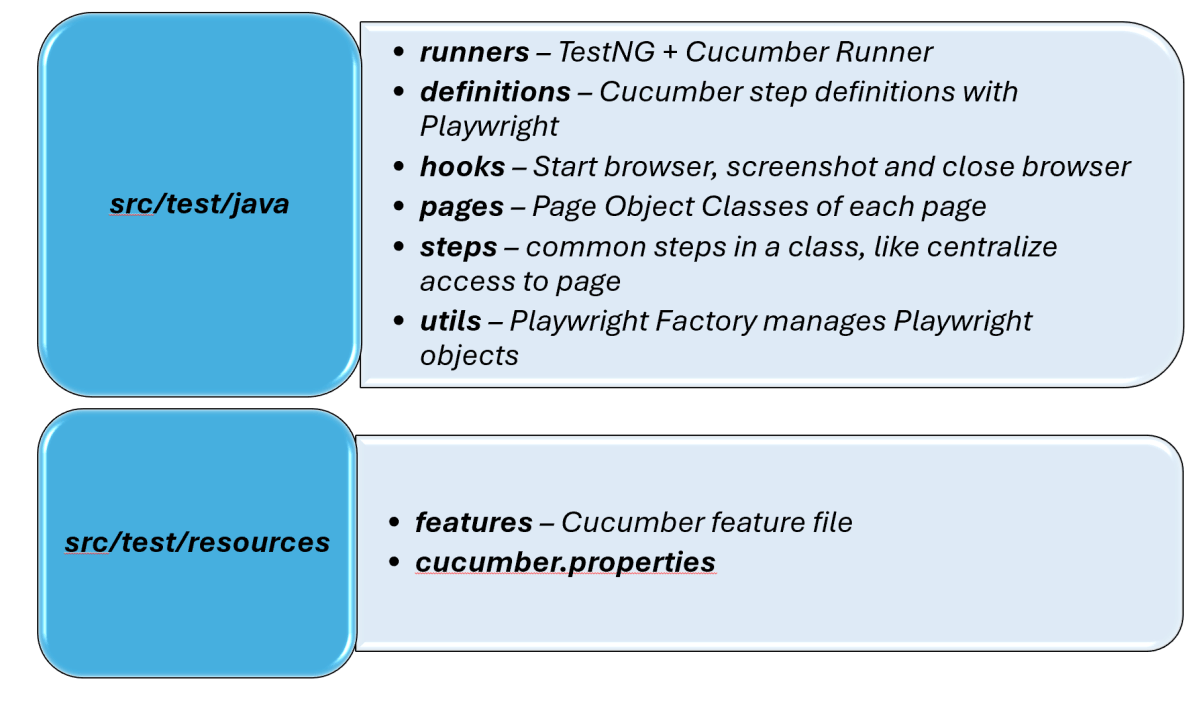
Creating a well-organized project structure is crucial for maintaining a scalable and efficient automation framework.
1. Maven Configuration (pom.xml): This file manages project dependencies, plugins, and other configurations.
2. Features (src/test/resources/…/features): It contains Gherkin feature files written in plain English.
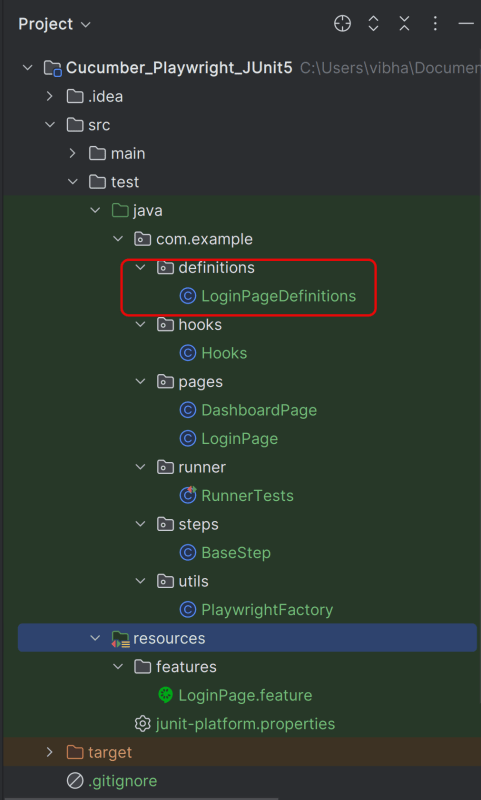
3. StepDefinition (src/test/java/.../tests/): Here, you write your actual test cases, utilizing the page classes. Cucumber steps are implemented.
4. Runner (src/main/java/…runner/): It connects Cucumber feature files with Junit Platform and triggers execution.
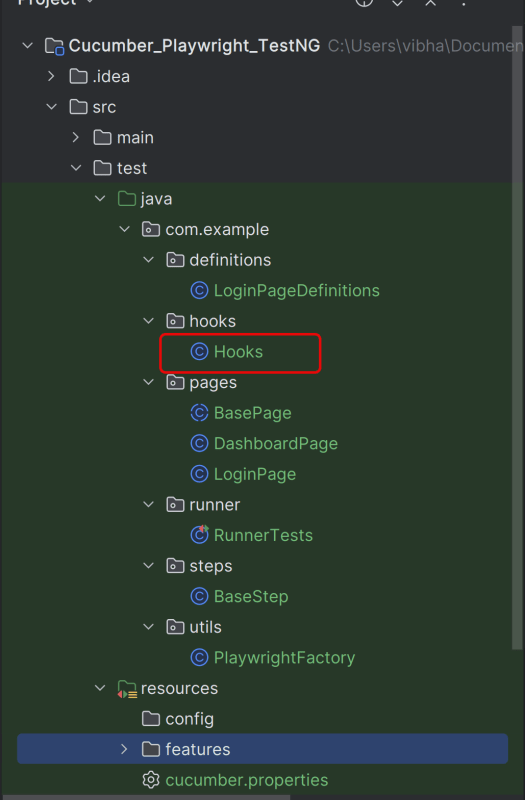
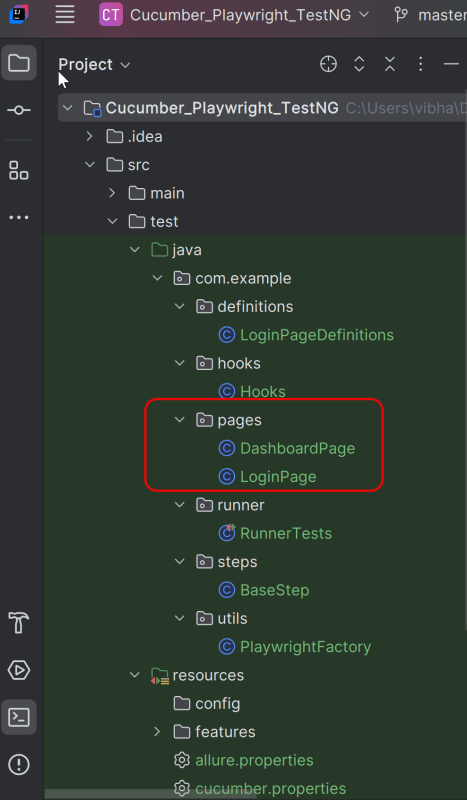
5. Hooks (src/test/java/…/hooks): Hooks manage test lifecycle events like Launch browser before scenario, Close browser after scenario, Capture screenshots on failure
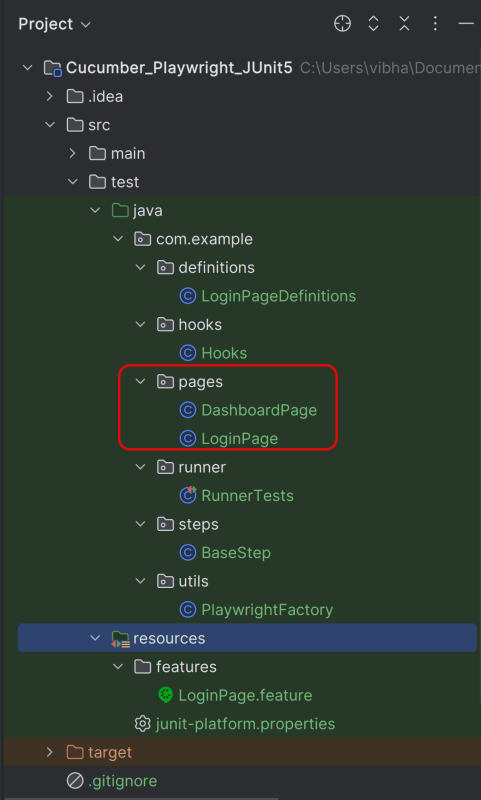
6. Page Classes (src/main/java/.../pages/): Each web page in your application should have a corresponding page class. This class encapsulates all the functionalities of the web page, following the Page Object Model.
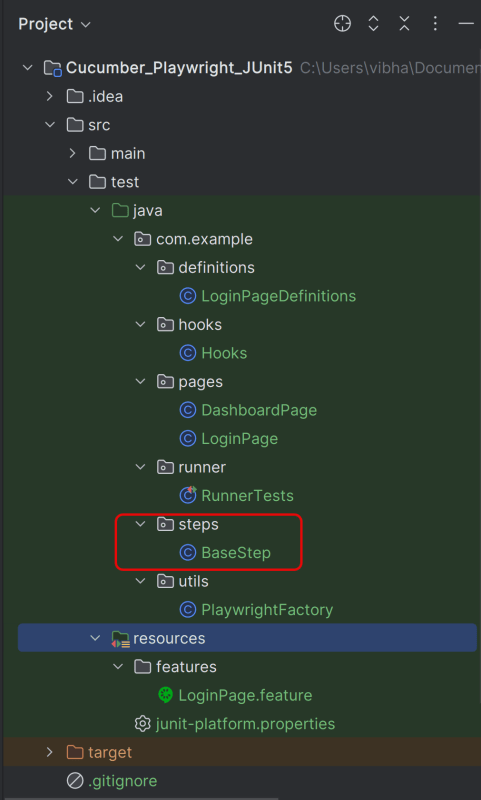
7. Steps (src/test/java/…/steps): It is an extra abstraction layer between step definitions and pages. It contains code that is common across scenarios.
8. Utility Classes (src/main/java/.../utils/): These classes can include various utilities like configuration readers, browser factory, helper methods for common tasks, etc.
9. junit-platform.properties: It contains global configuration for Junit Platform.
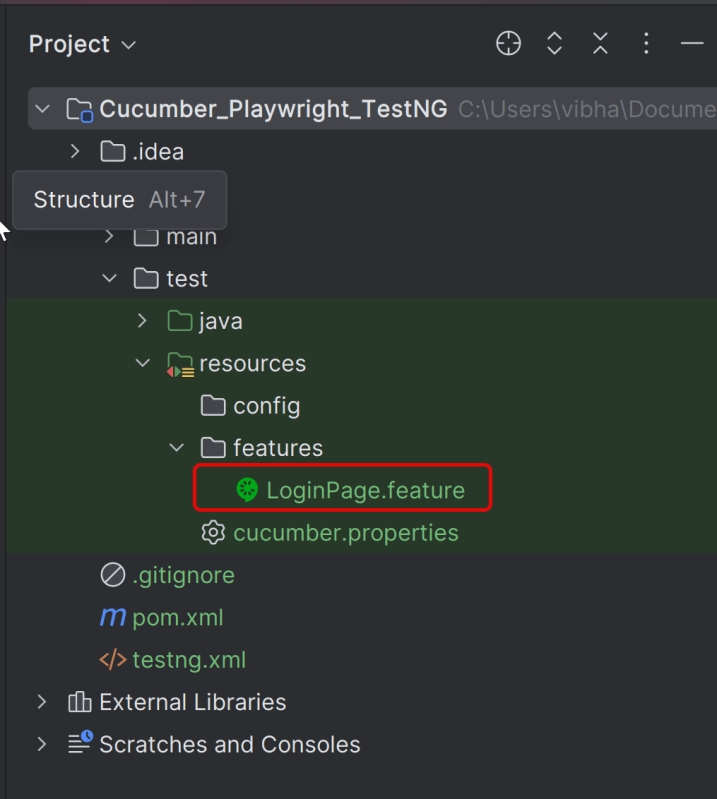
4. Create a feature file under src/test/resources/features
It is recommended to create a features folder in the src/test/resources directory. Create all the feature files in this features folder. Feature file should be saved as an extension of .feature. The test scenarios in the Feature file are written in Gherkins language. Add the test scenarios in this feature file. I have added sample test scenarios.
Feature: Login to HRM Application

  Background:
    Given User is on HRMLogin page "https://opensource-demo.orangehrmlive.com/"

  @ValidCredentials
  Scenario: Login with valid credentials

    When User enters username as "Admin" and password as "admin123"
    Then User should be able to login successfully and new page opens with heading "Dashboard"

  @InvalidCredentials
  Scenario Outline: Login with invalid credentials

    When User enters username as "<username>" and password as "<password>"
    Then User should be able to see error message "<errorMessage>"

    Examples:
      | username   | password  | errorMessage           |
      | Admin      | admin12$$ | Invalid credentials    |
      | admin$$    | admin123  | Invalid credentials    |
      | abc123     | xyz$$     | Invalid credentials    |

  @MissingUsername
  Scenario: Login with blank username

    When User enters username as " " and password as "admin123"
    Then User should be able to see a message "Required" below Username
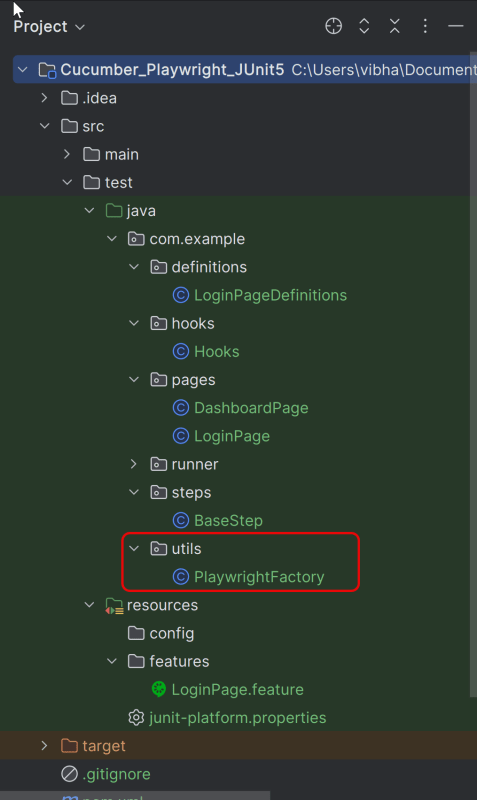
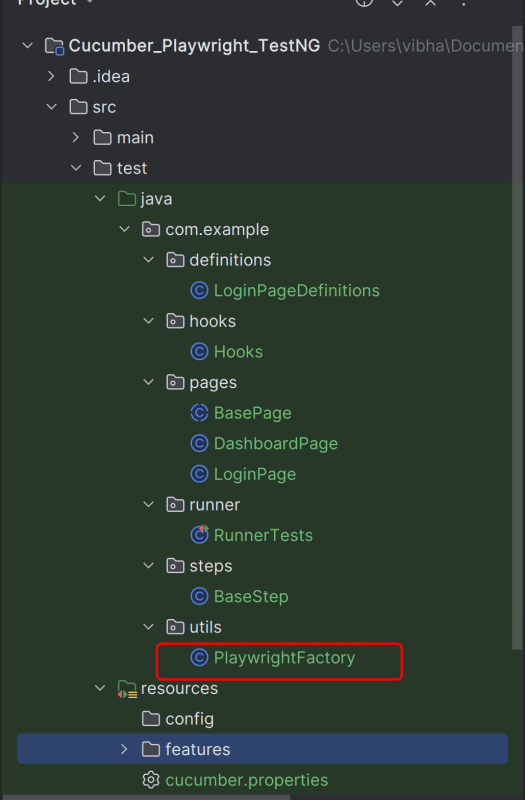
5. Create the utility package in src/test/java
Create a Playwright Factory that includes methods to start and close the browser.
package com.example.utils;

import com.microsoft.playwright.*;

public class PlaywrightFactory {

    private static Playwright playwright;
    private static Browser browser;
    private static BrowserContext context;
    private static Page page;

    public static void initBrowser() {

        playwright = Playwright.create();
        browser = playwright.chromium().launch(new BrowserType.LaunchOptions().setHeadless(false));
        context = browser.newContext();
        page = context.newPage();
    }

    public static Page getPage() {
        return page;
    }

    public static void closeBrowser() {
        if (page != null) page.close();
        if (context != null) context.close();
        if (browser != null) browser.close();
        if (playwright != null) playwright.close();
    }
}
6. Create the hooks package in src/test/java
Create a Hook class that contains the code that runs before or after each scenario. Here, it is responsible for
Each web page in your application should have a corresponding page class. This class encapsulates all the functionalities of the web page, following the Page Object Model.
LoginPage
package com.example.pages;

import com.microsoft.playwright.*;

public class LoginPage {

    private Page page;

    // Locators
    private final Locator usernameLocator;
    private final Locator passwordLocator;
    private final Locator submitLocator;
    private final Locator invalidCredentialsLocator;
    private final Locator missingUsernameLocator;

    public LoginPage(Page page) {
        this.page = page;
        this.usernameLocator = page.locator("input[name='username']");
        this.passwordLocator = page.locator("input[name='password']");
        this.submitLocator = page.locator("button[type='submit']");
        this.invalidCredentialsLocator = page.locator("//p[contains(@class, "oxd-text oxd-text--p oxd-alert-content-text")]");
        this.missingUsernameLocator = page.locator("//span[contains(@class, 'oxd-text oxd-text--span oxd-input-field-error-message oxd-input-group__message')]");
    }

    public void login(String user, String pass){
        usernameLocator.fill(user);
        passwordLocator.fill(pass);
        submitLocator.click();
    }

    public void getUrl(String url){
        page.navigate(url);
    }

    public String getMissingUsernameErrorMessage() {
        return missingUsernameLocator.textContent();
    }

    public String getErrorMessage () {
        return invalidCredentialsLocator.textContent();
    }
}
DashboardPage
package com.example.pages;

import com.microsoft.playwright.Locator;
import com.microsoft.playwright.Page;

public class DashboardPage {

    private Page page;

    private final Locator headingLocator;

    public DashboardPage(Page page){
        this.page = page;
        this.headingLocator = page.locator("//h6[contains(@class, "oxd-topbar-header-breadcrumb-module")]");
    }

    public String getDashboardPageHeading() {
        return headingLocator.textContent();
    }

}
8. Create the step package in src/test/java
package com.example.steps;

import com.example.utils.PlaywrightFactory;
import com.microsoft.playwright.Page;

public class BaseStep {

    protected Page getPage() {
        Page page = PlaywrightFactory.getPage();
        if (page == null) {
            throw new RuntimeException(
                    "Page is NULL. Ensure @Before hook ran and glue includes hooks package."
            );
        }
        return page;
    }
}
9. Create the step definition class in src/test/java
Create the step definition class corresponding to the feature file to test the scenarios in the src/test/java directory. The StepDefinition files should be created in this definitionsdirectory within the folder called definitions.
Below is the step definition of the LoginPage feature file.
package com.example.definitions;

import com.example.pages.DashboardPage;
import com.example.pages.LoginPage;
import com.example.steps.BaseStep;
import io.cucumber.java.en.Given;
import io.cucumber.java.en.Then;
import io.cucumber.java.en.When;
import org.junit.jupiter.api.Assertions;


public class LoginPageDefinitions extends BaseStep {

    private LoginPage loginPage;
    private DashboardPage dashboardPage;

    @Given("User is on HRMLogin page {string}")
    public void userIsOnHRMLoginPage(String baseUrl) {
        loginPage = new LoginPage(getPage());
        loginPage.getUrl(baseUrl);
    }

    @When("User enters username as {string} and password as {string}")
    public void userEntersUsernameAsAndPasswordAs(String username, String password) {
        loginPage.login(username, password);
    }

    @Then("User should be able to see error message {string}")
    public void userShouldBeAbleToSeeErrorMessage(String expectedErrorMessage) {
        Assertions.assertEquals(expectedErrorMessage, loginPage.getErrorMessage());
    }

    @Then("User should be able to see a message {string} below Username")
    public void userShouldBeAbleToSeeAMessageBelowUsername(String expectedErrorMessage) {
        Assertions.assertEquals(expectedErrorMessage, loginPage.getMissingUsernameErrorMessage());
    }

    @Then("User should be able to login successfully and new page opens with heading {string}")
    public void userShouldBeAbleToLoginSuccessfullyAndNewPageOpen(String expectedHeading) {
        dashboardPage = new DashboardPage(getPage());
        Assertions.assertEquals(expectedHeading, dashboardPage.getDashboardPageHeading());

    }

}
10. Create a JUnit Platform Cucumber Runner class in src/test/java
We need to create a class called Runner class to run the tests.
This JUnit 5 runner configures and launches Cucumber scenarios by selecting feature files, defining glue code packages, and executing them via the Cucumber engine on the JUnit Platform.
package com.example.runner;

import static io.cucumber.junit.platform.engine.Constants.GLUE_PROPERTY_NAME;
import org.junit.platform.suite.api.ConfigurationParameter;
import org.junit.platform.suite.api.IncludeEngines;
import org.junit.platform.suite.api.SelectClasspathResource;
import org.junit.platform.suite.api.Suite;

@Suite
@IncludeEngines("cucumber")
@SelectClasspathResource("features")
@ConfigurationParameter(
        key = GLUE_PROPERTY_NAME, value = "com.example"
)

public class RunnerTests {
}
1. @Suite – Marks this class as a JUnit 5 test suite. Acts as the entry point for test execution
2. @IncludeEngines(“cucumber”) – Tells JUnit Platform to use the Cucumber engine
3. @SelectClasspathResource(“features”) – Specifies the location of feature file
4. @ConfigurationParameter – Tells Cucumber where to find step definitions and hooks
11. Run the test using the Junit Platform Runner File
Go to the Runner class and right-click and select Run ‘RunnerTests’. The tests will run in IntelliJ.
Below is the test execution result. 1 test is failed intentionally to show the status of test execution in the report.
12. Run the tests from the Command Line
Run the command below in the command prompt to run the tests and to get the test execution report.
mvn clean site test
The execution screen looks like something as shown below.
13. Cucumber Report Generation
Add junit-platform.properties under src/test/resources and add the below instructions in the file.
cucumber.publish.enabled=true
Below is the image of the Cucumber Report generated using the Cucumber Service.
We can see the details of the failed test in the Report.
The highlighted part holds the screenshot of the failed test.
14. Surefire Report Generation
Maven Site Plugin creates a folder – site under the target directory.
Junit also produces an “index.html” report, and it resides under the target folder. The below image shows the index.html report. This is the latest theme of the report.
Recap of Key Points:
Playwright and Java: We explored the powerful combination of Playwright with Java. We highlighted the benefits of this duo in automated testing.
Build: Maven manage the dependencies and execution.
Cucumber (BDD Framework):It enables Behavior-Driven Development (BDD).
Feature: It uses Gherkin feature file to create the scenarios.
StepDefinition: Stepdefinition file contains the test code related to the feature file. When Cucumber executes a Gherkin step in a scenario, it will look for a matching step definition to execute.
Test Runner: It acts as a bridge between the feature and StepDefinition file.
JUnit5: It controls the test execution lifecycle. It integrates with Cucumber via Junit Platform runner.
Hooks: Hooks manage browser setup, teardown, and failure handling
Playwright is integrated with Java, Cucumber, and TestNG. This integration creates a robust and scalable test automation framework for modern web applications. It is a BDD-driven framework.
Page Object Model (POM) is a design pattern used in test automation. It enhances test maintenance and reduces code duplication. In this pattern, web pages are represented as classes. The various elements on the page are defined as variables in the class. All possible user interactions can then be implemented as methods in the class.
What is Cucumber?
Cucumber is Behavior Driven Development (BDD). It is a methodology that integrates non-technical stakeholders, testers, and developers into the same conversation. This is achieved by using clearly defined specifications.
In behavior-driven development with Cucumber, test cases are written in Gherkin syntax. They use a Given-When-Then structure. This structure closely mirrors user stories and business rules.
Benefits of Using Cucumber with Playwright
1. Readable, business-friendly tests: Cucumber’s Gherkin syntax (Given–When–Then) makes test scenarios easy to understand for non-technical stakeholders, bridging the gap between QA, developers, and business teams.
2. Better Test Maintainability: With standardized step definitions and modularized test architecture, scaling up your test suite is effortless. Altering the suite won’t harm the entire framework.
3. Clear reporting and traceability: Cucumber’s reports map test results directly to feature files. They map directly to scenarios. This makes it easier to track coverage and failures against requirements.
4. Cross-browser and cross-platform coverage: When combined with Playwright, Cucumber scenarios can be executed across Chromium, Firefox, and WebKit without changing feature files
5. Scales well in CI/CD pipelines: The combination supports parallel execution. It offers tagging and selective test runs. This makes it suitable for continuous testing in CI environments.
What is TestNG?
TestNG is a testing framework widely used with Selenium for building structured, maintainable, and efficient automated tests. Combining TestNG listeners with Playwright gives testers greater control over test monitoring, logging, and custom actions based on test outcomes. In TestNG you can initialize Playwright and Browser in @BeforeClass method and destroy them in @AfterClass.
System requirements
The following prerequisites are required to be installed on the machine to begin with a smooth setup and installation.
Java 11 or higher
IntelliJ IDE or any other IDE to create a project
Maven
Browsers on which tests need to be run, like Chrome, Firefox, etc.
High-Level Architecture
Setting Up Cucumber BDD Framework with Playwright and TestNG
1. Create a new Maven Project
The first step in setup is to create a new Maven project. I will be using IntelliJ in this tutorial. The following steps need to be followed to create a new Maven project :
Open IntelliJ, Navigate to File >> New >> Project
In the New Project window, enter the following details:
Name of the Project – Cucumber_Playwright_TestNG
Location/path where the project needs to be saved – Documents/Playwright (my location)
Select JDK version — I am using JDK 17
Archetype — Search for “quickstart” and select maven-archetype-quickstartfrom the results
Click on the Create button to create the project.
This will create a project as shown in IntelliJ.
2. Set Up the Environment
2.1 Add the Cucumber, Playwright Java, and TestNG dependencies
Add the Cucumber, Playwright Java, and TestNG dependencies to the pom.xml. The latest dependency can be found here.
The compiler plugin is used to compile the source code of a Maven project. This plugin has two goals, which are already bound to specific phases of the default lifecycle:
Creating a well-organized project structure is crucial for maintaining a scalable and efficient automation framework.
1. Maven Configuration (pom.xml): This file manages project dependencies, plugins, and other configurations.
2. Features (src/test/resources/…/features): Contains Gherkin feature files written in plain English.
3. StepDefinition (src/test/java/.../tests/): Here, you write your actual test cases, utilizing the page classes. Cucumber stepsare implemented.
4. Runner (src/main/java/…runner/): It connects Cucumber feature files with TestNGand triggers execution.
5. Hooks (src/test/java/…/hooks): Hooks manage test lifecycle events like Launch browser before scenario, Close browser after scenario, Capture screenshots on failure
6. Page Classes (src/main/java/.../pages/): Each web page in your application should have a corresponding page class. This class encapsulates all the functionalities of the web page, following the Page Object Model.
7. Steps (src/test/java/…/steps): It is an extra abstraction layer between step definitions and pages. It contains code which is common across scenarios.
8. Utility Classes (src/main/java/.../utils/): These classes can include various utilities like configuration readers, browser factory, helper methods for common tasks, etc.
9. Test Data Files (src/test/resources/testdata/): Externalizes test data to avoid hardcoding. This includes items like usernames and passwords. These are stored in external files for easy management.
10. cucumber.properties: It contains global configuration for Cucumber.
11. testng.xml: This file is the central configuration file that defines how the test suite should be executed.
4. Create a feature file under src/test/resources
It is recommended to create a features folder in the src/test/resources directory. Create all the feature files in this features folder. Feature file should be saved as an extension of .feature. The test scenarios in the Feature file are written in Gherkins language. Add the test scenarios in this feature file. I have added sample test scenarios. Out of 5 tests, 4 will pass and 1 will fail.
Feature: Login to HRM Application

  Background:
    Given User is on HRMLogin page "https://opensource-demo.orangehrmlive.com/"

  @ValidCredentials
  Scenario: Login with valid credentials

    When User enters username as "Admin" and password as "admin123"
    Then User should be able to login successfully and new page opens with heading "Dashboard"

  @InvalidCredentials
  Scenario Outline: Login with invalid credentials

    When User enters username as "<username>" and password as "<password>"
    Then User should be able to see error message "<errorMessage>"

    Examples:
      | username   | password  | errorMessage           |
      | Admin      | admin12$$ | Invalid credentials    |
      | admin$$    | admin123  | Invalid credentials    |
      | abc123     | xyz$$     | Invalid credentials    |

  @MissingUsername
  Scenario: Login with blank username

    When User enters username as " " and password as "admin123"
    Then User should be able to see a message "Required1" below Username
5. Create the utility package in src/test/java
Create a Playwright Factory that contains the methods to start the browser and close the browser.
package com.example.utils;

import com.microsoft.playwright.*;

public class PlaywrightFactory {

    private static Playwright playwright;
    private static Browser browser;
    private static BrowserContext context;
    private static Page page;

    public static void initBrowser() {

        playwright = Playwright.create();
        browser = playwright.chromium().launch(new BrowserType.LaunchOptions().setHeadless(false));
        context = browser.newContext();
        page = context.newPage();
    }

    public static Page getPage() {
        return page;
    }

    public static void closeBrowser() {
        if (page != null) page.close();
        if (context != null) context.close();
        if (browser != null) browser.close();
        if (playwright != null) playwright.close();
    }
}
6. Create the hooks package in src/test/java
Create a Hook class that contain the code that runs before or after each scenario. Here, it is responsible for
Each web page in your application should have a corresponding page class. This class encapsulates all the functionalities of the web page, following the Page Object Model.
LoginPage
package com.example.pages;

import com.microsoft.playwright.*;

public class LoginPage {

    private Page page;

    // Locators
    private final Locator usernameLocator;
    private final Locator passwordLocator;
    private final Locator submitLocator;
    private final Locator invalidCredentialsLocator;
    private final Locator missingUsernameLocator;

    public LoginPage(Page page) {
        this.page = page;
        this.usernameLocator = page.locator("input[name='username']");
        this.passwordLocator = page.locator("input[name='password']");
        this.submitLocator = page.locator("button[type='submit']");
        this.invalidCredentialsLocator = page.locator("//p[contains(@class, \"oxd-text oxd-text--p oxd-alert-content-text\")]");
        this.missingUsernameLocator = page.locator("//span[contains(@class, 'oxd-text oxd-text--span oxd-input-field-error-message oxd-input-group__message')]");
    }

    public void login(String user, String pass){
        usernameLocator.fill(user);
        passwordLocator.fill(pass);
        submitLocator.click();
    }

    public void getUrl(String url){
        page.navigate(url);
    }

    public String getMissingUsernameErrorMessage() {
        return missingUsernameLocator.textContent();
    }

    public String getErrorMessage () {
        return invalidCredentialsLocator.textContent();
    }
}
DashboardPage
package com.example.pages;

import com.microsoft.playwright.Locator;
import com.microsoft.playwright.Page;

public class DashboardPage {

    private Page page;

    private final Locator headingLocator;

    public DashboardPage(Page page){
        this.page = page;
        this.headingLocator = page.locator("//h6[contains(@class, \"oxd-topbar-header-breadcrumb-module\")]");
    }

    public String getDashboardPageHeading() {
        return headingLocator.textContent();
    }

}
8. Create the step package in src/test/java
package com.example.steps;

import com.example.utils.PlaywrightFactory;
import com.microsoft.playwright.Page;

public class BaseStep {

    protected Page getPage() {
        Page page = PlaywrightFactory.getPage();
        if (page == null) {
            throw new RuntimeException(
                    "Page is NULL. Ensure @Before hook ran and glue includes hooks package."
            );
        }
        return page;
    }
}
9. Create the step definition class in src/test/java
Create the step definition class corresponding to the feature file to test the scenarios in the src/test/java directory. The StepDefinition files should be created in this definitionsdirectory within the folder called definitions.
Below is the step definition of the LoginPage feature file.
package com.example.definitions;

import com.example.steps.BaseStep;
import com.example.pages.DashboardPage;
import com.example.pages.LoginPage;
import io.cucumber.java.en.Given;
import io.cucumber.java.en.Then;
import io.cucumber.java.en.When;
import org.testng.Assert;

public class LoginPageDefinitions extends BaseStep {

    private LoginPage loginPage;
    private DashboardPage dashboardPage;

    @Given("User is on HRMLogin page {string}")
    public void userIsOnHRMLoginPage(String baseUrl) {
        loginPage = new LoginPage(getPage());
        loginPage.getUrl(baseUrl);
    }

    @When("User enters username as {string} and password as {string}")
    public void userEntersUsernameAsAndPasswordAs(String username, String password) {
        loginPage.login(username, password);
    }

    @Then("User should be able to see error message {string}")
    public void userShouldBeAbleToSeeErrorMessage(String expectedErrorMessage) {
        Assert.assertEquals(loginPage.getErrorMessage(), expectedErrorMessage);
    }

    @Then("User should be able to see a message {string} below Username")
    public void userShouldBeAbleToSeeAMessageBelowUsername(String expectedErrorMessage) {
        Assert.assertEquals(loginPage.getMissingUsernameErrorMessage(), expectedErrorMessage);
    }

    @Then("User should be able to login successfully and new page opens with heading {string}")
    public void userShouldBeAbleToLoginSuccessfullyAndNewPageOpen(String expectedHeading) {
        dashboardPage = new DashboardPage(getPage());
        Assert.assertEquals(dashboardPage.getDashboardPageHeading(), expectedHeading);

    }

}
10. Create a TestNG Cucumber Runner class in src/test/java
We need to create a class called Runner class to run the tests. This class will use the TestNG annotation @RunWith(), which tells TestNG what is the test runner class. TestRunner should be created under src/test/java within the folder called runner.
AbstractTestNGCucumberTestsis a class provided by the Cucumber framework when we are integrating Cucumber with the TestNG test framework. This abstract class helps facilitate the execution of Cucumber tests using TestNG.
We need to specify the values of browser in the TestNG XML file that will pass to the test case file.
Let’s create a testng.xml file to run the test using TestNG.
Right click on the project, New >> File
<?xml version="1.0" encoding="UTF-8"?>
<!DOCTYPE suite SYSTEM "http://testng.org/testng-1.0.dtd">
<suite name="Playwright test suite" thread-count="3">
    <test name="Chromium Tests">
        <classes>
            <class name="com.example.runner.RunnerTests"/>
        </classes>
    </test>
</suite>
12. Run the test through Runner Class
Go to the Runner class and right-click and select Run ‘RunnerTests’. The tests will run as TestNG tests (in IntelliJ).
Below is the test execution result.
13. Run the tests from TestNG.xml
Execute the tests by right-clicking on testng.xml and select Run ‘…testng.xml’
This will run the tests in chromium as mentioned in the .xml file.
The output of the above program is
14. Run the tests from the Command Line
Run the below command in the command prompt to run the tests and to get the test execution report.
mvn clean test
The execution screen looks like something as shown below.
15. Cucumber Report Generation
Add cucumber.properties under src/test/resources and add the below instructions in the file.
cucumber.publish.enabled=true
Below is the image of the Cucumber Report generated using the Cucumber Service.
The screenshot of the failed test is also attached in the Cucumber Report.
Click on the highlighted part. It contains the screenshot.
16. TestNG Report Generation
TestNG generates various types of reports under test-output folder like emailable-report.html, index.html, testng-results.xml.
We are interested in the emailable-report.html report. Open emailable-report.html, as this is an HTML report, and open it with the browser. The below image shows emailable-report.html.
TestNG also produces an “index.html” report, and it resides under the test-output folder. The below image shows the index.html report. This is the latest theme of the report.
Recap of Key Points:
Playwright and Java: We explored the powerful combination of Playwright with Java. We highlighted the benefits of this duo in automated testing.
Build: Maven manage the dependencies and execution.
Cucumber (BDD Framework):It enables Behavior-Driven Development (BDD).
Feature: It uses Gherkin feature file to create the scenarios.
StepDefinition: StepDefinition file contains the test code related to the feature file. When Cucumber executes a Gherkin step in a scenario, it will look for a matching step definition to execute.
Test Runner: It acts as a bridge between the feature and StepDefinition file.
TestNG: It controls the test execution lifecycle. It integrates with Cucumber via TestNG runner.
Hooks: Hooks manage browser setup, teardown, and failure handling