GitLab automatically enables CI/CD pipelines for new projects. It’s just a matter of adding a new configuration file called .gitlab-ci.yml to your code repository with instructions for GitLab on what to run. So simply create the following basic workflow in your main repository directory and commit it:
By default, GitLab will have CI/CD pipelines and Auto DevOps enabled for all projects. What this means is that, when you push code to the repository, GitLab will automatically trigger the pipeline.
Step 3 – Create a .gitlab-ci.yml file in the project in GitLab
There are many ways to create a new file in GitLab. One of the ways is to create a file as shown in the below image. I have already created .gitlab-ci.yml in the project, which can be seen in the image.
It is a YAML file where you configure specific instructions for GitLab CI/CD. In the.gitlab-ci.yml, we can define:
The scripts you want to run.
Other configuration files and templates you want to include.
Dependencies and caches.
The commands you want to run in sequence and those you want to run in parallel.
The location to deploy your application to.
Whether you want to run the scripts automatically or trigger any of them manually.
Below is a sample example to run the SpringBoot project (Maven) in the GitLab pipeline.
image: maven:3.8.5-openjdk-17

stages:
  - test

variables:
  MAVEN_OPTS: "-Dmaven.repo.local=.m2/repository"

test:
  stage: test
  allow_failure: true

# Run the tests
  script:
    - echo "Executing SpringBoot scenarios with maven"
    - mvn clean test site

# Store artifacts
  artifacts:
    when: always
    name: "SpringBoot Report"
    paths:
    - target/site/*
    expire_in: 24 h
Image – maven:3.8.5-openjdk-17 is used in this test. It is a docker image for Maven and have Java 17 installed in it.
Pipeline configuration begins with jobs. Jobs are the most fundamental element of a .gitlab-ci.yml file.
Jobs are:
Defined with constraints stating under what conditions they should be executed.
Top-level elements with an arbitrary name and must contain at least the script clause.
Not limited in how many can be defined.
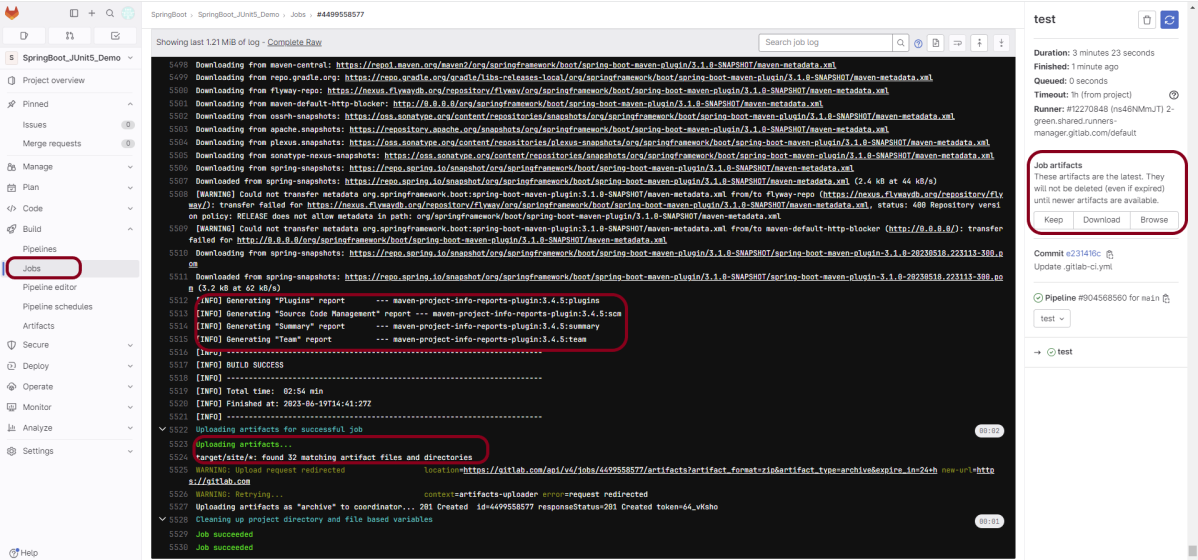
Jobs can output an archive of files and directories. This output is known as a job artifact. The expire_in keyword determines how long GitLab keeps the job artifacts. Here, it shows 24 hrs to retain the artifacts.
Step 4 – View GitLab Pipeline
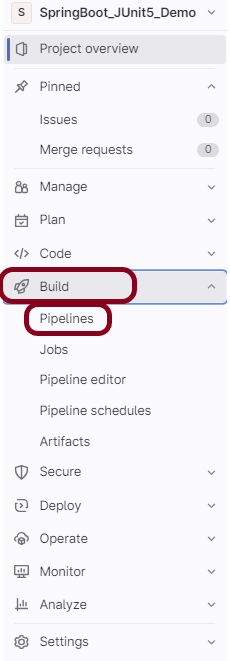
Now, when a new change is committed, a pipeline kicks off and it runs all the tests. To view the pipeline, go to the left panel and click on the Build option. There are a number of sub-options in the Build option, click on the Pipelines.
Step 5 – Run the tests in the GitLab pipeline
The below image shows that the tests are running in the GitLab pipeline.
Step 6 – Manually run the tests in the GitLab pipeline
Whenever there is a new change committed, the pipeline runs automatically. Imagine the scenario when we need to run the pipeline without any new change. This can be done by clicking on the button “Run pipeline”.
Step 7 – Check the status of the pipeline
Once the Status of the pipeline changes to either failed or passed, that means the tests are already executed.
As you can see, the Status is passed, its green colour. This means all the tests present in the test suite are executed and passed. If any test fails in the test suite, the final execution status will be brown. The reason for the brown colour is we have mentioned allow_failure: true.
Below shows the execution status report in the GitLab pipeline.
As I have added an artifact also in the .gitalb-ci.yml, which is highlighted in the image. This artifact creates a folder with the name “Serenity_Report”and the reports in this folder come from the path /target/site. This artifact gives us the option to download the reports or browse the report. This report will be available for 24 hours only as mentioned in the gitlab-ci.yml.
Step 8 – Download the report
Once, will click on the download button, it will download “SpringBoot_Report.zip”. Unzip the folder and it looks like something as shown below:
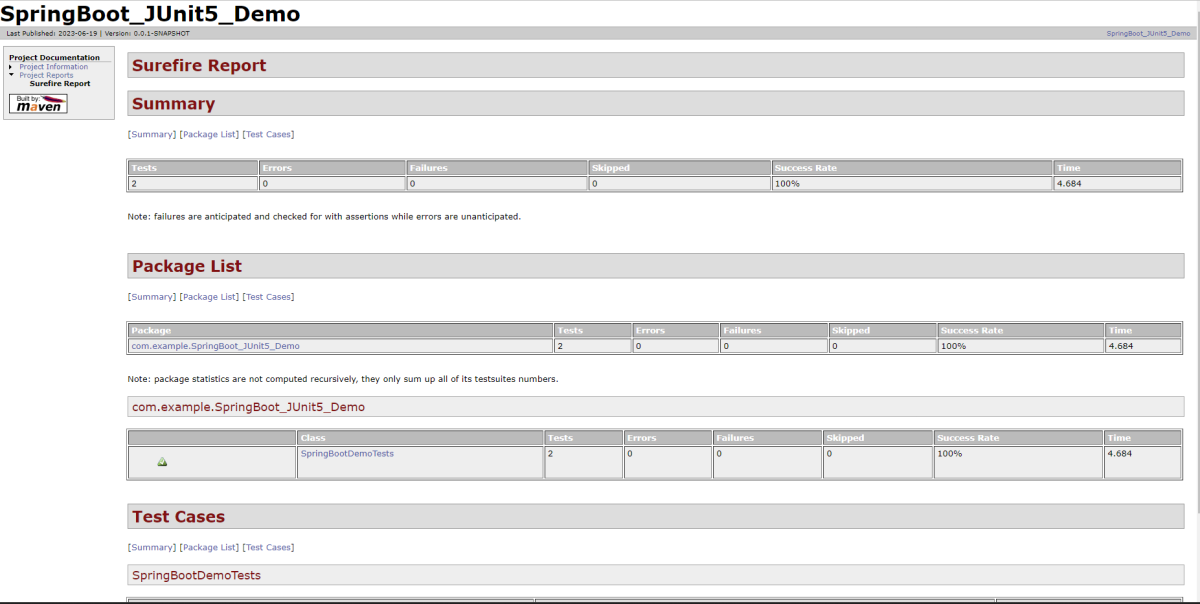
Example of SureFire-Report.html
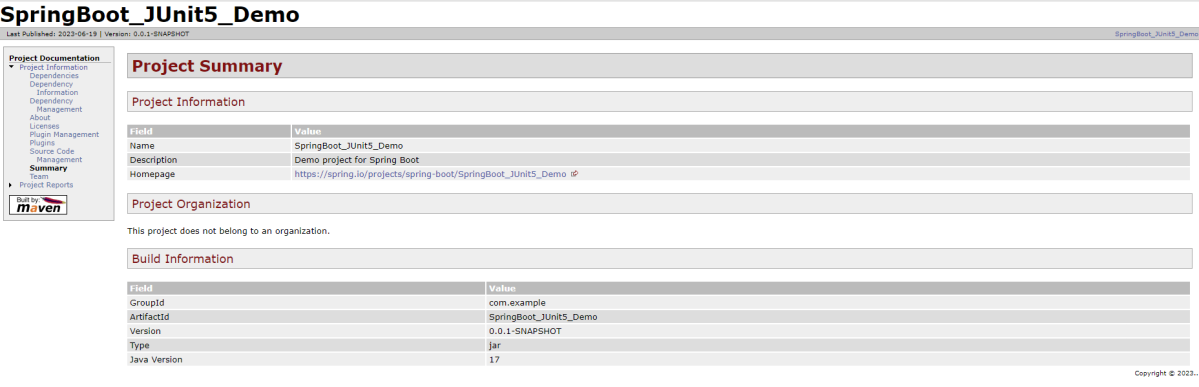
Example of Project Summary Report
Congratulations. This tutorial has explained the steps to run Serenity tests in GitLab CI/CD. Happy Learning!!
Spring Boot 3.0.4 requires Java 17 and is compatible with and including Java 19. Spring Framework 6.0.6 or above is also required.
Explicit build support is provided for the following build tools:
Maven – 3.5+
Gradle – 7.x (7.5 or later) and 8.x
Dependency List
SpringBoot Starter Parent – 3.1.0
Rest Assured – 5.3.0
Java 17
Maven – 3.8.6
What is SpringBoot Application?
Spring Boot is an open-source micro-framework that provides Java developers with a platform to get started with an auto-configurable production-grade Spring application.
Comes with embedded HTTP servers like Tomcat orJetty to test web applications.
Adds many plugins that developers can use to work with embedded and in-memory databases easily. Spring allows you to easily connect with database and queue services like Oracle, PostgreSQL, MySQL, MongoDB, Redis, Solr, ElasticSearch, Rabbit MQ, and others.
Project Directory Structure
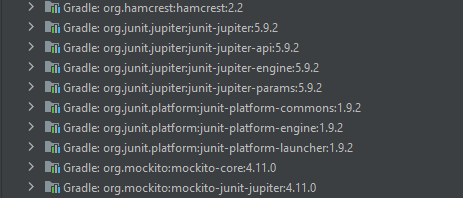
SpringBoot – 3.1.0-SNAPSHOT contains the JUnit 5 dependencies in it as shown in the below image. So, we don’t need to add them explicitly to the build.gradle.
Implementation Steps
Step 1 – Create a source folder – src/test/resources
Create a source folder – src/test/resources to create test scenarios in the Feature file.
Right-click on the test directory, select New->Directory and select resources (Maven Source Directories).
Step 2 – Add SpringBoot, and JUnit5 dependencies to the project
We have added SpringBootTest, and JUnit5 dependencies to pom.xml.
uses @SpringBootTest annotation which loads the actual application context.
uses WebEnvironment.RANDOM_PORT to create and run the application at some random server port.
@LocalServerPort gets the reference of the port where the server has started. It helps in building the actual request URIs to mimic real client interactions.
Below is the code of the Test class. These classes are created in the src/test/java directory.
import io.restassured.response.ValidatableResponse;
import org.junit.jupiter.api.Assertions;
import org.junit.jupiter.api.Test;
import org.springframework.beans.factory.annotation.Value;
import org.springframework.boot.test.context.SpringBootTest;
import org.springframework.boot.test.web.server.LocalServerPort;
import static io.restassured.RestAssured.given;

@SpringBootTest(webEnvironment = SpringBootTest.WebEnvironment.RANDOM_PORT)
public class SpringBootDemoTests {

    private final static String BASE_URI = "http://localhost:";

    @LocalServerPort
    private int port;

    @Value("${server.servlet.context-path}")
    private String basePath;

    private ValidatableResponse response;

    @Test
    public void verifyController1() throws Exception  {
         response = given().contentType("application/json")
                    .header("Content-Type", "application/json")
                 .when().get(BASE_URI + port + basePath+ "/").then().statusCode(200);

         String Actual = response.extract().asString();
          System.out.println("Result :"+Actual);
          Assertions.assertEquals("Hello World, Spring Boot!", Actual);
    }

    @Test
    public void verifyController2() throws Exception  {
        response = given().contentType("application/json")
                .header("Content-Type", "application/json")
                .when().get(BASE_URI + port + basePath+ "/qaautomation").then().statusCode(200);

        String Actual = response.extract().asString();
        System.out.println("Result :"+Actual);
        Assertions.assertEquals("Hello QA Automation!", Actual);
    }
}
This class sends the request and receives a response after performing the GET operation. Here, the validation of the response also takes place by asserting the expected and actual response
Step 4 – Create an application.properties file in src/test/resources
Application.properties is created under src/test/java.
spring.profiles.active – property to specify which profiles are active. The default profile is always active. server.port – By default, the embedded server starts on port 8080. Now the server will start on port 8089 server.servlet.context-path – the context path in Spring Boot can be changed by setting a property, server.servlet.context-path.
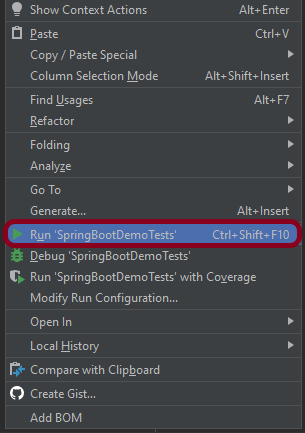
Step 5 – Run the tests from JUnit5
Right-click on the Test class and select Run ‘SpringBootDemoTests’.
The output of the above program is
Below is the execution log.
This image shows that the profile name is “test”. Application is started on port – “64733” and the context path is “/demo”.
Step 6 – Run the tests from the Command Line
Run the tests from the command line by using the below command
mvn clean test site
The output of the above program is
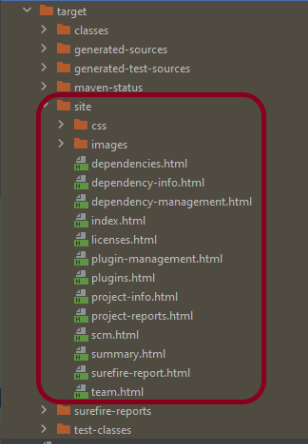
Step 7 – Surefire Report Generation
The test report generated by JUnit is placed under target/site/index.html.
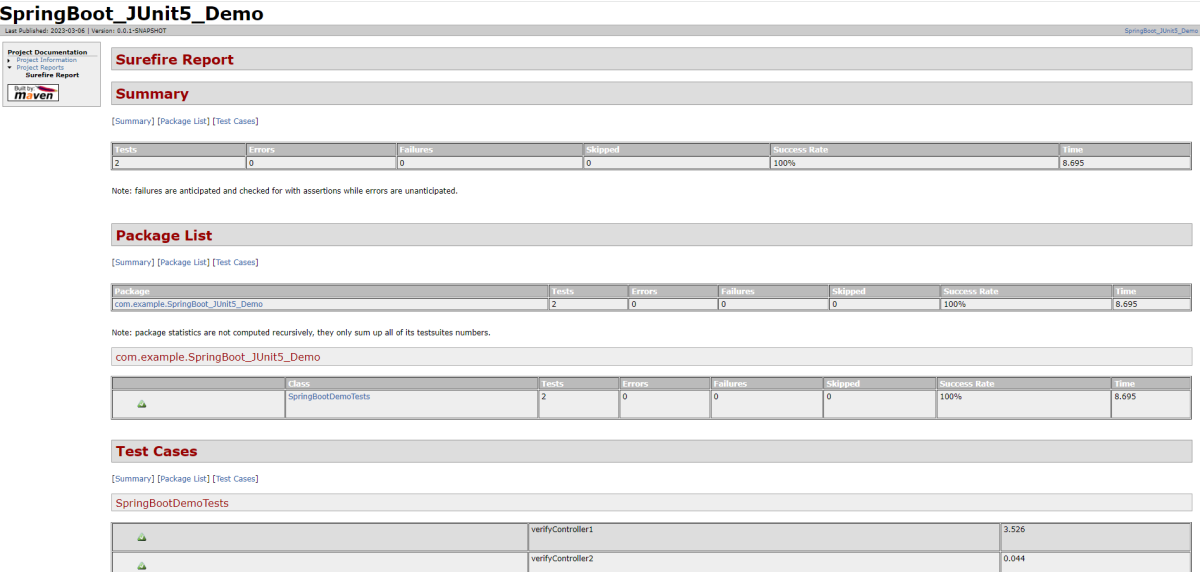
Below is the sample Surefire Report.
Congratulations on making it through this tutorial and hope you found it useful! Happy Learning!! Cheers!!
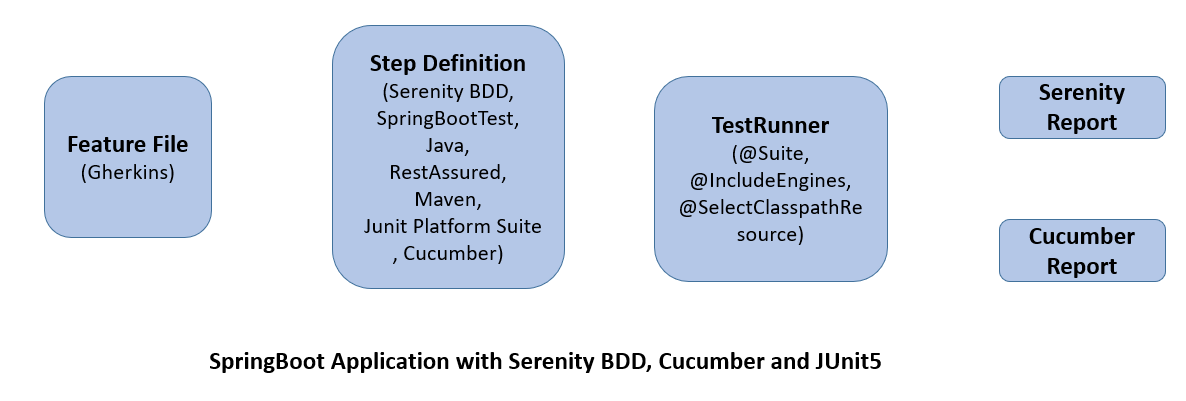
In the previous tutorial, I explained about Integration Testing of Springboot with Cucumber and JUnit4. In this tutorial, I will explain the Testing of the SpringBoot Application in BDD format using Serenity Bdd and Cucumber and JUnit5.
Serenity BDD is an open-source library that aims to make the idea of living documentation a reality.
Serenity BDD helps you write cleaner and more maintainable automated acceptance and regression tests faster. Serenity also uses the test results to produce illustrated, narrative reports that document and describe what your application does and how it works. Serenity tells you not only what tests have been executed, but more importantly, what requirements have been tested.
What is SpringBoot Application?
Spring Boot is an open-source micro framework that provides Java developers with a platform to get started with an auto-configurable production-grade Spring application.
Comes with embedded HTTP servers like Tomcat orJettyto test web applications.
Adds many plugins that developers can use to work with embedded and in-memory databases easily. Spring allows you to easily connect with database and queue services like Oracle, PostgreSQL, MySQL, MongoDB, Redis, Solr, ElasticSearch, Rabbit MQ, and others.
Dependency List
SpringBoot Starter Parent – 3.1.5
Serenity – 4.0.18
Serenity Cucumber – 4.0.18
Serenity Rest Assured – 4.0.18
Cucumber – 7.14.0
Java 17
JUnit Platform – 1.10.0
Maven – 3.8.6
Project Directory Structure
Relationship between SpringBoot, Serenity BDD, Cucumber, and JUnit5
What is RestController?
HTTP requests are handled by a controller in Spring’s approach to building RESTful web services. The @RestController annotation identifies these components, and the GreetingController shown below (from src/main/java/com/example/springboot_demo/HelloController.java) handles GET requests for / and /qaautomation by returning a new instance of the Greeting class. Spring RestController takes care of mapping request data to the request-defined handles method.
import org.springframework.web.bind.annotation.GetMapping;
import org.springframework.web.bind.annotation.RestController;

@RestController
public class HelloController {

    @GetMapping(path="/")
    String hello() {
        return "Hello World, Spring Boot!";
    }


    @GetMapping(path="/qaautomation")
    String qaautomation() {
        return "Hello QA Automation!";
    }

}
Implementation Steps
Step 1 – Create a source folder – src/test/resources
Create a source folder – src/test/resources to create test scenarios in the Feature file.
Right-click on the test directory select New->Directory and select resources (Maven Source Directories).
Step 2 – Add SpringBoot, Serenity, Cucumber, and JUnit5 dependencies to the project
We have added SpringBootTest, Serenity, Cucumber, JUnit5, Cucumber Junit Platform Engine, and many more.
Step 3 – Create a feature file under src/test/resources
Below is an example of a feature file that shows a sample test scenario.
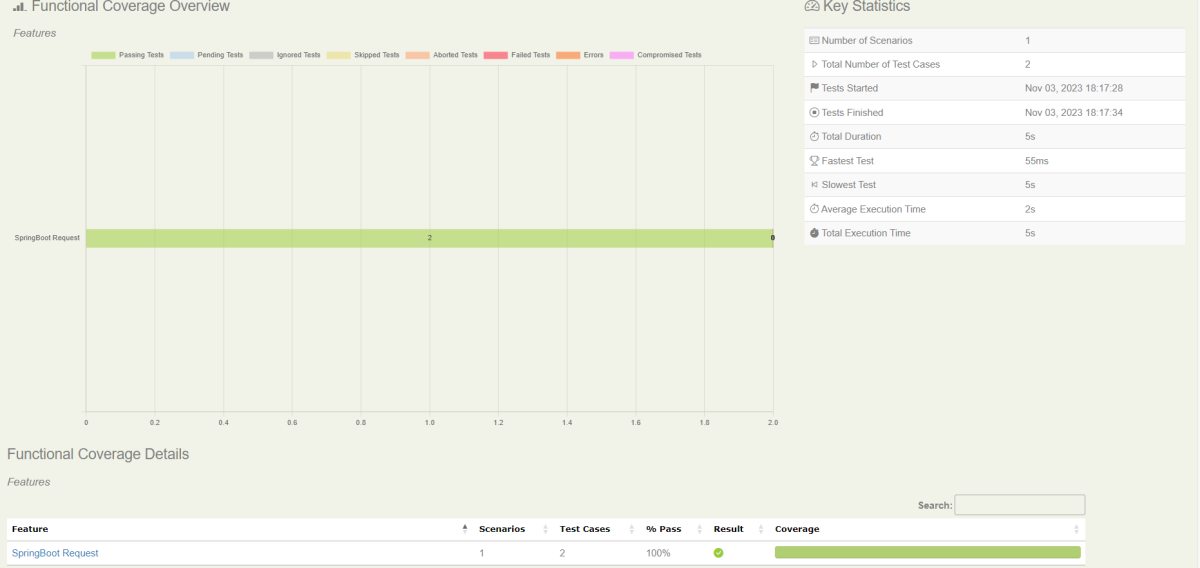
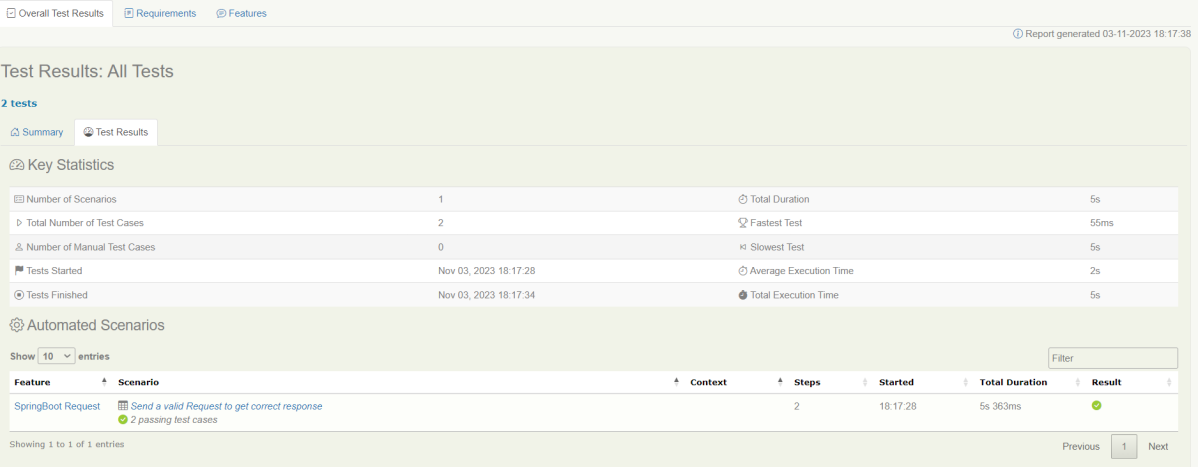
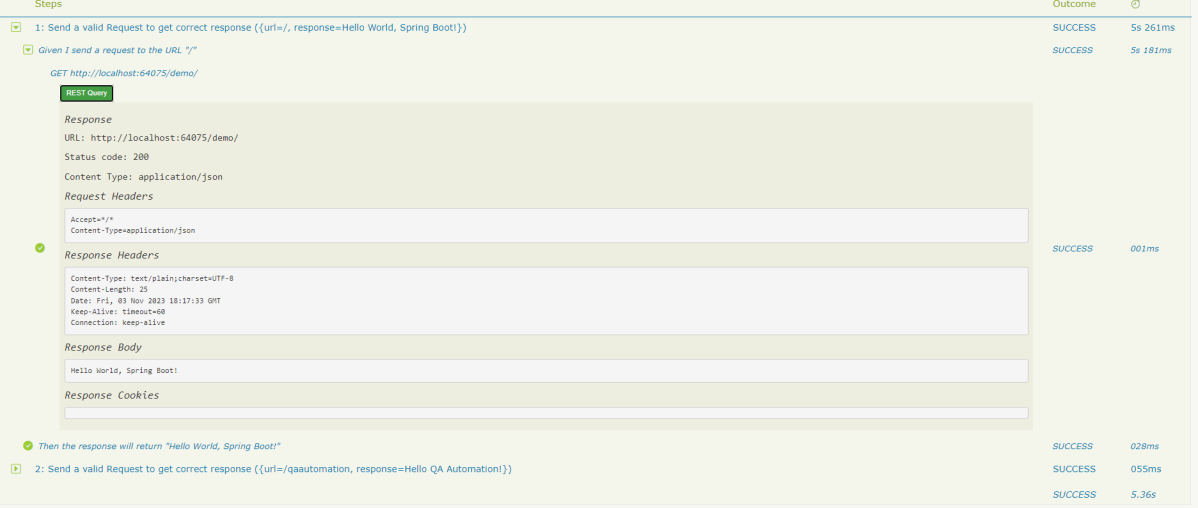
Feature: SpringBoot Request

@ReceiveCorrectResponse

   Scenario Outline: Send a valid Request to get correct response
    Given I send a request to the URL "<url>"
    Then the response will return "<response>"

   Examples:
   | url                       | response                             |
   | /                          | Hello World, Spring Boot!  |
   | /qaautomation   | Hello QA Automation!        |
The test class mentioned below (AbstractRestAssuredHelper) contains integration tests for the spring boot rest controller mentioned. This test class:
uses @SpringBootTest annotation which loads the actual application context.
uses WebEnvironment.RANDOM_PORT to create and run the application at some random server port.
@LocalServerPort gets the reference of the port where the server has started. It helps in building the actual request URIs to mimic real client interactions.
Step 4 – Create the StepDefinition and Helper classes
Below is the code of the StepDefinition and Helper class. These classes are created in the src/test/java directory.
This class sends the request and receives a response after performing the GET operation. Here, the validation of the response also takes place by asserting the expected and actual response
To use Rest-assured, Serenity provides the class SerenityRest
import io.cucumber.java.en.Given;
import io.cucumber.java.en.Then;
import io.restassured.response.Response;
import net.serenitybdd.rest.SerenityRest;
import net.thucydides.core.annotations.Steps;
import org.junit.jupiter.api.Assertions;

public class SpringBootDemoDefinitions {

	@Steps
    AbstractRestAssuredHelper helper;
    private Response response;

    @Given("I send a request to the URL {string}")
    public void iSendARequest(String endpoint) throws Exception  {
         response = helper.getAnonymousRequest().contentType("application/json")
                    .header("Content-Type", "application/json").when().get(endpoint);
    }

    @Then("the response will return {string}")
    public void extractResponse(String Expected ) {
          SerenityRest.restAssuredThat(response -> response.statusCode(200));
          String Actual = response.asString();
          System.out.println("Result :"+Actual);
          Assertions.assertEquals(Expected, Actual);
    }
}
Step 5 – Create a Serenity Runner class in the src/test/java directory
We cannot run a Feature file on its own in a cucumber-based framework. We need to create a Java class that will run the Feature File. It is the starting point for JUnit to start executing the tests. TestRunner class is created under src/ test/java.
import org.junit.platform.suite.api.ConfigurationParameter;
import org.junit.platform.suite.api.IncludeEngines;
import org.junit.platform.suite.api.SelectClasspathResource;
import org.junit.platform.suite.api.Suite;
import static io.cucumber.junit.platform.engine.Constants.GLUE_PROPERTY_NAME;
import static io.cucumber.junit.platform.engine.Constants.PLUGIN_PROPERTY_NAME;

@Suite
@IncludeEngines("cucumber")
@SelectClasspathResource("com.example")
@SelectClasspathResource("/features")
@ConfigurationParameter(key = GLUE_PROPERTY_NAME, value = "com.example.definitions")
@ConfigurationParameter(key = PLUGIN_PROPERTY_NAME, value = "io.cucumber.core.plugin.SerenityReporterParallel,pretty,timeline:build/test-results/timeline")
public class SpringRunnerTests {
}
@Suite – annotation from JUnit 5 to make this class a run configuration for the test suite. @IncludeEngines(“cucumber”) – tells JUnit 5 to use the Cucumber test engine to run features. @SelectClasspathResource(“/features”) – to change the location of your feature files (if you do not add this annotation classpath of the current class will be used). @ConfigurationParameter(key = GLUE_PROPERTY_NAME, value = “com.example.SpringBoot_Demo.definitions”) – this annotation specifies the path to steps definitions (java classes).
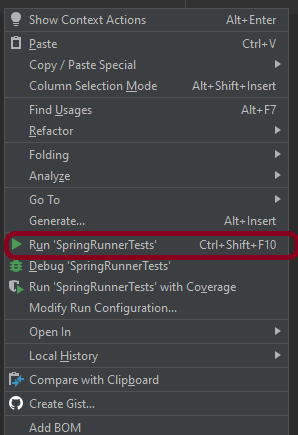
Step 6 – Run the tests from JUnit5
You can run the tests from SpringRunnerTests class. Right-click on the class and select Run ‘SpringRunnerTests’.
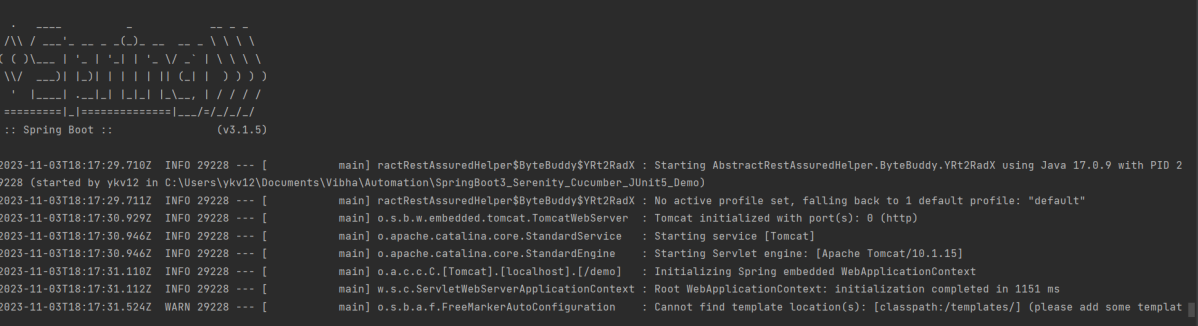
The output of the above program is
Step 7 – Run the tests from the Command Line
Run the tests from the command line by using the below command
mvn clean verify
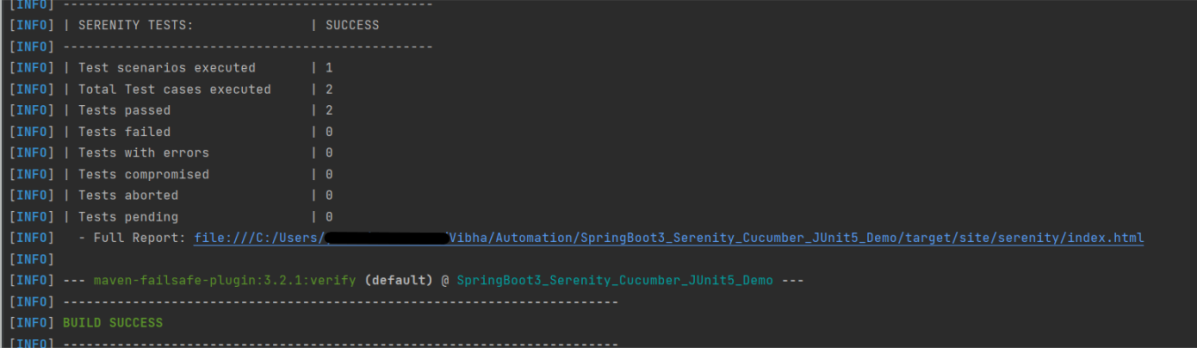
The output of the above program is
The test execution status is shown below:
Step 8 – Serenity Report Generation
By default, the test report generated by Serenity is placed under target/site/serenity/index.html. Below is the sample Serenity Report.
Go to the Test Results tab and we can see all the test scenarios.
Step 9 – Cucumber Report Generation
Cucumber Report can be generated by adding publish=true in SpringRunnerTests as shown in the above example. Click on the link provided in the execution status.
The previous tutorial will have explained to run Cucumber tests with JUnit4 or TestNG from Command-Line. Cucumber7 with JUnit5 has a lot of new configuration options. This tutorial will cover all the possible options.
Below is the sample CucumberRunnerTests class for JUnit5.
import static io.cucumber.junit.platform.engine.Constants.GLUE_PROPERTY_NAME;
import org.junit.platform.suite.api.ConfigurationParameter;
import org.junit.platform.suite.api.SelectClasspathResource;
import org.junit.platform.suite.api.Suite;

@Suite
@IncludeEngines("cucumber")
@SelectClasspathResource("com/example")
@SelectClasspathResource("/features")
@ConfigurationParameter(key = GLUE_PROPERTY_NAME, value = "com.example")

public class CucumberRunnerTests  {

}
Run Test from Command Line
1. Open the command prompt and change the directory to the project location where pom.xml is present.
cd C:\Users\Vibha\eclipse-workspace_personnel\Cucumber7JUnit5_Demo
2. All feature files should be in src/test/resources and create the Cucumber Runner class as CucumberRunnerTest. Note:- The Runner class name should end with Test to execute the tests from Command Line Run the following command in the command prompt:
mvn clean test
mvn clean test runs Cucumber Features using Cucumber’s JUnit Runner.
3. The below screenshot shows the build success output.
Overriding Cucumber Options
Cucumber provides several options that can be passed to on the command line.
1. Running Scenarios using Tags from Command Line
If you are using Maven and want to run a subset of scenarios tagged with @ValidCredentials.
mvn clean test -Dcucumber.filter.tags="@ValidCredentials"
2. Running a Feature file from Command Line
Suppose you want to run a single Feature File from the command line, then use the below syntax
mvn clean test -Dcucumber.features=src/test/resources/features/LoginPage.feature
3. Passing plugin from Command Line
If we want to pass a plugin, please use the below-specified command:
mvn clean test -Dcucumber.plugin=html:target/cucumber-reports/cucumberReport.html
You can see that the cucumberReport.html is generated by the plugin.
4. Passing multiple Parameter from Command Line
If we want to pass more than one parameter, then we can use the following command
mvn clean test -Dcucumber.features=src/test/resources/features/LoginPage.feature -Dcucumber.filter.tags="@ValidCredentials"
You can see that only 1 test is executed and rest 4 tests are skipped out of total 5 tests as shown in the Report.
5. Running a Scenario without a tag from Command Line
If we want to run a single Scenario from the command line and no tag is assigned to that scenario, this is how we specify
mvn clean test -Dcucumber.features=src/test/resources/features/LoginPage.feature:11
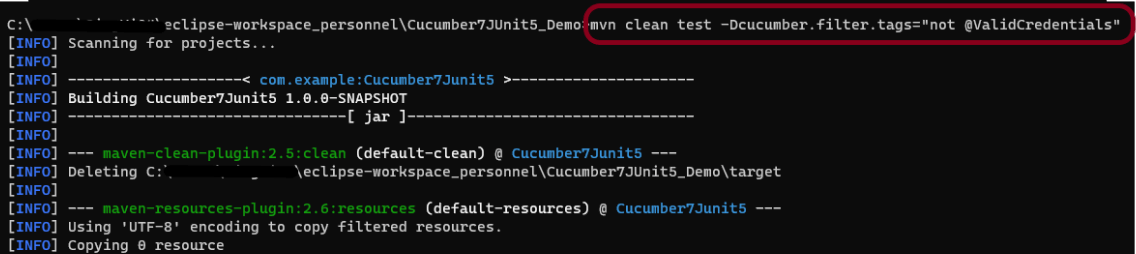
6. Ignoring a subset of scenarios
If we do not want to run any Scenario from the command line, this is how we specify
mvn clean test -Dcucumber.filter.tags="not @ValidCredentials"
There is a total of 5 tests, but only 4 will be executed and 1 will be skipped. The output of the above program is shown below:
7. Pass glue code through command line
If we want to pass glue code from the command line, this is how we specify
mvn clean test -Dcucumber.glue=com.example
8. Pass dry run value through command line
dry-run option can either be set as trueor false. If it is set as true, it means that Cucumber will only check that every step mentioned in the Feature File has corresponding code written in the Step Definition file or not. By default, dry-run is False.
mvn clean test -Dcucumber.execution.dry-run=true
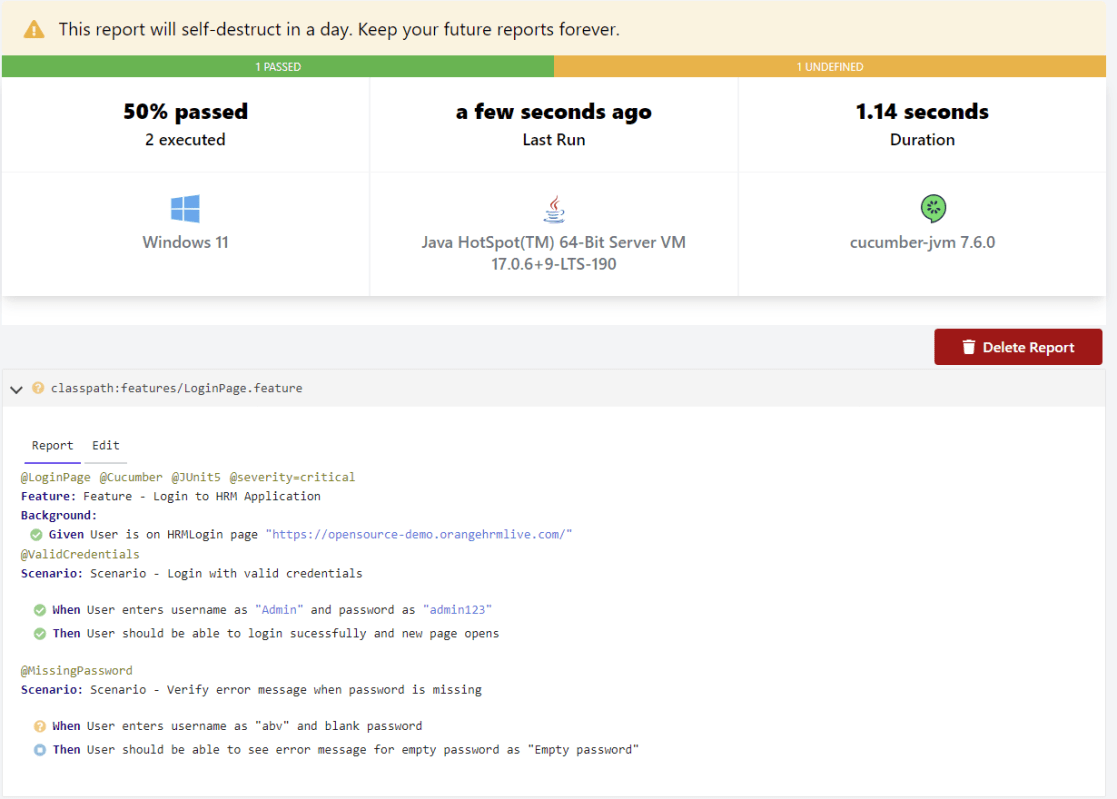
This image shows the steps in the feature file that does not have step definitions.
The cucumber report shows that out of 2 tests, 1 is executed and another one is undefined.
9. Pass snippet type value through command line
The default option for snippets is UNDERSCORE. This settings can be used to specify the way code snippets will be created by Cucumber.
mvn clean test -Dcucumber.snippet-type=camelcase
You can see that the code snippet is in camelCase. In the previous example, it underscored.
That’s it! Congratulations on making it through this tutorial and hope you found it useful! Happy Learning!!
Spring Boot 3.0.4 requires Java 17 and is compatible with and including Java 19. Spring Framework 6.0.6 or above is also required.
Explicit build support is provided for the following build tools:
Maven – 3.5+
Gradle – 7.x (7.5 or later) and 8.x
This framework consists of
SpringBoot Starter Parent – 3.1.0
Serenity Rest Assured – 3.6.12
Spring
Java 17
Gradle – 7.6.1
JUnit Jupiter API – 5.9.2
JUnit Jupiter Engine – 5.9.2
Serenity JUnit5 – 3.6.12
What is SpringBoot Application?
Spring Boot is an open-source micro-framework that provides Java developers with a platform to get started with an auto-configurable production-grade Spring application.
Comes with embedded HTTP servers like Tomcat orJetty to test web applications.
Adds many plugins that developers can use to work with embedded and in-memory databases easily. Spring allows you to easily connect with database and queue services like Oracle, PostgreSQL, MySQL, MongoDB, Redis, Solr, ElasticSearch, Rabbit MQ, and others.
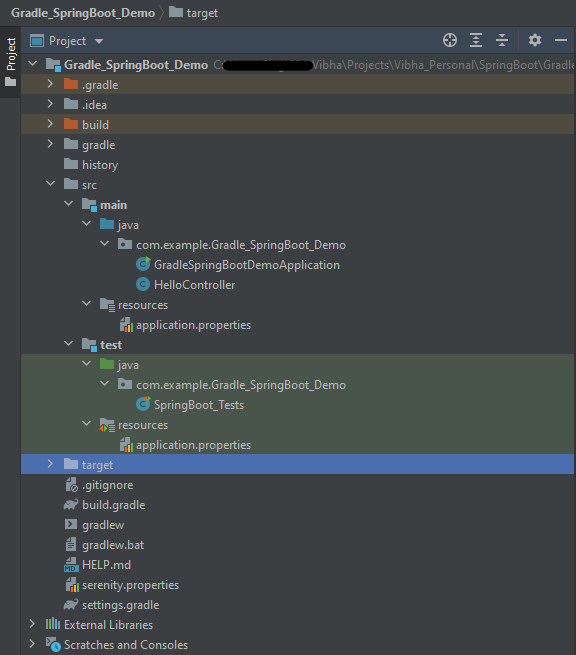
Project Directory Structure
Implementation Steps
Create a source folder – src/test/resources to create properties file
AddSpringBootTest, SerenityRest Assured, and Serenity-JUnit5 dependencies to the project
Create the Test classes.
Create an application.properties file in src/test/resources
Run the tests from JUnit5
Run the tests from Command Line
Serenity Report Generation
Step 1 – Create a source folder – src/test/resources to create test scenarios in the Feature file
Right-click on the test directory and select New->Directory and select resources (Maven Source Directories).
Step 2 – Add SpringBootTest,Rest Assured, and allure dependencies to the project
We have added SpringBootTest, SpringBoot Web, Tomcat, Spring Web, Rest Assured, and Serenity-JUnit5 dependencies to the build.gradle.
plugins {
	id 'java'
	id 'org.springframework.boot' version '3.1.0-SNAPSHOT'
	id 'io.spring.dependency-management' version '1.1.0'
	id 'net.serenity-bdd.serenity-gradle-plugin' version '3.6.7'
}

group = 'com.example'
version = '0.0.1-SNAPSHOT'
sourceCompatibility = '17'

repositories {
	mavenCentral()
	maven { url 'https://repo.spring.io/milestone' }
	maven { url 'https://repo.spring.io/snapshot' }
}

dependencies {

	implementation 'org.springframework.boot:spring-boot-starter'
	implementation 'org.springframework.boot:spring-boot-starter-web'
	implementation 'org.springframework.boot:spring-boot-starter-tomcat'
	implementation 'org.springframework:spring-web'

	testImplementation 'org.springframework.boot:spring-boot-starter-test'
	testImplementation 'net.serenity-bdd:serenity-junit5:3.6.12'
	testImplementation 'org.junit.jupiter:junit-jupiter-api:5.9.2'
	testImplementation 'org.junit.jupiter:junit-jupiter-engine:5.9.2'
	testImplementation 'net.serenity-bdd:serenity-core:3.6.12'
	testImplementation 'net.serenity-bdd:serenity-rest-assured:3.6.12'
	testImplementation 'net.serenity-bdd:serenity-spring:3.6.12'
}

tasks.named('test') {
	useJUnitPlatform() {}
	testLogging {
		showStandardStreams = true
	}
	systemProperties System.getProperties()
}

gradle.startParameter.continueOnFailure = true

test.finalizedBy(aggregate)
Step 3 – Create the Test classes
uses @SpringBootTest annotation which loads the actual application context.
uses WebEnvironment.RANDOM_PORT to create and run the application at some random server port.
@LocalServerPort gets the reference of the port where the server has started. It helps in building the actual request URIs to mimic real client interactions.
Below is the Test Class, created in the src/test/java directory.
import io.restassured.response.ValidatableResponse;
import net.serenitybdd.junit5.SerenityJUnit5Extension;
import org.junit.jupiter.api.Assertions;
import org.junit.jupiter.api.Test;
import org.junit.jupiter.api.extension.ExtendWith;
import org.springframework.beans.factory.annotation.Value;
import org.springframework.boot.test.context.SpringBootTest;
import org.springframework.boot.test.web.server.LocalServerPort;
import static io.restassured.RestAssured.given;

@ExtendWith(SerenityJUnit5Extension.class)
@SpringBootTest(webEnvironment = SpringBootTest.WebEnvironment.RANDOM_PORT)
public class SpringBootDemoDefinitions {

    private final static String BASE_URI = "http://localhost:";

    @LocalServerPort
    private int port;

    @Value("${server.servlet.context-path}")
    private String basePath;

   private ValidatableResponse response;

    @Test
    public void verifyController1() throws Exception  {
        response = given().contentType("application/json")
                .header("Content-Type", "application/json")
                .when().get(BASE_URI + port + basePath+ "/").then().statusCode(200);

        String Actual = response.extract().asString();
        System.out.println("Result :"+Actual);
        Assertions.assertEquals("Hello World, Spring Boot!", Actual);
    }

    @Test
    public void verifyController2() throws Exception  {
        response = given().contentType("application/json")
                .header("Content-Type", "application/json")
                .when().get(BASE_URI + port + basePath+ "/qaautomation").then().statusCode(200);

        String Actual = response.extract().asString();
        System.out.println("Result :"+Actual);
        Assertions.assertEquals("Hello QA Automation!", Actual);
    }
}
This class sends the request and receives a response after performing the GET operation. Here, the validation of the response also takes place by asserting the expected and actual response
Step 4 – Create an application.properties file in src/test/resources
Application.properties is created under src/ test/java.
spring.profiles.active – property to specify which profiles are active. The default profile is always active. server.port – By default, the embedded server starts on port 8080. Now the server will start on port 8090 server.servlet.context-path – the context path in Spring Boot can be changed by setting a property, server.servlet.context-path.
Step 5 – Run the tests from JUnit5
Right-click on the Test class and select Run ‘SpringBoot_Tests’.
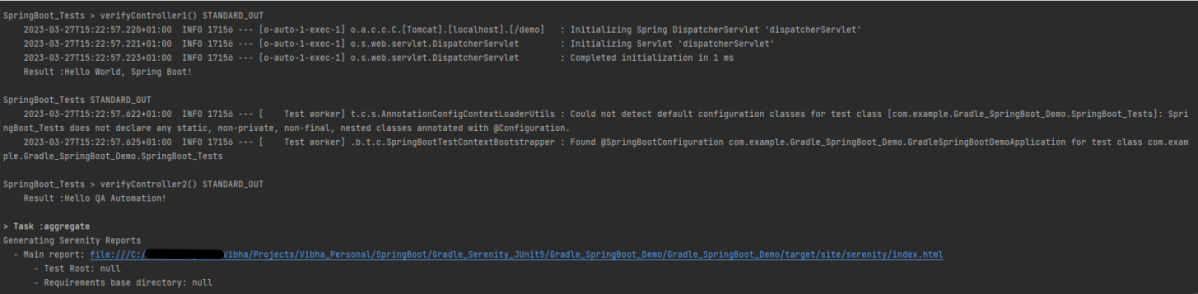
The output of the above program is
This image shows that the profile name is “test”. Application is started on port – “65221” and the context path is “/demo”.
Step 6 – Run the tests from Command Line
Run the tests from the command line by using the below command
gradle clean test
The output of the above program is
Step 7 – Serenity Report Generation
The best part about Serenity is the report generation by it. The Reports contain all possible type of information, you can think of with minimal extra effort. There is multiple types of reports are generated. We are interested in index.html .
Below is the new Serenity Report.
We are done! Congratulations on making it through this tutorial and hope you found it useful! Happy Learning!!
Spring Boot is an open-source micro-framework that provides Java developers with a platform to get started with an auto-configurable production-grade Spring application.
Comes with embedded HTTP servers like Tomcat orJetty to test web applications.
Adds many plugins that developers can use to work with embedded and in-memory databases easily. Spring allows you to easily connect with database and queue services like Oracle, PostgreSQL, MySQL, MongoDB, Redis, Solr, ElasticSearch, Rabbit MQ, and others.
Project Directory Structure
What is RestController?
HTTP requests are handled by a controller in Spring’s approach to building RESTful web services. The @RestController annotation identifies these components, and the GreetingController shown below (from src/main/java/com/example/springboot_demo/HelloController.java) handles GET requests for / and /qaautomation by returning a new instance of the Greeting class. Spring RestController takes care of mapping request data to the request-defined handles method.
import org.springframework.web.bind.annotation.GetMapping;
import org.springframework.web.bind.annotation.RestController;

@RestController
public class HelloController {

    @GetMapping(path="/")
    String hello() {
        return "Hello World, Spring Boot!";
    }


    @GetMapping(path="/qaautomation")
    String qaautomation() {
        return "Hello QA Automation!";
    }

}
Implementation Steps
Create a source folder – src/test/resources to create properties file
AddSpringBootTest, Serenity and JUnit5 dependencies to the project
Create the Test and Helper classes.
Create an application.properties file in src/test/resources
Create serenity.properties at the root of the project
Run the tests from JUnit5
Run the tests from Command Line
Serenity Report Generation
Step 1 – Create a source folder – src/test/resources to create test scenarios in the Feature file
Right-click on the test directory and select New->Directory and select resources (Maven Source Directories).
Step 2 – Add SpringBootTest, Serenity, and JUnit5 dependencies to the project
We have added SpringBootTest, Serenity, Rest Assured, and JUnit5 dependencies to pom.xml.
uses @SpringBootTest annotation which loads the actual application context.
uses WebEnvironment.RANDOM_PORT to create and run the application at some random server port.
@LocalServerPort gets the reference of the port where the server has started. It helps in building the actual request URIs to mimic real client interactions.
Below is the code of the StepDefinition and Helper class. These classes are created in the src/test/java directory.
This class sends the request and receives a response after performing the GET operation. Here, the validation of the response also takes place by asserting the expected and actual response
Step 4 – Create an application.properties file in src/test/resources
Application.properties is created under src/test/resources for the test profile. If you want to run the SpringBootApplication from DEV profile, then create application.properties file in src/main/resources.
spring.profiles.active – property to specify which profiles are active. The default profile is always active. server.port – By default, the embedded server starts on port 8080. Now the server will start on port 8090 server.servlet.context-path – the context path in Spring Boot can be changed by setting a property, server.servlet.context-path.
Step 5 – Create serenity.properties at the root of the project
serenity.project.name = Testing of SpringBoot Application with Serenity and JUnit5 Demo
Step 6 – Run the tests from JUnit5
Right-click on the Test class and select Run ‘SpringBootDemoApplicationTests’.
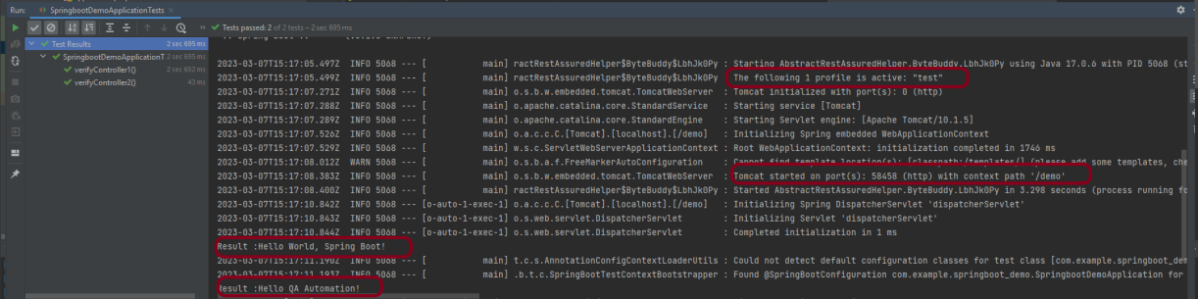
The output of the above program is
This image shows that the profile name is “test”. Application is started on port – “58458” and the context path is “/demo”.
Step 7 – Run the tests from Command Line
Run the tests from the command line by using the below command
mvn clean verify
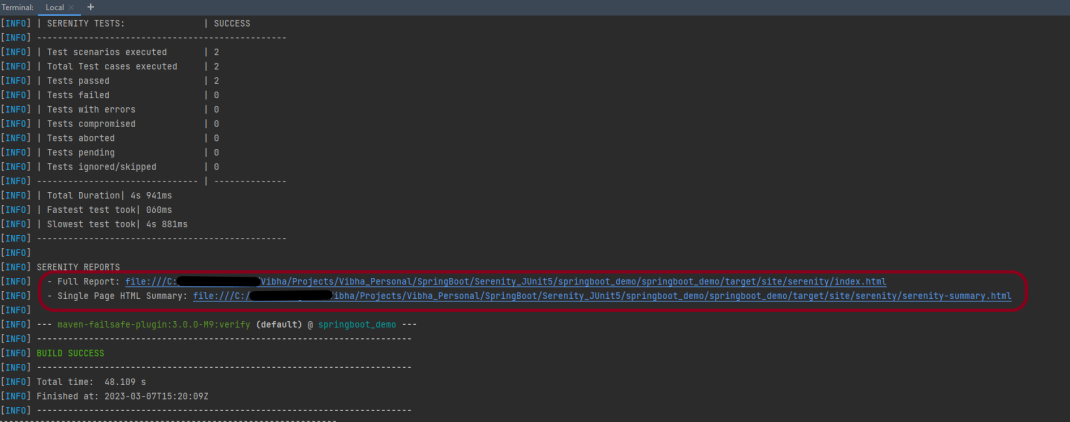
The output of the above program is
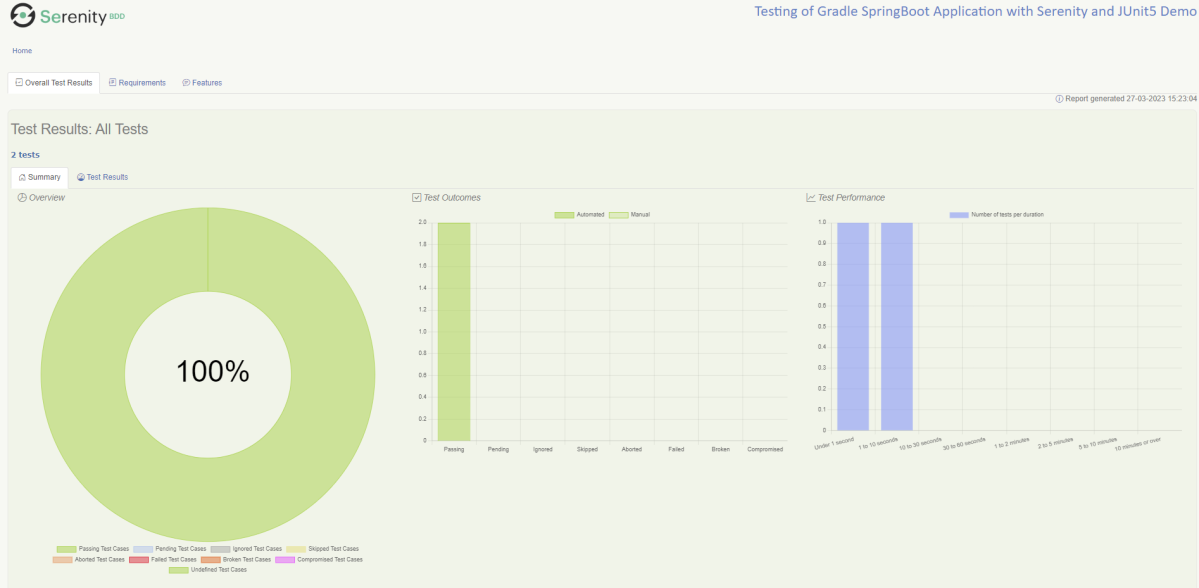
Step 8 – Serenity Report Generation
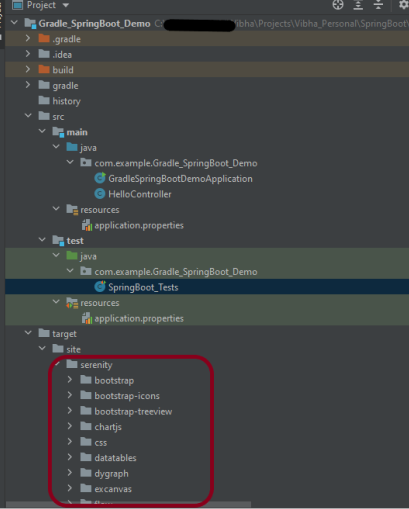
The serenity test reports are generated under target/site/serenity.
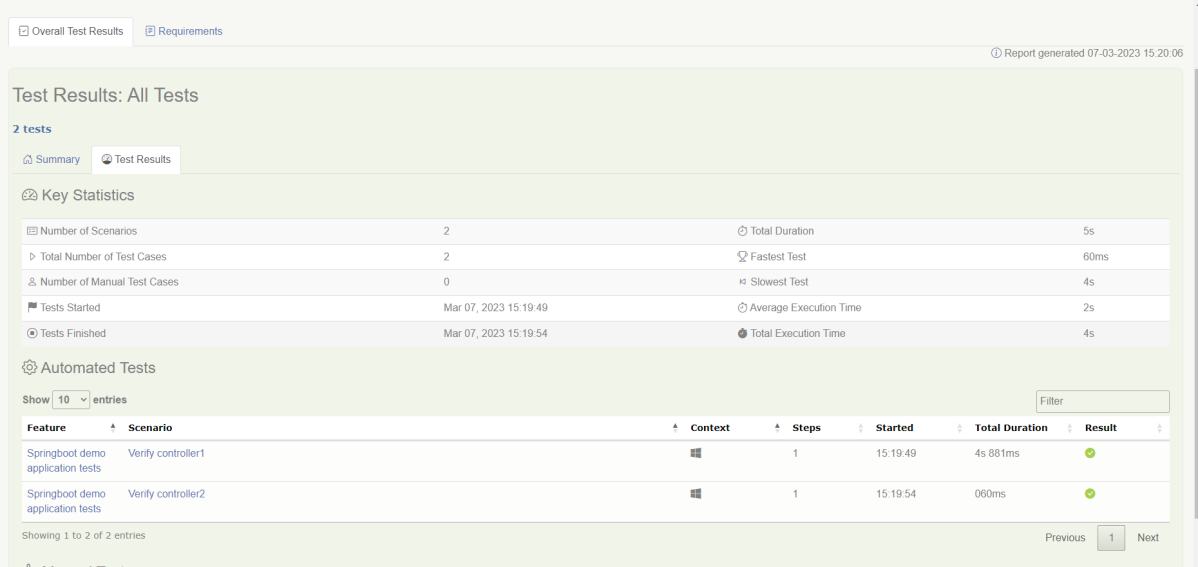
Below is the sample Index.html Report.
Go to Test Results, present at the top left of the index.html page.
Serenity Reports are living documentation that contains the meaningful report for each Test. It illustrated narrative reports that document and describe what your application does and how it works.
Environment variables JAVA_HOME and GRADLE_HOME are correctly configured
This framework consists of:
Java 11
JUnit Jupiter – 5.8.2
JUnit Jupiter Engine – 5.8.2
Gradle – 7.3.3 (Build Tool)
Selenium – 4.3.0
Steps to set up Gradle Java Project for Selenium and JUnit5
Download and Install Java on the system
Download and setup Eclipse IDE on the system
Setup Gradle on System
Create a new Gradle Project
Add Selenium and JUnit5 dependencies to the Gradle project
Create Pages and Test Code for the pages
Run the tests from Command Line
Gradle Report generation
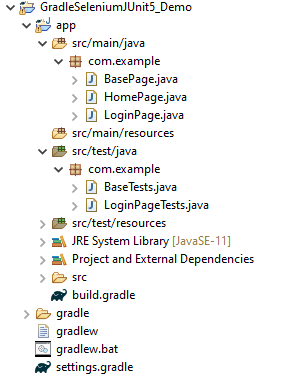
Project Structure
Implementation Steps
Step 1- Download and Install Java
Selenium needs Java to be installed on the system to run the tests. Click here to know How to install Java.
Step 2 – Download and setup Eclipse IDE on the system
The Eclipse IDE (integrated development environment) provides strong support for Java developers. Click here to know How to install Eclipse.
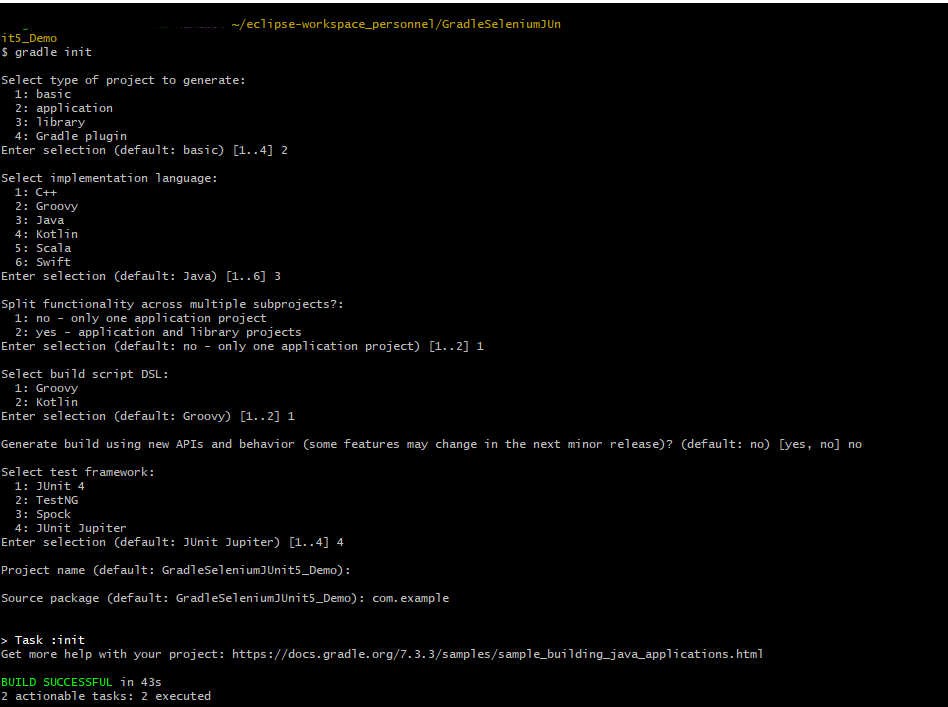
Step 3 – Setup Gradle
To build a test framework, we need to add several dependencies to the project. This can be achieved by any build tool. I have used Gradle Build Tool. Click here to know How to install Gradle.
Step 5 – Add Selenium and JUnit5 dependencies to the Gradle project
/*
 * This file was generated by the Gradle 'init' task.
 *
 */

plugins {
    // Apply the application plugin to add support for building a CLI application in Java.
    id 'application'
}

repositories {
    // Use Maven Central for resolving dependencies.
    mavenCentral()
}

java {
    sourceCompatibility = 11
    targetCompatibility = 11
}

dependencies {
    // Use JUnit Jupiter for testing.
    testImplementation 'org.junit.jupiter:junit-jupiter:5.8.2'
    testRuntimeOnly 'org.junit.jupiter:junit-jupiter-engine:5.8.2'

    implementation 'com.google.guava:guava:30.1.1-jre'
    implementation 'org.seleniumhq.selenium:selenium-java:4.4.0'
    implementation 'io.github.bonigarcia:webdrivermanager:5.3.0'
}

application {
    // Define the main class for the application.
    mainClass = 'com.example.App'
}

tasks.named('test') {
    // Use JUnit Platform for unit tests.
    useJUnitPlatform()  {
    }

 testLogging {
        events "passed", "skipped", "failed"
        showStandardStreams = true
    }

    systemProperties System.properties
    reports.html.setDestination(file("$projectDir/GradleReports"))
}
Step 6 – Create Pages and Test Code for the pages
We have used PageFactory model to build the tests. I have created a package named pages and created the page classes in that folder. Page class contains the locators of each web element present on that particular page along with the methods of performing actions using these web elements.
This is the BasePage that contains the PageFactory.initElements.
import org.openqa.selenium.WebDriver;
import org.openqa.selenium.support.PageFactory;

public class BasePage {

	  public WebDriver driver;

	  public BasePage(WebDriver driver) {
		  this.driver = driver;
		  PageFactory.initElements(driver,this);
	}

}
Below is the code for LoginPage and HomePage
LoginPage
import org.openqa.selenium.WebDriver;
import org.openqa.selenium.WebElement;
import org.openqa.selenium.support.FindBy;

public class LoginPage extends BasePage{

	 public LoginPage(WebDriver driver) {
		 super(driver);
    }

	@FindBy(name = "username")
    public WebElement userName;

    @FindBy(name = "password")
    public WebElement password;

    @FindBy(xpath = "//*[@id='app']/div[1]/div/div[1]/div/div[2]/div[2]/form/div[1]/div/span")
    public WebElement missingUsernameErrorMessage;

    @FindBy(xpath = "//*[@id='app']/div[1]/div/div[1]/div/div[2]/div[2]/form/div[1]/div/span")
    public WebElement missingPasswordErrorMessage;

    @FindBy(xpath = "//*[@id='app']/div[1]/div/div[1]/div/div[2]/div[2]/form/div[3]/button")
    public WebElement login;

    @FindBy(xpath = "//*[@id='app']/div[1]/div/div[1]/div/div[2]/div[2]/div/div[1]/div[1]/p")
    public  WebElement errorMessage;

    public String getMissingUsernameText() {
        return missingUsernameErrorMessage.getText();
    }

    public String getMissingPasswordText() {
        return missingPasswordErrorMessage.getText();
    }

    public String getErrorMessage() {
        return errorMessage.getText();
    }

    public void login(String strUserName, String strPassword) {

    	userName.sendKeys(strUserName);
    	password.sendKeys(strPassword);
    	login.click();

    }

}
HomePage
import org.openqa.selenium.WebDriver;
import org.openqa.selenium.WebElement;
import org.openqa.selenium.support.FindBy;

public class HomePage extends BasePage {

	public HomePage(WebDriver driver) {
		super(driver);
	}

	  @FindBy(xpath = "//*[@id='app']/div[1]/div[2]/div[2]/div/div[1]/div[1]/div[1]/h5")
	  public  WebElement homePageUserName;

	    public String getHomePageText() {
	       return homePageUserName.getText();
   }

}
Here, we have BaseTests Class also which contains the common methods needed by other test pages.
import java.time.Duration;
import org.junit.jupiter.api.AfterEach;
import org.junit.jupiter.api.BeforeEach;
import org.openqa.selenium.WebDriver;
import org.openqa.selenium.chrome.ChromeDriver;
import io.github.bonigarcia.wdm.WebDriverManager;

public class BaseTests {

	public WebDriver driver;
	public final static int TIMEOUT = 10;

	@BeforeEach
    public void setup() {
    	WebDriverManager.chromedriver().setup();
	    driver = new ChromeDriver();
	    driver.manage().window().maximize();
	    driver.get("https://opensource-demo.orangehrmlive.com/");
	    driver.manage().timeouts().implicitlyWait(Duration.ofSeconds(TIMEOUT));

    }

    @AfterEach
    public void tearDown() {
        driver.quit();
    }

}
LoginPageTests
import org.junit.jupiter.api.Test;
import org.junit.jupiter.params.ParameterizedTest;
import org.junit.jupiter.params.provider.CsvSource;
import static org.junit.jupiter.api.Assertions.assertEquals;
import org.junit.jupiter.api.Disabled;

public class LoginPageTests extends BaseTests{

    @ParameterizedTest
    @CsvSource({
            "admin$$,admin123",
            "Admin,admin123!!",
            "admin123,Admin",
            "%%%%%,$$$$$$"})
    public void invalidCredentials(String username, String password) {

	    LoginPage objLoginPage = new LoginPage(driver);
    	objLoginPage.login(username, password);

    	// Verify Error Message
    	 assertEquals("Invalid credentials",objLoginPage.getErrorMessage());

    }

    @Test
    public void validLogin() {

	    LoginPage objLoginPage = new LoginPage(driver);
    	objLoginPage.login("Admin", "admin123");

    	HomePage objHomePage = new HomePage(driver);

    	// Verify Home Page
    	 assertEquals("Employee Information",objHomePage.getHomePageText());

    }

    @Test
    public void missingUsername() {

	    LoginPage objLoginPage = new LoginPage(driver);
    	objLoginPage.login("", "admin123");

    	// Verify Error Message
   	     assertEquals("Invalid credentials",objLoginPage.getMissingUsernameText());

    }

    @Test @Disabled
    public void missingPassword() {

	    LoginPage objLoginPage = new LoginPage(driver);
    	objLoginPage.login("admin", "");

    	// Verify Error Message
   	     assertEquals("Invalid credentials",objLoginPage.getMissingPasswordText());

    }

}
Step 7 – Run the tests from Command Line
Note:- As you can see, my project has two parts – GradleSeleniumJUnit5_Demo and app.
Go to the app project and run the tests, using the below command.
gradle clean test
The output of the above program is
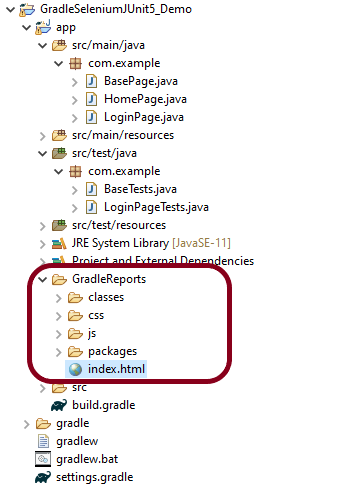
Step 8 – Gradle Report generation
Once the test execution is finished, refresh the project. We will see a folder – GradleReports. This report is generated when the tests are executed through the command line.
This folder contains index.html.
Right-click on index.html and select open with Web Browser. This report shows the summary of all the tests executed. As you can see that Failed tests are selected (highlighted in blue), so the name of the test failed along with the class name is displayed here.
This report contains detailed information about the failed test, which is shown below.
This shows the list of all the tests – passed, failed, or ignored.
Assumptions is a collection of utility methods that support conditional test execution based on assumptions.
In direct contrast to failed assertions, failed assumptions do not result in a test failure; rather, a failed assumption results in a test being aborted.
Assumptions are typically used whenever it does not make sense to continue execution of a given test method — for example, if the test depends on something that does not exist in the current runtime environment.
Junit 5 comes with a subset of the assumption methods that JUnit 4 provides with Java 8 lambda expressions and method references. All JUnit Jupiter assumptions are static methods in the org.junit.jupiter.api.Assumptions class.
Assumptions.assumeTrue() – If the condition is true, then run the test, else aborting the test.
Assumptions.false() – If the condition is false, then run the test, else aborting the test.
Assumptions.assumingThat() – is much more flexible, If condition is true then executes, else do not abort test continue rest of code in test.
1. assumeTrue
The assumeTrue() method validates the given assumption to be true and if the assumption is true – the test proceed, otherwise, test execution is aborted.
int num1 = 4;
int num2=6;
int num3 = 24;
int num4=10;
@Test
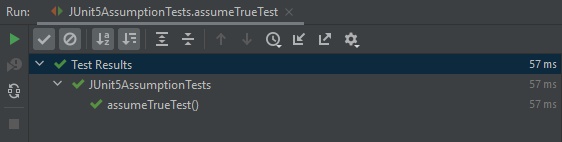
void assumeTrueTest() {
System.setProperty("ENV", "TEST");
assumeTrue("TEST".equals(System.getProperty("ENV")));
// Since the condition is true rest of it will get executed
assertEquals((num1*num2),num3,"The product of "+num1+"and "+num2+"is equal to "+num3);
}
The output of the above program is
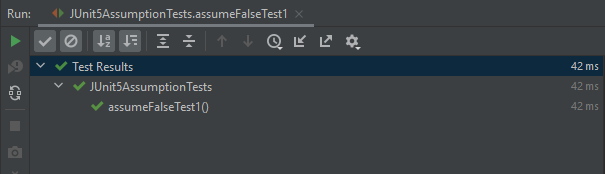
In the below example, assumeTrue() is false. So, the execution is skipped.
    int num1 = 4;
    int num2=6;
    int num3 = 24;
    int num4=10;

    @Test
    void assumeTrueTest1() {
        System.setProperty("ENV", "TEST");
        assumeTrue("QA".equals(System.getProperty("ENV")));

        // Since the condition is true rest of it will not get executed
        assertEquals((num1*num2),num3,"The product of "+num1+"and "+num2+"is equal to "+num3);

    }
The output of the above program is
2. assumeFalse()
The assumeFalse() method validates the given assumption to false and if the assumption is false – test proceed, otherwise, test execution is aborted. In the below example, the test is false and we are using assumeFalse(), so the tests will be executed.
    int num1 = 4;
    int num2=6;
    int num3 = 24;
    int num4=10;

    @Test
    void assumeFalseTest1() {
        System.setProperty("ENV", "TEST");
        assumeFalse("DEV".equals(System.getProperty("ENV")));

        // Since the condition is true rest of it will get executed
        assertEquals((num1*num2),num3,"The product of "+num1+"and "+num2+"is equal to "+num3);

    }
The output of the above program is
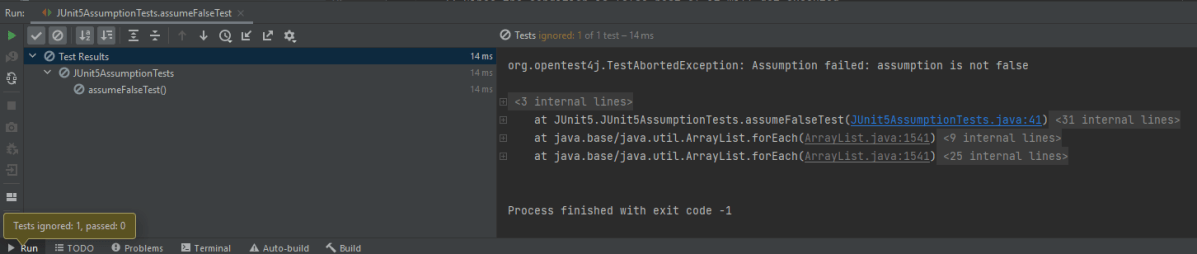
In the below example, the test is false and we are using assumeFalse(), so the tests will be executed.
 @Test
    void assumeFalseTest() {
        System.setProperty("ENV", "TEST");
        assumeFalse("TEST".equals(System.getProperty("ENV")));

        // Since the condition is false rest of it will not get executed
        assertEquals((num1*num2),num3,"The product of "+num1+"and "+num2+"is equal to "+num3);

    }
The output of the above program is
3. assertThat()
This method executes the supplied Executable, but only if the supplied assumption is valid.
Unlike the other assumption methods, this method will not abort the test.
If the assumption is invalid, this method does nothing. If the assumption is valid and the executable throws an exception, it will be treated like a regular test failure. The thrown exception will be rethrown as is but masked as an unchecked exception.
    int num1 = 4;
    int num2=6;
    int num3 = 24;
    int num4=10;
    int num5=8;
    int num6=2;

   @Test
    void assumingThatTest() {
        System.setProperty("ENV", "UAT");
        assumingThat(
                "UAT".equals(System.getProperty("ENV")),
                () -> {
                    // Since the condition is true, this assertion will get executed
                    System.out.println("Assuming that executable executed");
                    assertEquals((num1+num2),num4,"The product of "+ num1 +" and "+ num2 +" is not equal to "+num4);
                });
        // Since the condition is false rest of it will get executed
        System.out.println("Loop outside");
        assertEquals((num5-num2),num6,"The difference of "+ num5 +" and "+num2+" is not equal to " + num6);
    }
The output of the above program is
In the below example, the condition is false , so we skip the execution of that condition. But, we execute the rest of the code.
    int num1 = 4;
    int num2=6;
    int num3 = 24;
    int num4=10;

    @Test
    void assumingThatTest1() {
        System.setProperty("ENV", "UAT");
        assumingThat(
                "DEV".equals(System.getProperty("ENV")),
                () -> {
                    // Since the condition is false, this assertion will not get executed
                    System.out.println("Assuming that executable executed");
                    assertEquals((num1+num2),num4,"The sum of "+num1+"and "+num2+"is not equal to "+num4);
                });

        System.out.println("Loop outside");
        assertEquals((num1*num2),num3,"The product of "+num1+"and "+num2+"is not equal to "+num3);
    }
The output of the above program is
Difference between Assumption and Assertion
The main difference between the assertions and assumptions is –
The assumption is use to decide whether we want to execute a section or the rest of the test method or not and if the condition is false then the test is skipped.
Whereas if a condition in an assertion fails then it fails the test and something needs to be fixed.
JUnit5 enables us to execute a single test method multiple times with a different sets of data. This is called Parameterization. Parameterized Tests are declared just like regular @Test methods but use the @ParameterizedTest annotation.
This article shows you how to run a test multiple times with different arguments, so-called ‘Parameterized Tests’, let’s see the following ways to provide arguments to the test:
@ValueSource
@EnumSource
@MethodSource
@CsvSource
@CsvFileSource
@ArgumentsSource
We need to add junit-jupiter-params to support parameterized tests. In the case of Maven, add the dependency to POM.xml
Let us start with a simple example. The following example demonstrates a parameterized test that uses the @ValueSource annotation to specify an integer array as the source of arguments. The following @ParameterizedTest method will be invoked three times, with the values 5,6, and 0 respectively.
@ParameterizedTest
@ValueSource(ints = {5, 6, 0})
void test_int_arrays(int b) {

    int a= 5;
    int sum = a + b;
    assertTrue(sum>8);
 }
When executing the above-parameterized test method, each invocation will be reported separately.
The output of the above program is:
One of the limitations of value sources is that they only support these types:
short (with the shorts attribute)
byte (bytes attribute)
int (ints attribute)
long (longs attribute)
float (floats attribute)
double (doubles attribute)
char (chars attribute)
java.lang.String (strings attribute)
java.lang.Class (classes attribute)
Also, we can only pass one argument to the test method each time.
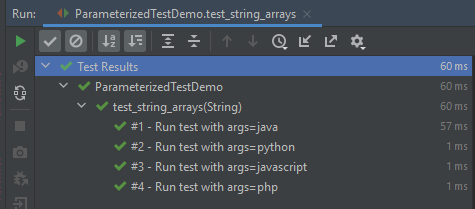
In the below example, an array of strings is passed as the argument to the Parameterized Test.
@ParameterizedTest(name = "#{index} - Run test with args={0}")
@ValueSource(strings = {"java", "python", "javascript","php"})
void test_string_arrays(String arg) {
        assertTrue(arg.length() > 1);
}
The output of the above program is:
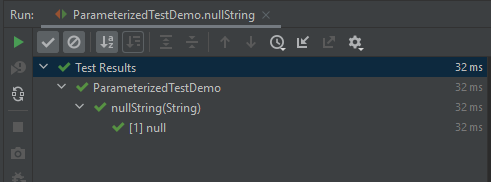
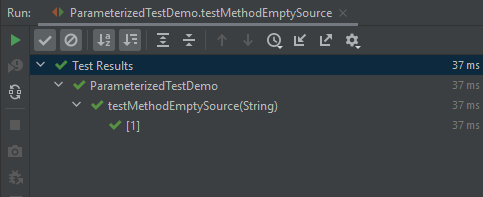
@NullSource
It provides a single null an argument to the annotated @ParameterizedTest method.
The parameterized test method result in seven invocations: 1 for null, 1 for the empty string, 4 for the explicit blank strings supplied via @ValueSource, and 1 non-blank string “a” supplied via @ValueSource.
The output of the above program is:
2. @EnumSource
@EnumSource provides a convenient way to use Enum constants.
The annotation provides an optional names attribute that lets you specify which constants shall be used, like in the following example. If omitted, all constants will be used.
The @EnumSource annotation also provides an optional mode attribute that enables fine-grained control over which constants are passed to the test method. For example, you can exclude names from the enum constant pool or specify regular expressions as in the following examples.
@MethodSource allows you to refer to one or more factory methods of the test class or external classes.
Factory methods within the test class must be static unless the test class is annotated with @TestInstance(Lifecycle.PER_CLASS); whereas, factory methods in external classes must always be static. In addition, such factory methods must not accept any arguments.
If you only need a single parameter, you can return a Stream of instances of the parameter type as demonstrated in the following example.
   @ParameterizedTest(name = "#{index} - Test with String : {0}")
    @MethodSource("stringProvider")
    void test_method_string(String arg) {
        assertNotNull(arg);
    }

    // this need static
    static Stream<String> stringProvider() {
        return Stream.of("java", "junit5", null);
    }
The output of the above program is
If you do not explicitly provide a factory method name via @MethodSource, JUnit Jupiter will search for a factory method that has the same name as the current @ParameterizedTest method by convention. This is demonstrated in the following example.
Streams for primitive types (DoubleStream, IntStream, and LongStream) are also supported as demonstrated by the following example.
 @ParameterizedTest(name = "#{index} - Test with Int : {0}")
    @MethodSource("rangeProvider")
    void test_method_int(int arg) {
        assertTrue(arg < 6);
    }

    static IntStream rangeProvider() {
        return IntStream.range(0, 6);
    }
The output of the above program is
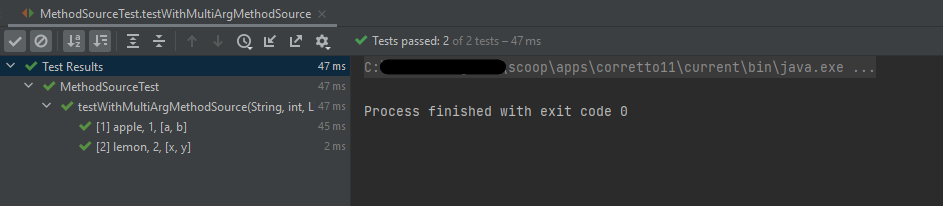
If a parameterized test method declares multiple parameters, you need to return a collection, stream, or array of Arguments instances or object arrays as shown below.
@CsvSource allows you to express argument lists as comma-separated values (i.e., CSV String literals). Each string provided via the value attribute in @CsvSource represents a CSV record and results in one invocation of the parameterized test.
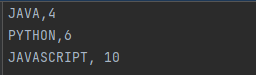
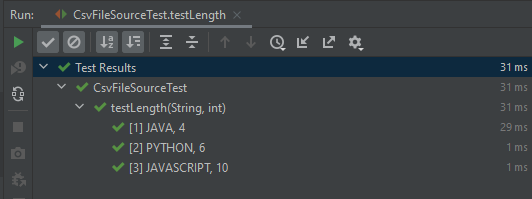
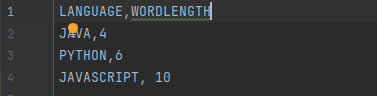
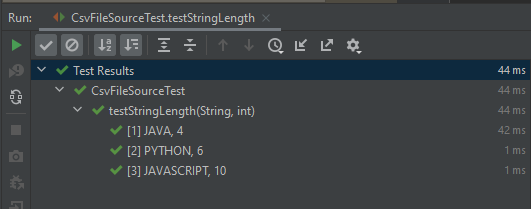
@CsvFileSource lets us use comma-separated value (CSV) files from the classpath or the local file system. Each record from a CSV file results in one invocation of the parameterized test. The first record may optionally be used to supply CSV headers.
If you would like the headers to be used in the display names, you can set the useHeadersInDisplayName attribute to true. The examples below demonstrate the use of useHeadersInDisplayName.
@ArgumentsSource can be used to specify a custom, reusable ArgumentsProvider. Note that an implementation of ArgumentsProvider must be declared as either a top-level class or as a static nested class.