Serenity Reports are living documentation that contains meaningful reports for each Test. It illustrated narrative reports that document and describe what your application does and how it works.
This report can be organized by using features, stories, steps, scenarios/tests. Serenity Report shows the count of passed, failed, compromised, skipped, pending, broken, ignored, pending, and manual test cases count and percentage. Serenity shows Over All Test Results, Requirements, Test Specifications & Test Results. It shows the details and overall time taken by each test step of a test case. It shows the details and overall timing taken by each on all test case execution.
All the above features of Serenity Report make it a great Report. But sometimes, we want to embed data from a JSON or XML file in the Serenity Report.
Let me explain this with the help of an example. Data-Driven tests are created in Serenity. We have test data mentioned in a .csv file and the test is reading the data from this file. When the report is generated, it does not show what all data are used by the Test. To overcome this situation, Serenity provides a feature that usesrecordReportData()., and this can be used like this:
Path credentialsFile = Paths.get("src/test/resources/testdata/credentials.csv");
Serenity.recordReportData().withTitle(" User Credentials with Error Message")
                                             .fromFile(credentialsFile);
If you have the contents of the report as a String, you can pass the String directly like this:
To generate a Serenity Report, use the command like this:
mvn clean verify
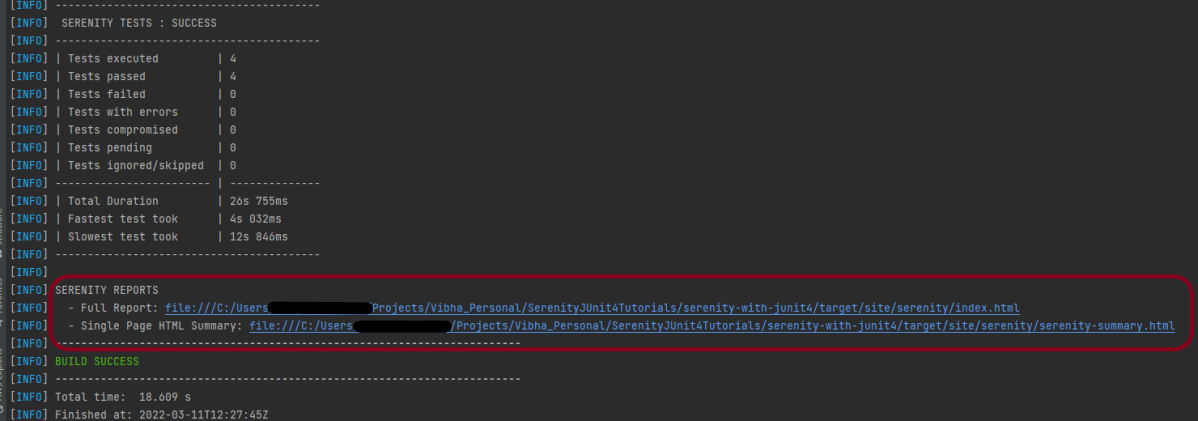
The output of the above program is
The Serenity Reports are generated undertarget/site/serenity/Index.html.
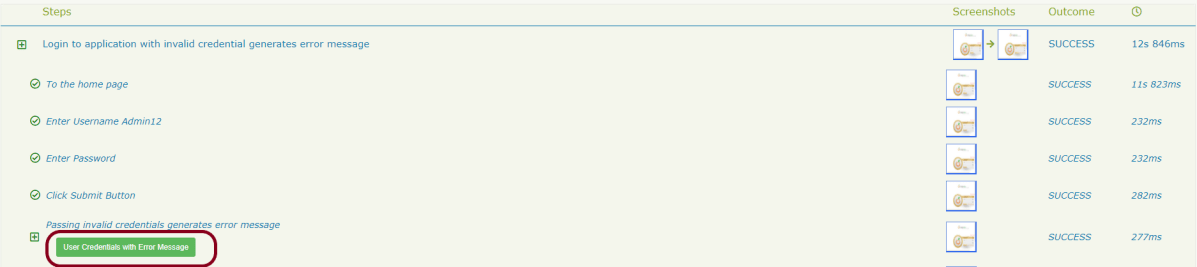
Go to the Detailed Step Description part in Serenity Report. A button with the label “User Credentials with Error Message” will appear next to the step where you called this method:
If you click on this button, you will see your data:
Keep in mind that this feature of Serenity is available from 1.9.16 onwards only.
Congratulation!! We have learned a wonderful feature present in Serenity.
In the previous tutorial, I have explained the Testing of Web Application using Serenity with JUnit4. In this tutorial, I will explain Data Driven Tests in Serenity with JUnit4. Serenity provides features to support Data Driven tests. Refer this tutorial to know how to setup a Serenity project with JUnit4.
There is a parameterized Test Runner to perform data driven tests in JUnit4.
@RunWith(SerenityParameterizedRunner.class)
This runner is very similar to the JUnit Parameterized test runner. Here, @TestData annotation is used to provide test data to the test, and you can use all of the other Serenity annotations like (@Managed, @Steps, @Title and so on). This test runner will also generate proper serenity reports for the executed tests.
Below is an example of data-driven serenity test. In this test, I have created a Test Class (ParameterizationTests) and Step Class (StepLoginPage) and Action Class (NavigateActions). I am passing a set of incorrect credentials to the Login page and will verify the error message.
Here is the code for ParameterizationTests.
@RunWith(SerenityParameterizedRunner.class)
public class ParameterizationTests {

    private final String userName;
    private final String passWord;
    private final String errorMessage;

    @Managed(options = "--headless")
    WebDriver driver;

    @Steps
    NavigateActions navigate;

    @Steps
    StepLoginPage loginPage;

    public ParameterizationTests(String userName, String passWord, String errorMessage) {
        super();
        this.userName = userName;
        this.passWord = passWord;
        this.errorMessage = errorMessage;
    }

    @TestData(columnNames = "Username, Password, ErrorMessage")
    public static Collection<Object[]> testData() {
        return Arrays.asList(new Object[][] { { "Admin12", "", "Password cannot be empty" },
                { "", "abc12", "Username cannot be empty" }, { "_Admin1", "admin123_", "Invalid credentials" },
                { " ", " ", "Username cannot be empty" } });
    }

    @Qualifier
     public String qualifier(){return " - " + " Username = " + userName + " and " + " Password = " + passWord + " should display " + errorMessage;}
    @Test
    @Title("Login to application with invalid credential generates error message")
    public void unsuccessfulLogin() {

        // Given
        navigate.toTheHomePage();

        // When
        loginPage.inputUserName(userName);
        loginPage.inputPassword(passWord);
        loginPage.clickLogin();

        // Then
        Serenity.reportThat("Passing invalid credentials generates error message",
                () -> assertThat(loginPage.loginPageErrorMessage()).isEqualToIgnoringCase(errorMessage));
    }

}
@TestData is the annotation for a method which provides parameters to be injected into the test class constructor by Parameterized. testData() method returns an array list of objects as shown above.
The test data is injected into member variables – userName and passWord. These values are represented as instance variables in the test class, and instantiated via the constructor. These member variables are used in the test.
@Managed is annotated as a WebDriver field that is managed by the Test Runner. The Serenity Test Runner will instantiate this WebDriver before the tests start, and close it once they have all finished.
public class NavigateActions extends UIInteractionSteps {

    @Step
    public void toTheHomePage() {
        openPageNamed("loginForm");
    }
}
There are two ways to run the tests.
Run the tests as JUnit Tests. Right click on the test and select Run As ->JUnit Test.
2. Run the tests through command line using below command.
mvn clean verify
This will run the tests as well as generate the test execution reports – Index.html and serenity-emailable.html.
So, the tests are run and the reports are generated at the shown path.
Index.html
The heading of parameters present in the Serenity Report (Index.html) like Username, Password and Error Message are generated by @TestData as shown below:
It is a single-page, self-contained HTML summary report, containing an overview of the test results, and a configurable breakdown of the status of different areas of the application.
We are done! Congratulations on making it through this tutorial and hope you found it useful! Happy Learning!!
Step 2 – Download and setup Eclipse IDE on the system
The Eclipse IDE (integrated development environment) provides strong support for Java developers. Click here to know How to install Eclipse.
Step 3 – Setup Gradle
To build a test framework, we need to add several dependencies to the project. This can be achieved by any build tool. I have used Gradle Build Tool. Click here to know How to install Gradle. Click here to know How to create a Gradle Java project.
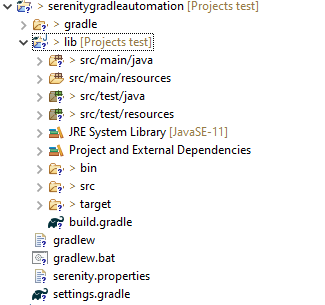
Below is the structure of the Gradle project.
Step 4 – Update repositories, plugin, and dependencies to the Gradle project
Step 5 – Create a feature file under src/test/resources
AFeature File is an entry point to the Cucumber tests. This is a file where you will describe your tests in Descriptive language (Like English). A feature file can contain a scenario or can contain many scenarios in a single feature file. Feature file Below is an example of a Feature file.
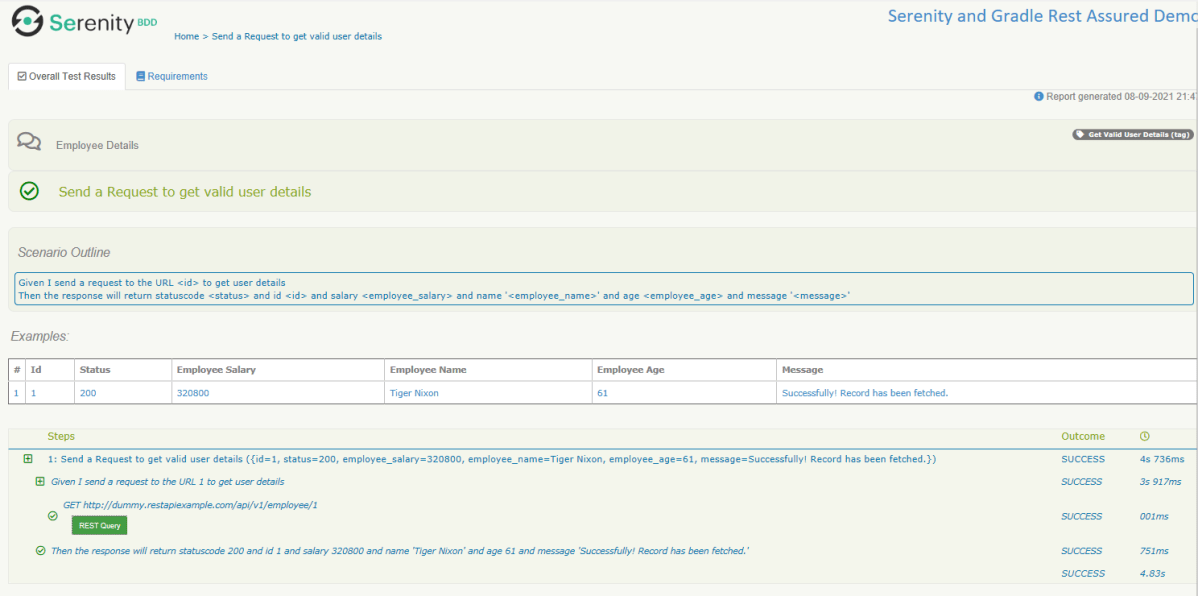
Feature: Employee Details


  @GetValidUserDetails
  Scenario Outline: Send a Request to get valid user details

  Given I send a request to the URL <id> to get user details
  Then the response will return statuscode <status> and id <id> and salary <employee_salary> and name '<employee_name>' and age <employee_age> and message '<message>'

  Examples:
    |id  |status  |employee_salary|employee_name |employee_age  |message                                  |
    |1   |200     |320800         |Tiger Nixon   |61            |Successfully! Record has been fetched.   |

  @GetInvalidUserDetails
  Scenario Outline: Send a Request to get invalid user details

  Given I send a request to the URL <id> to get user details
  Then the response will return statuscode <statusCode> and status '<statusMessage>' and and message '<message>'

  Examples:
    |id     |statusCode  |statusMessage    |message                                  |
    |9999   |200         |success          |Successfully! Record has been fetched.   |
Step 6 – Create the Step Definition class or Glue Code for the Test Scenario
The steps definition file stores the mapping between each step of the test scenario defined in the feature file with a code of the function to be executed. So, now when Cucumber executes a step of the scenario mentioned in the feature file, it scans the step definition file and figures out which function is to be called.
public class EmployeeDefinitions {

	private static final String URL = "http://dummy.restapiexample.com/api/v1/employee/";
	public Response response;

	@Given("I send a request to the URL {int} to get user details")
	public void sendRequest(int id) {

		response = SerenityRest.given().contentType("application/json").header("Content-Type", "application/json")
				.when().get(URL + id);
	}

	@Then("the response will return statuscode {int} and id {int} and salary {int} and name {string} and age {int} and message {string}")

	public void verifyValidUser(int statusCode, int id, int salary, String name, int age, String message) {
		SerenityRest.restAssuredThat(response -> response.statusCode(statusCode).and().body("data.id", equalTo(id))
				.and().body("data.employee_salary", equalTo(salary)).and().body("data.employee_name", equalTo(name))
				.and().body("data.employee_age", equalTo(age)).and().body("message", equalTo(message)));

	}

	@Then("the response will return statuscode {int} and status {string} and and message {string}")
	public void verifyInalidUser(int statusCode, String statusMessage, String message) {
		SerenityRest.restAssuredThat(response -> response.statusCode(statusCode).and()
				.body("status", equalTo(statusMessage)).and().body("message", equalTo(message)));

	}
}
Step 7 – Create a Serenity Cucumber Runner class
Cucumber runs the feature files via JUnit and needs a dedicated test runner class to actually run the feature files. When you run the tests with Serenity, you use theCucumberWithSerenity test runner. You also need to use the @CucumberOptionsclass to provide the root directory where the feature files can be found.
import org.junit.runner.RunWith;

import io.cucumber.junit.CucumberOptions;
import net.serenitybdd.cucumber.CucumberWithSerenity;

@RunWith(CucumberWithSerenity.class)
@CucumberOptions(plugin = { "pretty" }, features = "lib/src/test/resources/features/Employee.feature", glue = {
		"serenitygradlerestautomation.definitions" })

public class SerenityRunnerTest {
}
Step 8 – Create serenity.properties file at the root of the project
serenity.project.name = Serenity and Gradle Rest Assured Demo
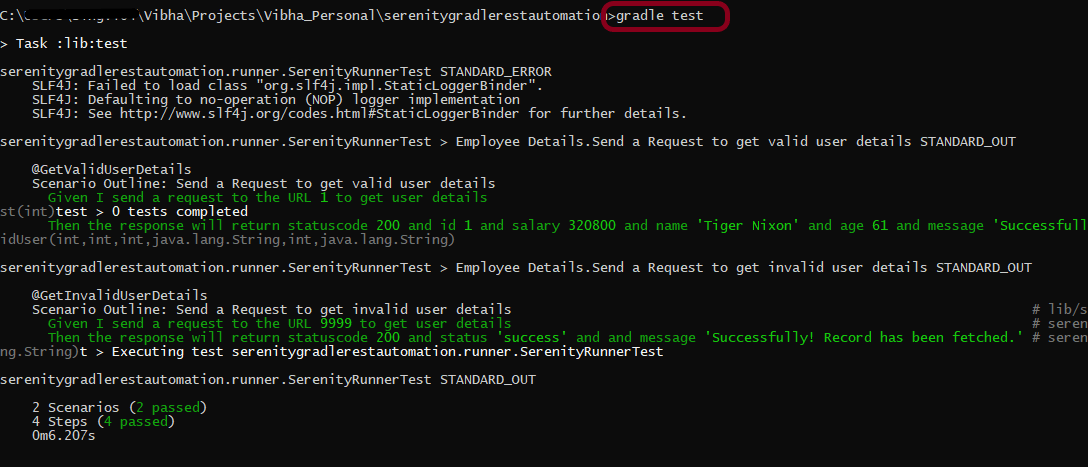
Step 9 – Run the tests through command line, which generates Serenity Report
Open the command line and go to the location where gradle.build of the project is present and type the below command.
gradle test
The Serenity report is generated under /lib/target/site/serenity.
Index.html
Overall Test Results Section provides the details about all the Test Scenario, like the time taken by each test step, the status of each test step, and soon.
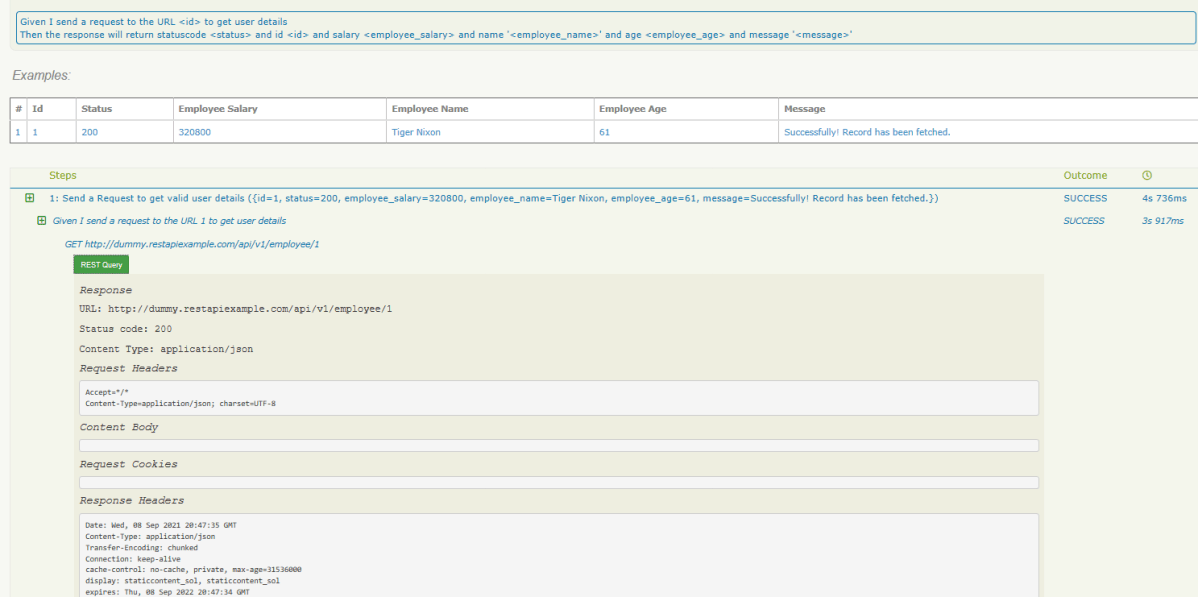
In this report, you can see the request as well as response details in the report.
Step 10 – Generate Single Page HTML Report
As we have already mentioned the dependencies of a single-page-report in build.gradle, we can generate an emailable serenity report that contains the summary of test execution.
gradle reports
Serenity Summary Report (single-page-report.html) is placed under lib\target\site\serenity.
We are done! Congratulations on making it through this tutorial and hope you found it useful! Happy Learning!!
In this tutorial, I will explain creating a framework for the testing of Web Applications in Cucumber BDD.
Pre-Requisite
Java 11 installed
Gradle installed
Eclipse or IntelliJ installed
This framework consists of:
Serenity – 2.6.0
Serenity Cucumber – 2.6.0
Java 11
JUnit – 4.13.2
Gradle – 7.2
Steps to setup Gradle Java Project for Web Application using Serenity, Cucumber6 and JUnit4
Download and Install Java on the system
Download and setup Eclipse IDE on the system
Setup Gradle on System and create a new Gradle Project
Update repositories, plugins, and dependencies to the Gradle project
Create a feature file under src/test/resources
Create the Step Definition class or Glue Code for the Test Scenario
Create a Serenity Cucumber Runnerclass
Create serenity.conffile under src/test/resources
Create serenity.properties file at the root of the project
Run the tests through commandline which generates Serenity Report
Step 1- Download and Install Java
Cucumber and Rest-Assured need Java to be installed on the system to run the tests. Click here to know How to install Java.
Step 2 – Download and setup Eclipse IDE on system
The Eclipse IDE (integrated development environment) provides strong support for Java developers. Click here to know How to install Eclipse.
Step 3 – Setup Gradle
To build a test framework, we need to add several dependencies to the project. This can be achieved by any build Tool. I have used Gradle Build Tool. Click here to know How to install Gradle. Click here to know How to create a Gradle Java project. Below is the structure of the Gradle project.
Step 4 – Update repositories, plugin, and dependencies to the Gradle project
Step 5 – Create a feature file under src/test/resources
AFeature Fileis an entry point to the Cucumber tests. This is a file where you will describe your tests in Descriptive language (Like English). A feature file can contain a scenario or can contain many scenarios in a single feature file. Below is an example of Feature file.
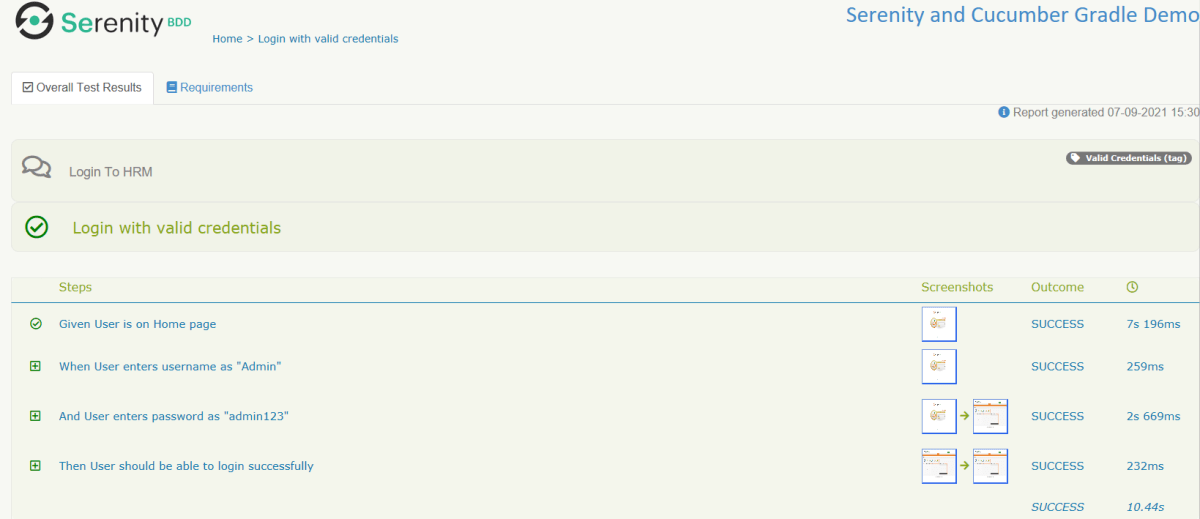
Feature: Login to HRM

   @ValidCredentials
   Scenario: Login with valid credentials

    Given User is on Home page
    When User enters username as "Admin"
    And User enters password as "admin123"
    Then User should be able to login successfully
Step 6 – Create the Step Definition class or Glue Code for the Test Scenario
The steps definition file stores the mapping between each step of the test scenario defined in the feature file with a code of the function to be executed. So, now when Cucumber executes a step of the scenario mentioned in the feature file, it scans the step definition file and figures out which function is to be called.
Create a StepDefinition class for LoginPage.feature
public class LoginPageDefinitions {

    @Steps
    StepLoginPage loginPage;

    @Steps
    StepDashboardPage dashPage;

    @Steps
    StepForgetPasswordPage forgetpasswordPage;

    @Given("User is on Home page")
    public void openApplication() {
        loginPage.open();
        System.out.println("Page is opened");
    }

    @When("User enters username as {string}")
    public void enterUsername(String userName) {
        System.out.println("Enter Username");
        loginPage.inputUserName(userName);
    }

    @When("User enters password as {string}")
    public void enterPassword(String passWord) {
        loginPage.inputPassword(passWord);

        loginPage.clickLogin();
    }

    @Then("User should be able to login successfully")
    public void clickOnLoginButton() {
        dashPage.loginVerify();
    }

}
Serenity Step Libraries integrate smoothly into Cucumber Step Definition files; all you need to do is to annotate a step library variable with the @Steps annotation. Methods that represent a business task or action (inputUserName()), and that will appear in the reports as a separate step, are annotated with the @Step annotation. Here, I have created two StepClasses – StepLoginPage and StepDashboardPage
public class StepLoginPage extends PageObject {

    @Step("Enter Username")
    public void inputUserName(String userName) {
        $(By.name("txtUsername")).sendKeys((userName));
    }

    @Step("Enter Password")
    public void inputPassword(String passWord) {
        $(By.name("txtPassword")).sendKeys((passWord));
    }

    @Step("Click Submit Button")
    public void clickLogin() {
        $(By.name("Submit")).click();
    }

}
StepDashboardPage
public class StepDashboardPage extends PageObject {

    @Step("Successful login")
    public void loginVerify() {
        String dashboardTitle = $(By.id("welcome")).getText();
        assertThat(dashboardTitle, containsString("Welcome"));
    }
}
Step 7 – Create a Serenity Cucumber Runner class
import org.junit.runner.RunWith;

import io.cucumber.junit.CucumberOptions;
import net.serenitybdd.cucumber.CucumberWithSerenity;

@RunWith(CucumberWithSerenity.class)
@CucumberOptions(plugin = {}, features = "lib/src/test/resources/features", glue = "serenitygradleautomation.definitions")

public class CucumberTestSuite {

}
Step 8 – Create serenity.conf file under src/test/resources
Serenity.conf file is used to specify various features like the type of webdriver used, various test environments, run tests in headless mode, and many more options.
In the previous tutorial, I explained the Generation of Serenity Report (index.html) using Cucumber6 and JUnit. Index.html report that acts both as a test report and living documentation for the product. It has various views like Overall Test Status, Requirement View, Capabilities View, and Features View.
Sometimes it is useful to be able to send a short summary of the test outcomes via email. Serenity allows us to generate a single-page, self-contained HTML summary report, containing an overview of the test results, and a configurable breakdown of the status of different areas of the application.
Pre-Requisite
Java 11 installed
Maven installed
Eclipse or IntelliJ installed
This framework consists of:
Java 11
Maven – 3.8.1
Serenity – 2.6.0
Serenity Maven – 2.6.0
Serenity Cucumber6 – 2.6.0
JUnit – 4.13.2
Maven Surefire Plugin – 3.0.0-M5
Maven Failsafe Plugin – 3.0.0-M5
Maven Comiler Plugin – 3.8.1
Implementation Steps
Update Properties section in Maven pom.xml
Add repositories and pluginRepository to Maven pom.xml
Add Serenity, Serenity Cucumber and JUnitdependencies to POM.xml
Update Build Section of pom.xml
Create source folder – src/test/resources and features folder within src/test/resources to create test scenarios in Feature file
Create theStep Definition class or Glue Code
Create a Serenity-Cucumber Runner class
Create serenity.conf file under src/test/resources
Createserenity.properties file in the root of the project
Run the tests through commandline which generates Serenity Report
To know about Step 1 to 3, please refer here. These steps are the same for Index.html report and emailable report.
Now, add the below-mentioned plugin. These reports are configured in the Serenity Maven plugin, where you need to do two things. First, you need to add a dependency for the serenity-emailer module in the plugin configuration. Then, you need to tell Serenity to generate the email report when it performs the aggregation task.
I have provided the location of Firefoxdriver through the command line. I believe this is the best way to run the test. We can hard-code the path in the test code or in serenity.conf file. In that case, you don’t need to provide the location of Firefoxdriver through command line. You can use the below command.
mvn verify
The output of the above program is
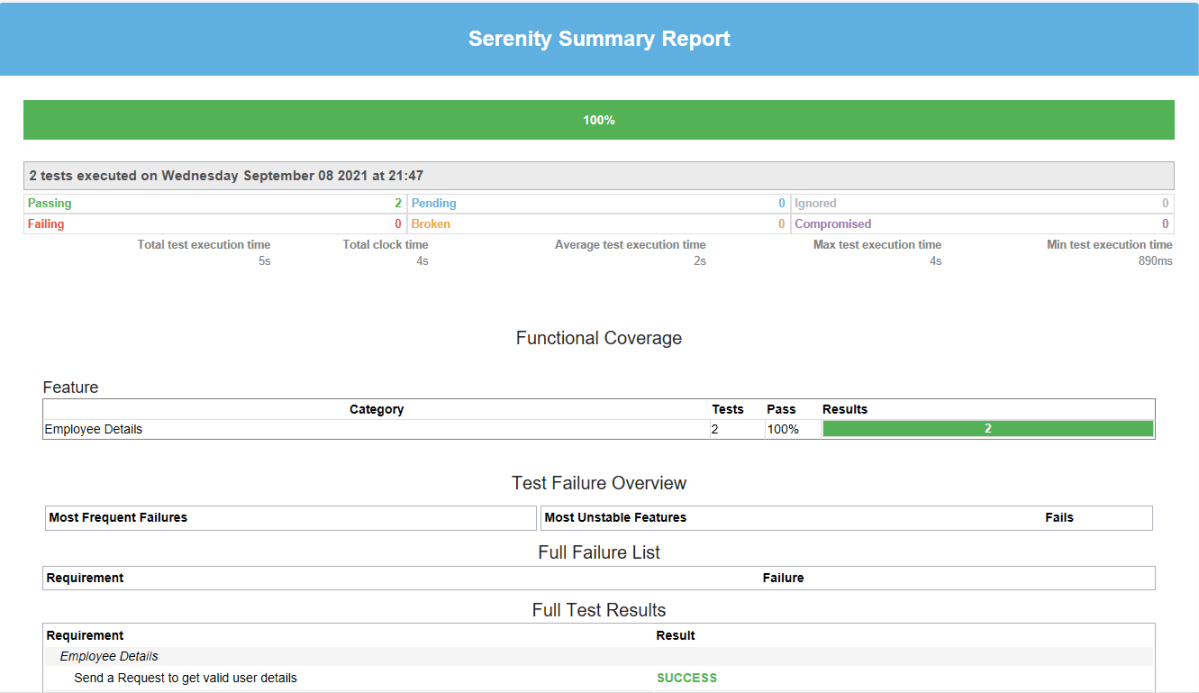
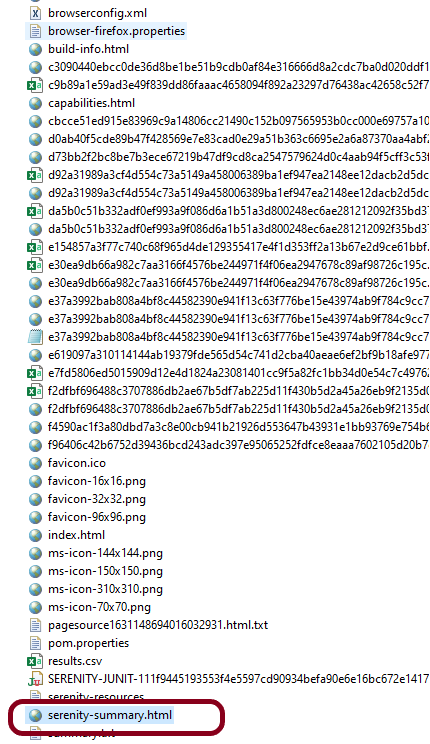
This image shows that two different types of reports are generated by Serenity – Full Report (index.html) and Single Page HTML Summary ( serenity-summary.html ).
This emailable report is called serenity-summary.html. This is generated under site/serenity/ serenity-summary.html
You can see a sample of such a report here:
As you can see in the above execution status, out of six tests, one test failed. The same information is displayed in the report.
This report provides a summary of the test execution.
The Functional Coverage section lets us highlight key areas of your application. By default, this section will list test results for each Feature. But we can configure the report to group results by other tags as well.
We are done! Congratulations on making it through this tutorial and hope you found it useful! Happy Learning!!
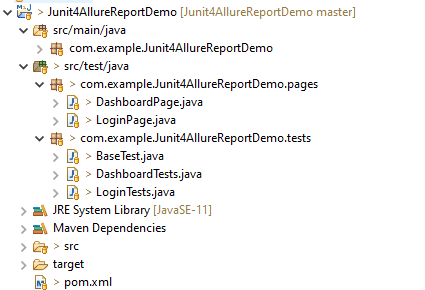
Below is the sample project which uses Selenium and JUnit4 which is used to generate an Allure Report.
We have 2 pages. Below is the code for Login Page which contains all the web elements and methods related to that web elements.
public class LoginPage {

	WebDriver driver;

	By userName = By.name("txtUsername");

	By password = By.name("txtPassword");

	By titleText = By.id("logInPanelHeading");

	By login = By.id("btnLogin");

	By errorMessage = By.id("spanMessage");

	public LoginPage(WebDriver driver) {
		this.driver = driver;
	}

	// Set user name in textbox
	public void setUserName(String strUserName) {
		driver.findElement(userName).sendKeys(strUserName);
	}

	// Set password in password textbox
	public void setPassword(String strPassword) {
		driver.findElement(password).sendKeys(strPassword);
	}

	// Click on login button
	public void clickLogin() {
		driver.findElement(login).click();
	}

	@Step("Verify title of Login Page")
	public void verifyPageTitle() {
		String loginPageTitle = driver.findElement(titleText).getText();
		Assert.assertTrue(loginPageTitle.contains("LOGIN Panel"));
	}

	/* Failed Test */
	@Step("Verify error message when invalid credentail is provided")
	public void verifyErrorMessage() {
		String invalidCredentialErrorMessage = driver.findElement(errorMessage).getText();
		Assert.assertTrue(invalidCredentialErrorMessage.contains("Incorrect Credentials"));
	}

	@Step("Enter username and password")
	public void login(String strUserName, String strPasword) {

		// Fill user name
		this.setUserName(strUserName);

		// Fill password
		this.setPassword(strPasword);

		// Click Login button
		this.clickLogin();

	}
}
DashboardPage.java
public class DashboardPage {

	WebDriver driver;

	By dashboardPageTitle = By.id("welcome");

	By options = By.cssSelector(
			"#dashboard-quick-launch-panel-menu_holder > table > tbody > tr > td:nth-child(1) > div > a > span");

	public DashboardPage(WebDriver driver) {
		this.driver = driver;

	}

	@Step("Verify title of Dashboard page")
	public void verifyDashboardPageTitle() {
		String DashboardPageTitle = driver.findElement(dashboardPageTitle).getText();
		Assert.assertTrue(DashboardPageTitle.contains("Welcome"));
	}

	@Step("Verify Quick Launch Options on Dashboard page")
	public void verifyQuickLaunchOptions() {
		String QuickLaunchOptions = driver.findElement(options).getText();
		Assert.assertTrue(QuickLaunchOptions.contains("Assign Leave"));
	}

}
Test Classes related to various Pages
BaseTest.java
public class BaseTest {

	public static WebDriver driver;
	LoginPage objLogin;
	DashboardPage objDashboardPage;

	@Step("Start the application")
	@Before
	public void setup() {
		System.setProperty("webdriver.gecko.driver",
				"C:\\Users\\Vibha\\Software\\geckodriver-v0.26.0-win64\\geckodriver.exe");
		driver = new FirefoxDriver();
		driver.manage().window().maximize();
		driver.manage().timeouts().implicitlyWait(10, TimeUnit.SECONDS);
		driver.get("https://opensource-demo.orangehrmlive.com/");
	}

	@Step("Stop the application")
	@After
	public void close() {
		driver.close();
	}
}
LoginTests.java
@Epic("Web Application Regression Testing using JUnit4")
@Feature("Login Page Tests")
@Listeners(TestExecutionListener.class)
public class LoginTests extends BaseTest {

	LoginPage objLogin;
	DashboardPage objDashboardPage;

	@Severity(SeverityLevel.NORMAL)
	@Test(priority = 0, description = "Verify Login Page")
	@Description("Test Description : Verify the title of Login Page")
	@Story("Title of Login Page")
	public void verifyLoginPage() {

		// Create Login Page object
		objLogin = new LoginPage(driver);

		// Verify login page text
		objLogin.verifyPageTitle();
	}

	@Severity(SeverityLevel.BLOCKER)
	@Test(priority = 1, description = "Login with invalid username and password")
	@Description("Test Description : Login Test with invalid credentials")
	@Story("Unsuccessful Login to Application")
	public void invalidCredentialTest() {

		// Create Login Page object
		objLogin = new LoginPage(driver);
		objLogin.login("test", "test123");

		// Verify login page text
		objLogin.verifyErrorMessage();

	}

}
DashboardTests.java
@Epic("Web Application Regression Testing using JUnit4")
@Feature("Dashboard Page Tests")
public class DashboardTests extends BaseTest {

	LoginPage objLogin;
	DashboardPage objDashboardPage;

	@Severity(SeverityLevel.BLOCKER)
	@Test
	@Description("Test Description : After successful login to application opens Dashboard page")
	@Story("Successful login of application opens Dashboard Page")

	public void DasboardTest() {

		objLogin = new LoginPage(driver);

		// login to application
		objLogin.login("Admin", "admin123");

		// go the dashboard page
		objDashboardPage = new DashboardPage(driver);

		// Verify dashboard page
		objDashboardPage.verifyQuickLaunchOptions();

	}

}
Step 5 – Run the Test and Generate Allure Report
To run the tests, use the below command
mvn clean test
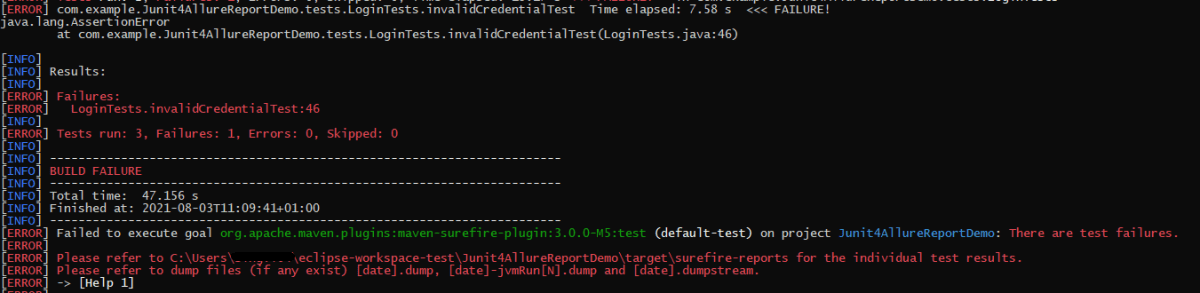
In the below image, we can see that one test is failed and two passed out of three tests.
This will create allure-results folder with all the test report. These files will be use to generate Allure Report.
To create Allure Report, use the below command
allure serve
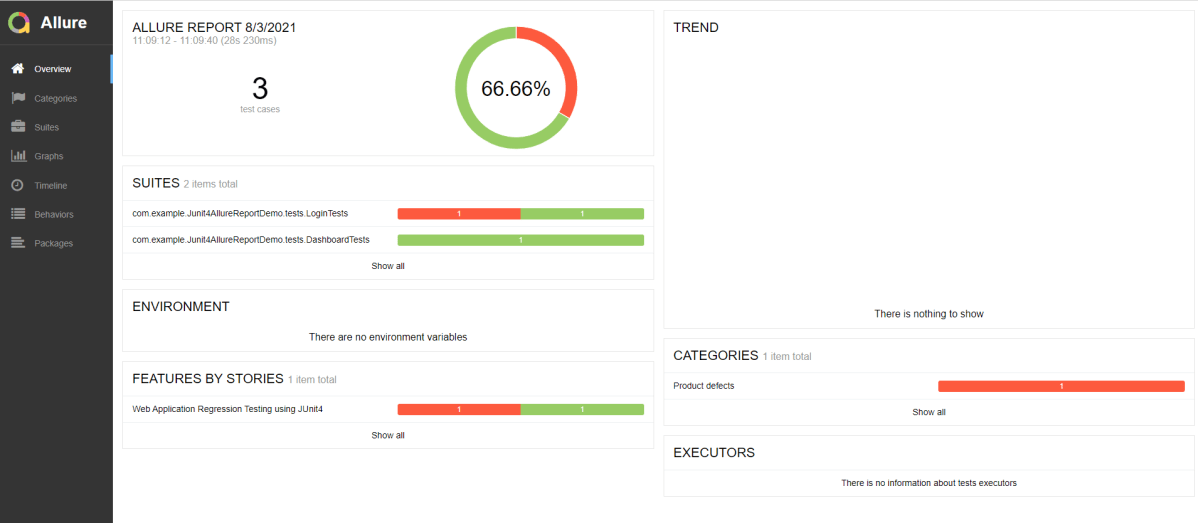
This will generate the beautiful Allure Test Report as shown below.
Allure Report Dashboard
Overview page hosts several default widgets representing basic characteristics of your project and test environment.
Statistics – overall report statistics.
Launches – if this report represents several test launches, statistics per launch will be shown here.
Behaviors – information on results aggregated according to stories and features.
Executors – information on test executors that were used to run the tests.
History Trend – if tests accumulated some historical data, it’s trend will be calculated and shown on the graph.
Environment – information on test environment.
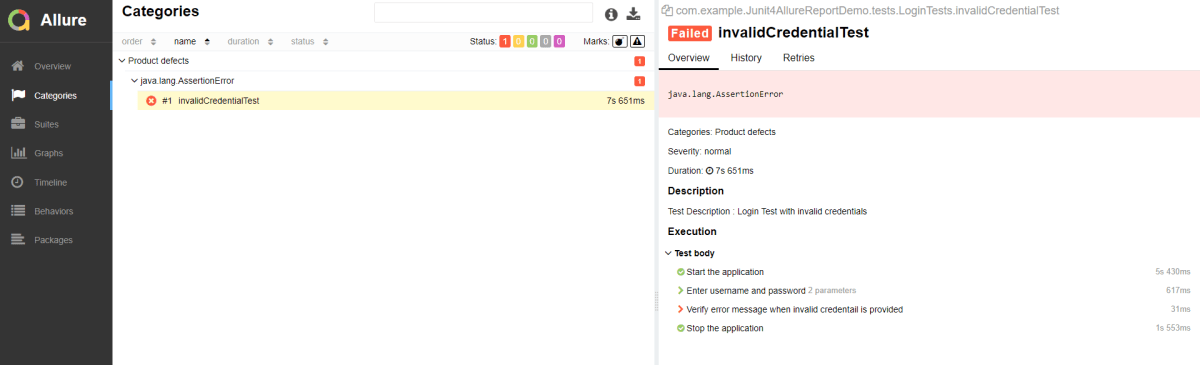
Categories in Allure Report
Categories tab gives you the way to create custom defects classification to apply for test results. There are two categories of defects – Product Defects (failed tests) and Test Defects (broken tests).
Suites in Allure Report
On the Suites tab a standard structural representation of executed tests, grouped by suites and classes can be found.
Graphs in Allure Report
Graphs allow you to see different statistics collected from the test data: statuses breakdown or severity and duration diagrams.
Timeline in Allure Report
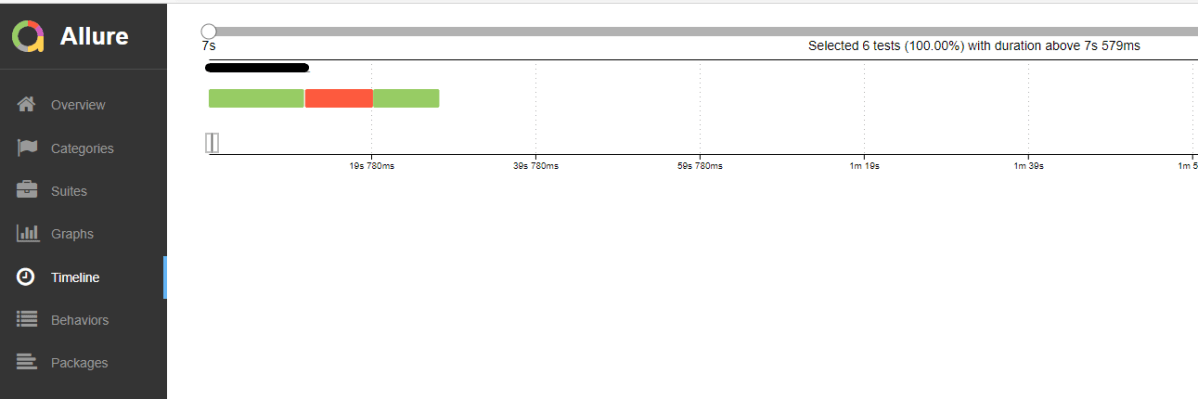
Timeline tab visualizes retrospective of tests execution, allure adaptors collect precise timings of tests, and here on this tab they are arranged accordingly to their sequential or parallel timing structure.
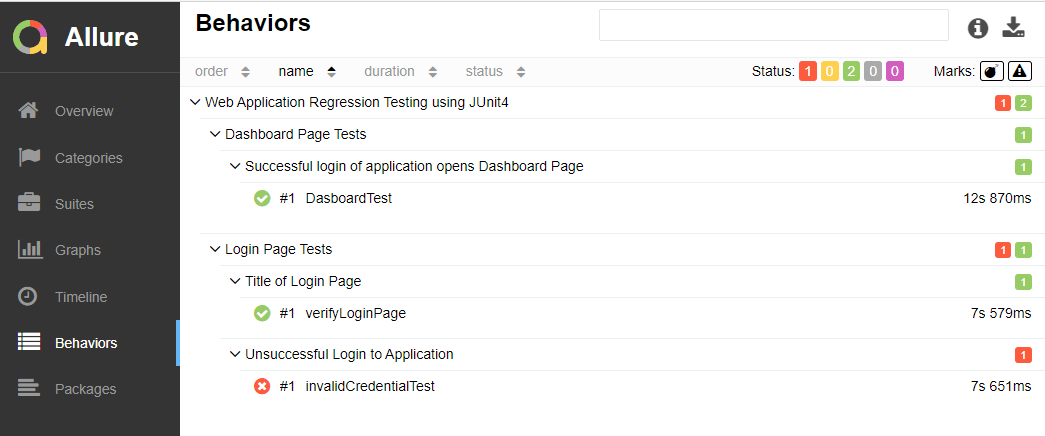
Behaviors of Allure Report
This tab groups test results according to Epic, Feature and Story tags.
Packages in Allure Report
Packages tab represents a tree-like layout of test results, grouped by different packages.
In this tutorial, I will explain Parallel Testing usingCucumber with JUnit4.
Cucumber-JVM allows parallel execution across multiple threads since version 4.0.0. There are several options to incorporate this built-in feature in a Cucumber project. You can do so by using JUnit, TestNG, or CLI.
Cucumber can be executed in parallel using JUnit and Maven test execution plugins.
In JUnit, thefeature files are run in parallel rather than in scenarios, which means all the scenarios in a feature file will be executed by the same thread. You can use either Maven Surefire or Failsafe plugin to execute the runner. In this tutorial, I’m using the Maven Surefire plugin.
Create a Maven project in your favorite IDE using the cucumber-archetype or by adding Cucumber dependencies to the POM as detailed here and Junit dependencies here. To know more about How to set up a Cucumber Maven project with Eclipse, please refer to this tutorial – Cucumber Tutorial – How to setup Cucumber with Eclipse.
Below is the structure of the project.
Step 2 – Update the Properties section in Maven pom.xml
Step 5 – Create a feature folder in src/test/resources
Add 2 feature files – LoginPage.feature and ForgotPasswordPage.feature in the features folder present in src/test/resources.
LoginPage.feature
Feature: Login to HRM Application

  Background:
    Given User is on Home page

  @ValidCredentials
  Scenario: Login with valid credentials - Feature 1, Scenario - 1

    When User enters username as "Admin" and password as "admin123"
    Then User should be able to login successfully

  @InvalidCredentials
  Scenario Outline: Login with invalid credentials - Feature 1, Scenario - 2

    When User enters username as "<username>" and password as "<password>"
    Then User should be able to see error message "<errorMessage>"

    Examples:
      | username    | password   | errorMessage                      |
      | Admin       | admin12$$  | Invalid credentials               |
      | admin$$     | admin123   | Invalid credentials               |
      | abc123      | xyz$$      | Invalid credentials               |
      |             | xyz$$      | Invalid credentials               |
ForgotPasswordPage.feature
Feature: Forgot Password Page

  Background:
    Given User is on Home page

  @BackFunctionality
  Scenario: Validate the cancel functionality - Feature 2, Scenario - 1

    When User clicks on Forgot your password? link
    Then User should be able to navigate to Reset Password page
    And User clicks on Cancel button to go back to Login Page

  @ResetFunctionality
  Scenario: Validate the Reset Password functionality - Feature 2, Scenario - 2

    When User clicks on Forgot your password? link
    Then User should be able to navigate to Reset Password page
    And User clicks on Reset Password button and provide username as "abc1234"
    And Verify the message "Reset Password link sent successfully"
Step 6 – Create the Page Object Model classes of LoginPage and ForgotPasswordPage feature files
Page Object Model class contains all the locators and the actions performed on these locators for the particular class to improve the readability and maintainability of the code.
Below are the Page Object Model classes for these feature files.
LoginPage
import org.openqa.selenium.By;
import org.openqa.selenium.WebDriver;

public class LoginPage {

    public WebDriver driver;

    By userName = By.name("username");
    By passWord = By.name("password");
    By login = By.xpath("//*[@id='app']/div[1]/div/div[1]/div/div[2]/div[2]/form/div[3]/button");
    By errorMessage = By.xpath("//*[@id='app']/div[1]/div/div[1]/div/div[2]/div[2]/div/div[1]/div[1]/p");
    By forgotPasswordLink = By.xpath("//*[@id='app']/div[1]/div/div[1]/div/div[2]/div[2]/form/div[4]/p");
    By loginPageTitle = By.xpath("//*[@id='app']/div[1]/div/div[1]/div/div[2]/h5");

    public LoginPage(WebDriver driver) {
        this.driver = driver;
    }

    public String getErrorMessage() {
        return driver.findElement(errorMessage).getText();
    }

    public void login(String strUserName, String strPassword) {

        // Fill user name
        driver.findElement(userName).sendKeys(strUserName);

        // Fill password
        driver.findElement(passWord).sendKeys(strPassword);

        // Click Login button
        driver.findElement(login).click();

    }

    // Click on Forgot Password link
    public void clickOnForgotPasswordLink() {
        driver.findElement(forgotPasswordLink).click();
    }

    //Get Login Page Title
    public String getLoginPageTitle() {
        return driver.findElement(loginPageTitle).getText();
    }
}
HomePage
import org.openqa.selenium.By;
import org.openqa.selenium.WebDriver;

public class HomePage {

    public WebDriver driver;

    public HomePage(WebDriver driver) {
        this.driver = driver;
    }

    By homePageUserName = By.xpath("//*[@id='app']/div[1]/div[1]/header/div[1]/div[1]/span/h6");

    public String getHomePageText() {
        return driver.findElement(homePageUserName).getText();
    }
}
ForgotPasswordPage
import org.openqa.selenium.By;
import org.openqa.selenium.WebDriver;

public class ForgotPasswordPage {

    WebDriver driver;

     By forgotPasswordPageTitle = By.xpath("//*[@id='app']/div[1]/div[1]/div/form/h6");
     By cancelBtn = By.xpath("//*[@id='app']/div[1]/div[1]/div/form/div[2]/button[1]");
     By resetPasswordBtn = By.xpath("//*[@id='app']/div[1]/div[1]/div/form/div[2]/button[2]");
     By userName = By.name("username");
     By resetMessage = By.xpath("//*[@id='app']/div[1]/div[1]/div/h6");

    public ForgotPasswordPage(WebDriver driver) {
        this.driver = driver;
    }

    // Get the Title of ForgotPage
    public String getForgotPageText() {
        return driver.findElement(forgotPasswordPageTitle).getText();
    }

    // Click Cancel Button
    public void clickOnCancelBtn() {
         driver.findElement(cancelBtn).click();
    }

    // Click ResetPassword Button
    public void clickOnRestPasswordBtn() {
        driver.findElement(resetPasswordBtn).click();
    }

    // Type username in TextBox
    public void TypeOnUsernameTextBox(String username) {
        driver.findElement(userName).sendKeys(username);
    }

    // Get Message
    public String getRestMessage() {
        return driver.findElement(resetMessage).getText();
    }
}
PageObjectManager – This class creates the object of all the above-mentioned Page Object Model classes. This an optional class. If you want you can create the objects in StepDefinition class also.
public class PageObjectManager {

    public LoginPage loginPage;
    public HomePage homePage;
    public ForgotPasswordPage forgotPasswordPage;
    public WebDriver driver;


    public PageObjectManager(WebDriver driver)
    {
        this.driver = driver;
    }

    public LoginPage getLoginPage()
    {

        loginPage= new LoginPage(driver);
        return loginPage;
    }

    public HomePage getHomePage()
    {
        homePage = new HomePage(driver);
        return homePage;
    }

    public ForgotPasswordPage getForgotPasswordPage()
    {
        forgotPasswordPage = new ForgotPasswordPage(driver);
        return forgotPasswordPage;
    }
}
Step 7 – Create the Step Definition classes for both feature files or Glue Code
Below is the Step Definition for LoginPage.feature.
import org.example.pageObjects.HomePage;
import org.example.pageObjects.LoginPage;
import org.example.pageObjects.PageObjectManager;
import org.example.utils.TestSetUp;
import io.cucumber.java.en.Given;
import io.cucumber.java.en.Then;
import io.cucumber.java.en.When;
import org.junit.Assert;

public class LoginPageDefinitions {

    TestSetUp setUp;
    public PageObjectManager pageObjectManager;
    public LoginPage loginPage;
    public HomePage homePage;


    public LoginPageDefinitions(TestSetUp setUp)  {
        this.setUp = setUp;
        this.loginPage = setUp.pageObjectManager.getLoginPage();
        this.homePage= setUp.pageObjectManager.getHomePage();
    }

    @Given("User is on Home page")
    public void loginTest()  {
        setUp.baseTest.WebDriverManager().get("https://opensource-demo.orangehrmlive.com/");

    }

    @When("User enters username as {string} and password as {string}")
    public void goToHomePage(String userName, String passWord) {

        // login to application
        loginPage.login(userName, passWord);

        // go the next page

    }

    @Then("User should be able to login successfully")
    public void verifyLogin() {

        // Verify home page
        Assert.assertTrue(homePage.getHomePageText().contains("Dashboard"));

    }

    @Then("User should be able to see error message {string}")
    public void verifyErrorMessage(String expectedErrorMessage) {

        // Verify home page
        Assert.assertEquals(loginPage.getErrorMessage(),expectedErrorMessage);

    }

}
Below is the Step Definition for ForgotPasswordPage.feature.
import io.cucumber.java.en.Then;
import io.cucumber.java.en.When;
import org.example.pageObjects.ForgotPasswordPage;
import org.example.pageObjects.LoginPage;
import org.example.pageObjects.PageObjectManager;
import org.example.utils.TestSetUp;
import org.junit.Assert;


public class ForgotPasswordPageDefinitions {

    TestSetUp setUp;
    PageObjectManager pageObjectManager;
    public LoginPage loginPage;
    public  ForgotPasswordPage forgotPasswordPage;

    public ForgotPasswordPageDefinitions(TestSetUp setUp) {
        this.setUp = setUp;
        this.loginPage = setUp.pageObjectManager.getLoginPage();
        this.forgotPasswordPage = setUp.pageObjectManager.getForgotPasswordPage();
    }

    @When("User clicks on Forgot your password? link")
    public void forgotPasswordLink() {

        loginPage.clickOnForgotPasswordLink();

    }

    @Then("User should be able to navigate to Reset Password page")
    public void verifyForgotPasswordPage() {

        Assert.assertEquals(forgotPasswordPage.getForgotPageText(),"Reset Password");

    }

    @Then("User clicks on Cancel button to go back to Login Page")
    public void verifyCancelBtn() {

        forgotPasswordPage.clickOnCancelBtn();
        Assert.assertEquals(loginPage.getLoginPageTitle(),"Login");

    }

    @Then("User clicks on Reset Password button and provide username as {string}")
    public void verifyResetPasswordBtn(String username) {

        forgotPasswordPage.TypeOnUsernameTextBox(username);
        forgotPasswordPage.clickOnRestPasswordBtn();

    }

    @Then("Verify the message {string}")
    public void verifyMessage(String message) {

        //  ForgotPasswordPage forgotPasswordPage = setUp.pageObjectManager.getForgotPasswordPage();
        Assert.assertEquals(forgotPasswordPage.getRestMessage(),message);

    }
}
Step 8 – Create the Hook Class and Dependency Injection class (TestSetUp) and BaseTest class
Below is the code for the ApplicationHook Class.
import io.cucumber.java.After;
import io.cucumber.java.AfterStep;
import io.cucumber.java.Scenario;
import org.example.utils.TestSetUp;
import org.openqa.selenium.OutputType;
import org.openqa.selenium.TakesScreenshot;
import org.openqa.selenium.WebDriver;

public class ApplicationHooks {

 public TestSetUp setUp;

    public ApplicationHooks(TestSetUp setUp) {
        this.setUp = setUp;
    }

    @After
    public void tearDown( )  {
        setUp.baseTest.WebDriverManager().quit();
    }

    @AfterStep
    public void addScreenshot(Scenario scenario) {

        WebDriver driver =  setUp.baseTest.WebDriverManager();
        if(scenario.isFailed()) {
            final byte[] screenshot = ((TakesScreenshot) driver).getScreenshotAs(OutputType.BYTES);
            scenario.attach(screenshot, "image/png", "image");
        }

    }

}
Below is the code for the Dependency Injection class. In Cucumber, if we want to share the state between multiple-step definition files, we will need to use dependency injection (DI).
import org.openqa.selenium.WebDriver;
import org.openqa.selenium.WebElement;
import pageObjects.PageObjectManager;

public class TestSetUp {

    public WebElement errorMessage;
    public WebElement homePageUserName;
    public PageObjectManager pageObjectManager;
    public BaseTest baseTest;

    public TestSetUp()  {

        baseTest = new BaseTest();
        pageObjectManager = new PageObjectManager(baseTest.WebDriverManager());

    }
}
BaseTest class is used to initialize the WebDriver.
import io.github.bonigarcia.wdm.WebDriverManager;
import org.openqa.selenium.WebDriver;
import org.openqa.selenium.chrome.ChromeDriver;
import java.time.Duration;

public class BaseTest {

    public WebDriver driver;
    public final static int TIMEOUT = 10;

    public WebDriver WebDriverManager ()  {


        if (driver == null) {

            WebDriverManager.chromedriver().setup();
            driver = new ChromeDriver();
            driver.manage().timeouts().implicitlyWait(Duration.ofSeconds(TIMEOUT));
            driver.manage().window().maximize();
            driver.get(url);

        }
        return driver;
    }
}
Step 9 – Create a Test Runner to run the tests
import io.cucumber.junit.Cucumber;
import io.cucumber.junit.CucumberOptions;
import org.junit.runner.RunWith;

@RunWith(Cucumber.class)
@CucumberOptions(tags = "", features = "src/test/resources/features", glue = "org.example.definitions")

public class CucumberRunnerTests  {

}
Step 10 – Cucumber Report Generation
To get Cucumber Test Reports, add cucumber.properties in src/test/resources and add the below instruction in the file.
cucumber.publish.enabled=true
Step 11 – Execute the tests from the command line
mvn clean test
Below is the execution screen. There are two feature files.
When we invoke the test through Maven, the surefire plugin executes the Feature files parallelly. Here, LoginPage has 5 scenarios and ForgotPasswordPage has 2 scenarios. So, initially when the execution will start 1 scenario from both the tests will be executed parallelly and then again one test from each feature will execute. Later, we will be left with 4 scenarios in the LoginPage feature file, so the scenario will run sequentially of the LoginPage feature file.
All the tests of a particular feature file are executed together as feature files are run in parallel, not scenarios.
Step 12 – Difference between Parallel tests and Non-Parallel Tests
Parallel Tests
Below is the Cucumber Report generated for parallel tests.
When the tests are run as JUnit tests from CucumberRunnerTests, then the tests are executed sequentially.
We are done! Congratulations on making it through this tutorial and hope you found it useful! Happy Learning!!