Last Updated On
In the previous tutorial, I have explained the Data Driven Tests in Serenity where test data are defined in Tests. In this tutorial, I will explain the Data Driven tests in Serenity where we will get the test data from CSV file.
To start with this tutorial, refer this tutorial also which explains how to setup a project with Serenity and JUnit4.
Project Structure

Serenity lets us perform data-driven testing using test data in a CSV file. We store our test data in a CSV file (by default with columns separated by commas), with the first column acting as a header.

We need to create a test class containing properties that match the columns in the test data, as you did for the data-driven test in the previous example. The test class will typically contain one or more tests that use these properties as parameters to the test step or Page Object methods.
Here, we need to keep in mind that as the tests are parameterized , we need to use the Parameterized test runner to perform data-driven tests.
@RunWith(SerenityParameterizedRunner.class)
This is imported from below package
net.serenitybdd.junit.runners.SerenityParameterizedRunner;
@UseTestDataFrom annotation is used to indicate where to find the CSV file (this can either be a file on the classpath or a relative or absolute file path – putting the data set on the class path (e.g. in src/test/resources) makes the tests more portable).
@UseTestDataFrom(value = "testdata/credentials.csv")
Below is the example of the Parameterized Tests.

ParameterizedTestsUsingCSV Class contains the SerenityParameterizedRunner as well as provides the path of the test data file using @UseTestDataFrom, and the Tests.
The Serenity Parameterized Runner creates a new instance of this class for each row of data in the CSV file, assigning the properties with corresponding values in the test data. As you can see, I have mentioned 3 variables in the CSV file – userName, passWord, and errorMessage. I have declared the same private variables in the Test Class too – username, password, and errorMessage that match the columns in the test data file. Keep this in mind, that the column name should be the same in test data file and Test.
import net.serenitybdd.annotations.Managed;
import net.serenitybdd.annotations.Steps;
import net.serenitybdd.annotations.Title;
import net.serenitybdd.core.Serenity;
import net.serenitybdd.junit.runners.SerenityParameterizedRunner;
import net.thucydides.junit.annotations.Qualifier;
import net.thucydides.junit.annotations.TestData;
import net.thucydides.junit.annotations.UseTestDataFrom;
import org.junit.Test;
import org.junit.runner.RunWith;
import org.openqa.selenium.WebDriver;

import static org.assertj.core.api.Assertions.assertThat;

@RunWith(SerenityParameterizedRunner.class)
@UseTestDataFrom(value = "testdata/credentials.csv")
public class ParameterizedTests {

    private String userName;
    private String passWord;
    private String errorMessage;

    @Managed(options = "--start-maximized")
     WebDriver driver;

    @Steps
    NavigateActions navigate;

    @Steps
    StepLoginPage loginPage;


    @TestData(columnNames = "Username, Password, ErrorMessage")

    @Qualifier
    public String qualifier(){return " - " + " Username = " + userName + " and " + " Password = " + passWord + " should display " + errorMessage;}

    @Test
    @Title("Login to application with invalid credential generates error message")
    public void unsuccessfulLogin() {

        // Given
        navigate.toTheHomePage();

        // When
        loginPage.inputUserName(userName);
        loginPage.inputPassword(passWord);
        loginPage.clickLogin();

        // Then
        Serenity.reportThat("Passing invalid credentials generates error message",
                () -> assertThat(assertThat(loginPage.errorMessage()).isEqualToIgnoringCase(errorMessage)));

    }

}
The heading of parameters present in the Serenity Report (Index.html) like Username, Password, and Error Message are generated by @TestData(columnNames).
The description of the Test Step in the Serenity Report is modified by using @Qualifier. It is used to mark a method as a qualifier in an instantiated data-driven test case.
The test class needs to have a WebDriver instance with a @Managed annotation for Serenity to manage it in the background. That is all that is required, we do not need to manage the driver anymore. Each test class will need this driver variable declaration.
The Test Class uses Step Class (StepLoginPage) and Action Class (NavigateActions) to perform the Tests. StepLoginPage contains test steps that represent the level of abstraction between the code that interacts with the application. NavigateAction page is used to open an environment-specific page defined in the serenity.config file under the pages section.
StepLoginPage
import net.serenitybdd.annotations.Step;
import net.serenitybdd.core.pages.PageObject;
import net.serenitybdd.core.pages.WebElementFacade;
import org.openqa.selenium.support.FindBy;

public class StepLoginPage extends PageObject {

    @FindBy(name = "username")
    WebElementFacade username;

    @FindBy(name = "password")
    WebElementFacade password;

    @FindBy(xpath = "//*[@id='app']/div[1]/div/div[1]/div/div[2]/div[2]/form/div[3]/button")
    WebElementFacade submitButton;

    @FindBy(xpath = "//*[@id='app']/div[1]/div/div[1]/div/div[2]/div[2]/div/div[1]/div[1]/p")
    WebElementFacade errorMessage;

    @FindBy(xpath = "//*[@id='app']/div[1]/div/div[1]/div/div[2]/div[2]/form/div[4]/p")
    WebElementFacade linkText;

    @Step("Enter Username")
    public void inputUserName(String userName) {
        username.sendKeys((userName));
    }

    @Step("Enter Password")
    public void inputPassword(String passWord) {
        password.sendKeys((passWord));
    }

    @Step("Click Submit Button")
    public void clickLogin() {
        submitButton.click();
    }

    @Step("Error Message on unsuccessful login")
    public String errorMessage() {
        String actualErrorMessage = errorMessage.getText();
        return actualErrorMessage;
    }

    @Step("Click Forget Password Link")
    public void clickForgetPasswordLink() {
        linkText.click();

        System.out.println("Clicked on Forgot Password Link");
    }

}
NavigateActions
import net.serenitybdd.annotations.Step;
import net.serenitybdd.core.steps.UIInteractionSteps;

public class NavigateActions extends UIInteractionSteps {

    @Step
    public void toTheHomePage() {
        openPageNamed("loginForm");
    }
}
Serenity.config
headless.mode = false

pages{
  loginForm = "https://opensource-demo.orangehrmlive.com/"
  }

environments {
  chrome {
    webdriver {
      driver = chrome
      autodownload = true
      capabilities {
        browserName = "chrome"
        acceptInsecureCerts = true
        "goog:chromeOptions" {
          args = ["--start-maximized", "ignore-certificate-errors",
            "incognito", "disable-infobars", "disable-gpu", "disable-default-apps", "disable-popup-blocking"]
        }
      }
    }
  }
}
This test can be executed by JUnit as well as from the command line
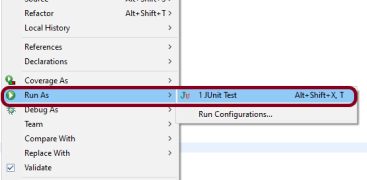
JUnit – Right-click on the Test, select Run As, and then select JUnit Test in Eclipse.
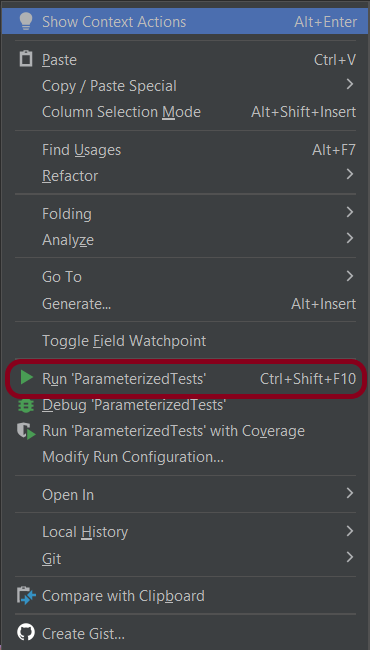
If you are using IntelliJ, then right-click and select Run “ParameterizedTests”
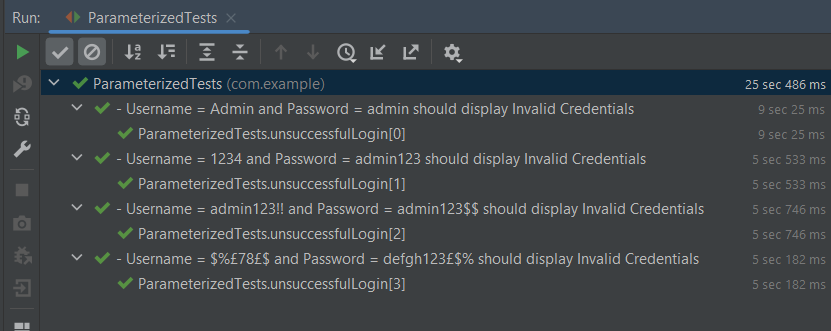
The Test execution status can be seen as shown below:
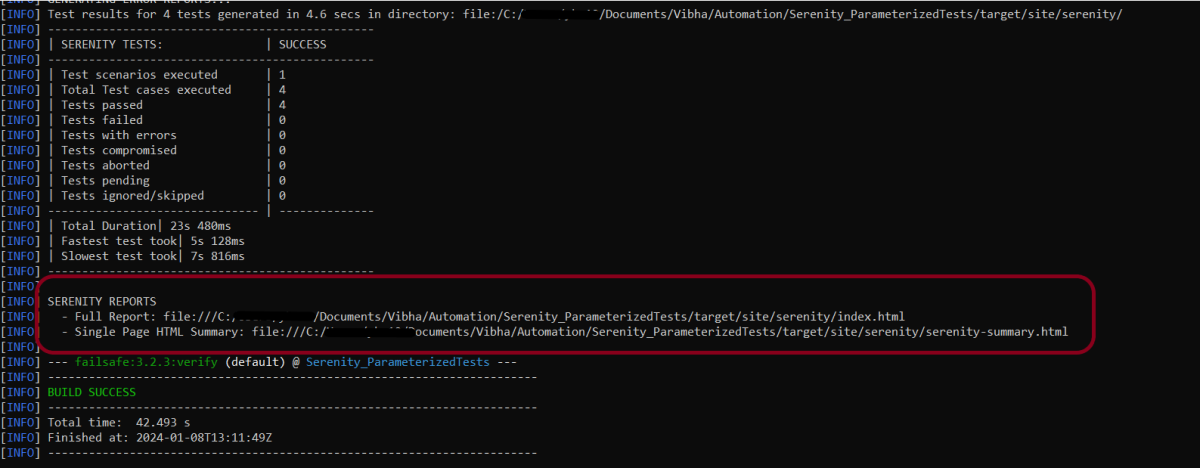
To run the tests using the command line, use the below command
mvn clean verify
This will execute the tests and will generate the Test Execution Report as shown below.
The reports are generated as shown in the below image.
Serenity generates very descriptive and beautiful reports – Index.html and Serenity Summary Report.
Index.html
This page provides the detail about the Test, its corresponding test data, the status of each test scenario with screenshots, and the execution time of each test.

This is the expanded view of all the test steps of a test with their screenshots. This also shows the execution time of each step in the test.

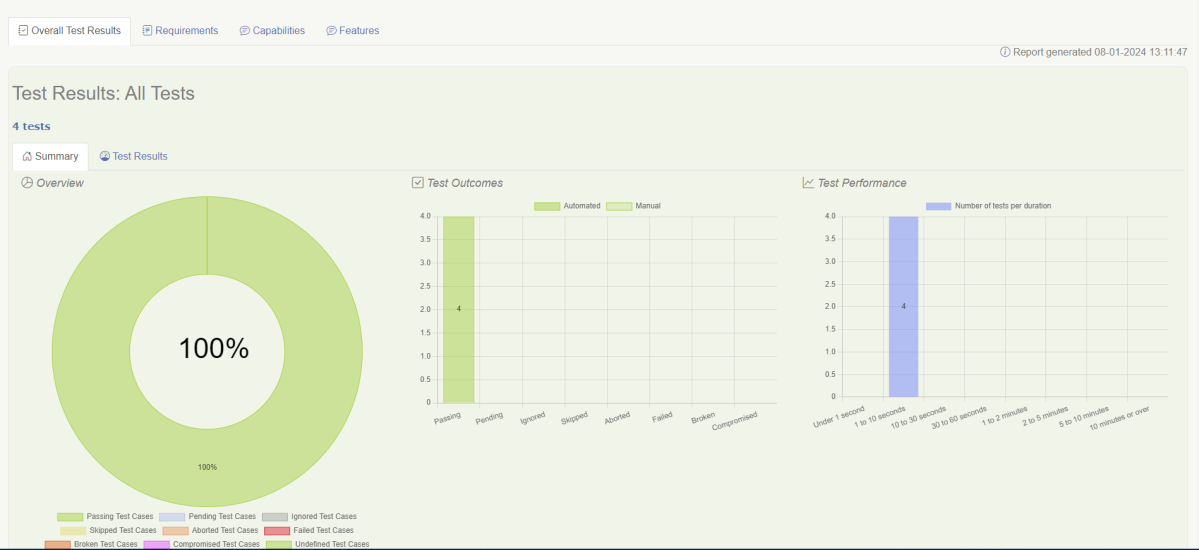
Serenity Summary Report
This report is a single-page, self-contained HTML summary report, containing an overview of the test results, and a configurable breakdown of the status of different areas of the application.

We are done! Congratulations on making it through this tutorial and hope you found it useful! Happy Learning!!
The complete code can be found on GitHub – vibssingh/Serenity_ParameterizedTests.
