The two most used classes for managing Excel Workbooks are:
HSSFWorkbook – These class methods are used to read/write data to Microsoft Excel file in .xls format. It is compatible with MS-Office versions 97–2003.
XSSFWorkbook – These class methods are used to read-write data to Microsoft Excel in .xls or .xlsx format. It is compatible with MS-Office versions 2007 or later.
How to read Excel (.xlsx) from specific cell value?
Step 1 – To locate the location of file.
File file = new File("C:\\Selenium_ReadTestData.xlsx");
Import File from package
import java.io.File;
Step 2– Instantiate FileInputStream to read from the file specified.
Here getRow(0) will look into the first row, and getCell(0) will look into the first column, i.e. A1.
To retrieve the String value we are making use of getStringCellValue in the end.
Below is the Excel which I’m using to read the data as mentioned below:-
We want to get the value of Row 1, Cell B
We want to get the value of Row 3, Cell A
Let us create a program for the same scenario:
import java.io.FileInputStream;
import java.io.IOException;
import org.apache.poi.xssf.usermodel.XSSFSheet;
import org.apache.poi.xssf.usermodel.XSSFWorkbook;

public class ReadSpecificData {

	public static void main(String[] args) {

     String path = "C:\\Selenium_ReadTestData.xlsx";

		try {

			//Create an object of FileInputStream class to read excel file
			FileInputStream fis = new FileInputStream(path);

			//Create object of XSSFWorkbook class
			XSSFWorkbook wb = new XSSFWorkbook(fis);

			//Read excel sheet by sheet name
			XSSFSheet sheet1 = wb.getSheet("Read_TestData");

			//Get data from specified cell
			System.out.println(sheet1.getRow(1).getCell(1).getStringCellValue());
			System.out.println(sheet1.getRow(3).getCell(0).getStringCellValue());

		} catch (IOException e) {
			e.printStackTrace();
		}

	}

}
The output of the above program is
How to read the entire Excel sheet?
To read the complete data from Excel, you can iterate over each cell of the row, present in the sheet.
To get the last and first-row numbers, there are two methods in the sheet class:
getLastRowNum()
getFirstRowNum()
int rowCount=sheet.getLastRowNum()-sheet.getFirstRowNum();
Once you get the row, you can iterate over the cells present in the row by using the total number of cells, which we can calculate using getLastCellNum() method:
int cellcount=sheet.getRow(1).getLastCellNum();
Below is the entire program to read complete Excel.
import java.io.FileInputStream;
import java.io.IOException;
import org.apache.poi.ss.usermodel.Sheet;
import org.apache.poi.ss.usermodel.Workbook;
import org.apache.poi.xssf.usermodel.XSSFWorkbook;

public class ReadExcelFile {
	public static  void main(String args[]) throws IOException {

		String path = "C:\\Selenium_ReadTestData.xlsx";

		//Create an object of FileInputStream class to read excel file
		FileInputStream fis = new FileInputStream(path);

		//Create object of XSSFWorkbook class
		Workbook workbook = new XSSFWorkbook(fis);

		//Read excel sheet by sheet name
		Sheet sheet = workbook.getSheet("Read_TestData");


		//Find number of rows in excel file
	    int rowCount=sheet.getLastRowNum()-sheet.getFirstRowNum();
	    System.out.println("row count:"+rowCount);

		 //iterate over all the row to print the data present in each cell.
	    for(int i=0;i<=rowCount;i++){

	        //get cell count in a row
	        int cellcount=sheet.getRow(i).getLastCellNum();

	        //iterate over each cell to print its value
	        for(int j=0;j<cellcount;j++){
	            System.out.print(sheet.getRow(i).getCell(j).getStringCellValue().toString() +"||");
	        }
	        System.out.println();
		}
	}
}
The output of the above program is
That’s it! We are done.
Congratulations on making it through this tutorial and hope you found it useful! Happy Learning!! Cheers!!
This tutorial tells how random variablecan generate and pass as a part of a request in JMeter. Suppose, in the load test, there is a requirement to pass random or different values to a specific parameter in the requests, how this can be achieved. One of the ways is to pass different values from a .csv file that contain different values and use them in the requests. The second way is to add Random Variable in JMeter, which generates random values at every run for requests.
The random variable config element is used to generate random numeric values within a range of specified minimum and maximum values.
Variable name:The name we are going to use to invoke the variable. “ReqCacheKey” in this example.
Output Format: The format for the variable. You can set the desired length of the number. I have set 0000000000 in order to work with a five-digit number. You can also use USER_000.
Minimum and Maximum:The range we want to set for the variable.
Seed: The seed for the random number generator. A seed is the first input that the number generation function receives to start the random generation. Here, it is ${__time()}. This will randomly generate the value like 1256078934, 9863457201
Per Thread:Is important to consider this option. If you set it as True, the threads will share the value. This means that there will be threads with the same value. If you require the variable to be different each time, this could cause problems for us. If you want to always generate a different value, you have to set it as False.
Implementation Steps
Create a Test Plan in JMeter
Create a new test plan in JMeter by selecting File > New Test Plan.
Add Thread Group
Select Test Plan on the tree
Add Thread Group
To add Thread Group: Right click on the “Test Plan” and add a new thread group: Add -> Threads (Users) -> Thread Group
In the Thread Group control panel, enter Thread Properties as follows:
Number of Threads: 1 – Number of users connects to the target website Loop Count: Infinite – Number of times to execute testing Ramp-Up Period: 1 Duration: 5 sec
Adding HTTP Request
The JMeter element used here is HTTP Request Sampler. In HTTP Request Control Panel, the Path field indicates which URL request you want to send
Add HTTP Request Sampler
To add: Right-click on Thread Group and select: Add -> Sampler -> HTTP Request
Below-mentioned are the values used in HTTP Request to perform the test.
Name – HTTP Request Server Name or IP – localhost Port – 8010 Method – POST Path – /demo/helloworld
Add a Random Variable
To add: Right-click on Thread Group and select: Add -> Config Element-> Random Variable.
The sample Request is shown below. cacheKey variable is parameterized. ReqCacheKey in Random Variable will generate the random values, which will be passed to the parameter cacheKey present in the request body
Seed is ${__time()}. This generates the value randomly, like 1256078934, 9863457201. If I keep Seed blank, then when the tests run multiple times, it has the same set of random values (repetitive values), we don’t want the same repetitive values, so seed is not blank
Adding Listeners to the Test Plan
Listeners
They show the results of the test execution. They can show results in a different format such as a tree, table, graph, or log file
We are adding the View Result Tree listener
View Result Tree– View Result Tree shows the results of the user request in basic HTML format
To add: Right click Test Plan, Add -> Listener -> View Result Tree
Save the Test Plan
To Save: Click File Select -> Save Test Plan as ->Give the name of the Test Plan. It will be saved as .jmx format
Run the Test Plan
Click on Green Triangle as shown at the top to run the test
View the Execution Status
Click on View Result Tree to see the status of Run. A successful request will be of a Green colour in the Text Section
In the below image, we can see that the cacheKey value is 1917449705 which is generated by Random Variable
Congratulations on making it through this tutorial and hope you found it useful! Happy Learning!! Cheers!!
We can perform GET as well as POST operations in JMeter. In this tutorial, we will only explain how we send POST HTTP requests in JMeter. In the previous tutorial, I explained how we can send GET request in JMeter.
Add Thread Group To add Thread Group: Right-click on the “Test Plan” and add a new thread group: Add -> Threads (Users) -> Thread Group
In the Thread Group control panel, enter Thread Properties as follows: We will take an example of row no 5
Number of Threads: 5 – Number of users connects to the target website Loop Count: 5 – Number of times to execute testing Ramp-Up Period: 5 – It tells JMeter how long to delay before starting the next user. For example, if we have 5 users and a 5 -second Ramp-Up period, then the delay between starting users would be 1 second (5 seconds /5 users).
Step 2 – Adding JMeter elements
The JMeter element used here is HTTP Request Sampler. In the HTTP Request Control Panel, the Path field indicates which URL request you want to send
2.1 Add HTTP Request Sampler To add: Right-click on Thread Group and select: Add -> Sampler -> HTTP Request
The below-mentioned are the values used in HTTP Request to perform the test
Name – HTTP POST Request Demo
Server Name or IP – reqres.in
Port –
Method – POST
Path – /api/users
2.2 Add HTTP Head Manager
The Header Manager lets you add or override HTTP request headers like can add Accept-Encoding, Accept, Cache-Control
To add: Right-click on Thread Group and select: Add -> Config Element -> HTTP Read Manager
The below-mentioned are the values used in Http Request to perform the test Content-type = application/json accept – application/json
Step 3 – Adding Listeners to Test Plan
Listeners – They show the results of the test execution. They can show results in a different format such as a tree, table, graph, or log file We are adding the View Result Tree listener
View Result Tree – View Result Tree shows the results of the user request in basic HTML format To add: Right-click on Test Plan, Add -> Listener -> View Result Tree
Aggregate Report
It is almost the same as Summary Report except Aggregate Report gives a few more parameters like, “Median”, “90% Line”, “95% Line” and “99% Line”.
To add: Right Click on Thread Group > Add > Listener > Aggregate Report
Step 4 – Save the Test Plan
To Save: Click File Select -> Save Test Plan as ->Give the name of the Test Plan. It will be saved in .jmx format.
Step 5 – Run the Test Plan
Click on the Green Triangle as shown at the top to run the test.
Step 6 – View the Execution Status
Click on View Result Tree to see the status of Run. A successful request will be of a Green colour in the Text Section.
Click on Response data and Response Header to view other information about Response.
Click on Aggregate Report Result to see the aggregated status of Run.
We are done! Congratulations on making it through this tutorial and hope you found it useful! Happy Learning!!
The previous tutorial explained the Integration of Cucumber with Selenium and TestNG. Sometimes, inconsistent test results are common as a result of an unstable environment like network issue or Database down and soon. A few tests may fail for no obvious reason and then rerun successfully. We are sometimes required to run only failed test cases after bug fixes to verify fixes quickly. We will learn how to rerun failed test cases in the Cucumber with TestNG project in this post.
Cucumber provides a rerun plugin option in the Runner class. This option generates a file. The file contains information about the failed tests.
Now, let us add a rerun plugin to the Cucumber Runner class. Here, we are creating a failedrerun.txt file that contains the information about the failed test. This file will be created under the target folder.
import io.cucumber.testng.AbstractTestNGCucumberTests;
import io.cucumber.testng.CucumberOptions;

@CucumberOptions(tags = "", features = "src/test/resources/features/LoginPage.feature",
        glue = "com.example.definitions",
        plugin =  {
        "pretty",
        "rerun:target/rerun.txt" // Saves paths of failed scenarios
    }
)
public class RunnerTests extends AbstractTestNGCucumberTests {
}
Create a Second Runner Class
The next step is to run failed test scenarios existing in the text file. We need to create a class similar to our runner class. This class will contain the location of the file that we want to execute. It will rerun our failed scenarios. In the ‘features’ variable, you need to mention the failedrerun.txt file, and don’t forget that you must mention the ‘@’ symbol before the file path.
import io.cucumber.testng.AbstractTestNGCucumberTests;
import io.cucumber.testng.CucumberOptions;

@CucumberOptions(tags = "",
        features = "@target/rerun.txt",
        glue = "com.example.definitions",
        plugin =  {
                "pretty"
        }
)

public class RunnerTestsFailed extends AbstractTestNGCucumberTests {
}
Mention both Test Runner details in the testng.xml.
<?xml version="1.0" encoding="UTF-8"?>
<!DOCTYPE suite SYSTEM "https://testng.org/testng-1.0.dtd">
<suite name="Suite">
    <test  name="Cucumber with TestNG Test">
        <classes>
            <class name="com.example.runner.RunnerTests"/>
            <class name="com.example.runner.RunnerTestsFailed"/>
        </classes>
    </test> <!-- Test -->
</suite> <!-- Suite -->
Run the tests using the below-mentioned command
mvn clean test
After running the tests from the command line, first, all the tests will be executed. If any test fails, a failedrerun.txt file will be generated that includes the details about the failed tests.
In the below screenshot, we can see that a scenario starting at line 25 has failed.
The first round of execution ends. Then, Cucumber Runner goes to the second runner. It runs the failed tests that are mentioned in failedrerun.txt.
We can see that 2 separate reports are generated here.
The first Cucumber Report shows that out of 5 tests, 1 test failed.
The second Cucumber Report shows that the one failed test is rerun again, and it again failed.
Cucumber is not an API automation tool, but it works well with other API automation tools.
There are 2 most commonly used Automation Tools for JVM to test API – Rest-Assured and Karate. In this tutorial, I will use RestAssured with Cucumber and JUnit4 for API Testing.
REST Assured is a Java library that provides a domain-specific language (DSL) for writing powerful, maintainable tests for RESTful APIs. REST Assured can be used easily in combination with existing unit testing frameworks, such as JUnit and TestNG. Rest assured, no matter how complex the JSON structures are, Rest Assured has methods to retrieve data from almost every part of the request and response.
What is Cucumber?
Cucumber is one such open-source tool, which supports Behaviour Driven Development(BDD). In simple words, Cucumber can be defined as a testing framework, driven by plain English. It serves as documentation, automated tests, and development aid – all in one.
Each scenario is a set of steps that the Cucumber must complete. Cucumber validates the software’s compliance with the specification and generates a report indicating success or failure for each scenario.
The cucumber must adhere to some basic syntax rules known as Gherkin in order to comprehend the scenarios.
In this tutorial, I will explain creating a framework for the testing of Rest API in Cucumber BDD.
This framework consists of:
Cucumber – 7.18.0
Java 17
JUnit – 4.13.2
Maven – 3.9.6
Rest Assured – 5.4.0
Maven Compiler – 3.13.0
Project Structure
Implementation Steps
Step 1 – Download and Install Java
Cucumber and Rest-Assured need Java to be installed on the system to run the tests. Click here to know How to install Java.
Step 2 – Download and setup Eclipse IDE on the system
The Eclipse IDE (integrated development environment) provides strong support for Java developers. Click here to know How to install Eclipse.
Step 3 – Setup Maven
To build a test framework, we need to add several dependencies to the project. Click here to know How to install Maven.
Step 4 – Create a new Maven Project
File -> New Project-> Maven-> Maven project-> Next -> Enter Group ID & Artifact ID -> Finish
Step 5 – Install the Cucumber Eclipse plugin for the Eclipse project(Eclipse Only)
The Cucumber plugin is an Eclipse plugin that allows eclipse to understand the Gherkin syntax. Cucumber Eclipse Plugin highlights the keywords present in Feature File. To install Cucumber Eclipse Plugin, please refer to this tutorial – How to install Cucumber Eclipse Plugin.
Step 6 – Create source folder src/test/resources
Create source folder src/test/resources to create test scenarios in the Feature file.
A new Maven Project is created with 2 folders – src/main/java and src/test/java. To create test scenarios, we need a new source folder called – src/test/resources. To create this folder, right-click on your maven project ->select New ->Java and then Source Folder.
Mention the source folder name as src/test/resources and click the Next button. This will create a source folder under your new Maven project as shown in the below image.
Step 7 – Add Rest-Assured and Cucumber dependencies to the project
You should place rest-assured before the JUnit dependency declaration in your pom.xml / build.gradle to make sure that the correct version of Hamcrest is used. REST Assured includes JsonPath and XmlPath as transitive dependencies.
The compiler plugin is used to compile the source code of a Maven project. This plugin has two goals, which are already bound to specific phases of the default lifecycle:
Step 9 – Create a feature file under src/test/resources
Create a folder with name features. Now, create the feature file in this folder. The feature file should be saved with extension .feature. This feature file contains the test scenarios created to test the application. The Test Scenarios are written in Gherkins language in the format of Given, When, Then, And, But.
Below is an example of a Test Scenario where we are using the GET method to get the information from the API.
Feature: Validation of get method

  @GetUserDetails
  Scenario Outline: Send a valid Request to get user details

    Given I send a request to the URL to get user details
    Then the response will return status <statusCode> and id <id> and email "<employee_email>" and first name "<employee_firstname>" and last name "<employee_lastname>"

    Examples:
    | statusCode | id  | employee_email          | employee_firstname | employee_lastname |
    | 200        | 2   | janet.weaver@reqres.in  | Janet              | Weaver            |
Step 10 – Create the Step Definition class or Glue Code for the Test Scenario
StepDefinition acts as an intermediate to your runner and feature file. It stores the mapping between each step of the scenario in the Feature file. So when you run the scenario, it will scan the step definition file to check the matched glue or test code.
import io.cucumber.java.en.Given;
import io.cucumber.java.en.Then;
import io.restassured.http.ContentType;
import io.restassured.response.ValidatableResponse;

import static io.restassured.RestAssured.given;
import static org.hamcrest.Matchers.equalTo;

public class APIDemoDefinitions {
    private ValidatableResponse validatableResponse;
    private String endpoint = "https://reqres.in/api/users/2";

    @Given("I send a request to the URL to get user details")
    public void sendRequest(){
        validatableResponse = given().contentType(ContentType.JSON)
                .when().get(endpoint).then();

        System.out.println("Response :"+validatableResponse.extract().asPrettyString());
    }

    @Then("the response will return status {int} and id {int} and email {string} and first name {string} and last name {string}")
    public void verifyStatus(int expectedStatusCode, int expectedId, String expectedEmail, String expectedFirstName, String expectedLastName){

        validatableResponse.assertThat().statusCode(expectedStatusCode);

        validatableResponse.assertThat().body("data.id",equalTo(expectedId));

        validatableResponse.assertThat().body("data.email",equalTo(expectedEmail));

        validatableResponse.assertThat().body("data.first_name",equalTo(expectedFirstName));

        validatableResponse.assertThat().body("data.last_name",equalTo(expectedLastName));

    }
}
In order to use REST assured effectively it’s recommended to statically import methods from the following classes:
There is another way to perform these assertions. We can use multiple body assertions together.
@Then("the response will return status {int} and id {int} and email {string} and first name {string} and last name {string}")
    public void verifyStatus(int expectedStatusCode, int expectedId, String expectedEmail, String expectedFirstName, String expectedLastName){

   validatableResponse.assertThat().statusCode(expectedStatusCode).body("data.id",equalTo(expectedId)).and()
                .body("data.email",equalTo(expectedEmail)).body("data.first_name",equalTo(expectedFirstName))
                .body("data.last_name",equalTo(expectedLastName));
Step 11 – Create a JUnit Cucumber Runner class
A runner will help us to run the feature file and act as an interlink between the feature file and StepDefinition Class.
import io.cucumber.junit.Cucumber;
import io.cucumber.junit.CucumberOptions;
import org.junit.runner.RunWith;

@RunWith(Cucumber.class)
@CucumberOptions(features= {"src/test/resources"}, glue= {"com.example.stepdefinitions"})
public class CucumberRunnerTests {
}
Note:- The name of the Runner class should end with Test otherwise we can’t run the tests using Command-Line.
Step 12 – Run the tests from JUnit
You can execute the test script by right-clicking on TestRunner class -> Run As JUnit (Eclipse).
You can execute the test script by right-clicking on TestRunner class -> Run CucumberRunnerTests (IntelliJ).
Step 13 – Run the tests from the Command Line
Run the below command in the command prompt to run the tests and to get the test execution report.
mvn clean test
The output of the above program is
Step 14 – Cucumber Report Generation
To get Cucumber Test Reports, add cucumber.properties under src/test/resources and add the below instruction in the file.
cucumber.publish.enabled=true
We are done! Congratulations on making it through this tutorial and hope you found it useful! Happy Learning!!
In the last tutorial, I explained How to test POST Request using Rest Assured. In this tutorial, I will automate a PATCH Request using Rest Assured. I will verify the status code, line of Status, and content of the Response.
To set up a basic Rest Assured Maven Project, click here and Gradle project, click here.
Add the below-mentioned dependencies to the pom.xml.
The HTTP PATCH request method applies partial modifications to a resource.
Difference between PUT and PATCH Method
PUT is a method of modifying resources where the client sends data that updates the entire resource.
PATCH is a method of modifying resources where the client sends partial data that is to be updated without modifying the entire data.
Below are the steps to test a PATCH Request using Rest Assured:
The steps to test the PATCH request are similar to the PUT request.
Below is the example for the test to PATCH method. (Non BDD)
import io.restassured.RestAssured;
import io.restassured.http.ContentType;
import io.restassured.response.Response;
import io.restassured.response.ValidatableResponse;
import io.restassured.specification.RequestSpecification;
import org.junit.Test;
import static org.hamcrest.CoreMatchers.equalTo;

public class Patch_NonBDDDemo {

    RequestSpecification requestSpecification;
    Response response;
    ValidatableResponse validatableResponse;

    @Test
    public void updateUser() {

        String jsonString = "{\"name\": \"William\"}";

        RestAssured.baseURI = "https://reqres.in/api/users/2";

        // Create a request specification
        requestSpecification = RestAssured.given();

        // Setting content type to specify format in which request payload will be sent.
        requestSpecification.contentType(ContentType.JSON);

        // Adding body as string
        requestSpecification.body(jsonString);

        // Calling PATCH method
        response = requestSpecification.patch();

        // Let's print response body.
        String responseString = response.prettyPrint();

        /*
         * To perform validation on response, we need to get ValidatableResponse type of
         * response
         */
        validatableResponse = response.then();

        // Get status code
        validatableResponse.statusCode(200);

        // It will check if status line is as expected
        validatableResponse.statusLine("HTTP/1.1 200 OK");

        // Check response - name attribute
        validatableResponse.body("name", equalTo("William"));

    }
}
In the above example, we have provided the name “ExtentReports/SparkReport_”. It means that a folder starts with the name “SparkReport_” under the “ExtentReports” folder. The date-time pattern we have provided in another format is the basis of a valid pattern. It will concatenate with the folder name to generate a unique folder for each execution.
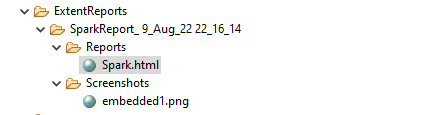
As seen in the image above, the “Reports” and “Screenshots” folders get created inside the new folder of SparkReports_. If we look inside the folder, we can see that the report was generated.
We can browse the screenshot folder to see all the screenshots taken during each step. Additionally, screenshots will be generated and named automatically.
Step 2 – Add a method to capture the screenshot
@After
public static void tearDown(Scenario scenario) {

		//validate if scenario has failed
		if(scenario.isFailed()) {
			final byte[] screenshot = ((TakesScreenshot) driver.getScreenshotAs(OutputType.BYTES);
			scenario.attach(screenshot, "image/png", scenario.getName());
		}
In the preceding example, the tearDown() method accepts a Scenario type object. The Scenario can be found within the io.cucumber. We used Selenium’s standard screenshot feature within the method. As an example, we’d like to read the file as a byte[] type. As a parameter, the attach method accepts byte[] type objects. Scenario.attach also includes a screenshot with each step of the scenario. To get the complete project, please refer to this tutorial – ExtentReports Version 5 for Cucumber 6 and TestNG.
The updated Hooks class will be as shown below:
import org.openqa.selenium.OutputType;
import org.openqa.selenium.TakesScreenshot;
import com.example.utils.HelperClass;
import io.cucumber.java.After;
import io.cucumber.java.Before;
import io.cucumber.java.Scenario;

public class Hooks {

	@Before
    public static void setUp() {

       HelperClass.setUpDriver();
    }

	@After
	public static void tearDown(Scenario scenario) {

		//validate if scenario has failed
		if(scenario.isFailed()) {
			final byte[] screenshot = ((TakesScreenshot) HelperClass.getDriver()).getScreenshotAs(OutputType.BYTES);
			scenario.attach(screenshot, "image/png", scenario.getName());
		}

		HelperClass.tearDown();
	}
}
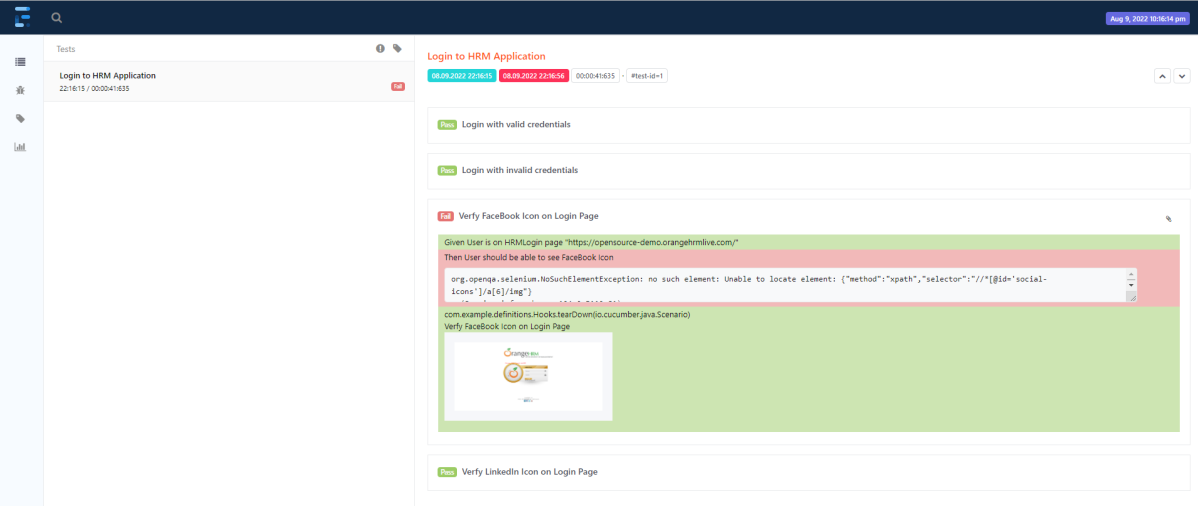
Let’s open the report and view the report. As you can see, besides the scenario, an attachment sign is available, which means something attaches to the scenario. As we have only one failed step, only one screenshot has been captured, as seen in the above image. Right-click on Spark.html and select Open with Web Browser.
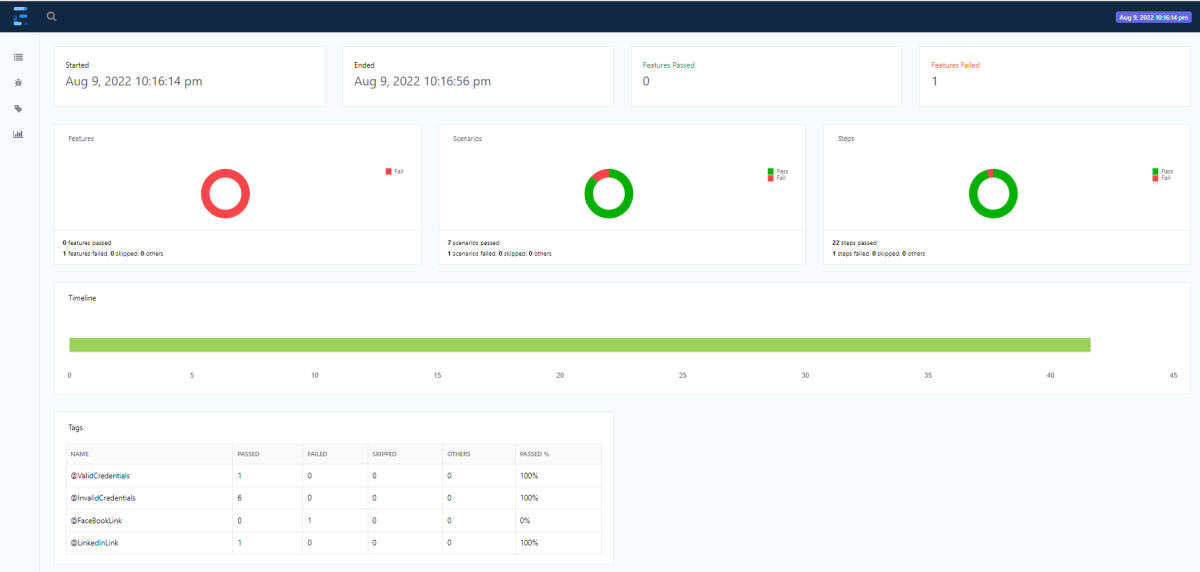
The report also has a summary section that displays the summary of the execution. The summary includes the overview of the pass/fail using a pictogram, start time, end time, and pass/fail details of features as shown in the image below.
Provide username and password and click on Sign in.
Step 5: Download and Install Maven Plugin
Click on the Manage Jenkins.
Choose Manage Plugins.
Step 6: Add the Maven Integration plugin
On the Plugins Page, go to the Available option
Select the Maven Integration Plugin
Click on Install without restart. The plugin will take a few moments to finish downloading depending on your internet connection, and will be installed automatically.
You can also select the option Download now and Install after the restartbutton. In which plugin is installed after the restart
You will be shown a “No updates available” message if you already have the Maven plugin installed.
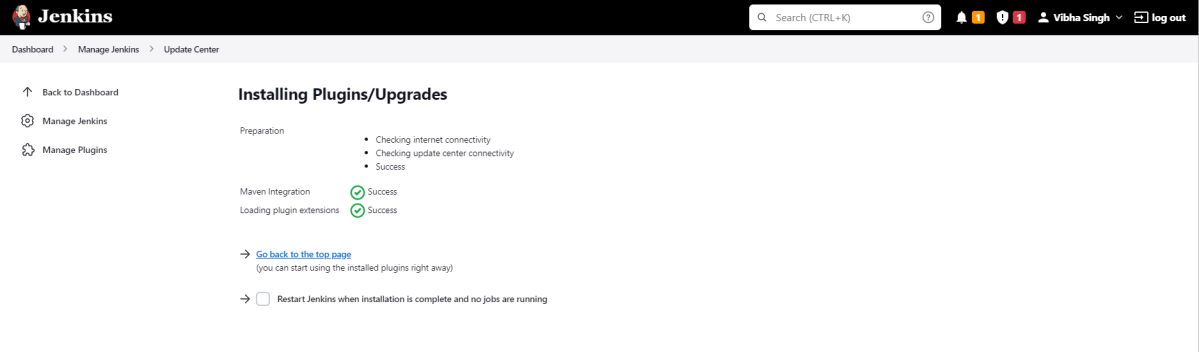
The plugin “Maven Integration” has been installed successfully.
Step 7: Restart Jenkins
Click on the checkbox “Restart Jenkins when installation is complete when no jobs are running“.
The Jenkins is being restarted, It is about to restart.
Again, log in to Jenkins UI.
Step 8: Create a new project using the Maven project plugin
Give the Name of the project – SeleniumTestNG_MavenDemo.
Click on the Maven project.
Click on the OK button.
In the General section, enter the project description in the Description box.
Step 9: Build Management
Go to the Buildsection of the new job.
In the Root POMtextbox, enter the full path to pom.xml
In the Goals and options section, enter “clean test”
Click on the Apply and Savebuttons.
We have created a new Maven project “SeleniumTestNG_MavenDemo” with the configuration to run the Selenium with TestNG Tests
Step 10: Execute the tests
Click on the Build Now link. Maven will build the project. It will then have TestNG execute the test cases.
To see the current status of the execution, click on the “console output“.
Congratulations on making it through this tutorial and hope you found it useful! Happy Learning!! Cheers!!
We canpretty-print a JSON using thetoString(int indentFactor) method of org.json.JSONObject class, where indentFactor is the number of spaces to add to each level of indentation.
public java.lang.String toString(int indentFactor)
Let us create a JSON Object.
import org.json.JSONArray;
import org.json.JSONObject;
import org.junit.Test;


public class Json_Demo {

    @Test
    public void passBodyAsJsonArray1() {

        // Creating JSON array to add first JSON object
        JSONArray array1 = new JSONArray();
        array1.put(new JSONObject().put("firstname", "Tom").put("lastname", "Mathew").put("age", 59).put("salary",
                720000));

        // Creating JSON array
        JSONArray array2 = new JSONArray();
        array2.put(new JSONObject().put("firstname", "Perry").put("lastname", "David").put("age", 32).put("salary",
                365000));

        // Create JSON Object to add JSONArrays
        JSONObject data1 = new JSONObject();
        data1.put("employee1", array1);
        data1.put("employee2", array2);

        System.out.println(data1);

    }
}
The output of the above program is
Add toString(int indentFactor) method to the above program.
import org.json.JSONArray;
import org.json.JSONObject;
import org.junit.Test;

public class Json_Demo {

    @Test
    public void passBodyAsJsonArray1() {

        // Creating JSON array to add first JSON object
        JSONArray array1 = new JSONArray();
        array1.put(new JSONObject().put("firstname", "Tom").put("lastname", "Mathew").put("age", 59).put("salary",
                720000));

        // Creating JSON array
        JSONArray array2 = new JSONArray();
        array2.put(new JSONObject().put("firstname", "Perry").put("lastname", "David").put("age", 32).put("salary",
                365000));

        // Create JSON Object to add JSONArrays
        JSONObject data1 = new JSONObject();
        data1.put("employee1", array1);
        data1.put("employee2", array2);

        System.out.println(data1.toString(4));

    }
}
The output of the above program is
Congratulations on making it through this tutorial and hope you found it useful! Happy Learning!! Cheers!!
Cucumber tests are grouped into features. A Feature file is one in which we store a description of the features and scenarios to be tested. It is used to provide a high-level description of test scenarios and group-related scenarios. A Feature File is an entry point to the Cucumber tests.
The first keyword in the Feature file is the Feature keyword, followed by: and short text that describes the feature.
You can add free-form text underneath the Feature to add more description.
These description lines are ignored by Cucumber at runtime, but are available for reporting (They are included by default in HTML reports).
The name and the optional description have no special meaning to Cucumber. Their purpose is to provide a place for you to document important aspects of the feature, such as a brief explanation and a list of business rules (general acceptance criteria).
The free format description for Feature ends when you start a line with the keyword Example or Scenario Outline (or their alias keywords).
You can place tags above Feature to group related features, independent of your file and directory structure.
A simple feature file consists of the following keywords/parts −
FeatureFile Name – Name of the feature under test. For example, here is LoginPage.feature
Feature − Describe the feature under test, like here “Login to HRM Application”
Scenario− What is the test scenario we want to test
Given − Prerequisite before the test steps get executed.
When − Specific condition that should match to execute the next step.
Then − What should happen if the condition mentioned in WHEN is satisfied
And/But – If we have several Given’s, When’s, or Then’s, then we can use And /But
Steps to create a Feature file
Step 1 – Create a new Maven project.
Step 2 – Add cucumber-java dependency to the POM.xml.
Step 3 – It is suggested to create the Feature files in the src/test/resources source folder. By default, this folder is not present. So, first, create a Source Folder named src/test/resources. Right-click on the project, and select New → Source Folder.
Provide the name to the Source Folder and click on the Finish button.
This creates a new Source Folder.
Step 4 –We want all our Feature files to be present inside a folder. So, create a new folder with the name Features in the src/test/resources folder.
Right-click on the src/test/resources folder, and select New →Package. Provide the name of Features to the package and click the Finish button.
Step 5 – Create a Feature file in the features package.
Right-click on the Feature folder, select New ->File and mention the name LoginPage.feature. Click the Finish button. (Remember to add .feature at the end of the file, otherwise, this feature file will be just an ordinary plain text file).
The below image is an example of the new feature file created. This sample feature file gives an idea how what an actual Feature file should look like.
Below is an example of a valid feature file.
@LoginPage
Feature: Login to HRM Application

   @ValidCredentials
   Scenario: Login with valid credentials

   Given User is on HRMLogin page "https://opensource-demo.orangehrmlive.com/"
    When User enters username as "Admin" and password as "admin123"
    Then User should be able to login successfully and new page open