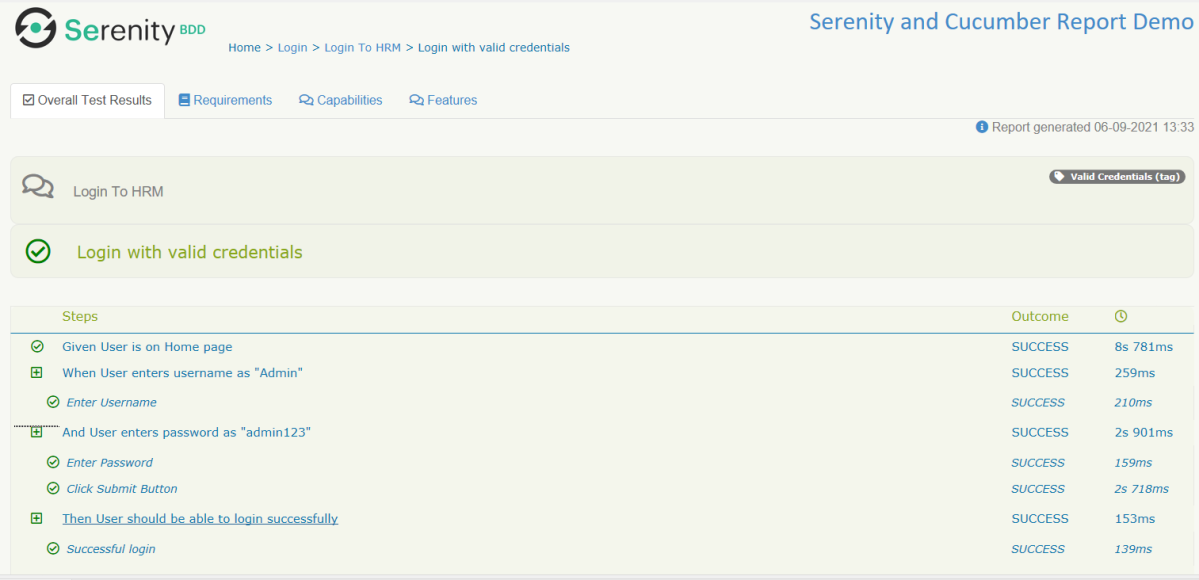
Serenity provides a wide range of options to manage screenshots in the report. By default, Serenity has set option serenity.take.screenshots=BEFORE_AND_AFTER_EACH_STEP, which means the screenshot is saved before and after each step as shown in the below image. Before this tutorial, refer to the previous tutorial on How to generate Serenity Report.
However, recording many screenshots can slow down test execution. So, maybe we like to record the screenshot of failed steps in the scenario. To achieve this flexibility, configure serenity.take.screenshots property inserenity.properties file.
There are various other types of options for managing screenshots in Serenity Report. This property can take the following values:
FOR_EACH_ACTION: Saves a screenshot at every web element action (like click(), typeAndEnter(), type(), typeAndTab() etc.).
BEFORE_AND_AFTER_EACH_STEP: Saves a screenshot before and after every step.
AFTER_EACH_STEP: Saves a screenshot after every step
FOR_FAILURES: Saves screenshots only for failing steps.
DISABLED: Doesn’t save screenshots for any steps.
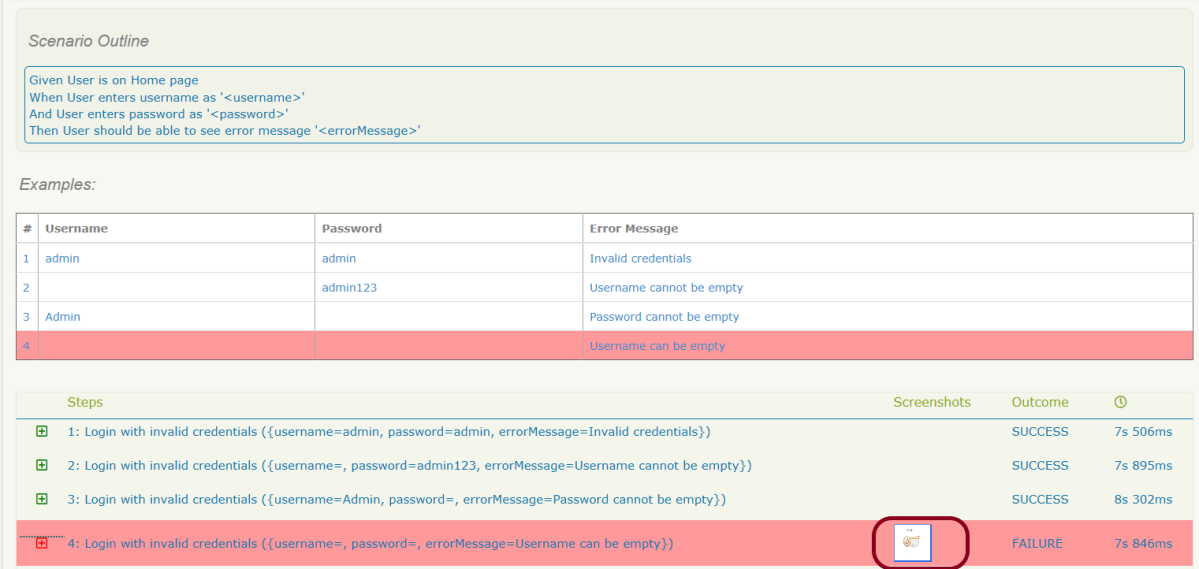
In the below option, I have used FOR_FAILURES option in the serenity.properties file.
Below is the screenshot of the passed test case. We can see that there is no screenshot attached to any of the test steps.
Below is the screenshot of the failed test case. We can see that there is a screenshot attached to the failed test step only, not all the test steps. In below example, it is a scenario outline with four different test data. Out of four, only one set of test data has failed. So, the screenshot is generated for the failed step of that particular test data.
We are done! Congratulations on making it through this tutorial and hope you found it useful! Happy Learning!!
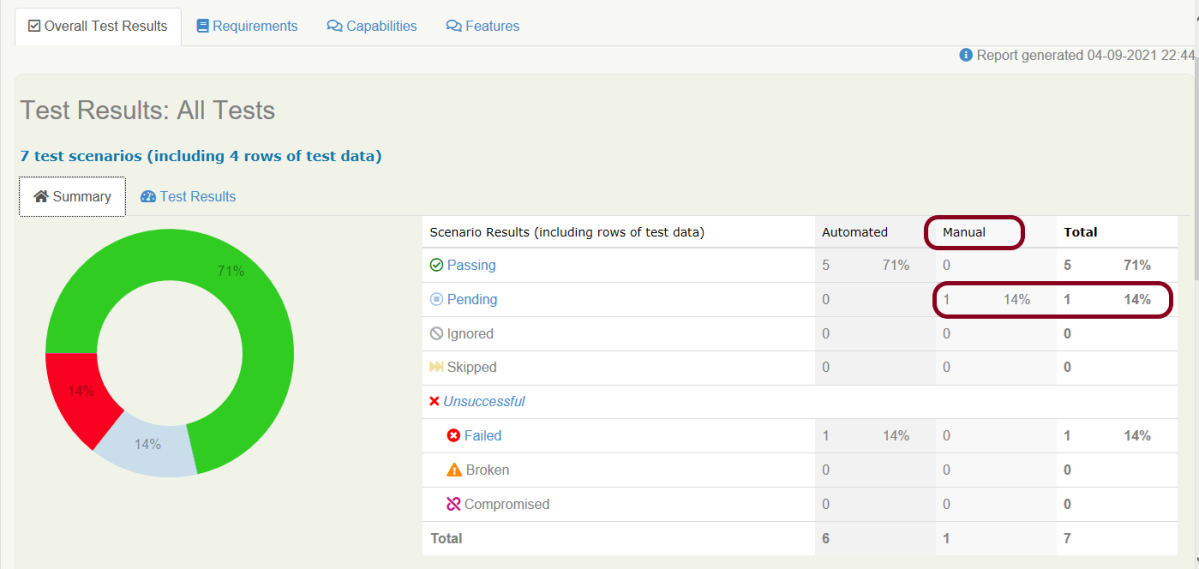
Cucumber is primarily and traditionally used for automating executable specifications. But with Serenity BDD, you can add special tags to indicate that a scenario represents a manual test case.
You can flag any Cucumber scenario as manual simply by using the @manual tag. In the below example, I have tagged a scenario as “@manual”. The last scenario is tagged as “manual”. By default, @manual scenarios are marked as pending in the Serenity reports.
Feature: Login to HRM
@ValidCredentials
Scenario: Login with valid credentials
Given User is on Home page
When User enters username as "Admin"
And User enters password as "admin123"
Then User should be able to login successfully
@InValidCredentials
Scenario Outline: Login with invalid credentials
Given User is on Home page
When User enters username as '<username>'
And User enters password as '<password>'
Then User should be able to see error message '<errorMessage>'
Examples:
|username |password |errorMessage |
|admin |admin |Invalid credentials |
| |admin123 |Username cannot be empty |
|Admin | |Password cannot be empty |
| | |Username can be empty |
@ForgetPassword
Scenario: Verify Forget Password Functionality
Given User is on Home page
When User clicks on Forgot your password link
Then User should be able to see new page which contains Reset Password button
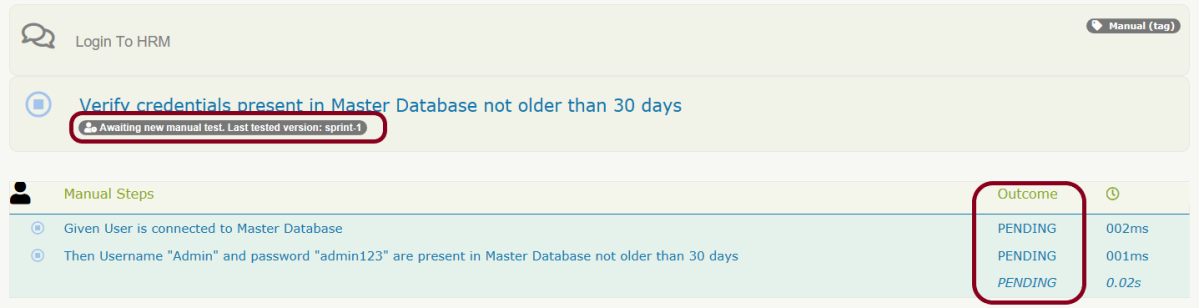
@manual
Scenario: Verify credentials present in Master Database not older than 30 days
Given User is connected to Master Database
Then Username "Admin" and password "admin123" are present in Master Database not older than 30 days
Execute the test suite using below command
mvn clean verify
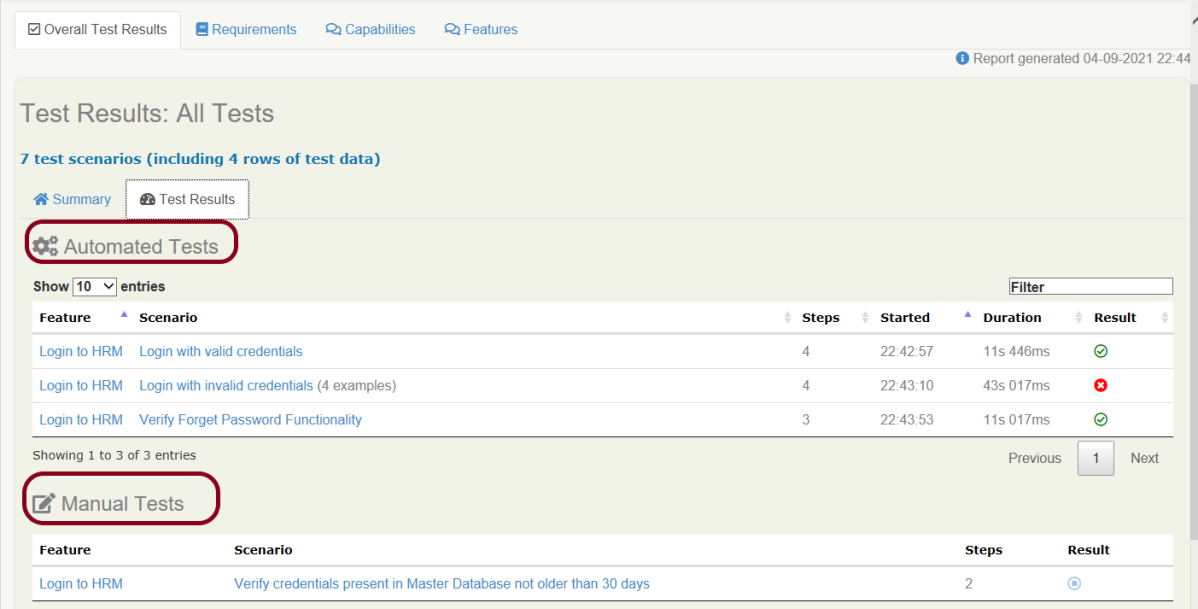
The scenario marked with @manual tag will now appear as a Manual test case in the Serenity report (Index.html). To know how to create Serenity Report, click here.
We can indicate a different result by adding the @manual-result tag as shown here:
A passing test: @manual-result:passed A failing test: @manual-result:failed A compromised test: @manual-result:compromised
If we want to record the result of a manual test, we should include both the @manual and the @manual-result tags.
   @manual
   @manual-result:passed
   Scenario: Verify credentials present in Master Database not older than 30 days

   Given User is connected to Master Database
   Then Username "Admin" and password "admin123" are present in Master Database not older than 30 days

   @manual
   @manual-result:failed
   Scenario: Verify different credentials are provided to Admin, Dev and QA to access Master Database

   Given User is connected to Master Database
   Then Different credentials are provided to Admin, Business, Dev and QA to access Master Database
This image shows that there are 2 manual tests. I have marked one manual test as passed and another one as failed which is clearly shown in this image.
How to update Manul Test Results
In the below example, we are considering that the team is working on Sprint-1. We have executed the manual tests and marked the status in the feature file as shown below.
  @manual
  @manual-result:passed
  @manual-last-tested:sprint-1
  Scenario: Verify credentials present in Master Database not older than 30 days

  Given User is connected to Master Database
  Then Username "Admin" and password "admin123" are present in Master Database not older than 30 days

  @manual
  @manual-result:failed
  @manual-last-tested:sprint-1
  Scenario: Verify different credentials are provided to Admin, Dev and QA to access Master Database

  Given User is connected to Master Database
  Then Different credentials are provided to Admin, Business, Dev and QA to access Master Database
In the Serenity properties , the team also records the current version (or sprint number):
serenity.project.name = Serenity and Cucumber Report Demo
current.target.version = sprint-1
Now, execute the feature file. This is how the report look like.
Now, we are in next sprint. Update the value of current.target.version in serenity.properties file.
serenity.project.name = Serenity and Cucumber Report Demo
current.target.version = sprint-2
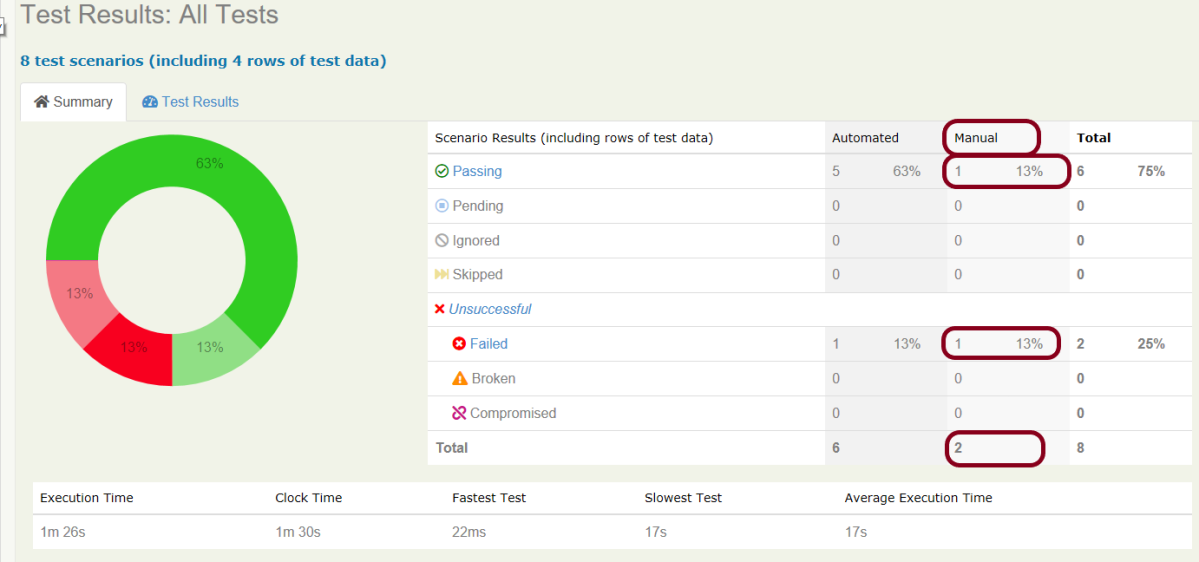
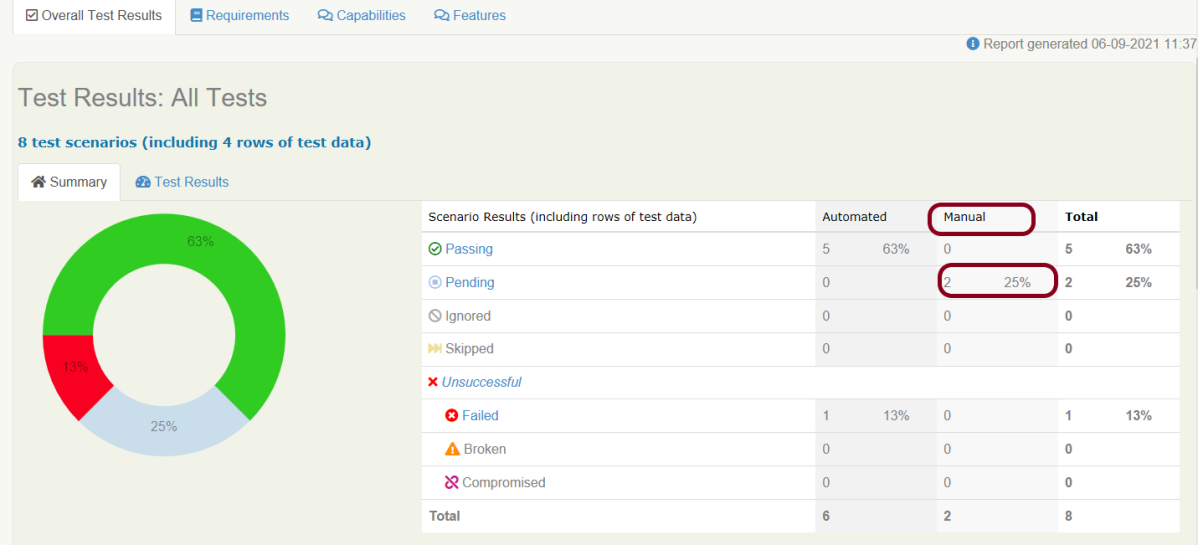
Now, when the manual scenario is processed, it will be marked as pending, with a note indicating that a new manual test is required:
Both the maual tests which were marked as pass and fail are now pending tests as shown in the image.
We are done! Congratulations on making it through this tutorial and hope you found it useful! Happy Learning!!
In the previous tutorial, I explained the Generation of Serenity Report (index.html) using Cucumber6 and JUnit. Index.html report that acts both as a test report and living documentation for the product. It has various views like Overall Test Status, Requirement View, Capabilities View, and Features View.
Sometimes it is useful to be able to send a short summary of the test outcomes via email. Serenity allows us to generate a single-page, self-contained HTML summary report, containing an overview of the test results, and a configurable breakdown of the status of different areas of the application.
Pre-Requisite
Java 11 installed
Maven installed
Eclipse or IntelliJ installed
This framework consists of:
Java 11
Maven – 3.8.1
Serenity – 2.6.0
Serenity Maven – 2.6.0
Serenity Cucumber6 – 2.6.0
JUnit – 4.13.2
Maven Surefire Plugin – 3.0.0-M5
Maven Failsafe Plugin – 3.0.0-M5
Maven Comiler Plugin – 3.8.1
Implementation Steps
Update Properties section in Maven pom.xml
Add repositories and pluginRepository to Maven pom.xml
Add Serenity, Serenity Cucumber and JUnitdependencies to POM.xml
Update Build Section of pom.xml
Create source folder – src/test/resources and features folder within src/test/resources to create test scenarios in Feature file
Create theStep Definition class or Glue Code
Create a Serenity-Cucumber Runner class
Create serenity.conf file under src/test/resources
Createserenity.properties file in the root of the project
Run the tests through commandline which generates Serenity Report
To know about Step 1 to 3, please refer here. These steps are the same for Index.html report and emailable report.
Now, add the below-mentioned plugin. These reports are configured in the Serenity Maven plugin, where you need to do two things. First, you need to add a dependency for the serenity-emailer module in the plugin configuration. Then, you need to tell Serenity to generate the email report when it performs the aggregation task.
I have provided the location of Firefoxdriver through the command line. I believe this is the best way to run the test. We can hard-code the path in the test code or in serenity.conf file. In that case, you don’t need to provide the location of Firefoxdriver through command line. You can use the below command.
mvn verify
The output of the above program is
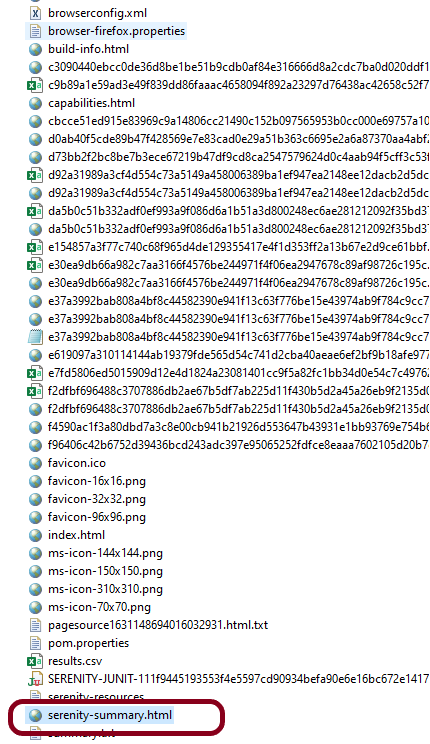
This image shows that two different types of reports are generated by Serenity – Full Report (index.html) and Single Page HTML Summary ( serenity-summary.html ).
This emailable report is called serenity-summary.html. This is generated under site/serenity/ serenity-summary.html
You can see a sample of such a report here:
As you can see in the above execution status, out of six tests, one test failed. The same information is displayed in the report.
This report provides a summary of the test execution.
The Functional Coverage section lets us highlight key areas of your application. By default, this section will list test results for each Feature. But we can configure the report to group results by other tags as well.
We are done! Congratulations on making it through this tutorial and hope you found it useful! Happy Learning!!
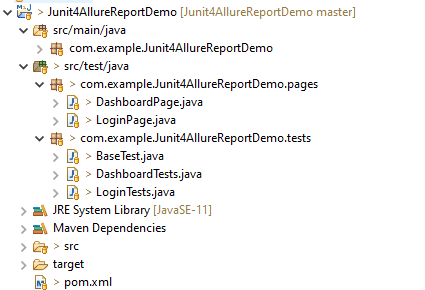
Below is the sample project which uses Selenium and JUnit4 which is used to generate an Allure Report.
We have 2 pages. Below is the code for Login Page which contains all the web elements and methods related to that web elements.
Note:- This is a sample code. There could be the probability that XPath would have changed. So, the tests won’t run as expected and please keep this in mind.
public class LoginPage {

	WebDriver driver;

	By userName = By.name("txtUsername");

	By password = By.name("txtPassword");

	By titleText = By.id("logInPanelHeading");

	By login = By.id("btnLogin");

	By errorMessage = By.id("spanMessage");

	public LoginPage(WebDriver driver) {
		this.driver = driver;
	}

	// Set user name in textbox
	public void setUserName(String strUserName) {
		driver.findElement(userName).sendKeys(strUserName);
	}

	// Set password in password textbox
	public void setPassword(String strPassword) {
		driver.findElement(password).sendKeys(strPassword);
	}

	// Click on login button
	public void clickLogin() {
		driver.findElement(login).click();
	}

	@Step("Verify title of Login Page")
	public void verifyPageTitle() {
		String loginPageTitle = driver.findElement(titleText).getText();
		assertTrue(loginPageTitle.contains("LOGIN Panel"));
	}

	/* Failed Test */
	@Step("Verify error message when invalid credentail is provided")
	public void verifyErrorMessage() {
		String invalidCredentialErrorMessage = driver.findElement(errorMessage).getText();
		assertTrue(invalidCredentialErrorMessage.contains("Incorrect Credentials"));
	}

	@Step("Enter username and password")
	public void login(String strUserName, String strPasword) {

		// Fill user name
		this.setUserName(strUserName);

		// Fill password
		this.setPassword(strPasword);

		// Click Login button
		this.clickLogin();

	}
}
assertTrue() is imported from the below JUnit package for assertion.
public class DashboardPage {

	WebDriver driver;

	By dashboardPageTitle = By.id("welcome");

	By assignLeaveOption = By.cssSelector(
			"#dashboard-quick-launch-panel-menu_holder > table > tbody > tr > td:nth-child(1) > div > a > span");

	By leaveListOption = By.cssSelector(
			"#dashboard-quick-launch-panel-menu_holder > table > tbody > tr > td:nth-child(2) > div > a > span");

	By timesheetsOption = By.cssSelector(
			"#dashboard-quick-launch-panel-menu_holder > table > tbody > tr > td:nth-child(3) > div > a > span");

	By applyLeaveOption = By.cssSelector(
			"#dashboard-quick-launch-panel-menu_holder > table > tbody > tr > td:nth-child(4) > div > a > span");

	public DashboardPage(WebDriver driver) {
		this.driver = driver;

	}

	@Step("Verify title of Dashboard page")
	public void verifyDashboardPageTitle() {
		String DashboardPageTitle = driver.findElement(dashboardPageTitle).getText();
		assertTrue(DashboardPageTitle.contains("Welcome"));
	}

	@Step("Verify Assign Leave Quick Launch Options on Dashboard page")
	public void verifyAssignLeaveOption() {
		String QuickLaunchOptions = driver.findElement(assignLeaveOption).getText();
		assertTrue(QuickLaunchOptions.contains("Assign Leave"));
	}

	@Step("Verify Leave List Quick Launch Options on Dashboard page")
	public void verifyLeaveListOption() {
		String LeaveListQuickLaunchOption = driver.findElement(leaveListOption).getText();
		assertTrue(LeaveListQuickLaunchOption.contains("Leave List"));
	}

	@Step("Verify Assign Leave Quick Launch Options on Dashboard page")
	public void verifytimesheetsOption() {
		String timesheetsOptionQuickLaunchOption = driver.findElement(timesheetsOption).getText();
		assertTrue(timesheetsOptionQuickLaunchOption.contains("Timesheets"));
	}

	@Step("Verify Leave List Quick Launch Options on Dashboard page")
	public void verifyApplyLeaveOption() {
		String applyLeaveQuickLaunchOptions = driver.findElement(applyLeaveOption).getText();
		assertTrue(applyLeaveQuickLaunchOptions.contains("Apply Leave"));
	}

}
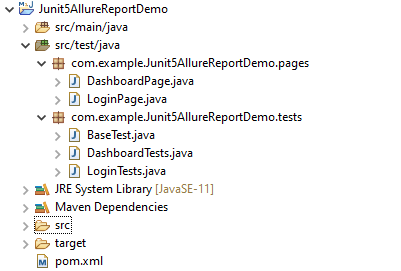
Test Classes related to various Pages
BaseTest.java
public class BaseTest {

	public static WebDriver driver;
	LoginPage objLogin;
	DashboardPage objDashboardPage;

	@Step("Start the application")
	@BeforeEach
	public void setup() {
		System.setProperty("webdriver.gecko.driver",
				"C:\\Users\\Vibha\\Software\\geckodriver-v0.26.0-win64\\geckodriver.exe");
		driver = new FirefoxDriver();
		driver.manage().window().maximize();
		driver.manage().timeouts().implicitlyWait(10, TimeUnit.SECONDS);
		driver.get("https://opensource-demo.orangehrmlive.com/");
	}

	@Step("Stop the application")
	@AfterEach
	public void close() {
		driver.close();
	}
}
@BeforeEach is used to signal that the annotated method should be executed before each @Test, @RepeatedTest, @ParameterizedTest, @TestFactory, and @TestTemplate method in the current test class. It is imported from:-
import org.junit.jupiter.api.BeforeEach;
@AfterEach is used to signal that the annotated method should be executed after each@Test, @RepeatedTest, @ParameterizedTest, @TestFactory, and @TestTemplatemethod in the current test class. It is imported from:-
import org.junit.jupiter.api.AfterEach;
LoginTests.java
@Epic("Web Application Regression Testing using JUnit5")
@Feature("Login Page Tests")
public class LoginTests extends BaseTest {
LoginPage objLogin;
DashboardPage objDashboardPage;
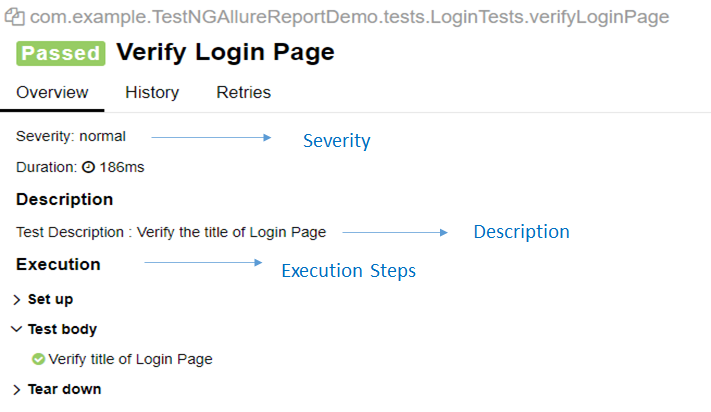
@Severity(SeverityLevel.NORMAL)
@Test
@Description("Test Description : Verify the title of Login Page")
@Story("Title of Login Page")
public void verifyLoginPage() {
// Create Login Page object
objLogin = new LoginPage(driver);
// Verify login page text
objLogin.verifyPageTitle();
}
@Severity(SeverityLevel.BLOCKER)
@Test
@Description("Test Description : Login Test with invalid credentials")
@Story("Unsuccessful Login to Application")
public void invalidCredentialTest() {
// Create Login Page object
objLogin = new LoginPage(driver);
objLogin.login("test", "test123");
// Verify login page text
objLogin.verifyErrorMessage();
}
}
DashboardTests.java
package com.example.Junit5AllureReportDemo.tests;

import org.junit.jupiter.api.Test;

import com.example.Junit5AllureReportDemo.pages.DashboardPage;
import com.example.Junit5AllureReportDemo.pages.LoginPage;

import io.qameta.allure.Description;
import io.qameta.allure.Epic;
import io.qameta.allure.Feature;
import io.qameta.allure.Severity;
import io.qameta.allure.SeverityLevel;
import io.qameta.allure.Story;

@Epic("Web Application Regression Testing using JUnit5")
@Feature("Dashboard Page Tests")
public class DashboardTests extends BaseTest {

	LoginPage objLogin;
	DashboardPage objDashboardPage;

	@Severity(SeverityLevel.BLOCKER)
	@Test
	@Description("Test Description : Verify title of Dashboard page")
	@Story("Title of Dashboard Page")
	public void dashboardTitleTest() {

		objLogin = new LoginPage(driver);

		// login to application
		objLogin.login("Admin", "admin123");

		// go the dashboard page
		objDashboardPage = new DashboardPage(driver);

		objDashboardPage.verifyDashboardPageTitle();

	}

	@Severity(SeverityLevel.BLOCKER)
	@Test
	@Description("Test Description : Verify Assign Leave Option in Quick Link Menu")
	@Story("Validation of Assign Leave Option")
	public void assignLeaveOptionTest() {

		objLogin = new LoginPage(driver);

		// login to application
		objLogin.login("Admin", "admin123");

		// go the dashboard page
		objDashboardPage = new DashboardPage(driver);

		objDashboardPage.verifyAssignLeaveOption();

	}

	@Severity(SeverityLevel.BLOCKER)
	@Test
	@Description("Test Description : Verify Apply Leave Option in Quick Link Menu")
	@Story("Validation of Apply Leave Option")
	public void applyLeaveOptionTest() {

		objLogin = new LoginPage(driver);

		// login to application
		objLogin.login("Admin", "admin123");

		// go the dashboard page
		objDashboardPage = new DashboardPage(driver);

		objDashboardPage.verifyApplyLeaveOption();

	}

	@Severity(SeverityLevel.BLOCKER)
	@Test
	@Description("Test Description : Verify Leave List Option in Quick Link Menu")
	@Story("Validation of Leave List Option")
	public void leaveListOptionTest() {

		objLogin = new LoginPage(driver);

		// login to application
		objLogin.login("Admin", "admin123");

		// go the dashboard page
		objDashboardPage = new DashboardPage(driver);

		objDashboardPage.verifyLeaveListOption();

	}

	@Severity(SeverityLevel.BLOCKER)
	@Test
	@Description("Test Description : Verify Timesheets Option in Quick Link Menu")
	@Story("Validation of Timesheets Option")
	public void timesheetsOptionTest() {

		objLogin = new LoginPage(driver);

		// login to application
		objLogin.login("Admin", "admin123");

		// go the dashboard page
		objDashboardPage = new DashboardPage(driver);

		objDashboardPage.verifyTimesheetsOption();

	}

}
Step 5 – Run the Test and Generate Allure Report
To run the tests, use the below command
mvn clean test
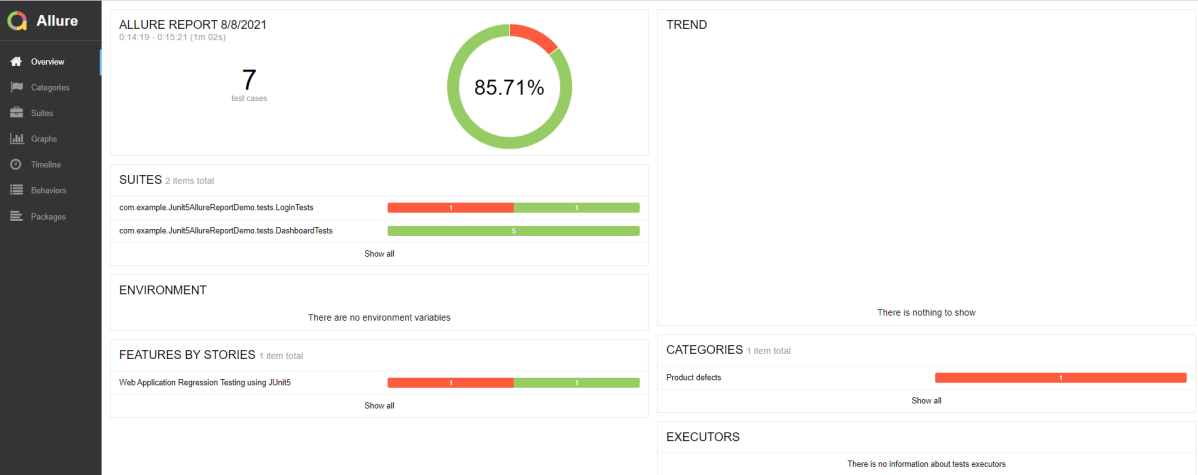
In the below image, we can see that one test failed and six passed out of seven tests.
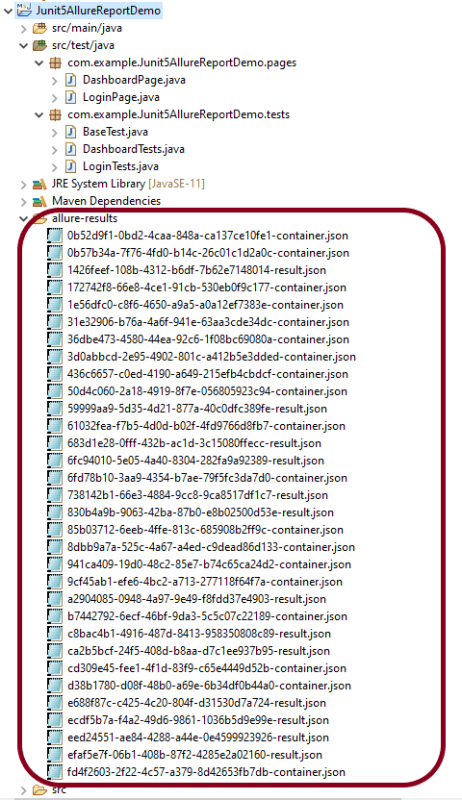
This will create the allure-results folder with all the test reports. These files will be used to generate Allure Report.
To create Allure Report, use the below command
allure serve
This will generate the beautiful Allure Test Report as shown below.
Allure Report Dashboard
Categories in Allure Report
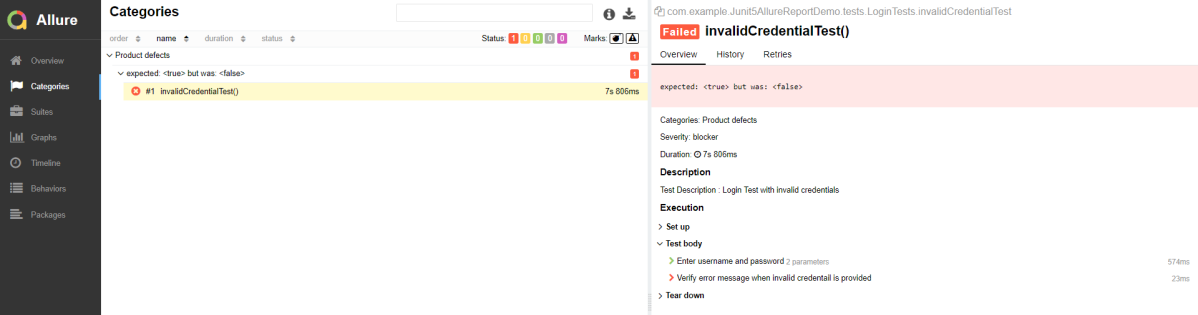
The categories tab gives you a way to create custom defect classifications to apply for test results. There are two categories of defects – Product Defects (failed tests) and Test Defects (broken tests).
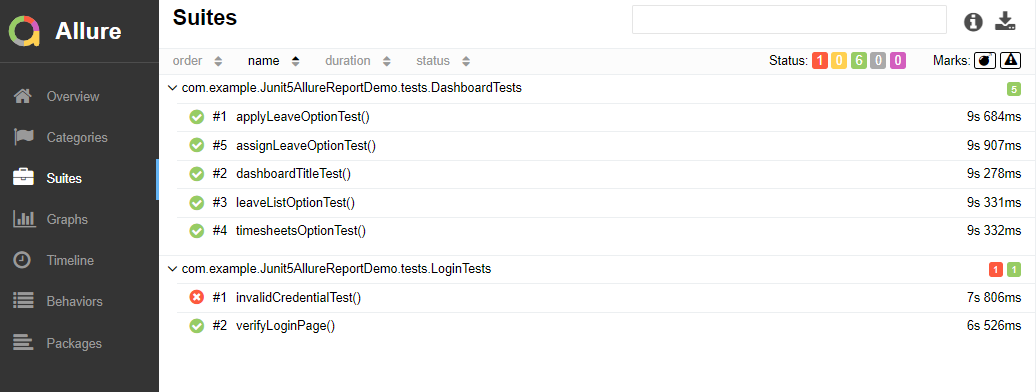
Suites in Allure Report
On the Suites tab a standard structural representation of executed tests, grouped by suites and classes can be found.
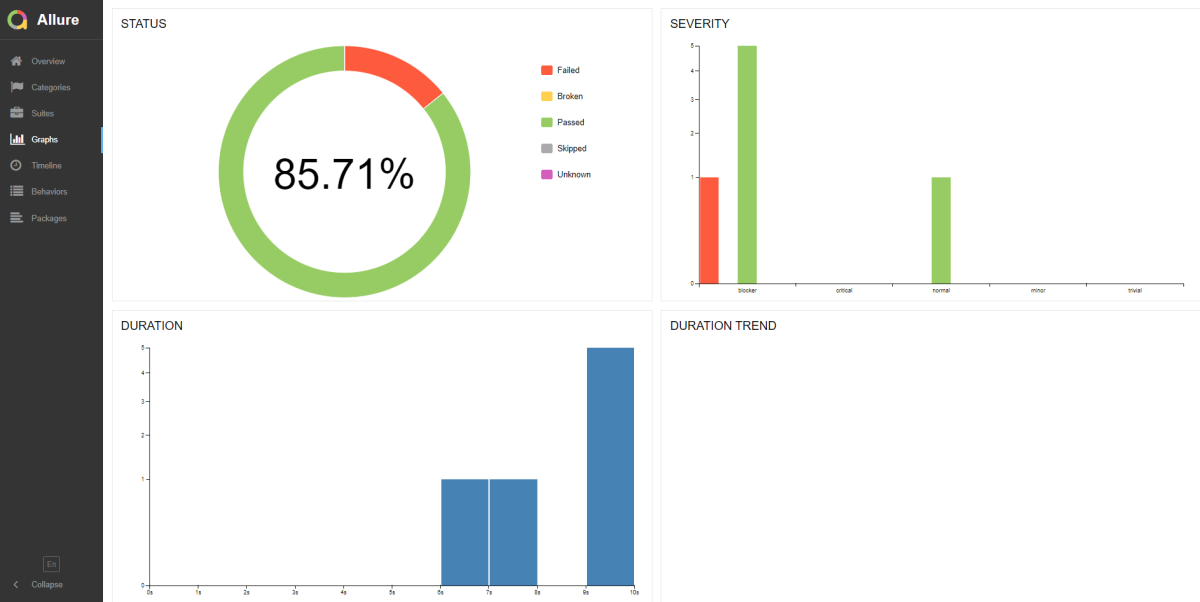
Graphs in Allure Report
Graphs allow you to see different statistics collected from the test data: status breakdown or severity and duration diagrams.
Timeline in Allure Report
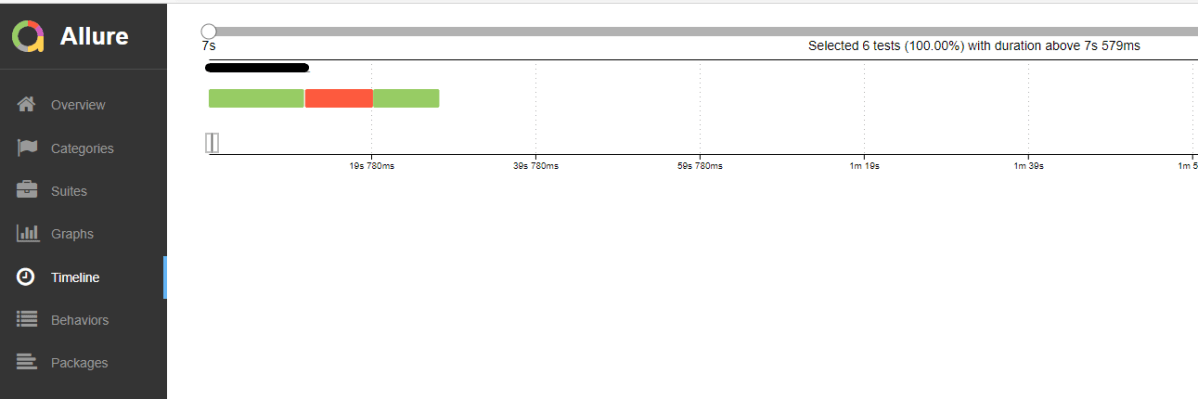
Timeline tab visualizes retrospective of tests execution, allure adaptors collect precise timings of tests, and here on this tab they are arranged accordingly to their sequential or parallel timing structure.
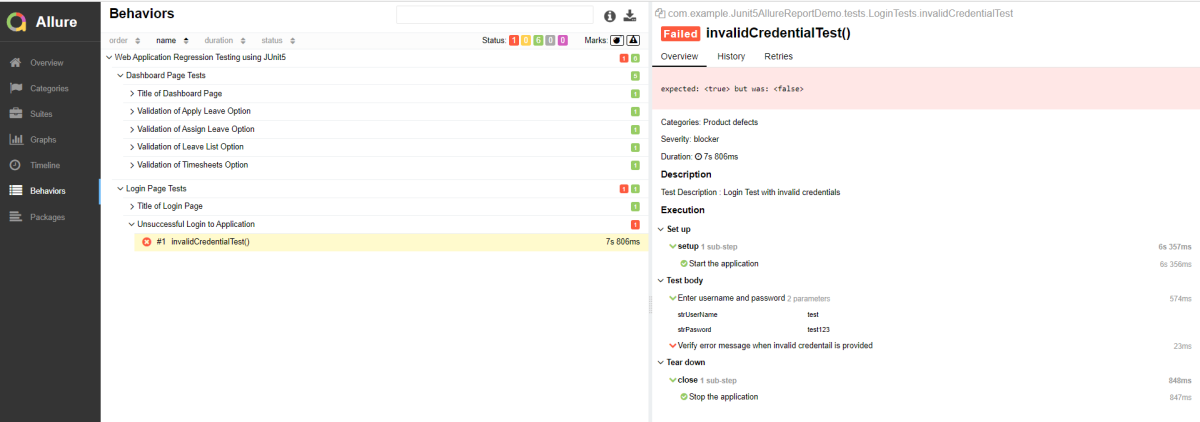
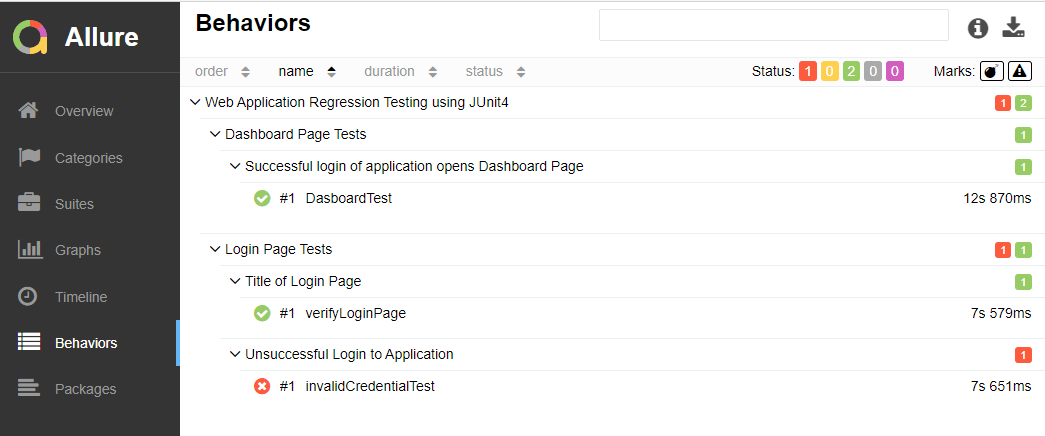
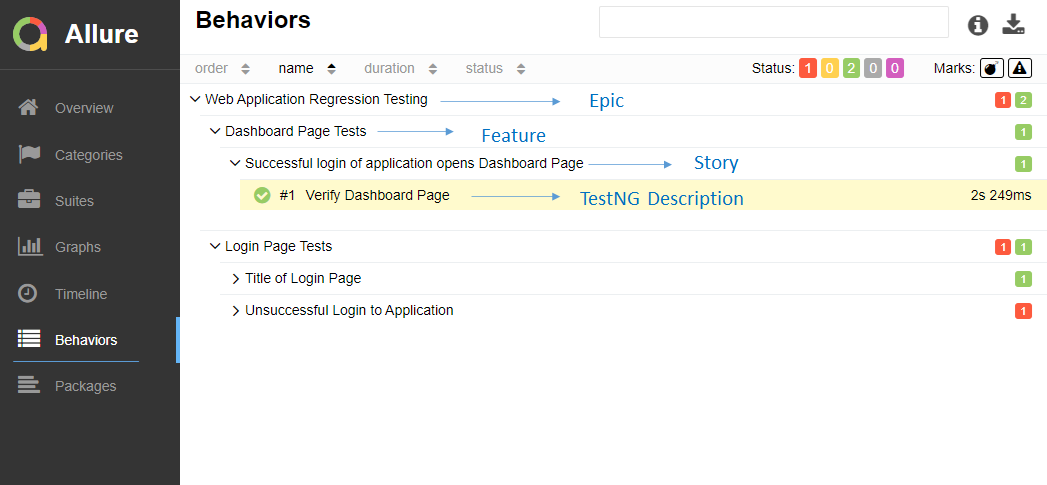
Behaviors of Allure Report
This tab groups test results according to Epic, Feature, and Story tags.
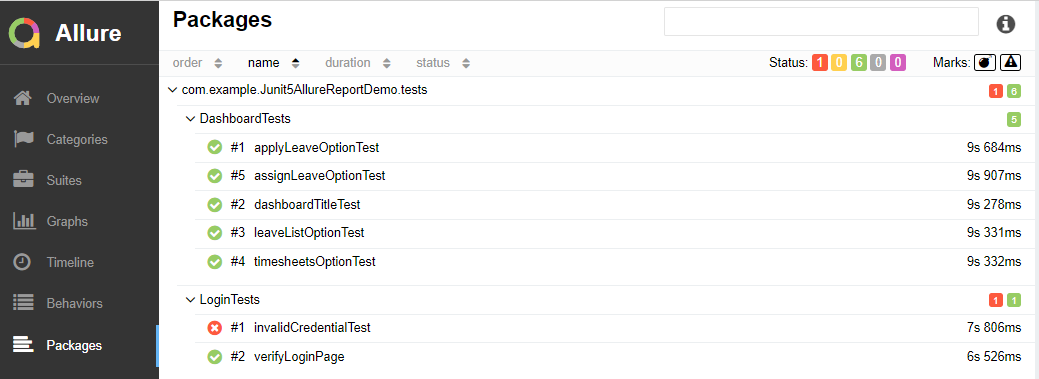
Packages in Allure Report
Packages tab represents a tree-like layout of test results, grouped by different packages.
We are done! Congratulations on making it through this tutorial and hope you found it useful! Happy Learning!!
Below is the sample project which uses Selenium and JUnit4 which is used to generate an Allure Report.
We have 2 pages. Below is the code for Login Page which contains all the web elements and methods related to that web elements.
public class LoginPage {

	WebDriver driver;

	By userName = By.name("txtUsername");

	By password = By.name("txtPassword");

	By titleText = By.id("logInPanelHeading");

	By login = By.id("btnLogin");

	By errorMessage = By.id("spanMessage");

	public LoginPage(WebDriver driver) {
		this.driver = driver;
	}

	// Set user name in textbox
	public void setUserName(String strUserName) {
		driver.findElement(userName).sendKeys(strUserName);
	}

	// Set password in password textbox
	public void setPassword(String strPassword) {
		driver.findElement(password).sendKeys(strPassword);
	}

	// Click on login button
	public void clickLogin() {
		driver.findElement(login).click();
	}

	@Step("Verify title of Login Page")
	public void verifyPageTitle() {
		String loginPageTitle = driver.findElement(titleText).getText();
		Assert.assertTrue(loginPageTitle.contains("LOGIN Panel"));
	}

	/* Failed Test */
	@Step("Verify error message when invalid credentail is provided")
	public void verifyErrorMessage() {
		String invalidCredentialErrorMessage = driver.findElement(errorMessage).getText();
		Assert.assertTrue(invalidCredentialErrorMessage.contains("Incorrect Credentials"));
	}

	@Step("Enter username and password")
	public void login(String strUserName, String strPasword) {

		// Fill user name
		this.setUserName(strUserName);

		// Fill password
		this.setPassword(strPasword);

		// Click Login button
		this.clickLogin();

	}
}
DashboardPage.java
public class DashboardPage {

	WebDriver driver;

	By dashboardPageTitle = By.id("welcome");

	By options = By.cssSelector(
			"#dashboard-quick-launch-panel-menu_holder > table > tbody > tr > td:nth-child(1) > div > a > span");

	public DashboardPage(WebDriver driver) {
		this.driver = driver;

	}

	@Step("Verify title of Dashboard page")
	public void verifyDashboardPageTitle() {
		String DashboardPageTitle = driver.findElement(dashboardPageTitle).getText();
		Assert.assertTrue(DashboardPageTitle.contains("Welcome"));
	}

	@Step("Verify Quick Launch Options on Dashboard page")
	public void verifyQuickLaunchOptions() {
		String QuickLaunchOptions = driver.findElement(options).getText();
		Assert.assertTrue(QuickLaunchOptions.contains("Assign Leave"));
	}

}
Test Classes related to various Pages
BaseTest.java
public class BaseTest {

	public static WebDriver driver;
	LoginPage objLogin;
	DashboardPage objDashboardPage;

	@Step("Start the application")
	@Before
	public void setup() {
		System.setProperty("webdriver.gecko.driver",
				"C:\\Users\\Vibha\\Software\\geckodriver-v0.26.0-win64\\geckodriver.exe");
		driver = new FirefoxDriver();
		driver.manage().window().maximize();
		driver.manage().timeouts().implicitlyWait(10, TimeUnit.SECONDS);
		driver.get("https://opensource-demo.orangehrmlive.com/");
	}

	@Step("Stop the application")
	@After
	public void close() {
		driver.close();
	}
}
LoginTests.java
@Epic("Web Application Regression Testing using JUnit4")
@Feature("Login Page Tests")
@Listeners(TestExecutionListener.class)
public class LoginTests extends BaseTest {

	LoginPage objLogin;
	DashboardPage objDashboardPage;

	@Severity(SeverityLevel.NORMAL)
	@Test(priority = 0, description = "Verify Login Page")
	@Description("Test Description : Verify the title of Login Page")
	@Story("Title of Login Page")
	public void verifyLoginPage() {

		// Create Login Page object
		objLogin = new LoginPage(driver);

		// Verify login page text
		objLogin.verifyPageTitle();
	}

	@Severity(SeverityLevel.BLOCKER)
	@Test(priority = 1, description = "Login with invalid username and password")
	@Description("Test Description : Login Test with invalid credentials")
	@Story("Unsuccessful Login to Application")
	public void invalidCredentialTest() {

		// Create Login Page object
		objLogin = new LoginPage(driver);
		objLogin.login("test", "test123");

		// Verify login page text
		objLogin.verifyErrorMessage();

	}

}
DashboardTests.java
@Epic("Web Application Regression Testing using JUnit4")
@Feature("Dashboard Page Tests")
public class DashboardTests extends BaseTest {

	LoginPage objLogin;
	DashboardPage objDashboardPage;

	@Severity(SeverityLevel.BLOCKER)
	@Test
	@Description("Test Description : After successful login to application opens Dashboard page")
	@Story("Successful login of application opens Dashboard Page")

	public void DasboardTest() {

		objLogin = new LoginPage(driver);

		// login to application
		objLogin.login("Admin", "admin123");

		// go the dashboard page
		objDashboardPage = new DashboardPage(driver);

		// Verify dashboard page
		objDashboardPage.verifyQuickLaunchOptions();

	}

}
Step 5 – Run the Test and Generate Allure Report
To run the tests, use the below command
mvn clean test
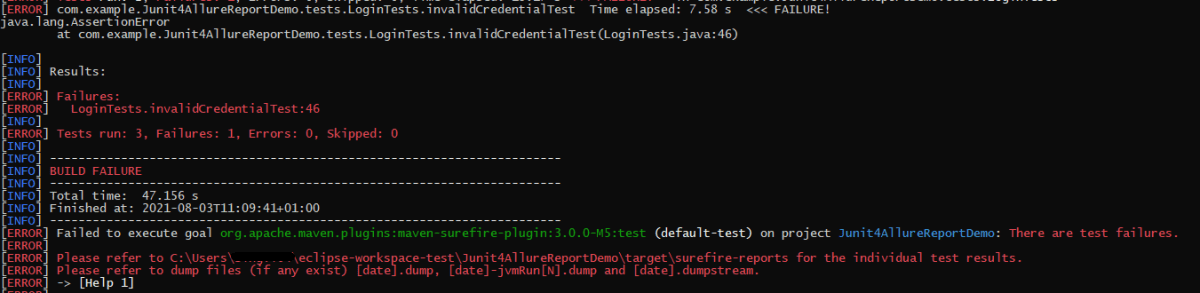
In the below image, we can see that one test is failed and two passed out of three tests.
This will create allure-results folder with all the test report. These files will be use to generate Allure Report.
To create Allure Report, use the below command
allure serve
This will generate the beautiful Allure Test Report as shown below.
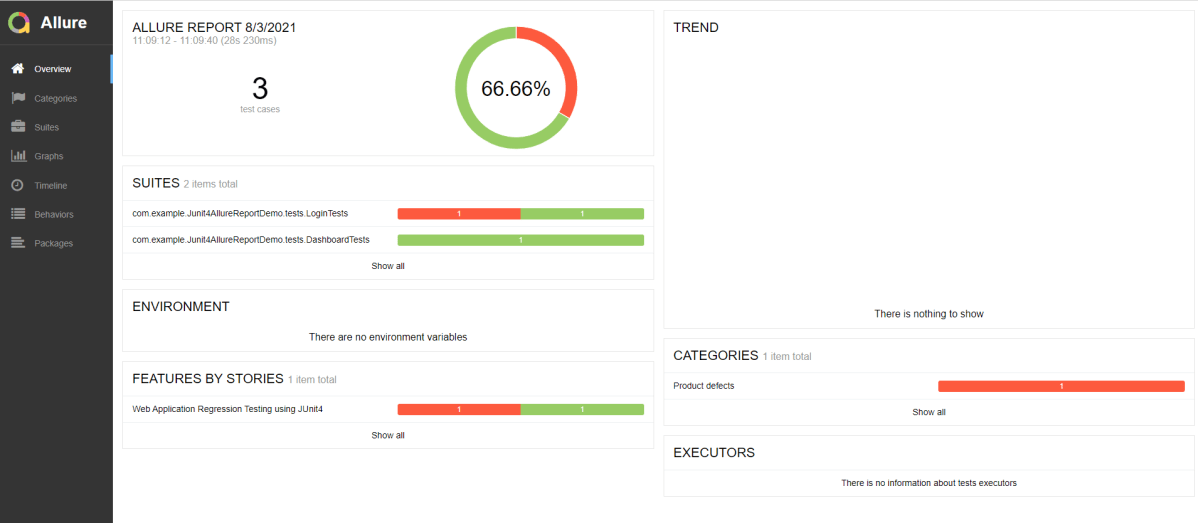
Allure Report Dashboard
Overview page hosts several default widgets representing basic characteristics of your project and test environment.
Statistics – overall report statistics.
Launches – if this report represents several test launches, statistics per launch will be shown here.
Behaviors – information on results aggregated according to stories and features.
Executors – information on test executors that were used to run the tests.
History Trend – if tests accumulated some historical data, it’s trend will be calculated and shown on the graph.
Environment – information on test environment.
Categories in Allure Report
Categories tab gives you the way to create custom defects classification to apply for test results. There are two categories of defects – Product Defects (failed tests) and Test Defects (broken tests).
Suites in Allure Report
On the Suites tab a standard structural representation of executed tests, grouped by suites and classes can be found.
Graphs in Allure Report
Graphs allow you to see different statistics collected from the test data: statuses breakdown or severity and duration diagrams.
Timeline in Allure Report
Timeline tab visualizes retrospective of tests execution, allure adaptors collect precise timings of tests, and here on this tab they are arranged accordingly to their sequential or parallel timing structure.
Behaviors of Allure Report
This tab groups test results according to Epic, Feature and Story tags.
Packages in Allure Report
Packages tab represents a tree-like layout of test results, grouped by different packages.
Below is the sample project which uses Selenium and TestNG which is used to generate an Allure Report.
We have 2 pages. Below is the code for Login Page which contains all the web elements and methods related to that web elements.
LoginPage.java
public class LoginPage {

	WebDriver driver;

	By userName = By.name("txtUsername");

	By password = By.name("txtPassword");

	By titleText = By.id("logInPanelHeading");

	By login = By.id("btnLogin");

	By errorMessage = By.id("spanMessage");

	public LoginPage(WebDriver driver) {
		this.driver = driver;
	}

	// Set user name in textbox
	public void setUserName(String strUserName) {
		driver.findElement(userName).sendKeys(strUserName);
	}

	// Set password in password textbox
	public void setPassword(String strPassword) {
		driver.findElement(password).sendKeys(strPassword);
	}

	// Click on login button
	public void clickLogin() {
		driver.findElement(login).click();
	}

	@Step("Verify title of Login Page")
	public void verifyPageTitle() {
		String loginPageTitle = driver.findElement(titleText).getText();
		Assert.assertTrue(loginPageTitle.contains("LOGIN Panel"));
	}

    /* Failed Test */
	@Step("Verify error message when invalid credentail is provided")
	public void verifyErrorMessage() {
		String invalidCredentialErrorMessage = driver.findElement(errorMessage).getText();
		Assert.assertTrue(invalidCredentialErrorMessage.contains("Incorrect Credentials"));
	}

	@Step("Enter username and password")
	public void login(String strUserName, String strPasword) {

		// Fill user name
		this.setUserName(strUserName);

		// Fill password
		this.setPassword(strPasword);

		// Click Login button
		this.clickLogin();

	}
}
Dashboard.java
public class DashboardPage {

	WebDriver driver;

	By dashboardPageTitle = By.id("welcome");

	By options = By.cssSelector(
			"#dashboard-quick-launch-panel-menu_holder > table > tbody > tr > td:nth-child(1) > div > a > span");

	public DashboardPage(WebDriver driver) {
		this.driver = driver;

	}

	@Step("Verify title of Dashboard page")
	public void verifyDashboardPageTitle() {
		String DashboardPageTitle = driver.findElement(dashboardPageTitle).getText();
		Assert.assertTrue(DashboardPageTitle.contains("Welcome"));
	}

	@Step("Verify Quick Launch Options on Dashboard page")
	public void verifyQuickLaunchOptions() {
		String QuickLaunchOptions = driver.findElement(options).getText();
		Assert.assertTrue(QuickLaunchOptions.contains("Assign Leave"));
	}

}
Below are the Test classes for Login Page and Dashboard Page. Here, we have BaseTest Class also which contains the common methods needed by other test pages.
BaseTest.java
public class BaseTest {

	public static WebDriver driver;
	LoginPage objLogin;
	DashboardPage objDashboardPage;

	@Step("Start the application")
	@BeforeMethod
	public void setup() {
		System.setProperty("webdriver.gecko.driver",
				"C:\\Users\\Vibha\\Software\\geckodriver-v0.26.0-win64\\geckodriver.exe");
		driver = new FirefoxDriver();
		driver.manage().window().maximize();
		driver.manage().timeouts().implicitlyWait(10, TimeUnit.SECONDS);
		driver.get("https://opensource-demo.orangehrmlive.com/");
	}

	@Step("Stop the application")
	@AfterMethod
	public void close() {
		driver.close();
	}
}
LoginTests.java
@Epic("Web Application Regression Testing")
@Feature("Login Page Tests")
@Listeners(TestExecutionListener.class)
public class LoginTests extends BaseTest {

	LoginPage objLogin;
	DashboardPage objDashboardPage;

	@Severity(SeverityLevel.NORMAL)
	@Test(priority = 0, description = "Verify Login Page")
	@Description("Test Description : Verify the title of Login Page")
	@Story("Title of Login Page")
	public void verifyLoginPage() {

		// Create Login Page object
		objLogin = new LoginPage(driver);

		// Verify login page text
		objLogin.verifyPageTitle();
	}

   /* Failed Test */
	@Severity(SeverityLevel.BLOCKER)
	@Test(priority = 1, description = "Login with invalid username and password")
	@Description("Test Description : Login Test with invalid credentials")
	@Story("Unsuccessful Login to Application")
	public void invalidCredentialTest() {

		// Create Login Page object
		objLogin = new LoginPage(driver);
		objLogin.login("test", "test123");

		// Verify login page text
		objLogin.verifyErrorMessage();

	}

}
We can order tests by severity by using @Severityannotation. Click here to know more about other Allure annotations.
DashboardTests.java
@Epic("Web Application Regression Testing")
@Feature("Dashboard Page Tests")
@Listeners(TestExecutionListener.class)
public class DashboardTests extends BaseTest {

	LoginPage objLogin;
	DashboardPage objDashboardPage;

	@Severity(SeverityLevel.BLOCKER)
	@Test(priority = 0, description = "Verify Dashboard Page")
	@Description("Test Description : After successful login to application opens Dashboard page")
	@Story("Successful login of application opens Dashboard Page")

	public void DasboardTest() {

		objLogin = new LoginPage(driver);

		// login to application
		objLogin.login("Admin", "admin123");

		// go the dashboard page
		objDashboardPage = new DashboardPage(driver);

		// Verify dashboard page
		objDashboardPage.verifyQuickLaunchOptions();

	}

}
We can group tests with @Epic, @Feature, and @Stories annotations. Click here to know more about other Allure annotations.
TestExecutionListener.class
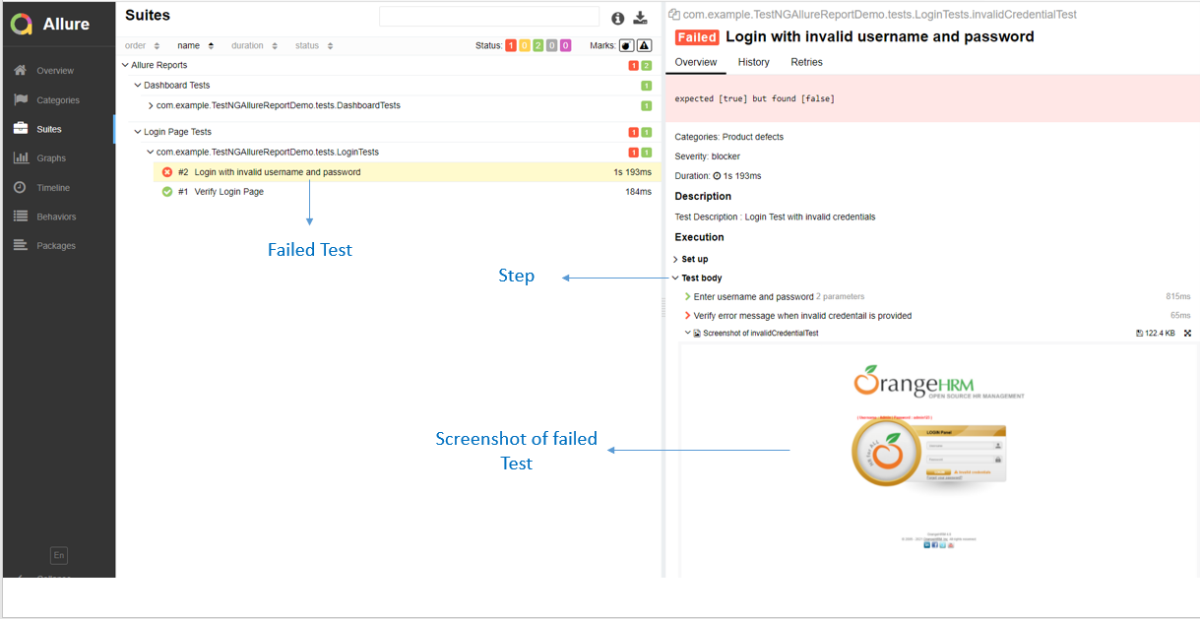
We can add attachments to our reports by using @Attachmentannotation. It can return String, byte [], etc. I need to add @Listeners({ TestExecutionListener.class }) declaration at the top of the test classes. Click here to know more about other Allure annotations.
public class TestExecutionListener implements ITestListener {

	@Attachment(value = "Screenshot of {0}", type = "image/png")
	public byte[] saveScreenshot(String name, WebDriver driver) {
		return (byte[]) ((TakesScreenshot) driver).getScreenshotAs(OutputType.BYTES);
	}

	@Override
	public void onTestFailure(ITestResult result) {
		saveScreenshot(result.getName(), BaseTest.driver);
	}

}
Step 5 – Create testng.xml for the project
TestNG.xml
<?xml version="1.0" encoding="UTF-8"?>
<!DOCTYPE suite SYSTEM "https://testng.org/testng-1.0.dtd">
<suite name = "Allure Reports">
  <test name = "Login Page Tests">
    <classes>
          <class name = "com.example.TestNGAllureReportDemo.tests.LoginTests"/>

          </classes>
          </test>
    <test name =" Dashboard Tests">
    <classes>
          <class name = "com.example.TestNGAllureReportDemo.tests.DashboardTests"/>
          </classes>
    </test>

</suite>
Step 6 – Run the Test and Generate Allure Report
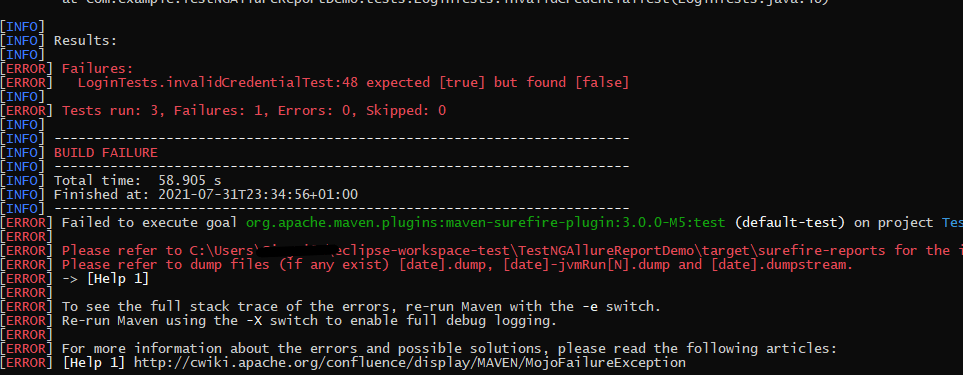
To run the tests, use the below command
mvn clean test
In the below image, we can see that one test failed and two passed out of three tests.
To create an Allure Report, use the below command
allure serve
This will generate the beautiful Allure Test Report as shown below.
Allure Report Dashboard
The overview page hosts several default widgets representing the basic characteristics of your project and test environment.
Statistics – overall report statistics.
Launches – if this report represents several test launches, statistics per launch will be shown here.
Behaviors – information on results aggregated according to stories and features.
Executors – information on test executors that were used to run the tests.
History Trend – if tests accumulated some historical data, it’s a trend that will be calculated and shown on the graph.
Environment – information on the test environment.
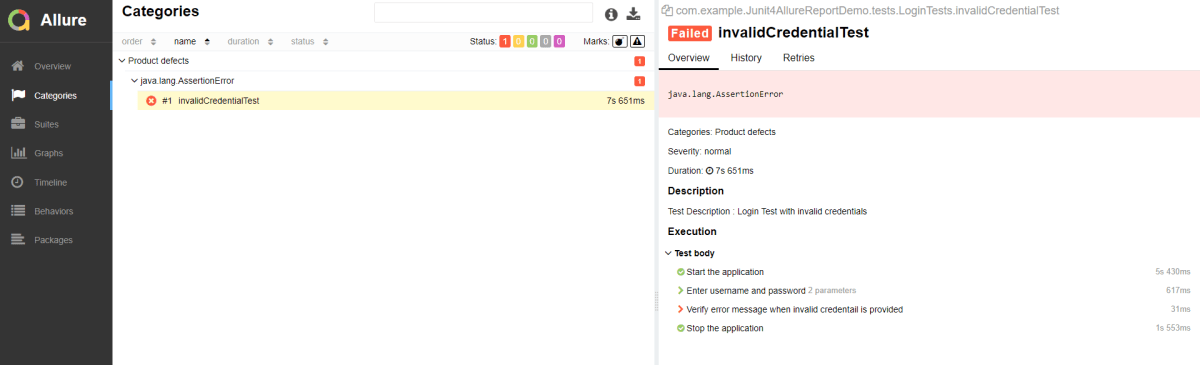
Categories in Allure Report
The categories tab gives you a way to create custom defects classifications to apply for test results. There are two categories of defects – Product Defects (failed tests) and Test Defects (broken tests).
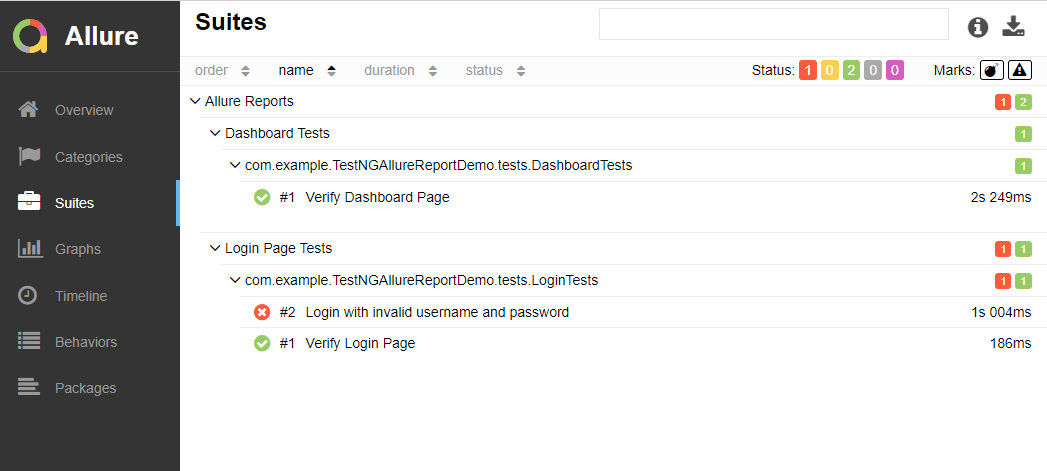
Suites in Allure Report
On the Suites tab a standard structural representation of executed tests, grouped by suites and classes can be found.
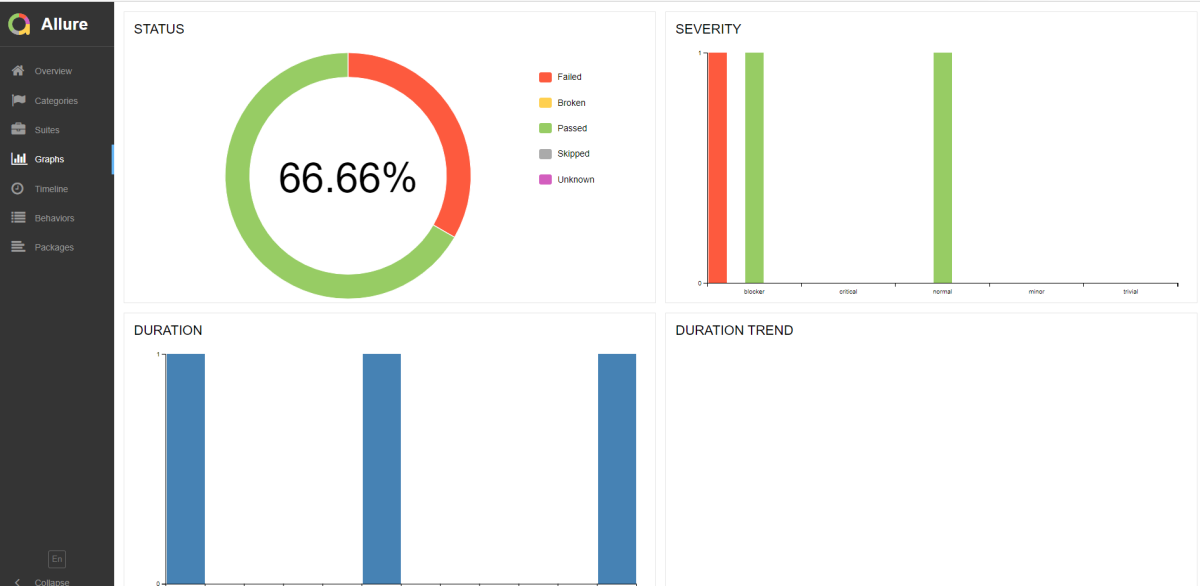
Graphs in Allure Report
Graphs allow you to see different statistics collected from the test data: status breakdown or severity and duration diagrams.
Timeline in Allure Report
The timeline tab visualizes retrospective of tests execution, allure adaptors collect precise timings of tests, and here on this tab, they are arranged accordingly to their sequential or parallel timing structure.
Behaviors of Allure Report
This tab groups test results according to Epic, Feature, and Story tags.
Packages in Allure Report
The packages tab represents a tree-like layout of test results, grouped by different packages.
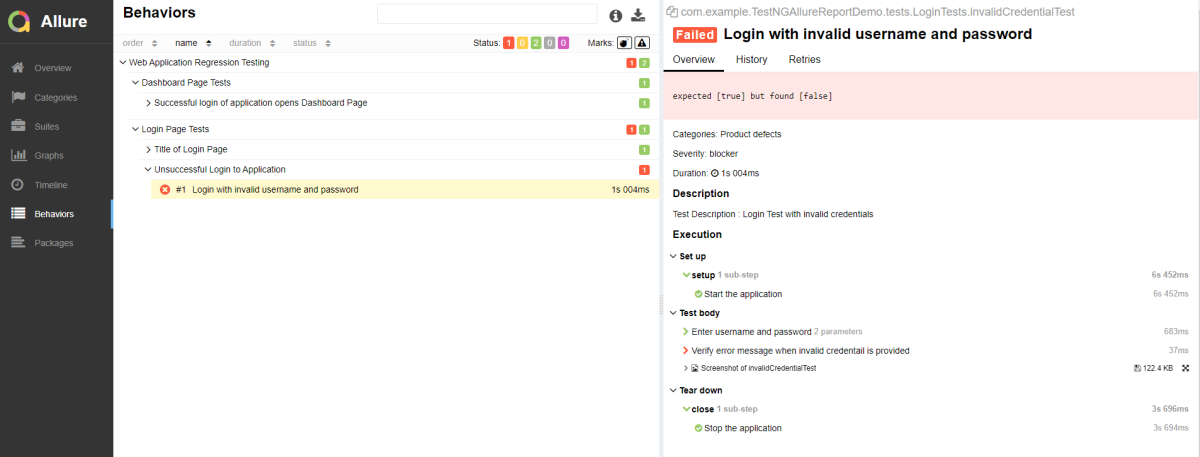
If you click on the (highlighted tab), it will show the test execution report in the below format.
Congratulations on making it through this tutorial and hope you found it useful! Happy Learning!! Cheers!!
REST Assured is a Java DSL for simplifying the testing of REST-based services built on top of HTTP Builder. It supports POST, GET, PUT, DELETE, OPTIONS, PATCH, and HEAD requests and can be used to validate and verify the response to these requests.
The rest-Assured library also provides the ability to validate the HTTP Responses received from the server. For e.g. we can verify the Status code, Status message, Headers, and even the Body of the response. This makes Rest-Assured a very flexible library that can be used for testing.
Dependency List:
Springboot – 3.2.3
Java 17
JUnit – 4.13.2
Maven – 3.9.6
RestAssured – 5.3.2
Junit Vintage
Sample SpringBoot Application
Below is the sample SpringBoot application used for the testing.
The Spring Boot Application class is generated with Spring Initializer. This class acts as the launching point for the application.
import org.springframework.boot.SpringApplication;
import org.springframework.boot.autoconfigure.SpringBootApplication;

@SpringBootApplication
public class SpringBootDemoApplication {

	public static void main(String[] args) {
		SpringApplication.run(SpringBootDemoApplication.class, args);
	}

}
The JPA Entity is any Java POJO, which can represent the underlying table structure. As our service is based on the Student table, we will create a Student Entity object.
import jakarta.persistence.Entity;
import jakarta.persistence.GeneratedValue;
import jakarta.persistence.Id;
import jakarta.validation.constraints.NotBlank;
import jakarta.validation.constraints.NotNull;
import jakarta.validation.constraints.Size;


@Entity
public class Student {

    @Id
    @GeneratedValue
    private Long id;

    @NotNull
    @Size(min = 4, message = "Name should have atleast 4 characters")
    private String name;

    @NotBlank(message = "passportNumber is mandatory")
    private String passportNumber;

    public Student() {
        super();
    }

    public Student(Long id, String name, String passportNumber) {
        super();
        this.id = id;
        this.name = name;
        this.passportNumber = passportNumber;
    }

    public Long getId() {
        return id;
    }

    public void setId(Long id) {
        this.id = id;
    }

    public String getName() {
        return name;
    }

    public void setName(String name) {
        this.name = name;
    }

    public String getPassportNumber() {
        return passportNumber;
    }

    public void setPassportNumber(String passportNumber) {
        this.passportNumber = passportNumber;
    }
}
The Repository represents the DAO layer, which typically does all the database operations. Thanks to Spring Data, who provides the implementations for these methods. Let’s have a look at our StudentRepository, which extends the JpaRepository. There are no method declarations here in the StudentRepository. That is because Spring Data’s JpaRepository has already declared basic CRUD methods.
Spring Rest Controller exposes all services on the student resource. RestController used for the below example is shown below.
import jakarta.validation.Valid;
import org.springframework.beans.factory.annotation.Autowired;
import org.springframework.hateoas.EntityModel;
import org.springframework.hateoas.server.mvc.WebMvcLinkBuilder;
import org.springframework.http.ResponseEntity;
import org.springframework.web.bind.annotation.*;
import org.springframework.web.servlet.support.ServletUriComponentsBuilder;
import java.net.URI;
import java.util.List;
import java.util.Optional;

import static org.springframework.hateoas.server.mvc.WebMvcLinkBuilder.linkTo;
import static org.springframework.hateoas.server.mvc.WebMvcLinkBuilder.methodOn;

@RestController
public class StudentController {

    @Autowired
    private StudentRepository studentRepository;

    @GetMapping("/students")
    public List<Student> retrieveAllStudents() {
        return studentRepository.findAll();
    }

    @GetMapping("/students/{id}")
    public EntityModel<Student> retrieveStudent(@PathVariable long id) {
        Optional<Student> student = studentRepository.findById(id);

        if (!student.isPresent())
            throw new StudentNotFoundException("id-" + id);

        EntityModel<Student> resource = EntityModel.of(student.get());

        WebMvcLinkBuilder linkTo = linkTo(methodOn(this.getClass()).retrieveAllStudents());

        resource.add(linkTo.withRel("all-students"));

        return resource;
    }

    @PostMapping("/students")
    public ResponseEntity<Object> createStudent(@Valid @RequestBody Student student) {
        Student savedStudent = studentRepository.save(student);

        URI location = ServletUriComponentsBuilder.fromCurrentRequest().path("/{id}")
                .buildAndExpand(savedStudent.getId()).toUri();

        return ResponseEntity.created(location).build();

    }

    @DeleteMapping("/students/{id}")
    public void deleteStudent(@PathVariable long id) {
        studentRepository.deleteById(id);
    }

    @PutMapping("/students/{id}")
    public ResponseEntity<Object> updateStudent(@Valid @RequestBody Student student, @PathVariable long id) {

        Optional<Student> studentOptional = studentRepository.findById(id);

        if (!studentOptional.isPresent())
            return ResponseEntity.notFound().build();

        student.setId(id);

        studentRepository.save(student);

        return ResponseEntity.noContent().build();
    }
}
StudentNotFoundException
import org.springframework.http.HttpStatus;
import org.springframework.web.bind.annotation.ResponseStatus;

@ResponseStatus(HttpStatus.NOT_FOUND)
public class StudentNotFoundException extends RuntimeException {

    public StudentNotFoundException(String exception) {
        super(exception);
    }

}
application.properties
spring.jpa.defer-datasource-initialization=true
data.sql
insert into student values(10001,'Annie', 'E1234567');
insert into student values(20001,'John', 'A1234568');
insert into student values(30001,'David','C1232268');
insert into student values(40001,'Amy','D213458');
Implementation Steps
Step 1 – Add SpringbootTest and Rest-Assured dependencies to the project
Step 2 – Create a test file under src/test/java and write the test code
package org.example;

import io.restassured.RestAssured;
import io.restassured.http.ContentType;
import io.restassured.response.ValidatableResponse;
import org.json.JSONException;
import org.json.JSONObject;
import org.junit.Before;
import org.junit.Test;
import org.junit.runner.RunWith;
import org.springframework.boot.test.context.SpringBootTest;
import org.springframework.boot.test.web.server.LocalServerPort;
import org.springframework.test.context.junit4.SpringRunner;

import static io.restassured.RestAssured.given;
import static org.hamcrest.Matchers.equalTo;

@RunWith(SpringRunner.class)
@SpringBootTest(webEnvironment = SpringBootTest.WebEnvironment.RANDOM_PORT)
public class SpringbootDemoTests {

    private final static String BASE_URI = "http://localhost";

    @LocalServerPort
    private int port;

    private ValidatableResponse validatableResponse;

    private ValidatableResponse validatableResponse1;

    @Before
    public void configureRestAssured() {
        RestAssured.baseURI = BASE_URI;
        RestAssured.port = port;
    }

    /* Get operation - Get the details of a Student */
    @Test
    public void listUsers() {

        validatableResponse = given()
                .contentType(ContentType.JSON)
                .when()
                .get("/students")
                .then()
                .assertThat().statusCode(200);

    }

    /* Get operation - Get the details of a Student */
    @Test
    public void listAUser() {

        validatableResponse = given()
                .contentType(ContentType.JSON)
                .when()
                .get("/students/30001")
                .then()
                .assertThat().log().all().statusCode(200)
                .body("id",equalTo(30001))
                .body("name",equalTo("David"))
                .body("passportNumber",equalTo("C1232268"));;
    }

    /* Create operation - Create a new Student */
    @Test
    public void createAUser() throws JSONException {

        JSONObject newStudent = new JSONObject();

        newStudent.put("name", "Timmy");
        newStudent.put("passportNumber", "ZZZ12345");

        validatableResponse = given()
                .contentType(ContentType.JSON).body(newStudent.toString())
                .when()
                .post("/students")
                .then()
                .log().all().assertThat().statusCode(201);

        /* Verify that a new Student is created */
        validatableResponse1 = given()
                .contentType(ContentType.JSON)
                .when()
                .get("/students/1")
                .then()
                .log().all().assertThat().statusCode(200)
                .body("id",equalTo(1))
                .body("name",equalTo("Timmy"))
                .body("passportNumber",equalTo("ZZZ12345"));

    }

    /* Update operation - Update PassportNumber of a Student */
    @Test
    public void updateAUser() throws JSONException {

        JSONObject newStudent = new JSONObject();

        newStudent.put("name", "John");
        newStudent.put("passportNumber", "YYYY1234");

        validatableResponse = given()
                .contentType(ContentType.JSON).body(newStudent.toString())
                .when()
                .put("/students/20001")
                .then()
                .log().all().assertThat().statusCode(204);

        /* Verify that the updated Student has updated PassportNumber */
        validatableResponse1 = given()
                .contentType(ContentType.JSON)
                .when()
                .get("/students/20001")
                .then()
                .log().all().assertThat().statusCode(200)
                .body("id",equalTo(20001))
                .body("name",equalTo("John"))
                .body("passportNumber",equalTo("YYYY1234"));

    }

    /* Delete operation - Delete a Student */
    @Test
    public void deleteAUser() throws JSONException {

        validatableResponse = given()
                .contentType(ContentType.JSON)
                .when()
                .delete("/students/10003")
                .then()
                .log().all().assertThat().statusCode(200);


        /* Verify that the deleted Student Request returns STATUS 404 */
        validatableResponse1 = given()
                .contentType(ContentType.JSON)
                .when()
                .get("/students/10003")
                .then()
                .log().all().assertThat().statusCode(404);

    }
}
When a class is annotated with @RunWith or extends a class annotated with @RunWith, JUnit will invoke the class it references to run the tests in that class instead of the runner built into JUnit.
SpringRunner is an alias for the SpringJUnit4ClassRunner. Here, we have simply annotated a JUnit 4-based test class with @RunWith(SpringRunner.class). The Spring TestContext Framework provides generic, annotation-driven unit and integration testing support that is agnostic of the testing framework in use (JUnit, TestNG).
We build the test class with @SpringBootTestannotation which starts up an Application Contextused throughout our test. In the classes property of @SpringBootTest annotation, we can specify which configuration classes build our Application Context. By default, @SpringBootTest annotation does not provide any web environment. In order to set up a test web server we need to use @SpringBootTest’s webEnvironment annotation. There are a few modes in which the web server can be started.
RANDOM_PORT – this is a recommended option where a real, embedded web server starts on a random port
DEFINED_PORT – web server will start on an 8080 or a port defined in application.properties
MOCK – loads a mock web environment where embedded servers are not started up.
Step 3 – Run the tests from JUnit
Right-click Run as JUnit Tests (Eclipse)
Right Click and select Run SpringBootDemoTests (IntelliJ)
Step 4 – Run the tests from Command Line
Open a command prompt and use the below command to run the tests.
mvn clean test
To run the tests from the command line, we need to add junit-vintage-engine dependency. Starting with Spring Boot 2.4, JUnit 5’s vintage engine has been removed from the spring-boot-starter-test.
Page Object Model(POM) is an object design pattern in Selenium webdriver which tells how to organize the object repository. In this case, we refer to web elements as Objects. Page Object Model(POM) is not a Test Framework.
In the Page Object Model (POM), each web page is represented as a separate class. For example, consider HRM website. It has many web pages like Login , Dashboard , Assign Leave, Leave List, Timesheets, etc. Under this model, for each web page in the application, there should be a corresponding Page Class. This Page class will identify the WebElements of that web page and also contains Page methods that perform operations on those WebElements.
If a new web element is added or an existing web element is updated, then you can add or update that web element in object repository by navigating to class which has same name as webpage.
The object repository is independent of test cases, so we can use the same object repository for a different purpose with different tools. For example, we can integrate Page Object Model in Selenium with TestNG/JUnit for functional Testing and at the same time with JBehave/Cucumber for acceptance testing.
POM enhances test maintenance, readability and reducing code duplication.
In this tutorial, I’m creating a project using Page Object Model as Design Pattern and TestNG as the Test Automation Framework.
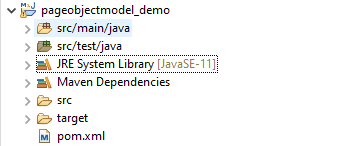
Steps to create a Page Object Model Project
Download and Install Java on system
Download and setup Eclipse IDE on system
Setup Maven
Create a new Maven Project
Add dependencies to pom.xml
Create Page Class for each page – LoginPage.Java and DashboardPage.java
Create tests for each Page – BaseTests, LoginTests and DashboardTests
Create a TestNG.XML
Run the tests from TestNG.xml
TestNG Report Generation
Step 1- Download and Install Java
Click here to know How to install Java. To check if Java is already installed on your machine, use the below command in the command line. This command will show the version of Java installed on your machine.
java -version
Step 2 – Download and setup Eclipse IDE on system
The Eclipse IDE (integrated development environment) provides strong support for Java developer. The Eclipse IDE for Java Developers distribution is designed to support standard Java development. It includes support for the Maven and Gradle build system and support for the Git version control system. Click here to know How to install Eclipse.
Step 3 – Setup Maven
To build a test framework, we need to add a number of dependencies to the project. It is very tedious and cumbersome process to add each dependency manually. So, to overcome this problem, we use a build management tool. Maven is a build management tool which is used to define project structure, dependencies, build, and test management. Click here to know How to install Maven.
To know if Maven is already installed or not on your machine, type this command in the command line. This command will show the version of Maven installed on your machine.
Step 6 – Create Page Class for each page – LoginPage.Java and DashboardPage.java
I want to test 2 pages – Login and Dashboard. So, I’m creating 2 seperate class. Each class will contain its web elements and methods of that page.
LoginPage.Java
import org.openqa.selenium.By;
import org.openqa.selenium.WebDriver;

public class LoginPage {

	WebDriver driver;

	By userName = By.name("txtUsername");

	By password = By.name("txtPassword");

	By titleText = By.id("logInPanelHeading");

	By login = By.id("btnLogin");

	public LoginPage(WebDriver driver) {
		this.driver = driver;
	}

	// Set user name in textbox
	public void setUserName(String strUserName) {
		driver.findElement(userName).sendKeys(strUserName);
	}

	// Set password in password textbox
	public void setPassword(String strPassword) {
		driver.findElement(password).sendKeys(strPassword);
	}

	// Click on login button
	public void clickLogin() {
		driver.findElement(login).click();
	}

	// Get the title of Login Page
	public String getLoginTitle() {
		return driver.findElement(titleText).getText();
	}

	public void login(String strUserName, String strPasword) {

		// Fill user name
		this.setUserName(strUserName);

		// Fill password
		this.setPassword(strPasword);

		// Click Login button
		this.clickLogin();
	}
}
DashboardPage.java
import org.openqa.selenium.By;
import org.openqa.selenium.WebDriver;

public class DashboardPage {

	WebDriver driver;

	By homePageUserName = By.id("welcome");

	public DashboardPage(WebDriver driver) {
		this.driver = driver;

	}

	// Get the User name from Home Page
	public String getHomePageText() {
		return driver.findElement(homePageUserName).getText();
	}

}
Step 7 – Create tests for each Page – BaseTests, LoginTests and DashboardTests
Here, I have created 3 classes. BaseTest class to contain startUp and tearDown methods. These methods will run once before the after of every class. LoginTests and DashboardTests classes contain the tests related to LoginPage and DashboardPage respectively.
BaseTest
import java.util.concurrent.TimeUnit;

import org.openqa.selenium.WebDriver;
import org.openqa.selenium.firefox.FirefoxDriver;
import org.testng.annotations.AfterClass;
import org.testng.annotations.BeforeClass;

import com.example.pageobjectmodel_demo.pages.DashboardPage;
import com.example.pageobjectmodel_demo.pages.LoginPage;

public class BaseTest {

	public static WebDriver driver;
	LoginPage objLogin;
	DashboardPage objDashboardPage;

	@BeforeClass
	public void setup() {
		System.setProperty("webdriver.gecko.driver",
				"C:\\Users\\Vibha\\Software\\geckodriver-v0.26.0-win64\\geckodriver.exe");
		driver = new FirefoxDriver();
		driver.manage().window().maximize();
		driver.manage().timeouts().implicitlyWait(10, TimeUnit.SECONDS);
		driver.get("https://opensource-demo.orangehrmlive.com/");
	}

	@AfterClass
	public void close() {
		driver.close();
	}
}
LoginTests
import org.testng.Assert;
import org.testng.annotations.Test;

import com.example.pageobjectmodel_demo.pages.DashboardPage;
import com.example.pageobjectmodel_demo.pages.LoginPage;

public class LoginTests extends BaseTest {

	LoginPage objLogin;
	DashboardPage objDashboardPage;

	@Test(priority = 0)
	public void loginTest() {

		// Create Login Page object
		objLogin = new LoginPage(driver);

		// Verify login page text
		String loginPageTitle = objLogin.getLoginTitle();
		Assert.assertTrue(loginPageTitle.contains("LOGIN Panel"));
	}

}
DashboardTests
import org.testng.Assert;
import org.testng.annotations.Test;

import com.example.pageobjectmodel_demo.pages.DashboardPage;
import com.example.pageobjectmodel_demo.pages.LoginPage;

public class DashboardTests extends BaseTest {

	LoginPage objLogin;
	DashboardPage objDashboardPage;

	@Test(priority = 0)
	public void DasboardTest() {

		objLogin = new LoginPage(driver);

		// login to application
		objLogin.login("Admin", "admin123");

		// go the dashboard page
		objDashboardPage = new DashboardPage(driver);

		// Verify dashboard page
		Assert.assertTrue(objDashboardPage.getHomePageText().contains("Welcome"));
	}

}
Step 8 – Create a TestNG.XML
Here, I have mentioned 2 test classes. So, when I will run the tests from TestNG.xml, it will run the tests of both the classes. If will mention any one class, then the test of that particular class will be executed.
<?xml version = "1.0"encoding = "UTF-8"?>
<!DOCTYPE suite SYSTEM "http://testng.org/testng-1.0.dtd">
<suite name = "PageObjectModel">
  <test name = "PageObjectModel Tests">
    <classes>
          <class name = "com.example.pageobjectmodel_demo.tests.LoginTests"/>
          <class name = "com.example.pageobjectmodel_demo.tests.DashboardTests"/>
     </classes>
   </test>
</suite>
Step 9 – Run the tests from TestNG.xml
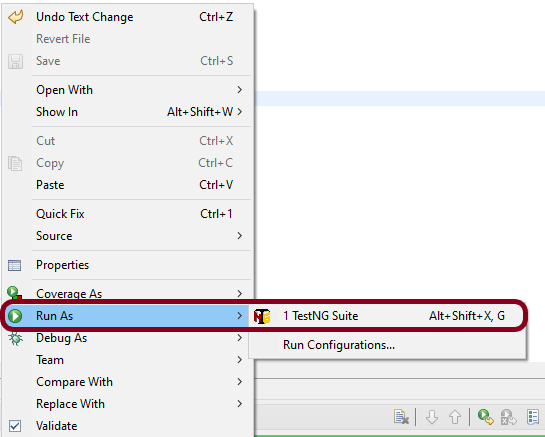
Right click on TestNG.xml and select Run As TestNG Suite.
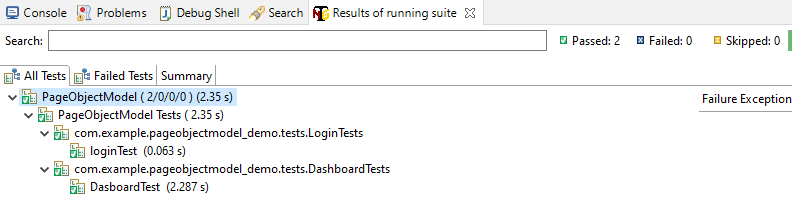
The execution status looks like as shown below.
Step 10 – TestNG Report Generation
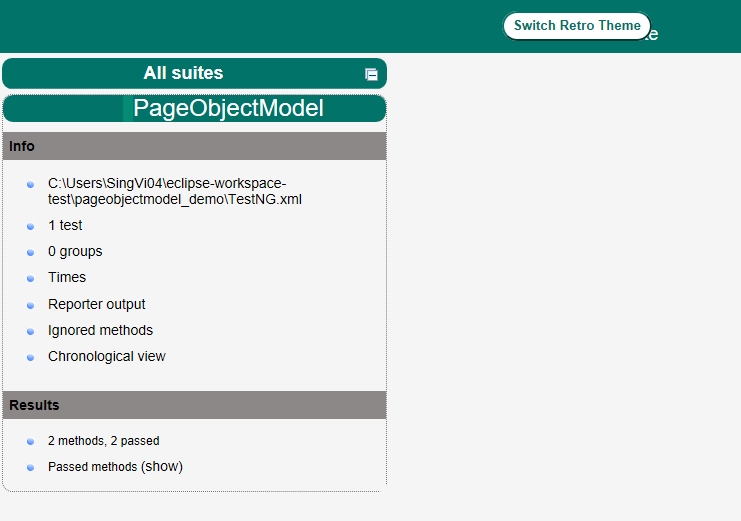
Once the execution is finished, refresh the project. It will create a test-output folder containing various reports generated by TestNG. Below is the screenshot of the report folder.
Image of Index.html report
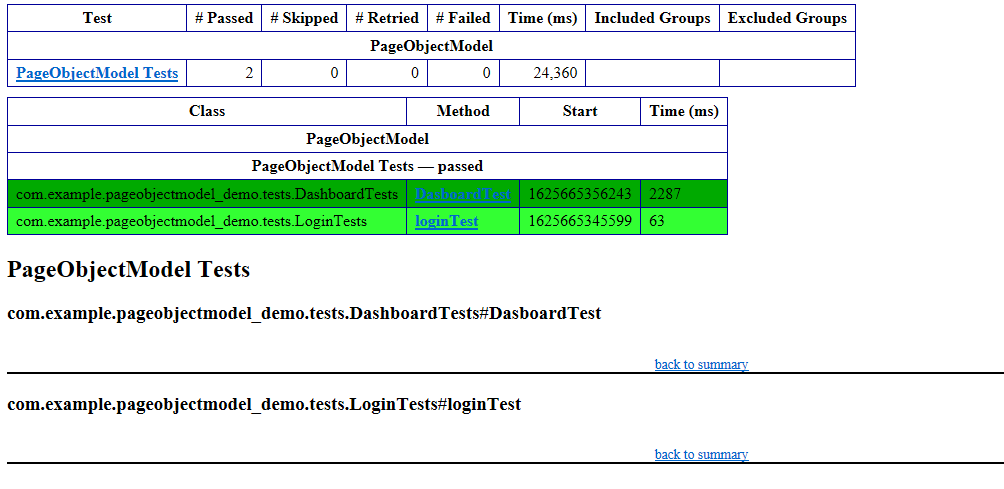
Image of emailable-report.html
Cheers! Congratulations on making it through this tutorial and hope you found it useful! Happy Learning!!
Selects the specified property in a parent object.
[‘property’]
Selects the specified property in a parent object. Be sure to put single quotes around the property name.Tip: Use this notation if the property name contains special characters such as spaces, or begins with a character other than A..Za..z_.
[n]
Selects the n-th element from an array. Indexes are 0-based.
[index1,index2,…]
Selects array elements with the specified indexes. Returns a list.
..property
Recursive descent: Searches for the specified property name recursively and returns an array of all values with this property name. Always returns a list, even if just one property is found.
*
Wildcard selects all elements in an object or an array, regardless of their names or indexes.
[start:end] [start:]
Selects array elements from the start index and up to, but not including, end index. If end is omitted, selects all elements from start until the end of the array. Returns a list.
[:n]
Selects the first n elements of the array. Returns a list.
[-n:]
Selects the last n elements of the array. Returns a list.
[?(expression)]
Selects all elements in an object or array that match the specified filter. Returns a list.
[(expression)]
Script expressions can be used instead of explicit property names or indexes. An example is [(@.length-1)] which selects the last item in an array. Here, length refers to the length of the current array rather than a JSON field named length.
@
Used in filter expressions to refer to the current node being processed.
Below is the sample JSON which I am using for extraction examples. I have saved this file in resources/Payloads as test.json.
{
    "store": {
        "book": [
            {
                "category": "reference",
                "author": "Nigel Rees",
                "title": "Sayings of the Century",
                "price": 8.95
            },
            {
                "category": "fiction",
                "author": "Evelyn Waugh",
                "title": "Sword of Honour",
                "price": 12.99
            },
            {
                "category": "fiction",
                "author": "Herman Melville",
                "title": "Moby Dick",
                "isbn": "0-553-21311-3",
                "price": 8.99
            },
            {
                "category": "fiction",
                "author": "J. R. R. Tolkien",
                "title": "The Lord of the Rings",
                "isbn": "0-395-19395-8",
                "price": 22.99
            }
        ],
        "bicycle": {
            "color": "red",
            "price": 19.95
        }
    },
    "expensive": 10
}
To extract all books present in the store:-
String allBooks = JsonPath.read(jsonString, "$..*").toString();
System.out.println("--------------- All books in the store --------------");
System.out.println(allBooks);
The complete program looks like as shown below:
import com.jayway.jsonpath.JsonPath;
public class JsonPath_Demo {

    public static void main(String args[]) {

        String jsonString = new String(Files.readAllBytes(Paths.get("src/test/resources/Payloads/test.json")));

        String allBooks = JsonPath.read(jsonString, "$..*").toString();
        System.out.println("--------------- All books in the store --------------");
        System.out.println(allBooks);
    }
}
The output of the above program is
Below are examples that show how to extract different nodes from a JSON Body. I have used the above JSON Body for these examples.
 // All bicycles in the store
String allBicycles = JsonPath.read(jsonString, "$..bicycle").toString();
System.out.println("--------------- All bicycles in the store ---------------");
System.out.println(allBicycles);

// The number of books
String noOfBooks = JsonPath.read(jsonString, "$..book.length()").toString();
System.out.println("--------------- The number of books ---------------");
System.out.println(noOfBooks);

// The authors of all books
String authors = JsonPath.read(jsonString, "$.store.book[*].author").toString();
System.out.println("--------------- Author of all Books ---------------");
System.out.println(authors);

// All authors
String allAuthors = JsonPath.read(jsonString, "$..author").toString();
System.out.println("--------------- All Authors ---------------");
System.out.println(allAuthors);

// All details of the store
String store = JsonPath.read(jsonString, "$.store.*").toString();
System.out.println("--------------- All details of the store ---------------");
System.out.println(store);

// Price of store
String storePrice = JsonPath.read(jsonString, "$.store..price").toString();
System.out.println("--------------- price of store ---------------");
System.out.println(storePrice);
The output of the above program is
Below are the examples where I have extracted specific book (nodes) from the JSON body.
// Third book
String thirdBook = JsonPath.read(jsonString, "$..book[2]").toString();
System.out.println("--------------- third book ---------------");
System.out.println(thirdBook);

// first Last Book
String firstLastBook = JsonPath.read(jsonString, "$..book[-1]").toString();
System.out.println("--------------- first Last Book ---------------");
System.out.println(firstLastBook);

// first two Books
String firstTwoBooks = JsonPath.read(jsonString, "$..book[0,1]").toString();
System.out.println("--------------- first Two Books ---------------");
System.out.println(firstTwoBooks);

// books from index 0 (inclusive) until index 2 (exclusive)
String booksRange = JsonPath.read(jsonString, "$..book[:2]").toString();
System.out.println("--------------- books from index 0 (inclusive) until index 2 (exclusive) ---------------");
System.out.println(booksRange);

// All books from index 1 (inclusive) until index 2 (exclusive)
String booksRange1 = JsonPath.read(jsonString, "$..book[1:2]").toString();
System.out.println("------------ All books from index 1 (inclusive) until index 2 (exclusive) -----------");
System.out.println(booksRange1);

// Book number one from tail
String bottomBook = JsonPath.read(jsonString, "$..book[1:]").toString();
System.out.println("--------------- Book number one from tail ---------------");
System.out.println(bottomBook);
The output of the above program is
Filters are logical expressions used to filter arrays. Below are examples of a JSONPath expression with the filters.
// All books in store expensive than 10
String expensiveBook = JsonPath.read(jsonString, "$.store.book[?(@.price > 10)]").toString();
System.out.println("--------------- All books in store costlier than 10 ---------------");
System.out.println(expensiveBook);

// All books in store that are not "expensive"
String notExpensiveBook = JsonPath.read(jsonString, "$..book[?(@.price <= $['expensive'])]").toString();
System.out.println("--------------- All books in store that are not expensive ---------------");
System.out.println(notExpensiveBook);

// All books in store that are equal to price 8.95
String comparePrice = JsonPath.read(jsonString, "$.store.book[?(@.price == 8.95)]").toString();
System.out.println("--------------- All books in store that are not expensive ---------------");
System.out.println(comparePrice);

// All books matching regex (ignore case)
String regxExample = JsonPath.read(jsonString, "$..book[?(@.author =~ /.*REES/i)]").toString();
System.out.println("--------------- All books matching regex (ignore case) ---------------");
System.out.println(regxExample);

// All books with price equal to mentioned list of prices
String priceList = JsonPath.read(jsonString, "$..book[?(@.price in ['12.99', '8.99'])]").toString();
System.out.println("--------------- All books with price equal to mentioned list of prices ---------------");
System.out.println(priceList);

// All books with price NOT equal to mentioned list of prices
String excludePriceList = JsonPath.read(jsonString, "$..book[?(@.price nin ['12.99', '8.99'])]").toString();
System.out.println("---------- All books with price NOT equal to mentioned list of prices ---------");
System.out.println(excludePriceList);

// All books with specified substring (case-sensitive)
String substringExample = JsonPath.read(jsonString, "$..book[?(@.author contains 'Melville')]").toString();
System.out.println("--------------- All books with specified substring (case-sensitive) ---------------");
System.out.println(substringExample);

// All books with an ISBN number
String specificBook = JsonPath.read(jsonString, "$..book[?(@.isbn)]").toString();
System.out.println("--------------- All books with an ISBN number ---------------");
System.out.println(specificBook);
The output of the above program is
We are done! Congratulations on making it through this tutorial and hope you found it useful! Happy Learning!!
In the previous tutorial, I have explained about How to add Formulas in Excel in Java. In this tutorial, I will explain How to customize the style of cells in Excel in Java using Apache POI.
I’m using Apache POI to write data to the excel file. To download and install Apache POI, refer here.
If you are using maven, then you need to add below dependency in pom.xml.