The previous tutorial explained the Integration of Cucumber with Selenium and JUnit4 in a Maven Project. This tutorial explains the test automation framework based on Gradle, Cucumber, Selenium, and JUnit4.
Pre Requisite:
- Java 8 or above installed
- Eclipse or IntelliJ IDE installed
- Gradle Installed
- Environment variables JAVA_HOME and GRADLE_HOME are correctly configured
In this tutorial, I’ll create a BDD Framework for the testing of web applications using Cucumber, and Selenium WebDriver with JUnit4. This framework consists of:-
- Cucumber Java- 7.6.0
- Cucumber JUnit– 7.6.0
- Java 11
- JUnit4 – 4.13.2
- Gradle – 7.5.1
- Selenium – 4.3.0
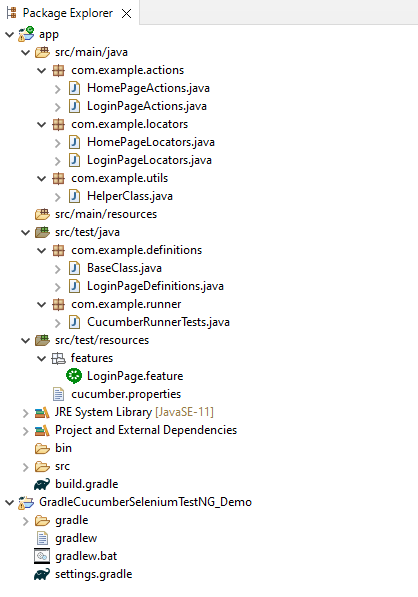
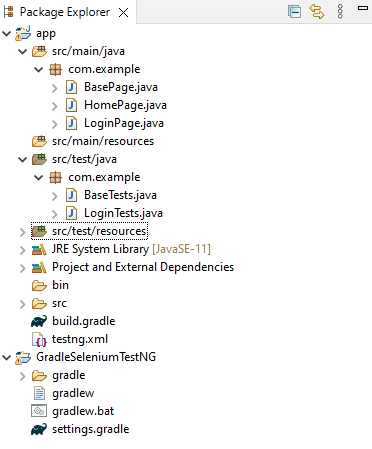
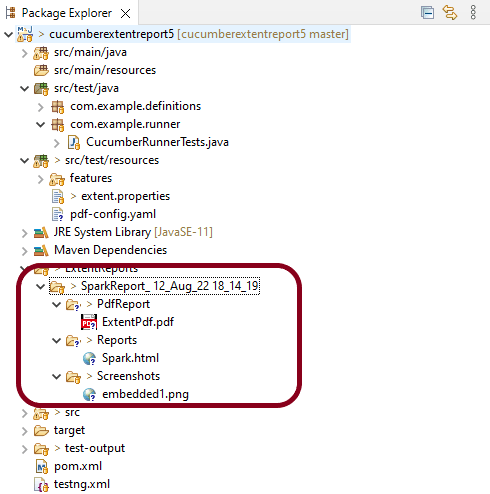
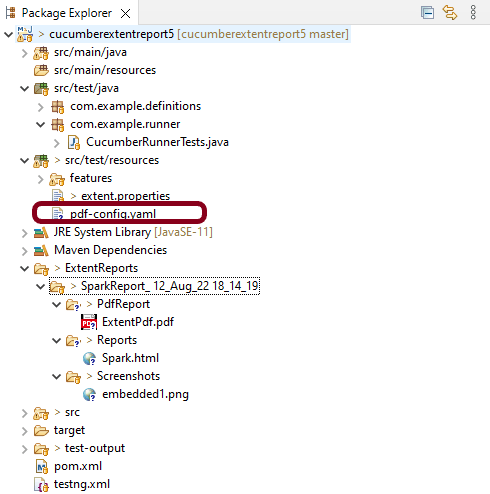
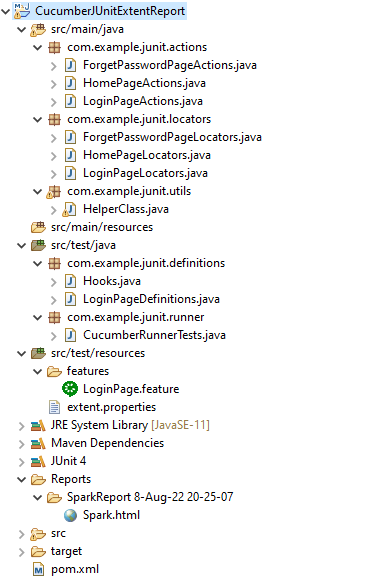
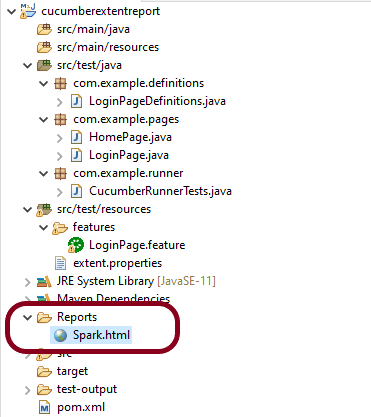
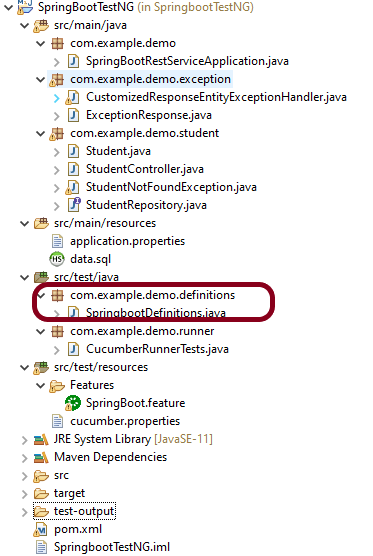
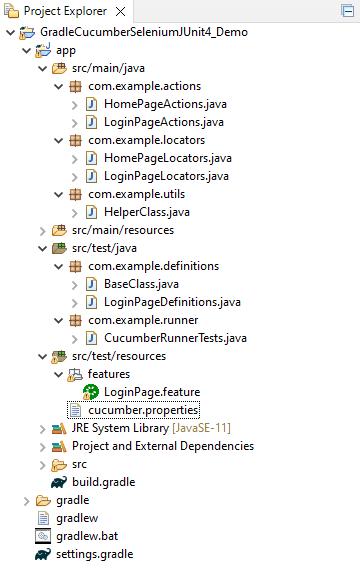
Project Structure
Steps to set up Cucumber Test Automation Framework with Selenium and TestNG
- Download and Install Java on the system
- Download and setup Eclipse IDE on the system
- Install and setup Gradle
- Install Cucumber Eclipse Plugin (For Eclipse IDE)
- Create a new Gradle Project
- Add Selenium, JUnit4, and Cucumber dependencies to the build.gradle
- Create a feature file under src/test/resources
- Create the classes for locators, actions, and utilities in src/main/java
- Create the Step Definition class or Glue Code in src/test/java
- Create a Hook class to contain the initialization and closing of the browser in src/test/java
- Create a JUnit4 Cucumber Runner class in src/test/java
- Run the tests from Command Line
- Cucumber Report Generation
Implementation Steps
Step 1- Download and Install Java
Cucumber and Selenium need Java to be installed on the system to run the tests. Click here to know How to install Java.
Step 2 – Download and setup Eclipse IDE on the system
The Eclipse IDE (integrated development environment) provides strong support for Java developers. Click here to know How to install Eclipse.
Step 3 – Setup Maven
To build a test framework, we need to add a number of dependencies to the project. Click here to know How to install Maven.
Step 4 – Install Cucumber Eclipse Plugin
The cucumber plugin is an Eclipse plugin that allows eclipse to understand the Gherkin syntax. When we are working with cucumber we will write the feature files that contain Feature, Scenario, Given, When, Then, And, But, Tags, Scenario Outline, and Examples. By default, eclipse doesn’t understand these keywords so it doesn’t show any syntax highlighter. Cucumber Eclipse Plugin highlights the keywords present in Feature File. Refer to this tutorial to get more detail – How to setup Cucumber with Eclipse.
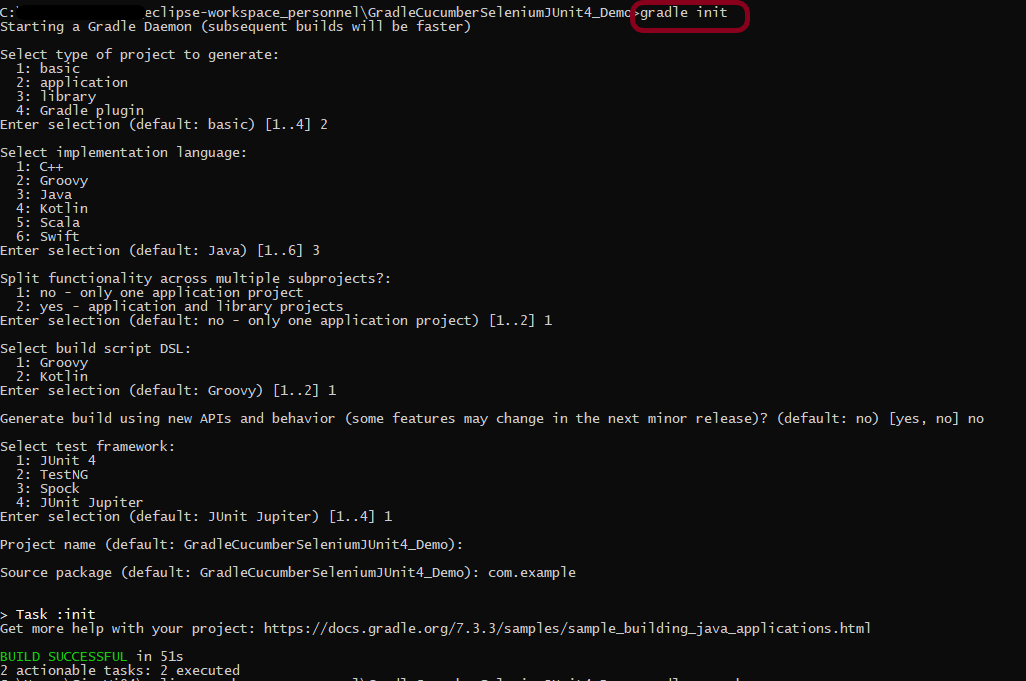
Step 5 – Create a new Gradle Project
Below are the steps to create the Gradle project from the command line.
If you want to create the Gradle project from Eclipse IDE, click here to know How to create a Gradle Java project. Below is the structure of the Gradle project.
Step 6 – Add Selenium, JUnit4, and Cucumber dependencies to the build.gradle
Add below mentioned Selenium, JUnit4, and Cucumber dependencies to the project.
/*
 * This file was generated by the Gradle 'init' task.
 *
 */

plugins {
    // Apply the application plugin to add support for building a CLI application in Java.
    id 'application'
}

repositories {
    // Use Maven Central for resolving dependencies.
    mavenCentral()
}

java {
    sourceCompatibility = 11
    targetCompatibility = 11
}

dependencies {

    testImplementation 'io.cucumber:cucumber-java:7.6.0'
    testImplementation 'io.cucumber:cucumber-junit:7.6.0'

    // Use JUnit test framework.
    testImplementation 'junit:junit:4.13.2'

    // This dependency is used by the application.
    implementation 'com.google.guava:guava:30.1.1-jre'
    implementation 'org.seleniumhq.selenium:selenium-java:4.4.0'
    implementation 'io.github.bonigarcia:webdrivermanager:5.3.0'
}

application {
    // Define the main class for the application.
    mainClass = 'com.example.App'
}

configurations {
    cucumberRuntime {
        extendsFrom testImplementation
    }
}

task cucumber() {
    dependsOn assemble, testClasses
    doLast {

        javaexec {
            main = "io.cucumber.core.cli.Main"
            classpath = configurations.cucumberRuntime + sourceSets.main.output + sourceSets.test.output

            args = ['--plugin', 'pretty',
            '--glue', 'com.example.definitions', 'src/test/resources'
            ]
        }

    }
}
I have added WebDriverManager dependency to the POM.xml to download the driver binaries automatically. To know more about this, please refer to this tutorial – How to manage driver executables using WebDriverManager.
Step 7 – Create a feature file in the src/test/resources directory
Create a folder with name features. Now, create the feature file in this folder. The feature file should be saved with the extension .feature. This feature file contains the test scenarios created to test the application. The Test Scenarios are written in Gherkins language in the format of Given, When, Then, And, But.
Feature: Login to HRM Application

Background:
   Given User is on HRMLogin page "https://opensource-demo.orangehrmlive.com/"

   @ValidCredentials
   Scenario: Login with valid credentials

    When User enters username as "Admin" and password as "admin123"
    Then User should be able to login sucessfully and new page open

   @InvalidCredentials
   Scenario Outline: Login with invalid credentials

    When User enters username as "<username>" and password as "<password>"
    Then User should be able to see error message "<errorMessage>"

  Examples:
  | username   | password  | errorMessage                      |
  | Admin      | admin12$$ | Invalid credentials               |
  | admin$$    | admin123  | Invalid credentials               |
  | abc123     | xyz$$     | Invalid credentials               |
  | $$$$$$     | %%%%%     | Invalid credentials               |

   @MissingUsername @FailedTest
   Scenario: Verify error message when username is missing

    When User enters username as "" and password as "admin123"
    Then User should be able to see error message for empty username as "Empty Username"
Step 8 – Create the classes for locators, actions, and utilities in src/main/java
Below is the sample code of the LoginPageLocators.
import org.openqa.selenium.WebElement;
import org.openqa.selenium.support.FindBy;

public class LoginPageLocators {

	@FindBy(name = "username")
    public WebElement userName;

    @FindBy(name = "password")
    public WebElement password;

    @FindBy(xpath = "//*[@id='app']/div[1]/div/div[1]/div/div[2]/div[2]/form/div[3]/button")
    public WebElement login;

    @FindBy(xpath = "//*[@id='app']/div[1]/div/div[1]/div/div[2]/div[2]/div/div[1]/div[1]/p")
    public  WebElement errorMessage;

    @FindBy(xpath = "//*[@id='app']/div[1]/div/div[1]/div/div[2]/div[2]/form/div[1]/div/span")
    public WebElement missingUsernameErrorMessage;

}
Below is the sample code for the HomePageLocators.
import org.openqa.selenium.WebElement;
import org.openqa.selenium.support.FindBy;

public class HomePageLocators {

	   @FindBy(xpath = "//*[@id='app']/div[1]/div[2]/div[2]/div/div[1]/div[1]/div[1]/h5")
	   public  WebElement homePageUserName;

}
Create the action classes for each web page. These action classes contain all the methods needed by the step definitions. In this case, I have created 2 action classes – LoginPageActions and HomePageActions.
LoginPageActions
import org.openqa.selenium.support.PageFactory;
import com.example.locators.LoginPageLocators;
import com.example.utils.HelperClass;

public class LoginPageActions {

	LoginPageLocators loginPageLocators = null;

    public LoginPageActions() {

    	this.loginPageLocators = new LoginPageLocators();
		PageFactory.initElements(HelperClass.getDriver(),loginPageLocators);
	}

    public void login(String strUserName, String strPassword) {

        // Fill user name
    	loginPageLocators.userName.sendKeys(strUserName);

        // Fill password
    	loginPageLocators.password.sendKeys(strPassword);

        // Click Login button
    	loginPageLocators.login.click();

    }

    // Get the error message when invalid credentials are provided
    public String getErrorMessage() {
        return loginPageLocators.errorMessage.getText();
    }

   // Get the error message when username is blank
   public String getMissingUsernameText() {
        return loginPageLocators.missingUsernameErrorMessage.getText();
    }
}
HomePageActions
import org.openqa.selenium.support.PageFactory;
import com.example.locators.HomePageLocators;
import com.example.utils.HelperClass;

public class HomePageActions {

	HomePageLocators homePageLocators = null;

	public HomePageActions() {

		this.homePageLocators = new HomePageLocators();

		PageFactory.initElements(HelperClass.getDriver(),homePageLocators);
    }


    // Get the User name from Home Page
    public String getHomePageText() {
        return homePageLocators.homePageUserName.getText();
    }

}
Create a Helper class where we are initializing the web driver, initializing the web driver wait, defining the timeouts, and creating a private constructor of the class, it will declare the web driver, so whenever we create an object of this class, a new web browser is invoked.
import java.time.Duration;
import org.openqa.selenium.WebDriver;
import org.openqa.selenium.chrome.ChromeDriver;
import io.github.bonigarcia.wdm.WebDriverManager;

public class HelperClass {

	private static HelperClass helperClass;
	private static WebDriver driver;
    public final static int TIMEOUT = 10;

	 private HelperClass() {

			WebDriverManager.chromedriver().setup();
	    	driver = new ChromeDriver();
	        driver.manage().timeouts().implicitlyWait(Duration.ofSeconds(TIMEOUT));
	        driver.manage().window().maximize();

	 }

    public static void openPage(String url) {
        driver.get(url);
    }

	public static WebDriver getDriver() {
		return driver;
	}

	public static void setUpDriver() {

		if (helperClass==null) {

			helperClass = new HelperClass();
		}
	}

	 public static void tearDown() {

		 if(driver!=null) {
			 driver.close();
			 driver.quit();
		 }

		 helperClass = null;

	 }
}
Step 9 – Create the Step Definition class or Glue Code in src/test/java
Now, we need to create the Step Definition of the Feature File
LoginPageDefinitions.java
import org.junit.Assert;
import com.example.actions.HomePageActions;
import com.example.actions.LoginPageActions;
import com.example.utils.HelperClass;
import io.cucumber.java.en.Given;
import io.cucumber.java.en.Then;
import io.cucumber.java.en.When;

public class LoginPageDefinitions {

	LoginPageActions objLogin = new LoginPageActions();
    HomePageActions objHomePage = new HomePageActions();

    @Given("User is on HRMLogin page {string}")
    public void loginTest(String url) {

    	HelperClass.openPage(url);
    }

    @When("User enters username as {string} and password as {string}")
    public void goToHomePage(String userName, String passWord) {

        objLogin.login(userName, passWord);
    }

    @Then("User should be able to login sucessfully and new page open")
    public void verifyLogin() {

        Assert.assertTrue(objHomePage.getHomePageText().contains("Employee Information"));
    }

    @Then("User should be able to see error message {string}")
    public void verifyErrorMessageForInvalidCredentials(String expectedErrorMessage) {

        Assert.assertEquals(expectedErrorMessage,objLogin.getErrorMessage());
    }

    @Then("User should be able to see error message for empty username as {string}")
    public void verifyErrorMessageForEmptyUsername(String expectedErrorMessage) {

        Assert.assertEquals(expectedErrorMessage,objLogin.getMissingUsernameText());

    }
}
Step 10 – Create a Hook class to contain the initialization and closing of the browser in src/test/java
import org.openqa.selenium.OutputType;
import org.openqa.selenium.TakesScreenshot;
import com.example.utils.HelperClass;
import io.cucumber.java.After;
import io.cucumber.java.Before;
import io.cucumber.java.Scenario;

public class BaseClass {

	@Before
    public static void setUp() {

       HelperClass.setUpDriver();
    }

	@After
	public static void tearDown(Scenario scenario) {


		//validate if scenario has failed
		if(scenario.isFailed()) {
			final byte[] screenshot = ((TakesScreenshot) HelperClass.getDriver()).getScreenshotAs(OutputType.BYTES);
			scenario.attach(screenshot, "image/png", scenario.getName());
		}

		HelperClass.tearDown();
	}
}
Step 11 – Create a JUnit Cucumber Runner class in src/test/java
Cucumber needs a TestRunner class to run the feature files. It is suggested to create a folder with the name of the runner in the src/test/java directory and create the Cucumber TestRunner class in this folder. Below is the code of the Cucumber TestRunner class.
import org.junit.runner.RunWith;
import io.cucumber.junit.Cucumber;
import io.cucumber.junit.CucumberOptions;

@RunWith(Cucumber.class)
@CucumberOptions(tags = "", features = {"src/test/resources/features/LoginPage.feature"}, glue = {"com.example.definitions"})

public class CucumberRunnerTests {

}
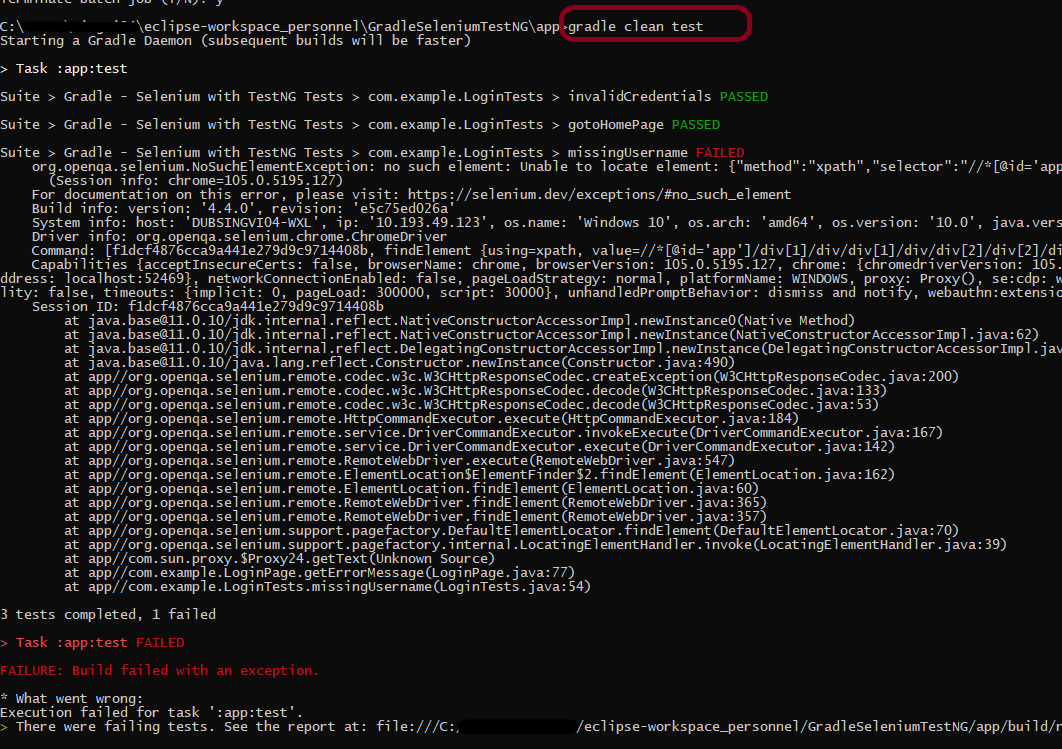
Step 12 – Run the tests from Command Line
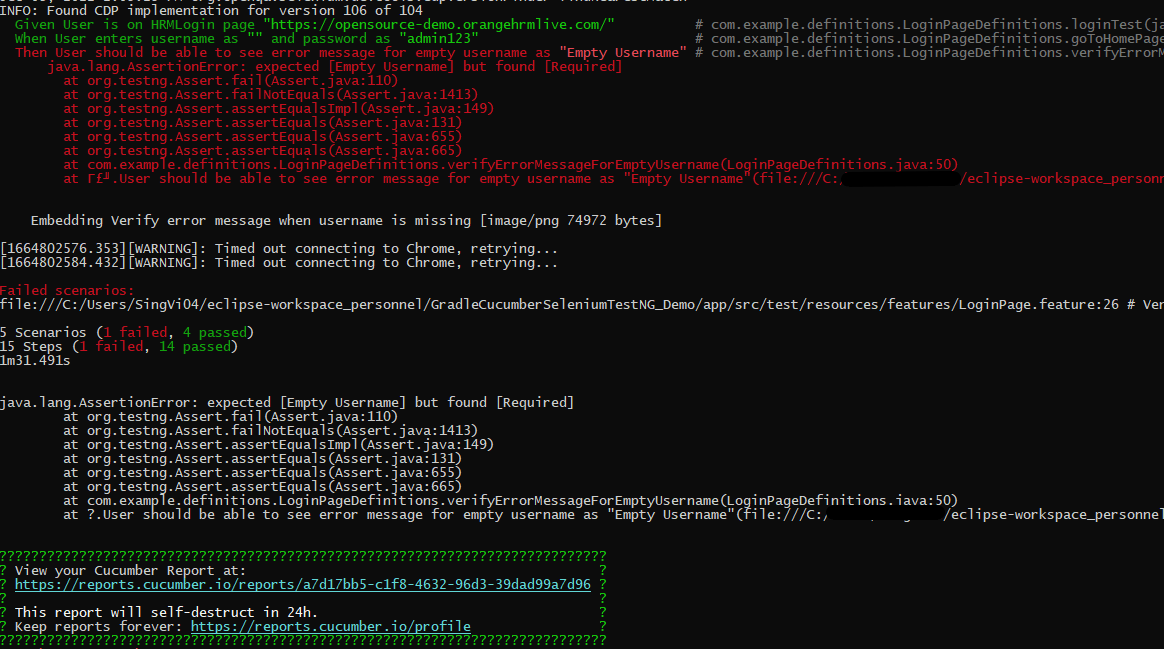
Run the below command in the command prompt to run the tests and to get the test execution report.
gradle cucumber
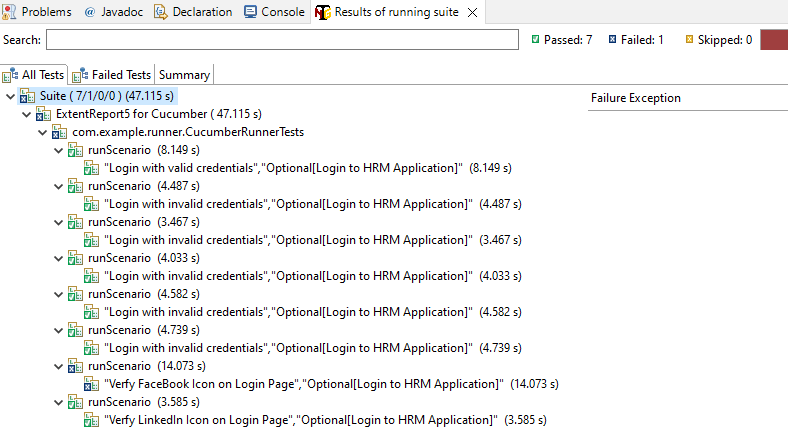
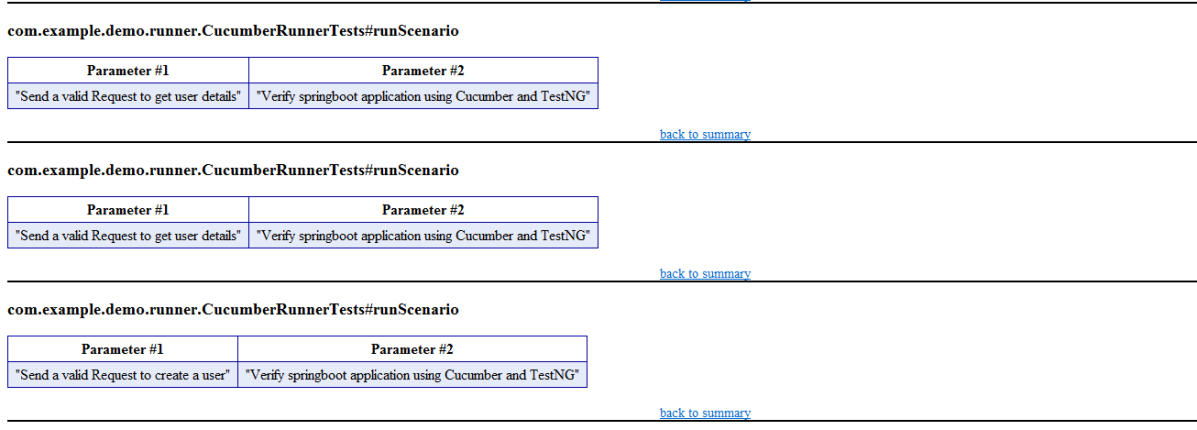
The output of the above program is

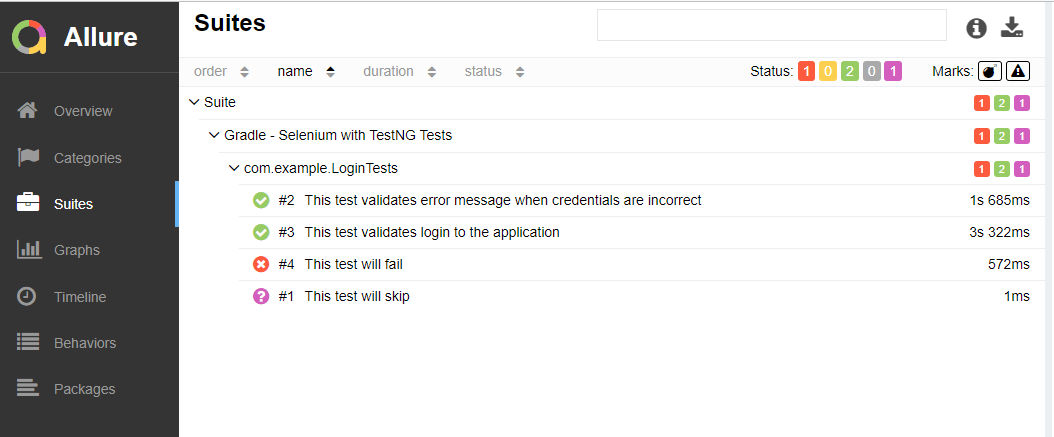
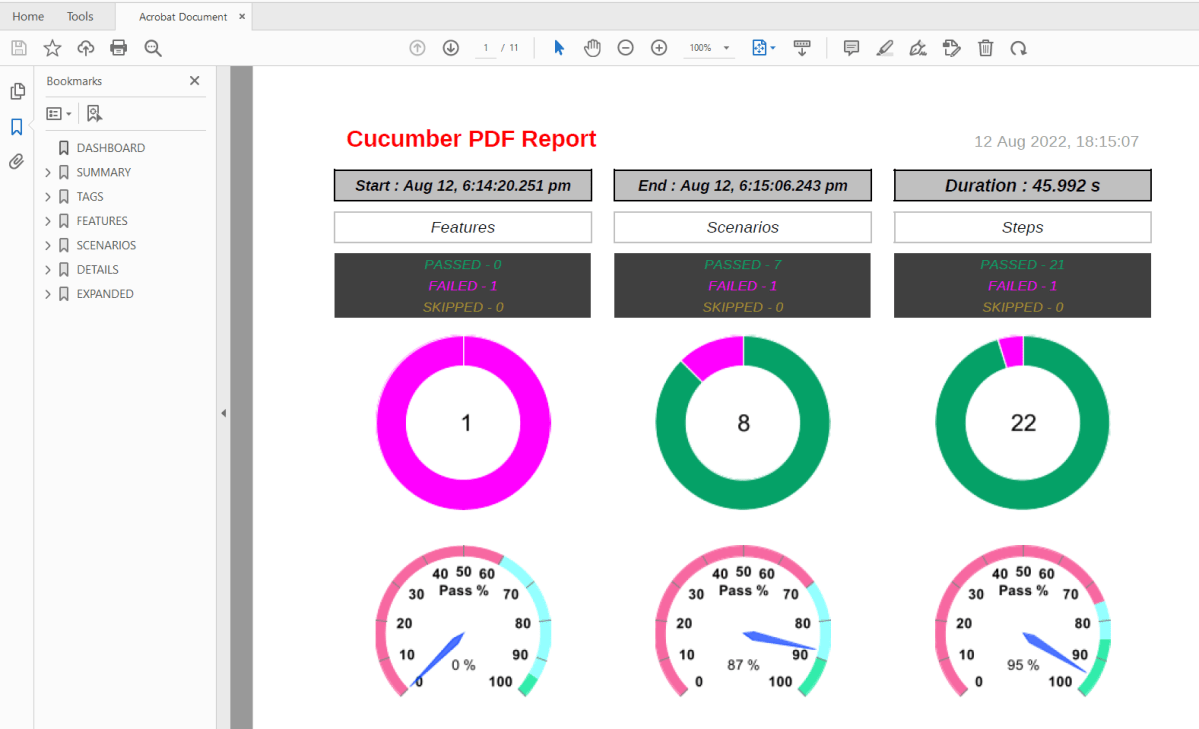
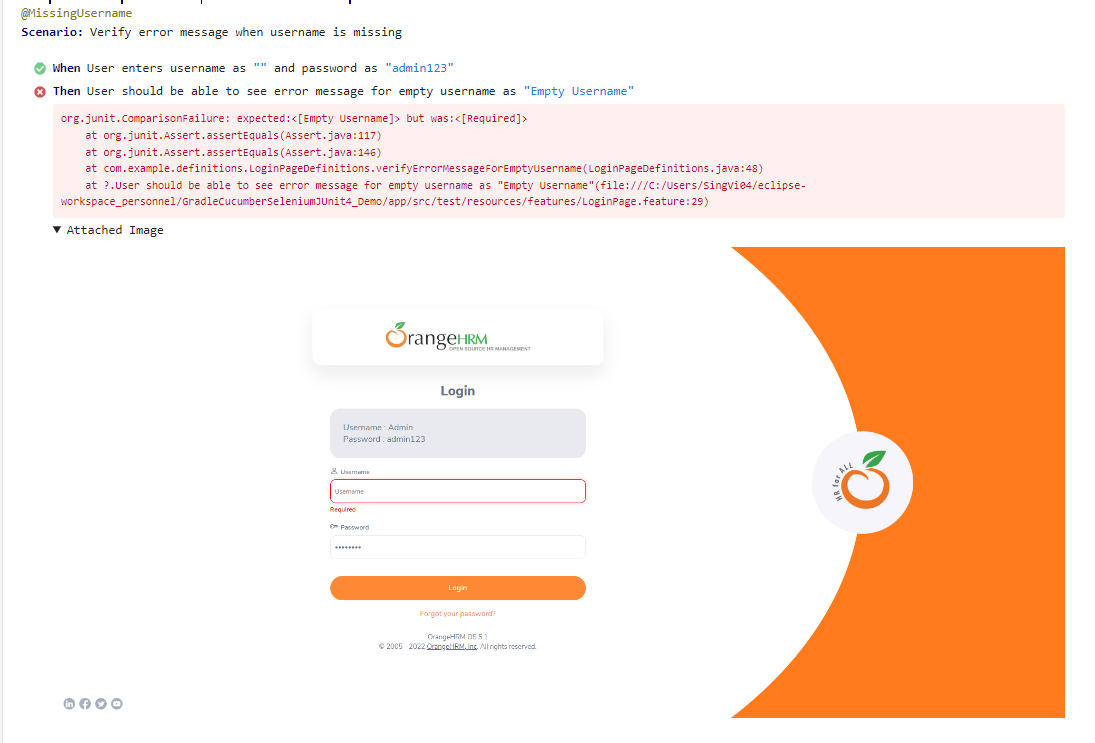
Step 13 – Cucumber Report Generation
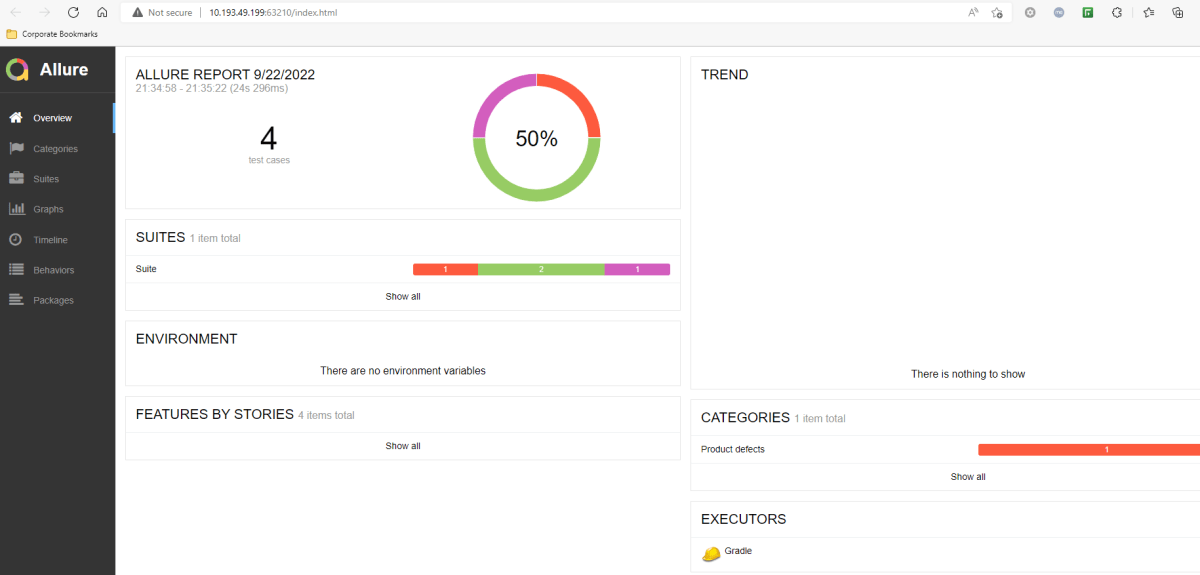
To get Cucumber Test Reports, add cucumber.properties under src/test/resources and add the below instruction in the file
cucumber.publish.enabled=true
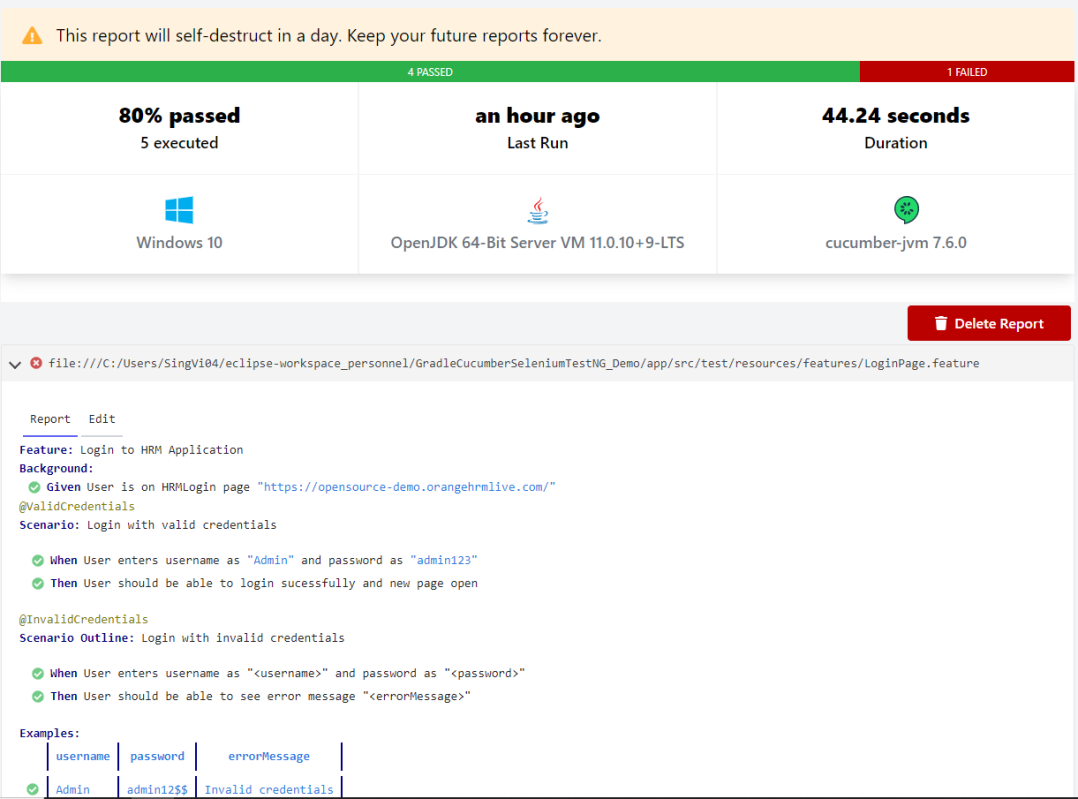
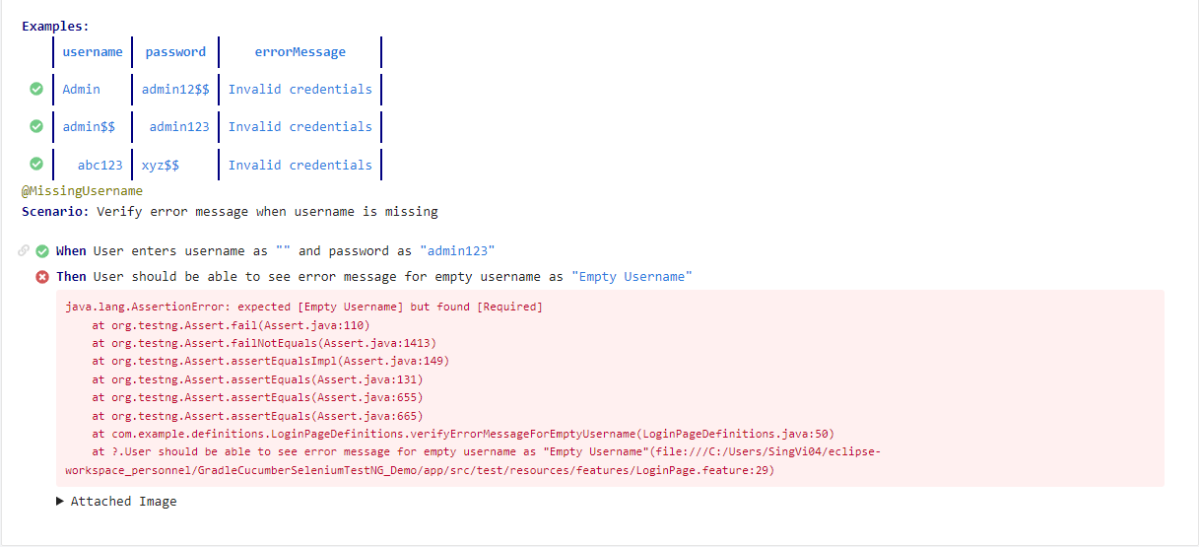
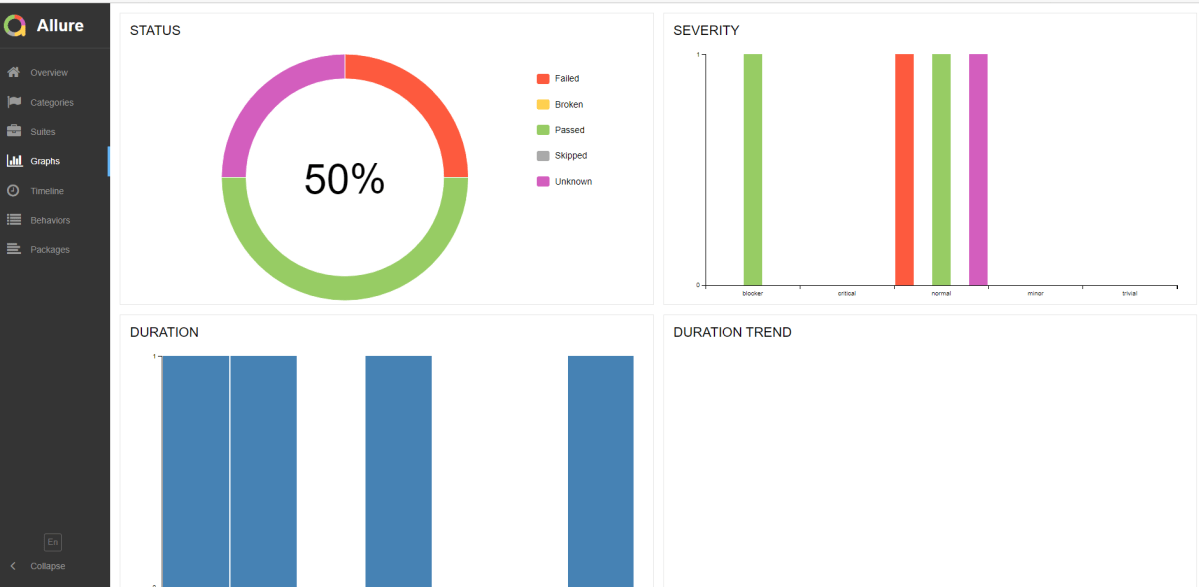
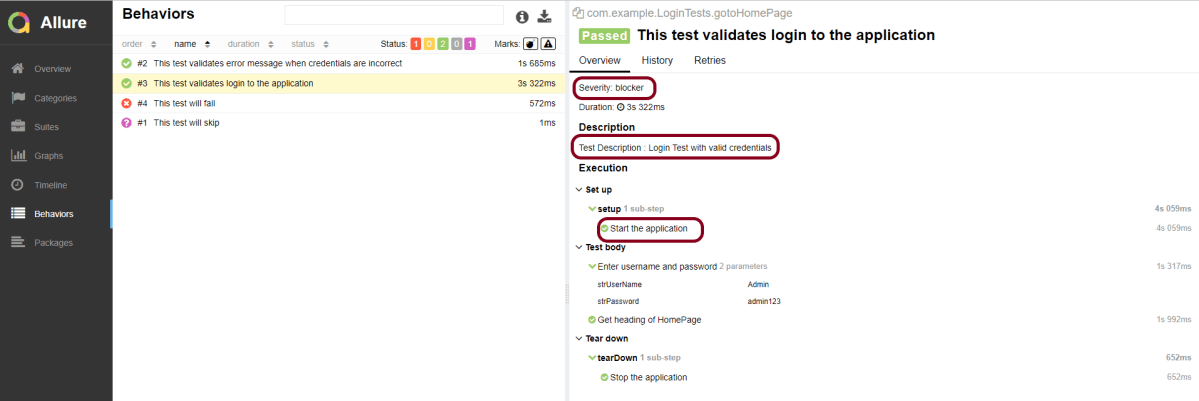
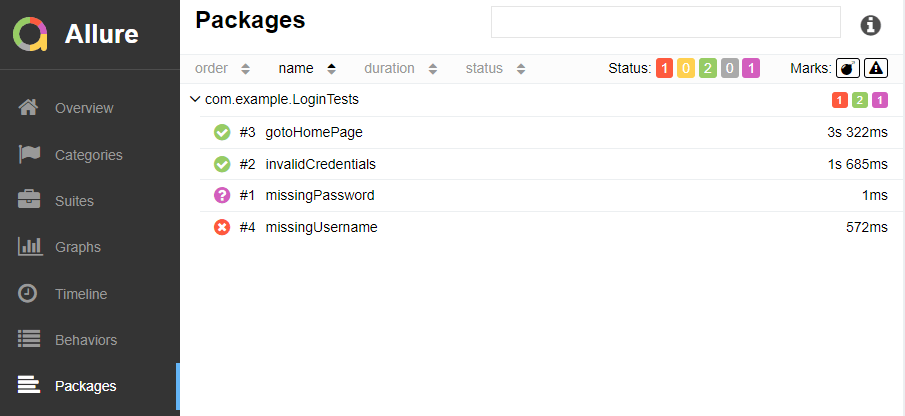
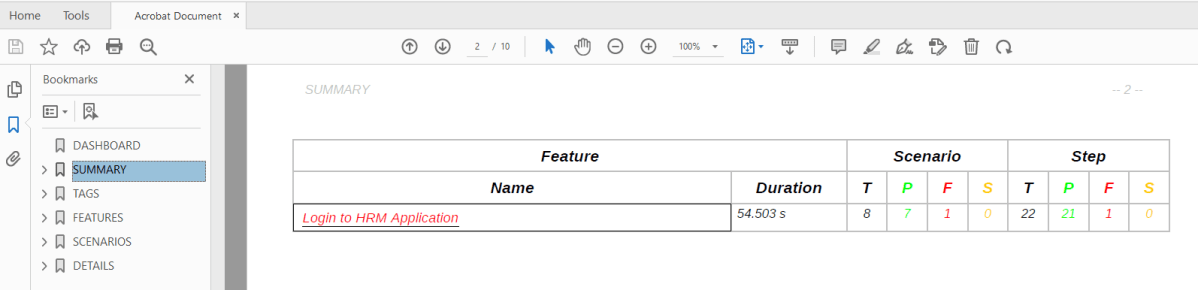
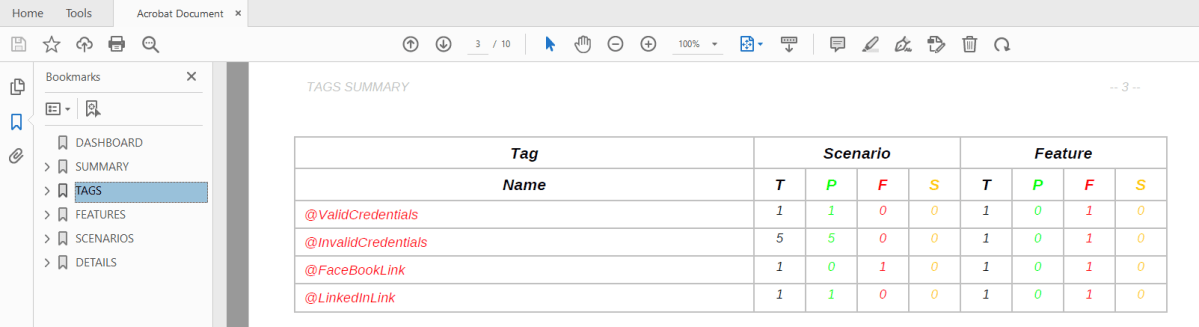
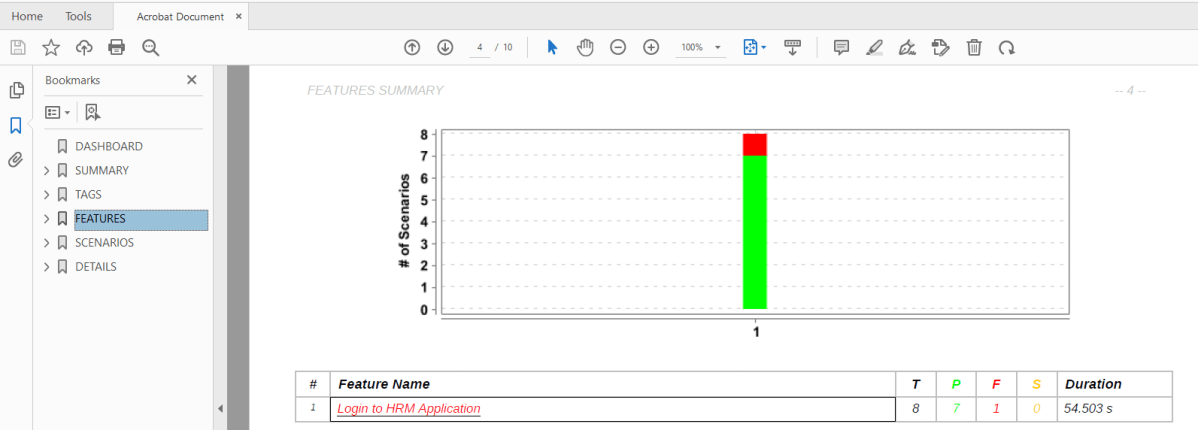
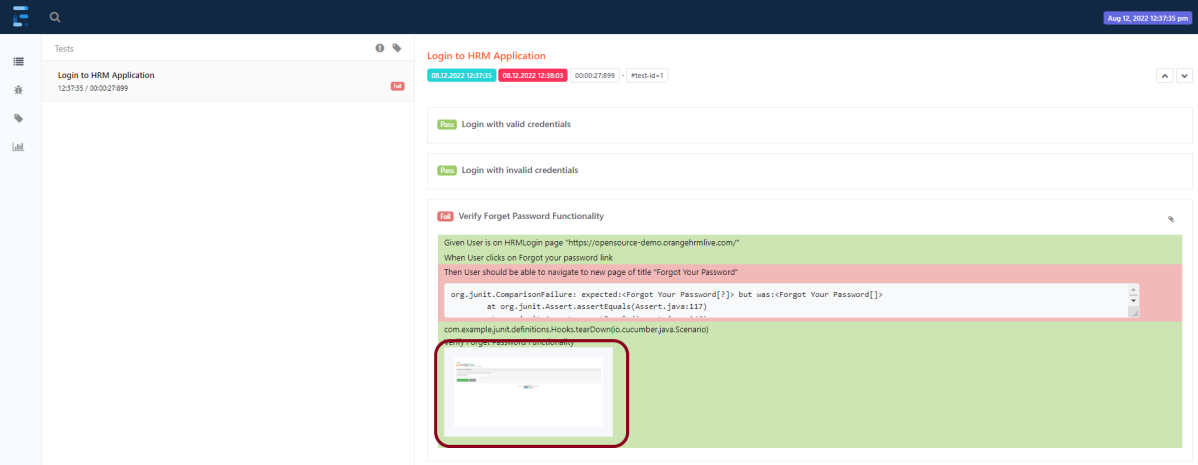
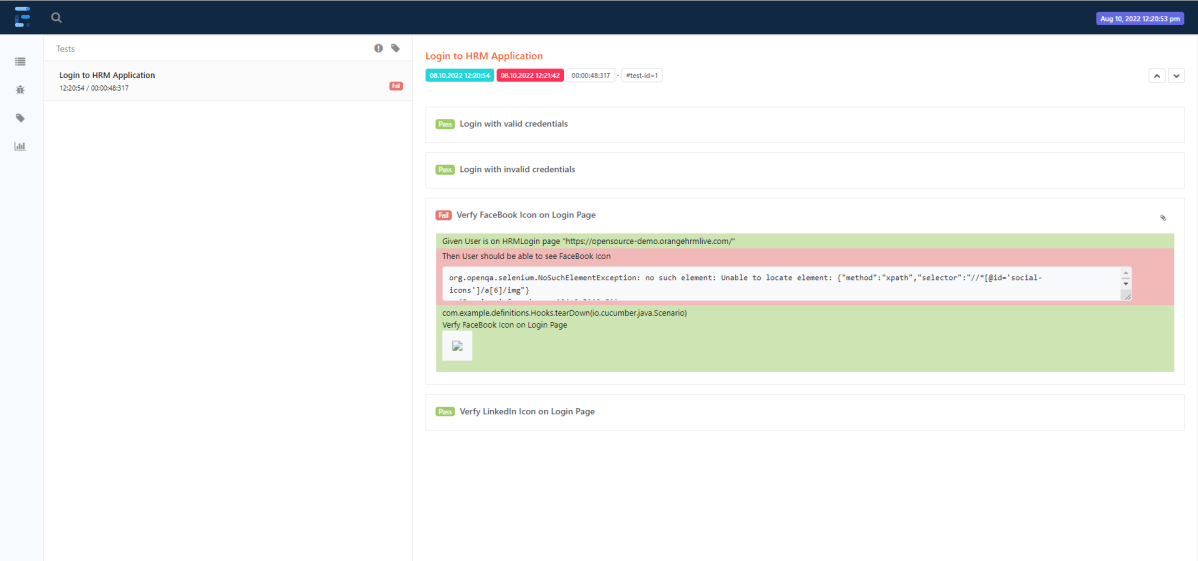
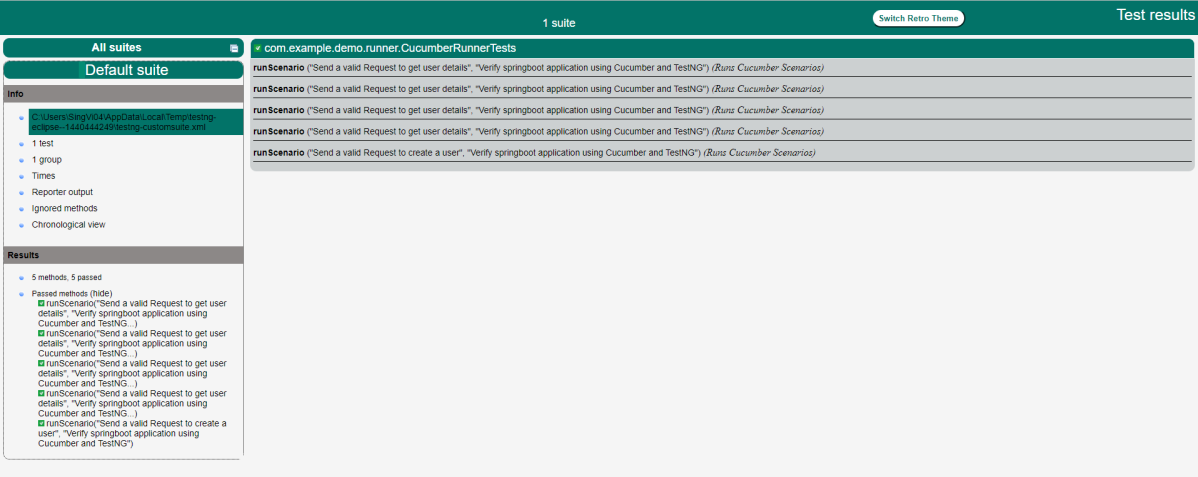
Below is the image of the Cucumber Report generated using the Cucumber Service.
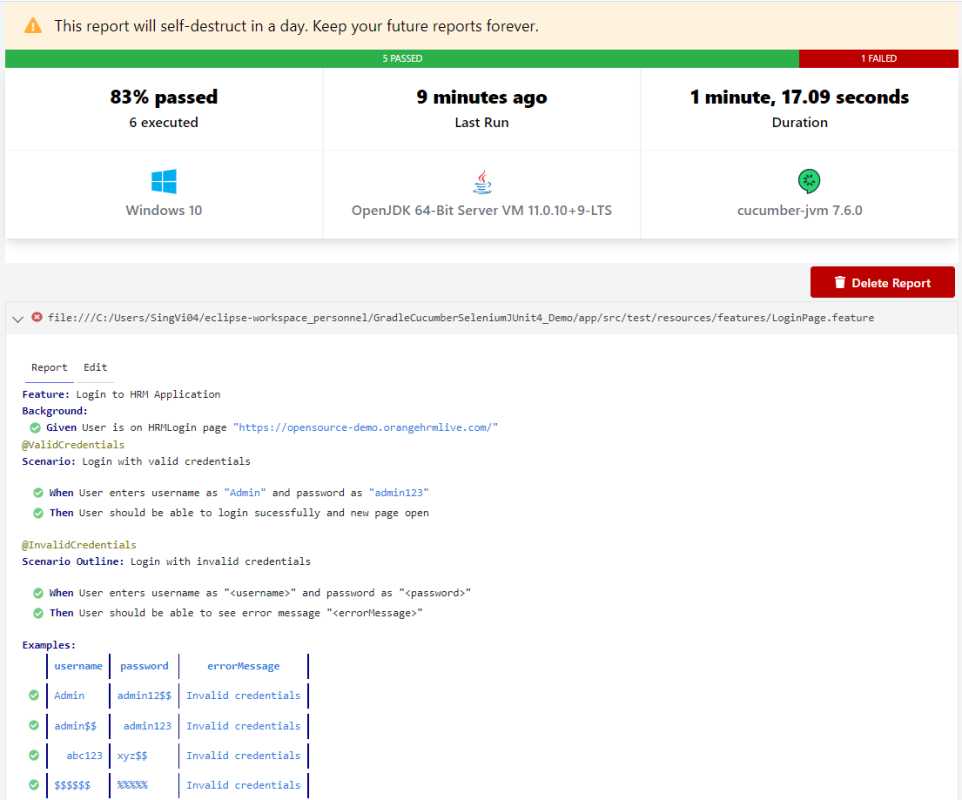

In the above example, as we can see, one of the tests has failed. So, when a test fails, we have written the code to take a screenshot of the failed step. The highlighted box above shows the image of the failed test. You can click on that to see the screenshot.
Congratulations on making it through this tutorial and hope you found it useful! Happy Learning!! Cheers!!