Docker provides the ability to package and run an application in a loosely isolated environment called a container.
This cheatsheet provides a comprehensive and practical reference for common Docker commands. It covers images, containers, volumes, networks, Docker Compose, command combos, and more.
Docker images are a lightweight, standalone, executable package of software that includes everything needed to run an application: code, runtime, system tools, system libraries and settings
1.List local images
docker images
2. Build an Image from a Dockerfile
docker build -t [image_name] .
3. Build an Image from a Dockerfile without the cache
docker build -t [image_name] . –no-cache
4. Download an image from Docker Hub/registry
docker pull [image]
5. Tag an image
docker tag [image] [new_image]
6. Delete an Image
docker rmi [image_id]
7. Remove all unused images
docker image prune
Container Management
A container is a runtime instance of a docker image. A container will always run the same, regardless of the infrastructure.
Commands for running, stopping, inspecting, and managing containers.
1.List running containers
docker ps
2. List all containers (including stopped ones)
docker ps -a
3. Run a container from an image
docker run [image]
4. List all containers (including stopped ones)
docker ps -a
5. Run a container from an image
docker run [image]
6. Create and run a container from an image, with a custom name
docker run --name [container_name] [image_name]
7. Run a container in detached mode
docker run -d --name [container_name] [image_name]
Welcome to the Docker Quiz! This blog post features 25 multiple-choice questions that explore advance concepts of Docker.
1. How do Docker containers achieve process isolation on the host system?
a) Virtual Machines b) Hypervisors c) Namespaces and cgroups d) Dedicated resources
Answer 1
c) Namespaces and cgroups
Namespaces are a feature of the Linux kernel that provide isolation for resources such as process IDs, network, user IDs, and file systems.
Docker uses cgroups to allocate resources efficiently among containers running on the same host, preventing one container from consuming excessive resources and impacting others.
2. What is the purpose of a Dockerfile?
a) To create virtual machines b) To optimize application code c) To store environment variables d) To define and build Docker images
Answer 2
d) To define and build Docker images
A Dockerfile contains a set of instructions to define and build a Docker image, specifying dependencies, configuration, and application code.
3. What does the Dockerfile contain?
a) Compiled source code b) Docker images c) Binary data d) Instructions for building a Docker image
Answer 3
Instructions for building a Docker image
A Dockerfile is a text file that contains a set of instructions used to automatically build a Docker image. These instructions define everything needed to assemble the image, such as: Base Image, Package Installation, Execution Commands, File Operations
4. How many types of volumes are there in Docker?
a) 3 b) 2 c) 4 d) 5
Answer 4
b) 2
There are two types of volumes in docker – Named volumes and Bind Mounts
5. Which of the following volume type allows you to share a directory from the host’s filesystem into the container?
a) Named volumes b) Bind Mounts
Answer 5
b) Bind Mounts
The bind mount volume type allows you to share a directory from the host’s filesystem into the container.
6. In which of the following volume type docker chooses the host location?
a) Named volumes b) Bind Mounts
Answer 6
a) Named volumes
In the Named volume type docker chooses the host location, whereas you decide the host location in the bind mount type of volume.
7. Which command is used to remove unused Docker objects, such as containers and images?
a) docker prune b) docker clean c) docker system prune d) docker remove
Answer 7
c) docker system prune
8. To list all the networks linked with Docker on the host, the ____ command is used.
a) docker network list b) docker network ls c) docker ls d) network ls
Answer 8
b) docker network ls
To list all the networks linked with Docker on the host, the docker network ls command is used.
9. What is port binding in Docker?
a) Binding environment variables b) Assigning internal ports to external ones c) Binding memory resources d) Binding IP addresses to containers
Answer 9
b) Assigning internal ports to external ones
Port binding in Docker refers to the process of linking internal ports within a Docker container to external ports on the host system. This allows applications running inside the container to communicate with external networks or systems
10. Which of the following is a tool that was built to assist define and distribute multi-container applications?
a) Docker setup b) Docker compose c) Docker notify
Answer 10
b) Docker compose
Docker Compose is a tool that was built to assist define and distribute multi-container applications.
11. Which of the following command is used to display the statistics of a running container?
Choose one option
a) Docker statistics b) Stats c) Docker statics d) Docker stats
Answer 11
d) Docker stats
The stats command is used to display the statistics of a running container.
12. Which command is used to view the logs of a running container?
Choose one option
a) docker view [container ID] b) docker logs [container ID] c) docker inspect [container ID] d) docker output [container ID]
Answer 12
b) docker logs [container ID]
13. What is the default Docker network mode?
Choose one option
a) host b) none c) bridge d) overlay
Answer 13
c) bridge
14. After making changes to a running container, how can you save those changes into an image?
Choose one option
a) docker save b) docker commit c) docker store d) docker snapshot
Answer 14
b) docker commit
15. What does the `ENTRYPOINT` directive do in a Dockerfile?
a) Sets an environment variable b) Specifies the command that will run on container start c) Exposes a port d) Confirms the image build
Answer 15
b) Specifies the command that will run on container start
16. What is the function of the `Dockerfile` directive `COPY`?
Choose one option
a) Copies files and directories from localhost to the image b) Moves data between volumes c) Copies data between containers d) Duplicates Docker images
Answer 16
a) Copies files and directories from localhost to the image
17. What is the syntax used to specify base image in a Dockerfile?
Choose one option
a) FROM [image name] b) BASE [image name] c) SOURCE [image name] d) INITIAL [image name]
Answer 17
a) FROM [image name]
18. What is the primary function of the .dockerignore file?
Choose one option
a) To list all images to be pulled from the Docker Hub b) To specify commands to run inside a container c) To prevent certain files and directories from being copied into an image d) To provide metadata about a Docker image
Answer 18
c) To prevent certain files and directories from being copied into an image
The .dockerignore file allows users to exclude files and directories from being copied to the image during the build process, much like .gitignore does for git repositories.
19. In a docker-compose.yml file, what is the function of the depends_on key?
a) Specifies the base images for services b) Specifies the build context for services c) Specifies the order in which services are started d) Specifies the network links between services
Answer 19
c) Specifies the order in which services are started
In a docker-compose.yml file, the depends_on key indicates the order in which services should be started. A service with a depends_on key will not start until the services it depends on have been started.
20. What is the primary purpose of Docker Swarm?
a) Image version management b) Multi-host container orchestration c) Container storage optimization d) Automated container build pipeline
Answer 20
b) Multi-host container orchestration
Docker Swarm is a native clustering and orchestration tool for Docker. It allows you to create and manage a swarm of Docker nodes and orchestrate services across multiple hosts.
21. What command initializes a node as a Docker Swarm manager?
a) docker swarm init b) docker swarm start c) docker swarm create d) docker swarm manager
Answer 21
a) docker swarm init
The docker swarm init command initializes the current node as a Docker Swarm manager, which manages the infrastructure of a swarm.
22. How can you inspect the details of a Docker network?
a) docker network view NETWORK_NAME b) docker network show NETWORK_NAME c) docker network detail NETWORK_NAME d) docker network inspect NETWORK_NAME
Answer 22
d) docker network inspect NETWORK_NAME
The docker network inspect command is used to display detailed information about a network.
23. Which command creates a Docker volume?
a) docker storage create b) docker add volume c) docker volume create d) docker create
Answer 23
c) docker volume create
The docker volume create command creates a new Docker volume for persistent storage.
24. Why is Docker commonly integrated with CI/CD pipelines?
a) Consistent environments across testing and production b) Easier dependency management c) Faster build and deployment times d) All of the mentioned
Answer 24
d) All of the mentioned
Docker integration with CI/CD ensures faster deployments, dependency management, and environment consistency.
25. Why is Kubernetes often paired with Docker?
a) For debugging local machines b) For virtualizing operating systems c) For orchestrating large-scale container deployments d) For building individual containers
Answer 25
c) For orchestrating large-scale container deployments
Kubernetes orchestrates, deploys, and manages containers at scale, complementing Docker’s container creation capabilities.
We would love to hear from you! Please leave your comments and share your scores in the section below
Docker is an open platform for developing, shipping, and running applications. Docker enables you to separate your applications from your infrastructure. Docker packages software into standardized units called containers. These containers have everything the software needs to run. They include libraries, system tools, code, and runtime.
Welcome to the Docker Quiz! This blog post features 25 multiple-choice questions that explore basic concepts of Docker.
1. What is Docker?
a) A Hypervisor b) An Operating System c) A Virtual Machine d) A Containerization platform
Answer 1
d) A Containerization platform
Docker is a containerization platform that allows developers to package and distribute applications and their dependencies in isolated containers.
2. Which of the following is the core component of Docker?
a) Docker CLI b) Docker Engine c) Docker Server d) Docker Hypervisor
Answer 2
b) Docker Engine
Docker Engine is the core component of Docker. It is responsible for creating, managing, and running Docker containers.
3. Which command is used to check the version of Docker?
a) docker details b) docker info c) docker version d) docker –version
Answer 3
d) docker –version
4. What is a Docker Container?
a) A network service b) A lightweight executable package c) An Operating System kernel d) A Virtual Machine
Answer 4
b) A lightweight executable package
A Docker container is a lightweight, standalone executable package containing everything needed to run a piece of software, including code, runtime, libraries, and system tools.
5. Which command creates and starts a new container?
a) docker create b) docker start c) docker run d) docker build
Answer 5
c) docker run
The command docker run creates and starts a new container from a specified Docker image. It combines the functions of the docker create and docker start commands into a single step, allowing the user to instantiate and execute a container immediately.
6. Which of the following command you will use to list your containers?
a) docker list b) docker show c) docker ps d) docker display
Answer 6
c) docker ps
The docker ps command lists all running Docker containers, along with various details like container ID, image name, creation time, and so on.
7. Which of the following statement is correct?
a) To remove a container, you first need to stop it b) You can directly remove a container, without stopping it.
Answer 7
a) To remove a container, you first need to stop it
To remove a container, you first need to stop it. Once it has stopped, you can remove it.
8. How do you stop a running Docker container?
a) docker pause b) docker terminate c) docker end d) docker stop
Answer 8
d) docker stop
The docker stop command stops a running container, gracefully terminating its processes.
9. What is a Docker Image?
a) A running container b) A snapshot of an application and its dependencies c) A configuration file d) A virtual hard drive
Answer 9
b) A snapshot of an application and its dependencies
A Docker Image contains all the necessary components to run an application, including code, libraries, dependencies, and runtime.
10. Which command is used to create a new Docker image?
a) docker build b) docker pull c) docker run d) docker commit
Answer 10
a) docker build
The docker build command is used to build a new image from a Dockerfile and a “context”. The context is the set of files in a specified directory or URLs that the image is built from.
11. Which command pulls an image from Docker Hub?
Choose one option
a) docker get b) docker fetch c) docker pull d) docker download
Answer 11
c) docker pull
The docker pull command is used to pull or download a Docker image from a registry like Docker Hub.
12. How can you remove a Docker image?
Choose one option
a) docker remove b) docker delete c) docker rm d) docker rmi
Answer 12
d) docker rmi
The docker rmi command is used to remove a Docker image from the system.
13. How can you run a command inside an existing Docker container?
Choose one option
a) docker exec b) docker attach c) docker run d) docker enter
Answer 13
a) docker exec
The docker exec command allows you to run commands inside an existing container. For example, docker exec -it container_id /bin/bash would open a bash shell inside the container with ID container_id.
14. What is Docker Compose?
Choose one option
a) A scripting language for Docker b) A continuous integration tool for Docker c) A tool for defining and running multi-container Docker applications d) A Docker CLI plugin
Answer 14
c) A tool for defining and running multi-container Docker applications
Docker Compose is a tool for defining and running multi-container Docker applications. With Compose, you define the services, networks, and volumes in a single docker-compose.yml file and then use docker-compose up to start the entire application stack.
15. What is the difference between a Docker Container and a Virtual Machine?
Choose one option
a) Containers are slower than VMs b) VMs run on hardware, while containers do not c) Containers share the host OS kernel, while VMs have their own kernel d) Containers are heavier than VMs
Answer 15
c) Containers share the host OS kernel, while VMs have their own kernel
Containers share the host OS kernel, whereas VMs have their own OS kernel, making containers more lightweight and efficient.
16. Which of the following is the default registry used by Docker?
Choose one option
a) Kubernetes Hub b) Container Store c) Docker Hub d) Image Hub
Answer 16
c) Docker Hub
Docker Hub is the default public registry where Docker images are stored and shared. You can pull and push images from and to Docker Hub.
17. What are the key components of Docker architecture?
Choose one option
a) Docker Manager, Docker Processor, Docker Configurator b) Docker Master, Docker Node, Docker Registry c) Docker Engine, Docker CLI, Docker Daemon d) Docker Kernel, Docker Service, Docker Network
Answer 17
c) Docker Engine, Docker CLI, Docker Daemon
18. What is the role of the Docker Daemon?
a) It stores operating system data b) It manages containers, images, and networks c) It interacts with the user interface d) It only handles logs
Answer 18
b) It manages containers, images, and networks
19. What is a Docker Registry?
a) A network router b) A local storage system c) A virtual machine host d) A repository for storing and sharing Docker images
Answer 19
d) A repository for storing and sharing Docker images
A Docker Registry is a storage system where you can store, share, and retrieve Docker images. Docker Hub is a popular example.
20. What is the primary purpose of the Docker Engine?
Choose one option
a) To provide a graphical visualization of containers b) To build and run containers c) To manage databases inside containers d) To interface with Kubernetes
Answer 20
b) To build and run containers
21. Which of the following commands logs you into Docker Hub from the CLI?
a) docker login b) docker auth c) docker sign-in d) docker connect
Answer 21
a) docker login
The docker login command allows users to log into Docker Hub or any other Docker registry from the command-line interface.
22. What does the -d flag do in the docker run command?
a) Deletes the container b) Displays detailed information c) Detaches the container (runs in the background) d) Downloads the latest image
Answer 22
c) Detaches the container (runs in the background)
23. How do you specify a Dockerfile other than the default “Dockerfile” during the build process?
a) Use –filename option b) Use –source option c) Use –file option d) Use –dockerfile option
Answer 23
c) Use –file option
The –file or -f option allows users to specify a different Dockerfile than the default one. For example, docker build –f MyDockerfile .
24. Which CLI command shows detailed information about a container?
a) docker inspect b) docker show c) docker details d) docker info
Answer 24
a) docker inspect
docker inspect provides detailed information about containers, including network configurations, status, and metadata.
25. Once the container has stopped, which of the following command you will use to remove a container?
a) Docker remove b) Docker Destroy c) Docker rm d) Docker del
Answer 25
c) Docker rm
When the container has stopped, use the docker rm command to remove it.
We would love to hear from you! Please leave your comments and share your scores in the section below
Docker is an open platform for developing, shipping, and running applications using the containers. Docker enables us to separate the applications from the infrastructure so we can deliver software quickly. With Docker, we can manage your infrastructure in the same ways you manage your applications.
Containers are lightweight, portable, and self-sufficient units that package an application and its dependencies, ensuring consistency across different environments.
What is Docker Desktop?
Docker Desktop is a one-click-install application for your Mac, Linux, or Windows environment that lets you build, share, and run containerized applications and microservices.
It provides a straightforward GUI (Graphical User Interface) that lets you manage your containers, applications, and images directly from your machine.
Before installing Docker on Windows 10 or 11, ensure your system meets the following requirements:
Windows 10 64-bit: Build 18362 or higher
Windows 11 64-bit
Hardware Virtualization Technology (VT-x) enabled in BIOS
Microsoft Hyper-V and Containers features enabled
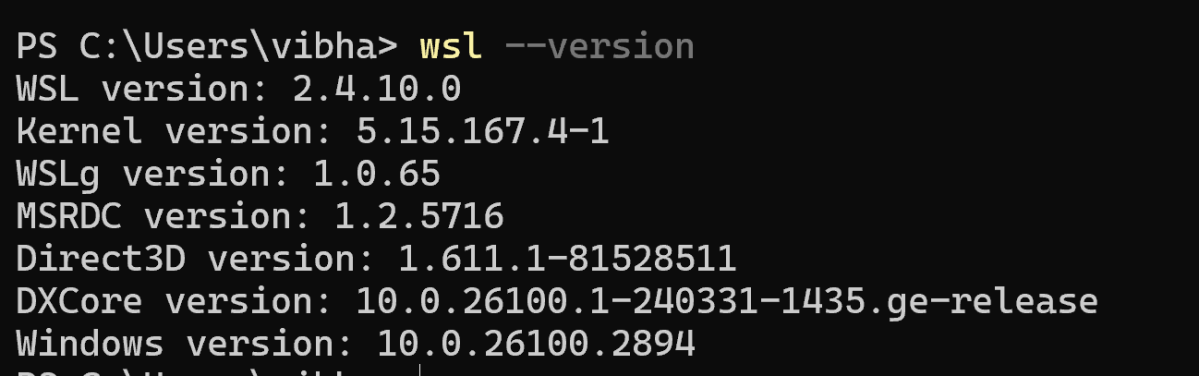
How to verify WSL is installed?
Windows Subsystem for Linux (WSL) 2 is a prerequisite for Docker Desktop on Windows. It provides a lightweight Linux kernel for compatibility and performance improvements.
wsl --version
The output of the above command should display the version of wsl installed on the machine.
Open PowerShell as Administrator and run:
wsl --install
Restart the computer if prompted.
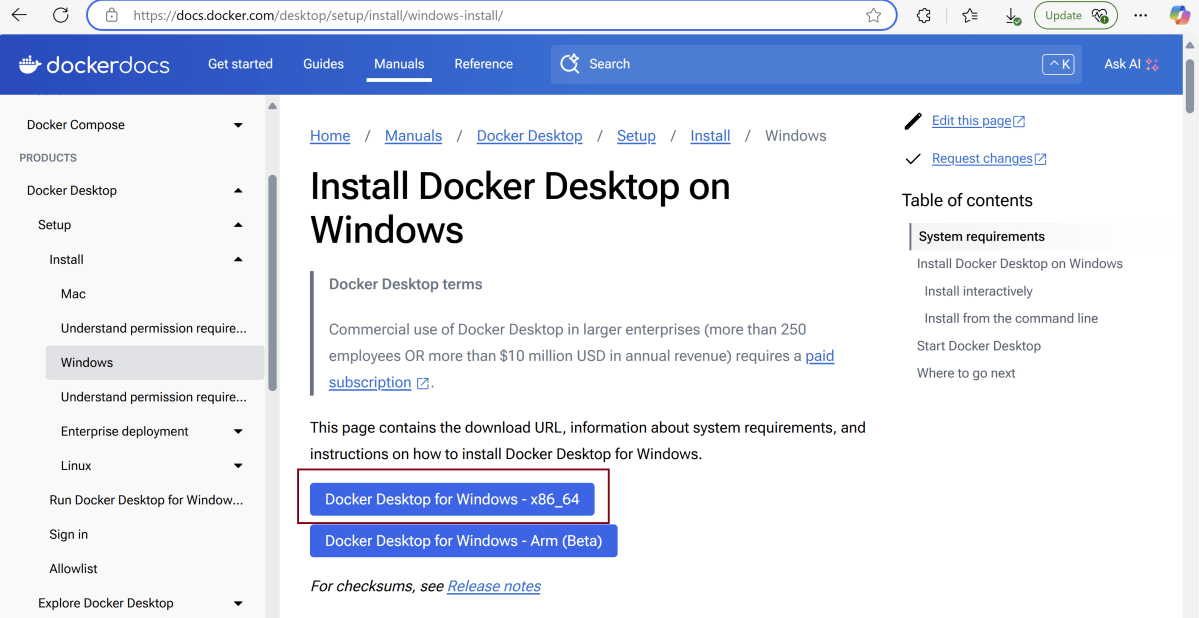
Install Docker Desktop
On the Docker download page, select “Windows” as your operating system.
The download will begin automatically. The duration will depend on your internet speed.
After installation, open Docker Desktop.
After clicking “OK,” the installation will start.
After installation completes, it will show a confirmation screen.
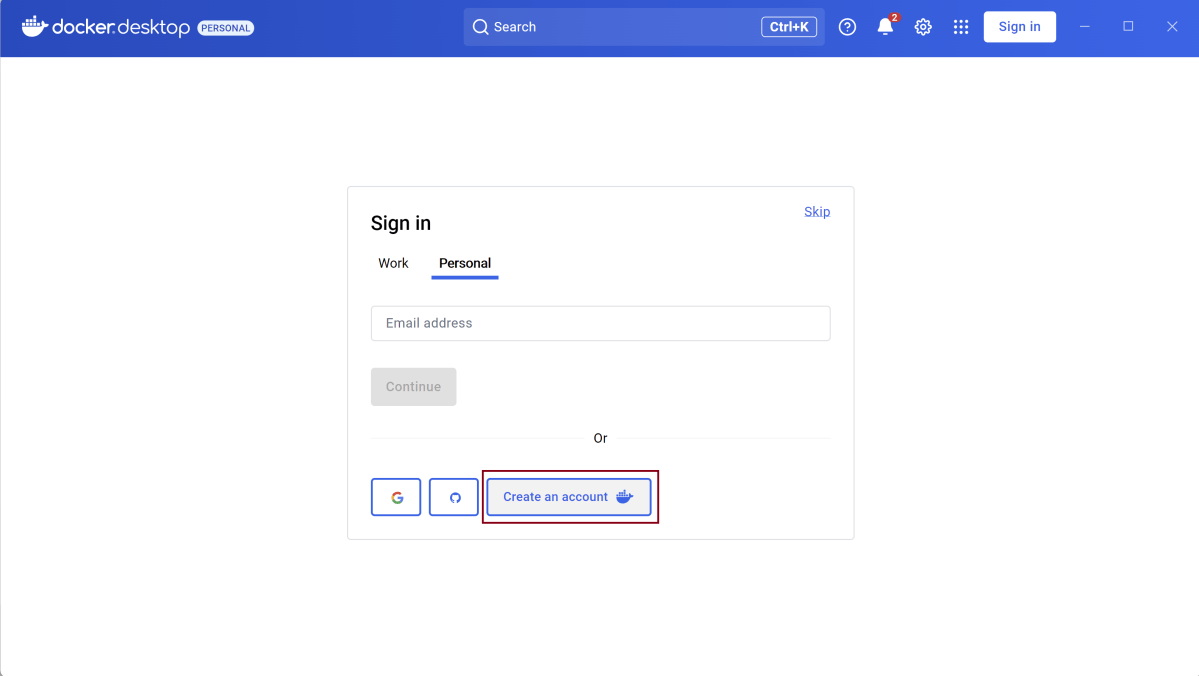
Create an account for Docker Desktop.
Once we will create the account, we will login and see that the Docker Engine is stopped.
Go to the settings and select “Start Docker Desktop when sign in to your computer.”. This is optional.
Go to the bottom tray and right click on the Desktop option.
It will show below mentioned options. Select “Quit Docker Desktop”.
Start Docker Desktop
Docker Desktop does not start automatically after installation. To start Docker Desktop:
Search for Docker, and select Docker Desktop in the search results.
The Docker menu displays the Docker Subscription Service Agreement. Select Acceptto continue. Docker Desktop starts after you accept the terms.
Note that Docker Desktop won’t run if you do not agree to the terms. You can choose to accept the terms at a later date by opening Docker Desktop.
Selenium is an open-source tool. It is not a single automation tool like QTP. Instead, it is a suite of software or a set of JAR files. These tools automate web browsers across various browsers. Selenium is used by many companies, but a few to mention are Netflix, Google, HubSpot, Fitbit, Accenture, IBM, and more.
Selenium – Introduction, Installation, Test Script
GitLab automatically enables CI/CD pipelines for new projects. It’s just a matter of adding a new configuration file called .gitlab-ci.yml to your code repository with instructions for GitLab on what to run. So simply create the following basic workflow in your main repository directory and commit it:
By default, GitLab will have CI/CD pipelines and Auto DevOps enabled for all projects. What this means is that, when you push code to the repository, GitLab will automatically trigger the pipeline.
Step 3 – Create a .gitlab-ci.yml file in the project in GitLab
There are many ways to create a new file in GitLab. One of the ways is to create a file as shown in the below image. I have already created a .gitlab-ci.yml in the project, which can be seen in the image.
It is a YAML file where you configure specific instructions for GitLab CI/CD. In the.gitlab-ci.yml, we can define:
The scripts you want to run.
Other configuration files and templates you want to include.
Dependencies and caches.
The commands you want to run in sequence and those you want to run in parallel.
The location to deploy your application to.
Whether you want to run the scripts automatically or trigger any of them manually.
Below is a sample example to run the SpringBoot project (Maven) in the GitLab pipeline.
image: maven:3.8.5-openjdk-17

stages:
  - test

variables:
  MAVEN_OPTS: "-Dmaven.repo.local=.m2/repository"

test:
  stage: test
  allow_failure: true

# Run the tests
  script:
    - echo "Executing SpringBoot scenarios with maven"
    - mvn clean test site

# Store artifacts
  artifacts:
    when: always
    name: "SpringBoot Report"
    paths:
    - target/site/*
    expire_in: 24 h
Image – maven:3.8.5-openjdk-17 is used in this test. It is a docker image for Maven and has Java 17 installed in it.
Pipeline configuration begins with jobs. Jobs are the most fundamental element of a .gitlab-ci.yml file.
Jobs can output an archive of files and directories. This output is known as a job artifact. The expire_in keyword determines how long GitLab keeps the job artifacts. Here, it shows 24 hrs to retain the artifacts.
Step 4 – Schedule the pipeline
To schedule the pipeline, go to the left panel and click on the Build option. There are several sub-options in the Build option, click on the Pipeline Schedules.
Click on the button “New Schedule” to create a schedule for the pipeline.
To add a pipeline schedule, we need to fill in the details displayed on this page.
Description – Provide the description of the project
Interval Pattern – Select one of the preconfigured intervals, or enter a custom interval in cron notation. Here, I have used 30 16 * * *, which means the job is scheduled to run every day at 4:30 PM.
Cron TimeZone – Mention the timezone in which the job should run. Here, I have used [UTC+1]Dublin timezone.
Target branch or tag – Select the branch or tag for the pipeline. Here, I have selected the “main” branch.
Click on the “Save pipeline schedule”.
Step 5 – Verify that the job is scheduled
Below is the image of the newly created pipeline. This shows all the necessary details like description, target, last pipeline, next run, and owner.
The “Next Run” shows the expected time to run the pipeline. Here, it shows that the run is going to start.
This image shows that the run has started, and it is in a pending state right now.
Step 6 – Run the tests in the GitLab pipeline
The pipeline runs automatically as per the time specified in the “Interval Pattern”. The below image shows that the tests are running in the GitLab pipeline.
Step 7 – Check the status of the pipeline
Once the Status of the pipeline changes to either failed or passed, that means the tests are already executed.
As you can see, the Status is passed, its green colour. This means all the tests present in the test suite are executed and passed. If any test fails in the test suite, the final execution status will be brown. The reason for the brown colour is we have mentioned allow_failure: true.
Below is the execution status report in the GitLab pipeline.
I have added an artifact also in the .gitalb-ci.yml, which is highlighted in the image. This artifact creates a folder with the name “SpringBoot_Report”and the reports in this folder come from the path /target/site. This artifact gives us the option to download the reports or browse the report. This report will be available for 24 hours only as mentioned in the gitlab-ci.yml.
Step 8 – Download the report
Once, will click on the download button, it will download “SpringBoot_Report.zip”. Unzip the folder and it looks like something as shown below:
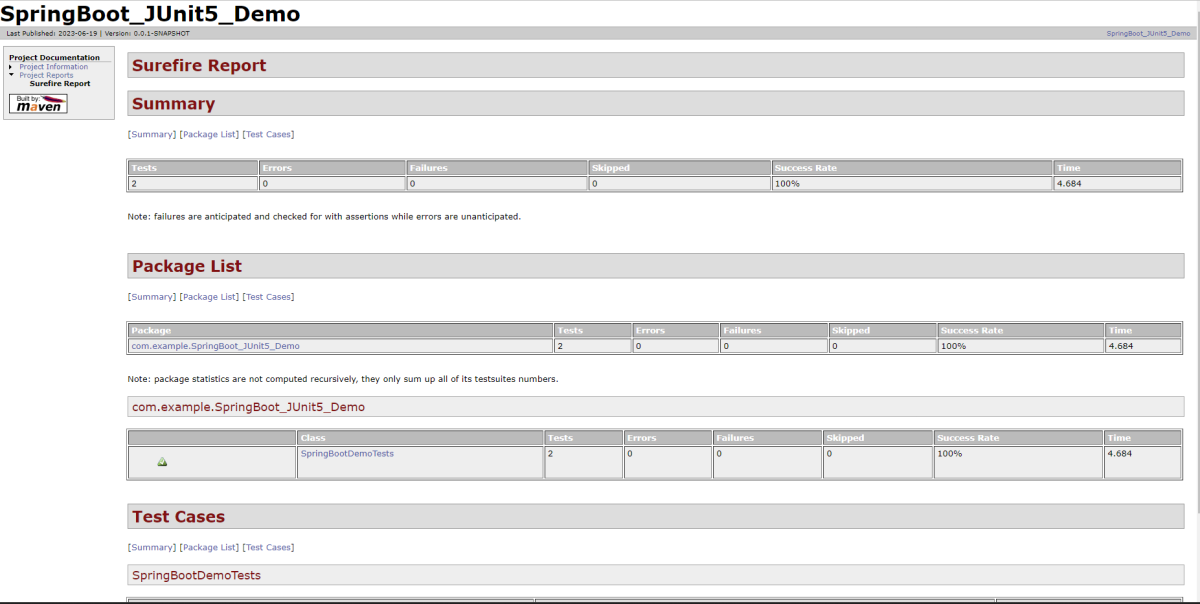
Example of SureFire-Report.html
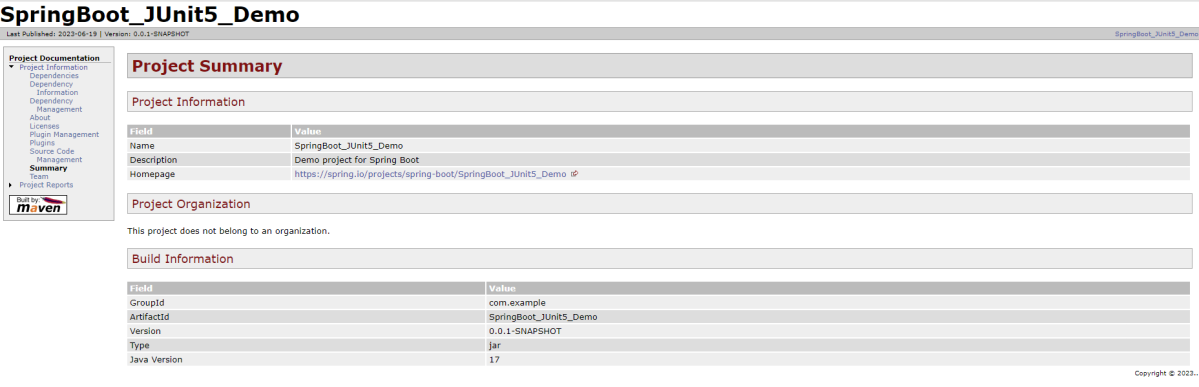
Example of Project Summary Report
How to schedule a cron job?
Five fields that are separated by whitespace make up a scheduling item. By adding more than one entry, you can schedule a job for more than one time.
Minute
Hour
Day of Month
Month
Day of week
MINUTE (0-59), HOUR (0-23), DAY (1-31), MONTH (1-12), DAY OF THE WEEK (0-6)
Each field can contain an exact value or use a set of special expressions:
The asterisk * indicates all valid values. So, a job that runs every day has a * in the third field.
A dash separates ranges of values. For example, a job that runs every hour from 9:00 a.m. to 5:00 p.m. would have 9-17 in the second field.
Intervals are specified with a slash /. A job that runs every 15 minutes has H/15 in the first field. Note that the H in the first field has a special meaning. If you wanted a job to run every 15 minutes, you could configure it as 0/15, which would make it run at the start of every hour.
Finally, you can specify multiple values with a comma. So, a job that runs Monday, Wednesday, and Friday would have 1,3,5 in the fifth field.
Here are several special predefined values that can be used to substitute the expressions in the cron.
Entry
Description
Description
@yearly
Run at any time during the year
H H H H *
@annually
Run at any time during the year
H H H H *
@monthly
Run at any time during the month
H H H * *
@weekly
Run at any time during the week
H H * * H
@daily
Run at any time during the day
H H * * *
@hourly
Run at any time during the hour
H * * * *
Here are the most common examples of cron job schedules that can be found in almost any crontab on Linux :
Schedule
Job
* * * * *
Run cron job every minute
H/5 * * * *
Run cron job every 5 minutes
H/30 * * * *
Run cron job every 30 minutes
0 * * * *
Run cron job every hour
0 H/3 * * *
Run cron job every 3 hours
0 13 * * *
Run cron job every day at 1pm
30 2 * * *
Run cron job every day at 2:30 am
0 0 * * *
Run cron job every day at midnight
0 0 * * 0
Run cron job every Sunday
0 0 * * 1
Run cron job every Monday
0 0 1 * *
Run cron job every first day of every month
0 0 1 1 *
Run cron job every first of January every year
Congratulations. This tutorial has explained the steps to schedule the pipeline in GitLab CI/CD. Happy Learning!!
This tutorial explains the process to run the Selenium Tests on multiple browsers in the GitLab pipeline. This is a very important step towards achieving CI/CD. Ideally, the tests need to run after any change (minor/major) before merging the latest change to the master branch. This makes life of a QA very easy.
Once the proposed changes are built, then push the commits to a feature branch in a remote repository that’s hosted in GitLab. The push triggers the CI/CD pipeline for your project. Then, GitLab CI/CD runs automated scripts (sequentially or in parallel) to build as well as to test the application. After a successful run of the test scripts, GitLab CI/CD deploys your changes automatically to any environment (DEV/QA/UAT/PROD). But if the test stage is failed in the pipeline, then the deployment is stopped.
After the implementation works as expected:
Get the code reviewed and approved.
Merge the feature branch into the default branch.
GitLab CI/CD deploys your changes automatically to a production environment.
To use GitLab CI/CD, we need to keep 2 things in mind:
a) Make sure a runner is available in GitLab to run the jobs. If there is no runner, install GitLab Runner and register a runner for your instance, project, or group.
b) Create a .gitlab-ci.yml file at the root of the repository. This file is where CI/CD jobs are defined.
The Selenium tests run on a headless browser in the pipeline.
How to check if GitLab Runner is configured?
Go to the project created in the GitLab. Go to the left side and click on Settings. Go to CI/CD option and a CI/CD Settings page open. Scroll down and see the Runners. By default, Shared runner will be selected for any new project.
What is a headless browser?
A headless browser is like any other browser, but without a Head/GUI (Graphical User Interface). A headless browser is used to automate the browser without launching the browser. While the tests are running, we could not see the browser, but we can see the test results coming on the console.
As explained in one of the previous tutorial, it is needed to add the maven-surefire-plugin to run the TestNG tests through the command line.
Step 3 – Create the Test Code
This is the BaseTest Class where the WebDriver is initialized, headless mode, full screen, and at the end close the WebDriver.
package com.example.tests;

import org.openqa.selenium.WebDriver;
import org.openqa.selenium.chrome.ChromeOptions;
import org.openqa.selenium.edge.EdgeOptions;
import org.openqa.selenium.firefox.FirefoxOptions;
import org.openqa.selenium.remote.RemoteWebDriver;
import org.testng.annotations.AfterMethod;
import org.testng.annotations.BeforeMethod;
import org.testng.annotations.Parameters;

import java.net.URL;
import java.time.Duration;

public class BaseTests {
    protected static ThreadLocal<RemoteWebDriver> driver = new ThreadLocal<RemoteWebDriver>();
    public static String remote_url = "http://selenium-hub:4444";
    public final static int TIMEOUT = 5;

    @BeforeMethod
    @Parameters("browser")
    public void setUp(String browser) throws Exception {
        if(browser.equalsIgnoreCase("chrome")) {

            ChromeOptions options = new ChromeOptions();
            options.addArguments("--start-maximized");
            options.addArguments("--headless=new");
            options.addArguments("--remote-allow-origins=*");
            driver.set(new RemoteWebDriver(new URL(remote_url), options));
            System.out.println("Browser Started :"+ browser);


        } else if (browser.equalsIgnoreCase("firefox")) {
            FirefoxOptions options = new FirefoxOptions();
            options.addArguments("--start-maximized");
            options.addArguments("-headless");
            driver.set(new RemoteWebDriver(new URL(remote_url), options));
            System.out.println("Browser Started :"+ browser);


        } else if (browser.equalsIgnoreCase("edge")) {
            EdgeOptions options = new EdgeOptions();
            options.addArguments("--start-maximized");
            options.addArguments("--headless=new");
            driver.set(new RemoteWebDriver(new URL(remote_url), options));
            System.out.println("Browser Started :"+ browser);


        } else {
            throw new Exception ("Browser is not correct");
        }

        driver.get().get("https://opensource-demo.orangehrmlive.com/");
        driver.get().manage().timeouts().implicitlyWait(Duration.ofSeconds(TIMEOUT));
    }


    public WebDriver getDriver() {
        return driver.get();
    }

    @AfterMethod
    public  void closeBrowser() {
        driver.get().quit();
        driver.remove();
    }

}
There is a Login pages that need to be tested.
LoginPage contains the tests to log in to the application. After successful login, the application moves to the next webpage – HomePage. You can see that BaseTest class is extended here.
package com.example.tests;

import org.openqa.selenium.By;
import org.testng.annotations.Test;

import static org.testng.Assert.assertEquals;

public class LoginPageTests extends BaseTests {

    By userName = By.name("username");
    By passWord = By.name("password");

    By loginBtn = By.xpath("//*[@id='app']/div[1]/div/div[1]/div/div[2]/div[2]/form/div[3]/button");

    By errorMessage = By.xpath("//*[@id='app']/div[1]/div/div[1]/div/div[2]/div[2]/div/div[1]/div[1]/p");

    By blankUsername = By.xpath("//*[@id='app']/div[1]/div/div[1]/div/div[2]/div[2]/form/div[1]/div/span");

    By dashboardPage = By.xpath("//*[@id='app']/div[1]/div[1]/header/div[1]/div[1]/span/h6");

    @Test
    public void invalidCredentials()  {

        getDriver().findElement(userName).sendKeys("1234");
        getDriver().findElement(passWord).sendKeys("12342");
        getDriver().findElement(loginBtn).click();
        String actualErrorMessage = getDriver().findElement(errorMessage).getText();
        System.out.println("Actual ErrorMessage :" + actualErrorMessage);
        assertEquals(actualErrorMessage,"Invalid credentials");

    }

    @Test
    public void blankUsername()  {

        getDriver().findElement(userName).sendKeys("");
        getDriver().findElement(passWord).sendKeys("12342");
        getDriver().findElement(loginBtn).click();
        String actualErrorMessage = getDriver().findElement(blankUsername).getText();
        System.out.println("Actual ErrorMessage :" + actualErrorMessage);
        assertEquals(actualErrorMessage,"Required");

    }

    @Test
    public void successfulLogin()  {

        getDriver().findElement(userName).sendKeys("Admin");
        getDriver().findElement(passWord).sendKeys("admin123");
        getDriver().findElement(loginBtn).click();
        String actualMessage = getDriver().findElement(dashboardPage).getText();
        System.out.println("Message :" + actualMessage);
        assertEquals(actualMessage,"Dashboard");

    }
}
Step 4 – Create testng.xml to run the tests
Now, let’s create a testng.xml to run the TestNG tests. It is very easy to create testng.xml in the case of Eclipse. Right-click on the project, and select TestNG -> Convert to TestNG. It will create a basic testng.xml structure. In case of IntelliJ, create a new file with the name of testng.xml and copy the code from here.
<?xml version="1.0" encoding="UTF-8"?>
<!DOCTYPE suite SYSTEM "https://testng.org/testng-1.0.dtd">
<suite name="Suite" parallel="tests" thread-count="3">
    <test name="Chrome Test">
        <parameter name="browser" value="chrome"></parameter>
        <classes>
            <class name="com.example.tests.LoginPageTests"/>
        </classes>
    </test> <!-- Test -->
    <test name="Firefox Test">
        <parameter name="browser" value="firefox"></parameter>
        <classes>
            <class name="com.example.tests.LoginPageTests"/>
        </classes>
    </test> <!-- Test -->
    <test name="Edge Test">
        <parameter name="browser" value="edge"></parameter>
        <classes>
            <class name="com.example.tests.LoginPageTests"/>
        </classes>
    </test> <!-- Test -->
</suite> <!-- Suite -->
version: 3. It is the latest version of the docker-compose files.
services(containers): This contains the list of the images and their configurations.
image: It defines which image will be used to spin up container.
ports: Published ports with host:container format.
container_name: You can give name to your containers.
depends_on: This defines the required dependency before spinning up the container. In our docker-compose.yml file, containers Chrome and Firefox are dependent upon container hub to spin up.
SE_NODE_MAX_INSTANCES: This defines how many instances of same version of browser can run over the Remote System.
SE_NODE_MAX_SESSIONS: This defines maximum number of concurrent sessions that will be allowed.
Step 6 – Create a .gitlab-ci.yml
stages:
  - test

variables:
  SELENIUM_SERVER_NAME: selenium-hub
  SELENIUM_SERVER_URL: http://${SELENIUM_SERVER_NAME}:4444
  DOCKER_HOST: tcp://docker:2375

services:
  - docker:20.10.16-dind

test:
  stage: test
  image: docker/compose
  before_script:
    - docker-compose up -d selenium-hub chrome edge firefox
    - sleep 10
    - docker-compose run ping curl ${SELENIUM_SERVER_URL}/status
  script:
    - docker-compose run tests mvn clean test

  artifacts:
    when: always
    name: "report"
    paths:
      - target/surefire-reports/**
    expire_in: 7 days
GitLab Section
Step 7 – Create a blank project in GitLab
To know, how to create a blank new project in GitLab, please refer tothis tutorial.
Step 8 – Push the project from local repository to Gitlab Repository
To know, how to push the changes in GitLab, please refer to this tutorial.
Step 9 – Run the tests in the GitLab pipeline
Now, when a new change is committed, a pipeline kicks off and it runs all the tests.
Step 10 – Check the status of the pipeline
Once the Status of the pipeline changes to either failed or passed.. that means the tests are already executed.
As you can see the Status is failed here which means that the execution is completed. Let us see the logs of the execution it shows that out of 9 tests, all 9 are passed. This shows that tests ran successfully in the GitLab pipeline.
As I have added an artifact also in the gitalb-ci.yml, which is highlighted in the image. This artifact creates a folder with the name “report” and the reports in this folder come from the path /target/surefire-reports. This artifact gives us the option to download the reports or browse the report. This report will be available for 7 days only as mentioned in the gitlab-ci.yml.
Step 11 – Download the report
Once, will click on the download button, it will download “report.zip”. Unzip the folder and it looks like something as shown below:
Example of Emailable-Report.html
Example of Index.html
Congratulations. This tutorial has explained the steps to run Selenium tests in GitLab CI/CD. Happy Learning!!
Cross-browser testing is a software testing practice that involves evaluating the compatibility and functionality of a website or web application across different web browsers. The goal of cross-browser testing is to ensure that the website or application works consistently and as expected on various browsers, operating systems, and devices.
Since different web browsers (such as Google Chrome, Mozilla Firefox, Microsoft Edge, Safari, etc.) may interpret and render HTML, CSS, and JavaScript code differently, cross-browser testing helps identify and address any discrepancies or issues that might arise. These differences can affect the visual appearance, layout, performance, and functionality of a website or application.
What is Selenium Grid?
Selenium Grid enables the execution of WebDriver scripts on remote machines (virtual or physical) by routing client commands to remote browser instances. Selenium Grid is a component of the Selenium testing framework that allows you to distribute and run tests across multiple browsers, operating systems, and machines simultaneously. It is particularly useful for performing parallel testing and cross-browser testing, helping to speed up the testing process and ensure consistent behavior across different environments.
What is new in Selenium Grid 4?
Grid 4 makes use of a variety of new technologies to enable scaling while allowing for local execution.
Selenium Grid 4 is a new implementation that does not share the previous version’s codebase.
I like how noVNC is packaged with Selenium Grid. In the dashboard, there is a Sessions tab that, when clicked, displays the links to the browser sessions that are now active, along with a video icon. When you click the video icon, you will be prompted to enter the password (“secret”), following which you will be taken to the current browser session where you can view the test live.
If we wanted to observe what was going on inside the browser session, we had to explicitly configure the grid for noVNC viewer in the prior version. From the grid, we just saw the browser icons highlighted, letting us know that the tests were being run in this or that browser.
What is Docker?
Docker is an open platform for developing, shipping, and running applications inside the containers. Containers are lightweight, portable, and self-sufficient units that package an application and its dependencies (such as libraries, frameworks, and runtime environments) together. Docker provides a consistent environment for running applications across different systems, making it easier to ensure that an application behaves the same way in development, testing, and production environments.
CLI Options for Docker
What is Docker Compose?
Docker Compose is a tool provided by Docker that allows you to define and manage multi-container Docker applications. It uses a simple and declarative YAML file to define the services, networks, and volumes that make up your application stack.
Project Structure
How to perform cross browser testing with Selenium Grid and Docker
Docker Desktop does not start automatically after installation. To start Docker Desktop, search for Docker, and select Docker Desktop in the search results. When the whale icon in the status bar stays steady, Docker Desktop is up-and-running, and is accessible from any terminal window.
Creating an instance of the Remote WebDriver and passing the selenium endpoint and chrome options defined in it.
To run a Remote WebDriver client, we first need to connect to the RemoteWebDriver. We do this by pointing the URL to the address of the server running our tests. In order to customize our configuration, we set desired capabilities.
BaseTests
import org.openqa.selenium.WebDriver;
import org.openqa.selenium.chrome.ChromeOptions;
import org.openqa.selenium.edge.EdgeOptions;
import org.openqa.selenium.firefox.FirefoxOptions;
import org.openqa.selenium.remote.RemoteWebDriver;
import org.testng.annotations.AfterMethod;
import org.testng.annotations.BeforeMethod;
import org.testng.annotations.Parameters;
import java.net.URL;
import java.time.Duration;

public class BaseTests {
    protected static ThreadLocal<RemoteWebDriver> driver = new ThreadLocal<RemoteWebDriver>();
    public static String remote_url = "http://localhost:4444";
    public final static int TIMEOUT = 5;

    @BeforeMethod
    @Parameters("browser")
    public void setUp(String browser) throws Exception {
        if(browser.equalsIgnoreCase("chrome")) {

            ChromeOptions options = new ChromeOptions();
            options.addArguments("--start-maximized");
            options.addArguments("--headless=new");
            options.addArguments("--remote-allow-origins=*");
            driver.set(new RemoteWebDriver(new URL(remote_url), options));
            System.out.println("Browser Started :"+ browser);

        } else if (browser.equalsIgnoreCase("firefox")) {
            FirefoxOptions options = new FirefoxOptions();
            options.addArguments("--start-maximized");
            options.addArguments("-headless");
            driver.set(new RemoteWebDriver(new URL(remote_url), options));
            System.out.println("Browser Started :"+ browser);

        } else if (browser.equalsIgnoreCase("edge")) {
            EdgeOptions options = new EdgeOptions();
            options.addArguments("--start-maximized");
            options.addArguments("--headless=new");
            driver.set(new RemoteWebDriver(new URL(remote_url), options));
            System.out.println("Browser Started :"+ browser);

        } else {
            throw new Exception ("Browser is not correct");
        }

        driver.get().get("https://opensource-demo.orangehrmlive.com/");
        driver.get().manage().timeouts().implicitlyWait(Duration.ofSeconds(5));
    }

    public WebDriver getDriver() {
        return driver.get();
    }

    @AfterMethod
    public  void closeBrowser() {
        driver.get().quit();
        driver.remove();
    }

}
LoginPageTests
import org.openqa.selenium.By;
import org.testng.annotations.Test;
import static org.testng.Assert.assertEquals;

public class LoginPageTests extends BaseTests {

    By userName = By.name("username");

    By passWord = By.name("password");

    By loginBtn = By.xpath("//*[@id='app']/div[1]/div/div[1]/div/div[2]/div[2]/form/div[3]/button");

    By errorMessage = By.xpath("//*[@id='app']/div[1]/div/div[1]/div/div[2]/div[2]/div/div[1]/div[1]/p");

    By blankUsername = By.xpath("//*[@id='app']/div[1]/div/div[1]/div/div[2]/div[2]/form/div[1]/div/span");

    By dashboardPage = By.xpath("//*[@id='app']/div[1]/div[1]/header/div[1]/div[1]/span/h6");

    @Test
    public void invalidCredentials()  {

        getDriver().findElement(userName).sendKeys("1234");
        getDriver().findElement(passWord).sendKeys("12342");
        getDriver().findElement(loginBtn).click();
        String actualErrorMessage = getDriver().findElement(errorMessage).getText();
        System.out.println("Actual ErrorMessage :" + actualErrorMessage);
        assertEquals(actualErrorMessage,"Invalid credentials");

    }

    @Test
    public void blankUsername()  {

        getDriver().findElement(userName).sendKeys("");
        getDriver().findElement(passWord).sendKeys("12342");
        getDriver().findElement(loginBtn).click();
        String actualErrorMessage = getDriver().findElement(blankUsername).getText();
        System.out.println("Actual ErrorMessage :" + actualErrorMessage);
        assertEquals(actualErrorMessage,"Required");

    }

    @Test
    public void successfulLogin()  {

        getDriver().findElement(userName).sendKeys("Admin");
        getDriver().findElement(passWord).sendKeys("admin123");
        getDriver().findElement(loginBtn).click();
        String actualMessage = getDriver().findElement(dashboardPage).getText();
        System.out.println("Message :" + actualMessage);
        assertEquals(actualMessage,"Dashboard");

    }
}
6. Create a testng.xml
It is very easy to create testng.xml in the case of Eclipse. Right-click on the project, and select TestNG -> Convert to TestNG. It will create a basic testng.xml structure. In case of IntelliJ, create a new file with the name of testng.xml and copy the code from here. Here, we are running the tests parallelly also.
<?xml version="1.0" encoding="UTF-8"?>
<!DOCTYPE suite SYSTEM "https://testng.org/testng-1.0.dtd">
<suite name="Suite" parallel="tests" thread-count="3">
    <test name="Chrome Test">
        <parameter name="browser" value="chrome"></parameter>
        <classes>
            <class name="com.example.tests.LoginPageTests"/>
        </classes>
    </test> <!-- Test -->

   <test name="Firefox Test">
        <parameter name="browser" value="firefox"></parameter>
        <classes>
            <class name="com.example.tests.LoginPageTests"/>
        </classes>
    </test> <!-- Test -->

    <test name="Edge Test">
        <parameter name="browser" value="edge"></parameter>
        <classes>
            <class name="com.example.tests.LoginPageTests"/>
        </classes>
    </test> <!-- Test -->
</suite> <!-- Suite -->
version: 3. It is the latest version of the docker-compose files.
services(containers): This contains the list of the images and their configurations.
image: It defines which image will be used to spin up container.
ports: Published ports with host:container format.
container_name: You can give name to your containers.
depends_on: This defines the required dependency before spinning up the container. In our docker-compose.yml file, containers Chrome and Firefox are dependent upon container hub to spin up.
SE_NODE_MAX_INSTANCES: This defines how many instances of same version of browser can run over the Remote System.
SE_NODE_MAX_SESSIONS: This defines maximum number of concurrent sessions that will be allowed.
8. Start the Selenium Grid
We have the docker compose file ready with all the configurations required to start the selenium grid.
To start the grid we need to navigate to the folder where our docker compose file is located and run the following command:
docker-compose up
Once the grid is up and running, we can navigate to http://localhost:4444and checkout the instances which are up and running as per the configurations we gave in the docker compose file.
9. Execute the tests
Go to the command line and execute the tests using the below command:
mvn clean test
The output of the above program is shown below:
Checkout the image below, this is how the selenium grid dashboard looks when the tests execution gets started
As mentioned earlier, in selenium grid 4, we have the sessions overview as well. So, when we click on the Session Tab we can see the execution happening live and there are other details as well displayed in the Dashboard like Capabilities, Start time, Duration and Node URI which are useful metrics from the test automation reporting.
We need to click on the video icon beside the browser session to watch the session live and it will ask for password here. The password is “secret”
This is how the test execution in Chrome looks like and its actually executing the tests.
10. View the Reports
TestNG generate the reports. Go to target/surefire-reports as shown in the below image.
Emailable-Report.html
Index.html
11. Stop the Selenium Grid
Once the execution of the tests are finished, it is advisable to stop the Grid. To stop the grid, we can press ctrl+c in the command prompt/terminal and it will instantly stop the containers. To Stop and remove containers, networks, volumes, and images created by docker we can use the following command:
docker-compose down
Congratulations!!. The above steps allow running Selenium tests in Docker seamlessly. Happy Learning.
Selenium Grid enables the execution of WebDriver scripts on remote machines (virtual or physical) by routing client commands to remote browser instances. Its goal is to make it simple to perform tests on numerous machines in parallel.
Selenium Grid enables us to run tests on multiple computers in parallel and to manage different browser versions and browser configurations centrally (rather than in each individual test).
What is new in Selenium Grid 4?
Grid 4 makes use of a variety of new technologies to enable scaling while allowing for local execution.
Selenium Grid 4 is a new implementation that does not share the previous version’s codebase.
I like how noVNC is packaged with Selenium Grid. In the dashboard, there is a Sessions tab that, when clicked, displays the links to the browser sessions that are now active, along with a video icon. When you click the video icon, you will be prompted to enter the password (“secret”), following which you will be taken to the current browser session where you can view the test live.
If we wanted to observe what was going on inside the browser session, we had to explicitly configure the grid for noVNC viewer in the prior version. From the grid, we just saw the browser icons highlighted, letting us know that the tests were being run in this or that browser.
What is Docker?
Docker is an open platform for developing, shipping, and running applications. Docker enables you to separate your applications from your infrastructure so you can deliver software quickly. With Docker, you can manage your infrastructure in the same ways you manage your applications.
CLI Options for Docker
What is Docker Compose?
Docker Compose is a tool that helps you define and share multi-container applications. With Compose, you can create a YAML file to define the services and with a single command, you can spin everything up or tear it all down.
Docker Desktop does not start automatically after installation. To start Docker Desktop, search for Docker, and select Docker Desktop in the search results. When the whale icon in the status bar stays steady, Docker Desktop is up-and-running, and is accessible from any terminal window.
Creating an instance of the Remote WebDriver and passing the selenium endpoint and chrome options defined in it.
To run a Remote WebDriver client, we first need to connect to the RemoteWebDriver. We do this by pointing the URL to the address of the server running our tests. In order to customize our configuration, we set desired capabilities.
BaseTests
import org.openqa.selenium.WebDriver;
import org.openqa.selenium.chrome.ChromeOptions;
import org.openqa.selenium.remote.RemoteWebDriver;
import org.testng.annotations.AfterMethod;
import org.testng.annotations.BeforeMethod;
import java.net.URL;
import java.time.Duration;

public class BaseTests {
    protected static ThreadLocal<RemoteWebDriver> driver = new ThreadLocal<RemoteWebDriver>();
    public static String remote_url = "http://localhost:4444";
    public final static int TIMEOUT = 5;

    @BeforeMethod
    public void setUp() throws Exception {

        ChromeOptions options = new ChromeOptions();
        options.addArguments("--start-maximized");
        driver.set(new RemoteWebDriver(new URL(remote_url), options));
        System.out.println("Browser Started : Chrome");

        driver.get().get("https://opensource-demo.orangehrmlive.com/");
        driver.get().manage().timeouts().implicitlyWait(Duration.ofSeconds(TIMEOUT));
        }


    public WebDriver getDriver() {
        return driver.get();
    }

    @AfterMethod
    public  void closeBrowser() {
        driver.get().quit();
        driver.remove();
    }

}
LoginPageTests
import org.openqa.selenium.By;
import org.testng.annotations.Test;
import static org.testng.Assert.assertEquals;

public class LoginPageTests extends BaseTests {

    By userName = By.name("username");
    By passWord = By.name("password");
    By loginBtn = By.xpath("//*[@id='app']/div[1]/div/div[1]/div/div[2]/div[2]/form/div[3]/button");
    By errorMessage = By.xpath("//*[@id='app']/div[1]/div/div[1]/div/div[2]/div[2]/div/div[1]/div[1]/p");
    By blankUsername = By.xpath("//*[@id='app']/div[1]/div/div[1]/div/div[2]/div[2]/form/div[1]/div/span");

   @Test
    public void invalidCredentials() {

        getDriver().findElement(userName).sendKeys("1234");
        getDriver().findElement(passWord).sendKeys("12342");
        getDriver().findElement(loginBtn).click();
        String actualErrorMessage = getDriver().findElement(errorMessage).getText();
        System.out.println("Actual ErrorMessage :" + actualErrorMessage);
        assertEquals(actualErrorMessage,"Invalid credentials");

    }

    @Test
    public void blankUsername() {

        getDriver().findElement(userName).sendKeys("");
        getDriver().findElement(passWord).sendKeys("12342");
        getDriver().findElement(loginBtn).click();
        String actualErrorMessage = getDriver().findElement(blankUsername).getText();
        System.out.println("Actual ErrorMessage :" + actualErrorMessage);
        assertEquals(actualErrorMessage,"Required");

    }
}
6. Create a testng.xml
It is very easy to create testng.xml in the case of Eclipse. Right-click on the project, and select TestNG -> Convert to TestNG. It will create a basic testng.xml structure. In case of IntelliJ, create a new file with the name of testng.xml and copy the code from here.
<?xml version="1.0" encoding="UTF-8"?>
<!DOCTYPE suite SYSTEM "https://testng.org/testng-1.0.dtd">
<suite name="Suite" parallel="none" thread-count="1">
    <test name="Chrome Test">
        <parameter name="browser" value="chrome"></parameter>
        <classes>
            <class name="com.example.tests.LoginPageTests"/>
        </classes>
    </test> <!-- Test -->

</suite> <!-- Suite -->
version: 3. It is the latest version of the docker-compose files.
services(containers): This contains the list of the images and their configurations.
image: It defines which image will be used to spin up container.
ports: Published ports with host:container format.
container_name: You can give name to your containers.
depends_on: This defines the required dependency before spinning up the container. In our docker-compose.yml file, containers Chrome and Firefox are dependent upon container hub to spin up.
SE_NODE_MAX_INSTANCES: This defines how many instances of same version of browser can run over the Remote System.
SE_NODE_MAX_SESSIONS: This defines maximum number of concurrent sessions that will be allowed.
8. Start the Selenium Grid
We have the docker compose file ready with all the configurations required to start the selenium grid.
To start the grid we need to navigate to the folder where our docker compose file is located and run the following command:
docker-compose up
Once the grid is up and running, we can navigate to http://localhost:4444. We can then check out the instances. They are up and running as per the configurations we gave in the docker compose file.
9. Execute the tests
Go to the command line and execute the tests using the below command:
mvn clean test
The output of the above program is shown below
Checkout the image below, this is how the selenium grid dashboard looks when the tests execution gets started
As mentioned earlier, in selenium grid 4, we have the sessions overview as well. So, when we click on the Session Tab we can see the execution happening live and there are other details as well displayed in the Dashboard like Capabilities, Start time, Duration and Node URI which are useful metrics from the test automation reporting.
We need to click on the video icon beside the browser session to watch the session live and it will ask for password here. The password is “secret”
This is how the test execution in Chrome looks like and its actually executing the tests.
10. View the Reports
TestNG generate the reports. Go to target/surefire-reports as shown in the below image.
Emailable-Report.html
Index.html
Congratulations!!. The above steps allow running Selenium tests in Docker seamlessly. Happy Learning.