In this tutorial, we will change the font style in Excel using Apache POI.
What is Apache POI?
Apache POI, where POI stands for (Poor Obfuscation Implementation) is the Java API for Microsoft Documents. It offers a collection of Java libraries. These libraries help us to read, write, and manipulate different Microsoft files such as Excel sheets, PowerPoint, and Word files.
Add the below mentioned dependencies to the project. The latest dependencies can be downloaded from Maven.
<!-- POI -->
    <dependency>
      <groupId>org.apache.poi</groupId>
      <artifactId>poi</artifactId>
      <version>5.3.0</version>
    </dependency>

    <!-- POI XML -->
    <dependency>
      <groupId>org.apache.poi</groupId>
      <artifactId>poi-ooxml</artifactId>
      <version>5.3.0</version>
    </dependency>
Every system comes bundled with a huge collection of fonts such as Arial, Impact, Times New Roman, etc. The collection can also be updated with new fonts, if required. Similarly there are various styles in which a font can be displayed, for example, bold, italic, underline, strike through, etc.
Apache POI provides methods to handle font in excel sheet. We can create font, set color, set size etc. The Font is an interface which provides methods to handle the font.
Font font = workbook.createFont();
Implementation
Step 1 – Create a blank workbook.
XSSFWorkbook workbook = newXSSFWorkbook();
Step 2 – Create a blank sheet and assign name to the sheet – Example_Sheet.
Step 7– Write the workbook to a File and close the workbook. Catches any IOException errors that might occur during the file creation or writing process.
Below is the sample code for changing the font style in the excel in Java.
package com.example.Excel;
import org.apache.poi.ss.usermodel.*;
import org.apache.poi.xssf.usermodel.XSSFSheet;
import org.apache.poi.xssf.usermodel.XSSFWorkbook;
import java.io.FileOutputStream;
import java.io.IOException;
public class ApplyFont_Excel {
public static void main(String[] args) throws IOException {
// create blank workbook
XSSFWorkbook workbook = new XSSFWorkbook();
// Create a blank sheet
XSSFSheet sheet = workbook.createSheet("Example_Sheet");
//Create a row
Row row = sheet.createRow(0);
//Create a cell
Cell cell = row.createCell(0);
//Set the value of the cell
cell.setCellValue("Happy Days");
//Create a new font
Font font = workbook.createFont();
font.setFontHeightInPoints((short) 24);
font.setFontName("Arial");
font.setBold(true);
font.setItalic(true);
font.setColor(IndexedColors.DARK_RED.getIndex());
font.setUnderline(Font.U_SINGLE);
//Create a cell style and set the font
CellStyle style = workbook.createCellStyle();
style.setFont(font);
//Apply the style to the cell
cell.setCellStyle(style);
//Write the output to the file
 try {
            FileOutputStream outputStream = new FileOutputStream("src/test/StyledCell.xlsx");
            workbook.write(outputStream);
            outputStream.close();
            System.out.println("StyledCell.xlsx Workbook is successfully created");
        } catch (IOException e) {
            e.printStackTrace();
        } finally {
            workbook.close();
        }
}
}
The output of the above program is
StyledCell.xlsx excel is created in src/test folder.
Open the excel and it looks like the below shown image:
To apply different font styles to different rows in an Excel sheet using Apache POI, you can define separate CellStyle objects, each associated with a unique Font, and apply these styles to the desired cells.
package com.example.Excel;

import org.apache.poi.ss.usermodel.*;
import org.apache.poi.xssf.usermodel.XSSFSheet;
import org.apache.poi.xssf.usermodel.XSSFWorkbook;

import java.io.FileOutputStream;
import java.io.IOException;

public class ApplyFontMultipleRows_Excel {

    public static void main(String[] args) throws IOException {

        // create blank workbook
        XSSFWorkbook workbook = new XSSFWorkbook();

        // Create a blank sheet
        XSSFSheet sheet = workbook.createSheet("Example_Sheet");

        //Create a new font1
        Font font1 = workbook.createFont();
        font1.setFontHeightInPoints((short) 12);
        font1.setFontName("Arial");
        font1.setBold(true);
        font1.setItalic(true);
        font1.setColor(IndexedColors.DARK_RED.getIndex());
        font1.setUnderline(Font.U_SINGLE);

        //Create a new font2
        Font font2 = workbook.createFont();
        font2.setFontHeightInPoints((short) 14);
        font2.setFontName("Times New Roman");
        font2.setBold(true);
        font2.setItalic(true);
        font2.setColor(IndexedColors.BLUE.getIndex());

        //Create a new font3
        Font font3 = workbook.createFont();
        font3.setFontHeightInPoints((short) 16);
        font3.setFontName("Courier New");
        font3.setBold(true);
        font3.setColor(IndexedColors.GREEN.getIndex());

        //Create a cell style and set the font
        CellStyle style1 = workbook.createCellStyle();
        style1.setFont(font1);

        CellStyle style2 = workbook.createCellStyle();
        style2.setFont(font2);

        CellStyle style3 = workbook.createCellStyle();
        style3.setFont(font3);

        // Apply styles to rows
        Row row1 = sheet.createRow(0);
        Cell cell1 = row1.createCell(0);
        cell1.setCellValue("Underlined Italic Bold Arial");
        cell1.setCellStyle(style1);

        Row row2 = sheet.createRow(1);
        Cell cell2 = row2.createCell(0);
        cell2.setCellValue("Bold Italic Times New Roman");
        cell2.setCellStyle(style2);

        Row row3 = sheet.createRow(2);
        Cell cell3 = row3.createCell(0);
        cell3.setCellValue("Courier New");
        cell3.setCellStyle(style3);

        //Write the output to the file
        try {
            FileOutputStream outputStream = new FileOutputStream("src/test/FontStyle.xlsx");
            workbook.write(outputStream);
            outputStream.close();
            System.out.println("Workbook FontStyle.xlsx is created");
        } catch (IOException e) {
            e.printStackTrace();
        } finally {
            workbook.close();
        }

    }
}
The output of the above program is
Open the excel and it looks like the below shown image:
In this example: 1. We created three different “Font“ objects with different styles (Underlined Italic Bold Arial, Times New Roman Bold Italic, and Courier New Italic). 2. We created three corresponding “CellStyle” objects and set the respective fonts. 3. We applied these styles to specific cells in different rows.
Congratulations on making it through this tutorial and hope you found it useful! Happy Learning!! Cheers!!
Step 6 – Create a Row. A spreadsheet consists of rows and cells. It has a grid layout.
XSSFRow row = sheet.createRow(rownum++);
Step 7 – Import XSSFRow from package
import org.apache.poi.xssf.usermodel.XSSFRow;
Step 8 – Create cells in a row. A row is a collection of cells. When you enter data in the sheet, it is always stored in the cell.
XSSFCell cell = row.createCell(cellnum++);
Step 9 – Import XSSFCell from package.
XSSFCell cell = row.createCell(cellnum++);
Step 10 – Iterate over Data and Write to the sheet
int rownum = 0;
for (Object[] employeeDetails : data) {
// Create Row
XSSFRow row = sheet.createRow(rownum++);
int cellnum = 0;
for (Object obj : employeeDetails) {
// Create cell
XSSFCell cell = row.createCell(cellnum++);
// Set value to cell
if (obj instanceof String)
cell.setCellValue((String) obj);
else if (obj instanceof Double)
cell.setCellValue((Double) obj);
else if (obj instanceof Integer)
cell.setCellValue((Integer) obj);
}
}
Step 11 – Open a FileOutputStream to a new file named “EmployeeDetails.xlsx”. Write data to an OutputStream. Use the below code to write output stream.
FileOutputStream out = new FileOutputStream(new File("EmployeeDetails.xlsx"));
workbook.write(out);
Step 12 – Close the output stream.
out.close();
Below is the sample code for writing the data in an excel in Java.
import java.io.File;
import java.io.FileOutputStream;
import java.io.IOException;
import java.util.ArrayList;
import org.apache.poi.xssf.usermodel.XSSFCell;
import org.apache.poi.xssf.usermodel.XSSFRow;
import org.apache.poi.xssf.usermodel.XSSFSheet;
import org.apache.poi.xssf.usermodel.XSSFWorkbook;
public class ReadWriteExcelFile {
public static void main(String[] args) throws IOException {
// create blank workbook
XSSFWorkbook workbook = new XSSFWorkbook();
// Create a blank sheet
XSSFSheet sheet = workbook.createSheet("Write_TestData");
ArrayList<Object[]> data = new ArrayList<Object[]>();
		data.add(new String[] { "Name", "Id", "Salary" });
		data.add(new Object[] { "Jim", "001A", 10000 });
		data.add(new Object[] { "Jack", "1001B", 40000 });
		data.add(new Object[] { "Tim", "2001C", 20000 });
		data.add(new Object[] { "Gina", "1004S", 30000 });
// Iterate over data and write to sheet
	int rownum = 0;
		for (Object[] employeeDetails : data) {

			// Create Row
			XSSFRow row = sheet.createRow(rownum++);

			int cellnum = 0;
			for (Object obj : employeeDetails) {

				// Create cell
				XSSFCell cell = row.createCell(cellnum++);

				// Set value to cell
				if (obj instanceof String)
					cell.setCellValue((String) obj);
				else if (obj instanceof Double)
					cell.setCellValue((Double) obj);
				else if (obj instanceof Integer)
					cell.setCellValue((Integer) obj);
			}
		}
try {
// Write the workbook in file system
FileOutputStream out = new FileOutputStream(new File("EmployeeDetails.xlsx"));
workbook.write(out);
out.close();
System.out.println("EmployeeDetails.xlsx has been created successfully");
} catch (Exception e) {
e.printStackTrace();
} finally {
workbook.close();
}
}
}
The output of the above program is
Summary:
Create a WorkBook and Sheet
Prepare the data. Use ArrayList to store the rows of data.
Write Data to the Excel by iterating over each row and cell
Save the Workbook
Handle the exceptions appropriately
That’s it! We have written data in Excel.
Congratulations on making it through this tutorial and hope you found it useful! Happy Learning!! Cheers!!
In the previous tutorial, I have explained How to update data in existing excel in Java. In this Java Excel tutorial, I will explain how to create an Excel with formula in a Java program. Excel is very excellent in calculating formulas. The Apache POI library provides excellent support for working with formulas in Excel.
I’m using Apache POI to write data to the excel file. To download and install Apache POI, refer here.
If you are using maven, then you need to add below dependency in pom.xml.
Step 9 – Write the workbook to a File and close the workbook
try {

			// Write the workbook in file system
			FileOutputStream out = new FileOutputStream(new File("Salary_Slip.xlsx"));
			workbook.write(out);
			out.close();
			System.out.println("Excel written successfully.");

		} catch (IOException e) {
			e.printStackTrace();

		}
In the above line, note that you should make sure that the cell at position (1, 5) does exist, otherwise you get a NullPointerException.
Let us see a program where I have created a cell which contains the formula.
import org.apache.poi.xssf.usermodel.XSSFRow;
import org.apache.poi.xssf.usermodel.XSSFSheet;
import org.apache.poi.xssf.usermodel.XSSFWorkbook;

import java.io.File;
import java.io.FileOutputStream;
import java.io.IOException;

public class FormulaExcelDemo {

    public static void main(String[] args) {

        // Create object of XSSFWorkbook class
        XSSFWorkbook workbook = new XSSFWorkbook();

        // Create object of XSSFSheet class
        XSSFSheet sheet = workbook.createSheet("Calculate Salary");

        // Create Header row using XSSFRow class
        XSSFRow header = sheet.createRow(0);
        header.createCell(0).setCellValue("Employee_Name");
        header.createCell(1).setCellValue("Base_Salary");
        header.createCell(2).setCellValue("Variable_Pay");
        header.createCell(3).setCellValue("Other_Benefits");
        header.createCell(4).setCellValue("Total Salary");
        header.createCell(5).setCellValue("Base_Variable Salary");

        XSSFRow dataRow = sheet.createRow(1);
        dataRow.createCell(0).setCellValue("George");
        dataRow.createCell(1).setCellValue(5000);
        dataRow.createCell(2).setCellValue(650);
        dataRow.createCell(3).setCellValue(1200);

        // Set formula
        dataRow.createCell(4).setCellFormula("B2+C2+D2");
        dataRow.createCell(5).setCellFormula("SUM(B2:C2)");

        try {

            // Write the workbook in file system
            FileOutputStream out = new FileOutputStream(new File("Salary_Slip.xlsx"));
            workbook.write(out);
            out.close();
            System.out.println("Excel written successfully.");

        } catch (IOException e) {
            e.printStackTrace();

        }
    }
}
The output of the above program is
Updated Excel
That’s it! Well Done! Cheers!!
Congratulations on making it through this tutorial and hope you found it useful! Happy Learning!!
A keyword-driven framework is a software testing framework that separates the test script logic from the test data through a set of keywords or actions.
1. Keywords: Keywords or actions represent the basic building blocks of the test script. Examples of keywords can include “click,” “sendKeys,” “verifyText,” etc. These keywords are defined in a central repository or spreadsheet, along with the associated test data and expected results.
2. Test Data: Test data is the input or parameters required to perform a specific keyword action. It can be stored in a separate data source such as an Excel spreadsheet or XML file. Test data includes information like usernames, passwords, URLs, input values, and expected outcomes.
3. Test Scripts: Test scripts are developed to execute the keywords. Each test script consists of a series of actions driven by the keywords. The test script fetches the keyword from the central repository and performs the associated action using the test data. It also captures and verifies the results against the expected outcome.
4. Central Repository: The central repository contains all the keywords, associated test data, and expected results. It acts as a bridge between test scripts and test data, allowing for easy maintenance and modification.
Project Structure
Here is the final snapshot of our project.
Dependency List
Selenium – 4.21.0
TestNG – 7.10.2
Apache POI – 5.2.5
Commons – 2.16.1
Maven Surefire – 3.2.5
Maven Compiler – 3.13.0
Java 17
Maven – 3.9.6
Implementation Steps
Step 1- Download and Install Java
Selenium needs Java to be installed on the system to run the tests. Click here to learn How to install Java.
Step 2 – Download and setup Eclipse IDE on the system
The Eclipse IDE (integrated development environment) provides strong support for Java developers, which is needed to write Java code. Click here to learn How to install Eclipse.
Step 3 – Setup Maven
To build a test framework, we need to add many dependencies to the project. It is a very tedious and cumbersome process to add each dependency manually. So, to overcome this problem, we use a build management tool. Maven is a build management tool that is used to define project structure, dependencies, build, and test management. Click here to learn How to install Maven.
Step 6 – Create a Java Keyword Class for each page
In this example, we will access 2 web pages, “Login” and “Home” pages.
Hence, we will create 2 Java classes for keywords – LoginPageKeywords.java and HomePageKeywords.java and a BasePage class to initialize the driver using PageFactory.
BasePage
package com.example.pages;

import org.openqa.selenium.WebDriver;
import org.openqa.selenium.support.PageFactory;

public class BasePage {
    public WebDriver driver;

    public BasePage(WebDriver driver) {
        this.driver = driver;
        PageFactory.initElements(driver,this);
    }

}
LoginPageKeywords
package com.example.keywords;

import com.example.utils.ExcelUtils;
import org.openqa.selenium.WebDriver;
import org.openqa.selenium.WebElement;
import org.openqa.selenium.support.FindBy;

public class LoginPageKeywords extends BasePage{

    public LoginPageKeywords(WebDriver driver) {
        super(driver);

    }

    @FindBy(name = "username")
    public WebElement userName;

    @FindBy(name = "password")
    public WebElement password;

    @FindBy(xpath = "//*[@class='oxd-form']/div[1]/div/span")
    public WebElement missingUsernameErrorMessage;

    @FindBy(xpath = "//*[@class='oxd-form']/div[2]/div/span")
    public WebElement missingPasswordErrorMessage;

    @FindBy(xpath = "//*[@class='oxd-form']/div[3]/button")
    public WebElement loginBtn;

    @FindBy(xpath = "//*[@id='app']/div[1]/div/div[1]/div/div[2]/div[2]/div/div[1]/div[1]/p")
    public  WebElement errorMessage;


    public void enterUsername(String strUserName) {
        userName.sendKeys(strUserName);
    }

    public void enterPassword(String strPassword) {
        password.sendKeys(strPassword);
    }

    public void login() {
        loginBtn.click();
    }

    public void login(String strUserName, String strPassword) {

        userName.sendKeys(strUserName);
        password.sendKeys(strPassword);
    }

    public String getMissingUsernameText() {
        return missingUsernameErrorMessage.getText();
    }

    public String getMissingPasswordText() {
        return missingPasswordErrorMessage.getText();
    }

    public String getErrorMessage() {
        return errorMessage.getText();
    }

    public LoginPageKeywords saveTestResults(int row, int column) {
        ExcelUtils.rowNumber = row ;
        ExcelUtils.columnNumber = column;
        return this;
    }

}
HomePageKeywords
package com.example.keywords;

import org.openqa.selenium.WebDriver;
import org.openqa.selenium.WebElement;
import org.openqa.selenium.support.FindBy;

public class HomePageKeywords extends BasePage {

    public HomePageKeywords(WebDriver driver) {
        super(driver);

    }

    @FindBy(xpath = "//*[@id='app']/div[1]/div[1]/header/div[1]/div[1]/span/h6")
    public  WebElement homePageUserName;

    public String verifyHomePage() {
        return homePageUserName.getText();
    }
}
Step 7 – Create an ExcelUtils Class
To manipulate Excel files and do Excel operations, we should create an Excel file and call it “ExcelUtils” under the utilspackage as shown below.
package com.example.utils;

import org.apache.poi.ss.usermodel.DataFormatter;
import org.apache.poi.xssf.usermodel.XSSFCell;
import org.apache.poi.xssf.usermodel.XSSFRow;
import org.apache.poi.xssf.usermodel.XSSFSheet;
import org.apache.poi.xssf.usermodel.XSSFWorkbook;

import java.io.FileInputStream;
import java.io.FileOutputStream;
import java.io.IOException;

public class ExcelUtils {


    public static String testDataExcelPath = null; //Location of Test data excel file
    private static XSSFWorkbook excelWorkBook; //Excel WorkBook
    private static XSSFSheet excelWorkSheet; //Excel Sheet
    private static XSSFCell cell; //Excel cell
    private static XSSFRow row; //Excel row
    public static int rowNumber; //Row Number
    public static int columnNumber; //Column Number
    public static FileInputStream ExcelFile;

    public static DataFormatter formatter;
    public static FileOutputStream fileOut;


    // This method has two parameters: "Test data excel file name" and "Excel sheet name"
    // It creates FileInputStream and set excel file and excel sheet to excelWBook and excelWSheet variables.
    public static void setExcelFileSheet(String sheetName) throws IOException {

        testDataExcelPath = Constants.currentDir + Constants.resourcePath;

        // Open the Excel file
        ExcelFile = new FileInputStream(testDataExcelPath + Constants.testDataExcelFileName);
        excelWorkBook = new XSSFWorkbook(ExcelFile);
        excelWorkSheet = excelWorkBook.getSheet(sheetName);

    }

    //This method reads the test data from the Excel cell.
    public static String getCellData(int rowNum, int colNum) {
        cell = excelWorkSheet.getRow(rowNum).getCell(colNum);
        formatter = new DataFormatter();
        return formatter.formatCellValue(cell);
    }

    //This method takes row number as a parameter and returns the data of given row number.
    public static XSSFRow getRowData(int rowNum) {
        row = excelWorkSheet.getRow(rowNum);
        return row;
    }

    //This method gets excel file, row and column number and set a value to the that cell.
    public static void setCellData(String value, int rowNum, int colNum) throws IOException {
        row = excelWorkSheet.getRow(rowNum);
        cell = row.getCell(colNum);
        if (cell == null) {
            cell = row.createCell(colNum);
            cell.setCellValue(value);
        } else {
            cell.setCellValue(value);
        }

        // Write to the workbook
        fileOut = new FileOutputStream(testDataExcelPath + Constants.testDataExcelFileName);
        excelWorkBook.write(fileOut);
        fileOut.flush();
        fileOut.close();
    }
}
In this file, I wrote all Excel operation methods.
setExcelFileSheet: This method has two parameters: “testdata.xlsx” and “LoginData”. It creates FileInputStream and sets Excel file and Excel sheet to excelWorkBook and excelWorkSheet variables.
getCellData: This method reads the test data from the Excel cell. We are passing row numbers and column numbers as parameters.
getRowData: This method takes the row number as a parameter and returns the data of the given row number.
setCellData: This method gets an Excel file, row, and column number andsets a value to that cell.
Step 8 – Create a Listener Class
We need to create a TestNG Listener class to check the status of each of the tests.
import com.example.tests.BaseTests;
import org.openqa.selenium.WebDriver;
import org.testng.ITestContext;
import org.testng.ITestListener;
import org.testng.ITestResult;
import java.io.IOException;

public class TestListener implements ITestListener {

    private static String getTestMethodName(ITestResult iTestResult) {
        return iTestResult.getMethod().getConstructorOrMethod().getName();
    }

    @Override
    public void onStart(ITestContext iTestContext) {
        System.out.println("I am in onStart method :" + iTestContext.getName());
    }

    @Override
    public void onFinish(ITestContext iTestContext) {
        System.out.println("I am in onFinish method :" + iTestContext.getName());
    }

    @Override
    public void onTestStart(ITestResult iTestResult) {
        System.out.println("I am in onTestStart method :" + getTestMethodName(iTestResult) + ": start");
    }

    @Override
    public void onTestSuccess(ITestResult iTestResult)  {
        System.out.println("I am in onTestSuccess method :" + getTestMethodName(iTestResult) + ": succeed");
        try {
            ExcelUtils.setCellData("PASSED", ExcelUtils.rowNumber, ExcelUtils.columnNumber);
        } catch (IOException e) {
            throw new RuntimeException(e);
        }
    }

    @Override
    public void onTestFailure(ITestResult iTestResult)  {
        System.out.println("I am in onTestFailure method :" + getTestMethodName(iTestResult) + " failed");
        try {
            ExcelUtils.setCellData("FAILED", ExcelUtils.rowNumber, ExcelUtils.columnNumber);
        } catch (IOException e) {
            throw new RuntimeException(e);
        }
    }

    @Override
    public void onTestSkipped(ITestResult iTestResult) {
        System.out.println("I am in onTestSkipped method :" + getTestMethodName(iTestResult) + ": skipped");
        try {
            ExcelUtils.setCellData("SKIPPED", ExcelUtils.rowNumber, ExcelUtils.columnNumber);
        } catch (IOException e) {
            throw new RuntimeException(e);
        }
    }

    @Override
    public void onTestFailedButWithinSuccessPercentage(ITestResult iTestResult) {
        System.out.println("Test failed but it is in defined success ratio " + getTestMethodName(iTestResult));
    }
}
Step 9 – Create a Constant Class
Create a new class file named “Constants” in the utils package in which the tester will define constants like URL, filePath, and excelData. The source code looks as below:
package com.example.utils;

public class Constants {

    public static final String testDataExcelFileName = "Test_Cases.xlsx"; //Global test data excel file
    public static final String currentDir = System.getProperty("user.dir");  //Main Directory of the project
    public static final String resourcePath = "\\src\\test\\resources\\";  //Main Directory of the project
    public static final String excelTestDataName = "LoginData";
}
Step 10 – Create a BaseTests Class
This BaseTests class contains the setup and tearDown methods to initialize the driver at the start of the test and exit the driver at the end of the test.
import org.openqa.selenium.WebDriver;
import org.openqa.selenium.chrome.ChromeDriver;
import org.openqa.selenium.chrome.ChromeOptions;
import org.testng.annotations.AfterMethod;
import org.testng.annotations.BeforeMethod;

import java.time.Duration;

public class BaseTests {

    public static WebDriver driver;
    public final static int TIMEOUT = 10;

    @BeforeMethod
    public void setup() {

        ChromeOptions options = new ChromeOptions();
        options.addArguments("--remote-allow-origins=*");
        options.addArguments("--no-sandbox");
        options.addArguments("--disable-dev-shm-usage");
        options.addArguments("--headless");
        driver = new ChromeDriver(options);
        driver.manage().window().maximize();
        driver.get("https://opensource-demo.orangehrmlive.com/");
        driver.manage().timeouts().implicitlyWait(Duration.ofSeconds(TIMEOUT));

    }

    @AfterMethod
    public void tearDown() {
        driver.quit();
    }

}
Step 11 – Create a Test Excel File
Create a test file – Test_Cases.xlsx and place it in src/test/resources. I have stored the following data in the file.
Sno – Numbering of the test cases
Name – Name of the test case
Step_ID – Number of each step of a test case
Description – Detail of each keyword
Keyword – Keyword defined for each step
InputData – This is an optional field. We need this field to provide the input data like username, password, error message, and other validations.
ExpectedResponse – This is the response we expect to get from the execution for the particular test.
ActualResponse – This is the response we get after the execution of the particular test
Status – This could be pass, fail, skip
Step 12 – Create the Tests in src/test/java
In the below LoginPageTests class, we have 2 different tests and the test result will be saved in Test_Cases.xlsx file for both the tests.
A Data Driven Framework is a software testing framework that separates the test script logic from the test data. The test data is stored separately in external files like csv, xlsx, or databases that allows easy maintenance of the framework. In data driven framework, the test scripts retrieves the input values and expected results from the external source and write the actual result to the same source like spreadsheets, XML files, CSV files or database.
Project Structure
Here is the final snapshot of our project.
Dependency List
Selenium – 4.21.0
TestNG – 7.10.2
Apache POI – 5.2.5
Commons – 2.16.1
Maven Surefire – 3.2.5
Maven Compiler – 3.13.0
Java 17
Maven – 3.9.6
Implementation Steps
Step 1- Download and Install Java
Selenium needs Java to be installed on the system to run the tests. Click here to learn How to install Java.
Step 2 – Download and setup Eclipse IDE on the system
The Eclipse IDE (integrated development environment) provides strong support for Java developers, which is needed to write Java code. Click here to learn How to install Eclipse.
Step 3 – Setup Maven
To build a test framework, we need to add a number of dependencies to the project. It is a very tedious and cumbersome process to add each dependency manually. So, to overcome this problem, we use a build management tool. Maven is a build management tool that is used to define project structure, dependencies, build, and test management. Click here to learn How to install Maven.
In this example, we will access 2 web pages, “Login” and “Home” pages.
Hence, we will create 2 Java classes in Page Layer – LoginPage.java and HomePage.java and a BasePage class to initialize the driver using PageFactory.
BasePage
package com.example.pages;

import org.openqa.selenium.WebDriver;
import org.openqa.selenium.support.PageFactory;

public class BasePage {
    public WebDriver driver;

    public BasePage(WebDriver driver) {
        this.driver = driver;
        PageFactory.initElements(driver,this);
    }

}
LoginPage
package com.example.pages;

import com.example.utils.ExcelUtils;
import org.openqa.selenium.WebDriver;
import org.openqa.selenium.WebElement;
import org.openqa.selenium.support.FindBy;
import org.openqa.selenium.support.PageFactory;

public class LoginPage extends BasePage{

    public LoginPage(WebDriver driver) {
        super(driver);

    }

    @FindBy(name = "username")
    public WebElement userName;

    @FindBy(name = "password")
    public WebElement password;

    @FindBy(xpath = "//*[@class='oxd-form']/div[1]/div/span")
    public WebElement missingUsernameErrorMessage;

    @FindBy(xpath = "//*[@class='oxd-form']/div[2]/div/span")
    public WebElement missingPasswordErrorMessage;

    @FindBy(xpath = "//*[@class='oxd-form']/div[3]/button")
    public WebElement login;

    @FindBy(xpath = "//*[@id='app']/div[1]/div/div[1]/div/div[2]/div[2]/div/div[1]/div[1]/p")
    public  WebElement errorMessage;


    public void login(String strUserName, String strPassword) {

        userName.sendKeys(strUserName);
        password.sendKeys(strPassword);
        login.click();

    }

    public String getMissingUsernameText() {
        return missingUsernameErrorMessage.getText();
    }

    public String getMissingPasswordText() {
        return missingPasswordErrorMessage.getText();
    }

    public String getErrorMessage() {
        return errorMessage.getText();
    }

    public LoginPage saveTestResults(int row, int column) {
        ExcelUtils.rowNumber = row ;
        ExcelUtils.columnNumber = column;
        return this;
    }

}
HomePage
import org.openqa.selenium.WebDriver;
import org.openqa.selenium.WebElement;
import org.openqa.selenium.support.FindBy;
import org.openqa.selenium.support.PageFactory;

public class HomePage extends BasePage {

    public HomePage(WebDriver driver) {
        super(driver);

    }

    @FindBy(xpath = "//*[@id='app']/div[1]/div[1]/header/div[1]/div[1]/span/h6")
    public  WebElement homePageUserName;

    public String getHomePageText() {
        return homePageUserName.getText();
    }

}
Step 7 – Create an ExcelUtils Class
In order to manipulate excel files and do excel operations, we should create an excel file and called it “ExcelUtils” under utils package as shown below.
package com.example.utils;

import org.apache.poi.ss.usermodel.DataFormatter;
import org.apache.poi.xssf.usermodel.XSSFCell;
import org.apache.poi.xssf.usermodel.XSSFRow;
import org.apache.poi.xssf.usermodel.XSSFSheet;
import org.apache.poi.xssf.usermodel.XSSFWorkbook;

import java.io.FileInputStream;
import java.io.FileNotFoundException;
import java.io.FileOutputStream;
import java.io.IOException;

public class ExcelUtils {

    public static final String testDataExcelFileName = "testdata.xlsx"; //Global test data excel file
    public static final String currentDir = System.getProperty("user.dir");  //Main Directory of the project
    public static final String resourcePath = "\\src\\test\\resources\\";  //Main Directory of the project
    public static String testDataExcelPath = null; //Location of Test data excel file
    private static XSSFWorkbook excelWorkBook; //Excel WorkBook
    private static XSSFSheet excelWorkSheet; //Excel Sheet
    private static XSSFCell cell; //Excel cell
    private static XSSFRow row; //Excel row
    public static int rowNumber; //Row Number
    public static int columnNumber; //Column Number
    public static FileInputStream ExcelFile;
    public static DataFormatter formatter;
    public static FileOutputStream fileOut;


    // This method has two parameters: "Test data excel file name" and "Excel sheet name"
    // It creates FileInputStream and set excel file and excel sheet to excelWBook and excelWSheet variables.
    public static void setExcelFileSheet(String sheetName) throws IOException {

        testDataExcelPath = currentDir + resourcePath;

        // Open the Excel file
        ExcelFile = new FileInputStream(testDataExcelPath + testDataExcelFileName);
        excelWorkBook = new XSSFWorkbook(ExcelFile);
        excelWorkSheet = excelWorkBook.getSheet(sheetName);

    }

    //This method reads the test data from the Excel cell.
    public static String getCellData(int rowNum, int colNum) {
        cell = excelWorkSheet.getRow(rowNum).getCell(colNum);
        formatter = new DataFormatter();
        return formatter.formatCellValue(cell);
    }

    //This method takes row number as a parameter and returns the data of given row number.
    public static XSSFRow getRowData(int rowNum) {
        row = excelWorkSheet.getRow(rowNum);
        return row;
    }

    //This method gets excel file, row and column number and set a value to the that cell.
    public static void setCellData(String value, int rowNum, int colNum) throws IOException {
        row = excelWorkSheet.getRow(rowNum);
        cell = row.getCell(colNum);
        if (cell == null) {
            cell = row.createCell(colNum);
            cell.setCellValue(value);
        } else {
            cell.setCellValue(value);
        }

        // Write to the workbook
        fileOut = new FileOutputStream(testDataExcelPath + testDataExcelFileName);
        excelWorkBook.write(fileOut);
        fileOut.flush();
        fileOut.close();
    }
}
In this file, I wrote all excel operation methods.
setExcelFileSheet: This method has two parameters: “testdata.xlsx” and “LoginData”. It creates FileInputStream and set excel file and excel sheet to excelWorkBook and excelWorkSheet variables.
getCellData: This method reads the test data from the Excel cell. We are passing row numbers and column numbers as parameters.
getRowData: This method takes row number as a parameter and returns the data of the given row number.
setCellData: This method gets an excel file, row, and column number and sets a value to that cell.
Step 8 – Create a Listener Class
We need to create a TestNG Listener class to check the status of each of the test.
import com.example.tests.BaseTests;
import org.openqa.selenium.WebDriver;
import org.testng.ITestContext;
import org.testng.ITestListener;
import org.testng.ITestResult;
import java.io.IOException;

public class TestListener implements ITestListener {

    private static String getTestMethodName(ITestResult iTestResult) {
        return iTestResult.getMethod().getConstructorOrMethod().getName();
    }

    @Override
    public void onStart(ITestContext iTestContext) {
        System.out.println("I am in onStart method :" + iTestContext.getName());
    }

    @Override
    public void onFinish(ITestContext iTestContext) {
        System.out.println("I am in onFinish method :" + iTestContext.getName());
    }

    @Override
    public void onTestStart(ITestResult iTestResult) {
        System.out.println("I am in onTestStart method :" + getTestMethodName(iTestResult) + ": start");
    }

    @Override
    public void onTestSuccess(ITestResult iTestResult)  {
        System.out.println("I am in onTestSuccess method :" + getTestMethodName(iTestResult) + ": succeed");
        try {
            ExcelUtils.setCellData("PASSED", ExcelUtils.rowNumber, ExcelUtils.columnNumber);
        } catch (IOException e) {
            throw new RuntimeException(e);
        }
    }

    @Override
    public void onTestFailure(ITestResult iTestResult)  {
        System.out.println("I am in onTestFailure method :" + getTestMethodName(iTestResult) + " failed");
        try {
            ExcelUtils.setCellData("FAILED", ExcelUtils.rowNumber, ExcelUtils.columnNumber);
        } catch (IOException e) {
            throw new RuntimeException(e);
        }
    }

    @Override
    public void onTestSkipped(ITestResult iTestResult) {
        System.out.println("I am in onTestSkipped method :" + getTestMethodName(iTestResult) + ": skipped");
        try {
            ExcelUtils.setCellData("SKIPPED", ExcelUtils.rowNumber, ExcelUtils.columnNumber);
        } catch (IOException e) {
            throw new RuntimeException(e);
        }
    }

    @Override
    public void onTestFailedButWithinSuccessPercentage(ITestResult iTestResult) {
        System.out.println("Test failed but it is in defined success ratio " + getTestMethodName(iTestResult));
    }
}
Step 9 – Create a BaseTests Class
This BaseTests class contains the setup and tearDown methods to initialize the driver at the start of the test and exit the driver at the end of the test.
import org.openqa.selenium.WebDriver;
import org.openqa.selenium.chrome.ChromeDriver;
import org.openqa.selenium.chrome.ChromeOptions;
import org.testng.annotations.AfterMethod;
import org.testng.annotations.BeforeMethod;

import java.time.Duration;

public class BaseTests {

    public static WebDriver driver;
    public final static int TIMEOUT = 10;

    @BeforeMethod
    public void setup() {

        ChromeOptions options = new ChromeOptions();
        options.addArguments("--remote-allow-origins=*");
        options.addArguments("--no-sandbox");
        options.addArguments("--disable-dev-shm-usage");
        options.addArguments("--headless");
        driver = new ChromeDriver(options);
        driver.manage().window().maximize();
        driver.get("https://opensource-demo.orangehrmlive.com/");
        driver.manage().timeouts().implicitlyWait(Duration.ofSeconds(TIMEOUT));

    }

    @AfterMethod
    public void tearDown() {
        driver.quit();
    }

}
Step 10 – Create a Test Excel File
Create a test file – testdata.xlsx and place it in src/test/resources. I have stored the following data in the file.
Test Case Name – Name of the test case
Username
Password
ExpectedResponse – This is the response we expect to get from the execution for the particular test.
ActualResponse – This is the response we get after the execution of the particular test
Status – This could be pass, fail, skip
Step 11 – Create the Tests in src/test/java
In the below LoginPageTests class, we have 4 different tests and we are failing test – validCredentials() to show that the test result will be saved in testdata.xlsx file for both passed and failed tests.
package com.example.tests;

import com.example.pages.HomePage;
import com.example.pages.LoginPage;
import com.example.utils.ExcelUtils;
import com.example.utils.TestListener;
import org.openqa.selenium.WebDriver;
import org.testng.Assert;
import org.testng.annotations.BeforeTest;
import org.testng.annotations.Listeners;
import org.testng.annotations.Test;
import java.io.IOException;

@Listeners({TestListener.class })
public class LoginPageTests extends BaseTests{

    String actualResponse;

    @BeforeTest
    public void setupTestData() throws IOException {

        System.out.println("Setup Test Data");
        ExcelUtils.setExcelFileSheet("LoginData");
    }

    @Test
    public void invalidCredentials() throws IOException {

        LoginPage objLoginPage = new LoginPage(driver);
        objLoginPage.login(ExcelUtils.getCellData(1,1), ExcelUtils.getCellData(1,2));
        actualResponse = objLoginPage.getErrorMessage();
        ExcelUtils.setCellData(actualResponse,1,4);
        objLoginPage.saveTestResults(1,5);
        Assert.assertEquals(actualResponse,ExcelUtils.getCellData(1,3));
    }

    @Test
    public void missingUsername() throws IOException {

        LoginPage objLoginPage = new LoginPage(driver);
        objLoginPage.login(ExcelUtils.getCellData(2,1), ExcelUtils.getCellData(2,2));
        actualResponse = objLoginPage.getMissingUsernameText();
        ExcelUtils.setCellData(actualResponse,2,4);
        objLoginPage.saveTestResults(2,5);
        Assert.assertEquals(actualResponse,ExcelUtils.getCellData(2,3));
    }

    @Test
    public void missingPassword() throws IOException {

        LoginPage objLoginPage = new LoginPage(driver);
        objLoginPage.login(ExcelUtils.getCellData(3,1), ExcelUtils.getCellData(3,2));
        actualResponse = objLoginPage.getMissingPasswordText();
        ExcelUtils.setCellData(actualResponse,3,4);
        objLoginPage.saveTestResults(3,5);
        Assert.assertEquals(actualResponse,ExcelUtils.getCellData(3,3));
    }

    //Fail this test
    @Test
    public void validCredentials() throws IOException {

        LoginPage objLoginPage = new LoginPage(driver);
        objLoginPage.login(ExcelUtils.getCellData(4,1), ExcelUtils.getCellData(4,2));
        HomePage objHomePage = new HomePage(driver);
        actualResponse = objHomePage.getHomePageText();
        ExcelUtils.setCellData(actualResponse,4,4);
        objLoginPage.saveTestResults(4,5);
        Assert.assertEquals(actualResponse,ExcelUtils.getCellData(4,3));
    }

}
Step 12 – Create testng.xml at the root of the project
<?xml version="1.0" encoding="UTF-8"?>
<!DOCTYPE suite SYSTEM "https://testng.org/testng-1.0.dtd">
<suite name="Data Driven Framework">
    <test name="Login Test">
        <classes>
            <class name="com.example.tests.LoginPageTests"/>
        </classes>
    </test> <!-- Test -->
</suite> <!-- Suite -->
Step 13 – Run the tests through testng.xml
Right-click on the testng.xml and select “Run ..\testng.xml”.
The output of the above execution is
As expected, 3 test are passed and 1 test is failed.
The testdata.xlsx file will be updated with the actual response and the test execution status as shown in the below image.
Note – Make sure to close the excel workbook before starting the test execution, otherwise the test execution will be in the hung state.
Step 14 – View TestNG Reports
If you are using IntelliJ, the HTML Reports do not generate automatically. Go to the Configuration -> Listeners -> select Use default Reporters.
The TestNG Reports will be generated in test-output folder.
We are concerned about 2 reports – index.html and emailable-report.html.
index.html
emailable-report.html
Summary:
The test scripts in Data Driven Framework can be reused with different sets of test data.
The Test data can be easily modified without modifying the actual code implementation.
This framework has used excel as an external source to store the test data and test results.
Java is a general-purpose programming language that is a concurrent, class-based, and object-oriented language. Java follows the concept of “write once and run anywhere (WORA).” This means that compiled Java code can be run on all different platforms that support Java. There’s no need for recompilation.
This tutorial describes how to download and install Apache POI.
Selenium does not have an inbuilt method to read data from an Excel File. However, there are various libraries in JAVA that help in reading/writing data from Excel files. Apache POI is one of the most used libraries, which provides various classes and methods to read/write data from various formats of Excel files(xls, xlsx etc).
Apache POI, where POI stands for (Poor Obfuscation Implementation) is the Java API for Microsoft Documents that offers a collection of Java libraries that helps us to read, write, and manipulate different Microsoft files such as Excel sheets, PowerPoint, and Word files.
Download Apache POI
POI 5.2.3 was the last version where we produced a set of poi-bin*.zip and poi-bin*.tgz files. We will continue to publish jars to Maven Central. If you are not using a build tool like Apache Maven or Gradle, you can still find these jars by traversing the directories at https://repo1.maven.org/maven2/org/apache/poi/. The jar files are present here. Download them from here.
Go to poi and get the latest jar file from here.
Step 1 – To download Apache POI, go to its official site, here. Click on the Download as shown in the image. This link will navigate to the page showing the latest release of Apache POI. The latest Apache POI version is 5.2.3. You can follow the same steps for any version of POI.
Step 2 – This page shows the latest Apache POI Release Artifacts. Here, you can see POI 5.0.0 is the latest one. Download any one of the Binary Distribution options. One option is .ztar.gz and another option is .zip. I have selected .zip option.
Step 3 – After clicking on the link, it navigates to another page as shown below. I have used the highlighted link to download the POI library files.
Step 4 – Once POI.zip is downloaded and extracted, this is how the folder looks like
How to add POI libraries in Eclipse?
Step 1 – Below is the Java project present in Eclipse.
Step 2 – To add POI libraries to this project, Right-click on the project, hover over the Build path, select Configure Build Path.
Step 3 – It will open the “Properties” of the project. After that, select the Librariestab. Finally, click on the Add External JARs as highlighted below.
Step 4 – Select the JARs in the parent folder of the unzipped POI files. Subsequently, click on the Openbutton to include them in the Eclipse project.
Step 5 – Next, select the JARs under the ooxml-lib folder in the unzipped POI folder as highlighted below:
Step 6 – Select the JARs under the lib folder in the unzipped POI folder as highlighted below.
Step 7 – After that, once all the POI JARs add, click on the Apply and Close button as highlighted below.
Step 8 – Once all the POI libraries successfully install in the Eclipse project, they will reflect under the Referenced Libraries folder in the left pane of the Eclipse project structure, as shown below:
How to add POI libraries to Maven Java Project
You can add the poi and poi-ooxml jar files to the Maven project by mentioning the dependencies in pom.xml.
The two most used classes for managing Excel Workbooks are:
HSSFWorkbook – These class methods are used to read/write data to Microsoft Excel file in .xls format. It is compatible with MS-Office versions 97–2003.
XSSFWorkbook – These class methods are used to read-write data to Microsoft Excel in .xls or .xlsx format. It is compatible with MS-Office versions 2007 or later.
How to read Excel (.xlsx) from specific cell value?
Step 1 – To locate the location of file.
File file = new File("C:\\Selenium_ReadTestData.xlsx");
Import File from package
import java.io.File;
Step 2– Instantiate FileInputStream to read from the file specified.
Here getRow(0) will look into the first row, and getCell(0) will look into the first column, i.e. A1.
To retrieve the String value we are making use of getStringCellValue in the end.
Below is the Excel which I’m using to read the data as mentioned below:-
We want to get the value of Row 1, Cell B
We want to get the value of Row 3, Cell A
Let us create a program for the same scenario:
import java.io.FileInputStream;
import java.io.IOException;
import org.apache.poi.xssf.usermodel.XSSFSheet;
import org.apache.poi.xssf.usermodel.XSSFWorkbook;

public class ReadSpecificData {

	public static void main(String[] args) {

     String path = "C:\\Selenium_ReadTestData.xlsx";

		try {

			//Create an object of FileInputStream class to read excel file
			FileInputStream fis = new FileInputStream(path);

			//Create object of XSSFWorkbook class
			XSSFWorkbook wb = new XSSFWorkbook(fis);

			//Read excel sheet by sheet name
			XSSFSheet sheet1 = wb.getSheet("Read_TestData");

			//Get data from specified cell
			System.out.println(sheet1.getRow(1).getCell(1).getStringCellValue());
			System.out.println(sheet1.getRow(3).getCell(0).getStringCellValue());

		} catch (IOException e) {
			e.printStackTrace();
		}

	}

}
The output of the above program is
How to read the entire Excel sheet?
To read the complete data from Excel, you can iterate over each cell of the row, present in the sheet.
To get the last and first-row numbers, there are two methods in the sheet class:
getLastRowNum()
getFirstRowNum()
int rowCount=sheet.getLastRowNum()-sheet.getFirstRowNum();
Once you get the row, you can iterate over the cells present in the row by using the total number of cells, which we can calculate using getLastCellNum() method:
int cellcount=sheet.getRow(1).getLastCellNum();
Below is the entire program to read complete Excel.
import java.io.FileInputStream;
import java.io.IOException;
import org.apache.poi.ss.usermodel.Sheet;
import org.apache.poi.ss.usermodel.Workbook;
import org.apache.poi.xssf.usermodel.XSSFWorkbook;

public class ReadExcelFile {
	public static  void main(String args[]) throws IOException {

		String path = "C:\\Selenium_ReadTestData.xlsx";

		//Create an object of FileInputStream class to read excel file
		FileInputStream fis = new FileInputStream(path);

		//Create object of XSSFWorkbook class
		Workbook workbook = new XSSFWorkbook(fis);

		//Read excel sheet by sheet name
		Sheet sheet = workbook.getSheet("Read_TestData");


		//Find number of rows in excel file
	    int rowCount=sheet.getLastRowNum()-sheet.getFirstRowNum();
	    System.out.println("row count:"+rowCount);

		 //iterate over all the row to print the data present in each cell.
	    for(int i=0;i<=rowCount;i++){

	        //get cell count in a row
	        int cellcount=sheet.getRow(i).getLastCellNum();

	        //iterate over each cell to print its value
	        for(int j=0;j<cellcount;j++){
	            System.out.print(sheet.getRow(i).getCell(j).getStringCellValue().toString() +"||");
	        }
	        System.out.println();
		}
	}
}
The output of the above program is
That’s it! We are done.
Congratulations on making it through this tutorial and hope you found it useful! Happy Learning!! Cheers!!
In the previous tutorial, I have explained about How to add Formulas in Excel in Java. In this tutorial, I will explain How to customize the style of cells in Excel in Java using Apache POI.
I’m using Apache POI to write data to the excel file. To download and install Apache POI, refer here.
If you are using maven, then you need to add below dependency in pom.xml.
In the previous tutorial, I explained about creating a new Excel file and writing data in that new Excel file using Java. In this tutorial, I will explain How to open and update existing Excel files in Java.
I’m using Apache POI to write data to the Excel file. To download and install Apache POI, refer here.
If you are using Maven, then you need to add the below dependency in pom.xml.
To know more about various interfaces and classes for managing Excel, pleaserefer to this tutorial.
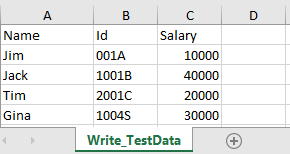
In the below example, I have an existing Excel with the name “EmployeeDetails.xlsx”.
This is Excel which I am going to update. I will add 2 rows below the last row in Excel.
Below is a complete example of updating the data in existing Excel. One thing we need to note here is that we can update the Excel file only when we close it first.
import java.io.File;
import java.io.FileInputStream;
import java.io.FileOutputStream;
import java.io.IOException;
import org.apache.poi.xssf.usermodel.XSSFCell;
import org.apache.poi.xssf.usermodel.XSSFRow;
import org.apache.poi.xssf.usermodel.XSSFSheet;
import org.apache.poi.xssf.usermodel.XSSFWorkbook;

public class ExcelFileUpdateExample {

	public static void main(String[] args) {

		try {

			FileInputStream fis = new FileInputStream(new File("EmployeeDetails.xlsx"));

			// Create object of XSSFWorkbook class
			XSSFWorkbook workbook = new XSSFWorkbook(fis);

			// Create object of XSSFWorkbook class
			XSSFSheet sheet = workbook.getSheet("Write_TestData");

			Object[][] bookData = { { "SeleniumTest", "0000A", 9999 }, { "JavaTest", "0000B", 9990 }, };

			// Get last row in Sheet
			int rowCount = sheet.getLastRowNum();

			for (Object[] Book : bookData) {

				// Create row for all the new data
				XSSFRow row = sheet.createRow(++rowCount);

				int columnCount = 0;

				// Create new cell for each row
				XSSFCell cell = row.createCell(columnCount);

				for (Object field : Book) {

					cell = row.createCell(columnCount++);
					if (field instanceof String) {
						cell.setCellValue((String) field);
					} else if (field instanceof Integer) {
						cell.setCellValue((Integer) field);
					}
				}

			}

			fis.close();

			// Write the workbook in file system
			FileOutputStream outputStream = new FileOutputStream("EmployeeDetails.xlsx");
			workbook.write(outputStream);
			System.out.println("Excel is updated successfully");

			// Close the workbook
			workbook.close();
			outputStream.close();

		} catch (IOException e) {
			e.printStackTrace();
		}
	}

}
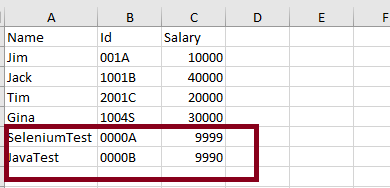
The output of the above program is
Below is the updated Excel.
Update a specific cell in the Excel file
In the below example, I will update the value in a specific cell. As you can see in the above image, I will update, 1004S to “Updated Value”. Below is the code snippet for the same.
import java.io.File;
import java.io.FileInputStream;
import java.io.FileOutputStream;
import java.io.IOException;
import org.apache.poi.ss.usermodel.CellType;
import org.apache.poi.xssf.usermodel.XSSFCell;
import org.apache.poi.xssf.usermodel.XSSFSheet;
import org.apache.poi.xssf.usermodel.XSSFWorkbook;
public class UpdateExcelDemo {
public static void main(String[] args) {
try {
// Create an object of FileInputStream class to read excel file
FileInputStream fis = new FileInputStream(new File("EmployeeDetails.xlsx"));
// Create object of XSSFWorkbook class
XSSFWorkbook workbook = new XSSFWorkbook(fis);
// Read excel sheet by sheet name
XSSFSheet sheet = workbook.getSheet("Write_TestData");
// Print data present at row 0 column 2
System.out.println(sheet.getRow(4).getCell(1).getStringCellValue());
// Get the Cell at index 3 from the above row
XSSFCell cell = sheet.getRow(4).getCell(1);

cell.setCellType(CellType.STRING);
cell.setCellValue("Updated Value");
// Write the output to the file
FileOutputStream fileOut = new FileOutputStream(new File("EmployeeDetails.xlsx"));
workbook.write(fileOut);
System.out.println("Id column in Excel is updated successfully");
fileOut.close();
// Closing the workbook
workbook.close();
} catch (IOException e) {
e.printStackTrace();
}
}
}
The output of the above program is
Below is the updated Excel.
That’s it! Well done.
Congratulations on making it through this tutorial and hope you found it useful! Happy Learning!! Cheers!!