An exception is an unwanted or unexpected event which occurs at the run time of the program, that leads to the disruption of the normal flow of execution of the program.
What is Exception Handling?
Exception Handling is a mechanism to handle runtime errors happen in the program such as ClassNotFoundException, IOException, SQLException, RemoteException, etc, which disruptes the normal execution of the program.
Suppose there are 6 statements in your program and there occurs an exception at statement 3, the rest of the code will not be executed i.e. statement 4 to 6 will not be executed. If we perform exception handling, the rest of the statement will be executed. That is why we use exception handling in Java.
What is the difference between Error and Exception?
Error: An Error indicates serious problem that a reasonable application should not try to catch. Error are used by the Java run-time system(JVM) to indicate errors having to do with the run-time environment itself(JRE) or StackOverflowError or OutOfMemoryError
Exception: Exception indicates conditions that a reasonable application might try to catch. Example of exceptions are IOException, SQLException, etc.
Types of Exceptions
1) Checked Exception The classes which directly inherit Throwable class except RuntimeException and Error are known as checked exceptions e.g. IOException, SQLException etc. Checked exceptions are checked at compile-time.
2) Unchecked Exception The classes which inherit RuntimeException are known as unchecked exceptions e.g. ArithmeticException, NullPointerException, ArrayIndexOutOfBoundsException etc. Unchecked exceptions are not checked at compile-time, but they are checked at runtime.
Hierarchy of Java Exception classes
Keywords used in Exception Handling in Java
1. try keyword – It is used to specify a block where we should place exception code. The try block must be followed by either catch or finally. It means, we can’t use try block alone.
2. catch keyword – It is used to handle the exception. It must be preceded by try block which means we can’t use catch block alone. It can be followed by finally block later.
3. finally keyword – It is used to execute the important code of the program irrespective the exception is handled or not.
4. throw keyword – It is used to throw an exception explicitly in the program inside a function or inside a block of code.
5. throws keyword – It is used to declare exceptions. It doesn’t throw an exception. It specifies that there may occur an exception in the method. It is always used with method signature.
Exception Handling Example in Java
Let’s see an example of exception handling where we can use try-catch block and will not use try-catch statements. Below example shows an exception without try-catch block.
package JavaDemo;

public class ExceptionHandlingDemo {

	static String a = null;

	public static void main(String[] args) {

		System.out.println(a.length());
	}

}

Output
Exception in thread "main" java.lang.NullPointerException
	at JavaDemo.ExceptionHandlingDemo.main(ExceptionHandlingDemo.java:9)
Below example shows an exception with try-catch block.
package JavaDemo;

public class ExceptionHandlingDemo {
	static String a = null;

	public static void main(String[] args) {
		// TODO Auto-generated method stub

		try {
			System.out.println(a.length());
		} catch (NullPointerException e) {
			System.out.println(e);
		}
		System.out.println("Exception is handled");
	}

}

Output
java.lang.NullPointerException
Exception is handled
Another important pre-requisite is addition of below instruction in cucumber.properties file
cucumber.publish.enabled=true
Cucumber.properties file should be present in src/test/resources.
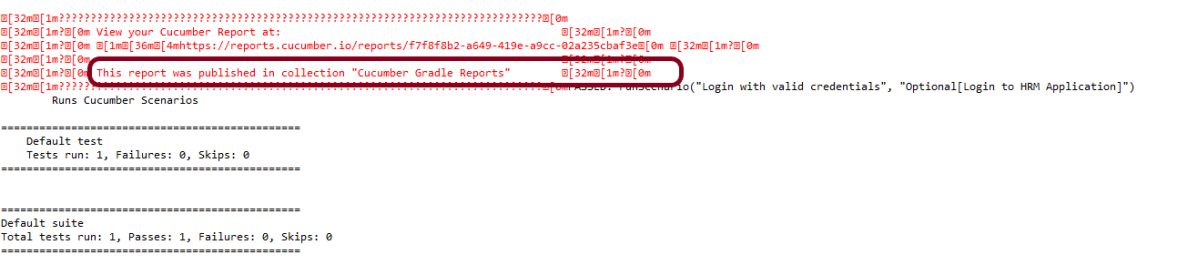
Now, execute the Cucumber tests by using command — mvn clean test in command line.
Below image shows the Console message generated
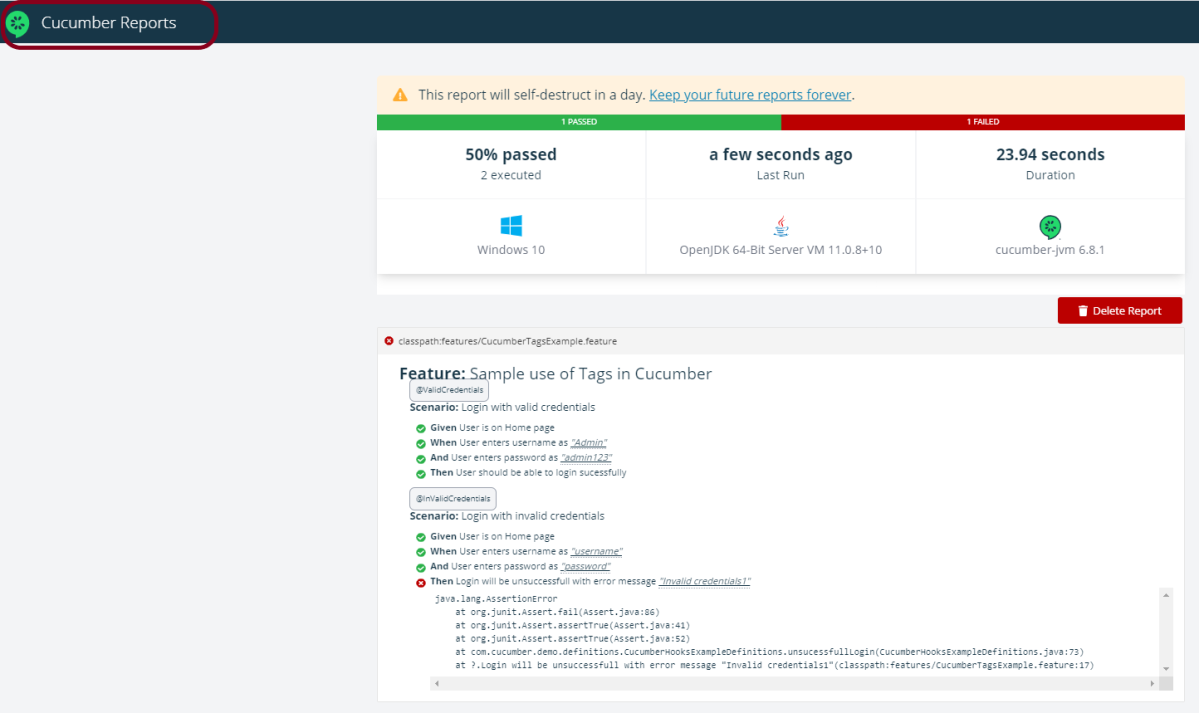
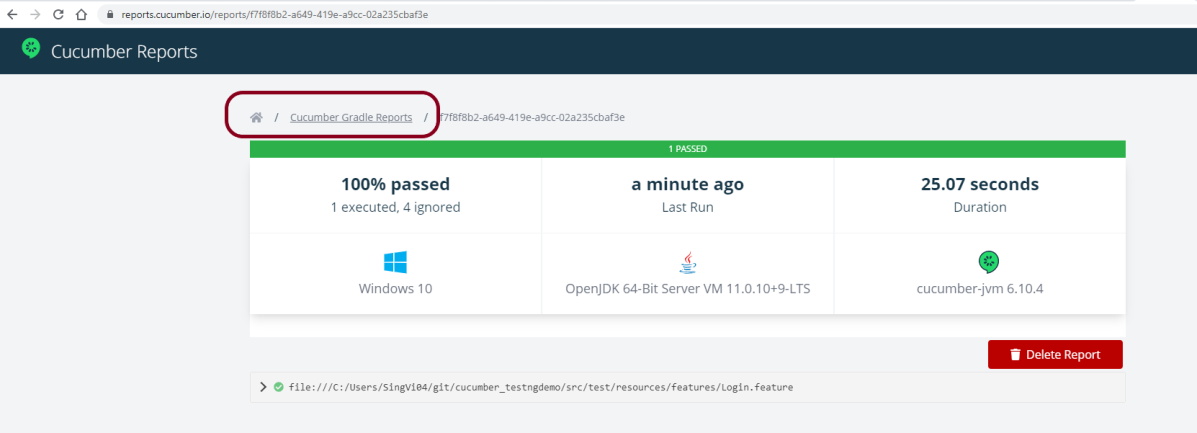
If you follow the link, you’ll see your report rendered in glorious color. Below is the image of such Cucumber Report. This report provide the information about
No Of Test Scenarios Executed
Passed vs Failed percentage
When the tests are executed like 8 minutes ago or 15 hours ago
Time taken to execute the Test Suite
Window Version
Java Version
Cucumber-jvm Version
Name of the feature file executed
Test Scenario step execution – passed, failed, pending
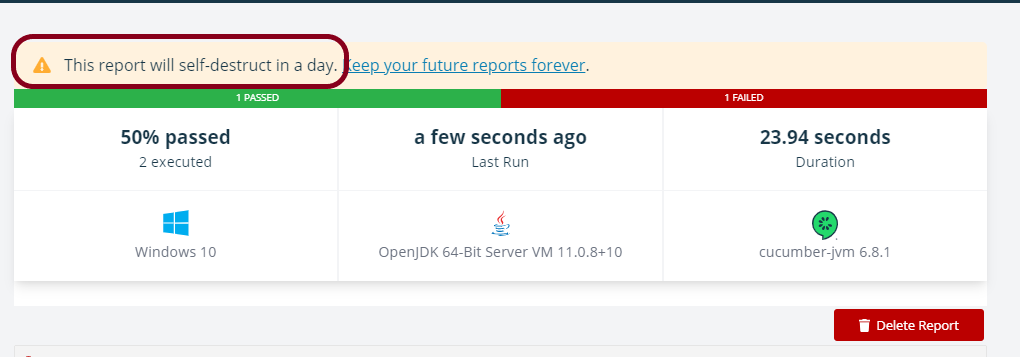
The report is self destructed in 24 hours. It is mentioned as a warning at the top of the report.
To save the report for future use, click on the link – Keep your future reports forever. It will open a dialog box as shown below. You can create a Report Collection and the reports present in Report Collection are not auto-deleted.
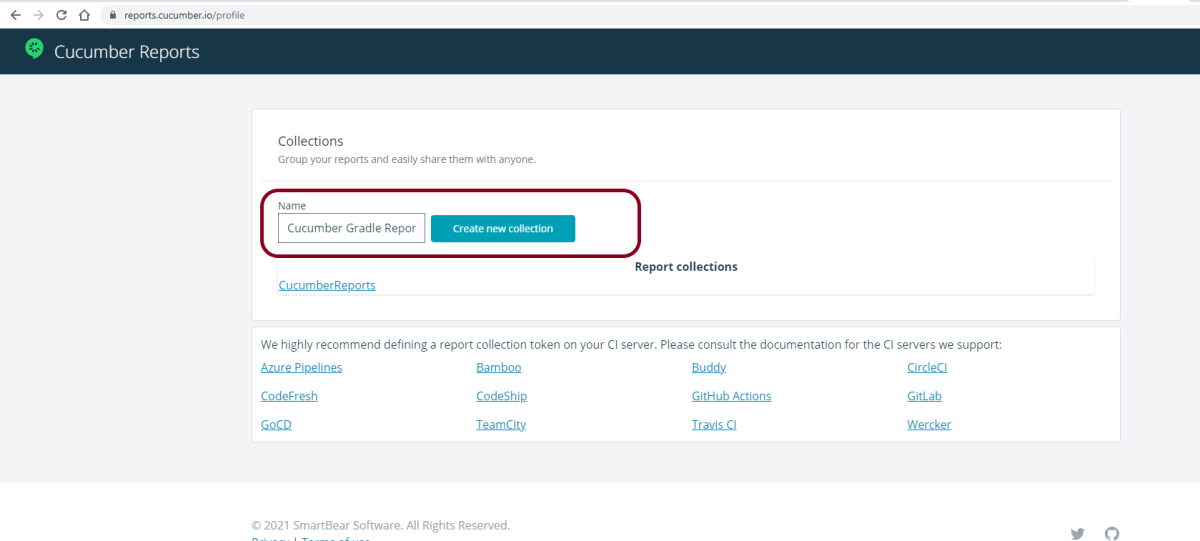
Login to GitHub. A new page as shown below will appear. Create a collection by providing the name in the Name box and click the “Create new collection“ button.
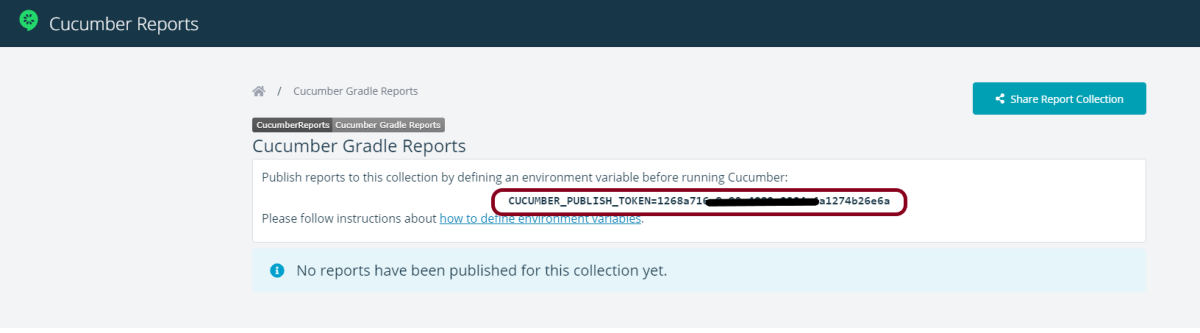
This page contains a token as shown in the image in the below screen. Mention this environment variable with token in cucumber.properties file which is present within src/test/resources.
When the tests will be executed, now the report will be saved under Cucumber Gradle Reports Collection.
Below is the image of the report which is saved under Cucumber Gradle Reports collection in GitHub.
If you have not added cucumber.properties to your project, then will get a screen as shown below.
Delete Report
The report can be deleted by clicking on Delete button on the report. Once you have clicked on Delete Report button, a dialog box as shown below is displayed. Once you click on Delete button present in the dialog box, the report is deleted permanently.
That’s it! Congratulations on making it through this tutorial and hope you found it useful! Happy Learning!!
The Spring framework enables automatic dependency injection. In other words, by declaring all the bean dependencies in a Spring configuration file, Spring container can autowire relationships between collaborating beans. This is called Spring bean Autowiring.
Now, let me explain this in simple language. Autowired provide us the object initialization.
Suppose, I have a Controller class called as UserController and a helper class called UserDaoService where I can write all the methods needed for UserController.
Now, I’ll annotate the helper class UserDaoService as @Component. I have created 3 methods in the helper class UserDaoService which are findAll(), save() and getOne().
Using findAll(), I will get data of all the users and in save() I will add the user in the list and findOne() will find a particular user from the list.
Objects in Spring Container is called Beans. When a class is annotated as @Component, it will create an object (bean) for that class. Here, in our example when we have annotated UserDaoService as @component , so at the time of application is in run mode it will create a bean for UserDaoService class in spring container.
In our controller class (UserController) there is dependency for Helper class (UserDaoService), so how our controller class beans know that there is helper class bean present in container. We need to told controller class bean to find out helper class bean and use it, so here @Autowired comes in picture. It will start to find bean for helper class and inject it into that variable so your variable in Initialized and ready to use.
Controller Class (UserResource)
@RestController
public class UserController
{

   @Autowired
   private UserDaoService service;

   @GetMapping("/users")
   public List<User> retriveAllUsers()
  {
      return service.findAll();
   }
}
Helper Class (UserDaoService)
import java.util.ArrayList;
import java.util.Date;
import java.util.List;
import org.springframework.stereotype.Component;

@Component
public class UserDaoService
{

   public static int usersCount=5;

    //creating an instance of ArrayList
    private static List<User> users=new ArrayList<>();

    //static block
    static
    {

      //adding users to the list
      users.add(new User(1, "John", new Date()));
      users.add(new User(2, "Tom", new Date()));
      users.add(new User(3, "Perry", new Date()));
     }

   //method that retrieve all users from the list
   public List<User> findAll()
   {
      return users;
   }

    //method that add the user in the list
    public User save(User user)
    {
      if(user.getId()==null)
      {
         //increments the user id
         user.setId(++usersCount);
      }
     users.add(user);
     return user;
    }

    //method that find a particular user from the list
     public User findOne(int id)
     {
        for(User user:users)
         {
           if(user.getId()==id)
           return user;
         }
     return null;
   }
}
In the above example, UserDaoService is Autowired in UserController class using by property. Using Autowired, I have called method findAll().
   @Autowired
   private UserDaoService service;
Use of @Autowired in Integration Testing of SpringBoot Application
Lets imagine a condition where different tests need to have a common test step. Suppose I have created 2 feature files where 1 feature file contain the tests related to valid Request/Response and another feature file create test scenarios related to various service errors. In both the cases, a test step where we have to send an access token to the requests is common. If I create this step in both StepDefinition files, it is duplicacy of code. To avoid this situation, we can create a Helper Class name as CommonStepDefinitions and declare it as @Componenet and @Autowired this helper class to specific StepDefinition class.
In the below example, I have created an access Token and I need to pass this access Token to the SpringBoot request to proceed further. I have @Autowired the CommonDefinition class to ValidRequestDefinitions and get the value of access token here and pass it to the request.
CommonStepDefinitions.class
@Component
@SpringBootTest
public class CommonStepDefinitions {

 @Given("^I generate an auth token to pass bearer token to request$")
    public String generateToken() throws JSONException {

	validatableResponse = given().auth().basic(username, password).param("grant_type", grant_type).when()
		.post(authUrl).then();

	JSONObject token = new JSONObject(validatableResponse.extract().asString());
	accessToken = token.get("access_token").toString();

	return accessToken;
  }
Main StepDefinition.class (ValidRequestDefinitions)
@SpringBootTest
public class ValidRequestDefinitions{

    private ValidatableResponse validatableResponse;
    private String bearerToken ;

    //Autowired on Property
    @Autowired
    CommonStepDefinitions helper;


    @When("^I send a valid request to the URL (.*)$")
    public void sendRequestToGenerateProcess(String endpoint) {

	bearerToken = helper.generateToken();

	validatableResponse = given().header("Authorization", "Bearer " + bearerToken).contentType(ContentType.JSON)
		.body(toString()).when().get(endpoint).then();

    }
That’s it! Congratulations on making it through this tutorial and hope you found it useful! Happy Learning!!
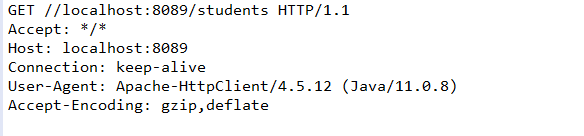
WireMock is a library for stubbing and mocking web services. It constructs a HTTP server that act as an actual web service. When a WireMock server is in action, we have the option to set up expectations, call the service, and then verify the behavior of service. It allows us to:-
Capture the incoming HTTP requests and write assertions for the captured HTTP requests.
Configure the response returned by the HTTP API when it receives a specific request.
Identify the stubbed and/or captured HTTP requests by using request matching.
Configure request matchers by comparing the request URL, request method, request headers, cookies, and request body with the expected values.
Use WireMock as a library or run it as a standalone process.
Why do we need to Wiremock a SpringBoot Application
Suppose your SpringBoot Application calls an external application and this call to external service bear some cost. You can’t test the application without calling the external service, So in this case, we can use WireMock to mock the external application while testing the REST service that you are developing in SpringBoot.
Spring Cloud Contract WireMock
The Spring Cloud Contract WireMock modules allow us to use WireMock in a Spring Boot application.
To use WireMock in SpringBoot, add Maven dependency
We can use JUnit @Rules to start and stop the server. To do so, use the WireMockRule convenience class to obtain optionsinstance, as the following example shows:
@Rule
    public WireMockRule wireMockRule = new WireMockRule(options().port(8081));
Wiremock runs as a stub server, and you can register stub behavior by using a Java API or by using static JSON declarations as part of your test.
Let us take the example of Student SpringBoot Application. The Response JSON of Student is shown below.
Creating a first WireMock mock service
Let us create a simple wiremock service with return status code as 200 and statsus message as “OK”.
@SpringBootTest
public class Wiremock_Example {

	@Rule
	public WireMockRule wireMockRule = new WireMockRule(options().port(8081));

	@Test
	public void test() {

       stubFor(get(urlPathEqualTo("/students"))
.willReturn(aResponse().withHeader("Content-Type", "application/json")
.withStatus(200).withStatusMessage("OK")));
	}
}
options is imported from package static com.github.tomakehurst.wiremock.core.WireMockConfiguration.options;
@Rule & @Test are from junit
WireMockRule is from com.github.tomakehurst.wiremock.junit.WireMockRule
The following code will configure a response with a status of 200 and status message of “OK” to be returned when the relative URL exactly matches /students (including query parameters). The body of the response will be “Tom” and Content-Type header will be sent with a value of application/json.
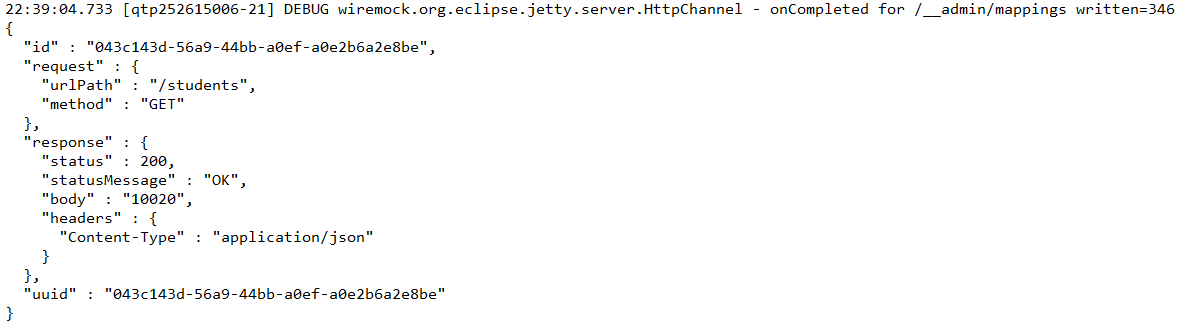
To create the stub described above via the JSON API, the following document can either be posted tohttp://<host>:<port>/__admin/mappings or placed in a file with a .json extension under the mappings directory:
Dynamic port numbers
Wiremock has the facility to pick free HTTP and HTTPS ports in SpringBoot application, which is a good idea if we need to run the applications concurrently.
@ClassRule
public static WireMockClassRule wiremock = new WireMockClassRule(
			WireMockSpring.options().dynamicPort());
Below is an example which shows how you can mock an applictaion on dynamic ports. In the below example, the localhost port is dynamic here (57099).
@SpringBootTest(webEnvironment = WebEnvironment.RANDOM_PORT)
public class Wiremock_Example {

	@Rule
	public WireMockRule wireMockRule = new WireMockRule(options().dynamicPort());

	@Test
	public void test() {
         stubFor(get(urlPathEqualTo("/students")).willReturn(aResponse()
.withHeader("Content-Type", "application/json")
.withStatus(200).withStatusMessage("OK").withBody("Tom")));
	}
}
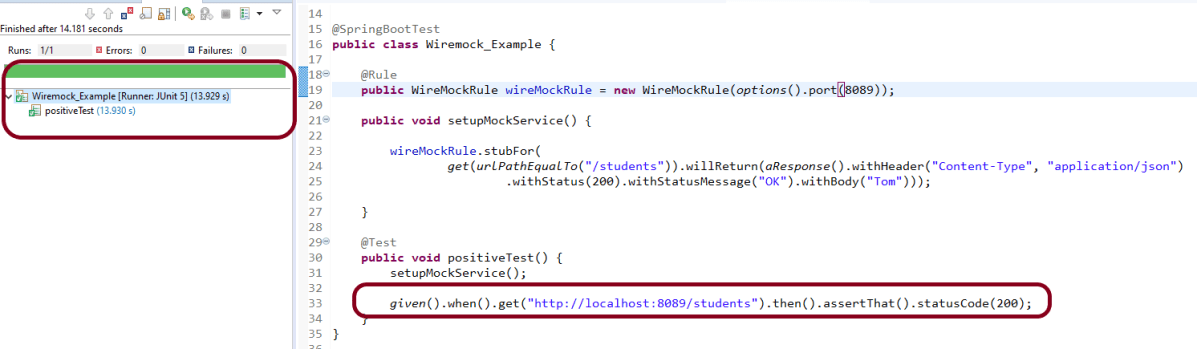
How to run and test Mock Service?
In the below example, I will use Rest Assured tests to validate the behaviour of Mock Service. First, I need to get the mock service up and running and then use it in a test.
@SpringBootTest
public class Wiremock_Example {

	@Rule
	public WireMockRule wireMockRule = new WireMockRule(options().port(8089));

	public void setupMockService() {
		wireMockRule.stubFor(get(urlPathEqualTo("/students"))
.willReturn(aResponse().withHeader("Content-Type", "application/json")
.withStatus(200).withStatusMessage("OK")));
	}

	@Test
	public void positiveTest() {
		setupMockService();

        given()
       .when()
            .get("http://localhost:8089/students")
       .then()
            .assertThat().statusCode(200);
	}
}
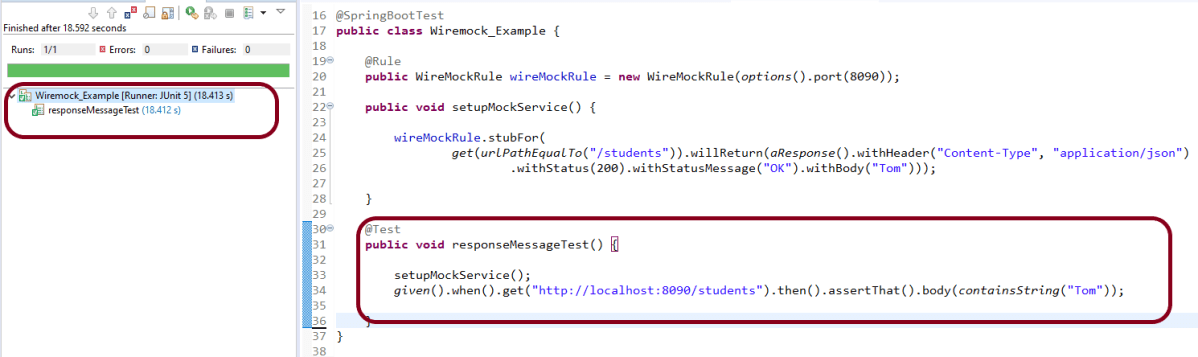
In the below example, it is shown that the response content of a wiremock service can also be verified.
@SpringBootTest
public class Wiremock_Example {

	@Rule
	public WireMockRule wireMockRule = new WireMockRule(options().port(8090));

	public void setupMockService() {

		wireMockRule.stubFor(get(urlPathEqualTo("/students"))
.willReturn(aResponse().withHeader("Content-Type", "application/json")
.withStatus(200).withStatusMessage("OK").withBody("Tom")));
	}

	@Test
	public void responseMessageTest() {

		setupMockService();

         given()
        .when()
            .get("http://localhost:8090/students")
        .then()
           .assertThat().body(containsString("Tom"));
	}
}
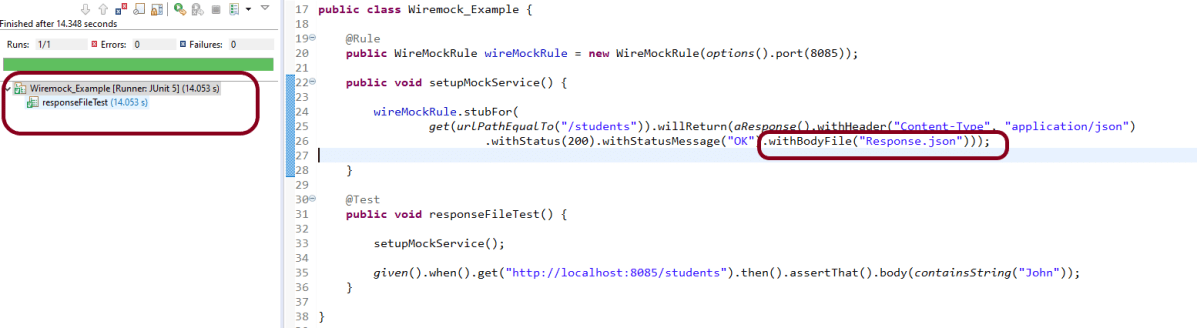
How to read response body from a file?
To read the body content from a file, place the file under the __files directory under src/test/resources when running from the JUnit rule.To make your stub use the file, use withBodyFile() on the response builder with the file’s path relative to __files.
public class Wiremock_Example {

	@Rule
	public WireMockRule wireMockRule = new WireMockRule(options().port(8085));

	public void setupMockService() {

		wireMockRule.stubFor(get(urlPathEqualTo("/students"))
.willReturn(aResponse().withHeader("Content-Type", "application/json")						.withStatus(200).withStatusMessage("OK").withBodyFile("Response.json")));
	}

	@Test
	public void responseFileTest() {

		setupMockService();

		given()
       .when()
           .get("http://localhost:8085/students").then()
       .assertThat()
           .body(containsString("John"));
	}
}
To read more about SpringBoot Wiremock, you can refer SpringBoot Wiremock website.
In the previous tutorial, I explained about the Testing of SpringBoot PUT Method. In this tutorial, I will discuss about the Testing of DELETE method to delete a Resource in SpringBoot application.
The structure of project and various Java classes present in SpringBoot application and the dependencies need in POM.xml to test springboot framework are mentioned here.
Below is the code of Student Controller which exposes the services of DELETE method of Student resource.
@DeleteMapping("/students/{id}")
@DeleteMapping annotation maps HTTP DELETE requests onto specific handler methods. It is a composed annotation that acts as a shortcut for @RequestMapping(method=RequestMethod.DELETE) .
Code of StudentController.java for DELETE method is below
@DeleteMapping("/students/{id}")
	public void deleteStudent(@PathVariable long id) {
		studentRepository.deleteById(id);
	}
Here, we are deleting the student resource by Id.
Scenario 1- Below picture shows how we can execute a sucessful DELETE Request Method using Postman
Before Deleting a Student Resource with Id 1001
In the below image, it shows all the details of student with Id 1001 and with status code of 201 is returned.
Now, we delete a Student with Id 1001 and the status code returned is 200.
After deleting the resource, again send a request to get the details of student of id 1001 which returns 404 – Not Found status.
Above scenario can be tested in the below way.
Feature: Delete Student  Request

   @DeleteStudent
   Scenario: Send a valid Request to delete a student

    Given I send a request to the URL "/students/1001" to get the detail of user with Id 1001
    When I send a request to the URL "/students/1001" to delete user
    Then the response will return status of 200
    And I resend the request to the URL "/students/1001" to get status of 404
Test Code to test above scenario (StepDefinition file)
@SpringBootTest(classes = SpringBoot2RestServiceApplication.class, webEnvironment = WebEnvironment.RANDOM_PORT)
public class DeleteStudentsDefinition {

	private final static String BASE_URI = "http://localhost";

	@LocalServerPort
	private int port;

	private ValidatableResponse validatableResponse1, validatableResponse2, validatableResponse3;

	private void configureRestAssured() {

		RestAssured.baseURI = BASE_URI;
		RestAssured.port = port;
	}

	protected RequestSpecification getAnonymousRequest() throws NoSuchAlgorithmException {
		configureRestAssured();
		return given();
	}

	@Given("^I send a request to the URL \"([^\"]*)\" to get the detail of user with Id 1001$")
	public void getRequest(String endpoint) throws Throwable {

		validatableResponse1 = getAnonymousRequest().contentType(ContentType.JSON).body(toString()).when().get(endpoint)
				.then();
	}

	@When("^I send a request to the URL \"([^\"]*)\" to delete user$")
	public void iSendARequest(String endpoint) throws Throwable {

		validatableResponse2 = getAnonymousRequest().contentType(ContentType.JSON).when().delete(endpoint).then();
	}

	@Then("^the response will return status of (\\d+)$")
	public void extractResponseOfValidStudent(int status) throws NoSuchAlgorithmException {
		validatableResponse2.assertThat().statusCode(equalTo(status));
	}

	@And("^I resend the request to the URL \"([^\"]*)\" to get status of (\\d+)$")
	public void reverifyStudent(String endpoint, int status) throws NoSuchAlgorithmException {
		validatableResponse3 = getAnonymousRequest().contentType(ContentType.JSON).body(toString()).when().get(endpoint)
				.then();
		validatableResponse3.assertThat().statusCode(equalTo(status));

   }
}
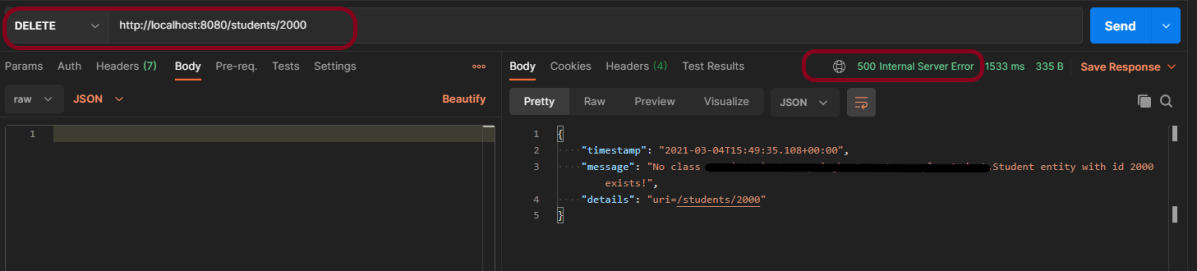
We can test the negative scenario similarly. Send a request with invalid student id, then we will get 500 Internal Server Error.
In the previous tutorial, I explained about the Testing of SpringBoot POST Method. In this tutorial, I will discuss about the Testing of PUT method to update a Resource in SpringBoot application.
The structure of project and various Java classes present in SpringBoot application and the dependencies need in POM.xml to test springboot framework are mentioned here.
Below is the code of Student Controller which exposes the services of PUT method of Student resource.
@PutMapping("/students/{id}")
PutMapping – It is Annotation for mapping HTTP PUTrequests onto specific handler methods.
RequestBody – It maps body of the web request to the method parameter.
Code of StudentController.java for PUT method is below
@PutMapping("/students/{id}")
	public ResponseEntity<Object> updateStudent(@Valid @RequestBody Student student, @PathVariable long id) {

		Optional<Student> studentOptional = studentRepository.findById(id);
		if (!studentOptional.isPresent())
			return ResponseEntity.notFound().build();
		student.setId(id);
		studentRepository.save(student);
		return ResponseEntity.noContent().build();
	}
Here, we are checking if the student exists or not before updating the student. If the student does not exist, we return a not found status. Otherwise, we save the student details using studentRepository.save(student) method.
To test a PUT method of springboot application, you should use below code snippet to send a PUT request
Map<String, String> map = new HashMap<>();
   map.put("name", newName);
   map.put("passport", passport);

JSONObject newStudent = new JSONObject(map);
validatableResponse1 = getAnonymousRequest().contentType(ContentType.JSON).body(newStudent.toString()).when()
.put(endpoint).then();
Scenario 1- Below picture shows how we can execute a sucessful PUT Request Method using Postman
Before Updation
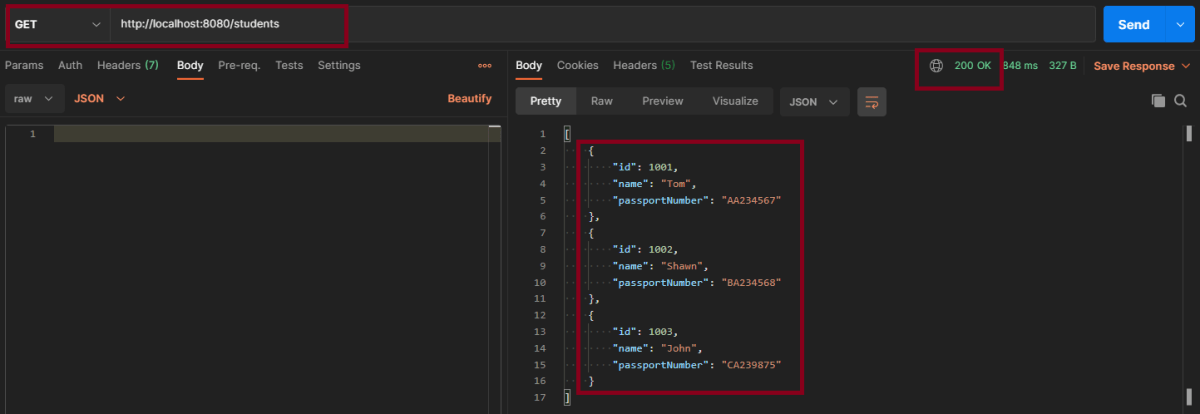
In the below image, details of all students with status code of 201 is returned.
Update Student – Here, I’m updating Student with Id 1001 from name Tom to Update and passport from AA234567 to AB000001
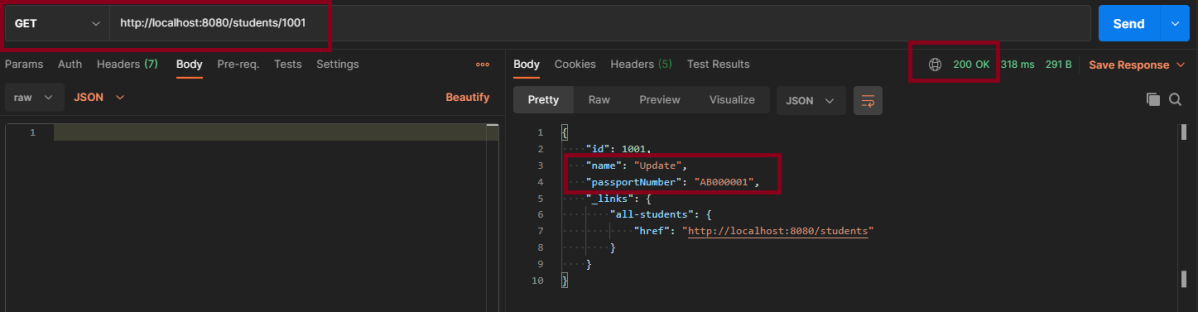
This is the image of updated Student of Id 1001
Above scenario can be tested in the below way.
Feature: Update Student Detail

   @UpdateStudent
   Scenario: Send a valid Request to update a student

    Given I send a request to the URL "/students" to get the detail of all users
    When I send a request to the URL "/students/1001" to update a user with name "Update" and passport as "AB000001"
    Then the response will return status of 204 for update student
    And I send a request to the URL "/students/1001" to get detail of updated student name as "Update"
Test Code to test above scenario (StepDefinition file)
@SpringBootTest(classes = SpringBoot2RestServiceApplication.class, webEnvironment = WebEnvironment.RANDOM_PORT)
public class UpdateStudentDefinitions {

	private final static String BASE_URI = "http://localhost";

	@LocalServerPort
	private int port;

	private ValidatableResponse validatableResponse, validatableResponse1, validatableResponse2;

	private void configureRestAssured() {

		RestAssured.baseURI = BASE_URI;
		RestAssured.port = port;

	}

	protected RequestSpecification getAnonymousRequest() throws NoSuchAlgorithmException {
		configureRestAssured();
		return given();
	}

	@Given("^I send a request to the URL \"([^\"]*)\" to get the detail of all users$")
	public void getRequest(String endpoint) throws Throwable {

		validatableResponse = getAnonymousRequest().contentType(ContentType.JSON).body(toString()).when().get(endpoint)
				.then();
	}

	@When("^I send a request to the URL \"([^\"]*)\" to update a user with name \"([^\"]*)\" and passport as \"([^\"]*)\"$")
	public void updateRequest(String endpoint, String newName, String passport) throws Throwable {

		Map<String, String> map = new HashMap<>();
		map.put("name", newName);
		map.put("passport", passport);

		JSONObject newStudent = new JSONObject(map);

		validatableResponse1 = getAnonymousRequest().contentType(ContentType.JSON).body(newStudent.toString()).when()
				.put(endpoint).then();
	}

	@Then("^the response will return status of (\\d+) for update student$")
	public void extractResponse(int status) {

		validatableResponse1.assertThat().statusCode(equalTo(status));
	}

	@And("^I send a request to the URL \"([^\"]*)\" to get detail of updated student name as \"([^\"]*)\"$")
	public void extractUpdatedResponse(String endpoint, String newName) throws NoSuchAlgorithmException {

		validatableResponse2 = getAnonymousRequest().contentType(ContentType.JSON).when().get(endpoint).then();
		validatableResponse2.assertThat().body("name", equalTo(newName));
	}
Scenario 2- Below picture shows how we can execute a unsucessful PUT Request Method using Postman
In the above image, I am trying to update the name of invalid student id 1000, so the response returns the status of 404.
This can be tested by using above step definition.
In the previous tutorial, I explained about theTesting of SpringBoot POST Method. In this tutorial, I will discuss the Testing of Exceptions in the SpringBoot application.
The most commonly used error codes in SpringBoot Application are:-
404 – RESOURCE NOT FOUND
400 – BAD REQUEST
401 – UNAUTHORIZED
415 – UNSUPPORTED TYPE – Representation not supported for the resource
500 – SERVER ERROR
Default Exception Handling with Spring Boot
Spring Boot provides a good default implementation for exception handling for RESTful Services.
This is the response when you try getting details of a non-existing student. You can see that the response status is 500 – Internal Server Error.
Customizing Exception Handling with Spring Boot
There are 2 most commonly used annotations used in Error Handling – @ExceptionHandler and @ControllerAdvice.
What is ExceptionHandler?
The @ExceptionHandler is an annotation used to handle the specific exceptions and send the custom responses to the client.
@ExceptionHandler(StudentNotFoundException.class)
What is ControllerAdvice?
A controller advice allows you to use exactly the same exception-handling techniques but apply them across the whole application, not just to an individual controller.
A combination of Spring and Spring Boot provides multiple options to customize responses for errors.
@ControllerAdvice
@RestController
public class CustomizedResponseEntityExceptionHandler extends ResponseEntityExceptionHandler {
You can specify the Response Status for a specific exception along with the definition of the Exception with the ‘@ResponseStatus’ annotation.
@ResponseStatus(HttpStatus.NOT_FOUND)
I have defined the StudentNotFoundExceptionclass. This Exception will be thrown by the controller when no resource i.e. Student to be returned in our case is found with HTTP Status of NOT_FOUND (404).
import org.springframework.http.HttpStatus;
import org.springframework.web.bind.annotation.ResponseStatus;

@ResponseStatus(HttpStatus.NOT_FOUND)
public class StudentNotFoundException extends RuntimeException {

	public StudentNotFoundException(String exception) {
		super(exception);
	}
}
The default error response provided by Spring Boot contains all the details that are typically needed.
However, you might want to create a framework-independent response structure for your organization. In that case, you can define a specific error response structure.
import java.util.Date;

public class ExceptionResponse {
	private Date timestamp;
	private String message;
	private String details;

	public ExceptionResponse(Date timestamp, String message, String details) {
		super();
		this.timestamp = timestamp;
		this.message = message;
		this.details = details;
	}

	public Date getTimestamp() {
		return timestamp;
	}

	public String getMessage() {
		return message;
	}

	public String getDetails() {
		return details;
	}
}
To use ExceptionResponseto return the error response, let’s define a ControllerAdvice as shown below.
@ControllerAdvice
@RestController
public class CustomizedResponseEntityExceptionHandler extends ResponseEntityExceptionHandler {

	@ExceptionHandler(StudentNotFoundException.class)
	public final ResponseEntity<Object> handleUserNotFoundException(StudentNotFoundException ex, WebRequest request) {
		ExceptionResponse exceptionResponse = new ExceptionResponse(new Date(), ex.getMessage(),
				request.getDescription(false));
		return new ResponseEntity(exceptionResponse, HttpStatus.NOT_FOUND);
	}
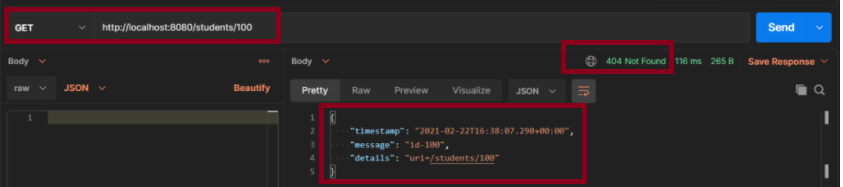
Scenario 1- How to execute a Get Request Method with an Invalid URL using Postman
The below picture shows how we can execute a Get Request Method with an Invalid URL using Postman.
The above scenario can be tested in the below way.
Feature: Student Exception

   @InvalidURL
   Scenario: Send a valid Request to create a student

    Given I send a request to the invalid URL "/students/100" to get a student details
    Then the response will return status of 404 and message "id-100"
Test Code to test the above scenario (StepDefinition file)
@SpringBootTest(classes = SpringBootRestServiceApplication.class, webEnvironment = WebEnvironment.RANDOM_PORT)
public class CustomizedErrorsDefinition {

	private final static String BASE_URI = "http://localhost";

	@LocalServerPort
	private int port;

	private ValidatableResponse validatableResponse;

	private void configureRestAssured() {

		RestAssured.baseURI = BASE_URI;
		RestAssured.port = port;
	}

	protected RequestSpecification getAnonymousRequest() throws NoSuchAlgorithmException {
		configureRestAssured();
		return given();
	}

	@Given("^I send a request to the invalid URL \"([^\"]*)\" to get a student details$")
	public void iSendARequest(String endpoint) throws Throwable {

		validatableResponse = getAnonymousRequest().contentType(ContentType.JSON).when().get(endpoint).then();
	}

	@Then("^the response will return status of (\\d+) and message \"([^\"]*)\"$")
	public void extractResponse(int status, String message) {		validatableResponse.assertThat().statusCode(equalTo(status)).body("message", equalTo(message));
	}
}
In the previous tutorial, I have explain about SpringBoot and how to perform Integration testing of SpringBoot Exception Handling. In this tutorial, I will explain about the Integration testing of Testing of SpringBoot Validation for RESTful Services.
What is Validation?
It is necessary that the response recieve from RestFul service should return meaningful information, like certain data type, constraints. If a response returns error message, then we expect it to provide information like clear error message, which field has an error, what is the type of error, proper status code and most importantly should not provide any sensitive information.
To know about all the dependencies neede to test Springboot, please click here.
Below are various Java classes present in a SpringBoot REST Application/API
• SpringBootRestServiceApplication.java – The Spring Boot Application class generated with Spring Initializer. This class acts as the launching point for application.
• pom.xml – Contains all the dependencies needed to build this project.
• Student.java – This is JPA Entity for Student class
• StudentRepository.java – This is JPA Repository for Student. This is created using Spring Data JpaRepository.
• StudentController.java – Spring Rest Controller exposing all services on the student resource.
• CustomizedExceptionHandler.java – This implements global exception handling and customize the responses based on the exception type.
• ErrorDetails.java – Response Bean to use when exceptions are thrown from API.
• StudentNotFoundException.java – Exception thrown from resources when student is not found.
• data.sql – Data is loaded from data.sql into Student table. Spring Boot would execute this script after the tables are created from the entities.
REST request validation annotations
ANNOTATION
USAGE
@AssertFalse
The annotated element must be false.
@AssertTrue
The annotated element must be true.
@DecimalMax
The annotated element must be a number whose value must be lower or equal to the specified maximum.
@DecimalMin
The annotated element must be a number whose value must be higher or equal to the specified minimum.
@Future
The annotated element must be an instant, date or time in the future.
@Max
The annotated element must be a number whose value must be lower or equal to the specified maximum.
@Min
The annotated element must be a number whose value must be higher or equal to the specified minimum.
@Negative
The annotated element must be a strictly negative number.
@NotBlank
The annotated element must not be null and must contain at least one non-whitespace character.
@NotEmpty
The annotated element must not be null nor empty.
@NotNull
The annotated element must not be null.
@Null
The annotated element must be null.
@Pattern
The annotated CharSequence must match the specified regular expression.
@Positive
The annotated element must be a strictly positive number.
@Size
The annotated element size must be between the specified boundaries (included).
Implementing Validation on the Resource
Add @Valid in addition to @RequestBody.
public ResponseEntity<Object> createStudent(@Valid @RequestBody Student student) {
Below is the example of Student.java class. Here, you can see I have used various validations.
Here, Student class is annotated with @Entity, indicating that it is a JPA entity. There is no @Table annotation so entity is mapped to a table named Student .)
Id property is annotated with @Id and also annotated with @GeneratedValue to indicate that the ID should be generated automatically.
@Entity
public class Student {
    @Id
    @GeneratedValue
    private Long id;

    @NotNull
    @Size(min = 4, message = "Name should have atleast 4 characters")
    private String name;

   @NotBlank(message = "passportNumber is mandatory")
   private String passportNumber;

    public Student() {
        super();
    }

    public Student(Long id, String name, String passportNumber) {
        super();
        this.id = id;
        this.name = name;
        this.passportNumber = passportNumber;
    }

    public Long getId() {
        return id;
    }

    public void setId(Long id) {
        this.id = id;
    }

    public String getName() {
        return name;
    }

    public void setName(String name) {
        this.name = name;
    }

    public String getPassportNumber() {
        return passportNumber;
    }

    public void setPassportNumber(String passportNumber) {
        this.passportNumber = passportNumber;
    }
}
We need a @ControllerAdvice to handle validation errors. Below is the snippet of validation error for invalid method arguement.
@ControllerAdvice
@RestController
public class CustomizedResponseEntityExceptionHandler extends ResponseEntityExceptionHandler {

	@Override
	protected ResponseEntity<Object> handleMethodArgumentNotValid(MethodArgumentNotValidException ex,
			HttpHeaders headers, HttpStatus status, WebRequest request) {
		ExceptionResponse exceptionResponse = new ExceptionResponse(new Date(), "Validation Failed",
				ex.getBindingResult().toString());
		return new ResponseEntity(exceptionResponse, HttpStatus.BAD_REQUEST);
	}
}
Scenario 1 – Below picture shows how we can execute a POST Request where Name is passed as null using Postman
@NotNull
    private String name;
In the below image, I am trying to create a new Student with name as null.
Above scenario can be tested in the below way.
Feature: Validation of Student Request
@CreateStudentWithNoName
Scenario: Send a Request to create a student with no name
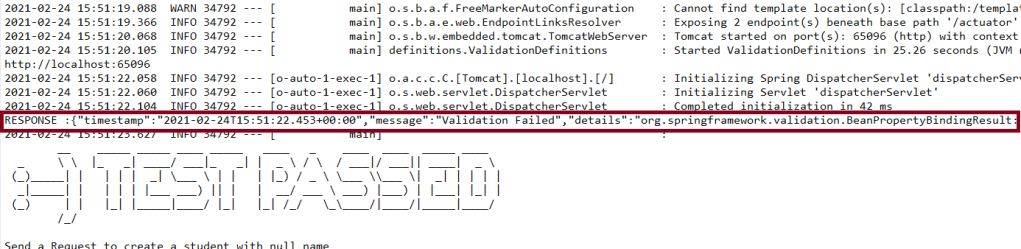
Given I send a request to the URL "/students" to create a user with name as null and passport as "RA000002"
Then the response will return error message as "Validation Failed" and details contain error detail as "default message [name]]; default message [must not be null]"
Test Code to test above scenario (StepDefinition file)
@SpringBootTest(classes = SpringBootRestServiceApplication.class, webEnvironment = WebEnvironment.RANDOM_PORT)
public class ValidationDefinitions {

	private final static String BASE_URI = "http://localhost";

	@LocalServerPort
	private int port;

	private ValidatableResponse validatableResponse, validatableResponse1;

	private void configureRestAssured() {

		RestAssured.baseURI = BASE_URI;
		RestAssured.port = port;
	}

	protected RequestSpecification getAnonymousRequest() throws NoSuchAlgorithmException {
		configureRestAssured();
		return given();
	}

	@Given("^I send a request to the URL \"([^\"]*)\" to create a user with name as null and passport as \"([^\"]*)\"$")
	public void iSendARequestwithNullName(String endpoint, String passport) throws Throwable {

		Map<String, String> map = new HashMap<>();
		map.put("name", null);
		map.put("passport", passport);

		JSONObject newStudent = new JSONObject(map);

		validatableResponse = getAnonymousRequest().contentType(ContentType.JSON).body(newStudent.toString()).when()
				.post(endpoint).then();
	}

	@Then("^the response will return error message as \"([^\"]*)\" and details contain error detail as \"([^\"]*)\"$")

	public void extractErrorResponse(String message, String details) {

		validatableResponse.assertThat().body("message", equalTo(message)).and().body(containsString(details));
	}
}
To know how to start the springBoot test and web environment. Please refer this link.
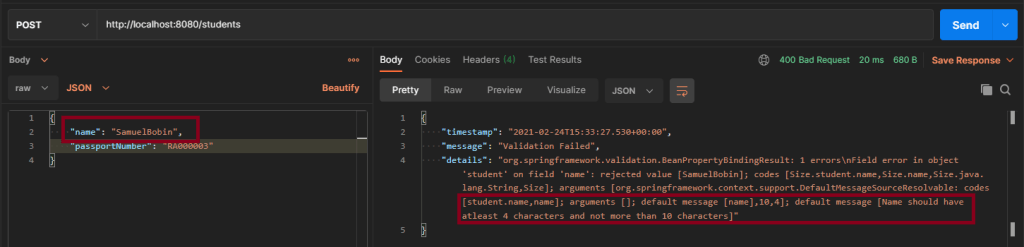
Scenario 2 – Below picture shows how we can execute a POST Request to create a student with Name as length outside the range using Postman
@Size(min = 4, max = 10, message = "Name should have atleast 4 characters and not more than 10 characters")
	private String name;
This means that name should have minimum 4 characters and maximum 10 character. Name not in this range will throw validation error with message as “Name should have atleast 4 characters and not more than 10 characters”
Above scenario can be tested in the below way.
 @CreateStudentWithInvalidName

    Scenario: Send a Request to create a student with invalid name

    Given I send a request to the URL "/students" to create a user with name as "SamuelBobin" and passport as "RA000003"
    Then the response will return error message as "Validation Failed" and details contain error detail as "Name should have atleast 4 characters and not more than 10 characters"
Test Code to test above scenario (StepDefinition file)
@Given("^I send a request to the URL \"([^\"]*)\" to create a user with name as \"([^\"]*)\" and passport as \"([^\"]*)\"$")
	public void iSendARequest(String endpoint, String newName, String passport) throws Throwable {

		Map<String, String> map = new HashMap<>();
		map.put("name", newName);
		map.put("passport", passport);

		JSONObject newStudent = new JSONObject(map);

		validatableResponse = getAnonymousRequest().contentType(ContentType.JSON).body(newStudent.toString()).when()
				.post(endpoint).then();
	}

	@Then("^the response will return error message as \"([^\"]*)\" and details contain error detail as \"([^\"]*)\"$")

	public void extractErrorResponse(String message, String details) {

		validatableResponse.assertThat().body("message", equalTo(message)).and().body(containsString(details));

	}
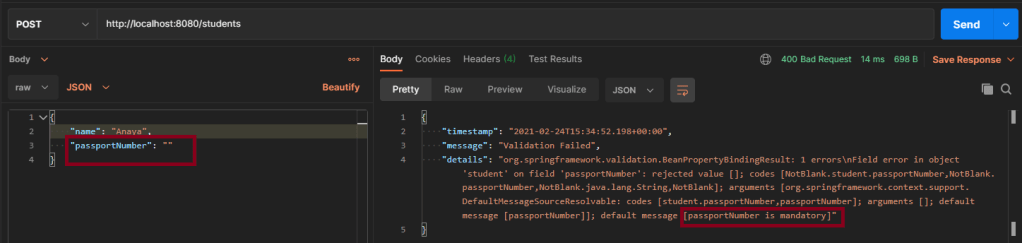
Scenario 3 – Below picture shows how we can execute a POST Request where creating a student with passport as not Blank using Postman
@NotBlank(message = "passportNumber is mandatory")
	private String passportNumber;
@NotBlank is to specify the attribute should not be blank and also a message when a validation error occurs “passportNumber is mandatory”.
In the previous tutorial, I explained about the Testing of SpringBoot GET Method. In this tutorial, I will discuss about the Testing of POST method which create Resource in SpringBoot application.
First, let us see what are RequestBody and PathMapping annotations which are commonly used assnotations for POST Method
1. What is RequestBody
The @RequestBody annotation maps body of the web request to the method parameter. The body of the request is passed through an HttpMessageConverterto resolve the method argument depending on the content type of the request.
public ResponseEntity<Object> createStudent(@Valid @RequestBody Student student) {
2. What is PathMapping
The @PathMapping annotation is the specialized version of the @RequestMapping annotation which acts as a shortcut for @RequestMapping(method=RequestMethod=POST).
Here, we will use @PostMapping. It is annotation for mapping HTTP POSTrequests onto specific handler.
@PostMapping is a composed annotation that acts as a shortcut for @RequestMapping(method=RequestMethod.POST)
@PostMapping("/students")
The dependencies need in POM.xml to test springboot framework is mentioned here.
Code of StudentController.java is below
@PostMapping("/students")
	public ResponseEntity<Object> createStudent(@Valid @RequestBody Student student) {
		Student savedStudent = studentRepository.save(student);

		URI location = ServletUriComponentsBuilder.fromCurrentRequest().path("/{id}")
				.buildAndExpand(savedStudent.getId()).toUri();

		return ResponseEntity.created(location).build();
}
ResponseEntity.created(location).build(): Return a status of created. Also return the location of created resource as a Response Header.
Code of Student.java is below
@Entity
public class Student {
	@Id
	@GeneratedValue
	private Long id;

	@NotNull
	@Size(min = 4, message = "Name should have atleast 4 characters")
	private String name;

	private String passportNumber;

	public Student() {
		super();
	}

	public Student(Long id, String name, String passportNumber) {
		super();
		this.id = id;
		this.name = name;
		this.passportNumber = passportNumber;
	}

	public Long getId() {
		return id;
	}

	public void setId(Long id) {
		this.id = id;
	}

	public String getName() {
		return name;
	}

	public void setName(String name) {
		this.name = name;
	}

	public String getPassportNumber() {
		return passportNumber;
	}

	public void setPassportNumber(String passportNumber) {
		this.passportNumber = passportNumber;
	}
}
This is the Student entity. Each entity must have at least two annotations defined: @Entity and @Id. The @Entity annotation specifies that the class is an entity and is mapped to a database table. The @Table annotation specifies the name of the database table to be used for mapping. The @Id annotation specifies the primary key of an entity and the @GeneratedValue provides for the specification of generation strategies for the values of primary keys.
Here, Student class is annotated with @Entity, indicating that it is a JPA entity. (Because no @Table annotation exists, it is assumed that this entity is mapped to a table named Student .)
The Student object’s idproperty is annotated with @Id so that JPA recognizes it as the object’s ID. The id property is also annotated with @GeneratedValue to indicate that the ID should be generated automatically.
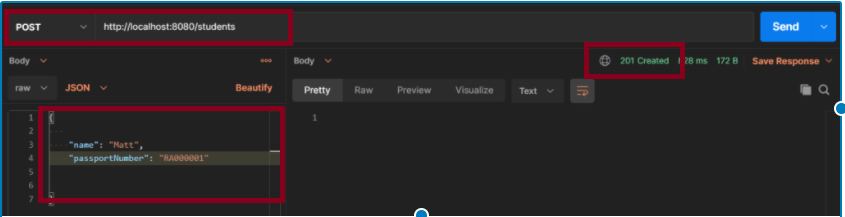
Scenario 1- Below picture shows how we can execute a sucessful POST Request Method on a Resource using Postman
In the below image, a new Student with name “Mat” is created and the status code returned is 201.
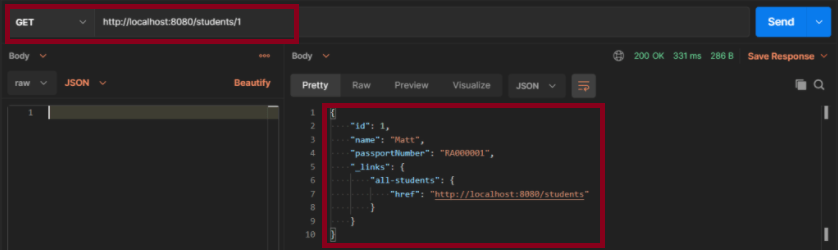
In the below image, I’m checking if the new user is created with name “Matt”. As id is auto genertaed, so the ID generation starts from 1.
Above scenario can be tested in the below way.
Feature: Create Student Request

   @CreateStudent
   Scenario: Send a valid Request to create a student

     Given I send a request to the URL "/students" to create a user with name "Matt" and passport as "RA000001"
    Then the response will return status of 201 for new student
    And I send a request to the URL "/students/1" to get detail of new student name as "Matt"
Test Code to test above scenario (StepDefinition file)
@SpringBootTest(classes = SpringBoot2RestServiceApplication.class, webEnvironment = WebEnvironment.RANDOM_PORT)
public class CreateStudentDefinition {

	private final static String BASE_URI = "http://localhost";

	@LocalServerPort
	private int port;

	private ValidatableResponse validatableResponse, validatableResponse1;

	private void configureRestAssured() {

		RestAssured.baseURI = BASE_URI;
		RestAssured.port = port;
	}

	protected RequestSpecification getAnonymousRequest() throws NoSuchAlgorithmException {
		configureRestAssured();
		return given();
	}

	@Given("^I send a request to the URL \"([^\"]*)\" to create a user with name \"([^\"]*)\" and passport as \"([^\"]*)\"$")
	public void iSendARequest(String endpoint, String newName, String passport) throws Throwable {

		JSONObject newStudent = new JSONObject();

		newStudent.put("name", newName);
		newStudent.put("passport", passport);

		validatableResponse = getAnonymousRequest().contentType(ContentType.JSON).body(newStudent.toString()).when()
				.post(endpoint).then();
	}

	@Then("^the response will return status of (\\d+) for new student$")
	public void extractResponseOfNewStudent(int status) {

		validatableResponse.assertThat().statusCode(equalTo(status));
	}

	@And("^I send a request to the URL \"([^\"]*)\" to get detail of new student name as \"([^\"]*)\"$")
	public void extractResponseOfNewStudent(String endpoint, String newName) throws NoSuchAlgorithmException {

		validatableResponse1 = getAnonymousRequest().contentType(ContentType.JSON).when().get(endpoint).then();
		validatableResponse1.assertThat().body("name", equalTo(newName));

	}
Here, I have used JSONObject from org.json to create the JSON directly. I use the put() method and supply the key and value as an argument.
JSONObject newStudent = new JSONObject();

		newStudent.put("name", newName);
		newStudent.put("passport", passport);
There is another way to create a JSON using Map. Here we construct a custom Map and then pass it as an argument to JSONObject‘s constructor.
Map<String, String> map = new HashMap<>();
		map.put("name", newName);
		map.put("passport", passport);

		JSONObject newStudent  = new JSONObject(map);
For assertion purpose, we use Hamcrest Matchers. Hamcrest is a framework for software tests. Hamcrest allows checking for conditions in your code via existing matchers classes. It also allows you to define your custom matcher implementations.
Page Object model is an object design pattern in Selenium, where web pages are represented as classes, and the various elements on the page are defined as variables in the class and all possible user interactions can then be implemented as methods in the class.
The benefit is that if there is any change in the UI for the page, the tests themselves don’t need to change, only the code within the page object needs to change. Subsequently all changes to support that new UI are located in one place.
Advantages:
1. Readable – There is a clean separation between test code and page specific code such as locators and methods.
2. Maintainability – In this model, separate classes are created for different pages of a web application like login page, the home page, employee detail page, change password page, etc. So, if there is any change in any element of a website then we only need to make changes in one class, and not in all classes.
3. Reusable – If multiple test scripts use the same web elements, then we need not write code to handle the web element in every test script. Placing it in a separate page class makes it reusable by making it accessible by any test script.
4. Easy project Structure– Its project structure is quite easy and understandable.
5. PageFactory – It can use PageFactory in the page object model in order to initialize the web element and store elements in the cache.
In case there are lots of web elements on a page, then the object repository class for a page can be separated from the class that includes methods for the corresponding page.
Example: If the New Customer page has many input fields. In that case, there can be 2 different classes. One class called NewCustomerObjects.java that forms the object repository for the UI elements on the register accounts page.
A separate class file NewCustomerMethods.java extending or inheriting NewCustomerObjects that includes all the methods performing different actions on the page could be created.
Consider the below script to login to an application and navigate to home page.
This is a small script. Therefore, script maintenance and readability looks very easy.
Imagine there are 50 different tests present in this script. In that case, the readability of the script decreases as well as maintenance become very difficult.
Scenario
Launch the Firefox browser.
The demo website opens in the browser.
Verify the Login Page
Enter username and Password and login to the demo site.
PageFactory is a way of implementing the “Page Object Model”. Here, we follow the principle of separation of Page Object Repository and Test Methods. It is an inbuilt concept of Page Object Model which is very optimized.
1. The annotation @FindBy is used in Pagefactory to identify an element while POM without Pagefactory uses the driver.findElement() method to locate an element.
2. The second statement for Pagefactory after @FindBy is assigning an <element name> of type WebElement class that works exactly similar to the assignment of an element name of type WebElement class as a return type of the method driver.findElement() that is used in usual POM (userName in this example).
3. Below is a code snippet of non PageFactory Mode to set Firefox driver path. A WebDriver instance is created with the name driver and the FirefoxDriver is assigned to the ‘driver’. The same driver object is then used to launch the demo website, locate the webelements and to perform various operations
Basically, here the driver instance is created initially and every web element is freshly initialized each time when there is a call to that web element using driver.findElement() or driver.findElements().
ChromeOptions options = new ChromeOptions();
driver = new ChromeDriver(options);
driver.manage().window().maximize();
driver.manage().timeouts().implicitlyWait(10, TimeUnit.SECONDS);
driver.get("https://opensource-demo.orangehrmlive.com/");
But with POM with PageFactory approach, all the elements are initialized with initElements() without explicitly initializing each web element.
The initElementsis a static method of PageFactory class which is used to initialize all the web elements located by @FindBy annotation. Thus, instantiating the Page classes easily. It is used to initialize the WebElements declared, using driver instance from the main class. In other words, WebElements are created using the driver instance. Only after the WebElements are initialized, they can be used in the methods to perform actions.
public Login(WebDriver driver) {
           this.driver = driver;
           // This initElements method will create all WebElements
           PageFactory.initElements(driver, this);
     }
3.2 Create methods for actions performed on WebElements.
Below actions are performed on WebElements in Login Page:
Get Text on Login Page
Type action on the Username field.
Type action in the Password field.
Click action on the Login Button
Note: A constructor has to be created in each of the class in the Page Layer, in order to get the driver instance from the Main class in Test Layer and also to initialize WebElements(Page Objects) declared in the page class using PageFactory.InitElement().
BaseClass
package com.example.pages;

import org.openqa.selenium.WebDriver;
import org.openqa.selenium.support.PageFactory;

public class BasePage {
    public WebDriver driver;

    public BasePage(WebDriver driver) {
        this.driver = driver;
        PageFactory.initElements(driver,this);
    }

}
Login Page
package com.example.pages;

import org.openqa.selenium.WebDriver;
import org.openqa.selenium.WebElement;
import org.openqa.selenium.support.FindBy;

public class LoginPage extends BasePage{

    public LoginPage(WebDriver driver) {
        super(driver);

    }

    @FindBy(name = "username")
    public WebElement userName;

    @FindBy(name = "password")
    public WebElement password;

    @FindBy(xpath = "//*[@class='oxd-form']/div[3]/button")
    public WebElement login;

    @FindBy(xpath = "//*[@id='app']/div[1]/div/div[1]/div/div[2]/div[2]/div/div[1]/div[1]/p")
    public  WebElement errorMessage;


    public void login(String strUserName, String strPassword) {

        userName.sendKeys(strUserName);
        password.sendKeys(strPassword);
        login.click();

    }

    public String getErrorMessage() {
        return errorMessage.getText();
    }


}
HomePage. java
package com.example.pages;

import org.openqa.selenium.WebDriver;
import org.openqa.selenium.WebElement;
import org.openqa.selenium.support.FindBy;

public class HomePage extends BasePage {

    public HomePage(WebDriver driver) {
        super(driver);

    }

    @FindBy(xpath = "//*[@id='app']/div[1]/div[1]/header/div[1]/div[1]/span/h6")
    public  WebElement homePageUserName;

    public String getHomePageText() {
        return homePageUserName.getText();
    }

}
Step 4 – Create test class for the tests of these pages
BaseTests
package com.example.tests;

import org.openqa.selenium.WebDriver;
import org.openqa.selenium.chrome.ChromeDriver;
import org.openqa.selenium.chrome.ChromeOptions;
import org.testng.annotations.AfterMethod;
import org.testng.annotations.BeforeMethod;

import java.time.Duration;

public class BaseTests {

    public static WebDriver driver;
    public final static int TIMEOUT = 10;

    @BeforeMethod
    public void setup() {

        ChromeOptions options = new ChromeOptions();
        options.addArguments("--remote-allow-origins=*");
        options.addArguments("--no-sandbox");
        options.addArguments("--disable-dev-shm-usage");
        options.addArguments("--headless");
        driver = new ChromeDriver(options);
        driver.manage().window().maximize();
        driver.get("https://opensource-demo.orangehrmlive.com/");
        driver.manage().timeouts().implicitlyWait(Duration.ofSeconds(TIMEOUT));

    }

    @AfterMethod
    public void tearDown() {
        driver.quit();
    }

}
LoginPageTests.java
package com.example.tests;

import com.example.pages.HomePage;
import com.example.pages.LoginPage;
import org.testng.Assert;
import org.testng.annotations.Test;

public class LoginPageTests extends BaseTests{

    String actualResponse;

    @Test
    public void invalidCredentials()  {

        LoginPage objLoginPage = new LoginPage(driver);
        objLoginPage.login("admin", "admin");
        actualResponse = objLoginPage.getErrorMessage();
        Assert.assertEquals(actualResponse,"Invalid credentials");
    }

    @Test
    public void validCredentials() {

        LoginPage objLoginPage = new LoginPage(driver);
        objLoginPage.login("Admin", "admin123");
        HomePage objHomePage = new HomePage(driver);
        actualResponse = objHomePage.getHomePageText();
        Assert.assertEquals(actualResponse,"Dashboard");

    }

}
Step 5 – Execute the tests
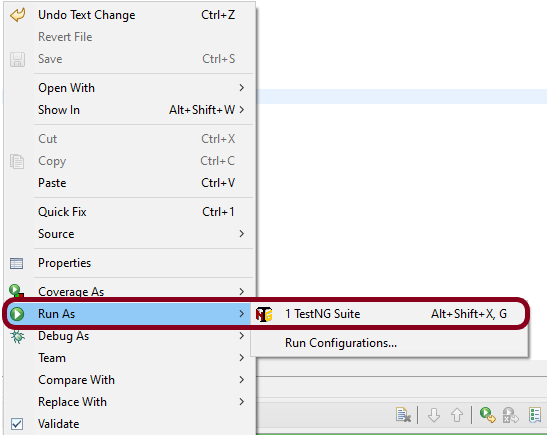
To run the test, right click and select as Run As and then select TestNG Test (Eclipse).
Right-click on the LoginPageTests and select Run ‘LoginPageTests’ (IntelliJ)
Step 6 – Create TestNG.xml
You can add TestNG.xml and run the tests from there also.
<?xml version = "1.0"encoding = "UTF-8"?>
<!DOCTYPE suite SYSTEM "http://testng.org/testng-1.0.dtd">
<suite name = "PageObjectModel">
    <test name = "PageObjectModel Tests">
        <classes>
            <class name ="com.example.tests.LoginPageTests"/>
        </classes>
    </test>
</suite>
Step 7 – Run the tests from TestNG.xml
Right click on TestNG.xml and select Run As TestNG Suite.
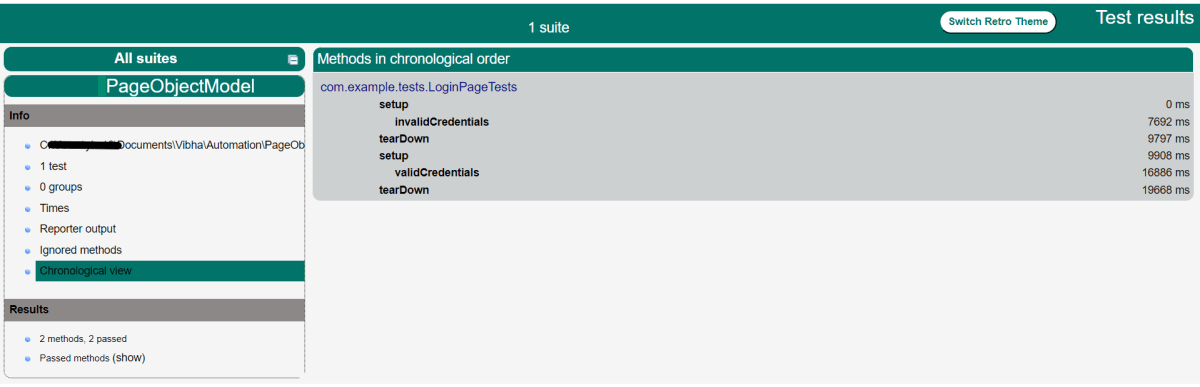
The execution status looks like as shown below.
Step 8 -TestNG Report Generation
Once the execution is finished, refresh the project. It will create a test-output folder containing various reports generated by TestNG. Below is the screenshot of the report folder.
Index.html
emailable-report.html
Step 9 – Execute the tests through command line
We can run the tests through command line. Use the below command: