In the previous tutorial, I explained about the Testing of SpringBoot POST Method. In this tutorial, I will discuss about the Testing of PUT method to update a Resource in SpringBoot application.
The structure of project and various Java classes present in SpringBoot application and the dependencies need in POM.xml to test springboot framework are mentioned here.
Below is the code of Student Controller which exposes the services of PUT method of Student resource.
@PutMapping("/students/{id}")
PutMapping – It is Annotation for mapping HTTP PUTrequests onto specific handler methods.
RequestBody – It maps body of the web request to the method parameter.
Code of StudentController.java for PUT method is below
@PutMapping("/students/{id}")
	public ResponseEntity<Object> updateStudent(@Valid @RequestBody Student student, @PathVariable long id) {

		Optional<Student> studentOptional = studentRepository.findById(id);
		if (!studentOptional.isPresent())
			return ResponseEntity.notFound().build();
		student.setId(id);
		studentRepository.save(student);
		return ResponseEntity.noContent().build();
	}
Here, we are checking if the student exists or not before updating the student. If the student does not exist, we return a not found status. Otherwise, we save the student details using studentRepository.save(student) method.
To test a PUT method of springboot application, you should use below code snippet to send a PUT request
Map<String, String> map = new HashMap<>();
   map.put("name", newName);
   map.put("passport", passport);

JSONObject newStudent = new JSONObject(map);
validatableResponse1 = getAnonymousRequest().contentType(ContentType.JSON).body(newStudent.toString()).when()
.put(endpoint).then();
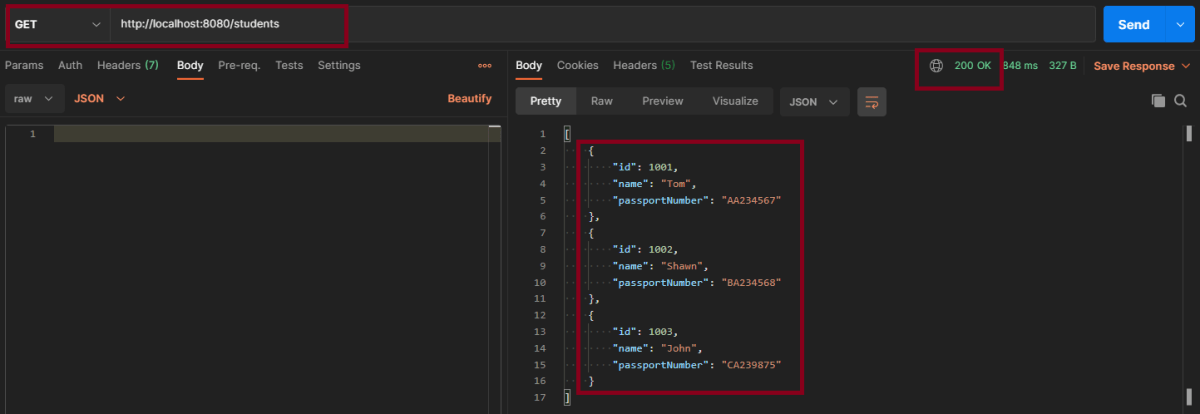
Scenario 1- Below picture shows how we can execute a sucessful PUT Request Method using Postman
Before Updation
In the below image, details of all students with status code of 201 is returned.
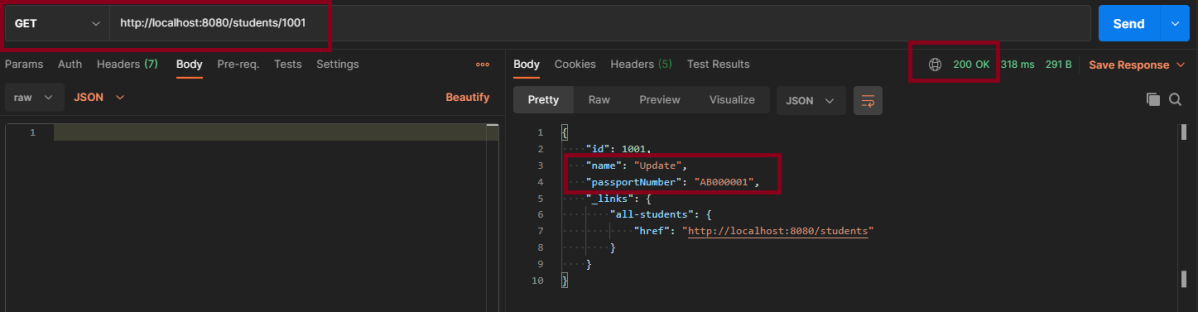
Update Student – Here, I’m updating Student with Id 1001 from name Tom to Update and passport from AA234567 to AB000001
This is the image of updated Student of Id 1001
Above scenario can be tested in the below way.
Feature: Update Student Detail

   @UpdateStudent
   Scenario: Send a valid Request to update a student

    Given I send a request to the URL "/students" to get the detail of all users
    When I send a request to the URL "/students/1001" to update a user with name "Update" and passport as "AB000001"
    Then the response will return status of 204 for update student
    And I send a request to the URL "/students/1001" to get detail of updated student name as "Update"
Test Code to test above scenario (StepDefinition file)
@SpringBootTest(classes = SpringBoot2RestServiceApplication.class, webEnvironment = WebEnvironment.RANDOM_PORT)
public class UpdateStudentDefinitions {

	private final static String BASE_URI = "http://localhost";

	@LocalServerPort
	private int port;

	private ValidatableResponse validatableResponse, validatableResponse1, validatableResponse2;

	private void configureRestAssured() {

		RestAssured.baseURI = BASE_URI;
		RestAssured.port = port;

	}

	protected RequestSpecification getAnonymousRequest() throws NoSuchAlgorithmException {
		configureRestAssured();
		return given();
	}

	@Given("^I send a request to the URL \"([^\"]*)\" to get the detail of all users$")
	public void getRequest(String endpoint) throws Throwable {

		validatableResponse = getAnonymousRequest().contentType(ContentType.JSON).body(toString()).when().get(endpoint)
				.then();
	}

	@When("^I send a request to the URL \"([^\"]*)\" to update a user with name \"([^\"]*)\" and passport as \"([^\"]*)\"$")
	public void updateRequest(String endpoint, String newName, String passport) throws Throwable {

		Map<String, String> map = new HashMap<>();
		map.put("name", newName);
		map.put("passport", passport);

		JSONObject newStudent = new JSONObject(map);

		validatableResponse1 = getAnonymousRequest().contentType(ContentType.JSON).body(newStudent.toString()).when()
				.put(endpoint).then();
	}

	@Then("^the response will return status of (\\d+) for update student$")
	public void extractResponse(int status) {

		validatableResponse1.assertThat().statusCode(equalTo(status));
	}

	@And("^I send a request to the URL \"([^\"]*)\" to get detail of updated student name as \"([^\"]*)\"$")
	public void extractUpdatedResponse(String endpoint, String newName) throws NoSuchAlgorithmException {

		validatableResponse2 = getAnonymousRequest().contentType(ContentType.JSON).when().get(endpoint).then();
		validatableResponse2.assertThat().body("name", equalTo(newName));
	}
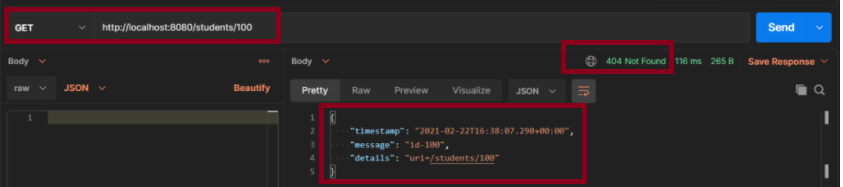
Scenario 2- Below picture shows how we can execute a unsucessful PUT Request Method using Postman
In the above image, I am trying to update the name of invalid student id 1000, so the response returns the status of 404.
This can be tested by using above step definition.
In the previous tutorial, I explained about theTesting of SpringBoot POST Method. In this tutorial, I will discuss the Testing of Exceptions in the SpringBoot application.
The most commonly used error codes in SpringBoot Application are:-
404 – RESOURCE NOT FOUND
400 – BAD REQUEST
401 – UNAUTHORIZED
415 – UNSUPPORTED TYPE – Representation not supported for the resource
500 – SERVER ERROR
Default Exception Handling with Spring Boot
Spring Boot provides a good default implementation for exception handling for RESTful Services.
This is the response when you try getting details of a non-existing student. You can see that the response status is 500 – Internal Server Error.
Customizing Exception Handling with Spring Boot
There are 2 most commonly used annotations used in Error Handling – @ExceptionHandler and @ControllerAdvice.
What is ExceptionHandler?
The @ExceptionHandler is an annotation used to handle the specific exceptions and send the custom responses to the client.
@ExceptionHandler(StudentNotFoundException.class)
What is ControllerAdvice?
A controller advice allows you to use exactly the same exception-handling techniques but apply them across the whole application, not just to an individual controller.
A combination of Spring and Spring Boot provides multiple options to customize responses for errors.
@ControllerAdvice
@RestController
public class CustomizedResponseEntityExceptionHandler extends ResponseEntityExceptionHandler {
You can specify the Response Status for a specific exception along with the definition of the Exception with the ‘@ResponseStatus’ annotation.
@ResponseStatus(HttpStatus.NOT_FOUND)
I have defined the StudentNotFoundExceptionclass. This Exception will be thrown by the controller when no resource i.e. Student to be returned in our case is found with HTTP Status of NOT_FOUND (404).
import org.springframework.http.HttpStatus;
import org.springframework.web.bind.annotation.ResponseStatus;

@ResponseStatus(HttpStatus.NOT_FOUND)
public class StudentNotFoundException extends RuntimeException {

	public StudentNotFoundException(String exception) {
		super(exception);
	}
}
The default error response provided by Spring Boot contains all the details that are typically needed.
However, you might want to create a framework-independent response structure for your organization. In that case, you can define a specific error response structure.
import java.util.Date;

public class ExceptionResponse {
	private Date timestamp;
	private String message;
	private String details;

	public ExceptionResponse(Date timestamp, String message, String details) {
		super();
		this.timestamp = timestamp;
		this.message = message;
		this.details = details;
	}

	public Date getTimestamp() {
		return timestamp;
	}

	public String getMessage() {
		return message;
	}

	public String getDetails() {
		return details;
	}
}
To use ExceptionResponseto return the error response, let’s define a ControllerAdvice as shown below.
@ControllerAdvice
@RestController
public class CustomizedResponseEntityExceptionHandler extends ResponseEntityExceptionHandler {

	@ExceptionHandler(StudentNotFoundException.class)
	public final ResponseEntity<Object> handleUserNotFoundException(StudentNotFoundException ex, WebRequest request) {
		ExceptionResponse exceptionResponse = new ExceptionResponse(new Date(), ex.getMessage(),
				request.getDescription(false));
		return new ResponseEntity(exceptionResponse, HttpStatus.NOT_FOUND);
	}
Scenario 1- How to execute a Get Request Method with an Invalid URL using Postman
The below picture shows how we can execute a Get Request Method with an Invalid URL using Postman.
The above scenario can be tested in the below way.
Feature: Student Exception

   @InvalidURL
   Scenario: Send a valid Request to create a student

    Given I send a request to the invalid URL "/students/100" to get a student details
    Then the response will return status of 404 and message "id-100"
Test Code to test the above scenario (StepDefinition file)
@SpringBootTest(classes = SpringBootRestServiceApplication.class, webEnvironment = WebEnvironment.RANDOM_PORT)
public class CustomizedErrorsDefinition {

	private final static String BASE_URI = "http://localhost";

	@LocalServerPort
	private int port;

	private ValidatableResponse validatableResponse;

	private void configureRestAssured() {

		RestAssured.baseURI = BASE_URI;
		RestAssured.port = port;
	}

	protected RequestSpecification getAnonymousRequest() throws NoSuchAlgorithmException {
		configureRestAssured();
		return given();
	}

	@Given("^I send a request to the invalid URL \"([^\"]*)\" to get a student details$")
	public void iSendARequest(String endpoint) throws Throwable {

		validatableResponse = getAnonymousRequest().contentType(ContentType.JSON).when().get(endpoint).then();
	}

	@Then("^the response will return status of (\\d+) and message \"([^\"]*)\"$")
	public void extractResponse(int status, String message) {		validatableResponse.assertThat().statusCode(equalTo(status)).body("message", equalTo(message));
	}
}
In the previous tutorial, I have explain about SpringBoot and how to perform Integration testing of SpringBoot Exception Handling. In this tutorial, I will explain about the Integration testing of Testing of SpringBoot Validation for RESTful Services.
What is Validation?
It is necessary that the response recieve from RestFul service should return meaningful information, like certain data type, constraints. If a response returns error message, then we expect it to provide information like clear error message, which field has an error, what is the type of error, proper status code and most importantly should not provide any sensitive information.
To know about all the dependencies neede to test Springboot, please click here.
Below are various Java classes present in a SpringBoot REST Application/API
• SpringBootRestServiceApplication.java – The Spring Boot Application class generated with Spring Initializer. This class acts as the launching point for application.
• pom.xml – Contains all the dependencies needed to build this project.
• Student.java – This is JPA Entity for Student class
• StudentRepository.java – This is JPA Repository for Student. This is created using Spring Data JpaRepository.
• StudentController.java – Spring Rest Controller exposing all services on the student resource.
• CustomizedExceptionHandler.java – This implements global exception handling and customize the responses based on the exception type.
• ErrorDetails.java – Response Bean to use when exceptions are thrown from API.
• StudentNotFoundException.java – Exception thrown from resources when student is not found.
• data.sql – Data is loaded from data.sql into Student table. Spring Boot would execute this script after the tables are created from the entities.
REST request validation annotations
ANNOTATION
USAGE
@AssertFalse
The annotated element must be false.
@AssertTrue
The annotated element must be true.
@DecimalMax
The annotated element must be a number whose value must be lower or equal to the specified maximum.
@DecimalMin
The annotated element must be a number whose value must be higher or equal to the specified minimum.
@Future
The annotated element must be an instant, date or time in the future.
@Max
The annotated element must be a number whose value must be lower or equal to the specified maximum.
@Min
The annotated element must be a number whose value must be higher or equal to the specified minimum.
@Negative
The annotated element must be a strictly negative number.
@NotBlank
The annotated element must not be null and must contain at least one non-whitespace character.
@NotEmpty
The annotated element must not be null nor empty.
@NotNull
The annotated element must not be null.
@Null
The annotated element must be null.
@Pattern
The annotated CharSequence must match the specified regular expression.
@Positive
The annotated element must be a strictly positive number.
@Size
The annotated element size must be between the specified boundaries (included).
Implementing Validation on the Resource
Add @Valid in addition to @RequestBody.
public ResponseEntity<Object> createStudent(@Valid @RequestBody Student student) {
Below is the example of Student.java class. Here, you can see I have used various validations.
Here, Student class is annotated with @Entity, indicating that it is a JPA entity. There is no @Table annotation so entity is mapped to a table named Student .)
Id property is annotated with @Id and also annotated with @GeneratedValue to indicate that the ID should be generated automatically.
@Entity
public class Student {
    @Id
    @GeneratedValue
    private Long id;

    @NotNull
    @Size(min = 4, message = "Name should have atleast 4 characters")
    private String name;

   @NotBlank(message = "passportNumber is mandatory")
   private String passportNumber;

    public Student() {
        super();
    }

    public Student(Long id, String name, String passportNumber) {
        super();
        this.id = id;
        this.name = name;
        this.passportNumber = passportNumber;
    }

    public Long getId() {
        return id;
    }

    public void setId(Long id) {
        this.id = id;
    }

    public String getName() {
        return name;
    }

    public void setName(String name) {
        this.name = name;
    }

    public String getPassportNumber() {
        return passportNumber;
    }

    public void setPassportNumber(String passportNumber) {
        this.passportNumber = passportNumber;
    }
}
We need a @ControllerAdvice to handle validation errors. Below is the snippet of validation error for invalid method arguement.
@ControllerAdvice
@RestController
public class CustomizedResponseEntityExceptionHandler extends ResponseEntityExceptionHandler {

	@Override
	protected ResponseEntity<Object> handleMethodArgumentNotValid(MethodArgumentNotValidException ex,
			HttpHeaders headers, HttpStatus status, WebRequest request) {
		ExceptionResponse exceptionResponse = new ExceptionResponse(new Date(), "Validation Failed",
				ex.getBindingResult().toString());
		return new ResponseEntity(exceptionResponse, HttpStatus.BAD_REQUEST);
	}
}
Scenario 1 – Below picture shows how we can execute a POST Request where Name is passed as null using Postman
@NotNull
    private String name;
In the below image, I am trying to create a new Student with name as null.
Above scenario can be tested in the below way.
Feature: Validation of Student Request
@CreateStudentWithNoName
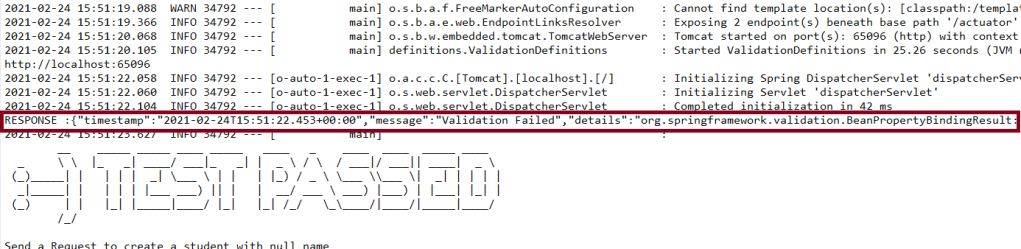
Scenario: Send a Request to create a student with no name
Given I send a request to the URL "/students" to create a user with name as null and passport as "RA000002"
Then the response will return error message as "Validation Failed" and details contain error detail as "default message [name]]; default message [must not be null]"
Test Code to test above scenario (StepDefinition file)
@SpringBootTest(classes = SpringBootRestServiceApplication.class, webEnvironment = WebEnvironment.RANDOM_PORT)
public class ValidationDefinitions {

	private final static String BASE_URI = "http://localhost";

	@LocalServerPort
	private int port;

	private ValidatableResponse validatableResponse, validatableResponse1;

	private void configureRestAssured() {

		RestAssured.baseURI = BASE_URI;
		RestAssured.port = port;
	}

	protected RequestSpecification getAnonymousRequest() throws NoSuchAlgorithmException {
		configureRestAssured();
		return given();
	}

	@Given("^I send a request to the URL \"([^\"]*)\" to create a user with name as null and passport as \"([^\"]*)\"$")
	public void iSendARequestwithNullName(String endpoint, String passport) throws Throwable {

		Map<String, String> map = new HashMap<>();
		map.put("name", null);
		map.put("passport", passport);

		JSONObject newStudent = new JSONObject(map);

		validatableResponse = getAnonymousRequest().contentType(ContentType.JSON).body(newStudent.toString()).when()
				.post(endpoint).then();
	}

	@Then("^the response will return error message as \"([^\"]*)\" and details contain error detail as \"([^\"]*)\"$")

	public void extractErrorResponse(String message, String details) {

		validatableResponse.assertThat().body("message", equalTo(message)).and().body(containsString(details));
	}
}
To know how to start the springBoot test and web environment. Please refer this link.
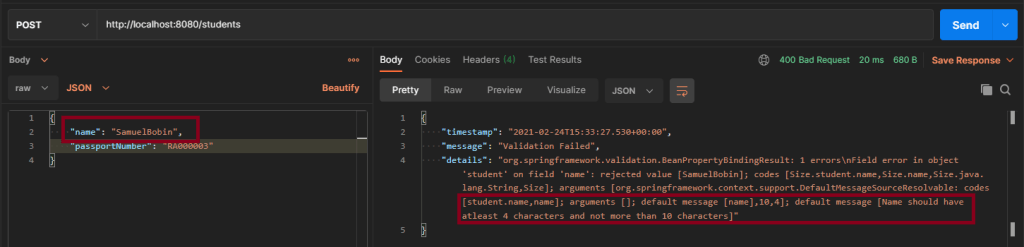
Scenario 2 – Below picture shows how we can execute a POST Request to create a student with Name as length outside the range using Postman
@Size(min = 4, max = 10, message = "Name should have atleast 4 characters and not more than 10 characters")
	private String name;
This means that name should have minimum 4 characters and maximum 10 character. Name not in this range will throw validation error with message as “Name should have atleast 4 characters and not more than 10 characters”
Above scenario can be tested in the below way.
 @CreateStudentWithInvalidName

    Scenario: Send a Request to create a student with invalid name

    Given I send a request to the URL "/students" to create a user with name as "SamuelBobin" and passport as "RA000003"
    Then the response will return error message as "Validation Failed" and details contain error detail as "Name should have atleast 4 characters and not more than 10 characters"
Test Code to test above scenario (StepDefinition file)
@Given("^I send a request to the URL \"([^\"]*)\" to create a user with name as \"([^\"]*)\" and passport as \"([^\"]*)\"$")
	public void iSendARequest(String endpoint, String newName, String passport) throws Throwable {

		Map<String, String> map = new HashMap<>();
		map.put("name", newName);
		map.put("passport", passport);

		JSONObject newStudent = new JSONObject(map);

		validatableResponse = getAnonymousRequest().contentType(ContentType.JSON).body(newStudent.toString()).when()
				.post(endpoint).then();
	}

	@Then("^the response will return error message as \"([^\"]*)\" and details contain error detail as \"([^\"]*)\"$")

	public void extractErrorResponse(String message, String details) {

		validatableResponse.assertThat().body("message", equalTo(message)).and().body(containsString(details));

	}
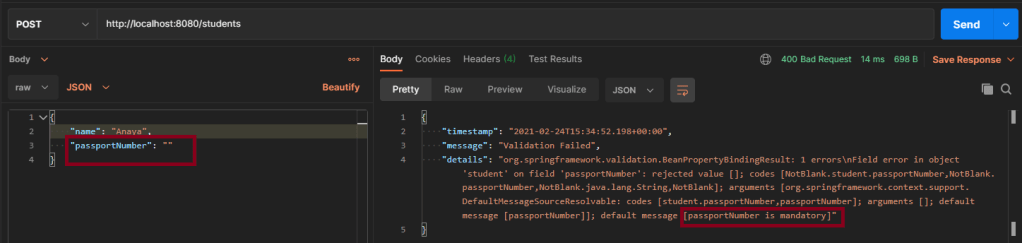
Scenario 3 – Below picture shows how we can execute a POST Request where creating a student with passport as not Blank using Postman
@NotBlank(message = "passportNumber is mandatory")
	private String passportNumber;
@NotBlank is to specify the attribute should not be blank and also a message when a validation error occurs “passportNumber is mandatory”.
In the previous tutorial, I explained about the Testing of SpringBoot GET Method. In this tutorial, I will discuss about the Testing of POST method which create Resource in SpringBoot application.
First, let us see what are RequestBody and PathMapping annotations which are commonly used assnotations for POST Method
1. What is RequestBody
The @RequestBody annotation maps body of the web request to the method parameter. The body of the request is passed through an HttpMessageConverterto resolve the method argument depending on the content type of the request.
public ResponseEntity<Object> createStudent(@Valid @RequestBody Student student) {
2. What is PathMapping
The @PathMapping annotation is the specialized version of the @RequestMapping annotation which acts as a shortcut for @RequestMapping(method=RequestMethod=POST).
Here, we will use @PostMapping. It is annotation for mapping HTTP POSTrequests onto specific handler.
@PostMapping is a composed annotation that acts as a shortcut for @RequestMapping(method=RequestMethod.POST)
@PostMapping("/students")
The dependencies need in POM.xml to test springboot framework is mentioned here.
Code of StudentController.java is below
@PostMapping("/students")
	public ResponseEntity<Object> createStudent(@Valid @RequestBody Student student) {
		Student savedStudent = studentRepository.save(student);

		URI location = ServletUriComponentsBuilder.fromCurrentRequest().path("/{id}")
				.buildAndExpand(savedStudent.getId()).toUri();

		return ResponseEntity.created(location).build();
}
ResponseEntity.created(location).build(): Return a status of created. Also return the location of created resource as a Response Header.
Code of Student.java is below
@Entity
public class Student {
	@Id
	@GeneratedValue
	private Long id;

	@NotNull
	@Size(min = 4, message = "Name should have atleast 4 characters")
	private String name;

	private String passportNumber;

	public Student() {
		super();
	}

	public Student(Long id, String name, String passportNumber) {
		super();
		this.id = id;
		this.name = name;
		this.passportNumber = passportNumber;
	}

	public Long getId() {
		return id;
	}

	public void setId(Long id) {
		this.id = id;
	}

	public String getName() {
		return name;
	}

	public void setName(String name) {
		this.name = name;
	}

	public String getPassportNumber() {
		return passportNumber;
	}

	public void setPassportNumber(String passportNumber) {
		this.passportNumber = passportNumber;
	}
}
This is the Student entity. Each entity must have at least two annotations defined: @Entity and @Id. The @Entity annotation specifies that the class is an entity and is mapped to a database table. The @Table annotation specifies the name of the database table to be used for mapping. The @Id annotation specifies the primary key of an entity and the @GeneratedValue provides for the specification of generation strategies for the values of primary keys.
Here, Student class is annotated with @Entity, indicating that it is a JPA entity. (Because no @Table annotation exists, it is assumed that this entity is mapped to a table named Student .)
The Student object’s idproperty is annotated with @Id so that JPA recognizes it as the object’s ID. The id property is also annotated with @GeneratedValue to indicate that the ID should be generated automatically.
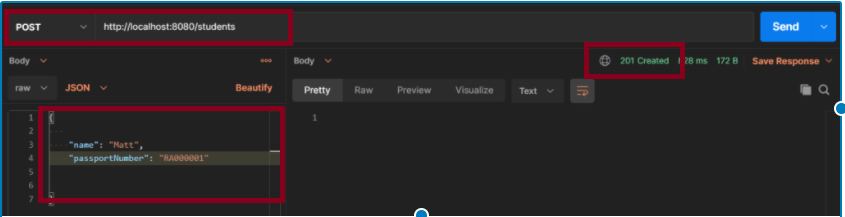
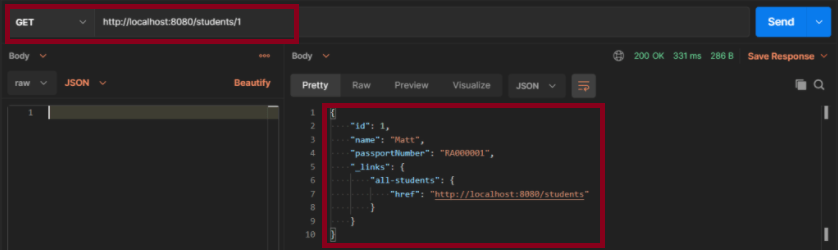
Scenario 1- Below picture shows how we can execute a sucessful POST Request Method on a Resource using Postman
In the below image, a new Student with name “Mat” is created and the status code returned is 201.
In the below image, I’m checking if the new user is created with name “Matt”. As id is auto genertaed, so the ID generation starts from 1.
Above scenario can be tested in the below way.
Feature: Create Student Request

   @CreateStudent
   Scenario: Send a valid Request to create a student

     Given I send a request to the URL "/students" to create a user with name "Matt" and passport as "RA000001"
    Then the response will return status of 201 for new student
    And I send a request to the URL "/students/1" to get detail of new student name as "Matt"
Test Code to test above scenario (StepDefinition file)
@SpringBootTest(classes = SpringBoot2RestServiceApplication.class, webEnvironment = WebEnvironment.RANDOM_PORT)
public class CreateStudentDefinition {

	private final static String BASE_URI = "http://localhost";

	@LocalServerPort
	private int port;

	private ValidatableResponse validatableResponse, validatableResponse1;

	private void configureRestAssured() {

		RestAssured.baseURI = BASE_URI;
		RestAssured.port = port;
	}

	protected RequestSpecification getAnonymousRequest() throws NoSuchAlgorithmException {
		configureRestAssured();
		return given();
	}

	@Given("^I send a request to the URL \"([^\"]*)\" to create a user with name \"([^\"]*)\" and passport as \"([^\"]*)\"$")
	public void iSendARequest(String endpoint, String newName, String passport) throws Throwable {

		JSONObject newStudent = new JSONObject();

		newStudent.put("name", newName);
		newStudent.put("passport", passport);

		validatableResponse = getAnonymousRequest().contentType(ContentType.JSON).body(newStudent.toString()).when()
				.post(endpoint).then();
	}

	@Then("^the response will return status of (\\d+) for new student$")
	public void extractResponseOfNewStudent(int status) {

		validatableResponse.assertThat().statusCode(equalTo(status));
	}

	@And("^I send a request to the URL \"([^\"]*)\" to get detail of new student name as \"([^\"]*)\"$")
	public void extractResponseOfNewStudent(String endpoint, String newName) throws NoSuchAlgorithmException {

		validatableResponse1 = getAnonymousRequest().contentType(ContentType.JSON).when().get(endpoint).then();
		validatableResponse1.assertThat().body("name", equalTo(newName));

	}
Here, I have used JSONObject from org.json to create the JSON directly. I use the put() method and supply the key and value as an argument.
JSONObject newStudent = new JSONObject();

		newStudent.put("name", newName);
		newStudent.put("passport", passport);
There is another way to create a JSON using Map. Here we construct a custom Map and then pass it as an argument to JSONObject‘s constructor.
Map<String, String> map = new HashMap<>();
		map.put("name", newName);
		map.put("passport", passport);

		JSONObject newStudent  = new JSONObject(map);
For assertion purpose, we use Hamcrest Matchers. Hamcrest is a framework for software tests. Hamcrest allows checking for conditions in your code via existing matchers classes. It also allows you to define your custom matcher implementations.
Page Object model is an object design pattern in Selenium, where web pages are represented as classes, and the various elements on the page are defined as variables in the class and all possible user interactions can then be implemented as methods in the class.
The benefit is that if there is any change in the UI for the page, the tests themselves don’t need to change, only the code within the page object needs to change. Subsequently all changes to support that new UI are located in one place.
Advantages:
1. Readable – There is a clean separation between test code and page specific code such as locators and methods.
2. Maintainability – In this model, separate classes are created for different pages of a web application like login page, the home page, employee detail page, change password page, etc. So, if there is any change in any element of a website then we only need to make changes in one class, and not in all classes.
3. Reusable – If multiple test scripts use the same web elements, then we need not write code to handle the web element in every test script. Placing it in a separate page class makes it reusable by making it accessible by any test script.
4. Easy project Structure– Its project structure is quite easy and understandable.
5. PageFactory – It can use PageFactory in the page object model in order to initialize the web element and store elements in the cache.
In case there are lots of web elements on a page, then the object repository class for a page can be separated from the class that includes methods for the corresponding page.
Example: If the New Customer page has many input fields. In that case, there can be 2 different classes. One class called NewCustomerObjects.java that forms the object repository for the UI elements on the register accounts page.
A separate class file NewCustomerMethods.java extending or inheriting NewCustomerObjects that includes all the methods performing different actions on the page could be created.
Consider the below script to login to an application and navigate to home page.
This is a small script. Therefore, script maintenance and readability looks very easy.
Imagine there are 50 different tests present in this script. In that case, the readability of the script decreases as well as maintenance become very difficult.
Scenario
Launch the Firefox browser.
The demo website opens in the browser.
Verify the Login Page
Enter username and Password and login to the demo site.
PageFactory is a way of implementing the “Page Object Model”. Here, we follow the principle of separation of Page Object Repository and Test Methods. It is an inbuilt concept of Page Object Model which is very optimized.
1. The annotation @FindBy is used in Pagefactory to identify an element while POM without Pagefactory uses the driver.findElement() method to locate an element.
2. The second statement for Pagefactory after @FindBy is assigning an <element name> of type WebElement class that works exactly similar to the assignment of an element name of type WebElement class as a return type of the method driver.findElement() that is used in usual POM (userName in this example).
3. Below is a code snippet of non PageFactory Mode to set Firefox driver path. A WebDriver instance is created with the name driver and the FirefoxDriver is assigned to the ‘driver’. The same driver object is then used to launch the demo website, locate the webelements and to perform various operations
Basically, here the driver instance is created initially and every web element is freshly initialized each time when there is a call to that web element using driver.findElement() or driver.findElements().
ChromeOptions options = new ChromeOptions();
driver = new ChromeDriver(options);
driver.manage().window().maximize();
driver.manage().timeouts().implicitlyWait(10, TimeUnit.SECONDS);
driver.get("https://opensource-demo.orangehrmlive.com/");
But with POM with PageFactory approach, all the elements are initialized with initElements() without explicitly initializing each web element.
The initElementsis a static method of PageFactory class which is used to initialize all the web elements located by @FindBy annotation. Thus, instantiating the Page classes easily. It is used to initialize the WebElements declared, using driver instance from the main class. In other words, WebElements are created using the driver instance. Only after the WebElements are initialized, they can be used in the methods to perform actions.
public Login(WebDriver driver) {
           this.driver = driver;
           // This initElements method will create all WebElements
           PageFactory.initElements(driver, this);
     }
3.2 Create methods for actions performed on WebElements.
Below actions are performed on WebElements in Login Page:
Get Text on Login Page
Type action on the Username field.
Type action in the Password field.
Click action on the Login Button
Note: A constructor has to be created in each of the class in the Page Layer, in order to get the driver instance from the Main class in Test Layer and also to initialize WebElements(Page Objects) declared in the page class using PageFactory.InitElement().
BaseClass
package com.example.pages;

import org.openqa.selenium.WebDriver;
import org.openqa.selenium.support.PageFactory;

public class BasePage {
    public WebDriver driver;

    public BasePage(WebDriver driver) {
        this.driver = driver;
        PageFactory.initElements(driver,this);
    }

}
Login Page
package com.example.pages;

import org.openqa.selenium.WebDriver;
import org.openqa.selenium.WebElement;
import org.openqa.selenium.support.FindBy;

public class LoginPage extends BasePage{

    public LoginPage(WebDriver driver) {
        super(driver);

    }

    @FindBy(name = "username")
    public WebElement userName;

    @FindBy(name = "password")
    public WebElement password;

    @FindBy(xpath = "//*[@class='oxd-form']/div[3]/button")
    public WebElement login;

    @FindBy(xpath = "//*[@id='app']/div[1]/div/div[1]/div/div[2]/div[2]/div/div[1]/div[1]/p")
    public  WebElement errorMessage;


    public void login(String strUserName, String strPassword) {

        userName.sendKeys(strUserName);
        password.sendKeys(strPassword);
        login.click();

    }

    public String getErrorMessage() {
        return errorMessage.getText();
    }


}
HomePage. java
package com.example.pages;

import org.openqa.selenium.WebDriver;
import org.openqa.selenium.WebElement;
import org.openqa.selenium.support.FindBy;

public class HomePage extends BasePage {

    public HomePage(WebDriver driver) {
        super(driver);

    }

    @FindBy(xpath = "//*[@id='app']/div[1]/div[1]/header/div[1]/div[1]/span/h6")
    public  WebElement homePageUserName;

    public String getHomePageText() {
        return homePageUserName.getText();
    }

}
Step 4 – Create test class for the tests of these pages
BaseTests
package com.example.tests;

import org.openqa.selenium.WebDriver;
import org.openqa.selenium.chrome.ChromeDriver;
import org.openqa.selenium.chrome.ChromeOptions;
import org.testng.annotations.AfterMethod;
import org.testng.annotations.BeforeMethod;

import java.time.Duration;

public class BaseTests {

    public static WebDriver driver;
    public final static int TIMEOUT = 10;

    @BeforeMethod
    public void setup() {

        ChromeOptions options = new ChromeOptions();
        options.addArguments("--remote-allow-origins=*");
        options.addArguments("--no-sandbox");
        options.addArguments("--disable-dev-shm-usage");
        options.addArguments("--headless");
        driver = new ChromeDriver(options);
        driver.manage().window().maximize();
        driver.get("https://opensource-demo.orangehrmlive.com/");
        driver.manage().timeouts().implicitlyWait(Duration.ofSeconds(TIMEOUT));

    }

    @AfterMethod
    public void tearDown() {
        driver.quit();
    }

}
LoginPageTests.java
package com.example.tests;

import com.example.pages.HomePage;
import com.example.pages.LoginPage;
import org.testng.Assert;
import org.testng.annotations.Test;

public class LoginPageTests extends BaseTests{

    String actualResponse;

    @Test
    public void invalidCredentials()  {

        LoginPage objLoginPage = new LoginPage(driver);
        objLoginPage.login("admin", "admin");
        actualResponse = objLoginPage.getErrorMessage();
        Assert.assertEquals(actualResponse,"Invalid credentials");
    }

    @Test
    public void validCredentials() {

        LoginPage objLoginPage = new LoginPage(driver);
        objLoginPage.login("Admin", "admin123");
        HomePage objHomePage = new HomePage(driver);
        actualResponse = objHomePage.getHomePageText();
        Assert.assertEquals(actualResponse,"Dashboard");

    }

}
Step 5 – Execute the tests
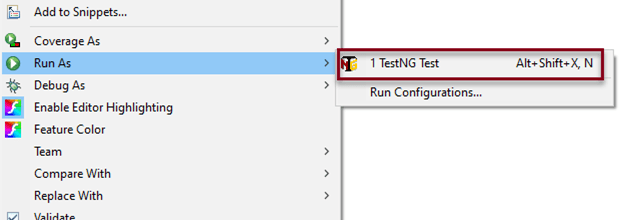
To run the test, right click and select as Run As and then select TestNG Test (Eclipse).
Right-click on the LoginPageTests and select Run ‘LoginPageTests’ (IntelliJ)
Step 6 – Create TestNG.xml
You can add TestNG.xml and run the tests from there also.
<?xml version = "1.0"encoding = "UTF-8"?>
<!DOCTYPE suite SYSTEM "http://testng.org/testng-1.0.dtd">
<suite name = "PageObjectModel">
    <test name = "PageObjectModel Tests">
        <classes>
            <class name ="com.example.tests.LoginPageTests"/>
        </classes>
    </test>
</suite>
Step 7 – Run the tests from TestNG.xml
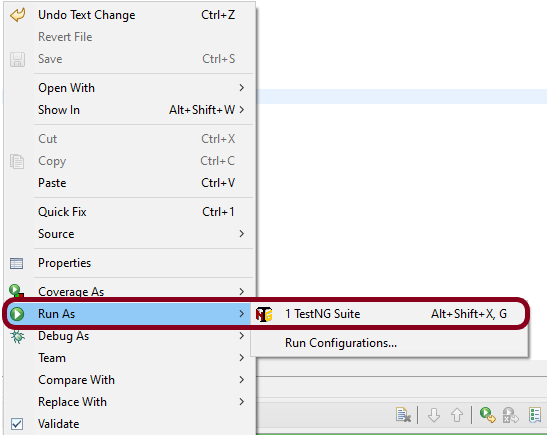
Right click on TestNG.xml and select Run As TestNG Suite.
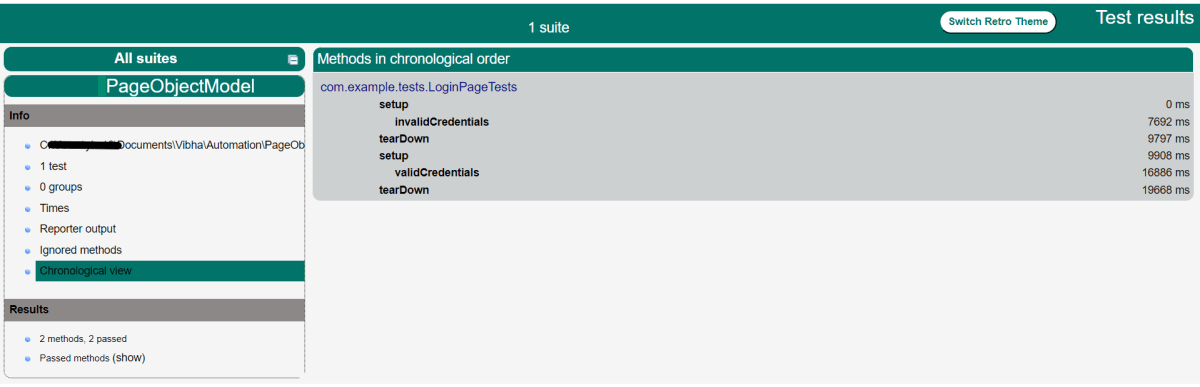
The execution status looks like as shown below.
Step 8 -TestNG Report Generation
Once the execution is finished, refresh the project. It will create a test-output folder containing various reports generated by TestNG. Below is the screenshot of the report folder.
Index.html
emailable-report.html
Step 9 – Execute the tests through command line
We can run the tests through command line. Use the below command:
Eclipse IDE is a software that allows you to write your programs and test scripts in multiple programming languages (with Java being the most popular one).
Download Eclipse IDE
1. Open the below mentioned link. Latest version of Eclipse available is Eclipse IDE 2024-09 R Packages Eclipse Download .
2. Select – Eclipse IDE for Java Developers. Depending on type of Operating System, download either 32 bit or 64 bit. My system is 64 bit, so downloading 64 bit Eclipse .
3. Click on the Download button to start downloading process.
Install/Setup Eclipse
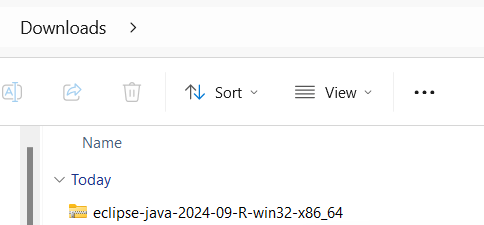
1. We do not need to install Eclipse, just unzip the Eclipse downloaded folder. Go to the path where Eclipse downloaded and unzip the folder .
2. Eclipse folder have Eclipse Editor (Eclipse.exe), double click on it.
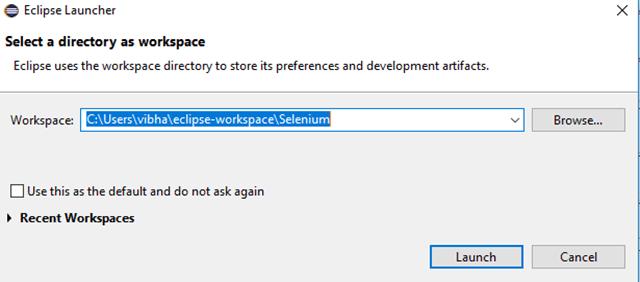
3. Eclipse Workplace directory will get open. You can provide name to this directory. In Eclipse, all the projects saved in Eclipse Directory
4. A folder with same Eclipse Directory name creates in same path as mentioned above.
5. Eclipse Workspace will open as shown below:
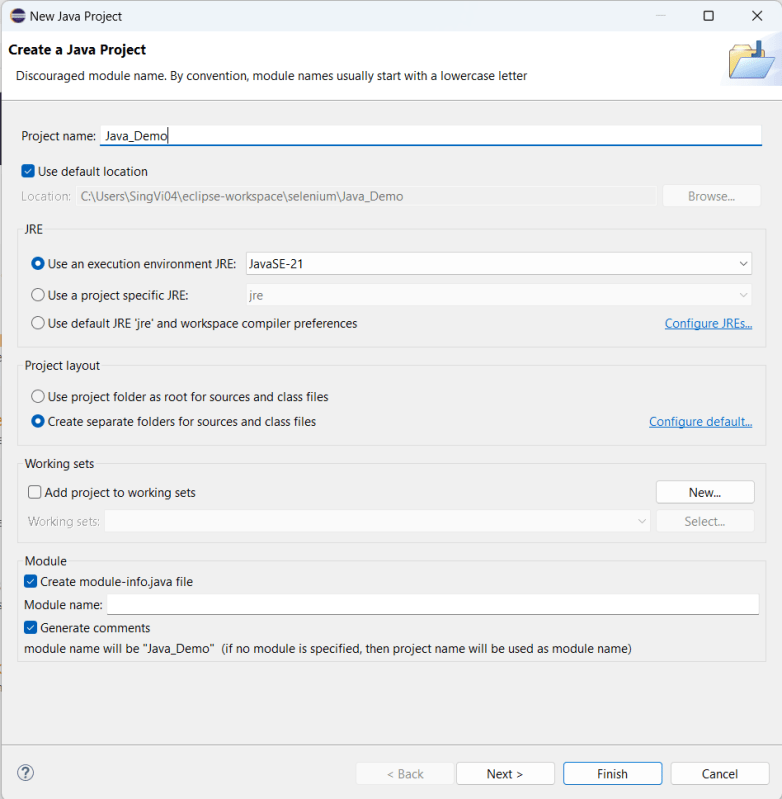
6. Click on the “Create a new Java project”. It will open an editor as shown below. We need to provide the Java Project name here as it is Java_Demo in this case. Click on the “Next” button.
7. It will show the Java Settings as shown in the below image. Click on the “Finish” button.
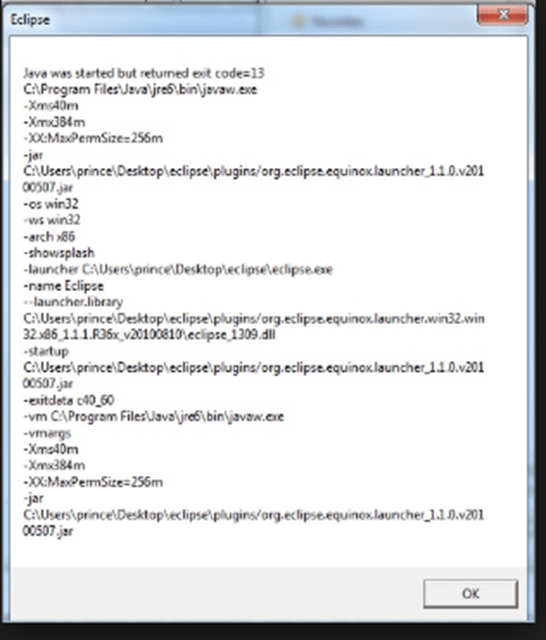
Note: – There are chances that you may face the issue while trying to access Eclipse IDE – Java was started but returned exit code =13. This is because there is configuration mistake in Eclipse.ini (Eclipse Configuration) file. The error will look like something below:-
To fix this issue, open the Eclipse Configuration file. It will be present in unzipped Eclipse Folder.
Add the below mentioned line in Eclipse Configuration file:-
Spring Boot is an open-source micro framework which provides Java developers with a platform to get started with an auto configurable production-grade Spring application.
In this tutorial, lets see a SpringBoot REST Application and how it can be tested with the help of Rest Assured and Serenity
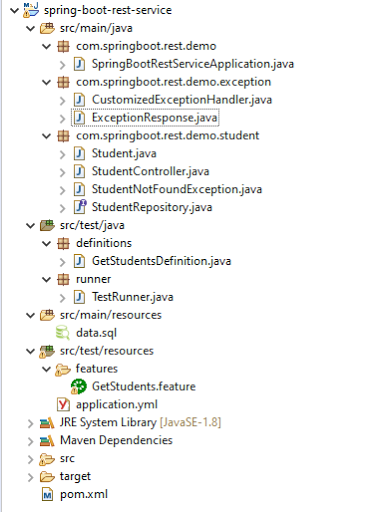
Below is the structure of a SpringBoot application project
Below are various Java classes present in a SpringBoot REST Application/API
SpringBootRestServiceApplication.java – The Spring Boot Application class generated with Spring Initializer. This class acts as the launching point for application.
pom.xml – Contains all the dependencies needed to build this project.
Student.java – This is JPA Entity for Student class
StudentRepository.java – This is JPA Repository for Student. This is created using Spring Data JpaRepository.
StudentController.java – Spring Rest Controller exposing all services on the student resource.
CustomizedExceptionHandler.java – This implements global exception handling and customize the responses based on the exception type.
ErrorDetails.java – Response Bean to use when exceptions are thrown from API.
StudentNotFoundException.java – Exception thrown from resources when student is not found.
data.sql – Data is loaded from data.sql into Student table. Spring Boot would execute this script after the tables are created from the entities.
HTTP also defines standard response codes.
200 – SUCESS
404 – RESOURCE NOT FOUND
400 – BAD REQUEST
201 – CREATED
401 – UNAUTHORIZED
415 – UNSUPPORTED TYPE – Representation not supported for the resource
500 – SERVER ERROR
Let’s consider a few HTTP Methods:
GET : Should not update anything. Should return same result in multiple calls.
POST : Should create a new resource. Ideally return JSON with link to newly created resource. Same return codes as get possible. In addition – Return code 201 (CREATED) can be used.
PUT : Update a known resource. ex: update client details. Possible Return Codes : 200(OK) + 404 (NOT FOUND) +400 (BAD REQUEST)
DELETE : Used to delete a resource. Possible Return Codes : 200(OK).
We will create a Student Resource exposing three services using proper URIs and HTTP methods:
Retrieve all Students – @GetMapping(“/students”)
Get details of specific student – @GetMapping(“/students/{id}”)
Delete a student – @DeleteMapping(“/students/{id}”)
First, let us see what are @RestController, @AutoWired, @GetMapping and @PathVariable annotations.
1. @RestController
SpringBoot RestController annotation is use to create RESTful web services using Spring MVC. Spring RestController takes care of mapping request data to the request defined handles method.
2. @Autowired
The Spring framework enables automatic dependency injection. In other words, by declaring all the bean dependencies in a Spring configuration file, Spring container can autowire relationships between collaborating beans. This is called Spring bean autowiring. To know more about Autowired, you can refer this tutorial.
3. @GetMapping
It is annotation for mapping HTTP GET requests onto specific handler methods. Specifically, @GetMapping is a composed annotation that acts as a shortcut for @RequestMapping(method = RequestMethod.GET)
4. @PathVariable
This annotation can be used to handle template variables in the request URI mapping, and use them as method parameters. In this example, we use @PathVariable annotation to extract the templated part of the URI represented by the variable {id}.
A simple GET request to /students/{id} will invoke retrieveStudent with the extracted id value
http://localhost:8080/students/1001
Code of StudentController.java is below
@RestController
public class StudentController {

     @Autowired
     private StudentRepository studentRepository;

     @GetMapping("/students")
     public List retrieveAllStudents() {
           return studentRepository.findAll();
     }

     @GetMapping("/students/{id}")
     public EntityModel retrieveStudent(@PathVariable long id) {
           Optional student = studentRepository.findById(id);
           if (!student.isPresent())
                throw new StudentNotFoundException("id-" + id);
           EntityModel resource = EntityModel.of(student.get());

           WebMvcLinkBuilder linkTo = linkTo(methodOn(this.getClass()).retrieveAllStudents());
           resource.add(linkTo.withRel("all-students"));
           return resource;
     }
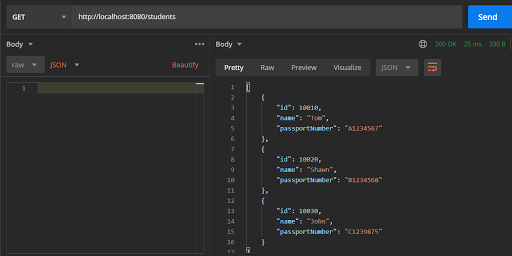
Scenario 1- Below picture shows how we can execute a Get Request Method on a Resource using Postman
Above scenario can be tested in the below way.
@ReceiveUserDetails
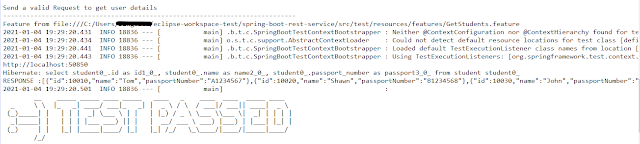
Scenario Outline: Send a valid Request to get user details
Given I send a request to the URL "/students" to get user details
Then the response will return status 200 and id and names and passport_no
Examples:
|studentID |studentNames |studentPassportNo|
|10010 |Tom |A1234567 |
|10020 |Shawn |B1234568 |
|10030 |John |C1239875 |
Test Code to test above scenario (StepDefinition file)
@SpringBootTest(classes = com.springboot.rest.demo.SpringBootRestServiceApplication.class, webEnvironment = WebEnvironment.RANDOM_PORT)

public class GetStudentsDefinition {

     private final static String BASE_URI = "http://localhost";

     @LocalServerPort
     private int port;

     private ValidatableResponse validatableResponse;

     private void configureRestAssured() {
           RestAssured.baseURI = BASE_URI;
           RestAssured.port = port;
     }

     protected RequestSpecification getAnonymousRequest() throws NoSuchAlgorithmException {
           configureRestAssured();
           return given();
     }

     @Given("^I send a request to the URL \"([^\"]*)\" to get user details$")
     public void iSendARequest(String endpoint) throws Throwable {
           validatableResponse = getAnonymousRequest().contentType(ContentType.JSON)
    .when().get(endpoint).then();
     }

     @Then("^the response will return status (\\d+) and id (.*) and names (.*) and passport_no (.*)$")
     public void extractResponse(int status, String id, String studentName,
     String passportNo) {
     validatableResponse.assertThat().statusCode(equalTo(status)).body(containsString(id))
                     .body(containsString(studentName)).body(containsString(passportNo));

     }
1. The @SpringBootTest annotation tells Spring Boot to look for a main configuration class (one with @SpringBootApplication, for instance) and use that to start a Spring application context.
2. WebEnvironment.RANDOM_PORT is used to create run the application at some random server port.
3. For assertion purpose, we use Hamcrest Matchers. Hamcrest is a framework for software tests. Hamcrest allows checking for conditions in your code via existing matchers classes. It also allows you to define your custom matcher implementations.
4. @LocalServerPort gets the reference of port where the server has started. It helps in building the actual request URIs to mimic real client interactions.
5. ContentType.JSON is imported fromrestassured as well as ValidatableResponse
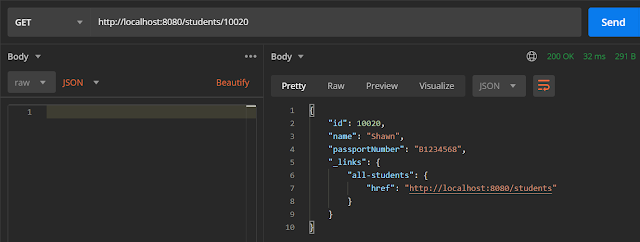
Scenario 2- Below picture shows how we can execute a Get Request Method to get detail of a specific Student. Here, we want details of student of Id 10020
@ReceiveAUserDetail
   Scenario: Send a valid Request to get user details
    Given I send a request to the URL "/students/10020" to get user detail of a specific user
    Then the response will return status 200 and name "Shawn"
Test Code to test above scenario (StepDefinition file)
@Given("^I send a request to the URL \"([^\"]*)\" to get user detail of a specific user$")
public void sendRequestForSpecificUser(String endpoint) throws Throwable {
validatableResponse = getAnonymousRequest().contentType(ContentType.JSON).when().get(endpoint).then();
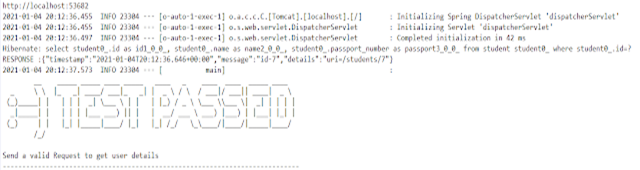
System.out.println("RESPONSE :" + validatableResponse.extract().asString());
}
@Then("^the response will return status (\\d+) and name \"([^\"]*)\"$")
public void extractResponseOfSpecificUser(int status, String name) {
validatableResponse.assertThat().statusCode(equalTo(status)).body("name", equalTo(name));
}
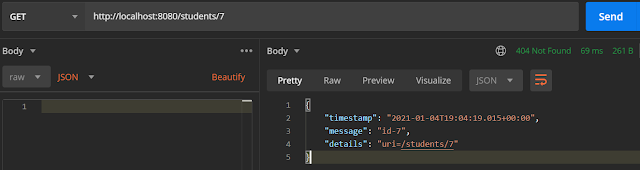
Scenario 3- Below picture shows how we can execute a Get Request Method for incorrect Student
@IncorrectUserId
   Scenario: Send a valid Request to get user details
    Given I send a request to the URL "/students/7" to get user detail of a specific user
    Then the response will return status 404 and message "id-7"
Test Code to test above scenario (StepDefinition file)
@Given("^I send a request to the URL \"([^\"]*)\" to get user detail of a specific user$")
     public void sendRequestForSpecificUser(String endpoint) throws Throwable {
           validatableResponse = getAnonymousRequest().contentType(ContentType.JSON).when().get(endpoint).then();
           System.out.println("RESPONSE :" + validatableResponse.extract().asString());
     }

     @Then("^the response will return status (\\d+) and message \"([^\"]*)\"$")
     public void extractResponseOfInvalidUser(int status, String message) {
         validatableResponse.assertThat().statusCode(equalTo(status)).body("message", equalTo(message));

     }
The listener is defined as an interface that modifies the default TestNG’s behaviour. There are several interfaces that allow you to modify TestNG’s behaviour that are called “TestNG Listeners”. It allows customizing TestNG reports or logs. There are many types of TestNG listeners available. Here are a few listeners:
IAnnotationTransformer
IAnnotationTransformer2
IHookable
IInvokedMethodListener
IMethodInterceptor
IReporter
ISuiteListener
ITestListener
When you implement one of these interfaces, you can let TestNG know about it in either of the following ways:
Using in yourtestng.xml file.
Using the@Listeners annotation on any of your test classes.
ITestListenerhas the following methods
OnStart – Invoked before running all the test methods belonging to the classes inside the tag and calling all their Configuration methods.
onTestSuccess – onTestSuccess method is called on the success of any Test.
onTestFailure – onTestFailure method is called on the failure of any Test.
onTestSkipped – onTestSkippedmethod is called on skipped of any Test.
onTestFailedButWithinSuccessPercentage– method is called each time Test fails but is within success percentage. Invoked each time a method fails but has been annotated with successPercentage and this failure still keeps it within the success percentage requested.
onFinish – Invoked after all the test methods belonging to the classes inside the tag have run and all their Configuration methods have been called.
onTestStart – Invoked each time before a test will be invoked. The ITestResult is only partially filled with the references to class, method, start millis, and status.
Here, I explain the use of listener – ITestListener in a program mentioned below
Step 1) Create a class “ListenerDemo” that implements ‘ITestListener’. Add methods like onTestFailure, onTestSkipped, onTestStart, onTestSuccessto this class
Step 2) Create another class “ListenerTestCases” for the login process automation. Selenium will execute these ‘TestCases’ to login automatically.
Step 3) Next, implement this listener in our regular project class i.e. “ListenerTestCases “. There are two different ways to connect to the class and interface.
The first way is to use Listeners annotation (@Listeners) as shown below:
Step 4): Execute the “ListenerTestCases” class. Methods in class “TestPass ” are called automatically according to the behaviour of methods annotated as @Test.
Step 5): Verify the Output that logs display at the console.
import org.testng.ITestContext;
import org.testng.ITestListener;
import org.testng.ITestResult;

public class ListenerDemo implements ITestListener {

            // When Test case get failed, this method is called.
            public void onTestFailure(ITestResult Result) {
                        System.out.println("The name of the testcase failed is :" + Result.getName());
            }

            // When Test case get Skipped, this method is called.
            public void onTestSkipped(ITestResult Result) {
                        System.out.println("The name of the testcase Skipped is :" + Result.getName());
            }

            // When Test case get Started, this method is called.
            public void onTestStart(ITestResult Result) {
                        System.out.println(Result.getName() + " test case started");
            }

            // When Test case get passed, this method is called.
            public void onTestSuccess(ITestResult Result) {
                        System.out.println("The name of the testcase passed is :" + Result.getName());
            }
}
In the below test, there are 2 test cases. One Test passes and another fails. When we are executing ListenerTestCases, it will call the ListenersDemo internally.
import org.openqa.selenium.By;
import org.openqa.selenium.WebDriver;
importorg.openqa.selenium.chrome.ChromeDriver;
import org.testng.Assert;
import org.testng.annotations.Listeners;
import org.testng.annotations.Test;

@Listeners(com.selenium.testng.TestNGDemo.ListenerDemo.class)
public class ListenerTestCases {

            static WebDriver driver;

            @Test
            public void TestPass() {
                        System.setProperty("webdriver.chrome.driver",
                                    "C:\\Users\\Vibha\\Desktop\\SeleniumKT\\chromedriver_win32\\chromedriver.exe");
                        driver= new ChromeDriver();
                        driver.get("https://opensource-demo.orangehrmlive.com/");
                        driver.findElement(By.name("txtUsername")).sendKeys("Admin");
                        driver.findElement(By.name("txtPassword")).sendKeys("admin123");
                        driver.findElement(By.id("btnLogin")).submit();
                        String dashboardTitle = driver.findElement(By.id("welcome")).getText();
                        Assert.assertTrue(dashboardTitle.contains("Welcome"));
            }

            @Test
            public void TestFail() {
                        System.setProperty("webdriver.chrome.driver",
                                    "C:\\Users\\Vibha\\Desktop\\SeleniumKT\\chromedriver_win32\\chromedriver.exe");
                        driver= new ChromeDriver();
                        driver.get("https://opensource-demo.orangehrmlive.com/");
                        driver.findElement(By.name("txtUsername")).sendKeys("Admin");
                        driver.findElement(By.name("txtPassword")).sendKeys("admin123");
                        driver.findElement(By.id("btnLogin")).submit();
                        String dashboardTitle = driver.findElement(By.id("welcome")).getText();
                        Assert.assertTrue(dashboardTitle.contains("Hello"));
            }
}

Output
TestFail test case started
The name of the testcase failed is :TestFail
TestPass test case started
The name of the testcase passed is :TestPass
PASSED: TestPass
FAILED: TestFail
java.lang.AssertionError: did not expect to find [true] but found [false]
The output of the above program is
To execute this program, we need to Right-click and select Run as – TestNG.
There is another way to execute the Listener class, which is using testng.xml. There is a Listener class named “ListenerDemo” where the implementation of various methods of the listener is present. If we want to run the tests using testng.xml, then there is no need of mentioning Listeners in the ListenerTestCases class.
<?xml version = "1.0"encoding = "UTF-8"?>
<!DOCTYPE suite SYSTEM "http://testng.org/testng-1.0.dtd">
<suite name = "TestSuite">
<listeners>
<listener class-name ="com.selenium.testng.TestNGDemo.ListenerDemo"/>
</listeners>

<test name ="Test">
<classes>
<class name="com.selenium.testng.TestNGDemo.ListenerTestCases"/>
</classes>
</test>
</suite>
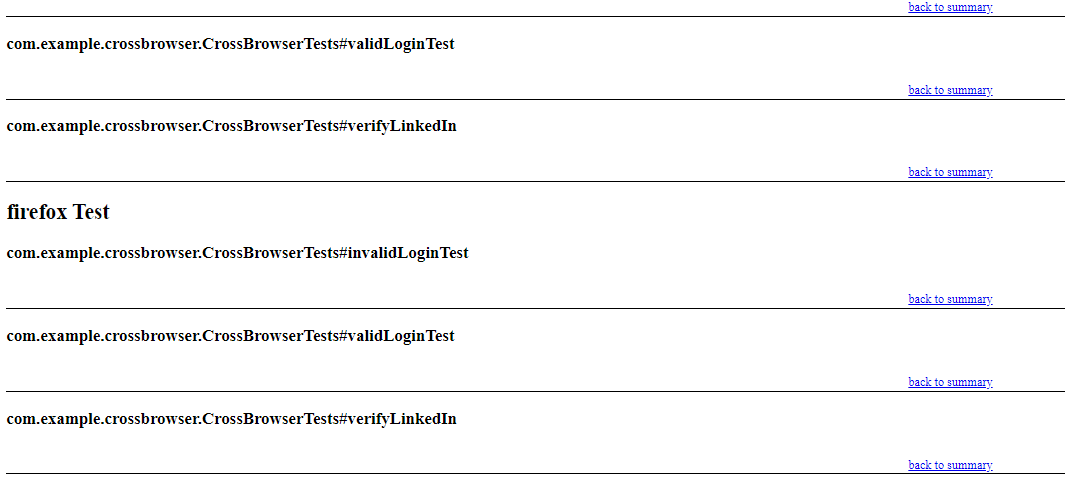
The test execution result will look like something shown below.
TestNG generates various types of reports under the test-output folder. Open “emailable-report.html”, as this is an HTML report open it with the browser. It will look like something below.
TestNG also produces an “index.html” report, and it resides under the test-output folder.
There is another example of Listener –ITestResult.
We are done! Congratulations on making it through this tutorial and hope you found it useful! Happy Learning!!
Cross Browser is a technique in which a web application tests on different browsers and operating systems. Cross Browser testing, make sure that the site rendered the same in every browser.
Suppose, we have to execute 25 tests cases to test a web application on Google Chrome Browser and it takes around 4 hrs to execute these tests. However, we do not know if a user is going to access the web application on which browser. Therefore, now the same set of test cases need to executes on Firefox, Edge, Internet Explorer, Safari and Opera.
Therefore, now we need to execute 25*6=150 test cases and test execution hour changes from 4 to 24 hrs to check that the web application is working as expected. What is the best approach to handle this situation is to automate these tests and perform cross browser testing
Why do we need to perform cross browser testing?
Each website is built by anyone or combination of these technologies – HTML, CSS and Javascript. Each browser uses different rendering engines to compute these technologies. Chrome uses Blink, WebKit on iOS, V8 JavaScript engine, Firefox uses Gecko, Edge uses Chromium-based with Blink and V8 engines, Safari uses Webkit rendering engine, IE uses Trident and so on.
1) Font size, image orientation and alignment mismatch in different browsers
2) Different browser is compatible with different operating systems
3) CSS,HTML validation difference can be there
Lets see an example of Cross Browser testing using Selenium and TestNG.
Step 1 – Add the below dependencies to the POM.xml, in case of Maven project.
We need to specify the values of browser in the TestNG XML file that will pass to the test case file.
<?xml version="1.0" encoding="UTF-8"?>
<!DOCTYPE suite SYSTEM "https://testng.org/testng-1.0.dtd">
<suite name="Suite" parallel="tests" thread-count="3">
  <test name="Chrome Test">
   <parameter name="browser" value="chrome" />
    <classes>
      <class name="com.example.crossbrowser.CrossBrowserTests"/>
    </classes>
  </test> <!-- Test -->

    <test name="firefox Test">
   <parameter name="browser" value="firefox" />
    <classes>
      <class name="com.example.crossbrowser.CrossBrowserTests"/>
    </classes>
  </test> <!-- Test -->

    <test name="Edge Test">
   <parameter name="browser" value="edge" />
    <classes>
      <class name="com.example.crossbrowser.CrossBrowserTests"/>
    </classes>
  </test> <!-- Test -->
</suite> <!-- Suite -->
To execute this program, we need to Right click on the program and select Run as – TestNGTest
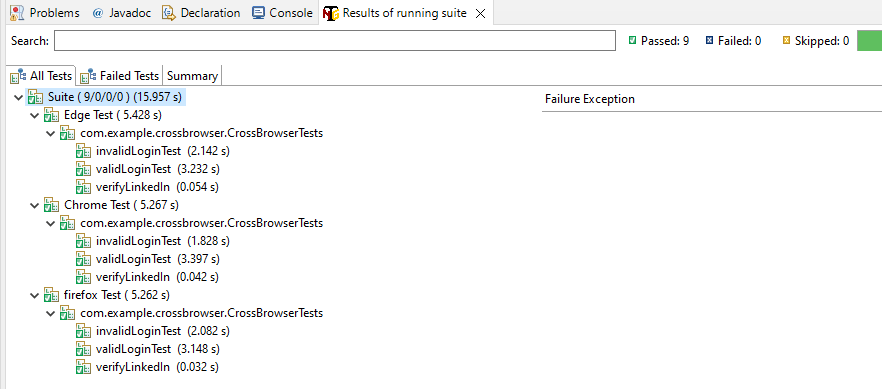
The test execution result looks like as shown below. It shows the test execution status of all the tests. As, in this program, 3 tests are executed and all 3 of them passes. The same result can be depicted from below image.
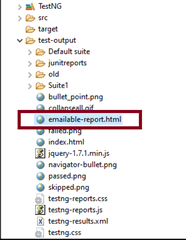
TestNG Report Generation
TestNG generates various type of reports under test-output folder like emailable-report.html, index.html, testng-results.xml
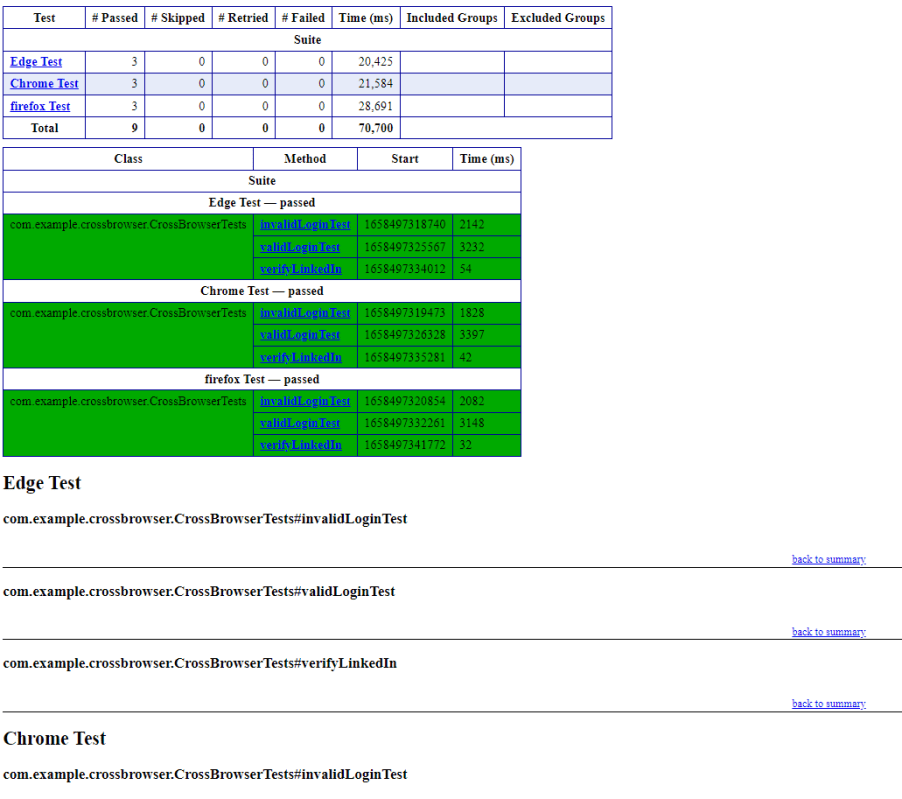
We are interested in ’emailable-report.html’ report. Open ’emailable-report.html’, as this is a html report open it with browser. Below image shows emailable-report.html.
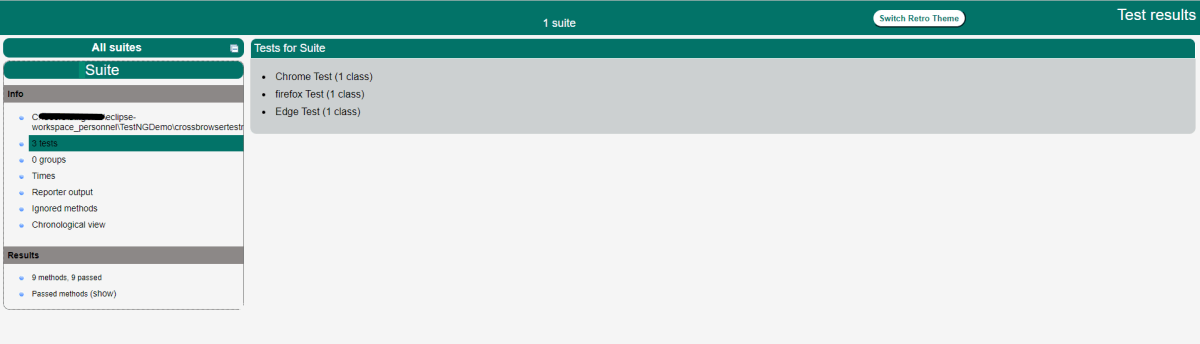
TestNG also produce “index.html” report and it resides under test-output folder. Below image shows index.html report.
We are done! Congratulations on making it through this tutorial and hope you found it useful! Happy Learning!!
Assertions in TestNG are a way to verify that the expected result and the actual result matches or not in the test case. A test is considered successful ONLY if it is completed without throwing any exception. An example of assertion can be logging into the website, checking the title of the webpage, verifying the functionality of an input box that takes only integers, etc.
Below are few commonly used assertions in TestNG.
1. Assert.assertEquals(String actual, String expected) – It takes two string arguments and checks whether both strings are equal or not. If they are not, it will fail the test and an AssertionError is thrown.
2. Assert.assertEquals(String actual, String expected, String message)– It takes two string arguments and checks whether both strings are equal or not. If they are not, it will fail the test and an AssertionError is thrown with message provided as argument.
3. Assert.assertEquals(boolean actual, boolean expected)– It takes two Boolean arguments and checks whether both are equal or not. If they are not, it will fail the test and an AssertionError is thrown.
4. Assert.assertEquals(java.util.Collection actual, java.util.Collection expected, java.lang.String message) – It takes two collection objects and verifies both collections contain the same elements and with the same order. If they are not, it will fail the test and an AssertionError is thrown.
5. Assert.assertTrue(condition) – It takes one boolean argument and checks that a condition is true or not. If not, it will fail the test and an AssertionError is thrown.
6. Assert.assertTrue(condition, message) – It takes one boolean argument and checks that a condition is true or not. If not, it will fail the test and an AssertionError is thrown with message provided as argument.
7. Assert.assertFalse(condition)– It takes one boolean argument and checks that a condition is false or not. If not, it will fail the test and an AssertionError is thrown.
8. Assert.assertFalse(condition, message) – It takes one boolean argument and checks that a condition is false or not. If not, it will fail the test and an AssertionError is thrown with message provided as argument.
9. Assert.assertSame(String actual, String expected) – It asserts that two objects refer to the same object. If they do not, an AssertionError is thrown.
10. Assert.assertNotSame(String actual, String expected) – It asserts that two objects do not refer to the same object. If they do, an AssertionError is thrown.
package com.example;
import org.testng.Assert;
import org.testng.annotations.Test;

public class testAssertions {

    @Test
    public void testAssertions() {

        // test data
        String str1 = new String("TestNG");
        String str2 = new String("TestNG");
        String str3 = null;
        String str4 = "TestNG";
        String str5 = "TestNG";
        String str6 = new String("Not_TestNG");

        int val1 = 5;
        int val2 = 6;

        // Check that two objects are equal
        Assert.assertEquals(str1, str2);
        System.out.println("Equals Assertion is successful");

        // Check that two objects are not equal
        Assert.assertNotEquals(str1, str6);
        System.out.println("NotEquals Assertion is successful");

        // Check that a condition is true
        Assert.assertTrue(val1 < val2);
        System.out.println("True Assertion is successful");

        // Check that a condition is false
        Assert.assertFalse(val1 > val2);
        System.out.println("False Assertion is successful");

        // Check that an object isn't null
        Assert.assertNotNull(str1);
        System.out.println("Not Null Assertion is successful");

        // Check that an object is null
        Assert.assertNull(str3);

        // Check if two object references point to the same object
        Assert.assertSame(str4, str5);
        System.out.println("Same Assertion is successful");

        // Check if two object references not point to the same object
        Assert.assertNotSame(str1, str3);
        System.out.println("Not Same Assertion is successful");
    }
}
The output of the above program is
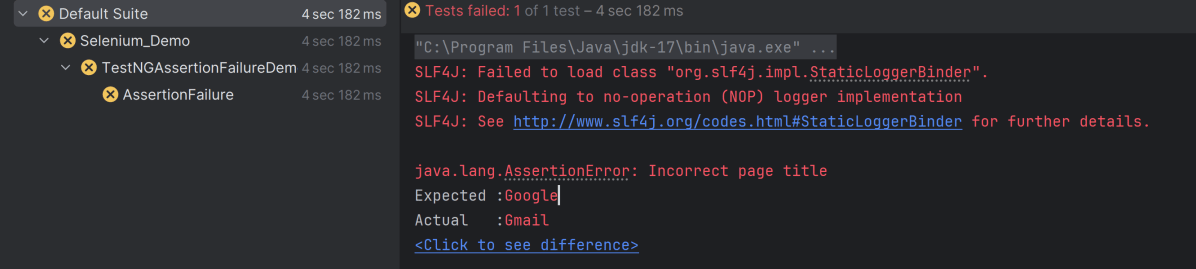
Lets see if an assertion fails, how the output looks shown below. In the below example, we are verifying the pageTitle of Gmail. If the test fails, we should see the message provided in the assertion also.
import org.openqa.selenium.WebDriver;
import org.openqa.selenium.firefox.FirefoxDriver;
import org.openqa.selenium.firefox.FirefoxOptions;
import org.testng.Assert;
import org.testng.annotations.Test;

public class TestNGAssertionFailureDemo {

    @Test
    public void AssertionFailure() throws InterruptedException {

        FirefoxOptions options = new FirefoxOptions();
        WebDriver driver = new FirefoxDriver(options);
        // Test Condition 1: If Page title matches with actualTitle then it finds email
        // title and enters the value which we pass
        driver.get("https://www.gmail.com");
        String actualTitle = "Google";
        String expectedTitle = driver.getTitle();
        Assert.assertEquals(expectedTitle, actualTitle, "Incorrect page title");
    }
}
The output of the above program is
You can show in the output console, there is an error message “Incorrect page title” as we have mentioned this message in the Assertion.


