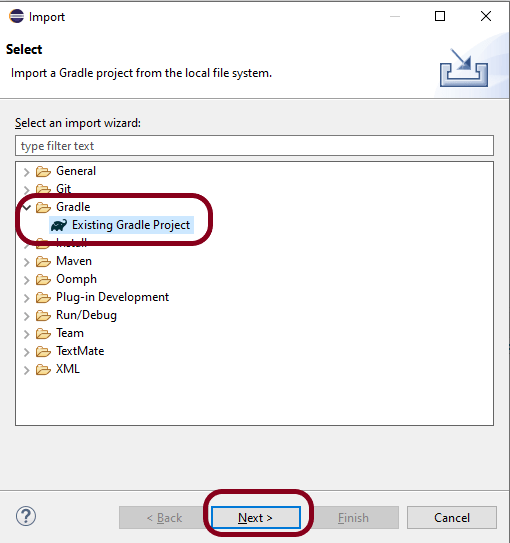
Step 1 – Open Eclipse IDE. In Eclipse IDE, select File ->Import ->Maven ->Existing Gradle Project. Click NEXT Button.
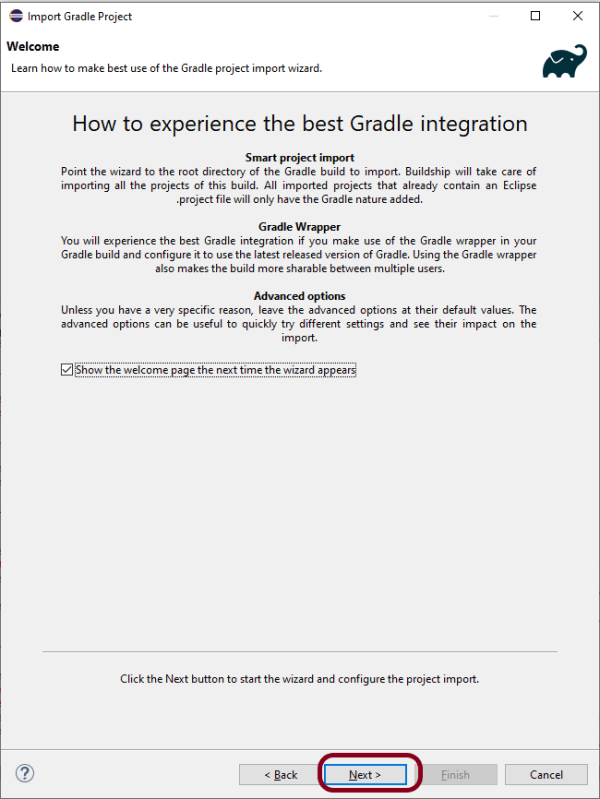
Step 2 – A welcome screen will appear. You can uncheck the box – Show the welcome page the next time the wizard appears. This is optional. Click the NEXT button.
Step 3 – Browse the location from where you want to import the Gradle project. Click the NEXT button.
Step 4 – This screen allows us to Configure Customized Workspace Settings. This shows that Gradle Version 7.0 is used for this project. Click the Finish Button.
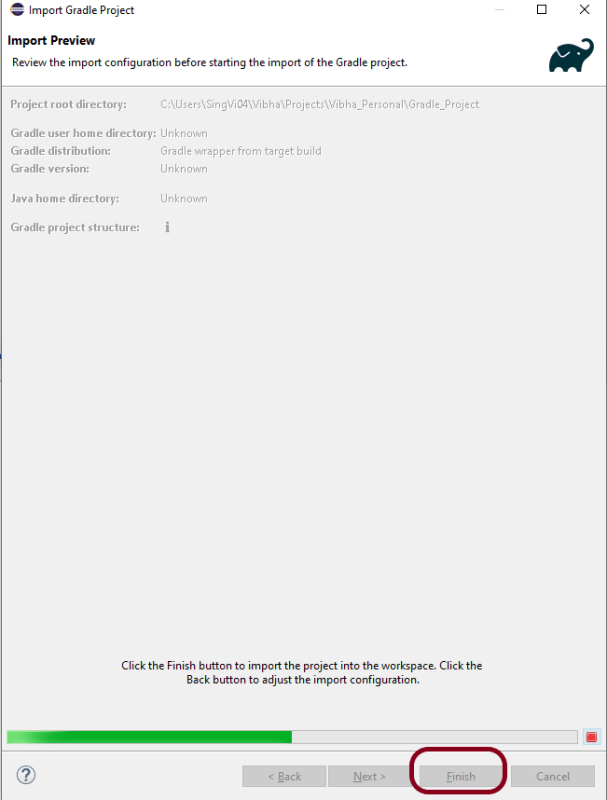
Step 5 – This screen allows us to review the import configuration. If you feel something is incorrect, click the BACK Button.
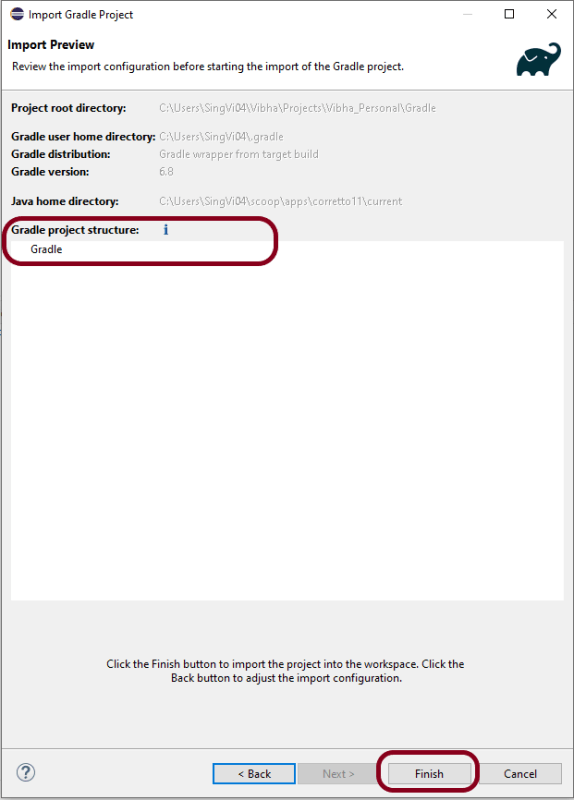
Step 6 – We can see that the Gradle project Name is Gradle and other details like Version. Click the FINISH Button. This will import the project structure into Workspace.
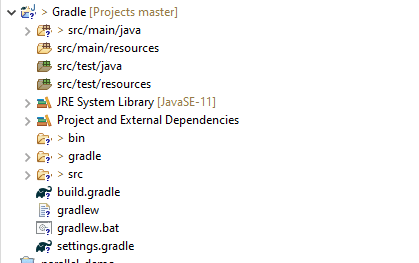
Step 7 – Below is the imported project Structure in Eclipse.
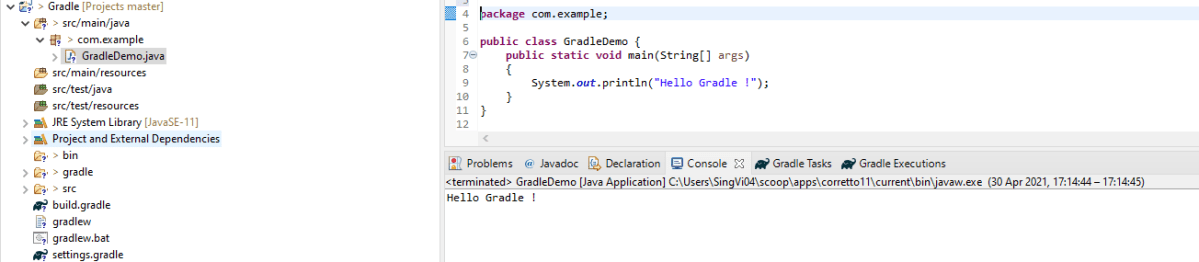
Step 8 – To check if the project is imported successfully. Run GradleDemo.java class by right click on the Java class and Run As Java Application.
That’s it! We have imported a Gradle Project in Eclipse.
Congratulations on making it through this tutorial and hope you found it useful! Happy Learning!! Cheers!!
Step 1 – Open Command Prompt. Change current folder to the folder where we want to create the Java project.
cd C:\Users\vibha\eclipse-workspace\Projects\Vibha_Personal\Gradle_Project
Step 2 – Create a Project from Gradle Template. Type the below command and press ENTER.
gradle init
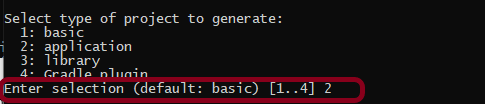
Step 3 – Select the type of project to generate. I’m selecting the application option as if I select basic, it won’t create a src directory. Type 2 and press ENTER.
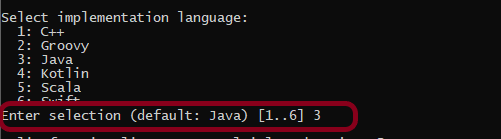
Step 4 – Select implementation language. This is a Java project, so TYPE 3 and press ENTER.
Step 5 – Select Split functionality across multiple subprojects. I have selected 1 as I want only 1 application. Type 1 and press ENTER.
Step 6 – Select build script DSL (Domain Specific Language) – As in Maven POM.xml (XML) is created to build a script file, here we can use Groovy or Kotlin to build the script file. Type 1 (Groovy) and press ENTER.
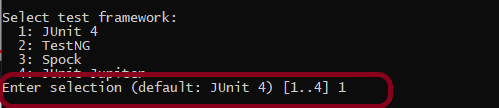
Step 7 – Select Test Framework – There are 4 different test frameworks. Depending on your requirement, select an option. I have selected 1 (JUnit 4) and press ENTER.
Step 8 – It needs the Project name and Source Package name. If I won’t provide the project name, it will take by default my current folder name which is Gradle_Project. Similarly, if I won’t provide the Source Package name, then it will provide the current project name as Source Package Name.
Project name – GradleDemoFromCMD Source Package – com.example
Press ENTER. init script will run and create a Gradle project. You can see as the build is successfull.
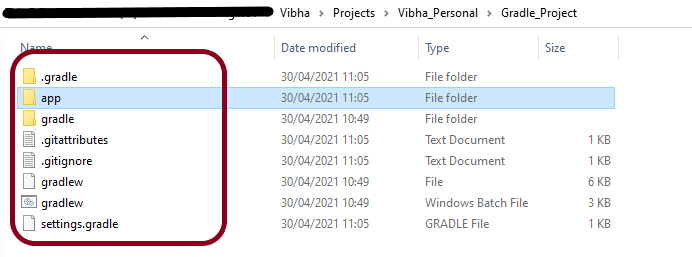
Step 9 – Below is the project structure. As you can see, the name of the project is GradleDemoFromCMD, but that is not the name of the project folder here. But, when I’ll import this folder into Eclipse, the project name will be GradleDemoFromCMD.
Step 10 – Open app folder. There should be src folder and build.gradle. Open build.gradle.
/*
 * This file was generated by the Gradle 'init' task.
 *
 * This generated file contains a sample Java application project to get you started.
 * For more details take a look at the 'Building Java & JVM projects' chapter in the Gradle
 * User Manual available at https://docs.gradle.org/7.0/userguide/building_java_projects.html
 */

plugins {
    // Apply the application plugin to add support for building a CLI application in Java.
    id 'application'
}

repositories {
    // Use Maven Central for resolving dependencies.
    mavenCentral()
}

dependencies {
    // Use JUnit test framework.
    testImplementation 'junit:junit:4.13.1'

    // This dependency is used by the application.
    implementation 'com.google.guava:guava:30.0-jre'
}

application {
    // Define the main class for the application.
    mainClass = 'com.example.App'
}
This build.gradle contains all the information which I have provided while creating the project.
That’s it! We have created a Gradle Project using Command Line.
Congratulations on making it through this tutorial and hope you found it useful! Happy Learning!! Cheers!!
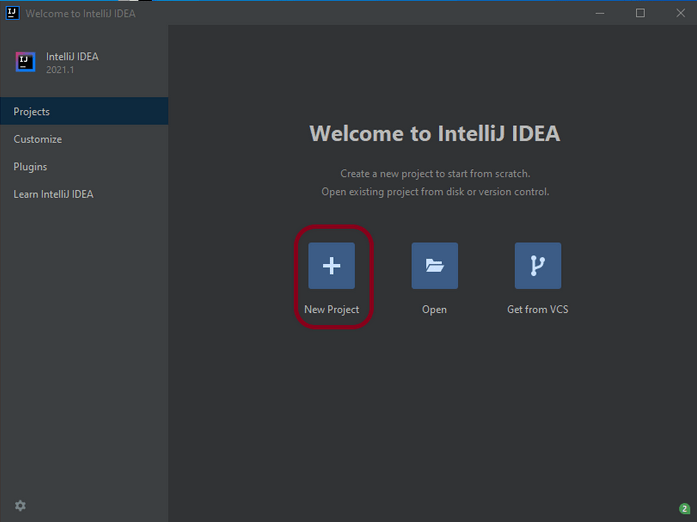
Step 1 – Open the IntelliJ. It will look as shown below. To create a New Project, click on New Project Icon.
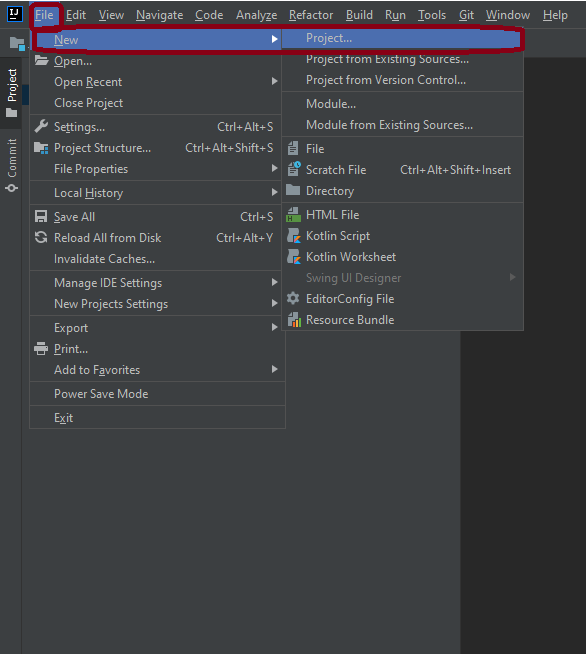
Step 2 – Click on File Option, hover on New Option and click on Project Option as shown below.
Step 3 – Select New Project as Gradle. Project SDK should be current Java version available. Additional Libraries – Java Click on the Next Button.
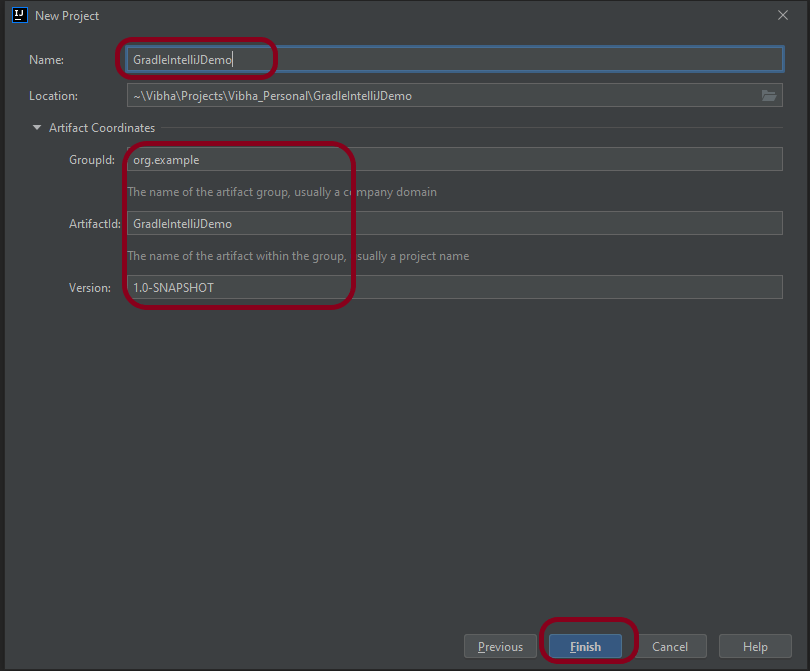
Step 4 – Below screen will appear. Mention the Name, Group Id, Artifact Id and Version . Click the Finish button
Name : GradleIntelliJDemo Group Id : com.example Artifact Id : GradleIntelliJDemo Version : 1.0-SNAPSHOT
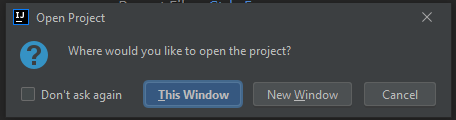
Step 5 – This dialog box will appear on the screen. This provides you the option to open the project in current window or will open a new window with this project. I’m selecting the option – New Window.
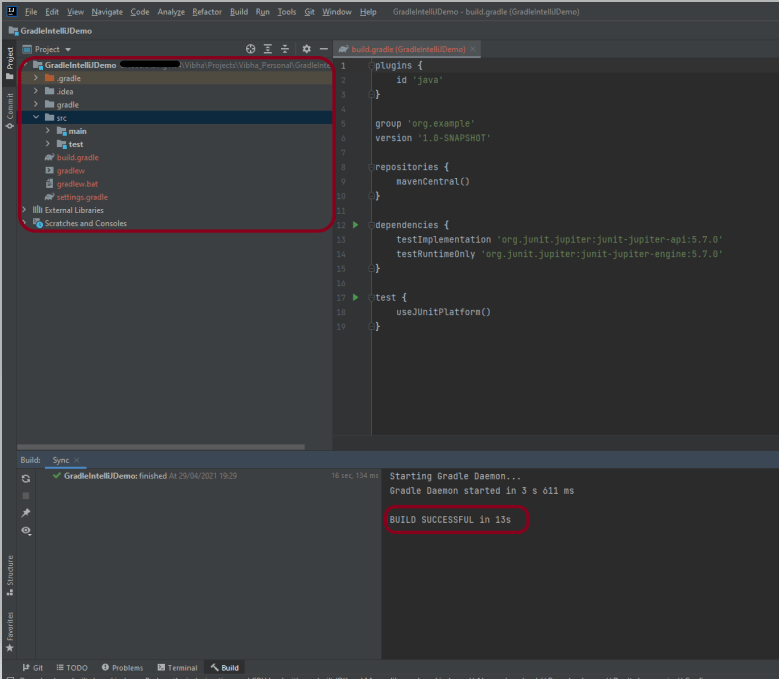
Step 6 – This screen shows the structure of Gradle project as well as build.gradle file.
Step 7 – Project Folder Creation – We can see a folder with the name of project – GradleIntelliJDemo in our Eclipse Workspace.
Step 8 – Right click build.gradle and select Run GradleIntelliJDemo. If the build is successful, below screen appears.
This is how we can create the Gradle project – MavenIntelliJDemo in IntelliJ.
Congratulations on making it through this tutorial and hope you found it useful! Happy Learning!! Cheers!!
Step 1 – Open IntelliJ IDEA IDE. Click on Terminal Button as shown in the below image.
Step 2 – Go to the path where you want to create the project. This can be done by typing command
cd path of folder
Step 3 – This tells Maven to generate a Java project from a Maven template.
mvn archetype:generate
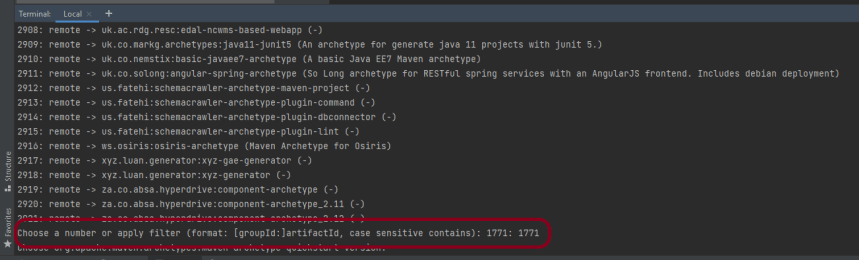
Step 4 – We need to mention the number as displayed on your screen in Command Prompt to proceed further. Like here, Choose a number or apply filter has 1771, so I have also mentioned 1771 in command prompt.
Step 5 – We need to provide again input in command prompt. This time program wants to know which version we want to use. I prefer to use the latest version. Here, it is 8, so I have selected version 8.
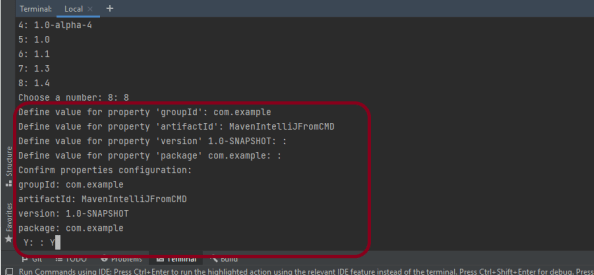
Step 6 – We need to provide 2 input here
A) Value of groupId – This serves as the group identifier of your Maven project, it should be in a form similar to Java packages, such as com.example B) Value of artifactId – This serves as the group-local identifier of my Maven project like MavenIntelliJFromCMD C) Value of Version – The initial version of our project. The default is 1.0-SNAPSHOT D) Value of package – The name of our root package. The default is groupId we have created earlier. We will notice the INFO message about the properties.
If the displayed settings are correct, then just enter Y in :: prompt.
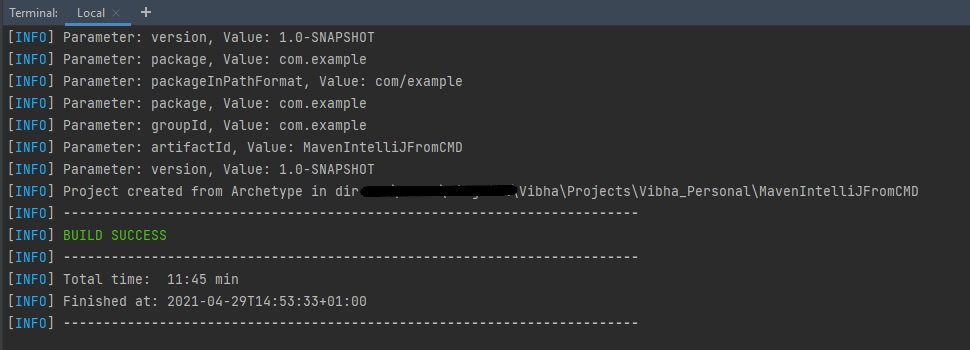
Step 7 –Successful Build – Below screenshot shows that the Maven IntelliJ Project built successfully.
Step 8 –Contents of Project Folder – Open folder MavenIntelliJFromCMD to see the contents of the folder. It should have POM file and src.
This project can be imported in IntelliJ and can be used further. To know how to import Java Maven project in Intellij, click here.
That’s it! We have created a Maven Project in IntelliJ using Command Line.
Congratulations on making it through this tutorial and hope you found it useful! Happy Learning!! Cheers!!
In the previous tutorial, I have explained How to create a Maven Project in IntelliJ. In this tutorail, I will explain how we can import a Java Maven project in IntelliJ IDE.
Step 1 – Open IntelliJ IDEA and Welcome Screen appears. Click Open button present on Welcome Screen.
Step 2 – Navigate to your Maven project and select the top-level folder. Select the project you want to Import. As you can see, I have selected – MavenProjectFromCMD option. Select OK button to proceed to next screen.
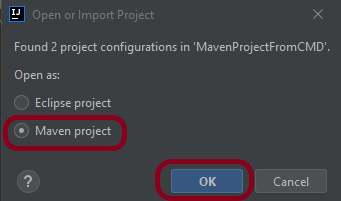
Step 3 – A screen appears to Open or Import project. It will have all the possible configurations for the project. As this is a Maven project, select Mavenproject and click OK Button.
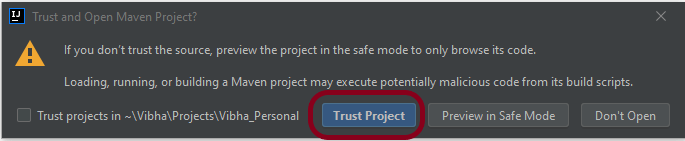
Step 4 – A warning message box will appears. Select Trust Project Button and move forward.
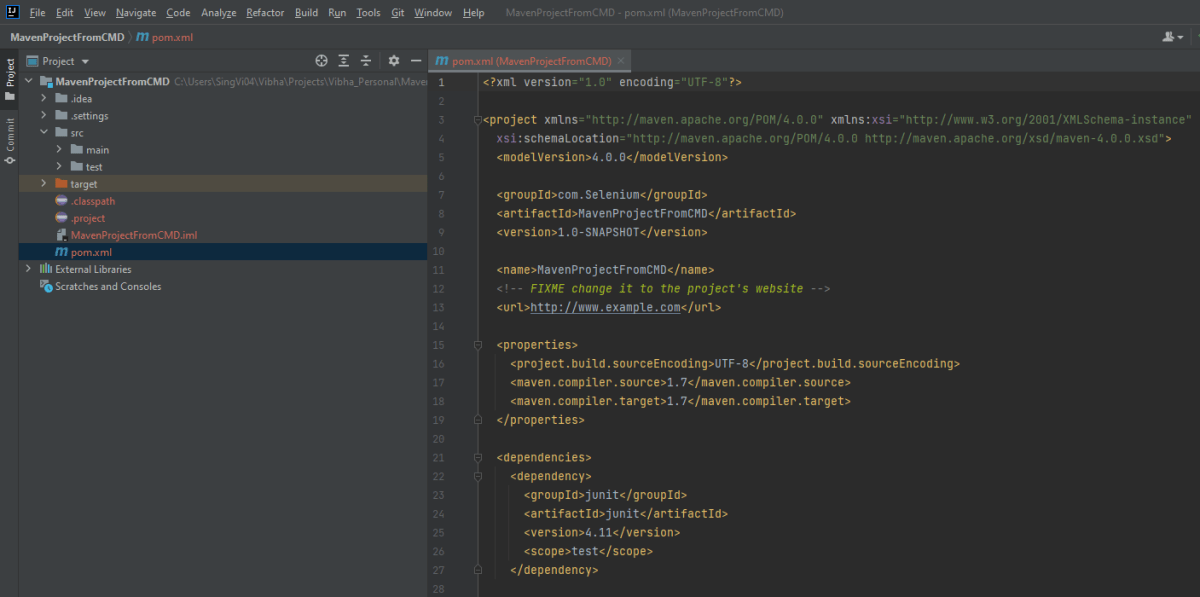
Step 5 -This screens shows that the project is imported.
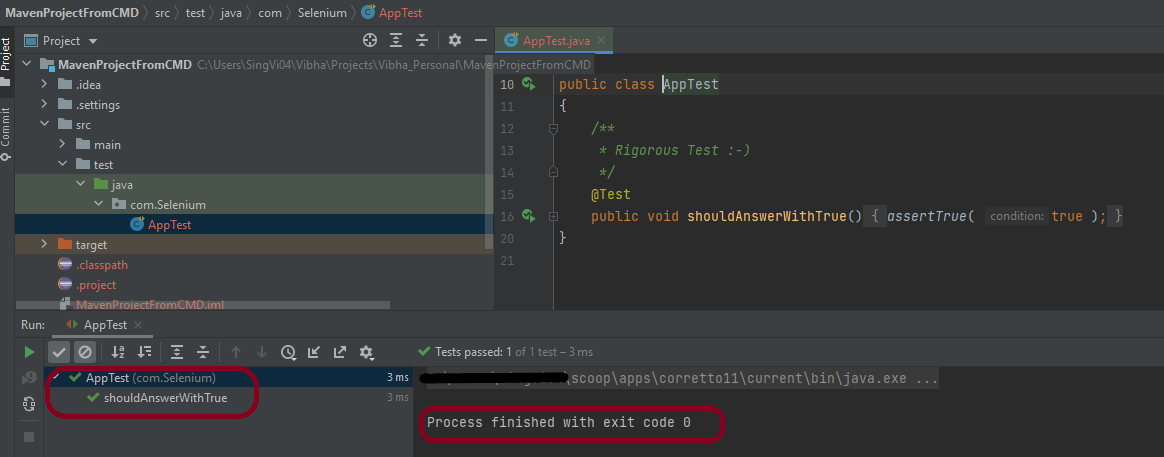
Step 6 – Run the test present in the project. Here, I have run AppTest. Right click on AppTest ->Run ‘AppTest’. Below screen shows that the project is imported successfully.
That’s it! So Simple!!!
Congratulations on making it through this tutorial and hope you found it useful! Happy Learning!!
Step 1 – Open the IntelliJ. It will look as shown below. To create a New Project, click on New Project Icon.
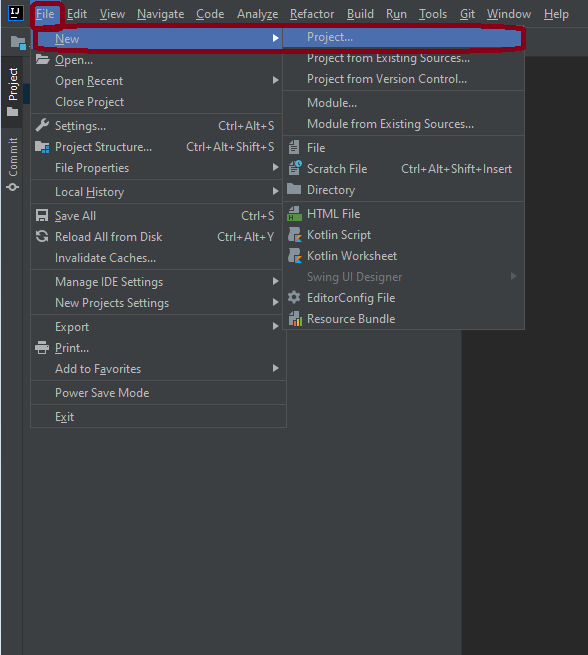
Step 2 – Click on File Option, hover on New Option, and click on Project Option as shown below.
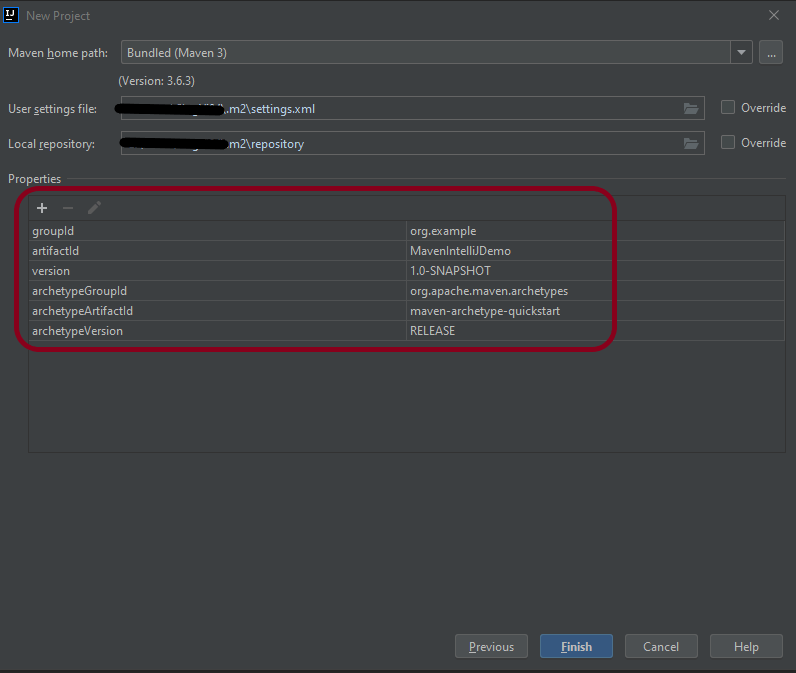
Step 3 – Select New Project as Maven. Project SDKshould be current Java version available. Select option for Create from archetype. This will enable the options to select archetype. Select archetype : maven-archetype-quickstart. Click on the Next Button.
Step 4– Below screen will appear. Mention the Name, Group Id, Artifact Id, and Version. Click the Finish button
Name : MavenIntelliJDemo Group Id : com.example Artifact Id : MavenIntelliJDemo Version : 1.0-SNAPSHOT
Step 5 – Verify the information in the below screen. Click onFinish Button.
Step 6 – This dialog box will appear on the screen. This provides you the option to open the project in the current window or will open a new window with this project. I’m selecting the option – New Window.
Step 7 – This screen shows the structure of the Maven project as well as the POM.xml file.
Step 8 – Project Folder Creation – We can see a folder with the name of the project – MavenIntelliJDemo in our Eclipse Workspace.
This is how we can create the Maven project – MavenIntelliJDemo in IntelliJ.
That’s it! Congratulations on making it through this tutorial and hope you found it useful! Happy Learning!!
In the previous tutorial, I explained how to download and install IntelliJ on Windows. In this tutorial, I will explain how to create a Java project in IntelliJ.
Steps to follow:
Open the IntelliJ. It will look as shown below. To create a New Project, click on the “New Project” Icon.
2. Select Project SDK as the Java version present on your system and select the option as Java. Click on the “Next”button.
3. The next screen provides options to choose Project Template as shown below. Click on the “Next” Button.
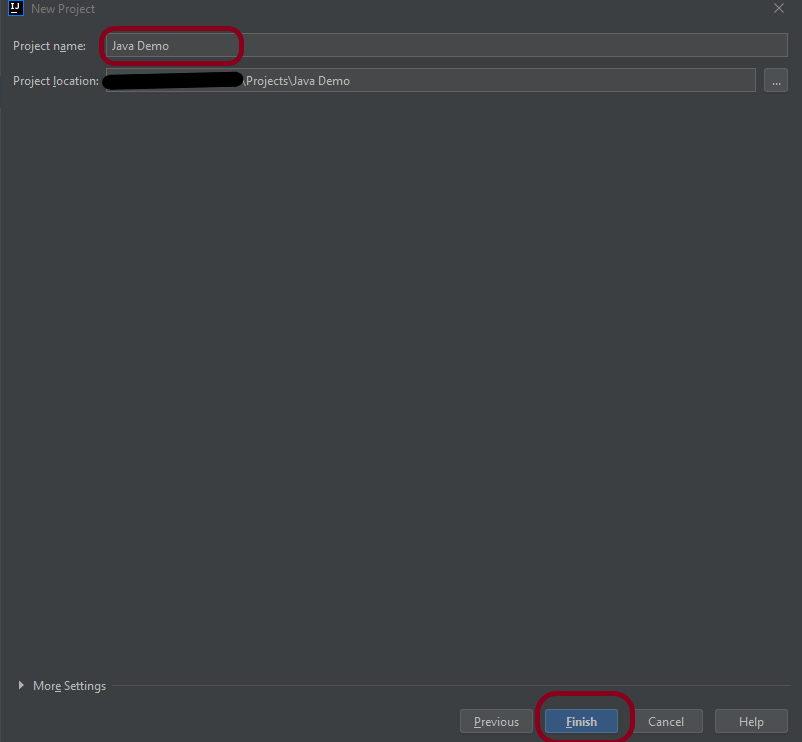
4. I have mentioned the Project Name as Java Demo and thepath where I want to save my project on my computer.
5. Click on the “Finish”Button to create the project. It will also ask to create the directory as shown below.
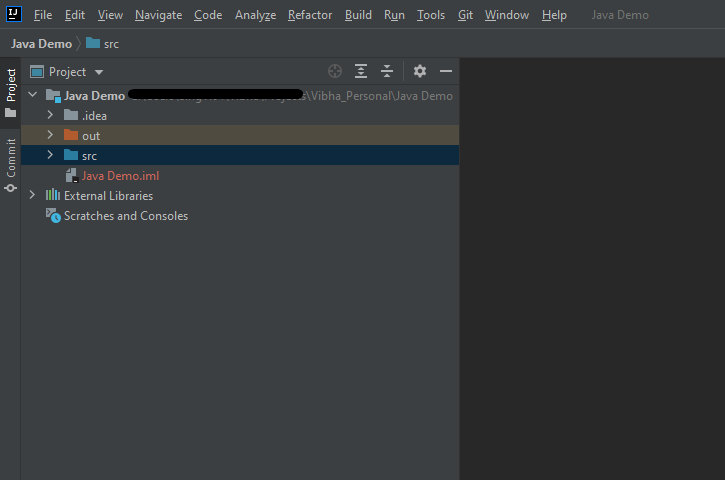
6. Clickthe “Create”button to grant permission. It will launch IDE as shown below.
Now, I have created a new Java Project named Java Demo. Let me create a new Java Class – HelloWorld.
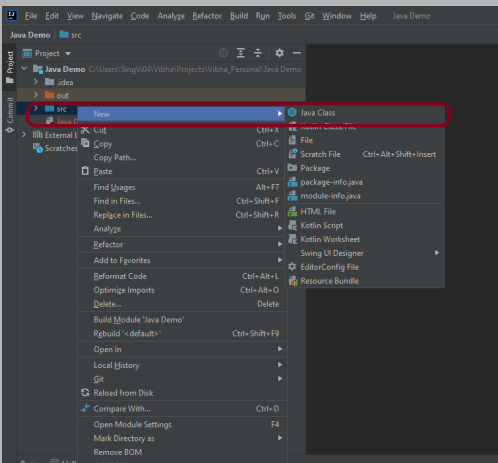
Expand the Project Hello Word and right-click on the src folder, hover on New Option, and click on Java Class Option as shown below.
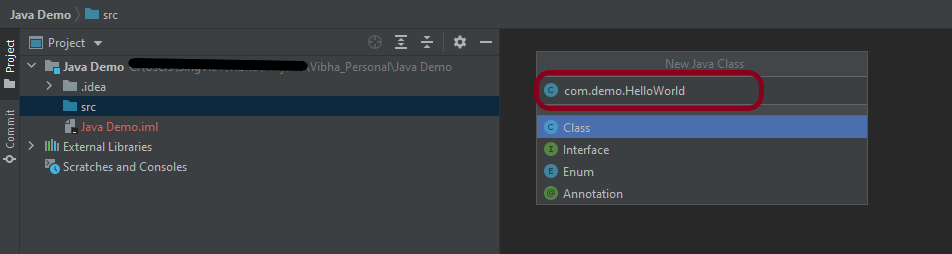
2. I have provided the Java Filename with the package as shown in the below image. Now press the Enter Key to create the packages and Java file.
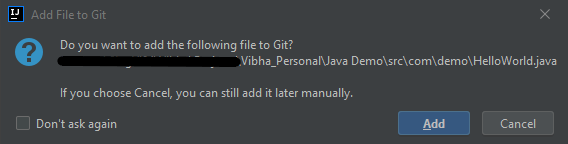
3. It will show a message to Add the File to Git. Depending on your requirement, select Add or Cancel. I don’t want to add the File to Git, so selected Cancel.
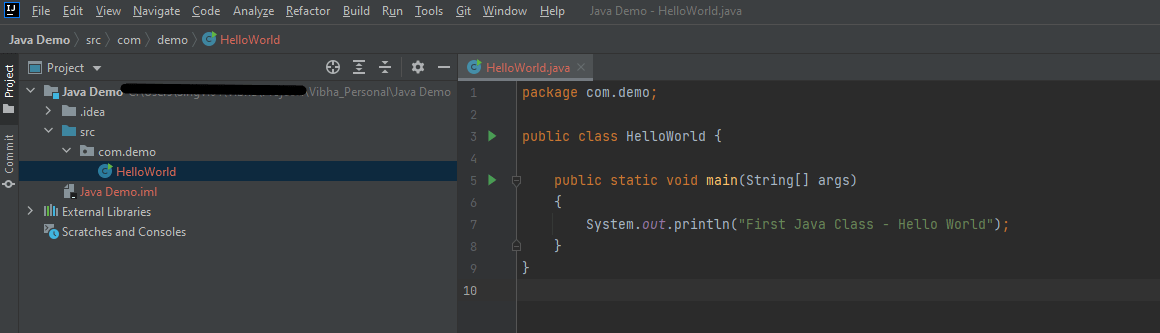
4. I have updated the “HelloWorld” class to print the first Java Class – Hello World on the console, as shown in the below image.
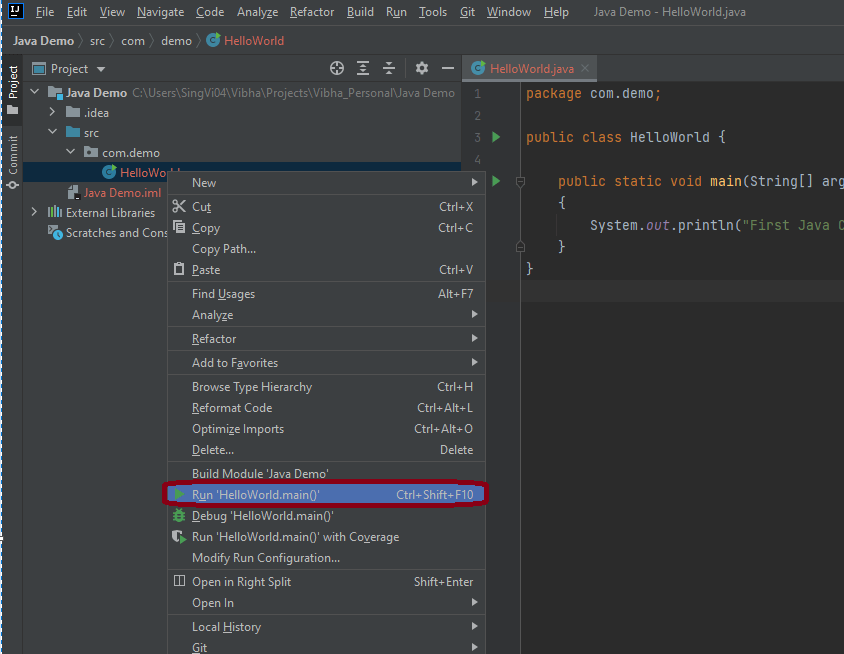
5. Now right-click on the “HelloWorld”class file and choose “Run HelloWorld.main()” Option or press Ctrl + Shift + F10to compile and execute the program as shown in thebelow image. It will also build the project.
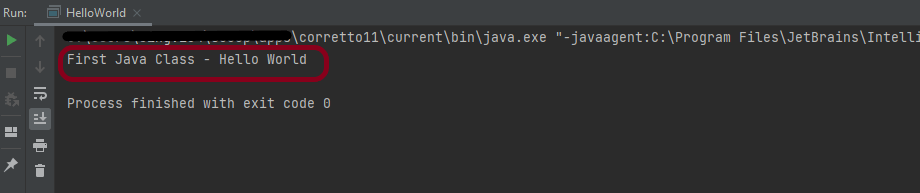
6. The final output of the program will be displayed on the console as shown below.
This is how we can create the Java Demo project to execute our first program in Java – HelloWorld.
That’s it! Congratulations on making it through this tutorial and hope you found it useful! Happy Learning!!
IntelliJ IDEA is one of the smartest IDE for Java development. It’s also the base of the official Android IDE i.e. Android Studio used for Android mobile application development. This tutorial provides all the steps required to install IntelliJ Idea on Windows 10 for Java development.
Download IntelliJ on Windows
Click this link to download IntelliJ IDEA on your machine. It will open the download page as shown below. The IntelliJ IDEA provides two different installers i.e. Ultimate and Community. The Ultimate edition is commercial version (which has trial version for 30 days post which you needs license). The Community edition can be used for free. This tutorial shows the steps required to install the Community edition.
2. Download IntelliJ by clicking on Download button and use any one of the option either .exe or .jar. Below image shows IntelliJ.exe on your machine.
Installation of IntelliJ IDEA
To start installation, double click on the idealC-2021.exe (this version can change in future).
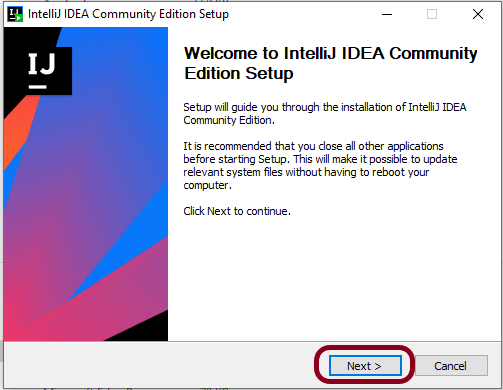
2. It will show the welcome screen as shown below. Click on the Next Button to continue with the installation.
3. It will provide options to choose the installation location as shown in below image. Make sure that you have sufficient space available on the selected drive since it will consume around 1.6 GB storage. Click on the Next Button after choosing the appropriate installation path.
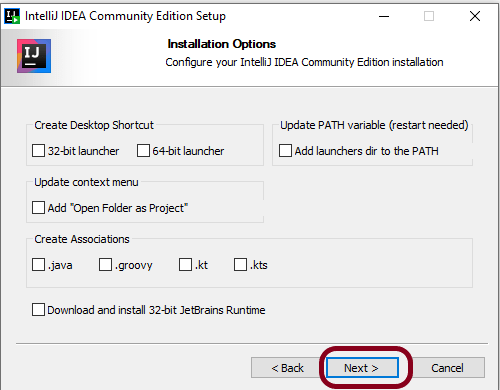
4. It will show the Installation options as shown below to configure system path, create 64-bit desktop launcher icon, Open Folder as Project, and file association for Java, Groovy, and Kotlin files. I have selected the option to create a desktop launcher icon. You may choose the options based on your requirements. Click on the Next Button after choosing the Installation Options.
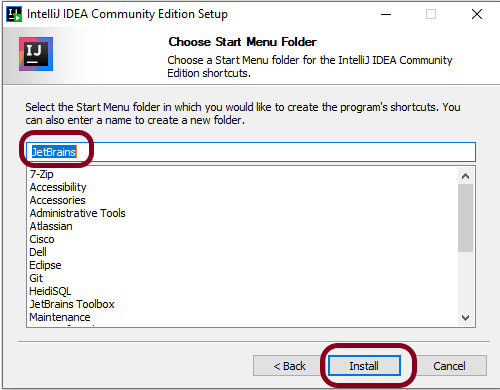
5. After choosing the Installation Options, the next screen shows options to configure the Start Menu Folder as shown below.
6. Click on the Install Button after selecting the Start Menu Folder option. It will show the installation progress as shown below.
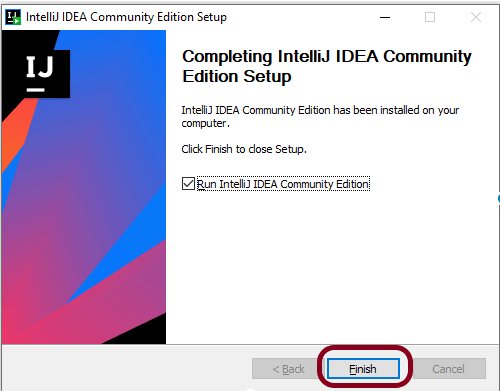
7. It will show the final screen after successfully installing IntelliJ IDEA as shown below.
8. Click on the Finish Button to close the installer. Below image shows that IntelliJ icon is placed at Desktop as we have selected in the previous step.
That’s it! We have downloaded and installed IntelliJ. Congratulations on making it through this tutorial and hope you found it useful! Happy Learning!!
In the next tutorial, I’ll explain how to create a new project in IntelliJ.
Abstract Class and Interface are used to achieve Abstraction where abstract methods are declared. We can’t instantiate Abstract Class and Interface.
Abstract Class
Interface
Abstract Class can have both abstract method and non-abstract methods.
Interface can have only abstract methods.
Abstract Class does not support multiple Inheritance.
Interface supports multiple Inheritance.
Abstract Class can be implemented by using keyword “extends”.
Interface can be implemented by using keyword “implements”.
Abstract class can provide the implementation of interface.
Interface can’t provide the implementation of abstract class.
Abstract Class can have static, non-static, final & non-final variables.
Interface can have only final & static variables.
Abstract Class can have class members as private, protected, etc.
Interface can have class members as public by default.
Example: public abstract class Shape{ public abstract void draw(); }
Example: public interface Drawable{ void draw(); }
An abstract class can extend another Java class and implement multiple Java interfaces.
An interface can extend another Java interface only.
Abstract keyword is used to declared abstract class
Interface keyword is used to declare interface.
Below is an example of Abstract Class. In the below example, there is an abstract class with abstract method. This abstract method is implemented in SubClass.
//Abstract Class
public abstract class Bank {

    // Abstract method
    abstract void getRateOfInterest();
}
SubClass
//Subclass (inherit from Bank)
public class SBI extends Bank {

    // The body of getRateOfInterest is declared here
    public void getRateOfInterest() {

        System.out.println("Interest Rate of SBI Bank :" + 5.3);

    }
}
Test Class
public class AbstractionTest {

    public static void main(String[] args) {

        Bank bank1 = new SBI();
        bank1.getRateOfInterest();

    }

}
Below is an example of Interface. In the below example, Interface has two abstract methods and the implementation of abstract methods are declared in Test Class.
public interface MyInterface {

    // Abstract methods
    public void method1();

    public void method2();
}
Test Class
public class InterfaceTest implements MyInterface {

    public void method1() {
        System.out.println("Implementation of Method 1");
    }

    public void method2() {
        System.out.println("Implementation of Method 2");
    }

    public static void main(String[] args) {
        MyInterface interTest = new InterfaceTest();
        interTest.method1();
        interTest.method2();

    }
}
In this tutorial, I’ll explain about Interfaces in Java.
What is Interface?
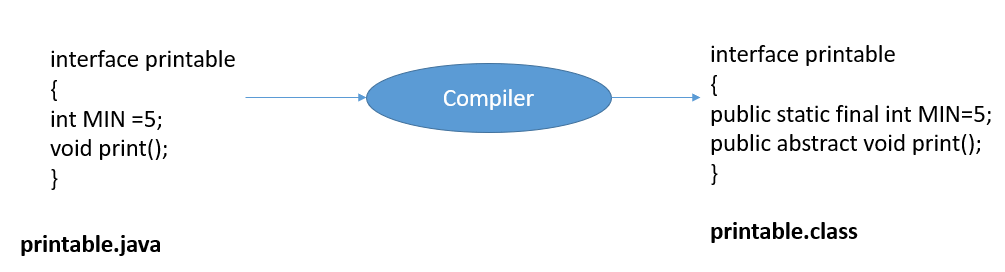
An interface is a group of related methods with empty bodies (abstract methods).
All the methods in Interface are public and abstract.
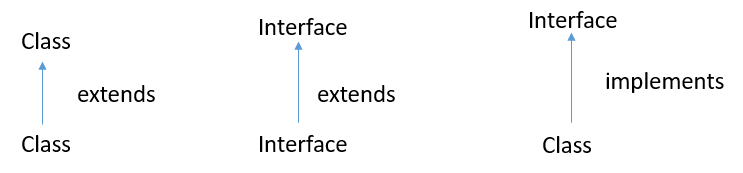
A class can implement more than one interface.
An interface can extends another interface or interfaces
A class that implements interface must implements all the methods in interface. To implement interface use implements keyword.
The variables declared in an interface are public, static & final by default.
Java does not support multiple inheritance in case of class, but by using interface it can achieve multiple inheritance .
Syntax of Interface
interface test {
//declare methods which are abstract by default
//declare variables which are public, static, final by default
}
Relationship between Class and Interfaces
Below is an example of implementation of Interface. I have declared a class as Interface which have two abstract methods.
public interface MyInterface {

	// Abstract methods
	public void method1();

	public void method2();
}
Interface Implementation
public class InterfaceTest implements MyInterface {

	public void method1() {
		System.out.println("Implementation of Method 1");
	}

	public void method2() {
		System.out.println("Implementation of Method 2");
	}

	public static void main(String[] args) {
		MyInterface interTest = new InterfaceTest();
		interTest.method1();
		interTest.method2();

	}
}
Output
Implementation of Method 1
Implementation of Method 2
Multiple Interface
In the below example, Interface 2 extends Interface 1 and class implements Interface 2.
Interface 1
public interface Infa1 {
	public void method1();

}
Interface 2
public interface Infa2 extends Infa1 {
	public void method2();

}
MultipleInterfaceTest Class
public class MultipleInterfaceTest implements Infa2 {

	public void method1() {
		System.out.println("Implementation of Method 1");
	}

	public void method2() {
		System.out.println("Implementation of Method 2");
	}

	public static void main(String[] args) {

		Infa2 obj = new MultipleInterfaceTest();
		obj.method1();
		obj.method2();
	}

}
Output
Implementation of Method 1
Implementation of Method 2
Multiple Inheritance
Interface supports multiple Inheritance. Here, there are two interfaces which are implemented in class MultipleInheritanceTest.
Interface 1
public interface Infa1 {
	public void method();

}
Interface 2
public interface Infa2 {
	public void method();

}
MultipleInheritanceTest Class
public class MultipleInheritanceTest implements Infa1, Infa2 {

	public void method() {
		System.out.println("Implementation of Method ");
	}


	public static void main(String[] args) {
		MultipleInheritanceTest test = new MultipleInheritanceTest();
		test.method();
	}

}