1) B) A continuous integration/continuous delivery (CI/CD) tool
2) C) Java
3) C) Automating parts of the software development process
4) B) java -jar jenkins.war
5) D) Jenkins Client
Jenkins Client is not a core component of Jenkins. The core components of Jenkins include Jenkins Master, Jenkins Slave, and Jenkins Node.
6) B) A unit of work that Jenkins executes
7) C) Source Code Management
8) D) All of the above
9) B) A piece of software that provides additional functionality to Jenkins
A Jenkins plugin is a piece of software that provides additional functionality to Jenkins. There are thousands of plugins available for Jenkins, including plugins for source control, build tools, and notification systems.
10) C) Manage Plugins under Manage Jenkins
11) B) A tool used to manage the installation of plugins in Jenkins
The Jenkins Plugin Manager is a tool used to manage the installation of plugins in Jenkins. It allows users to search for and install new plugins, update existing plugins, and configure plugin settings.
12) C) Access “Manage Plugins” in Jenkins and install from the available plugins list
13) D) All of the above
14) C) To define tools like JDK, Maven, and Git that are available to Jenkins jobs
15) D) To manage security settings for Jenkins
The Jenkins Security Plugin is used to manage security settings for Jenkins. It allows users to define users, groups, and permissions for accessing Jenkins resources, ensuring that only authorized users can perform actions in Jenkins.
16) D) To create backups of Jenkins configurations and jobs
The Jenkins Backup Plugin is used to create backups of Jenkins configurations and jobs. It allows users to easily restore a Jenkins server in the event of a failure or to migrate to a new server.
17) B) To enable Jenkins to communicate with external systems
The Jenkins Notification Plugins are used to enable Jenkins to communicate with external systems. They allow users to send notifications, such as build results or deployment status, to other systems, such as chat services or email.
18) A) An interface used to interact with Jenkins via HTTP requests
The Jenkins REST API is an interface used to interact with Jenkins via HTTP requests. It allows users to perform common tasks, such as triggering builds or retrieving build results, using simple HTTP calls.
19) A) A command-line interface used to interact with a Jenkins server
The Jenkins CLI is a command-line interface used to interact with a Jenkins server. It allows users to perform common tasks, such as creating jobs or triggering builds, from the command line.
Welcome to the Jenkins Quiz! This blog post features 25 multiple-choice questions that explore essential concepts of Jenkins.
1. What is Jenkins?
Select the best answer
A) A database management tool B) A continuous integration/continuous delivery (CI/CD) tool C) A programming language D) An integrated development environment (IDE)
A) A set of scripts that automate the building of software B) A piece of software that provides additional functionality to Jenkins C) A configuration file that defines the build process in Jenkins D) A report generated by Jenkins after a build is complete
A) A feature that allows users to configure global settings in Jenkins B) A tool used to manage the installation of plugins in Jenkins C) A tool used to manage the installation of software on Jenkins nodes D) A tool used to manage the distribution of work to Jenkins slaves
A) Manually download the plugin file and move it to the Jenkins installation directory B) Use the “Install Plugin” option in Global Tool Configuration C) Access “Manage Plugins” in Jenkins and install from the available plugins list D) Jenkins does not support plugin installations
14. What is the purpose of the “Global Tool Configuration” in Jenkins?
Choose one option
A) To configure global security settings B) To manage system logs C) To define tools like JDK, Maven, and Git that are available to Jenkins jobs D) To configure job-level parameters
15. What is the purpose of the Jenkins Security Plugin?
Choose one option
A) To manage the installation of plugins in Jenkins B) To manage the distribution of work to Jenkins slaves C) To enable Jenkins to communicate with external systems D) To manage security settings for Jenkins
16. What is the purpose of the Jenkins Backup Plugin?
Choose one option
A) To manage the installation of plugins in Jenkins B) To manage the distribution of work to Jenkins slaves C) To enable Jenkins to communicate with external systems D) To create backups of Jenkins configurations and jobs
17. What is the purpose of the Jenkins Notification Plugins?
Choose one option
A) To manage the installation of plugins in Jenkins B) To enable Jenkins to communicate with external systems C) To define Jenkins jobs in code D) To extend the functionality of Jenkins
A) An interface used to interact with Jenkins via HTTP requests B) A tool used to manage the installation of software on Jenkins nodes C) A tool used to manage the distribution of work to Jenkins slaves D) A graphical user interface used to interact with a Jenkins server
A) A command-line interface used to interact with a Jenkins server B) A graphical user interface used to interact with a Jenkins server C) A tool used to manage the installation of software on Jenkins nodes D) A tool used to manage the distribution of work to Jenkins slaves
Step 1.1 – Open PyCharm and create a new project. Go to File and select New Project from the main menu.
Step 1.2 – Choose the project location. Click the “Browse” button next to the Location field and specify the directory for your project.
Deselect the Create a main.py welcome script checkbox because you will create a new Python file for this tutorial.
Click on the “Create” Button.
Step 1.3 – A new dialog appears asking to open the project using any one of the given options. I have selected New Window as I like to have separate windows for each project.
Below is the image of the new project created in PyCharms.
Step 2 – Create 3 new directories in the new project
Right-Click on the project, select New->Directory, and provide the name as Tests, Drivers, and Resources
Below is the image of the new directories.
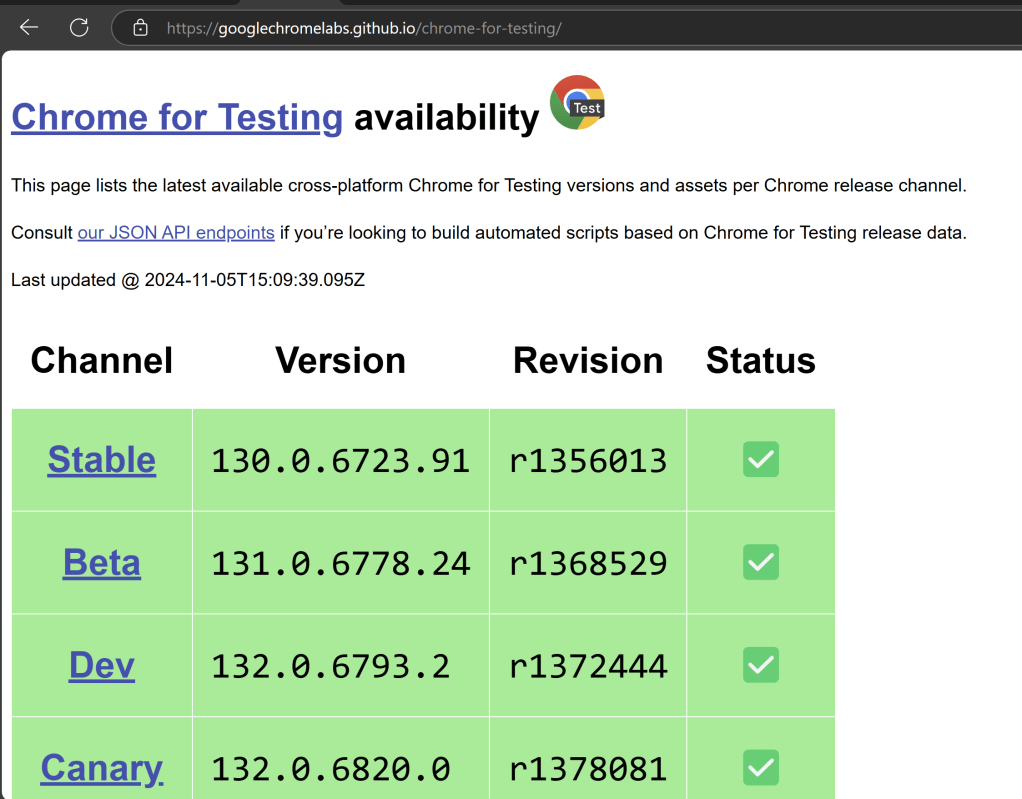
Step 3 – Download ChromeBinaries, Geckodriver and msedgedriver binaries
Download ChromeBinaries, Geckodriver and msedgedriver binaries and place in Drivers directory. This directory contains the browser binary in it. As we are using Chrome, will keep chromedriver.exe here.
The tests are going to use the Chrome browser, Firefox and Edge browsers, so we need to download the corresponding driver binaries to open a blank browser.
I will rename chromedriver.exe to Chrome, msedgedriver.exe to Edgeand geckodriver.exe to Firefox.
Step 4 – Create Test Files
This directory contains multiple test case files consisting of test steps.
Right-click on the new directory and select New File and provide the name as LoginPageTests.robot as shown below:
Below is the code for LoginPageTests.robot
*** Settings ***
Documentation       Tests to login to Login Page
Library     SeleniumLibrary
Test Setup      Open the Browser with URL
Test Teardown   Close Browser Session
Resource       ../Resources/GenericResources.robot
Resource       ../Resources/LoginResources.robot

*** Test Cases ***

Validate Unsuccessful Login using invalid credentials

    LoginResources.Fill the login form     ${valid_username}       ${invalid_password}
    LoginResources.Verify the error message is correct


Validate successful Login

    LoginResources.Fill the login form     ${valid_username}       ${valid_password}
    DashboardResources.Verify Dashboard page opens
Settings
Documentation: Allows to add the description about the Login Test page. Library: Import SeleniumLibrary for browser interactions. Test Setup: Open the Browser with URL keyword to setup the browser before each test Test Teardown: Capture Screenshot On Failure keyword to capture screenshots if the test fails Suite Teardown: Close Browser Session keyword close all the browsers at the end of the test suite. Resource: Provide the path of the resource file that contains the reusable keywords, variables and other settings.
Step 5 – Create Resources file for each page
It maintains the files which contain page elements as well as corresponding keywords.
Right-click on the new directory and select New File and provide the name as LoginResources.robot, DashboardResources.robot and GenericResources.robot as shown below:
GenericResources.robot contains the keywords that are common to all the tests, like the opening of the browser or closing of the browser.
*** Settings ***
Documentation    A resource file with reusable keywords and variables.
Library     SeleniumLibrary

*** Variables ***
${valid_username}     Admin
${valid_password}       admin123
${invalid_username}     1234
${invalid_password}     45678
${url}        https://opensource-demo.orangehrmlive.com/web/index.php/auth/login
${browser}      Chrome   #Default browser, if no browser provided


*** Keywords ***

Open the Browser with URL
    Open Browser   ${url}    ${browser}   executable_path=C:/Users/vibha/Documents/Automation/Python/CrossBrowser_RobotFramework/Drivers/${browser}
    Maximize Browser Window
    Set Selenium Implicit Wait    5

Close Browser Session
    Close Browser
Variables used in GenericResources.robot
${valid_username}, ${valid_password}, ${invalid_username}, ${invalid_password}: Assign values ${url}: The URL to navigate to ${browser_name}: Browser will be used to run the tests
Below is the code for LoginResources.robot
*** Settings ***
Documentation        All the page objects and keywords of landing page
Library     SeleniumLibrary

*** Variables ***
${login_error_message}      css:.oxd-alert-content--error
${dashboard_title}       css:.oxd-topbar-header-breadcrumb-module
${missing_username_error_message}    xpath://*[@class='oxd-form']/div[1]/div/span
${missing_password_error_message}   xpath://*[@class='oxd-form']/div[2]/div/span
${forgot_password_link}   xpath://div[@class='orangehrm-login-forgot']/p

*** Keywords ***

Fill the login form
    [Arguments]    ${username}      ${password}
   Input Text    css:input[name=username]   ${username}
   Input Password    css:input[name=password]   ${password}
   Click Button    css:.orangehrm-login-button


Verify the error message is correct
    Element Text Should Be    ${login_error_message}    Invalid credentials
Below is the code for DashboardResources.robot
*** Settings ***
Documentation        All the page objects and keywords of Dashboard page
Library     SeleniumLibrary

*** Variables ***
${dashboard_title}       css:.oxd-topbar-header-breadcrumb-module

*** Keywords ***

Verify Dashboard page opens
    Element Text Should Be    ${dashboard_title}      Dashboard
All the below-mentioned keywords are derived from SeleniumLibrary. The functionality of keywords mentioned above:
1. Open Browser − The keyword opens a new browser instance to the optional url.
2. Maximize Browser Window – This keyword maximizes the current browser window.
3. Set Selenium Implicit Wait – This keyword sets the implicit wait value used by Selenium.
4. Close Browser – Close the current browser.
5. Input Text − This keyword is used to type the given text in the specified textbox identified by the locator name:username.
6. Input Password – This keyword is used to type the given text in the specified password identified by the locator name:password.
The difference compared to Input Text is that this keyword does not log the given password on the INFO level.
7. Click button – This keyword is used to click the button identified by the locator. In this case, it is “Login” button.
8. Element Text Should Be – This keyword is used to verify that the current page contains the exact text identified by the locator. Here, we are checking the exact text “Invalid Credentials”.
To run this script, go to the command line and go to directory tests.
Step 6 – Execute the tests
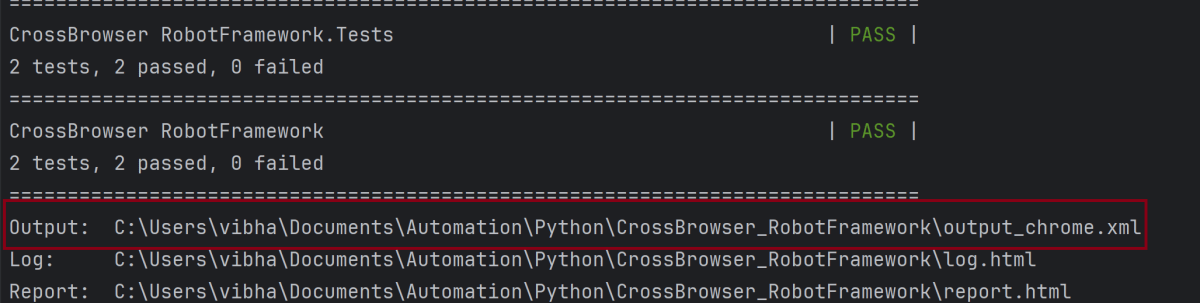
Run your tests separately for each browser (e.g., Chrome, Firefox, Edge), generating an individual output XML file for each. For example, use the below command to run the tests using the Chrome browser:
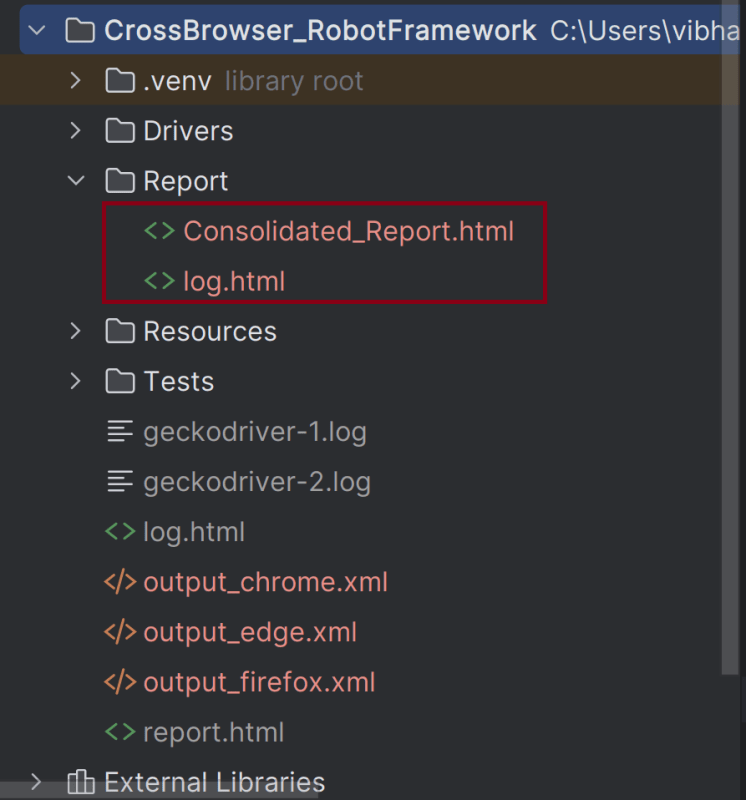
1. –outputdir Report specifies the directory where the consolidated report will be saved.
2. –report “Consolidated Report.html” sets the name of the report of the Consolidated Report.
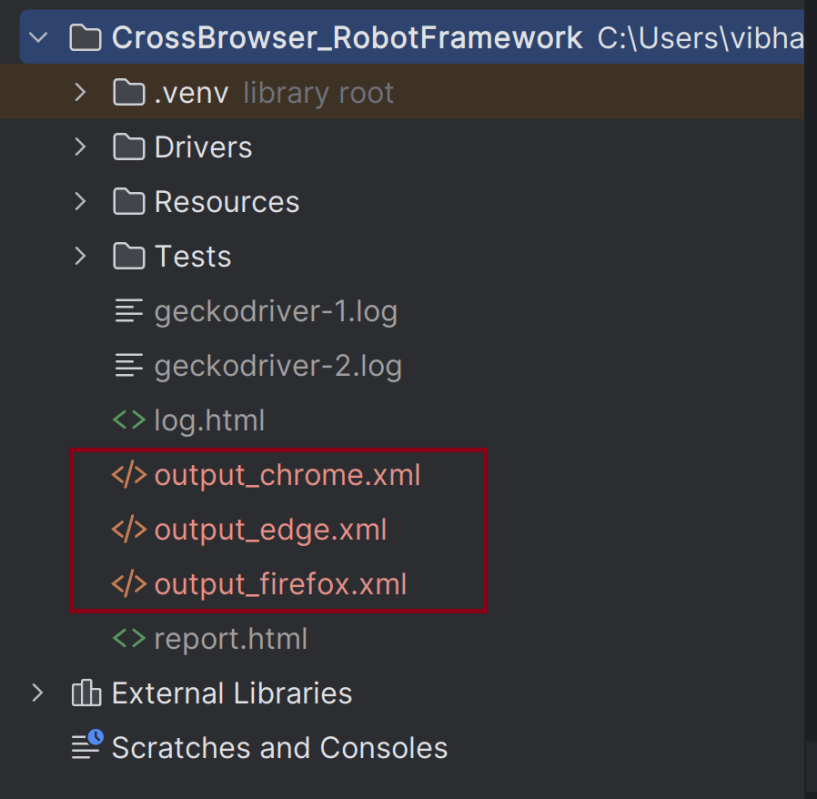
3. The list of XML files (output_chrome.xml, output_edge, output_firefox) are the individual report files that will be merged.
Step 8 – View Report and Log
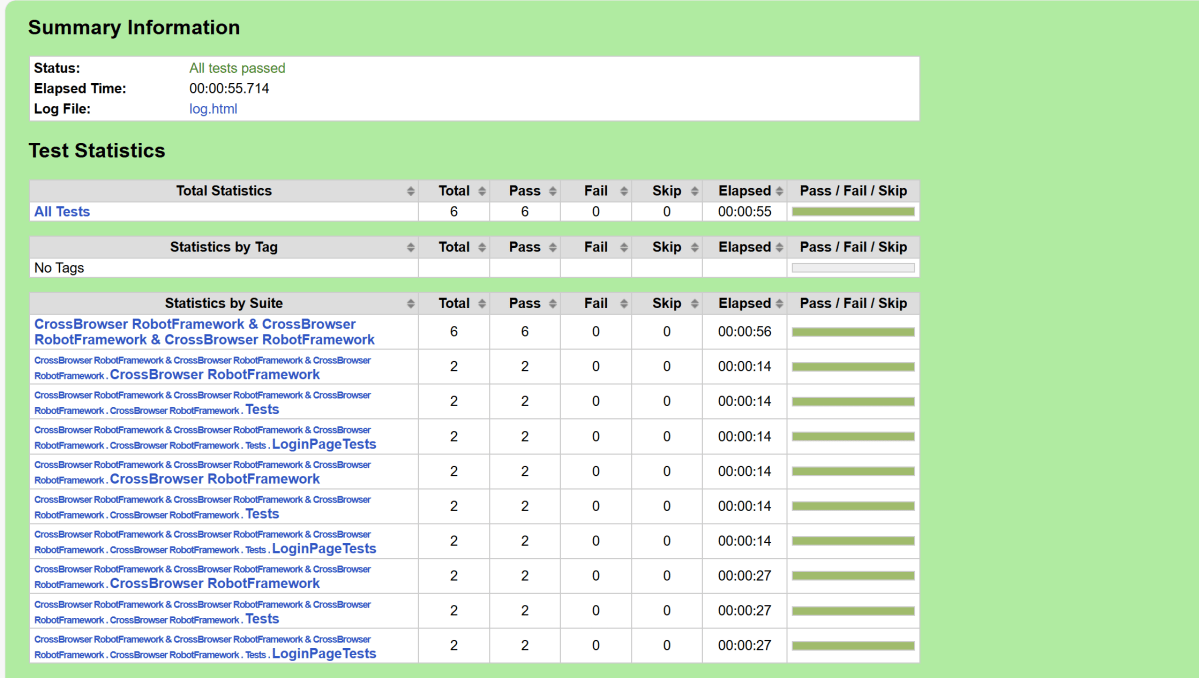
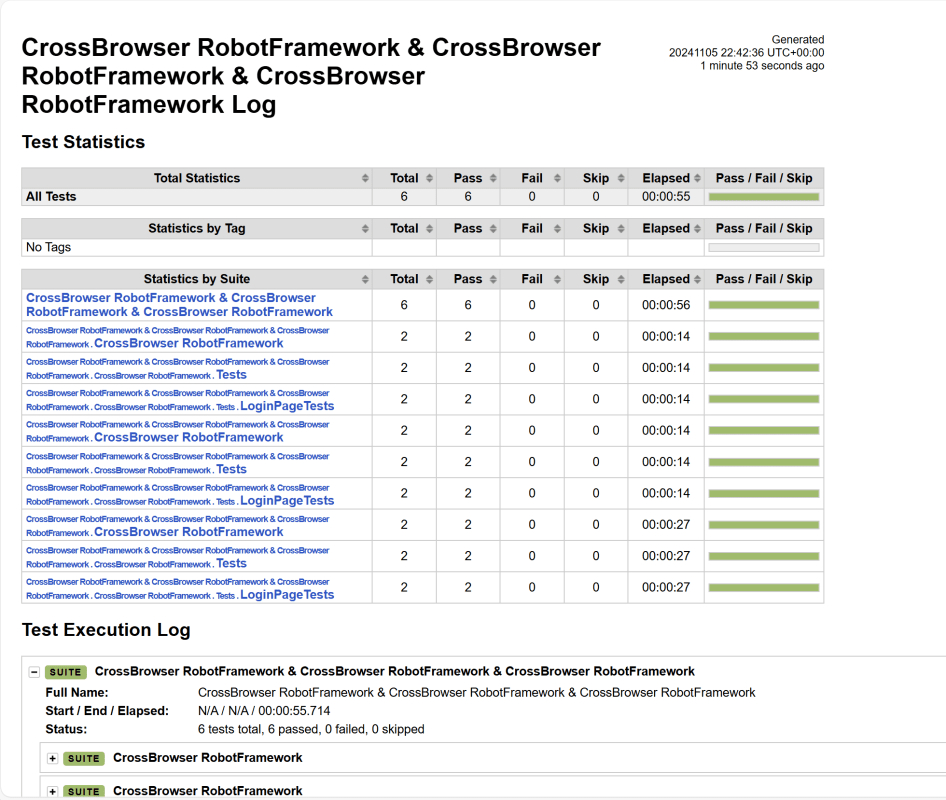
We have total 6 test cases passed (2 test case for each browser).
Let us now see the report and log details.
Report
Right-click on report.html. Select Open In->Browser->Chrome(any browser of your wish).
The Report generated by the framework is shown below:
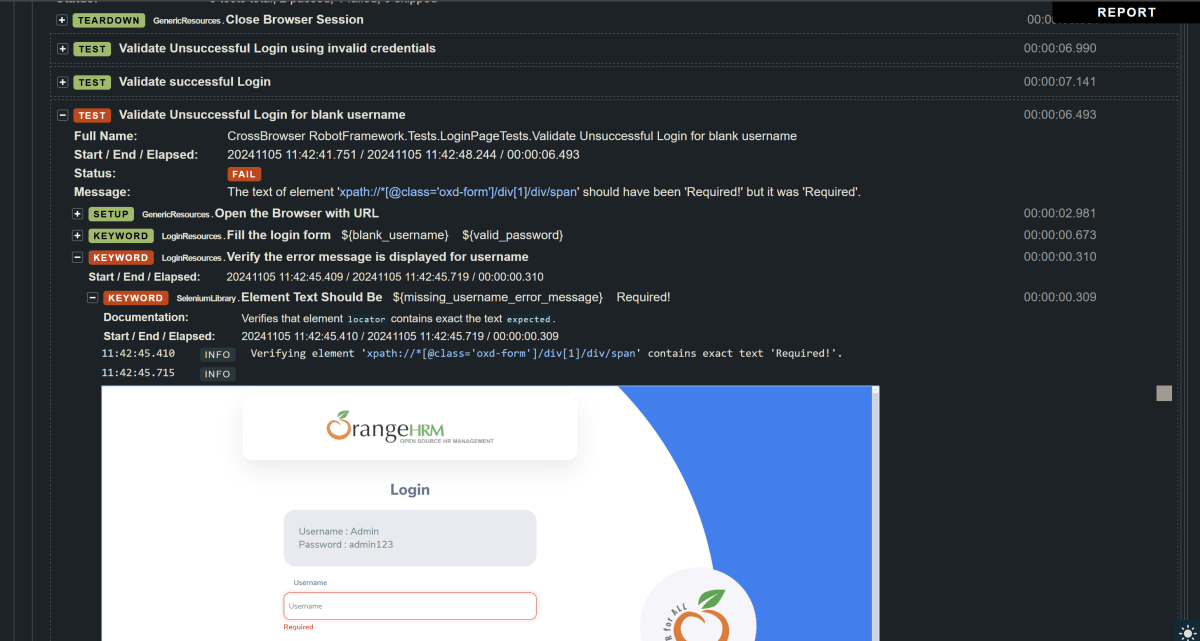
Log
The screenshots will be included in the log.html file under the specific failed test case step. Robot Framework has multiple log levels that control what is shown in the automatically generated log file. The default Robot Framework log level is INFO.
Right-click on log.html. Select Open In->Browser->Chrome(any browser of your wish).
That’s it! Congratulations on making it through this tutorial and hope you found it useful! Happy Learning!!
The previous tutorial explained the How to rerun failed tests in Cucumber. There are multiple times that we need to rerun the failed tests twice to overcome the intermittent network or environment issues. This can be achieved by creating multiple TestRunner class.
In the main test runner, configure Cucumber to generate a JSON report for the initial test run and capture any failed tests in a rerun file. We are using rerun plugin to logs the paths of failed scenarios in a text file – rerun.txt that will be created inside the target folder.
Set Up a Runner for running the failed tests first time
Create a second runner that reads from the rerun.txt file and generates a new rerun1.txt file that contains the path of failed tests and create a separate JSON report for failed test reruns.
import io.cucumber.testng.AbstractTestNGCucumberTests;
import io.cucumber.testng.CucumberOptions;

@CucumberOptions(tags = "",
        features = "@target/rerun.txt",
        glue = "com.example.definitions",
        plugin =  {
                "pretty",
                "html:target/cucumber-reports/cucumber-rerun1-report.html",
                "json:target/cucumber-reports/cucumber-rerun1-report.json",
                "rerun:target/rerun1.txt"
        }
)

public class RunnerTestsFailed extends AbstractTestNGCucumberTests {
}
Set Up a Runner for running the failed tests second time
Create a third runner that reads from the rerun1.txt file and generates a separate JSON report for failed test reruns.
import io.cucumber.testng.AbstractTestNGCucumberTests;
import io.cucumber.testng.CucumberOptions;

@CucumberOptions(tags = "",
        features = "@target/rerun1.txt",
        glue = "com.example.definitions",
        plugin =  {
                "pretty",
                "html:target/cucumber-reports/cucumber-rerun2-report.html",
                "json:target/cucumber-reports/cucumber-rerun2-report.json"
        }
)

public class RunnerTestsSecondFailed extends AbstractTestNGCucumberTests {
}
Mention all the Test Runner details in the testng.xml
We need to mention all the TestRunner class name in the testng.xml. This will run first runner that will generate a file rerun.txt which in turns contain the path of the failed scenarios. Then, second runner will use this new file rerun.txt as input to the feature file and rerun the failed tests and generate second file – rerun1.txt which is used as input to the third Test Runner file.
<?xml version="1.0" encoding="UTF-8"?>
<!DOCTYPE suite SYSTEM "https://testng.org/testng-1.0.dtd">
<suite name="Suite">
    <test  name="Cucumber with TestNG Test">
        <classes>
            <class name="com.example.runner.RunnerTests"/>
            <class name="com.example.runner.RunnerTestsFailed"/>
            <class name="com.example.runner.RunnerTestsSecondFailed"/>
        </classes>
    </test> <!-- Test -->
</suite> <!-- Suite -->
Add cucumber-reporting Plugin to pom.xml
Use the cucumber-reporting plugin by Masterthought to combine the JSON files into a single report. Configure the plugin in your pom.xml to read both the main and rerun JSON files.
Use the below command to run the tests and generate the consolidated Test Report.
mvn clean verify
RunnerTests class generates cucumber-report.json file whereas RunnerTestsFailed generates cucumber-rerun-report.json files are present in target/cucumber-reports folder.
MasterThought plugin uses these json files to generate a consolidated report in target/cucumber-html-reports.
There are different types of HTML reports gets generated as a part of the test execution cycle.
1. feature-overview – This HTML report gives an overall overview of test execution. Main HTML report which covers all different sections like Features, Tags, Steps, and Failures.
2. failures-overview – This HTML report gives an overview of all failed tests.
3. step-overview – This HTML report shows step statistics for the current cycle.
4. tag-overview – This HTML report shows passing and failing statistics for different tags used in test execution.
Congratulations on making it through this tutorial and hope you found it useful! Happy Learning!! Cheers!!
Step 1.1 – Open PyCharm and create a new project. Go to File and select New Project from the main menu.
Step 1.2 – Choose the project location. Click the “Browse” button next to the Location field and specify the directory for your project.
Deselect the Create a main.py welcome script checkbox because you will create a new Python file for this tutorial.
Click on the “Create” Button.
Step 1.3 – A new dialog appears asking to open the project using any one of the given options. I have selected New Window as I like to have separate windows for each project.
Below is the image of the new project created in PyCharms.
Step 2 – Create 3 new directories in the new project
Right-Click on the project, select New->Directory, and provide the name as Tests, Drivers, and Resources
Below is the image of the new directories.
Step 3 – Download ChromeBinaries and place in Drivers directory
This directory contains the browser binary in it. As we are using Chrome, will keep chromedriver.exe here.
The tests are going to use the Chrome browser, so we need to download the ChromeBinaries to open a blank browser in Chrome.
This directory contains multiple test case files consisting of test steps.
Right-click on the new directory and select New File and provide the name as LoginPageTests.robot as shown below:
Below is the code for LoginPageTests.robot
*** Settings ***
Documentation       Tests to login to Login Page
Library     SeleniumLibrary
Test Setup      Open the Browser with URL
Test Teardown   Capture Screenshot On Failure
Suite Teardown  Close Browser Session
Resource       ../Resources/GenericResources.robot
Resource       ../Resources/LoginResources.robot

*** Test Cases ***

Validate Unsuccessful Login using invalid credentials

    LoginResources.Fill the login form     ${valid_username}       ${invalid_password}
    LoginResources.Verify the error message is correct


Validate successful Login

    LoginResources.Fill the login form     ${valid_username}       ${valid_password}
    DashboardResources.Verify Dashboard page opens


Validate Unsuccessful Login for blank username

     LoginResources.Fill the login form     ${blank_username}       ${valid_password}
     LoginResources.Verify the error message is displayed for username
Settings
Documentation: Allows to add the description about the Login Test page.
Library: Import SeleniumLibrary for browser interactions.
Test Setup: Open the Browser with URL keyword to setup the browser before each test
Test Teardown: Capture Screenshot On Failure keyword to capture screenshots if the test fails
Suite Teardown: Close Browser Session keyword close all the browsers at the end of the test suite.
Resource: Provide the path of the resource file that contains the reusable keywords, variables and other settings.
Step 5 – Create Resources file for each page
It maintains the files which contain page elements as well as corresponding keywords.
Right-click on the new directory and select New File and provide the name as LoginResources.robot, DashboardResources.robot and GenericResources.robot as shown below:
GenericResources.robot contains the keywords that are common to all the tests, like the opening of the browser or closing of the browser.
*** Settings ***
Documentation    A resource file with reusable keywords and variables.
Library     SeleniumLibrary

*** Variables ***
${valid_username}     Admin
${valid_password}       admin123
${invalid_username}     1234
${invalid_password}     45678
${blank_username}
${url}        https://opensource-demo.orangehrmlive.com/web/index.php/auth/login
${browser_name}      Chrome
${output_dir}      ./screenshots


*** Keywords ***

Open the Browser with URL
    Open Browser   ${url}    ${browser_name}   executable_path=C:/Users/vibha/Documents/Automation/Python/CrossBrowser_RobotFramework/Drivers/${browser_name}
    Maximize Browser Window
    Set Selenium Implicit Wait    5

Capture screenshot On Failure
    Run Keyword If Test Failed    Capture Page Screenshot    ${output_dir}/${TEST NAME}.png
    Close Browser

Close Browser Session
    Close Browser
${browser_name}: Browser will be used to run the tests
${output_dir}: Directory where the screenshots will be saved.
Below is the code for LoginResources.robot
*** Settings ***
Documentation        All the page objects and keywords of landing page
Library     SeleniumLibrary

*** Variables ***
${login_error_message}      css:.oxd-alert-content--error
${dashboard_title}       css:.oxd-topbar-header-breadcrumb-module
${missing_username_error_message}    xpath://*[@class='oxd-form']/div[1]/div/span

*** Keywords ***

Fill the login form
    [Arguments]    ${username}      ${password}
   Input Text    css:input[name=username]   ${username}
   Input Password    css:input[name=password]   ${password}
   Click Button    css:.orangehrm-login-button


Verify the error message is correct
    Element Text Should Be    ${login_error_message}    Invalid credentials


Verify the error message is displayed for username
     Element Text Should Be    ${missing_username_error_message}      Required
Below is the code for DashboardResources.robot
*** Settings ***
Documentation        All the page objects and keywords of Dashboard page
Library     SeleniumLibrary

*** Variables ***
${dashboard_title}       css:.oxd-topbar-header-breadcrumb-module

*** Keywords ***

Verify Dashboard page opens
    Element Text Should Be    ${dashboard_title}      Dashboard
All the below-mentioned keywords are derived from SeleniumLibrary. The functionality of keywords mentioned above:
1. Open Browser − The keyword opens a new browser instance to the optional url.
2. Maximize Browser Window – This keyword maximizes the current browser window.
3. Set Selenium Implicit Wait – This keyword sets the implicit wait value used by Selenium.
4. Run Keyword If Test Failed – Runs the given keyword with the given argument (Capture Page Screenshot), if the test failed.
5. Close Browser – Close the current browser.
6. Input Text − This keyword is used to type the given text in the specified textbox identified by the locator name:username.
7. Input Password – This keyword is used to type the given text in the specified password identified by the locator name:password.
The difference compared to Input Text is that this keyword does not log the given password on the INFO level.
8. Click button – This keyword is used to click the button identified by the locator. In this case, it is “Login” button.
9. Element Text Should Be – This keyword is used to verify that the current page contains the exact text identified by the locator. Here, we are checking the exact text “Invalid Credentials”.
To run this script, go to the command line and go to directory tests. We need the below command to run the Robot Framework script.
robot .
The output of the above program is
Step 7 – View Screenshots of the failed tests
Screenshots of the failed tests will be saved in screenshots folder with the name of failed test as shown in the below image.
Step 8 – View Report and Log
We have 2 test cases passed and 1 failed. The Robot Framework generates log.html, output.xml, and report.html by default.
Let us now see the report and log details.
Report
Right-click on report.html. Select Open In->Browser->Chrome(any browser of your wish).
The Report generated by the framework is shown below:
Log
The screenshots will be included in the log.html file under the specific failed test case step. Robot Framework has multiple log levels that control what is shown in the automatically generated log file. The default Robot Framework log level is INFO.
Right-click on log.html. Select Open In->Browser->Chrome(any browser of your wish).
Points to Consider
Path to Screenshots: By default, screenshots are saved in the same directory as the test files. We can customize the path in the Capture Screenshot On Failure keyword. Here, we have used screenshot folder to save the screenshots in it.
Browser Compatibility: Make sure that we have the correct WebDriver for the browser as well as compatible version of the driver (e.g., chromedriver for Chrome, geckodriver for Firefox, msedgedriver for Edge).
Failure Scenarios: This setup captures screenshots only when a test fails, making it easier to debug issues.
That’s it! Congratulations on making it through this tutorial and hope you found it useful! Happy Learning!!
1) c) Organized collection of data or information that can be accessed, updated, and managed
2) c) Table
3) a) All Correct
4) c) WHERE clause
The WHERE clause is incomplete and needs a condition to specify which records to update.
5) a) True
6) a) SELECT * FROM Employees WHERE FirstName=’Peter’ AND LastName=’Jackson’
7) a) All Correct
8) b) >= ‘2023-06-01’
The OR operator should be followed by a complete condition, including the column name. SELECT * FROM Orders WHERE OrderDate >= ‘2023-01-01’ OR OrderDate >= ‘2023-06-01’;
9) c) HAVING
10) c) No error
11) a) SELECT * FROM Employees WHERE LastName BETWEEN ‘Hansen’ AND ‘Pettersen’
12) a) SELECT DISTINCT
13) a) ORDER BY
14) a) SELECT * FROM Employees ORDER BY FirstName DESC
15) a) INSERT INTO Employees VALUES (‘Jimmy’, ‘Jackson’)
16) a) INSERT INTO Persons (LastName) VALUES (‘Olsen’)
17) c) To give users access privileges
18) b) Removes specific access privileges from users
19) d) All Correct
20) c) ON Database
This is because the REVOKE statement usually specifies the type of object (such as a) specific table or schema) with tables). Just mentioning Database without specifying an object within it is incorrect. The corrected syntax typically needs to look like:
REVOKE INSERT, UPDATE ON Database.* FROM user123;
21) a) UPDATE Employees SET LastName=’Nilsen’ WHERE LastName=’Hansen’
22) a) DELETE FROM Employees WHERE FirstName = ‘Peter’
Welcome to the SQL Quiz! This blog post features 25 multiple-choice questions that explore essential concepts of SQL.
1. What is a database?
Select the best answer
a) Organized collection of information that cannot be accessed, updated, and managed b) Collection of data or information without organizing c) Organized collection of data or information that can be accessed, updated, and managed d) Organized collection of data that cannot be updated
6. With SQL, how do you select all the records from a table named “Employees” where the “FirstName” is “Peter” and the “LastName” is “Jackson”?
Choose one option
a) SELECT * FROM Employees WHERE FirstName='Peter' AND LastName='Jackson'

b) SELECT FirstName='Peter', LastName='Jackson' FROM Employees

c) SELECT * FROM Employees WHERE FirstName<>'Peter' AND LastName<>'Jackson'

d)  SELECT * FROM Employees WHERE FirstName='Jackson' AND LastName='Peter'
11. With SQL, how do you select all the records from a table named “Employees” where the “LastName” is alphabetically between (and including) “Hansen” and “Pettersen”?
Choose one option
a) SELECT * FROM Employees WHERE LastName BETWEEN 'Hansen' AND 'Pettersen'

b) SELECT * FROM Employees WHERE LastName>'Hansen' AND LastName<'Pettersen'

c) SELECT LastName>'Hansen' AND LastName<'Pettersen' FROM Employees

d) None
14. With SQL, how can you return all the records from a) table named “Employees” sorted descending by “FirstName”?
Choose one option
a) SELECT * FROM Employees ORDER BY FirstName DESC

b) SELECT * FROM Employees SORT 'FirstName' DESC

c) SELECT * FROM Employees SORT BY 'FirstName' DESC

d) SELECT * FROM Employees ORDER FirstName DESC
15. With SQL, how can you insert a new record into the “Employees” table?
Choose one option
a) INSERT INTO Employees VALUES ('Jimmy', 'Jackson')

b) INSERT VALUES ('Jimmy', 'Jackson') INTO Employees

c) INSERT ('Jimmy', 'Jackson') INTO Employees

d) INSERT INTO Table Employees VALUES ('Jimmy', 'Jackson')
16. With SQL, how can you insert “Olsen” as the “LastName” in the “Persons” table?
Choose one option
a) INSERT INTO Persons (LastName) VALUES ('Olsen')

b) INSERT ('Olsen') INTO Persons (LastName)

c) INSERT INTO Persons ('Olsen') INTO LastName

d) All incorrect
21. How can you change “Hansen” into “Nilsen” in the “LastName” column in the Employees table?
Choose one option
a) UPDATE Employees SET LastName='Nilsen' WHERE LastName='Hansen'

b) MODIFY Employees SET LastName='Nilsen' WHERE LastName='Hansen'

c) UPDATE Employees SET LastName='Hansen' INTO LastName='Nilsen'

d) MODIFY Employees SET LastName='Hansen' INTO LastName='Nilsen
22. With SQL, how can you delete the records where the “FirstName” is “Peter” in the Employees Table?
Choose one option
a) DELETE FROM Employees WHERE FirstName = 'Peter'

b) DELETE FirstName='Peter' FROM Employees

c) DELETE ROW FirstName='Peter' FROM Employees

d) All are incorrect
There are multiple reports produced when the Cucumber failed tests are redone. There is no unified test execution status provided in these reports. To generate a consolidated Cucumber report after rerunning any failed tests, follow these steps:
In the main test runner, configure Cucumber to generate a JSON report for the initial test run and capture any failed tests in a rerun file. We are using rerun plugin to logs the paths of failed scenarios in a text file – rerun.txt that will be created inside the target folder.
Create a second runner that reads from the rerun.txt file and generates a separate JSON report for failed test reruns.
import io.cucumber.testng.AbstractTestNGCucumberTests;
import io.cucumber.testng.CucumberOptions;

@CucumberOptions(tags = "",
        features = "@target/rerun.txt",
        glue = "com.example.definitions",
        plugin =  {
                "pretty",
                "html:target/cucumber-reports/cucumber-rerun-report.html",
                "json:target/cucumber-reports/cucumber-rerun-report.json"
        }
)

public class RunnerTestsFailed extends AbstractTestNGCucumberTests {
}
Mention both Test Runner details in the testng.xml
We need to mention both the TestRunner class name in the testng.xml. This will run both the runners sequentially.
<?xml version="1.0" encoding="UTF-8"?>
<!DOCTYPE suite SYSTEM "https://testng.org/testng-1.0.dtd">
<suite name="Suite">
    <test  name="Cucumber with TestNG Test">
        <classes>
            <class name="com.example.runner.RunnerTests"/>
            <class name="com.example.runner.RunnerTestsFailed"/>
        </classes>
    </test> <!-- Test -->
</suite> <!-- Suite -->
Add cucumber-reporting Plugin to pom.xml
Use the cucumber-reporting plugin by Masterthought to combine the JSON files into a single report. Configure the plugin in your pom.xml to read both the main and rerun JSON files.
Use the below command to run the tests and generate the consolidated Test Report.
mvn clean verify
RunnerTests class generates cucumber-report.json file whereas RunnerTestsFailed generates cucumber-rerun-report.json files are present in target/cucumber-reports folder.
MasterThought plugin uses these json files to generate a consolidated report in target/cucumber-html-reports.
There are different types of HTML reports gets generated as a part of the test execution cycle.
1. feature-overview – This HTML report gives an overall overview of test execution. Main HTML report which covers all different sections like Features, Tags, Steps, and Failures.
2. failures-overview – This HTML report gives an overview of all failed tests.
3. step-overview – This HTML report shows step statistics for the current cycle.
4. tag-overview – This HTML report shows passing and failing statistics for different tags used in test execution.
Congratulations on making it through this tutorial and hope you found it useful! Happy Learning!! Cheers!!
In this article we will see how we can download a pdf file using selenium at a desired location in java on Firefox browser.
Many applications generate PDF Report like Billing Report, Policy Report, so on and as part of the testing process, the QA needs to download the PDF’s and verify the data present in that report. We should be able to perform this operation using automation also. Selenium supports the downloading of the document like PDF, word, excel and many more.
Implementation Steps
Step 1 – Define directory path for PDF to be downloaded
Define the directory path where the PDF will be downloaded. Here, it will create a directory with the name of downloads in the project.
This preference sets where downloaded files will be saved. The value `2` indicates that all downloaded files should be saved to a user-specified directory.
This preference specifies the MIME types for which Firefox will automatically download files without prompting the user with an “Open/Save As” dialog. In this case, application/pdf is being used to indicate that PDF files should be downloaded directly.
Step 3 – Initialize WebDriver and Open Webpage
WebDriver driver = new FirefoxDriver(options);
driver.manage().window().maximize();
driver.get("https://freetestdata.com/document-files/pdf/");
Step 4 – Find and Click the Download Link and wait for the download completion
Locate the download link using XPath and click on it to start the download.
WebElement downloadLink = new WebDriverWait(driver, Duration.ofSeconds(10))
.until(ExpectedConditions.elementToBeClickable(By.xpath("//*[@class=\"elementor-button-text\"]")));
downloadLink.click();
Step 5 – Verify the File Download
Check if the downloaded file exists in the specified download directory or not.
File downloadedFile = new File(downloadFilepath + "/Free_Test_Data_100KB_PDF.pdf");
if (downloadedFile.exists()) {
System.out.println("File is downloaded!");
} else {
System.out.println("File is not downloaded.");
}
Step 6 – Quit the WebDriver
driver.quit();
The complete program can be seen below:
package com.example;
import org.openqa.selenium.By;
import org.openqa.selenium.WebDriver;
import org.openqa.selenium.WebElement;
import org.openqa.selenium.firefox.FirefoxDriver;
import org.openqa.selenium.firefox.FirefoxOptions;
import org.openqa.selenium.support.ui.ExpectedConditions;
import org.openqa.selenium.support.ui.WebDriverWait;
import java.io.File;
import java.time.Duration;
public class FirefoxDownload_PDF {
public static void main(String[] args) {
// Setup download directory
String downloadFilepath = System.getProperty("user.dir") + File.separator + "firefox_downloads";
// FirefoxOptions configuration
FirefoxOptions options = new FirefoxOptions();
options.addPreference("browser.download.folderList", 2);
options.addPreference("browser.download.dir", downloadFilepath);
options.addPreference("browser.helperApps.neverAsk.saveToDisk", "application/pdf");
// Initialize Firefox WebDriver and configure browser window
WebDriver driver = new FirefoxDriver(options);
driver.manage().window().maximize();
driver.get("https://freetestdata.com/document-files/pdf/");
// Locate the download link/button and click and wait for the download to complete
WebElement downloadLink = new WebDriverWait(driver, Duration.ofSeconds(10))
              .until(ExpectedConditions.elementToBeClickable(By.xpath("//*[@class=\"elementor-button-text\"]")));
downloadLink.click();
// Verify if the PDF file exists
File downloadedFile = new File(downloadFilepath + "/Free_Test_Data_100KB_PDF.pdf");
if (downloadedFile.exists()) {
System.out.println("File is downloaded from Firefox!");
} else {
System.out.println("File is not downloaded.");
}
// Cleanup: close the browser
driver.quit();
}
}
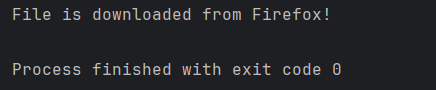
The output of the above program is
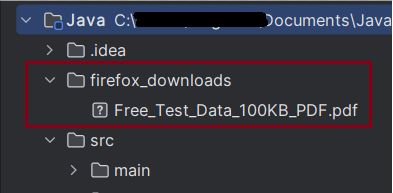
We can see that a firefox_downloads folder is created, and it has the downloaded pdf file – Free_Test_Data_100KB_PDF.pdf.
Summary:
Setup: Configures Firefox to automatically download PDFs and sets the download directory.
Automatically save files of specified MIME types (in this case, PDFs) without prompting the user with a dialog.
Download and Verify: Navigates to a specific URL, clicks the download link, waits for the download to complete, and verifies if the file exists in the specified directory.
Cleanup: Closes the browser session.
That’s it! Congratulations on making it through this tutorial and hope you found it useful! Happy Learning!!
In Git, HEAD is a special pointer or reference that points to the currently checked-out commit in the repository.
12) b) git reset HEAD~1
The git reset HEAD~1 command moves the current branch pointer back to the previous commit, effectively undoing the most recent commit. Note that there are different modes (like –soft, –hard) which decide the fate of changes during this operation.
Git supports various merge strategies like fast-forward, recursive, and octopus. “squid” is not a merge strategy in Git.
16) d) git branch
17) b) Applies changes from a specific commit to the current branch
18) a) git clean
The git clean command removes untracked files from your working directory, ensuring your workspace is tidy.
19) c) A repository without a working directory
A bare repository in Git is a repository that contains only the .git directory and no working directory. It’s typically used for shared repositories and remotes.
20) b) git diff
21) a) git merge
The git merge command integrates changes from one branch into another. This is commonly used when features or bug fixes from one branch need to be brought into the main branch.
22) c) Overlapping changes between branches
A merge conflict occurs when there are changes in the same part of a file in both the current branch and the branch to be merged. Git cannot decide which change should take precedence, so it asks the user to resolve the conflict.