ExtentReports Version 5 for Cucumber 6 and TestNG

HOME

What is ExtentReport?

ExtentReport is a logger-style reporting library for automated tests. ExtentReports uses the logging style to add information about test sessions, such as the creation of tests, adding screenshots, assigning tags, and adding events or series of steps to sequentially indicate the flow of test steps.  ExtentReports 5 is built on an open-Core. That means, both community and professional editions use the same, full-featured API with the exception of a few reporters.

Extent Report 4 onwards, there are 2 editions of Extent Report – Core and Professional.

Below is the screenshot that shows which reporters are available in Professional or Community Editions. You can also visit this page

This tutorial explains the use of Extent Report Core Edition.

Prerequisite:

  1. Java 8 or higher is needed for ExtentReport5
  2. Maven or Gradle
  3. JAVA IDE (like Eclipse, IntelliJ, or soon)
  4. TestNG installed
  5. Cucumber Eclipse plugin (in case using Eclipse)
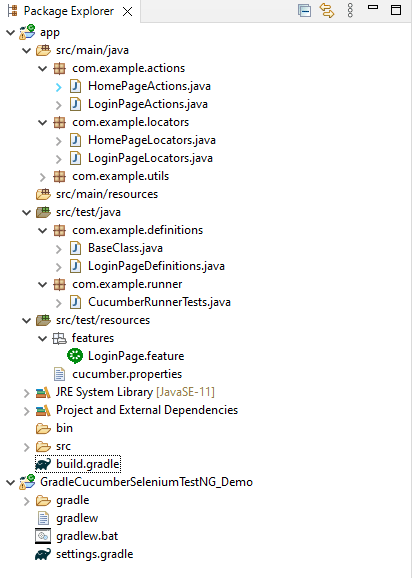
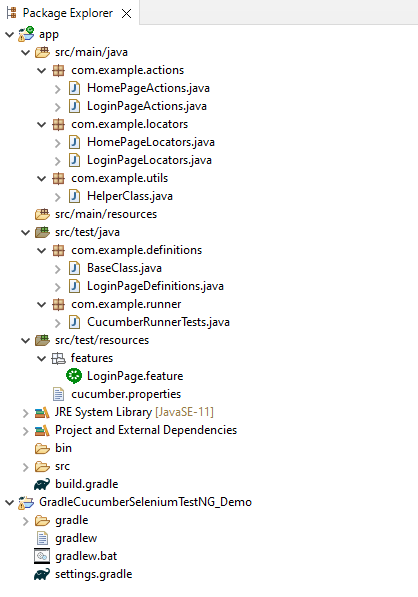
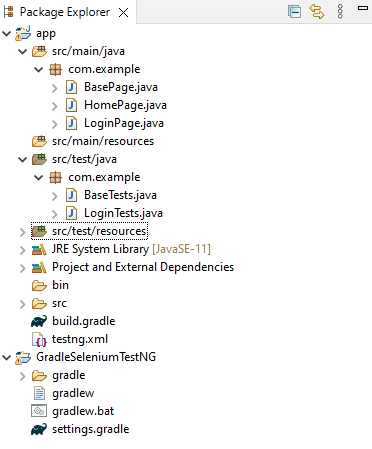
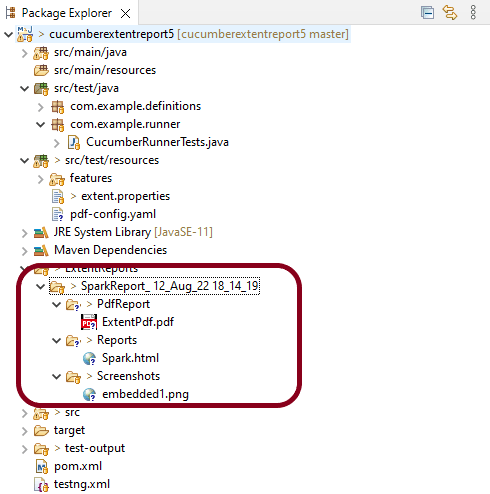
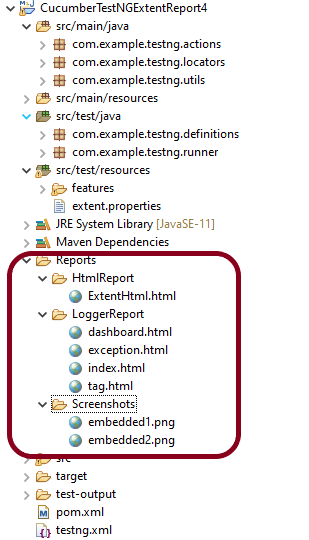
Project Structure

Step 1 – Add Maven dependencies to the POM

Add ExtentReport dependency

<dependency>
    <groupId>com.aventstack</groupId>
    <artifactId>extentreports</artifactId>
    <version>5.0.9</version>
</dependency>

Add tech grasshopper maven dependency for Cucumber

<dependency>
    <groupId>tech.grasshopper</groupId>
    <artifactId>extentreports-cucumber6-adapter</artifactId>
    <version>2.13.0</version>
</dependency>

The complete POM.xml will look like as shown below with other Selenium and TestNG dependencies.

	<properties>
		<project.build.sourceEncoding>UTF-8</project.build.sourceEncoding>
		<cucumber.version>6.11.0</cucumber.version>
		<extentreports.cucumber6.adapter.version>2.13.0</extentreports.cucumber6.adapter.version>
		<extentreports.version>5.0.9</extentreports.version>
		<selenium.version>4.3.0</selenium.version>
		<webdrivermanager.version>5.2.1</webdrivermanager.version>
		<testng.version>7.4.0</testng.version>		
		<maven.compiler.plugin.version>3.10.1</maven.compiler.plugin.version>
		<maven.surefire.plugin.version>3.0.0-M7</maven.surefire.plugin.version>
		<maven.compiler.source.version>11</maven.compiler.source.version>
		<maven.compiler.target.version>11</maven.compiler.target.version>
	</properties>

	<dependencies>

		<dependency>
			<groupId>io.cucumber</groupId>
			<artifactId>cucumber-java</artifactId>
			<version>${cucumber.version}</version>
		</dependency>

		<dependency>
           <groupId>io.cucumber</groupId>
           <artifactId>cucumber-testng</artifactId>
           <version>${cucumber.version}</version>
           <scope>test</scope>
       </dependency>

		<!-- Cucumber ExtentReport Adapter -->
		<dependency>
			<groupId>tech.grasshopper</groupId>
			<artifactId>extentreports-cucumber6-adapter</artifactId>
			<version>${extentreports.cucumber6.adapter.version}</version>
		</dependency>


		<!-- Extent Report -->
		<dependency>
			<groupId>com.aventstack</groupId>
			<artifactId>extentreports</artifactId>
			<version>${extentreports.version}</version>
		</dependency>
		
		<!-- Selenium -->
		<dependency>
			<groupId>org.seleniumhq.selenium</groupId>
			<artifactId>selenium-java</artifactId>
			<version>${selenium.version}</version>
		</dependency>


		<!-- Web Driver Manager -->
		<dependency>
			<groupId>io.github.bonigarcia</groupId>
			<artifactId>webdrivermanager</artifactId>
			<version>${webdrivermanager.version}</version>
		</dependency>

		<!-- TestNG -->
		<dependency>
			<groupId>org.testng</groupId>
			<artifactId>testng</artifactId>
			<version>${testng.version}</version>
			<scope>test</scope>
		</dependency>


		<!-- Apache Common -->
		<dependency>
			<groupId>org.apache.directory.studio</groupId>
			<artifactId>org.apache.commons.io</artifactId>
			<version>2.4</version>
		</dependency>

	</dependencies>

	<build>
		<plugins>
			<plugin>
				<groupId>org.apache.maven.plugins</groupId>
				<artifactId>maven-compiler-plugin</artifactId>
				<version>${maven.compiler.plugin.version}</version>
				<configuration>
					<source>${maven.compiler.source.version}</source> <!--For JAVA 8 use 1.8-->
					<target>${maven.compiler.target.version}</target> <!--For JAVA 8 use 1.8-->
				</configuration>
			</plugin>
			<plugin>
				<groupId>org.apache.maven.plugins</groupId>
				<artifactId>maven-surefire-plugin</artifactId>
				<version>${maven.surefire.plugin.version}</version>
				<configuration>
					<suiteXmlFiles>
						<suiteXmlFile>testng.xml</suiteXmlFile>
					</suiteXmlFiles>
				</configuration>
			</plugin>
		</plugins>
	</build>
</project>

Step 2: Create a feature file in src/test/resources

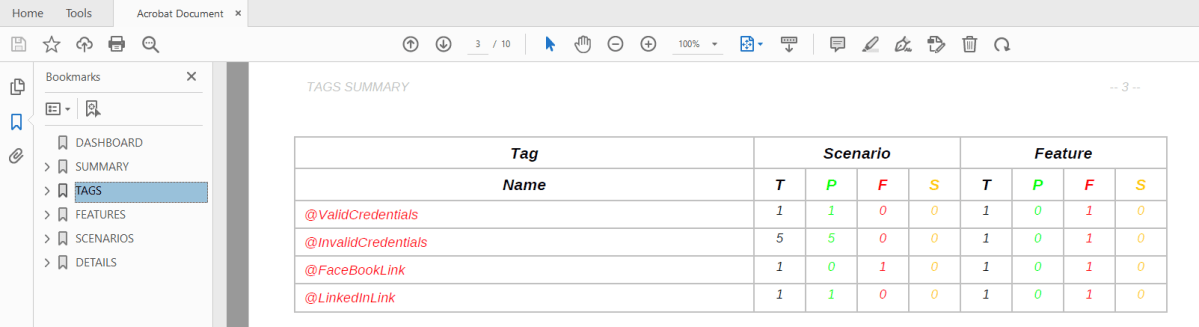
Below is a sample feature file. I have also added a failed scenario in @FaceBookLink.

Feature: Login to HRM Application 
 
   @ValidCredentials
   Scenario: Login with valid credentials
     
    Given User is on HRMLogin page "https://opensource-demo.orangehrmlive.com/"
    When User enters username as "Admin" and password as "admin123"
    Then User should be able to login sucessfully and new page open
    
   @InvalidCredentials
   Scenario Outline: Login with invalid credentials
     
    Given User is on HRMLogin page "https://opensource-demo.orangehrmlive.com/"
    When User enters username as "<username>" and password as "<password>"
    Then User should be able to see error message "<errorMessage>"
    
  Examples:
  | username   | password    | errorMessage                           |
  |                   | abc              | Username cannot be empty     |
  | admin        |                    | Password cannot be empty          |
  |                   |                    | Username cannot be empty          |
  | Admin       | admin12$$ | Invalid credentials               |
  | admin$$    | admin123   | Invalid credentials               |
  
    
  @FaceBookLink
  Scenario: Verify FaceBook Icon on Login Page
     
    Given User is on HRMLogin page "https://opensource-demo.orangehrmlive.com/"
    Then User should be able to see FaceBook Icon
    
  @LinkedInLink
  Scenario: Verify LinkedIn Icon on Login Page
     
    Given User is on HRMLogin page "https://opensource-demo.orangehrmlive.com/"
    Then User should be able to see LinkedIn Icon  

Step 3: Create extent.properties file in src/test/resources

We need to create the extent.properties file at the src/test/resources folder for the grasshopper extent report adapter to recognize it. Using a property file for reporting is quite helpful if you want to define several different properties.

Let’s enable spark report in an extent properties file:

extent.reporter.spark.start=true
extent.reporter.spark.out=Reports/Spark.html

Step 4: Create a Helper class in src/main/java

We have used Page Object Model with Cucumber and TestNG.

Create a Helper class where we are initializing the web driver, initializing the web driver wait, defining the timeouts, and creating a private constructor of the class, within it will declare the web driver, so whenever we create an object of this class, a new web browser is invoked. We are using a setter and getter method to get the object of Chromedriver with the help of a private constructor itself within the same class.

HelperClass

import java.time.Duration;
import org.openqa.selenium.WebDriver;
import org.openqa.selenium.chrome.ChromeDriver;
import org.openqa.selenium.support.ui.WebDriverWait;
import io.github.bonigarcia.wdm.WebDriverManager;

public class HelperClass {
	
	private static HelperClass helperClass;
	
	private static WebDriver driver;
	private static WebDriverWait wait;
    public final static int TIMEOUT = 10;
	
	 private HelperClass() {
		 
			WebDriverManager.chromedriver().setup();
	    	driver = new ChromeDriver();
	        wait = new WebDriverWait(driver, Duration.ofSeconds(TIMEOUT));
        driver.manage().timeouts().implicitlyWait(Duration.ofSeconds(TIMEOUT));
	        driver.manage().window().maximize();
	 }      
	    	
    public static void openPage(String url) {
        driver.get(url);
    }

	
	public static WebDriver getDriver() {
		return driver;				
	}
	
	public static void setUpDriver() {
		
		if (helperClass==null) {
			
			helperClass = new HelperClass();
		}
	}
	
	 public static void tearDown() {
		 
		 if(driver!=null) {
			 driver.close();
			 driver.quit();
		 }
		 
		 helperClass = null;
	 } 
	
}

Step 5: Create Locator classes in src/main/java

Create a locator class for each page that contains the detail of the locators of all the web elements. Here, I’m creating 2 locator classes – LoginPageLocators and HomePageLocators.

LoginPageLocators

import org.openqa.selenium.WebElement;
import org.openqa.selenium.support.FindBy;

public class LoginPageLocators {

	@FindBy(name = "txtUsername")
    public WebElement userName;
 
    @FindBy(name = "txtPassword")
    public WebElement password;
 
    @FindBy(id = "logInPanelHeading")
    public WebElement titleText;
 
    @FindBy(id = "btnLogin")
    public WebElement login;
 
    @FindBy(id = "spanMessage")
    public  WebElement errorMessage;
    
    @FindBy(xpath = "//*[@id='social-icons']/a[1]/img")
    public  WebElement linkedInIcon;
    
    @FindBy(xpath = "//*[@id='social-icons']/a[6]/img")  //Invalid Xpath
    public  WebElement faceBookIcon;
     
}

HomePageLocators

import org.openqa.selenium.WebElement;
import org.openqa.selenium.support.FindBy;

public class HomePageLocators {

	@FindBy(id = "welcome")
	public  WebElement homePageUserName;
}

Step 6: Create Action classes in src/main/java

Create the action classes for each web page. These action classes contain all the methods needed by the step definitions. In this case, I have created 2 action classes – LoginPageActions and HomePageActions

LoginPageActions

In this class, the very first thing will do is to create the object of LoginPageLocators class so that we should be able to access all the PageFactory elements. Secondly, create a public constructor of LoginPageActions class

import org.openqa.selenium.support.PageFactory;
import com.example.locators.LoginPageLocators;
import com.example.utils.HelperClass;

public class LoginPageActions {

	LoginPageLocators loginPageLocators = null; 
	
    public LoginPageActions() {

    	this.loginPageLocators = new LoginPageLocators();

		PageFactory.initElements(HelperClass.getDriver(),loginPageLocators);
	}

  
	// Set user name in textbox
    public void setUserName(String strUserName) {
    	loginPageLocators.userName.sendKeys(strUserName);
    }
 
    // Set password in password textbox
    public void setPassword(String strPassword) {
    	loginPageLocators.password.sendKeys(strPassword);
    }
 
    // Click on login button
    public void clickLogin() {
    	loginPageLocators.login.click();
    }
 
    // Get the title of Login Page
    public String getLoginTitle() {
        return loginPageLocators.titleText.getText();
    }
    
    
    // Get the title of Login Page
    public String getErrorMessage() {
        return loginPageLocators.errorMessage.getText();
    }
    
    // LinkedIn Icon is displayed
    public Boolean getLinkedInIcon() {
   
        return loginPageLocators.linkedInIcon.isDisplayed();
    }
    
    // FaceBook Icon is displayed
    public Boolean getFaceBookIcon() {
   
        return loginPageLocators.faceBookIcon.isDisplayed();
    }
 
    public void login(String strUserName, String strPassword) {
 
        // Fill user name
        this.setUserName(strUserName);
 
        // Fill password
        this.setPassword(strPassword);
 
        // Click Login button
        this.clickLogin();
 
    }
}

HomePageActions

import org.openqa.selenium.support.PageFactory;
import com.example.locators.HomePageLocators;
import com.example.utils.HelperClass;

public class HomePageActions {

	HomePageLocators homePageLocators = null;
   
	public HomePageActions() {
    	
		this.homePageLocators = new HomePageLocators();

		PageFactory.initElements(HelperClass.getDriver(),homePageLocators);
    }

 
    // Get the User name from Home Page
    public String getHomePageText() {
        return homePageLocators.homePageUserName.getText();
    }

}

Step 7: Create a Step Definition file in src/test/java

Create the corresponding Step Definition file of the feature file.

LoginPageDefinitions

import org.testng.Assert;
import com.example.actions.HomePageActions;
import com.example.actions.LoginPageActions;
import com.example.utils.HelperClass;
import io.cucumber.java.en.Given;
import io.cucumber.java.en.Then;
import io.cucumber.java.en.When;

public class LoginPageDefinitions{	

	LoginPageActions objLogin = new LoginPageActions();
    HomePageActions objHomePage = new HomePageActions();
		
 
    @Given("User is on HRMLogin page {string}")
    public void loginTest(String url) {
    	
    	HelperClass.openPage(url);
 
    }
 
    @When("User enters username as {string} and password as {string}")
    public void goToHomePage(String userName, String passWord) {
 
        // login to application
        objLogin.login(userName, passWord);
 
        // go the next page
        
    }
 
    @Then("User should be able to login sucessfully and new page open")
    public void verifyLogin() {
 
        // Verify home page
        Assert.assertTrue(objHomePage.getHomePageText().contains("Welcome"));
 
    }
    
    @Then("User should be able to see error message {string}")
    public void verifyErrorMessage(String expectedErrorMessage) {
 
        // Verify home page
        Assert.assertEquals(objLogin.getErrorMessage(),expectedErrorMessage);
 
    }
    
    @Then("User should be able to see LinkedIn Icon")
    public void verifyLinkedInIcon( ) {
    	
    	Assert.assertTrue(objLogin.getLinkedInIcon());
    }
    
    @Then("User should be able to see FaceBook Icon")
    public void verifyFaceBookIcon( ) {
    	
    	Assert.assertTrue(objLogin.getFaceBookIcon());
    }
      
}

Step 8: Create Hook class in src/test/java

Create the hook class that contains the Before and After hook. @Before hook contains the method to call the setup driver which will initialize the chrome driver. This will be run before any test.

After Hook – Here will call the tearDown method.

import com.example.utils.HelperClass;
import io.cucumber.java.After;
import io.cucumber.java.Before;

public class Hooks {
	
	@Before
    public static void setUp() {

       HelperClass.setUpDriver();
    }
	
	@After
	public static void tearDown() {
		
		HelperClass.tearDown();
	}
}

Step 9: Create a Cucumber Test Runner class in src/test/java

Add the extent report cucumber adapter to the runner class’s CucumberOption annotation. It is an important component of the configuration. It also ensures that the cucumber runner class recognizes and launches the extent report adapter for cucumber. Please add the following text as a plugin to the CucumberOptions as described below.

plugin = {"com.aventstack.extentreports.cucumber.adapter.ExtentCucumberAdapter:"})

This is how your runner class should look after being added to our project. Moreover, be sure to keep the colon “:” at the end.

import io.cucumber.testng.AbstractTestNGCucumberTests;
import io.cucumber.testng.CucumberOptions;
 
@CucumberOptions(tags = "", features = "src/test/resources/features/LoginPage.feature", glue = "com.example.definitions",
                 plugin = {"com.aventstack.extentreports.cucumber.adapter.ExtentCucumberAdapter:"})
 
public class CucumberRunnerTests extends AbstractTestNGCucumberTests {
 
}

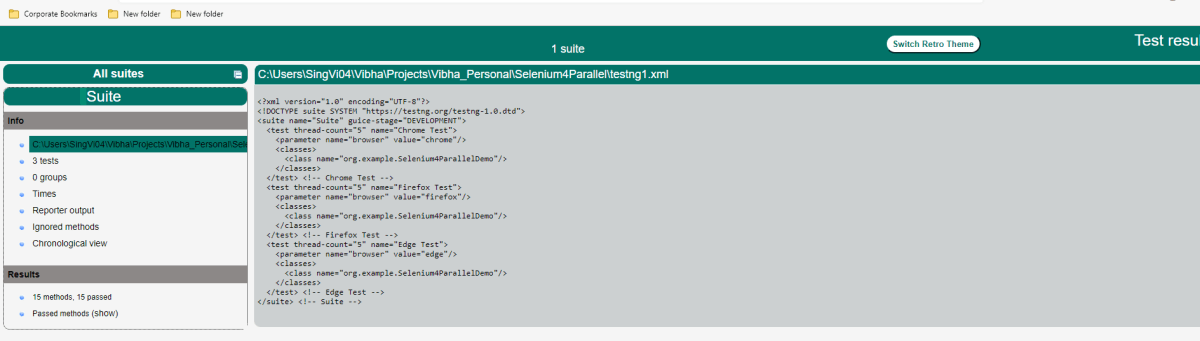
Step 10: Create the testng.xml for the project

Right-click on the project and select TestNG -> convert to TestNG.

<?xml version="1.0" encoding="UTF-8"?>
<!DOCTYPE suite SYSTEM "https://testng.org/testng-1.0.dtd">
<suite name="Suite">
  <test name="ExtentReport5 for Cucumber">
  
  <classes>
  <class name = "com.example.runner.CucumberRunnerTests"/>
  </classes>
  </test> <!-- Test -->
</suite> <!-- Suite -->

Step 11: Execute the code
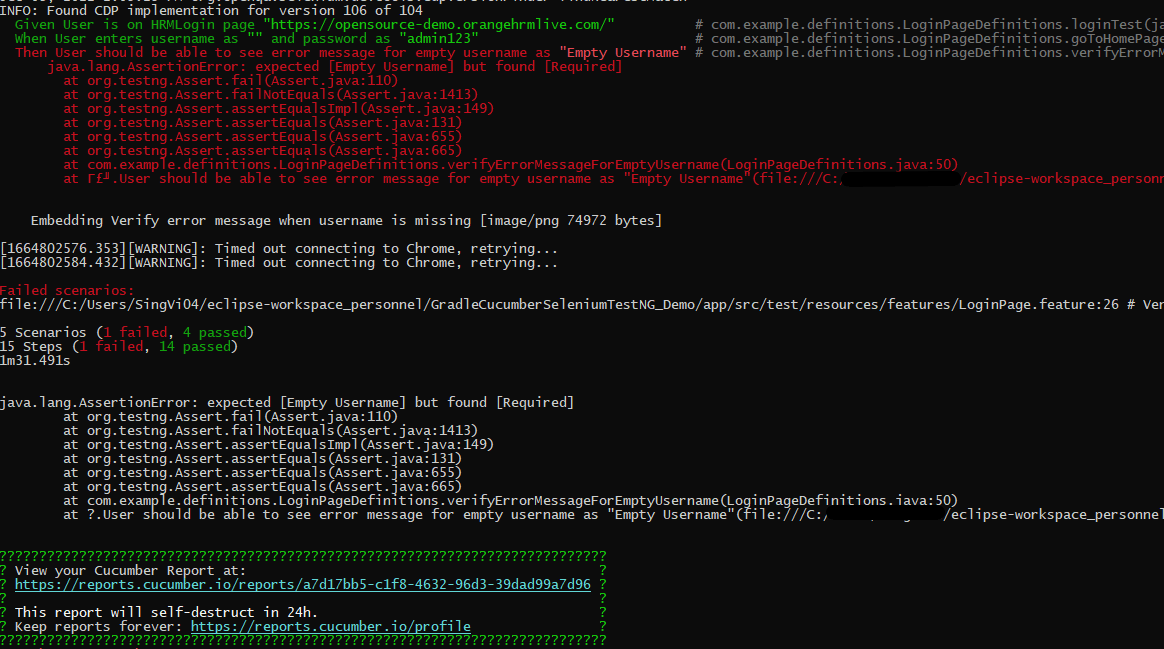
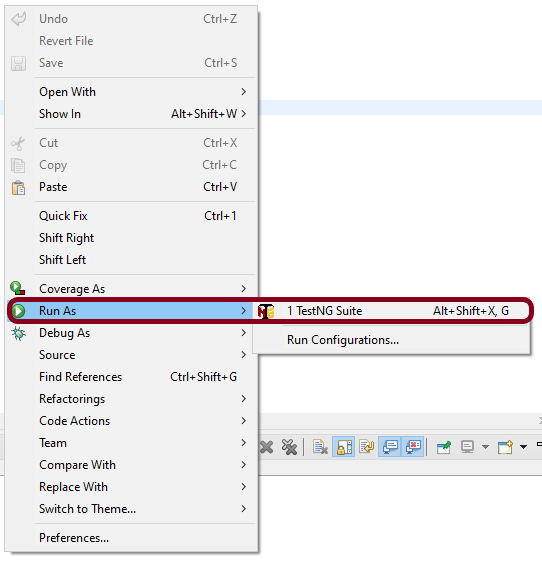
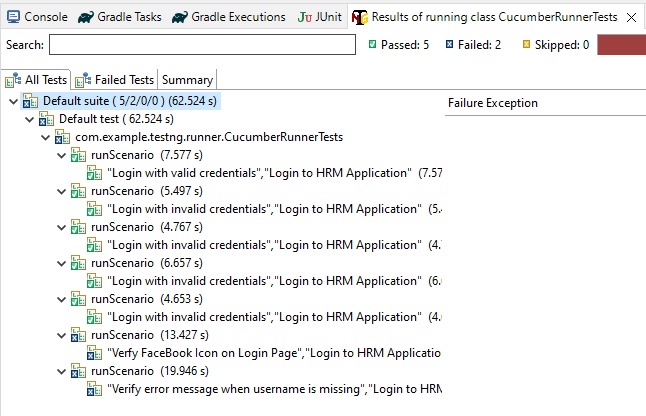
Right-Click on the Runner class and select Run As -> TestNG Test.
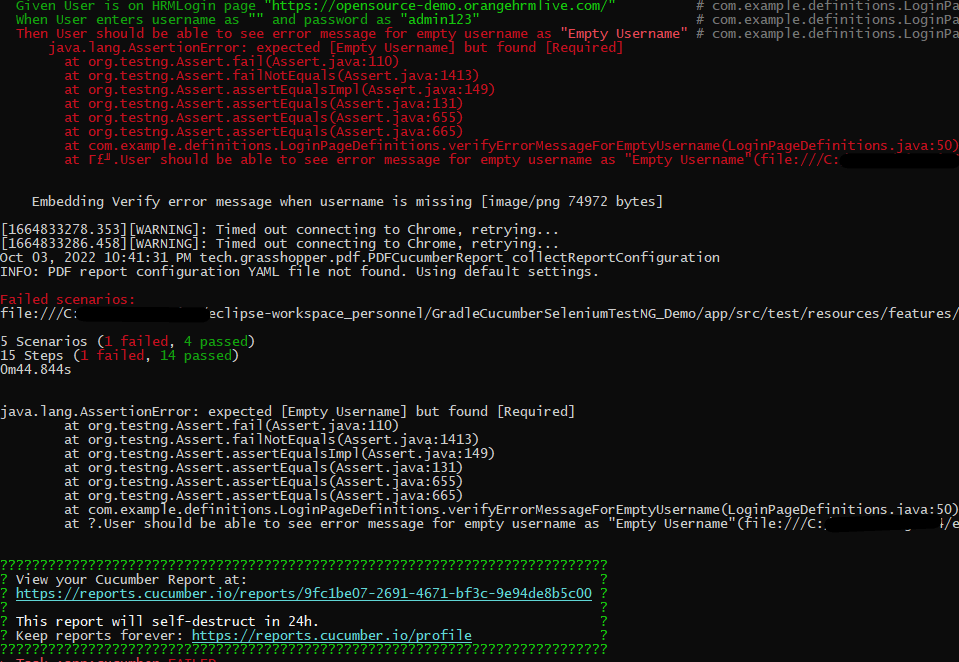
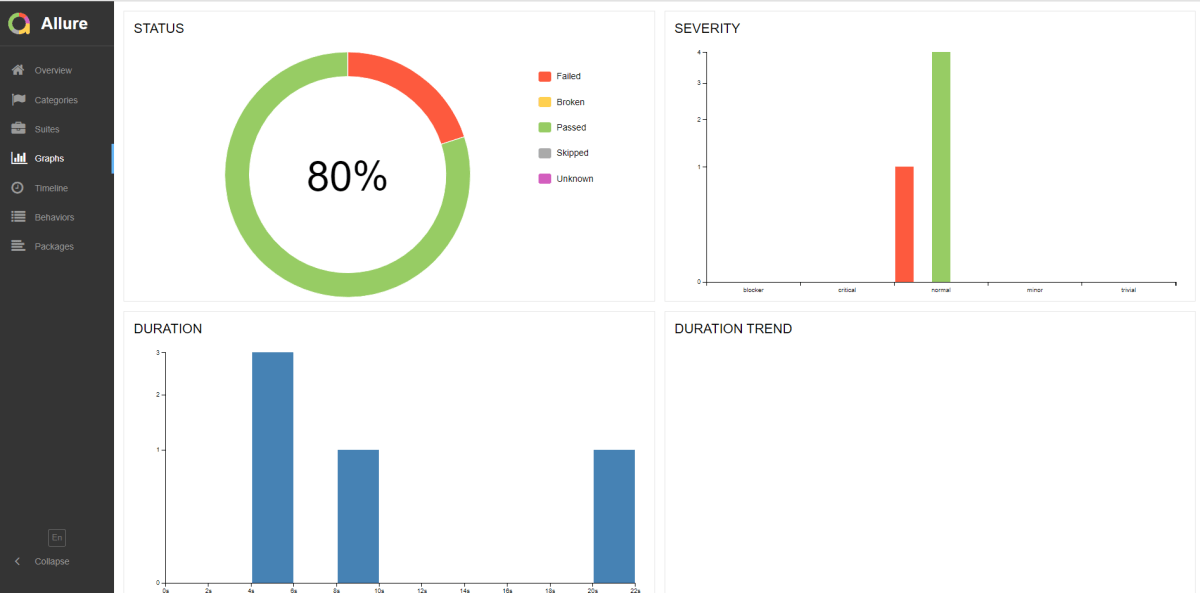
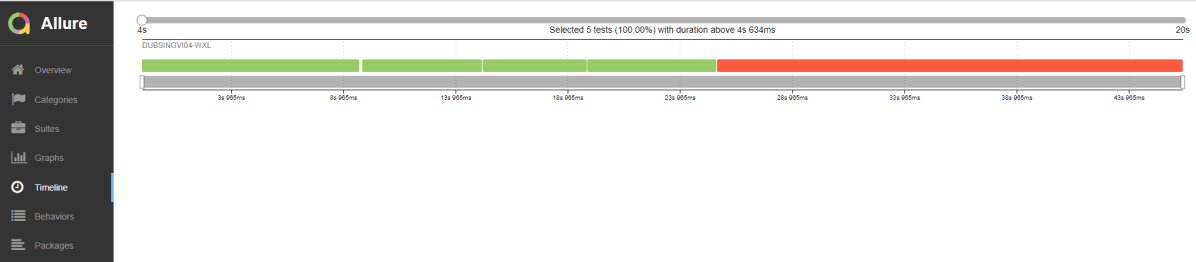
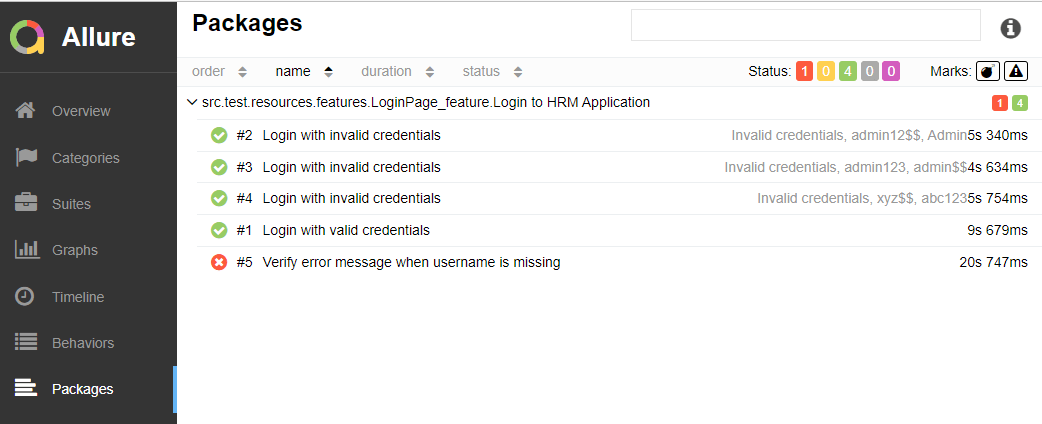
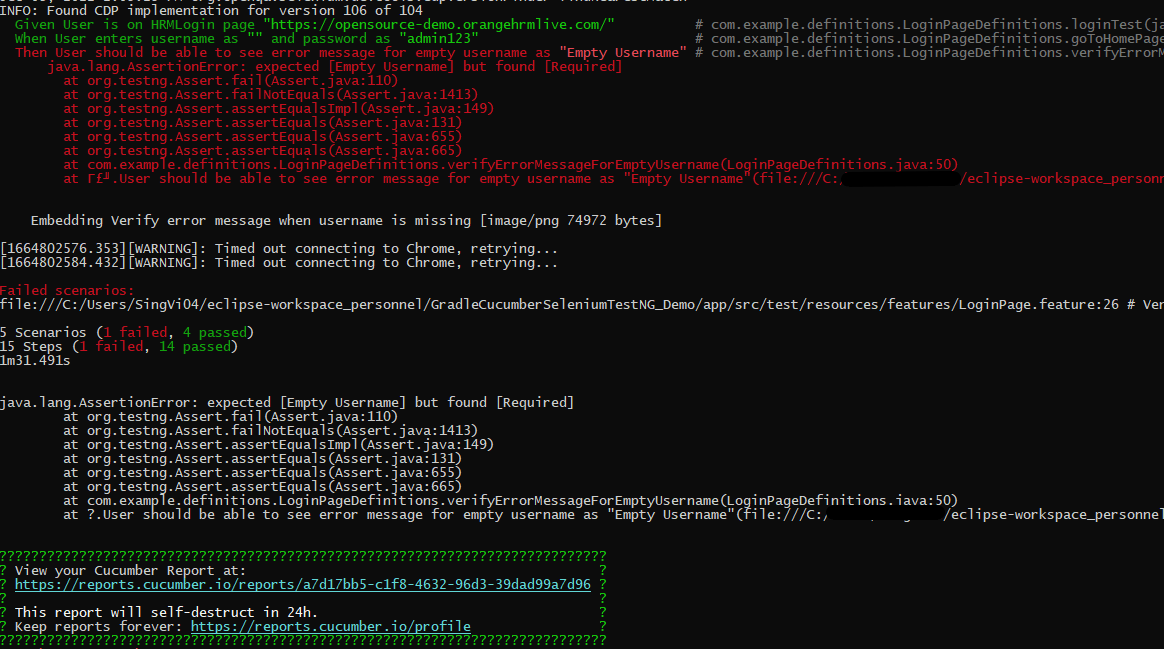
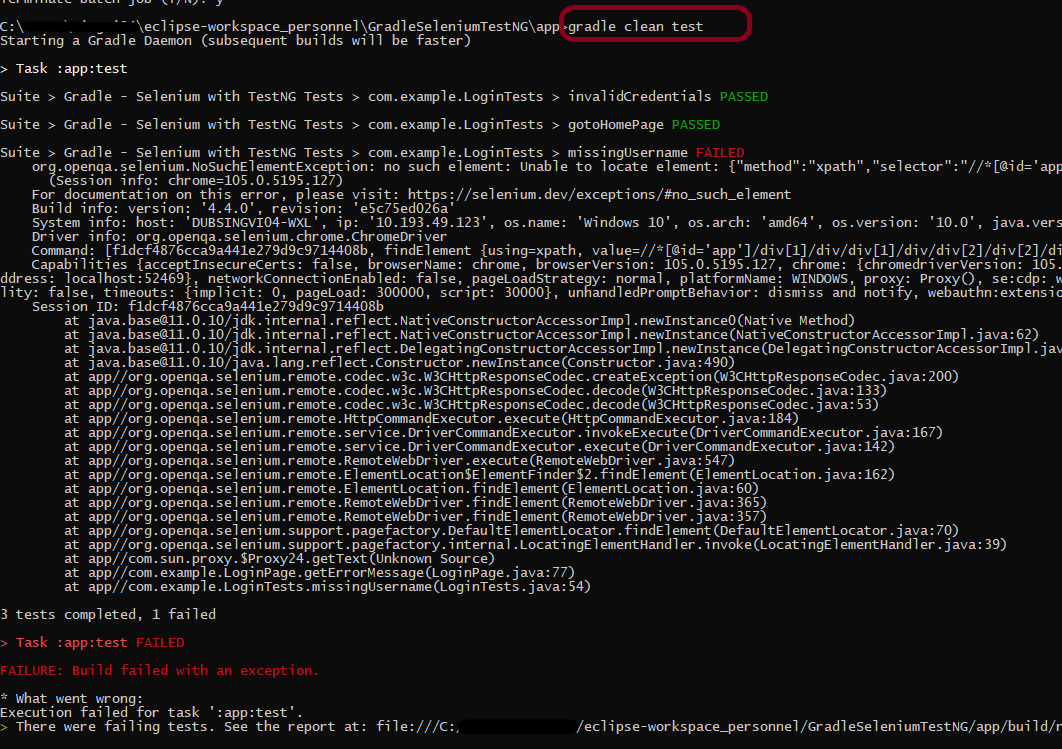
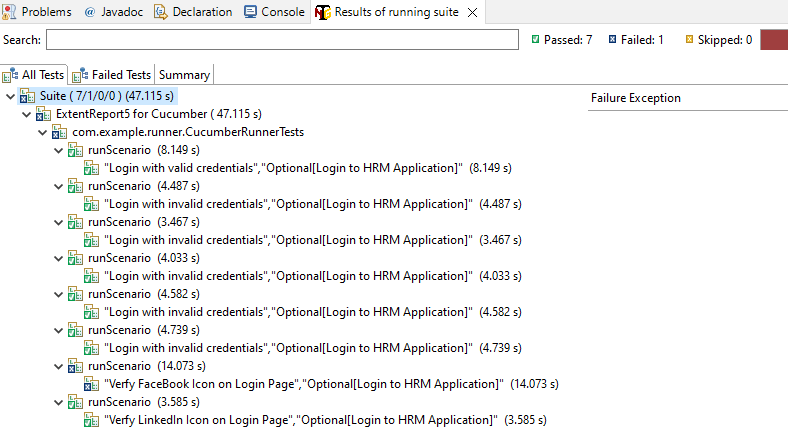
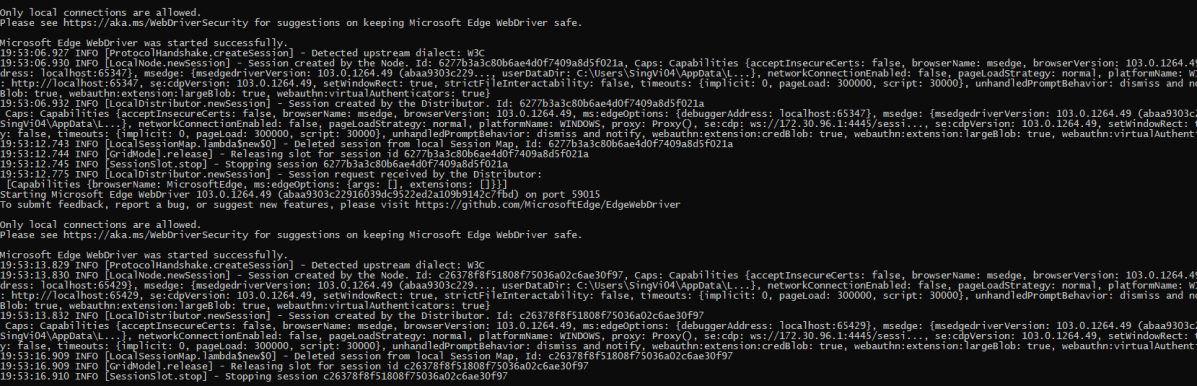
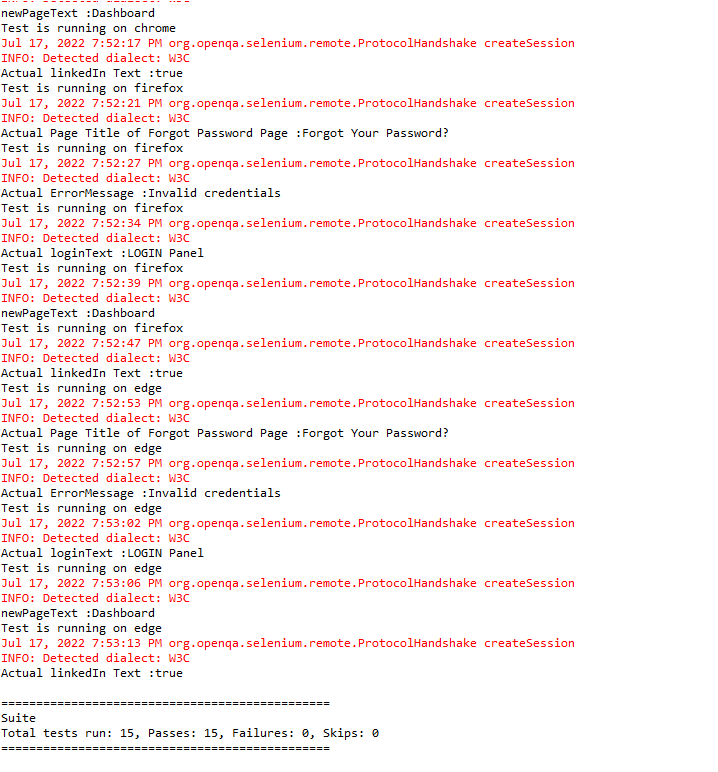
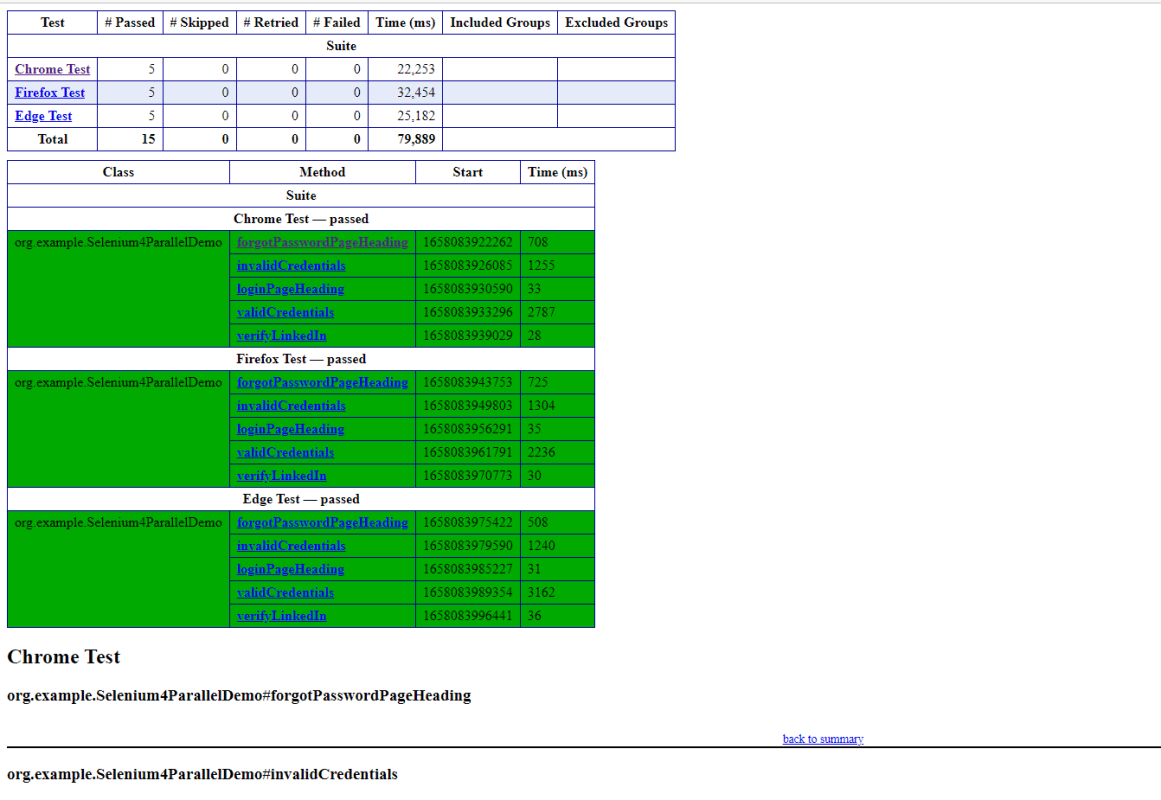
Below is the screenshot of Console. As expected, 7 tests, out of 8 are passed and 1 is failed.

Step 12: View the ExtentReport

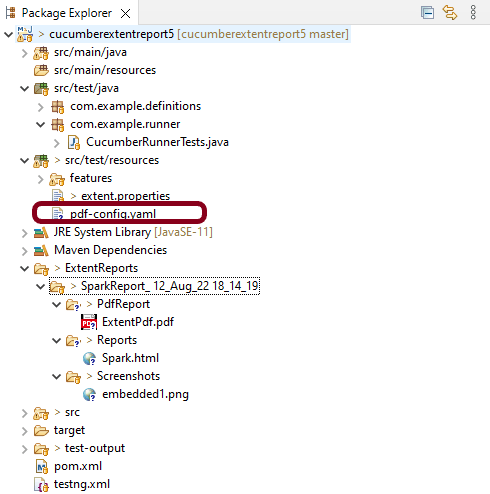
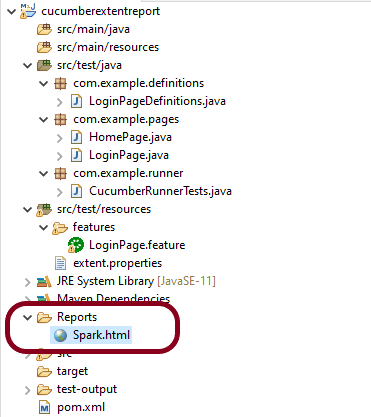
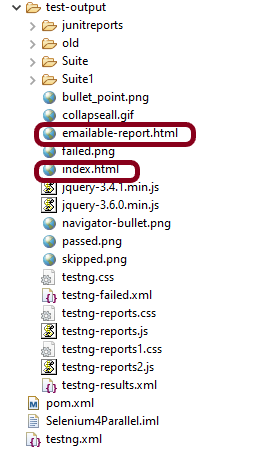
Refresh the project and will see a new folder – Report. The ExtentReport will be present in that folder with the name Spark.html.

Right-click and open with Web Browser.

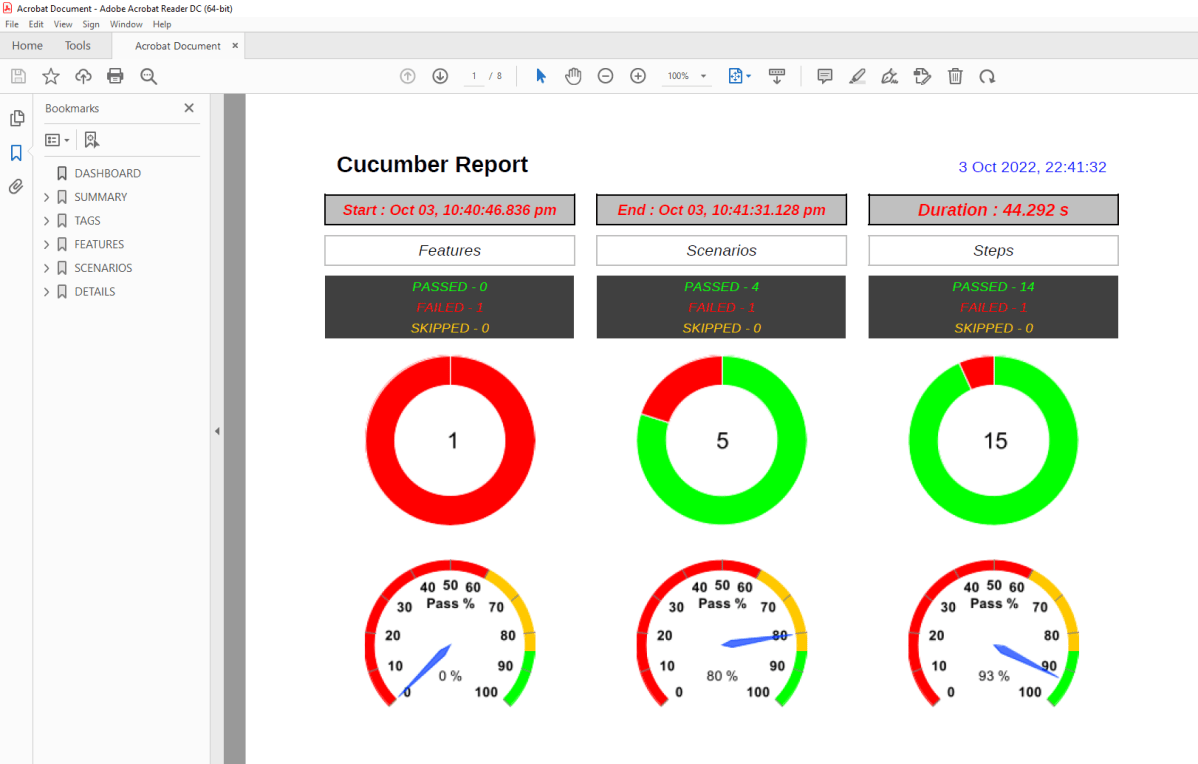
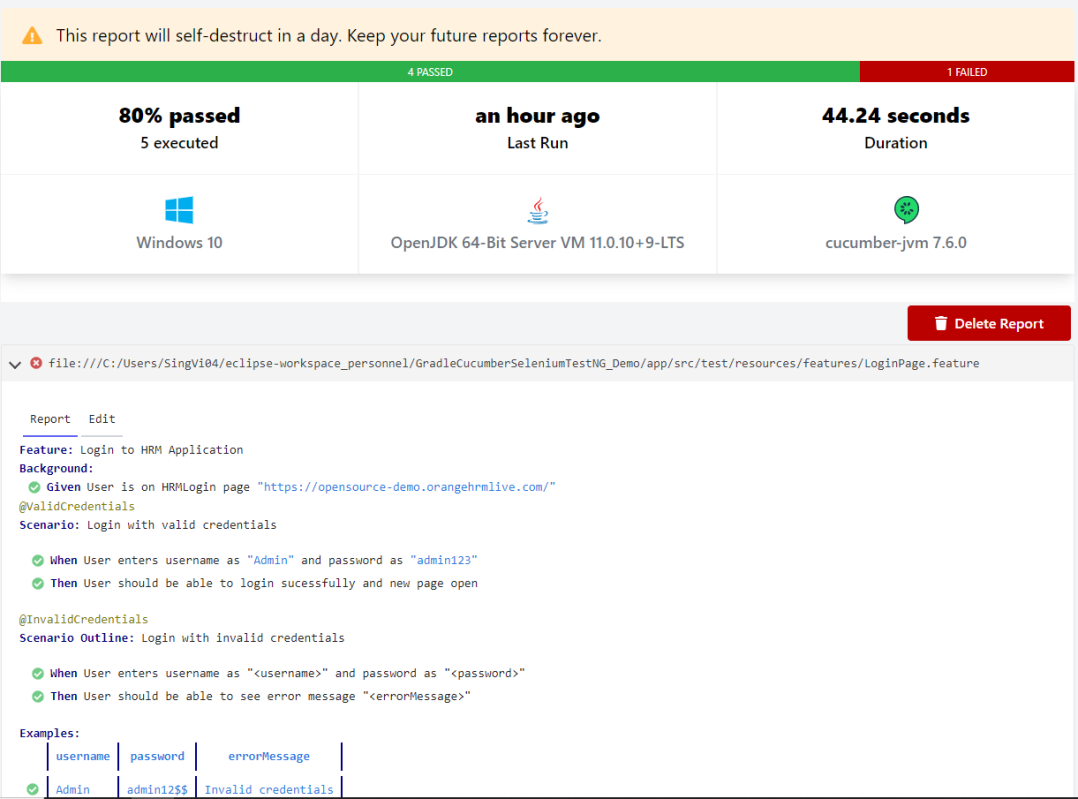
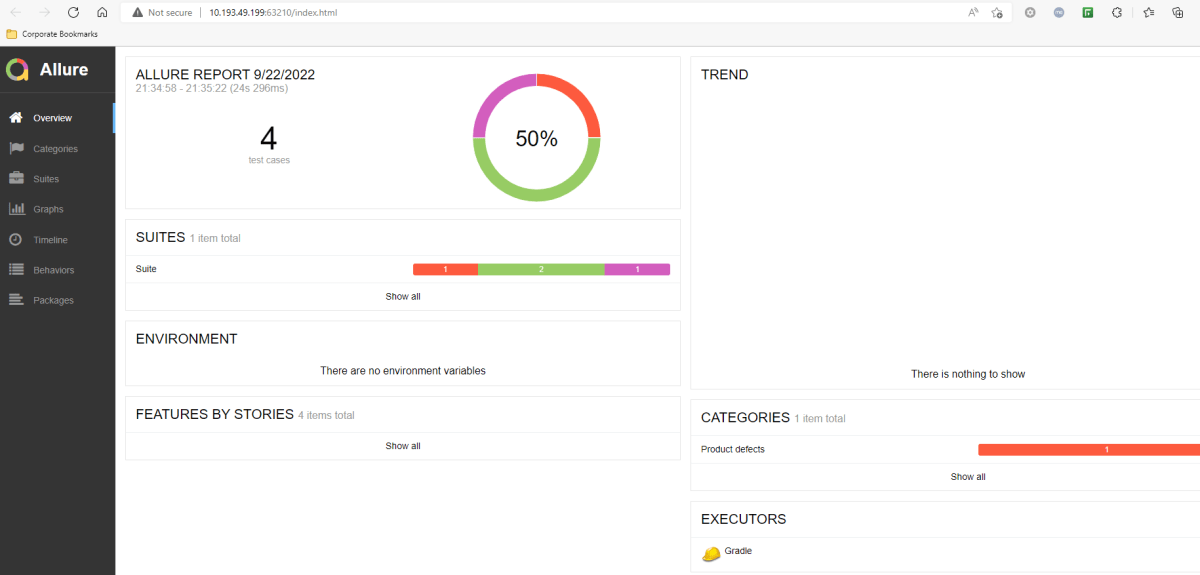
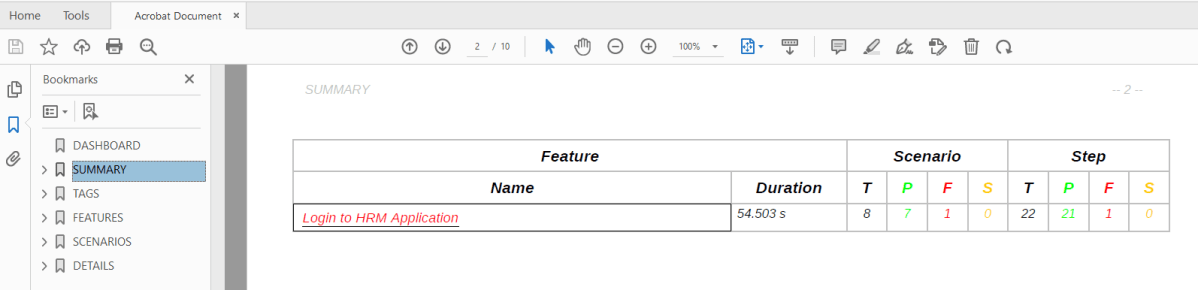
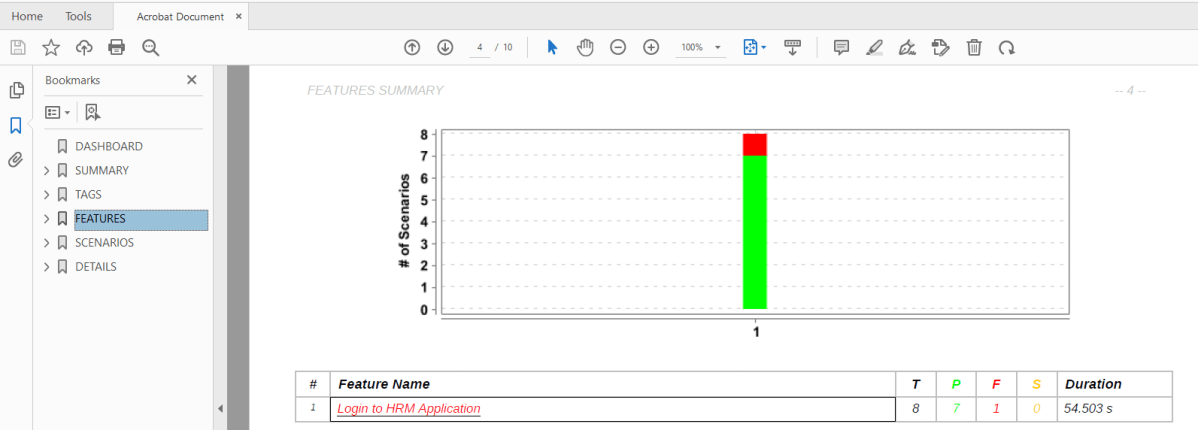
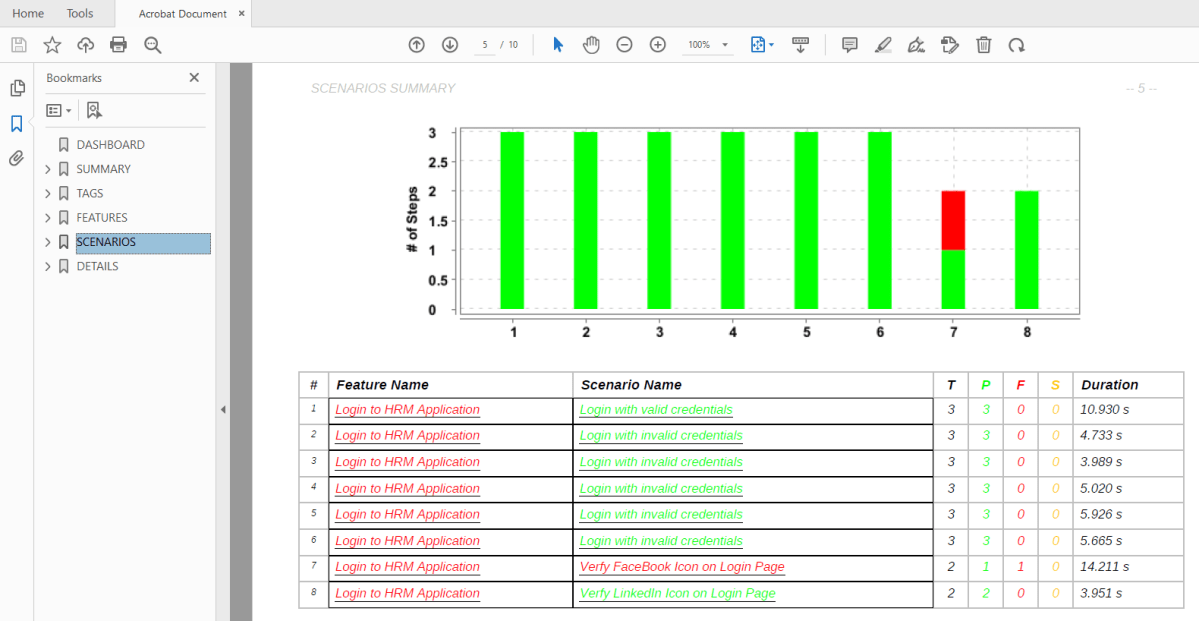
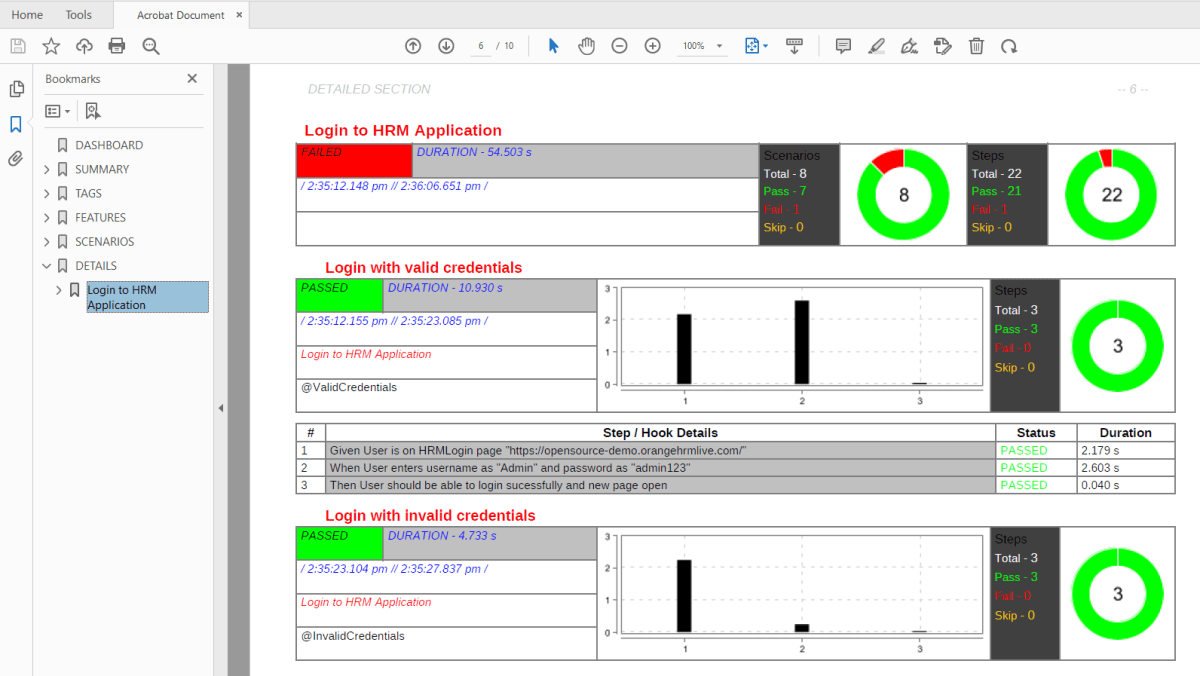
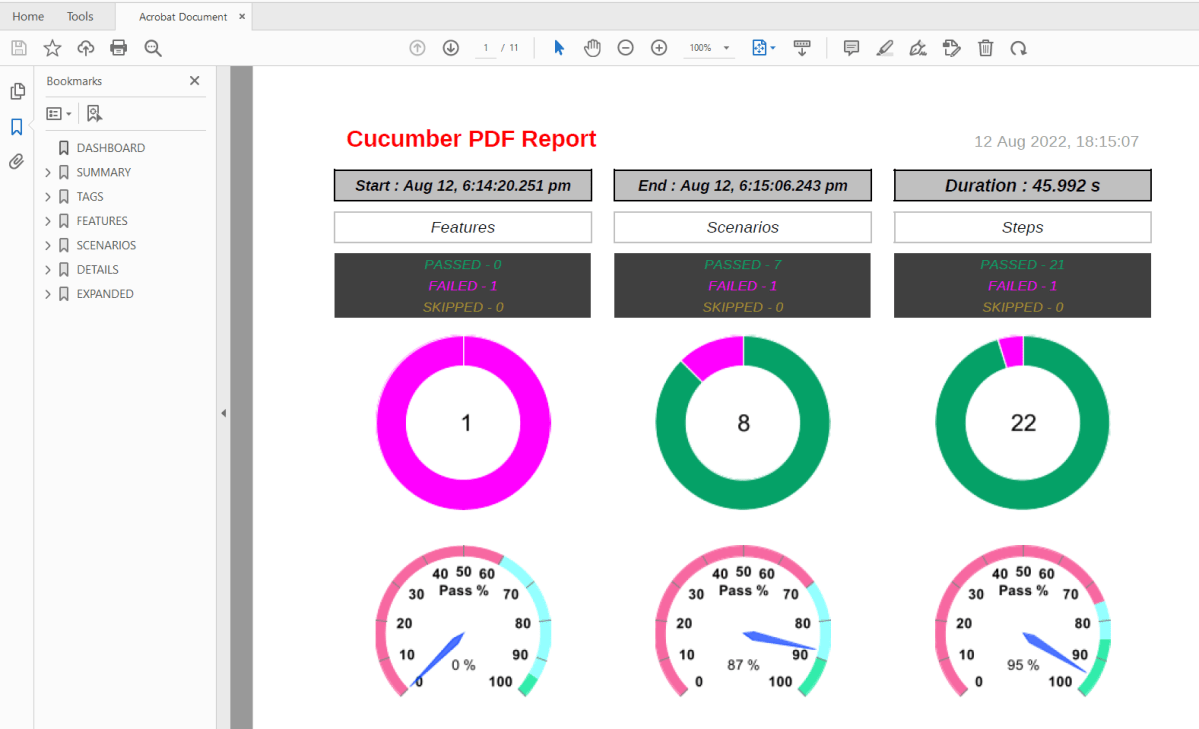
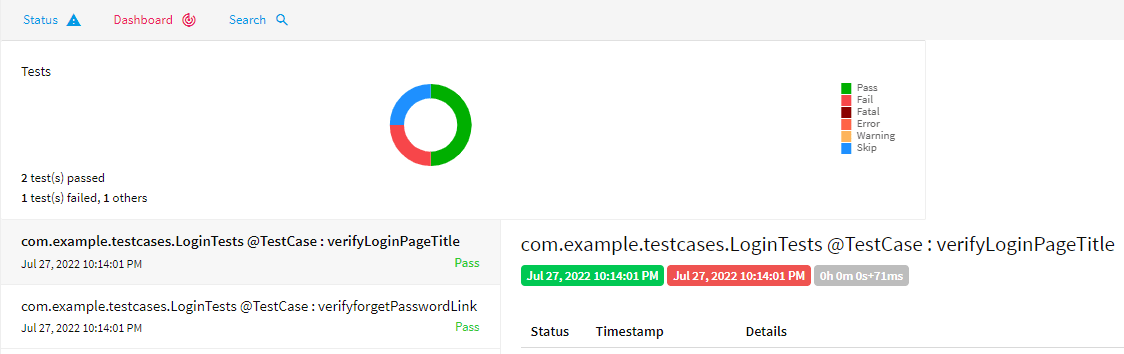
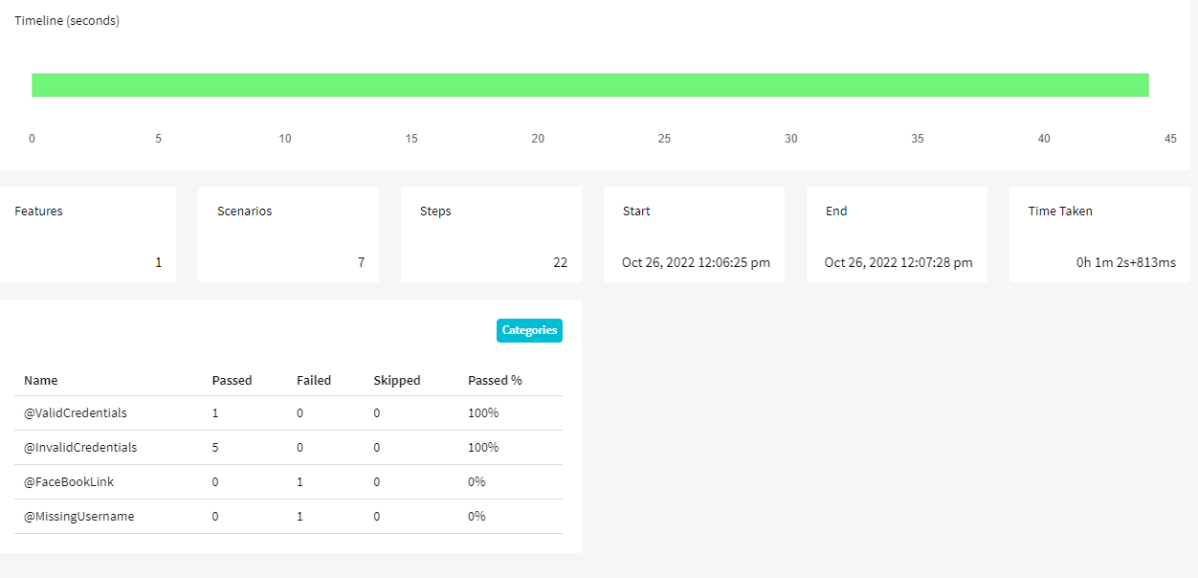
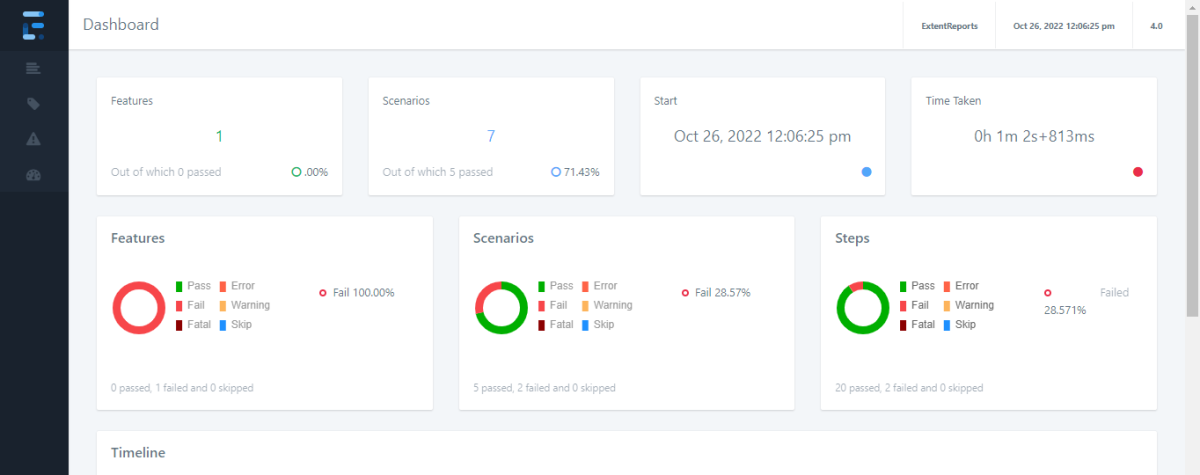
The report also has a summary section that displays the summary of the execution. The summary includes the overview of the pass/fail using a pictogram, start time, end time, and pass/fail details of features as shown in the image below.
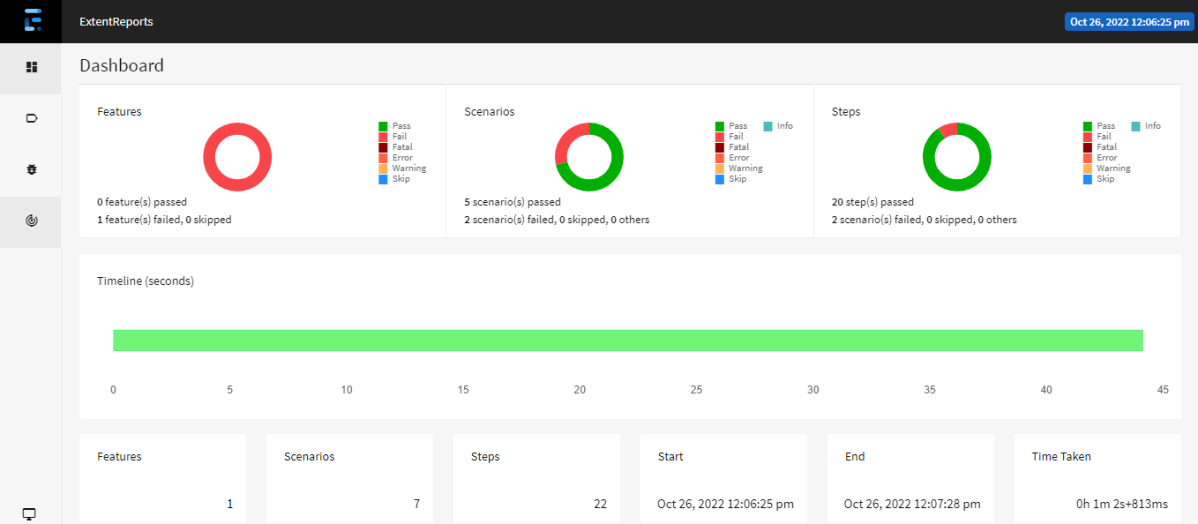
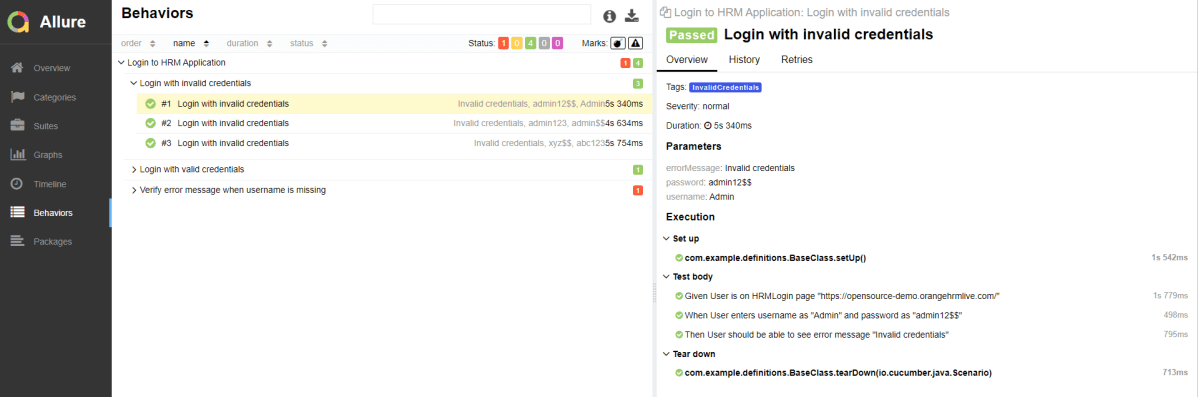
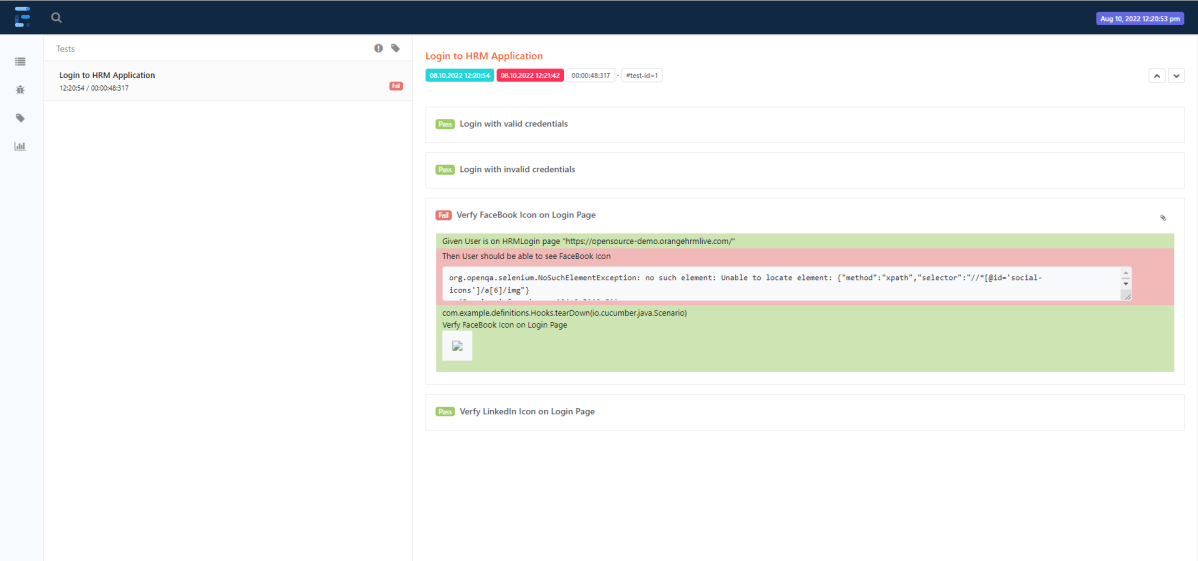
Click on the first icon present on the left side of the report. To view the details about the steps, click on the scenarios. Clicking on the scenario will expand, showing off the details of the steps of each scenario.
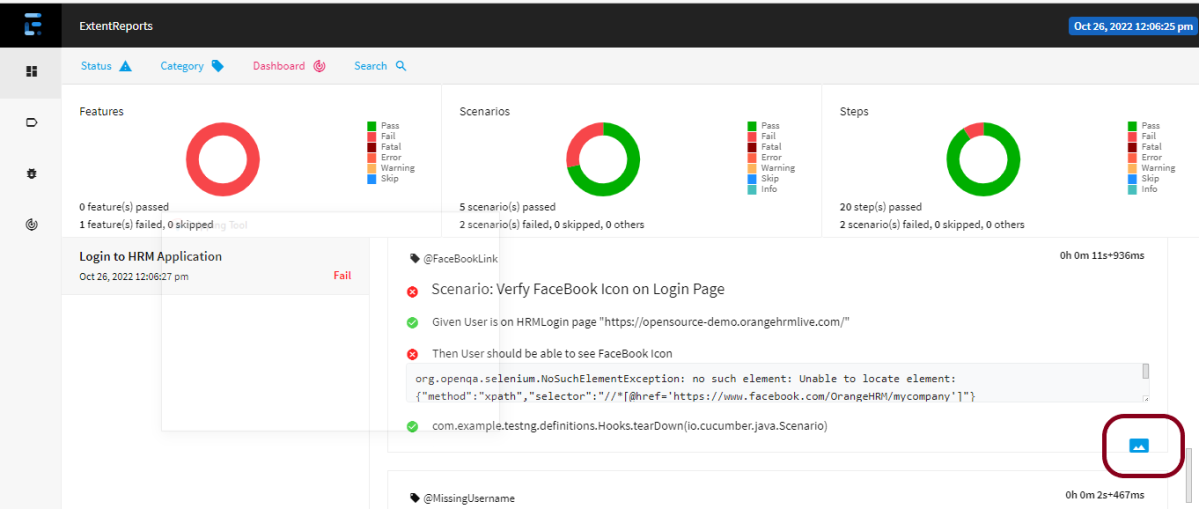
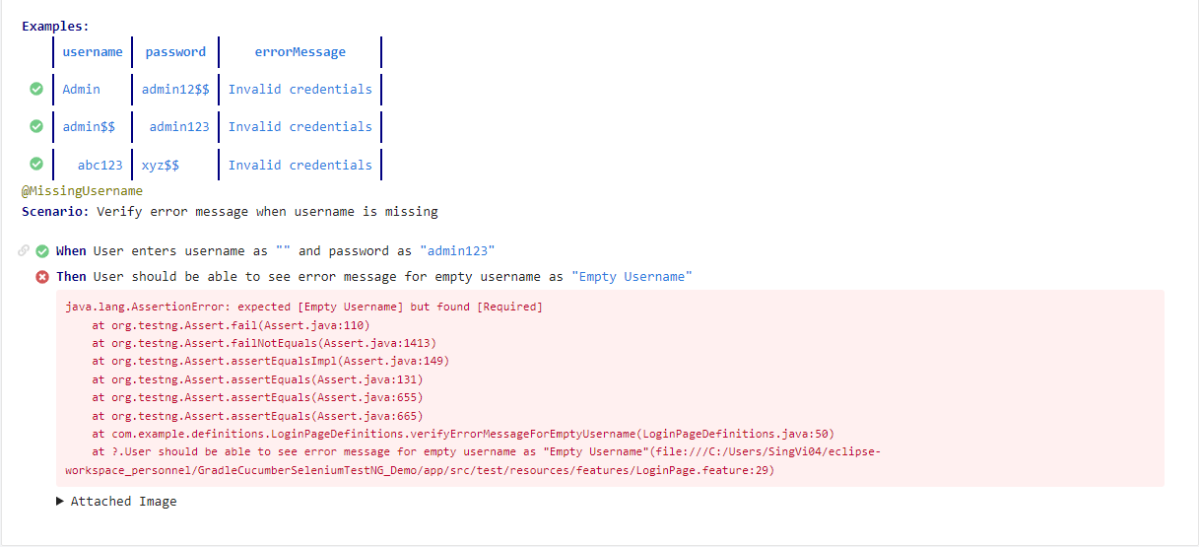
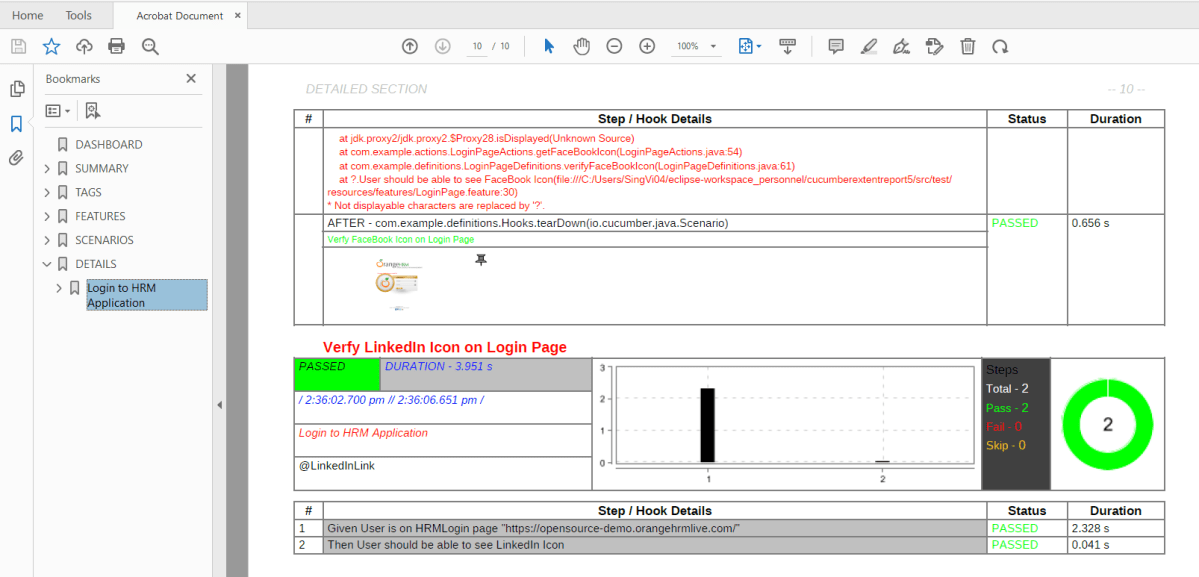
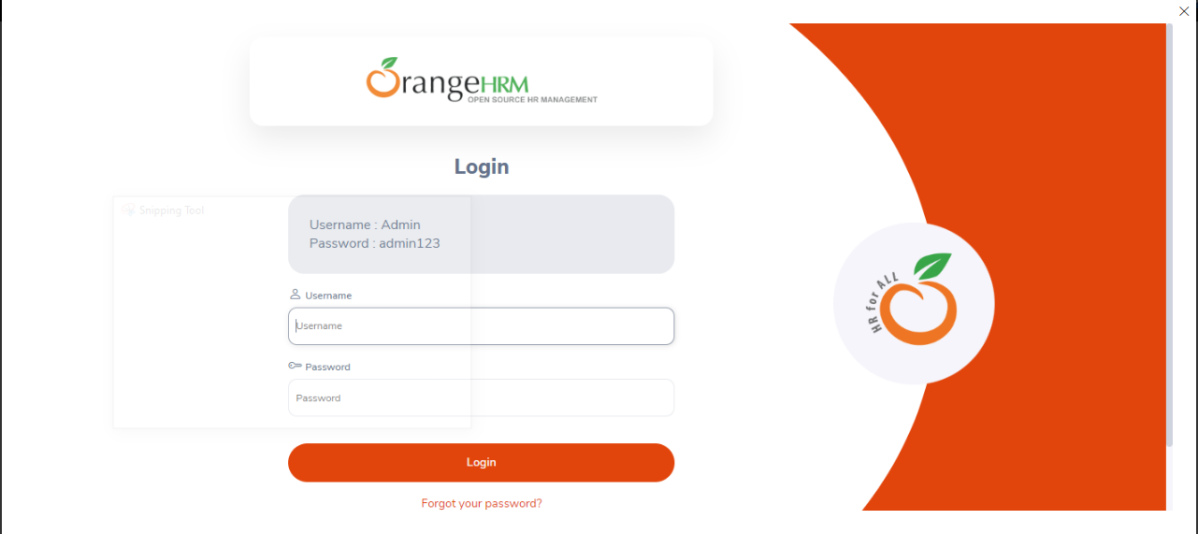
Step 13: How to customize the report folder name

We learned how to generate an ExtentReport in Cucumber Junit in the previous section. The problem with the previous approach is that it will continue to override the previous report once the new report is created. Typically, we must keep a backup of all the reports generated by previous tests. To accomplish this, we must save each report with a unique report name or folder name.

It’s simple to create reports with different folder names using the Extent reporter plugin adapter. Two settings must be added to our extent. basefolder.name and basefolder.datetimepattern are properties files. The values assigned to these will be combined to form a folder name. As a result, a report will be generated within that. The basefolder.datetimepattern value must be in a valid date-time format.

Let us update the extent.properties file.

extent.reporter.spark.start=true
extent.reporter.spark.out=Spark.html

#FolderName
basefolder.name=Reports/SparkReport
basefolder.datetimepattern=d-MMM-YY HH-mm-ss

The value for basefolder.name in the preceding snippet is “Report/SparkReport.” It means that the folder will be named SparkReport, and that it will create a Report folder within the project directory. You can specify the location of your folder. In the following setting, we’ve used a date and time stamp to create unique folder names by concatenating them with the report name.

So, when we run the report, it will generate at the location shown in the image below:

Congratulation!! We are able to create an Extent Report for Cucumber. Happy Learning!!!

ExtentReports Version 4 with Selenium and TestNG

Last Updated On

HOME

In this tutorial, I will describe How to generate an ExtentReport in Selenium with the TestNG maven project.

Table of Contents

  1. What is ExtentReports?
  2. Project Structure
  3. Implementation Steps
    1. Add the dependencies to the POM.xml
    2. Create ExtentManager Class
    3. Create ExtentListeners class
    4. Create the BaseTests class
    5. Create the LoginPage class
    6. Create the LoginTests class
    7. Create TestNG.xml
    8. Execute the tests from testng.xml
    9. Test Execution Result
    10. Extent Report Generation

What is ExtentReports?

ExtentReports is a logger-style reporting library for automated tests. ExtentReports is a library that can be used to build a customized detailed report. It can be integrated with TestNG, JUnit, etc. This report can be built in JAVA, .NET and it provides a detailed summary of each test case and each test step too in a graphical manner. Extent reports produce HTML-based documents that offer several advantages like pie charts, graphs, screenshots addition, and test summary.  ExtentReports 4 is built on an open-Core.

Project Structure

Implementation Steps

1. Add the dependencies to the POM.xml

<properties>
        <project.build.sourceEncoding>UTF-8</project.build.sourceEncoding>
        <selenium.version>4.3.0</selenium.version>
        <testng.version>7.4.0</testng.version>
        <extentreports.version>4.0.0</extentreports.version>
        <webdrivermanager.version>5.2.1</webdrivermanager.version>
        <maven-surefire-plugin-version>3.0.0-M5</maven-surefire-plugin-version>
    </properties>

	<dependencies>

		<!-- Extent Report -->
		<dependency>
			<groupId>com.aventstack</groupId>
			<artifactId>extentreports</artifactId>
			<version>${extentreports.version}</version>
		</dependency>

		<!-- TestNG -->
		<dependency>
			<groupId>org.testng</groupId>
			<artifactId>testng</artifactId>
			<version>${testng.version}</version>
			<scope>test</scope>
		</dependency>

		<!-- Apache Common -->
		<dependency>
			<groupId>org.apache.directory.studio</groupId>
			<artifactId>org.apache.commons.io</artifactId>
			<version>2.4</version>
		</dependency>

		<!-- Selenium -->
		<dependency>
			<groupId>org.seleniumhq.selenium</groupId>
			<artifactId>selenium-java</artifactId>
			<version>${selenium.version}</version>
		</dependency>

		<!-- Web Driver Manager -->
		<dependency>
			<groupId>io.github.bonigarcia</groupId>
			<artifactId>webdrivermanager</artifactId>
			<version>${webdrivermanager.version}</version>
		</dependency>

	</dependencies>

	<build>
		<plugins>
			<plugin>
				<groupId>org.apache.maven.plugins</groupId>
				<artifactId>maven-compiler-plugin</artifactId>
				<configuration>
					<source>11</source> <!--For JAVA 8 use 1.8-->
					<target>11</target> <!--For JAVA 8 use 1.8-->
				</configuration>
			</plugin>
			<plugin>
				<groupId>org.apache.maven.plugins</groupId>
				<artifactId>maven-surefire-plugin</artifactId>
				<version>${maven-surefire-plugin-version}</version>
				<configuration>
					<suiteXmlFiles>
						<suiteXmlFile>testng.xml</suiteXmlFile>
					</suiteXmlFiles>
				</configuration>
			</plugin>
		</plugins>
	</build>
</project>

2. Create ExtentManager Class

In this class, we created a createInstance() method. Also, you need to set your ExtentReports report HTML file location.

import java.io.File;
import java.io.IOException;
import java.util.Date;
import org.apache.commons.io.FileUtils;
import org.openqa.selenium.TakesScreenshot;
import com.aventstack.extentreports.ExtentReports;
import com.aventstack.extentreports.reporter.ExtentHtmlReporter;
import com.aventstack.extentreports.reporter.configuration.Theme;
import com.example.testcases.BaseTests;
import org.openqa.selenium.OutputType;

public class ExtentManager extends BaseTests{

	private static ExtentReports extent;
	public static String screenshotName;
		
    public static ExtentReports createInstance(String fileName) {
        
    	ExtentHtmlReporter htmlReporter = new ExtentHtmlReporter(fileName);
            
        htmlReporter.config().setTheme(Theme.DARK);
        htmlReporter.config().setDocumentTitle(fileName);
        htmlReporter.config().setEncoding("utf-8");
        htmlReporter.config().setReportName(fileName);
        
        extent = new ExtentReports();
        extent.attachReporter(htmlReporter);
        extent.setSystemInfo("Release No", "22");
        extent.setSystemInfo("Environment", "QA");
        extent.setSystemInfo("Build no", "B-12673");
              
        return extent;
    }

	
	public static void captureScreenshot() {
		
		TakesScreenshot screenshot = (TakesScreenshot)driver;
	  	  
        // Call method to capture screenshot
        File src = screenshot.getScreenshotAs(OutputType.FILE);

        try
        {
        	Date d = new Date();
    		screenshotName = d.toString().replace(":", "_").replace(" ", "_") + ".jpg";  
            FileUtils.copyFile(src,new File(System.getProperty("user.dir") + "\\reports\\" + screenshotName));
            System.out.println("Successfully captured a screenshot");
       } catch (IOException e) {
           System.out.println("Exception while taking screenshot " + e.getMessage());
      }
	}
}

The ExtentHtmlReporter is used for creating an HTML file, and it accepts a file path as a parameter.

ExtentHtmlReporter htmlReporter = new ExtentHtmlReporter(fileName);

The file path represents the path in which our extent report would be generated. This is defined in ExtentListeners class.

	static Date d = new Date();
	static String fileName = "ExtentReport_" + d.toString().replace(":", "_").replace(" ", "_") + ".html";

	private static ExtentReports extent = ExtentManager.createInstance(System.getProperty("user.dir")+"\\reports\\"+fileName);

ExtentHtmlReporter is also used to customize the extent reports. It allows many configurations to be made through the config() method. Some of the configurations that can be made are described below.

htmlReporter.config().setDocumentTitle(fileName);
htmlReporter.config().setEncoding("utf-8");
htmlReporter.config().setReportName(fileName);

We have two themes – STANDARD and DARK for customizing the look and feel of our extent reports.

htmlReporter.config().setTheme(Theme.DARK);

STANDARD Look

   htmlReporter.config().setTheme(Theme.STANDARD);

captureScreenshot() is a method in ExtentTest class that attaches the captured screenshot in the Extent Report. It takes the image path where the screenshot has been captured as the parameter and attaches the screenshot to the Extent Report in Selenium.

public static void captureScreenshot() {
		
		TakesScreenshot screenshot = (TakesScreenshot)driver;
	  	  
        // Call method to capture screenshot
        File src = screenshot.getScreenshotAs(OutputType.FILE);

        try
        {
        	Date d = new Date();
    		screenshotName = d.toString().replace(":", "_").replace(" ", "_") + ".jpg";  
            FileUtils.copyFile(src,new File(System.getProperty("user.dir") + "\\reports\\" + screenshotName));
            System.out.println("Successfully captured a screenshot");
       } catch (IOException e) {
           System.out.println("Exception while taking screenshot " + e.getMessage());
      }
	}

3. Create ExtentListeners class

This class contains the action done by extent report on each step. In our tests, we implement ITestListener and use its methods. TestNG provides the @Listeners annotation, which listens to every event that occurs in a Selenium code. TestNG Listeners are activated either before the test or after the test case. It is an interface that modifies the TestNG behavior. If any event matches an event for which we want the listener to listen then it executes the code, which ultimately results in modifying the default behavior of TestNG. To know more about ITestListener, please refer to this tutorial.

import java.util.Arrays;
import java.util.Date;
import org.testng.ITestContext;
import org.testng.ITestListener;
import org.testng.ITestResult;
import com.aventstack.extentreports.ExtentReports;
import com.aventstack.extentreports.ExtentTest;
import com.aventstack.extentreports.MediaEntityBuilder;
import com.aventstack.extentreports.Status;
import com.aventstack.extentreports.markuputils.ExtentColor;
import com.aventstack.extentreports.markuputils.Markup;
import com.aventstack.extentreports.markuputils.MarkupHelper;

public class ExtentListeners implements ITestListener {
	
	static Date d = new Date();
	static String fileName = "ExtentReport_" + d.toString().replace(":", "_").replace(" ", "_") + ".html";

	private static ExtentReports extent = ExtentManager.createInstance(System.getProperty("user.dir")+"\\reports\\"+fileName);
	
	public static ThreadLocal<ExtentTest> testReport = new ThreadLocal<ExtentTest>();
	

	public void onTestStart(ITestResult result) {
	
		ExtentTest test = extent.createTest(result.getTestClass().getName()+"     @TestCase : "+result.getMethod().getMethodName());
        testReport.set(test);
        
	}

	public void onTestSuccess(ITestResult result) {
		
		String methodName=result.getMethod().getMethodName();
		String logText="<b>"+"TEST CASE:- "+ methodName.toUpperCase()+ " - PASSED"+"</b>";		
		Markup markup = MarkupHelper.createLabel(logText, ExtentColor.GREEN);
		testReport.get().pass(markup);
		
	}

	public void onTestFailure(ITestResult result) {
		
		String excepionMessage = Arrays.toString(result.getThrowable().getStackTrace());
		testReport.get().fail("<details>" + "<summary>" + "<b>" + "<font color=" + "red>" + "Exception Occured:Click to see"
				+ "</font>" + "</b >" + "</summary>" +excepionMessage.replaceAll(",", "<br>")+"</details>"+" \n");
		
		try {

			ExtentManager.captureScreenshot();
			testReport.get().fail("<b>" + "<font color=" + "red>" + "Screenshot of failure" + "</font>" + "</b>",
					MediaEntityBuilder.createScreenCaptureFromPath(ExtentManager.screenshotName)
							.build());
		} catch (Exception e) {

		}
		
		String failureLogg="TEST CASE FAILED";
		Markup markup = MarkupHelper.createLabel(failureLogg, ExtentColor.RED);
		testReport.get().log(Status.FAIL, markup);

	}

	public void onTestSkipped(ITestResult result) {
		
		String methodName=result.getMethod().getMethodName();
		String logText="<b>"+"TEST CASE:- "+ methodName.toUpperCase()+ " - SKIPPED"+"</b>";		
		Markup markup = MarkupHelper.createLabel(logText, ExtentColor.ORANGE);
		testReport.get().skip(markup);

	}

	public void onTestFailedButWithinSuccessPercentage(ITestResult result) {

	}

	public void onStart(ITestContext context) {
	}

	public void onFinish(ITestContext context) {

		if (extent != null) {

			extent.flush();
		}
	}
}

I have defined actions for onTestStart(), onTestSuccess(), onTestFailure(), onTestSkipped() and onFinish() methods.

The ITestListener is an interface that has unimplemented methods by default and we can add lines of code within each method. So whenever a specific event occurs, the code written within that method will be executed. 

onTestFailure() is a method in which this listener will be invoked whenever the test fails. Within this method, we shall add our code to capture screenshots whenever the test case fails on execution. The screenshot of the failed test case is also embedded in the report.

onTestSuccess() is a method that is invoked once the test execution is complete and the test has been passed. We shall add the log included in the Extent Report to mark the test case as passed within this method

String methodName=result.getMethod().getMethodName();
String logText="<b>"+"TEST CASE:- "+ methodName.toUpperCase()+ " PASSED"+"</b>";		
Markup markup = MarkupHelper.createLabel(logText, ExtentColor.GREEN);
testReport.get().pass(markup);

onTestSkipped() is a method that is invoked if the test execution is skipped. This is the same as the onTestSuccess() method.

public void onTestSkipped(ITestResult result) {
		
		String methodName=result.getMethod().getMethodName();
		String logText="<b>"+"TEST CASE:- "+ methodName.toUpperCase()+ " - SKIPPED"+"</b>";		
		Markup markup = MarkupHelper.createLabel(logText, ExtentColor.ORANGE);
		testReport.get().skip(markup);

	}

4. Create the BaseTests class

This class contains the methods to initialize the browser and exit the browser after every test.

import java.time.Duration;
import org.openqa.selenium.WebDriver;
import org.openqa.selenium.support.ui.WebDriverWait;
import org.testng.annotations.AfterTest;
import org.testng.annotations.BeforeTest;
import io.github.bonigarcia.wdm.WebDriverManager;

public class BaseTests {

	public static WebDriver driver;
	public WebDriverWait wait;
	  
	@BeforeTest
    public void setup() throws Exception {
          
       driver = WebDriverManager.firefoxdriver().create();
       driver.get("https://opensource-demo.orangehrmlive.com/");
       wait = new WebDriverWait(driver, Duration.ofSeconds(10));
       driver.manage().window().maximize();
    }
	  
	@AfterTest
	 public  void closeBrowser() {
	    	
	   driver.close();    	
			  
	  }

5. Create the LoginPage class

This class contains the locator of all the web elements and methods needed for the testing of the page.

package com.example.testcases;

import org.openqa.selenium.WebDriver;
import org.openqa.selenium.WebElement;
import org.openqa.selenium.support.FindBy;
import org.openqa.selenium.support.PageFactory;

public class LoginPage extends BaseTests{

    WebDriver driver;

    @FindBy(name = "txtUsername")
    WebElement userName;

    @FindBy(name = "txtPassword")
    WebElement password;

    @FindBy(id = "logInPanelHeading")
    WebElement titleText;

    @FindBy(id = "btnLogin")
    WebElement login;
    
    @FindBy(id="spanMessage")
    WebElement errorMessage;
    
    @FindBy(id="forgotPasswordLink")
    WebElement forgetPasswordLink;
    
    @FindBy(xpath="//*[@id='social-icons']/a[1]/img")
    WebElement linkedInIcon;

    public LoginPage(WebDriver driver) {
          this.driver = driver;

          // This initElements method will create all WebElements
          PageFactory.initElements(driver, this);
    }

    // Set user name in textbox
    public void setUserName(String strUserName) {
          userName.sendKeys(strUserName);
    }

    // Set password in password textbox
    public void setPassword(String strPassword) {
          password.sendKeys(strPassword);
    }

    // Click on login button
    public void clickLogin() {
          login.click();
    }

    // Get the title of Login Page
    public String getLoginTitle() {
          return titleText.getText();
    }
    
    // Get the text of forgotPasswordLink
    public String getforgotPasswordLinkText() {
          return forgetPasswordLink.getText();
    }
    
    // Get the errorMessage
    public String getErrorMessage() {
          return errorMessage.getText();
    }
    
    // Verify linkedInIcon is enabled
    public Boolean isEnabledLinkedIn() {
          return linkedInIcon.isEnabled();
    }

    public void login(String strUserName, String strPasword) {

          // Fill user name
          this.setUserName(strUserName);

          // Fill password
          this.setPassword(strPasword);

          // Click Login button
          this.clickLogin();
    }
}

6. Create the LoginTests class

This class contains all the tests. As we are using, I have assigned priority to all the tests to run the tests in a specified order.

import static org.testng.Assert.assertTrue;
import org.testng.Assert;
import org.testng.SkipException;
import org.testng.annotations.Test;

public class LoginTests extends BaseTests{

    LoginPage objLogin;

    @Test(priority = 0)
    public void verifyLoginPageTitle() {

          // Create Login Page object
          objLogin = new LoginPage(driver);

          // Verify login page text
          String loginPageTitle = objLogin.getLoginTitle();
          Assert.assertTrue(loginPageTitle.contains("LOGIN Panel"));
    }
    
    @Test(priority = 1)
    public void verifyforgetPasswordLink() {

    String expectedText= objLogin.getforgotPasswordLinkText();
    Assert.assertTrue(expectedText.contains("Forgot your password?"));
    
    }
      
    @Test(priority = 2)
    public void HomeTest() {

          // login to application
          objLogin.login("Admin1", "admin1234");

         String expectedError = objLogin.getErrorMessage();

          // Verify home page
          Assert.assertTrue(expectedError.contains("Username cannot be empty"));
    }

    @Test(priority = 3)
    public void verifyLinkedIn() {

        System.out.println("Actual linkedIn Text :" + objLogin.isEnabledLinkedIn());
        assertTrue(objLogin.isEnabledLinkedIn());
        
        System.out.println("Im in skip exception");
		throw new SkipException("Skipping this exception");
    }
       
}

In this example, there are 4 tests, and out of 4, 2 should pass, 1 should fail and 1 should skip.

7. Create TestNG.xml

In the TestNG.xml file, we shall add our classes and also the listener class.

<?xml version="1.0" encoding="UTF-8"?>
<!DOCTYPE suite SYSTEM "https://testng.org/testng-1.0.dtd">
<suite name="Extent Report Demo">

<listeners>
     <listener class-name ="com.example.extentlisteners.ExtentListeners"/>
  </listeners>
  
  <test name="Login Tests">
    <classes>
      <class name="com.example.testcases.LoginTests"/>
    </classes>
  </test> <!-- Test -->
</suite> <!-- Suite -->

8. Execute the tests from testng.xml

Right-click on testng.xml and select Run As -> TestNG Suite.

9 Test Execution Result

The test execution result can be seen in the console.

10. Extent Report Generation

Refresh the project and will see a folder with the name of the reports present in the project.

Right-click the report and open it in your choice of browser.

Upon opening the Extent Report, you can see the summary of the tests executed.

This is the view of the dashboard in the Extent Report. This page provides a complete view of the total number of tests executed, passed tests, failed tests, the total time taken for executing the tests, and also the classification of the tests based on the category.

Extent reports produce simple and visually appealing reports. Furthermore, the HTML-based report is simple to share with other stakeholders. Extent Reports provide greater detail, allowing testers to be more effective when it comes to quickly debugging software.

Congratulations!! We are able to generate an ExtentReport. Happy Learning!!

Selenium 4 Grid – Parallel Testing

HOME

The previous tutorial explained running the tests in Selenium4 Grid using the Standalone option. One of the major advantages of Selenium Grid is the ability to run tests parallelly on multiple browsers simultaneously. Parallel testing helps to reduce execution time and efforts and results in a faster time to delivery.

In this tutorial, we will run the same set of tests on Chrome, Firefox, and Edge browsers sequentially initially to confirm that we can perform Cross Browser testing also.

It is very important to construct our tests thread-safe in order to run them in parallel without a problem

This example uses Selenium 4 with TestNG.

Implementation Steps

1. Download Selenium Grid 4

The latest version of Selenium 4 is 4.3.0 and the same can be downloaded from the official website of Selenium

2. Download various Browser driver exe

It is recommended to download the exe of various browsers in the same location where the Selenium WebDriver jar file is present. This is because Selenium 4 Alpha has the ability to automatically detect the WebDrivers present on the node machine. For this example, I have downloaded Chrome, Firefox, and edge drivers.

3. Start Selenium Server Jar

Open a command line terminal. Go to the location where these files are present

cd C:/Users/Vibha/Software/SeleniumGrid

Use the below command to run selenium-server standalone jar files.

java -jar selenium-server-4.3.0.jar standalone --port 4445

It’s optional to mention the port number at the end of the command. By default, it will use port 4444. It is good practice to mention the port at the end to avoid any conflict between the ports.

4. Open Selenium Console

The server is listening on http://172.30.96.1:4445/ui/index.html  which is the same as shown in the above image. This is a dynamic address, so make sure to get the address from the logs when Selenium Grid is started.

The Grid automatically identifies that the WebDrivers for Chrome and Firefox are present on the system.

5. Add dependencies to the project

In this example, we are using a Maven project, so are adding the dependencies to the POM.xml.

<?xml version="1.0" encoding="UTF-8"?>
<project xmlns="http://maven.apache.org/POM/4.0.0"
         xmlns:xsi="http://www.w3.org/2001/XMLSchema-instance"
         xsi:schemaLocation="http://maven.apache.org/POM/4.0.0 http://maven.apache.org/xsd/maven-4.0.0.xsd">
    <modelVersion>4.0.0</modelVersion>

    <groupId>org.example</groupId>
    <artifactId>Selenium4Parallel</artifactId>
    <version>1.0-SNAPSHOT</version>

    <properties>
        <maven.compiler.source>11</maven.compiler.source>
        <maven.compiler.target>11</maven.compiler.target>
    </properties>

    <dependencies>

        <!-- Selenium 4 Dependency -->
        <dependency>
            <groupId>org.seleniumhq.selenium</groupId>
            <artifactId>selenium-java</artifactId>
            <version>4.1.2</version>
        </dependency>

        <!-- Selenium WebDriver Manager -->
        <dependency>
            <groupId>io.github.bonigarcia</groupId>
            <artifactId>webdrivermanager</artifactId>
            <version>5.1.0</version>
        </dependency>

        <!-- TestNG Dependency -->
        <dependency>
            <groupId>org.testng</groupId>
            <artifactId>testng</artifactId>
            <version>7.4.0</version>
            <scope>test</scope>
        </dependency>

    </dependencies>

</project>

6. Create a Test Code

Creating an instance of the Remote WebDriver and passing the selenium endpoint and chrome options defined in it.

To run a Remote WebDriver client, we first need to connect to the RemoteWebDriver. We do this by pointing the URL to the address of the server running our tests. In order to customize our configuration, we set desired capabilities.

Below is an example of instantiating a remote WebDriver object pointing to our remote web server running our tests on Chrome, Firefox, and Edge. We have used @Parameters Annotation to pass the browser names to the tests.

import org.openqa.selenium.By;
import org.openqa.selenium.Capabilities;
import org.openqa.selenium.WebDriver;
import org.openqa.selenium.chrome.ChromeOptions;
import org.openqa.selenium.edge.EdgeOptions;
import org.openqa.selenium.firefox.FirefoxOptions;
import org.openqa.selenium.remote.RemoteWebDriver;
import org.openqa.selenium.support.ui.ExpectedConditions;
import org.openqa.selenium.support.ui.WebDriverWait;
import org.testng.annotations.AfterMethod;
import org.testng.annotations.BeforeMethod;
import org.testng.annotations.Parameters;
import java.net.MalformedURLException;
import java.net.URL;
import java.time.Duration;

public class BaseTest {


    protected static ThreadLocal<RemoteWebDriver> driver = new ThreadLocal<RemoteWebDriver>();
    public static String remote_url = "http://localhost:4445/";
    public Capabilities capabilities;

    @Parameters({"browser"})
    @BeforeMethod
    public void setDriver(String browser) throws MalformedURLException {
    	
    	System.out.println("Test is running on "+browser);

        if(browser.equals("firefox")) {
            capabilities = new FirefoxOptions();
        } else if (browser.equals("chrome")) {
            capabilities = new ChromeOptions();
        } else if (browser.equals("edge")) {
        	capabilities = new EdgeOptions();
        }

        driver.set(new RemoteWebDriver(new URL(remote_url), capabilities));
        driver.get().get("https://opensource-demo.orangehrmlive.com/");
        driver.get().manage().window().maximize();
        driver.get().manage().timeouts().pageLoadTimeout(Duration.ofSeconds(10));
        WebDriverWait wait = new WebDriverWait(driver.get(), Duration.ofSeconds(10));
        wait.until(ExpectedConditions.visibilityOfElementLocated(By.xpath("//*[@id='divUsername']/span")));
    }

    public WebDriver getDriver() {
        return driver.get();
    }

    @AfterMethod
    public  void closeBrowser() {
        driver.get().quit();
        driver.remove();
    }
}

Selenium4ParallelDemo

This class contains the various tests that need to be executed.

  • In BaseTest class, I created ThreadLocal <>() webdriver (ThreadLocalMap) for thread-safe test execution
  • I got the TestNG parameter (browser) with @Parameter annotation.
  • BaseTest returns browser Capabilities based on browser name.
  • In BaseTest class, the getDriver() method returns the created driver.
  • Selenium4ParallelDemo class extends TestBase class and comprises their test code.

import org.openqa.selenium.By;
import org.testng.annotations.Test;
import static org.testng.Assert.assertEquals;
import static org.testng.Assert.assertTrue;

public class Selenium4ParallelDemo extends BaseTest {

    @Test
    public void validCredentials()  {

        getDriver().findElement(By.xpath("//*[@id='txtUsername']")).sendKeys("Admin");
        getDriver().findElement(By.xpath("//*[@id='txtPassword']")).sendKeys("admin123");
        getDriver().findElement(By.xpath("//*[@id='btnLogin']")).click();
        String newPageText = getDriver().findElement(By.xpath("//*[@id='content']/div/div[1]/h1")).getText();
        System.out.println("newPageText :" + newPageText);
        assertEquals(newPageText,"Dashboard");

    }

    @Test
    public void invalidCredentials() {
    	
        getDriver().findElement(By.xpath("//*[@id='txtUsername']")).sendKeys("1234");
        getDriver().findElement(By.xpath("//*[@id='txtPassword']")).sendKeys("12342");
        getDriver().findElement(By.xpath("//*[@id='btnLogin']")).click();
        String actualErrorMessage = getDriver().findElement(By.xpath("//*[@id='spanMessage']")).getText();
        System.out.println("Actual ErrorMessage :" + actualErrorMessage);
        assertEquals(actualErrorMessage,"Invalid credentials");

    }

    @Test
    public void loginPageHeading() {

        String loginText = getDriver().findElement(By.xpath("//*[@id='logInPanelHeading']")).getText();
        System.out.println("Actual loginText :" + loginText);
        assertEquals(loginText,"LOGIN Panel");

    }

    @Test
    public void forgotPasswordPageHeading()  {

        getDriver().findElement(By.xpath("//*[@id='forgotPasswordLink']/a")).click();
        String forgetPasswordTitle= getDriver().findElement(By.xpath(" //*[@id='content']/div[1]/div[2]/h1")).getText();
        System.out.println("Actual Page Title of Forgot Password Page :" + forgetPasswordTitle);
        assertEquals(forgetPasswordTitle,"Forgot Your Password?");
    }

    @Test
    public void verifyLinkedIn() {

        Boolean linkedInIcon = getDriver().findElement(By.xpath("//*[@id='social-icons']/a[1]/img")).isEnabled();
        System.out.println("Actual linkedIn Text :" + linkedInIcon);
        assertTrue(linkedInIcon);

    }
}

7. Create a testng.xml

It is very easy to create testng.xml in the case of Eclipse. Right-click on the project, and select TestNG -> Convert to TestNG. It will create a basic testng.xml structure. We need to add the parameter name and value to it.

We are planning to run the test on 3 different browsers, so we are passing the name of the browser from this testng.xml using the parameter. This testng.xml will run the test sequentially. There is a minor change needs to be done in testng.xml that will run the tests parallelly.

<?xml version="1.0" encoding="UTF-8"?>
<!DOCTYPE suite SYSTEM "https://testng.org/testng-1.0.dtd">

<suite name="Suite">
  <test thread-count="5" name="Chrome Test">
    <parameter name ="browser" value="chrome"/>
    <classes>
      <class name="org.example.Selenium4ParallelDemo"/>
    </classes>
  </test> <!-- Test -->
  
   <test thread-count="5" name="Firefox Test">
    <parameter name ="browser" value="firefox"/>
    <classes>
      <class name="org.example.Selenium4ParallelDemo"/>
    </classes>
  </test> <!-- Test -->
  
   <test thread-count="5" name="Edge Test">
    <parameter name ="browser" value="edge"/>
    <classes>
      <class name="org.example.Selenium4ParallelDemo"/>
    </classes>
  </test> <!-- Test -->
</suite> <!-- Suite -->

8. Run the tests from testng.xml

Right-Click on the testng.xml and select Run As ->TestNG Suite.

9. Navigate to the sessions tab on the Selenium Grid UI upon running the command

It would reflect an active session.

10. Review the test execution result

There are 2 ways to see if the tests are getting executed or not. First, we can check in the command line. We can see the logs there as shown below.

The complete test execution result can be found in the console too.

The tests are TestNG ones, so we can also check the Result of Running Suite tab also.

11. TestNG Report Generation

TestNG generates the test reports in the test-output folder.

We are interested in 2 reports – index.html and emailable-report.html.

Index.html

The below image shows that the tests are run sequentially.

Emailable-Report.html

This report is the summary report. It contains the summary of all the tests executed like, the number of tests passed, skipped, retried, and failed, and the execution time taken by each test.

Parallel Testing

Update the testng.xml for parallel testing. Add parallel=”tests” in the XML.

Updated testng.xml

<?xml version="1.0" encoding="UTF-8"?>
<!DOCTYPE suite SYSTEM "https://testng.org/testng-1.0.dtd">

<suite name="Suite" parallel="tests">
  <test thread-count="5" name="Chrome Test">
    <parameter name ="browser" value="chrome"/>
    <classes>
      <class name="org.example.Selenium4ParallelDemo"/>
    </classes>
  </test> <!-- Test -->
  
   <test thread-count="5" name="Firefox Test">
    <parameter name ="browser" value="firefox"/>
    <classes>
      <class name="org.example.Selenium4ParallelDemo"/>
    </classes>
  </test> <!-- Test -->
  
   <test thread-count="5" name="Edge Test">
    <parameter name ="browser" value="edge"/>
    <classes>
      <class name="org.example.Selenium4ParallelDemo"/>
    </classes>
  </test> <!-- Test -->
</suite> <!-- Suite -->

The below image shows that the tests were running on multiple browsers at the same time.

The console also shows that tests were started on all three browsers at the same time.

Index.html shows that methods run in chronological order. It can be seen that the setDriver() method for all 3 browsers was the first one to be executed.

Best Practices:

  1. It is advisable to use nodes other than 4444 to run the tests. By using the different port numbers, we prevent the risk that the port is already in use on your system.
  2. It is suggested to use RemoteWebDriver objects, as it is used to set which node (or machine) our test will run against.

Congratulations on making it through this tutorial and hope you found it useful! Happy Learning!! Cheers!!

How to Retry failed tests in TestNG – IRetryAnalyzer

HOME

TestNG is a well thought Test Framework. It provides a lot of different features which makes the life of a tester a little easy. It happens sometimes that a test execution fails, but the failure is not a product bug, but there can be different reasons for the failure such as the environment is down, third party web service is down, or the browser becomes unresponsive. Imagine a scenario where we need to run a test suite consisting of 100 tests and a few tests failed as a result of a known intermittent environment issue. We know that these tests can pass if rerun a couple of times. So, in this case, the retry functionality of TestNG comes to the rescue. This is one of the best and most frequently used functionality.

In this tutorial let us study how we can implement retry on failed tests in TestNG. In order to achieve this, we have to first understand the org.testng.IRetryAnalyzer interface.

To start with, please add the below dependencies to the Maven Project.

<dependencies>
  
      <dependency>
          <groupId>org.seleniumhq.selenium</groupId>
          <artifactId>selenium-java</artifactId>
          <version>3.141.59</version>
      </dependency>
      
      <dependency>
          <groupId>io.github.bonigarcia</groupId>
          <artifactId>webdrivermanager</artifactId>
          <version>5.1.0</version>
       </dependency>

      <dependency>
           <groupId>org.testng</groupId>
           <artifactId>testng</artifactId>
           <version>7.5</version>
           <scope>test</scope>
      </dependency>

  </dependencies>

IRetryAnalyzer – It is an interface to implement to be able to have a chance to retry a failed test. The definition of this interface is

public interface IRetryAnalyzer {

  /**
   * Returns true if the test method has to be retried, false otherwise.
   *
   * @param result The result of the test method that just ran.
   * @return true if the test method has to be retried, false otherwise.
   */
  boolean retry(ITestResult result);
}

This method implementation returns true if you want to re-execute your failed test and false if you don’t want to re-execute your test.

When you bind a retry analyzer to a test, TestNG automatically invokes the retry analyzer to determine if TestNG can retry a test case again in an attempt to see if the test that just fails now passes. Here is how you use a retry analyzer:

  1. Bind this implementation to the @Test annotation for e.g., @Test(retryAnalyzer = Retry.class)
  2. Build an implementation of the interface org.testng.IRetryAnalyzer

1. Add IRetryAnalyzer to the @Test Annotation

First of all, you need to create a class that implements the IRetryAnalyzer like the below example:

import org.testng.IRetryAnalyzer;
import org.testng.ITestResult;

public class Retry implements IRetryAnalyzer {
	
	int retryCount = 0;
	int maxRetryCount = 2;

	public boolean retry(ITestResult result) {
 
	if(!result.isSuccess()) {                         //Check if test is failed
		
		if(retryCount<maxRetryCount) {                //Check if the maximum number of test execution is reached
			System.out.println("Retrying Test : Re-running " + result.getName() +
 " for " + (retryCount+1) + " time(s)."); //Print the number of Retry attempts
			
			retryCount++;                             //Increase the maxRetryCount by 1
			
			result.setStatus(ITestResult.FAILURE);    //Mark test as failed
         return true;                                 //Rerun the failed test
		} else {
			result.setStatus(ITestResult.FAILURE);    //TestNG marks last run as failed, if last run is max retry
		} 
	  }else {
			result.setStatus(ITestResult.SUCCESS);    //TestNG parks test as passed when the test test passes
			
	  }
	
return false;
	}
}

This example shows that failed test case will run 3 times till it passes. In case it fails the third time, test execution will stop and TestNG will mark this case as failed. We can change the number of tries by changing the value of maxRetryCount.

Using retryAnalyzer attribute in the @Test annotation

The next step is to associate your test cases with IRetryAnalyzer. In order to do this, you need to use the method below.

@Test(retryAnalyzer = Retry.class)
public void verifyLoginPage() {
}

Let us see the complete implementation with the help of the below example.

import java.util.concurrent.TimeUnit;
import org.openqa.selenium.By;
import org.openqa.selenium.WebDriver;
import org.openqa.selenium.chrome.ChromeDriver;
import org.openqa.selenium.chrome.ChromeOptions;
import org.testng.Assert;
import org.testng.annotations.AfterTest;
import org.testng.annotations.BeforeTest;
import org.testng.annotations.Test;
import io.github.bonigarcia.wdm.WebDriverManager;

public class RetryFailedTests {
	
	WebDriver driver;
	 
    @BeforeTest
    public void setUp() {
    	 
    	WebDriverManager.chromedriver().setup();
    	 
        ChromeOptions chromeOptions = new ChromeOptions();
  
        driver = new ChromeDriver(chromeOptions);
        driver.get("https://opensource-demo.orangehrmlive.com/");
 
        driver.manage().window().maximize();
        driver.manage().timeouts().implicitlyWait(30, TimeUnit.SECONDS);
    }
 
    @Test(retryAnalyzer = Retry.class)
    public void verifyLoginPage() {
 
        String expectedTitle = driver.findElement(By.xpath("//*[@id='logInPanelHeading']")).getText();
 
        System.out.println("Title :" + expectedTitle);
        Assert.assertTrue(expectedTitle.equalsIgnoreCase("LOGIN Panel !!"));
    }
 
    @Test(retryAnalyzer = Retry.class)
    public void verifyHomePage() {
 
        System.out.println("Username Entered");
        driver.findElement(By.name("txtUsername")).sendKeys("Admin");
 
        System.out.println("Password Entered");
        driver.findElement(By.name("txtPassword")).sendKeys("admin123");
 
        driver.findElement(By.id("btnLogin")).submit();
 
        String newPageText = driver.findElement(By.id("welcome")).getText();
        System.out.println("newPageText :" + newPageText);
        Assert.assertTrue(newPageText.contains("Welcome"));
    }
 
    @AfterTest
    public void teardown() {
 
        driver.quit();
    }
 
}

In the above example, test – verifyLoginPage() will be retried a maximum of 3 times, if the test fails. To run the tests, Right-click on the class and select Run As ->TestNG Suite.

The output of the above program is

2. Implement Interface ITestAnnotationTransformer to retry failed tests

In this case, you would need to implement ITestAnnotationTransformer interface. The implementation of this interface is

public interface IAnnotationTransformer extends ITestNGListener {

  /**
   * This method will be invoked by TestNG to give you a chance to modify a TestNG annotation read
   * from your test classes. You can change the values you need by calling any of the setters on the
   * ITest interface.
   *
   * <p>Note that only one of the three parameters testClass, testConstructor and testMethod will be
   * non-null.
   *
   * @param annotation The annotation that was read from your test class.
   * @param testClass If the annotation was found on a class, this parameter represents this class
   *     (null otherwise).
   * @param testConstructor If the annotation was found on a constructor, this parameter represents
   *     this constructor (null otherwise).
   * @param testMethod If the annotation was found on a method, this parameter represents this
   *     method (null otherwise).
   */
  default void transform(
      ITestAnnotation annotation, Class testClass, Constructor testConstructor, Method testMethod) {
    // not implemented
  }

The transform method is called for every test during the test run. We can use this listener for our retry analyzer as shown below:

import java.lang.reflect.Constructor;
import java.lang.reflect.Method;
import org.testng.IAnnotationTransformer;
import org.testng.annotations.ITestAnnotation;

public class RetryListener implements IAnnotationTransformer{

	public void transform(ITestAnnotation arg0, Class arg1, Constructor arg2,Method arg3) {
		
			arg0.setRetryAnalyzer(Retry.class);
		}

	}

Now let us create a class that contains all the tests.

import java.util.concurrent.TimeUnit;
import org.openqa.selenium.By;
import org.openqa.selenium.WebDriver;
import org.openqa.selenium.chrome.ChromeDriver;
import org.openqa.selenium.chrome.ChromeOptions;
import org.testng.Assert;
import org.testng.annotations.AfterTest;
import org.testng.annotations.BeforeTest;
import org.testng.annotations.Test;
import io.github.bonigarcia.wdm.WebDriverManager;

public class RetryTests {
	
	WebDriver driver;
	 
    @BeforeTest
    public void setUp() {
    	 
    	 WebDriverManager.chromedriver().setup();
    	 
         ChromeOptions chromeOptions = new ChromeOptions();
  
         driver = new ChromeDriver(chromeOptions);
         driver.get("https://opensource-demo.orangehrmlive.com/");
 
         driver.manage().window().maximize();
         driver.manage().timeouts().implicitlyWait(30, TimeUnit.SECONDS);
    }
 
    @Test(description = "This test validates title of login functionality")
    public void verifyLoginPage() {
 
        String expectedTitle = driver.findElement(By.xpath("//*[@id='logInPanelHeading']")).getText();
 
        System.out.println("Title :" + expectedTitle);
        Assert.assertTrue(expectedTitle.equalsIgnoreCase("LOGIN Panel !!"));
    }
 
    @Test(description = "This test validates  successful login to Home page")
    public void verifyHomePage() {
 
        System.out.println("Username Entered");
        driver.findElement(By.name("txtUsername")).sendKeys("Admin");
 
        System.out.println("Password Entered");
        driver.findElement(By.name("txtPassword")).sendKeys("admin123");
 
        driver.findElement(By.id("btnLogin")).submit();
 
        String newPageText = driver.findElement(By.id("welcome")).getText();
        System.out.println("newPageText :" + newPageText);
        Assert.assertTrue(newPageText.contains("Welcome"));
    }
 
    @AfterTest
    public void teardown() {
 
        driver.quit();
    }
 
}

Once we have the implementation of IAnnotationTransformer, we just need to add it as a listener in the testng.xml. Like this:

<?xml version="1.0" encoding="UTF-8"?>
<!DOCTYPE suite SYSTEM "https://testng.org/testng-1.0.dtd">
<suite name="Suite">

<listeners>
<listener class-name="com.example.retrydemo.RetryListener"></listener>

</listeners>

  <test name="Test">
    <classes>
      <class name="com.example.retrydemo.RetryTests"/>
    </classes>
  </test> <!-- Test -->
</suite> <!-- Suite -->

Now let us run the tests. Right-click on testng.xml and select Run As -> TestNG Suite.

The output of the above program is

This is pretty much it on this topic. Congratulations on making it through this tutorial and hope you found it useful! Happy Learning!! Cheers!!

Integration Testing of Springboot with Cucumber and TestNG

HOME

In this tutorial, I am going to build an automation framework to test the Springboot application with Cucumber, Rest Assured, and TestNG.

What is Springboot?

Spring Boot is an open-source micro-framework maintained by a company called Pivotal. It provides Java developers with a platform to get started with an auto-configurable production-grade Spring application. With it, developers can get started quickly without losing time on preparing and configuring their Spring application.

What is Cucumber?

Cucumber is a software tool that supports behavior-driven development (BDD). Cucumber can be defined as a testing framework, driven by plain English. It serves as documentation, automated tests, and development aid – all in one.

This framework consists of:

  1. Springboot – 2.5.2
  2. Cucumber – 7.3.4
  3. Java 11
  4. TestNG – 7.3.4
  5. Maven – 3.8.1
  6. RestAssured – 5.1.1

Steps to setup Cucumber Test Automation Framework for API Testing using Rest-Assured

  1. Add SpringbootTest, Rest-AssuredJUnit, and Cucumber dependencies to the project
  2. Create a source folder src/test/resources and create a feature file under src/test/resources
  3. Create the Step Definition class or Glue Code for the Test Scenario under the src/test/java directory
  4. Create a Cucumber Runner class under the src/test/java directory
  5. Run the tests from Cucumber Test Runner
  6. Run the tests from Command Line
  7. Run the tests from TestNG
  8. Generation of TestNG Reports
  9. Cucumber Report Generation

Below is the structure of a SpringBoot application project

We need the below files to create a SpringBoot Application.

SpringBootRestServiceApplication.java

The Spring Boot Application class is generated with Spring Initializer. This class acts as the launching point for the application.

import org.springframework.boot.SpringApplication;
import org.springframework.boot.autoconfigure.SpringBootApplication;

@SpringBootApplication
public class SpringBootRestServiceApplication {

    public static void main(String[] args) {

        SpringApplication.run(SpringBootRestServiceApplication.class, args);
    }
}

Student.java

This is JPA Entity for Student class

import javax.persistence.Entity;
import javax.persistence.GeneratedValue;
import javax.persistence.Id;
import javax.validation.constraints.NotBlank;
import javax.validation.constraints.NotNull;
import javax.validation.constraints.Size;

@Entity
public class Student {
    @Id
    @GeneratedValue
    private Long id;

    @NotNull
    @Size(min = 4, message = "Name should have atleast 4 characters")
    private String name;

    @NotBlank(message = "passportNumber is mandatory")
    private String passportNumber;

    public Student() {
        super();
    }

    public Student(Long id, String name, String passportNumber) {
        super();
        this.id = id;
        this.name = name;
        this.passportNumber = passportNumber;
    }

    public Long getId() {
        return id;
    }

    public void setId(Long id) {
        this.id = id;
    }

    public String getName() {
        return name;
    }

    public void setName(String name) {
        this.name = name;
    }

    public String getPassportNumber() {
        return passportNumber;
    }

    public void setPassportNumber(String passportNumber) {
        this.passportNumber = passportNumber;
    }
}

StudentRepository.java 

This is JPA Repository for Student. This is created using Spring Data JpaRepository.

import org.springframework.data.jpa.repository.JpaRepository;
import org.springframework.stereotype.Repository;

@Repository
public interface StudentRepository extends JpaRepository<Student, Long>{

}

StudentController.java

Spring Rest Controller exposes all services on the student resource.

import static org.springframework.hateoas.server.mvc.WebMvcLinkBuilder.linkTo;
import static org.springframework.hateoas.server.mvc.WebMvcLinkBuilder.methodOn;
import java.net.URI;
import java.util.List;
import java.util.Optional;
import javax.validation.Valid;
import org.springframework.beans.factory.annotation.Autowired;
import org.springframework.hateoas.EntityModel;
import org.springframework.hateoas.server.mvc.WebMvcLinkBuilder;
import org.springframework.http.ResponseEntity;
import org.springframework.web.bind.annotation.GetMapping;
import org.springframework.web.bind.annotation.PathVariable;
import org.springframework.web.bind.annotation.PostMapping;
import org.springframework.web.bind.annotation.RequestBody;
import org.springframework.web.bind.annotation.RestController;
import org.springframework.web.servlet.support.ServletUriComponentsBuilder;

@RestController
public class StudentController {

    @Autowired
    private StudentRepository studentRepository;

    @GetMapping("/students")
    public List<Student> retrieveAllStudents() {
        return studentRepository.findAll();
    }

    @GetMapping("/students/{id}")
    public EntityModel<Student> retrieveStudent(@PathVariable long id) {
        Optional<Student> student = studentRepository.findById(id);

        if (!student.isPresent())
            throw new StudentNotFoundException("id-" + id);

        EntityModel<Student> resource = EntityModel.of(student.get());

        WebMvcLinkBuilder linkTo = linkTo(methodOn(this.getClass()).retrieveAllStudents());

        resource.add(linkTo.withRel("all-students"));

        return resource;
    }

    @PostMapping("/students")
    public ResponseEntity<Object> createStudent(@Valid @RequestBody Student student) {
        Student savedStudent = studentRepository.save(student);

        URI location = ServletUriComponentsBuilder.fromCurrentRequest().path("/{id}")
                .buildAndExpand(savedStudent.getId()).toUri();

        return ResponseEntity.created(location).build();

    }
}

application.properties

Spring Boot automatically loads the application.properties whenever it starts up. You can de-reference values from the property file in the java code through the environment.

spring.jpa.defer-datasource-initialization=true

data.sql 

Data is loaded from data.sql into the Student table. Spring Boot would execute this script after the tables are created from the entities.

insert into student values(10001,'Annie', 'E1234567');
insert into student values(20001,'John', 'A1234568');
insert into student values(30001,'David','C1232268');
insert into student values(40001,'Amy','D213458');

Test Automation Framework Implementation

Step 1 – Add SpringbootTest, Cucumber, Rest-Assured, and TestNG dependencies to the project (Maven project)

 <properties>
        <project.build.sourceEncoding>UTF-8</project.build.sourceEncoding>
        <rest-assured.version>5.1.1</rest-assured.version>
        <cucumber.version>7.3.4</cucumber.version>
    </properties>

<dependencies>
        
        <dependency>
            <groupId>org.springframework.boot</groupId>
            <artifactId>spring-boot-starter-test</artifactId>
            <scope>test</scope>
        </dependency>

        <dependency>
            <groupId>io.rest-assured</groupId>
            <artifactId>rest-assured</artifactId>
            <version>${rest-assured.version}</version>
            <scope>test</scope>
        </dependency>

        <dependency>
            <groupId>io.cucumber</groupId>
            <artifactId>cucumber-java</artifactId>
            <version>${cucumber.version}</version>
        </dependency>

        <dependency>
            <groupId>io.cucumber</groupId>
            <artifactId>cucumber-testng</artifactId>
            <version>${cucumber.version}</version>
            <scope>test</scope>
        </dependency>

        <dependency>
            <groupId>io.cucumber</groupId>
            <artifactId>cucumber-spring</artifactId>
            <version>${cucumber.version}</version>
            <scope>test</scope>
        </dependency>

</dependencies>

Step 2 – Create a source folder src/test/resources and create a feature file under src/test/resources

By default, the Maven project has an src/test/java directory only. Create a new Source Folder under src/test with the name of resources. Create a folder name as Features within the src/test/resources directory.

Create a feature file to test the Springboot application. Below is a sample feature file.

Feature: Verify springboot application using Cucumber and TestNG

  @ReceiveUserDetails
  Scenario Outline: Send a valid Request to get user details
    Given I send a request to the URL "/students" to get user details
    Then The response will return status 200 
    And The response contains id <studentID> and names "<studentNames>" and passport_no "<studentPassportNo>"

    Examples:
      |studentID    |studentNames  |studentPassportNo|
      |10001        |Annie         |E1234567         |
      |20001        |John          |A1234568         |
      |30001        |David         |C1232268         |
      |40001        |Amy           |D213458          |
      
   
  @CreateUser
  Scenario: Send a valid Request to create a user 
    Given I send a request to the URL "/students" to create a user with name "Annie" and passportNo "E1234567"
    Then The response will return status 201
    And Resend the request to the URL "/students" and the response returned contains name "Annie" and passport_no "E1234567"

Step 3 – Create the Step Definition class or Glue Code for the Test Scenario under src/test/java

The corresponding step definition file of the above feature file is shown below.

import static io.restassured.RestAssured.given;
import static org.hamcrest.Matchers.containsString;
import static org.hamcrest.Matchers.equalTo;
import static org.hamcrest.Matchers.hasItem;
import org.json.JSONObject;
import org.springframework.boot.test.context.SpringBootTest;
import org.springframework.boot.web.server.LocalServerPort;
import io.cucumber.java.en.Given;
import io.cucumber.java.en.Then;
import io.cucumber.spring.CucumberContextConfiguration;
import io.restassured.RestAssured;
import io.restassured.http.ContentType;
import io.restassured.response.ValidatableResponse;
import io.restassured.specification.RequestSpecification;

@CucumberContextConfiguration
@SpringBootTest(webEnvironment = SpringBootTest.WebEnvironment.RANDOM_PORT)
public class SpringbootDefinitions {

	private final static String BASE_URI = "http://localhost";

	@LocalServerPort
	private int port;

	private ValidatableResponse validatableResponse, validatableResponse1;

	private void configureRestAssured() {
		RestAssured.baseURI = BASE_URI;
		RestAssured.port = port;
	}

	protected RequestSpecification requestSpecification() {
		configureRestAssured();
		return given();
	}

	@Given("I send a request to the URL {string} to get user details")
	public void getStudentDetails(String endpoint) throws Throwable {
		validatableResponse = requestSpecification().contentType(ContentType.JSON).when().get(endpoint).then();
		System.out.println("RESPONSE :" + validatableResponse.extract().asString());
	}

	@Given("I send a request to the URL {string} to create a user with name {string} and passportNo {string}")
	public void createStudent(String endpoint, String studentName, String studentPassportNumber) throws Throwable {

		JSONObject student = new JSONObject();
		student.put("name", studentName);
		student.put("passportNumber", studentPassportNumber);

		validatableResponse = requestSpecification().contentType(ContentType.JSON).body(student.toString()).when()
				.post(endpoint).then();
		System.out.println("RESPONSE :" + validatableResponse.extract().asString());
	}

	@Then("The response will return status {int}")
	public void verifyStatusCodeResponse(int status) {
		validatableResponse.assertThat().statusCode(equalTo(status));

	}

	@Then("The response contains id {int} and names {string} and passport_no {string}")
	public void verifyResponse(int id, String studentName, String passportNo) {
		validatableResponse.assertThat().body("id", hasItem(id)).body(containsString(studentName))
				.body(containsString(passportNo));

	}

	@Then("Resend the request to the URL {string} and the response returned contains name {string} and passport_no {string}")
	public void verifyNewStudent(String endpoint, String studentName, String passportNo) {

		validatableResponse1 = requestSpecification().contentType(ContentType.JSON).when().get(endpoint).then();
		System.out.println("RESPONSE :" + validatableResponse1.extract().asString());
		validatableResponse1.assertThat().body(containsString(studentName)).body(containsString(passportNo));

	}
}

To make Cucumber aware of your test configuration you can annotate a configuration class on your glue path with @CucumberContextConfiguration and with one of the following annotations: @ContextConfiguration, @ContextHierarchy, or @BootstrapWith.It is imported from:

import io.cucumber.spring.CucumberContextConfiguration;

As we are using SpringBoot, we are annotating the configuration class with @SpringBootTest. It is imported from:

import org.springframework.boot.test.context.SpringBootTest;

By default, @SpringBootTest does not start the webEnvironment to refine further how your tests run. It has several options: MOCK(default), RANDOM_PORT, DEFINED_PORT, NONE.

RANDOM_PORT loads a WebServerApplicationContext and provides a real web environment. The embedded server is started and listens on a random port. LocalServerPort is imported from the package:

import org.springframework.boot.web.server.LocalServerPort;

Step 4 – Create a Cucumber TestNG Runner class under src/test/java

A runner will help us to run the feature file and acts as an interlink between the feature file and StepDefinition Class. The TestRunner should be created within the directory src/test/java.

import io.cucumber.testng.AbstractTestNGCucumberTests;
import io.cucumber.testng.CucumberOptions;

@CucumberOptions(features = {"src/test/resources/Features"}, glue = {"com.example.demo.definitions"})
public class CucumberRunnerTests extends AbstractTestNGCucumberTests {

}

The @CucumberOptions annotation is responsible for pointing to the right feature package, configuring the plugin for a better reporting of tests in the console output, and specifying the package where extra glue classes may be found. We use it to load configuration and classes that are shared between tests.

Step 5 – Run the tests from Cucumber Test Runner

You can execute the test script by right-clicking on TestRunner class -> Run As TestNG in Eclipse.

In case you are using IntelliJ, select Run CucumberRunnerTests.

SpringBootTest creates an application context containing all the objects we need for the Integration Testing It, starts the embedded server, creates a web environment, and then enables methods to do Integration testing.

Step 6 – Run the tests from Command Line

Use the below command to run the tests through the command line.

mvn clean test

Step 7 – Run the tests from TestNG

Create a testng.xml in the project as shown below:

<?xml version="1.0" encoding="UTF-8"?>
<!DOCTYPE suite SYSTEM "https://testng.org/testng-1.0.dtd">
<suite name = "Suite1">
  <test name = "SpringBoot Cucumber TestNG Demo">
    <classes>
          <class name = "com.example.demo.runner.CucumberRunnerTests"/>
     </classes>  
   </test>
</suite>

Step 8 – Generation of TestNG Reports

TestNG generates various types of reports under the test-output folder like emailable-report.html, index.html, testng-results.xml.

We are interested in the “emailable-report.html” report. Open “emailable-report.html”, as this is an HTML report, and open it with the browser. The below image shows emailable-report.html.

TestNG also produce “index.html” report, and it resides under test-output folder. The below image shows index.html report.

Step 9 – Cucumber Report Generation

Add cucumber.properties under src/test/resources and add the below instruction in the file.

cucumber.publish.enabled=true

The link to the Cucumber Report is present in the execution status.

Below is the image of the Cucumber Report generated using the Cucumber Service.

Complete Source Code:
Refer to GitHub for the source code.

Congratulations!! We are able to build a test framework to test the SpringBoot application using Cucumber, Rest Assured, and TestNG.

Execute Testng.xml using batch file

HOME

In the previous tutorial, we have seen executing testng.xml tests from command line. Now here we will look into executing testng.xml using batch file (.bat) file.

A batch file (.bat) is used in DOS and Windows, which is an unformatted text file that consists of a series of commands to be executed by the command line interpreter.

Prerequisite:

  1. Selenium
  2. TestNG
  3. Maven
  4. Java 11
  5. Maven Complier Plugin
  6. Maven Surefire Plugin
  7. Notepad

Let us first create some tests in a class.

import static org.testng.Assert.assertTrue;

import static org.hamcrest.Matchers.containsString;
import static org.hamcrest.MatcherAssert.assertThat;

import org.openqa.selenium.By;
import org.openqa.selenium.WebDriver;
import org.openqa.selenium.firefox.FirefoxDriver;
import org.testng.annotations.AfterTest;
import org.testng.annotations.BeforeTest;
import org.testng.annotations.Test;

public class TestNGRunFromCommandLine {
	
	 WebDriver driver;
	 
	    @BeforeTest
	    public void setUp() {
	        System.setProperty("webdriver.gecko.driver",
	                "C:\\Users\\Vibha\\Software\\geckodriver\\geckodriver.exe");
	 
	        driver = new FirefoxDriver();
	        driver.get("https://opensource-demo.orangehrmlive.com/"); 
	        driver.manage().window().maximize();
	    }
	 
	    @Test(description = "This test validates title of login functionality", priority = 0)
	    public void verifyLoginPage() {
	 
	        String expectedTitle = driver.findElement(By.xpath("//*[@id='logInPanelHeading']")).getText(); 
	        System.out.println("Title :" + expectedTitle);
	        assertTrue(expectedTitle.equalsIgnoreCase("LOGIN Panel12"));
	    }
	 
	    @Test(description = "This test validates  successful login to Home page", priority = 1)
	    public void verifyHomePage() throws InterruptedException {
	 
	        System.out.println("Username Entered");
	        driver.findElement(By.name("txtUsername")).sendKeys("Admin");
	 
	        System.out.println("Password Entered");
	        driver.findElement(By.name("txtPassword")).sendKeys("admin123");         
	        driver.findElement(By.id("btnLogin")).submit();
	        
	        Thread.sleep(2000);
	 
	        String newPageText = driver.findElement(By.xpath("//*[@id='content']/div/div[1]/h1")).getText();
	        System.out.println("newPageText :" + newPageText);
	        assertThat(newPageText, containsString("Dashboard"));
	    }
	 
	    @AfterTest
	    public void teardown() {
	 
	        driver.quit();
	    }
	 
	}

The below is the testng.xml file which has a class that we have created above and we will be invoking this xml file using batch file (.bat).

<?xml version="1.0" encoding="UTF-8"?>
<!DOCTYPE suite SYSTEM "https://testng.org/testng-1.0.dtd">
<suite name="Suite">
  <test name="Test">
    <classes>
      <class name="TestNG_Demo.TestNGRunFromCommandLine"/>
    </classes>
  </test> 
</suite> 

 How to create a batch file?

Step 1: Open notepad
Step 2: Paste the below lines of code – You may need to add your project location. In the example, project location is set as C:\Users\Vibha\Projects\Vibha_Personal\ParallelTestsTestNG
Step 3: Save the file as ‘TestNGProject.bat’ in location that you want to save.

cd C:\Users\Vibha\Projects\Vibha_Personal\ParallelTestsTestNG
mvn compile test

Now, to run the tests, double-click on the TestNGProject.bat file and all the commands mentioned in the file will be executed one by one.

As we know, TestNG generates a lot of Reports automatically. We are going to look into 2 reports – emailable-report.html and index.html. The reports are generated under surefire-reports folder within the target directory.

Emailable-Report.html

Index.html

Hope this article helps you to invoke your tests using .bat file. 

Parallel testing of DataProviders in TestNG

HOME

The previous tutorial has explained the DataProviders in TestNG. The DataProvider in TestNG is a way to pass the parameters in the test functions. Using DataProvider in TestNG, we can easily inject multiple values into the same test case. It comes inbuilt into TestNG and is popularly used in data-driven frameworks.

 It is an option for the parallel execution of tests in TestNG. 

It is advisable to create 2 classes – one class contains the Test cases and another class defines TestNG parameters – DataProviders.

Let us create a class for the DataProvider method with all the Test Data as shown below:

import org.testng.annotations.DataProvider;

public class DataProviderDemo {	
	
	 @DataProvider(name = "testData", parallel=true)
	 public Object[][] dataProvFunc() {
	       return new Object[][] {           
	    	   {"","","Username cannot be empty"},    	  
	    	   {"","Test","Username cannot be empty"},
	    	   {"$%1234","2345%$","Invalid credentials"}          
	    	 };
	    }
	}

An extra parameter “parallel” is required to initiate parallel execution in TestNG using the data provider.

Below is the test which uses the parameter from the data provider and runs the tests parallelly.

A new ThreadLocal is instantiated for each test class, since it’s in the BeforeClass annotation.

private static final ThreadLocal<WebDriver> WEB_DRIVER_THREAD_LOCAL = new ThreadLocal<WebDriver>();

Below is the complete test code:

import org.openqa.selenium.By;
import org.openqa.selenium.WebDriver;
import org.openqa.selenium.chrome.ChromeDriver;
import org.testng.Assert;
import org.testng.annotations.AfterMethod;
import org.testng.annotations.BeforeMethod;
import org.testng.annotations.Test;

public class DataProviderParallelTests {
	
	public WebDriver driver;
	private static final ThreadLocal<WebDriver> WEBDRIVER_THREADLOCAL = new ThreadLocal<WebDriver>();
	
	 @BeforeMethod
    public void setUp(){

        System.setProperty("webdriver.chrome.driver",
                "C:\\Users\\Vibha\\Software\\chromedriver\\chromedriver.exe");
        driver = new ChromeDriver();
        WEBDRIVER_THREADLOCAL.set(driver);
        System.out.println("Before method Thread Id:" + Thread.currentThread().getId());
        
    }
	
	@Test(dataProvider = "testData", dataProviderClass = DataProviderDemo.class)
    public void invalidLoginTest(String username, String password, String errorMessage) throws InterruptedException {
		     
	    driver = WEBDRIVER_THREADLOCAL.get();
	    driver.manage().window().maximize();
        driver.get("https://opensource-demo.orangehrmlive.com/");
     
        Thread.sleep(2000);
        driver.findElement(By.name("txtUsername")).sendKeys(username);
        System.out.println("Username :" + username);
        
        Thread.sleep(2000);
        driver.findElement(By.name("txtPassword")).sendKeys(password);
        System.out.println("password :" + password);
        
        Thread.sleep(2000);
        String expectedError = driver.findElement(By.id("spanMessage")).getText();
        System.out.println("Error Message :" + expectedError);
        Assert.assertTrue(expectedError.contains(errorMessage));

    }
		 
	@AfterMethod
	public void tear_down() {
		 
		 WebDriver driver = WEBDRIVER_THREADLOCAL.get();
		 System.out.println("After method Thread Id:" + Thread.currentThread().getId());
	        if (driver != null) {
	            driver.quit();
	     }
    }	
}

testng.xml

<?xml version="1.0" encoding="UTF-8"?>
<!DOCTYPE suite SYSTEM "https://testng.org/testng-1.0.dtd">
<suite name="Suite" thread-count="2" data-provider-thread-count="2">
  <test name="Test">
    <classes>
      <class name="DataProvider.DataProviderParallelTests"/>
    </classes>
  </test> <!-- Test -->
</suite> <!-- Suite -->

In this file, the data-provider-thread-count is set to 2, then two browsers will be opened, and the first two tests will run from the list. 

Run the test script from testng.xml, Right-Click on the XML, and select Run As ->TestNG Suite.

The execution status shown below shows that 2 threads are active at a time, which execute 2 sets of data provider parameters – Thread 14 and Thread 15. Once the tests are finished for Thread 14 and Thread 15, they are closed and a new Thread 15 is again initiated to start the test execution of the 3rd parameter.

TestNG generates multiple test reports under the folder test-output. We are mainly concerned about 2 reports – emailable-report.html and index.html.

Emailable-report.html

Emailable reports are a type of summary report that one can transfer to other people in the team through any medium. 

Index.html

Index report contains the index-like structure of different parts of the report, such as failed tests, test files, passed tests, etc. We can divide this report into two parts. The left part contains the index, and this is the reason it is called an index report, while the right part contains the explored content of that index.

We are done! Congratulations on making it through this tutorial and hope you found it useful! Happy Learning!!

DataProvider in TestNG using Excel

HOME

In the previous tutorial, I explained the DataProvider in TestNG without using Excel. In this tutorial, I will explain the use of Excel in DataProvider for TestNG.

I have created an Excel – SearchInBing.xlsx and placed it on the Desktop. You can create a Test Data folder in your project and place the Excel file within it. So, my datasheet looks like the below:

Next, we will create a DataProvider method that will use another method to read the Excel file & create a 2D object from the row & column values of the Excel and return the same value, so that our test script can use it. The code for it would look like the below:

import org.apache.poi.ss.usermodel.Cell;
import org.testng.annotations.DataProvider;

import java.io.FileInputStream;
import java.io.IOException;

import org.apache.poi.xssf.usermodel.XSSFRow;
import org.apache.poi.xssf.usermodel.XSSFSheet;
import org.apache.poi.xssf.usermodel.XSSFWorkbook;

public class ExcelDataProvider {

    @DataProvider(name = "excelData")
    public Object[][] excelDataProvider() throws IOException {

        // We are creating an object from the excel sheet data by calling a method that
        // reads data from the excel stored locally in our system
        Object[][] arrObj = getExcelData(
                C:\\Users\\Vibha\\Desktop\\SearchInBing.xlsx","Details");
        return arrObj;
}

    // This method handles the excel - opens it and reads the data from the
    // respective cells using a for-loop & returns it in the form of a string array
    public String[][] getExcelData(String fileName, String sheetName) throws IOException {
        String[][] data = null;
        try {

            FileInputStream fis = new FileInputStream(fileName);
            XSSFWorkbook workbook = new XSSFWorkbook(fis);
            XSSFSheet sheet = workbook.getSheet(sheetName);
            XSSFRow row = sheet.getRow(0);
            int noOfRows = sheet.getPhysicalNumberOfRows();
            int noOfCols = row.getLastCellNum();
            Cell cell;
            data = new String[noOfRows - 1][noOfCols];

            for (int i = 1; i < noOfRows; i++) {
                for (int j = 0; j < noOfCols; j++) {
                    row = sheet.getRow(i);
                    cell = row.getCell(j);
                    data[i - 1][j] = cell.getStringCellValue();
                }
            }
        } catch (Exception e) {
            System.out.println("The exception is: " + e.getMessage());
        }
        return data;
    }
}

Now, create a class that contains the test code. By default, the data provider will be looked for in the current test class or one of its base classes. If you want to put your data provider in a different class, it needs to be a static method or a class with a no-arg constructor, and you specify the class where it can be found in the data provider class attribute.

import io.github.bonigarcia.wdm.WebDriverManager;
import org.openqa.selenium.By;
import org.openqa.selenium.Keys;
import org.openqa.selenium.WebDriver;
import org.openqa.selenium.WebElement;
import org.openqa.selenium.chrome.ChromeDriver;
import org.testng.Assert;
import org.testng.annotations.AfterMethod;
import org.testng.annotations.BeforeMethod;
import org.testng.annotations.Test;

public class DataProviderWithExcelDemo {
    
  WebDriver driver;

   @BeforeMethod
    public void setUp() {
        System.out.println("Start test");
        WebDriverManager.chromedriver().setup();
        driver = new ChromeDriver();
        driver.get("https://www.bing.com");
        driver.manage().window().maximize();

    }

    @Test(dataProvider = "excelData", dataProviderClass = ExcelDataProvider.class)
    public void search(String keyWord1, String keyWord2) {

        WebElement txtBox = driver.findElement(By.id("sb_form_q"));
        txtBox.sendKeys(keyWord1, " ", keyWord2);
        System.out.println("Keyword entered is : " + keyWord1 + " " + keyWord2);
        txtBox.sendKeys(Keys.ENTER);
        System.out.println("Search results are displayed.");
        System.out.println("RESULT: "+ driver.getTitle());
        Assert.assertTrue(driver.getPageSource().contains(keyWord1));
    }

    @AfterMethod
    public void burnDown() {
        driver.quit();
    }

}

To run the code, right-click and Select – TestNG Test.

The Execution status will look like this, as shown below:

This test execution generates reports under the test-output folder.

We are concerned about two reports – index.html and emailable-report.html.

Below is the image of emailable-report.html.

Below is the image of index.html.

See how easy it is to read data from Excel and use it in the Test Code using DataProvider.

I hope you have enjoyed this tutorial. Happy Learning!!

Integration of Allure Report with Selenium and TestNG

HOME

In this tutorial, I will explain how to integrate Allure Report (one of the very famous Reports) with Selenium and TestNG.

What is Allure Framework?

Allure is an open-source framework designed to create interactive and comprehensive test reports by Yandex QA Team.

The below example covers the implementation of Allure Reports in Selenium using TestNG, Java, and Maven.

Prerequisite:

  1. Java 11 installed
  2. Maven installed
  3. Eclipse or IntelliJ installed
  4. Environment variables JAVA_HOME, MAVEN_HOME and ALLURE_HOME are correctly configured

Dependency List

  1. Selenium – 3.141.59
  2. Java 11
  3. TestNG – 7.4.0
  4. Maven – 3.8.1
  5. Allure Report – 2.14.0
  6. Allure TestNG – 2.14.0

Implementation Steps

  1. Update the Properties section in Maven pom.xml
  2. Add Selenium, TestNG, and Allure TestNG dependencies in POM.xml
  3. Update Build Section of pom.xml in Allure Report Project.
  4. Create Pages and Test Code for the pages
  5. Create testng.xml for the project
  6. Run the Test and Generate Allure Report

Step 1 – Update the Properties section

<properties>
    <project.build.sourceEncoding>UTF-8</project.build.sourceEncoding>
    <selenium.version>3.141.59</selenium.version>
    <testng.version>7.4.0</testng.version>
    <allure.testng.version>2.14.0</allure.testng.version>
    <maven.compiler.plugin.version>3.5.1</maven.compiler.plugin.version>
    <maven.compiler.source>11</maven.compiler.source>
    <maven.compiler.target>11</maven.compiler.target>
    <aspectj.version>1.9.6</aspectj.version>
    <maven.surefire.plugin.version>3.0.0-M5</maven.surefire.plugin.version>
  </properties>

Step 2 – Add Selenium, TestNG, and Allure TestNG dependencies in POM.xml

<dependencies>
    
     <!-- https://mvnrepository.com/artifact/org.seleniumhq.selenium/selenium-java -->
    <dependency>
      <groupId>org.seleniumhq.selenium</groupId>
      <artifactId>selenium-java</artifactId>
      <version>${selenium.version}</version>
    </dependency>
    
    <!-- https://mvnrepository.com/artifact/org.testng/testng -->
    <dependency>
      <groupId>org.testng</groupId>
      <artifactId>testng</artifactId>
      <version>${testng.version}</version>
      <scope>test</scope>
    </dependency>
    
    <!-- https://mvnrepository.com/artifact/io.qameta.allure/allure-testng -->
    <dependency>
        <groupId>io.qameta.allure</groupId>
        <artifactId>allure-testng</artifactId>
        <version>${allure.testng.version}</version>
        <scope>test</scope>
    </dependency>
  </dependencies>

Step 3 – Update the Build Section of pom.xml in the Allure Report Project

<build>
       
       <plugins>
   <!-- Compiler plug-in -->
  
           <plugin>
                <groupId>org.apache.maven.plugins</groupId>
                <artifactId>maven-compiler-plugin</artifactId>
                <version>${maven.compiler.plugin.version}</version>
                <configuration>
                    <source>${maven.compiler.source}</source> <!--For JAVA 8 use 1.8-->
                    <target>${maven.compiler.target}</target> <!--For JAVA 8 use 1.8-->
                </configuration>
            </plugin>
            
     <!-- Added Surefire Plugin configuration to execute tests -->       
          <plugin>
              <groupId>org.apache.maven.plugins</groupId>
              <artifactId>maven-surefire-plugin</artifactId>
              <version>${maven.surefire.plugin.version}</version>
              <configuration>
                    <suiteXmlFiles>
                        <suiteXmlFile>TestNG.xml</suiteXmlFile>
                    </suiteXmlFiles>
                 <argLine>
                    -javaagent:"${settings.localRepository}/org/aspectj/aspectjweaver/${aspectj.version}/aspectjweaver-${aspectj.version}.jar"
                 </argLine>
             </configuration>          
             <dependencies>
            
            <!-- https://mvnrepository.com/artifact/org.aspectj/aspectjweaver -->
                <dependency>
                    <groupId>org.aspectj</groupId>
                    <artifactId>aspectjweaver</artifactId>
                    <version>${aspectj.version}</version>
                </dependency>
            </dependencies>
        </plugin>
      </plugins>
  </build>

Step 4 – Create Pages and Test Code for the pages

Below is the sample project which uses Selenium and TestNG which is used to generate an Allure Report.

We have 2 pages. Below is the code for Login Page which contains all the web elements and methods related to that web elements.

LoginPage.java

public class LoginPage {

	WebDriver driver;

	By userName = By.name("txtUsername");

	By password = By.name("txtPassword");

	By titleText = By.id("logInPanelHeading");

	By login = By.id("btnLogin");

	By errorMessage = By.id("spanMessage");

	public LoginPage(WebDriver driver) {
		this.driver = driver;
	}

	// Set user name in textbox
	public void setUserName(String strUserName) {
		driver.findElement(userName).sendKeys(strUserName);
	}

	// Set password in password textbox
	public void setPassword(String strPassword) {
		driver.findElement(password).sendKeys(strPassword);
	}

	// Click on login button
	public void clickLogin() {
		driver.findElement(login).click();
	}

	@Step("Verify title of Login Page")
	public void verifyPageTitle() {
		String loginPageTitle = driver.findElement(titleText).getText();
		Assert.assertTrue(loginPageTitle.contains("LOGIN Panel"));
	}

    /* Failed Test */
	@Step("Verify error message when invalid credentail is provided")
	public void verifyErrorMessage() {
		String invalidCredentialErrorMessage = driver.findElement(errorMessage).getText();
		Assert.assertTrue(invalidCredentialErrorMessage.contains("Incorrect Credentials"));
	}

	@Step("Enter username and password")
	public void login(String strUserName, String strPasword) {

		// Fill user name
		this.setUserName(strUserName);

		// Fill password
		this.setPassword(strPasword);

		// Click Login button
		this.clickLogin();

	}
}

Dashboard.java

public class DashboardPage {

	WebDriver driver;

	By dashboardPageTitle = By.id("welcome");

	By options = By.cssSelector(
			"#dashboard-quick-launch-panel-menu_holder > table > tbody > tr > td:nth-child(1) > div > a > span");

	public DashboardPage(WebDriver driver) {
		this.driver = driver;

	}

	@Step("Verify title of Dashboard page")
	public void verifyDashboardPageTitle() {
		String DashboardPageTitle = driver.findElement(dashboardPageTitle).getText();
		Assert.assertTrue(DashboardPageTitle.contains("Welcome"));
	}

	@Step("Verify Quick Launch Options on Dashboard page")
	public void verifyQuickLaunchOptions() {
		String QuickLaunchOptions = driver.findElement(options).getText();
		Assert.assertTrue(QuickLaunchOptions.contains("Assign Leave"));
	}

}

Below are the Test classes for Login Page and Dashboard Page. Here, we have BaseTest Class also which contains the common methods needed by other test pages.

BaseTest.java

public class BaseTest {

	public static WebDriver driver;
	LoginPage objLogin;
	DashboardPage objDashboardPage;

	@Step("Start the application")
	@BeforeMethod
	public void setup() {
		System.setProperty("webdriver.gecko.driver",
				"C:\\Users\\Vibha\\Software\\geckodriver-v0.26.0-win64\\geckodriver.exe");
		driver = new FirefoxDriver();
		driver.manage().window().maximize();
		driver.manage().timeouts().implicitlyWait(10, TimeUnit.SECONDS);
		driver.get("https://opensource-demo.orangehrmlive.com/");
	}

	@Step("Stop the application")
	@AfterMethod
	public void close() {
		driver.close();
	}
}

LoginTests.java

@Epic("Web Application Regression Testing")
@Feature("Login Page Tests")
@Listeners(TestExecutionListener.class)
public class LoginTests extends BaseTest {

	LoginPage objLogin;
	DashboardPage objDashboardPage;

	@Severity(SeverityLevel.NORMAL)
	@Test(priority = 0, description = "Verify Login Page")
	@Description("Test Description : Verify the title of Login Page")
	@Story("Title of Login Page")
	public void verifyLoginPage() {

		// Create Login Page object
		objLogin = new LoginPage(driver);

		// Verify login page text
		objLogin.verifyPageTitle();
	}

   /* Failed Test */
	@Severity(SeverityLevel.BLOCKER)
	@Test(priority = 1, description = "Login with invalid username and password")
	@Description("Test Description : Login Test with invalid credentials")
	@Story("Unsuccessful Login to Application")
	public void invalidCredentialTest() {

		// Create Login Page object
		objLogin = new LoginPage(driver);
		objLogin.login("test", "test123");

		// Verify login page text
		objLogin.verifyErrorMessage();

	}

}

We can order tests by severity by using @Severity annotation. Click here to know more about other Allure annotations.

DashboardTests.java

@Epic("Web Application Regression Testing")
@Feature("Dashboard Page Tests")
@Listeners(TestExecutionListener.class)
public class DashboardTests extends BaseTest {

	LoginPage objLogin;
	DashboardPage objDashboardPage;

	@Severity(SeverityLevel.BLOCKER)
	@Test(priority = 0, description = "Verify Dashboard Page")
	@Description("Test Description : After successful login to application opens Dashboard page")
	@Story("Successful login of application opens Dashboard Page")

	public void DasboardTest() {

		objLogin = new LoginPage(driver);

		// login to application
		objLogin.login("Admin", "admin123");

		// go the dashboard page
		objDashboardPage = new DashboardPage(driver);

		// Verify dashboard page
		objDashboardPage.verifyQuickLaunchOptions();

	}

}

We can group tests with @Epic@Feature, and @Stories annotations. Click here to know more about other Allure annotations.

TestExecutionListener.class

We can add attachments to our reports by using @Attachment annotation. It can return String, byte [], etc.  I need to add @Listeners({ TestExecutionListener.class }) declaration at the top of the test classes. Click here to know more about other Allure annotations.

public class TestExecutionListener implements ITestListener {

	@Attachment(value = "Screenshot of {0}", type = "image/png")
	public byte[] saveScreenshot(String name, WebDriver driver) {
		return (byte[]) ((TakesScreenshot) driver).getScreenshotAs(OutputType.BYTES);
	}

	@Override
	public void onTestFailure(ITestResult result) {
		saveScreenshot(result.getName(), BaseTest.driver);
	}

}

Step 5 – Create testng.xml for the project

TestNG.xml

<?xml version="1.0" encoding="UTF-8"?>
<!DOCTYPE suite SYSTEM "https://testng.org/testng-1.0.dtd">
<suite name = "Allure Reports">
  <test name = "Login Page Tests">
    <classes>
          <class name = "com.example.TestNGAllureReportDemo.tests.LoginTests"/>
         
          </classes>
          </test> 
    <test name =" Dashboard Tests">   
    <classes> 
          <class name = "com.example.TestNGAllureReportDemo.tests.DashboardTests"/>
          </classes>
    </test>

</suite>

Step 6 – Run the Test and Generate Allure Report

To run the tests, use the below command

mvn clean test

In the below image, we can see that one test failed and two passed out of three tests.

To create an Allure Report, use the below command

allure serve

This will generate the beautiful Allure Test Report as shown below.

Allure Report Dashboard

The overview page hosts several default widgets representing the basic characteristics of your project and test environment.

  1. Statistics – overall report statistics.
  2. Launches – if this report represents several test launches, statistics per launch will be shown here.
  3. Behaviors – information on results aggregated according to stories and features.
  4. Executors – information on test executors that were used to run the tests.
  5. History Trend – if tests accumulated some historical data, it’s a trend that will be calculated and shown on the graph.
  6. Environment – information on the test environment.

Categories in Allure Report

The categories tab gives you a way to create custom defects classifications to apply for test results. There are two categories of defects – Product Defects (failed tests) and Test Defects (broken tests).

Suites in Allure Report

On the Suites tab a standard structural representation of executed tests, grouped by suites and classes can be found.

Graphs in Allure Report

Graphs allow you to see different statistics collected from the test data: status breakdown or severity and duration diagrams.

Timeline in Allure Report

The timeline tab visualizes retrospective of tests execution, allure adaptors collect precise timings of tests, and here on this tab, they are arranged accordingly to their sequential or parallel timing structure.

Behaviors of Allure Report

This tab groups test results according to Epic, Feature, and Story tags.

Packages in Allure Report

The packages tab represents a tree-like layout of test results, grouped by different packages.

If you click on the (highlighted tab), it will show the test execution report in the below format.

Congratulations on making it through this tutorial and hope you found it useful! Happy Learning!! Cheers!!

Additional tutorials on Allure Reports:

How to create and run TestNG.xml of a TestNG class

HOME

There are 2 ways to run TestNG tests – using Run As TestNG tests and from testng.xml.

In this tutorial, I’m explaining how to create and run tests using TestNG.xml.

Step 1 – In the below project, there is no testng.xml present.

Step 2 – Right click on class name “API_Test.java” and navigate TestNG–>Convert to TestNG“.

Step 3 – Now a new window for testng.xml will be generated as shown below. Click the Finish Button.

<?xml version="1.0" encoding="UTF-8"?>
<!DOCTYPE suite SYSTEM "https://testng.org/testng-1.0.dtd">
<suite name="Suite">
  <test thread-count="5" name="Test">
    <classes>
      <class name="com.example.RestAssured_TestNG_Demo.API_Test"/>
    </classes>
  </test> <!-- Test -->
</suite> <!-- Suite -->

Step 4 – A xml file named testng.xml will be generated in project hierarchy.

Step 5 – Right click on this testng.xml and select Run As–> Testng Suite. 

Step 6 – You will view the result in two different tabs: Console and “Results of running suite”. Below is the image of Rest of running suite tab.

Multiple Classes

Let us imagine a scenario where there are 3 classes and we want to run them all together, you can done that by creating a testng.xml and mention all 3 classes in that testng.xml.

Select all 3 classes and right click and navigate TestNG–>Convert to TestNG“.

This is how the testng.xml will look like for multiple classes.

<?xml version="1.0" encoding="UTF-8"?>
<!DOCTYPE suite SYSTEM "https://testng.org/testng-1.0.dtd">
<suite name="Suite">
  <test thread-count="5" name="Test">
    <classes>
      <class name="com.example.RestAssured_TestNG_Demo.API_Test1"/>
      <class name="com.example.RestAssured_TestNG_Demo.Test3"/>
      <class name="com.example.RestAssured_TestNG_Demo.Test2"/>
    </classes>
  </test> <!-- Test -->
</suite> <!-- Suite -->

Right click on this testng.xml and select Run As–> Testng Suite.  You will get the result in two tabs: Console and Results of running suite. This shows that all the tests present within the three classes are executed.

Congratulations on making it through this tutorial and hope you found it useful! Happy Learning!! Cheers!!