Selenium is an open-source tool. It is not a single automation tool like QTP. Instead, it is a suite of software or a set of JAR files. These tools automate web browsers across various browsers. Selenium is used by many companies, but a few to mention are Netflix, Google, HubSpot, Fitbit, Accenture, IBM, and more.
Selenium – Introduction, Installation, Test Script
The previous tutorial explained running the tests in Selenium4 Grid using the Standalone option. One of the major advantages of Selenium Grid is the ability to run tests parallelly on multiple browsers simultaneously. Parallel testing helps to reduce execution time and efforts and results in a faster time to delivery.
In this tutorial, we will run the same set of tests on Chrome, Firefox, and Edge browsers sequentially initially to confirm that we can perform Cross Browser testing also.
It is very important to construct our tests thread-safe in order to run them in parallel without a problem.
It is recommended to download the exe of various browsers in the same location where the Selenium WebDriver jar file is present. This is because Selenium 4 Alpha has the ability to automatically detect the WebDrivers present on the node machine. For this example, I have downloaded Chrome, Firefox, and edge drivers.
3. Start Selenium Server Jar
Open a command line terminal. Go to the location where these files are present
cd C:/Users/Vibha/Software/SeleniumGrid
Use the below command to run selenium-server standalone jar files.
It’s optional to mention the port number at the end of the command. By default, it will use port 4444. It is good practice to mention the port at the end to avoid any conflict between the ports.
4. Open Selenium Console
The server is listening on http://172.30.96.1:4445/ui/index.html which is the same as shown in the above image. This is a dynamic address, so make sure to get the address from the logs when Selenium Grid is started.
The Grid automatically identifies that the WebDrivers for Chrome and Firefox are present on the system.
5. Add dependencies to the project
In this example, we are using a Maven project, so are adding the dependencies to the POM.xml.
Creating an instance of the Remote WebDriver and passing the selenium endpoint and chrome options defined in it.
To run a Remote WebDriver client, we first need to connect to the RemoteWebDriver. We do this by pointing the URL to the address of the server running our tests. In order to customize our configuration, we set desired capabilities.
Below is an example of instantiating a remote WebDriver object pointing to our remote web server running our tests on Chrome, Firefox, and Edge. We have used @Parameters Annotation to pass the browser names to the tests.
import org.openqa.selenium.By;
import org.openqa.selenium.Capabilities;
import org.openqa.selenium.WebDriver;
import org.openqa.selenium.chrome.ChromeOptions;
import org.openqa.selenium.edge.EdgeOptions;
import org.openqa.selenium.firefox.FirefoxOptions;
import org.openqa.selenium.remote.RemoteWebDriver;
import org.openqa.selenium.support.ui.ExpectedConditions;
import org.openqa.selenium.support.ui.WebDriverWait;
import org.testng.annotations.AfterMethod;
import org.testng.annotations.BeforeMethod;
import org.testng.annotations.Parameters;
import java.net.MalformedURLException;
import java.net.URL;
import java.time.Duration;

public class BaseTest {


    protected static ThreadLocal<RemoteWebDriver> driver = new ThreadLocal<RemoteWebDriver>();
    public static String remote_url = "http://localhost:4445/";
    public Capabilities capabilities;

    @Parameters({"browser"})
    @BeforeMethod
    public void setDriver(String browser) throws MalformedURLException {

    	System.out.println("Test is running on "+browser);

        if(browser.equals("firefox")) {
            capabilities = new FirefoxOptions();
        } else if (browser.equals("chrome")) {
            capabilities = new ChromeOptions();
        } else if (browser.equals("edge")) {
        	capabilities = new EdgeOptions();
        }

        driver.set(new RemoteWebDriver(new URL(remote_url), capabilities));
        driver.get().get("https://opensource-demo.orangehrmlive.com/");
        driver.get().manage().window().maximize();
        driver.get().manage().timeouts().pageLoadTimeout(Duration.ofSeconds(10));
        WebDriverWait wait = new WebDriverWait(driver.get(), Duration.ofSeconds(10));
        wait.until(ExpectedConditions.visibilityOfElementLocated(By.xpath("//*[@id='divUsername']/span")));
    }

    public WebDriver getDriver() {
        return driver.get();
    }

    @AfterMethod
    public  void closeBrowser() {
        driver.get().quit();
        driver.remove();
    }
}
Selenium4ParallelDemo
This class contains the various tests that need to be executed.
InBaseTest class, I created ThreadLocal <>() webdriver (ThreadLocalMap) for thread-safe test execution
I got the TestNG parameter (browser)with @Parameterannotation.
BaseTest returns browser Capabilities based on browser name.
In BaseTest class, thegetDriver()method returns the created driver.
Selenium4ParallelDemoclass extends TestBase class and comprises their test code.
It is very easy to create testng.xml in the case of Eclipse. Right-click on the project, and select TestNG -> Convert to TestNG. It will create a basic testng.xml structure. We need to add the parameter name and value to it.
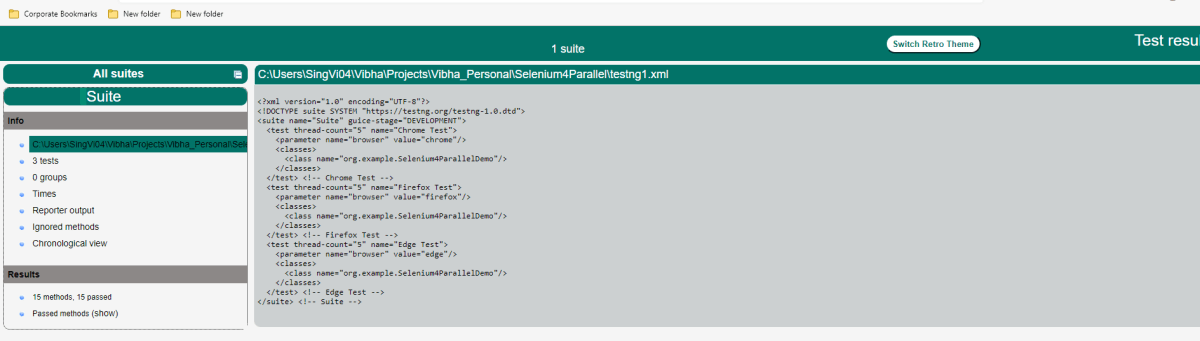
We are planning to run the test on 3 different browsers, so we are passing the name of the browser from this testng.xml using the parameter. This testng.xml will run the test sequentially. There is a minor change needs to be done in testng.xml that will run the tests parallelly.
<?xml version="1.0" encoding="UTF-8"?>
<!DOCTYPE suite SYSTEM "https://testng.org/testng-1.0.dtd">

<suite name="Suite">
  <test thread-count="5" name="Chrome Test">
    <parameter name ="browser" value="chrome"/>
    <classes>
      <class name="org.example.Selenium4ParallelDemo"/>
    </classes>
  </test> <!-- Test -->

   <test thread-count="5" name="Firefox Test">
    <parameter name ="browser" value="firefox"/>
    <classes>
      <class name="org.example.Selenium4ParallelDemo"/>
    </classes>
  </test> <!-- Test -->

   <test thread-count="5" name="Edge Test">
    <parameter name ="browser" value="edge"/>
    <classes>
      <class name="org.example.Selenium4ParallelDemo"/>
    </classes>
  </test> <!-- Test -->
</suite> <!-- Suite -->
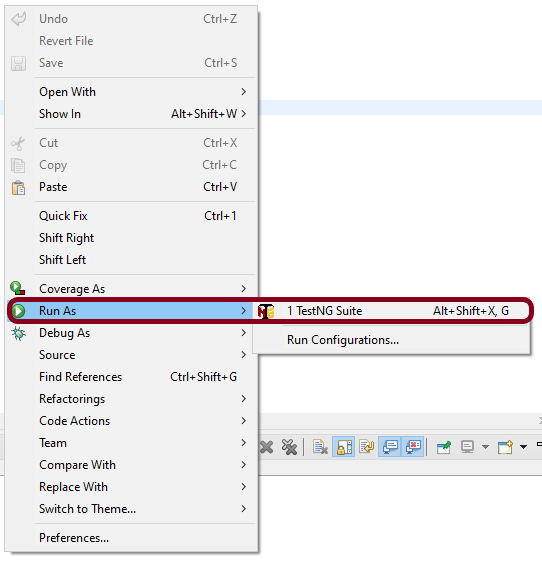
8. Run the tests from testng.xml
Right-Click on the testng.xml and selectRun As ->TestNG Suite.
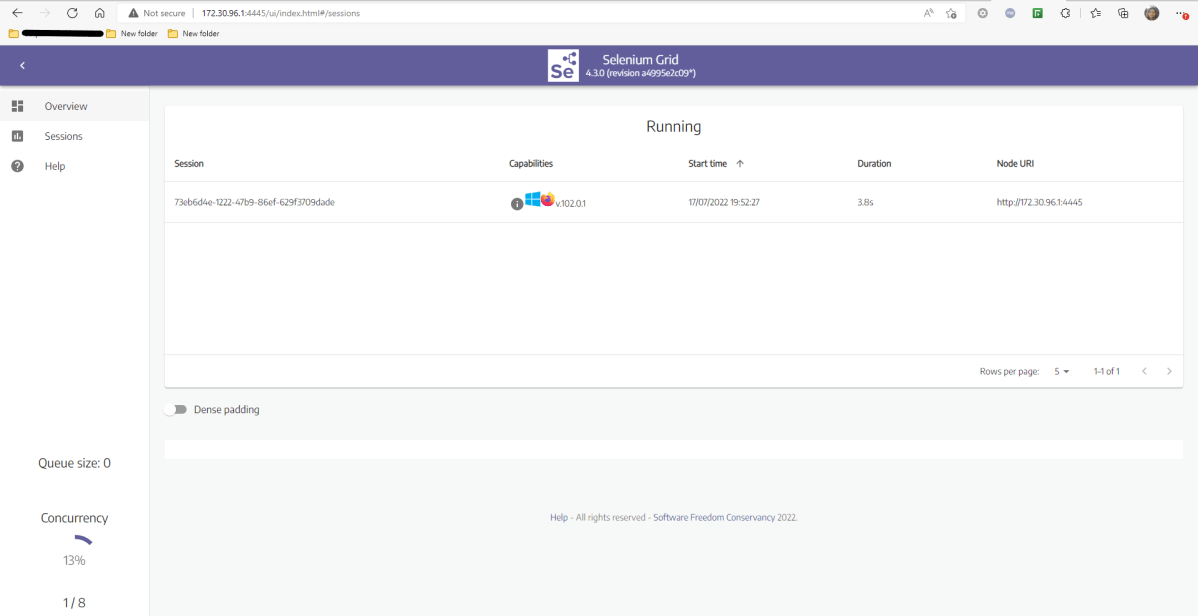
9. Navigate to the sessions tab on the Selenium Grid UI upon running the command
It would reflect an active session.
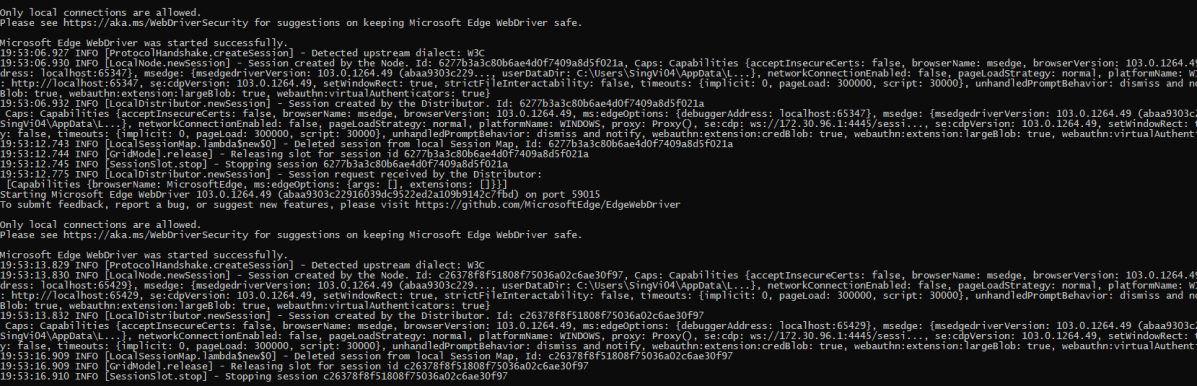
10. Review the test execution result
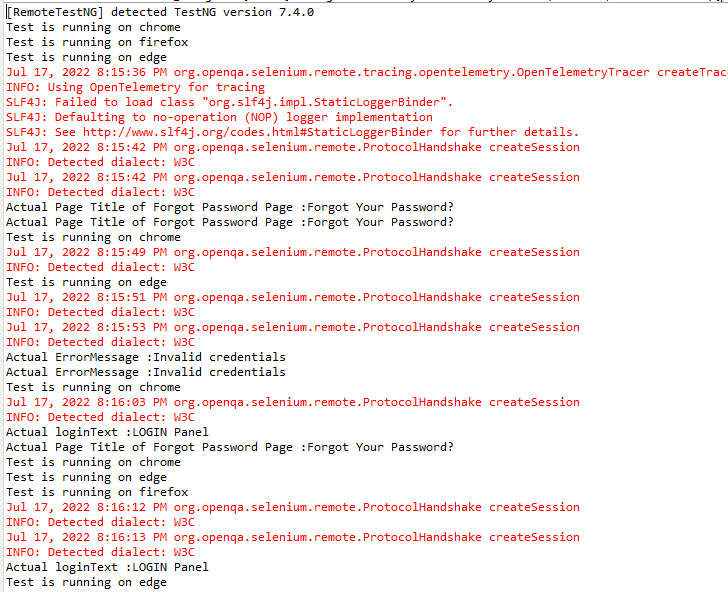
There are 2 ways to see if the tests are getting executed or not. First, we can check in the command line. We can see the logs there as shown below.
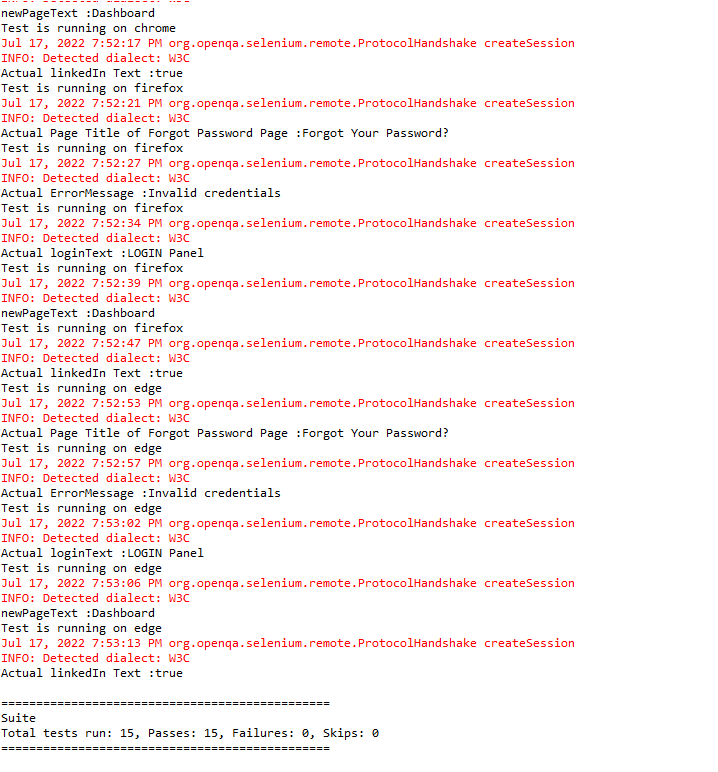
The complete test execution result can be found in the console too.
The tests are TestNG ones, so we can also check the “Result of Running Suite“ tab also.
11. TestNG Report Generation
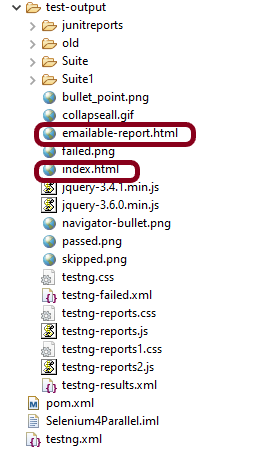
TestNG generates the test reports in the test-output folder.
We are interested in 2 reports – index.html and emailable-report.html.
Index.html
The below image shows that the tests are run sequentially.
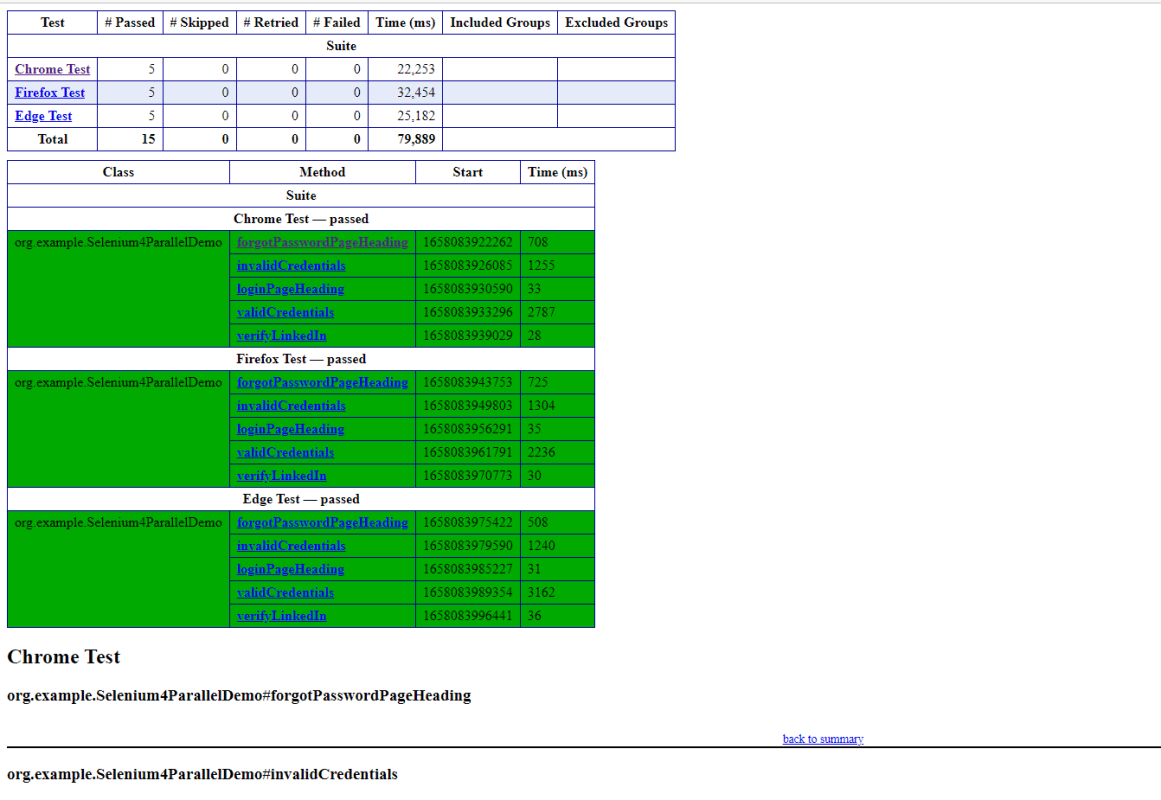
Emailable-Report.html
This report is the summary report. It contains the summary of all the tests executed like, the number of tests passed, skipped, retried, and failed, and the execution time taken by each test.
Parallel Testing
Update the testng.xml for parallel testing. Add parallel=”tests” in the XML.
Updated testng.xml
<?xml version="1.0" encoding="UTF-8"?>
<!DOCTYPE suite SYSTEM "https://testng.org/testng-1.0.dtd">

<suite name="Suite" parallel="tests">
  <test thread-count="5" name="Chrome Test">
    <parameter name ="browser" value="chrome"/>
    <classes>
      <class name="org.example.Selenium4ParallelDemo"/>
    </classes>
  </test> <!-- Test -->

   <test thread-count="5" name="Firefox Test">
    <parameter name ="browser" value="firefox"/>
    <classes>
      <class name="org.example.Selenium4ParallelDemo"/>
    </classes>
  </test> <!-- Test -->

   <test thread-count="5" name="Edge Test">
    <parameter name ="browser" value="edge"/>
    <classes>
      <class name="org.example.Selenium4ParallelDemo"/>
    </classes>
  </test> <!-- Test -->
</suite> <!-- Suite -->
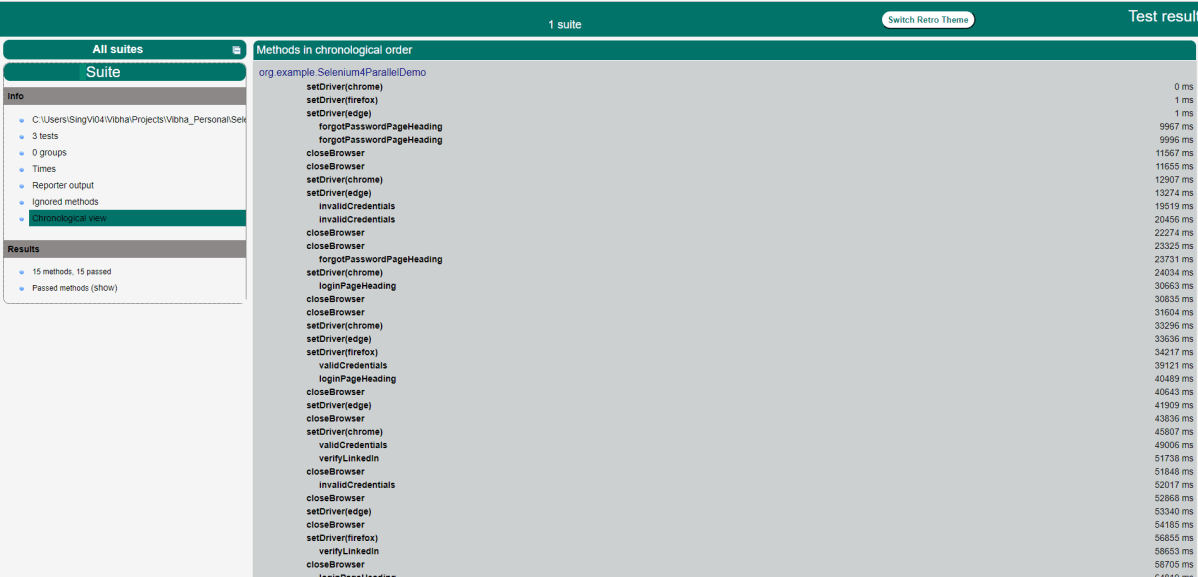
The below image shows that the tests were running on multiple browsers at the same time.
The console also shows that tests were started on all three browsers at the same time.
Index.html shows that methods run in chronological order. It can be seen that the setDriver() method for all 3 browsers was the first one to be executed.
Best Practices:
It is advisable to use nodes other than 4444 to run the tests. By using the different port numbers, we prevent the risk that the port is already in use on your system.
It is suggested to use RemoteWebDriver objects, as it is used to set which node (or machine) our test will run against.
Congratulations on making it through this tutorial and hope you found it useful! Happy Learning!! Cheers!!
Selenium Grid routes command received by the client to distant browser instances, allowing WebDriver scripts to be run on remote machines (virtual or real). Its goal is to make running tests in parallel on numerous machines as simple as possible.
Selenium Grid allows us to run tests on numerous workstations in parallel and centrally manage diverse browser versions and setups (instead of in each individual test).
Selenium Grid 4 makes use of a variety of new technologies to make scaling up easier while still allowing for local execution.
Selenium Grid 4 is a brand-new implementation that doesn’t use the same codebase as the previous version.
A Selenium Grid is made up of several components. Using a Grid role, you can start each one individually or all of them at once, depending on your needs.
Imagine we need to run 1000 tests and it takes 20 hrs to run these tests. With the help pf Selenium Grid, we can have 4 different machines (VMs or separate physical machines) to run those tests. We can roughly reduce the execution time to one-fourth, which means the test execution will be finished in 5 hrs.
Grid is also used to support running tests against multiple runtime environments, specifically, against different browsers at the same time. For example, a ‘grid’ of virtual machines can be set up with each supporting a different browser that the application to be tested must support. So, machine 1 has Google Chrome, machine 2, has Edge, and machine 3 has the latest Firefox. When the test suite is run, Selenium-Grid receives each test-browser combination and assigns each test to run against its required browser. Grid makes cross-browser and parallel testing very easy.
Selenium Grid modes
1. Standalone
The term “standalone” refers to the combination of all components that, in the view of the user, operate as if they were one. After launching it in Standalone mode, you’ll have a fully functional Grid of one.
Standalone is also the quickest way to get a Selenium Grid up and running. The server will be listening on http://localhost:4444 by default, and you should use that URL in your RemoteWebDriver tests. The server will look for available drivers in the System PATH and utilize them.
java -jar selenium-server-4.1.2.jar standalone
2. Hub and Nodes
It enables the classic Hub & Node(s) setup. These roles are suitable for small and middle-sized Grids.
Hub – A Hub is the union of the following components:
Router
Distributor
Session Map
New Session Queue
Event Bus
By default, the server will be listening on http://localhost:4444, and that’s the URL you should point your RemoteWebDriver tests.
java -jar selenium-server-4.1.2.jar hub
Node – One or more Nodes can be started in this setup, and the server will detect the available drivers that it can use from the System PATH.
Grid 4 has the ability to start Docker containers on demand, this means that it starts a Docker container in the background for each new session request, the test gets executed there, and when the test completes, the container gets thrown away.
To know the complete implementation of Selenium Grid4 with Docker, please refer to this tutorial – Selenium Grid 4 with Docker.
Implementation of Standalone Selenium Grid
Now, let us see how to run Selenium tests in Selenium Grid using the Standalone option.
Step 1 – Download driver.exe for the browsers
I have downloaded the driver.exe (chrome, gecko) in Downloads.
Step 2 – Download selenium-server jar
Go to Selenium Official website. Navigate to Downloads and it shows that the latest stable version of Selenium Grid is 4.3.0. Click on that and download the jar file. Make sure to keep the browsers.exe and selenium-server jar file in the same folder.
Step 3 – Execute selenium-server jar
Open a command line terminal. Use the below command to run selenium-server standalone jar files.
It’s optional to mention the port number at the end of the command. By default, it will use port 4444. It is good practice to mention the port at the end to avoid any conflict between the ports.
Step 4 – Add dependencies to the Maven project
Let us add the necessary dependencies to the pom.xml in the case of the Maven Project.
Creating an instance of the Remote WebDriver and passing the selenium endpoint and chrome options defined in it.
To run a Remote WebDriver client, we first need to connect to the RemoteWebDriver. We do this by pointing the URL to the address of the server running our tests. In order to customize our configuration, we set desired capabilities. Below is an example of instantiating a remote WebDriver object pointing to our remote web server running our tests on Chrome.
HelperClass
This class contains the initialization of the Remote web driver and the closing of the web driver.
import java.net.MalformedURLException;
import java.net.URL;
import java.time.Duration;
import org.openqa.selenium.By;
import org.openqa.selenium.WebDriver;
import org.openqa.selenium.chrome.ChromeOptions;
import org.openqa.selenium.remote.RemoteWebDriver;
import org.openqa.selenium.support.ui.ExpectedConditions;
import org.openqa.selenium.support.ui.WebDriverWait;
import org.testng.annotations.AfterMethod;
import org.testng.annotations.BeforeMethod;


public class HelperClass {

	protected static ThreadLocal<RemoteWebDriver> driver = new ThreadLocal<RemoteWebDriver>();
    public static String remote_url = "http://localhost:4446";

    @BeforeMethod
    public void setDriver() throws MalformedURLException {

        ChromeOptions options = new ChromeOptions();
        driver.set(new RemoteWebDriver(new URL(remote_url), options));
        driver.get().get("https://opensource-demo.orangehrmlive.com/");
        driver.get().manage().window().maximize();

        driver.get().manage().timeouts().pageLoadTimeout(Duration.ofSeconds(10));
        WebDriverWait wait = new WebDriverWait(driver.get(), Duration.ofSeconds(10));
        wait.until(ExpectedConditions.visibilityOfElementLocated(By.xpath("//*[@id='divUsername']/span")));
    }

    public WebDriver getDriver() {
        return driver.get();
    }

    @AfterMethod
    public  void closeBrowser() {
        driver.get().quit();
        driver.remove();
    }
}
Selenium4GridTest
This class contains all the tests like login test, invalid credential, verify heading of the login page, verify LinkedIn link on the login page, and verify the heading of Forgot Password page.
import static org.testng.Assert.assertEquals;
import static org.testng.Assert.assertTrue;
import org.openqa.selenium.By;
import org.testng.annotations.Test;

public class Selenium4GridTest extends HelperClass{

	    @Test
	    public void invalidCredentials() {

	        getDriver().findElement(By.xpath("//*[@id='txtUsername']")).sendKeys("1234");
	        getDriver().findElement(By.xpath("//*[@id='txtPassword']")).sendKeys("12342");
	        getDriver().findElement(By.xpath("//*[@id='btnLogin']")).click();
	        String actualErrorMessage = getDriver().findElement(By.xpath("//*[@id='spanMessage']")).getText();
	        System.out.println("Actual ErrorMessage :" + actualErrorMessage);
	        assertEquals(actualErrorMessage,"Invalid credentials");

	    }

	    @Test
	    public void loginPageHeading() {

	        String loginText = getDriver().findElement(By.xpath("//*[@id='logInPanelHeading']")).getText();
	        System.out.println("Actual loginText :" + loginText);
	        assertEquals(loginText,"LOGIN Panel");

	    }

	    @Test
	    public void forgotPasswordPageHeading()  {

	        getDriver().findElement(By.xpath("//*[@id='forgotPasswordLink']/a")).click();
	        String forgetPasswordTitle= getDriver().findElement(By.xpath(" //*[@id='content']/div[1]/div[2]/h1")).getText();
	        System.out.println("Actual Page Title of Forgot Password Page :" + forgetPasswordTitle);
	        assertEquals(forgetPasswordTitle,"Forgot Your Password?");
	    }

	    @Test
	    public void verifyLinkedIn() {

	        Boolean linkedInIcon = getDriver().findElement(By.xpath("//*[@id='social-icons']/a[1]/img")).isEnabled();
	        System.out.println("Actual linkedIn Text :" + linkedInIcon);
	        assertTrue(linkedInIcon);

	    }
	}
Step 6 – Create a testng.xml
It is very easy to create testng.xml for Eclipse IDE. Right-click on the project -> TestNG -> Convert to TestNG.
<?xml version="1.0" encoding="UTF-8"?>
<!DOCTYPE suite SYSTEM "https://testng.org/testng-1.0.dtd">
<suite name="Suite">
  <test thread-count="5" name="Test">
    <classes>
      <class name="org.example.Selenium4GridTest"/>
    </classes>
  </test> <!-- Test -->
</suite> <!-- Suite -->
Step 7 – Execute the tests through the command line
To run it from the command prompt, open a command prompt and go to the project and run the following command:
mvn clean test
Step 8 – Execute the tests from testng.xml
We can right-click on testng.xml, and select Run As -> TestNG Suite.
Step 9 – Navigate to the sessions tab on the Selenium Grid UI upon running the command.
It would reflect an active session.
Step 10 – Review the test execution result
The logs can be viewed in the command prompt as shown below:
Step 11 – TestNG Report Generation
TestNG generates the test reports in test-output folder.
We are interested in index.html report. This report contains various information, like time taken by each step in the test, time taken by each test, testng.xml, and number of tests passed or failed.
Emailable-Report.html
The output reports in TestNG reporting look like below as all tests are passed:
Congratulations!! We are able to run Selenium 4 tests on the new Selenium 4 Grid. Happy Learning!!