Security testing involves evaluating a computing system’s security features. This ensures they function properly. It also protects the application’s users and data.
Security testing is crucial in software testing. It helps identify security threats early. Addressing these threats resolves potential problems for you and your users.
In this article, we will discuss the basics of security testing in software testing. We will cover what it is and why it is important.
Security testing is a critical process in the software development lifecycle. It aims at identifying vulnerabilities in software applications and systems. It also focuses on mitigating these threats. The goal of the process is to discover potential security breaches, misconfigurations, and malicious code which could compromise the system. Security testing methods include penetration testing, vulnerability scanning, and code reviews.
Why Security Testing is Important?
1.Identify Vulnerabilities:Security testing helps detect vulnerabilities in software applications. These include weaknesses like SQL injection, cross-site scripting (XSS), and buffer overflow. It evaluates how well the application or system can withstand potential attacks and unauthorized intrusions.
2. Maintain User Trust: Implementing robust security testing helps build trust between users and organizations. Users are more likely to engage with platforms that demonstrate a strong commitment to data security and privacy.
3. Compliance and Legal Requirements: Organizations often need to comply with regulatory standards such as GDPR, HIPAA, or PCI DSS. Security testing helps ensure that systems adhere to these requirements and avoid legal repercussions. Example includes
The Payment Card Industry Data Security Standard (PCI DSS) for credit card data.
The System and Organization Controls 2 (SOC 2) for handling data stored in the cloud.
The Health Insurance Portability and Accountability Act (HIPPA) for safeguarding sensitive patient information.
4. Ensure Data Protection:Testing confirms whether sensitive data is properly protected against unauthorized access and data breaches. This includes evaluating encryption methods, data transmission security, and access controls.
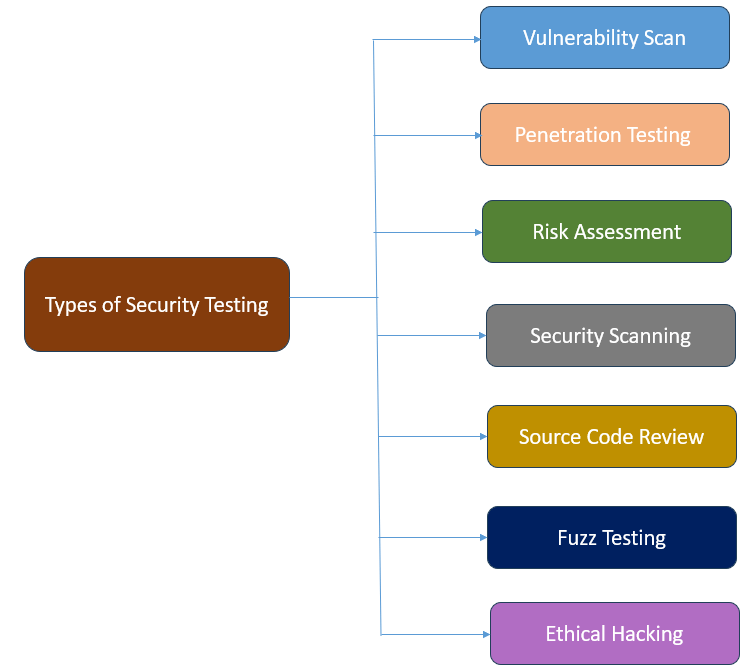
Types of Security Testing
1.Vulnerability Scan – Vulnerability scanning is the process of scanning software for known vulnerabilities or weaknesses. This type of testing involves using automated testing tools like Burp Suite, Open VAS, Acunetix and so on to identify potential security flaws in your software. Examples of such flaws include outdated software components, weak passwords, or insecure network configurations.
2. Penetration Testing – It takes the proactive approach of simulating real-world cyber attacks. Ethical hackers are employed to mimic the tactics of malicious actors. This provides valuable insights into the software’s strengths and weaknesses.
Penetration testers look out for vulnerabilities associated with authentication and authorization flaws. It also looks out for security weaknesses related to network configurations, such as open ports or unencrypted network traffic.
3. Risk Assessment – Risk assessment involves identifying potential threats to your software. It also involves assessing the likelihood and negative impacts of those threats. This type of testing typically involves analyzing the software’s architecture, design, and implementation. The goal is to identify potential security risks. Examples of these risks include data breaches, denial of service (DOS) attacks, or malware and viruses.
4. Security Scanning – Security scanning involves using automated tools to scan software for potential security vulnerabilities. These tools may include software or hardware-based scanners that can detect a wide range of security issues.
Security scanning may include tests for common vulnerabilities such as SQL injection, cross-site scripting (XSS), and buffer overflow attacks.
5. Source Code Review – The primary aim of source code review is to detect security flaws. It also identifies logical errors and vulnerabilities. This is done by manually or automatically examining the source code of the application. The review process often involves more than one person. Independent security experts, rather than the development team, usually conduct it. This way, the specialists can identify and report potential security and functional issues. As a result, the quality of the product and its security is improved.
6. Fuzz Testing – Fuzz testing is used to identify vulnerabilities, bugs, and security loopholes in software applications by inputting a large volume of random, unexpected, or invalid data into the application. The focus is on testing the application’s robustness and error-handling capabilities, often without knowledge of the source code.
7. Ethical Hacking – Ethical hacking is a cybersecurity practice where an authorized individual, known as an ethical hacker or a white-hat hacker, simulates potential attacks on a computer system or network. The primary aim is to identify and fix security vulnerabilities before malicious hackers can exploit them. Some of these vulnerabilities include phishing attacks, social engineering attacks, or physical security breaches.
Security testing in software development
Security testing can be effectively incorporated into different stages of the Software Development Lifecycle (SDLC):
Requirement Analysis – At this stage, security requirements should be identified, documented, and integrated into the project scope. Use threat modeling to anticipate potential security threats and define security controls needed to mitigate them.
Design Phase – Conduct security reviews of the design and architecture. Evaluate the architecture for security best practices like secure communication protocols, authentication mechanisms, and data encryption.
Development – Educate developers on secure coding practices, and include guidelines for writing secure code. Integrate Static Application Security Testing (SAST) tools to scan the code for vulnerabilities as it is being written.
Testing – Perform Dynamic Application Security Testing (DAST) on the running application to identify vulnerabilities. Conduct penetration testing to simulate real-world attacks and explore the application’s resilience.
Deployment: Ensure that the deployment environment is securely configured. Conduct security scanning and audits to verify the security posture of the application and its environment.
Maintenance: Regularly monitor, update, and re-assess the application for security vulnerabilities as new threats emerge. Perform periodic security audits and compliance checks to confirm ongoing adherence to security standards.
SQL injection vulnerabilities may affect any website or application that uses an SQL database. These databases include MySQL, Oracle, and SQL Server. Malicious actors may use them to gain unauthorized access to sensitive information. This can include customer information, personal data, and trade secrets.
Understanding SQLi’s particular vulnerability is vital for protecting your systems, products, and security infrastructure.
SQL injection is a security vulnerability. It allows an attacker to interfere with the queries an application makes to its database. Attackers can use SQL Injection vulnerabilities to bypass application security measures. They can go around authentication and authorization of a web page or web application and retrieve the content of the entire SQL database. It usually occurs when untrusted data is improperly sanitized and then inserted into a SQL query. This can lead to unauthorized viewing of data, deletion of data, or other harmful activities.
SQL Injection attacks are one of the oldest, most prevalent, and most dangerous web application vulnerabilities. The OWASP organization (Open Web Application Security Project) lists injections in their OWASP Top 10 2017 document as the number one threat to web application security.
How does SQL Injection works?
SQL injection typically occurs when user input is directly concatenated into a SQL query without proper validation or escaping.
Consequences of SQL Injection
1. Data Manipulation– Attackers can use SQL Injections to find the credentials of other users in the database. They can then impersonate these users. The impersonated user may be a database administrator with all database privileges.
2. Denial of Service (DoS) – Malicious queries can overload the database server. This results in a denial of service. It makes the application unresponsive to legitimate users.
3. Unauthorized Changes – SQL also lets you alter data in a database and add new data. For example, in a financial application, an attacker can use SQL Injection to alter balances. They void transactions or transfer money to their account.
4. Data Loss – You can use SQL to delete records from a database, even drop tables. Even if the administrator makes database backups, deletion of data could affect application availability until the database is restored.
5. Backup Corruption – Attackers may also tamper with backups, making data recovery extremely difficult after an attack.
6. Access to Operating System – Advanced SQL injection attacks can provide access to the underlying operating system, allowing attackers to execute system commands.
7. Regulatory Fines – Non-compliance with data protection regulations like GDPR, HIPAA, or CCPA due to data breaches can result in hefty fines.
SQL Injection Example
In-band SQLi (Classic) SQL Injection Example
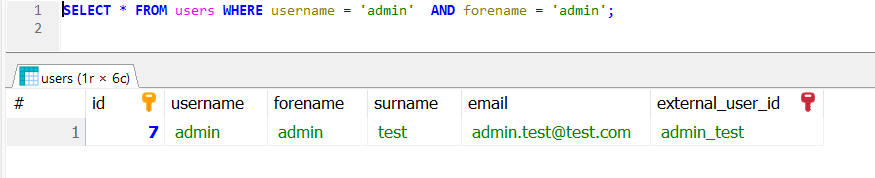
Below is a script in Java that tries to authenticate a user by querying the database:
String username = request.getParameter("username");
String forename = request.getParameter("forename");

String sql = "SELECT * FROM users WHERE username = '" + username + "' AND forename = '" + forename + "'";

Connection conn = DriverManager.getConnection(url, username, forename);
Statement stmt = conn.createStatement();
ResultSet result = stmt.executeQuery(sql);
if (result.next()) {
    // User is authenticated
    String status = result.getString("success");
    System.out.println("Login to the application");
} else {
    // Authentication failed
  System.out.println("Unable to Login");
}
Original SQL
SELECT * FROM users WHERE username = 'admin' AND forename = 'admin';
If a malicious user inputs the username as ‘admin’ — AND forename as ‘admin’ fields:
SELECT * FROM users WHERE username = 'admin' -- AND forename = 'admin';
The `—` is a comment marker in SQL, causing the rest of the query to be ignored. This effectively becomes:
SELECT * FROM users WHERE username = 'admin'
If there is a user with the username `admin`, the attacker would be logged in without providing the correct forename.
To prevent SQL injection, it is essential to use parameterized queries or prepared statements, which safely handle user input and separate SQL code from data.
String username = request.getParameter("username");
String forename = request.getParameter("forename");

String sql = "SELECT * FROM users WHERE username = ? AND forename = ?";

Connection conn = DriverManager.getConnection(url, username, forename);
PreparedStatement preparedStatement = conn.prepareStatement(sql);
preparedStatement.setString(1, username);
preparedStatement.setString(2, forename);
ResultSet result = preparedStatement.executeQuery();
if (result.next()) {
    // User is authenticated
       String status = result.getString("success");
       System.out.println("Login to the application");
} else {
    // Authentication failed
    System.out.println("Unable to Login");
}
In this example, the `?` placeholders are used in the SQL query, and setStringsafely assigns the user input to the query parameters, ensuring that special characters are correctly escaped and handled.
Example of a Union-Based SQL Injection
SELECT ProductName, ProductDescription, ProductCost
FROM Products
WHERE ProductId = '100' UNION SELECT Username, Password FROM Users;
Using the UNION SELECT statement, this query combines the request for item 100’s name and description and cost with another that pulls names and passwords for every user in the database.
Types of SQL Injection
SQL injections typically fall under three categories: In-band SQLi (Classic), Inferential SQLi (Blind) and Out-of-band SQLi.
In-band SQL Injection
In-band SQL injection is the most common type of attack. With this type of SQL injection attack, a malicious user uses the same communication channel for the attack. The same channel is used to gather results.
Error-based SQL Injection:This technique allows attackers to gain information about the database structure. They achieve this by using a SQL command to generate an error message from the database server. Error messages are useful during the development of a web application or web page. However, they can be a vulnerability later. This is because they expose information about the database. Attackers intentionally force the application to generate errors through malformed queries.
Union-based SQL injection: This technique involves attackers using the UNION SQL operator. They combine multiple select statements to return a single HTTP response. An attacker can use this technique to extract information from the database.
Inferential SQL Injection
Inferential SQL injection is also called blind SQL injection because the website database doesn’t transfer data to the attacker like with in-band SQL injection. Instead, a malicious user can learn about the structure of the server by sending data payloads and observing the response.
Boolean injection: With this technique, attackers send a SQL query to the database and observe the result. Using true/false statements to infer database information based on the application’s behavior.
Time-based injection: With this technique, attackers send a SQL query to the database. The query makes the database wait a specific number of seconds before responding. Attackers can determine if the result is true or false. They analyze how many seconds elapse before a response. For example, a hacker could use a SQL query. It commands a delay if the first letter of the first database’s name is A. Then, if the response is delayed, the attacker knows the query is true.
Out-of-Band SQL Injection
This type is less common but can be effective when other methods are not feasible. In this type of SQL injection attack, malicious users employ different communication channels. They use one channel for the attack and another to gather results. Attackers use this method if a server is too slow or unstable to use inferential SQL injection or in-band SQL injection.
Best Practices to Protect Your Database from SQL Injection
Install the latest software and security patches from vendors when available.
Conduct regular security testing, including penetration testing and code reviews, to identify and fix vulnerabilities before they are exploited
Always use prepared statements or parameterized queries that separate SQL code from data, ensuring user inputs are handled securely.
Configure error reporting instead of sending error messages to the client web browser.
Use stored procedures to build SQL statements with parameters that are stored in the database and called from the application.
Use allowlist input validation to prevent unvalidated user input from being added to query.
Welcome to the Security Testing on Web Application Quiz!
1) What is the primary goal of security testing in a web application?
a) To improve the user interface and user experience. b) To identify and mitigate security vulnerabilities within the application. c) To enhance the application’s performance and load times.
Answer 1
b) To identify and mitigate security vulnerabilities within the application.
2) What does the acronym ‘OWASP’ stand for?
a) Open Web Application Security Project b) Open Worldwide Application Security Protocol c) Offline Web Application Security Program d) Operational Web Application Safety Procedure
Answer 2
a) Open Web Application Security Project
3) Which of the following is a common method hackers use to find vulnerabilities in web applications?
a) Social engineering b) Penetration testing c) Phishing d) All of the above
Answer 3
d) All of the above
4) What is the primary goal of encryption in web applications?
a) To compress data b) To increase data integrity c) To secure data transmission and storage d) To improve server performance
Answer 4
c) To secure data transmission and storage
5) What is the main risk of using default configurations for web applications?
a) Performance degradation b) Increased vulnerability to attacks c) Incompatibility with browsers d) Accessibility issues
Answer 5
b) Increased vulnerability to attacks
6) What is the main function of a web application firewall (WAF)?
a) To block unauthorized access to the network b) To filter and monitor HTTP traffic between a web application and the Internet c) To encrypt data in transit d) To detect and remove malware from user devices
Answer 6
b) To filter and monitor HTTP traffic between a web application and the Internet
WAFs are designed to defend against a variety of attacks that aim to exploit vulnerabilities in web applications, including:
7) Which of the following HTTP headers is used to enhance security by declaring how browsers should handle site’s content?
a) Content-Type b) Strict-Transport-Security c) Content-Security-Policy d) Cache-Control
Answer 7
c) Content-Security-Policy
It helps to prevent various types of attacks such as Cross-Site Scripting (XSS), clickjacking, and other code injection attacks by restricting resources like scripts, styles, or media from being loaded from unauthorized sources.
8) What is a common result of a successful buffer overflow attack?
a) Data leakage b) Execution of arbitrary code c) Network eavesdropping d) Denial of service
Answer 8
b) Execution of arbitrary code
9) What does the term “privilege escalation” refer to in web application security?
a) The granting of highest-level access to all users b) An attacker obtaining unauthorized higher-level privileges c) The prioritization of security patches based on severity d) Increasing the complexity of user authentication mechanisms
Answer 9
b) An attacker obtaining unauthorized higher-level privileges
10) What is the function of the HttpOnly attribute in a cookie?
a) To ensure cookies are only transferred over HTTPS b) To limit cookies to the current session c) To prevent access to cookies via JavaScript d) To enable cross-domain cookie usage
Answer 10
c) To prevent access to cookies via JavaScript
11) Which of the following is implemented during secure session management to enhance security?
a) Storing sessions in browser local storage b) Terminating sessions after a period of inactivity c) Using random session IDs d) b and c
Answer 11
d) b and c
12) Which type of attack is mitigated by setting the Secure attribute on cookies?
a) Clickjacking b) SQL Injection c) Man-in-the-middle (MitM) attack d) Session hijacking over HTTP
Answer 12
2) Clickjacking
13) What type of attack exploits the trust a user has in a particular site?
a) Phishing b) SQL Injection c) Cross-Site Scripting (XSS) d) Cross-Site Request Forgery (CSRF)
Answer 13
d) Cross-Site Request Forgery (CSRF)
14) What is Cross-Site Request Forgery (CSRF)?
a) A method to steal user cookies b) A technique to redirect users to a malicious site c) An attack that tricks the victim into submitting a malicious request d) None of the above
Answer 14
c) An attack that tricks the victim into submitting a malicious request
15) Which security mechanism is designed to prevent CSRF (Cross-Site Request Forgery) attacks?
a) Input validation b) Use of CSRF tokens c) Secure cookies d) Output encoding
Answer 15
b) Use of CSRF tokens
16) What is Cross-Site Scripting (XSS)?
a) A scripting language for web development b) A technique to enhance website design c) An attack where malicious scripts are injected into web pages d) A secure communication protocol
Answer 16
c) An attack where malicious scripts are injected into web pages
17) Which of the following is NOT a type of cross-site scripting (XSS)?
a) Reflected XSS b) Stored XSS c) DOM-based XSS d) Injection XSS
Answer 17
d) Injection XSS
18) What is a potential risk associated with insecure file uploads on a web application?
a) Improved user experience b) Increased server performance c) Remote code execution d) Enhanced data integrity
Answer 18
c) Remote code execution
19) Which of the following is a best practice for password storage?
a) Storing passwords in plain text b) Encrypting passwords using symmetric key encryption c) Hashing passwords using a strong, one-way hashing algorithm with salt d) Using passwords only for trusted users
Answer 19
c) Hashing passwords using a strong, one-way hashing algorithm with salt
20) What is the primary purpose of HTTPS?
a) To redirect users to the correct webpage b) To improve website loading times c) To encrypt data transmitted between the user’s browser and the web server d) To block unwanted ads
Answer 20
c) To encrypt data transmitted between the user’s browser and the web server
21) Which HTTP header can be used to protect against clickjacking attacks?
a) Content-Security-Policy b) X-Frame-Options c) X-XSS-Protection d) Strict-Transport-Security
Answer 21
b) X-Frame-Options
22) What is the purpose of content security policy (CSP)?
a) To prevent data breaches b) To protect against XSS attacks c) To enforce secure password handling d) To block SQL injections
Answer 22
b) To protect against XSS attacks
23) Which protocol is designed to replace the widely exploited TELNET and offer encrypted communication?
a) HTTP b) SSH c) FTP d) SMTP
Answer 23
b) SSH
24) Which OWASP tool is used primarily for penetration testing of web applications?
a) OWASP ZAP b) Metasploit c) Nmap d) John the Ripper
Answer 24
a) OWASP ZAP
25) During a web application penetration test, what is the importance of session management testing?
a) To identify UI/UX issues b) To ensure efficient data processing c) To verify secure user session handling d) To optimize web server performance
Security Testing is a type of software testing that aims to identify and address vulnerabilities and threats in an application to ensure that its data and resources are protected against potential intrusions, misuses, and breaches. The primary goal of security testing is to ensure that the software is robust and secure from external and internal threats.
What is Security Testing in API?
API security testing is a process of evaluating API endpoints to identify and remediate vulnerabilities such as fuzzy input, parameter tampering, or injection attacks. Historically, this was done through penetration testing or manual scanning of the APIs by an enterprise security team. However, teams are shifting to running API security tests as part of the DevOps pipeline, ensuring that security issues are caught early in the development lifecycle.
Why Do You Need API Security Testing?
1. Protection of Sensitive Data – APIs often handle sensitive data, including personal information, financial data, and proprietary business information. Security testing helps ensure that this data is protected from unauthorized access, breaches, and leaks. Examples: Ensure data in transit is encrypted; prevent exposure of Personally Identifiable Information (PII)
2. Prevent Unauthorized Access: APIs typically serve as the gateway to an application’s backend and other critical infrastructure. Security testing helps to identify and mitigate flaws in authentication and authorization mechanisms, preventing unauthorized access. Examples: Ensuring proper use of API keys, tokens, and OAuth; verifying role-based access control (RBAC).
3. Ensuring Service Availability: Malicious actors can exploit vulnerabilities to launch Denial-of-Service (DoS) attacks, overwhelming your APIs and making them unavailable to legitimate users. Robust API penetration testing tools help uncover these weaknesses, allowing you to implement measures that prevent such attacks and ensure reliable service for your users.
4. Maintaining Compliance: Industrial regulations, such as HIPAA, GDPR, ISO, and SOX, mandate specific security controls during data handling. Failure to comply with such regulations due to API vulnerabilities can lead to hefty fines and legal liabilities. Security testing ensures that APIs comply with these regulatory requirements and avoid legal penalties. Examples: Encrypting sensitive data, maintaining proper access logs, and ensuring data integrity.
5. Prevent Injection Attacks: Injection attacks, such as SQL injection and command injection, can compromise the security of API endpoints and underlying systems. Security testing helps identify and remediate these vulnerabilities by validating input handling and data sanitization processes. Examples: Testing for SQL injection flaws; ensuring proper input validation.
6. Improving Stakeholder Trust: Customers and partners entrust the company with their data when they interact with their APIs. Regular security testing demonstrates your commitment to data protection, strengthening business relationships, and fostering customer confidence in your services.
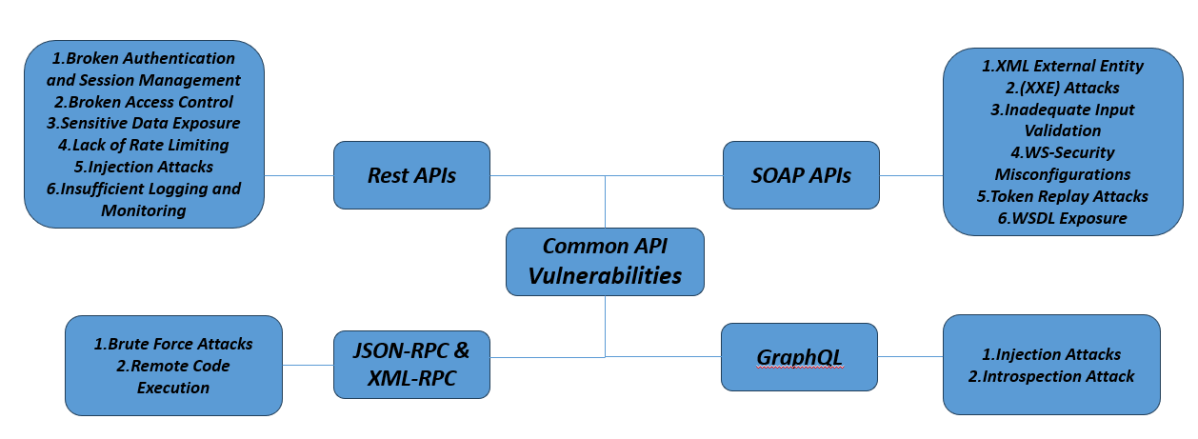
What are the common security vulnerabilities found in API?
Rest APIs
REST APIs or RESTful APIs are stateless APIs that use simple HTTP requests to access and use data. It is one of the most used types of API due to its simplicity and flexibility of implementation in any language.
Common Vulnerabilities in REST APIs
1. Broken Authentication and Session Management: Weak authentication mechanisms can lead to unauthorized access. Use of tokens and proper handling of sessions is crucial.
2. Broken Access Control: Insufficient enforcement of user permissions can lead to unauthorized access to endpoints. Implement role-based access control (RBAC) and least privilege principle.
3. Sensitive Data Exposure: Failure to encrypt sensitive data both in transit and at rest. Use HTTPS, encrypt sensitive data and avoid exposing unnecessary data in API responses.
4. Lack of Rate Limiting: Failure to implement request throttling can result in Denial of Service (DoS) attacks. Implement rate limiting and quotas to control abuse.
5. Injection Attacks: Attackers insert malicious code into the requests to manipulate the APIs’ intended behavior. SQL Injection, Host-Header Injection, and Command Injection are some of the most common attacks.
6. Insufficient Logging and Monitoring: Lack of proper logging mechanisms can lead to undetected security incidents. Enforce comprehensive logging and monitoring for suspicious activities.
SOAP APIs
SOAP, or Simple Object Access Protocol, uses XML-based messaging to transfer data between the client and server.
Common Vulnerabilities in SOAP APIs
1. XML External Entity (XXE) Attacks: An attacker can manipulate XML data to exploit vulnerabilities in the XML parsers. Disable DTDs (Document Type Definitions) and external entity references.
2. Inadequate Input Validation:SOAP messages may not be thoroughly checked for integrity. Validate and sanitize all incoming XML content.
3. WS-Security Misconfigurations:Weak or improperly configured WS-Security policies can lead to security lapses. Ensure robust WS-Security configurations including encryption and digital signatures.
4. Token Replay Attacks:Reuse of tokens for unauthorized API requests. Implement mechanisms to detect and prevent token reuse, such as timestamps and nonces.
5. WSDL Exposure: If the WSDL file is exposed to the attackers, they can view detailed information about the API structure and operations, allowing them to craft more targeted attacks.
JSON-RPC and XML-RPC
JSON-RPC and XML-RPC are remote call protocols that use JSON and XML, respectively, to communicate between the client and the server. They send an HTTP request to a server that implements RPC and receives an HTTP response.
Common Vulnerabilities in JSON and XML RPC:
1. Brute Force Attacks: These attacks involve attempting various combinations of user credentials to gain unauthorized access. XML-RPC can be easily leveraged as an entry point for attacks and can execute multiple login attempts rapidly, leading to brute-force attacks.
2. Remote Code Execution: In this attack, attackers can execute malicious code on the server from a remote connection.
GraphQL
GraphQL is a flexible and efficient query language for APIs. It allows the client side to request the exact amount of data required to reduce data over- and underfetching.
Common Vulnerabilities Found in GraphQL APIs
1. Injection Attacks: Attackers insert malicious code into the requests to manipulate the APIs’ intended behavior. SQL Injection, Host-Header Injection, and Command Injection are some of the most common attacks.
2. Introspection Attack: It exploits an API’s introspection endpoint to gather information about access tokens, exposing sensitive details that attackers can use to compromise security. Introspection endpoints are designed to validate and retrieve metadata about tokens, such as their scopes, expiration, and the user they represent. If improperly secured, attackers can leverage them to gain unauthorized access or manipulate token data.
Types of API Security Testing
Dynamic API Security Tests
Dynamic API Security Testing involves testing the security of APIs during runtime. It dynamically interacts with the API, sends various requests with different payloads, and observes how the API behaves under different conditions to identify security vulnerabilities.
Running a dynamic API security test simulates an actual API-based attack and surfaces vulnerabilities introduced from both open-source dependencies and the code your team wrote.
OWASP ZAP (Zed Attack Proxy) – It is an open-source web application security scanner designed to find vulnerabilities in web applications and APIs.
Burp Suite – It is a comprehensive web vulnerability scanner that supports both automated and manual testing. It is used for the advanced scanning for API vulnerabilities and support for GraphQL, SOAP, and REST APIs.
SQLMap – It is an open-source penetration testing tool for automating SQL injection detection and exploitation. It supports various types of SQL injection attacks.
Static API Security Tests
Static analysis security testing tools look at the source code of the application to identify potential vulnerabilities. This form of testing looks for patterns in the code that represent potential security concerns. These tools are language-dependent, meaning you have to use a static tool that matches the language your API is written in.
SonarQube – It is an open-source platform that inspects code quality and security.
Checkmarx – It is a comprehensive static application security testing tool that focuses on security vulnerabilities.
Fortify Static Code Analyzer (SCA) – It is a static analysis tool by Micro Focus that identifies security vulnerabilities in source code.
Software Composition Analysis
Software Composition Analysis (SCA) tools look at the dependency tree of your application and match this against a database of known vulnerabilities. Using these tools, you would be alerted if your application or API uses a library or framework with a known vulnerability. With the ever-increasing use of open source in API development, these tools are essential to include in security testing. The limitations of SCA tools are that (1) they generally do not surface if the vulnerability is actually exploitable within your API, and (2) they only capture open-source vulnerabilities, not security bugs your team may have introduced.
Black Duck by Synopsys – Comprehensive SCA tool that identifies open-source components, assesses vulnerabilities, and manages license compliance.
Snyk – Developer-friendly tool that integrates with CI/CD pipelines to detect and fix open-source vulnerabilities in dependencies.
WhiteSource – Tool focused on managing open-source components, identifying vulnerabilities, and ensuring license compliance.
Security Quiz – You can test your knowledge with this Security Testing.
1. What is the primary goal of security testing in API testing?
a) To ensure the API functions as expected b) To verify the API’s security features against potential vulnerabilities c) To check API response times d) To test the user interface of the API
Answer 1
b) To verify the API’s security features against potential vulnerabilities
2. Which of the following is a common security vulnerability in APIs?
a) SQL Injection b) Cross-Site Scripting (XSS) c) Cross-Site Request Forgery (CSRF) d) All of the above
Answer 2
d) All of the above
3. Which attack can occur if an API does not properly validate user inputs?
a) Cross-Site Scripting (XSS) b) Denial of Service (DoS) c) SQL Injection d) Both a and c
Answer 3
d) Both a and c
4. What type of vulnerability can occur if an API leaks sensitive information in error messages?
a) Data Injection b) Information Disclosure c) XML External Entity (XXE) d) Broken Object Level Authorization (BOLA)
Answer 4
b) Information Disclosure
5. Which of these is a common tool used for API security testing?
a) Postman b) Burp Suite c) Swagger d) Selenium
Answer 5
b) Burp Suite
6. Which of the following is NOT a common security mechanism used for APIs?
a) OAuth b) JWT (JSON Web Token) c) SSL/TLS d) XML Parsing
Answer 6
d) XML Parsing
7. What does the term “Rate Limiting” refer to in API security?
a) The process of limiting the number of API requests a user can make within a specified time period b) The restriction of access to a specific set of users based on their IP address c) The process of allowing only authenticated users to access the API d) The encryption of data being sent in API requests
Answer 7
a) The process of limiting the number of API requests a user can make within a specified time period
8. What is the primary purpose of using an API token for authentication?
a) To ensure that the API request is coming from a valid user or system b) To speed up the API response c) To make the API endpoint accessible to everyone d) To increase the load on the server
Answer 8
a) To ensure that the API request is coming from a valid user or system
9. What is the best practice to prevent SQL Injection in API testing?
a) Allowing raw user inputs in the SQL queries b) Using parameterized queries or prepared statements c) Relying only on the database’s built-in security d) Allowing all API inputs
Answer 9
b) Using parameterized queries or prepared statements
10. Which of the following is a technique for testing the authorization of API access?
a) Testing if an API endpoint allows unauthenticated requests b) Testing the validity of an API token c) Ensuring that API responses include proper status codes for unauthorized access (e.g., 401, 403) d) All of the above
Answer 10
d) All of the above
11. What is the significance of encryption in API security?
a) To ensure data integrity by verifying the data is not tampered with b) To ensure data is securely transmitted and cannot be easily read by unauthorized users c) To speed up the API response d) To allow multiple API users to access the same data
Answer 11
b) To ensure data is securely transmitted and cannot be easily read by unauthorized users
12. Which of the following API security measures helps in protecting sensitive data during transmission?
a) Use of HTTPS b) IP Whitelisting c) User Authentication d) Query String Parameters
Answer 12
a) Use of HTTPS
13. What type of attack does Cross-Site Request Forgery (CSRF) typically target in API security?
a) It exploits the trust that a site has in the user’s browser b) It targets the API endpoint to inject malicious code c) It exploits weaknesses in the client-side JavaScript d) It bypasses authentication mechanisms
Answer 13
a) It exploits the trust that a site has in the user’s browser
14. Which method is commonly used to protect sensitive data in APIs during storage?
a) Encryption b) Caching c) Compression d) Rate Limiting
Answer 14
a) Encryption
15. What type of API attack involves sending malicious code through input fields to compromise the server or database?
a) Cross-Site Scripting (XSS) b) SQL Injection c) Man-in-the-Middle (MitM) d) DoS (Denial of Service)
Answer 15
b) SQL Injection
16. Which of the following is a valid security mechanism to prevent API key theft?
a) Store the API key in a local text file b) Use secure methods like OAuth for authentication c) Embed API keys directly in the frontend JavaScript code d) None of the above
Answer 16
b) Use secure methods like OAuth for authentication
17. What is Broken Object Level Authorization (BOLA)?
a) An attack that exploits poor input validation b) A vulnerability where users can access objects they are not authorized to view c) A flaw in API rate limiting implementation d) A security gap caused by misconfigured SSL/TLS settings
Answer 17
b) A vulnerability where users can access objects they are not authorized to view
18. What does the term API spoofing refer to in security?
a) Manipulating API responses to deceive users b) Impersonating a legitimate user or system to gain unauthorized access c) Intercepting API requests and altering data during transmission d) Exploiting an API vulnerability to crash the server
Answer 18
b) Impersonating a legitimate user or system to gain unauthorized access
19. Which of the following is a best practice for securing API endpoints?
a) Using a single access key for all users b) Applying security measures such as authentication, encryption, and authorization for every API request c) Allowing unlimited access to the API without any restrictions d) Not validating input from users
Answer 19
b) Applying security measures such as authentication, encryption, and authorization for every API request
20. Which of the following is an example of an insecure API design practice?
a) Using secure, token-based authentication (OAuth) b) Storing API keys in a public GitHub repository c) Encrypting sensitive data in transit d) Implementing rate limiting
Answer 20
b) Storing API keys in a public GitHub repository
21. What is the primary function of OAuth in API security?
a) To enable public access to APIs b) To authenticate and authorize users securely for API access c) To protect the API server from being overloaded d) To validate data inputs
Answer 21
b) To authenticate and authorize users securely for API access
22. Which HTTP status code indicates that a client is not authorized to access a resource?
a) 200 OK b) 401 Unauthorized c) 500 Internal Server Error d) 404 Not Found
Answer 22
b) 401 Unauthorized
23. Why is it essential to validate API responses?
a) To minimize bandwidth usage b) To detect unauthorized data leakage c) To ensure API compatibility with browsers d) To verify that the API uses REST principles
Answer 23
b) To detect unauthorized data leakage
24. What type of API attack involves overwhelming the server with a massive number of requests?
a) SQL Injection b) XML Injection c) Denial of Service (DoS) d) Man-in-the-Middle (MITM)
Answer 24
c) Denial of Service (DoS)
25. What is the purpose of using CORS (Cross-Origin Resource Sharing) in API security?
a) To block all external access to APIs b) To prevent unauthorized domains from accessing API resources c) To speed up API communication d) To allow unrestricted access to API endpoints
Answer 25
b) To prevent unauthorized domains from accessing API resources
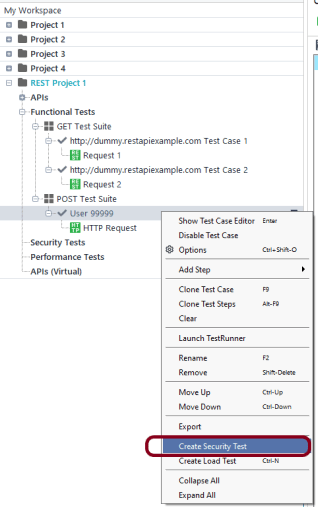
The previous tutorial has explained the creation of a new Security Test. This tutorial explains the process to create a Security test from the existing Functional Test.
Steps to be followed to create a security test from a functional test case:
Create the Security Test from Functional Test
Run the Security Test
Analyse Security Test Results
Generation of Security Test Report
Sample Test Report
Analyse Security Test Report
Create the Security Test from Functional Test
Step 1 – Right-click the test case present under Functional Tests in the Navigator and select Create Security Test.
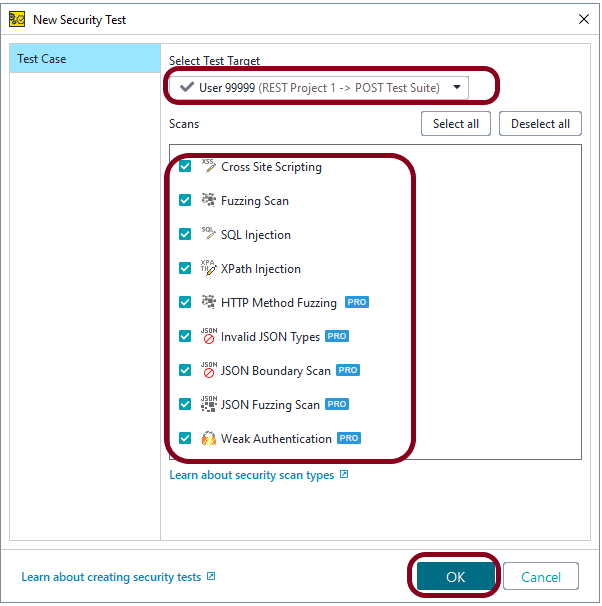
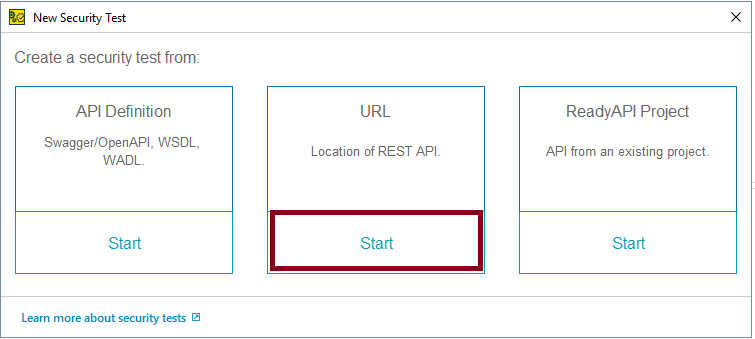
Step 2 – Click Select Test Target. Select the test case you want to apply the security scan to. All the applicable scans are selected by default
Leave the scans you want to have in your test checked and uncheck the other scans.
There is a list of Scans, you can select either one scan or multiple scans. I have selected all the scans.
Boundary Scan
Cross Site Scripting
Fuzzing Scan
Invalid Types
SQL Injection
XPath Injection
HTTP Method Fuzzing
Sensitive Files Exposure
Weak Authentication
Click the OK button.
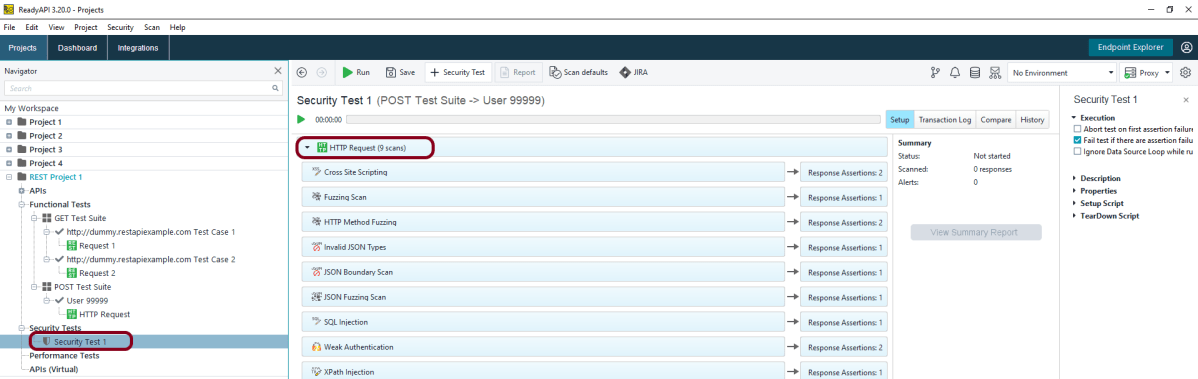
Step 3 – This screen shows all the scans added to the Security Test.
Run the Security Test
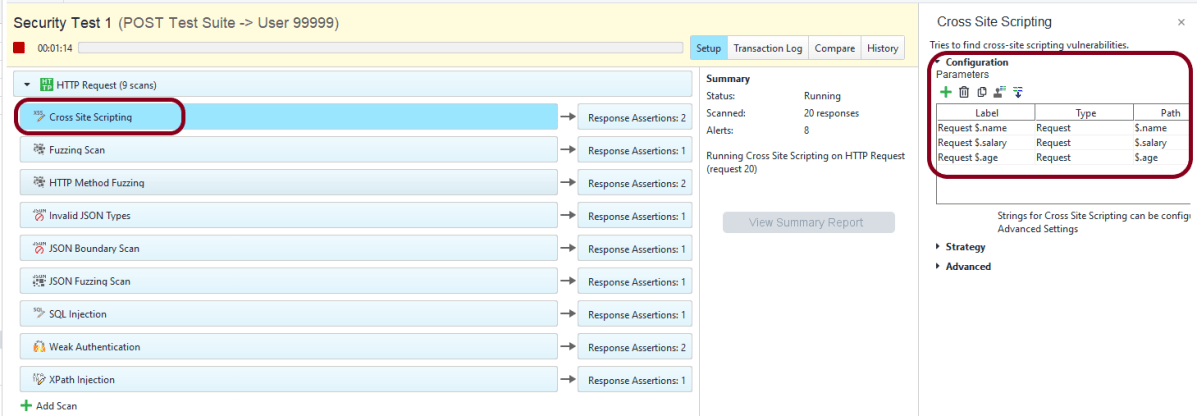
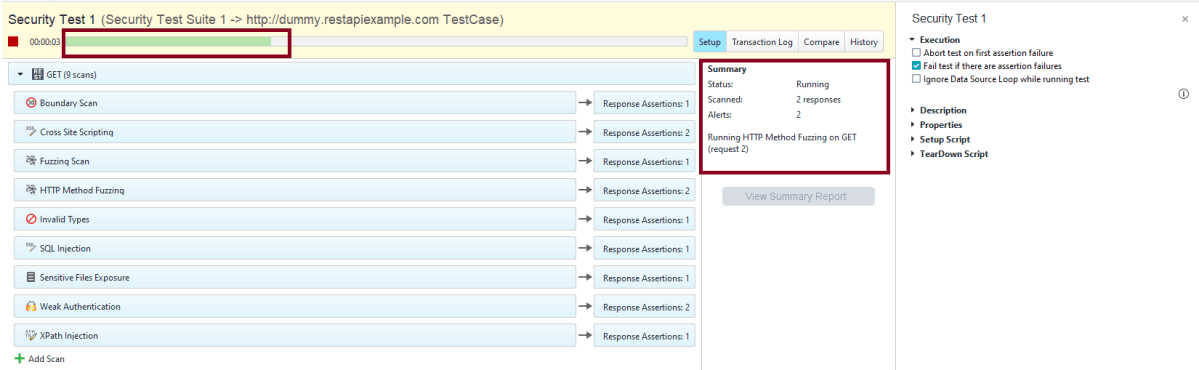
Step 4 – Click the Green arrow “Run” to start the test.
Step 5 – ReadyAPI will start sending modified requests and checking responses.
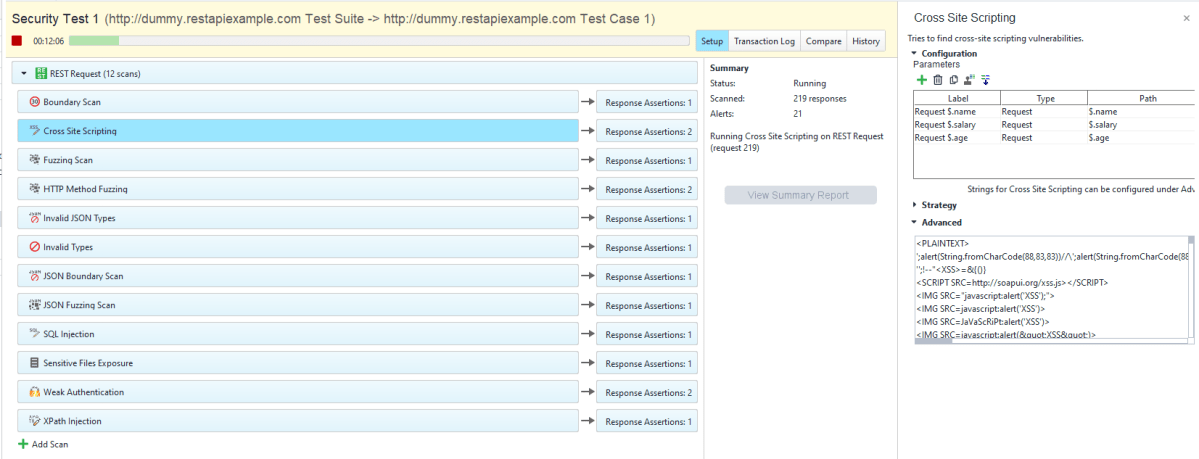
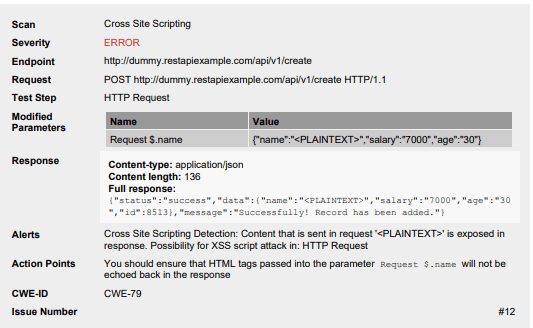
Step 6 – The security test window shows the progress of each test step and matching security scans. This screen shows all the configurations of Cross Site Scripting. Similarly, all the scans have their own in-built configurations.
Analyse Security Test Results
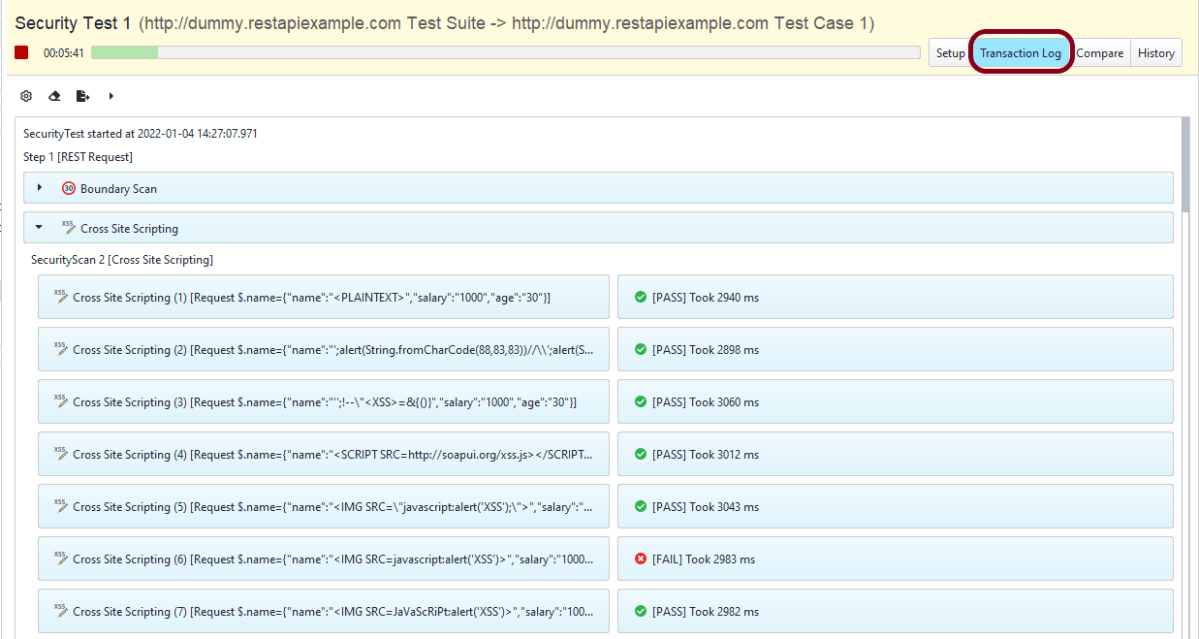
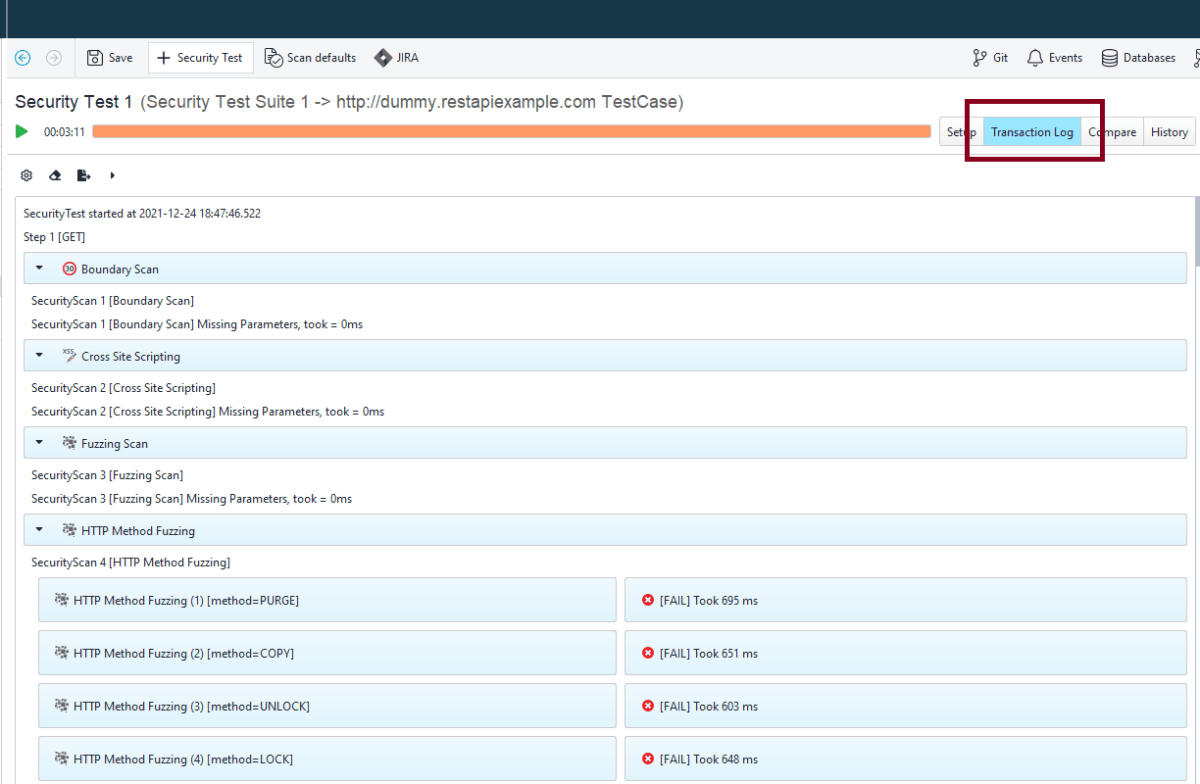
Step 7 – The Transaction Log shows additional information about security scans.
Step 8 – The details of a particular request or response are available in the inspector.
The Setup pane contains the detail about the configuration used for the tests.
Generation of Security Test Report
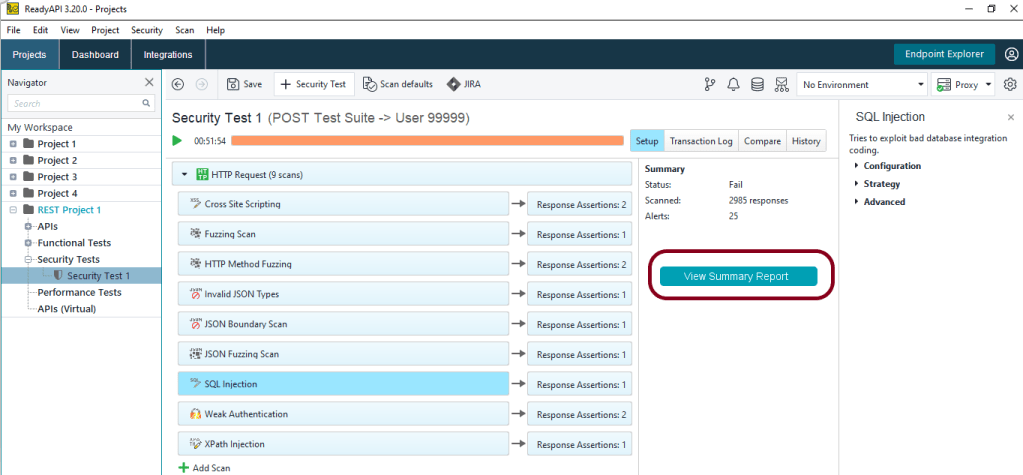
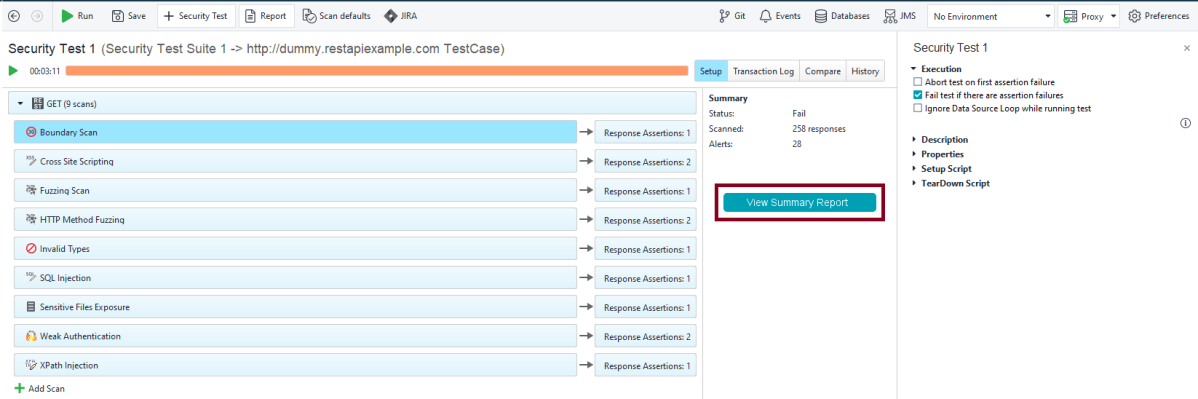
Step 9 – After the security test run finishes, click View Summary Report:
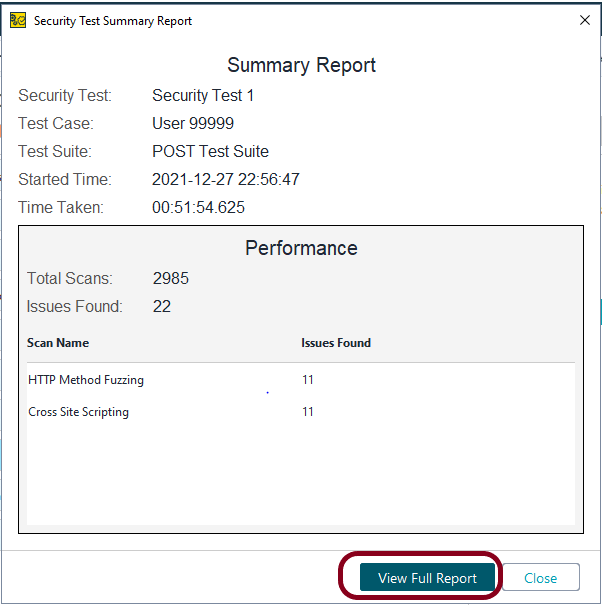
Step 10 – In the dialog that appears, click View Full Report.
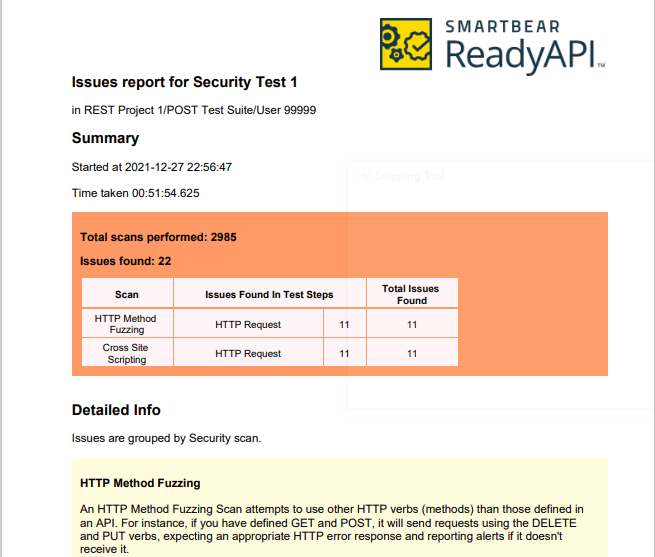
Step 11 – After that, ReadyAPI will open the report in the default PDF viewer.
Sample Test Report
Analyse Security Test Report
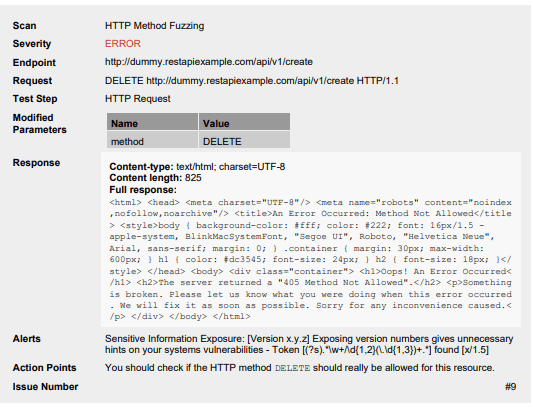
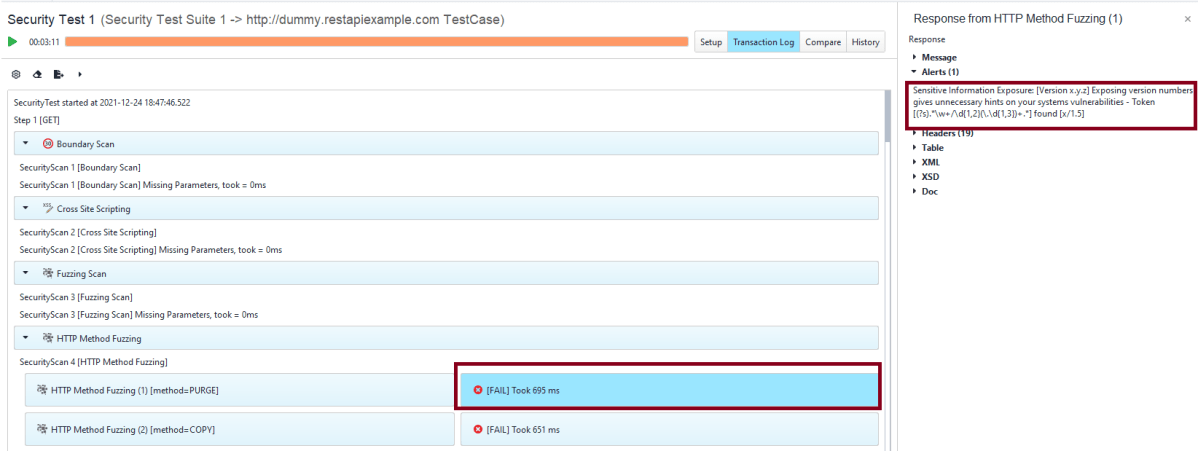
Step 12 – Example of HTTP Method Fuzzing
Example of Cross Site Scripting
Congratulations!! We have successfully created the Security Test from the Functional Test. We are also run the test and generated the Security Test Report also. That’s a great accomplishment.
Security tests in ReadyAPI include various types of security scans. Each of them detects a specific vulnerability. With multiple security scans in one test, you guarantee your service is well-protected against possible attacks.
This tutorial explains the steps to create the Security tests in ReadyAPI.
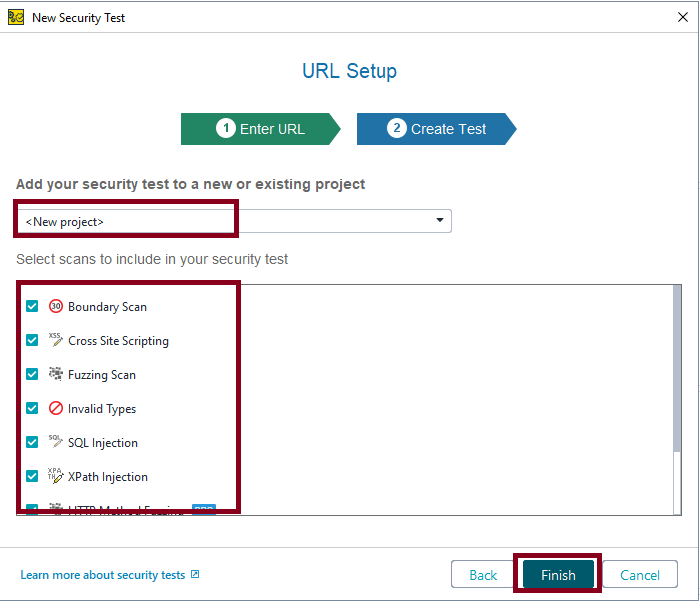
Step 4 – Select the scans you need and click the Finish button.
Another thing to keep in mind is to select whether you want to create a new project or add the test to an existing project. Here, I’m creating a new project.
There is a list of Scans, you can select either one scan or multiple scans. I have selected all the scans.
Boundary Scan
Cross Site Scripting
Fuzzing Scan
Invalid Types
SQL Injection
XPath Injection
HTTP Method Fuzzing
Sensitive Files Exposure
Weak Authentication
Run the Security Tests
Step 5 – We have created a security test. ReadyAPI will offer you to run the security test immediately or edit it before running. We do not need to configure anything, so select the Run Security Test option.
If you want to edit the test before running it, then select the Edit Security Test option.
Step 6 – ReadyAPI will start sending modified requests and checking responses.
The security test window shows the progress of each test step and matching security scans:
The Summary pane contains a short overview of the currently running security test.
Step 7 – After the security test run finishes, click View Summary Report:
Analyse Security Test Results
Step 8 – The Transaction Log shows additional information about security scans.
Step 9 – The details of a particular request or response are available in the inspector.
Generation of Security Test Report
Step 10 – In the dialog that appears, click View Full Report:
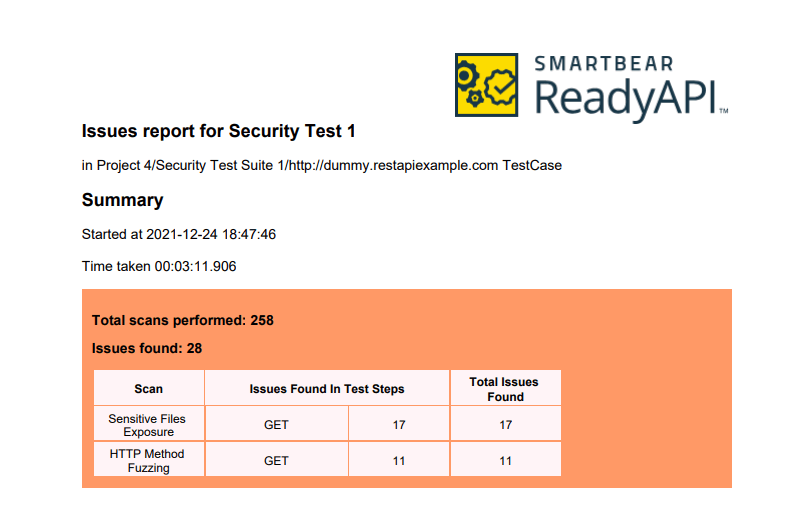
After that, ReadyAPI will open the report in the default PDF viewer.
This Summary Report shows there was a total of 258 scans and 28 issues are found. Out of 28 issues, 17 issues were Sensitive Files Exposure, and 11 issues are HTTP Method Fuzzing.
Sample Test Report
Analyse Security Test Report
Step 12 – Sensitive Files Exposure
Example of HTTP Method Fuzzing
Congratulations!! We have successfully created a Security test, run it as well as generating the Test Report, and analyzed the result too. Cheers!!!
ReadyAPI is an easy-to-use no-code API Testing platform designedto streamline your testing workflows. Automate and scale your end-to-end tests across multiple API types. Run compatible load tests against your functional tests. Enable virtualization to ensure fast and reliable integrations for your development teams.
ReadyAPI allows teams to create, manage, and execute automated functional, security, and performance tests in one centralized interface – accelerating API quality for Agile and DevOps software teams. It allows importing API definitions like OpenAPI/Swagger or AsyncAPI, testing and recording live API traffic, or virtualizing web services to remove pipeline dependencies.
ReadyAPI is handled by SmartBear. ReadyAPI is not an open source tool, but a licensed tool.
In ReadyAPI, We can easily manage our APIs and project. We can easily create APIs from an openAPI, Swagger, WSDL, and WADL definition and use Discovery to record API requests and methods.
Step 2 – Before starting the installation, please check the system requirements for ReadyAPI.
Step 3 – As ReadyAPI is a licensed tool, but it also provides a trial version as well as commercial Pro License.
If you want to go for the trial version, fill in the details on this page and get Free Trial.
If you have license, then download the installer for your platform from the ReadyAPI Downloads Center.
I have a license, so will download ReadyAPI Desktop 3.20.0 (Windows Installer 64-bit).
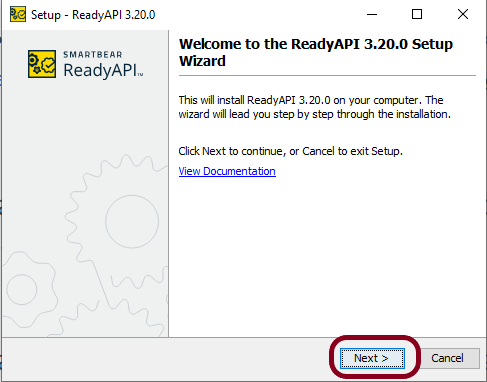
Step 4 – Once the download is completed, run the installer. The installer will unpack the files and prepare them for installation:
Step 5 – Click the Next button to proceed with the installation:
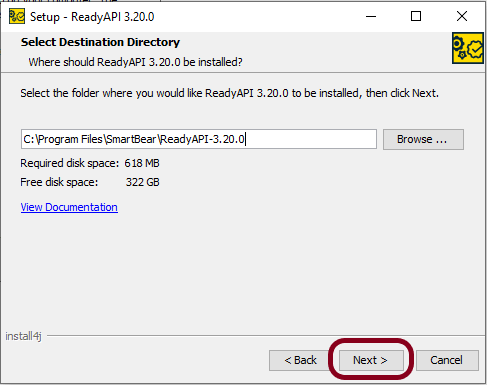
Step 6 – If you install ReadyAPI for the first time or have chosen to install it to a different directory, the wizard will ask you to specify the installation folder:
Step 7 – This image shows that installation is in progress.
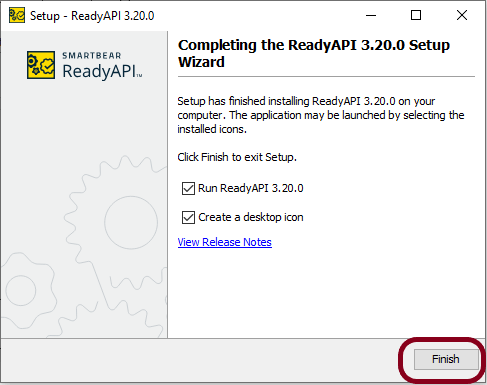
Step 8 – When the installation is complete, you can select the Run ReadyAPI check box to run ReadyAPI upon closing the wizard. You can also select the Create a desktop icon check box to create a desktop icon for ReadyAPI. Click the Finish button.
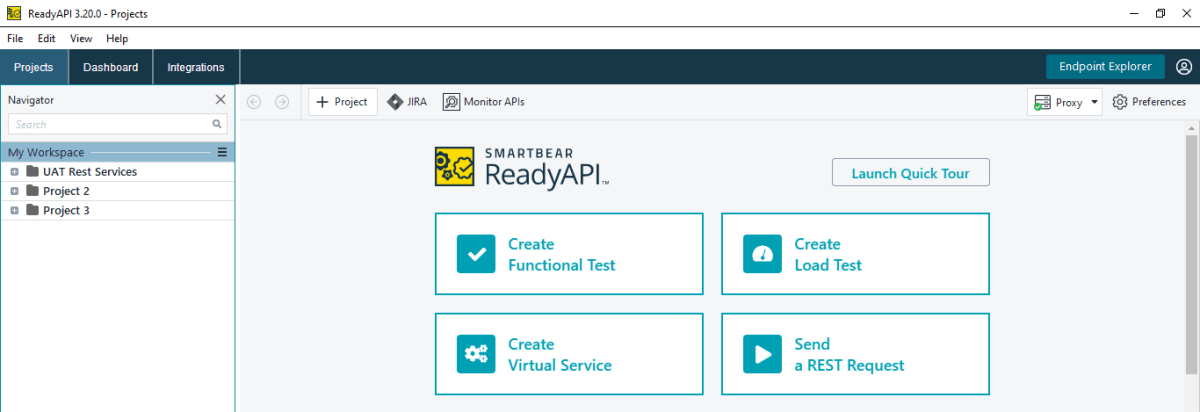
Step 9 – Once the installation is successfully completed, ReadyAPI will open, and it will look like something as in the below image.
We are done! Congratulations on making it through this tutorial and hope you found it useful! Happy Learning!!