Pytest is a versatile testing framework in Python. It can be used for various types of testing, like REST API testing. In this tutorial, we will test Rest API in PyTest Framework.
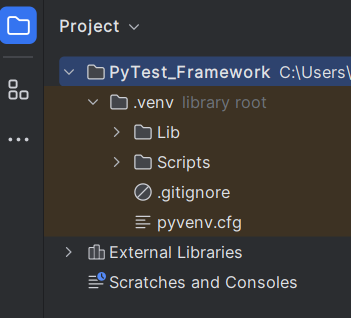
2.1 Create a new project folder and open it in PyCharm.
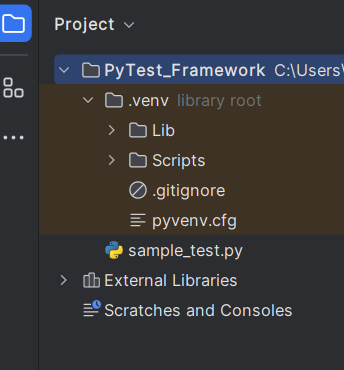
2.2 – Go to the project folder and create a new python file – test_restapi.py.
2.3 – Add requests package to the PyCharms
Go to File->Settings ->Project: PyTest_Framework->Python Interpreter.
Click on the “+” sign and enter allure-r in the search bar. It will show a list of packages. Select the “requests” package and click on the “Install Package”.
Once the package is installed, we will see the message that the package is installed successfully.
Welcome to the Robot Framework Quiz! This blog post features 25 multiple-choice questions that explore concepts of Robot Framework.
1. Which command line tool is used to execute Robot Framework tests?
Select the best answer
a) robot b) run_rf c) test_execute d) execute_robot
Answer 1
a) robot
2. Which configuration is used to define test setup and teardown in Robot Framework?
Choose one option
a) Test Configuration b) Test Fixture c) Suite Setup d) Keyword Setup
Answer 2
c) Suite Setup
*** Settings ***
Documentation       Tests to login to Login Page
Library     SeleniumLibrary
Test Setup      Open the Browser with URL
Test Teardown   Close Browser Session
Resource       ../Resources/GenericResources.robot
3. Robot Framework is built on top of which programming language?
Choose one option
a) Python b) JavaScript c) C# d) PHP
Answer 3
a) Python
Robot Framework is primarily implemented using Python, and it relies on Python libraries for its functionality. It also allows for creation of test libraries using Python.
4. What is the name of the tool provided by Robot Framework to execute test cases?
Choose one option
a) Test Runner b) RobotExecutor c) Pybot d) RIDE
Answer 4
c) Pybot
5. Which command is used to install Robot Framework using pip?
Choose one option
a) pip install robot b) pip install robotframework c) pip install robotframework-core d) pip install robotframework-tools
Answer 5
pip install robotframework
6. In which format are the test results generated by Robot Framework by default?
a) PDF b) Excel c) HTML d) JSON
Answer 6
c) HTML
7. How do you write a comment in a Robot Framework test case file?
a) // This is a comment b) # This is a comment c) % This is a comment d) Comment This is a comment
Answer 7
b) # This is a comment
8. What is the purpose of the RequestsLibrary in Robot Framework?
Choose one option
a) To provide keywords for database operations b) To provide keywords for web testing c) To provide keywords for file operations d) To provide keywords for REST API testing
Answer 8
d) To provide keywords for REST API testing
The RequestsLibrary in Robot Framework provides keywords for testing REST APIs. It supports making HTTP requests and validating responses using different methods.
9. What is the purpose of the DatabaseLibrary in Robot Framework?
Choose one option
a) To provide keywords for database operations b) To provide keywords for web testing c) To provide keywords for file operations d) To provide keywords for REST API testing
Answer 9
a) To provide keywords for database operations
The DatabaseLibrary in Robot Framework provides keywords for database testing. It supports connecting to different types of databases and executing SQL queries.
10. What is the purpose of the Collections library in Robot Framework?
Choose one option
a) To provide keywords for manipulating collections b) To provide keywords for web testing c) To provide keywords for file operations d) To provide keywords for REST API testing
Answer 10
a) To provide keywords for manipulating collections
The Collections library in Robot Framework provides keywords for manipulating different types of collections like lists, dictionaries, and sets.
11. What is the purpose of the Requests library in Robot Framework?
Choose one option
a) To provide keywords for interacting with HTTP services using the Requests library b) To provide keywords for web testing c) To provide keywords for file operations d) To provide keywords for REST API testing
Answer 11
a) To provide keywords for interacting with HTTP services using the Requests library
The Requests library in Robot Framework provides keywords for interacting with HTTP services using the Requests library. It supports sending HTTP requests and receiving HTTP responses.
12. What is the purpose of the AppiumLibrary in Robot Framework?
Choose one option
a) To provide keywords for mobile app testing using Appium b) To provide keywords for web testing using Selenium c) To provide keywords for file operations d) To provide keywords for REST API testing
Answer 12
a) To provide keywords for mobile app testing using Appium
The AppiumLibrary in Robot Framework provides keywords for mobile app testing using Appium. It supports automating mobile apps on different platforms.
13. What is the purpose of the “Documentation” keyword in Robot Framework test cases?
Choose one option
a) To execute a test case b) To import a module c) To provide an explanation of the test case d) To declare a variable
Answer 13
c) To provide an explanation of the test case
14. Which file generated by Robot Framework provides a high-level overview of the test execution results?
Choose one option
a) Log.html b) Output.xml c) Report.html d) Summary.txt
Answer 14
c) Report.html
15. In Robot Framework, which file contains detailed information about each step of the test execution?
Choose one option
a) Log.html b) Output.xml c) Report.html d) DetailedLog.html
Answer 15
a) Log.html
16. Which of the following assertion levels is captured by default in Robot Framework logs?
Choose one option
a) DEBUG b) TRACE c) INFO d) WARNING
Answer 16
c) INFO
17. What is the command to run a Robot Framework test file named `test.robot` using Python?
Choose one option
a) python -m test.robot b) python robot.run test.robot c) robot test.robot d) python -m robot test.robot
Answer 17
c) robot test.robot
18. Robot Framework supports parallel testing?
Choose one option
a) Yes b) No
Answer 18
a) Yes
19. Which tool is commonly used to enable parallel execution of Robot Framework test cases?
a) RobotIDE b) Selenium Grid c) Pabot d) Pybot
Answer 19
c) Pabot
Pabot is a parallel test runner for Robot Framework. It can be used to run tests in parallel on a single machine with multiple processes.
20. To run tests in parallel, the test cases in Robot Framework must be:
Choose one option
a) Written in a single file b) Independent of each other c) Using only one library d) Sequentially organized
Answer 20
b) Independent of each other.
21. In Pabot, how can you separate test cases logically for parallel execution?
a) Cluster by keyword usage b) Group using tags c) Divide based on file size d) Merge test data files
Answer 21
b) Group using tags
22. Which command is used to solely convert an `Output.xml` file to a log and report?
a) robot –relog Output.xml b) rebot –recreate Output.xml c) rebot Output.xml d) robot –convert Output.xml
Answer 22
c) rebot Output.xml
23. How can you disable the generation of the report file in Robot Framework?
a) Use the option –no-report b) Use the option –disable-report c) Use the option –skip-report d) Use the option –report NONE
Answer 23
d) Use the option –report NONE
24. What is the purpose of the Faker library in Robot Framework?
a) To generate random test data b) To provide keywords for web testing using Selenium c) To provide keywords for file operations d) To provide keywords for mobile app testing using Appium
Answer 24
a) To generate random test data
25. Can we run Robot Framework tests in CI/CD pipeline?
a) Yes b) No
Answer 25
a) Yes
We would love to hear from you! Please leave your comments and share your scores in the section below
A response code indicating the status of the request (e.g., 200 OK, 404 Not Found). The status code that the server returns tells us whether the request was successful or not. If the request was successful, the server sends the status code in the range of 200-299. If the request was not successful, then the status code other than the range is returned.
What is Status Line?
The status line is a key component of an HTTP response or request message. It provides information about the status of an HTTP request or the version of protocol being used.
HTTP/1.1 200 OK
HTTP/1.1: The HTTP protocol version. 200: The status code indicating success. OK: A human-readable reason phrase for the status code.
What is RequestLibrary?
RequestLibrary is a Robot Framework library aimed to provide HTTP API testing functionalities by wrapping the well-known Python Requests Library.
*** Settings ***
Library           RequestsLibrary
Library           Collections
Library           BuiltIn

*** Variables ***
${BASE_URL}          https://reqres.in/api/users/2

*** Test Cases ***
Validate HTTP Response Details
    [Documentation]   This test case validates the HTTP response status code, line, body, headers, and content type

    # Create session
    Create Session    api    ${BASE_URL}

    # Create headers dictionary in the test case
    ${HEADERS}=       Create Dictionary      Content-Type=application/json

    # Send GET request
    ${response}=      GET On Session    api    url=${BASE_URL}    headers=${HEADERS}

    # Validate Status Code
    Should Be Equal As Numbers    ${response.status_code}    200
    Log To Console    Status Code: ${response.status_code}

   # Construct expected status line dynamically
    ${expected_status_line}=    Set Variable    HTTP/1.1 ${response.status_code} OK
    Log To Console    Expected Status Line: ${expected_status_line}

    # Validate Status Line
    ${actual_status_line}=   Evaluate    f"HTTP/1.1 ${response.status_code} OK"
    Should Be Equal    ${actual_status_line}    ${expected_status_line}
    Log To Console    Status Line: ${actual_status_line}
Settings Section
RequestsLibrary: Used for making HTTP requests. Collections: Provides utilities like creating and manipulating dictionaries. BuiltIn: Provides core Robot Framework keywords (like Log To Console).
Variables Section
${BASE_URL}: The base URL for the HTTP request.
Test Case Section:
This test case send an HTTP GET request.
1. Initializes an HTTP session named “api” with the specified base URL.
3. Sends a GET request on the “api” session to the specified URL. This request uses the headers created earlier, which includes the headers (${headers}) for authentication.
${response}= GET On Session api url=${BASE_URL} headers=${HEADERS}
${response}= We are saving the response of the GET operation in the ${response} variable.
4. Asserts that the response status code is 200, indicating a successful request. We have logged the Status Code too
Should Be Equal As Numbers    ${response.status_code}    200
Log To Console    Status Code: ${response.status_code}
5. Set Variable to construct expected Status Line. It dynamically constructs the expected status line using ${response.status_code}.
${expected_status_line}= Set Variable HTTP/1.1 ${response.status_code} OK
6. Evaluate to construct actual Status Line. Uses Python’s f-string syntax inside Evaluate to dynamically construct the actual status line.
We need the below command to run the Robot Framework script.
robot ValidateStatusCode.robot
The output of the above program is
View Report and Log
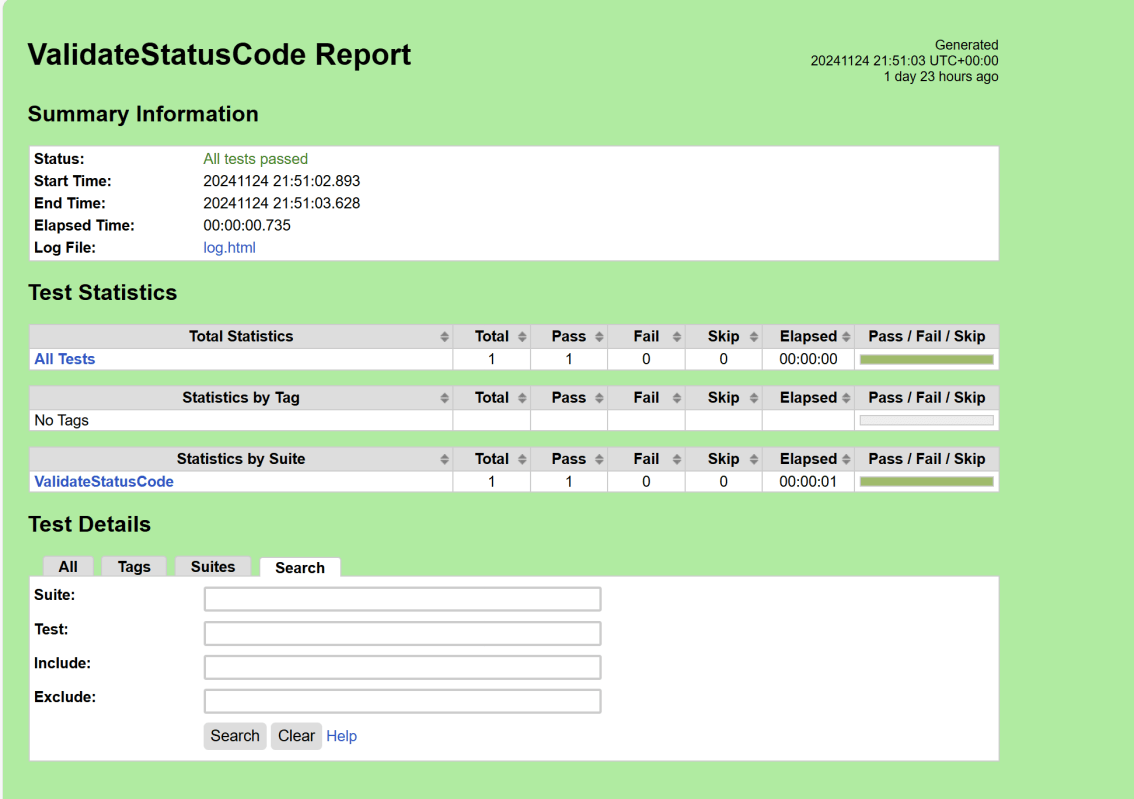
We have the test case passed. The Robot Framework generates log.html, output.xml, and report.html by default.
Let us now see the report and log details.
Report
Right-click on report.html. Select Open In->Browser->Chrome(any browser of your wish).
The Report generated by the framework is shown below:
Log
Robot Framework has multiple log levels that control what is shown in the automatically generated log file. The default Robot Framework log level is INFO.
Right-click on log.html. Select Open In->Browser->Chrome(any browser of your wish).
That’s it! Congratulations on making it through this tutorial and hope you found it useful! Happy Learning!!
In this article, we will discuss how to pass the Authentication Token in the header. We will focus on its implementation in Robot Framework.
What is an authorization token?
An authorization token is often referred to as an access token. It is a piece of data or credential. This token is used to authenticate. It authorizes access to protected resources or operations in a system.
Below is an example of passing authorization token in Postman.
RequestLibrary is a Robot Framework library aimed to provide HTTP API testing functionalities by wrapping the well-known Python Requests Library.
Implementation Steps:
Step 1 – Create a new project
Step 1.1 – Open PyCharm and create a new project. Go to File and select New Project from the main menu.
Step 1.2 – Choose the project location. Click the “Browse” button next to the Location field and specify the directory for your project.
Deselect the Create a main.py welcome script checkbox because you will create a new Python file for this tutorial.
Click on the “Create” Button.
Step 1.3 – A new dialog appears asking to open the project using any one of the given options. I have selected New Window as I like to have separate windows for each project.
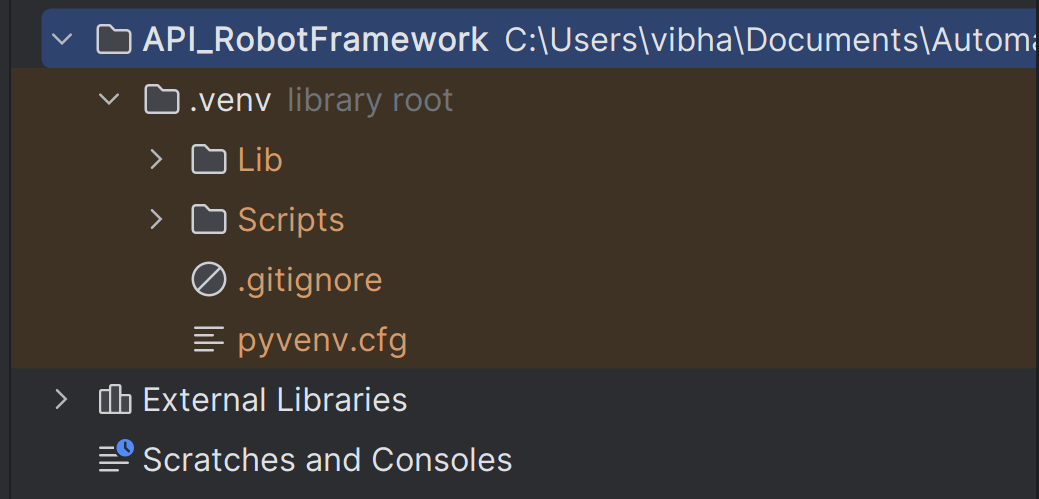
Below is the image of the new project created in PyCharms.
Step 2 – Install RequestLibrary
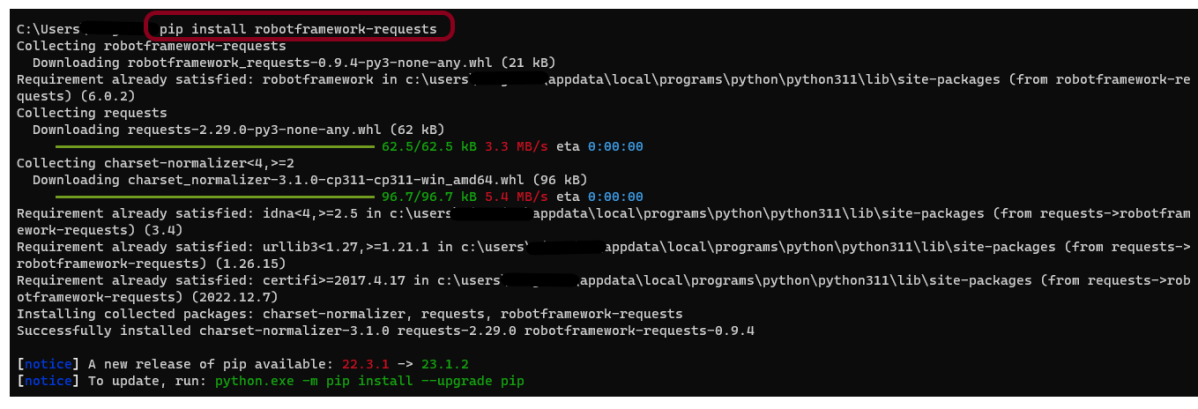
To install RequestLibrary, you need to use the below command:
pip install robotframework-requests
Step 3 – Add robotframework-requests package to the PyCharms
Go to File->Settings ->Project:API_RobotFramework ->Python Interpreter.
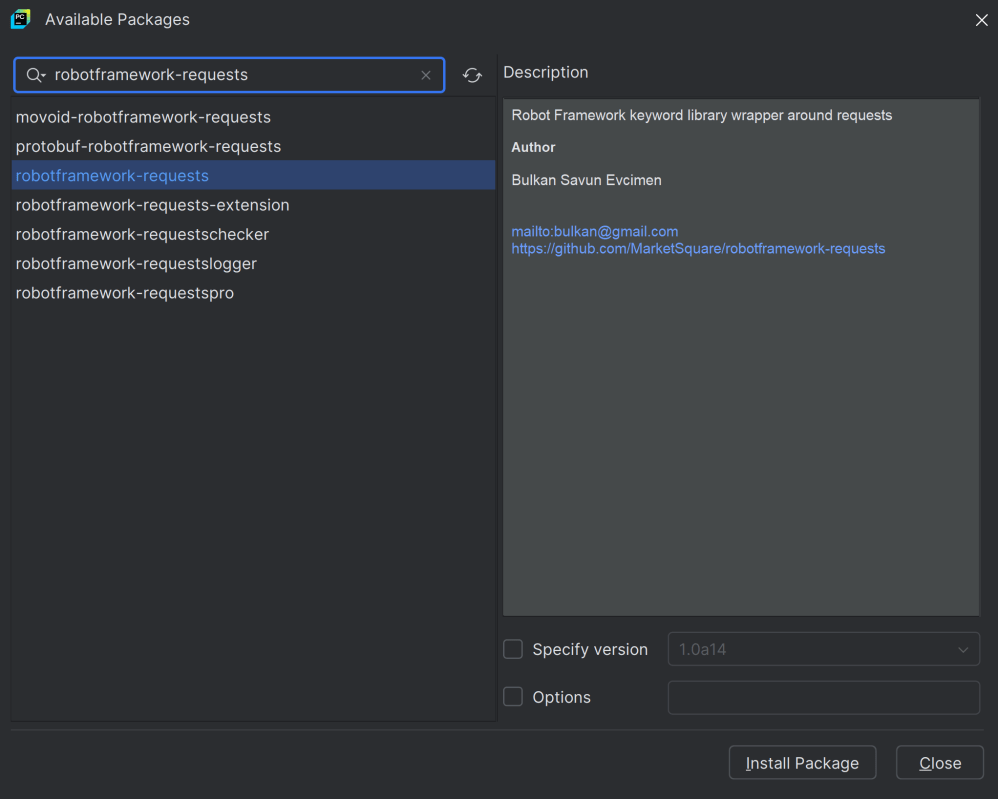
Click on the “+” sign and enter robotframework-requests in the search bar. It will show a list of packages. Select the “robotframework-requests” package and click on the “Install Package”.
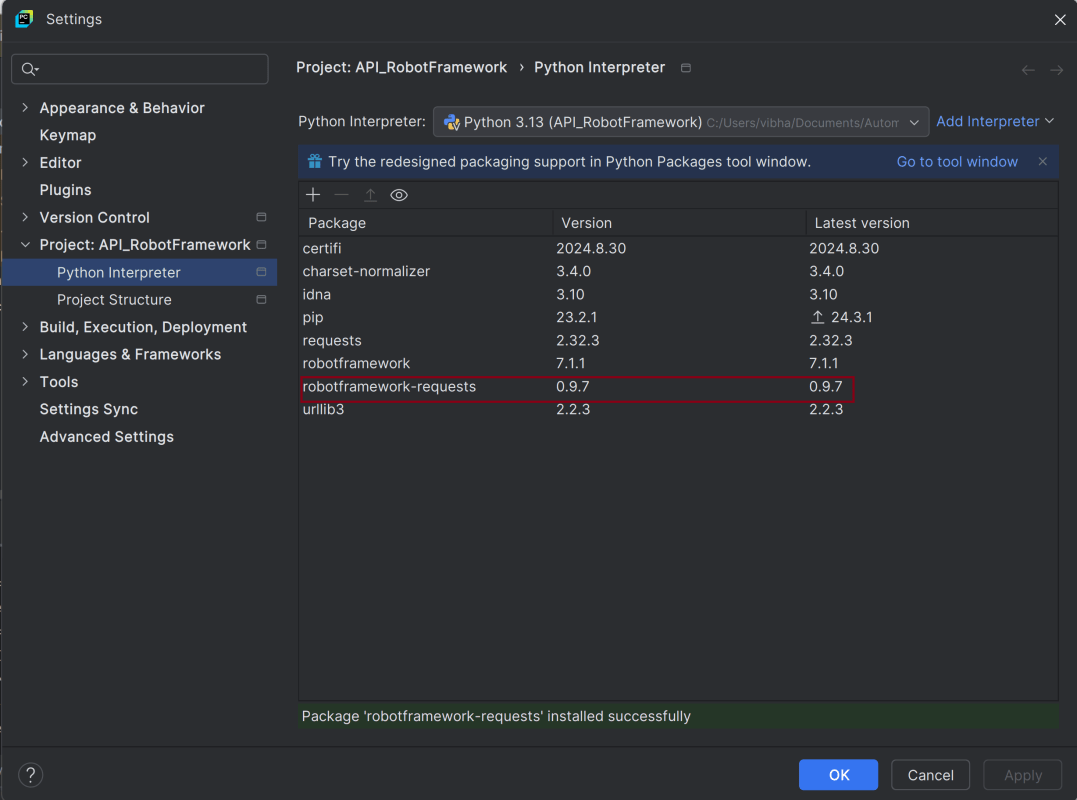
Once the package is installed, we will see the message that the package is installed successfully.
Once the package is installed, it can be seen under the package list as shown below:
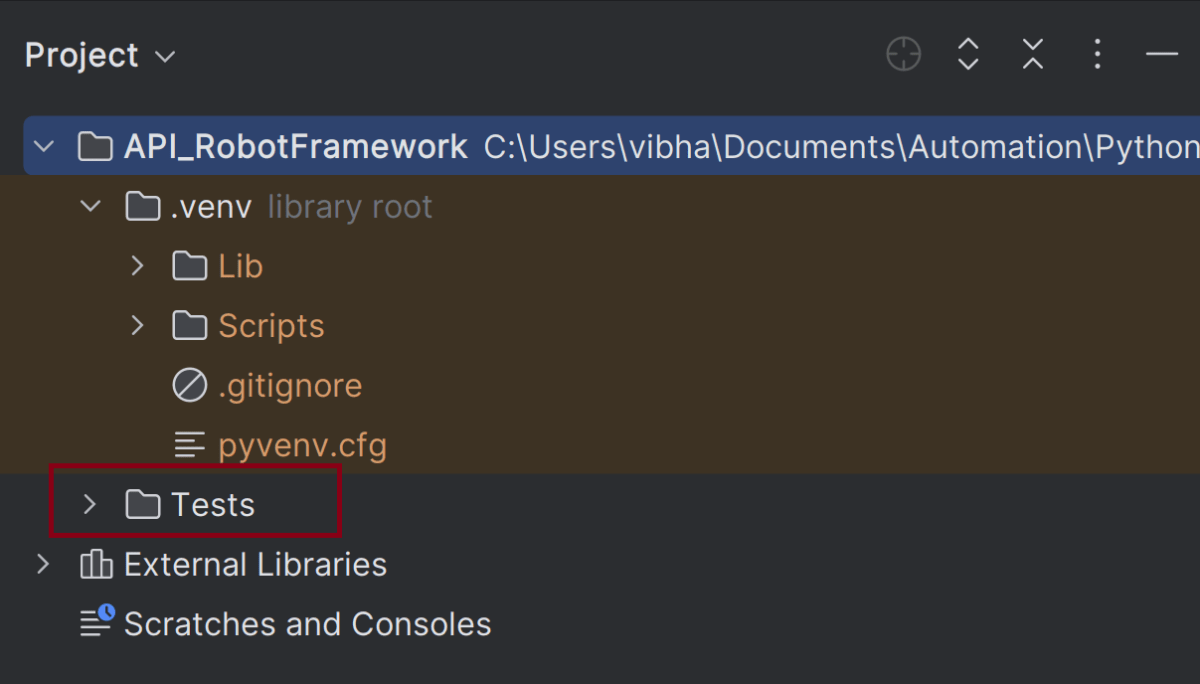
Step 4 – Create a new directory in the new project
Right-Click on the project, select New->Directory, and provide the name as Tests
Below is the image of the new directory.
Right-click on the new directory and select New File and provide the name as AuthTokenDemo.robot as shown below:
Step 5 – Create API tests in Robot Framework
The API Test in Robot Framework.
*** Settings ***
Library           RequestsLibrary
Library           Collections
Library           BuiltIn


*** Variables ***
${BASE_URL}       https://httpbin.org/basic-auth/user/pass
${AUTH_TOKEN}     Basic dXNlcjpwYXNz


*** Test Cases ***
Example API Request with Authorization Header
    [Documentation]   Example of sending a GET request with an Authorization token in the header

    Create Session    api    ${BASE_URL}

     # Create headers dictionary in the test case
    ${headers}=       Create Dictionary    Authorization=${AUTH_TOKEN}    Content-Type=application/json

   ${response}=      GET On Session    api    url=${BASE_URL}     headers=${headers}
    Log To Console    Status Code: ${response.status_code}
    Log To Console    Response Body: ${response.text}
    Should Be Equal As Numbers    ${response.status_code}    200
Settings Section
RequestsLibrary: Used for making HTTP requests. Collections: Provides utilities like creating and manipulating dictionaries. BuiltIn: Provides core Robot Framework keywords (like Log To Console).
Variables Section
${BASE_URL}: The base URL for the HTTP request. ${AUTH_TOKEN}: Authentication Token
Test Case Section:
This test case send an HTTP GET request with an Authorization token in the headers.
1. Initializes an HTTP session named “api” with the specified base URL.
Create Session api ${BASE_URL}
2. Create Headers and includes the predefined token (Basic dXNlcjpwYXNz) for basic authentication.
3. Sends a GET request on the “api” session to the specified URL. This request uses the headers created earlier, which includes the headers (${headers}) for authentication.
${response}= GET On Session api url=${BASE_URL} headers=${headers}
${response}= We are saving the response of the GET operation in the ${response} variable.
4. Asserts that the response status code is 200, indicating a successful request.
Log To Console    Status Code: ${response.status_code}
Log To Console    Response Body: ${response.text}
Should Be Equal As Numbers    ${response.status_code}    200
Step 6 – Execute the tests
We need the below command to run the Robot Framework script.
robot AuthTokenDemo.robot
The output of the above program is
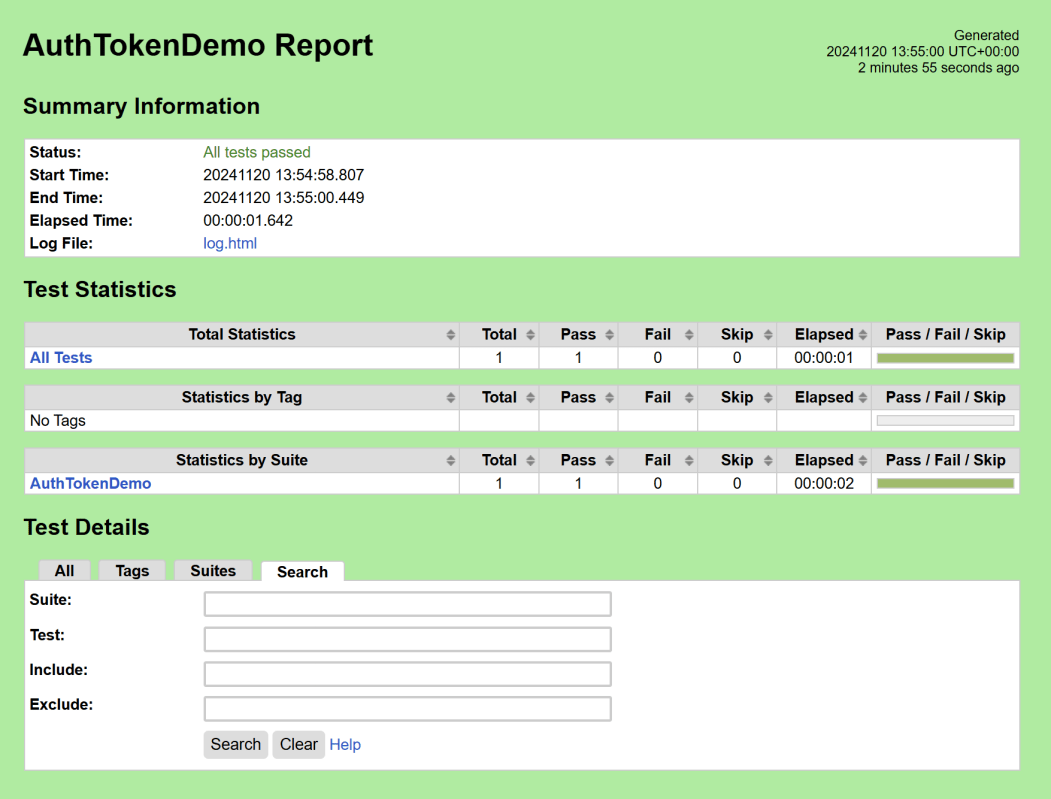
Step 7 – View Report and Log
We have the test case passed. The Robot Framework generates log.html, output.xml, and report.html by default.
Let us now see the report and log details.
Report
Right-click on report.html. Select Open In->Browser->Chrome(any browser of your wish).
The Report generated by the framework is shown below:
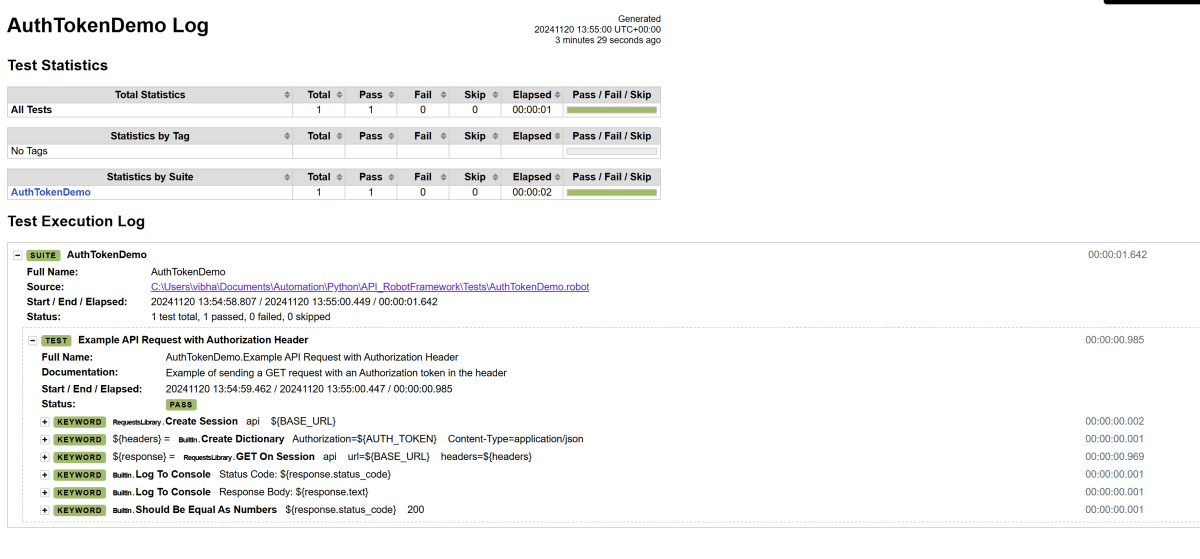
Log
Robot Framework has multiple log levels that control what is shown in the automatically generated log file. The default Robot Framework log level is INFO.
Right-click on log.html. Select Open In->Browser->Chrome(any browser of your wish).
That’s it! Congratulations on making it through this tutorial and hope you found it useful! Happy Learning!!
In this article, we will discuss how to perform Basic Auth with base64. We will focus on its implementation in Robot Framework.
What is Basic Auth?
Basic Authentication (Basic Auth) is a simple authentication scheme built into the HTTP protocol. It is used to securely transmit user credentials (username and password) to authenticate to an API or a web service.
RequestLibrary is a Robot Framework library aimed to provide HTTP API testing functionalities by wrapping the well-known Python Requests Library.
Implementation Steps:
Step 1 – Create a new project
Step 1.1 – Open PyCharm and create a new project. Go to File and select New Project from the main menu.
Step 1.2 – Choose the project location. Click the “Browse” button next to the Location field and specify the directory for your project.
Deselect the Create a main.py welcome script checkbox because you will create a new Python file for this tutorial.
Click on the “Create” Button.
Step 1.3 – A new dialog appears asking to open the project using any one of the given options. I have selected New Window as I like to have separate windows for each project.
Below is the image of the new project created in PyCharms.
Step 2 – Install RequestLibrary
To install RequestLibrary, you need to use the below command:
pip install robotframework-requests
Step 3 – Add robotframework-requests package to the PyCharms
Go to File->Settings ->Project:API_RobotFramework ->Python Interpreter.
Click on the “+” sign and enter robotframework-requests in the search bar. It will show a list of packages. Select the “robotframework-requests” package and click on the “Install Package”.
Once the package is installed, we will see the message that the package is installed successfully.
Once the package is installed, it can be seen under the package list as shown below:
Step 4 – Create a new directory in the new project
Right-Click on the project, select New->Directory, and provide the name as Tests
Below is the image of the new directory.
Right-click on the new directory and select New File and provide the name as AuthTokenDemo.robot as shown below:
Step 5 – Create API tests in Robot Framework
The API Test in Robot Framework.
*** Settings ***
Library           RequestsLibrary
Library           Collections
Library           BuiltIn

*** Variables ***
${BASE_URL}       https://httpbin.org/basic-auth/user/pass
${USERNAME}       user
${PASSWORD}       pass
#${HEADERS}        Create Dictionary    Content-Type=application/json

**** Keywords ***
Create Basic Auth Header

    # Concatenate the username and password in "user:pass" format
    ${credentials}=    Set Variable    ${username}:${password}
    Log To Console    Credentials: ${credentials}

    # Encode the credentials using base64 encoding
    ${encoded}=    Evaluate    str(base64.b64encode('${credentials}'.encode('utf-8')), 'utf-8')    modules=base64
    Log To Console    Encoded Credentials: ${encoded}

    # Create a headers dictionary and add the Authorization header
    ${headers}=    Create Dictionary    Content-Type=application/json
    Set To Dictionary    ${headers}    Authorization=Basic ${encoded}
    RETURN    ${headers}

**** Test Cases ***
Test Preemptive Basic Auth with Custom Header
    [Documentation]   Manually setting Authorization header for preemptive Basic Authentication

    ${headers}=    Create Basic Auth Header

    Create Session    api    ${BASE_URL}    headers=${headers}
    ${response}=      GET On Session    api    url=${BASE_URL}
    Log To Console    Status Code: ${response.status_code}
    Log To Console    Response Body: ${response.text}
    Should Be Equal As Numbers    ${response.status_code}    200
Variables Section
${BASE_URL}: The base URL for the HTTP request. ${USERNAME} and ${PASSWORD}: Credentials for Basic Authentication.
Keywords Section
This custom keyword creates an HTTP header with Basic Authentication.
1. This concatenates the username and password into the format "user:pass".
${credentials}=    Set Variable    ${username}:${password}
Log To Console    Credentials: ${credentials}
2. Converts the string “user:pass” into a base64-encoded format. This is required for the Authorization header in Basic Authentication.
Create Dictionary: Initializes a dictionary with a key-value pair for Content-Type. Set To Dictionary: Adds the Authorization header with the value Basic . RETURN: Returns the dictionary to the calling test case.
${headers}=    Create Dictionary    Content-Type=application/json
Set To Dictionary    ${headers}    Authorization=Basic ${encoded}
RETURN    ${headers}
Test Case Section:
This test case uses the Create Basic Auth Header keyword to perform an authenticated GET request.
1. Calls the Create Basic Auth Header keyword to get a dictionary containing the HTTP headers for the request.
${headers}= Create Basic Auth Header
2. Initializes an HTTP session named “api” with the specified base URL and headers. The headers contain Authorization for Basic Authentication.
Create Session api ${BASE_URL} headers=${headers}
3. Sends a GET request on the “api” session to the specified URL. This request uses the headers created earlier, which include Basic Authentication.
${response}= GET On Session api url=${BASE_URL}
${response}= We are saving the response of the GET operation in the ${response} variable.
4. Asserts that the response status code is 200, indicating a successful request.
 Log To Console    Status Code: ${response.status_code}
Log To Console    Response Body: ${response.text}
Should Be Equal As Numbers    ${response.status_code}    200
Step 6 – Execute the tests
We need the below command to run the Robot Framework script.
robot BasicAuthDemo.robot
The output of the above program is
Step 7 – View Report and Log
We have the test case passed. The Robot Framework generates log.html, output.xml, and report.html by default.
Let us now see the report and log details.
Report
Right-click on report.html. Select Open In->Browser->Chrome(any browser of your wish).
The Report generated by the framework is shown below:
Log
Robot Framework has multiple log levels that control what is shown in the automatically generated log file. The default Robot Framework log level is INFO.
Right-click on log.html. Select Open In->Browser->Chrome(any browser of your wish).
That’s it! Congratulations on making it through this tutorial and hope you found it useful! Happy Learning!!
Step 1.1 – Open PyCharm and create a new project. Go to File and select New Project from the main menu.
Step 1.2 – Choose the project location. Click the “Browse” button next to the Location field and specify the directory for your project.
Deselect the Create a main.py welcome script checkbox because you will create a new Python file for this tutorial.
Click on the “Create” Button.
Step 1.3 – A new dialog appears asking to open the project using any one of the given options. I have selected New Window as I like to have separate windows for each project.
Below is the image of the new project created in PyCharms.
Step 2 – Create 3 new directories in the new project
Right-Click on the project, select New->Directory, and provide the name as Tests, Drivers, and Resources
Below is the image of the new directories.
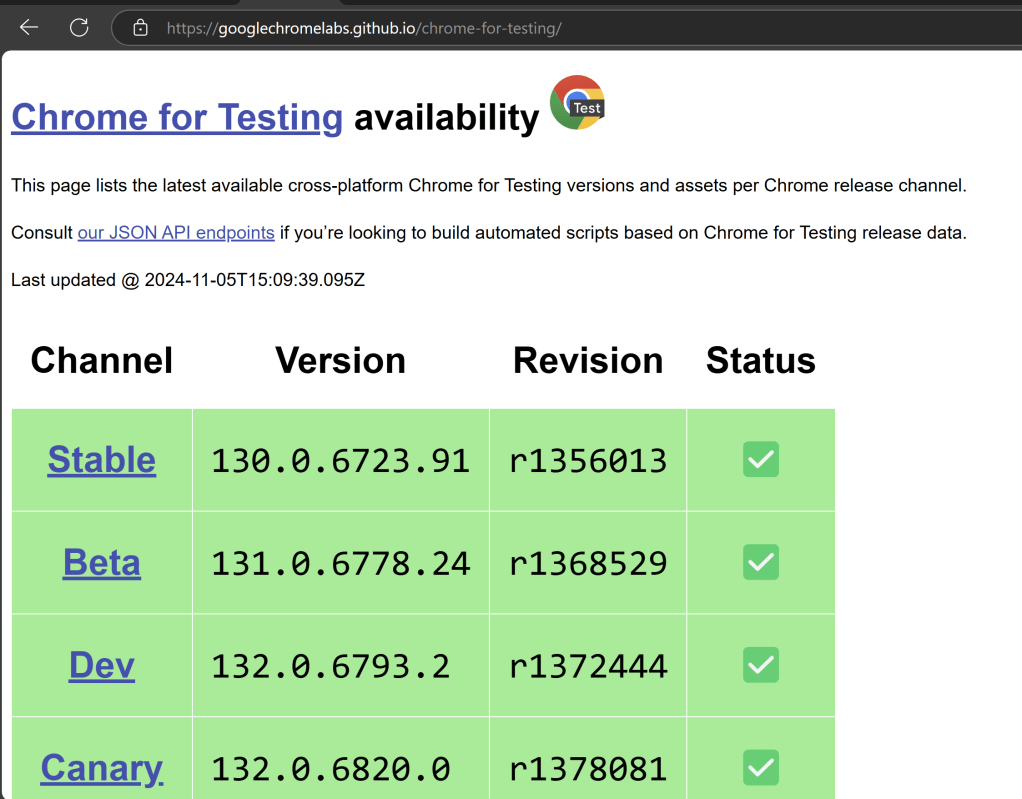
Step 3 – Download ChromeBinaries, Geckodriver and msedgedriver binaries
Download ChromeBinaries, Geckodriver and msedgedriver binaries and place in Drivers directory. This directory contains the browser binary in it. As we are using Chrome, will keep chromedriver.exe here.
The tests are going to use the Chrome browser, Firefox and Edge browsers, so we need to download the corresponding driver binaries to open a blank browser.
I will rename chromedriver.exe to Chrome, msedgedriver.exe to Edgeand geckodriver.exe to Firefox.
Step 4 – Create Test Files
This directory contains multiple test case files consisting of test steps.
Right-click on the new directory and select New File and provide the name as LoginPageTests.robot as shown below:
Below is the code for LoginPageTests.robot
*** Settings ***
Documentation       Tests to login to Login Page
Library     SeleniumLibrary
Test Setup      Open the Browser with URL
Test Teardown   Close Browser Session
Resource       ../Resources/GenericResources.robot
Resource       ../Resources/LoginResources.robot

*** Test Cases ***

Validate Unsuccessful Login using invalid credentials

    LoginResources.Fill the login form     ${valid_username}       ${invalid_password}
    LoginResources.Verify the error message is correct


Validate successful Login

    LoginResources.Fill the login form     ${valid_username}       ${valid_password}
    DashboardResources.Verify Dashboard page opens
Settings
Documentation: Allows to add the description about the Login Test page. Library: Import SeleniumLibrary for browser interactions. Test Setup: Open the Browser with URL keyword to setup the browser before each test Test Teardown: Capture Screenshot On Failure keyword to capture screenshots if the test fails Suite Teardown: Close Browser Session keyword close all the browsers at the end of the test suite. Resource: Provide the path of the resource file that contains the reusable keywords, variables and other settings.
Step 5 – Create Resources file for each page
It maintains the files which contain page elements as well as corresponding keywords.
Right-click on the new directory and select New File and provide the name as LoginResources.robot, DashboardResources.robot and GenericResources.robot as shown below:
GenericResources.robot contains the keywords that are common to all the tests, like the opening of the browser or closing of the browser.
*** Settings ***
Documentation    A resource file with reusable keywords and variables.
Library     SeleniumLibrary

*** Variables ***
${valid_username}     Admin
${valid_password}       admin123
${invalid_username}     1234
${invalid_password}     45678
${url}        https://opensource-demo.orangehrmlive.com/web/index.php/auth/login
${browser}      Chrome   #Default browser, if no browser provided


*** Keywords ***

Open the Browser with URL
    Open Browser   ${url}    ${browser}   executable_path=C:/Users/vibha/Documents/Automation/Python/CrossBrowser_RobotFramework/Drivers/${browser}
    Maximize Browser Window
    Set Selenium Implicit Wait    5

Close Browser Session
    Close Browser
Variables used in GenericResources.robot
${valid_username}, ${valid_password}, ${invalid_username}, ${invalid_password}: Assign values ${url}: The URL to navigate to ${browser_name}: Browser will be used to run the tests
Below is the code for LoginResources.robot
*** Settings ***
Documentation        All the page objects and keywords of landing page
Library     SeleniumLibrary

*** Variables ***
${login_error_message}      css:.oxd-alert-content--error
${dashboard_title}       css:.oxd-topbar-header-breadcrumb-module
${missing_username_error_message}    xpath://*[@class='oxd-form']/div[1]/div/span
${missing_password_error_message}   xpath://*[@class='oxd-form']/div[2]/div/span
${forgot_password_link}   xpath://div[@class='orangehrm-login-forgot']/p

*** Keywords ***

Fill the login form
    [Arguments]    ${username}      ${password}
   Input Text    css:input[name=username]   ${username}
   Input Password    css:input[name=password]   ${password}
   Click Button    css:.orangehrm-login-button


Verify the error message is correct
    Element Text Should Be    ${login_error_message}    Invalid credentials
Below is the code for DashboardResources.robot
*** Settings ***
Documentation        All the page objects and keywords of Dashboard page
Library     SeleniumLibrary

*** Variables ***
${dashboard_title}       css:.oxd-topbar-header-breadcrumb-module

*** Keywords ***

Verify Dashboard page opens
    Element Text Should Be    ${dashboard_title}      Dashboard
All the below-mentioned keywords are derived from SeleniumLibrary. The functionality of keywords mentioned above:
1. Open Browser − The keyword opens a new browser instance to the optional url.
2. Maximize Browser Window – This keyword maximizes the current browser window.
3. Set Selenium Implicit Wait – This keyword sets the implicit wait value used by Selenium.
4. Close Browser – Close the current browser.
5. Input Text − This keyword is used to type the given text in the specified textbox identified by the locator name:username.
6. Input Password – This keyword is used to type the given text in the specified password identified by the locator name:password.
The difference compared to Input Text is that this keyword does not log the given password on the INFO level.
7. Click button – This keyword is used to click the button identified by the locator. In this case, it is “Login” button.
8. Element Text Should Be – This keyword is used to verify that the current page contains the exact text identified by the locator. Here, we are checking the exact text “Invalid Credentials”.
To run this script, go to the command line and go to directory tests.
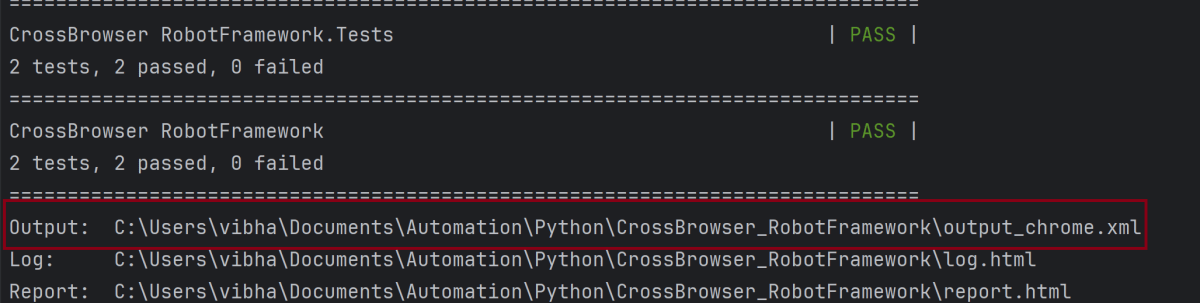
Step 6 – Execute the tests
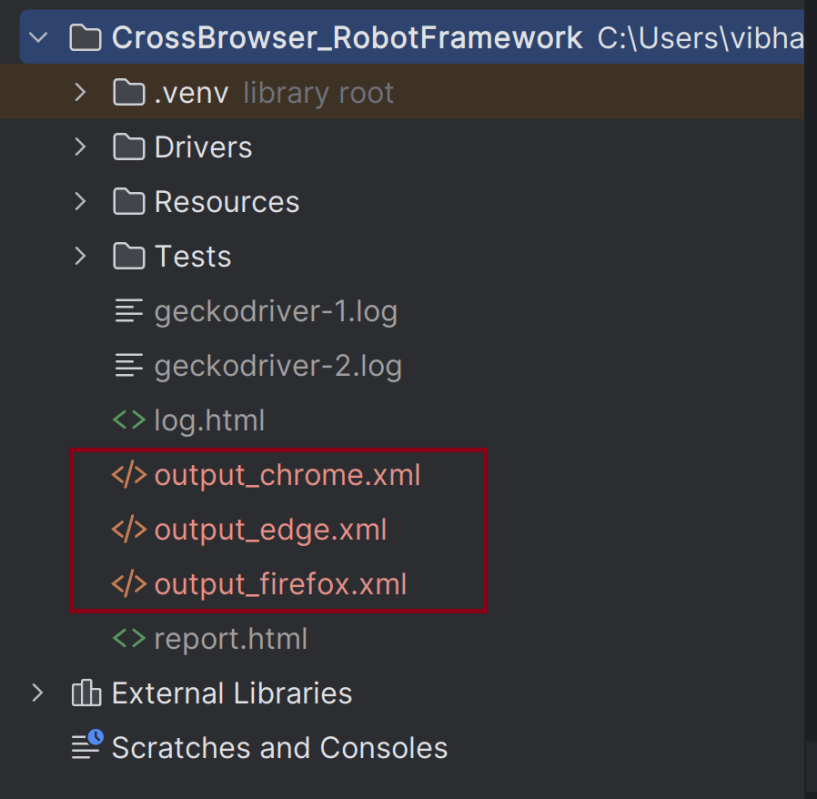
Run your tests separately for each browser (e.g., Chrome, Firefox, Edge), generating an individual output XML file for each. For example, use the below command to run the tests using the Chrome browser:
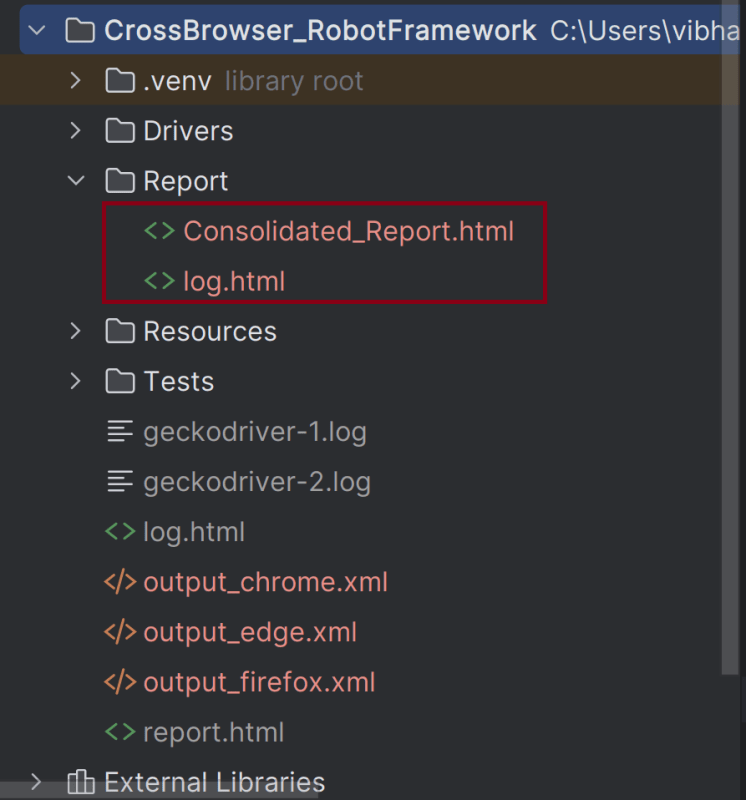
1. –outputdir Report specifies the directory where the consolidated report will be saved.
2. –report “Consolidated Report.html” sets the name of the report of the Consolidated Report.
3. The list of XML files (output_chrome.xml, output_edge, output_firefox) are the individual report files that will be merged.
Step 8 – View Report and Log
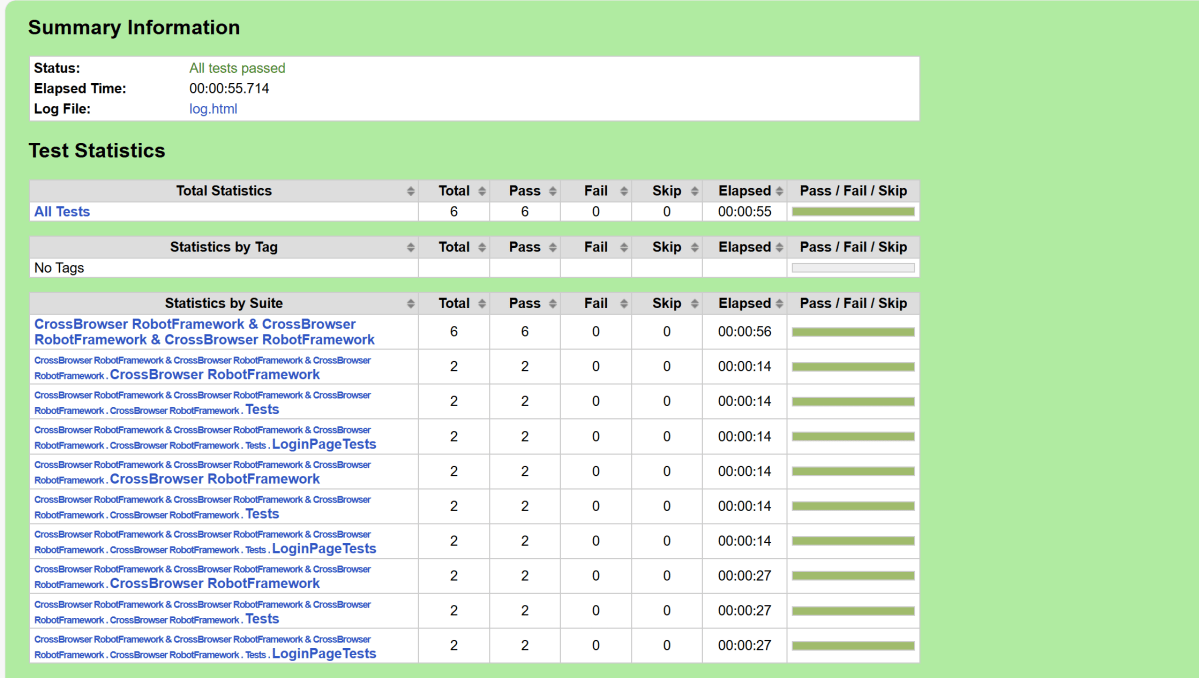
We have total 6 test cases passed (2 test case for each browser).
Let us now see the report and log details.
Report
Right-click on report.html. Select Open In->Browser->Chrome(any browser of your wish).
The Report generated by the framework is shown below:
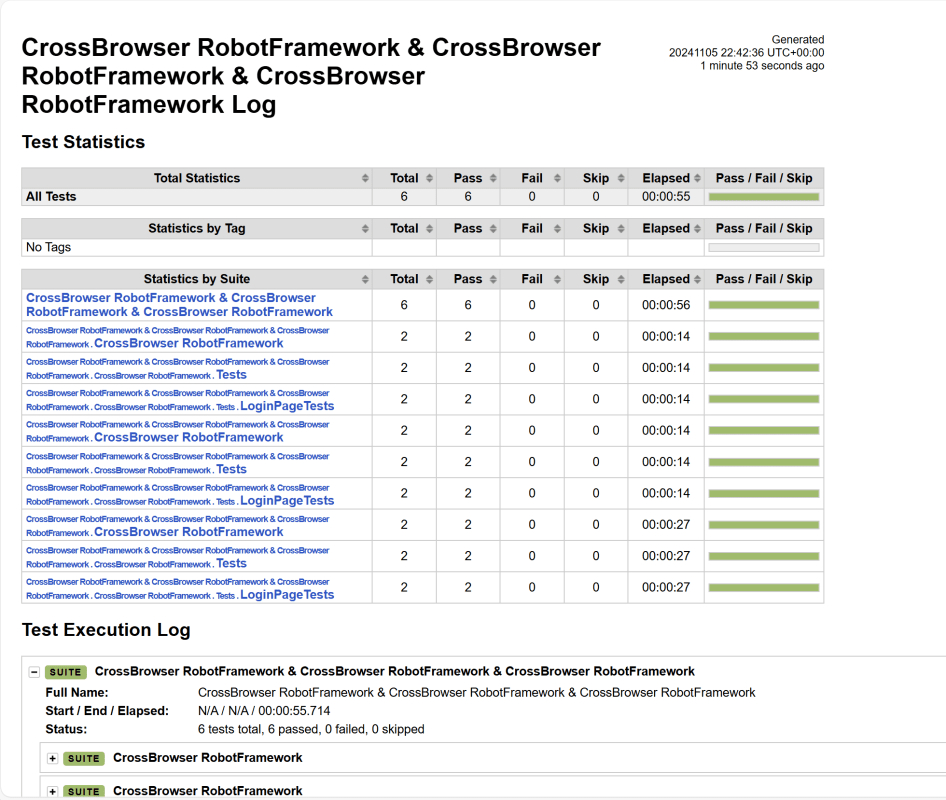
Log
The screenshots will be included in the log.html file under the specific failed test case step. Robot Framework has multiple log levels that control what is shown in the automatically generated log file. The default Robot Framework log level is INFO.
Right-click on log.html. Select Open In->Browser->Chrome(any browser of your wish).
That’s it! Congratulations on making it through this tutorial and hope you found it useful! Happy Learning!!
Step 1.1 – Open PyCharm and create a new project. Go to File and select New Project from the main menu.
Step 1.2 – Choose the project location. Click the “Browse” button next to the Location field and specify the directory for your project.
Deselect the Create a main.py welcome script checkbox because you will create a new Python file for this tutorial.
Click on the “Create” Button.
Step 1.3 – A new dialog appears asking to open the project using any one of the given options. I have selected New Window as I like to have separate windows for each project.
Below is the image of the new project created in PyCharms.
Step 2 – Create 3 new directories in the new project
Right-Click on the project, select New->Directory, and provide the name as Tests, Drivers, and Resources
Below is the image of the new directories.
Step 3 – Download ChromeBinaries and place in Drivers directory
This directory contains the browser binary in it. As we are using Chrome, will keep chromedriver.exe here.
The tests are going to use the Chrome browser, so we need to download the ChromeBinaries to open a blank browser in Chrome.
This directory contains multiple test case files consisting of test steps.
Right-click on the new directory and select New File and provide the name as LoginPageTests.robot as shown below:
Below is the code for LoginPageTests.robot
*** Settings ***
Documentation Tests to login to Login Page
Library SeleniumLibrary
Test Setup Open the Browser with URL
Test Teardown Capture Screenshot On Failure
Suite Teardown Close Browser Session
Resource ../Resources/GenericResources.robot
Resource ../Resources/LoginResources.robot
*** Test Cases ***
Validate Unsuccessful Login using invalid credentials
LoginResources.Fill the login form ${valid_username} ${invalid_password}
LoginResources.Verify the error message is correct
Validate successful Login
LoginResources.Fill the login form ${valid_username} ${valid_password}
DashboardResources.Verify Dashboard page opens
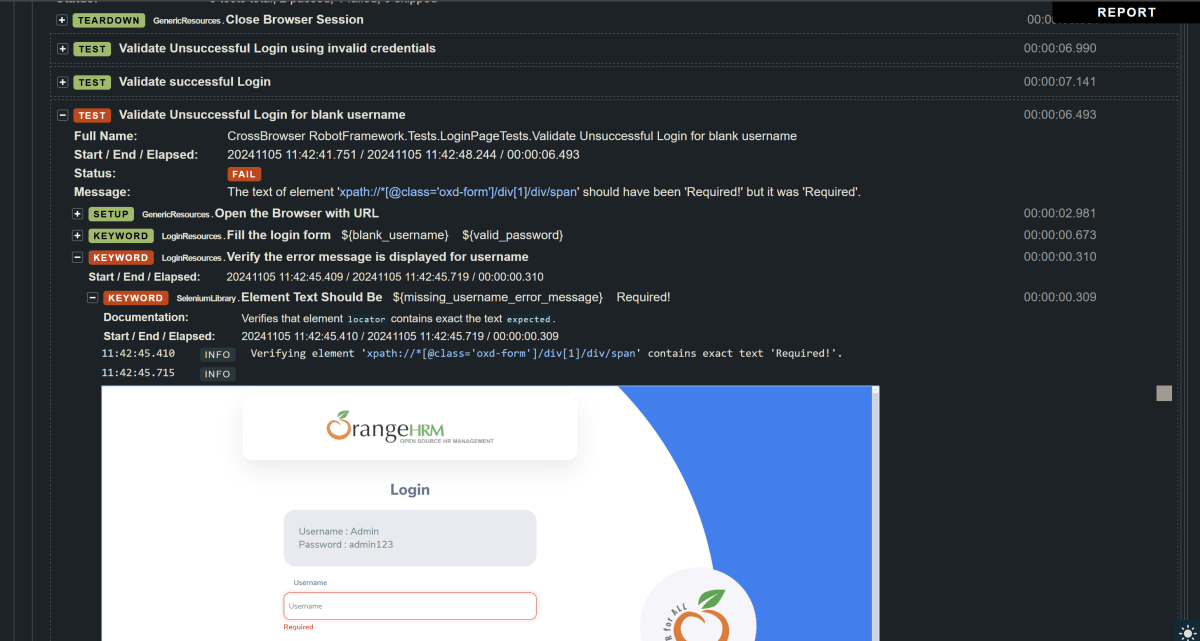
Validate Unsuccessful Login for blank username
LoginResources.Fill the login form ${blank_username} ${valid_password}
LoginResources.Verify the error message is displayed for username
Settings
Documentation: Allows to add the description about the Login Test page.
Library: Import SeleniumLibrary for browser interactions.
Test Setup: Open the Browser with URL keyword to setup the browser before each test
Test Teardown: Capture Screenshot On Failure keyword to capture screenshots if the test fails
Suite Teardown: Close Browser Session keyword close all the browsers at the end of the test suite.
Resource: Provide the path of the resource file that contains the reusable keywords, variables and other settings.
Step 5 – Create Resources file for each page
It maintains the files which contain page elements as well as corresponding keywords.
Right-click on the new directory and select New File and provide the name as LoginResources.robot, DashboardResources.robot and GenericResources.robot as shown below:
GenericResources.robot contains the keywords that are common to all the tests, like the opening of the browser or closing of the browser.
*** Settings ***
Documentation    A resource file with reusable keywords and variables.
Library     SeleniumLibrary

*** Variables ***
${valid_username}     Admin
${valid_password}       admin123
${invalid_username}     1234
${invalid_password}     45678
${blank_username}
${url}        https://opensource-demo.orangehrmlive.com/web/index.php/auth/login
${browser_name}      Chrome
${output_dir}      ./screenshots


*** Keywords ***

Open the Browser with URL
    Open Browser   ${url}    ${browser_name}   executable_path=C:/Users/vibha/Documents/Automation/Python/CrossBrowser_RobotFramework/Drivers/${browser_name}
    Maximize Browser Window
    Set Selenium Implicit Wait    5

Capture screenshot On Failure
    Run Keyword If Test Failed    Capture Page Screenshot    ${output_dir}/${TEST NAME}.png
    Close Browser

Close Browser Session
    Close Browser
${browser_name}: Browser will be used to run the tests
${output_dir}: Directory where the screenshots will be saved.
Below is the code for LoginResources.robot
*** Settings ***
Documentation        All the page objects and keywords of landing page
Library     SeleniumLibrary

*** Variables ***
${login_error_message}      css:.oxd-alert-content--error
${dashboard_title}       css:.oxd-topbar-header-breadcrumb-module
${missing_username_error_message}    xpath://*[@class='oxd-form']/div[1]/div/span

*** Keywords ***

Fill the login form
    [Arguments]    ${username}      ${password}
   Input Text    css:input[name=username]   ${username}
   Input Password    css:input[name=password]   ${password}
   Click Button    css:.orangehrm-login-button


Verify the error message is correct
    Element Text Should Be    ${login_error_message}    Invalid credentials


Verify the error message is displayed for username
     Element Text Should Be    ${missing_username_error_message}      Required
Below is the code for DashboardResources.robot
*** Settings ***
Documentation        All the page objects and keywords of Dashboard page
Library     SeleniumLibrary

*** Variables ***
${dashboard_title}       css:.oxd-topbar-header-breadcrumb-module

*** Keywords ***

Verify Dashboard page opens
    Element Text Should Be    ${dashboard_title}      Dashboard
All the below-mentioned keywords are derived from SeleniumLibrary. The functionality of keywords mentioned above:
1. Open Browser − The keyword opens a new browser instance to the optional url.
2. Maximize Browser Window – This keyword maximizes the current browser window.
3. Set Selenium Implicit Wait – This keyword sets the implicit wait value used by Selenium.
4. Run Keyword If Test Failed – Runs the given keyword with the given argument (Capture Page Screenshot), if the test failed.
5. Close Browser – Close the current browser.
6. Input Text − This keyword is used to type the given text in the specified textbox identified by the locator name:username.
7. Input Password – This keyword is used to type the given text in the specified password identified by the locator name:password.
The difference compared to Input Text is that this keyword does not log the given password on the INFO level.
8. Click button – This keyword is used to click the button identified by the locator. In this case, it is “Login” button.
9. Element Text Should Be – This keyword is used to verify that the current page contains the exact text identified by the locator. Here, we are checking the exact text “Invalid Credentials”.
To run this script, go to the command line and go to directory tests. We need the below command to run the Robot Framework script.
robot .
The output of the above program is
Step 7 – View Screenshots of the failed tests
Screenshots of the failed tests will be saved in screenshots folder with the name of failed test as shown in the below image.
Step 8 – View Report and Log
We have 2 test cases passed and 1 failed. The Robot Framework generates log.html, output.xml, and report.html by default.
Let us now see the report and log details.
Report
Right-click on report.html. Select Open In->Browser->Chrome(any browser of your wish).
The Report generated by the framework is shown below:
Log
The screenshots will be included in the log.html file under the specific failed test case step. Robot Framework has multiple log levels that control what is shown in the automatically generated log file. The default Robot Framework log level is INFO.
Right-click on log.html. Select Open In->Browser->Chrome(any browser of your wish).
Points to Consider
Path to Screenshots: By default, screenshots are saved in the same directory as the test files. We can customize the path in the Capture Screenshot On Failure keyword. Here, we have used screenshot folder to save the screenshots in it.
Browser Compatibility: Make sure that we have the correct WebDriver for the browser as well as compatible version of the driver (e.g., chromedriver for Chrome, geckodriver for Firefox, msedgedriver for Edge).
Failure Scenarios: This setup captures screenshots only when a test fails, making it easier to debug issues.
That’s it! Congratulations on making it through this tutorial and hope you found it useful! Happy Learning!!
We are given an Excel file and our task is to append the data into this excel file using Python. In this article, we’ll explore openpyxl library to append data to an Excel file using Python.
Prerequisite:
Python is installed PIP is installed PyCharms is installed
from openpyxl.reader.excel import load_workbook
from openpyxl.styles import Font
#Load the workbook
workbook = load_workbook("C:\\Users\\ykv12\\Documents\\Vibha\\Automation\\SearchInBing.xlsx")
sheet = workbook.active
#Sample data
new_data =[
    ["Scrum Master", "5-10 Years", "35K"],
    ["Consultatnt", "8-12 Years", "37K"]
]
#Append the new data to the sheet
last_row = sheet.max_row + 1
for i, row in enumerate(new_data, start=last_row):
    for j, value in enumerate(row, start=1):
        sheet.cell(row=i, column=j, value=value)
#Save the workbook
workbook.save("C:\\Users\\ykv12\\Documents\\Vibha\\Automation\\SearchInBing.xlsx")
print("Data is appended in the Excel file successfully")
The output of the above program is
Updated Excel
That’s it! Congratulations on making it through this tutorial and hope you found it useful! Happy Learning!!
Reading data from Excel files is a common practice in software development and testing. Excel provides a tabular format which is easy to understand and navigate. Data can be written to Excel for manipulation, analysis and visualization using Java, Python, R and soon. There are several ways to read the data from Excel in Python, but we will discuss openpyxl.
Prerequisite:
Python is installed PIP is installed PyCharms is installed
from openpyxl.workbook import Workbook
#Create a new workbook
workbook = Workbook()
sheet = workbook.active
#Rename the sheet
sheet.title ="Sample Sheet"
#Sample data
data =[
    ["Name", "Designation", "EmployeeId"],
    ["Tom", "BA", 11001],
    ["Trina", "PO", 11002],
    ["Will", "Dev", 11003]
]
#Write data to the sheet
for row in data:
    sheet.append(row)
#Save the workbook
workbook.save("C:\\Users\\Documents\\Vibha\\Automation\\WriteExcel.xlsx")
print("Data is written the Excel file successfully")
The output of the above program is
The Excel is created and saved at the specified location.
Header with bold font
Below is the complete program:
from openpyxl.styles import Font
from openpyxl.workbook import Workbook

#Create a new workbook
workbook = Workbook()
sheet = workbook.active

#Rename the sheet
sheet.title ="Sample Sheet"

#Sample data
headers =  ["Name", "Designation", "EmployeeId"]
rows =[
    ["Tom", "BA", 11001],
    ["Trina", "PO", 11002],
    ["Will", "Dev", 11003]
]

#Write headers with bold font
for col_num, header in enumerate(headers, start=1):
    cell = sheet.cell(row=1, column=col_num, value=header)
    cell.font = Font(bold=True)


#Write rows
for row_num, row_data in enumerate(rows, start=2):
    for col_num, cell_value in enumerate(row_data, start=1):
       sheet.cell(row=row_num, column=col_num, value=cell_value)

#Save the workbook
workbook.save("C:\\Users\\Documents\\Vibha\\Automation\\FormattedExcel.xlsx")
print("Data is written the Excel file successfully")
Define the list “headers” containing the name of the headers. Iterate over the headers using enumerate(headers, start=1), which provides an index starting from 1. For each header, create a cell in the first row and corresponding column and set its value.
Use Font(bold=True) to make the font of the header bold and assign it to “cell.font”.
The output of the above program is
Formatted Excel
We are done! Congratulations on making it through this tutorial and hope you found it useful! Happy Learning!!
Reading data from Excel files is a common practice in software development and testing. Excel provides a tabular format which is easy to understand and navigate. Data can be read from Excel for manipulation, analysis and visualization using Java, Python, R and soon. There are several ways to read the data from Excel in Python, but we will discuss openpyxl.
Prerequisite:
Python is installed PIP is installed PyCharms is installed
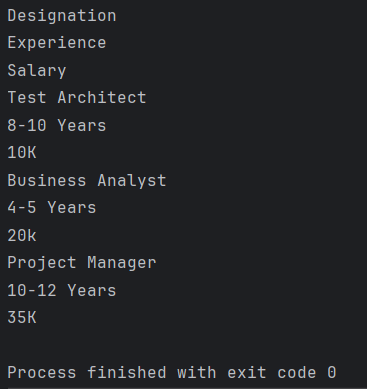
for row in sheet.iter_rows(min_row=1, max_row=sheet.max_row, min_col=1, max_col=sheet.max_column):
    for cell in row:
        print(cell.value)
The complete program is
from openpyxl import load_workbook
from tabulate import tabulate

#Load the workbook
workbook = load_workbook("C:\\Users\\Vibha\\Automation\\SearchInBing.xlsx")

#Select the active worksheet
sheet = workbook.active

#Iterate over rows and columns
for row in sheet.iter_rows(min_row=1, max_row=sheet.max_row, min_col=1, max_col=sheet.max_column):
    for cell in row:
        print(cell.value)
The output of the above program is
sheet.iter_rows() is used to iterate over the specified rows and columns
cell.value extracts the data from the each cell.
As we can see that the output is not displayed in structured format.
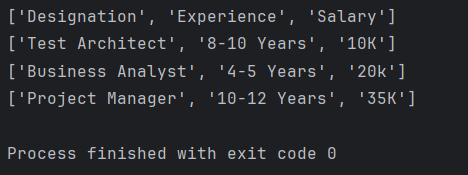
To display the output in the structure format, use the below program:
from openpyxl import load_workbook
from tabulate import tabulate

#Load the workbook
workbook = load_workbook("C:\\Users\\Vibha\\Automation\\SearchInBing.xlsx")

#Select the active worksheet
sheet = workbook.active

#Display data in a structured format
for row in sheet.iter_rows(min_row=1, max_row=sheet.max_row, min_col=1, max_col=sheet.max_column):
    row_data =[]
    for cell in row:
        row_data.append((cell.value))
    print(row_data)
The output of the above program is
Display the Excel data in Tabular Format
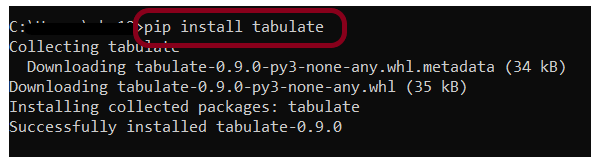
Install the tabulate library
pip install tabulate
Below is the complete program:
from openpyxl import load_workbook
from tabulate import tabulate

#Load the workbook
workbook = load_workbook("C:\\Users\\Vibha\\Automation\\SearchInBing.xlsx")

#Select the active worksheet
sheet = workbook.active

#Display data in a tabular format
data =[]
for row in sheet.iter_rows(values_only = True):
    data.append(list(row))

print(tabulate(data, headers='firstrow', tablefmt='grid'))
sheet.iter_rows(values_only = True) reads the rowss in the sheet and values_only=True ensures that we get the cell values only. Collect the data onto a list of lists.
tabulate(data, headers=’firstrow’, tablefmt=’grid’) is used to print the data nicely in grid format. headers=firstrow uses the first row as headers and tablefmt=grid sets the format to a grid style.
The output of the above program is
We are done! Congratulations on making it through this tutorial and hope you found it useful! Happy Learning!!