Serenity Reports are living documentation that contains the meaningful report for each Test. It illustrated narrative reports that document and describe what your application does and how it works.
Maven
How to configure Java and Maven in Jenkins
In the previous tutorial, I explained the steps to download and configure Jenkins in Windows 10.
The introduction of the Global Tool Configuration section in Jenkins 2 is a wise decision. This section contains all the major configurations for external tools, their locations, and automatic installer tools.
Table of Contents
Configuring Java
Open Jenkins and go to Jenkins Dashboard. After that, click on the Manage Jenkins link as shown below:

When we click on the “Manage Jenkins” link, we are redirected to the Manage Jenkins page, where we can see various types of options, including the “Global Tool Configuration” option.

We need to set the JDK path in Jenkins as shown below.

Click on the Add JDK button. By default, “Install Automatically” will be checked, so since we are going to use the JDK installed in our local machine, “Install automatically” will install the latest version of JDK, and you will also need to provide credentials to download the relevant JDK.

Provide the JDK’s name as we gave as JDK 11 because that is what is currently installed on my machine and also provide the path of JDK in the JAVA_HOME textbox.

Configuring Maven
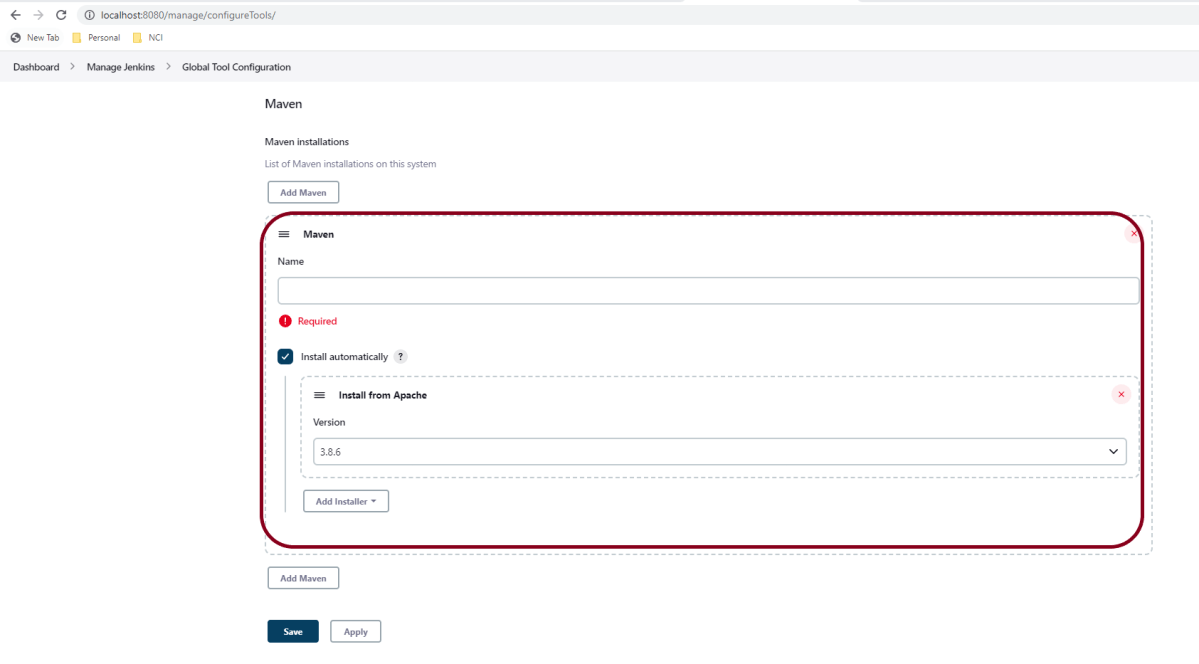
As mentioned above, go to Global Tool Configuration and scroll down to see the Maven option.

Click on the “Add Maven” button. Kindly note that by default, “Install Automatically” will be checked, so since we are going to use the Maven installed on our local machine, “Install automatically” will install the latest version of Maven, and you will also need to provide credentials to download relevant Maven.
Provide the Maven’s name as we gave as Maven 3.8.6 because that is what is currently installed on my machine, and also provide the path of Maven in the MAVEN_HOME textbox.
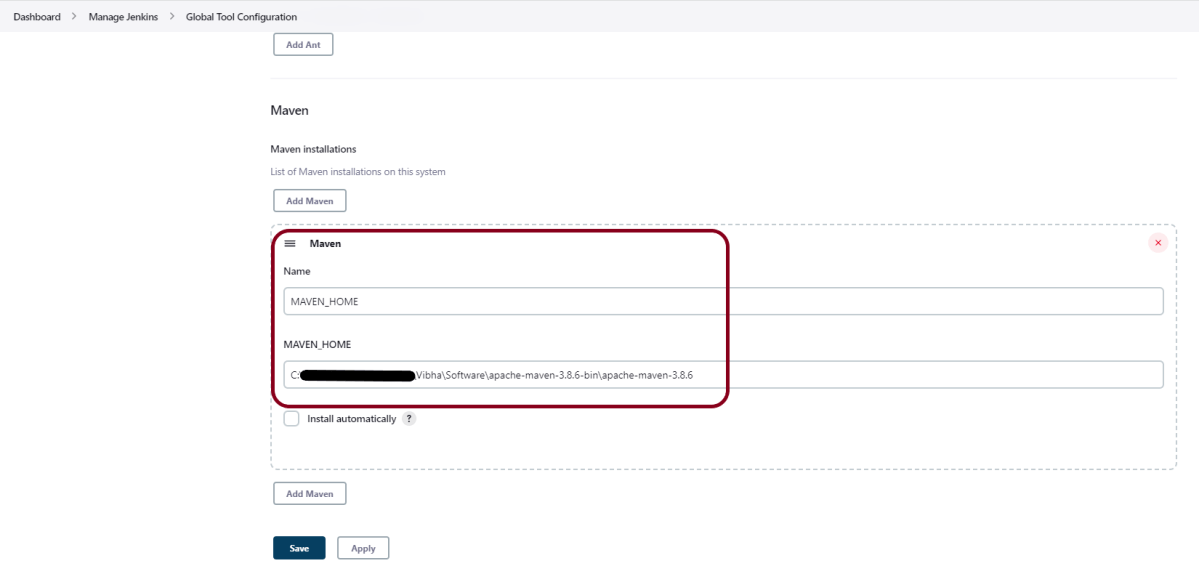
Click on the Apply and Save buttons.
Congratulations!!. The above steps configured Java and Maven to Jenkins. Happy Learning
Gradle – Extent Report Version 5 for Cucumber, Selenium, and TestNG
The previous tutorial explained the generation of Extent Reports Version 5 for Cucumber 7 and TestNG in a Maven project. In this tutorial, I will explain the steps to create an Extent Report Version 5 for Cucumber, Selenium, and TestNG in a Gradle project.
Table of Contents
- Prerequisite
- Dependency List
- Implementation Steps
- Add Extent Report dependency to the build.gradle
- Add ExtentCucumberAdapter plugin to task cucumber
- Add Cucumber, Selenium, and TestNG dependencies in build.gradle
- Create Locator and Action classes and Step Definition corresponding to the feature file
- Create extent.properties file in the resources folder
- Execute the Tests
- View the ExtentReports
Prerequisite
- Java 8 or above installed
- Eclipse or IntelliJ IDE installed
- Gradle Installed
- Environment variables JAVA_HOME and GRADLE_HOME are correctly configured
In this tutorial, I’ll create a BDD Framework for the testing of web applications using Cucumber, and Selenium WebDriver with TestNG.
Dependency List
- Cucumber Java- 7.6.0
- Cucumber JUnit– 7.6.0
- Java 11
- TestNG – 7.6.0
- Gradle – 7.5.1
- Selenium – 4.3.0
- ExtentReport – 5.0.9
- GrassHopper Cucumber Adapter – 1.7.0
Implementation Steps
There is a tutorial that explains the Integration of Cucumber, Selenium, and TestNG in a Gradle project. Please refer to this tutorial – Gradle Project with Cucumber, Selenium and TestNG.
Step 1 – Add Extent Report dependency to the build.gradle
To create an Extent Report, we need to add the below-mentioned dependency in the build.gradle
implementation 'tech.grasshopper:extentreports-cucumber7-adapter:1.7.0'
implementation 'com.aventstack:extentreports:5.0.9'
Step 2 – Add ExtentCucumberAdapter plugin to task cucumber
task cucumber() {
    dependsOn assemble, compileTestJava
    doLast {
        javaexec {
            main = "io.cucumber.core.cli.Main"
            classpath = configurations.cucumberRuntime + sourceSets.main.output + sourceSets.test.output
            args = ['--plugin', 'pretty',
            '--plugin', 'io.qameta.allure.cucumber7jvm.AllureCucumber7Jvm',
            '--plugin', 'com.aventstack.extentreports.cucumber.adapter.ExtentCucumberAdapter:',
            '--glue', 'com.example.definitions', 'src/test/resources']
        }
    }
}
Step 3 – Add Cucumber, Selenium, and TestNG dependencies in build.gradle
dependencies {

    testImplementation 'io.cucumber:cucumber-java:7.6.0'
    testImplementation 'io.cucumber:cucumber-junit:7.6.0'

     //TestNG
     testImplementation 'org.testng:testng:7.6.0'

    //ExtentReport
    implementation 'tech.grasshopper:extentreports-cucumber7-adapter:1.7.0'
    implementation 'com.aventstack:extentreports:5.0.9'

    // This dependency is used by the application.
    implementation 'com.google.guava:guava:30.1.1-jre'
    implementation 'org.seleniumhq.selenium:selenium-java:4.4.0'
    implementation 'io.github.bonigarcia:webdrivermanager:5.3.0'
}
The complete build.gradle is shown below:
plugins {
    // Apply the application plugin to add support for building a CLI application in Java.
    id 'application'
}

repositories {
    // Use Maven Central for resolving dependencies.
    mavenCentral()
}

java {
    sourceCompatibility = 11
    targetCompatibility = 11
}

dependencies {

    // Use TestNG framework, also requires calling test.useTestNG() below
    testImplementation 'io.cucumber:cucumber-java:7.6.0'
    testImplementation 'io.cucumber:cucumber-testng:7.6.0'

    //TestNG
     testImplementation 'org.testng:testng:7.6.0'

    //ExtentReport
     implementation 'tech.grasshopper:extentreports-cucumber7-adapter:1.7.0'
     implementation 'com.aventstack:extentreports:5.0.9'

     //Others
     implementation 'com.google.guava:guava:31.0.1-jre'
     implementation 'org.seleniumhq.selenium:selenium-java:4.4.0'
     implementation 'io.github.bonigarcia:webdrivermanager:5.3.0'

}

application {
    // Define the main class for the application.
    mainClass = 'com.example.App'
}

tasks.named('test') {
    // Use TestNG for unit tests.
    useTestNG()
}

configurations {
    cucumberRuntime {
        extendsFrom testImplementation
    }
}

task cucumber() {
    dependsOn assemble, compileTestJava
    doLast {
        javaexec {
            main = "io.cucumber.core.cli.Main"
            classpath = configurations.cucumberRuntime + sourceSets.main.output + sourceSets.test.output
            args = ['--plugin', 'pretty',
            '--plugin', 'io.qameta.allure.cucumber7jvm.AllureCucumber7Jvm',
            '--plugin', 'com.aventstack.extentreports.cucumber.adapter.ExtentCucumberAdapter:',
            '--glue', 'com.example.definitions', 'src/test/resources']
        }
    }
}
Step 4 – Create Locator and Action classes and Step Definition corresponding to the feature file
As mentioned above, there is another tutorial that explains the project structure as well as the feature file and corresponding Step Definitions, please refer to this tutorial – Gradle Project with Cucumber, Selenium, and TestNG.
Step 5 – Create extent.properties file in the resources folder and paste the below code
#Extent Report
extent.reporter.spark.start=true
extent.reporter.spark.out=Reports/Spark.html

#PDF Report
extent.reporter.pdf.start=true
extent.reporter.pdf.out=PdfReport/ExtentPdf.pdf

#HTML Report
extent.reporter.html.start=true
extent.reporter.html.out=HtmlReport/ExtentHtml.html

#FolderName
basefolder.name=ExtentReports/SparkReport_
basefolder.datetimepattern=d_MMM_YY HH_mm_ss

#Screenshot
screenshot.dir=/Screenshots/
screenshot.rel.path=../Screenshots/

#Base64
extent.reporter.spark.base64imagesrc=true

#System Info
systeminfo.os=windows
systeminfo.version=10
Step 6 – Execute the Tests
Go to the app project and run the tests, using the below command
gradle cucumber
The output of the above program is
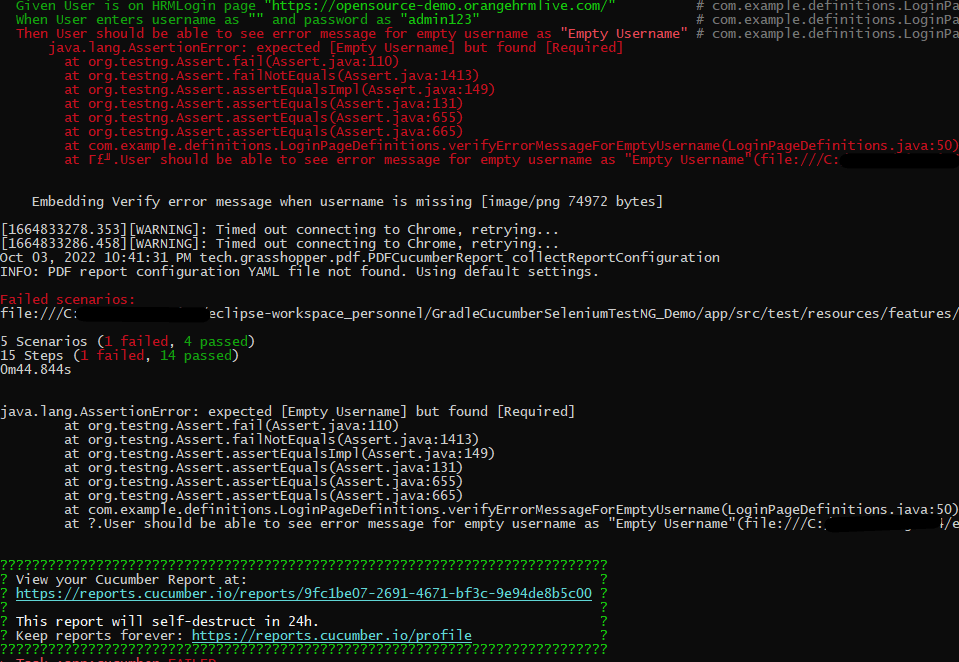
Step 7 – View the ExtentReports
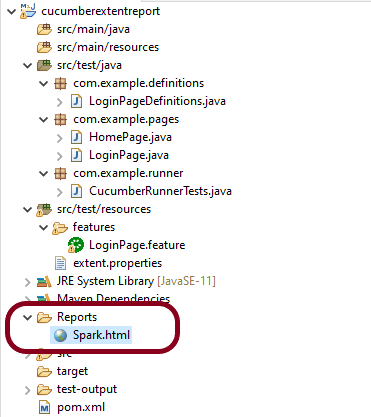
Refresh the project and will see a new folder – SparkReport_ which further contains 4 folders -Html Report, Pdf Report, Reports, and Screenshots.

The Extent Report will be present in the Report’s folder with the name Spark.html. PDF Report is present in the Pdf Report folder and HTML Report is present in the HTML report folder. We can see that the Screenshot’s folder is empty because we have used the base64imagesrc feature, which resulted in no physical screenshots. The screenshots are embedded in the reports.
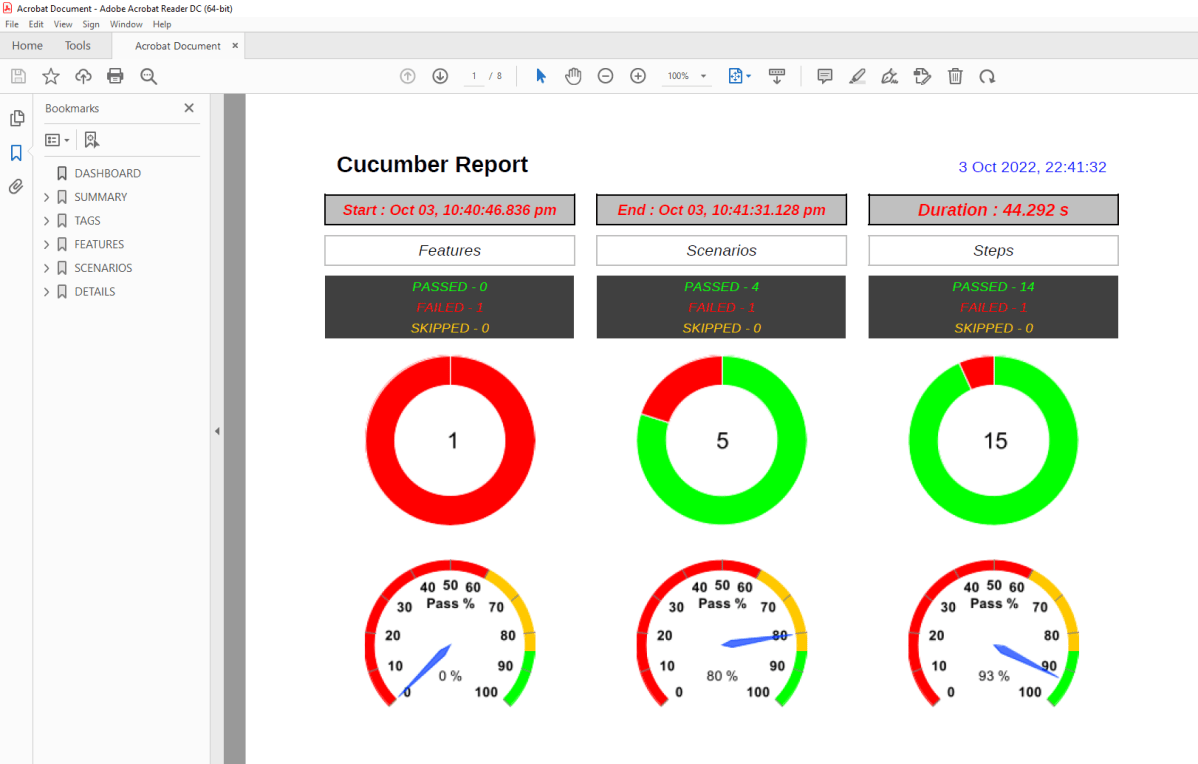
Right-click and open the ExtentHtml.html report with the Web Browser. The report also has a summary section that displays the summary of the execution. The summary includes the overview of the pass/fail using a pictogram, start time, end time, and pass/fail details of features as shown in the image below.
ExtentHtml.html

The failed test has a screenshot embedded in it. Double-click on mase64image, and it will open the screenshot in full screen.

Screenshot of failed Test Case
PDF Report
To know more about PDF Report generation, please refer to this tutorial – PDF ExtentReport for Cucumber and TestNG.
Spark Report
Right-click and open the Spark.html report with the Web Browser.

Congratulations on making it through this tutorial and hope you found it useful! Happy Learning!! Cheers!!
ExtentReports Version 5 for Cucumber 6 and TestNG
In this tutorial, we will discuss what is the ExtentReport and how to generate the ExtentReport.
Table of Contents
- What is ExtentReport?
- Prerequisite
- Project Structure
- Implementation Steps
- Add Maven dependencies to the POM
- Create a feature file in src/test/resources/
- Create extent.properties file in src/test/resources
- Create a Helper class in src/main/java
- Create Locator classes in src/main/java
- Create Action classes in src/main/java
- Create a Step Definition file in src/test/java
- Create Hook class in src/test/java
- Create a Cucumber Test Runner class in src/test/java
- Create the testng.xml for the project
- Execute the code
- View the ExtentReport
- How to customize the report folder name
What is ExtentReport?
ExtentReport is a logger-style reporting library for automated tests. ExtentReports uses the logging style to add information about test sessions, such as the creation of tests, adding screenshots, assigning tags, and adding events or series of steps to sequentially indicate the flow of test steps. ExtentReports 5 is built on an open-Core. That means, both community and professional editions use the same, full-featured API with the exception of a few reporters.
Extent Report 4 onwards, there are 2 editions of Extent Report – Core and Professional.
Below is the screenshot that shows which reporters are available in Professional or Community Editions. You can also visit this page.

This tutorial explains the use of Extent Report Core Edition.
Prerequisite:
- Java 8 or higher is needed for ExtentReport5
- Maven or Gradle
- JAVA IDE (like Eclipse, IntelliJ, or soon)
- TestNG installed
- Cucumber Eclipse plugin (in case using Eclipse)
Project Structure

Implementation Steps
Step 1 – Add Maven dependencies to the POM
Add ExtentReport dependency
<dependency>
    <groupId>com.aventstack</groupId>
    <artifactId>extentreports</artifactId>
    <version>5.0.9</version>
</dependency>
Add tech grasshopper maven dependency for Cucumber
<dependency>
    <groupId>tech.grasshopper</groupId>
    <artifactId>extentreports-cucumber6-adapter</artifactId>
    <version>2.13.0</version>
</dependency>
The complete POM.xml will look like as shown below with other Selenium and TestNG dependencies.
	<properties>
		<project.build.sourceEncoding>UTF-8</project.build.sourceEncoding>
		<cucumber.version>6.11.0</cucumber.version>
		<extentreports.cucumber6.adapter.version>2.13.0</extentreports.cucumber6.adapter.version>
		<extentreports.version>5.0.9</extentreports.version>
		<selenium.version>4.3.0</selenium.version>
		<webdrivermanager.version>5.2.1</webdrivermanager.version>
		<testng.version>7.4.0</testng.version>
		<maven.compiler.plugin.version>3.10.1</maven.compiler.plugin.version>
		<maven.surefire.plugin.version>3.0.0-M7</maven.surefire.plugin.version>
		<maven.compiler.source.version>11</maven.compiler.source.version>
		<maven.compiler.target.version>11</maven.compiler.target.version>
	</properties>

	<dependencies>

		<dependency>
			<groupId>io.cucumber</groupId>
			<artifactId>cucumber-java</artifactId>
			<version>${cucumber.version}</version>
		</dependency>

		<dependency>
           <groupId>io.cucumber</groupId>
           <artifactId>cucumber-testng</artifactId>
           <version>${cucumber.version}</version>
           <scope>test</scope>
       </dependency>

		<!-- Cucumber ExtentReport Adapter -->
		<dependency>
			<groupId>tech.grasshopper</groupId>
			<artifactId>extentreports-cucumber6-adapter</artifactId>
			<version>${extentreports.cucumber6.adapter.version}</version>
		</dependency>


		<!-- Extent Report -->
		<dependency>
			<groupId>com.aventstack</groupId>
			<artifactId>extentreports</artifactId>
			<version>${extentreports.version}</version>
		</dependency>

		<!-- Selenium -->
		<dependency>
			<groupId>org.seleniumhq.selenium</groupId>
			<artifactId>selenium-java</artifactId>
			<version>${selenium.version}</version>
		</dependency>


		<!-- Web Driver Manager -->
		<dependency>
			<groupId>io.github.bonigarcia</groupId>
			<artifactId>webdrivermanager</artifactId>
			<version>${webdrivermanager.version}</version>
		</dependency>

		<!-- TestNG -->
		<dependency>
			<groupId>org.testng</groupId>
			<artifactId>testng</artifactId>
			<version>${testng.version}</version>
			<scope>test</scope>
		</dependency>


		<!-- Apache Common -->
		<dependency>
			<groupId>org.apache.directory.studio</groupId>
			<artifactId>org.apache.commons.io</artifactId>
			<version>2.4</version>
		</dependency>

	</dependencies>

	<build>
		<plugins>
			<plugin>
				<groupId>org.apache.maven.plugins</groupId>
				<artifactId>maven-compiler-plugin</artifactId>
				<version>${maven.compiler.plugin.version}</version>
				<configuration>
					<source>${maven.compiler.source.version}</source> <!--For JAVA 8 use 1.8-->
					<target>${maven.compiler.target.version}</target> <!--For JAVA 8 use 1.8-->
				</configuration>
			</plugin>
			<plugin>
				<groupId>org.apache.maven.plugins</groupId>
				<artifactId>maven-surefire-plugin</artifactId>
				<version>${maven.surefire.plugin.version}</version>
				<configuration>
					<suiteXmlFiles>
						<suiteXmlFile>testng.xml</suiteXmlFile>
					</suiteXmlFiles>
				</configuration>
			</plugin>
		</plugins>
	</build>
</project>
Step 2: Create a feature file in src/test/resources
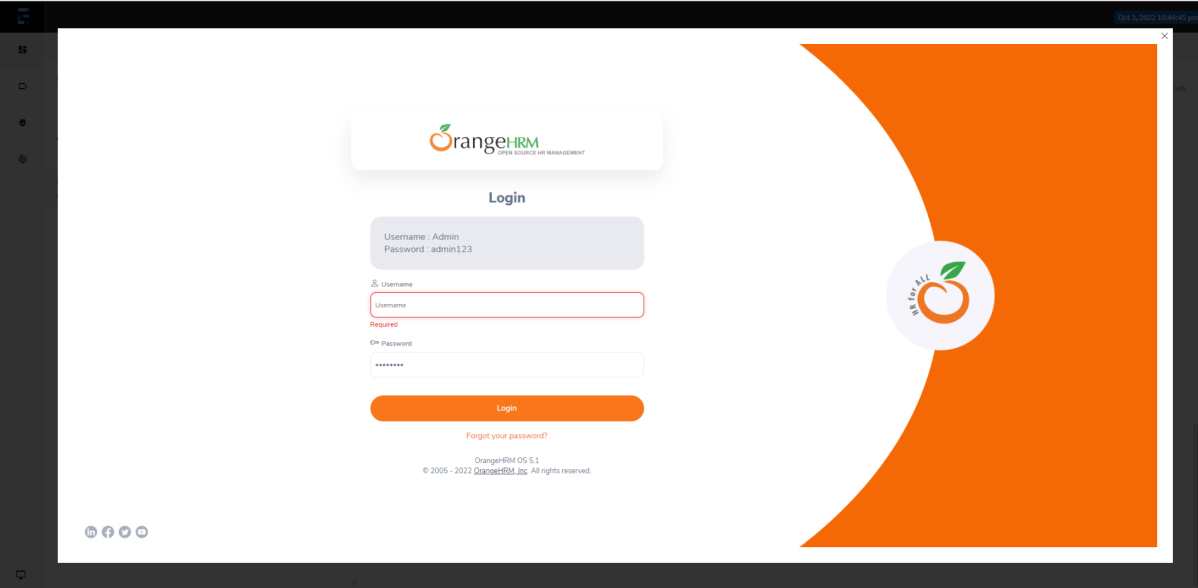
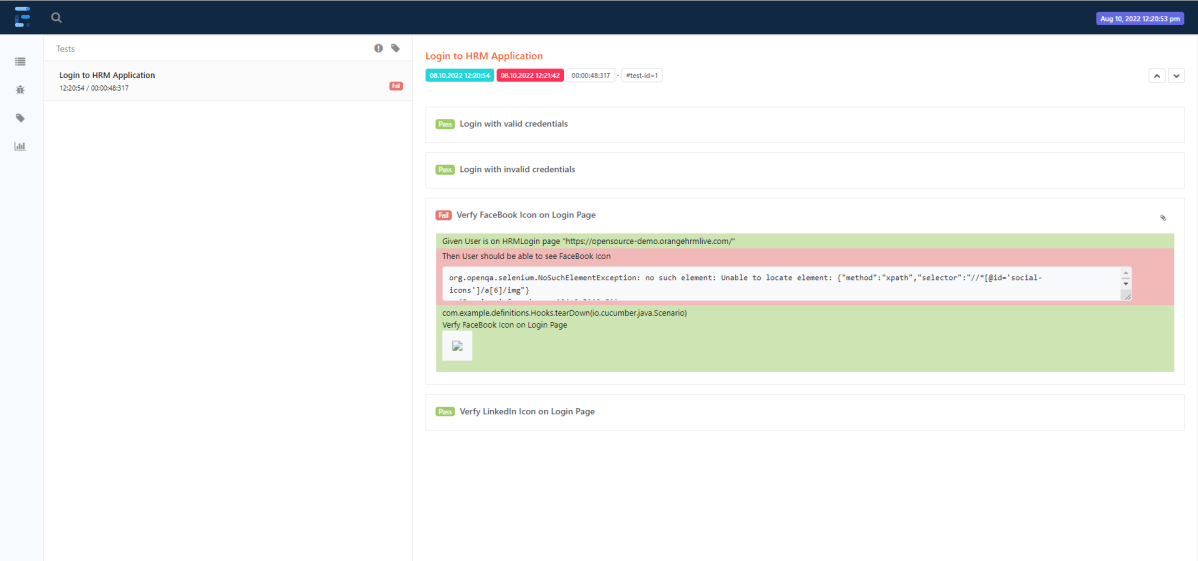
Below is a sample feature file. I have also added a failed scenario in @FaceBookLink.
Feature: Login to HRM Application

   @ValidCredentials
   Scenario: Login with valid credentials

    Given User is on HRMLogin page "https://opensource-demo.orangehrmlive.com/"
    When User enters username as "Admin" and password as "admin123"
    Then User should be able to login sucessfully and new page open

   @InvalidCredentials
   Scenario Outline: Login with invalid credentials

    Given User is on HRMLogin page "https://opensource-demo.orangehrmlive.com/"
    When User enters username as "<username>" and password as "<password>"
    Then User should be able to see error message "<errorMessage>"

  Examples:
  | username   | password    | errorMessage                           |
  |                   | abc              | Username cannot be empty     |
  | admin        |                    | Password cannot be empty          |
  |                   |                    | Username cannot be empty          |
  | Admin       | admin12$$ | Invalid credentials               |
  | admin$$    | admin123   | Invalid credentials               |


  @FaceBookLink
  Scenario: Verify FaceBook Icon on Login Page

    Given User is on HRMLogin page "https://opensource-demo.orangehrmlive.com/"
    Then User should be able to see FaceBook Icon

  @LinkedInLink
  Scenario: Verify LinkedIn Icon on Login Page

    Given User is on HRMLogin page "https://opensource-demo.orangehrmlive.com/"
    Then User should be able to see LinkedIn Icon
Step 3: Create extent.properties file in src/test/resources
We need to create the extent.properties file at the src/test/resources folder for the grasshopper extent report adapter to recognize it. Using a property file for reporting is quite helpful if you want to define several different properties.
Let’s enable spark report in an extent properties file:
extent.reporter.spark.start=true
extent.reporter.spark.out=Reports/Spark.html
Step 4: Create a Helper class in src/main/java
We have used Page Object Model with Cucumber and TestNG.
Create a Helper class where we are initializing the web driver, initializing the web driver wait, defining the timeouts, and creating a private constructor of the class, within it will declare the web driver, so whenever we create an object of this class, a new web browser is invoked. We are using a setter and getter method to get the object of Chromedriver with the help of a private constructor itself within the same class.
HelperClass
import java.time.Duration;
import org.openqa.selenium.WebDriver;
import org.openqa.selenium.chrome.ChromeDriver;
import org.openqa.selenium.support.ui.WebDriverWait;
import io.github.bonigarcia.wdm.WebDriverManager;

public class HelperClass {

	private static HelperClass helperClass;

	private static WebDriver driver;
	private static WebDriverWait wait;
    public final static int TIMEOUT = 10;

	 private HelperClass() {

			WebDriverManager.chromedriver().setup();
	    	driver = new ChromeDriver();
	        wait = new WebDriverWait(driver, Duration.ofSeconds(TIMEOUT));
        driver.manage().timeouts().implicitlyWait(Duration.ofSeconds(TIMEOUT));
	        driver.manage().window().maximize();
	 }

    public static void openPage(String url) {
        driver.get(url);
    }


	public static WebDriver getDriver() {
		return driver;
	}

	public static void setUpDriver() {

		if (helperClass==null) {

			helperClass = new HelperClass();
		}
	}

	 public static void tearDown() {

		 if(driver!=null) {
			 driver.close();
			 driver.quit();
		 }

		 helperClass = null;
	 }

}
Step 5: Create Locator classes in src/main/java
Create a locator class for each page that contains the detail of the locators of all the web elements. Here, I’m creating 2 locator classes – LoginPageLocators and HomePageLocators.
LoginPageLocators
import org.openqa.selenium.WebElement;
import org.openqa.selenium.support.FindBy;

public class LoginPageLocators {

	@FindBy(name = "txtUsername")
    public WebElement userName;

    @FindBy(name = "txtPassword")
    public WebElement password;

    @FindBy(id = "logInPanelHeading")
    public WebElement titleText;

    @FindBy(id = "btnLogin")
    public WebElement login;

    @FindBy(id = "spanMessage")
    public  WebElement errorMessage;

    @FindBy(xpath = "//*[@id='social-icons']/a[1]/img")
    public  WebElement linkedInIcon;

    @FindBy(xpath = "//*[@id='social-icons']/a[6]/img")  //Invalid Xpath
    public  WebElement faceBookIcon;

}
HomePageLocators
import org.openqa.selenium.WebElement;
import org.openqa.selenium.support.FindBy;

public class HomePageLocators {

	@FindBy(id = "welcome")
	public  WebElement homePageUserName;
}
Step 6: Create Action classes in src/main/java
Create the action classes for each web page. These action classes contain all the methods needed by the step definitions. In this case, I have created 2 action classes – LoginPageActions and HomePageActions
LoginPageActions
In this class, the very first thing will do is to create the object of LoginPageLocators class so that we should be able to access all the PageFactory elements. Secondly, create a public constructor of LoginPageActions class
import org.openqa.selenium.support.PageFactory;
import com.example.locators.LoginPageLocators;
import com.example.utils.HelperClass;

public class LoginPageActions {

	LoginPageLocators loginPageLocators = null;

    public LoginPageActions() {

    	this.loginPageLocators = new LoginPageLocators();

		PageFactory.initElements(HelperClass.getDriver(),loginPageLocators);
	}


	// Set user name in textbox
    public void setUserName(String strUserName) {
    	loginPageLocators.userName.sendKeys(strUserName);
    }

    // Set password in password textbox
    public void setPassword(String strPassword) {
    	loginPageLocators.password.sendKeys(strPassword);
    }

    // Click on login button
    public void clickLogin() {
    	loginPageLocators.login.click();
    }

    // Get the title of Login Page
    public String getLoginTitle() {
        return loginPageLocators.titleText.getText();
    }


    // Get the title of Login Page
    public String getErrorMessage() {
        return loginPageLocators.errorMessage.getText();
    }

    // LinkedIn Icon is displayed
    public Boolean getLinkedInIcon() {

        return loginPageLocators.linkedInIcon.isDisplayed();
    }

    // FaceBook Icon is displayed
    public Boolean getFaceBookIcon() {

        return loginPageLocators.faceBookIcon.isDisplayed();
    }

    public void login(String strUserName, String strPassword) {

        // Fill user name
        this.setUserName(strUserName);

        // Fill password
        this.setPassword(strPassword);

        // Click Login button
        this.clickLogin();

    }
}
HomePageActions
import org.openqa.selenium.support.PageFactory;
import com.example.locators.HomePageLocators;
import com.example.utils.HelperClass;

public class HomePageActions {

	HomePageLocators homePageLocators = null;

	public HomePageActions() {

		this.homePageLocators = new HomePageLocators();

		PageFactory.initElements(HelperClass.getDriver(),homePageLocators);
    }


    // Get the User name from Home Page
    public String getHomePageText() {
        return homePageLocators.homePageUserName.getText();
    }

}
Step 7: Create a Step Definition file in src/test/java
Create the corresponding Step Definition file of the feature file.
LoginPageDefinitions
import org.testng.Assert;
import com.example.actions.HomePageActions;
import com.example.actions.LoginPageActions;
import com.example.utils.HelperClass;
import io.cucumber.java.en.Given;
import io.cucumber.java.en.Then;
import io.cucumber.java.en.When;

public class LoginPageDefinitions{

	LoginPageActions objLogin = new LoginPageActions();
    HomePageActions objHomePage = new HomePageActions();


    @Given("User is on HRMLogin page {string}")
    public void loginTest(String url) {

    	HelperClass.openPage(url);

    }

    @When("User enters username as {string} and password as {string}")
    public void goToHomePage(String userName, String passWord) {

        // login to application
        objLogin.login(userName, passWord);

        // go the next page

    }

    @Then("User should be able to login sucessfully and new page open")
    public void verifyLogin() {

        // Verify home page
        Assert.assertTrue(objHomePage.getHomePageText().contains("Welcome"));

    }

    @Then("User should be able to see error message {string}")
    public void verifyErrorMessage(String expectedErrorMessage) {

        // Verify home page
        Assert.assertEquals(objLogin.getErrorMessage(),expectedErrorMessage);

    }

    @Then("User should be able to see LinkedIn Icon")
    public void verifyLinkedInIcon( ) {

    	Assert.assertTrue(objLogin.getLinkedInIcon());
    }

    @Then("User should be able to see FaceBook Icon")
    public void verifyFaceBookIcon( ) {

    	Assert.assertTrue(objLogin.getFaceBookIcon());
    }

}
Step 8: Create Hook class in src/test/java
Create the hook class that contains the Before and After hook. @Before hook contains the method to call the setup driver which will initialize the chrome driver. This will be run before any test.
After Hook – Here will call the tearDown method.
import com.example.utils.HelperClass;
import io.cucumber.java.After;
import io.cucumber.java.Before;

public class Hooks {

	@Before
    public static void setUp() {

       HelperClass.setUpDriver();
    }

	@After
	public static void tearDown() {

		HelperClass.tearDown();
	}
}
Step 9: Create a Cucumber Test Runner class in src/test/java
Add the extent report cucumber adapter to the runner class’s CucumberOption annotation. It is an important component of the configuration. It also ensures that the cucumber runner class recognizes and launches the extent report adapter for cucumber. Please add the following text as a plugin to the CucumberOptions as described below.
plugin = {"com.aventstack.extentreports.cucumber.adapter.ExtentCucumberAdapter:"})
This is how your runner class should look after being added to our project. Moreover, be sure to keep the colon “:” at the end.
import io.cucumber.testng.AbstractTestNGCucumberTests;
import io.cucumber.testng.CucumberOptions;

@CucumberOptions(tags = "", features = "src/test/resources/features/LoginPage.feature", glue = "com.example.definitions",
                 plugin = {"com.aventstack.extentreports.cucumber.adapter.ExtentCucumberAdapter:"})

public class CucumberRunnerTests extends AbstractTestNGCucumberTests {

}
Step 10: Create the testng.xml for the project
Right-click on the project and select TestNG -> convert to TestNG.
<?xml version="1.0" encoding="UTF-8"?>
<!DOCTYPE suite SYSTEM "https://testng.org/testng-1.0.dtd">
<suite name="Suite">
  <test name="ExtentReport5 for Cucumber">

  <classes>
  <class name = "com.example.runner.CucumberRunnerTests"/>
  </classes>
  </test> <!-- Test -->
</suite> <!-- Suite -->
Step 11: Execute the code
Right-Click on the Runner class and select Run As -> TestNG Test.
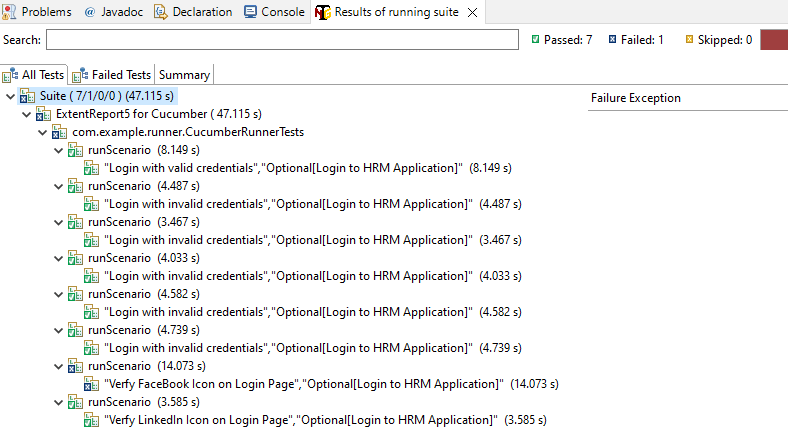
Below is the screenshot of Console. As expected, 7 tests, out of 8 are passed and 1 is failed.
Step 12: View the ExtentReport
Refresh the project and will see a new folder – Report. The ExtentReport will be present in that folder with the name Spark.html.
Right-click and open with Web Browser.
The report also has a summary section that displays the summary of the execution. The summary includes the overview of the pass/fail using a pictogram, start time, end time, and pass/fail details of features as shown in the image below.

Click on the first icon present on the left side of the report. To view the details about the steps, click on the scenarios. Clicking on the scenario will expand, showing off the details of the steps of each scenario.
Step 13: How to customize the report folder name
We learned how to generate an ExtentReport in Cucumber Junit in the previous section. The problem with the previous approach is that it will continue to override the previous report once the new report is created. Typically, we must keep a backup of all the reports generated by previous tests. To accomplish this, we must save each report with a unique report name or folder name.
It’s simple to create reports with different folder names using the Extent reporter plugin adapter. Two settings must be added to our extent. basefolder.name and basefolder.datetimepattern are properties files. The values assigned to these will be combined to form a folder name. As a result, a report will be generated within that. The basefolder.datetimepattern value must be in a valid date-time format.
Let us update the extent.properties file.
extent.reporter.spark.start=true
extent.reporter.spark.out=Spark.html

#FolderName
basefolder.name=Reports/SparkReport
basefolder.datetimepattern=d-MMM-YY HH-mm-ss
The value for basefolder.name in the preceding snippet is “Report/SparkReport.” It means that the folder will be named SparkReport, and that it will create a Report folder within the project directory. You can specify the location of your folder. In the following setting, we’ve used a date and time stamp to create unique folder names by concatenating them with the report name.
So, when we run the report, it will generate at the location shown in the image below:

Congratulation!! We are able to create an Extent Report for Cucumber. Happy Learning!!!
ExtentReports Version 4 with Selenium and TestNG
In this tutorial, I will describe How to generate an ExtentReport in Selenium with the TestNG maven project.
Table of Contents
What is ExtentReports?
ExtentReports is a logger-style reporting library for automated tests. ExtentReports is a library that can be used to build a customized detailed report. It can be integrated with TestNG, JUnit, etc. This report can be built in JAVA, .NET and it provides a detailed summary of each test case and each test step too in a graphical manner. Extent reports produce HTML-based documents that offer several advantages like pie charts, graphs, screenshots addition, and test summary. ExtentReports 4 is built on an open-Core.
Project Structure

Implementation Steps
1. Add the dependencies to the POM.xml
<properties>
        <project.build.sourceEncoding>UTF-8</project.build.sourceEncoding>
        <selenium.version>4.3.0</selenium.version>
        <testng.version>7.4.0</testng.version>
        <extentreports.version>4.0.0</extentreports.version>
        <webdrivermanager.version>5.2.1</webdrivermanager.version>
        <maven-surefire-plugin-version>3.0.0-M5</maven-surefire-plugin-version>
    </properties>

	<dependencies>

		<!-- Extent Report -->
		<dependency>
			<groupId>com.aventstack</groupId>
			<artifactId>extentreports</artifactId>
			<version>${extentreports.version}</version>
		</dependency>

		<!-- TestNG -->
		<dependency>
			<groupId>org.testng</groupId>
			<artifactId>testng</artifactId>
			<version>${testng.version}</version>
			<scope>test</scope>
		</dependency>

		<!-- Apache Common -->
		<dependency>
			<groupId>org.apache.directory.studio</groupId>
			<artifactId>org.apache.commons.io</artifactId>
			<version>2.4</version>
		</dependency>

		<!-- Selenium -->
		<dependency>
			<groupId>org.seleniumhq.selenium</groupId>
			<artifactId>selenium-java</artifactId>
			<version>${selenium.version}</version>
		</dependency>

		<!-- Web Driver Manager -->
		<dependency>
			<groupId>io.github.bonigarcia</groupId>
			<artifactId>webdrivermanager</artifactId>
			<version>${webdrivermanager.version}</version>
		</dependency>

	</dependencies>

	<build>
		<plugins>
			<plugin>
				<groupId>org.apache.maven.plugins</groupId>
				<artifactId>maven-compiler-plugin</artifactId>
				<configuration>
					<source>11</source> <!--For JAVA 8 use 1.8-->
					<target>11</target> <!--For JAVA 8 use 1.8-->
				</configuration>
			</plugin>
			<plugin>
				<groupId>org.apache.maven.plugins</groupId>
				<artifactId>maven-surefire-plugin</artifactId>
				<version>${maven-surefire-plugin-version}</version>
				<configuration>
					<suiteXmlFiles>
						<suiteXmlFile>testng.xml</suiteXmlFile>
					</suiteXmlFiles>
				</configuration>
			</plugin>
		</plugins>
	</build>
</project>
2. Create ExtentManager Class
In this class, we created a createInstance() method. Also, you need to set your ExtentReports report HTML file location.
import java.io.File;
import java.io.IOException;
import java.util.Date;
import org.apache.commons.io.FileUtils;
import org.openqa.selenium.TakesScreenshot;
import com.aventstack.extentreports.ExtentReports;
import com.aventstack.extentreports.reporter.ExtentHtmlReporter;
import com.aventstack.extentreports.reporter.configuration.Theme;
import com.example.testcases.BaseTests;
import org.openqa.selenium.OutputType;

public class ExtentManager extends BaseTests{

	private static ExtentReports extent;
	public static String screenshotName;

    public static ExtentReports createInstance(String fileName) {

    	ExtentHtmlReporter htmlReporter = new ExtentHtmlReporter(fileName);

        htmlReporter.config().setTheme(Theme.DARK);
        htmlReporter.config().setDocumentTitle(fileName);
        htmlReporter.config().setEncoding("utf-8");
        htmlReporter.config().setReportName(fileName);

        extent = new ExtentReports();
        extent.attachReporter(htmlReporter);
        extent.setSystemInfo("Release No", "22");
        extent.setSystemInfo("Environment", "QA");
        extent.setSystemInfo("Build no", "B-12673");

        return extent;
    }


	public static void captureScreenshot() {

		TakesScreenshot screenshot = (TakesScreenshot)driver;

        // Call method to capture screenshot
        File src = screenshot.getScreenshotAs(OutputType.FILE);

        try
        {
        	Date d = new Date();
    		screenshotName = d.toString().replace(":", "_").replace(" ", "_") + ".jpg";
            FileUtils.copyFile(src,new File(System.getProperty("user.dir") + "\\reports\\" + screenshotName));
            System.out.println("Successfully captured a screenshot");
       } catch (IOException e) {
           System.out.println("Exception while taking screenshot " + e.getMessage());
      }
	}
}
The ExtentHtmlReporter is used for creating an HTML file, and it accepts a file path as a parameter.
ExtentHtmlReporter htmlReporter = new ExtentHtmlReporter(fileName);
The file path represents the path in which our extent report would be generated. This is defined in ExtentListeners class.
	static Date d = new Date();
	static String fileName = "ExtentReport_" + d.toString().replace(":", "_").replace(" ", "_") + ".html";

	private static ExtentReports extent = ExtentManager.createInstance(System.getProperty("user.dir")+"\\reports\\"+fileName);
ExtentHtmlReporter is also used to customize the extent reports. It allows many configurations to be made through the config() method. Some of the configurations that can be made are described below.
htmlReporter.config().setDocumentTitle(fileName);
htmlReporter.config().setEncoding("utf-8");
htmlReporter.config().setReportName(fileName);
We have two themes – STANDARD and DARK for customizing the look and feel of our extent reports.
htmlReporter.config().setTheme(Theme.DARK);

STANDARD Look
htmlReporter.config().setTheme(Theme.STANDARD);
captureScreenshot() is a method in ExtentTest class that attaches the captured screenshot in the Extent Report. It takes the image path where the screenshot has been captured as the parameter and attaches the screenshot to the Extent Report in Selenium.
public static void captureScreenshot() {

		TakesScreenshot screenshot = (TakesScreenshot)driver;

        // Call method to capture screenshot
        File src = screenshot.getScreenshotAs(OutputType.FILE);

        try
        {
        	Date d = new Date();
    		screenshotName = d.toString().replace(":", "_").replace(" ", "_") + ".jpg";
            FileUtils.copyFile(src,new File(System.getProperty("user.dir") + "\\reports\\" + screenshotName));
            System.out.println("Successfully captured a screenshot");
       } catch (IOException e) {
           System.out.println("Exception while taking screenshot " + e.getMessage());
      }
	}
3. Create ExtentListeners class
This class contains the action done by extent report on each step. In our tests, we implement ITestListener and use its methods. TestNG provides the @Listeners annotation, which listens to every event that occurs in a Selenium code. TestNG Listeners are activated either before the test or after the test case. It is an interface that modifies the TestNG behavior. If any event matches an event for which we want the listener to listen then it executes the code, which ultimately results in modifying the default behavior of TestNG. To know more about ITestListener, please refer to this tutorial.
import java.util.Arrays;
import java.util.Date;
import org.testng.ITestContext;
import org.testng.ITestListener;
import org.testng.ITestResult;
import com.aventstack.extentreports.ExtentReports;
import com.aventstack.extentreports.ExtentTest;
import com.aventstack.extentreports.MediaEntityBuilder;
import com.aventstack.extentreports.Status;
import com.aventstack.extentreports.markuputils.ExtentColor;
import com.aventstack.extentreports.markuputils.Markup;
import com.aventstack.extentreports.markuputils.MarkupHelper;

public class ExtentListeners implements ITestListener {

	static Date d = new Date();
	static String fileName = "ExtentReport_" + d.toString().replace(":", "_").replace(" ", "_") + ".html";

	private static ExtentReports extent = ExtentManager.createInstance(System.getProperty("user.dir")+"\\reports\\"+fileName);

	public static ThreadLocal<ExtentTest> testReport = new ThreadLocal<ExtentTest>();


	public void onTestStart(ITestResult result) {

		ExtentTest test = extent.createTest(result.getTestClass().getName()+"     @TestCase : "+result.getMethod().getMethodName());
        testReport.set(test);

	}

	public void onTestSuccess(ITestResult result) {

		String methodName=result.getMethod().getMethodName();
		String logText="<b>"+"TEST CASE:- "+ methodName.toUpperCase()+ " - PASSED"+"</b>";
		Markup markup = MarkupHelper.createLabel(logText, ExtentColor.GREEN);
		testReport.get().pass(markup);

	}

	public void onTestFailure(ITestResult result) {

		String excepionMessage = Arrays.toString(result.getThrowable().getStackTrace());
		testReport.get().fail("<details>" + "<summary>" + "<b>" + "<font color=" + "red>" + "Exception Occured:Click to see"
				+ "</font>" + "</b >" + "</summary>" +excepionMessage.replaceAll(",", "<br>")+"</details>"+" \n");

		try {

			ExtentManager.captureScreenshot();
			testReport.get().fail("<b>" + "<font color=" + "red>" + "Screenshot of failure" + "</font>" + "</b>",
					MediaEntityBuilder.createScreenCaptureFromPath(ExtentManager.screenshotName)
							.build());
		} catch (Exception e) {

		}

		String failureLogg="TEST CASE FAILED";
		Markup markup = MarkupHelper.createLabel(failureLogg, ExtentColor.RED);
		testReport.get().log(Status.FAIL, markup);

	}

	public void onTestSkipped(ITestResult result) {

		String methodName=result.getMethod().getMethodName();
		String logText="<b>"+"TEST CASE:- "+ methodName.toUpperCase()+ " - SKIPPED"+"</b>";
		Markup markup = MarkupHelper.createLabel(logText, ExtentColor.ORANGE);
		testReport.get().skip(markup);

	}

	public void onTestFailedButWithinSuccessPercentage(ITestResult result) {

	}

	public void onStart(ITestContext context) {
	}

	public void onFinish(ITestContext context) {

		if (extent != null) {

			extent.flush();
		}
	}
}
I have defined actions for onTestStart(), onTestSuccess(), onTestFailure(), onTestSkipped() and onFinish() methods.
The ITestListener is an interface that has unimplemented methods by default and we can add lines of code within each method. So whenever a specific event occurs, the code written within that method will be executed.
onTestFailure() is a method in which this listener will be invoked whenever the test fails. Within this method, we shall add our code to capture screenshots whenever the test case fails on execution. The screenshot of the failed test case is also embedded in the report.

onTestSuccess() is a method that is invoked once the test execution is complete and the test has been passed. We shall add the log included in the Extent Report to mark the test case as passed within this method
String methodName=result.getMethod().getMethodName();
String logText="<b>"+"TEST CASE:- "+ methodName.toUpperCase()+ " PASSED"+"</b>";
Markup markup = MarkupHelper.createLabel(logText, ExtentColor.GREEN);
testReport.get().pass(markup);

onTestSkipped() is a method that is invoked if the test execution is skipped. This is the same as the onTestSuccess() method.
public void onTestSkipped(ITestResult result) {

		String methodName=result.getMethod().getMethodName();
		String logText="<b>"+"TEST CASE:- "+ methodName.toUpperCase()+ " - SKIPPED"+"</b>";
		Markup markup = MarkupHelper.createLabel(logText, ExtentColor.ORANGE);
		testReport.get().skip(markup);

	}

4. Create the BaseTests class
This class contains the methods to initialize the browser and exit the browser after every test.
import java.time.Duration;
import org.openqa.selenium.WebDriver;
import org.openqa.selenium.support.ui.WebDriverWait;
import org.testng.annotations.AfterTest;
import org.testng.annotations.BeforeTest;
import io.github.bonigarcia.wdm.WebDriverManager;

public class BaseTests {

	public static WebDriver driver;
	public WebDriverWait wait;

	@BeforeTest
    public void setup() throws Exception {

       driver = WebDriverManager.firefoxdriver().create();
       driver.get("https://opensource-demo.orangehrmlive.com/");
       wait = new WebDriverWait(driver, Duration.ofSeconds(10));
       driver.manage().window().maximize();
    }

	@AfterTest
	 public  void closeBrowser() {

	   driver.close();

	  }
5. Create the LoginPage class
This class contains the locator of all the web elements and methods needed for the testing of the page.
package com.example.testcases;

import org.openqa.selenium.WebDriver;
import org.openqa.selenium.WebElement;
import org.openqa.selenium.support.FindBy;
import org.openqa.selenium.support.PageFactory;

public class LoginPage extends BaseTests{

    WebDriver driver;

    @FindBy(name = "txtUsername")
    WebElement userName;

    @FindBy(name = "txtPassword")
    WebElement password;

    @FindBy(id = "logInPanelHeading")
    WebElement titleText;

    @FindBy(id = "btnLogin")
    WebElement login;

    @FindBy(id="spanMessage")
    WebElement errorMessage;

    @FindBy(id="forgotPasswordLink")
    WebElement forgetPasswordLink;

    @FindBy(xpath="//*[@id='social-icons']/a[1]/img")
    WebElement linkedInIcon;

    public LoginPage(WebDriver driver) {
          this.driver = driver;

          // This initElements method will create all WebElements
          PageFactory.initElements(driver, this);
    }

    // Set user name in textbox
    public void setUserName(String strUserName) {
          userName.sendKeys(strUserName);
    }

    // Set password in password textbox
    public void setPassword(String strPassword) {
          password.sendKeys(strPassword);
    }

    // Click on login button
    public void clickLogin() {
          login.click();
    }

    // Get the title of Login Page
    public String getLoginTitle() {
          return titleText.getText();
    }

    // Get the text of forgotPasswordLink
    public String getforgotPasswordLinkText() {
          return forgetPasswordLink.getText();
    }

    // Get the errorMessage
    public String getErrorMessage() {
          return errorMessage.getText();
    }

    // Verify linkedInIcon is enabled
    public Boolean isEnabledLinkedIn() {
          return linkedInIcon.isEnabled();
    }

    public void login(String strUserName, String strPasword) {

          // Fill user name
          this.setUserName(strUserName);

          // Fill password
          this.setPassword(strPasword);

          // Click Login button
          this.clickLogin();
    }
}
6. Create the LoginTests class
This class contains all the tests. As we are using, I have assigned priority to all the tests to run the tests in a specified order.
import static org.testng.Assert.assertTrue;
import org.testng.Assert;
import org.testng.SkipException;
import org.testng.annotations.Test;

public class LoginTests extends BaseTests{

    LoginPage objLogin;

    @Test(priority = 0)
    public void verifyLoginPageTitle() {

          // Create Login Page object
          objLogin = new LoginPage(driver);

          // Verify login page text
          String loginPageTitle = objLogin.getLoginTitle();
          Assert.assertTrue(loginPageTitle.contains("LOGIN Panel"));
    }

    @Test(priority = 1)
    public void verifyforgetPasswordLink() {

    String expectedText= objLogin.getforgotPasswordLinkText();
    Assert.assertTrue(expectedText.contains("Forgot your password?"));

    }

    @Test(priority = 2)
    public void HomeTest() {

          // login to application
          objLogin.login("Admin1", "admin1234");

         String expectedError = objLogin.getErrorMessage();

          // Verify home page
          Assert.assertTrue(expectedError.contains("Username cannot be empty"));
    }

    @Test(priority = 3)
    public void verifyLinkedIn() {

        System.out.println("Actual linkedIn Text :" + objLogin.isEnabledLinkedIn());
        assertTrue(objLogin.isEnabledLinkedIn());

        System.out.println("Im in skip exception");
		throw new SkipException("Skipping this exception");
    }

}
In this example, there are 4 tests, and out of 4, 2 should pass, 1 should fail and 1 should skip.
7. Create TestNG.xml
In the TestNG.xml file, we shall add our classes and also the listener class.
<?xml version="1.0" encoding="UTF-8"?>
<!DOCTYPE suite SYSTEM "https://testng.org/testng-1.0.dtd">
<suite name="Extent Report Demo">

<listeners>
     <listener class-name ="com.example.extentlisteners.ExtentListeners"/>
  </listeners>

  <test name="Login Tests">
    <classes>
      <class name="com.example.testcases.LoginTests"/>
    </classes>
  </test> <!-- Test -->
</suite> <!-- Suite -->
8. Execute the tests from testng.xml
Right-click on testng.xml and select Run As -> TestNG Suite.

9 Test Execution Result
The test execution result can be seen in the console.

10. Extent Report Generation
Refresh the project and will see a folder with the name of the reports present in the project.

Right-click the report and open it in your choice of browser.
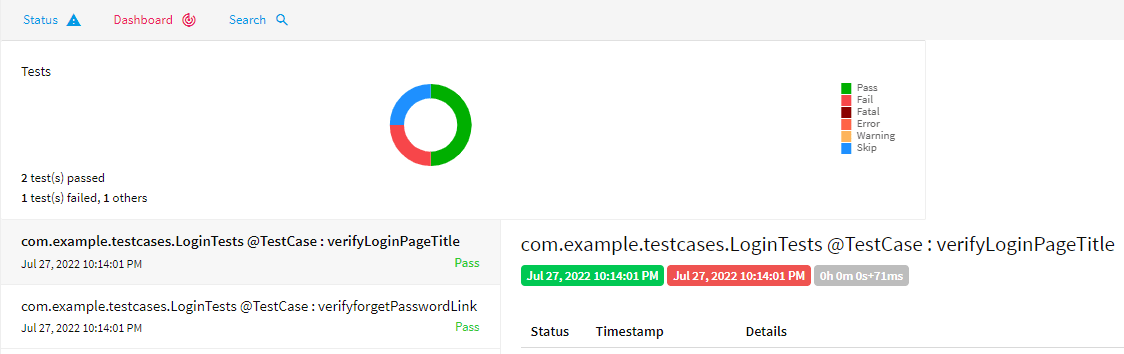
Upon opening the Extent Report, you can see the summary of the tests executed.

This is the view of the dashboard in the Extent Report. This page provides a complete view of the total number of tests executed, passed tests, failed tests, the total time taken for executing the tests, and also the classification of the tests based on the category.

Extent reports produce simple and visually appealing reports. Furthermore, the HTML-based report is simple to share with other stakeholders. Extent Reports provide greater detail, allowing testers to be more effective when it comes to quickly debugging software.
Congratulations!! We are able to generate an ExtentReport. Happy Learning!!
Integration Testing of Springboot with Cucumber and TestNG
In this tutorial, I am going to build an automation framework to test the Springboot application with Cucumber, Rest Assured, and TestNG.
What is Springboot?
Spring Boot is an open-source micro-framework maintained by a company called Pivotal. It provides Java developers with a platform to get started with an auto-configurable production-grade Spring application. With it, developers can get started quickly without losing time on preparing and configuring their Spring application.
What is Cucumber?
Cucumber is a software tool that supports behavior-driven development (BDD). Cucumber can be defined as a testing framework, driven by plain English. It serves as documentation, automated tests, and development aid – all in one.
This framework consists of:
- Springboot – 2.5.2
- Cucumber – 7.3.4
- Java 11
- TestNG – 7.3.4
- Maven – 3.8.1
- RestAssured – 5.1.1

Steps to setup Cucumber Test Automation Framework for API Testing using Rest-Assured
- Add SpringbootTest, Rest-Assured, JUnit, and Cucumber dependencies to the project
- Create a source folder src/test/resources and create a feature file under src/test/resources
- Create the Step Definition class or Glue Code for the Test Scenario under the src/test/java directory
- Create a Cucumber Runner class under the src/test/java directory
- Run the tests from Cucumber Test Runner
- Run the tests from Command Line
- Run the tests from TestNG
- Generation of TestNG Reports
- Cucumber Report Generation
Below is the structure of a SpringBoot application project
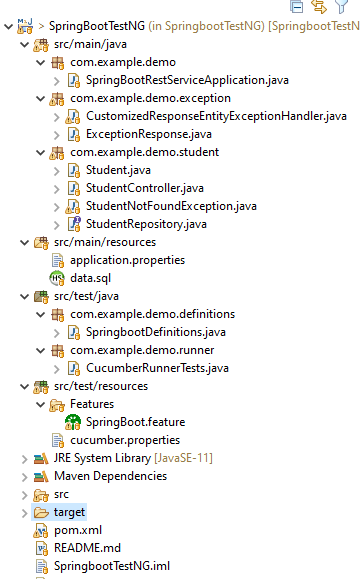
We need the below files to create a SpringBoot Application.
SpringBootRestServiceApplication.java
The Spring Boot Application class is generated with Spring Initializer. This class acts as the launching point for the application.
import org.springframework.boot.SpringApplication;
import org.springframework.boot.autoconfigure.SpringBootApplication;

@SpringBootApplication
public class SpringBootRestServiceApplication {

    public static void main(String[] args) {

        SpringApplication.run(SpringBootRestServiceApplication.class, args);
    }
}
Student.java
This is JPA Entity for Student class
import javax.persistence.Entity;
import javax.persistence.GeneratedValue;
import javax.persistence.Id;
import javax.validation.constraints.NotBlank;
import javax.validation.constraints.NotNull;
import javax.validation.constraints.Size;

@Entity
public class Student {
    @Id
    @GeneratedValue
    private Long id;

    @NotNull
    @Size(min = 4, message = "Name should have atleast 4 characters")
    private String name;

    @NotBlank(message = "passportNumber is mandatory")
    private String passportNumber;

    public Student() {
        super();
    }

    public Student(Long id, String name, String passportNumber) {
        super();
        this.id = id;
        this.name = name;
        this.passportNumber = passportNumber;
    }

    public Long getId() {
        return id;
    }

    public void setId(Long id) {
        this.id = id;
    }

    public String getName() {
        return name;
    }

    public void setName(String name) {
        this.name = name;
    }

    public String getPassportNumber() {
        return passportNumber;
    }

    public void setPassportNumber(String passportNumber) {
        this.passportNumber = passportNumber;
    }
}
StudentRepository.java
This is JPA Repository for Student. This is created using Spring Data JpaRepository.
import org.springframework.data.jpa.repository.JpaRepository;
import org.springframework.stereotype.Repository;

@Repository
public interface StudentRepository extends JpaRepository<Student, Long>{

}
StudentController.java
Spring Rest Controller exposes all services on the student resource.
import static org.springframework.hateoas.server.mvc.WebMvcLinkBuilder.linkTo;
import static org.springframework.hateoas.server.mvc.WebMvcLinkBuilder.methodOn;
import java.net.URI;
import java.util.List;
import java.util.Optional;
import javax.validation.Valid;
import org.springframework.beans.factory.annotation.Autowired;
import org.springframework.hateoas.EntityModel;
import org.springframework.hateoas.server.mvc.WebMvcLinkBuilder;
import org.springframework.http.ResponseEntity;
import org.springframework.web.bind.annotation.GetMapping;
import org.springframework.web.bind.annotation.PathVariable;
import org.springframework.web.bind.annotation.PostMapping;
import org.springframework.web.bind.annotation.RequestBody;
import org.springframework.web.bind.annotation.RestController;
import org.springframework.web.servlet.support.ServletUriComponentsBuilder;

@RestController
public class StudentController {

    @Autowired
    private StudentRepository studentRepository;

    @GetMapping("/students")
    public List<Student> retrieveAllStudents() {
        return studentRepository.findAll();
    }

    @GetMapping("/students/{id}")
    public EntityModel<Student> retrieveStudent(@PathVariable long id) {
        Optional<Student> student = studentRepository.findById(id);

        if (!student.isPresent())
            throw new StudentNotFoundException("id-" + id);

        EntityModel<Student> resource = EntityModel.of(student.get());

        WebMvcLinkBuilder linkTo = linkTo(methodOn(this.getClass()).retrieveAllStudents());

        resource.add(linkTo.withRel("all-students"));

        return resource;
    }

    @PostMapping("/students")
    public ResponseEntity<Object> createStudent(@Valid @RequestBody Student student) {
        Student savedStudent = studentRepository.save(student);

        URI location = ServletUriComponentsBuilder.fromCurrentRequest().path("/{id}")
                .buildAndExpand(savedStudent.getId()).toUri();

        return ResponseEntity.created(location).build();

    }
}
application.properties
Spring Boot automatically loads the application.properties whenever it starts up. You can de-reference values from the property file in the java code through the environment.
spring.jpa.defer-datasource-initialization=true
data.sql
Data is loaded from data.sql into the Student table. Spring Boot would execute this script after the tables are created from the entities.
insert into student values(10001,'Annie', 'E1234567');
insert into student values(20001,'John', 'A1234568');
insert into student values(30001,'David','C1232268');
insert into student values(40001,'Amy','D213458');
Test Automation Framework Implementation
Step 1 – Add SpringbootTest, Cucumber, Rest-Assured, and TestNG dependencies to the project (Maven project)
 <properties>
        <project.build.sourceEncoding>UTF-8</project.build.sourceEncoding>
        <rest-assured.version>5.1.1</rest-assured.version>
        <cucumber.version>7.3.4</cucumber.version>
    </properties>

<dependencies>

        <dependency>
            <groupId>org.springframework.boot</groupId>
            <artifactId>spring-boot-starter-test</artifactId>
            <scope>test</scope>
        </dependency>

        <dependency>
            <groupId>io.rest-assured</groupId>
            <artifactId>rest-assured</artifactId>
            <version>${rest-assured.version}</version>
            <scope>test</scope>
        </dependency>

        <dependency>
            <groupId>io.cucumber</groupId>
            <artifactId>cucumber-java</artifactId>
            <version>${cucumber.version}</version>
        </dependency>

        <dependency>
            <groupId>io.cucumber</groupId>
            <artifactId>cucumber-testng</artifactId>
            <version>${cucumber.version}</version>
            <scope>test</scope>
        </dependency>

        <dependency>
            <groupId>io.cucumber</groupId>
            <artifactId>cucumber-spring</artifactId>
            <version>${cucumber.version}</version>
            <scope>test</scope>
        </dependency>

</dependencies>
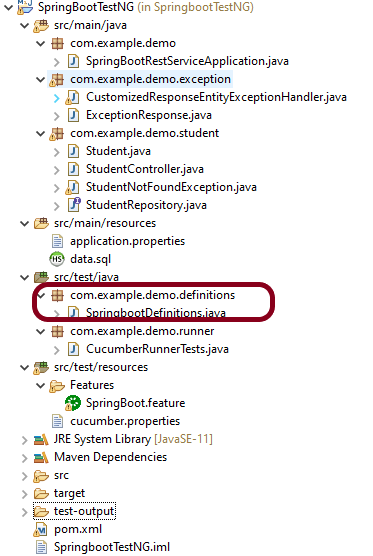
Step 2 – Create a source folder src/test/resources and create a feature file under src/test/resources
By default, the Maven project has an src/test/java directory only. Create a new Source Folder under src/test with the name of resources. Create a folder name as Features within the src/test/resources directory.

Create a feature file to test the Springboot application. Below is a sample feature file.
Feature: Verify springboot application using Cucumber and TestNG

  @ReceiveUserDetails
  Scenario Outline: Send a valid Request to get user details
    Given I send a request to the URL "/students" to get user details
    Then The response will return status 200
    And The response contains id <studentID> and names "<studentNames>" and passport_no "<studentPassportNo>"

    Examples:
      |studentID    |studentNames  |studentPassportNo|
      |10001        |Annie         |E1234567         |
      |20001        |John          |A1234568         |
      |30001        |David         |C1232268         |
      |40001        |Amy           |D213458          |


  @CreateUser
  Scenario: Send a valid Request to create a user
    Given I send a request to the URL "/students" to create a user with name "Annie" and passportNo "E1234567"
    Then The response will return status 201
    And Resend the request to the URL "/students" and the response returned contains name "Annie" and passport_no "E1234567"
Step 3 – Create the Step Definition class or Glue Code for the Test Scenario under src/test/java
The corresponding step definition file of the above feature file is shown below.
import static io.restassured.RestAssured.given;
import static org.hamcrest.Matchers.containsString;
import static org.hamcrest.Matchers.equalTo;
import static org.hamcrest.Matchers.hasItem;
import org.json.JSONObject;
import org.springframework.boot.test.context.SpringBootTest;
import org.springframework.boot.web.server.LocalServerPort;
import io.cucumber.java.en.Given;
import io.cucumber.java.en.Then;
import io.cucumber.spring.CucumberContextConfiguration;
import io.restassured.RestAssured;
import io.restassured.http.ContentType;
import io.restassured.response.ValidatableResponse;
import io.restassured.specification.RequestSpecification;

@CucumberContextConfiguration
@SpringBootTest(webEnvironment = SpringBootTest.WebEnvironment.RANDOM_PORT)
public class SpringbootDefinitions {

	private final static String BASE_URI = "http://localhost";

	@LocalServerPort
	private int port;

	private ValidatableResponse validatableResponse, validatableResponse1;

	private void configureRestAssured() {
		RestAssured.baseURI = BASE_URI;
		RestAssured.port = port;
	}

	protected RequestSpecification requestSpecification() {
		configureRestAssured();
		return given();
	}

	@Given("I send a request to the URL {string} to get user details")
	public void getStudentDetails(String endpoint) throws Throwable {
		validatableResponse = requestSpecification().contentType(ContentType.JSON).when().get(endpoint).then();
		System.out.println("RESPONSE :" + validatableResponse.extract().asString());
	}

	@Given("I send a request to the URL {string} to create a user with name {string} and passportNo {string}")
	public void createStudent(String endpoint, String studentName, String studentPassportNumber) throws Throwable {

		JSONObject student = new JSONObject();
		student.put("name", studentName);
		student.put("passportNumber", studentPassportNumber);

		validatableResponse = requestSpecification().contentType(ContentType.JSON).body(student.toString()).when()
				.post(endpoint).then();
		System.out.println("RESPONSE :" + validatableResponse.extract().asString());
	}

	@Then("The response will return status {int}")
	public void verifyStatusCodeResponse(int status) {
		validatableResponse.assertThat().statusCode(equalTo(status));

	}

	@Then("The response contains id {int} and names {string} and passport_no {string}")
	public void verifyResponse(int id, String studentName, String passportNo) {
		validatableResponse.assertThat().body("id", hasItem(id)).body(containsString(studentName))
				.body(containsString(passportNo));

	}

	@Then("Resend the request to the URL {string} and the response returned contains name {string} and passport_no {string}")
	public void verifyNewStudent(String endpoint, String studentName, String passportNo) {

		validatableResponse1 = requestSpecification().contentType(ContentType.JSON).when().get(endpoint).then();
		System.out.println("RESPONSE :" + validatableResponse1.extract().asString());
		validatableResponse1.assertThat().body(containsString(studentName)).body(containsString(passportNo));

	}
}
To make Cucumber aware of your test configuration you can annotate a configuration class on your glue path with @CucumberContextConfiguration and with one of the following annotations: @ContextConfiguration, @ContextHierarchy, or @BootstrapWith.It is imported from:
import io.cucumber.spring.CucumberContextConfiguration;
As we are using SpringBoot, we are annotating the configuration class with @SpringBootTest. It is imported from:
import org.springframework.boot.test.context.SpringBootTest;
By default, @SpringBootTest does not start the webEnvironment to refine further how your tests run. It has several options: MOCK(default), RANDOM_PORT, DEFINED_PORT, NONE.
RANDOM_PORT loads a WebServerApplicationContext and provides a real web environment. The embedded server is started and listens on a random port. LocalServerPort is imported from the package:
import org.springframework.boot.web.server.LocalServerPort;
Step 4 – Create a Cucumber TestNG Runner class under src/test/java
A runner will help us to run the feature file and acts as an interlink between the feature file and StepDefinition Class. The TestRunner should be created within the directory src/test/java.

import io.cucumber.testng.AbstractTestNGCucumberTests;
import io.cucumber.testng.CucumberOptions;

@CucumberOptions(features = {"src/test/resources/Features"}, glue = {"com.example.demo.definitions"})
public class CucumberRunnerTests extends AbstractTestNGCucumberTests {

}
The @CucumberOptions annotation is responsible for pointing to the right feature package, configuring the plugin for a better reporting of tests in the console output, and specifying the package where extra glue classes may be found. We use it to load configuration and classes that are shared between tests.
Step 5 – Run the tests from Cucumber Test Runner
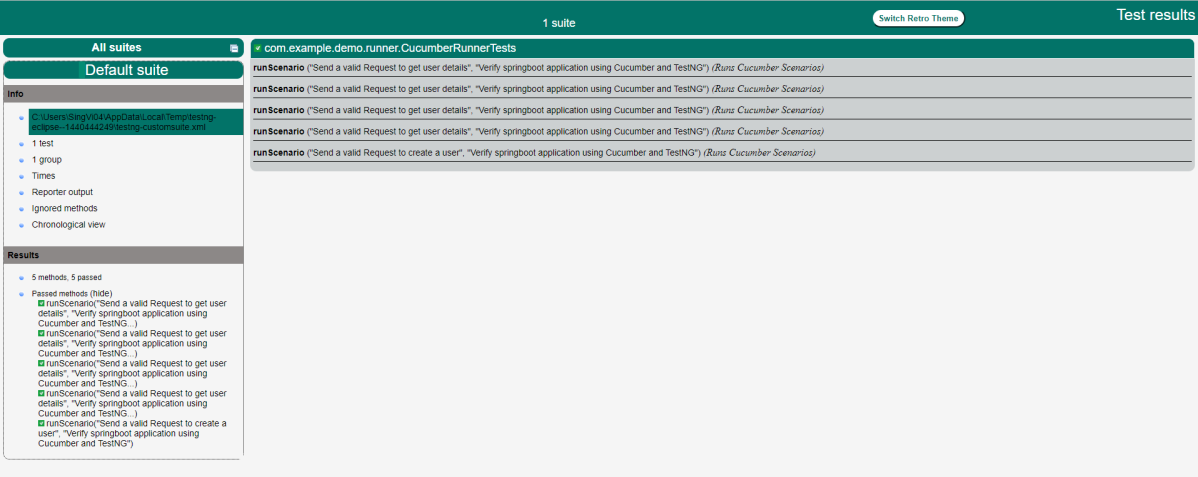
You can execute the test script by right-clicking on TestRunner class -> Run As TestNG in Eclipse.
In case you are using IntelliJ, select “Run CucumberRunnerTests“.
SpringBootTest creates an application context containing all the objects we need for the Integration Testing It, starts the embedded server, creates a web environment, and then enables methods to do Integration testing.

Step 6 – Run the tests from Command Line
Use the below command to run the tests through the command line.
mvn clean test

Step 7 – Run the tests from TestNG
Create a testng.xml in the project as shown below:
<?xml version="1.0" encoding="UTF-8"?>
<!DOCTYPE suite SYSTEM "https://testng.org/testng-1.0.dtd">
<suite name = "Suite1">
  <test name = "SpringBoot Cucumber TestNG Demo">
    <classes>
          <class name = "com.example.demo.runner.CucumberRunnerTests"/>
     </classes>
   </test>
</suite>
Step 8 – Generation of TestNG Reports
TestNG generates various types of reports under the test-output folder like emailable-report.html, index.html, testng-results.xml.

We are interested in the “emailable-report.html” report. Open “emailable-report.html”, as this is an HTML report, and open it with the browser. The below image shows emailable-report.html.

TestNG also produce “index.html” report, and it resides under test-output folder. The below image shows index.html report.
Step 9 – Cucumber Report Generation
Add cucumber.properties under src/test/resources and add the below instruction in the file.
cucumber.publish.enabled=true
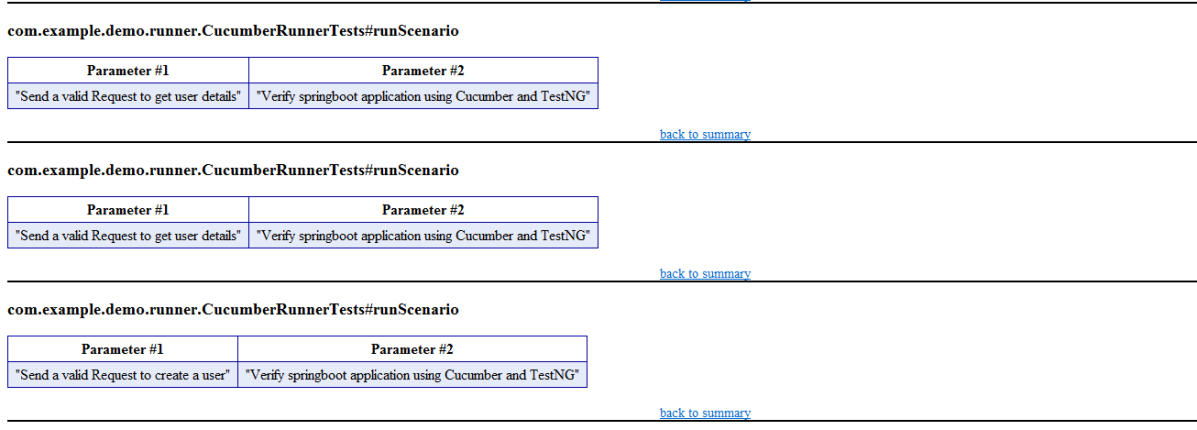
The link to the Cucumber Report is present in the execution status.

Below is the image of the Cucumber Report generated using the Cucumber Service.

Complete Source Code:
Refer to GitHub for the source code.
Congratulations!! We are able to build a test framework to test the SpringBoot application using Cucumber, Rest Assured, and TestNG.
Explicit Wait in Serenity
In the previous tutorial, I explained the Implicit Wait in Serenity. This tutorial will explain the Explicit Wait in Serenity.
What is Explicit Wait?
The explicit wait is used to wait for a specific web element on the web page for a specified amount of time. You can configure wait time element by element basis.
By default, the explicit wait is for 5 sec, with an interval of 10 ms.
Below is the example where I have created two classes – ExplicitWaitDemo and SynchronizationTests.
ExplicitWaitDemo
@DefaultUrl("http://the-internet.herokuapp.com/dynamic_loading/1")
public class ExplicitWaitDemo extends PageObject {

    //Incorrect XPath
	@FindBy(xpath = "//*[@id='start']/buttons")
	WebElementFacade startButton;

	@FindBy(xpath = "//*[@id='finish']/h4")
	WebElementFacade pageText;

	public void explicitWaitDemo1() throws InterruptedException {

		open();

		startButton.waitUntilClickable().click();

	}
}
SynchronizationTests
@RunWith(SerenityRunner.class)
public class SynchronizationTests {

	ExplicitWaitDemo ewaitDemo;

	@Managed
	WebDriver driver;

	@Test
	public void waitTest1() throws InterruptedException {

		ewaitDemo.explicitWaitDemo1();

	}

}
You can see that Serenity waited for 5 sec, with an interval of 100 ms.

When we need to wait for a web element for a specific amount of time, then the below-mentioned command can be added to serenity.conf.
webdriver {
      wait {
         for {
            timeout = 6000

        }
   }
}
The same can be added to serenity.properties as shown below.
webdriver.wait.for.timeout = 6000
Now, let us run the same above test. I have used the incorrect XPath for the button. So the test should fail after trying to locate the button for 6 secs.
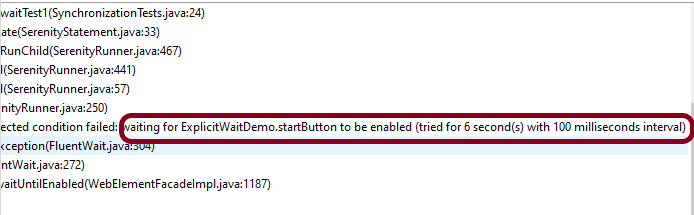
You can print the explicit wait time by using the method – getWaitForTimeout().
In the below example, I have used the explicit wait as 6 sec and which is also returned by the method – getWaitForTimeout().
@DefaultUrl("http://the-internet.herokuapp.com/dynamic_loading/2")
public class ExplicitWaitDemo extends PageObject {

	@FindBy(xpath = "//*[@id='start']/button")
	WebElementFacade startButton;

	@FindBy(xpath = "//*[@id='finish']/h4")
	WebElementFacade pageText;

	public void explicitWaitDemo1() throws InterruptedException {

		open();

		startButton.click();

		System.out.println("Explicit Time defined for the test (in seconds):" + getWaitForTimeout().toSeconds());

	}
}
The output of the above program is

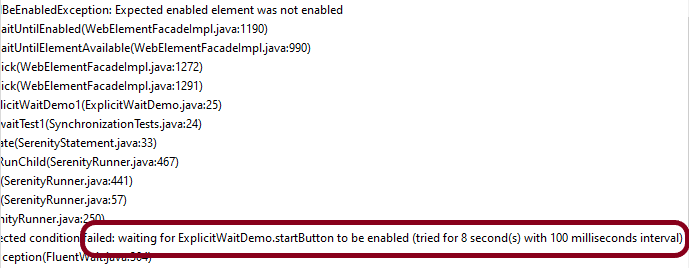
You can override the value of explicit wait mentioned in the serenity.properties or serenity.conf files. This can be done by using the method – withTimeoutOf(Duration duration).
@DefaultUrl("http://the-internet.herokuapp.com/dynamic_loading/1")
public class ExplicitWaitDemo extends PageObject {

    //Incorrect XPath
	@FindBy(xpath = "//*[@id='start']/buttons")
	WebElementFacade startButton;

	@FindBy(xpath = "//*[@id='finish']/h4")
	WebElementFacade pageText;

	public void explicitWaitDemo1() throws InterruptedException {

		open();

       //Override the value mentioned in serenity.conf for timeout from 6 sec to 8 sec
		startButton.withTimeoutOf(Duration.ofSeconds(8)).click();

	}
}
The output of the above program is
You can also wait for more arbitrary conditions, e.g.
@DefaultUrl("http://the-internet.herokuapp.com/dynamic_loading/2")
public class ExplicitWaitDemo extends PageObject {
@FindBy(xpath = "//*[@id='start']/button")
WebElementFacade startButton;
@FindBy(xpath = "//*[@id='finish']/h4")
WebElementFacade pageText;
public void explicitWaitDemo1() throws InterruptedException {
open();
startButton.click();
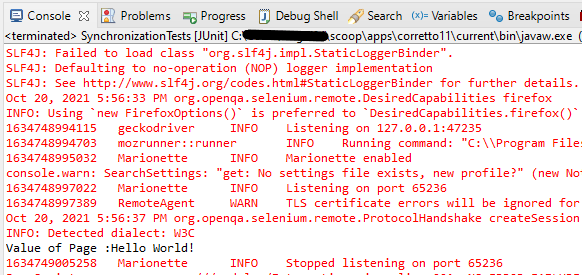
String expected = waitFor(pageText).getText();
System.out.println("Value of Page :" + expected);
Assert.assertEquals("Hello World!", expected);
}
}
The output of the above program is
You can also specify the timeout for a field. For example, if you wanted to wait for up to 8 seconds for a button to become clickable before clicking on it, you could do the following:
startButton.withTimeoutOf(Duration.ofSeconds(8)).waitUntilClickable().click();
Finally, if a specific element of a PageObject needs to have a bit more time to load, you can use the timeoutInSeconds attribute in the Serenity @FindBy annotation, e.g.
import net.serenitybdd.core.annotations.findby.FindBy;
...
@FindBy(xpath = ("//*[@id='start']/button"), timeoutInSeconds="10"))
public WebElementFacade startButton;
To wait for a specific text on the web page, you can use waitForTextToAppear attribute
waitForTextToAppear("Example 1").waitFor(startButton).click();
There are many other methods that can be used with Explicit Wait.
We are done! Congratulations on making it through this tutorial and hope you found it useful! Happy Learning!!
Data Driven Tests in Serenity with JUnit
In the previous tutorial, I have explained the Testing of Web Application using Serenity with JUnit4. In this tutorial, I will explain Data Driven Tests in Serenity with JUnit4. Serenity provides features to support Data Driven tests. Refer this tutorial to know how to setup a Serenity project with JUnit4.
There is a parameterized Test Runner to perform data driven tests in JUnit4.
@RunWith(SerenityParameterizedRunner.class)
This runner is very similar to the JUnit Parameterized test runner. Here, @TestData annotation is used to provide test data to the test, and you can use all of the other Serenity annotations like (@Managed, @Steps, @Title and so on). This test runner will also generate proper serenity reports for the executed tests.
Below is an example of data-driven serenity test. In this test, I have created a Test Class (ParameterizationTests) and Step Class (StepLoginPage) and Action Class (NavigateActions). I am passing a set of incorrect credentials to the Login page and will verify the error message.
Here is the code for ParameterizationTests.
@RunWith(SerenityParameterizedRunner.class)
public class ParameterizationTests {

    private final String userName;
    private final String passWord;
    private final String errorMessage;

    @Managed(options = "--headless")
    WebDriver driver;

    @Steps
    NavigateActions navigate;

    @Steps
    StepLoginPage loginPage;

    public ParameterizationTests(String userName, String passWord, String errorMessage) {
        super();
        this.userName = userName;
        this.passWord = passWord;
        this.errorMessage = errorMessage;
    }

    @TestData(columnNames = "Username, Password, ErrorMessage")
    public static Collection<Object[]> testData() {
        return Arrays.asList(new Object[][] { { "Admin12", "", "Password cannot be empty" },
                { "", "abc12", "Username cannot be empty" }, { "_Admin1", "admin123_", "Invalid credentials" },
                { " ", " ", "Username cannot be empty" } });
    }

    @Qualifier
     public String qualifier(){return " - " + " Username = " + userName + " and " + " Password = " + passWord + " should display " + errorMessage;}
    @Test
    @Title("Login to application with invalid credential generates error message")
    public void unsuccessfulLogin() {

        // Given
        navigate.toTheHomePage();

        // When
        loginPage.inputUserName(userName);
        loginPage.inputPassword(passWord);
        loginPage.clickLogin();

        // Then
        Serenity.reportThat("Passing invalid credentials generates error message",
                () -> assertThat(loginPage.loginPageErrorMessage()).isEqualToIgnoringCase(errorMessage));
    }

}
@TestData is the annotation for a method which provides parameters to be injected into the test class constructor by Parameterized. testData() method returns an array list of objects as shown above.
The test data is injected into member variables – userName and passWord. These values are represented as instance variables in the test class, and instantiated via the constructor. These member variables are used in the test.
@Managed is annotated as a WebDriver field that is managed by the Test Runner. The Serenity Test Runner will instantiate this WebDriver before the tests start, and close it once they have all finished.
Here is the code for the StepLoginPage.
public class StepLoginPage extends PageObject {

    @FindBy(name = "txtUsername")
    WebElementFacade username;

    @FindBy(name = "txtPassword")
    WebElementFacade txtPassword;

    @FindBy(name = "Submit")
    WebElementFacade submitButton;

    @FindBy(id = "spanMessage")
    WebElementFacade errorMessage;

    @FindBy(xpath = "//*[@id='forgotPasswordLink']/a")
    WebElementFacade forgotPasswordLinkText;

    @Step("Enter Username")
    public void inputUserName(String userName) {
        $("[name='txtUsername']").sendKeys((userName));
    }

    @Step("Enter Password")
    public void inputPassword(String passWord) {
        txtPassword.sendKeys((passWord));
    }

    @Step("Click Submit Button")
    public void clickLogin() {
        submitButton.click();
    }

    @Step("Error Message on unsuccessful login")
    public String loginPageErrorMessage() {
        return errorMessage.getText();
    }

    @Step("Click Forget Password Link")
    public void clickForgetPasswordLink() {
        forgotPasswordLinkText.click();
    }
}
NavigateActions
public class NavigateActions extends UIInteractionSteps {

    @Step
    public void toTheHomePage() {
        openPageNamed("loginForm");
    }
}
There are two ways to run the tests.
- Run the tests as JUnit Tests. Right click on the test and select Run As ->JUnit Test.

2. Run the tests through command line using below command.
mvn clean verify
This will run the tests as well as generate the test execution reports – Index.html and serenity-emailable.html.
So, the tests are run and the reports are generated at the shown path.

Index.html

The heading of parameters present in the Serenity Report (Index.html) like Username, Password and Error Message are generated by @TestData as shown below:
@TestData(columnNames = "Username, Password, ErrorMessage")

The description of Test Step in the Serenity Report is modified by using @Qualifier.
It is used to mark a method as a qualifier in an instantiated data-driven test case.
  @Qualifier
    public String qualifier(){return " - " + " Username = " + userName + " and " + " Password = " + passWord + " should display " + errorMessage;}

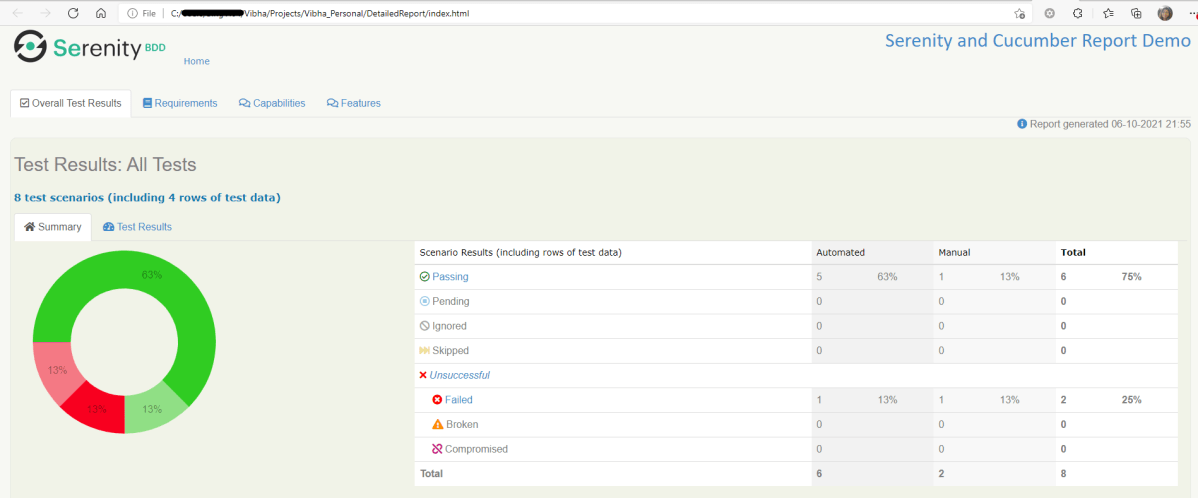
Serenity-Summary.html
It is a single-page, self-contained HTML summary report, containing an overview of the test results, and a configurable breakdown of the status of different areas of the application.

We are done! Congratulations on making it through this tutorial and hope you found it useful! Happy Learning!!
How to generate Serenity Report in customized path
In the previous tutorial, I explained the generation of Serenity Report. In this tutorial, I will explain how to generate the Serenity Report in Customized path.
Before going through this tutorial, please refer to the tutorial for Serenity Report Generation.
Add outputDirectory to serenity-maven-plugin and mention the path where we want to save our Reports.
<plugin>
<groupId>net.serenity-bdd.maven.plugins</groupId>
<artifactId>serenity-maven-plugin</artifactId>
<version>${serenity.version}</version>
<dependencies>
<dependency>
<groupId>net.serenity-bdd</groupId>
<artifactId>serenity-single-page-report</artifactId>
<version>${serenity.version}</version>
</dependency>
</dependencies>
<configuration>
<tags>${tags}</tags>
<reports>single-page-html</reports>
</configuration>
<executions>
<execution>
<id>serenity-reports</id>
<phase>post-integration-test</phase>
<goals>
<goal>aggregate</goal>
</goals>
<configuration>
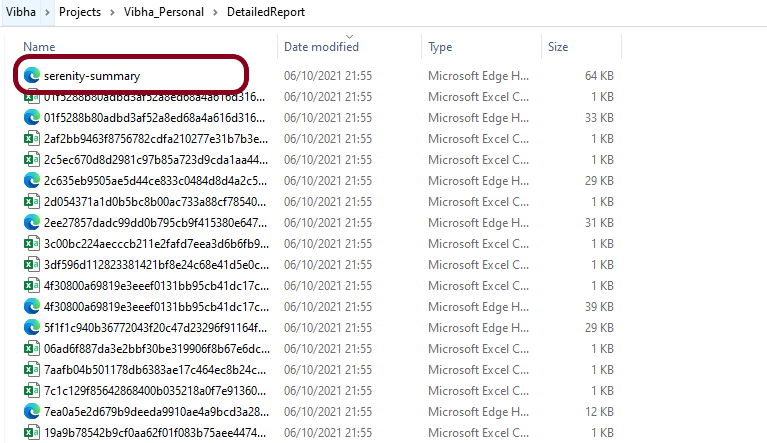
<outputDirectory>C:\\Users\\Vibha\\Projects\\Vibha_Personal\\DetailedReport</outputDirectory>
</configuration>
</execution>
</executions>
</plugin>
.........
Execute the tests using the command line
mvn clean verify
You can see that the reports are generated at the above-specified path.
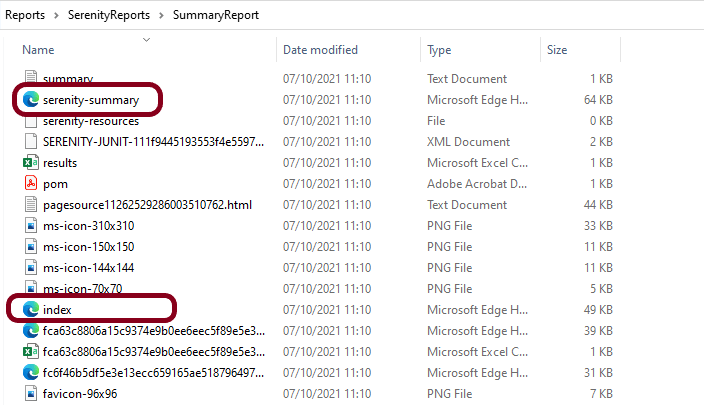
Another way is to add outputDirectory detail in serenity.properties file.
serenity.project.name = Serenity and Cucumber Report Demo
serenity.outputDirectory=C:\\Users\\Reports\\SerenityReports\\SummaryReport
How to create a Serenity Report for specified tests?
Suppose we want to run a set of tests, not a complete test suite, and we want to get the report containing the details of only executed tests, in the short a very specific report. This can be achieved by using @tags.
Suppose you mark each test suite with a tag @E2E. So to run only the tests for the @E2E, you could run the following:
mvn clean verify -Dtags="E2E"
You will also need to configure the serenity-maven-plugin to use the tags you provide at the command line:
 <plugin>
     <groupId>net.serenity-bdd.maven.plugins</groupId>
     <artifactId>serenity-maven-plugin</artifactId>
     <version>${serenity.version}</version>
     <dependencies>
        <dependency>
            <groupId>net.serenity-bdd</groupId>
            <artifactId>serenity-single-page-report</artifactId>
            <version>${serenity.version}</version>
        </dependency>
      </dependencies>
        <configuration>
             <tags>${tags}</tags>
             <reports>single-page-html</reports>
        </configuration>
        .........
When you run the tests with this configuration, you will get a test report with only the tests related to the @E2E tag.
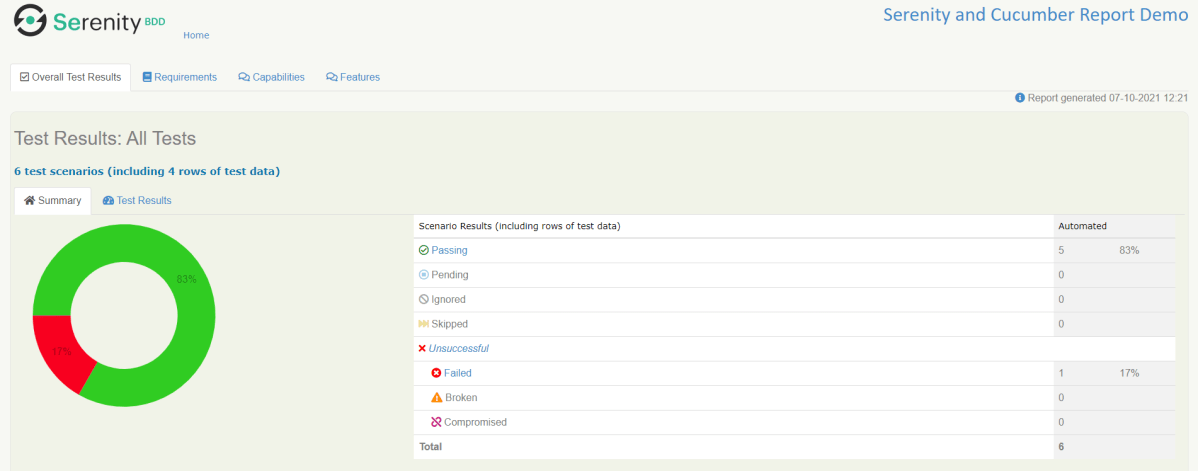
We are done! Congratulations on making it through this tutorial and hope you found it useful! Happy Learning!!
Manual Tests in Serenity with JUnit5
In this tutorial, I will explain about Manual Tests in Serenity JUnit5.
You can annotate @Test not @Steps as @Manual.
In contrast to Junit4 a test method annotated with @Manual will actually be executed. This allows to further specify the example using @Step methods and show them the report.
Below is an example where tests are annotated with @Manual with description.
@SerenityTest
public class LoginTests {

	@Managed
	WebDriver driver;

	@Steps
	StepLoginPage loginPage;

	@Steps
	StepDashboardPage dashPage;

	@Steps
	StepForgetPasswordPage forgetpasswordPage;

	@Test
	@Title("Login to application should be successful")
	public void sucessfulLogin() {

		// Given
		loginPage.open();

		// When
		loginPage.inputUserName("Admin");
		loginPage.inputPassword("admin123");
		loginPage.clickLogin();

		// Then
		dashPage.loginVerify();
	}

	@Test
	@Title("Login to application should be unsuccessful with error message")
	public void unsucessfulLogin() throws InterruptedException {

		// Given
		loginPage.open();

		// When
		loginPage.inputUserName("abc");
		loginPage.inputPassword("abc12");
		loginPage.clickLogin();

		// Then
		String actualErrorMessage = loginPage.errorMessage();
		assertEquals("Invalid credentials", actualErrorMessage);
	}

	@Test
	@Manual
	void manualDefault() {
		loginPage.manualStep();
	}

	@Test
	@Manual(result = TestResult.SUCCESS)
	void manualSuccess() {
		loginPage.manualStep();
	}

	@Test
	@Manual(result = TestResult.COMPROMISED)
	void manualCompromised() {
		loginPage.manualStep();
	}

	@Test
	@Manual(result = TestResult.ERROR)
	void manualError() {
		loginPage.manualStep();
	}

	@Test
	@Manual(result = TestResult.ERROR, reason = "A reason for the error")
	void manualErrorWithReason() {
		loginPage.manualStep();
	}

	@Test
	@Manual(result = TestResult.FAILURE)
	void manualFailure() {
		loginPage.manualStep();
	}

	@Test
	@Manual(result = TestResult.IGNORED)
	void manualIgnored() {
		loginPage.manualStep();
	}

	@Test
	@Manual(result = TestResult.PENDING)
	void manualPending() {
		loginPage.manualStep();
	}

	@Test
	@Manual(result = TestResult.SKIPPED)
	void manualSkipped() {
		loginPage.manualStep();
	}

	@Test
	@Manual(result = TestResult.UNDEFINED)
	void manualUndefined() {
		loginPage.manualStep();
	}

	@Test
	@Manual(result = TestResult.UNSUCCESSFUL)
	void manualUnsuccessful() {
		loginPage.manualStep();
	}

}
StepLoginPage.java
public class StepLoginPage extends PageObject {

	@FindBy(name = "txtUsername")
	WebElementFacade username;

	@FindBy(name = "txtPassword")
	WebElementFacade password;

	@FindBy(name = "Submit")
	WebElementFacade submitButton;

	@FindBy(id = "spanMessage")
	WebElementFacade errorMessage;

	@FindBy(id = "forgotPasswordLink")
	WebElementFacade linkText;

	@Step("Enter Username")
	public void inputUserName(String userName) {
		username.sendKeys((userName));
	}

	@Step("Enter Password")
	public void inputPassword(String passWord) {
		password.sendKeys((passWord));
	}

	@Step("Click Submit Button")
	public void clickLogin() {
		submitButton.click();
	}

	@Step("Error Message on unsuccessful login")
	public String errorMessage() {
		String actualErrorMessage = errorMessage.getText();
		System.out.println("Actual Error Message :" + actualErrorMessage);
		return actualErrorMessage;
	}

	@Step("Manual Test Step")
	public void manualStep() {

		System.out.println("Verify various status of manual step");

	}

}
StepDashboardPage.java
public class StepDashboardPage extends PageObject {

	@FindBy(id = "welcome")
	WebElementFacade dashboardText;

	@Step("Successful login")
	public void loginVerify() {
		String dashboardTitle = dashboardText.getText();
		assertThat(dashboardTitle, containsString("Welcome"));
	}
}
Execute these tests by using the below command in commandline.
mvn clean verify
There are two automated tests and rest all are Manual tests. We have Manual Test marked as Default, SUCCESS, COMPROMISED, ERROR, FAILURE, IGNORED, PENDING, SKIPPED, UNDEFINED and UNSUCCESSFUL.
The execution status looks like as shown below.
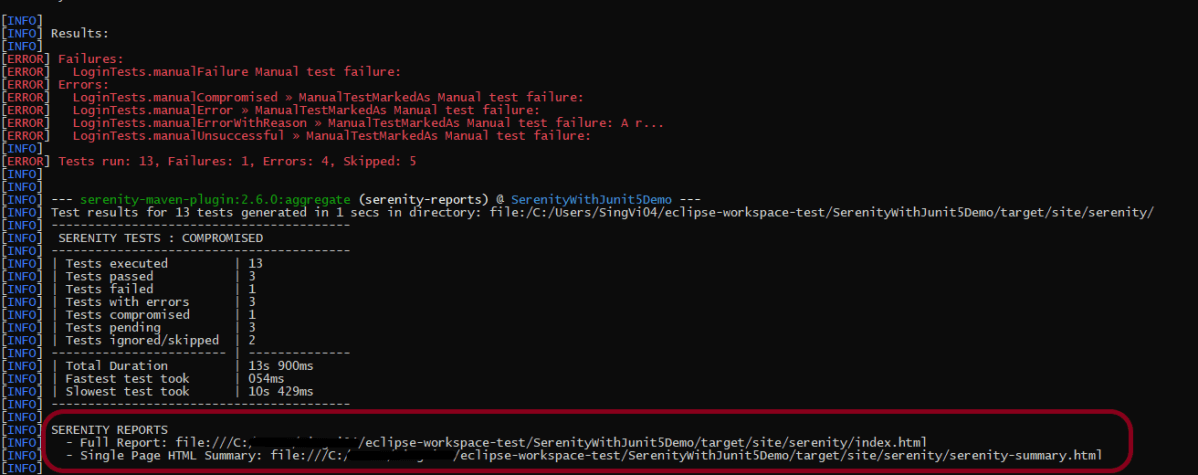
The reports are generated under /target/site/serenity. There are 2 types of Reports are generated – index.html and serenity-summary.html. To know how to generate Serenity Reports, please refer tutorials for index.html and serenity-summary.html.
By default, @manual scenarios are marked as pending in the Serenity reports.
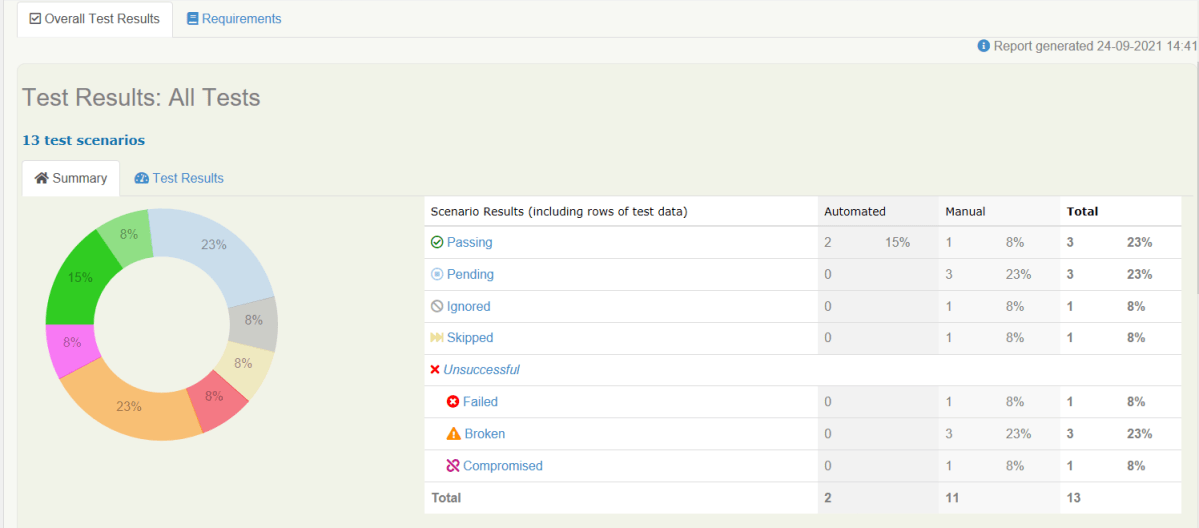
All scenarios highlighted by blue color are Pending ones whereas pink color are Broken ones.
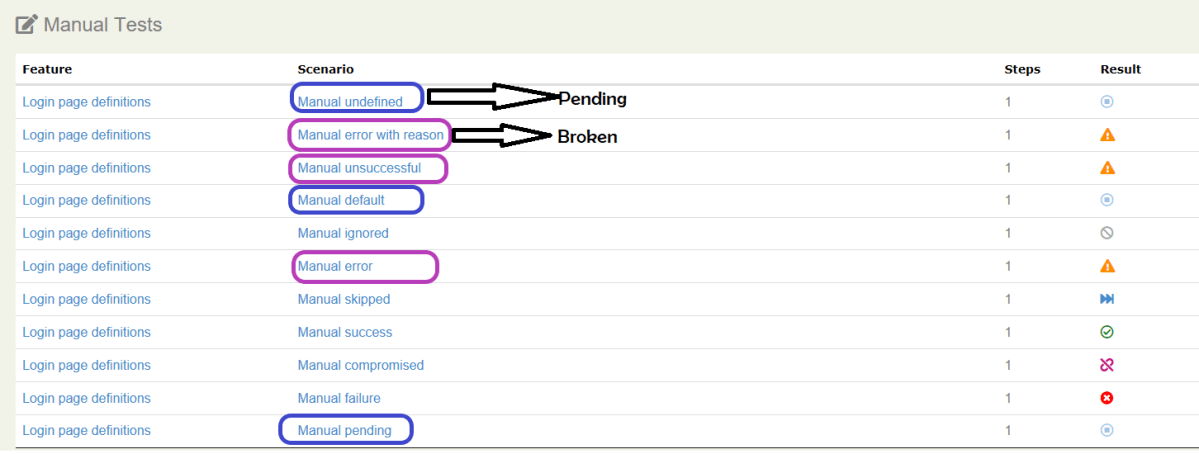
Serenity-Summary.html


We are done! Congratulations on making it through this tutorial and hope you found it useful! Happy Learning!!
