In the previous tutorial, I have explained How to create a Maven Project in IntelliJ. In this tutorail, I will explain how we can import a Java Maven project in IntelliJ IDE.
Step 1 – Open IntelliJ IDEA and Welcome Screen appears. Click Open button present on Welcome Screen.
Step 2 – Navigate to your Maven project and select the top-level folder. Select the project you want to Import. As you can see, I have selected – MavenProjectFromCMD option. Select OK button to proceed to next screen.
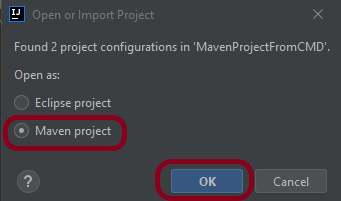
Step 3 – A screen appears to Open or Import project. It will have all the possible configurations for the project. As this is a Maven project, select Mavenproject and click OK Button.
Step 4 – A warning message box will appears. Select Trust Project Button and move forward.
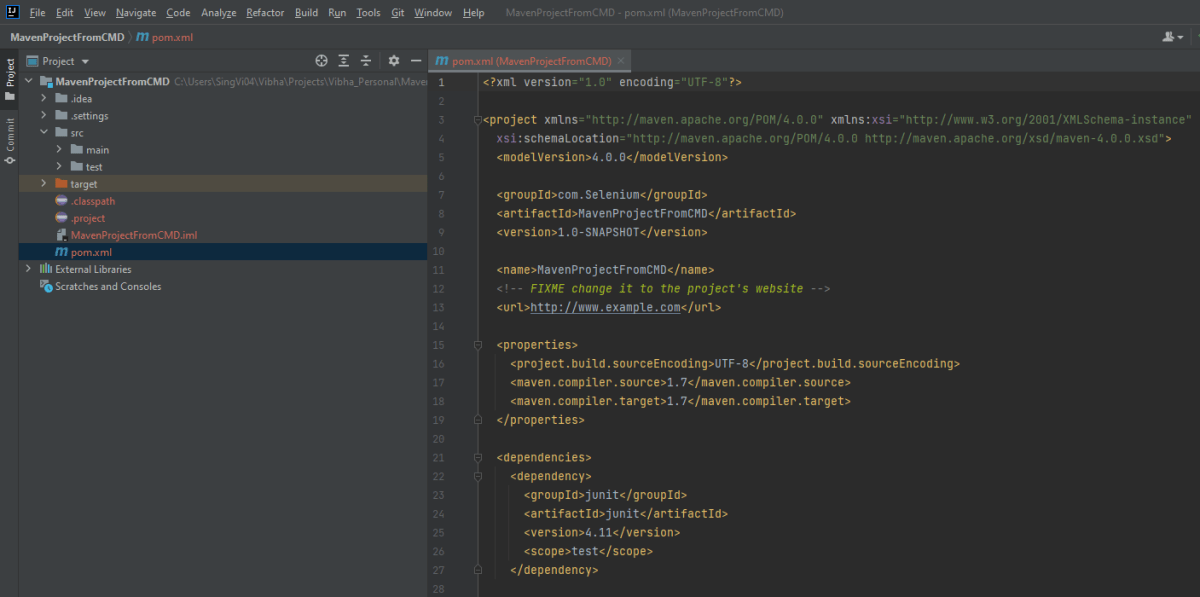
Step 5 -This screens shows that the project is imported.
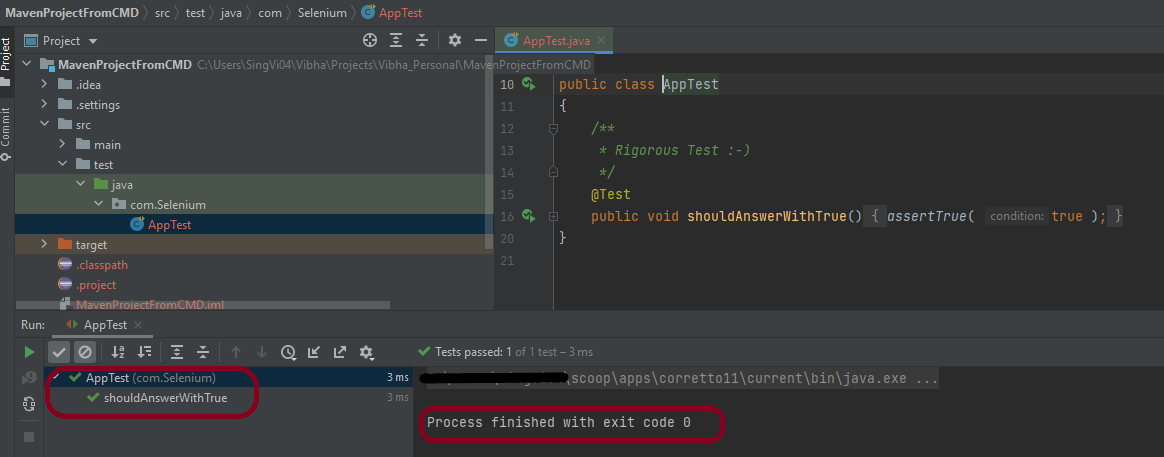
Step 6 – Run the test present in the project. Here, I have run AppTest. Right click on AppTest ->Run ‘AppTest’. Below screen shows that the project is imported successfully.
That’s it! So Simple!!!
Congratulations on making it through this tutorial and hope you found it useful! Happy Learning!!
Step 1 – Open the IntelliJ. It will look as shown below. To create a New Project, click on New Project Icon.
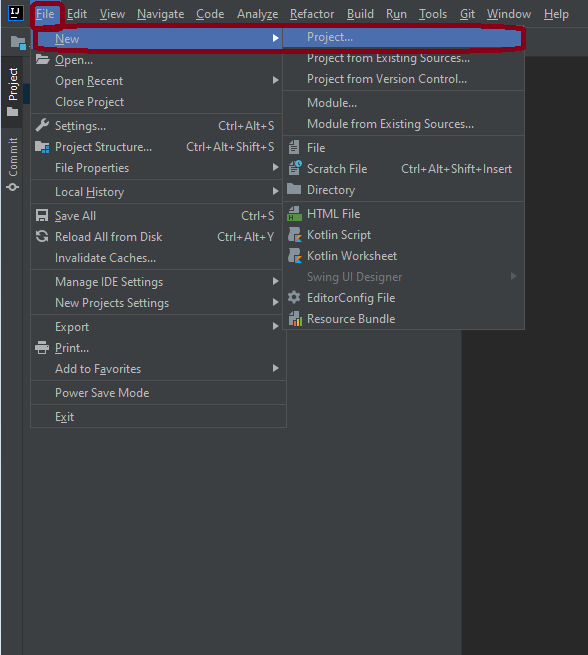
Step 2 – Click on File Option, hover on New Option, and click on Project Option as shown below.
Step 3 – Select New Project as Maven. Project SDKshould be current Java version available. Select option for Create from archetype. This will enable the options to select archetype. Select archetype : maven-archetype-quickstart. Click on the Next Button.
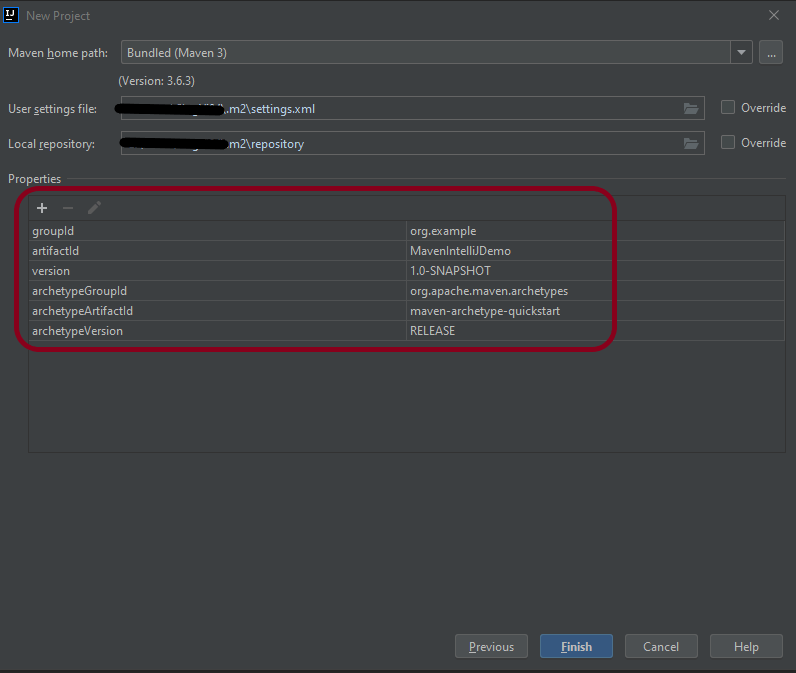
Step 4– Below screen will appear. Mention the Name, Group Id, Artifact Id, and Version. Click the Finish button
Name : MavenIntelliJDemo Group Id : com.example Artifact Id : MavenIntelliJDemo Version : 1.0-SNAPSHOT
Step 5 – Verify the information in the below screen. Click onFinish Button.
Step 6 – This dialog box will appear on the screen. This provides you the option to open the project in the current window or will open a new window with this project. I’m selecting the option – New Window.
Step 7 – This screen shows the structure of the Maven project as well as the POM.xml file.
Step 8 – Project Folder Creation – We can see a folder with the name of the project – MavenIntelliJDemo in our Eclipse Workspace.
This is how we can create the Maven project – MavenIntelliJDemo in IntelliJ.
That’s it! Congratulations on making it through this tutorial and hope you found it useful! Happy Learning!!
In the previous tutorial, I explained how to download and install IntelliJ on Windows. In this tutorial, I will explain how to create a Java project in IntelliJ.
Steps to follow:
Open the IntelliJ. It will look as shown below. To create a New Project, click on the “New Project” Icon.
2. Select Project SDK as the Java version present on your system and select the option as Java. Click on the “Next”button.
3. The next screen provides options to choose Project Template as shown below. Click on the “Next” Button.
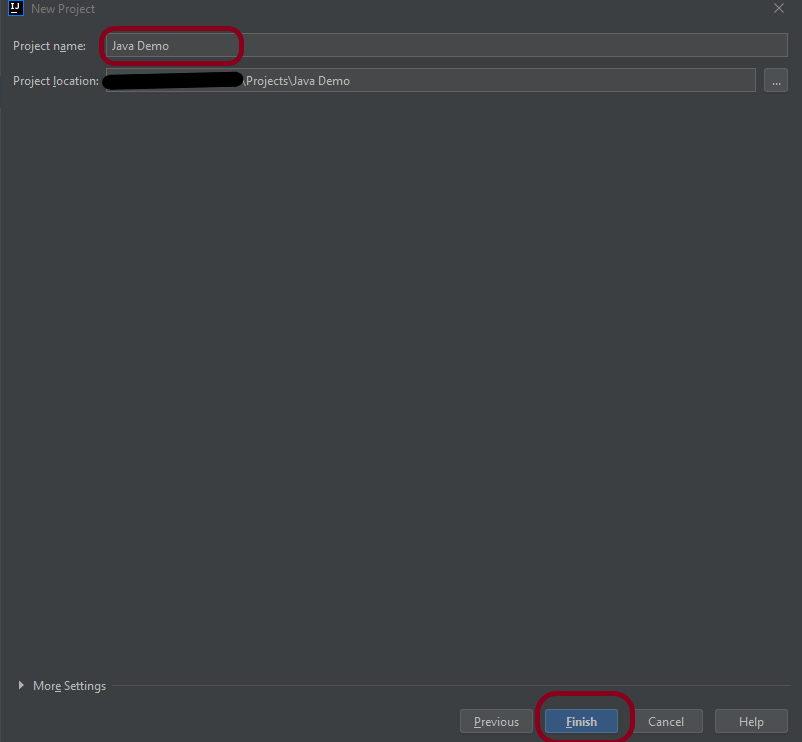
4. I have mentioned the Project Name as Java Demo and thepath where I want to save my project on my computer.
5. Click on the “Finish”Button to create the project. It will also ask to create the directory as shown below.
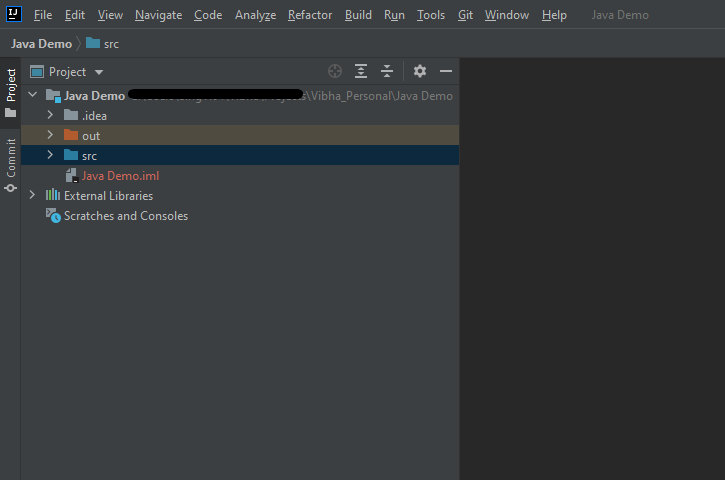
6. Clickthe “Create”button to grant permission. It will launch IDE as shown below.
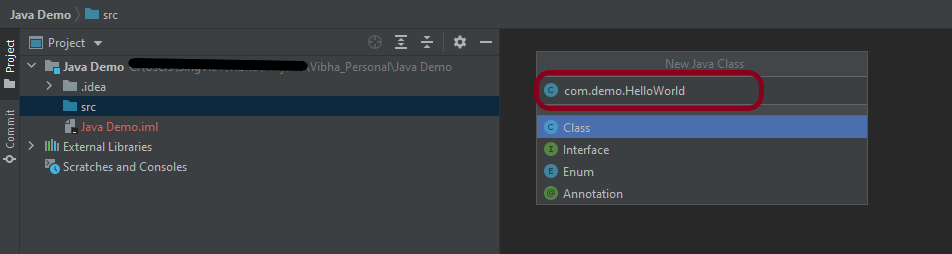
Now, I have created a new Java Project named Java Demo. Let me create a new Java Class – HelloWorld.
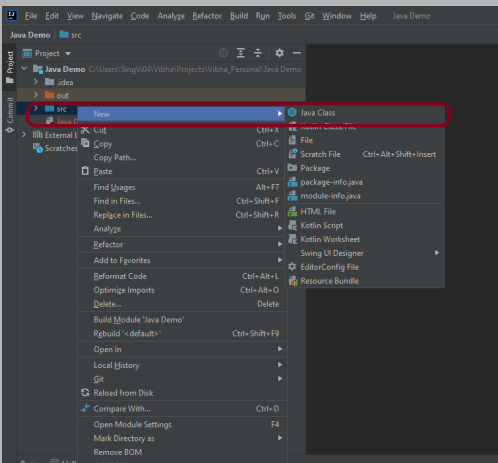
Expand the Project Hello Word and right-click on the src folder, hover on New Option, and click on Java Class Option as shown below.
2. I have provided the Java Filename with the package as shown in the below image. Now press the Enter Key to create the packages and Java file.
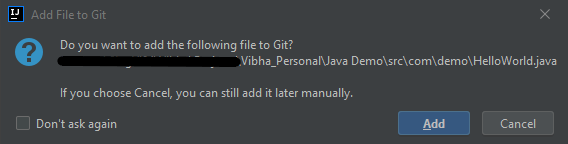
3. It will show a message to Add the File to Git. Depending on your requirement, select Add or Cancel. I don’t want to add the File to Git, so selected Cancel.
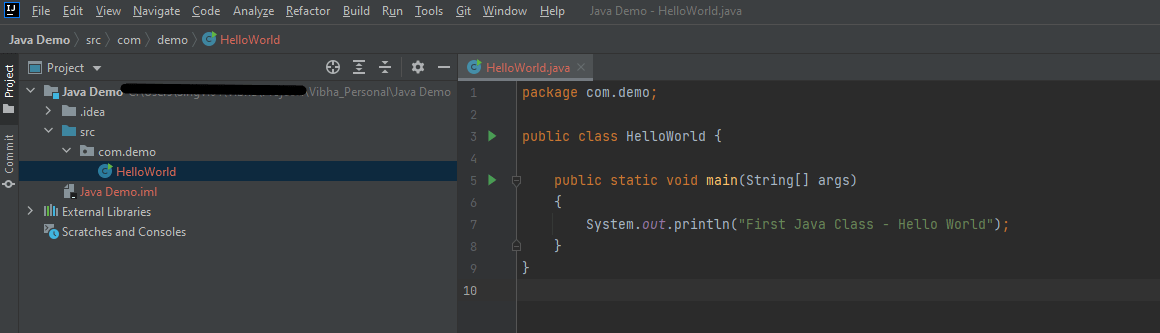
4. I have updated the “HelloWorld” class to print the first Java Class – Hello World on the console, as shown in the below image.
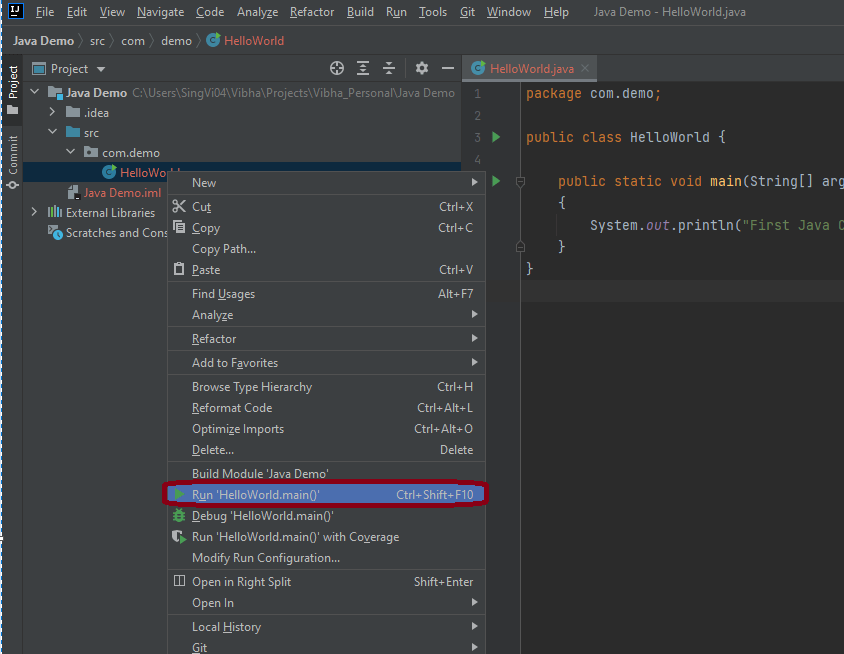
5. Now right-click on the “HelloWorld”class file and choose “Run HelloWorld.main()” Option or press Ctrl + Shift + F10to compile and execute the program as shown in thebelow image. It will also build the project.
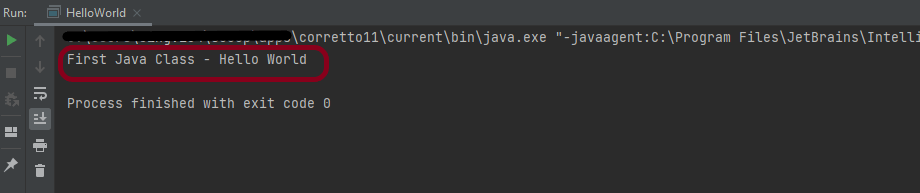
6. The final output of the program will be displayed on the console as shown below.
This is how we can create the Java Demo project to execute our first program in Java – HelloWorld.
That’s it! Congratulations on making it through this tutorial and hope you found it useful! Happy Learning!!
IntelliJ IDEA is one of the smartest IDE for Java development. It’s also the base of the official Android IDE i.e. Android Studio used for Android mobile application development. This tutorial provides all the steps required to install IntelliJ Idea on Windows 10 for Java development.
Download IntelliJ on Windows
Click this link to download IntelliJ IDEA on your machine. It will open the download page as shown below. The IntelliJ IDEA provides two different installers i.e. Ultimate and Community. The Ultimate edition is commercial version (which has trial version for 30 days post which you needs license). The Community edition can be used for free. This tutorial shows the steps required to install the Community edition.
2. Download IntelliJ by clicking on Download button and use any one of the option either .exe or .jar. Below image shows IntelliJ.exe on your machine.
Installation of IntelliJ IDEA
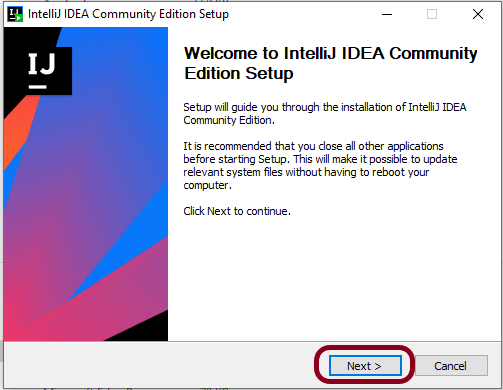
To start installation, double click on the idealC-2021.exe (this version can change in future).
2. It will show the welcome screen as shown below. Click on the Next Button to continue with the installation.
3. It will provide options to choose the installation location as shown in below image. Make sure that you have sufficient space available on the selected drive since it will consume around 1.6 GB storage. Click on the Next Button after choosing the appropriate installation path.
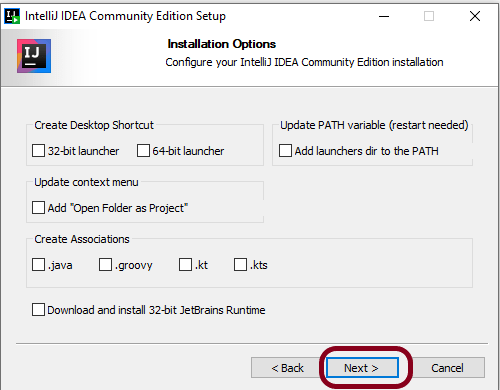
4. It will show the Installation options as shown below to configure system path, create 64-bit desktop launcher icon, Open Folder as Project, and file association for Java, Groovy, and Kotlin files. I have selected the option to create a desktop launcher icon. You may choose the options based on your requirements. Click on the Next Button after choosing the Installation Options.
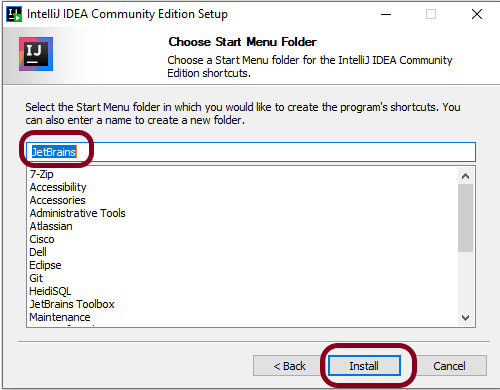
5. After choosing the Installation Options, the next screen shows options to configure the Start Menu Folder as shown below.
6. Click on the Install Button after selecting the Start Menu Folder option. It will show the installation progress as shown below.
7. It will show the final screen after successfully installing IntelliJ IDEA as shown below.
8. Click on the Finish Button to close the installer. Below image shows that IntelliJ icon is placed at Desktop as we have selected in the previous step.
That’s it! We have downloaded and installed IntelliJ. Congratulations on making it through this tutorial and hope you found it useful! Happy Learning!!
In the next tutorial, I’ll explain how to create a new project in IntelliJ.
In this tutorial, I’ll explain about Interfaces in Java.
What is Interface?
An interface is a group of related methods with empty bodies (abstract methods).
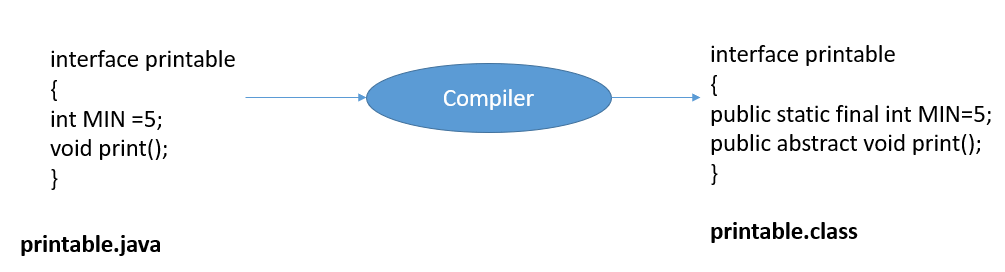
All the methods in Interface are public and abstract.
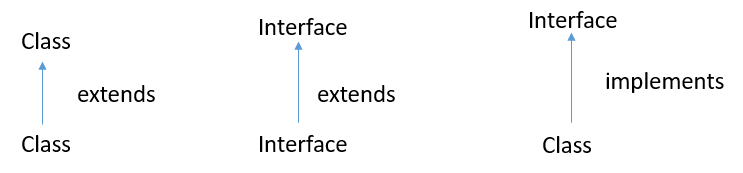
A class can implement more than one interface.
An interface can extends another interface or interfaces
A class that implements interface must implements all the methods in interface. To implement interface use implements keyword.
The variables declared in an interface are public, static & final by default.
Java does not support multiple inheritance in case of class, but by using interface it can achieve multiple inheritance .
Syntax of Interface
interface test {
//declare methods which are abstract by default
//declare variables which are public, static, final by default
}
Relationship between Class and Interfaces
Below is an example of implementation of Interface. I have declared a class as Interface which have two abstract methods.
public interface MyInterface {

	// Abstract methods
	public void method1();

	public void method2();
}
Interface Implementation
public class InterfaceTest implements MyInterface {

	public void method1() {
		System.out.println("Implementation of Method 1");
	}

	public void method2() {
		System.out.println("Implementation of Method 2");
	}

	public static void main(String[] args) {
		MyInterface interTest = new InterfaceTest();
		interTest.method1();
		interTest.method2();

	}
}
Output
Implementation of Method 1
Implementation of Method 2
Multiple Interface
In the below example, Interface 2 extends Interface 1 and class implements Interface 2.
Interface 1
public interface Infa1 {
	public void method1();

}
Interface 2
public interface Infa2 extends Infa1 {
	public void method2();

}
MultipleInterfaceTest Class
public class MultipleInterfaceTest implements Infa2 {

	public void method1() {
		System.out.println("Implementation of Method 1");
	}

	public void method2() {
		System.out.println("Implementation of Method 2");
	}

	public static void main(String[] args) {

		Infa2 obj = new MultipleInterfaceTest();
		obj.method1();
		obj.method2();
	}

}
Output
Implementation of Method 1
Implementation of Method 2
Multiple Inheritance
Interface supports multiple Inheritance. Here, there are two interfaces which are implemented in class MultipleInheritanceTest.
Interface 1
public interface Infa1 {
	public void method();

}
Interface 2
public interface Infa2 {
	public void method();

}
MultipleInheritanceTest Class
public class MultipleInheritanceTest implements Infa1, Infa2 {

	public void method() {
		System.out.println("Implementation of Method ");
	}


	public static void main(String[] args) {
		MultipleInheritanceTest test = new MultipleInheritanceTest();
		test.method();
	}

}
In this tutorial, I’ll explain about abstraction in Java.
What is Abstraction?
Abstraction is a process of hiding the implementation details and showing only functionality to the user.
There are two ways to achieve abstraction in java
Abstract class
Interface
What is an Abstract Class?
A class which is declared as abstract is known as an abstract class.
It can have abstract and non-abstract methods.
It needs to be extended and its method is implemented.
It cannot be instantiated.
It can have constructors and static methods also.
It can have final methods which will force the subclass not to change the body of the method.
An abstract class is a class that contains at least one abstract method.
When an abstract class is subclassed, the subclass usually provides implementations for all of the abstract methods in its parent class. However, if it does not, then the subclass must also be declared abstract.
Example of Abstract Class
abstract class Test
{
}
What is Abstract Method?
An abstract method is a method that is declared without an implementation (without braces, and followed by a semicolon), like this:
abstract int test(int a, int b);
Below is an example of abstraction.
Abstract Class
//Abstract Class
public abstract class Bank {

	// Abstract method
	abstract void getRateOfInterest();
}
SubClass1
//Subclass (inherit from Bank)
public class SBI extends Bank {

	// The body of getRateOfInterest is declared here
	public void getRateOfInterest() {

		System.out.println("Interest Rate of SBI Bank :" + 5.3);

	}
}
SubClass2
//Subclass (inherit from Bank)
public class BOI extends Bank {

	// The body of getRateOfInterest is declared here
	public void getRateOfInterest() {

		System.out.println("Interest Rate of BOI Bank :" + 4.1);

	}

}
Test Class
public class AbstractionTest {

	public static void main(String[] args) {

		Bank bank1 = new SBI();
		bank1.getRateOfInterest();

		Bank bank2 = new BOI();
		bank2.getRateOfInterest();

	}

}
Output
Interest Rate of SBI Bank :5.3
Interest Rate of BOI Bank :4.1
Abstract class can have a data member, constructor, abstract method, non abstract method and even main() method.
Below is an example where the abstract class has both abstract method as well as non abstract method.
public abstract class Bike { // abstract class

	int x = 25; // Instance Variable

	Bike() // Constructor
	{
		int y = 10;

		System.out.println("Value of y :" + y);
		System.out.println("Bike is created");

	}

	abstract void run(); // abstract method

	void change_gear() // non abstract method
	{
		System.out.println("Gear is changed");
	}

}
SubClass
public class Trek extends Bike {

	void run() {
		System.out.println("Bike is running");
	}

}
Test Class
public class AbstractionDemoTest {

	public static void main(String[] args) {

		Bike bike = new Trek();
		bike.run();
		bike.change_gear();

		System.out.println("Value of x :" + bike.x);

	}
}
Output
Value of y :10
Bike is created
Bike is running
Gear is changed
Value of x :25
Advantages of Abstraction
It reduces the complexity of viewing the things.
Avoids code duplication and increases reusability.
Helps to increase security of an application or program as only important details are provided to the user.
Encapsulation in Java is a process of wrapping the data and code in a single unit. The whole idea behind encapsulation is to hide the implementation details from users. If a data member is private it means it can only be accessed within the same class. No outside class can access private data member (variable) of other class. It is one of the four important OOPs concept.
To achieve encapsulation in Java −
Declare the variables of a class as private.
Provide public setter and getter methods to modify and view the variables values.
The get method returns the variable value, and the set method sets the value.
Syntax of get method – method name starts with get followed by the variable name where first letter is capital.
Syntax of set method – method name starts with set followed by the variable name where first letter is capital.
Below is an example of encapsulation with two variables and their getter and setter method.
public class EncapsulationDemo {

	// private variables
	private String name;
	private int age;

	// getter method for age
	public int getAge() {
		return age;
	}

	// setter method for age
	public void setAge(int setAge) {
		this.age = setAge;

	}

	// getter method for name
	public String getName() {
		return name;
	}

	// setter method for name
	public void setName(String newName) {
		this.name = newName;
	}

}
The variables of the EncapsulationDemo class can be accessed using the following program −
public class EncapsulationTest {

	public static void main(String[] args) {

		//creating instance of the encapsulated class
		EncapsulationDemo encap = new EncapsulationDemo();

		//setting value in the age member
		encap.setAge(25);

		//setting value in the name member
		encap.setName("Terry");

		//getting value of the age and name member
		System.out.print("Name : " + encap.getName() + " and Age :" + encap.getAge());

	}

}
Output
Name : Terry and Age :25
The encapsulate class is easy to test. So, it is better for unit testing.
The standard IDE’s are providing the facility to generate the getters and setters. So, it is easy and fast to create an encapsulated class in Java.
In this tutorial, we will discuss Inheritance and types of Inheritance in Java.
What is Interitance?
Inheritance can be defined as the process where one class acquires the properties (methods and fields) of another class.
The class which inherits the properties of other is known as subclass (derived class, child class) and the class whose properties are inherited is known as superclass (base class, parent class).
Inheritance is applicable for public and protected members only. Private members can’t be inherited.
Inheritance represents the IS-A relationship which is also known as a parent-child relationship.
Inheritance supports the concept of “reusability”, i.e. when we want to create a new class and there is already a class that includes some of the code that we want, we can derive our new class from the existing class. By doing this, we are reusing the fields and methods of the existing class.
The keyword used for inheritance is extends.
Syntax
class derived-class extends base class
{
//methods and variables
}
Below is an example of Inheritance. In the below example, ParentCalculation is the Base class (parent class) and has a method addition. ChildCaclculation is the derived class (child class) which has extends base class ParentCalculation. When an object of ChildCaclculation class is created, a copy of all methods and fields of the superclass acquire memory in this object. That is why by using the object of the subclass we can also access the members of a superclass.
Base Class
public class ParentCalculation {

	int z;

	public void addition(int x, int y) {
		z = x + y;
		System.out.println("The sum of the given numbers:" + z);
	}

}
Derived Class
public class ChildCaclculation extends ParentCalculation {

	int c;

	public void multiplication(int a, int b) {
		c = a * b;
		System.out.println("The multiplication of the given numbers:" + c);
	}

	public static void main(String[] args) {
		ChildCaclculation cal = new ChildCaclculation();
		cal.addition(10, 14);
		cal.multiplication(5, 6);

	}

}
Output
The sum of the given numbers:24
The multiplication of the given numbers:30
Types of Inheritance in Java
Below are the different types of inheritance available in Java.
1. Single Inheritance
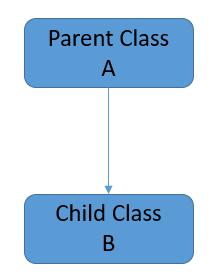
In single inheritance, subclass (derived) inherit the features of superclass (base). In the image below, class A serves as a base class for the derived class B.
Base Class
public class Employee {

	String name = "Tom";
	int emp_no = 12001;

	public void displayEmployee() {
		System.out.println("Base Class");

		System.out.println("Name :" + name);
		System.out.println("Emp_No :" + emp_no);
	}
}
Derived Class
package JavaDemo.Inheritance;

public class Department extends Employee {

	String deptName = "IT Division";

	public void displayDept() {
		System.out.println("Derived Class");

		System.out.println("Department Name :" + deptName);
	}

	public static void main(String[] args) {

		Department dept = new Department();

		// Derived method
		dept.displayDept();

		// Base Method
		dept.displayEmployee();

	}

}
Output
Derived Class
Department Name :IT Division
Base Class
Name :Tom
Emp_No :12001
2. Multilevel Inheritance
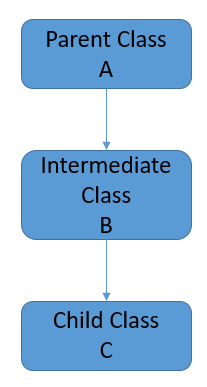
In this, derived class extends an base class as well as the derived class act as a base class for another derived class. In the below example, Employee is Base class, Department is intermediate derived class and SubDivision is derived class.
Base Class
package JavaDemo.Inheritance;

public class Employee {

	String name = "Tom";
	int emp_no = 12001;

	public void displayEmployee() {
		System.out.println("Base Class");

		System.out.println("Name :" + name);
		System.out.println("Emp_No :" + emp_no);
	}
}
Intermediate Derived Class
package JavaDemo.Inheritance;

public class Department extends Employee {

	String deptName = "IT Division";

	public void displayDept() {
		System.out.println("Intermediate Derived Class");

		System.out.println("Department Name :" + deptName);
	}

	public static void main(String[] args) {

		Department dept = new Department();

		// Intermediate Derived method
		dept.displayDept();

		// Base Method
		dept.displayEmployee();

	}

}
Derived Class
package JavaDemo.Inheritance;

public class SubDivision extends Department {

	String sub_division = "Production Support";

	public void displaySubDivision() {
		System.out.println("Derived Class");

		System.out.println("SubDivision Name :" + sub_division);
	}

	public static void main(String[] args) {

		SubDivision div = new SubDivision();

		// Derived method
		div.displaySubDivision();

		// Intermediate Derived method
		div.displayDept();

		// Base Method
		div.displayEmployee();

	}

}
Output
Derived Class
SubDivision Name :Production Support
Intermediate Derived Class
Department Name :IT Division
Base Class
Name :Tom
Emp_No :12001
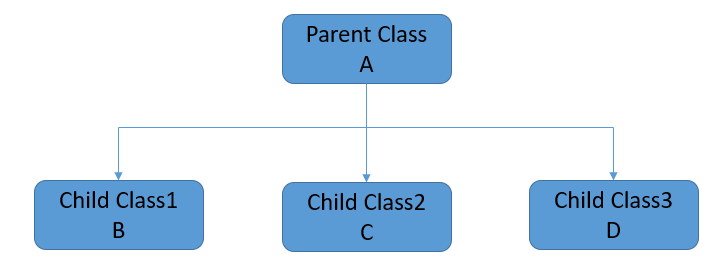
3. Hierarchical Inheritance
In Hierarchical Inheritance, one class serves as a superclass (base class) for more than one subclasses.
In the below example, Employee is the base class. Department and Salary are the derived classes.
Base Class
package JavaDemo.Inheritance;

public class Employee {

	String name = "Tom";
	int emp_no = 12001;

	public void displayEmployee() {
		System.out.println("Base Class");

		System.out.println("Name :" + name);
		System.out.println("Emp_No :" + emp_no);
	}
}
Derived Class1
public class Department extends Employee {

	String deptName = "IT Division";

	public void displayDept() {
		System.out.println("Derived Class 1");

		System.out.println("Department Name :" + deptName);
	}

	public static void main(String[] args) {

		Department dept = new Department();

		// Derived method
		dept.displayDept();

		// Base Method
		dept.displayEmployee();

	}

}
Derived Class2
package JavaDemo.Inheritance;

public class Salary extends Employee {

	float Salary = 65000;

	public void displaySalary() {
		System.out.println("Derived Class 2");
		System.out.println("Salary :" + Salary);
	}

	public static void main(String[] args) {

		Salary sal = new Salary();
		sal.displaySalary();
		sal.displayEmployee();

		System.out.println("=========================");

		Department dept = new Department();
		dept.displayDept();
		dept.displayEmployee();

	}

}
Output
Derived Class 2
Salary :65000.0
Base Class
Name :Tom
Emp_No :12001
=========================
Derived Class 1
Department Name :IT Division
Base Class
Name :Tom
Emp_No :12001
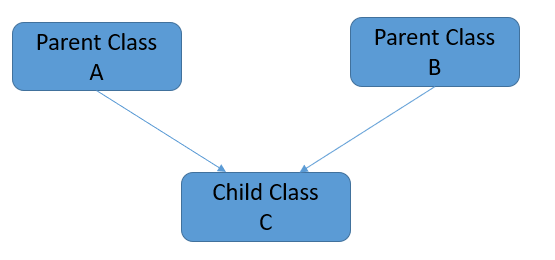
4. Multiple Inheritance
In Multiple inheritances, one class can have more than one superclass and inherit features from all parent classes. Java does not support multiple inheritances with classes. We can achieve multiple inheritances only through Interfaces.
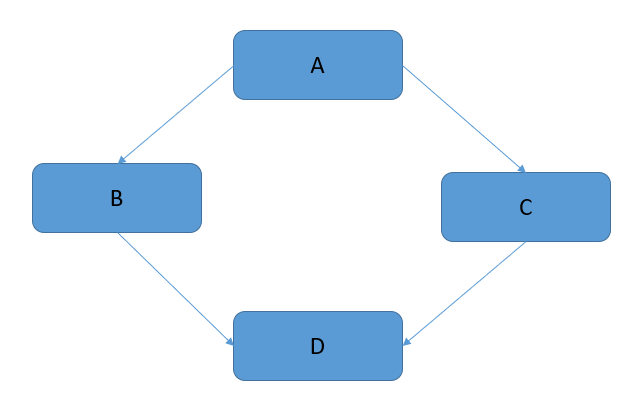
5. Hybrid Inheritance
It is a combination of single and multiple inheritance. As Java doesn’t support multiple inheritances with classes, hybrid inheritance is also not possible with classes. In java, we can achieve hybrid inheritance only through Interfaces.
Congratulations on making it through this tutorial and hope you found it useful! Happy Learning!! Cheers!!
In the previous tutorial, I have explained about thecontrol flow of try catch and finally blocks in Java. In this tutorial, I’ll explain multiple catch exceptions. Java supports multiple catch exceptions, that means a try block can have more than one catch handlers. All catch blocks must be ordered from most specific to most general, i.e. catch for ArithmeticException must come before catch for Exception.
Scenario 1 – In the below example, an array is defined of size 10 and we want to perform an invalid arithmetic operation on element 15 of the array. In this case, we have defined 3 different catch handlers to handle the exception – Arithmetic Exception, ArrayIndexOutOfBounds Exception and Parent Exception. The try block has thrown exception – Arithmetic as the Arithmetic operation is invalid (divide by 0).
public class MultipleCatchDemo1 {

	public static void main(String[] args) {
		try {
			int a[] = new int[10];
			a[15] = 30 / 0;

        } catch (ArithmeticException e) {
			System.out.println("Arithmetic Exception occurs");

        } catch (ArrayIndexOutOfBoundsException e) {
			System.out.println("ArrayIndexOutOfBounds Exception occurs");

        } catch (Exception e) {
			System.out.println("Parent Exception occurs");

        }
		System.out.println("Rest of the program");
	}
}
The output of the above program is
Scenario 2 – In the below example, I’m throwing an exception which is not handled by first catch exception handler.
public class MultipleCatchDemo2 {

	public static void main(String[] args) {

		try {
			int a[] = new int[10];
			System.out.println(a[15]);

		} catch (ArithmeticException e) {
			System.out.println("Arithmetic Exception occurs");

		} catch (ArrayIndexOutOfBoundsException e) {
			System.out.println("ArrayIndexOutOfBounds Exception occurs");

		} catch (Exception e) {
			System.out.println("Parent Exception occurs");

		}
		System.out.println("Rest of the program");
	}
}
The output of the above program is
Scenario 3 – In the below example, I’m throwing an exception which is not handled by any catch exception handler specified in the program. Then, parent exception handler will be invoked.
public class MultipleCatchDemo3 {

	public static void main(String[] args) {
		try {
			int a[] = new int[10];
			System.out.println(a[10]);

		} catch (ArithmeticException e) {
			System.out.println("Arithmetic Exception occurs");

		} catch (NullPointerException e) {
			System.out.println("NullPointer Exception occurs");

		} catch (Exception e) {
			System.out.println("Parent Exception occurs");

		}
		System.out.println("Rest of the program");
	}
}
The output of the above program is
Scenario 4 – In the below example, we do not maintain the order of preference in exceptions (child to parent), then compile time error occurs.
public class MultipleCatchDemo4 {

	public static void main(String[] args) {
		try {
			int a[] = new int[10];
			System.out.println(a[10]);

		} catch (Exception e) {
			System.out.println("Parent Exception occurs");

		} catch (ArithmeticException e) {
			System.out.println("Arithmetic Exception occurs");

		} catch (ArrayIndexOutOfBoundsException e) {
			System.out.println("ArrayIndexOutOfBounds Exception occurs");

		}
		System.out.println("Rest of the program");
	}
}
The output of the above program is
Scenario 5– In the below example, try block has 2 exceptions. It will call the first suitable catch block for the first try statement which has thrown the exception.
public class MultipleCatchDemo5 {

	public static void main(String[] args) {
		try {
			int a[] = new int[10];
			a[15] = 30 / 0;
			System.out.println(a[20]);

		} catch (ArithmeticException e) {
			System.out.println("Arithmetic Exception occurs");

		} catch (ArrayIndexOutOfBoundsException e) {
			System.out.println("ArrayIndexOutOfBounds Exception occurs");

		} catch (Exception e) {
			System.out.println("Parent Exception occurs");

		}
		System.out.println("Rest of the program");
	}
}
The output of the above program is
Similarly, if I interchanged the try statements as shown below the response will also changes.
public class MultipleCatchDemo6 {

	public static void main(String[] args) {
		try {
			int a[] = new int[10];
			System.out.println(a[20]);
			a[15] = 30 / 0;

		} catch (ArithmeticException e) {
			System.out.println("Arithmetic Exception occurs");

		} catch (ArrayIndexOutOfBoundsException e) {
			System.out.println("ArrayIndexOutOfBounds Exception occurs");

		} catch (Exception e) {
			System.out.println("Parent Exception occurs");

		}
		System.out.println("Rest of the program");
	}
}
In this tutorial, I’ll explain about the flow control of try catch and finally blocks in accordance to the exception.
What is try block in Java?
It is used to specify a block where we should place exception code. The try block must be followed by either catch or finally. It means, we can’t use try block alone. If an exception occurs at the particular statement of try block, the rest of the block code will not execute. So, it is recommended not to keeping the code in try block that will not throw an exception.
What is catch block in Java?
It is used to handle the exception by declaring the type of exception within the parameter. It must be preceded by try block which means we can’t use catch block alone. It can be followed by finally block later. You can use multiple catch block with a single try block.
What is finally block in Java?
It is used to execute important statements such as establishing connection, stream, etc. It is always executed whether exception is handled or not.
Syntax of try-catch block
try{
//throw an exception
}catch{ //handle exception }
Syntax of try-catch-finally block
try{
//throw an exception
}catch { //handle exception }
finally { //important code which will always be executed  }
1.Exception occurs in try block and handled in catch block
If a statement in try block throws an exception, then rest of the code of try block is not executed. The control transfers to corresponding catch block. After the execution of code in catch block, the control moves to the rest of the program code to be executed.
public class TryCatchDemo {

	public static void main(String[] args) {
		{
			try {
				String a = null; // null value
				System.out.println(a.length());

				// This will never execute as try block has exception just above this statement
				System.out.println("Inside try block");

				// Exception will be handled in catch block and will execute the statements in
				// catch block
			} catch (NullPointerException e) {
				System.out.println("NullPointer Exception - Exception caught in Catch block");

			}

			// Rest of the program will be executed
			System.out.println("Outside try-catch block");
		}
	}
}

Output
NullPointer Exception - Exception caught in Catch block
Outside try-catch block
2. Exception occurs in try block and handled in catch block and finally block is present
If a statement in try block throws an exception, then rest of the code of try block is not executed. The control transfers to corresponding catch block. After the execution of code in catch block, the control moves to finally block (if present) and then the rest of the program is executed.
public class TryCatchFinallyDemo {

	public static void main(String[] args) {
		{
			try {
				String a = null; // null value
				System.out.println(a.length());

				// This will never execute as try block has exception just above this statement
				System.out.println("Inside try block");

				// Exception will be handled in catch block and will execute the statements in
				// catch block
			} catch (NullPointerException e) {
				System.out.println("NullPointer Exception - Exception caught in Catch block");

				// Statement present in finally block will be executed irrespective whether
				// exception is handled or not
			} finally {
				System.out.println("finally block executed");
			}

			// Rest of the program will be executed
			System.out.println("Outside try-catch block");
		}
	}
}

Output
NullPointer Exception - Exception caught in Catch block
finally block executed
Outside try-catch block
3. Exception occurred in try-block is not handled in catch block without finally block
If a statement in try block throws an exception, then rest of the code of try block is not executed.
public class TryNoCatchDemo {

	public static void main(String[] args) {
		{
			try {
				String a = null; // null value
				System.out.println(a.length());

				// This will never execute as try block has exception just above this statement
				System.out.println("Inside try block");

				// Incorrect Exception
			} catch (IndexOutOfBoundException e) {
				System.out.println("IndexOutOfBound Exception - Exception caught in Catch block");

			}


			// Rest of the program will be executed
			System.out.println("Outside try-catch block");
		}
	}
}

Output
Exception in thread "main" java.lang.Error: Unresolved compilation problem:
	IndexOutOfBoundException cannot be resolved to a type

	at JavaDemo.Exception.TryNoCatchDemo.main(TryNoCatchDemo.java:15)
4. Exception occurred in try-block is not handled in catch block with finally block
public class TryNoCatchFinallyDemo {

	public static void main(String[] args) {
		{
			try {
				String a = null; // null value
				System.out.println(a.length());

				// This will never execute as try block has exception just above this statement
				System.out.println("Inside try block");

				// Incorrect Exception
			} catch (IndexOutOfBoundException e) {
				System.out.println("IndexOutOfBound Exception - Exception caught in Catch block");

			}

			finally {
				System.out.println("finally block executed");
			}

			// Rest of the program will be executed
			System.out.println("Outside try-catch block");
		}
	}
}

Output
Exception in thread "main" java.lang.Error: Unresolved compilation problem:
	IndexOutOfBoundException cannot be resolved to a type

	at JavaDemo.Exception.TryNoCatchDemo.main(TryNoCatchDemo.java:15)
5. Exception doesn’t occur in try-block
If a statement in try block does not throw an exception, then catch block will be never executed and then rest of the program will be executed.
public class NoTryCatchDemo {

	public static void main(String[] args) {
		try {

			String str = "123";

			int num = Integer.parseInt(str);

			// this statement will execute
			// as no any exception is raised by above statement
			System.out.println("Inside try block");

		}

		catch (NumberFormatException ex) {

			System.out.println("catch block executed.");

		}

		System.out.println("Outside try-catch clause");
	}
}

Output
Inside try block
Outside try-catch clause
6. Exception doesn’t occur in try-block with finally block
If a statement in try block does not throw an exception, then catch block will never be executed. But the finally block will be executed and then rest of the program will be executed.
public class NoTryCatchFinallyDemo {

	public static void main(String[] args) {
		try {

			String str = "123";

			int num = Integer.parseInt(str);

			// this statement will execute
			// as no any exception is raised by above statement
			System.out.println("Inside try block");

		}

		catch (NumberFormatException ex) {

			System.out.println("catch block executed");

		} finally {
			System.out.println("finally block executed");
		}

		System.out.println("Outside try-catch clause");
	}
}

Output
Inside try block
finally block executed
Outside try-catch clause