Selenium Quiz 3 – You can test your knowledge with this Selenium Quiz. We have created this Selenium WebDriver Quiz Online Test to help you master Selenium.
13. Consider the web page is still loading, and the element is not yet on the screen at the time of the find operation. What would be the exception thrown by the WebDriver?
Selenium Quiz – You can test your knowledge with this Selenium Quiz. We have created this Selenium WebDriver Quiz Online Test to help you master Selenium.
1. Which of the following browsers supports selenium?.
Selenium Quiz – You can test your knowledge with this Selenium Quiz. We have created this Selenium WebDriver Quiz Online Test to help you master Selenium.
1. What is selenium, select the best answer.
Select the best answer
Selenium is the open-source test automated tool to test web-based UI which only supports JavaScript’s
Selenium is the open-source test automated tool to test web-based UI which supports many different languages like Java, Python, Perl, PHP, Ruby, and C#.
Selenium is a behavioral testing tool that supports many different languages like Java, Python, Perl, PHP, Ruby, and C#.
A proxy server acts as an intermediary for requests between a client and a server. In simple terms, the traffic flows through the proxy server on its way to the address you requested and back.
A proxy server for automation scripts with Selenium could be helpful for:
Capture network traffic
Mock backend calls made by the website
Access the required website under complex network topologies or strict corporate restrictions/policies.
1. Setting up Proxy using Selenium
Create an instance of Proxy and set the proxy configuration:
     // Set the proxy server details
        String proxyAddress = "proxy.example";
        int proxyPort = 8080;

        // Create a Proxy object and set the HTTP proxy details
        Proxy proxy = new Proxy();
        proxy.setHttpProxy(proxyAddress + ":" + proxyPort);
Replace “your_proxy_address” with the actual proxy address and “port” with the appropriate port number.
setHttpProxy – Specify which proxy to use for HTTP connections
2. Configure Chrome options with the Proxy object
Create an instance of ChromeOptionsand set the proxy:
ChromeOptions options = new ChromeOptions();
options.setProxy(proxy);
Launch Chrome WebDriver with the configured options:
WebDriver driver = new ChromeDriver(options);
The complete program is mentioned below:
import org.openqa.selenium.Proxy;
import org.openqa.selenium.WebDriver;
import org.openqa.selenium.chrome.ChromeDriver;
import org.openqa.selenium.chrome.ChromeOptions;
public class ProxyDemo {
public static void main(String[] args) {
// Set the proxy server details
String proxyAddress = "localhost";
int proxyPort = 8080;
// Create a Proxy object and set the HTTP proxy details
Proxy proxy = new Proxy();
proxy.setHttpProxy(proxyAddress + ":" + proxyPort);
// Configure Chrome options with the Proxy object
ChromeOptions options = new ChromeOptions();
options.setProxy(proxy);
options.addArguments("start-maximized");
// Instantiate ChromeDriver with the configured options
WebDriver driver = new ChromeDriver(options);
// Perform your browsing actions using the driver
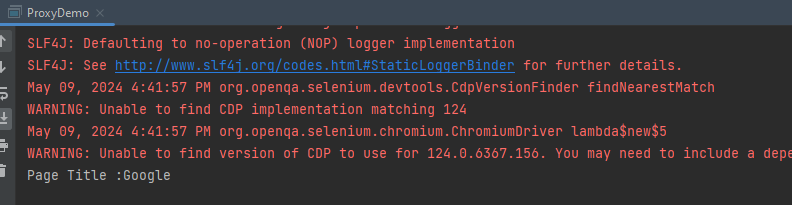
driver.get("https://www.google.com");
System.out.println("Page Title :" + driver.getTitle());
// Close the browser session
driver.quit();
}
}
The ArrayList class is a resizable array, which can be found in the java.util package. ArrayList objects are created in the same fashion as other object classes. The primary difference with ArrayLists is that the element type of the ArrayList must be specified using arrows (<>).
Java ArrayList contains()
The contains() method checks if the specified element is present in the arraylist.
contains() Return Value
returns true if the specified element is present in the arraylist.
returns false if the specified element is not present in the arraylist.
Let us create 2 ArrayLists.
import java.util.ArrayList;
import java.util.Arrays;

public class Compare_ArrayList {

    public static void main(String[] args) {

        ArrayList<String> list1 = new ArrayList<String>();

        list1.add("Java");
        list1.add("Python");
        list1.add("PHP");
        list1.add("JavaScript");
        list1.add("Ruby");

        ArrayList<String> list2 = new ArrayList<>(Arrays.asList("Python", "Ruby"));

        System.out.println("ArrayList1:" + list1);
        System.out.println("ArrayList2:" + list2);

        System.out.println("Check PHP is present in arrayList1 :" + list1.contains("PHP"));
        System.out.println("Check Cobol is present in arrayList1 :" + list1.contains("Cobol"));
        System.out.println("Compare 2 arrayList using contains: " + list1.contains(list2));

        }
}
The output of the above program is
When we are comparing 2 ArrayList, then both the ArrayList should contain the same elements in the same sequence.
In the below example, the sequence of the elements is different, so the method returns false.
import java.util.ArrayList;
import java.util.Arrays;

public class Compare_ArrayList {

    public static void main(String[] args) {

        ArrayList<String> list1 = new ArrayList<String>();

        list1.add("Java");
        list1.add("Python");
        list1.add("PHP");
        list1.add("JavaScript");
        list1.add("Ruby");

        ArrayList<String> list3 = new ArrayList<>(Arrays.asList("Python", "Java", "Ruby", "PHP", "JavaScript"));

        System.out.println("ArrayList1:" + list1);
        System.out.println("ArrayList2:" + list2);
        System.out.println("Compare 2 arrayList using contains with different sequence: " + list1.contains(list3));
        }
}
The output of the above program is
That’s it! Congratulations on making it through this tutorial and hope you found it useful! Happy Learning!!
Step 4 – Create the Test Class sunder src/test/java folder
ApplicationLoginJUnit5Tests.java
import com.example.steps.StepDashboardPage;
import com.example.steps.StepForgetPasswordPage;
import com.example.steps.StepLoginPage;
import net.serenitybdd.annotations.Steps;
import net.serenitybdd.annotations.Title;
import net.serenitybdd.core.Serenity;
import net.serenitybdd.junit5.SerenityJUnit5Extension;
import org.junit.jupiter.api.Test;
import org.junit.jupiter.api.extension.ExtendWith;

import static org.assertj.core.api.Assertions.assertThat;

@ExtendWith(SerenityJUnit5Extension.class)
public class ApplicationLoginTests {

    @Steps
    NavigateActions navigate;

    @Steps
    StepLoginPage loginPage;

    @Steps
    StepDashboardPage dashboardPage;

    @Steps
    StepForgetPasswordPage forgetPasswordPage;

    @Test
    @Title("Login to application with valid credentials navigates to DashBoard page")

    public void successfulLogin() {

        navigate.toTheHomePage();

        // When
        loginPage.inputUserName("Admin");
        loginPage.inputPassword("admin123");
        loginPage.clickLogin();

        // Then
        Serenity.reportThat("Passing valid credentials navigates to DashBoard page",
                () -> assertThat(dashboardPage.getHeading()).isEqualToIgnoringCase("Dashboard"));
    }

    @Test
    @Title("Login to application with invalid credential generates error message")
    void unsuccessfulLogin() {

        navigate.toTheHomePage();

        // When
        loginPage.inputUserName("Admin");
        loginPage.inputPassword("admin1232");
        loginPage.clickLogin();

        // Then
        Serenity.reportThat("Passing invalid credentials generates error message",
                () -> assertThat(loginPage.loginPageErrorMessage()).isEqualToIgnoringCase("Invalid credentials"));
    }

    @Test
    @Title("Verify Forgot your password link")
    void clickForgetPasswordLink() {

        // Given
        navigate.toTheHomePage();

        // When
        loginPage.clickForgetPasswordLink();

        // Then
        Serenity.reportThat("Open Forget Password Page after clicking forget password link",
                () -> assertThat(forgetPasswordPage.getHeadingForgetPasswordPage())
                        .isEqualToIgnoringCase("Reset Password"));
    }
}
To run a JUnit5 test with Serenity BDD, simply add the annotation@net.serenitybdd.junit5.SerenityTest (instead of @org.junit.runner.RunWith(net.serenitybdd.junit.runners.SerenityRunner.class) for JUnit4.
@ExtendWith(SerenityJUnit5Extension.class)
@Testis imported from package:-
import org.junit.jupiter.api.Test;
StepDashboardPage
import net.serenitybdd.annotations.Step;

import net.serenitybdd.core.pages.PageObject;
import net.serenitybdd.core.pages.WebElementFacade;
import org.openqa.selenium.support.FindBy;

public class StepDashboardPage extends PageObject {

    @FindBy(xpath = "//*[@class='oxd-topbar-header-breadcrumb']/h6")
    WebElementFacade dashboardPageTitle;

    @Step("Heading of DashBoard Page")
    public String getHeading() {
        return dashboardPageTitle.getText();
    }
}
The WebElementFacade class contains a convenient fluent API for dealing with web elements, providing some commonly-used extra features that are not provided out-of-the-box by the WebDriver API. WebElementFacades are largely interchangeable with WebElements: you just declare a variable of type WebElementFacade instead of type WebElement
The @Steps annotation marks a Serenity step library. Create the test following the Given/When/Then pattern and using step methods from the step library. The @Title annotation lets you provide your own title for this test in the test reports. Serenity @Title is considered for the Serenity report. Consistently with Junit4, the @Title annotation does not influence the name in the Junit report.
The JUnit Serenity integration provides some special support for Serenity Page Objects. In particular, Serenity will automatically instantiate any PageObjectfields in your JUnit test.
Junit5 @Disabled annotation can be used on test and step methods(same as @Ignore in JUnit4).
NavigateAction
import net.serenitybdd.annotations.Step;
import net.serenitybdd.core.steps.UIInteractionSteps;

public class NavigateAction extends UIInteractionSteps {

    @Step
    public void toTheHomePage() {
        openPageNamed("loginForm");

    }
}
Step 5 – Create serenity.conf file under src/test/resources
serenity.conf file is used to specify various features like the type of web driver used, various test environments, run tests in headless mode, and many more options.
In this tutorial, we will see how can we retrieve the child nodes from an XML in Java.
What is XML?
XML stands for eXtensible Markup Language. It is a markup language much like HTML and was designed to store and transport data. XML was designed to be both human- and machine-readable. It is a flexible way to create information formats and share both the format and the data on the World Wide Web, intranets, and elsewhere.
Let’s see a simple XML.
<?xml version = "1.0"?>
<department>
    <employee id = "10001">
        <firstname>Tom</firstname>
        <lastname>Mathew</lastname>
        <salary>25000</salary>
        <age>21</age>
    </employee>

    <employee id = "20001">
        <firstname>Katherine</firstname>
        <lastname>Jason</lastname>
        <salary>15000</salary>
        <age>20</age>
    </employee>

    <employee id = "30001">
        <firstname>David</firstname>
        <lastname>Mathew</lastname>
        <salary>35000</salary>
        <age>25</age>
    </employee>

    <employee id = "40001">
        <firstname>Berry</firstname>
        <lastname>Brian</lastname>
        <salary>50000</salary>
        <age>30</age>
    </employee>
</department>
1.A File object inputFile is created, representing the XML file located at “src/test/resources/testData/test.xml”.
2. A DocumentBuilderFactory instance is created. This is a factory API that enables applications to obtain a parser that produces DOM object trees from XML documents.
4. The XML document is parsed using the DocumentBuilder instance, resulting in a Document object that represents the entire XML document.
Document doc = dBuilder.parse(inputFile);
5. The normalize method is called on the Document object to ensure that the document’s DOM tree is fully normalized, which means that it is structurally correct according to the XML specification
doc.getDocumentElement().normalize();
6. It retrieves a NodeList of all employee elements in the document and prints out the number of such elements.
7. A for loop is used to iterate over each employee node in the NodeList. For each employee node, its name and the values of its id, firstname, lastname, salary, and age child elements are printed out.
for (int temp = 0; temp < nodeList.getLength(); temp++) {
Node node = nodeList.item(temp);
System.out.println("\nCurrent Element :" + node.getNodeName());
if (node.getNodeType() == Node.ELEMENT_NODE) {
Element eElement = (Element) node;
//returns specific attribute
System.out.println("Employee Id : " + eElement.getAttribute("id"));
//returns a list of subelements of specified name
System.out.println("First Name: " + eElement.getElementsByTagName("firstname").item(0).getTextContent());
System.out.println("Last Name: " + eElement.getElementsByTagName("lastname").item(0).getTextContent());
System.out.println("Salary: " + eElement.getElementsByTagName("salary").item(0).getTextContent());
System.out.println("Age: " + eElement.getElementsByTagName("age").item(0).getTextContent());
}
8. If any exceptions occur during the parsing process (such as ParserConfigurationException, SAXException, or IOException), they are caught, and their stack traces are printed out.
The complete program is mentioned below:
import org.w3c.dom.Document;
import org.w3c.dom.Element;
import org.w3c.dom.Node;
import org.w3c.dom.NodeList;
import org.xml.sax.SAXException;
import javax.xml.parsers.DocumentBuilder;
import javax.xml.parsers.DocumentBuilderFactory;
import javax.xml.parsers.ParserConfigurationException;
import java.io.File;
import java.io.IOException;
public class XMLParser {
public static void main(String[] args) {
try {
//Create a DocumentBuilder
File inputFile = new File("src/test/resources/testData/test.xml");
System.out.println("Request :" + inputFile);
DocumentBuilderFactory dbFactory = DocumentBuilderFactory.newInstance();
DocumentBuilder dBuilder = dbFactory.newDocumentBuilder();
Document doc = dBuilder.parse(inputFile);
doc.getDocumentElement().normalize();
//Extract the root element
System.out.println("Root element :" + doc.getDocumentElement().getNodeName());
NodeList nodeList = doc.getElementsByTagName("employee");
System.out.println("Node Length :" + nodeList.getLength());
for (int temp = 0; temp < nodeList.getLength(); temp++) {

        Node node = nodeList.item(temp);
        System.out.println("\nCurrent Element :" + node.getNodeName());

        if (node.getNodeType() == Node.ELEMENT_NODE) {
            Element eElement = (Element) node;

             //returns specific attribute
              System.out.println("Employee Id : " + eElement.getAttribute("id"));

            //returns a list of subelements of specified name
             System.out.println("First Name: " + eElement.getElementsByTagName("firstname").item(0).getTextContent());
             System.out.println("Last Name: " + eElement.getElementsByTagName("lastname").item(0).getTextContent());
             System.out.println("Salary: " + eElement.getElementsByTagName("salary").item(0).getTextContent());
             System.out.println("Age: " + eElement.getElementsByTagName("age").item(0).getTextContent());

    }
}
} catch (ParserConfigurationException | SAXException | IOException e) {
e.printStackTrace();
}
}
}
The output of the above program is
Complex XML
<?xml version = "1.0"?>
<cars>
    <sportscar company = "Porsce">
        <carname type = "formula one">Porsche 718 Boxster</carname>
        <carname type = "sports car">Porsche 718 Cayman</carname>
        <carname type = "sports car">2024 Porsche Panamera</carname>
    </sportscar>

    <supercars company = "Lamborgini">
        <carname>Lamborghini Aventador</carname>
        <carname>Lamborghini Reventon</carname>
        <carname>Lamborghini Gallardo</carname>
    </supercars>

    <supercars company = "Audi">
        <carname>Audi R8</carname>
        <carname>Audi Q8</carname>
        <carname>Audi Q6 e-tron</carname>
    </supercars>
</cars>
The complete program is shown below:
package com.example.XML;

import org.w3c.dom.Document;
import org.w3c.dom.Element;
import org.w3c.dom.Node;
import org.w3c.dom.NodeList;
import org.xml.sax.SAXException;

import javax.xml.parsers.DocumentBuilder;
import javax.xml.parsers.DocumentBuilderFactory;
import javax.xml.parsers.ParserConfigurationException;
import java.io.File;
import java.io.IOException;

public class ComplexXMLParser {

    public static void main(String[] args) {

        try {

            //Create a DocumentBuilder
            File inputFile = new File("src/test/resources/testData/test4.xml");
            System.out.println("Request :" + inputFile);
            DocumentBuilderFactory dbFactory = DocumentBuilderFactory.newInstance();
            DocumentBuilder dBuilder = dbFactory.newDocumentBuilder();
            Document doc = dBuilder.parse(inputFile);
            doc.getDocumentElement().normalize();

            //Extract the root element
            System.out.println("Root element :" + doc.getDocumentElement().getNodeName());

            NodeList sportscarNodeList = doc.getElementsByTagName("sportscar");
           // System.out.println("Node Length :" + nodeList.getLength());

            for (int temp = 0; temp < sportscarNodeList.getLength(); temp++) {

                Node node = sportscarNodeList.item(temp);
                System.out.println("\nCurrent Element :" + node.getNodeName());

                if (node.getNodeType() == Node.ELEMENT_NODE) {
                    Element eElement = (Element) node;

                    //returns specific attribute
                    System.out.println("sportscar : " + eElement.getAttribute("company"));

                    NodeList sportcarNameList = eElement.getElementsByTagName("carname");

                    for (int count = 0; count < sportcarNameList.getLength(); count++) {
                        Node node1 = sportcarNameList.item(count);

                        if (node1.getNodeType() == node1.ELEMENT_NODE) {
                            Element car = (Element) node1;

                            System.out.print("\ncar type : " + car.getAttribute("type"));
                            System.out.print("\ncar name : " + car.getTextContent());

                        }
                    }
                }

            }

            System.out.println("\n====================================================");
            NodeList supercarsNodeList = doc.getElementsByTagName("supercars");
            // System.out.println("Node Length :" + nodeList.getLength());

            for (int temp = 0; temp < supercarsNodeList.getLength(); temp++) {

                Node node1 = supercarsNodeList.item(temp);
                System.out.println("\nCurrent Element :" + node1.getNodeName());

                if (node1.getNodeType() == Node.ELEMENT_NODE) {
                    Element eElement = (Element) node1;

                    //returns specific attribute
                    System.out.println("supercars : " + eElement.getAttribute("company"));

                    NodeList supercarsNameList = eElement.getElementsByTagName("carname");

                    for (int count = 0; count < supercarsNameList.getLength(); count++) {
                        Node node2 = supercarsNameList.item(count);

                        if (node1.getNodeType() == node2.ELEMENT_NODE) {
                            Element car = (Element) node2;

                            System.out.print("car name : " + car.getTextContent()+"\n");

                        }
                    }
                }

            }

        } catch (ParserConfigurationException | SAXException | IOException e) {
            e.printStackTrace();
        }
    }

}
The output of the above program is
We are done! Congratulations on making it through this tutorial and hope you found it useful! Happy Learning!!
In the previous tutorial, I explainedSerenity BDD with Cucumber for Web Application. In this tutorial, I will explain the Integration of Serenity with JUnit4. This tutorial gives an idea of how to set up a new project where we like to use Serenity as BDD Framework and JUnit as a Testing framework.
This project consists of various classes – ApplicationLoginTests (This is the Test Class which is going to contain all the tests). NavigationActions is the Action class that is used to open the webpage or application. StepLoginPage, StepDashboardPage, and StepForgotPasswordPage are the Page Object classes that contain multiple functionalities of that page and that help to keep the code clean.
Implementation Steps
Step 1 – Update the Properties section
Update the Properties section in Maven pom.xml, in case of Maven project.
The Test Class – ApplicationLoginTests is created under src/test/java directory.
package org.example.tests;

import net.serenitybdd.annotations.Pending;
import net.serenitybdd.annotations.Steps;
import net.serenitybdd.annotations.Title;
import net.serenitybdd.core.Serenity;
import net.serenitybdd.junit.runners.SerenityRunner;
import org.example.steps.StepDashBoardPage;
import org.example.steps.StepForgotPasswordPage;
import org.example.steps.StepLoginPage;
import org.junit.Test;
import org.junit.runner.RunWith;

import static org.junit.Assert.assertTrue;

@RunWith(SerenityRunner.class)
public class ApplicationLoginTests {

    @Steps
    NavigateActions navigate;

    @Steps
    StepLoginPage loginPage;

    @Steps
    StepDashBoardPage dashboardPage;

    @Steps
    StepForgotPasswordPage forgetPasswordPage;


    @Test
    @Title("Login to application with invalid credential generates error message")
    public void invalidCredentials() {

        // Given
        navigate.toTheHomePage();

        // When
        loginPage.inputUserName("Admin");
        loginPage.inputPassword("admin");
        loginPage.clickLogin();

        // Then
        Serenity.reportThat("Passing invalid credentials generates error message",
                () -> assertTrue(loginPage.errorMessage().equalsIgnoreCase("Invalid Credentials")));

    }

    @Test
    @Title("Login to application with valid credentials navigates to DashBoard page")
    public void successfulLogin() {

        navigate.toTheHomePage();
        // loginPage.open();

        // When
        loginPage.inputUserName("Admin");
        loginPage.inputPassword("admin123");
        loginPage.clickLogin();

        // Then
        Serenity.reportThat("Passing valid credentials navigates to DashBoard page",
                () -> assertTrue(dashboardPage.getHeading().equalsIgnoreCase("DashBoard")));
    }


    @Test
    @Pending
    @Title("Verify Forgot your password link")
    public void clickForgetPasswordLink() {

        // Given
        navigate.toTheHomePage();

        // When
        loginPage.clickForgetPasswordLink();

        // Then
        Serenity.reportThat("Open Forget Password Page after clicking forget password link",
                () -> assertTrue(forgetPasswordPage.getHeadingForgetPasswordPage().equalsIgnoreCase("Reset Password")));

    }

}
The tests run using the Serenity test runner – @RunWith(SerenityRunner.class).
The @Steps annotation marks a Serenity step library.
Create the test following the Given/When/Then pattern and using step methods from the step library.
The @Title annotation lets you provide your own title for this test in the test reports.
Step 5 – Create the Action class
Create NavigateActions class under src/test/java. This class is used to open a web browser with the URL specified. This class is extended from UIInteractionSteps.
openPageNamed() method opens an environment-specific page defined in the serenity.conf file under the pages section. The value of loginForm is derived from serenity.config:
package org.example.tests;

import net.serenitybdd.annotations.Step;
import net.serenitybdd.core.steps.UIInteractionSteps;

public class NavigateActions extends UIInteractionSteps {

    @Step
    public void toTheHomePage() {
        // openUrl("https://opensource-demo.orangehrmlive.com/");

        openPageNamed("loginForm");
    }
}
The JUnit Serenity integration provides some special support for Serenity Page Objects. In particular, Serenity will automatically instantiate any PageObject fields in the JUnit test. When a field of type StepLoginPage is declared in the test, Serenity instantiates it for you. The page is automatically instantiated and ready to be used.
@Managed
WebDriver driver;
@Managed declares a WebDriver instance that will be managed by Serenity. The WebDriver instance will be initialized automatically.
The driver parameter lets you define what WebDriver driver you want to run these tests in. Possible values include Firefox, chrome, iexplorer, phantomjs, appium, safari, edge, and htmlunit. The default browser in Serenity is Firefox. There are multiple ways to configure webDriver. One of the ways is to mention with @Managed as shown below:
@Managed(driver="chrome")
Step 7 – Create the serenity.conf file
Serenity.conf file is used to specify various features like the type of webdriver used, various test environments, run test in headless mode, and many more options. Serenity.conf can also contain settings like start size, disable sandbox, disable gpu, and others that need to be added to chrome.switches setting. Create serenity.conf file under src/test/resources.
The serenity.properties file is created at the root of the project.
serenity.project.name = Serenity and Junit4 Demo
Step 9 – Run the tests through the command
Open the command line and go to the location where the pom.xml of the project is present and type the below command.
mvn clean verify
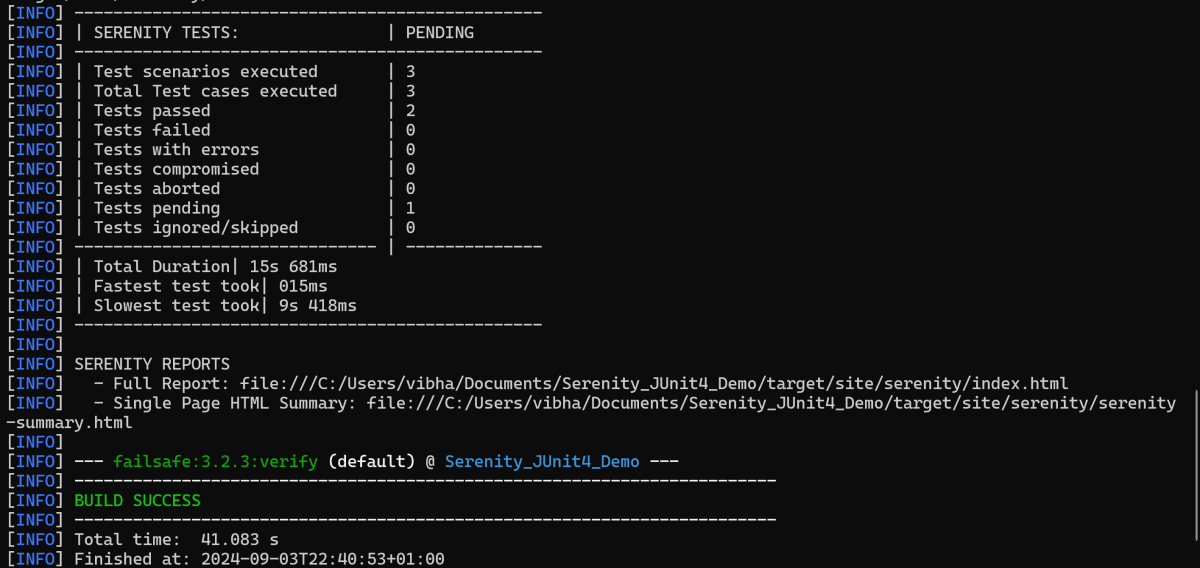
Below is the execution status.
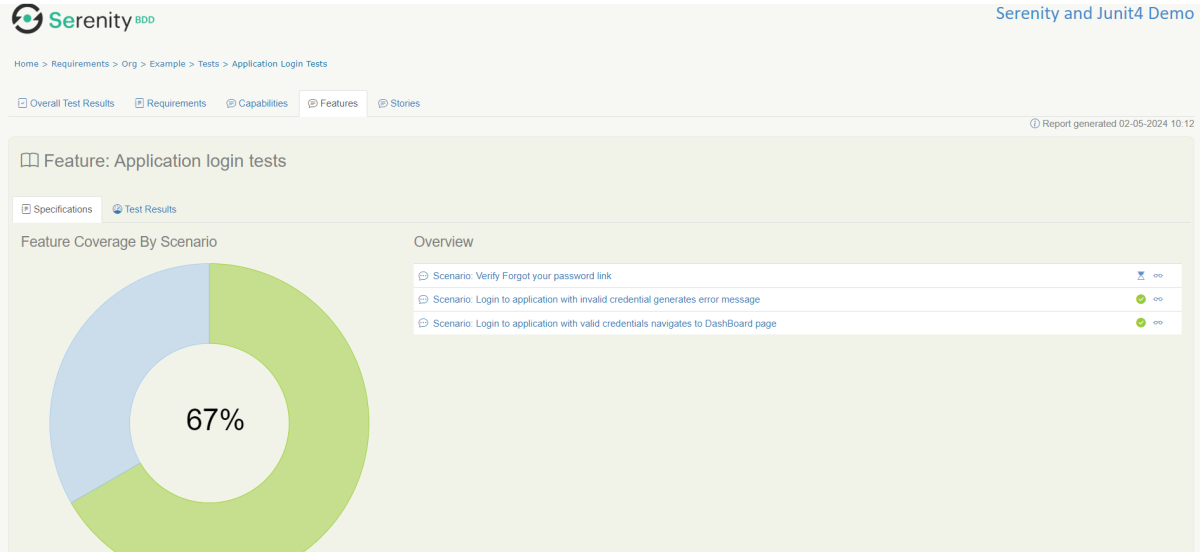
Step 10 – View the Serenity Reports
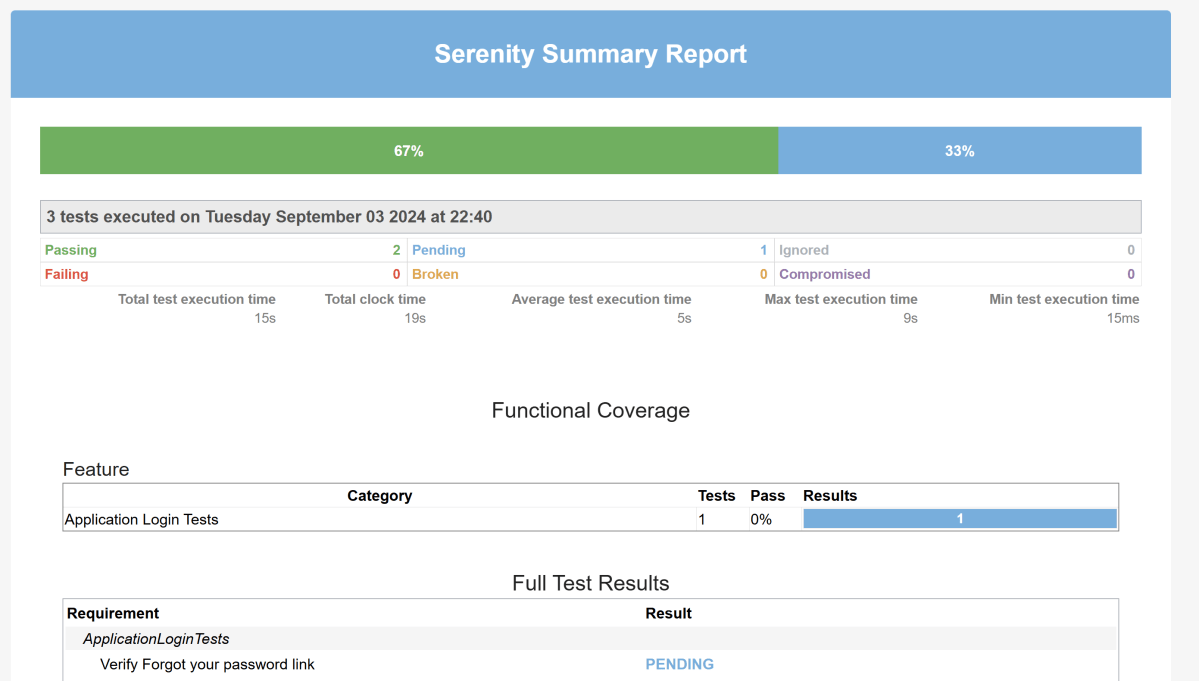
There are 2 types of reports are generated – Index.htmland Serenity-Summary.html.
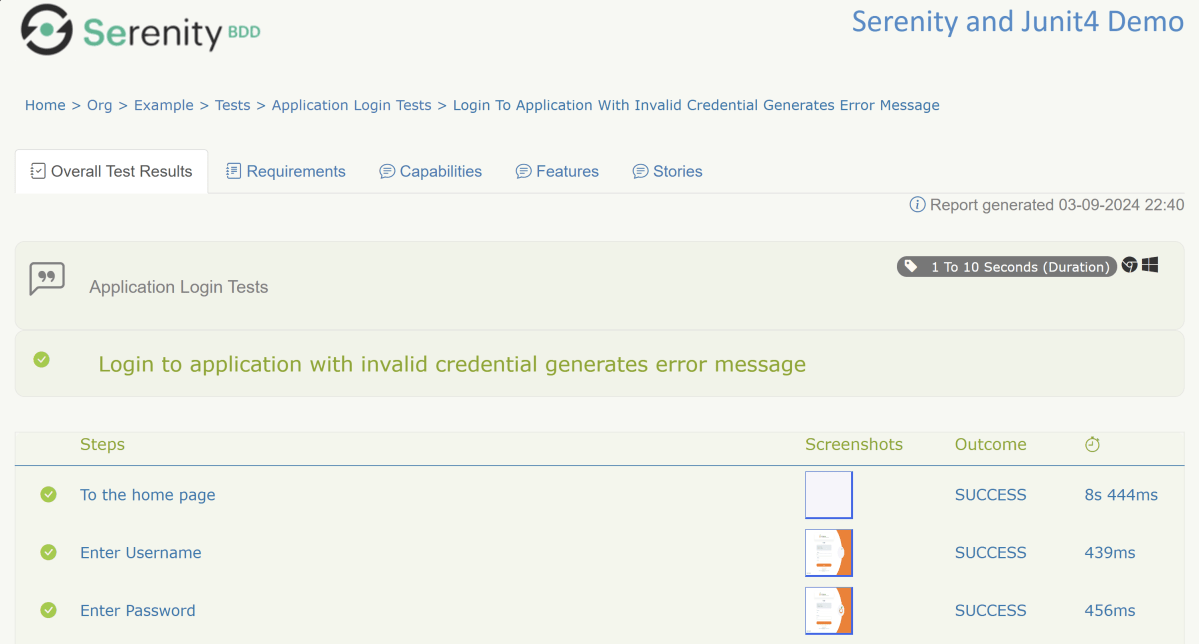
Index.html
We can see the value of the @Title annotation, ‘Login to the application with valid credentials navigates to DashBoard page’, added as the heading. The value of @Step annotation, ‘Enter Username’, and ‘Enter Password’ is added to the Report as various steps.
This report contains a screenshot of each step also.
Emailable Report (Serenity-Summary.html)
These reports are present under /target/site/serenity.
Skipping the tests
In Serenity, you use the @Pending annotation, either for a test or for a @Step-annotated method, to indicate that the scenario is still being implemented and that the results are not available yet. These tests appear as ‘Pending’ (shown in blue) in the test reports.
    @Test
	@Pending
	@Title("Verify Forgot your password link")
	public void clickForgetPasswordLink() {

		// Given
		loginPage.open();

		// When
		loginPage.clickForgetPasswordLink();

		// Then
		Assert.assertTrue(forgetpasswordPage.ForgetPasswordPage());
	}
The output of the above program is
Tests marked with@Ignorewill appear as ‘Ignored’ (from JUnit) and appears as grey in the test reports.
We are done! Congratulations on making it through this tutorial and hope you found it useful! Happy Learning!!