In the previous tutorial, we discussed How to disable Test Cases using TestNG. In this tutorial, we will see how we can create a dependency between Selenium Test Cases using TestNG.
Imagine there is a situation in which a test case can only be executed if a particular test case executes successfully. This can be achieved in TestNG by dependsOnMethod().
Below is an example.
To Run the TestNG program, right-click on the Java Program – here it is TestNGMethodDependencyDemo, select Run As TestNG Test(Eclipse).
Below is an example of dependsOnMethod() method.
import org.testng.annotations.Test;

public class TestNGMethodDependencyDemo {

    @Test
    public static void FirstTest() {
        System.out.println("This is Test Case 1");
    }

    @Test(dependsOnMethods = "FirstTest")
    public static void SecondTest() {
        System.out.println("This is Test Case 2 and will be executed after Test Case 1 successfully executed");
    }

    @Test
    public static void ThirdTest() {
        System.out.println("This is Test Case 3");
    }

    @Test
    public static void FourthTest() {
        System.out.println("This is Test Case 4");
    }
}
The output of the above program is
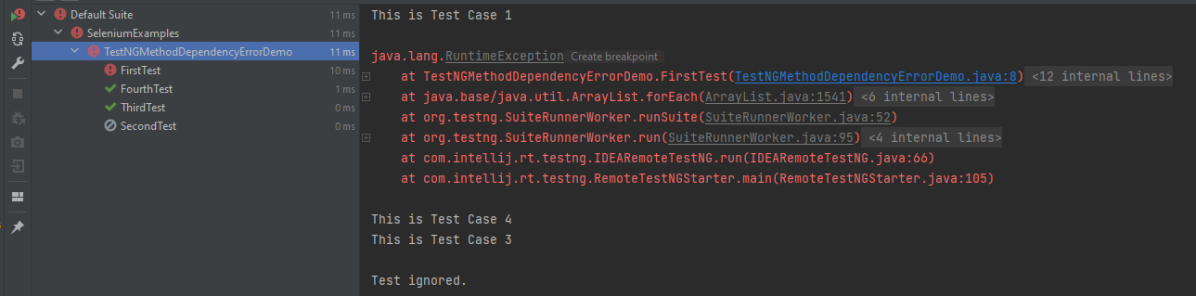
In the below scenario, Test Case 2 is dependent on Test CASE 1. If Test Case 1 fails, then Test Case 2 will skip.
package TestNGDemo;

import org.testng.annotations.Test;
public class TestNGMethodDependencyErrorDemo {

      @Test
      public static void FirstTest() {
            System.out.println("This is Test Case 1");
            throw new RuntimeException();
      }

      @Test(dependsOnMethods = "FirstTest")
      public static void SecondTest() {
          System.out.println("This is Test Case 2 and will be executed after Test Case 1 sucessfully executed");
     }

     @Test
     public static void ThirdTest() {
          System.out.println("This is Test Case 3");
     }

      @Test
      public static void FourthTest() {
            System.out.println("This is Test Case 4");
    }
}
The output of the above program is
We are done. Congratulations on making it through this tutorial and hope you found it useful!
TestNG provides several features like prioritizing the test cases, grouping the test cases, skipping the test cases, defining dependencies between test cases, and so on. The previous tutorial has explained the parameters in TestNG.
In this tutorial, we will see how the test cases can be prioritized using TestNG. If no priority is assigned to a Test Case, then the annotated test methods are executed as per the alphabetical order of the tests.
Below is an example
import org.testng.annotations.Test;

public class TestNGPriorityDemo {


     @Test
     public static void FirstTest() {
           System.out.println("This is Test Case 1");
     }

     @Test
     public static void SecondTest() {
           System.out.println("This is Test Case 2");
     }

     @Test
     public static void ThirdTest() {
           System.out.println("This is Test Case 3");
     }

     @Test
     public static void FourthTest() {
           System.out.println("This is Test Case 4");
     }
}
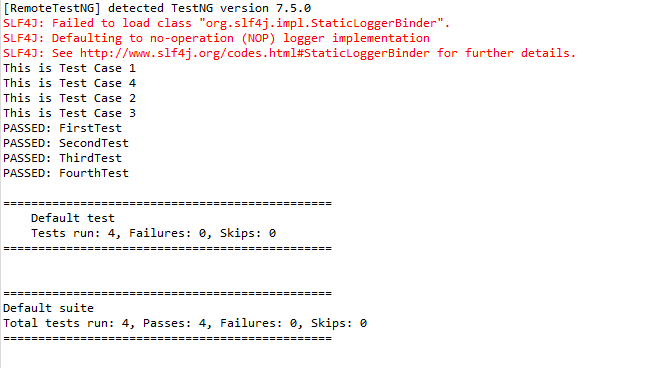
The output of the above program is
In the above example, FirstTest and FourthTest have the highest preference as per the alphabetical order. F comes before S and T. FirstTest is executed before Fourth because preference of I is higher than O.
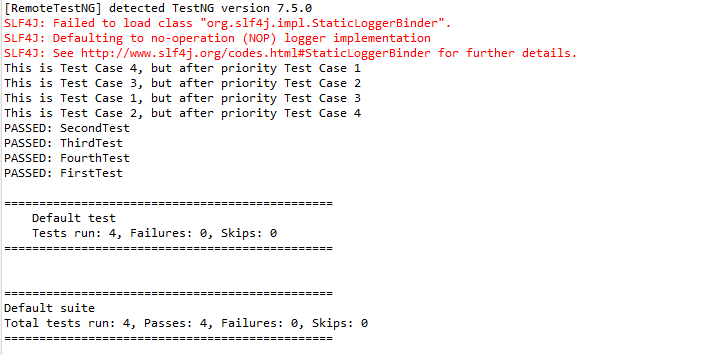
The methods can be prioritized by assigning a number to the annotated test cases. The smaller the number, the higher the priority. Priority can be assigned as parameters while defining the test cases. In the below example, we have assigned priority to test cases, and now they are executed as per the priority. The Test Case with priority = 1 has the highest precedence. It overrides the rule of executing test cases by alphabetical order.
To Run the TestNG program, right-click on the program, select Run As TestNG Test.
import org.testng.annotations.Test;

public class TestNGPriorityDemo {


     @Test(priority = 3)
     public static void FirstTest() {
           System.out.println("This is Test Case 1, but after priority Test Case 3");
     }


     @Test(priority = 4)
     public static void SecondTest() {
           System.out.println("This is Test Case 2, but after priority Test Case 4");
     }


     @Test(priority = 2)
     public static void ThirdTest() {
           System.out.println("This is Test Case 3, but after priority Test Case 2");
     }


     @Test(priority = 1)
     public static void FourthTest() {
          System.out.println("This is Test Case 4, but after priority Test Case 1");
     }
}
The output of the above program is
We are done. Congratulations on making it through this tutorial and hope you found it useful!
Parallelism or multi-threading in software terms is defined as the ability of the software, operating system, or program to execute multiple parts or sub-components of another program simultaneously.
Parallel testing helps to reduce execution time and efforts and results in faster time to delivery. In a scenario where we have two versions of software available, and we need to check its stability and compatibility, we can run the two versions simultaneously and find issues at a much faster rate.
How to run Parallel Tests with Selenium?
TestNG provides multiple ways to execute tests in separate threads. In testng.xml, if we set ‘parallel’ attribute on the tag to ‘methods’, testNG will run all the ‘@Test’ methods in tag in a separate thread.
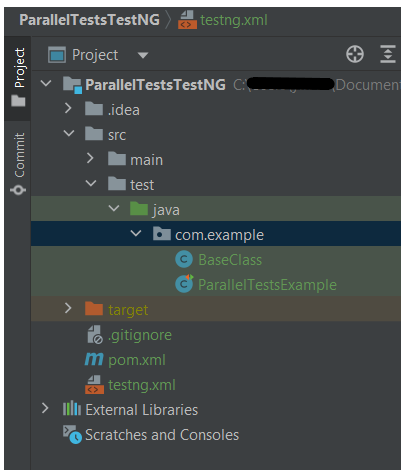
The project Structure looks like shown below:-
To start with, add the below mentioned dependencies to POM.xml (Maven project)
Let us create a class with multiple tests. In the below Example, we have created three test cases or methods . We want to run these methods parallelly. To achieve this, we need to add the below command in testng.xml
parallel="methods"
Below is an example of parallel tests.
import org.openqa.selenium.By;
import org.openqa.selenium.WebDriver;
import org.openqa.selenium.chrome.ChromeDriver;
import org.openqa.selenium.chrome.ChromeOptions;
import org.testng.Assert;
import org.testng.annotations.*;
import java.time.Duration;
public class ParallelTestsExample1 {
@Test
public void invalidLoginTest() {
System.out.println("Test Case 1 with Thread Id - "+Thread.currentThread().getId());
ChromeOptions options = new ChromeOptions();
options.addArguments("--start-maximized");
WebDriver driver = new ChromeDriver(options);
driver.manage().timeouts().implicitlyWait(Duration.ofSeconds(5));
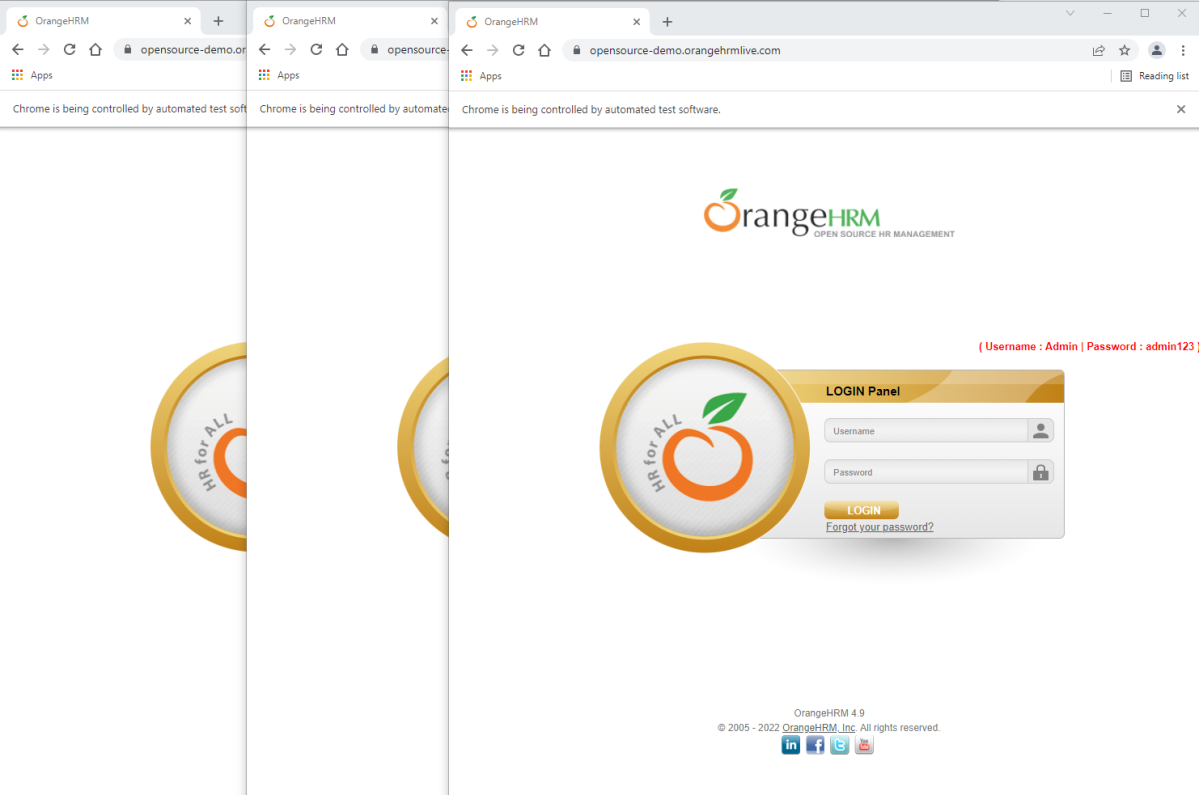
driver.get("https://opensource-demo.orangehrmlive.com/web/index.php/auth/login");
driver.findElement(By.name("username")).sendKeys("admin123123");
driver.findElement(By.name("password")).sendKeys("adm");
driver.findElement(By.xpath("//*[@class='oxd-form']/div[3]/button")).click();
String expectedError = driver.findElement(By.xpath("//*[@class='orangehrm-login-error']/div[1]/div[1]/p")).getText();
Assert.assertTrue(expectedError.contains("Invalid credentials"));
}
@Test
public void validLoginTest() throws InterruptedException {
System.out.println("Test Case 2 with Thread Id - "+Thread.currentThread().getId());
ChromeOptions options = new ChromeOptions();
options.addArguments("--start-maximized");
WebDriver driver = new ChromeDriver(options);
driver.manage().timeouts().implicitlyWait(Duration.ofSeconds(5));
driver.get("https://opensource-demo.orangehrmlive.com/web/index.php/auth/login");
driver.findElement(By.name("username")).sendKeys("Admin");
driver.findElement(By.name("password")).sendKeys("admin123");
driver.findElement(By.xpath("//*[@class='oxd-form']/div[3]/button")).click();
String expectedTitle = driver.findElement(By.xpath("//*[@class='oxd-topbar-header-breadcrumb']/h6")).getText();
Assert.assertTrue(expectedTitle.contains("Dashboard"));
}
@Test
public void forgotLinkTest() {
System.out.println("Test Case 3 with Thread Id - "+Thread.currentThread().getId());
ChromeOptions options = new ChromeOptions();
options.addArguments("--start-maximized");
WebDriver driver = new ChromeDriver(options);
driver.manage().timeouts().implicitlyWait(Duration.ofSeconds(5));
driver.get("https://opensource-demo.orangehrmlive.com/web/index.php/auth/login");
String expectedLink = driver.findElement(By.className("orangehrm-login-forgot-header")).getText();
Assert.assertTrue(expectedLink.contains("Forgot your password?"));
}
}
Now, let us create a testng.xml. Right click on the project and select TestNG -> Convert to TestNG.
The attribute thread-count allows you to specify how many threads should be allocated for this execution.
parallel = “methods” means that the methods will run parallel
The parallel attribute can be extended for multiple values, as below:
· Methods: Helps run methods in separate threads
· Tests: Help to run all methods belonging to the same tag in the same thread, means tests will run sequentially
· Classes: Helps to run all methods belonging to a class in a single thread
· Instances: Helps run all methods in the same instance in the same thread
testng.xml
<?xml version="1.0" encoding="UTF-8"?>
<!DOCTYPE suite SYSTEM "https://testng.org/testng-1.0.dtd">
<suite name="Suite">
  <test name="Parallel Tests" parallel = "methods" thread-count="3">
    <classes>
      <class name="com.example.parallel.ParallelTestsExample"/>
    </classes>
  </test> <!-- Test -->
</suite> <!-- Suite -->
How to run the tests?
Right-click on testng.xml and select Run AS -> TestNG Suite. If you will run the Test Class – ParallelTestDemo.java as Right click and then Run As TestNG Tests, then the methods will run sequentially.
Execution
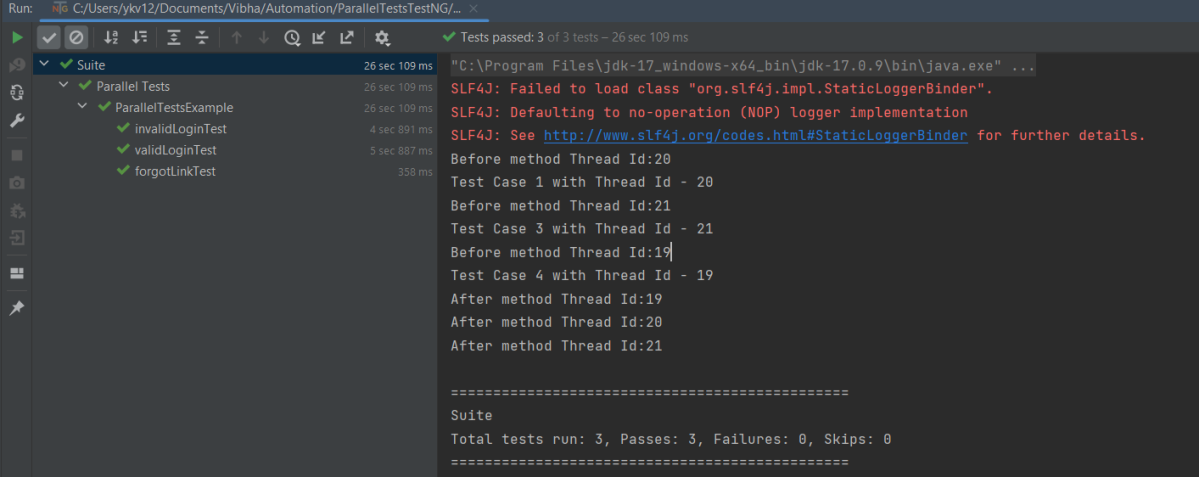
Here it can be seen that 3 tests were running on thread no – 19, 20 and 21. Out of all 3 tests, browser for only 1 test is closed and rest 2 browsers are left open.
First thread initialized a browser and set a value to static WebDriver reference. Second thread initialized another browser and set a new value to the same static WebDriver reference and this will impact value set by first thread as it is a static.All threads wanted to close same browser that is the reason there is one configuration method failure as one browser is closed another threads will not find sessions to close the browsers. Browser was closed already so last 2 tests did not able to close the browser.
To overcome this issue, will use ThreadLocal<WebDriver>. The complete program looks like as below:
First, I will create a HelperClass which contains the initialization of driver and closing the driver. I like to keep the tests only in Test Class. This is not mandatory. You can combine the code of both classes in one also.
HelperClass
import org.openqa.selenium.WebDriver;
import org.openqa.selenium.chrome.ChromeDriver;
import org.openqa.selenium.chrome.ChromeOptions;
import org.testng.annotations.AfterMethod;
import org.testng.annotations.BeforeMethod;

import java.time.Duration;

public class BaseClass {

    private static final ThreadLocal<WebDriver> driver = new ThreadLocal<WebDriver>();

    @BeforeMethod
    public void setDriver()  {

        ChromeOptions options = new ChromeOptions();
        options.addArguments("--start-maximized");
        driver.set(new ChromeDriver(options));
        driver.get().manage().timeouts().implicitlyWait(Duration.ofSeconds(5));
        driver.get().get("https://opensource-demo.orangehrmlive.com/web/index.php/auth/login");
        System.out.println("Before method Thread Id:" + Thread.currentThread().getId());

    }

    public WebDriver getDriver() {
        return driver.get();
    }

    @AfterMethod
    public  void closeBrowser() {
        System.out.println("After method Thread Id:" + Thread.currentThread().getId());
        driver.get().quit();
        driver.remove();
    }
}
ParallelTestsExample
import org.openqa.selenium.By;
import org.testng.Assert;
import org.testng.annotations.Test;

public class ParallelTestsExample extends BaseClass{

    @Test
    public void invalidLoginTest() {

        System.out.println("Test Case 1 with Thread Id - "+Thread.currentThread().getId());

        getDriver().findElement(By.name("username")).sendKeys("admin123123");
        getDriver().findElement(By.name("password")).sendKeys("adm");
        getDriver().findElement(By.xpath("//*[@class='oxd-form']/div[3]/button")).click();
        String expectedError = getDriver().findElement(By.xpath("//*[@class='orangehrm-login-error']/div[1]/div[1]/p")).getText();
        Assert.assertTrue(expectedError.contains("Invalid credentials"));

    }

    @Test
    public void validLoginTest() throws InterruptedException {

        System.out.println("Test Case 2 with Thread Id - "+Thread.currentThread().getId());

        getDriver().findElement(By.name("username")).sendKeys("Admin");
        getDriver().findElement(By.name("password")).sendKeys("admin123");
        getDriver().findElement(By.xpath("//*[@class='oxd-form']/div[3]/button")).click();
        Thread.sleep(5000);
        String expectedTitle = getDriver().findElement(By.xpath("//*[@class='oxd-topbar-header-breadcrumb']/h6")).getText();
        Assert.assertTrue(expectedTitle.contains("Dashboard"));
    }

    @Test
    public void forgotLinkTest() {

        System.out.println("Test Case 3 with Thread Id - "+Thread.currentThread().getId());

        String expectedLink = getDriver().findElement(By.className("orangehrm-login-forgot-header")).getText();
        Assert.assertTrue(expectedLink.contains("Forgot your password?"));
    }

}
The output of the above program is
Report Generation
TestNG generates 2 reports – emailable-report.html and index.html
Emailable-Report.html
Go to test-output folder and open emailable-report.html
This report gives a summary of all the tests executed, passed, failed, skipped and retried with their respective execution time.
Index.html
This report provides the detailed description of the tests like no of tests present, no of methods, time taken by each step, total time taken by each steps, testng.xml data and soon.
Run Tests Sequentially
If you will run the Test Class – ParallelTestDemo.java as Right click and then Run As TestNG Tests, then the methods will run sequentially. Here all tests are run with Thread 1 whereas with parallel execution tests were run with different threads.
We can make parallel = none, if don’t want to run them parallel. It is shown below that all the tests are running on Thread 1 that means once a test ends then another test starts on that thread.
In the last tutorial, I have explain the Parameters in TestNG which passes different test data to the test case as arguments. Similar to TestNG Parameters, DataProviders are a means to pass data to test scripts in TestNG. In this tutorial, I will explain about the DataProviders in TestNG.
What is DataProvider in TestNG?
The DataProvider in TestNG is another way to pass the parameters in the test function, the other one being TestNG parameters. Using DataProvider in TestNG, we can easily inject multiple values into the same test case. It comes inbuilt in TestNG and is popularly used in data-driven frameworks.
Syntax of DataProvider
@DataProvider (name = "name_of_dataprovider")
public Object[][] dpMethod() {
    return new Object [][] { values}
}
A Data Provider is a method on the class that returns an array of array of objects. This method is annotated with @DataProvider
A @Test method specifies its Data Provider with the dataProvider attribute. This name must correspond to a method on the same class annotated with @DataProvider(name=”…”) with a matching name.
TestNG dataprovider returns a 2d list of objects..An array of array of objects (Object[][]) where the first dimension’s size is the number of times the test method will be invoked and the second dimension size contains an array of objects that must be compatible with the parameter types of the test method.
DataProviders are not declared on top of the functions like TestNG parameters but have a method of their own, which in regular speaking terms called a dataprovider method. For example, dpMethod here.
The dataprovider name calls the dataprovider method, and if there is no name specified by the tester, then the dataprovider method is the default name used in the receiving @Test case.
Data providers can run in parallel with the attribute parallel.
Below is the basic example of using DataProvider in TestNG.
import org.openqa.selenium.By;
import org.openqa.selenium.Keys;
import org.openqa.selenium.WebDriver;
import org.openqa.selenium.WebElement;
import org.openqa.selenium.chrome.ChromeDriver;
import org.openqa.selenium.chrome.ChromeOptions;
import org.testng.annotations.AfterMethod;
import org.testng.annotations.BeforeMethod;
import org.testng.annotations.DataProvider;
import org.testng.annotations.Test;

public class DataProvider_Demo {

    WebDriver driver;

    @DataProvider(name = "testData")
    public Object[][] dataProvFunc() {
        return new Object[][] { { "Selenium" }, { "TestNG" } };
    }

    @BeforeMethod
    public void setUp() {

        System.out.println("Start the test");
        ChromeOptions options = new ChromeOptions();
        options.addArguments("--start-maximized");
        driver = new ChromeDriver(options);
        driver.get("https://www.bing.com/");

    }

    // Passing the dataProvider to the test method through @Test annotation
    @Test(dataProvider = "testData")
    public void search(String keyWord) {
        WebElement txtBox = driver.findElement(By.id("sb_form_q"));
        txtBox.sendKeys(keyWord);
        System.out.println("Keyword entered is : " + keyWord);
        txtBox.sendKeys(Keys.ENTER);
        System.out.println("Search result is displayed.");
    }

    @AfterMethod
    public void burnDown() {
        driver.quit();

        System.out.println("End the test");
    }

}
In the above example, I am passing two search keywords, viz “Selenium” and “TestNG” to the test method using the DataProvider method. You can run the code and check the output.
The output of the above program is
Here, Test is executed with two values, but we have run the test only once.
Inheriting DataProvider in TestNG
It is messy to have supporting methods like DataProvider and test code in one class. It is always preferred to declare the test case in one class and define TestNG parameters like DataProviders in another class. By default, the data provider will be looked for in the current test class or one of its base classes. If you want to put your data provider in a different class, it needs to be a static method or a class with a non-arg constructor, and you specify the class where it can be found in the dataProviderClass attribute.
Let us create separate classes for the DataProvider method and the test method, as shown below:
DataProvider Class
public class DPDemo {

	@DataProvider(name = "testData")
	public Object[][] dataProvFunc() {
		return new Object[][] {
          { "Selenium" }, { "TestNG" }, { "Automation" } };
	}
}
We can see that all we did was create a DataProvider method in a Class and create a new class for Test Code.
import org.openqa.selenium.By;
import org.openqa.selenium.Keys;
import org.openqa.selenium.WebDriver;
import org.openqa.selenium.WebElement;
import org.openqa.selenium.chrome.ChromeDriver;
import org.openqa.selenium.chrome.ChromeOptions;
import org.testng.annotations.AfterMethod;
import org.testng.annotations.BeforeMethod;
import org.testng.annotations.Test;

public class DataProviderInheritance_Demo {

    WebDriver driver;

    @BeforeMethod
    public void setUp() {

        System.out.println("Start the test");
        ChromeOptions options = new ChromeOptions();
        options.addArguments("--start-maximized");
        driver = new ChromeDriver(options);
        driver.get("https://www.bing.com/");

    }

    // Passing the dataProvider to the test method through @Test annotation
    @Test(dataProvider = "testData", dataProviderClass = DPDemo.class)
    public void search(String keyWord) {
        WebElement txtBox = driver.findElement(By.id("sb_form_q"));
        txtBox.sendKeys(keyWord);
        System.out.println("Keyword entered is : " + keyWord);
        txtBox.sendKeys(Keys.ENTER);
        System.out.println("Search result is displayed.");
    }

    @AfterMethod
    public void burnDown() {
        driver.quit();
        System.out.println("End the test");
    }

}
As you can see, to handle the inheritance, all we did was add an attribute to the test method (highlighted above), which specifies the class that has the DataProvider method.
The output of the above program is
Passing Multiple Parameter Values in TestNG DataProviders
Passing multiple values is pretty similar to passing numerous parameters. The only difference is that we will pass various values to a single parameter so that a string of input(s) is sent in one go.
Let us quickly understand this concept with the help of the code as shown below.
DataProvider Class
public class DPDemo {

	@DataProvider(name = "testData")
	public Object[][] dataProvFunc() {
		return new Object[][] { { "Automation Tester", "2-5 years" }, { "Performance Tester", "3+ years" },
				{ "DevOps", "5+ years" } };
	}
}
Test Code – DataProviderInheritanceDemo
import org.openqa.selenium.By;
import org.openqa.selenium.Keys;
import org.openqa.selenium.WebDriver;
import org.openqa.selenium.WebElement;
import org.openqa.selenium.chrome.ChromeDriver;
import org.openqa.selenium.chrome.ChromeOptions;
import org.testng.annotations.AfterMethod;
import org.testng.annotations.BeforeMethod;
import org.testng.annotations.Test;

public class DataProviderInheritanceDemo {

    WebDriver driver;

    @BeforeMethod
    public void setUp() {

        System.out.println("Start the test");
        ChromeOptions options = new ChromeOptions();
        options.addArguments("--start-maximized");
        driver = new ChromeDriver(options);
        driver.get("https://www.bing.com/");

    }

    // Passing the dataProvider to the test method through @Test annotation
    @Test(dataProvider = "testData", dataProviderClass = DPDemo.class)
    public void search(String keyWord1, String keyWord2) {

        WebElement txtBox = driver.findElement(By.id("sb_form_q"));
        txtBox.sendKeys(keyWord1, keyWord2);
        System.out.println("Keyword entered is : " + keyWord1 + " " + keyWord2);
        txtBox.sendKeys(Keys.ENTER);
        System.out.println("Search result is displayed.");
    }

    @AfterMethod
    public void burnDown() {
        driver.quit();
        System.out.println("End the test");
    }
}
Run the test script, and you will see both the values for the TestNG parameters being passed in one go.
The output of the above program is
We are done! Congratulations on making it through this tutorial and hope you found it useful! Happy Learning!!
TestNG was developed by a famous programmer named “Cedric Beust”. It is distributed under Apache Software License and is easily available to download. TestNG requires JDK 7 or higher. TestNG is a testing framework inspired by JUnit and NUnit, but introduces some new functionalities that make it more powerful and easier to use.
Assertions in TestNG are a way to verify that the expected result and the actual result match not in the test case. A test is considered successful ONLY if it is completed without throwing any exceptions. An example of assertion can be logging into the website, checking the title of the webpage, verifying the functionality of an input box that takes only integers, etc.
If the project is a Maven project, then please add the latest TestNG dependency in the pom.xml.
Hard Assertion throws AssertionError immediately when an Assert Condition fails and moves to the next @Test method
Suppose, there are 2 assertions in a Test and the first assertion fails, then HardAssertion does not execute the second Assertion Condition and declares the test as failed
As you can see in the below example, there are 2 assert conditions under Test – AssertionFailure(). As the first Assert Condition fails, it moved directly to the second test without executing another Assert Condition.
package org.example;

import org.openqa.selenium.By;
import org.openqa.selenium.WebDriver;
import org.openqa.selenium.firefox.FirefoxDriver;
import org.openqa.selenium.firefox.FirefoxOptions;
import org.testng.Assert;
import org.testng.annotations.Test;

public class HardAssertionDemo {

    @Test
    public void AssertionFailure() {

        FirefoxOptions firefoxOptions = new FirefoxOptions();
        WebDriver driver = new FirefoxDriver(firefoxOptions);

        driver.get("https://duckduckgo.com/");
        String expectedTitle = "DuckDuckGo";

        String actualTitle = driver.getTitle();
        String actualText1 = driver.findElement(By.xpath("//*[@class='homepage-cta-section_title__Lovig heading_heading2__oEFPn heading_heading__IiMSV']")).getText();

        /* Hard Assert */
        System.out.println("Verify Title :" + actualTitle);
        Assert.assertEquals(actualTitle, expectedTitle, "Incorrect page title");

        System.out.println("Verify Text :" + actualText1);
        Assert.assertEquals(actualText1, "Privacy Protection For Any Device");

        driver.quit();
    }

    @Test
    public void print() {
        System.out.println("Hard Assertion is displayed");
    }
}
The output of the above program is
What is Soft Assert?
To overcome the above-mentioned problem, there is another type of assertion called Soft Assert.
Soft Assert does not throw an exception when an Assert Condition fails, and continues with the next step after the Assert Condition.
Soft assert does not include by default in TestNG. For this, you need to include the below package :
org.testng.asserts.SoftAssert;
The first step is to create an instance of SoftAssert class.
SoftAssert softAssertion = new SoftAssert();
After this, we can use this softAssert variable instead of hard assert.
Create an object of SoftAssertion to run Assert Conditions
Below is an example of a Soft Assert.
package org.example;

import org.openqa.selenium.By;
import org.openqa.selenium.WebDriver;
import org.openqa.selenium.firefox.FirefoxDriver;
import org.openqa.selenium.firefox.FirefoxOptions;
import org.testng.annotations.Test;
import org.testng.asserts.SoftAssert;

public class SoftAssertionDemo {

    @Test
    public void assertionFailure() {

        SoftAssert softAssertion = new SoftAssert();
        FirefoxOptions firefoxOptions = new FirefoxOptions();
        WebDriver driver = new FirefoxDriver(firefoxOptions);

        driver.manage().window().maximize();
        driver.get("https://duckduckgo.com/");

        String expectedTitle = "DuckDuckGo";

        String actualTitle = driver.getTitle();
        String actualText1 = driver.findElement(By.xpath("//*[@class='homepage-cta-section_title__Lovig heading_heading2__oEFPn heading_heading__IiMSV']")).getText();

        /* Soft Assert */
        System.out.println("Verify Title :" + actualTitle);
        softAssertion.assertEquals(actualTitle, expectedTitle, "Incorrect page title");

        System.out.println("Verify Text :" + actualText1);
        softAssertion.assertEquals(actualText1, "Privacy Protection For Any Device");

        driver.quit();
    }

    @Test
    public void print() {
        System.out.println("Soft Assertion is displayed");
    }

}
The output of the above program is
AssertAll
If there is any exception, and you want to throw it, then you need to use assertAll() method as a last statement in the @Test and test suite again to continue with the next @Test as it is.
package org.example;

import org.openqa.selenium.By;
import org.openqa.selenium.WebDriver;
import org.openqa.selenium.firefox.FirefoxDriver;
import org.openqa.selenium.firefox.FirefoxOptions;
import org.testng.annotations.Test;
import org.testng.asserts.SoftAssert;

public class AssertAllDemo {


    @Test
    public void assertionFailure() {

        SoftAssert softAssertion = new SoftAssert();

        FirefoxOptions firefoxOptions = new FirefoxOptions();
        WebDriver driver = new FirefoxDriver(firefoxOptions);

        driver.manage().window().maximize();
        driver.get("https://duckduckgo.com/");

        String expectedTitle = "DuckDuckGo";

        String actualTitle = driver.getTitle();
        String actualText1 = driver.findElement(By.xpath("//*[@class='homepage-cta-section_title__Lovig heading_heading2__oEFPn heading_heading__IiMSV']")).getText();


        /* AssertAll */
        System.out.println("Verify Title :" + actualTitle);
        softAssertion.assertEquals(actualTitle, expectedTitle, "Incorrect page title");

        System.out.println("Verify Text :" + actualText1);
        softAssertion.assertEquals(actualText1, "Privacy Protection For Any Device");

        softAssertion.assertAll();

        driver.quit();
    }

    @Test
    public void print() {
        System.out.println("Soft Assertion is displayed");
    }

}
The output of the above program is
In the above program, we can see that both assertions of Test – assertionFailure are executed, but as the first assertion has failed, the test – assertionFailure is marked as failed.
Congratulations on making it through this tutorial and hope you found it useful! Happy Learning!! Cheers!!
InnvocationCount is one of the feature available in TestNG. InvocationCount is used when we want to run the same test multiple times. If we want to run single @Test 10 times at a single thread, then invocationCount can be used. To invoke a method multiple times, the below syntax is used.
@Test(invocationCount = 3)
In this example, the @Test method will execute for 3 times each on a single thread.
In this tutorial, we will illustrate how to get the current invocation count.
Step 1 − Create a TestNG class, InvocationCount_Demo.
Step 2− Write two @Test methods in the class InvocationCount_Demo as shown in the programming code section below. Add invocationCount=3 to method verifyTitle and 2 to validLoginTest.
Step 3 − Create the testNG.xml as given below to run the TestNG classes.
Step 4− Now, run the testNG.xml or directly TestNG class in IDE or compile and run it using command line.
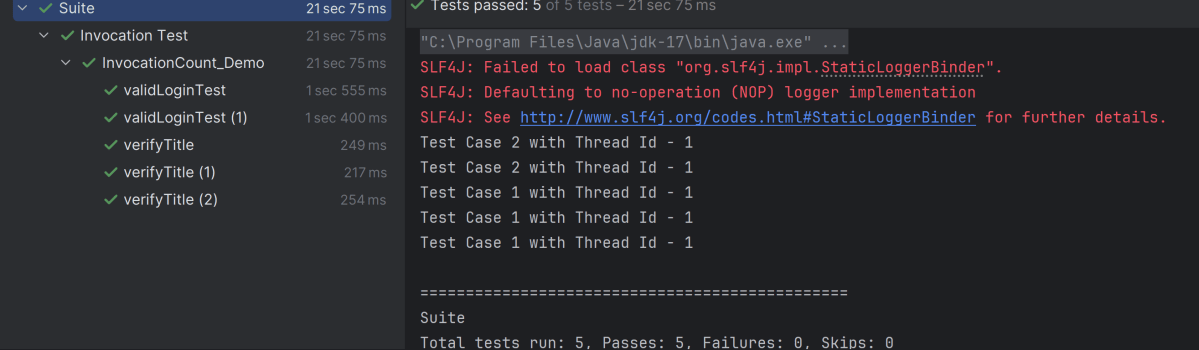
Step 5 − In the output, the user can see a total of 1 thread running sequentially for all invocations of @Test.
import org.openqa.selenium.By;
import org.openqa.selenium.WebDriver;
import org.openqa.selenium.firefox.FirefoxDriver;
import org.openqa.selenium.firefox.FirefoxOptions;
import org.testng.Assert;
import org.testng.annotations.AfterMethod;
import org.testng.annotations.BeforeMethod;
import org.testng.annotations.Test;

import java.time.Duration;


public class InvocationCount_Demo {

    WebDriver driver;

    @BeforeMethod
    public void setup() throws Exception {

        FirefoxOptions options = new FirefoxOptions();
        driver = new FirefoxDriver(options);
        driver.get("https://opensource-demo.orangehrmlive.com/");
        driver.manage().timeouts().implicitlyWait(Duration.ofSeconds(10));
        driver.manage().window().maximize();
    }

    @Test(invocationCount = 3)
    public void verifyTitle() {

        System.out.println("Test Case 1 with Thread Id - " + Thread.currentThread().getId());
        String expectedTitle = driver.findElement(By.xpath("//*[@class='oxd-text oxd-text--h5 orangehrm-login-title']")).getText();
        Assert.assertEquals(expectedTitle,"Login");
    }

    @Test(invocationCount = 2)
    public void validLoginTest() throws InterruptedException {

        System.out.println("Test Case 2 with Thread Id - "+Thread.currentThread().getId());

        driver.findElement(By.name("username")).sendKeys("Admin");
        driver.findElement(By.name("password")).sendKeys("admin123");
        driver.findElement(By.xpath("//*[@class='oxd-form-actions orangehrm-login-action']/button")).click();
        String expectedTitle = driver.findElement(By.xpath("//*[@class='oxd-topbar-header-breadcrumb']/h6")).getText();
        Assert.assertTrue(expectedTitle.contains("Dashboard"));
    }

    @AfterMethod
    public  void closeBrowser() {

        driver.quit();

    }
}
testng.xml
This is a configuration file that is used to organize and run the TestNG test cases. It is very handy when limited tests are needed to execute rather than the full suite.
<?xml version="1.0" encoding="UTF-8"?>
<!DOCTYPE suite SYSTEM "https://testng.org/testng-1.0.dtd">
<suite name="Suite">
    <test name="Invocation Test">
        <classes>
            <class name="com.example.InvocationCount_Demo"/>
        </classes>
    </test> <!-- Test -->
</suite> <!-- Suite -->
The output of the above program is
We can add threadPoolSize to the @Test.
threadPoolSize – It defines the size of the thread pool for any method. The method will be invoked from multiple threads, as specified by invocationCount.
@Test(invocationCount = 3, threadPoolSize)
Congratulations on making it through this tutorial and hope you found it useful! Happy Learning!! Cheers!!
One of the important features of TestNG is the ability to pass different test data to a test case as arguments, which is called parametrization
There are mainly two ways through which we can provide parameter values to TestNGtests.
Through testng.xml XML configuration file
Through DataProviders
In this tutorial, we will discuss using testng.xml for parametrization. If we need to pass some simple values such as String or Integer types to the test methods at runtime, there is something called @Parameter where parameter values through TestNG XML configuration files pass to test.
@Parameters("value")
Let us explain how we can use parameters. To start with, add the below dependencies to the POM.xml in the case of the Maven project.
Step 1 – Create a JAVA test class, say, TestNGParameterizationDemo.java
Step 2 – Add test method parameterizedTest() to the test class. This method takes a string as an input parameter
Add the annotation @Parameters(“browser”) to this method. The parameter passes a value from testng.xml
Step 3 – Create a TestNG.xml and pass the value of the parameter in this configuration file.
Below is an example that shows the use of Parameters.
import io.github.bonigarcia.wdm.WebDriverManager;
import org.openqa.selenium.By;
import org.openqa.selenium.WebDriver;
import org.openqa.selenium.chrome.ChromeDriver;
import org.openqa.selenium.chrome.ChromeOptions;
import org.openqa.selenium.firefox.FirefoxDriver;
import org.openqa.selenium.firefox.FirefoxOptions;
import org.testng.annotations.AfterMethod;
import org.testng.annotations.BeforeMethod;
import org.testng.annotations.Parameters;
import org.testng.annotations.Test;

import java.util.concurrent.TimeUnit;

import static org.testng.Assert.assertEquals;

public class TestNGParameterizationDemo {
    WebDriver driver;
    By userName = By.name("username");
    By passWord = By.name("password");

    By loginBtn = By.xpath("//*[@class='oxd-form']/div[3]/button");

    By loginTitle = By.xpath("//*[@class='oxd-topbar-header-breadcrumb']/h6");

    By errorMessage = By.xpath("//*[@class='orangehrm-login-error']/div[1]/div/p");


    @BeforeMethod
    @Parameters("browser")
    public void parameterizedTest(String browser) {
        if (browser.equalsIgnoreCase("firefox")) {

            WebDriverManager.firefoxdriver().setup();
            FirefoxOptions options=new FirefoxOptions();
            options.addArguments("--start-maximized");
            driver=new FirefoxDriver(options);
            System.out.println("Browser Started :" + browser);

        } else if (browser.equalsIgnoreCase("chrome")) {
            WebDriverManager.chromedriver().setup();
            ChromeOptions options=new ChromeOptions();
            options.addArguments("--start-maximized");
            driver=new ChromeDriver(options);
            System.out.println("Browser Started :" + browser);
        }

        driver.manage().timeouts().implicitlyWait(10, TimeUnit.SECONDS);
        driver.get("https://opensource-demo.orangehrmlive.com/");

    }

    @Test
    public void validCredentials()  {

        driver.findElement(userName).sendKeys("Admin");
        driver.findElement(passWord).sendKeys("admin123");
        driver.findElement(loginBtn).click();
        String newPageText = driver.findElement(loginTitle).getText();
        System.out.println("newPageText :" + newPageText);
        assertEquals(newPageText,"Dashboard");
    }

    @Test
    public void invalidCredentials() {

        driver.findElement(userName).sendKeys("1234");
        driver.findElement(passWord).sendKeys("admin3456");
        driver.findElement(loginBtn).click();
        String actualErrorMessage = driver.findElement(errorMessage).getText();
        System.out.println("Actual ErrorMessage :" + actualErrorMessage);
        assertEquals(actualErrorMessage,"Invalid credentials");

    }

    @AfterMethod
    public  void closeBrowser() {
        driver.quit();
    }
}
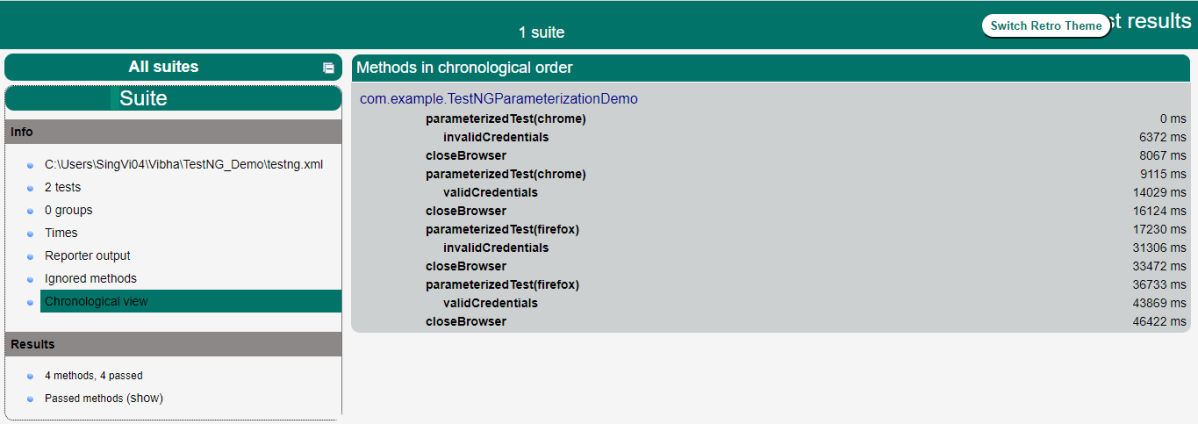
TestNG.xml looks like this, as shown below. Here, the parameter name is the browser name value for the browser is “Chrome”. So, this “Chrome” value is passed to Test as a parameter, and as a result, a Google Chrome browser opens. Similarly, the same tests are run using Firefox, as it is mentioned in the testng.xml.
<?xml version="1.0" encoding="UTF-8"?>
<!DOCTYPE suite SYSTEM "https://testng.org/testng-1.0.dtd">

<suite name="Suite ">

    <test name="Chrome Test">
        <parameter name="browser" value="chrome" />
        <classes>
            <class name="TestNGParameterizationDemo" />
        </classes>
    </test> <!-- Test -->

    <test name="Firefox Test">
        <parameter name="browser" value="firefox" />
        <classes>
            <class name="TestNGParameterizationDemo" />
        </classes>
    </test> <!-- Test -->
</suite> <!-- Suite -->
The output of the above program is
The execution generates reports – Index.html and Emailable-Report.html. The reports are generated under the target folder.
Index.html
Emailable-Report.html
Congratulations on making it through this tutorial and hope you found it useful! Happy Learning!! Cheers!!
The previous tutorial has explained the Integration of Selenium with TestNG and the tests are executed through either TestNG Suite or testng.xml. This tutorial explains the steps to run the TestNG Tests through the command line.
Prerequisite
Selenium
TestNG
Maven
Java 11
Maven Compiler Plugin
Maven Surefire Plugin
Imagine we need to run the TestNG Tests in CI/CD pipelines like Jenkins or GitLab, then we can’t right-click and select TestNG Suite or tesng.xml to run the tests. In such situations, the tests can be executed through the command line.
We need to add plugins to pom.xml to compile the test code and then run the tests. To know more about Maven Surefire Plugin for TestNG, refer to this blog.
Create a sample class that has @Test methods. In the example below, we have created a class as below:
import static org.testng.Assert.assertTrue;
import static org.hamcrest.Matchers.containsString;
import static org.hamcrest.MatcherAssert.assertThat;
import org.openqa.selenium.By;
import org.openqa.selenium.WebDriver;
import org.openqa.selenium.firefox.FirefoxDriver;
import org.testng.annotations.AfterTest;
import org.testng.annotations.BeforeTest;
import org.testng.annotations.Test;

public class TestNGRunFromCommandLine {

	 WebDriver driver;

	    @BeforeTest
	    public void setUp() {
	        System.setProperty("webdriver.gecko.driver",
	                "C:\\Users\\Vibha\\Software\\geckodriver\\geckodriver.exe");

	        driver = new FirefoxDriver();
	        driver.get("https://opensource-demo.orangehrmlive.com/");

	        driver.manage().window().maximize();
	    }

	    @Test(description = "This test validates title of login functionality", priority = 0)
	    public void verifyLoginPage() {

	        String expectedTitle = driver.findElement(By.xpath("//*[@id='logInPanelHeading']")).getText();
	        System.out.println("Title :" + expectedTitle);
	        assertTrue(expectedTitle.equalsIgnoreCase("LOGIN Panel"));
	    }

	    @Test(description = "This test validates  successful login to Home page", priority = 1)
	    public void verifyHomePage() {

	        System.out.println("Username Entered");
	        driver.findElement(By.name("txtUsername")).sendKeys("Admin");

	        System.out.println("Password Entered");
	        driver.findElement(By.name("txtPassword")).sendKeys("admin123");

	        driver.findElement(By.id("btnLogin")).submit();

	        String newPageText = driver.findElement(By.xpath("//*[@id='content']/div/div[1]/h1")).getText();
	        System.out.println("newPageText :" + newPageText);
	        assertThat(newPageText, containsString("Dashboard"));
	    }

	    @AfterTest
	    public void teardown() {

	        driver.quit();
	    }
	}
The below is the testng.xml file, which will execute all the tests that are available under ‘TestNGRunFromCommandLine‘ class.
<?xml version="1.0" encoding="UTF-8"?>
<!DOCTYPE suite SYSTEM "https://testng.org/testng-1.0.dtd">
<suite name="Suite">
  <test name="Test">
    <classes>
      <class name="TestNG_Demo.TestNGRunFromCommandLine"/>
    </classes>
  </test>
</suite>
Run the tests using command line
The below commands are used to execute the ‘testng.xml’ file from the command line. First, we need to go the place where the pom.xml of the project is placed. Then use the mvn compile test to compile the code and execute the TestNG tests.
cd C:\Users\Vibha\Projects\Vibha_Personal\ParallelTestsTestNG
mvn compile test
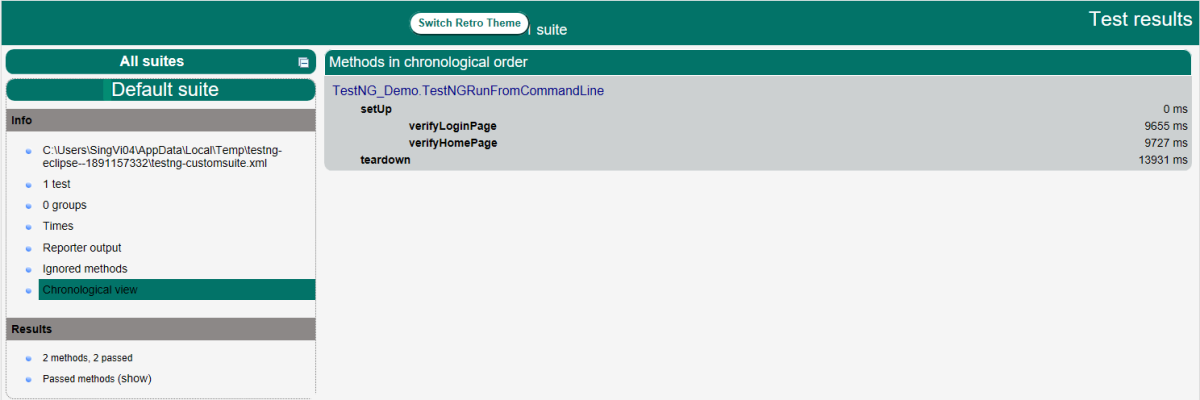
After executing the above command, it should execute the tests that we have specified in testng.xml file. Below is the screenshot after the execution of the tests.
This execution generates various TestNG Reports. We are concerned about emailable-report.html and index.html.
Emailable-Report.html
An emailable report is a type of summary report that one can transfer to other people in the team through any medium. Click on option “emailable-report.html”. Click on the options web browser. The output reports in TestNG reporting will look like below:
Index.html
Index report contains the index-like structure of different parts of the report, such as failed tests, test file, passed tests, etc.
Right-click on the index.html from the project directory. Select the option open with the web browser option.
The result will look like this:
Congratulations. This tutorial has explained running the tests of TestNG using Command Line. Happy Learning!!
TestNG is a well thought Test Framework. It provides a lot of different features which makes the life of a tester a little easy. It happens sometimes that a test execution fails, but the failure is not a product bug, but there can be different reasons for the failure such as the environment is down, third party web service is down, or the browser becomes unresponsive. Imagine a scenario where we need to run a test suite consisting of 100 tests and a few tests failed as a result of a known intermittent environment issue. We know that these tests can pass if rerun a couple of times. So, in this case, the retry functionality of TestNG comes to the rescue. This is one of the best and most frequently used functionality.
In this tutorial let us study how we can implement retry on failed tests in TestNG. In order to achieve this, we have to first understand the org.testng.IRetryAnalyzer interface.
To start with, please add the below dependencies to the Maven Project.
IRetryAnalyzer – It is an interface to implement to be able to have a chance to retry a failed test. The definition of this interface is
public interface IRetryAnalyzer {

  /**
   * Returns true if the test method has to be retried, false otherwise.
   *
   * @param result The result of the test method that just ran.
   * @return true if the test method has to be retried, false otherwise.
   */
  boolean retry(ITestResult result);
}
This method implementation returns true if you want to re-execute your failed test and false if you don’t want to re-execute your test.
When you bind a retry analyzer to a test, TestNG automatically invokes the retry analyzer to determine if TestNG can retry a test case again in an attempt to see if the test that just fails now passes. Here is how you use a retry analyzer:
Bind this implementation to the @Test annotation for e.g., @Test(retryAnalyzer = Retry.class)
Build an implementation of the interface org.testng.IRetryAnalyzer
1. Add IRetryAnalyzer to the @TestAnnotation
First of all, you need to create a class that implements the IRetryAnalyzer like the below example:
import org.testng.IRetryAnalyzer;
import org.testng.ITestResult;

public class Retry implements IRetryAnalyzer {

	int retryCount = 0;
	int maxRetryCount = 2;

	public boolean retry(ITestResult result) {

	if(!result.isSuccess()) {                         //Check if test is failed

		if(retryCount<maxRetryCount) {                //Check if the maximum number of test execution is reached
			System.out.println("Retrying Test : Re-running " + result.getName() +
 " for " + (retryCount+1) + " time(s)."); //Print the number of Retry attempts

			retryCount++;                             //Increase the maxRetryCount by 1

			result.setStatus(ITestResult.FAILURE);    //Mark test as failed
         return true;                                 //Rerun the failed test
		} else {
			result.setStatus(ITestResult.FAILURE);    //TestNG marks last run as failed, if last run is max retry
		}
	  }else {
			result.setStatus(ITestResult.SUCCESS);    //TestNG parks test as passed when the test test passes

	  }

return false;
	}
}
This example shows that failed test case will run 3 times till it passes. In case it fails the third time, test execution will stop and TestNG will mark this case as failed. We can change the number of tries by changing the value of maxRetryCount.
Using retryAnalyzer attribute in the @Test annotation
The next step is to associate your test cases with IRetryAnalyzer. In order to do this, you need to use the method below.
@Test(retryAnalyzer = Retry.class)
public void verifyLoginPage() {
}
Let us see the complete implementation with the help of the below example.
In the above example, test – verifyLoginPage() will be retried a maximum of 3 times, if the test fails. To run the tests, Right-click on the class and select Run As ->TestNG Suite.
The output of the above program is
2. Implement Interface ITestAnnotationTransformer to retry failed tests
In this case, you would need to implement ITestAnnotationTransformer interface. The implementation of this interface is
public interface IAnnotationTransformer extends ITestNGListener {

  /**
   * This method will be invoked by TestNG to give you a chance to modify a TestNG annotation read
   * from your test classes. You can change the values you need by calling any of the setters on the
   * ITest interface.
   *
   * <p>Note that only one of the three parameters testClass, testConstructor and testMethod will be
   * non-null.
   *
   * @param annotation The annotation that was read from your test class.
   * @param testClass If the annotation was found on a class, this parameter represents this class
   *     (null otherwise).
   * @param testConstructor If the annotation was found on a constructor, this parameter represents
   *     this constructor (null otherwise).
   * @param testMethod If the annotation was found on a method, this parameter represents this
   *     method (null otherwise).
   */
  default void transform(
      ITestAnnotation annotation, Class testClass, Constructor testConstructor, Method testMethod) {
    // not implemented
  }
The transform method is called for every test during the test run. We can use this listener for our retry analyzer as shown below:
import java.lang.reflect.Constructor;
import java.lang.reflect.Method;
import org.testng.IAnnotationTransformer;
import org.testng.annotations.ITestAnnotation;

public class RetryListener implements IAnnotationTransformer{

	public void transform(ITestAnnotation arg0, Class arg1, Constructor arg2,Method arg3) {

			arg0.setRetryAnalyzer(Retry.class);
		}

	}
Now let us create a class that contains all the tests.
import java.util.concurrent.TimeUnit;
import org.openqa.selenium.By;
import org.openqa.selenium.WebDriver;
import org.openqa.selenium.chrome.ChromeDriver;
import org.openqa.selenium.chrome.ChromeOptions;
import org.testng.Assert;
import org.testng.annotations.AfterTest;
import org.testng.annotations.BeforeTest;
import org.testng.annotations.Test;
import io.github.bonigarcia.wdm.WebDriverManager;

public class RetryTests {

	WebDriver driver;

    @BeforeTest
    public void setUp() {

    	 WebDriverManager.chromedriver().setup();

         ChromeOptions chromeOptions = new ChromeOptions();

         driver = new ChromeDriver(chromeOptions);
         driver.get("https://opensource-demo.orangehrmlive.com/");

         driver.manage().window().maximize();
         driver.manage().timeouts().implicitlyWait(30, TimeUnit.SECONDS);
    }

    @Test(description = "This test validates title of login functionality")
    public void verifyLoginPage() {

        String expectedTitle = driver.findElement(By.xpath("//*[@id='logInPanelHeading']")).getText();

        System.out.println("Title :" + expectedTitle);
        Assert.assertTrue(expectedTitle.equalsIgnoreCase("LOGIN Panel !!"));
    }

    @Test(description = "This test validates  successful login to Home page")
    public void verifyHomePage() {

        System.out.println("Username Entered");
        driver.findElement(By.name("txtUsername")).sendKeys("Admin");

        System.out.println("Password Entered");
        driver.findElement(By.name("txtPassword")).sendKeys("admin123");

        driver.findElement(By.id("btnLogin")).submit();

        String newPageText = driver.findElement(By.id("welcome")).getText();
        System.out.println("newPageText :" + newPageText);
        Assert.assertTrue(newPageText.contains("Welcome"));
    }

    @AfterTest
    public void teardown() {

        driver.quit();
    }

}
Once we have the implementation of IAnnotationTransformer, we just need to add it as a listener in the testng.xml. Like this:
<?xml version="1.0" encoding="UTF-8"?>
<!DOCTYPE suite SYSTEM "https://testng.org/testng-1.0.dtd">
<suite name="Suite">

<listeners>
<listener class-name="com.example.retrydemo.RetryListener"></listener>

</listeners>

  <test name="Test">
    <classes>
      <class name="com.example.retrydemo.RetryTests"/>
    </classes>
  </test> <!-- Test -->
</suite> <!-- Suite -->
Now let us run the tests. Right-click on testng.xml and select Run As -> TestNG Suite.
The output of the above program is
This is pretty much it on this topic. Congratulations on making it through this tutorial and hope you found it useful! Happy Learning!! Cheers!!


