Cucumber and Rest-Assured need Java to be installed on the system to run the tests. Click here to learn How to install Java.
Step 2 – Download and setup Eclipse IDE on the system
The Eclipse IDE (integrated development environment) provides strong support for Java developers. Click here to learn How to install Eclipse.
Step 3 – Setup Gradle
To build a test framework, we need to add several dependencies to the project. This can be achieved by any build tool. I have used the Gradle Build Tool. Click here to learn How to install Gradle.
Step 4 – Create a new Gradle Project
To create a new Gradle project, go to the top left side and select File -> New Project -> Gradle -> Gradle project -> Next ->Enter Project Name and Project Location ->Next ->Select Gradle Version ->Next ->Review the Configuration -> Finish.
Step 5 – Add Rest-Assured and Cucumber dependencies to the Gradle project
This syntax is used for Gradle 5.0 and higher.
dependencies {
    // This dependency is exported to consumers, that is to say found on their compile classpath.
    api 'org.apache.commons:commons-math3:3.6.1'

    // This dependency is used internally, and not exposed to consumers on their own compile classpath.
    implementation 'com.google.guava:guava:29.0-jre'

    testImplementation 'io.cucumber:cucumber-java:6.8.1'
    testImplementation 'io.cucumber:cucumber-junit:6.8.1'
    testImplementation 'io.rest-assured:rest-assured:4.3.3'
If you are using Gradle 4.10.3 or older, use the below dependency block to build.gradle.
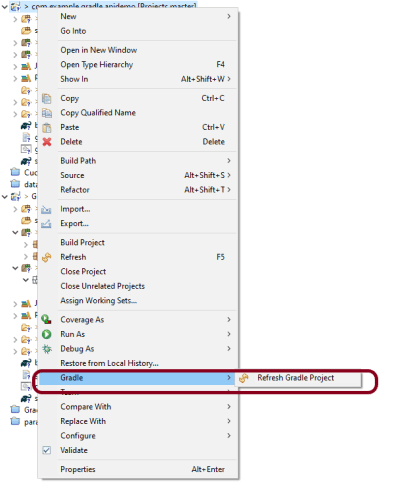
Once you have added dependencies, configurations, and Gradle cucumber task, Right-click on the project, Hover to the Gradle option, and click Refresh Gradle Project. Eclipse does not automatically update the classpath of the build.gradle file is updated. Select GradleRefresh Gradle Project from the context menu of the project or from your build.gradle file for that.
Step 8 – Create a feature file under src/test/resources
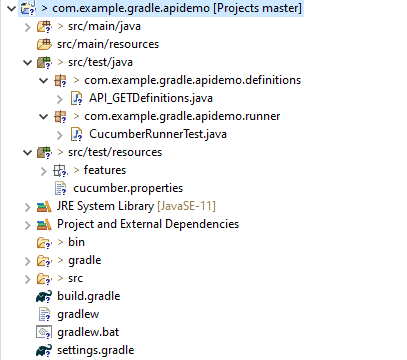
A new Gradle Project is created with 4 folders – src/main/java, src/main/resources, src/test/java and src/test/resources. Features are created under the src/test/resources directory. Create a folder with name features. Now, create the feature file in this folder. The feature file should be saved with the extension .feature. This feature file contains the test scenarios created to test the application. The Test Scenarios are written in Gherkins language in the format of Given, When, Then, And, But.
Below is an example of a Test Scenario where we are using the GET method to get the information from the API.
Feature: Validation of get method

@GetUserDetails
  Scenario Outline: Send a valid Request to get user details

  Given I send a request to the URL to get user details
  Then the response will return status 200 and id <id> and salary <employee_salary> and name "<employee_name>" and age <employee_age> and message "<message>"

Examples:
    |id  |employee_salary|employee_name |employee_age  |message                                  |
    |1   |320800         |Tiger Nixon   |61            |Successfully! Record has been fetched.   |
Step 9 – Create the Step Definition class or Glue Code for the Test Scenario
Step Definition acts as an intermediate to your runner and feature file. It stores the mapping between each step of the scenario in the Feature file. So when you run the scenario, it will scan the step definition file to check the matched glue or test code.
import io.restassured.http.ContentType;

import io.restassured.response.ValidatableResponse;

import static io.restassured.RestAssured.given;
import static org.hamcrest.Matchers.equalTo;

import io.cucumber.java.en.Given;
import io.cucumber.java.en.Then;

public class API_GETDefinitions {


    private ValidatableResponse validatableResponse;

    private String endpoint = "http://dummy.restapiexample.com/api/v1/employee/1";

    @Given("I send a request to the URL to get user details")
    public void sendRequest(){
        validatableResponse = given().contentType(ContentType.JSON)
                .when().get(endpoint).then();

        System.out.println("Response :"+validatableResponse.extract().asPrettyString());
    }


    @Then("the response will return status {int} and id {int} and salary {int} and name {string} and age {int} and message {string}")
    public void verifyStatus(int statusCode, int id, int emp_Salary, String emp_name, int emp_age, String message ){

        validatableResponse.assertThat().statusCode(statusCode);

        validatableResponse.assertThat().body("data.id",equalTo(id));

        validatableResponse.assertThat().body("data.employee_salary",equalTo(emp_Salary));

        validatableResponse.assertThat().body("data.employee_name",equalTo(emp_name));

        validatableResponse.assertThat().body("data.employee_age",equalTo(emp_age));

        validatableResponse.assertThat().body("message",equalTo(message));

    }
}
In order to use REST assured effectively, it’s recommended to statically import methods from the following classes:
A runner will help us to run the feature file and act as an interlink between the feature file and step definition Class. To know more about Runner, refer to this link.
import org.junit.runner.RunWith;

import io.cucumber.junit.Cucumber;
import io.cucumber.junit.CucumberOptions;

@RunWith(Cucumber.class)

@CucumberOptions(plugin ="pretty",features= {"src/test/resources/features/API_GET.feature"}, glue= {"com.example.gradle.apidemo"})

public class CucumberRunnerTest {

}
Step 11 – Run the tests from JUnit
You can execute the test script by right-clicking on the Test Runner class -> Run As JUnit.
Step 12 – Run the tests from the Command Line
Run the following Gradle task from the directory path wherebuild.gradlefile is located. To know more about this report, refer here.
gradle cucumber
Below is the screenshot of the execution of Cucumber tests in Command-Line.
Step 13 – Cucumber Report Generation
To get Cucumber Test Reports, add cucumber.properties under src/test/resources and add the below instruction in the file.
cucumber.publish.enabled=true
Below is the image of the Cucumber Report.
We are done! Congratulations on making it through this tutorial and hope you found it useful! Happy Learning!!
In this tutorial, I will explain Parallel Testing usingCucumber with JUnit4.
Cucumber-JVM allows parallel execution across multiple threads since version 4.0.0. There are several options to incorporate this built-in feature in a Cucumber project. You can do so by using JUnit, TestNG, or CLI.
Cucumber can be executed in parallel using JUnit and Maven test execution plugins.
In JUnit, thefeature files are run in parallel rather than in scenarios, which means all the scenarios in a feature file will be executed by the same thread. You can use either Maven Surefire or Failsafe plugin to execute the runner. In this tutorial, I’m using the Maven Surefire plugin.
Create a Maven project in your favorite IDE using the cucumber-archetype or by adding Cucumber dependencies to the POM as detailed here and Junit dependencies here. To know more about How to set up a Cucumber Maven project with Eclipse, please refer to this tutorial – Cucumber Tutorial – How to setup Cucumber with Eclipse.
Below is the structure of the project.
Step 2 – Update the Properties section in Maven pom.xml
Step 5 – Create a feature folder in src/test/resources
Add 2 feature files – LoginPage.feature and ForgotPasswordPage.feature in the features folder present in src/test/resources.
LoginPage.feature
Feature: Login to HRM Application

  Background:
    Given User is on Home page

  @ValidCredentials
  Scenario: Login with valid credentials - Feature 1, Scenario - 1

    When User enters username as "Admin" and password as "admin123"
    Then User should be able to login successfully

  @InvalidCredentials
  Scenario Outline: Login with invalid credentials - Feature 1, Scenario - 2

    When User enters username as "<username>" and password as "<password>"
    Then User should be able to see error message "<errorMessage>"

    Examples:
      | username    | password   | errorMessage                      |
      | Admin       | admin12$$  | Invalid credentials               |
      | admin$$     | admin123   | Invalid credentials               |
      | abc123      | xyz$$      | Invalid credentials               |
      |             | xyz$$      | Invalid credentials               |
ForgotPasswordPage.feature
Feature: Forgot Password Page

  Background:
    Given User is on Home page

  @BackFunctionality
  Scenario: Validate the cancel functionality - Feature 2, Scenario - 1

    When User clicks on Forgot your password? link
    Then User should be able to navigate to Reset Password page
    And User clicks on Cancel button to go back to Login Page

  @ResetFunctionality
  Scenario: Validate the Reset Password functionality - Feature 2, Scenario - 2

    When User clicks on Forgot your password? link
    Then User should be able to navigate to Reset Password page
    And User clicks on Reset Password button and provide username as "abc1234"
    And Verify the message "Reset Password link sent successfully"
Step 6 – Create the Page Object Model classes of LoginPage and ForgotPasswordPage feature files
Page Object Model class contains all the locators and the actions performed on these locators for the particular class to improve the readability and maintainability of the code.
Below are the Page Object Model classes for these feature files.
LoginPage
import org.openqa.selenium.By;
import org.openqa.selenium.WebDriver;

public class LoginPage {

    public WebDriver driver;

    By userName = By.name("username");
    By passWord = By.name("password");
    By login = By.xpath("//*[@id='app']/div[1]/div/div[1]/div/div[2]/div[2]/form/div[3]/button");
    By errorMessage = By.xpath("//*[@id='app']/div[1]/div/div[1]/div/div[2]/div[2]/div/div[1]/div[1]/p");
    By forgotPasswordLink = By.xpath("//*[@id='app']/div[1]/div/div[1]/div/div[2]/div[2]/form/div[4]/p");
    By loginPageTitle = By.xpath("//*[@id='app']/div[1]/div/div[1]/div/div[2]/h5");

    public LoginPage(WebDriver driver) {
        this.driver = driver;
    }

    public String getErrorMessage() {
        return driver.findElement(errorMessage).getText();
    }

    public void login(String strUserName, String strPassword) {

        // Fill user name
        driver.findElement(userName).sendKeys(strUserName);

        // Fill password
        driver.findElement(passWord).sendKeys(strPassword);

        // Click Login button
        driver.findElement(login).click();

    }

    // Click on Forgot Password link
    public void clickOnForgotPasswordLink() {
        driver.findElement(forgotPasswordLink).click();
    }

    //Get Login Page Title
    public String getLoginPageTitle() {
        return driver.findElement(loginPageTitle).getText();
    }
}
HomePage
import org.openqa.selenium.By;
import org.openqa.selenium.WebDriver;

public class HomePage {

    public WebDriver driver;

    public HomePage(WebDriver driver) {
        this.driver = driver;
    }

    By homePageUserName = By.xpath("//*[@id='app']/div[1]/div[1]/header/div[1]/div[1]/span/h6");

    public String getHomePageText() {
        return driver.findElement(homePageUserName).getText();
    }
}
ForgotPasswordPage
import org.openqa.selenium.By;
import org.openqa.selenium.WebDriver;

public class ForgotPasswordPage {

    WebDriver driver;

     By forgotPasswordPageTitle = By.xpath("//*[@id='app']/div[1]/div[1]/div/form/h6");
     By cancelBtn = By.xpath("//*[@id='app']/div[1]/div[1]/div/form/div[2]/button[1]");
     By resetPasswordBtn = By.xpath("//*[@id='app']/div[1]/div[1]/div/form/div[2]/button[2]");
     By userName = By.name("username");
     By resetMessage = By.xpath("//*[@id='app']/div[1]/div[1]/div/h6");

    public ForgotPasswordPage(WebDriver driver) {
        this.driver = driver;
    }

    // Get the Title of ForgotPage
    public String getForgotPageText() {
        return driver.findElement(forgotPasswordPageTitle).getText();
    }

    // Click Cancel Button
    public void clickOnCancelBtn() {
         driver.findElement(cancelBtn).click();
    }

    // Click ResetPassword Button
    public void clickOnRestPasswordBtn() {
        driver.findElement(resetPasswordBtn).click();
    }

    // Type username in TextBox
    public void TypeOnUsernameTextBox(String username) {
        driver.findElement(userName).sendKeys(username);
    }

    // Get Message
    public String getRestMessage() {
        return driver.findElement(resetMessage).getText();
    }
}
PageObjectManager – This class creates the object of all the above-mentioned Page Object Model classes. This an optional class. If you want you can create the objects in StepDefinition class also.
public class PageObjectManager {

    public LoginPage loginPage;
    public HomePage homePage;
    public ForgotPasswordPage forgotPasswordPage;
    public WebDriver driver;


    public PageObjectManager(WebDriver driver)
    {
        this.driver = driver;
    }

    public LoginPage getLoginPage()
    {

        loginPage= new LoginPage(driver);
        return loginPage;
    }

    public HomePage getHomePage()
    {
        homePage = new HomePage(driver);
        return homePage;
    }

    public ForgotPasswordPage getForgotPasswordPage()
    {
        forgotPasswordPage = new ForgotPasswordPage(driver);
        return forgotPasswordPage;
    }
}
Step 7 – Create the Step Definition classes for both feature files or Glue Code
Below is the Step Definition for LoginPage.feature.
import org.example.pageObjects.HomePage;
import org.example.pageObjects.LoginPage;
import org.example.pageObjects.PageObjectManager;
import org.example.utils.TestSetUp;
import io.cucumber.java.en.Given;
import io.cucumber.java.en.Then;
import io.cucumber.java.en.When;
import org.junit.Assert;

public class LoginPageDefinitions {

    TestSetUp setUp;
    public PageObjectManager pageObjectManager;
    public LoginPage loginPage;
    public HomePage homePage;


    public LoginPageDefinitions(TestSetUp setUp)  {
        this.setUp = setUp;
        this.loginPage = setUp.pageObjectManager.getLoginPage();
        this.homePage= setUp.pageObjectManager.getHomePage();
    }

    @Given("User is on Home page")
    public void loginTest()  {
        setUp.baseTest.WebDriverManager().get("https://opensource-demo.orangehrmlive.com/");

    }

    @When("User enters username as {string} and password as {string}")
    public void goToHomePage(String userName, String passWord) {

        // login to application
        loginPage.login(userName, passWord);

        // go the next page

    }

    @Then("User should be able to login successfully")
    public void verifyLogin() {

        // Verify home page
        Assert.assertTrue(homePage.getHomePageText().contains("Dashboard"));

    }

    @Then("User should be able to see error message {string}")
    public void verifyErrorMessage(String expectedErrorMessage) {

        // Verify home page
        Assert.assertEquals(loginPage.getErrorMessage(),expectedErrorMessage);

    }

}
Below is the Step Definition for ForgotPasswordPage.feature.
import io.cucumber.java.en.Then;
import io.cucumber.java.en.When;
import org.example.pageObjects.ForgotPasswordPage;
import org.example.pageObjects.LoginPage;
import org.example.pageObjects.PageObjectManager;
import org.example.utils.TestSetUp;
import org.junit.Assert;


public class ForgotPasswordPageDefinitions {

    TestSetUp setUp;
    PageObjectManager pageObjectManager;
    public LoginPage loginPage;
    public  ForgotPasswordPage forgotPasswordPage;

    public ForgotPasswordPageDefinitions(TestSetUp setUp) {
        this.setUp = setUp;
        this.loginPage = setUp.pageObjectManager.getLoginPage();
        this.forgotPasswordPage = setUp.pageObjectManager.getForgotPasswordPage();
    }

    @When("User clicks on Forgot your password? link")
    public void forgotPasswordLink() {

        loginPage.clickOnForgotPasswordLink();

    }

    @Then("User should be able to navigate to Reset Password page")
    public void verifyForgotPasswordPage() {

        Assert.assertEquals(forgotPasswordPage.getForgotPageText(),"Reset Password");

    }

    @Then("User clicks on Cancel button to go back to Login Page")
    public void verifyCancelBtn() {

        forgotPasswordPage.clickOnCancelBtn();
        Assert.assertEquals(loginPage.getLoginPageTitle(),"Login");

    }

    @Then("User clicks on Reset Password button and provide username as {string}")
    public void verifyResetPasswordBtn(String username) {

        forgotPasswordPage.TypeOnUsernameTextBox(username);
        forgotPasswordPage.clickOnRestPasswordBtn();

    }

    @Then("Verify the message {string}")
    public void verifyMessage(String message) {

        //  ForgotPasswordPage forgotPasswordPage = setUp.pageObjectManager.getForgotPasswordPage();
        Assert.assertEquals(forgotPasswordPage.getRestMessage(),message);

    }
}
Step 8 – Create the Hook Class and Dependency Injection class (TestSetUp) and BaseTest class
Below is the code for the ApplicationHook Class.
import io.cucumber.java.After;
import io.cucumber.java.AfterStep;
import io.cucumber.java.Scenario;
import org.example.utils.TestSetUp;
import org.openqa.selenium.OutputType;
import org.openqa.selenium.TakesScreenshot;
import org.openqa.selenium.WebDriver;

public class ApplicationHooks {

 public TestSetUp setUp;

    public ApplicationHooks(TestSetUp setUp) {
        this.setUp = setUp;
    }

    @After
    public void tearDown( )  {
        setUp.baseTest.WebDriverManager().quit();
    }

    @AfterStep
    public void addScreenshot(Scenario scenario) {

        WebDriver driver =  setUp.baseTest.WebDriverManager();
        if(scenario.isFailed()) {
            final byte[] screenshot = ((TakesScreenshot) driver).getScreenshotAs(OutputType.BYTES);
            scenario.attach(screenshot, "image/png", "image");
        }

    }

}
Below is the code for the Dependency Injection class. In Cucumber, if we want to share the state between multiple-step definition files, we will need to use dependency injection (DI).
import org.openqa.selenium.WebDriver;
import org.openqa.selenium.WebElement;
import pageObjects.PageObjectManager;

public class TestSetUp {

    public WebElement errorMessage;
    public WebElement homePageUserName;
    public PageObjectManager pageObjectManager;
    public BaseTest baseTest;

    public TestSetUp()  {

        baseTest = new BaseTest();
        pageObjectManager = new PageObjectManager(baseTest.WebDriverManager());

    }
}
BaseTest class is used to initialize the WebDriver.
import io.github.bonigarcia.wdm.WebDriverManager;
import org.openqa.selenium.WebDriver;
import org.openqa.selenium.chrome.ChromeDriver;
import java.time.Duration;

public class BaseTest {

    public WebDriver driver;
    public final static int TIMEOUT = 10;

    public WebDriver WebDriverManager ()  {


        if (driver == null) {

            WebDriverManager.chromedriver().setup();
            driver = new ChromeDriver();
            driver.manage().timeouts().implicitlyWait(Duration.ofSeconds(TIMEOUT));
            driver.manage().window().maximize();
            driver.get(url);

        }
        return driver;
    }
}
Step 9 – Create a Test Runner to run the tests
import io.cucumber.junit.Cucumber;
import io.cucumber.junit.CucumberOptions;
import org.junit.runner.RunWith;

@RunWith(Cucumber.class)
@CucumberOptions(tags = "", features = "src/test/resources/features", glue = "org.example.definitions")

public class CucumberRunnerTests  {

}
Step 10 – Cucumber Report Generation
To get Cucumber Test Reports, add cucumber.properties in src/test/resources and add the below instruction in the file.
cucumber.publish.enabled=true
Step 11 – Execute the tests from the command line
mvn clean test
Below is the execution screen. There are two feature files.
When we invoke the test through Maven, the surefire plugin executes the Feature files parallelly. Here, LoginPage has 5 scenarios and ForgotPasswordPage has 2 scenarios. So, initially when the execution will start 1 scenario from both the tests will be executed parallelly and then again one test from each feature will execute. Later, we will be left with 4 scenarios in the LoginPage feature file, so the scenario will run sequentially of the LoginPage feature file.
All the tests of a particular feature file are executed together as feature files are run in parallel, not scenarios.
Step 12 – Difference between Parallel tests and Non-Parallel Tests
Parallel Tests
Below is the Cucumber Report generated for parallel tests.
When the tests are run as JUnit tests from CucumberRunnerTests, then the tests are executed sequentially.
We are done! Congratulations on making it through this tutorial and hope you found it useful! Happy Learning!!
In the previous tutorial, I explained the various types of Reports available in Cucumber. In this tutorial, I will explain how we can do Data-Driven Testing in Cucumber. Cucumber inherently supports Data-Driven testing by the use of the Scenario Outline and Examples section. Using these keywords, Cucumber allows for easy Data-Driven testing to be complete where no changes need to be made to the Java file (StepDefinition file).
Pre-Requisite
Cucumber – 6.10.4
Java – 11
Selenium – 3.141.59
Junit – 4.13.2 ( You can use TestNG also)
Cucumber JUnit – 6.10.4 (If using TestNG, then replace this with Cucumber TestNG)
The project folder structure and code should be in the below state.
In case, the project uses Maven, we need to add the below dependencies to the project.
Below is an example of Scenarios with a different set of data (no Scenario Outline).
  @InvalidCredentials1
  Scenario: Login with invalid username and password

    Given User is on Home page
    When User enters username as "Admin1" and password as "admin1"
    Then User should be able to see an "Invalid credentials"

  @InvalidCredentials2
  Scenario: Login with blank username

    Given User is on Home page
    When User enters username as "" and password as "admin123"
    Then User should be able to see an "Username cannot be empty"

  @InvalidCredentials3
  Scenario: Login with invalid credentials

    Given User is on Home page
    When User enters username as "Admin" and password as ""
    Then User should be able to see an "Password cannot be empty"
The stepdefinition corresponding to the above feature file is
import io.cucumber.java.en.Given;
import io.cucumber.java.en.Then;
import io.cucumber.java.en.When;
import org.junit.Assert;
import org.openqa.selenium.By;
import org.openqa.selenium.WebDriver;
import org.openqa.selenium.chrome.ChromeDriver;

public class ScenarioOutlineDefinitions {

    WebDriver driver;

    @Given("User is on Home page")
    public void userOnHomePage() {

        System.setProperty("webdriver.chrome.driver",
                "C:\\Users\\Vibha\\Software\\chromedriver_win32\\chromedriver.exe");

        driver = new ChromeDriver();
        driver.manage().window().maximize();
        driver.get("https://opensource-demo.orangehrmlive.com/");
    }

    @When("User enters username as {string} and password as {string}")
    public void entersCredentials(String userName, String passWord) throws InterruptedException {

        System.out.println("Username Entered");
        driver.findElement(By.name("txtUsername")).sendKeys(userName);

        System.out.println("Password Entered");
        driver.findElement(By.name("txtPassword")).sendKeys(passWord);

        driver.findElement(By.id("btnLogin")).submit();

    }

    @Then("User should be able to see an {string}")
    public void verifyErrorMessage(String expectedErrorMessage) throws InterruptedException {

        String actualErrorMessage = driver.findElement(By.id("spanMessage")).getText();
        System.out.println("Error Message :" + actualErrorMessage);
        Assert.assertEquals(actualErrorMessage,expectedErrorMessage);

        //close the browser
        driver.quit();

    }
}
TestRunner Class
Run the test by Right Click on TestRunner class and Click Run As > JUnit Test Application.
import io.cucumber.junit.Cucumber;
import io.cucumber.junit.CucumberOptions;
import org.junit.runner.RunWith;

@RunWith(Cucumber.class)
@CucumberOptions(monochrome = true, plugin = "pretty", features = "src/test/resources/Features/ScenarioOutline.feature",
        glue = "definitions")

public class CucumberRunnerTest {
}
Below is the output of the above program:
Data Driven Testing using Scenario Outline
Scenario Outline – It is used to repeat the same tests by passing different values or arguments to Step Definition
Examples – All scenario outlines have to be followed with the Examples section. This contains the data that has to be passed on to the scenario in Feature File.
We can repeatedly do something like the above and check for each parameter that we want to test, but that will make tests hard to maintain with many repetitions. Instead, we can use a Scenario Outline to add different inputs or arguments to the same scenario. We can re-write it like this:
Feature:  Example of Scenario Outline

  @InvalidCredentials
  Scenario Outline: Login with invalid credentials

    Given User is on Home page
    When User enters username as "<username>" and password as "<password>"
    Then User should be able to see an "<errorMessage>"

    Examples:
      | username   | password | errorMessage             |
      | Admin1     | admin1   | Invalid credentials      |
      |            | admin123 | Username cannot be empty |
      | Admin      |          | Password cannot be empty |
Note:- The table must have a header row corresponding to the variables in the Scenario Outline steps.
The Example’s section is a table where each argument variable represents a column in the table, separated by “|”. Each line below the header represents an individual run of the test case with the respective data. As a result, if there are 2 lines below the header in the Examples table, the script will run 2 times with its respective data.
When Cucumber starts to run this program, first, it will map parameters from the data table to placeholders like, and soon in the Feature File. The corresponding StepDefinition of Feature file is mentioned above. The steps can use delimited parameters that reference headers in the examples table. The cucumber will replace these parameters with values from the table before it tries to match the step against a step definition. There is no change in the StepDefinition as mentioned in the above example.
import io.cucumber.java.en.Given;
import io.cucumber.java.en.Then;
import io.cucumber.java.en.When;
import org.junit.Assert;
import org.openqa.selenium.By;
import org.openqa.selenium.WebDriver;
import org.openqa.selenium.chrome.ChromeDriver;

public class ScenarioOutlineDefinitions {

    WebDriver driver;

    @Given("User is on Home page")
    public void userOnHomePage() {

        System.setProperty("webdriver.chrome.driver",
                "C:\\Users\\Vibha\\Software\\chromedriver_win32\\chromedriver.exe");

        driver = new ChromeDriver();
        driver.manage().window().maximize();
        driver.get("https://opensource-demo.orangehrmlive.com/");
    }

    @When("User enters username as {string} and password as {string}")
    public void entersCredentials(String userName, String passWord) throws InterruptedException {

        System.out.println("Username Entered");
        driver.findElement(By.name("txtUsername")).sendKeys(userName);

        System.out.println("Password Entered");
        driver.findElement(By.name("txtPassword")).sendKeys(passWord);

        driver.findElement(By.id("btnLogin")).submit();

    }

    @Then("User should be able to see an {string}")
    public void verifyErrorMessage(String expectedErrorMessage) throws InterruptedException {

        String actualErrorMessage = driver.findElement(By.id("spanMessage")).getText();
        System.out.println("Error Message :" + actualErrorMessage);
        Assert.assertEquals(actualErrorMessage,expectedErrorMessage);

        //close the browser
        driver.quit();

    }
}
TestRunner Class
There are no changes in TestRunner class also.
import io.cucumber.junit.Cucumber;
import io.cucumber.junit.CucumberOptions;
import org.junit.runner.RunWith;

@RunWith(Cucumber.class)
@CucumberOptions(monochrome = true, plugin = "pretty", features = "src/test/resources/Features/ScenarioOutline.feature",
        glue = "definitions")

public class CucumberRunnerTest {
}
Below is the output in Console:
Congratulations. We have seen an example of Scenario Outline. I hope this is helpful. Happy Learning!!
The previous tutorial is all about JUnit Test Runner. In this tutorial, will show you how to generate reports in Cucumber.
Cucumber with JUnit gives us the capability to generate reports in the form of HTML, XML, JSON & TXT. Cucumber frameworks generate very good and detailed reports, which can be share with all stakeholders.
Let’s generate the Cucumber Report
Step 1 − Create a Maven project named MyCucumberProject in Eclipse.
Step 2 − Create a feature file named MyHoliday.feature under src/test/resources
Step 3 − Create a StepDefinition named MyHolidayDefinitions.java under src/test/java
Step 4 − Create a TestRunner class under src/test/resources
Step 5 − Run JUnit TestRunner class by right click Run As -> JUnit
Write the following code for Feature File
Feature: Book Flight and Hotel for Vacation

@BookOneWayFlight
Scenario: Book Flight for one way trip

  Given I live in Dublin with 2 adults and 2 kids
  And I want to book one way flight ticket from Dublin to London on 22nd Jan 2020
  When I search online
  Then TripAdvisor should provide me options of flights on 22nd Jan 2020
  And Cost of my flight should not be more than 50 Euro per person
  And Tickets should be refundable

@BookHotel
Scenario: Book Hotel for one the trip

  Given I need 1 room with 2 double beds
  And I want to book hotel from 22nd Jan 2020 to 25th Jan 2020
  When I search online
  Then TripAdvisor should provide me options of hotels for time period of 22nd Jan 2020 to 25th Jan 2020
  And Fare of my room should not be more than 200 Euro per night
  And Breakfast should be included in the room fare
Below is the full program, which shows the step definition of above mentioned feature
import io.cucumber.java.en.And;
import io.cucumber.java.en.Given;
import io.cucumber.java.en.Then;
import io.cucumber.java.en.When;

public class MyHolidayDefinitions {

          @Given("^I live in Dublin with 2 adults and 2 kids$")
          public void needFlight() {
                   System.out.println("I live in Dublin with 2 adults and 2 kids");
          }

          @Given("^I need 1 room with 2 double beds$")
          public void needRoom() {
                   System.out.println("I need 1 room with 2 double beds");
          }

          @When("^I search online$")
          public void onlineSearch() {
                   System.out.println("I search online");
          }

          @Then("^TripAdvisor should provide me options of flights on 22nd Jan 2020$")
          public void searchFlightInTripAdvisor() {
                   System.out.println("TripAdvisor should provide me options of flights on 22nd Jan 2020");
          }

         @Then("^Cost of my flight should not be more than 50 Euro per person$")
          public void flightFare() {
                   System.out.println("Cost of my flight should not be more than 50 Euro per person");
          }

          @Then("^TripAdvisor should provide me options of hotels for time period of 22nd Jan 2020 to 25th Jan 2020")
          public void searchRoomInTripAdvisor() {
                   System.out.println(
                                      "TripAdvisor should provide me options of hotels for time period of 22nd Jan 2020 to 25th Jan 2020");
          }

          @And("^I want to book one way flight ticket from Dublin to London on 22nd Jan 2020$")
          public void ticketType() {
                   System.out.println("I want to book one way flight ticket from Dublin to London on 22nd Jan 2020");
          }

          @And("^I want to book hotel from 22nd Jan 2020 to 25th Jan 2020$")
          public void stayDuration() {
                   System.out.println("I want to book hotel from 22nd Jan 2020 to 25th Jan 2020");
          }

          @And("^Fare of my room should not be more than 200 Euro per night$")
          public void roomFare() {
                   System.out.println("Fare of my room should not be more than 200 Euro per night");
          }

          @And("^Breakfast should be included in the room fare$")
          public void includeBreakfast() {
                   System.out.println("Breakfast should be included in the room fare");
          }

          @And("^Tickets should be refundable$")
          public void refunableTicket() {
                   System.out.println("Tickets should be refundable");
          }
}
Cucumber HTML Reports
For HTML reports, add html:target/cucumber-reports to the @CucumberOptions plugin option.
We have specified the path of the Cucumber report, which we want it to generate it under the target folder. This will generate an HTML report at the location mentioned in the formatter
HTML Report Output
Cucumber Json Reports
For Json reports, add json:target/cucumber-reports/Cucumber.json to the @CucumberOptions plugin option.
Gherkin uses a set of special keywords to give structure and meaning to executable specifications. Each keyword is translated into many spoken languages; in this reference, we will use English. Gherkin serves multiple purposes:-
Most lines in the Gherkin document start with one of the keywords. Comment lines are allowed anywhere in the file, starting with a hash sign (#).
Gherkin syntax is written in plain English (or other supported languages), making it understandable to business stakeholders who may not have a technical background.
What is a Feature File?
A file in which we store features, description of the features and scenarios to be tested.
Feature file consists of the below-mentioned keywords:-
1) Feature – It is used to provide a high-level description of test scenarios and to group related scenarios.
The first keyword in the Feature file is the Feature keyword, followed by: and short text that describes the feature.
2) Scenario – This describes the steps followed to test the scenario and the expected outcome of the scenario.
3) Scenario Outline – It is used to run the same scenario multiple times with different sets of values.
4) Background – Suppose we find that the Given steps are the same for all Scenarios in a feature file. Then we should use Background. We can move these Given steps under the Background section.
5) Steps– Each step starts with Given, When, Then, And or But. Cucumber executes each step in a scenario one at a time, in the sequence they have mentioned in the scenario. When Cucumber tries to execute a step, it looks for a matching step definition to execute.
Given– It is used to describe the initial context of the scenario. When a Given step is executed, it will configure the system to a well-defined state, such as creating & configuring objects or adding data to a test database.
When – It is used to describe an event or action. This can be a person interacting with the system, or it can be an event triggered by another system.
Then – It is used to describe the expected outcome of the scenario
And/But – If we have several Given’s, When’s or Then’s, then we can use And /But.
Below is the sample feature file.
Feature: Book flight ticket for one-way trip
Scenario:flight ticket for one-way trip from Dublin

Given I live in Dublin
And I want to book one way flight ticket from Dublin for 22nd Jan 20
When I search Online
Then TripAdvisor should provide me options of flight for 22nd Jan 20
And Cost of my flight should not be more than 50
And Tickets should be refundable
What is Step Definition?
It is a Java method with an expression, which is used to link it to Gherkin steps. When Cucumberexecutes a Gherkin step, it will look for a matching step definition to execute.
Cucumber reads the Gherkin script and maps each step to a piece of executable code (known as step definitions) written in a programming language such as Java, Ruby, or Python. These step definitions execute the steps described in Gherkin to verify the application’s behavior.
Feature: Book flight ticket for one-way trip
Scenario: flight ticket for one-way trip from Dublin
Given  I live in Dublin

@Given ("I live in Dublin")
public voidVacation()
          {
                   System.out.println("I live in Dublin");
          }
When Cucumberencounters a Gherkin step without a matching step definition, it will print a step definition snippet with a matching CucumberExpression. We can use this as a starting point for a new step definition.
Scenario: Flight ticket for one-way trip from Dublin
Given  I live in Dublin
Here, Cucumber didn’t get step definition for the above-mentioned Given step. So, it will provide a snippet as mentioned below:-
@Given ("I live in Dublin")
public void i_live_in_Dublin() {
          // Write code here that turns the phrase above into concrete actions

    throw new cucumber.api.PendingException();
}
We are done! Congratulations on making it through this tutorial and hope you found it useful! Happy Learning!!
In this tutorial, we will discuss about Cucumber Testing Tool. However, before starting with Cucumber, we should know what Behavior Driven Development (BDD) is.
What is Behavioral Driven Development (BDD)?
BDD is a set of practices that helps to reduce the rework caused by misunderstanding or vague requirements, narrow the communication gaps between the development team, testing team, and customers and promote continuous communication among them. In BDD, tests are written in plain descriptive English (Gherkin) and they are more user-focused. As the tests are in plain English, so everyone like Business stakeholders, Business Analyst, QA Team, and Developers can contribute to testing. Cucumber is one such open-source tool, which supports Behavior Driven Development (BDD). In simple words, Cucumber can be defined as a testing framework, driven by plain English. It serves as documentation, automated tests, and development aid – all in one.
How Cucumber works?
Cucumber reads the code written in plain English text (Language Gherkin) in the feature file.
It finds the exact match of each step in the step definition.
The piece of code to execute can be different software frameworks like Selenium, Ruby on Rails, etc.
This has become the reason for Cucumber’s popularity over other frameworks, like JBehave, JDave, Easyb, etc.
Cucumber supports over a dozen different software platforms like −
Ruby on Rails
Selenium
PicoContainer
Spring Framework
Waitr
Advantages of Cucumber Over other Tools
Cucumber supports different languages like Java.net and Ruby.
It acts as a bridge between the business and technical language. We can accomplish this by creating a test case in plain English text.
It allows the test script to be written without knowledge of any code; it allows the involvement of non-programmers as well.
It serves the purpose of an end-to-end test framework, unlike other tools.
Due to simple test script architecture, Cucumber provides code re-usability.
Example of a Cucumber/BDD test:
Feature: Book flight ticket for one-way trip
Scenario: Book flight ticket for one-way trip from Dublin to London

Given I live in Dublin
And I want to book one way flight ticket from Dublin to London for 23rd Oct 19
When I search Online
Then TripAdvisor should provide me options of flight for 23rd Oct 19
And Cost of my flight should not be more than 50 Euro per person
And Tickets should be refundable
Any Business User or Stakeholder can understand the above-mentioned test case. They can provide their feedback, on if this is expected from the functionality or not or do we need to add other steps too.