The previous tutorial explained the How to rerun failed tests in Cucumber. There are multiple times that we need to rerun the failed tests twice to overcome the intermittent network or environment issues. This can be achieved by creating multiple TestRunner class.
In the main test runner, configure Cucumber to generate a JSON report for the initial test run and capture any failed tests in a rerun file. We are using rerun plugin to logs the paths of failed scenarios in a text file – rerun.txt that will be created inside the target folder.
Set Up a Runner for running the failed tests first time
Create a second runner that reads from the rerun.txt file and generates a new rerun1.txt file that contains the path of failed tests and create a separate JSON report for failed test reruns.
import io.cucumber.testng.AbstractTestNGCucumberTests;
import io.cucumber.testng.CucumberOptions;

@CucumberOptions(tags = "",
        features = "@target/rerun.txt",
        glue = "com.example.definitions",
        plugin =  {
                "pretty",
                "html:target/cucumber-reports/cucumber-rerun1-report.html",
                "json:target/cucumber-reports/cucumber-rerun1-report.json",
                "rerun:target/rerun1.txt"
        }
)

public class RunnerTestsFailed extends AbstractTestNGCucumberTests {
}
Set Up a Runner for running the failed tests second time
Create a third runner that reads from the rerun1.txt file and generates a separate JSON report for failed test reruns.
import io.cucumber.testng.AbstractTestNGCucumberTests;
import io.cucumber.testng.CucumberOptions;

@CucumberOptions(tags = "",
        features = "@target/rerun1.txt",
        glue = "com.example.definitions",
        plugin =  {
                "pretty",
                "html:target/cucumber-reports/cucumber-rerun2-report.html",
                "json:target/cucumber-reports/cucumber-rerun2-report.json"
        }
)

public class RunnerTestsSecondFailed extends AbstractTestNGCucumberTests {
}
Mention all the Test Runner details in the testng.xml
We need to mention all the TestRunner class name in the testng.xml. This will run first runner that will generate a file rerun.txt which in turns contain the path of the failed scenarios. Then, second runner will use this new file rerun.txt as input to the feature file and rerun the failed tests and generate second file – rerun1.txt which is used as input to the third Test Runner file.
<?xml version="1.0" encoding="UTF-8"?>
<!DOCTYPE suite SYSTEM "https://testng.org/testng-1.0.dtd">
<suite name="Suite">
    <test  name="Cucumber with TestNG Test">
        <classes>
            <class name="com.example.runner.RunnerTests"/>
            <class name="com.example.runner.RunnerTestsFailed"/>
            <class name="com.example.runner.RunnerTestsSecondFailed"/>
        </classes>
    </test> <!-- Test -->
</suite> <!-- Suite -->
Add cucumber-reporting Plugin to pom.xml
Use the cucumber-reporting plugin by Masterthought to combine the JSON files into a single report. Configure the plugin in your pom.xml to read both the main and rerun JSON files.
Use the below command to run the tests and generate the consolidated Test Report.
mvn clean verify
RunnerTests class generates cucumber-report.json file whereas RunnerTestsFailed generates cucumber-rerun-report.json files are present in target/cucumber-reports folder.
MasterThought plugin uses these json files to generate a consolidated report in target/cucumber-html-reports.
There are different types of HTML reports gets generated as a part of the test execution cycle.
1. feature-overview – This HTML report gives an overall overview of test execution. Main HTML report which covers all different sections like Features, Tags, Steps, and Failures.
2. failures-overview – This HTML report gives an overview of all failed tests.
3. step-overview – This HTML report shows step statistics for the current cycle.
4. tag-overview – This HTML report shows passing and failing statistics for different tags used in test execution.
Congratulations on making it through this tutorial and hope you found it useful! Happy Learning!! Cheers!!
There are multiple reports produced when the Cucumber failed tests are redone. There is no unified test execution status provided in these reports. To generate a consolidated Cucumber report after rerunning any failed tests, follow these steps:
In the main test runner, configure Cucumber to generate a JSON report for the initial test run and capture any failed tests in a rerun file. We are using rerun plugin to logs the paths of failed scenarios in a text file – rerun.txt that will be created inside the target folder.
Create a second runner that reads from the rerun.txt file and generates a separate JSON report for failed test reruns.
import io.cucumber.testng.AbstractTestNGCucumberTests;
import io.cucumber.testng.CucumberOptions;

@CucumberOptions(tags = "",
        features = "@target/rerun.txt",
        glue = "com.example.definitions",
        plugin =  {
                "pretty",
                "html:target/cucumber-reports/cucumber-rerun-report.html",
                "json:target/cucumber-reports/cucumber-rerun-report.json"
        }
)

public class RunnerTestsFailed extends AbstractTestNGCucumberTests {
}
Mention both Test Runner details in the testng.xml
We need to mention both the TestRunner class name in the testng.xml. This will run both the runners sequentially.
<?xml version="1.0" encoding="UTF-8"?>
<!DOCTYPE suite SYSTEM "https://testng.org/testng-1.0.dtd">
<suite name="Suite">
    <test  name="Cucumber with TestNG Test">
        <classes>
            <class name="com.example.runner.RunnerTests"/>
            <class name="com.example.runner.RunnerTestsFailed"/>
        </classes>
    </test> <!-- Test -->
</suite> <!-- Suite -->
Add cucumber-reporting Plugin to pom.xml
Use the cucumber-reporting plugin by Masterthought to combine the JSON files into a single report. Configure the plugin in your pom.xml to read both the main and rerun JSON files.
Use the below command to run the tests and generate the consolidated Test Report.
mvn clean verify
RunnerTests class generates cucumber-report.json file whereas RunnerTestsFailed generates cucumber-rerun-report.json files are present in target/cucumber-reports folder.
MasterThought plugin uses these json files to generate a consolidated report in target/cucumber-html-reports.
There are different types of HTML reports gets generated as a part of the test execution cycle.
1. feature-overview – This HTML report gives an overall overview of test execution. Main HTML report which covers all different sections like Features, Tags, Steps, and Failures.
2. failures-overview – This HTML report gives an overview of all failed tests.
3. step-overview – This HTML report shows step statistics for the current cycle.
4. tag-overview – This HTML report shows passing and failing statistics for different tags used in test execution.
Congratulations on making it through this tutorial and hope you found it useful! Happy Learning!! Cheers!!
In Cucumber, “@CucumberOptions“ is an annotation used to specify various options for running Cucumber tests. It allows you to configure different aspects of how your Cucumber tests are executed. This annotation is typically placed above the test runner class, which is responsible for triggering the execution of Cucumber tests.
1.Command-line arguments have the highest precedence. If you specify options through the CLI, they will override any settings provided by “@CucumberOptions“ or properties files. For example, running the tests with specific options from the terminal.
mvn clean test -Dcucumber.options="--tags @smoke --plugin pretty"
2. The “@CucumberOptions” annotation comes next in the precedence order. Settings configured here will override those provided in properties files but will be overridden by CLI arguments. For example, specifying configurations directly in the test runner class.
3. Configuration settings in properties files have the lowest precedence. These settings will be used if neither CLI arguments nor “@CucumberOptions“ provide a value for a particular option. For example, Creating a “cucumber.properties“ file to specify default configurations.
The glue option helps Cucumber locate the step definition file. In the glue cucumber option, we specify the package to load the glue code. Where glue code is our step definitions or hooks.
The glue code in Cucumber performs the following tasks:
– Scans the project for step definitions and associates them with the corresponding steps in the feature files. – Executes the automation code defined in the step definitions when the corresponding step is encountered during test execution. – Provides a way to configure Cucumber runtime options, such as defining test hooks, plugins, and other settings.
Cucumber Glue Example
import org.junit.runner.RunWith;
import io.cucumber.junit.Cucumber;
import io.cucumber.junit.CucumberOptions;

@RunWith(Cucumber.class)
@CucumberOptions(plugin = "pretty", features = "src/test/resources/features",
glue = "com.example.customer")

public class CucumberRunnerTest {

}
This option specifies the package where the step definition classes are located. In this example, the step definitions are expected to be present in the “com.example.customer” package.
How Glue Locate Step Definitions
1. By default, Cucumber expects the step definitions to be in the same package as the Test Runner class. 2. If the “glue“ option is not specified in the Cucumber options, Cucumber will automatically assume that the step definitions are located in the same package as the test runner. Therefore, if your test runner class is “com.example.runner“, Cucumber will consider the “com.example.runner“ package as the default package for locating the step definitions.
You can comment or remove the “glue“ line in the Cucumber options if your test runner and step definitions are in the same package.
Multiple StepDefinitions in Glue Code
If the step definitions are present in 2 different packages, you can separate packages using a comma and double quotes.
Without proper glue settings, Cucumber will not be able to connect the feature files’ scenarios with the corresponding implementation, resulting in unimplemented step errors.
We are done! Congratulations on making it through this tutorial and hope you found it useful! Happy Learning!!
In the previous tutorial, we showed youWhat is Feature File in Cucumber is. This tutorial will show you how to run this feature file.
Once the Feature file is created, we need to create a class called Runner class to run the tests. This class will use the JUnit annotation @RunWith(), which tells JUnit what is the test runner class.
We cannot run a Feature file on its own in a cucumber-based framework. We need to create a Java class, which will run the Feature File. It is the starting point for JUnit to start executing the tests. TestRunner class is created under src/test/java. In this tutorial, Cucumber uses the JUnit framework to run the tests. Apart from JUnit, we can also use the TestNG Test Runner class to run the cucumber tests.
JUnit Test Runner Class
First, we need to add the below dependencies to the POM.xml (in the case of the Maven project).
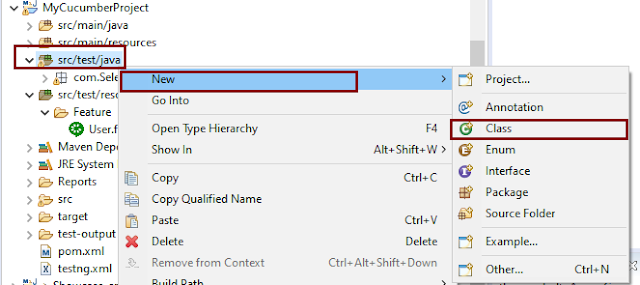
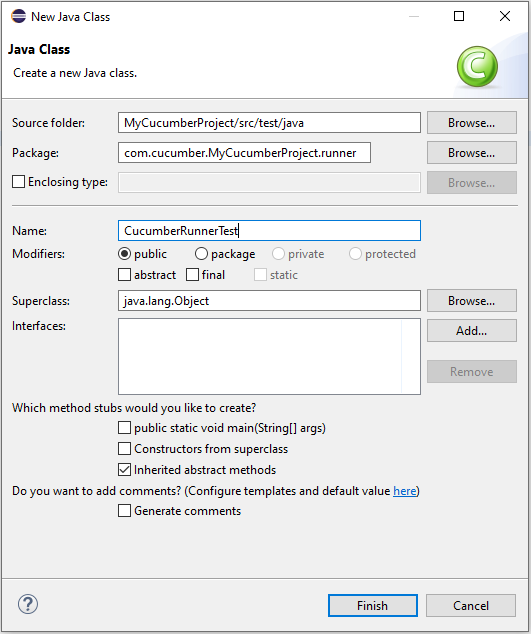
Create a new runner class file called CucumberRunnerTest.
Select and Right-Click on the package outline. Click on the New→Class.
Provide the Java class a name, such as CucumberRunnerTest, and click the Finish button.
Import Statements
1) @RunWithannotation tells JUnit that tests should run using the Cucumber class.
import org.junit.runner.RunWith;
2) Cucumber.class is imported from:
import io.cucumber.junit.Cucumber;
3) @CucumberOptionsannotation tells Cucumber where to look for feature files, what reporting system to use, and some other things also. But as of now, in the above test, we have just told it for the Feature file folder. It is imported from:
import io.cucumber.junit.CucumberOptions;
The CucumberRunnerTest class looks like shown below:
import org.junit.runner.RunWith;
import io.cucumber.junit.Cucumber;
import io.cucumber.junit.CucumberOptions;

@RunWith(Cucumber.class)
@CucumberOptions(plugin = "pretty", features = "src/test/resources/Features/MyHoliday.feature", tags = "@BookOneWayFlight")

public class CucumberRunnerTest {

}
The first parameter, called features, provides the location of the feature file. Similarly, the second parameter, called tags, provides the tag name (scenario) which needs to run. Apart from these, we can use plugins, and glue, in the CucumberOptions.
The feature file is placed under src/test/resources, so it is added as the path for the Feature file.
Run the Cucumber Test
As we know, the Feature file is already created in the previous tutorial. TestRunner class is created to run the Cucumber Tests.
Right Click on CucumberRunnerTest class and Click Run As > JUnit Test Application
The output of the Test Execution looks as shown below image.
This output shows that the Feature file is created, and Test Runner is able to run the Feature File. But this error shows that we should implement these methods so that the Steps mentioned in the Feature file can be traced to Java methods, which can be executed while executing the feature file. Don’t worry about this error. We will see how to create step definitions in the next tutorial.
Congratulations on making it through this tutorial and hope you found it useful! Happy Learning!! Cheers!!
In this tutorial, I will explain Parallel Testing using Cucumber with TestNG.
Cucumber-JVM allows parallel execution across multiple threads since version 4.0.0. There are several options to incorporate this built-in feature in a Cucumber project. You can do so by using JUnit, TestNG, or CLI.
Cucumber can be executed in parallel using TestNG and Maven test execution plugins by setting the data providerparallel option to true.
In TestNG, the scenarios and rows in a scenario outline are executed in multiple threads. One can use either Maven Surefire or Failsafe plugin for executing the runners. In this tutorial, I’m using the Maven Surefire plugin.
Feature: Login to HRM Application

  Background:
    Given User is on Home page

  @ValidCredentials
  Scenario: Login with valid credentials - Feature 1, Scenario -1

    When User enters username as "Admin" and password as "admin123"
    Then User should be able to login successfully

  @InvalidCredentials
  Scenario Outline: Login with invalid credentials - Feature 1, Scenario -2

    When User enters username as "<username>" and password as "<password>"
    Then User should be able to see error message "<errorMessage>"

    Examples:
      | username    | password   | errorMessage                      |
      | Admin        | admin12$$  | Invalid credentials               |
      | admin$$     | admin123   | Invalid credentials               |
      | abc123       | xyz$$      | Invalid credentials               |
ForgotPasswordPage.feature
Feature: Forgot Password Page

  Background:
    Given User is on Home page

  @BackFunctionality
  Scenario: Validate the cancel functionality - Feature 2, Scenario - 1

    When User clicks on Forgot your password? link
    Then User should be able to navigate to Reset Password page
    And User clicks on Cancel button to go back to Login Page

  @ResetFunctionality
  Scenario: Validate the Reset Password functionality - Feature 2, Scenario - 2

    When User clicks on Forgot your password? link
    Then User should be able to navigate to Reset Password page
    And User clicks on Reset Password button and provide username as "abc1234"
    And Verify the message "Reset Password link sent successfully"
Step 6 – Create Page Object Model classes of both feature files
Page Object Model class contains all the locators and the actions performed on these locators for the particular class to improve the readability and maintainability of the code.
Below are the Page Object Model classes for these feature files.
LoginPage
import org.openqa.selenium.By;
import org.openqa.selenium.WebDriver;

public class LoginPage {

    public WebDriver driver;

    By userName = By.name("username");
    By passWord = By.name("password");
    By login = By.xpath("//*[@id='app']/div[1]/div/div[1]/div/div[2]/div[2]/form/div[3]/button");
    By errorMessage = By.xpath("//*[@class='orangehrm-login-error']/div[1]/div[1]/p");
    By forgotPasswordLink = By.xpath("//*[@id='app']/div[1]/div/div[1]/div/div[2]/div[2]/form/div[4]/p");
    By loginPageTitle = By.xpath("//*[@id='app']/div[1]/div/div[1]/div/div[2]/h5");

    public LoginPage(WebDriver driver) {
        this.driver = driver;
    }

    public String getErrorMessage() {
        return driver.findElement(errorMessage).getText();
    }

    public void login(String strUserName, String strPassword) {

        // Fill user name
        driver.findElement(userName).sendKeys(strUserName);

        // Fill password
        driver.findElement(passWord).sendKeys(strPassword);

        // Click Login button
        driver.findElement(login).click();

    }

    // Click on Forgot Password link
    public void clickOnForgotPasswordLink() {
        driver.findElement(forgotPasswordLink).click();
    }

    //Get Login Page Title
    public String getLoginPageTitle() {
        return driver.findElement(loginPageTitle).getText();
    }
}
HomePage
import org.openqa.selenium.By;
import org.openqa.selenium.WebDriver;

public class HomePage {

    public WebDriver driver;

    public HomePage(WebDriver driver) {
        this.driver = driver;
    }

    By homePageUserName = By.xpath("//*[@class='oxd-topbar-header-breadcrumb']/h6");

    public String getHomePageText() {
        return driver.findElement(homePageUserName).getText();
    }
}
ForgotPasswordPage
import org.openqa.selenium.By;
import org.openqa.selenium.WebDriver;

public class ForgotPasswordPage {

    WebDriver driver;

     By forgotPasswordPageTitle = By.xpath("//*[@id='app']/div[1]/div[1]/div/form/h6");
     By cancelBtn = By.xpath("//*[@id='app']/div[1]/div[1]/div/form/div[2]/button[1]");
     By resetPasswordBtn = By.xpath("//*[@id='app']/div[1]/div[1]/div/form/div[2]/button[2]");
     By userName = By.name("username");
     By resetMessage = By.xpath("//*[@id='app']/div[1]/div[1]/div/h6");

    public ForgotPasswordPage(WebDriver driver) {
        this.driver = driver;
    }

    // Get the Title of ForgotPage
    public String getForgotPageText() {
        return driver.findElement(forgotPasswordPageTitle).getText();
    }

    // Click Cancel Button
    public void clickOnCancelBtn() {
         driver.findElement(cancelBtn).click();
    }

    // Click ResetPassword Button
    public void clickOnRestPasswordBtn() {
        driver.findElement(resetPasswordBtn).click();
    }

    // Type username in TextBox
    public void TypeOnUsernameTextBox(String username) {
        driver.findElement(userName).sendKeys(username);
    }

    // Get Message
    public String getRestMessage() {
        return driver.findElement(resetMessage).getText();
    }
}
PageObjectManager – This class creates the object of all the above-mentioned Page Object Model classes. This an optional class. If you want you can create the objects in StepDefinition class also.
public class PageObjectManager {

    public LoginPage loginPage;
    public HomePage homePage;
    public ForgotPasswordPage forgotPasswordPage;
    public WebDriver driver;


    public PageObjectManager(WebDriver driver)
    {
        this.driver = driver;
    }

    public LoginPage getLoginPage()
    {

        loginPage= new LoginPage(driver);
        return loginPage;
    }

    public HomePage getHomePage()
    {
        homePage = new HomePage(driver);
        return homePage;
    }

    public ForgotPasswordPage getForgotPasswordPage()
    {
        forgotPasswordPage = new ForgotPasswordPage(driver);
        return forgotPasswordPage;
    }
}
Step 7 – Create the Step Definition classes for both feature files or Glue Code
Below is the Step Definition for LoginPage.feature.
import io.cucumber.java.en.Given;
import io.cucumber.java.en.Then;
import io.cucumber.java.en.When;
import pageObjects.HomePage;
import pageObjects.LoginPage;
import pageObjects.PageObjectManager;
import utils.TestSetUp;
import org.testng.Assert;

public class LoginPageDefinitions {

    TestSetUp setUp;
    public PageObjectManager pageObjectManager;
    public LoginPage loginPage;
    public HomePage homePage;


    public LoginPageDefinitions(TestSetUp setUp) {
        this.setUp = setUp;
        this.loginPage = setUp.pageObjectManager.getLoginPage();
        this.homePage= setUp.pageObjectManager.getHomePage();
    }

    @Given("User is on Home page")
    public void loginTest() throws IOException {
        setUp.baseTest.WebDriverManager().get("https://opensource-demo.orangehrmlive.com/");

    }

    @When("User enters username as {string} and password as {string}")
    public void goToHomePage(String userName, String passWord) {

        // login to application
        loginPage.login(userName, passWord);

        // go the next page

    }

    @Then("User should be able to login successfully")
    public void verifyLogin() {

        // Verify home page
        Assert.assertTrue(homePage.getHomePageText().contains("Dashboard"));

    }

    @Then("User should be able to see error message {string}")
    public void verifyErrorMessage(String expectedErrorMessage) {

        // Verify home page
        Assert.assertEquals(loginPage.getErrorMessage(),expectedErrorMessage);

    }

}
Below is the Step Definition for ForgotPasswordPage.feature.
import io.cucumber.java.en.Then;
import io.cucumber.java.en.When;
import pageObjects.ForgotPasswordPage;
import pageObjects.LoginPage;
import pageObjects.PageObjectManager;
import utils.TestSetUp;
import org.testng.Assert;

public class ForgotPasswordPageDefinitions{

    TestSetUp setUp;
    PageObjectManager pageObjectManager;
    public LoginPage loginPage;
    public  ForgotPasswordPage forgotPasswordPage;

    public ForgotPageDefinitions(TestSetUp setUp) {
        this.setUp = setUp;
        this.loginPage = setUp.pageObjectManager.getLoginPage();
        this.forgotPasswordPage = setUp.pageObjectManager.getForgotPasswordPage();
    }

    @When("User clicks on Forgot your password? link")
    public void forgotPasswordLink() {

        loginPage.clickOnForgotPasswordLink();

    }

    @Then("User should be able to navigate to Reset Password page")
    public void verifyForgotPasswordPage() {

        Assert.assertEquals(forgotPasswordPage.getForgotPageText(),"Reset Password");

    }

    @Then("User clicks on Cancel button to go back to Login Page")
    public void verifyCancelBtn() {

        forgotPasswordPage.clickOnCancelBtn();
        Assert.assertEquals(loginPage.getLoginPageTitle(),"Login");

    }

    @Then("User clicks on Reset Password button and provide username as {string}")
    public void verifyResetPasswordBtn(String username) {

        forgotPasswordPage.TypeOnUsernameTextBox(username);
        forgotPasswordPage.clickOnRestPasswordBtn();

    }

    @Then("Verify the message {string}")
    public void verifyMessage(String message) {

        Assert.assertEquals(forgotPasswordPage.getRestMessage(),message);

    }
}
Step 8 – Create the Hook Class and Dependency Injection class (TestSetUp) and BaseTest class
Below is the code for the ApplicationHook Class.
import io.cucumber.java.After;
import utils.TestSetUp;

public class ApplicationHooks {

 public TestSetUp setUp;

    public ApplicationHooks(TestSetUp setUp) {
        this.setUp = setUp;
    }

    @After
    public void tearDown( ) throws IOException {
        setUp.baseTest.WebDriverManager().quit();
    }
}
Below is the code for the Dependency Injection class. In Cucumber, if we want to share the state between multiple-step definition files, we will need to use dependency injection (DI).
import org.openqa.selenium.WebDriver;
import org.openqa.selenium.WebElement;
import pageObjects.PageObjectManager;

public class TestSetUp {

    public WebElement errorMessage;
    public WebElement homePageUserName;
    public PageObjectManager pageObjectManager;
    public BaseTest baseTest;

    public TestSetUp()  {

        baseTest = new BaseTest();
        pageObjectManager = new PageObjectManager(baseTest.WebDriverManager());

    }
}
BaseTest class is used to initialize the WebDriver.
import io.github.bonigarcia.wdm.WebDriverManager;
import org.openqa.selenium.WebDriver;
import org.openqa.selenium.chrome.ChromeDriver;
import java.time.Duration;

public class BaseTest {

    public WebDriver driver;
    public final static int TIMEOUT = 10;

    public WebDriver WebDriverManager ()  {


        if (driver == null) {

            ChromeOptions options = new ChromeOptions();
            driver = new ChromeDriver(options);
            driver.manage().timeouts().implicitlyWait(Duration.ofSeconds(TIMEOUT));
            driver.manage().window().maximize();
            driver.get(url);

        }
        return driver;
    }
}
Step 9 – Create a Cucumber TestNG Runner class
Add a cucumber runner by extending the AbstractTestNGCucumberTests class and overriding the scenarios method. Set the parallel option value to true for the DataProvider annotation.
import io.cucumber.testng.AbstractTestNGCucumberTests;
import io.cucumber.testng.CucumberOptions;
import org.testng.annotations.DataProvider;

@CucumberOptions(tags = "", features = "src/test/resources/features", glue = "org.example.definitions")
public class CucumberRunnerTests  extends AbstractTestNGCucumberTests {

   @Override
    @DataProvider(parallel = true)
    public Object[][] scenarios() {
        return super.scenarios();
    }

}
Step 10 – Report Generation
Add cucumber.properties under src/test/resources and add the below instruction in the file.
cucumber.publish.enabled=true
Step 11 – Execute the test from Command Line
Use the below-mentioned command in the command prompt to run the tests.
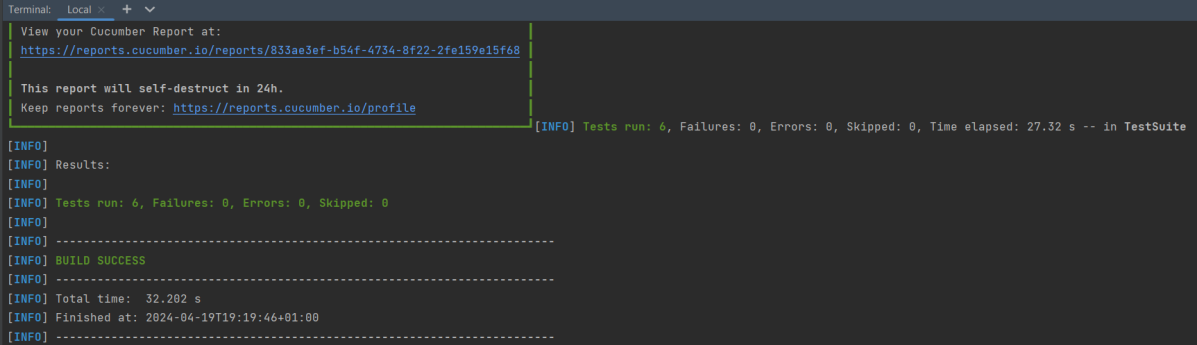
mvn clean test
The output of the above program is
Step 12 – Execute the tests from TestNG Runner
Go to the Runner class and right-click Run As TestNG Test. The tests will run as TestNG tests. (Eclipse)
In the case of IntelliJ, right-click and select Run “CucumberRunnerTests”.
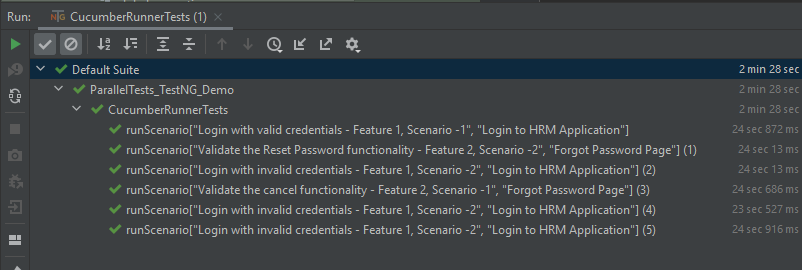
Step 13 – Test Execution Result
All the tests are started at the same time, so they share different threads. The way tests are executed is different in them. With non-parallel tests, all the scenarios of the same feature are executed together, and then the scenarios of another feature file. Whereas in parallel tests, all the tests are started at the same time, so there won’t be any specific order.
All the scenarios have started simultaneously.
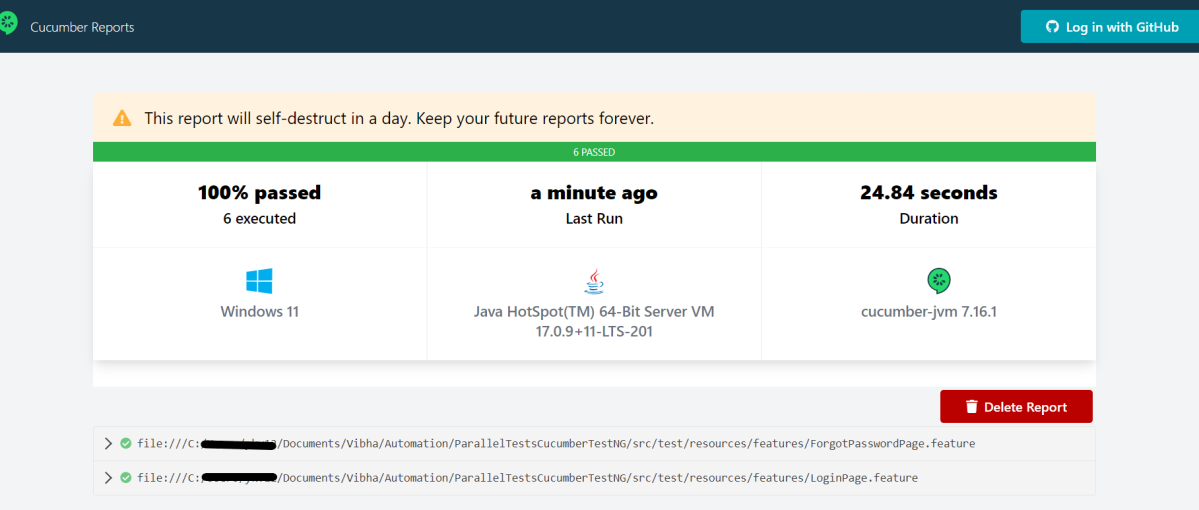
The Cucumber Report is shown below:
There are chances that we don’t want to run all the scenarios simultaneously, in this case, we need to add the below-mentioned configuration in the pom.xml. The value =2 means that 2 scenarios will be executed simultaneously.
Cucumber Data Tables can be used to add multiple parameters in Step Definition in a tabular form rather than putting all the parameters in the Gherkin statement. This is much easier to read and multiple rows of data can be passed in the same step. Data tables from Gherkin can be accessed by using the DataTable object as the last parameter in a Step Definition. This conversion can be done either by Cucumber or manually.
Let’s write a simple data table and see how we use it.
1. Table into List of a List of Strings
| firstName | lastName | age |
| Thomas    | Brown | 30 |
| Perry     | Wilson | 26 |
| Ashley    | William | 27 |

java type: List<List<String>>

The natural representation of list of a list of strings is shown below.

[
  [ "firstName", "lastName", "age" ],
  [ "Thomas", "Brown", "30" ],
  [ "Perry", "Wilson", "26" ],
  [ "Ashley", "William", "27" ]
]
2. Table into List of Maps
java type: List<Map<String, String>>
The natural representation of list of maps is shown below.

[
  { "firstName": "Thomas", "lastName": "Brown",  "age": "30" },
  { "firstName": "Perry",  "lastName": "Wilson", "age": "26" },
  { "firstName": "Ashley", "lastName": "William", "age": "27" }
]
3. Table into Single Map
Table where first colum is key as shown below

| IN  | India          |
| IRE | Ireland        |
java type: Map<String, String>

TO convert the table into a single map

{
  "IN": "India",
  "IRE": "Ireland"
}
4. Table into map that uses a list as its value
 A table with multiple column values per key.

 | IN  | India          | 29  |
 | IRE | Ireland        | 8   |

java type: Map<String, List<String>>

{
  "IN":  ["India","29"],
  "IRE": ["Ireland","8"]
}
Now, let us see how we can use DataTable in Cucumber
Cucumber Data Tables Example in Java
Data Table without Header Example
Below is an example of how to implement Data Tables without a Header. For example, we want to test the Login Page of an application. We can either mention all the arguments inside the Gherkin statement or use a table to list all the arguments, as we used below:
Feature: Login to HRM Application

  @ValidCredentials
  Scenario: Login with valid credentials - Data Table without Header

    Given User is on HRMLogin page
    When User enters valid credentials
      | Admin | admin123 |
    Then User should be able to login successfully and new page open
Below is the Step Definition of the above scenario.
import io.cucumber.datatable.DataTable;
import io.cucumber.java.After;
import io.cucumber.java.Before;
import io.cucumber.java.en.Given;
import io.cucumber.java.en.Then;
import io.cucumber.java.en.When;
import org.junit.Assert;
import org.openqa.selenium.By;
import org.openqa.selenium.WebDriver;
import org.openqa.selenium.chrome.ChromeDriver;
import java.util.List;
import java.util.Map;
import java.util.concurrent.TimeUnit;
import static org.hamcrest.CoreMatchers.containsString;
import static org.hamcrest.MatcherAssert.assertThat;

public class DataTableDefinitions {

    WebDriver driver;

 @Before
    public void setup() {

        ChromeOptions options = new ChromeOptions();
        options.addArguments("--start-maximized");
        driver = new ChromeDriver(options);
        driver.manage().timeouts().implicitlyWait(Duration.ofSeconds(5));

    }

    @Given("User is on HRMLogin page")
    public void userOnHomePage() {

        driver.get("https://opensource-demo.orangehrmlive.com/");
    }

     @When("User enters valid credentials")
    public void entersValidCredential(DataTable dataTable) throws InterruptedException{

        System.out.println("Credentials Entered");

        List<List<String>> signUpForm = dataTable.asLists(String.class);
        String userName = signUpForm.get(0).get(0);
        String passWord = signUpForm.get(0).get(1);
        driver.findElement(By.name("username")).sendKeys(userName);
        driver.findElement(By.name("password")).sendKeys(passWord);
        driver.findElement(By.xpath("//*[@class='oxd-form']/div[3]/button")).submit();
    }

    @Then("User should be able to login successfully and new page open")
    public void successfulLogin() throws InterruptedException {

        String newPageText = driver.findElement(By.xpath("//*[@class='oxd-topbar-header-breadcrumb']/h6")).getText();
        System.out.println("newPageText :" + newPageText);
        assertThat(newPageText, containsString("Dashboard"));
    }

    @After
    public void teardown(){
        driver.quit();
    }
}
To run the Feature file, we need a Cucumber TestRunner.
import io.cucumber.junit.Cucumber;
import io.cucumber.junit.CucumberOptions;
import org.junit.runner.RunWith;

@RunWith(Cucumber.class)
@CucumberOptions(monochrome = true, plugin = "pretty", features = "src/test/resources/Features/DataTable.feature",
        glue = "definitions", tags="@ValidCredentials")

public class CucumberRunnerTest {
}
The output of the above program is
In the above example, we don’t have a header. We have just got the List object. We get the values of DataTable starting from 0 index.
Cucumber converts the above table into a list of lists. It treats each row as a list of the column values. We use the asLists method — supplying a String.class argument — to convert the DataTable argument to a List<List<String>>. This Class argument informs the asLists method of what data type we expect each element to be.
Data Table with Header and Single Row Example
Below is a cucumber data tables example with the header.
Adding a header to your table makes it easier to read and maintain.
  @InValidCredential
  Scenario: Login with invalid credential - Header with Single Row

    Given User is on HRMLogin page
    Then User enters invalid credentials and Login will be unsuccessful with error message
      | Username  | Password   | ErrorMessage        |
      | Admin1    | admin123!$ | Invalid credentials |
Below is the Step Definition of the above scenario.
package org.example.definitions;

import io.cucumber.datatable.DataTable;
import io.cucumber.java.After;
import io.cucumber.java.Before;
import io.cucumber.java.en.Given;
import io.cucumber.java.en.Then;
import io.cucumber.java.en.When;
import org.junit.Assert;
import org.openqa.selenium.By;
import org.openqa.selenium.WebDriver;
import org.openqa.selenium.chrome.ChromeDriver;
import org.openqa.selenium.chrome.ChromeOptions;

import java.time.Duration;
import java.util.List;
import java.util.Map;

public class DataTableDefinitions {

    WebDriver driver;

    @Before
    public void setup() {

        ChromeOptions options = new ChromeOptions();
        options.addArguments("--start-maximized");
        driver = new ChromeDriver(options);
        driver.manage().timeouts().implicitlyWait(Duration.ofSeconds(5));

    }

    @Given("User is on HRMLogin page")
    public void userOnHomePage() {

        driver.get("https://opensource-demo.orangehrmlive.com/");
    }

    @Then("User enters invalid credentials and Login will be unsuccessful with error message")
    public void entersInvalidCredential(DataTable userTable) throws InterruptedException {

        System.out.println("Enter Credentials");
        List<Map<String, String>> user = userTable.asMaps(String.class, String.class);

        String userName = user.get(0).get("Username");
        System.out.println("Username :" + userName);
        driver.findElement(By.name("username")).sendKeys(userName);

        String passWord = user.get(0).get("Password");
        System.out.println("Password :" + passWord);
        driver.findElement(By.name("password")).sendKeys(passWord);

        driver.findElement(By.xpath("//*[@class='oxd-form']/div[3]/button")).submit();

        String errorMessage = user.get(0).get("ErrorMessage");
        String actualErrorMessage = driver.findElement(By.xpath("//*[@class='orangehrm-login-error']/div[1]/div[1]/p")).getText();
        System.out.println("Actual Error Message :" + actualErrorMessage);
        Assert.assertTrue(actualErrorMessage.equalsIgnoreCase(errorMessage));

    }

    @After
    public void teardown(){
        driver.quit();
    }

}
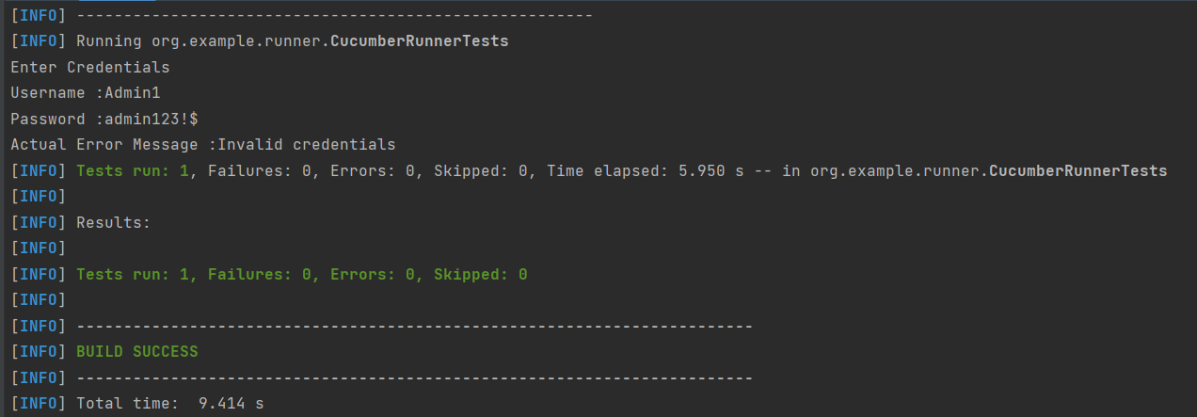
The output of the above program is
In the above example, we have only 1 row with the header, so have used get(0) to retrieve the first row of DataTable. After that, I used get(“HeaderName”) to get the value of the row of DataTable.
Data Table with Header and Multiple Rows Example
Below is a cucumber data table example with multiple rows of data with the header. This is helpful when we want to test multiple combinations of data in a step.
  @Multiple_InValidCredentials
  Scenario: Login with invalid credentials - Data Table with Header and Multiple Rows

    Given User is on HRMLogin page
    Then User enters invalid credentials and Login will be unsuccessful with custom error messages
      | Username    | Password  | ErrorMessage         |
      | Admin1      | admin123! | Invalid credentials  |
      | Admina      | admin123a | Invalid credentials  |
Below is the Step Definition of the above scenario
import io.cucumber.datatable.DataTable;
import io.cucumber.java.After;
import io.cucumber.java.Before;
import io.cucumber.java.en.Given;
import io.cucumber.java.en.Then;
import io.cucumber.java.en.When;
import org.junit.Assert;
import org.openqa.selenium.By;
import org.openqa.selenium.WebDriver;
import org.openqa.selenium.chrome.ChromeDriver;
import java.util.List;
import java.util.Map;
import java.util.concurrent.TimeUnit;
import static org.hamcrest.CoreMatchers.containsString;
import static org.hamcrest.MatcherAssert.assertThat;

public class DataTableDefinitions {

    WebDriver driver;

     @Before
    public void setup() {

        ChromeOptions options = new ChromeOptions();
        options.addArguments("--start-maximized");
        driver = new ChromeDriver(options);
        driver.manage().timeouts().implicitlyWait(Duration.ofSeconds(5));

    }

    @Given("User is on HRMLogin page")
    public void userOnHomePage() {

        driver.get("https://opensource-demo.orangehrmlive.com/");
    }

     @Then("User enters invalid credentials and Login will be unsuccessful with custom error messages")
    public void entersInvalidCredentials(DataTable userTable) throws InterruptedException {

        System.out.println("Enter Credentials");

        List<Map<String, String>> user = userTable.asMaps(String.class, String.class);
        for (Map<String, String> form : user) {

            String userName = form.get("Username");
            System.out.println("Username :" + userName);
            driver.findElement(By.name("username")).sendKeys(userName);

            String passWord = form.get("Password");
            System.out.println("Password :" + passWord);
            driver.findElement(By.name("password")).sendKeys(passWord);

            driver.findElement(By.xpath("//*[@class='oxd-form']/div[3]/button")).submit();

            String errorMessage = form.get("ErrorMessage");
            String actualErrorMessage = driver.findElement(By.xpath("//*[@class='orangehrm-login-error']/div[1]/div[1]/p")).getText();
            System.out.println("Actual Error Message :" + actualErrorMessage);

            Assert.assertTrue(actualErrorMessage.equalsIgnoreCase(errorMessage));

        }
    }

    @After
    public void teardown(){
        driver.quit();
    }

}
The output of the above program is
Cucumber creates a list containing each row, but instead maps the column heading to each column value. Cucumber repeats this process for each subsequent row. We use the asMaps method — supplying two String.class arguments — to convert the DataTable argument to a List<Map<String, String>>.
The first argument denotes the data type of the key (header). The second indicates the data type of each column value. Thus, we supply two String.class arguments because our headers (key) and title and author (values) are all Strings.
Congratulations on making it through this tutorial and hope you found it useful! Happy Learning!! Cheers!!
As we know, Cucumber is a BDD Tool and Selenium Webdriver is used for the automation of web applications. Imagine we need to build a test framework that can be used by businesses to understand the test scenarios and as well can test the web application. This can be achieved by integrating Cucumber with Selenium.
In this tutorial, I’ll create a BDD Framework for the testing of web applications using Selenium Webdriver.
Cucumber and Selenium need Java to be installed on the system to run the tests. Click here to knowHow to install Java.
Step 2 – Download and setup Eclipse IDE on the system
The Eclipse IDE (integrated development environment) provides strong support for Java developers. The Eclipse IDE for Java Developers distribution is designed to support standard Java development. It includes support for the Maven and Gradle build system and support for the Git version control system. Click here to know How to install Eclipse.
Step 3 – Setup Maven
To build a test framework, we need to add a number of dependencies to the project. It is a very tedious and cumbersome process to add each dependency manually. So, to overcome this problem, we use a build management tool. Maven is a build management tool that is used to define project structure, dependencies, build, and test management. Click here to know How to install Maven.
Step 4 – Install Cucumber Eclipse Plugin (Only for Eclipse)
The cucumber plugin is an Eclipse plugin that allows eclipse to understand the Gherkin syntax. When we are working with cucumber we will write the feature files that contain Feature, Scenario, Given, When, Then, And, But, Tags, Scenario Outline, and Examples. By default, eclipse doesn’t understand these keywords so it doesn’t show any syntax highlighter. Cucumber Eclipse Plugin highlights the keywords present in Feature File. Refer to this tutorial to get more detail – How to setup Cucumber with Eclipse.
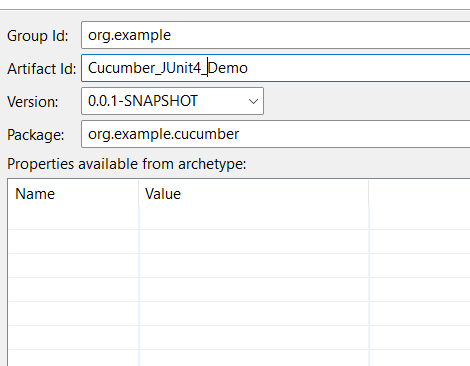
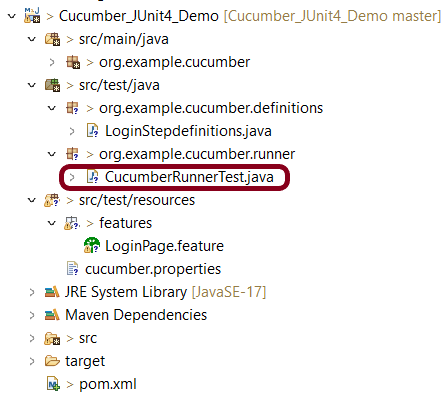
Group Id – org.example Artifact Id – Cucumber_JUnit4_Demo Version – 0.0.1-SNAPSHOT Package – cucumber
Maven Dependency (pom.xml) looks like something shown below for a new Maven project.
Step 6 – Create source folder src/test/resources
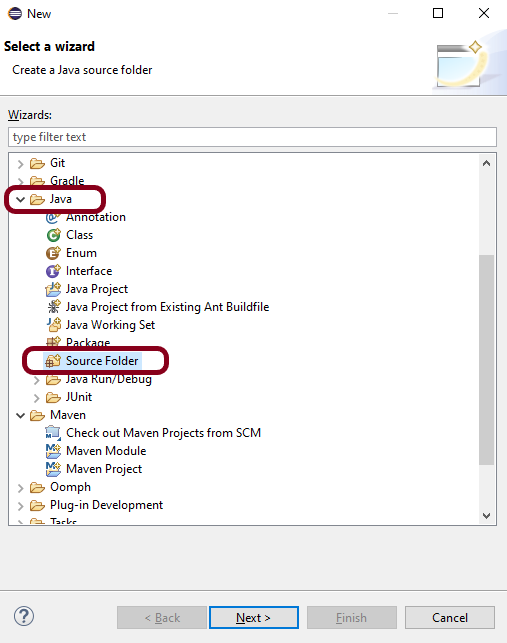
When a new Maven Project is created, it has 2 folders – src/main/java and src/test/java. To create test scenarios, we need a new source folder called – src/test/resources. To create this folder, Right-click on your Maven project ->select New ->Java, and then Source Folder. The Feature file is created in the src/test/resources source folder.
Mention the source folder name as src/test/resources and click the Next button. This will create a source folder under your new Maven project, as shown in the below image.
Step 7 – Add Selenium and Cucumber dependencies to the project
Add the below-mentioned Selenium and Cucumber dependencies to the project.
The compiler plugin is used to compile the source code of a Maven project. This plugin has two goals, which are already bound to specific phases of the default lifecycle:
Step 9 – Create a feature file (LoginPage.feature)
Feature file should be saved as an extension of .feature. Add the test scenarios in this feature file. I have added sample test scenarios. In this feature file, I have created a scenario for successful login and another one for a failed login. The test scenarios are written in the Gherkins language. A feature file contains all the test scenarios and is placed in src/test/resources/features.
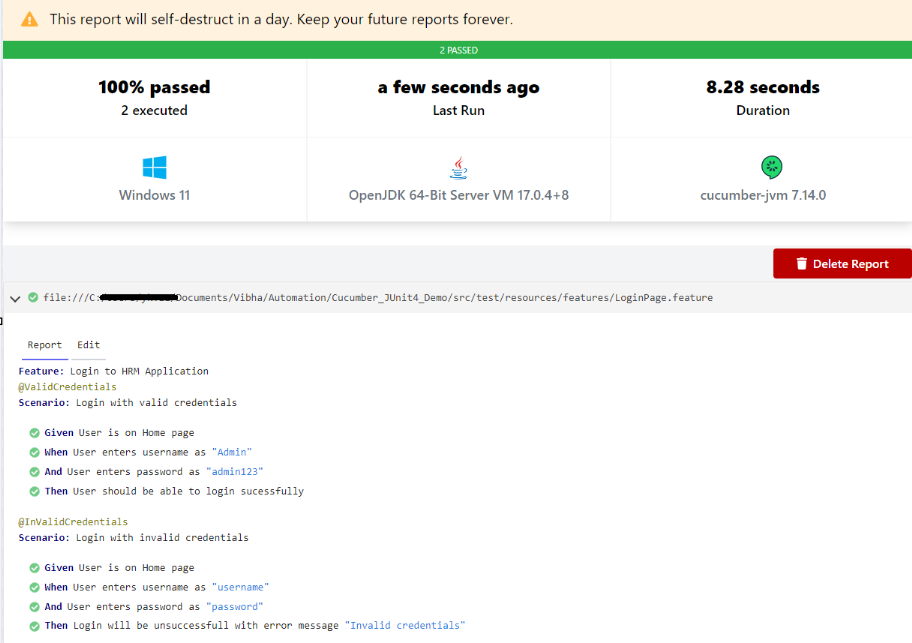
Feature: Login to HRM Application

   @ValidCredentials
   Scenario: Login with valid credentials

    Given User is on Home page
    When User enters username as "Admin"
    And User enters password as "admin123"
    Then User should be able to login sucessfully

   @InValidCredentials
   Scenario: Login with invalid credentials

    Given User is on Home page
    When User enters username as "username"
    And User enters password as "password"
    Then Login will be unsuccessfull with error message "Invalid credentials"
Step 10 – Create the step definition class
The StepDefinition class is created in src/test/java. The StepDefinition class contains the test code corresponding to the steps of Test Scenario in the Feature File.
It is recommended to create a package with a name such as org.example.cucumber.stepdefinitionsin src/test/java and create the step definition java file corresponding to the feature files in that package
package org.example.definitions;
import java.time.Duration;
import org.junit.Assert;
import org.openqa.selenium.By;
import org.openqa.selenium.WebDriver;
import org.openqa.selenium.chrome.ChromeDriver;
import org.openqa.selenium.chrome.ChromeOptions;
import io.cucumber.java.After;
import io.cucumber.java.Before;
import io.cucumber.java.en.Given;
import io.cucumber.java.en.Then;
import io.cucumber.java.en.When;
public class LoginStepdefinitions {
WebDriver driver;
@Before
public void setUp() {
ChromeOptions options = new ChromeOptions();
options.addArguments("--start-maximized");
driver = new ChromeDriver(options);
driver.manage().timeouts().implicitlyWait(Duration.ofSeconds(5));
}
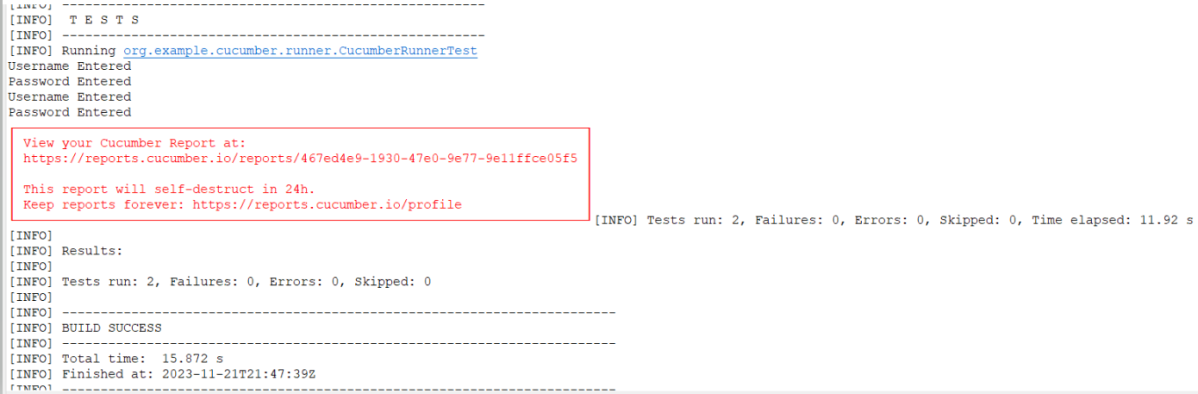
@Given("User is on Home page")
public void userOnHomePage() {
driver.get("https://opensource-demo.orangehrmlive.com/");
}
@When("User enters username as {string}")
public void entersUsername(String userName) {
System.out.println("Username Entered");
driver.findElement(By.name("username")).sendKeys(userName);
}
@When("User enters password as {string}")
public void entersPassword(String passWord) {
System.out.println("Password Entered");
driver.findElement(By.name("password")).sendKeys(passWord);
driver.findElement(By.xpath("//*[@class='oxd-form']/div[3]/button")).submit();
}
@Then("User should be able to login sucessfully")
public void sucessfullLogin() {
String homePageHeading = driver.findElement(By.xpath("//*[@class='oxd-topbar-header-breadcrumb']/h6")).getText();
//Verify new page - HomePage
Assert.assertEquals("Dashboard",homePageHeading);
}
@Then("Login will be unsuccessfull with error message {string}")
public void unsucessfullLogin(String expectedErrorMessage) {
String actualErrorMessage = driver.findElement(By.xpath("//*[@class='orangehrm-login-error']/div[1]/div[1]/p")).getText();
// Verify Error Message
Assert.assertEquals( expectedErrorMessage, actualErrorMessage);
}
@After
public void teardown() {
driver.quit();
}
}
Step 11 – Create a Cucumber Runner classunder src/test/java
It is recommended to create a package with a name such as org.example.cucumber.runner in src/test/java and create the CucumberRunnerTest (Runner) java file corresponding to that package.
We need to create a class called Runner class to run the tests. This class will use the JUnit annotation @RunWith(), which tells JUnit what is the test runner class.
In the previous tutorial, I explained Hooks in Cucumber. In this tutorial, I will explain Condition Hooks in Cucumber.
Hooks can be conditionally selected for execution based on the tags of the scenario. These are called Condition or Tagged Hooks.
Tagged Hooks are much like the scenario hooks, but the only difference is that they are executed before and after the specified tag.
These tagged hooks will be very specific to the particular tags, so these are not common for all scenarios.
So basically, they can also be run in the following two ways:
Before (‘tagName’)
After (‘tagName’)
Why do we need Tagged Hooks?
Suppose there are 3 different sets of scenarios. The prerequisites of these scenarios are different, like they have to open different browsers. So, we don’t want to have a common hook for all the scenarios. In this case, we can create a tagged hook to satisfy the requirement of each scenario.
In the below example, there are 3 tags – ChromeBrowser, FireFoxBrowser, and EdgeBrowser. I want to run the hook which has the specified tag for that scenario. For Example, I want @After and @Before hooks related to Chrome Browser should be executed for the tag – @ChromeBrowser.
Below is the feature file which has 3 different scenarios.
Feature: Conditional or Tagged Hooks

@ChromeBrowser
Scenario: Open Chrome Browser

Given I want to open Google Chrome Browser

@FireFoxBrowser
Scenario: Open Firefox Browser

Given I want to open Mozilla Firefox Browser

@EdgeBrowser
Scenario: Open Edge Browser

Given I want to open Microsoft Edge Browser
Below is the Step Definition for the above feature file.
import io.cucumber.java.en.Given;

public class ConditionalHooksExampleDefinitions {

	@Given("I want to open Google Chrome Browser")
	public void chrome() throws Throwable {
	    System.out.println("I want to open Google Chrome Browser");
	}

	@Given("I want to open Mozilla Firefox Browser")
	public void firefox() throws Throwable {
		System.out.println("I want to open Mozilla Firefox Browser");
	}

	@Given("I want to open Microsoft Edge Browser")
	public void edge() throws Throwable {
		System.out.println("I want to open Microsoft Edge Browser");
	}

}
Hooks can be defined in the same class or different. I have defined Hooks in a separate class.
import io.cucumber.java.After;
import io.cucumber.java.AfterStep;
import io.cucumber.java.Before;
import io.cucumber.java.BeforeStep;

public class Hooks {

	@BeforeStep
    public void beforeStep(){
        System.out.println("@@@@@@@@@@@@@@@ Before Step @@@@@@@@@@@@@@@@@");
    }

	@AfterStep
    public void afterStep(){
        System.out.println("@@@@@@@@@@@@@@@@  After Step @@@@@@@@@@@@@@@@");
    }

	@Before("@ChromeBrowser")
    public void beforeGoogle(){
        System.out.println("******* before Chrome *******");
    }

	@Before("@FireFoxBrowser")
    public void beforeFirefox(){
        System.out.println("$$$$$$$$$$ before FireFox $$$$$$$$$$");
    }

	@Before("@EdgeBrowser")
    public void beforeEdge(){
		System.out.println("============ before Edge =============");
    }

	@After("@ChromeBrowser")
    public void afterGoogle(){
        System.out.println("********* After Google *********");
    }

	@After("@FireFoxBrowser")
    public void afterFireFox(){
		System.out.println("$$$$$$$$$$$ After FireFox $$$$$$$$$$");
    }

	@After("@EdgeBrowser")
    public void afterEdge(){
        System.out.println("============ After Edge ==============");
    }

}
There is no change in the Test Runner Class.
import org.junit.runner.RunWith;
import io.cucumber.junit.Cucumber;
import io.cucumber.junit.CucumberOptions;

@RunWith(Cucumber.class)
@CucumberOptions(monochrome = true, plugin = "pretty", features = "src/test/resources/features/ConditionalHooks.feature", tags = {
		"" })

public class MyRunnerTests {

}
The output of the above execution is
At the start of execution, @Before(“@ChromeBrowser”) {Scenario Hook} is executed.
After that @BeforeStep (Step Hook) hook is executed.
The given statement of the @ChromeBrowser tag is executed in the third step.
The fourth step is to execute @AfterStep.
Now, at last, the @After(“@ChromeBrowser”) hook is executed. Similarly, the same sequence is followed for FireFox and Edge Scenarios.
Congratulations on making it through this tutorial and hope you found it useful! Happy Learning!! Cheers!!
To have a successful and effective implementation of a test framework, it is always advisable that the test framework supports test execution in multiple ways. The most commonly used ways to execute tests in Cucumber Framework are by running the tests using JUnit and TestNG.
To execute tests using JUnit, we need to create a JUnit Test Runner. Whereas, we need a Maven project to execute Cucumber tests from Command-Line.
Feature: Login to HRM Application

  Background:
    Given User is on HRMLogin page "https://opensource-demo.orangehrmlive.com/"

  @ValidCredentials
  Scenario: Login with valid credentials

    When User enters username as "Admin" and password as "admin123"
    Then User should be able to login successfully

  @InvalidCredentials
  Scenario Outline: Login with invalid credentials

    When User enters username as "<username>" and password as "<password>"
    Then User should be able to see error message "<errorMessage>"

    Examples:
      | username   | password  | errorMessage                      |
      | Admin      | admin12$$ | Invalid credentials               |
      | admin$$    | admin123  | Invalid credentials               |
      | abc123     | xyz$$     | Invalid credentials               |
HomePage.feature
Feature: Login to Home

  Background:
    Given User is on HRMLogin page "https://opensource-demo.orangehrmlive.com/"

  @ValidCredentialsHome
  Scenario: Login with valid credentials to got to home page

    When User enters username as "Admin" and password as "admin123"
    Then User should be able to login successfully and new Home page opens
Run Test from Command Line
1. Running all the tests
1. Open the command prompt and change the directory to the project location where pom.xml is present.
2. All feature files should be in src/test/resources and create the Cucumber Runner class as CucumberRunnerTest. Note:- The Runner class name should end with Test to execute the tests from Command Line Run the following command in the command prompt:
mvn clean test
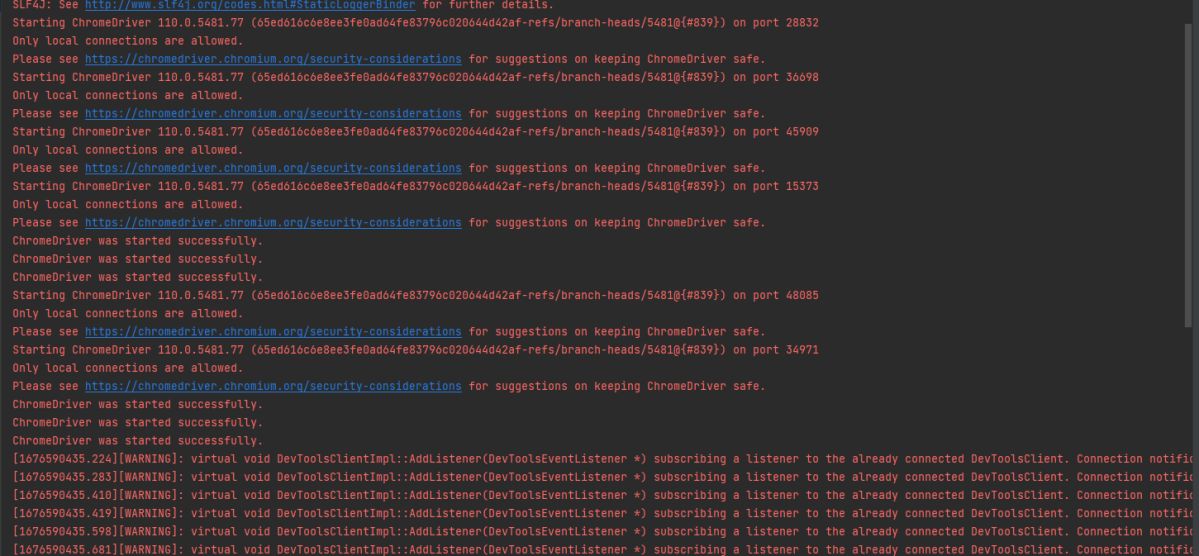
mvn clean test runs Cucumber Features using Cucumber’s JUnit Runner. The @RunWith (Cucumber.class)annotation on the TestRunner class tells JUnit to start Cucumber. Cucumber runs time parses the command-line options to know what feature to run, where the Glue Code lives, what plugins to use, and so on.
3. The below screenshot shows that CucumberRunnerTest class is triggered.
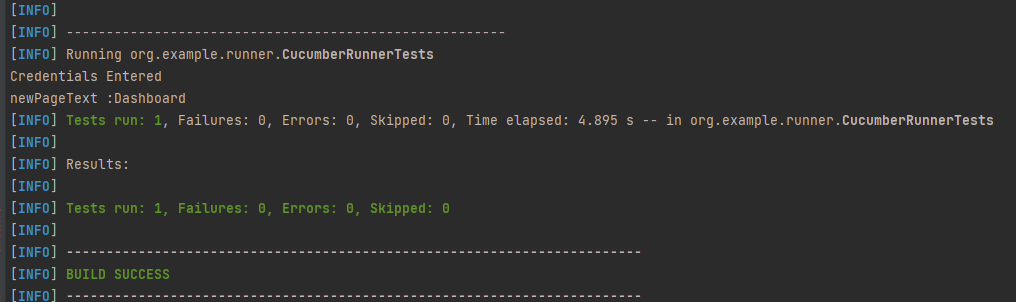
4. The below screenshot shows the build success output.
Cucumber provides several options that can be passed to on the command line.
2. Running Scenarios using Tags
If you are using Maven and want to run a subset of scenarios tagged with @ValidCredentials.
mvn clean test -Dcucumber.filter.tags="@ValidCredentials"
The output of the above program is
3. Running a Feature file
Suppose you want to run a single Feature File from the command line, then use the below syntax
mvn clean test -Dcucumber.features="src/test/resources/features/HomePage.feature"
The output of the above program is
4. Creating Cucumber Report from Command Line
If we want to generate a different report, then we can use the following command and see the HTML report generate at the location mentioned:
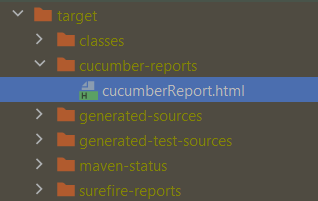
mvn clean test -Dcucumber.plugin="html:target/cucumber-reports/cucumberReport.html"
The output of the above program is
5. Passing multiple Parameters
If we want to pass more than one parameter, then we can use the following command
mvn clean test -Dcucumber.features="src/test/resources/features/LoginPage.feature" -Dcucumber.filter.tags="@ValidCredentials"
The output of the above program is
6. Running a Scenario without a tag
If we want to run a single Scenario from the command line and no tag is assigned to that scenario, this is how we specify
mvn clean test -Dcucumber.features="src/test/resources/features/LoginPage.feature:7"
The output of the above program is
That’s it! Congratulations on making it through this tutorial and hope you found it useful! Happy Learning!!