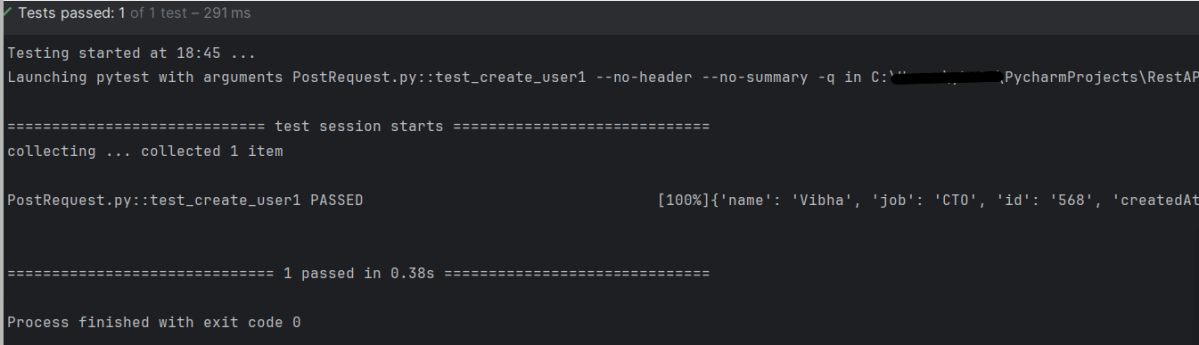
requests.put(url, data=data) – function sends a PUT request to the specified URL with the provided data. The data dictionary contains the key-value pairs that we want to send in the PUT request payload. You can modify it based on the requirements of the API we are working with.
The response object contains information about the response, including the status code and the response content.
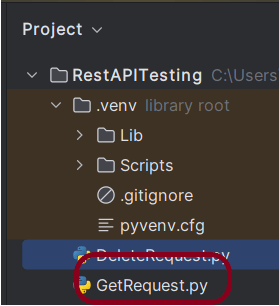
Requests is an HTTP client library for the Python programming language. Requests is one of the most downloaded Python libraries, with over 300 million monthly downloads. It maps the HTTP protocol onto Python’s object-oriented semantics.
requests.post(url, data=data) – function sends a POST request to the specified URL with the provided data. The data dictionary contains the key-value pairs that we want to send in the POST request payload. You can modify it based on the requirements of the API we are working with.
The response object contains information about the response, including the status code and the response content.
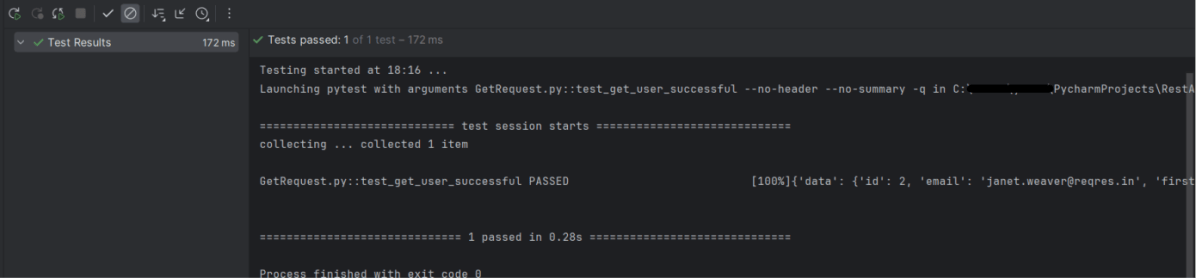
The output of the above program is
In the above example, we have passed the request body in the requests.post(). In the below example, will define a variable and assign the request body to it.
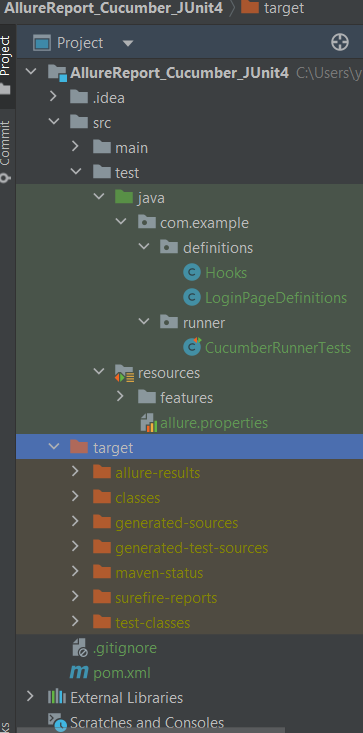
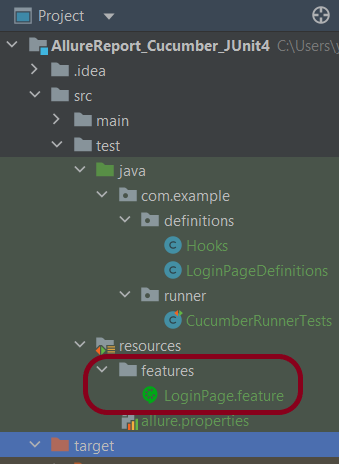
Step 4 – Create Feature file in src/test/resources
Create source folder – src/test/resources and features folder within src/test/resources to create test scenarios in Feature file. Feature file should be saved as an extension of .feature. Add the test scenarios in this feature file. I have added sample test scenarios. In this feature file, I have created a scenario for successful login and one Scenario Outline for failed login. The test scenarios are written in Gherkins language.
Feature: Login to HRM Application

  Background:
    Given User is on HRMLogin page "https://opensource-demo.orangehrmlive.com/"

  @ValidCredentials
  Scenario: Login with valid credentials

    When User enters username as "Admin" and password as "admin123"
    Then User should be able to login successfully and new page open

  @InvalidCredentials
  Scenario Outline: Login with invalid credentials

    When User enters username as "<username>" and password as "<password>"
    Then User should be able to see error message "<errorMessage>"

    Examples:
      | username   | password    | errorMessage                      |
      | Admin        | admin12$$ | Invalid credentials               |
      | admin$$     | admin123   | Invalid credentials               |
      | abc123       | xyz$$          | Invalid credentials               |
      | 234             | xyz$$         | Invalid credentials!              |
Step 5 – Create the Step Definition class or Glue Code
The stepdefinition class is created in src/test/java.
Below is the code for the LoginDefinition class.
package com.example.definitions;

import io.cucumber.java.en.Given;
import io.cucumber.java.en.Then;
import io.cucumber.java.en.When;
import org.junit.Assert;
import org.openqa.selenium.By;

public class LoginPageDefinitions {

   Hooks hooks;

    @Given("User is on HRMLogin page {string}")
    public void loginTest(String url) {

        hooks.driver.get(url);

    }

    @When("User enters username as {string} and password as {string}")
    public void goToHomePage(String userName, String passWord) {

        // login to application
        hooks.driver.findElement(By.name("username")).sendKeys(userName);
        hooks.driver.findElement(By.name("password")).sendKeys(passWord);
        hooks.driver.findElement(By.xpath("//*[@class='oxd-form']/div[3]/button")).submit();

        // go the next page
    }

    @Then("User should be able to login successfully and new page open")
    public void verifyLogin() {

        String homePageHeading = hooks.driver.findElement(By.xpath("//*[@class='oxd-topbar-header-breadcrumb']/h6")).getText();

        //Verify new page - HomePage
        Assert.assertEquals("Dashboard",homePageHeading);

    }

    @Then("User should be able to see error message {string}")
    public void verifyErrorMessage(String expectedErrorMessage) {

        String actualErrorMessage = hooks.driver.findElement(By.xpath("//*[@class='orangehrm-login-error']/div[1]/div[1]/p")).getText();

        // Verify Error Message
        Assert.assertEquals(expectedErrorMessage,actualErrorMessage);

    }

}
Hook.java
package com.example.definitions;

import io.cucumber.java.After;
import io.cucumber.java.Before;
import io.cucumber.java.Scenario;
import org.openqa.selenium.OutputType;
import org.openqa.selenium.TakesScreenshot;
import org.openqa.selenium.WebDriver;
import org.openqa.selenium.chrome.ChromeDriver;
import org.openqa.selenium.chrome.ChromeOptions;

import java.time.Duration;

public class Hooks {
    protected static WebDriver driver;
    public final static int TIMEOUT = 5;

    @Before
    public void setUp() {

        ChromeOptions options = new ChromeOptions();
        options.addArguments("--start-maximized");
        driver = new ChromeDriver(options);
        driver.manage().timeouts().implicitlyWait(Duration.ofSeconds(TIMEOUT));

    }

    @After
    public void tearDown(Scenario scenario) {
        try {
            String screenshotName = scenario.getName();
            if (scenario.isFailed()) {
                TakesScreenshot ts = (TakesScreenshot) driver;
                byte[] screenshot = ts.getScreenshotAs(OutputType.BYTES);
                scenario.attach(screenshot, "img/png", screenshotName);
            }
        } catch (Exception e) {
            e.printStackTrace();
        }
        driver.quit();
    }
}
Step 6 – Create a Cucumber Runner class
We need to create a class called Runner class to run the tests. This class will use the JUnit annotation @RunWith(), which tells JUnit what is the test runner class.
package com.example.runner;

import org.junit.runner.RunWith;
import io.cucumber.junit.Cucumber;
import io.cucumber.junit.CucumberOptions;

@RunWith(Cucumber.class)
@CucumberOptions(tags = "", features = {"src/test/resources/features"}, glue = {"com.example.definitions"},
        plugin = {"pretty","io.qameta.allure.cucumber7jvm.AllureCucumber7Jvm"})

public class CucumberRunnerTests  {

}
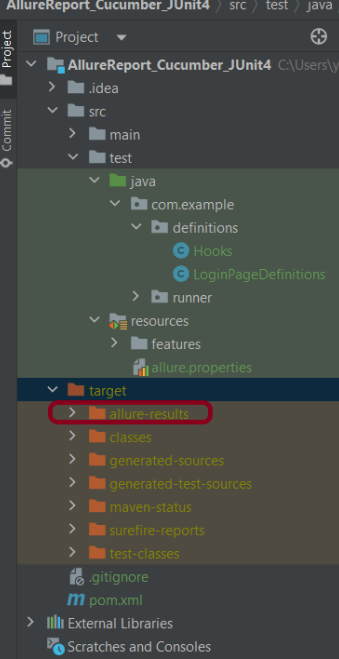
Step 7 – Create allure.properties in src/test/resources
Allure, by default, saves test results in the project’s root directory. However, it is recommended to store your test results in the build output directory. To configure this, create an allure.properties file and place it in the test resources directory of your project, which is typically located at src/test/resources:
allure.results.directory=target/allure-results
Step 8 – Run the Test and Generate Allure Report
To run the tests, use the below command
mvn clean test
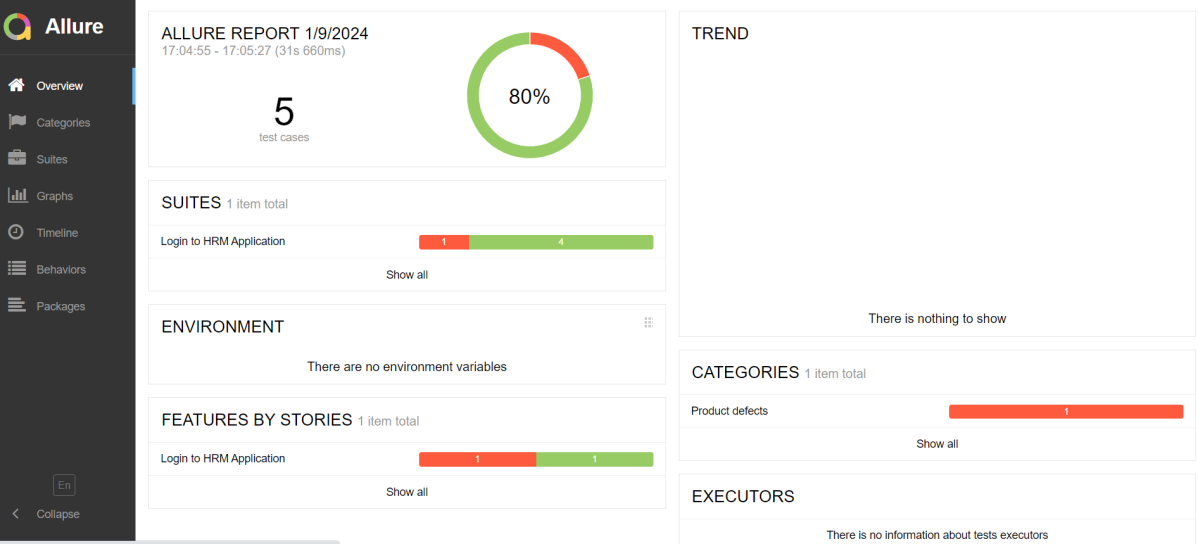
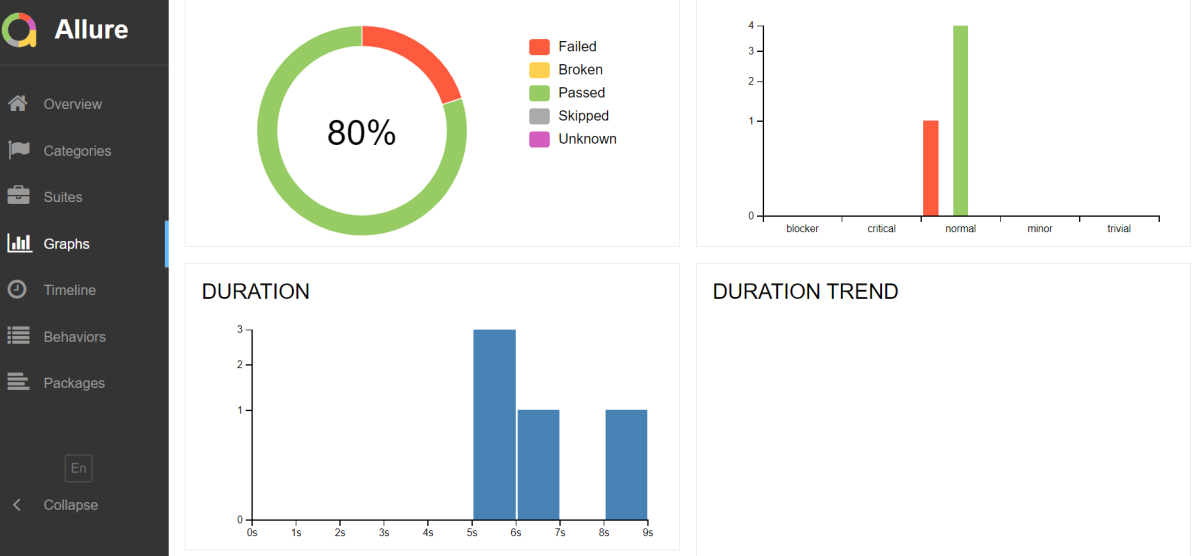
In the below image, we can see that one test is failed and four passed out of five tests.
This will create allure-results folder with all the test report. These files will be use to generate Allure Report.
Step 9 – Generate Allure Report
Change current directory to target directory and then use the below command to generate the Allure Report
allure serve
This will generate the beautiful Allure Test Report as shown below.
Allure Report Dashboard
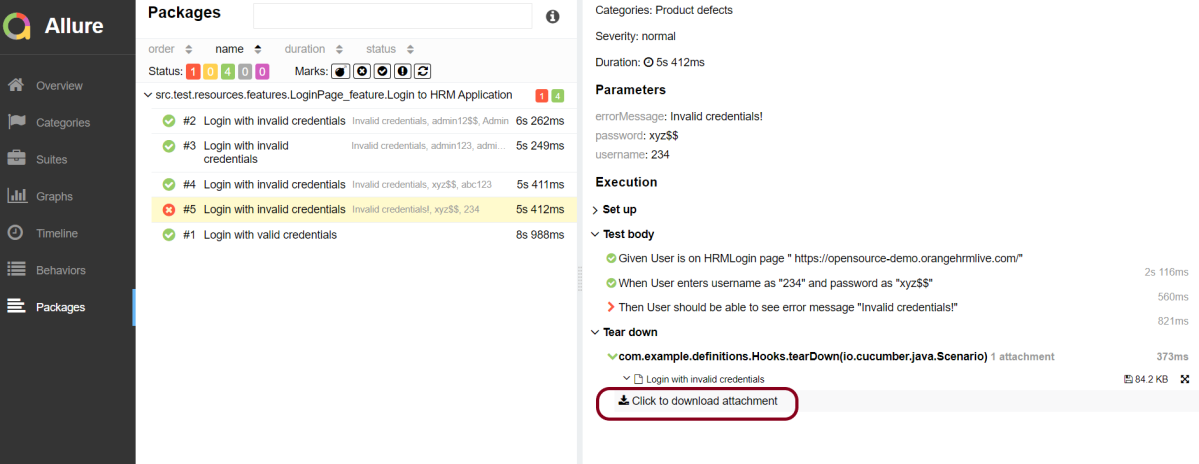
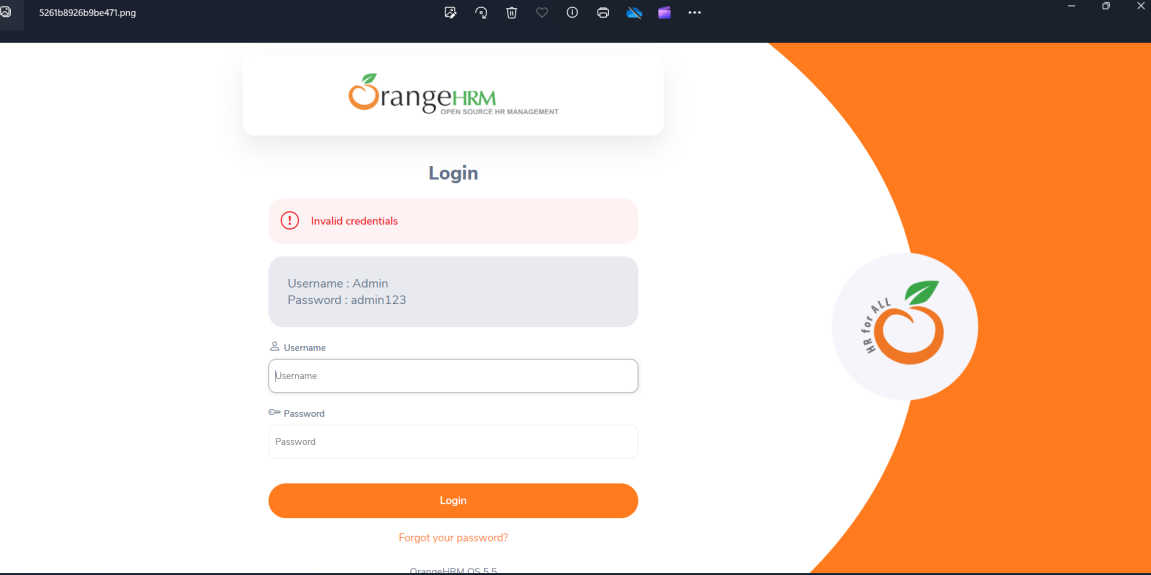
It shows detail of all the test steps and the screenshot of the failed test step also as shown below.
Categories in Allure Report
Categories tab gives you the way to create custom defects classification to apply for test results. There are two categories of defects – Product Defects (failed tests) and Test Defects (broken tests).
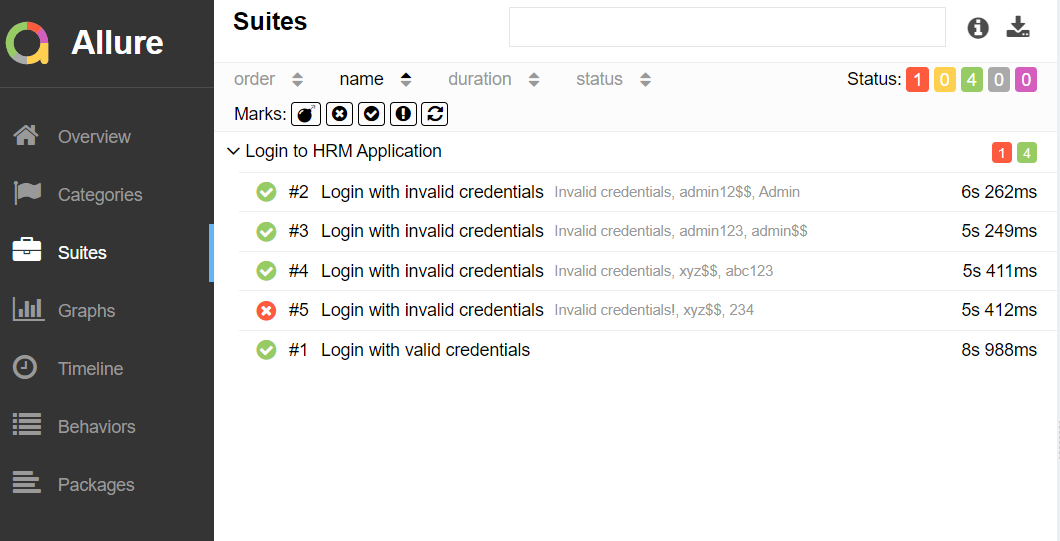
Suites in Allure Report
On the Suites tab a standard structural representation of executed tests, grouped by suites and classes can be found.
Graphs in Allure Report
Graphs allow you to see different statistics collected from the test data: statuses breakdown or severity and duration diagrams.
Timeline in Allure Report
Timeline tab visualizes retrospective of tests execution, allure adaptors collect precise timings of tests, and here on this tab they are arranged accordingly to their sequential or parallel timing structure.
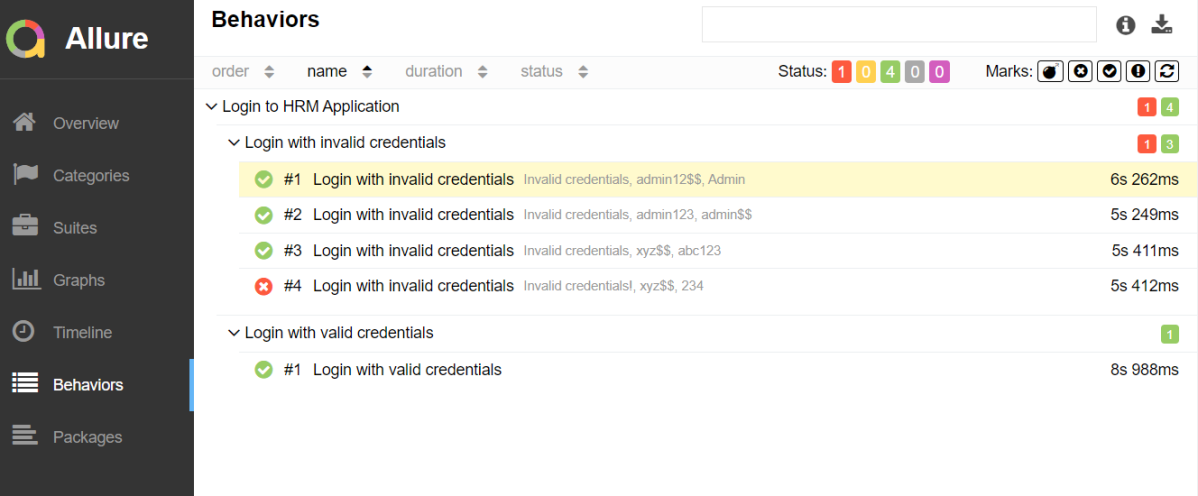
Behaviors of Allure Report
This tab groups test results according to Epic, Feature and Story tags.
Packages in Allure Report
Packages tab represents a tree-like layout of test results, grouped by different packages.
That’s it! Congratulations on making it through this tutorial and hope you found it useful! Happy Learning!!
Python is a high-level, general-purpose programming language. Its design philosophy emphasizes code readability with the use of significant indentation. Python is dynamically typed and garbage-collected. It supports multiple programming paradigms, including structured, object-oriented, and functional programming.
In the previous tutorial, I have explained theData Driven Tests in Serenity where test data are defined in Tests. In this tutorial, I will explain the Data Driven tests in Serenity where we will get the test data from CSV file.
Serenity lets us perform data-driven testing using test data in a CSV file. We store our test data in a CSV file (by default with columns separated by commas), with the first column acting as a header.
We need to create a test class containing properties that match the columns in the test data, as you did for the data-driven test in the previous example. The test class will typically contain one or more tests that use these properties as parameters to the test step or Page Object methods.
Here, we need to keep in mind that as the tests are parameterized , we need to use the Parameterized test runner to perform data-driven tests.
@UseTestDataFrom annotation is used to indicate where to find the CSV file (this can either be a file on the classpath or a relative or absolute file path – putting the data set on the class path (e.g. in src/test/resources) makes the tests more portable).
ParameterizedTestsUsingCSV Class contains the SerenityParameterizedRunner as well as provides the path of the test data file using @UseTestDataFrom, and the Tests.
The Serenity Parameterized Runner creates a new instance of this class for each row of data in the CSV file, assigning the properties with corresponding values in the test data. As you can see, I have mentioned 3 variables in the CSV file – userName, passWord, and errorMessage. I have declared the same private variables in the Test Class too – username, password, and errorMessage that match the columns in the test data file. Keep this in mind, that the column name should be the same in test data file and Test.
The heading of parameters present in the Serenity Report (Index.html) like Username, Password, and Error Message are generated by @TestData(columnNames).
The description of the Test Step in the Serenity Report is modified by using @Qualifier. It is used to mark a method as a qualifier in an instantiated data-driven test case.
The test class needs to have a WebDriver instance with a @Managed annotation for Serenity to manage it in the background. That is all that is required, we do not need to manage the driver anymore. Each test class will need this driver variable declaration.
The Test Class uses Step Class (StepLoginPage) and Action Class (NavigateActions) to perform the Tests. StepLoginPage contains test steps that represent the level of abstraction between the code that interacts with the application. NavigateAction page is used to open an environment-specific page defined in the serenity.config file under the pages section.
This test can be executed by JUnit as well as from the command line
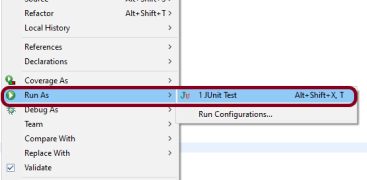
JUnit – Right-click on the Test, select Run As, and then select JUnit Test in Eclipse.
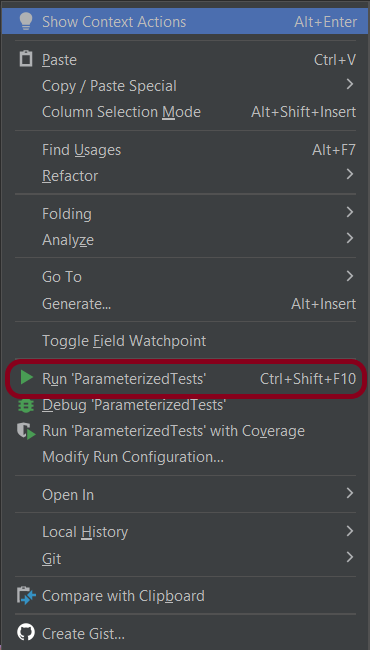
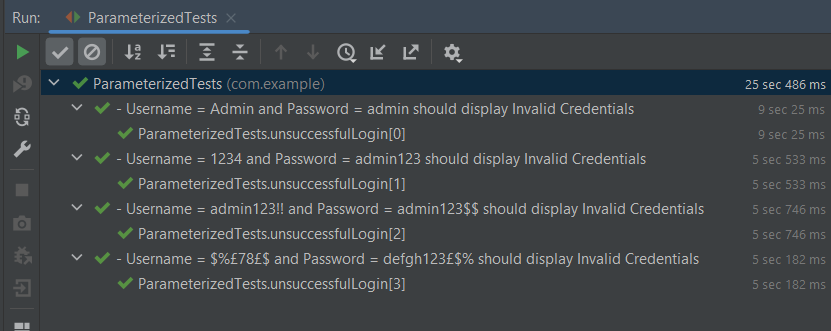
If you are using IntelliJ, then right-click and select Run “ParameterizedTests”
The Test execution status can be seen as shown below:
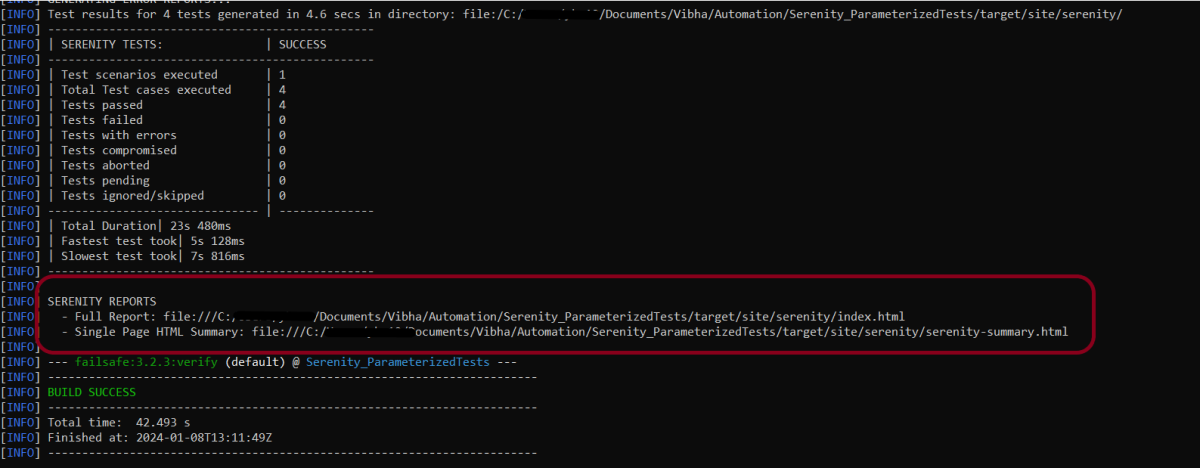
To run the tests using the command line, use the below command
mvn clean verify
This will execute the tests and will generate the Test Execution Report as shown below.
The reports are generated as shown in the below image.
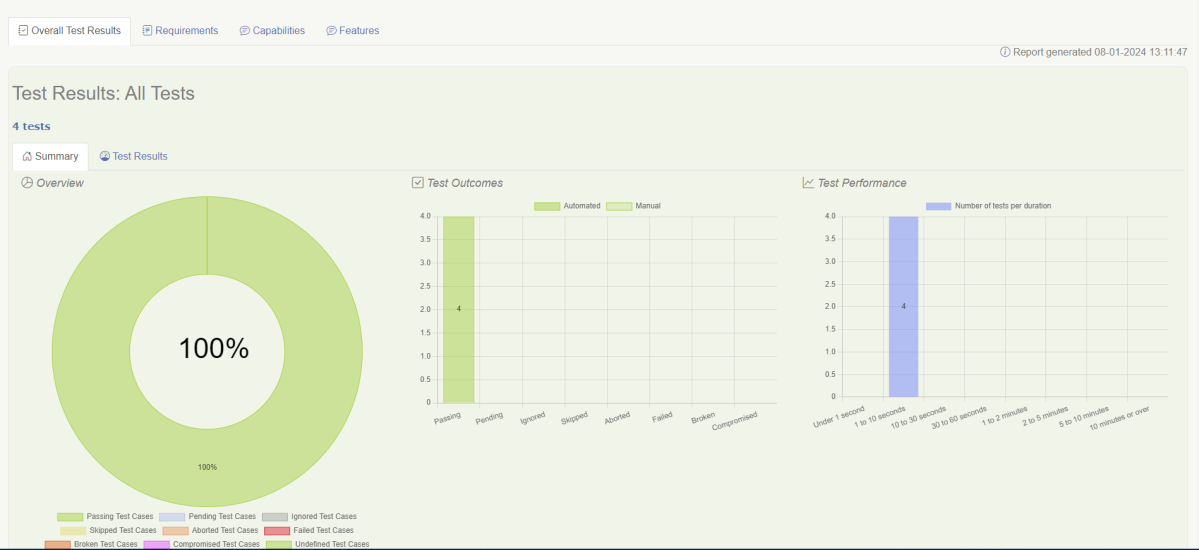
Serenity generates very descriptive and beautiful reports – Index.html and Serenity Summary Report.
Index.html
This page provides the detail about the Test, its corresponding test data, the status of each test scenario with screenshots, and the execution time of each test.
This is the expanded view of all the test steps of a test with their screenshots. This also shows the execution time of each step in the test.
Serenity Summary Report
This report is a single-page, self-contained HTML summary report, containing an overview of the test results, and a configurable breakdown of the status of different areas of the application.
We are done! Congratulations on making it through this tutorial and hope you found it useful! Happy Learning!!
This tutorial explains the steps to run the Selenium tests for Chrome browser in headless mode. We are going to run the tests in Selenium 4 as well as Selenium 3.
What is headless browser?
A headless browser is like any other browser, but without a Head/GUI (Graphical User Interface). A headless browser is used to automate the browser without launching the browser. While the tests are running, we could not see the browser, but we can see the test results coming on the console.
Headless browser testing is generally faster when compared to actual UI testing as it doesn’t wait for the whole page to render before performing any action.
When we need to execute automated test cases remotely on a server or in any of the build and release pipelines for continuous integration servers like Gitlab or Jenkins, it is not always possible to install real browsers on such remote machines. We can use headless browsers to run automation tests efficiently.
It is easy to perform multi-tasking with a Headless browser. The browser or our machine can do anything else while the tests run in the background.
There are 2 ways to add dependencies to the Selenium project.
Once the Selenium and WebDriverManager folders are downloaded, unzip the folder. Once the zip file is extracted, reference these jar files in the project. For this, navigate to project properties and click Build Path-> Configure Build Path in Eclipse. Click “Add External Jars“. After clicking on the “Add External JARs“, selected all the extracted JARs. The JARs files are present in the project.
2. Add the below dependencies to pom.xml or build.gradle.
package com.example.steps;

import org.openqa.selenium.WebDriver;
import org.openqa.selenium.chrome.ChromeDriver;
import org.openqa.selenium.chrome.ChromeOptions;
import org.openqa.selenium.firefox.FirefoxDriver;
import org.openqa.selenium.firefox.FirefoxOptions;

public class ChromeOptionsHeadless_Demo {

    public static void main(String[] args) {

        // Create an object of Chrome Options class
        ChromeOptions options = new ChromeOptions();

        // Set Firefox Headless mode as TRUE
        options.addArguments("--headless=new");

        // Create an object of WebDriver class and pass the Chrome Options object
        // as an argument
        WebDriver driver = new ChromeDriver(options);

        // Navigate to site url
        driver.get("https://duckduckgo.com/");

        System.out.println("Executing Chrome Driver in Headless mode..");
        System.out.println("Page Title : " + driver.getTitle());
        System.out.println("Page URL  : " + driver.getCurrentUrl());

        // Close the driver
        driver.quit();
    }

}
We know that to execute Selenium automation scripts on browsers like chrome or firefox, we must download the binary files of these drivers like chromedriverand geckodriver, etc. After this, we need to set the path to these binaries in the automation script or add the classpath location. Here, we want to execute Selenium WebDriver automation scripts on the Chrome browser, then you need first to download chromedriver.exe and then use the System.setProperty method to set its path as follows:
	// Set the path of ChromeDriver
	System.setProperty("webdriver.chrome.driver",
				"C:\\Users\\Vibha\\Software\\chromedriver_win32_98.0.4758.102\\chromedriver.exe");
The complete program looks like as shown below:
import org.openqa.selenium.chrome.ChromeDriver;
import org.openqa.selenium.chrome.ChromeOptions;

public class ChromeOptionsHeadless1 {

	public static void main(String[] args) {

		// Set the path of ChromeDriver
		System.setProperty("webdriver.chrome.driver",
				"C:\\Users\\Vibha\\Software\\chromedriver_win32_98.0.4758.102\\chromedriver.exe");

		// Create an object of Chrome Options class
		ChromeOptions options = new ChromeOptions();

		// pass the argument –headless to Chrome Options class.
		options.addArguments("--headless");

		// Create an object of Chrome Driver class and pass the Chrome Options object as
		// an argument
		ChromeDriver driver = new ChromeDriver(options);

		System.out.println("Executing Chrome Driver in Headless mode..");
		driver.get("https://duckduckgo.com/");

		System.out.println("Title of Page :" + driver.getTitle());
		System.out.println("Page URL  : " + driver.getCurrentUrl());

		// Close the driver
		driver.close();

	}
}
The output of the above program is
How to run headless Chrome Tests in Selenium using WebDriverManager?
WebDriverManager has an automated way to download browser executables(exes) or binaries. It supports different browsers like Chrome, Firefox, Microsoft Edge, Internet Explorer, Opera, or PhantomJS.
WebDriverManager.chromedriver().setup: checks for the latest version of the specified WebDriver binary. If the binaries are not present on the machine, then it will download the WebDriver binaries. Next, it instantiates the Selenium WebDriver instance with the ChromeDriver.
import org.openqa.selenium.chrome.ChromeDriver;
import org.openqa.selenium.chrome.ChromeOptions;

import io.github.bonigarcia.wdm.WebDriverManager;

public class ChromeOptionsHeadless2 {

	public static void main(String[] args) {

		// WebDriverManager downloads chrome browser executables or binaries.
		WebDriverManager.chromedriver().setup();

		// Create an object of Chrome Options class
		ChromeOptions options = new ChromeOptions();

		// pass the argument –headless to Chrome Options class.
		options.addArguments("--headless");

		// Create an object of Chrome Driver class and pass the Chrome Options object as
		// an argument
		ChromeDriver driver = new ChromeDriver(options);

		System.out.println("Executing Chrome Driver in Headless mode..");
		driver.get("https://duckduckgo.com/");

		System.out.println("Title of Page :" + driver.getTitle());
		System.out.println("Page URL  : " + driver.getCurrentUrl());

		// Close the driver
		driver.close();

	}

}
The output of the above program is
Congratulations!! We are able to run Chrome tests in Selenium in headless mode.
This tutorial explains the steps to run the Selenium tests on Firefox browser in headless mode. We are going to run the tests in Selenium. To run the Selenium tests on Chrome browser in headless mode, refer this tutorial.
To start with, we need to add dependencies to the project.
Download the latest version of WebDriverManager (Download this if you want to use WebDriverManager to download browser executables(exes) or binaries automatically, then skip downloading FireFox Binary).
Selenium 4
Add the below dependencies to pom.xml or build.gradle.
Below is an example to run the Firefox tests in the headless mode.
import org.openqa.selenium.WebDriver;
import org.openqa.selenium.firefox.FirefoxDriver;
import org.openqa.selenium.firefox.FirefoxOptions;

public class FirefoxOptionsHeadless_Demo {

    public static void main(String[] args) {

        // Create an object of Firefox Options class
        FirefoxOptions options = new FirefoxOptions();

        // Set Firefox Headless mode as TRUE
        options.addArguments("-headless");

        // Create an object of WebDriver class and pass the Firefox Options object
        // as an argument
        WebDriver driver = new FirefoxDriver(options);

        // Navigate to site url
        driver.get("https://duckduckgo.com/");

        System.out.println("Executing Firefox Driver in Headless mode..");
        System.out.println("Page Title : " + driver.getTitle());
        System.out.println("Page URL  : " + driver.getCurrentUrl());

        // Close the driver
        driver.quit();
    }

}
The output of the above program is
Selenium 3
Add the below dependencies to pom.xml or build.gradle.
A headless browser is like any other browser, but without a GUI (Graphical User Interface). A headless browser is used to automate the browser without launching the browser. While the tests are running, we could not see the browser, but we can see the test results coming on the console. This makes the test execution faster than normal execution. This is suitable for parallel testing as UI tests needs a lot of memory and resources.
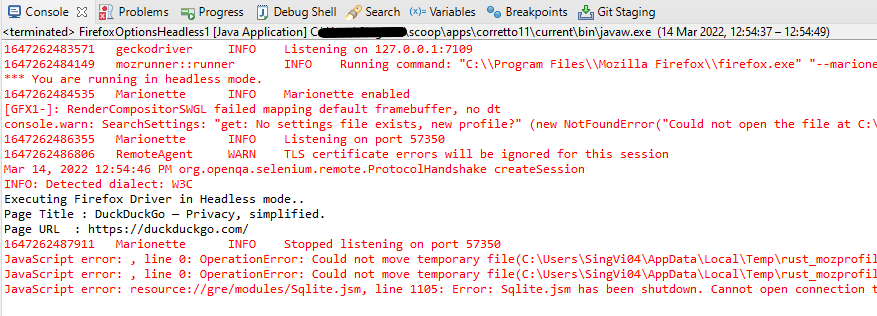
The path of Gecko Driver (used for Firefox browser) needs to be set up in the Test using System.setProperty().Here, we use the methods setHeadless(true) of the FirfoxOptions class provided by Selenium WebDriver.
The complete program looks like as shown below:
import org.openqa.selenium.WebDriver;
import org.openqa.selenium.firefox.FirefoxDriver;
import org.openqa.selenium.firefox.FirefoxOptions;

public class FirefoxOptionsHeadless1 {

	public static void main(String[] args) {

		// Set the path of GeckoDriver
		System.setProperty("webdriver.gecko.driver",
				"C:\\Users\\Vibha\\Software\\geckodriver\\geckodriver.exe");

		// Create an object of Firefox Options class
		FirefoxOptions options = new FirefoxOptions();

		// Set Firefox Headless mode as TRUE
		options.setHeadless(true);

		// Create an object of WebDriver class and pass the Firefox Options object
		// as an argument
		WebDriver driver = new FirefoxDriver(options);

		// Navigate to site url
		driver.get("https://duckduckgo.com/");

		System.out.println("Executing Firefox Driver in Headless mode..");
		System.out.println("Page Title : " + driver.getTitle());
		System.out.println("Page URL  : " + driver.getCurrentUrl());

		// Close the driver
		driver.close();
	}
}
The output of the above program is
How to run headless Firefox Tests in Selenium using WebDriverManager?
WebDriverManager.firefoxdriver().setup(): checks for the latest version of the specified WebDriver binary. If the binaries are not present on the machine, then it will download the WebDriver binaries. In this case, it is not needed to download Firefox binary and set up the path
import org.openqa.selenium.WebDriver;
import org.openqa.selenium.firefox.FirefoxDriver;
import org.openqa.selenium.firefox.FirefoxOptions;

import io.github.bonigarcia.wdm.WebDriverManager;

public class FirefoxOptionsHeadless2 {

	public static void main(String[] args) {

		WebDriverManager.firefoxdriver().setup();

		// Create an object of Firefox Options class
		FirefoxOptions options = new FirefoxOptions();

		// Set Firefox Headless mode as TRUE
		options.setHeadless(true);

		// Create an object of Firefox Driver class and pass the Firefox Options object
		// as an argument
		WebDriver driver = new FirefoxDriver(options);

		// Navigate to the url
		driver.get("https://duckduckgo.com/");

		System.out.println("Executing Firefox Driver in Headless mode..");
		System.out.println("Page Title : " + driver.getTitle());
		System.out.println("Page URL  : " + driver.getCurrentUrl());

		// Close the driver
		driver.close();
	}

}
Congratulations!! We have run the tests in headless mode in FireFox.
Featurefile should be saved as an extension of .feature. Add the test scenarios in this feature file. I have added sample test scenarios. The test scenarios are written inGherkins language. A feature file is created under src/test/resources.
Feature: Login to HRM

   @ValidCredentials
   Scenario: Login with valid credentials

    Given User is on Home page
    When User enters username as "Admin"
    And User enters password as "admin123"
    Then User should be able to login successfully

    @InValidCredentials
    Scenario Outline: Login with invalid credentials

    Given User is on Home page
    When User enters username as '<username>'
    And User enters password as '<password>'
    Then User should be able to see error message '<errorMessage>'

   Examples:
    |username  |password  |errorMessage                    |
    |admin     |admin     |Invalid credentials             |
    |          |admin123  |Username cannot be empty        |
    |Admin     |          |Password cannot be empty        |
    |          |          |Username cannot be empty        |

   @ForgetPassword
   Scenario: Verify Forget Password Functionality

    Given User is on Home page
    When User clicks on Forgot your password link
    Then User should be able to see new page which contains Reset Password button
Step 5 – Create the Step Definition class or Glue Code
Create a StepDefinition class for LoginPage.feature.
package com.example.definitions;

import com.example.steps.StepDashboardPage;
import com.example.steps.StepForgetPasswordPage;
import com.example.steps.StepLoginPage;
import io.cucumber.java.en.Given;
import io.cucumber.java.en.Then;
import io.cucumber.java.en.When;
import net.serenitybdd.annotations.Steps;
import org.junit.Assert;

import static org.junit.Assert.assertTrue;

public class LoginPageDefinitions {

    @Steps
    StepLoginPage loginPage;

    @Steps
    StepDashboardPage dashPage;

    @Steps
    StepForgetPasswordPage forgetpasswordPage;

    @Given("User is on Home page")
    public void openApplication() {
        loginPage.open();
        System.out.println("Page is opened");
    }

    @When("User enters username as {string}")
    public void enterUsername(String userName) {
        System.out.println("Enter Username");
        loginPage.inputUserName(userName);
    }

    @When("User enters password as {string}")
    public void enterPassword(String passWord) {
        loginPage.inputPassword(passWord);

        loginPage.clickLogin();
    }

    @Then("User should be able to login successfully")
    public void clickOnLoginButton() {
        dashPage.loginVerify();
    }

    @Then("User should be able to see error message {string}")
    public void unsuccessfulLogin(String expectedErrorMessage)  {

        String actualErrorMessage = loginPage.errorMessage();
        Assert.assertEquals(expectedErrorMessage, actualErrorMessage);
    }

    @When("User clicks on Forgot your password link")
    public void clickForgetPasswordLink() {
        loginPage.clickForgetPasswordLink();
    }

    @Then("User should be able to see new page which contains Reset Password button")
    public void verifyForgetPasswordPage() {

        assertTrue(forgetpasswordPage.ForgetPasswordPage());
    }

}
Serenity Step Libraries integrate smoothly into Cucumber Step Definition files; all you need to do is to annotate a step library variable with the @Steps annotation. Methods that represent a business task or action (inputUserName()), and that will appear in the reports as a separate step, is annotated with the @Step annotation. Other methods, such as loginVerify(), query the state of the application and are used in assert statements.
Here, I have created 3 StepClasses – StepLoginPage, StepDashboardPage, and StepForgetPasswordPage
We cannot run a Feature file on its own in a cucumber-based framework. We need to create a Java class, which will run the Feature File. It is the starting point for JUnit to start executing the tests. TestRunner class creates under src/ test/java. When you run the tests with serenity, you use the CucumberWithSerenity test runner. If the feature files are not in the same package as the test runner class, you also need to use the @CucumberOptions class to provide the root directory where the feature files are found.
import org.junit.runner.RunWith;

import io.cucumber.junit.CucumberOptions;
import net.serenitybdd.cucumber.CucumberWithSerenity;

@RunWith(CucumberWithSerenity.class)
@CucumberOptions(plugin = {}, features = "src/test/resources/features/LoginPage.feature", glue = "com.example.definitions")

public class SerenityRunnerTests {

}
Step 7 – Create serenity.conf file under src/test/resources
Serenity.conf file is used to specify various features like the type of webdriver used, various test environments, run tests in headless mode, and many more options.
webdriver.driver. – This tells Serenity which browser to use for the test execution. You can configure this in several locations – serenity.properties or serenity.conf. Here, I have provided this information in serenity.conf
We can also configure the webdriver.base.url property for different environments in the serenity.conf configuration file, in the src/test/resources directory. Below is an example of the same.
Once the environment section is present in your serenity.conf file, you can use the environment system property to use the properties for a given environment. For example, the following would cause the staging URLs to be used:
mvn clean verify -Denvironment=staging
The default environment will be used if no other value is provided. In our example, I will not provide any environment, so it will pick the default environment.
Step 8 – Create serenity.properties file at the root of the project
serenity.project.name = Serenity and Cucumber Report Demo
Step 9 – Run the tests through the command line which generates Serenity Report
Open the command line and go to the location where pom.xml of the project is present and type the below command.
mvn clean verify -Denvironment=firefox
I have provided the location of the Firefox driver through the command line. I believe this is the best way to run the test. We can hard-code the path in the test code or in serenity.conf file. If you don’t want to pass the location of webdriver through the command line, then mention the details of webdriver in serenity.conf and just use the below command for execution.
mvn clean verify
Below is the image of the execution status.
This also provides the location of the serenity report as highlighted in the above image.
Serenity Report
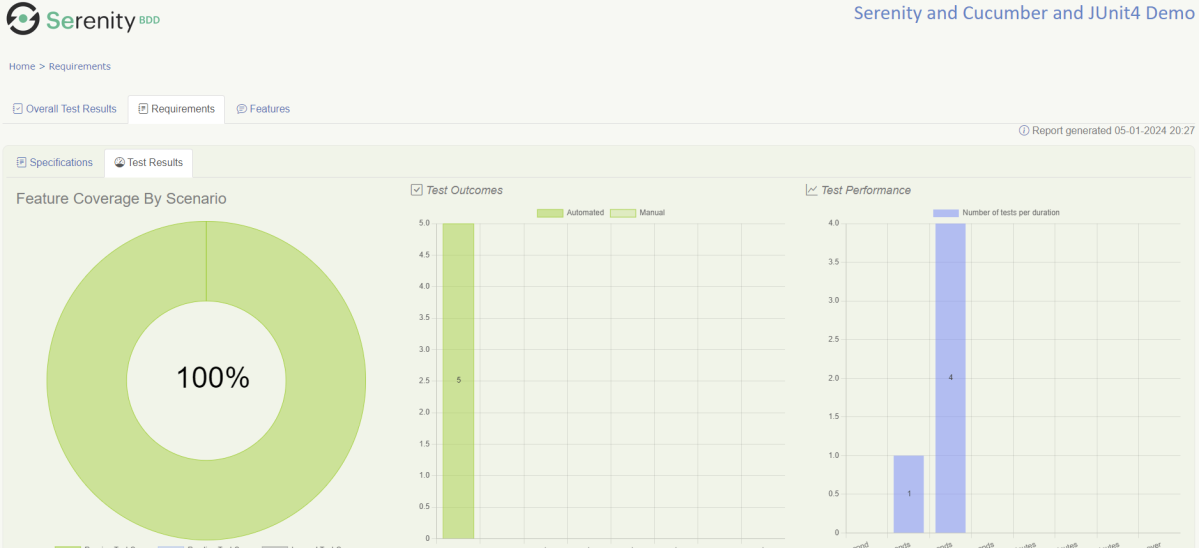
Requirement View
In Serenity, requirements are organized in a hierarchy. We can get an idea of the full directory structure (in src/test/features directory) for the project.
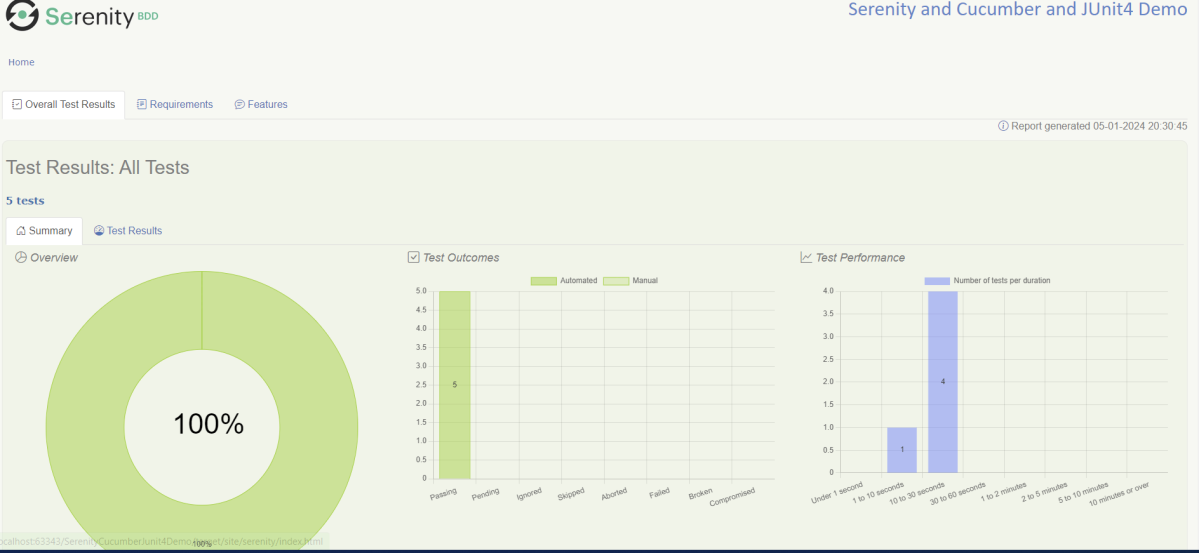
The Test Resultstab (shown below) tells you about the acceptance tests that were executed for this set of requirements.
Test Results
At the bottom of the Test Results tab, you will find the actual test results – the list of all the tests, automated and manual, that were executed for this requirement.
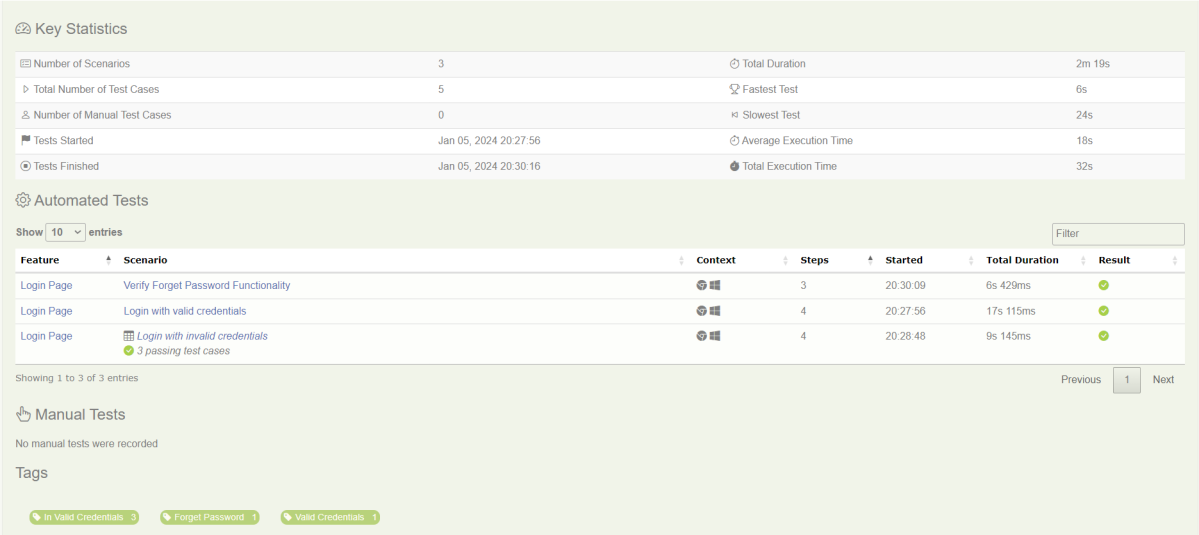
Feature
This provides the detail of all the Test Scenarios present in a Feature File.
Below is an example of a Scenario Outline in the Report. It shows all the examples mentioned in the feature file.
This screen shows the test steps and screenshots of each step.
We are done! Congratulations on making it through this tutorial and hope you found it useful! Happy Learning!!