In the previous tutorial, I provided the Introduction of Rest Assured. In this tutorial, I will explain how to set up a basic Rest Assured Maven project in Eclipse IDE. Before starting, let us recap about Rest Assured.
Table of Content
What is Rest Assured?
REST Assured is a Java DSL for simplifying testing of REST-based services built on top of HTTP Builder. It supports POST, GET, PUT, DELETE, OPTIONS, PATCH, and HEAD requests. It can be used to validate and verify the response of these requests.
The Rest Assured library also provides the ability to validate the HTTP Responses received from the server. This makes Rest-Assured a very flexible library that can be used for testing.REST Assured can be used to test XML as well as JSON-based web services. REST Assured can be integrated with JUnit and TestNG frameworks for writing test cases for our application.
What is Maven?
Apache Maven is a software project management and comprehension tool. Based on the concept of a project object model (POM), Maven can manage a project’s build, reporting and documentation from a central piece of information.
Implementation Steps
Step 1- Download and Install Java
Rest-Assured needs Java to be installed on the system to run the tests. Click here to learn How to install Java.
Step 2 – Download and setup Eclipse IDE on the system
The Eclipse IDE (integrated development environment) provides strong support for Java developers. Click here to learn How to install Eclipse.
Step 3 – Setup Maven
To build a test framework, we need to add several dependencies to the project. Click here to learn How to install Maven.
Step 4 – Create a new Maven Project
Go to File -> New Project-> Maven-> Maven project ->Next

Step 4.1 – Select “Create a simple project”. Click on the Next Button.

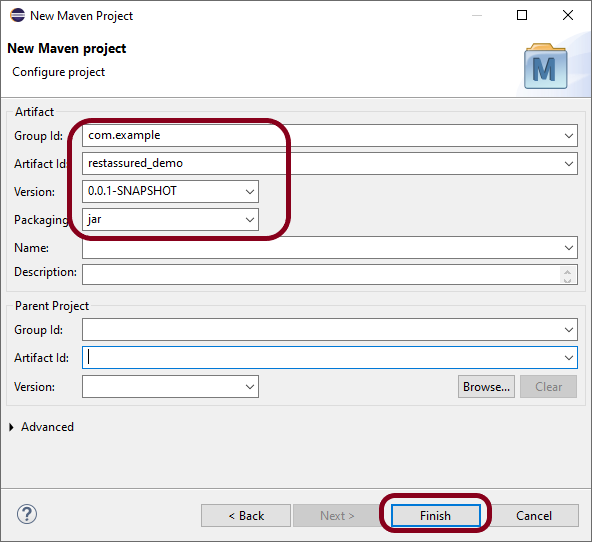
Step 4.2 – Provide Group Id and Artifact Id and click on the finish button.
Group Id – com.example
Artifact Id – restassured_demo
Step 4.3 – Below is the structure of the Maven project in Eclipse.

Step 4.4 – This is the structure of POM.xml created for the project.

Step 5 – Add Rest Assured, and JUnit dependencies to the project
In the Project Explorer, navigate to your Maven project and open pom.xml. Add REST Assured dependency under dependencies in the pom.xml file. The latest version can be found from here.
 <dependencies>
    <!-- REST Assured dependency -->
    <dependency>
        <groupId>io.rest-assured</groupId>
        <artifactId>rest-assured</artifactId>
        <version>5.5.1</version>
        <scope>test</scope>
    </dependency>

    <!-- JUnit dependency -->
    <dependency>
        <groupId>junit</groupId>
        <artifactId>junit</artifactId>
        <version>4.13.2</version>
        <scope>test</scope>
    </dependency>
</dependencies>
Step 6 – Add Maven Compiler plugin to pom.xml
Add Maven Compiler plugin at the build section of the project.
 <plugin>
        <groupId>org.apache.maven.plugins</groupId>
        <artifactId>maven-compiler-plugin</artifactId>
        <version>3.14.0</version>
        <configuration>
          <source>17</source>
          <target>17</target>
        </configuration>
      </plugin>
The complete pom.xml looks like as shown below:
<project xmlns="http://maven.apache.org/POM/4.0.0" xmlns:xsi="http://www.w3.org/2001/XMLSchema-instance" xsi:schemaLocation="http://maven.apache.org/POM/4.0.0 https://maven.apache.org/xsd/maven-4.0.0.xsd">
  <modelVersion>4.0.0</modelVersion>
  <groupId>com.example</groupId>
  <artifactId>restassured_demo</artifactId>
  <version>0.0.1-SNAPSHOT</version>

 <dependencies>
    <!-- REST Assured dependency -->
    <dependency>
        <groupId>io.rest-assured</groupId>
        <artifactId>rest-assured</artifactId>
        <version>5.5.1</version>
        <scope>test</scope>
    </dependency>

    <!-- JUnit dependency -->
    <dependency>
        <groupId>junit</groupId>
        <artifactId>junit</artifactId>
        <version>4.13.2</version>
        <scope>test</scope>
    </dependency>
</dependencies>

 <build>
    <plugins>
      <plugin>
        <groupId>org.apache.maven.plugins</groupId>
        <artifactId>maven-compiler-plugin</artifactId>
        <version>3.14.0</version>
        <configuration>
          <source>17</source>
          <target>17</target>
        </configuration>
      </plugin>
    </plugins>
  </build>
</project>
Step 7 – Update Maven Project
Right-click on your project in the Eclipse Project Explorer. Choose `Maven` -> `Update Project…` and confirm to download the specified dependencies.
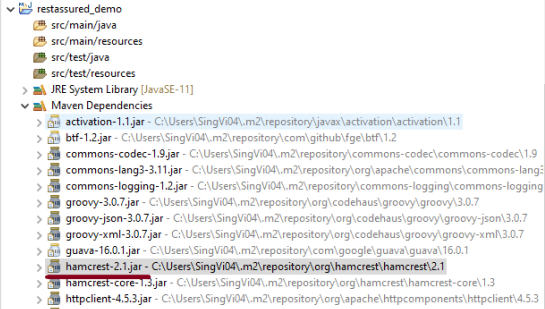
Below are the Rest Assured, and junit jar files present under Maven Dependencies.

Step 8 – Create a Test Class
Right-click on the src/test/java folder, create a new package (e.g., com.example.tests).

Create a new Java class inside this package (e.g., ApiTests.java).
Use the following example to set up a basic REST Assured GET request test.
package com.example.tests;

import org.junit.Test;

import static org.hamcrest.Matchers.equalTo;
import static io.restassured.RestAssured.given;

public class APITests {

	String BaseURL = "https://reqres.in/api/users";

	@Test
	public void getUser() {

		// Given
		given()

				// When
				.when().get(BaseURL + "/2")

				// Then
				.then().statusCode(200).statusLine("HTTP/1.1 200 OK")

				// To verify user of id 2
				.body("data.id", equalTo(2)).body("data.email", equalTo("janet.weaver@reqres.in"))
				.body("data.first_name", equalTo("Janet")).body("data.last_name", equalTo("Weaver"));
	}

}
Step 9 – Run the Test
Right-click on your test class and select Run As -> JUnit Test to execute your REST Assured tests.

The output of the above program is

Point to Remember
1. Don’t add the dependency on Hamcrest explicitly. Rest Assured includes it by default. You can see it in the Maven Dependencies folder under the project.
Congratulations on making it through this tutorial and hope you found it useful! Happy Learning!!

Hi, Really great effort and well defined .
LikeLike
Thank you Umar
LikeLike