Rest Assured – How to test JSON Request using Jackson API

HOME

This tutorial focuses on the testing of a REST API (with JSON payload). We will use Jackson API to serialize the request.

It is suggested to go through these tutorials to understand about creating a JSON Object Payload using POJO (Plain Old Java Object).

How to create JSON Object Payload using POJO – Jackson API

How to create JSON Array Payload using POJO – Jackson API

How to create Nested JSON Object using POJO – Jackson API

To start with, we need to add Jackson Maven’s Dependency to the POM. Always add the latest version of Jackson dependency to your project.

<dependency>
    <groupId>com.fasterxml.jackson.core</groupId>
    <artifactId>jackson-databind</artifactId>
    <version>2.17.2</version>
</dependency>

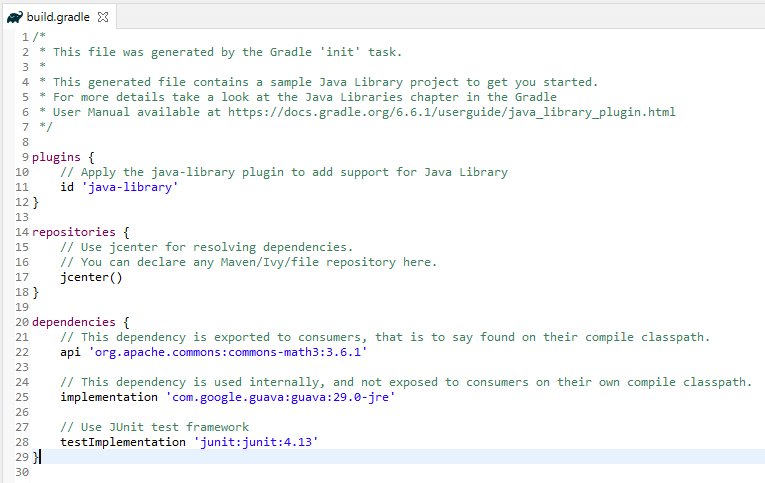
The complete POM.xml will look like this, as shown below:

<?xml version="1.0" encoding="UTF-8"?>
<project xmlns="http://maven.apache.org/POM/4.0.0"
         xmlns:xsi="http://www.w3.org/2001/XMLSchema-instance"
         xsi:schemaLocation="http://maven.apache.org/POM/4.0.0 http://maven.apache.org/xsd/maven-4.0.0.xsd">
    <modelVersion>4.0.0</modelVersion>

    <groupId>com.example</groupId>
    <artifactId>RestAssured_JUnit4_Demo</artifactId>
    <version>1.0-SNAPSHOT</version>

    <properties>
        <rest-assured.version>5.3.0</rest-assured.version>
        <junit.version>4.13.2</junit.version>
        <jackson.version>2.17.2</jackson.version>
        <maven.compiler.source>11</maven.compiler.source>
        <maven.compiler.target>11</maven.compiler.target>
    </properties>

    <dependencies>

        <!-- Rest-Assured Dependency -->
        <dependency>
            <groupId>io.rest-assured</groupId>
            <artifactId>rest-assured</artifactId>
            <version>${rest-assured.version}</version>
            <scope>test</scope>
        </dependency>

        <!-- JUnit4 Dependency -->
        <dependency>
            <groupId>junit</groupId>
            <artifactId>junit</artifactId>
            <version>${junit.version}</version>
            <scope>test</scope>
        </dependency>

        <!-- Jackson Dependency -->
        <dependency>
            <groupId>com.fasterxml.jackson.core</groupId>
            <artifactId>jackson-databind</artifactId>
            <version>${jackson.version}</version>
        </dependency>

        <!-- Hamcrest Dependency -->
        <dependency>
            <groupId>org.hamcrest</groupId>
            <artifactId>hamcrest-all</artifactId>
            <version>1.3</version>
            <scope>test</scope>
        </dependency>

    </dependencies>

</project>

This dependency will also transitively add the following libraries to the classpath:

  1. jackson-annotations
  2. jackson-core

In the below example, let us assume that we need to create a new Employee (POST Request). To start with, we need to create a POJO class of the JSON payload (EmployeeDetails). This POJO class should contain the data members corresponding to the JSON nodes and their corresponding getter and setter methods.

public class EmployeeDetails {

	// private variables or data members of pojo class
	private String name;
	private double salary;
	private int age;

    // Getter and Setters
	public String getName() {
		return name;
	}

	public void setName(String name) {
		this.name = name;
	}

	public double getSalary() {
		return salary;
	}

	public void setSalary(double salary) {
		this.salary = salary;
	}

	public int getAge() {
		return age;
	}

	public void setAge(int age) {
		this.age = age;
	}

}

Now that we have our POJO class, we can start writing some REST Assured Serialization tests!

Let’s start with REST Assured Serialization with JSON. I want to send a POST request to my EmployeeDetails API that will add a new Employee to the database. I will send a POJO of the employee in the request body. This is what the code looks like in the test class:

import com.fasterxml.jackson.core.JsonProcessingException;
import com.fasterxml.jackson.databind.ObjectMapper;
import io.restassured.http.ContentType;
import org.junit.Test;
import static io.restassured.RestAssured.given;
import static org.hamcrest.Matchers.equalTo;

public class EmployeeTests {

    @Test
    public void createEmployee() {

        // Create an object of POJO class
        EmployeeDetails emp = new EmployeeDetails();
        emp.setName("Vibha");
        emp.setSalary(75000);
        emp.setAge(30);

        // Converting a Java class object to a JSON payload as string
        ObjectMapper mapper = new ObjectMapper();
        String employeePrettyJson = null;
        try {
            employeePrettyJson = mapper.writerWithDefaultPrettyPrinter().writeValueAsString(emp);
        } catch (JsonProcessingException e) {
            e.printStackTrace();
        }
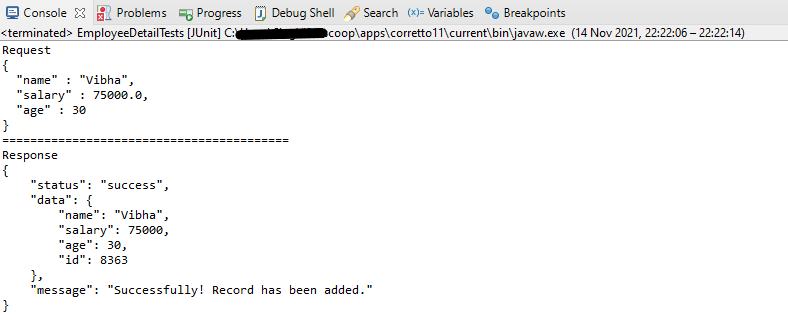
        System.out.println("Request");
        System.out.println(employeePrettyJson);
        System.out.println("=========================================");
        System.out.println("Response");

        // GIVEN
        given().baseUri("https://dummy.restapiexample.com/api").contentType(ContentType.JSON).body(emp)

                // WHEN
                .when().post("/v1/create")

                // THEN
                .then().assertThat().statusCode(200).body("data.name", equalTo("Vibha"))
                .body("message", equalTo("Successfully! Record has been added.")).log().body();

    }

}

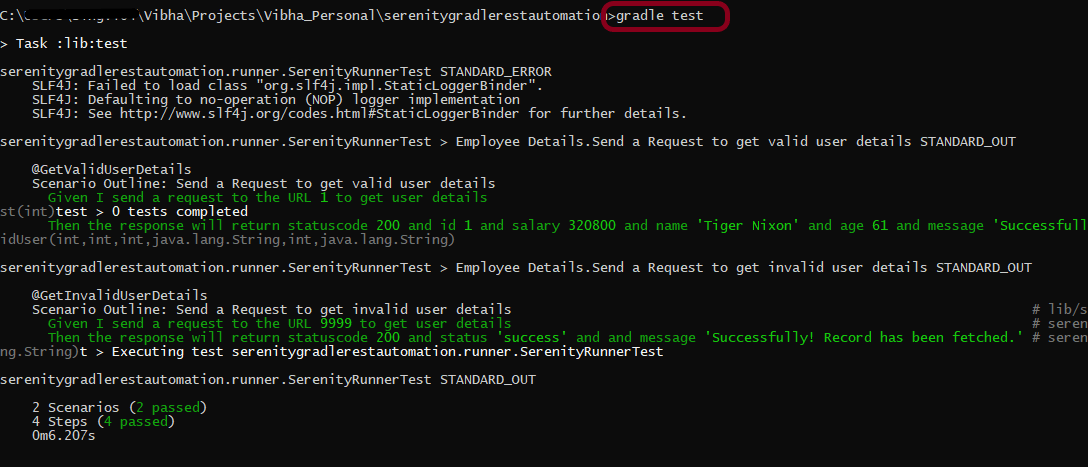
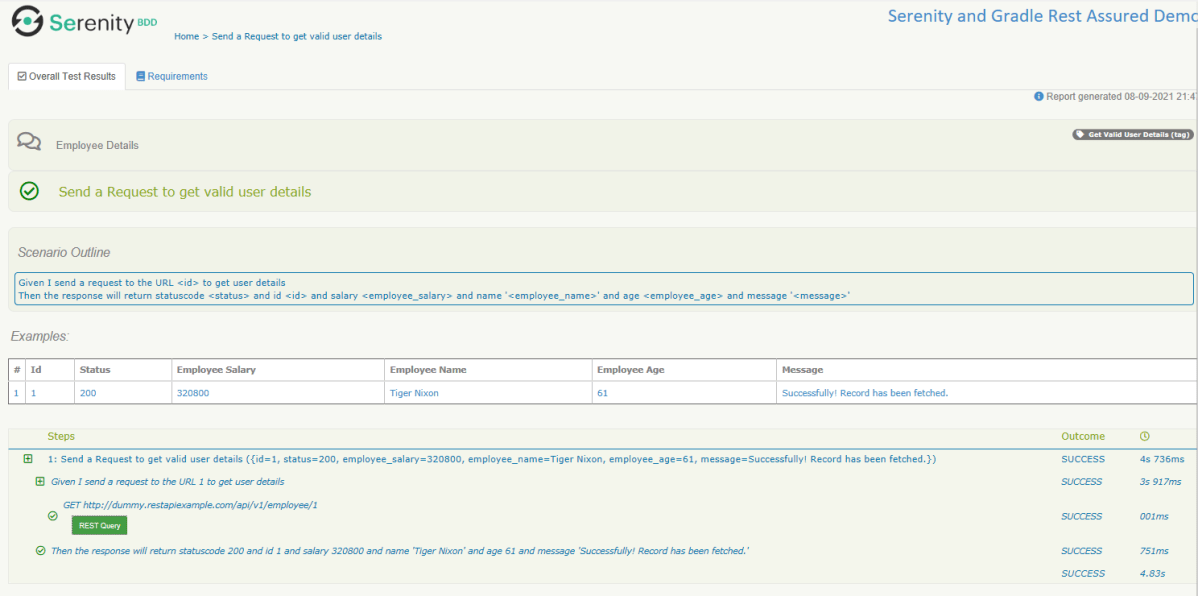
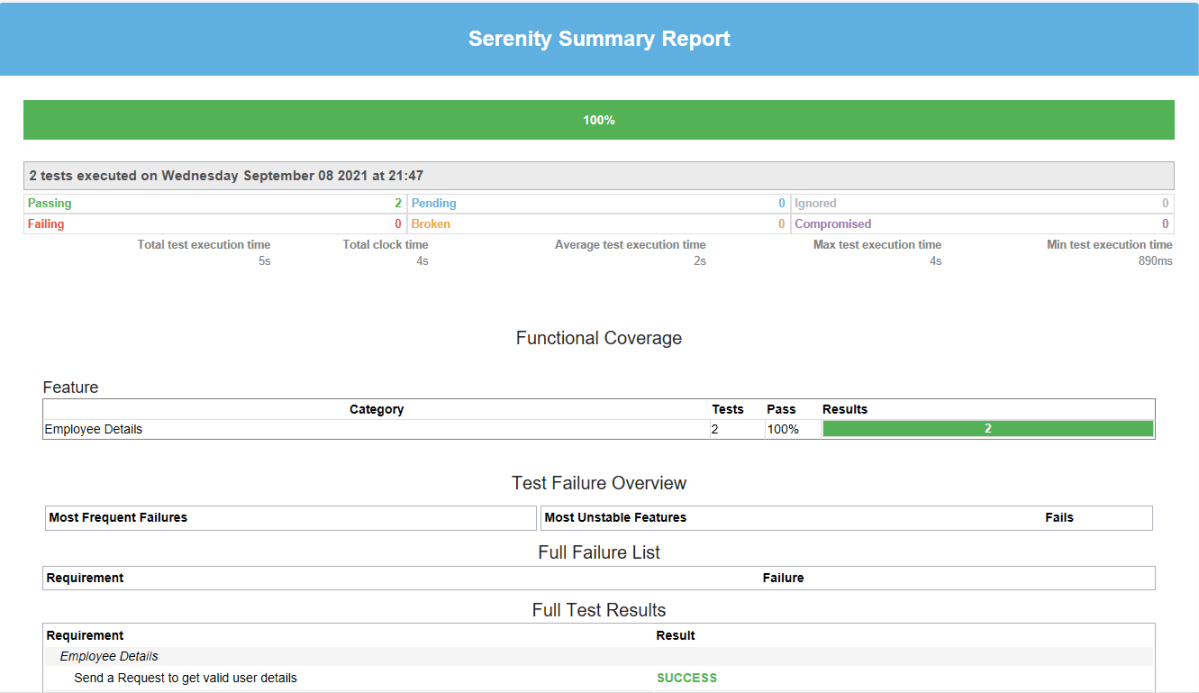
The output of the above program is

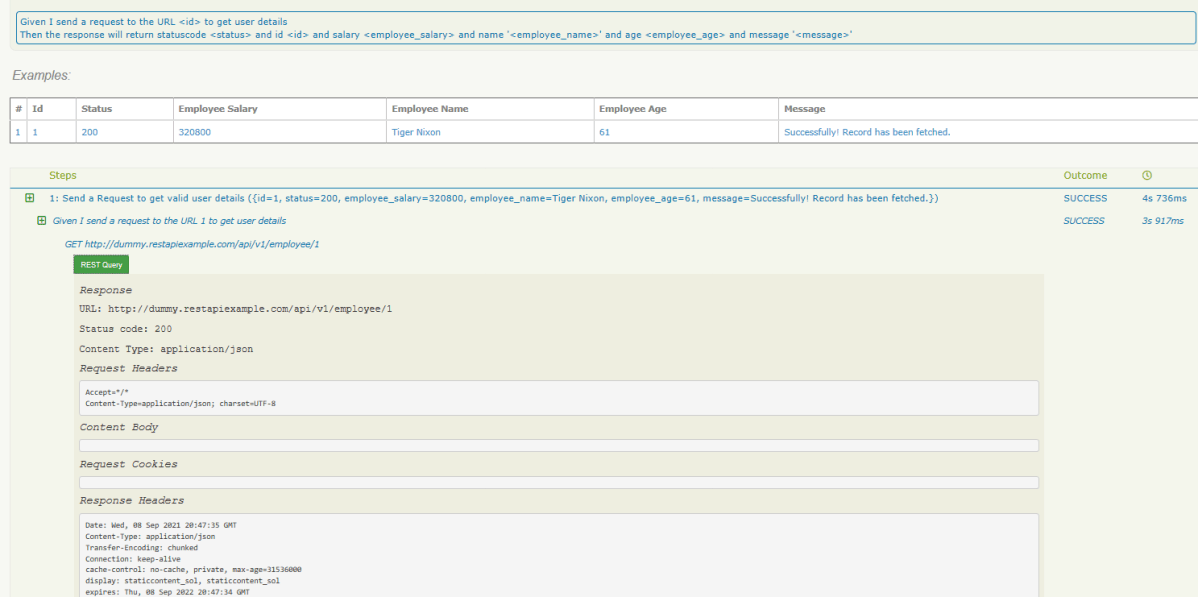
If you want to see the structure of the Request, then add the below in the test code.

ObjectMapper mapper = new ObjectMapper();
String employeePrettyJson = mapper.writerWithDefaultPrettyPrinter().writeValueAsString(emp);
System.out.println(employeePrettyJson);

REST Assured Serialization with Jackson handled all the serialization work for us. Great! See, this has become so simple with the help of Jackson API.

We are done! Congratulations on making it through this tutorial and hope you found it useful! Happy Learning!!

How to create Nested JSON Object using POJO – Jackson API

Last Updated On

HOME

In the previous tutorial, I explained the creation of JSON Array using POJO. In this tutorial, I will explain the creation of a nested JSON Object (JSON with multiple nodes) using POJO.

It is recommended to go through these tutorials to understand POJO, JSON Object, and JSON Array.

How to create JSON Object Payload using POJO – Jackson API

How to create JSON Array Payload using POJO – Jackson API

We are using Jackson API for Serialization and Deserialization. So, add the Jackson dependency to the project. We need to add the below-mentioned dependencies to run this example.

<?xml version="1.0" encoding="UTF-8"?>
<project xmlns="http://maven.apache.org/POM/4.0.0"
         xmlns:xsi="http://www.w3.org/2001/XMLSchema-instance"
         xsi:schemaLocation="http://maven.apache.org/POM/4.0.0 http://maven.apache.org/xsd/maven-4.0.0.xsd">
    <modelVersion>4.0.0</modelVersion>

    <groupId>com.example</groupId>
    <artifactId>RestAssured_JUnit4_Demo</artifactId>
    <version>1.0-SNAPSHOT</version>

    <properties>
        <junit.version>4.13.2</junit.version>
        <jackson.version>2.17.1</jackson.version>
        <hamcrest.version>1.3</hamcrest.version>
    </properties>

    <dependencies>

        <!-- JUnit4 Dependency -->
        <dependency>
            <groupId>junit</groupId>
            <artifactId>junit</artifactId>
            <version>${junit.version}</version>
            <scope>test</scope>
        </dependency>

        <!-- Jackson Dependency -->
        <dependency>
            <groupId>com.fasterxml.jackson.core</groupId>
            <artifactId>jackson-databind</artifactId>
            <version>${jackson.version}</version>
        </dependency>

        <!-- Hamcrest Dependency -->
        <dependency>
            <groupId>org.hamcrest</groupId>
            <artifactId>hamcrest-all</artifactId>
            <version>${hamcrest.version}</version>
            <scope>test</scope>
        </dependency>

    </dependencies>

</project>

We will use a nested JSON Object (a combination of JSON Arrays and objects).

{
  "companyName": "QAAutomation",
  "companyEmailId": "qaautomation@org.com",
  "companyNumber": "+353891234121", 
  "companyAddress": "12, HeneryStreet, Dublin, D12PW20", 
  "supportedSalaryBanks": [
    "AIB",
    "BOI",
    "PSB"
  ],
  "employee": [
    { 
	  "firstName" : "Vibha",
      "lastName" : "Singh",
      "age" : 30,
      "salary" : 75000.0,
      "designation" : "Manager",
      "contactNumber" : "+919999988822",
      "emailId" : "abc@test.com"
    },
    {
      "firstName" : "Neha",
      "lastName" : "Verma",
      "age" : 25,
      "salary" : 60000.0,
      "designation" : "Lead",
      "contactNumber" : "+914442266221",
      "emailId" : "xyz@test.com"
    },
    {
      "firstName" : "Rajesh",
      "lastName" : "Gupta",
      "age" : 20,
      "salary" : 40000.0,
      "designation" : "Intern",
      "contactNumber" : "+919933384422",
      "emailId" : "pqr@test.com"
    }
  ],
  "contractors": [
    {
      "firstName": "John",
      "lastName": "Mathew",
      "contractFrom": "Jan-2018",
      "contractTo": "Aug-2022",
	  "contactNumber" : "+919631384422"
    },
    {
      "firstName": "Seema",
      "lastName": "Prasad",
      "contractFrom": "Jun-2019",
      "contractTo": "Jun-2023"
	  "contactNumber" : "+919688881422"
    }
  ],
  "companyPFDeails": {
    "pfName": "XYZ",
    "pfYear": 2020,
    "noOfEmployees": 100
  }
}

It is very overwhelming to handle this type of nested JSON Object at a glance. So, we will split this into small parts or objects. So basically, we can split the above JSON into 4 parts – Employee, Contractors, CompanyPFDetails, and NestedPOJODemo.

companyName, companyEmailId, companyNumber, and companyAddress are 1:1 mapping in the payload. supportedSalaryBanks is an array of String values.

	private String companyName;
	private String companyEmailId;
	private String companyNumber;
	private String companyAddress;
	private List<String> supportedSalaryBanks;

Employee has value as an array of employees. There is no ready-made data type to represent elements of this array as a whole. So here we need to create a POJO class that can contain all details of an employee.

To represent an array of Employees and Contractors

	List<Employee> employee;
	List<Contractors> contractors;

Create a POJO class for CompanyPFDetails and add it to the main payload.

Now, let us see various POJO classes.

Employee POJO Class

public class Employee {

	// private variables or data members of pojo class
	private String firstName;
	private String lastName;
	private int age;
	private double salary;
	private String designation;
	private String contactNumber;
	private String emailId;

	// Getter and setter methods
	public String getFirstName() {
		return firstName;
	}

	public void setFirstName(String firstName) {
		this.firstName = firstName;
	}

	public String getLastName() {
		return lastName;
	}

	public void setLastName(String lastName) {
		this.lastName = lastName;
	}

	public int getAge() {
		return age;
	}

	public void setAge(int age) {
		this.age = age;
	}

	public double getSalary() {
		return salary;
	}

	public void setSalary(double salary) {
		this.salary = salary;
	}

	public String getDesignation() {
		return designation;
	}

	public void setDesignation(String designation) {
		this.designation = designation;
	}

	public String getContactNumber() {
		return contactNumber;
	}

	public void setContactNumber(String contactNumber) {
		this.contactNumber = contactNumber;
	}

	public String getEmailId() {
		return emailId;
	}

	public void setEmailId(String emailId) {
		this.emailId = emailId;
	}

}

Contractors POJO Class

public class Contractors {

	// private variables or data members of pojo class
	private String firstName;
	private String lastName;
	private String contractFrom;
	private String contractTo;
	private String contactNumber;

	public String getFirstName() {
		return firstName;
	}

	public void setFirstName(String firstName) {
		this.firstName = firstName;
	}

	public String getLastName() {
		return lastName;
	}

	public void setLastName(String lastName) {
		this.lastName = lastName;
	}

	public String getContractFrom() {
		return contractFrom;
	}

	public void setContractFrom(String contractFrom) {
		this.contractFrom = contractFrom;
	}

	public String getContractTo() {
		return contractTo;
	}

	public void setContractTo(String contractTo) {
		this.contractTo = contractTo;
	}

	public String getContactNumber() {
		return contactNumber;
	}

	public void setContactNumber(String contactNumber) {
		this.contactNumber = contactNumber;
	}

}

CompanyPFDetails POJO Class

public class CompanyPFDetails {

	private String pfName;
	private int pfYear;
	private int noOfEmployees;

	public String getPfName() {
		return pfName;
	}

	public void setPfName(String pfName) {
		this.pfName = pfName;
	}

	public int getPfYear() {
		return pfYear;
	}

	public void setPfYear(int pfYear) {
		this.pfYear = pfYear;
	}

	public int getNoOfEmployees() {
		return noOfEmployees;
	}

	public void setNoOfEmployees(int noOfEmployees) {
		this.noOfEmployees = noOfEmployees;
	}

}

NestedPOJODemo class

public class NestedPOJODemo {

	// private variables or data members of pojo class
	private String companyName;
	private String companyEmailId;
	private String companyNumber;
	private String companyAddress;
	private List<String> supportedSalaryBanks;
	List<Employee> employee;
	List<Contractors> contractors;
	CompanyPFDetails companyPFDetails;

	public String getCompanyName() {
		return companyName;
	}

	public void setCompanyName(String companyName) {
		this.companyName = companyName;
	}

	public String getCompanyEmailId() {
		return companyEmailId;
	}

	public void setCompanyEmailId(String companyEmailId) {
		this.companyEmailId = companyEmailId;
	}

	public String getCompanyNumber() {
		return companyNumber;
	}

	public void setCompanyNumber(String companyNumber) {
		this.companyNumber = companyNumber;
	}

	public String getCompanyAddress() {
		return companyAddress;
	}

	public void setCompanyAddress(String companyAddress) {
		this.companyAddress = companyAddress;
	}

	public List<String> getSupportedSalaryBanks() {
		return supportedSalaryBanks;
	}

	public void setSupportedSalaryBanks(List<String> supportedSalaryBanks) {
		this.supportedSalaryBanks = supportedSalaryBanks;
	}

	public List<Employee> getEmployee() {
		return employee;
	}

	public void setEmployee(List<Employee> employee) {
		this.employee = employee;
	}

	public List<Contractors> getContractors() {
		return contractors;
	}

	public void setContractors(List<Contractors> contractors) {
		this.contractors = contractors;
	}

	public CompanyPFDetails getCompanyPFDetails() {
		return companyPFDetails;
	}

	public void setCompanyPFDetails(CompanyPFDetails companyPFDetails) {
		this.companyPFDetails = companyPFDetails;
	}

}

Let’s create a JSON Payload using the above POJO classes.

import com.fasterxml.jackson.databind.ObjectMapper;
import org.junit.Test;
import java.io.IOException;
import java.util.ArrayList;
import java.util.List;

public class NestedPOJOTest {

    @Test
    public void createNestedPOJO() throws IOException {

        NestedPOJODemo demo = new NestedPOJODemo();
        demo.setCompanyName("QAAutomation");
        demo.setCompanyEmailId("qaautomation@org.com");
        demo.setCompanyNumber("+353891234121");
        demo.setCompanyAddress("12, HeneryStreet, Dublin, D12PW20");

        List<String> supportedSalaryBanks = new ArrayList<String>();
        supportedSalaryBanks.add("AIB");
        supportedSalaryBanks.add("BOI");
        supportedSalaryBanks.add("PSB");
        demo.setSupportedSalaryBanks(supportedSalaryBanks);

        // First Employee
        Employee emp1 = new Employee();
        emp1.setFirstName("Vibha");
        emp1.setLastName("Singh");
        emp1.setAge(30);
        emp1.setSalary(75000);
        emp1.setDesignation("Manager");
        emp1.setContactNumber("+919999988822");
        emp1.setEmailId("abc@test.com");

        // Second Employee
        Employee emp2 = new Employee();
        emp2.setFirstName("Neha");
        emp2.setLastName("Verms");
        emp2.setAge(35);
        emp2.setSalary(60000);
        emp2.setDesignation("Lead");
        emp2.setContactNumber("+914442266221");
        emp2.setEmailId("xyz@test.com");

        // Third Employee
        Employee emp3 = new Employee();
        emp3.setFirstName("Rajesh");
        emp3.setLastName("Gupta");
        emp3.setAge(20);
        emp3.setSalary(40000);
        emp3.setDesignation("Intern");
        emp3.setContactNumber("+919933384422");
        emp3.setEmailId("pqr@test.com");

        // Creating a List of Employees
        List<Employee> employeeList = new ArrayList<Employee>();
        employeeList.add(emp1);
        employeeList.add(emp2);
        employeeList.add(emp3);
        demo.setEmployee(employeeList);

        // First Contractor
        Contractors contractor1 = new Contractors();
        contractor1.setFirstName("John");
        contractor1.setLastName("Mathew");
        contractor1.setContractFrom("Jan-2018");
        contractor1.setContractTo("Aug-2022");
        contractor1.setContactNumber("+919631384422");

        // Second Contractor
        Contractors contractor2 = new Contractors();
        contractor2.setFirstName("Seema");
        contractor2.setLastName("Mathew");
        contractor2.setContractFrom("Jun-2019");
        contractor2.setContractTo("Jun-2023");
        contractor2.setContactNumber("+919688881422");

        // Creating a List of Contractors
        List<Contractors> contractorList = new ArrayList<Contractors>();
        contractorList.add(contractor1);
        contractorList.add(contractor2);
        demo.setContractors(contractorList);

        CompanyPFDetails pf = new CompanyPFDetails();
        pf.setPfName("XYZ");
        pf.setPfYear(2020);
        pf.setNoOfEmployees(100);
        demo.setCompanyPFDetails(pf);

        ObjectMapper mapper = new ObjectMapper();
        String nestedJsonPayload = mapper.writerWithDefaultPrettyPrinter().writeValueAsString(demo);
        System.out.println(nestedJsonPayload);

    }

}

Here, I have used ObjectMapper for reading and writing JSON, either to and from basic POJOs (Plain Old Java Objects), or to and from a general-purpose JSON Tree Model (JsonNode), as well as related functionality for performing conversions.

We can save this JSON payload in a file in the project or any location of your choice. Here, I’m saving this Nested JSON Payload in a file within src/test/resources.

String userDir = System.getProperty("user.dir");
mapper.writerWithDefaultPrettyPrinter().writeValue(new File(userDir + "\\src\\test\\resources\\NestedEmployeePayload.json"), demo);
	}

We are done! Congratulations on making it through this tutorial and hope you found it useful! Happy Learning!!

How to create JSON Array Payload using POJO – Jackson API

HOME

In the previous tutorial, I explained the creation of JSON Object using POJO. In this tutorial, will create a JSON Array Payload using POJO.

To learn about POJO, please refer to this tutorial.

You can refer to these tutorials to understand various ways of using Jackson API

Serialization – How to create JSON Payload from Java Object – Jackson API

How to create JSON Array Payload using POJO – Jackson API

How to create Nested JSON Object using POJO – Jackson API

Serialization – How to convert Map to JSON string using Jackson API

JSON Array is a collection of JSON Objects. In the below example, will create a list of employees.

The sample JSON Array structure looks like the image as shown below:-

{
  "firstName" : "Vibha",
  "lastName" : "Singh",
  "age" : 30,
  "salary" : 75000.0,
  "designation" : "Manager",
  "contactNumber" : "+919999988822",
  "emailId" : "abc@test.com"
  
  "firstName" : "Neha",
  "lastName" : "Verma",
  "age" : 25,
  "salary" : 60000.0,
  "designation" : "Lead",
  "contactNumber" : "+914442266221",
  "emailId" : "xyz@test.com"
  
  "firstName" : "Rajesh",
  "lastName" : "Gupta",
  "age" : 20,
  "salary" : 40000.0,
  "designation" : "Intern",
  "contactNumber" : "+919933384422",
  "emailId" : "pqr@test.com"
}

We need to create an Employee class that contains private data members and the corresponding getter and setter methods of these data members.

Below is an Employee Class with private data members, as well as the corresponding getter and setter methods of these data members. Every IDE provides a shortcut to create these getter and setter methods.

public class Employee {

	// private variables or data members of POJO class
	private String firstName;
	private String lastName;
	private int age;
	private double salary;
	private String designation;
	private String contactNumber;
	private String emailId;

	// Getter and setter methods
	public String getFirstName() {
		return firstName;
	}

	public void setFirstName(String firstName) {
		this.firstName = firstName;
	}

	public String getLastName() {
		return lastName;
	}

	public void setLastName(String lastName) {
		this.lastName = lastName;
	}

	public int getAge() {
		return age;
	}

	public void setAge(int age) {
		this.age = age;
	}

	public double getSalary() {
		return salary;
	}

	public void setSalary(double salary) {
		this.salary = salary;
	}

	public String getDesignation() {
		return designation;
	}

	public void setDesignation(String designation) {
		this.designation = designation;
	}

	public String getContactNumber() {
		return contactNumber;
	}

	public void setContactNumber(String contactNumber) {
		this.contactNumber = contactNumber;
	}

	public String getEmailId() {
		return emailId;
	}

	public void setEmailId(String emailId) {
		this.emailId = emailId;
	}

}

Serialization – Serialization is a process where you convert an Instance of a Class (Object of a class) into a Byte Stream. Here, we are converting Employee class object to JSON Array representation or Object.

Deserialization – It is the reverse of serializing. In this process, we will read the Serialized byte stream from the file and convert it back into the Class instance representation. Here, we are converting a JSON Array to an Employee class object.

We are using Jackson API for Serialization and Deserialization. So, add the Jackson dependency to the project.

<dependency>
    <groupId>com.fasterxml.jackson.core</groupId>
    <artifactId>jackson-databind</artifactId>
    <version>2.13.0</version>
</dependency>

Below is the class where we will assign values to the data members by using getter methods (Serialization).

public class EmployeeArrayTest {

	@Test
	public void createEmployeeArray() {

		Employee emp1 = new Employee();
		emp1.setFirstName("Vibha");
		emp1.setLastName("Singh");
		emp1.setAge(30);
		emp1.setSalary(75000);
		emp1.setDesignation("Manager");
		emp1.setContactNumber("+919999988822");
		emp1.setEmailId("abc@test.com");

		Employee emp2 = new Employee();
		emp2.setFirstName("Neha");
		emp2.setLastName("Verms");
		emp2.setAge(35);
		emp2.setSalary(60000);
		emp2.setDesignation("Lead");
		emp2.setContactNumber("+914442266221");
		emp2.setEmailId("xyz@test.com");

		Employee emp3 = new Employee();
		emp3.setFirstName("Rajesh");
		emp3.setLastName("Gupta");
		emp3.setAge(20);
		emp3.setSalary(40000);
		emp3.setDesignation("Intern");
		emp3.setContactNumber("+919933384422");
		emp3.setEmailId("pqr@test.com");

		// Creating a List of Employees
		List<Employee> employeeList = new ArrayList<Employee>();
		employeeList.add(emp1);
		employeeList.add(emp2);
		employeeList.add(emp3);

		// Converting a Java class object to a JSON Array Payload as string
		ObjectMapper mapper = new ObjectMapper();
		try {
			String allEmployeeJson = mapper.writeValueAsString(employeeList);
			String employeeListPrettyJson = mapper.writerWithDefaultPrettyPrinter().writeValueAsString(employeeList);
			System.out.println(allEmployeeJson);
			System.out.println(employeeListPrettyJson);
		} catch (JsonProcessingException e) {
			e.printStackTrace();
		}
	}

ObjectMapper is imported from:-

import com.fasterxml.jackson.databind.ObjectMapper;

In the below example, we are deserializing the JSON Array Payload to Java objects.

    @Test
	public void getEmployeeArray() {

		Employee emp1 = new Employee();
		emp1.setFirstName("Vibha");
		emp1.setLastName("Singh");
		emp1.setAge(30);
		emp1.setSalary(75000);
		emp1.setDesignation("Manager");
		emp1.setContactNumber("+919999988822");
		emp1.setEmailId("abc@test.com");

		Employee emp2 = new Employee();
		emp2.setFirstName("Neha");
		emp2.setLastName("Verms");
		emp2.setAge(35);
		emp2.setSalary(60000);
		emp2.setDesignation("Lead");
		emp2.setContactNumber("+914442266221");
		emp2.setEmailId("xyz@test.com");

		Employee emp3 = new Employee();
		emp3.setFirstName("Rajesh");
		emp3.setLastName("Gupta");
		emp3.setAge(20);
		emp3.setSalary(40000);
		emp3.setDesignation("Intern");
		emp3.setContactNumber("+919933384422");
		emp3.setEmailId("pqr@test.com");

		// Creating a List of Employees
		List<Employee> employeeList = new ArrayList<Employee>();
		employeeList.add(emp1);
		employeeList.add(emp2);
		employeeList.add(emp3);

		// Converting a Java class object to a JSON Array Payload as string

		ObjectMapper mapper = new ObjectMapper();
		String allEmployeeJson = null;

		try {
			allEmployeeJson = mapper.writerWithDefaultPrettyPrinter().writeValueAsString(employeeList);
		} catch (JsonProcessingException e) {
			e.printStackTrace();
		}

		List<Employee> allEmployeeDetails = null;
		try {
			allEmployeeDetails = mapper.readValue(allEmployeeJson, new TypeReference<List<Employee>>() {
			});
		} catch (JsonMappingException e) {
			e.printStackTrace();
		} catch (JsonProcessingException e) {
			e.printStackTrace();
		}

		for (Employee emp : allEmployeeDetails) {

			System.out.println("===================================");

			System.out.println("First Name of employee : " + emp.getFirstName());
			System.out.println("Last Name of employee : " + emp.getLastName());
			System.out.println("Age of employee : " + emp.getAge());
			System.out.println("Salary of employee : " + emp.getSalary());
			System.out.println("Designation of employee : " + emp.getDesignation());
			System.out.println("Contact Number of employee : " + emp.getContactNumber());
			System.out.println("EmailId of employee : " + emp.getEmailId());
		}
	}

If you want to read the data from a file placed on Desktop, below is the sample code for the same.

  @Test
	public void readArrayJsonFromFile() throws IOException {

		ObjectMapper mapper = new ObjectMapper();

		// Converting Employee json string to Employee class object
		List<Employee> allEmployeeDetails = null;
		try {
			allEmployeeDetails = mapper.readValue(new File(
					"C:\\Users\\Vibha\\Desktop\\EmployeeList.json"),
					new TypeReference<List<Employee>>() {
					});
		} catch (StreamReadException e) {
			e.printStackTrace();
		} catch (DatabindException e) {
			e.printStackTrace();
		} catch (IOException e) {
			e.printStackTrace();
		}


		for (Employee emp : allEmployeeDetails) {

			System.out.println("######################################");

			System.out.println("First Name of employee : " + emp.getFirstName());
			System.out.println("Last Name of employee : " + emp.getLastName());
			System.out.println("Age of employee : " + emp.getAge());
			System.out.println("Salary of employee : " + emp.getSalary());
			System.out.println("Designation of employee : " + emp.getDesignation());
			System.out.println("Contact Number of employee : " + emp.getContactNumber());
			System.out.println("EmailId of employee : " + emp.getEmailId());
		}
	}

We are done! Congratulations on making it through this tutorial and hope you found it useful! Happy Learning!!

Serenity BDD with Cucumber and Rest Assured in Gradle

HOME

In the previous tutorial, I explained the Integration of Serenity BDD with Rest Assured in Maven Project. In this tutorial, I will explain the Integration of Serenity BDD with Rest Assured in the Gradle Project.

Prerequisite

  1. Java 11 installed
  2. Gradle installed
  3. Eclipse or IntelliJ installed

Dependency List

  1. Serenity – 2.6.0
  2. Serenity Cucumber – 2.6.0
  3. Serenity Rest Assured – 2.6.0
  4. Rest Assured – 4.3.2
  5. Java 11
  6. JUnit – 4.13.2
  7. Gradle – 7.2

Implementation Steps

Step 1- Download and Install Java

Click here to know How to install Java.

Step 2 – Download and setup Eclipse IDE on the system

The Eclipse IDE (integrated development environment) provides strong support for Java developers. Click here to know How to install Eclipse.

Step 3 – Setup Gradle

To build a test framework, we need to add several dependencies to the project. This can be achieved by any build tool. I have used Gradle Build Tool. Click here to know How to install Gradle. Click here to know How to create a Gradle Java project.

Below is the structure of the Gradle project.

Step 4 – Update repositories, plugin, and dependencies to the Gradle project

defaultTasks 'clean', 'test', 'aggregate'

repositories {
    mavenLocal()
    jcenter()
}

buildscript {
    repositories {
        mavenLocal()
        jcenter()
    }
    dependencies {
        classpath("net.serenity-bdd:serenity-gradle-plugin:2.4.24")
        classpath("net.serenity-bdd:serenity-single-page-report:2.4.24")
    }
}

apply plugin: 'java'
apply plugin: 'eclipse'
apply plugin: 'idea'
apply plugin: 'net.serenity-bdd.aggregator'

sourceCompatibility = 11
targetCompatibility = 11

serenity {
    reports = ["single-page-html"]
}

dependencies {
   
    testImplementation 'net.serenity-bdd:serenity-cucumber6:2.6.0'
    testImplementation 'net.serenity-bdd:serenity-screenplay:2.6.0'
    testImplementation 'net.serenity-bdd:serenity-screenplay-rest:2.6.0'
    testImplementation 'net.serenity-bdd:serenity-rest-assured:2.6.0'
    testImplementation 'io.rest-assured:rest-assured:4.3.2'
    testImplementation 'junit:junit:4.13.1'
}

test {
    testLogging.showStandardStreams = true
    systemProperties System.getProperties()
}

gradle.startParameter.continueOnFailure = true

test.finalizedBy(aggregate)

Step 5 – Create a feature file under src/test/resources

A Feature File is an entry point to the Cucumber tests. This is a file where you will describe your tests in Descriptive language (Like English). A feature file can contain a scenario or can contain many scenarios in a single feature file. Feature file Below is an example of a Feature file.

Feature: Employee Details
  

  @GetValidUserDetails
  Scenario Outline: Send a Request to get valid user details
 
  Given I send a request to the URL <id> to get user details
  Then the response will return statuscode <status> and id <id> and salary <employee_salary> and name '<employee_name>' and age <employee_age> and message '<message>'
 
  Examples:
    |id  |status  |employee_salary|employee_name |employee_age  |message                                  |
    |1   |200     |320800         |Tiger Nixon   |61            |Successfully! Record has been fetched.   |   
    
  @GetInvalidUserDetails
  Scenario Outline: Send a Request to get invalid user details
 
  Given I send a request to the URL <id> to get user details
  Then the response will return statuscode <statusCode> and status '<statusMessage>' and and message '<message>'
 
  Examples:
    |id     |statusCode  |statusMessage    |message                                  |
    |9999   |200         |success          |Successfully! Record has been fetched.   |

Step 6 – Create the Step Definition class or Glue Code for the Test Scenario

The steps definition file stores the mapping between each step of the test scenario defined in the feature file with a code of the function to be executed. So, now when Cucumber executes a step of the scenario mentioned in the feature file, it scans the step definition file and figures out which function is to be called.

public class EmployeeDefinitions {

	private static final String URL = "http://dummy.restapiexample.com/api/v1/employee/";
	public Response response;

	@Given("I send a request to the URL {int} to get user details")
	public void sendRequest(int id) {

		response = SerenityRest.given().contentType("application/json").header("Content-Type", "application/json")
				.when().get(URL + id);
	}

	@Then("the response will return statuscode {int} and id {int} and salary {int} and name {string} and age {int} and message {string}")

	public void verifyValidUser(int statusCode, int id, int salary, String name, int age, String message) {
		SerenityRest.restAssuredThat(response -> response.statusCode(statusCode).and().body("data.id", equalTo(id))
				.and().body("data.employee_salary", equalTo(salary)).and().body("data.employee_name", equalTo(name))
				.and().body("data.employee_age", equalTo(age)).and().body("message", equalTo(message)));

	}

	@Then("the response will return statuscode {int} and status {string} and and message {string}")
	public void verifyInalidUser(int statusCode, String statusMessage, String message) {
		SerenityRest.restAssuredThat(response -> response.statusCode(statusCode).and()
				.body("status", equalTo(statusMessage)).and().body("message", equalTo(message)));

	}
}

Step 7 – Create a Serenity Cucumber Runner class

Cucumber runs the feature files via JUnit and needs a dedicated test runner class to actually run the feature files. When you run the tests with Serenity, you use the CucumberWithSerenity test runner. You also need to use the @CucumberOptions class to provide the root directory where the feature files can be found.

import org.junit.runner.RunWith;

import io.cucumber.junit.CucumberOptions;
import net.serenitybdd.cucumber.CucumberWithSerenity;

@RunWith(CucumberWithSerenity.class)
@CucumberOptions(plugin = { "pretty" }, features = "lib/src/test/resources/features/Employee.feature", glue = {
		"serenitygradlerestautomation.definitions" })

public class SerenityRunnerTest {
}

Step 8 – Create serenity.properties file at the root of the project

serenity.project.name = Serenity and Gradle Rest Assured Demo

Step 9 – Run the tests through command line, which generates Serenity Report

Open the command line and go to the location where gradle.build of the project is present and type the below command.

gradle test

The Serenity report is generated under /lib/target/site/serenity.

Index.html

Overall Test Results Section provides the details about all the Test Scenario, like the time taken by each test step, the status of each test step, and soon.

In this report, you can see the request as well as response details in the report.

Step 10 – Generate Single Page HTML Report

As we have already mentioned the dependencies of a single-page-report in build.gradle, we can generate an emailable serenity report that contains the summary of test execution.

gradle reports

Serenity Summary Report (single-page-report.html) is placed under lib\target\site\serenity.

We are done! Congratulations on making it through this tutorial and hope you found it useful! Happy Learning!!

Integration Testing of SpringBoot using RestAssured

HOME

In this tutorial, I am going to build an automation framework to test Springboot application with Rest Assured and JUnit4 only.

  1. What is Rest Assured?
  2. Dependency List
  3. Sample SpringBoot Application
  4. Implementation Steps
    1. Add SpringbootTest and Rest-Assured dependencies to the project
    2. Create a test file under src/test/java and write the test code
    3. Run the tests from JUnit
    4. Run the tests from Command Line

What is Rest Assured?

REST Assured is a Java DSL for simplifying the testing of REST-based services built on top of HTTP Builder. It supports POST, GET, PUT, DELETE, OPTIONS, PATCH, and HEAD requests and can be used to validate and verify the response to these requests.

The rest-Assured library also provides the ability to validate the HTTP Responses received from the server. For e.g. we can verify the Status code, Status message, Headers, and even the Body of the response. This makes Rest-Assured a very flexible library that can be used for testing.

Dependency List:

  1. Springboot – 3.2.3
  2. Java 17
  3. JUnit – 4.13.2
  4. Maven – 3.9.6
  5. RestAssured – 5.3.2
  6. Junit Vintage

Below is the sample SpringBoot application used for the testing.

The Spring Boot Application class is generated with Spring Initializer. This class acts as the launching point for the application.

import org.springframework.boot.SpringApplication;
import org.springframework.boot.autoconfigure.SpringBootApplication;

@SpringBootApplication
public class SpringBootDemoApplication {

	public static void main(String[] args) {
		SpringApplication.run(SpringBootDemoApplication.class, args);
	}

}

The JPA Entity is any Java POJO, which can represent the underlying table structure. As our service is based on the Student table, we will create a Student Entity object.

import jakarta.persistence.Entity;
import jakarta.persistence.GeneratedValue;
import jakarta.persistence.Id;
import jakarta.validation.constraints.NotBlank;
import jakarta.validation.constraints.NotNull;
import jakarta.validation.constraints.Size;


@Entity
public class Student {

    @Id
    @GeneratedValue
    private Long id;

    @NotNull
    @Size(min = 4, message = "Name should have atleast 4 characters")
    private String name;

    @NotBlank(message = "passportNumber is mandatory")
    private String passportNumber;

    public Student() {
        super();
    }

    public Student(Long id, String name, String passportNumber) {
        super();
        this.id = id;
        this.name = name;
        this.passportNumber = passportNumber;
    }

    public Long getId() {
        return id;
    }

    public void setId(Long id) {
        this.id = id;
    }

    public String getName() {
        return name;
    }

    public void setName(String name) {
        this.name = name;
    }

    public String getPassportNumber() {
        return passportNumber;
    }

    public void setPassportNumber(String passportNumber) {
        this.passportNumber = passportNumber;
    }
}

The Repository represents the DAO layer, which typically does all the database operations. Thanks to Spring Data, who provides the implementations for these methods. Let’s have a look at our StudentRepository, which extends the JpaRepository. There are no method declarations here in the StudentRepository. That is because Spring Data’s JpaRepository has already declared basic CRUD methods.

import org.springframework.data.jpa.repository.JpaRepository;
import org.springframework.stereotype.Repository;

@Repository
public interface StudentRepository extends JpaRepository<Student, Long>{

}

Spring Rest Controller exposes all services on the student resource. RestController used for the below example is shown below.

import jakarta.validation.Valid;
import org.springframework.beans.factory.annotation.Autowired;
import org.springframework.hateoas.EntityModel;
import org.springframework.hateoas.server.mvc.WebMvcLinkBuilder;
import org.springframework.http.ResponseEntity;
import org.springframework.web.bind.annotation.*;
import org.springframework.web.servlet.support.ServletUriComponentsBuilder;
import java.net.URI;
import java.util.List;
import java.util.Optional;

import static org.springframework.hateoas.server.mvc.WebMvcLinkBuilder.linkTo;
import static org.springframework.hateoas.server.mvc.WebMvcLinkBuilder.methodOn;

@RestController
public class StudentController {

    @Autowired
    private StudentRepository studentRepository;

    @GetMapping("/students")
    public List<Student> retrieveAllStudents() {
        return studentRepository.findAll();
    }

    @GetMapping("/students/{id}")
    public EntityModel<Student> retrieveStudent(@PathVariable long id) {
        Optional<Student> student = studentRepository.findById(id);

        if (!student.isPresent())
            throw new StudentNotFoundException("id-" + id);

        EntityModel<Student> resource = EntityModel.of(student.get());

        WebMvcLinkBuilder linkTo = linkTo(methodOn(this.getClass()).retrieveAllStudents());

        resource.add(linkTo.withRel("all-students"));

        return resource;
    }

    @PostMapping("/students")
    public ResponseEntity<Object> createStudent(@Valid @RequestBody Student student) {
        Student savedStudent = studentRepository.save(student);

        URI location = ServletUriComponentsBuilder.fromCurrentRequest().path("/{id}")
                .buildAndExpand(savedStudent.getId()).toUri();

        return ResponseEntity.created(location).build();

    }

    @DeleteMapping("/students/{id}")
    public void deleteStudent(@PathVariable long id) {
        studentRepository.deleteById(id);
    }

    @PutMapping("/students/{id}")
    public ResponseEntity<Object> updateStudent(@Valid @RequestBody Student student, @PathVariable long id) {

        Optional<Student> studentOptional = studentRepository.findById(id);

        if (!studentOptional.isPresent())
            return ResponseEntity.notFound().build();

        student.setId(id);

        studentRepository.save(student);

        return ResponseEntity.noContent().build();
    }
}

import org.springframework.http.HttpStatus;
import org.springframework.web.bind.annotation.ResponseStatus;

@ResponseStatus(HttpStatus.NOT_FOUND)
public class StudentNotFoundException extends RuntimeException {

    public StudentNotFoundException(String exception) {
        super(exception);
    }

}

spring.jpa.defer-datasource-initialization=true
insert into student values(10001,'Annie', 'E1234567');
insert into student values(20001,'John', 'A1234568');
insert into student values(30001,'David','C1232268');
insert into student values(40001,'Amy','D213458');

Implementation Steps

Step 1 – Add SpringbootTest and Rest-Assured dependencies to the project

<project xmlns="http://maven.apache.org/POM/4.0.0" xmlns:xsi="http://www.w3.org/2001/XMLSchema-instance"
  xsi:schemaLocation="http://maven.apache.org/POM/4.0.0 http://maven.apache.org/xsd/maven-4.0.0.xsd">
  <modelVersion>4.0.0</modelVersion>

  <parent>
    <groupId>org.springframework.boot</groupId>
    <artifactId>spring-boot-starter-parent</artifactId>
    <version>3.2.3</version>
    <relativePath/> <!-- lookup parent from repository -->
  </parent>

  <groupId>com.example</groupId>
  <artifactId>demo</artifactId>
  <version>0.0.1-SNAPSHOT</version>
  <name>SpringBoot_Demo</name>
  <description>Demo project for Spring Boot</description>

  <properties>
    <java.version>17</java.version>
    <junit.version>4.13.2</junit.version>
    <rest-assured.version>5.3.2</rest-assured.version>
    <maven.compiler.plugin.version>3.12.1</maven.compiler.plugin.version>
    <maven.surefire.plugin.version>3.2.3</maven.surefire.plugin.version>
    <maven.compiler.source>17</maven.compiler.source>
    <maven.compiler.target>17</maven.compiler.target>
  </properties>

  <dependencies>
    <dependency>
      <groupId>org.springframework.boot</groupId>
      <artifactId>spring-boot-starter</artifactId>
    </dependency>

    <dependency>
      <groupId>org.springframework.boot</groupId>
      <artifactId>spring-boot-starter-test</artifactId>
      <scope>test</scope>
    </dependency>

    <dependency>
      <groupId>org.springframework.boot</groupId>
      <artifactId>spring-boot-starter-data-jpa</artifactId>
    </dependency>

    <dependency>
      <groupId>org.springframework.boot</groupId>
      <artifactId>spring-boot-starter-web</artifactId>
    </dependency>

    <dependency>
      <groupId>org.springframework.boot</groupId>
      <artifactId>spring-boot-starter-hateoas</artifactId>
    </dependency>

    <dependency>
      <groupId>org.springframework.boot</groupId>
      <artifactId>spring-boot-starter-validation</artifactId>
    </dependency>

    <dependency>
      <groupId>org.springframework.boot</groupId>
      <artifactId>spring-boot-devtools</artifactId>
      <scope>runtime</scope>
    </dependency>

    <dependency>
      <groupId>com.h2database</groupId>
      <artifactId>h2</artifactId>
      <scope>runtime</scope>
    </dependency>

    <dependency>
      <groupId>junit</groupId>
      <artifactId>junit</artifactId>
      <version>${junit.version}</version>
      <scope>test</scope>
    </dependency>

    <dependency>
      <groupId>io.rest-assured</groupId>
      <artifactId>rest-assured</artifactId>
      <version>${rest-assured.version}</version>
      <scope>test</scope>
    </dependency>

    <dependency>
      <groupId>org.junit.vintage</groupId>
      <artifactId>junit-vintage-engine</artifactId>
      <scope>test</scope>
    </dependency>

  </dependencies>

  <build>
    <plugins>
      <plugin>
        <groupId>org.springframework.boot</groupId>
        <artifactId>spring-boot-maven-plugin</artifactId>
      </plugin>

      <plugin>
        <groupId>org.apache.maven.plugins</groupId>
        <artifactId>maven-compiler-plugin</artifactId>
        <version>${maven.compiler.plugin.version}</version>
        <configuration>
          <source>${maven.compiler.source}</source>
          <target>${maven.compiler.target}</target>
        </configuration>
      </plugin>

      <plugin>
        <groupId>org.apache.maven.plugins</groupId>
        <artifactId>maven-surefire-plugin</artifactId>
        <version>${maven.surefire.plugin.version}</version>
        <configuration>
          <testFailureIgnore>true</testFailureIgnore>
        </configuration>
      </plugin>
    </plugins>
  </build>
</project>

Step 2 – Create a test file under src/test/java and write the test code

package org.example;

import io.restassured.RestAssured;
import io.restassured.http.ContentType;
import io.restassured.response.ValidatableResponse;
import org.json.JSONException;
import org.json.JSONObject;
import org.junit.Before;
import org.junit.Test;
import org.junit.runner.RunWith;
import org.springframework.boot.test.context.SpringBootTest;
import org.springframework.boot.test.web.server.LocalServerPort;
import org.springframework.test.context.junit4.SpringRunner;

import static io.restassured.RestAssured.given;
import static org.hamcrest.Matchers.equalTo;

@RunWith(SpringRunner.class)
@SpringBootTest(webEnvironment = SpringBootTest.WebEnvironment.RANDOM_PORT)
public class SpringbootDemoTests {

    private final static String BASE_URI = "http://localhost";

    @LocalServerPort
    private int port;

    private ValidatableResponse validatableResponse;

    private ValidatableResponse validatableResponse1;

    @Before
    public void configureRestAssured() {
        RestAssured.baseURI = BASE_URI;
        RestAssured.port = port;
    }

    /* Get operation - Get the details of a Student */
    @Test
    public void listUsers() {

        validatableResponse = given()
                .contentType(ContentType.JSON)
                .when()
                .get("/students")
                .then()
                .assertThat().statusCode(200);

    }

    /* Get operation - Get the details of a Student */
    @Test
    public void listAUser() {

        validatableResponse = given()
                .contentType(ContentType.JSON)
                .when()
                .get("/students/30001")
                .then()
                .assertThat().log().all().statusCode(200)
                .body("id",equalTo(30001))
                .body("name",equalTo("David"))
                .body("passportNumber",equalTo("C1232268"));;
    }

    /* Create operation - Create a new Student */
    @Test
    public void createAUser() throws JSONException {

        JSONObject newStudent = new JSONObject();

        newStudent.put("name", "Timmy");
        newStudent.put("passportNumber", "ZZZ12345");

        validatableResponse = given()
                .contentType(ContentType.JSON).body(newStudent.toString())
                .when()
                .post("/students")
                .then()
                .log().all().assertThat().statusCode(201);

        /* Verify that a new Student is created */
        validatableResponse1 = given()
                .contentType(ContentType.JSON)
                .when()
                .get("/students/1")
                .then()
                .log().all().assertThat().statusCode(200)
                .body("id",equalTo(1))
                .body("name",equalTo("Timmy"))
                .body("passportNumber",equalTo("ZZZ12345"));

    }

    /* Update operation - Update PassportNumber of a Student */
    @Test
    public void updateAUser() throws JSONException {

        JSONObject newStudent = new JSONObject();

        newStudent.put("name", "John");
        newStudent.put("passportNumber", "YYYY1234");

        validatableResponse = given()
                .contentType(ContentType.JSON).body(newStudent.toString())
                .when()
                .put("/students/20001")
                .then()
                .log().all().assertThat().statusCode(204);

        /* Verify that the updated Student has updated PassportNumber */
        validatableResponse1 = given()
                .contentType(ContentType.JSON)
                .when()
                .get("/students/20001")
                .then()
                .log().all().assertThat().statusCode(200)
                .body("id",equalTo(20001))
                .body("name",equalTo("John"))
                .body("passportNumber",equalTo("YYYY1234"));

    }

    /* Delete operation - Delete a Student */
    @Test
    public void deleteAUser() throws JSONException {

        validatableResponse = given()
                .contentType(ContentType.JSON)
                .when()
                .delete("/students/10003")
                .then()
                .log().all().assertThat().statusCode(200);


        /* Verify that the deleted Student Request returns STATUS 404 */
        validatableResponse1 = given()
                .contentType(ContentType.JSON)
                .when()
                .get("/students/10003")
                .then()
                .log().all().assertThat().statusCode(404);

    }
}

When a class is annotated with @RunWith or extends a class annotated with @RunWith, JUnit will invoke the class it references to run the tests in that class instead of the runner built into JUnit.

SpringRunner is an alias for the SpringJUnit4ClassRunner. Here, we have simply annotated a JUnit 4-based test class with @RunWith(SpringRunner.class). The Spring TestContext Framework provides generic, annotation-driven unit and integration testing support that is agnostic of the testing framework in use (JUnit, TestNG).

We build the test class with @SpringBootTest annotation which starts up an Application Context used throughout our test. In the classes property of @SpringBootTest annotation, we can specify which configuration classes build our Application Context. By default, @SpringBootTest annotation does not provide any web environment.
In order to set up a test web server we need to use @SpringBootTest’s webEnvironment annotation.
There are a few modes in which the web server can be started.

  • RANDOM_PORT – this is a recommended option where a real, embedded web server starts on a random port
  • DEFINED_PORT – web server will start on an 8080 or a port defined in application.properties
  • MOCK – loads a mock web environment where embedded servers are not started up.

Step 3 – Run the tests from JUnit

Right-click Run as JUnit Tests (Eclipse)

Right Click and select Run SpringBootDemoTests (IntelliJ)

Step 4 – Run the tests from Command Line

Open a command prompt and use the below command to run the tests.

mvn clean test

We are done! Congratulations on making it through this tutorial and hope you found it useful! Happy Learning!!

Extraction from JSON in Rest Assured – JsonPath

HOME

In this tutorial, I will explain how can we extract the body from JSON Response in Rest Assured. This is needed for the assertion of tests. In the previous tutorial, I explained various types of Assertions can be done on JSON Request using Hamcrest.

JsonPath is available at the Central Maven Repository. Maven users add this to the POM.

<!-- https://mvnrepository.com/artifact/com.jayway.jsonpath/json-path -->
<dependency>
    <groupId>com.jayway.jsonpath</groupId>
    <artifactId>json-path</artifactId>
    <version>2.9.0</version>
</dependency>

If the project is Gradle, add the below dependency in build.gradle.

 testImplementation 'com.jayway.jsonpath:json-path:2.6.0'

JsonPath expressions can use the dot–notation.

$.store.book[0].title

or the bracket–notation

$['store']['book'][0]['title']
Expression Description
$ The root object or array.
.property Selects the specified property in a parent object.
[‘property’] Selects the specified property in a parent object. Be sure to put single quotes around the property name.Tip: Use this notation if the property name contains special characters such as spaces, or begins with a character other than A..Za..z_.
[n] Selects the n-th element from an array. Indexes are 0-based.
[index1,index2,…] Selects array elements with the specified indexes. Returns a list.
..property Recursive descent: Searches for the specified property name recursively and returns an array of all values with this property name. Always returns a list, even if just one property is found.
* Wildcard selects all elements in an object or an array, regardless of their names or indexes.
[start:end]
[start:]
Selects array elements from the start index and up to, but not including, end index. If end is omitted, selects all elements from start until the end of the array. Returns a list.
[:n] Selects the first n elements of the array. Returns a list.
[-n:] Selects the last n elements of the array. Returns a list.
[?(expression)] Selects all elements in an object or array that match the specified filter. Returns a list.
[(expression)] Script expressions can be used instead of explicit property names or indexes. An example is [(@.length-1)] which selects the last item in an array. Here, length refers to the length of the current array rather than a JSON field named length.
@ Used in filter expressions to refer to the current node being processed.

Below is the sample JSON which I am using for extraction examples. I have saved this file in resources/Payloads as test.json.

{
    "store": {
        "book": [
            {
                "category": "reference",
                "author": "Nigel Rees",
                "title": "Sayings of the Century",
                "price": 8.95
            },
            {
                "category": "fiction",
                "author": "Evelyn Waugh",
                "title": "Sword of Honour",
                "price": 12.99
            },
            {
                "category": "fiction",
                "author": "Herman Melville",
                "title": "Moby Dick",
                "isbn": "0-553-21311-3",
                "price": 8.99
            },
            {
                "category": "fiction",
                "author": "J. R. R. Tolkien",
                "title": "The Lord of the Rings",
                "isbn": "0-395-19395-8",
                "price": 22.99
            }
        ],
        "bicycle": {
            "color": "red",
            "price": 19.95
        }
    },
    "expensive": 10
}

To extract all books present in the store:-

String allBooks = JsonPath.read(jsonString, "$..*").toString();
System.out.println("--------------- All books in the store --------------");
System.out.println(allBooks);
import com.jayway.jsonpath.JsonPath;
public class JsonPath_Demo {

    public static void main(String args[]) {

        String jsonString = new String(Files.readAllBytes(Paths.get("src/test/resources/Payloads/test.json")));

        String allBooks = JsonPath.read(jsonString, "$..*").toString();
        System.out.println("--------------- All books in the store --------------");
        System.out.println(allBooks);
    }
}

Below are examples that show how to extract different nodes from a JSON Body. I have used the above JSON Body for these examples.

 // All bicycles in the store
String allBicycles = JsonPath.read(jsonString, "$..bicycle").toString();
System.out.println("--------------- All bicycles in the store ---------------");
System.out.println(allBicycles);

// The number of books
String noOfBooks = JsonPath.read(jsonString, "$..book.length()").toString();
System.out.println("--------------- The number of books ---------------");
System.out.println(noOfBooks);

// The authors of all books
String authors = JsonPath.read(jsonString, "$.store.book[*].author").toString();
System.out.println("--------------- Author of all Books ---------------");
System.out.println(authors);

// All authors
String allAuthors = JsonPath.read(jsonString, "$..author").toString();
System.out.println("--------------- All Authors ---------------");
System.out.println(allAuthors);

// All details of the store
String store = JsonPath.read(jsonString, "$.store.*").toString();
System.out.println("--------------- All details of the store ---------------");
System.out.println(store);

// Price of store
String storePrice = JsonPath.read(jsonString, "$.store..price").toString();
System.out.println("--------------- price of store ---------------");
System.out.println(storePrice);

Below are the examples where I have extracted specific book (nodes) from the JSON body.

// Third book
String thirdBook = JsonPath.read(jsonString, "$..book[2]").toString();
System.out.println("--------------- third book ---------------");
System.out.println(thirdBook);

// first Last Book
String firstLastBook = JsonPath.read(jsonString, "$..book[-1]").toString();
System.out.println("--------------- first Last Book ---------------");
System.out.println(firstLastBook);

// first two Books
String firstTwoBooks = JsonPath.read(jsonString, "$..book[0,1]").toString();
System.out.println("--------------- first Two Books ---------------");
System.out.println(firstTwoBooks);

// books from index 0 (inclusive) until index 2 (exclusive)
String booksRange = JsonPath.read(jsonString, "$..book[:2]").toString();
System.out.println("--------------- books from index 0 (inclusive) until index 2 (exclusive) ---------------");
System.out.println(booksRange);

// All books from index 1 (inclusive) until index 2 (exclusive)
String booksRange1 = JsonPath.read(jsonString, "$..book[1:2]").toString();
System.out.println("------------ All books from index 1 (inclusive) until index 2 (exclusive) -----------");
System.out.println(booksRange1);

// Book number one from tail
String bottomBook = JsonPath.read(jsonString, "$..book[1:]").toString();
System.out.println("--------------- Book number one from tail ---------------");
System.out.println(bottomBook);

Filters are logical expressions used to filter arrays. Below are examples of a JSONPath expression with the filters.

// All books in store expensive than 10
String expensiveBook = JsonPath.read(jsonString, "$.store.book[?(@.price > 10)]").toString();
System.out.println("--------------- All books in store costlier than 10 ---------------");
System.out.println(expensiveBook);

// All books in store that are not "expensive"
String notExpensiveBook = JsonPath.read(jsonString, "$..book[?(@.price <= $['expensive'])]").toString();
System.out.println("--------------- All books in store that are not expensive ---------------");
System.out.println(notExpensiveBook);

// All books in store that are equal to price 8.95
String comparePrice = JsonPath.read(jsonString, "$.store.book[?(@.price == 8.95)]").toString();
System.out.println("--------------- All books in store that are not expensive ---------------");
System.out.println(comparePrice);

// All books matching regex (ignore case)
String regxExample = JsonPath.read(jsonString, "$..book[?(@.author =~ /.*REES/i)]").toString();
System.out.println("--------------- All books matching regex (ignore case) ---------------");
System.out.println(regxExample);

// All books with price equal to mentioned list of prices
String priceList = JsonPath.read(jsonString, "$..book[?(@.price in ['12.99', '8.99'])]").toString();
System.out.println("--------------- All books with price equal to mentioned list of prices ---------------");
System.out.println(priceList);

// All books with price NOT equal to mentioned list of prices
String excludePriceList = JsonPath.read(jsonString, "$..book[?(@.price nin ['12.99', '8.99'])]").toString();
System.out.println("---------- All books with price NOT equal to mentioned list of prices ---------");
System.out.println(excludePriceList);

// All books with specified substring (case-sensitive)
String substringExample = JsonPath.read(jsonString, "$..book[?(@.author contains 'Melville')]").toString();
System.out.println("--------------- All books with specified substring (case-sensitive) ---------------");
System.out.println(substringExample);

// All books with an ISBN number
String specificBook = JsonPath.read(jsonString, "$..book[?(@.isbn)]").toString();
System.out.println("--------------- All books with an ISBN number ---------------");
System.out.println(specificBook);

We are done! Congratulations on making it through this tutorial and hope you found it useful! Happy Learning!!

How to test POST request from JSON Object in Rest Assured

HOME

In the last tutorial, I explained How to test POST Request using Rest Assured where the request body is in String Format. In this tutorial, I will create a request body using JSON Object in Rest Assured. This request body can be used for POST or PUT operations.

First, set up a basic Rest Assured Maven Project by clicking here and a Gradle project by clicking here.

In the previous post, you must have observed that I had hard-coded the JSON request body in a string format. It is not a good practice if you have a dynamic payload or want to create a payload at run time or parameterized one. It is always recommended to create a payload in a way that is easy to maintain. You should manage, update, and retrieve value from it easily. This can be achieved by JSONObject or JSONArray.

JSONObject is an unordered collection of key and value pairs, resembling Java’s native Map implementations. JSON stores data as a key-value pair. The key is the left side and the value is the right side, and a semicolon is used to separate both. One key-value pair is separated from another key-value pair using a comma (,).

The internal form is an object having the get and opt methods for accessing the values by name and put methods for adding or replacing values by name. The values can be any of these types: Boolean, JSONArray, JSONObject, Number, String, or JSONObject.NULL object.

To create a request body using JSON Object, we need to add a Maven dependency.

<dependencies>

    <dependency>
      <groupId>org.json</groupId>
      <artifactId>json</artifactId>
      <version>20240303</version>
    </dependency>

    <dependency>
      <groupId>junit</groupId>
      <artifactId>junit</artifactId>
      <version>4.13.2</version>
      <scope>test</scope>
    </dependency>

    <dependency>
      <groupId>io.rest-assured</groupId>
      <artifactId>rest-assured</artifactId>
      <version>5.5.0</version>
      <scope>test</scope>
    </dependency>

 </dependencies>

JSONObject is imported from package:-

import org.json.JSONObject;

JSONObject exposes an API similar to Java’s Map interface. Below is an example of creating a request from a JSON Object. Here, Id is the auto-generated attribute. We are using the put() method and supply the key and value as an argument. I am using a logger just to print the JSON body in the Console. 

import io.restassured.RestAssured;
import io.restassured.http.ContentType;
import org.json.JSONObject;
import org.junit.Test;
import static org.hamcrest.Matchers.equalTo;

public class Json_Demo {

    @Test
    public void passBodyAsJsonObject() {

        JSONObject data = new JSONObject();

        data.put("employee_name", "MapTest");
        data.put("profile_image", "test.png");
        data.put("employee_age", "30");
        data.put("employee_salary", "11111");

        RestAssured
                .given()
                .contentType(ContentType.JSON)
                .body(data.toString())
                .log().all()

                .when()
                .post("https://dummy.restapiexample.com/api/v1/create")

                .then()
                .assertThat().statusCode(200)
                .body("data.employee_name", equalTo("MapTest"))
                .body("data.employee_age", equalTo("30"))
                .body("data.employee_salary", equalTo("11111"))
                .body("data.profile_image", equalTo("test.png"))
                .body("message", equalTo("Successfully! Record has been added."))
                .log().all();

    }
}

The request body will look as shown below:-

The texts produced by the toString() methods strictly conform to the JSON syntax rules.

 .body(data.toString())

The above one is a simple JSON Request Body. Let’s take an example of a Complex Request Body or nested Request Body.

We need to create two JSONObject here. One will hold overall key-value pairs, and another JSONObject will hold only employee_details key-value pairs. 

Below is an example that shows how to create a complex JSON request body using JSONObject.

@Test
public void passBodyAsJsonObjectDemo() {
        
   //First JSONObject
	JSONObject data = new JSONObject();

	data.put("profile_image", "test.png");
        
    //Second JSONObject
	JSONObject detail = new JSONObject();

	detail.put("updated_message", "Details of New Resource");
	detail.put("employee_age", "30");

	data.put("employee_details", detail);

	data.put("employee_name", "MapTest");
	data.put("employee_salary", "11111");
	
	RestAssured
        .given()
               .contentType(ContentType.JSON)
               .body(data.toString())
               .log().all()
				
		.when()
              .post("http://dummy.restapiexample.com/api/v1/create")
				
		.then()
               .assertThat().statusCode(200)
               .body("data.employee_name", equalTo("MapTest"))
			   .body("data.employee_details.employee_age", equalTo("30"))
			   .body("data.employee_details.updated_message", equalTo("Details of New Resource"))
			   .body("data.employee_salary", equalTo("11111")).body("data.profile_image", equalTo("test.png"))
				.body("message", equalTo("Successfully! Record has been added."))
                .log().all();
	}
}

The request body will look as shown below:-

We are done. Congratulations on making it through this tutorial and hope you found it useful! Happy Learning!!

Setup Basic REST Assured Gradle Project In Eclipse IDE

HOME

In the previous tutorial, I have provided the Introduction of Rest Assured. In this tutorial, I will explain how to setup basic Rest Assured Gradle project in Eclipse IDE. Before going through this tutorial, it is recommended to go through previous tutorial to know about Rest Assured.

What is Gradle?

Gradle is an open-source build automation tool that is designed to be flexible enough to build almost any type of software. A build automation tool is used to automate the creation of applications. The building process includes compiling, linking, and packaging the code. The process becomes more consistent with the help of building automation tools.

Steps to setup Rest Assured Gradle Project in Eclipse

  1. Download and Install Java on the system
  2. Download and setup Eclipse IDE on the system
  3. Setup Gradle on System
  4. Create a new Gradle Project
  5. Add Rest-Assured dependencies to the project

Step 1- Download and Install Java

Rest-Assured needs Java to be installed on the system to run the tests. Check if Java is installed on your machine or not by using the below command on Command Prompt.

java -version

If Java is not installed, then click here to know How to install Java.

Step 2 – Download and setup Eclipse IDE on the system

The Eclipse IDE (integrated development environment) provides strong support for Java developers. If Eclipse IDE is already not present on your system, then click here to know How to install Eclipse.

Step 3 – Setup Gradle

To build a test framework, we need to add several dependencies to the project. This can be achieved by any build Tool. I have used Gradle Build Tool. Click here to know How to install Gradle.

Step 4 – Create a new Gradle Project

To know, in detail, how to create a Gradle project in Eclipse, refer to this link.

File ->New Project ->Gradle Project ->Next.

Provide projectname and location where you want to save the project on your system. Click the Finish Button.

Verify the Gradle Version and Gradle project structure name. Click the Finish Button.

Below is the structure of the new Gradle project.

Below is the structure and content of the build.gradle of the new project.

Step 5 – Add Rest-Assured dependencies to the project

Add Rest-Assured, JSON Schema Validator, and JUnit dependencies to the project.

    // Use rest assured
    testImplementation 'io.rest-assured:rest-assured:4.3.3'
    testImplementation 'io.rest-assured:json-schema-validator:4.3.3'

Step 6 – Below are the Rest Assured, json schema validator, junit jar files present under Maven Dependencies.

Make sure you right-click on project -> Select Gradle ->Refresh Gradle Project. It is needed to see the new jar files in the project.

That’s it! Congratulations on making it through this tutorial and hope you found it useful! Happy Learning!! Cheers

How To Create Gradle Project with Cucumber to test Rest API

HOME

This tutorial describes the creation of the Gradle Java Project to test Rest API using Cucumber BDD and Rest-Assured.

In this tutorial, I will explain creating a framework for the testing of Rest API in Cucumber BDD.

  1. Cucumber – 6.8.1 or above
  2. Java 8 or above
  3. JUnit 4
  4. Gradle 6.6.1 (Build Tool)
  5. Rest Assured 4.3.3

Project Structure

Step 1- Download and Install Java

Cucumber and Rest-Assured need Java to be installed on the system to run the tests. Click here to learn How to install Java.

Step 2 – Download and setup Eclipse IDE on the system

The Eclipse IDE (integrated development environment) provides strong support for Java developers. Click here to learn How to install Eclipse.

Step 3 – Setup Gradle

To build a test framework, we need to add several dependencies to the project. This can be achieved by any build tool. I have used the Gradle Build Tool. Click here to learn How to install Gradle.

Step 4 – Create a new Gradle Project

To create a new Gradle project, go to the top left side and select File -> New Project -> Gradle -> Gradle project -> Next -> Enter Project Name and Project Location ->Next ->Select Gradle Version ->Next ->Review the Configuration -> Finish.

Click here to know How to create a Gradle Java project. Below is the structure of the Gradle project.

Step 5 – Add Rest-Assured and Cucumber dependencies to the Gradle project

This syntax is used for Gradle 5.0 and higher.

dependencies {
    // This dependency is exported to consumers, that is to say found on their compile classpath.
    api 'org.apache.commons:commons-math3:3.6.1'

    // This dependency is used internally, and not exposed to consumers on their own compile classpath.
    implementation 'com.google.guava:guava:29.0-jre'
    
    testImplementation 'io.cucumber:cucumber-java:6.8.1'
    testImplementation 'io.cucumber:cucumber-junit:6.8.1'
    testImplementation 'io.rest-assured:rest-assured:4.3.3'

If you are using Gradle 4.10.3 or older, use the below dependency block to build.gradle.

dependencies {
    testCompile 'io.cucumber:cucumber-java:6.8.1'
}

Step 6 – Add Configuration to build.gradle

The below configuration is added to the build.gradle when Gradle is 5.0 or higher version.

configurations {
    cucumberRuntime {
        extendsFrom testImplementation
    }
}

If Gradle is 4.10.3 or older, use the below configuration.

configurations {
    cucumberRuntime {
        extendsFrom testRuntime
    }
}

Step 7 – Add Gradle Cucumber Task to build.gradle 

task cucumber() {
    dependsOn assemble, testClasses
    doLast {
        javaexec {
            main = "io.cucumber.core.cli.Main"
            classpath = configurations.cucumberRuntime + sourceSets.main.output + sourceSets.test.output
            args = ['--plugin', 'pretty', '--glue', 'com.example.gradle.apidemo', 'src/test/resources']
        }
    }
}

Once you have added dependencies, configurations, and Gradle cucumber task, Right-click on the project, Hover to the Gradle option, and click Refresh Gradle Project. Eclipse does not automatically update the classpath of the build.gradle file is updated. Select Gradle  Refresh Gradle Project from the context menu of the project or from your build.gradle file for that.

Step 8 – Create a feature file under src/test/resources

A new Gradle Project is created with 4 folders – src/main/java, src/main/resources, src/test/java and src/test/resources. Features are created under the src/test/resources directory. Create a folder with name features. Now, create the feature file in this folder. The feature file should be saved with the extension .feature. This feature file contains the test scenarios created to test the application. The Test Scenarios are written in Gherkins language in the format of Given, When, Then, And, But.

Below is an example of a Test Scenario where we are using the GET method to get the information from the API.

Feature: Validation of get method
 
@GetUserDetails
  Scenario Outline: Send a valid Request to get user details
 
  Given I send a request to the URL to get user details
  Then the response will return status 200 and id <id> and salary <employee_salary> and name "<employee_name>" and age <employee_age> and message "<message>"
 
Examples:
    |id  |employee_salary|employee_name |employee_age  |message                                  |
    |1   |320800         |Tiger Nixon   |61            |Successfully! Record has been fetched.   |
   

Step 9 – Create the Step Definition class or Glue Code for the Test Scenario

Step Definition acts as an intermediate to your runner and feature file. It stores the mapping between each step of the scenario in the Feature file. So when you run the scenario, it will scan the step definition file to check the matched glue or test code.

import io.restassured.http.ContentType;
 
import io.restassured.response.ValidatableResponse;
 
import static io.restassured.RestAssured.given;
import static org.hamcrest.Matchers.equalTo;
 
import io.cucumber.java.en.Given;
import io.cucumber.java.en.Then;
 
public class API_GETDefinitions {
     
 
    private ValidatableResponse validatableResponse;
 
    private String endpoint = "http://dummy.restapiexample.com/api/v1/employee/1";
  
    @Given("I send a request to the URL to get user details")
    public void sendRequest(){
        validatableResponse = given().contentType(ContentType.JSON)
                .when().get(endpoint).then();   
         
        System.out.println("Response :"+validatableResponse.extract().asPrettyString());
    }
  
  
    @Then("the response will return status {int} and id {int} and salary {int} and name {string} and age {int} and message {string}")
    public void verifyStatus(int statusCode, int id, int emp_Salary, String emp_name, int emp_age, String message ){
         
        validatableResponse.assertThat().statusCode(statusCode);
         
        validatableResponse.assertThat().body("data.id",equalTo(id));
         
        validatableResponse.assertThat().body("data.employee_salary",equalTo(emp_Salary));
         
        validatableResponse.assertThat().body("data.employee_name",equalTo(emp_name));
         
        validatableResponse.assertThat().body("data.employee_age",equalTo(emp_age));
         
        validatableResponse.assertThat().body("message",equalTo(message));      
         
    }
}

In order to use REST assured effectively, it’s recommended to statically import methods from the following classes:

import io.restassured.RestAssured.*
import io.restassured.matcher.RestAssuredMatchers.*
import static org.hamcrest.Matchers.*

given() method is imported from package:

import static io.restassured.RestAssured.given;

equalTo() method is imported from package:

import static org.hamcrest.Matchers;

Step 10 – Create a Cucumber Runner class 

A runner will help us to run the feature file and act as an interlink between the feature file and step definition Class. To know more about Runner, refer to this link.

import org.junit.runner.RunWith;

import io.cucumber.junit.Cucumber;
import io.cucumber.junit.CucumberOptions;

@RunWith(Cucumber.class)

@CucumberOptions(plugin ="pretty",features= {"src/test/resources/features/API_GET.feature"}, glue= {"com.example.gradle.apidemo"})

public class CucumberRunnerTest {

}

Step 11 – Run the tests from JUnit

You can execute the test script by right-clicking on the Test Runner class -> Run As JUnit.

Step 12 – Run the tests from the Command Line

Run the following Gradle task from the directory path where build.gradle file is located. To know more about this report, refer here.

gradle cucumber

Below is the screenshot of the execution of Cucumber tests in Command-Line.

Step 13 – Cucumber Report Generation

To get Cucumber Test Reports, add cucumber.properties under src/test/resources and add the below instruction in the file.

cucumber.publish.enabled=true

Below is the image of the Cucumber Report.

We are done! Congratulations on making it through this tutorial and hope you found it useful! Happy Learning!!

SpringBoot WireMock

HOME

What is WireMock?

WireMock is a library for stubbing and mocking web services. It constructs a HTTP server that act as an actual web service. When a WireMock server is in action, we have the option to set up expectations, call the service, and then verify the behavior of service. It allows us to:-

  • Capture the incoming HTTP requests and write assertions for the captured HTTP requests.
  • Configure the response returned by the HTTP API when it receives a specific request.
  • Identify the stubbed and/or captured HTTP requests by using request matching.
  • Configure request matchers by comparing the request URL, request method, request headers, cookies, and request body with the expected values.
  • Use WireMock as a library or run it as a standalone process.

Why do we need to Wiremock a SpringBoot Application

Suppose your SpringBoot Application calls an external application and this call to external service bear some cost. You can’t test the application without calling the external service, So in this case, we can use WireMock to mock the external application while testing the REST service that you are developing in SpringBoot.

Spring Cloud Contract WireMock

The Spring Cloud Contract WireMock modules allow us to use WireMock in a Spring Boot application.

To use WireMock in SpringBoot, add Maven dependency

<dependency>
	<groupId>org.springframework.cloud</groupId>
	<artifactId>spring-cloud-contract-wiremock</artifactId>
	<scope>test</scope>
</dependency>

To use WireMock’s fluent API add the following import:

import static com.github.tomakehurst.wiremock.client.WireMock.*;

We can use JUnit  @Rules  to start and stop the server. To do so, use the WireMockRule convenience class to obtain options instance, as the following example shows:

@Rule
    public WireMockRule wireMockRule = new WireMockRule(options().port(8081));

Wiremock runs as a stub server, and you can register stub behavior by using a Java API or by using static JSON declarations as part of your test.

Let us take the example of Student SpringBoot Application. The Response JSON of Student is shown below.

Creating a first WireMock mock service

Let us create a simple wiremock service with return status code as 200 and statsus message as “OK”.

@SpringBootTest
public class Wiremock_Example {

	@Rule
	public WireMockRule wireMockRule = new WireMockRule(options().port(8081));

	@Test
	public void test() {
	 
       stubFor(get(urlPathEqualTo("/students"))
.willReturn(aResponse().withHeader("Content-Type", "application/json")
.withStatus(200).withStatusMessage("OK")));
	}
}
  1. options is imported from package static com.github.tomakehurst.wiremock.core.WireMockConfiguration.options;
  2. @Rule & @Test are from junit
  3. WireMockRule is from com.github.tomakehurst.wiremock.junit.WireMockRule

The following code will configure a response with a status of 200 and status message of “OK” to be returned when the relative URL exactly matches /students (including query parameters). The body of the response will be “Tom” and Content-Type header will be sent with a value of application/json.

To create the stub described above via the JSON API, the following document can either be posted to http://<host&gt;:<port>/__admin/mappings or placed in a file with a .json extension under the mappings directory:

Dynamic port numbers

Wiremock has the facility to pick free HTTP and HTTPS ports in SpringBoot application, which is a good idea if we need to run the applications concurrently.

@ClassRule
public static WireMockClassRule wiremock = new WireMockClassRule(
			WireMockSpring.options().dynamicPort());

Below is an example which shows how you can mock an applictaion on dynamic ports. In the below example, the localhost port is dynamic here (57099).

@SpringBootTest(webEnvironment = WebEnvironment.RANDOM_PORT)
public class Wiremock_Example {

	@Rule
	public WireMockRule wireMockRule = new WireMockRule(options().dynamicPort());

	@Test
	public void test() {
         stubFor(get(urlPathEqualTo("/students")).willReturn(aResponse()
.withHeader("Content-Type", "application/json")
.withStatus(200).withStatusMessage("OK").withBody("Tom")));
	}
}

How to run and test Mock Service?

In the below example, I will use Rest Assured tests to validate the behaviour of Mock Service. First, I need to get the mock service up and running and then use it in a test.

@SpringBootTest
public class Wiremock_Example {

	@Rule
	public WireMockRule wireMockRule = new WireMockRule(options().port(8089));

	public void setupMockService() {
		wireMockRule.stubFor(get(urlPathEqualTo("/students"))
.willReturn(aResponse().withHeader("Content-Type", "application/json")
.withStatus(200).withStatusMessage("OK")));
	}

	@Test
	public void positiveTest() {
		setupMockService();
   
        given()
       .when()
            .get("http://localhost:8089/students")
       .then()
            .assertThat().statusCode(200);
	}
}

In the below example, it is shown that the response content of a wiremock service can also be verified.

@SpringBootTest
public class Wiremock_Example {

	@Rule
	public WireMockRule wireMockRule = new WireMockRule(options().port(8090));

	public void setupMockService() {

		wireMockRule.stubFor(get(urlPathEqualTo("/students"))
.willReturn(aResponse().withHeader("Content-Type", "application/json")
.withStatus(200).withStatusMessage("OK").withBody("Tom")));
	}

	@Test
	public void responseMessageTest() {

		setupMockService();
		 
         given()
        .when()
            .get("http://localhost:8090/students")
        .then()
           .assertThat().body(containsString("Tom"));
	}
}

How to read response body from a file?

To read the body content from a file, place the file under the  __files directory under src/test/resources when running from the JUnit rule.To make your stub use the file, use withBodyFile() on the response builder with the file’s path relative to __files.

public class Wiremock_Example {

	@Rule
	public WireMockRule wireMockRule = new WireMockRule(options().port(8085));

	public void setupMockService() {

		wireMockRule.stubFor(get(urlPathEqualTo("/students"))
.willReturn(aResponse().withHeader("Content-Type", "application/json")						.withStatus(200).withStatusMessage("OK").withBodyFile("Response.json")));
	}

	@Test
	public void responseFileTest() {

		setupMockService();

		given()
       .when()
           .get("http://localhost:8085/students").then()
       .assertThat()
           .body(containsString("John"));
	}
}

To read more about SpringBoot Wiremock, you can refer SpringBoot Wiremock website.