In the previous tutorial, I explained the Integration of Serenity BDD with Rest Assured in Maven Project. In this tutorial, I will explain the Integration of Serenity BDD with Rest Assured in the Gradle Project.
Table of Contents
- Prerequisite
- Dependency List
- Implementation Steps
- Download and Install Java
- Download and setup Eclipse IDE on the system
- Setup Gradle
- Update repositories, plugin, and dependencies to the Gradle project
- Create a feature file under src/test/resources
- Create the Step Definition class or Glue Code for the Test Scenario
- Create a Serenity Cucumber Runner class
- Create serenity.properties file at the root of the project
- Run the tests through command line, which generates Serenity Report
- Generate Single Page HTML Report
Prerequisite
- Java 11 installed
- Gradle installed
- Eclipse or IntelliJ installed
Dependency List
- Serenity – 2.6.0
- Serenity Cucumber – 2.6.0
- Serenity Rest Assured – 2.6.0
- Rest Assured – 4.3.2
- Java 11
- JUnit – 4.13.2
- Gradle – 7.2
Implementation Steps
Step 1- Download and Install Java
Click here to know How to install Java.
Step 2 – Download and setup Eclipse IDE on the system
The Eclipse IDE (integrated development environment) provides strong support for Java developers. Click here to know How to install Eclipse.
Step 3 – Setup Gradle
To build a test framework, we need to add several dependencies to the project. This can be achieved by any build tool. I have used Gradle Build Tool. Click here to know How to install Gradle. Click here to know How to create a Gradle Java project.
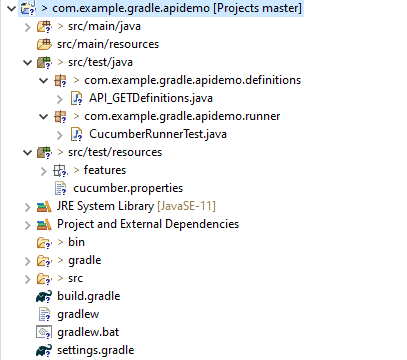
Below is the structure of the Gradle project.
Step 4 – Update repositories, plugin, and dependencies to the Gradle project
defaultTasks 'clean', 'test', 'aggregate'

repositories {
    mavenLocal()
    jcenter()
}

buildscript {
    repositories {
        mavenLocal()
        jcenter()
    }
    dependencies {
        classpath("net.serenity-bdd:serenity-gradle-plugin:2.4.24")
        classpath("net.serenity-bdd:serenity-single-page-report:2.4.24")
    }
}

apply plugin: 'java'
apply plugin: 'eclipse'
apply plugin: 'idea'
apply plugin: 'net.serenity-bdd.aggregator'

sourceCompatibility = 11
targetCompatibility = 11

serenity {
    reports = ["single-page-html"]
}

dependencies {

    testImplementation 'net.serenity-bdd:serenity-cucumber6:2.6.0'
    testImplementation 'net.serenity-bdd:serenity-screenplay:2.6.0'
    testImplementation 'net.serenity-bdd:serenity-screenplay-rest:2.6.0'
    testImplementation 'net.serenity-bdd:serenity-rest-assured:2.6.0'
    testImplementation 'io.rest-assured:rest-assured:4.3.2'
    testImplementation 'junit:junit:4.13.1'
}

test {
    testLogging.showStandardStreams = true
    systemProperties System.getProperties()
}

gradle.startParameter.continueOnFailure = true

test.finalizedBy(aggregate)
Step 5 – Create a feature file under src/test/resources
A Feature File is an entry point to the Cucumber tests. This is a file where you will describe your tests in Descriptive language (Like English). A feature file can contain a scenario or can contain many scenarios in a single feature file. Feature file Below is an example of a Feature file.
Feature: Employee Details


  @GetValidUserDetails
  Scenario Outline: Send a Request to get valid user details

  Given I send a request to the URL <id> to get user details
  Then the response will return statuscode <status> and id <id> and salary <employee_salary> and name '<employee_name>' and age <employee_age> and message '<message>'

  Examples:
    |id  |status  |employee_salary|employee_name |employee_age  |message                                  |
    |1   |200     |320800         |Tiger Nixon   |61            |Successfully! Record has been fetched.   |

  @GetInvalidUserDetails
  Scenario Outline: Send a Request to get invalid user details

  Given I send a request to the URL <id> to get user details
  Then the response will return statuscode <statusCode> and status '<statusMessage>' and and message '<message>'

  Examples:
    |id     |statusCode  |statusMessage    |message                                  |
    |9999   |200         |success          |Successfully! Record has been fetched.   |
Step 6 – Create the Step Definition class or Glue Code for the Test Scenario
The steps definition file stores the mapping between each step of the test scenario defined in the feature file with a code of the function to be executed. So, now when Cucumber executes a step of the scenario mentioned in the feature file, it scans the step definition file and figures out which function is to be called.
public class EmployeeDefinitions {

	private static final String URL = "http://dummy.restapiexample.com/api/v1/employee/";
	public Response response;

	@Given("I send a request to the URL {int} to get user details")
	public void sendRequest(int id) {

		response = SerenityRest.given().contentType("application/json").header("Content-Type", "application/json")
				.when().get(URL + id);
	}

	@Then("the response will return statuscode {int} and id {int} and salary {int} and name {string} and age {int} and message {string}")

	public void verifyValidUser(int statusCode, int id, int salary, String name, int age, String message) {
		SerenityRest.restAssuredThat(response -> response.statusCode(statusCode).and().body("data.id", equalTo(id))
				.and().body("data.employee_salary", equalTo(salary)).and().body("data.employee_name", equalTo(name))
				.and().body("data.employee_age", equalTo(age)).and().body("message", equalTo(message)));

	}

	@Then("the response will return statuscode {int} and status {string} and and message {string}")
	public void verifyInalidUser(int statusCode, String statusMessage, String message) {
		SerenityRest.restAssuredThat(response -> response.statusCode(statusCode).and()
				.body("status", equalTo(statusMessage)).and().body("message", equalTo(message)));

	}
}
Step 7 – Create a Serenity Cucumber Runner class
Cucumber runs the feature files via JUnit and needs a dedicated test runner class to actually run the feature files. When you run the tests with Serenity, you use the CucumberWithSerenity test runner. You also need to use the @CucumberOptions class to provide the root directory where the feature files can be found.
import org.junit.runner.RunWith;

import io.cucumber.junit.CucumberOptions;
import net.serenitybdd.cucumber.CucumberWithSerenity;

@RunWith(CucumberWithSerenity.class)
@CucumberOptions(plugin = { "pretty" }, features = "lib/src/test/resources/features/Employee.feature", glue = {
		"serenitygradlerestautomation.definitions" })

public class SerenityRunnerTest {
}
Step 8 – Create serenity.properties file at the root of the project
serenity.project.name = Serenity and Gradle Rest Assured Demo
Step 9 – Run the tests through command line, which generates Serenity Report
Open the command line and go to the location where gradle.build of the project is present and type the below command.
gradle test
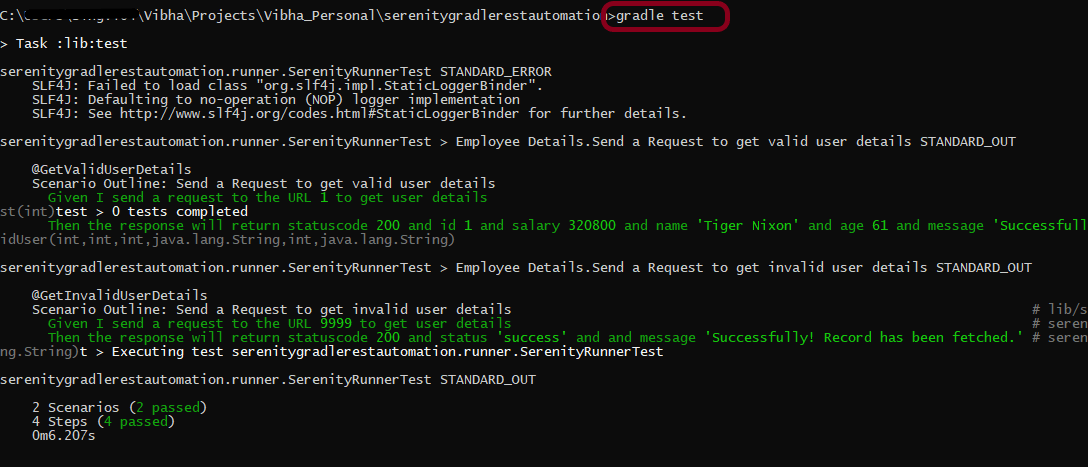
The Serenity report is generated under /lib/target/site/serenity.
Index.html

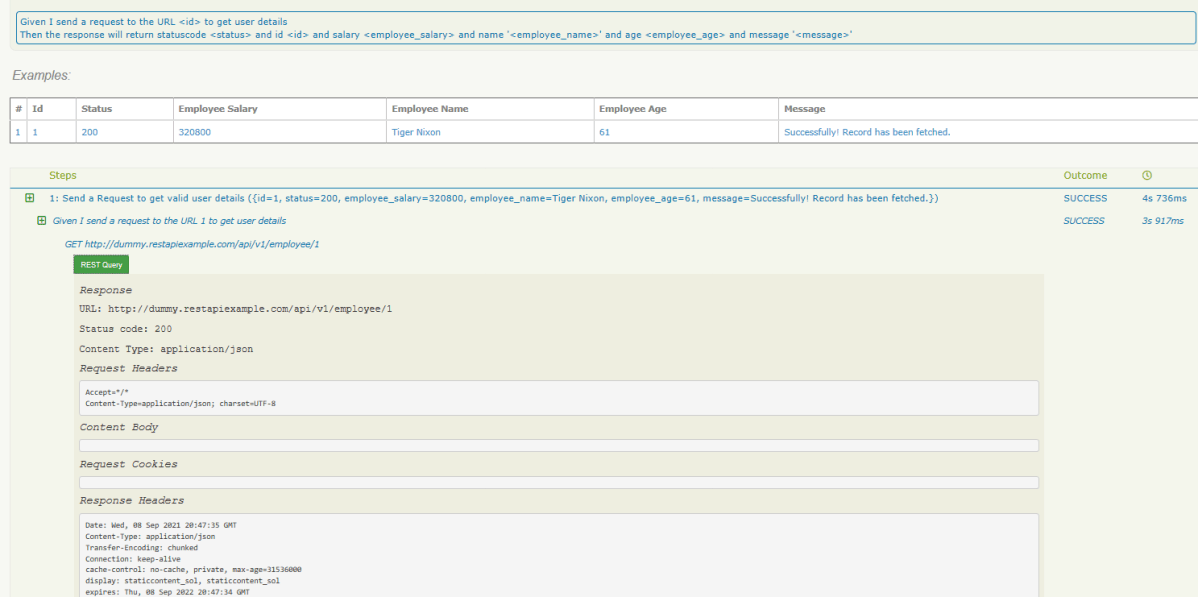
Overall Test Results Section provides the details about all the Test Scenario, like the time taken by each test step, the status of each test step, and soon.
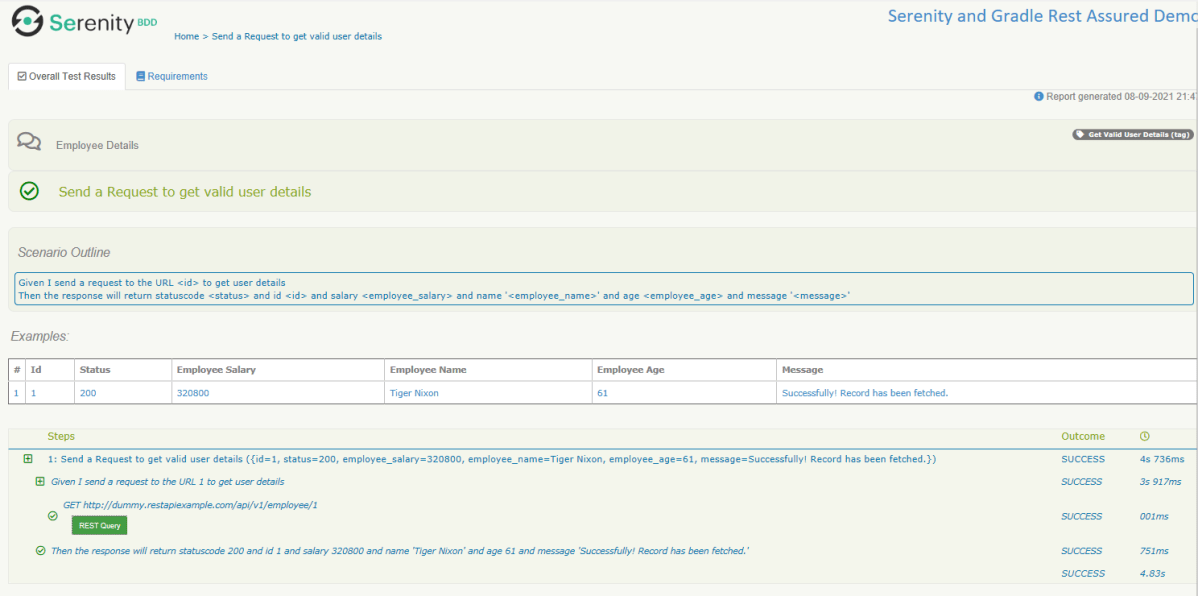
In this report, you can see the request as well as response details in the report.
Step 10 – Generate Single Page HTML Report
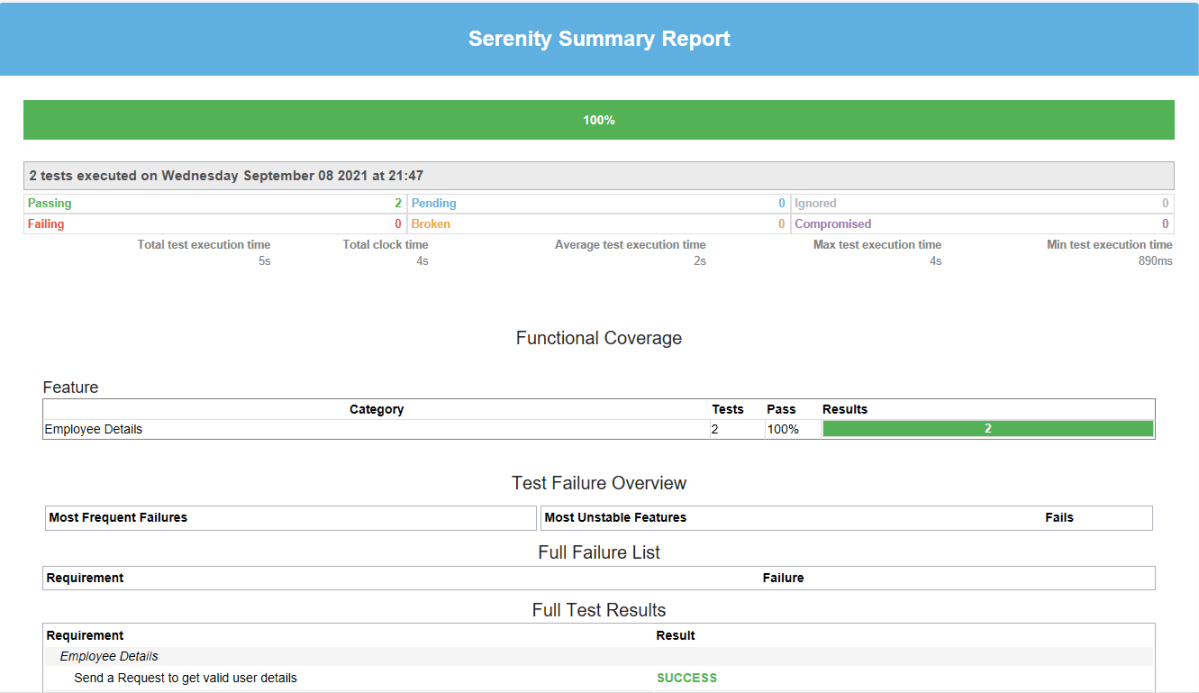
As we have already mentioned the dependencies of a single-page-report in build.gradle, we can generate an emailable serenity report that contains the summary of test execution.
gradle reports

Serenity Summary Report (single-page-report.html) is placed under lib\target\site\serenity.
We are done! Congratulations on making it through this tutorial and hope you found it useful! Happy Learning!!