Jenkin’s installed and started on the computer. The current Jenkins version is – 2.361.2
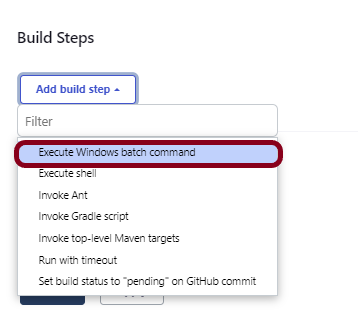
Implementation Steps
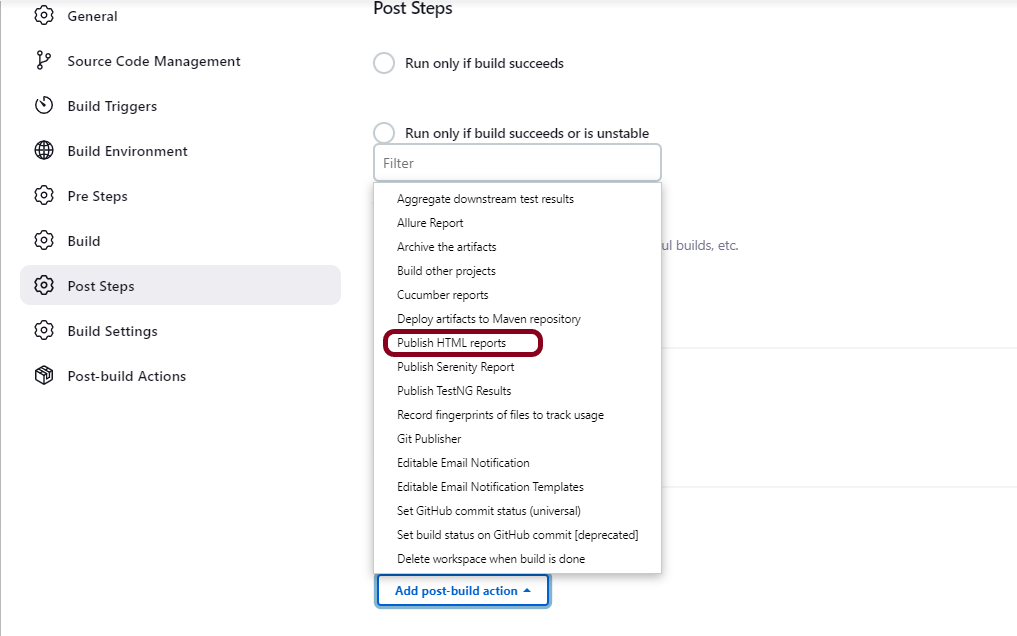
To generate HTML Report in Jenkins, we need to download HTML Publisher Plugin. Please refer to this tutorial to install the plugin – How to install Plugins in Jenkins.
Step 1: Create a new FreeStyle project
Give the Name of the project – RobotFramework_Demo
Click on the Maven project.
Click on the OK button.
In the General section, enter the project description in the Description box.
Step 2: Select a custom workspace
Mention the full path of the project in the Use custom workspace.
Select Source Code Management as None if the project is locally present on the machine.
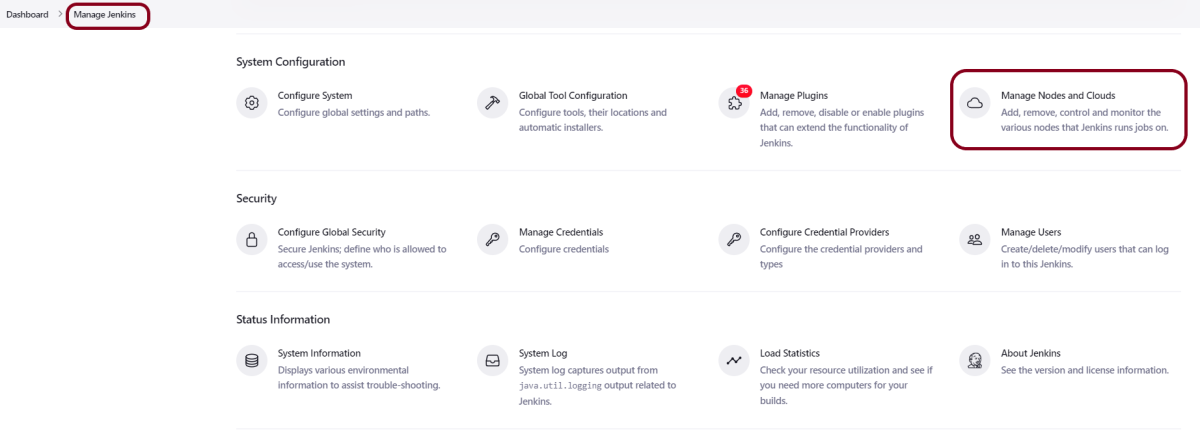
We can customize Content Security Policy in Jenkins. But keep in mind that it should be done after checking with the Security team in your organization. This is a workaround solution. I can’t emphasize enough that this is not a standard practice.
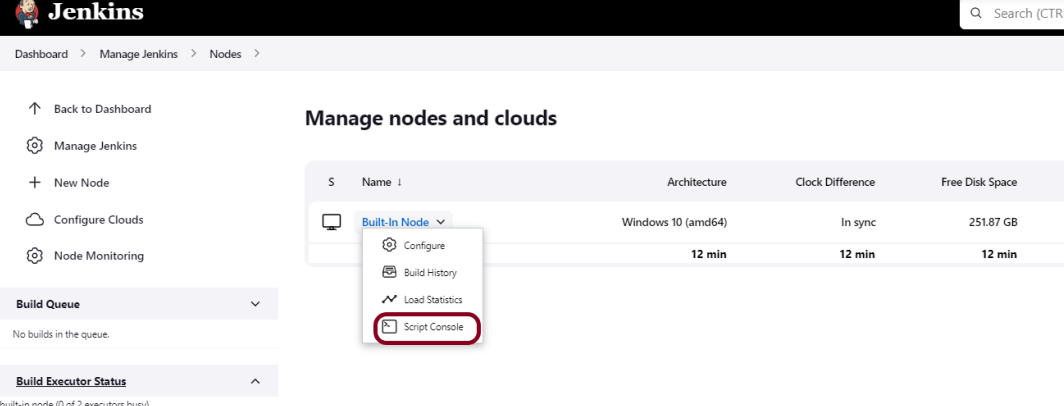
Go to Manage Jenkins -> Manage Nodes and Clouds.
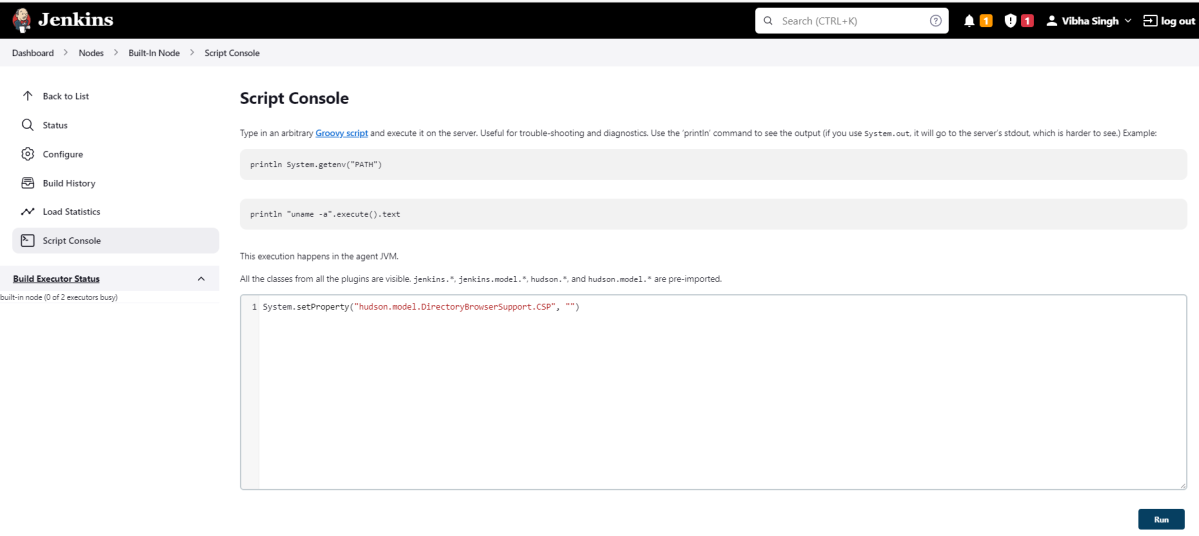
Click on the Script Console option.
Type in the following command and Press Run. If you see the output as ‘Result:’ then the protection is disabled. Re-Run your build and you can see that the new HTML files archived will have the CSS enabled.
In this tutorial, we will discuss running the tests parallelly in the Robot Framework. To run the tests parallelly, we need to have pabot installed on the machine. Pabot is a parallel test runner for Robot Framework. It can be used to run tests in parallel on a single machine with multiple processes.
What is Parallel Testing?
Parallel testing is an automated testing process that allows developers and testers to run numerous tests against various real-world device combinations and browser setups at the same time. Parallel testing aims to solve time restrictions by distributing tests across available resources.
For example, if 20 test cases take 100 minutes to complete, 10 parallel execution might run 2 test cases each, reducing overall testing time to 10 minutes.
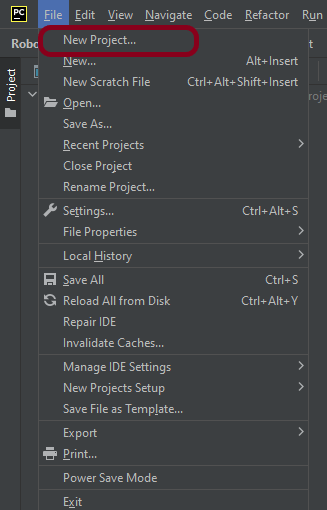
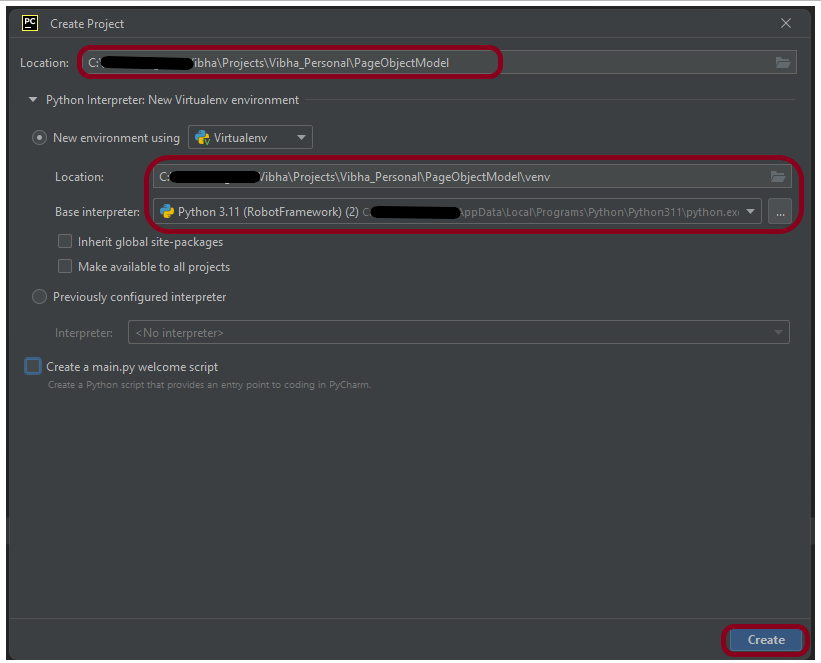
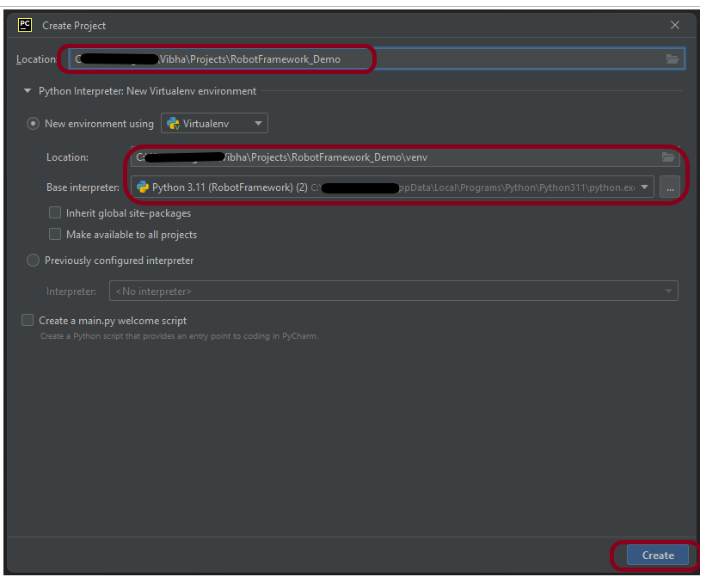
Step 1.1 – Open PyCharm and create a new project. Go to File and select New Project from the main menu.
Step 1.2 – Choose the project location. Click the “Browse” button next to the Location field and specify the directory for your project.
Deselect the Create a main.py welcome script checkbox because you will create a new Python file for this tutorial.
Click on the “Create” Button.
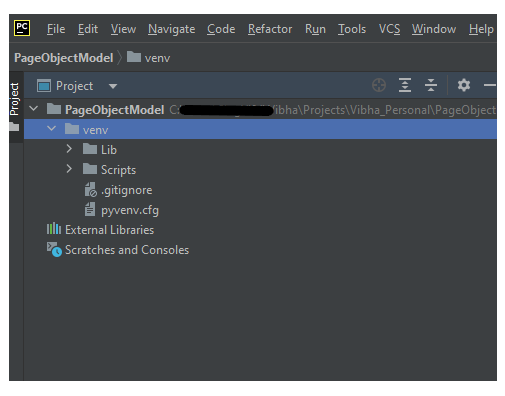
Step 1.3 – A new dialog appears asking to open the project using any one of the given options. I have selected New Window as I like to have separate windows for each project.
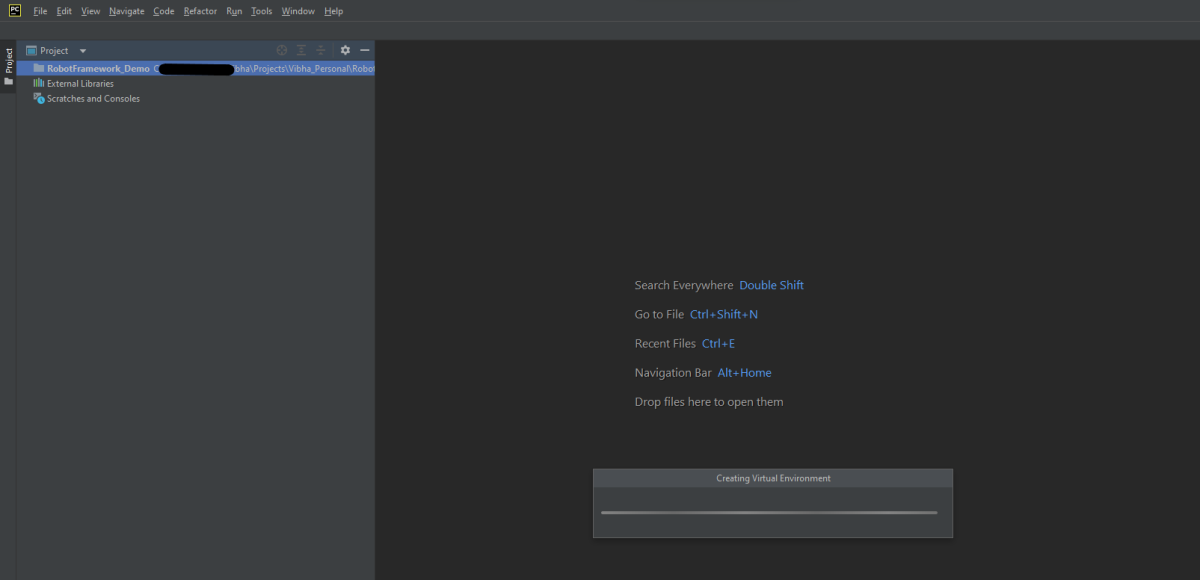
Below is the image of the new project created in PyCharms.
Step 2 – Download pabot plugin
Go to command prompt and run the below mentioned command to download pabot:
pip install -U robotframework-pabot
Step 3 – Add pabot package to the PyCharms
Go to File->Settings ->Project:RobotFramework_Demo ->Python Interpreter.
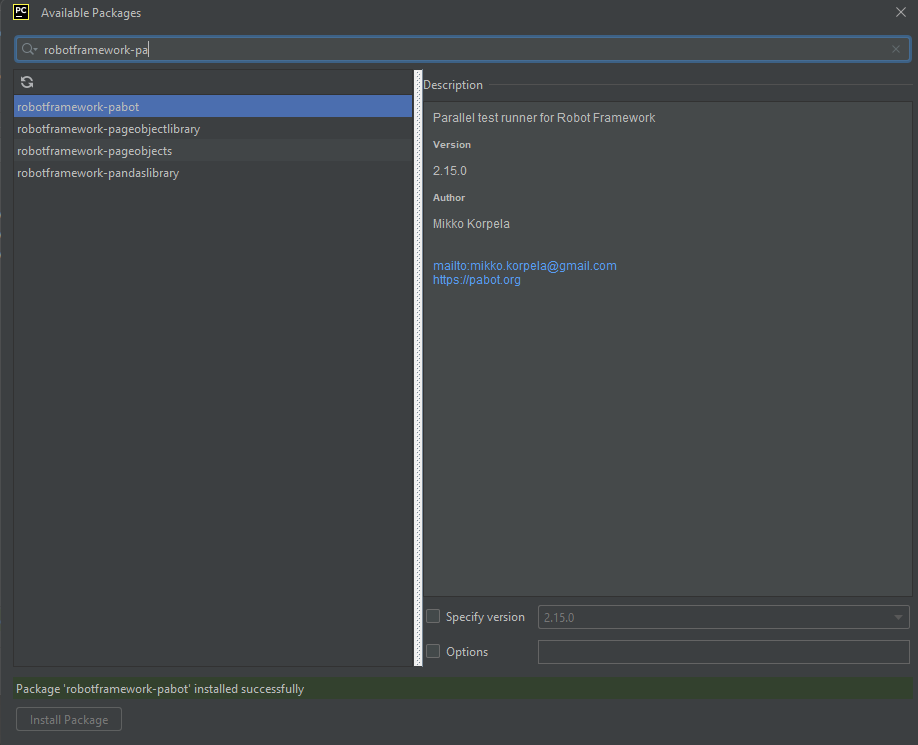
Click on the “+” sign and enter pabot in the search bar. It will show a list of packages. Select the “robotframework-pabot” package and click on the “Install Package”.
Once the package is installed, we will see the message that the package is installed successfully.
Once the package is installed, it can be seen under the package list as shown below:
Click the “Apply” and “OK” button.
Step 4 – Create 3 new directories in the new project
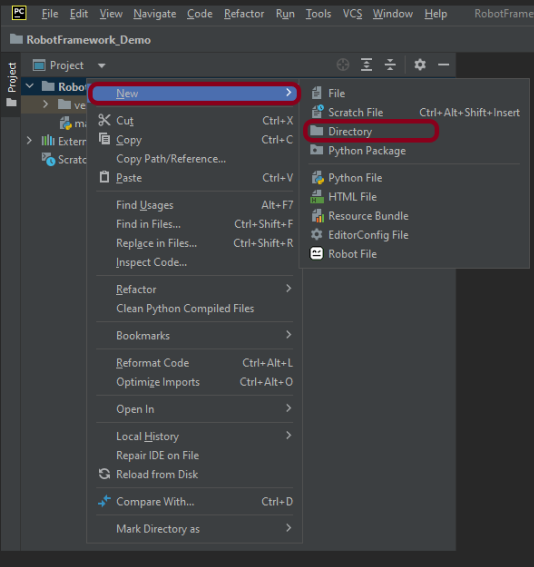
Right-Click on the project, select New->Directory, and provide the name as TestCases, Drivers, and Resources
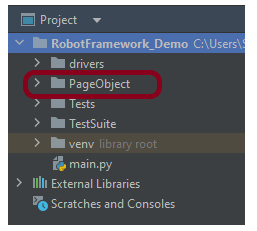
Below is the image of the new directories.
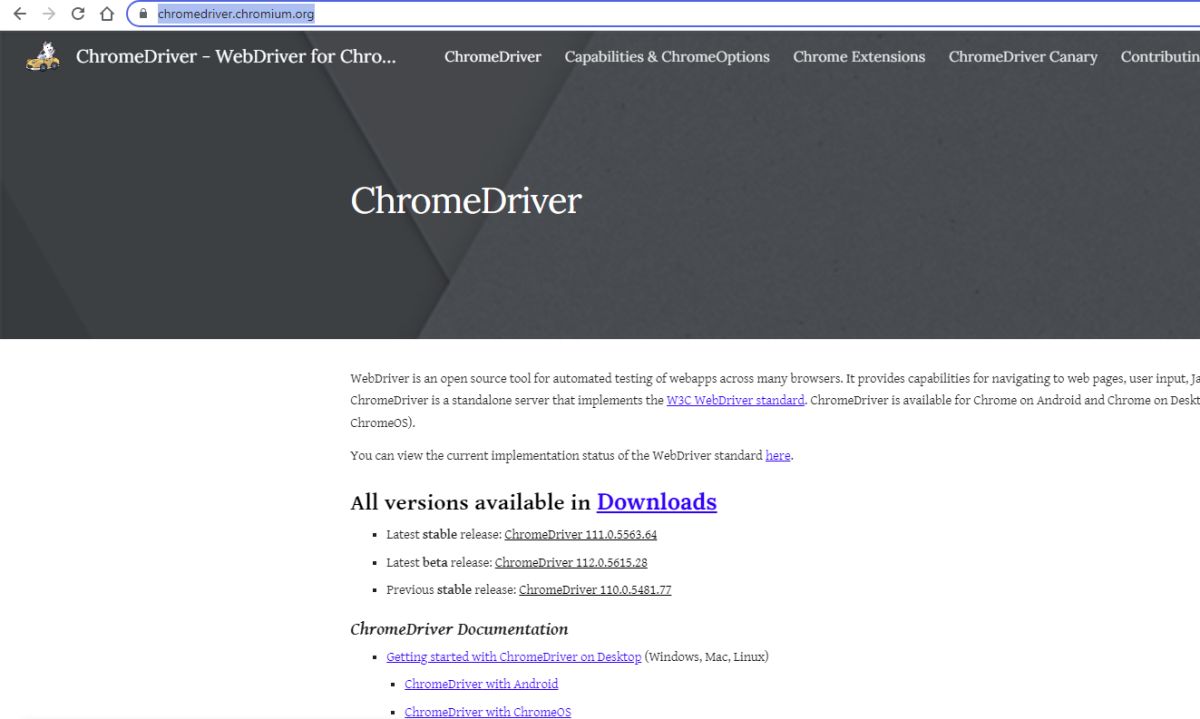
Step 5 – Download ChromeBinaries and place them in the Drivers directory
This directory contains the browser binary in it. As we are using Chrome, will keep chromedriver.exe here.
The tests are going to use the Chrome browser, so we need to download the ChromeBinaries to open a blank browser in Chrome.
This directory contains multiple test case files consisting of test steps.
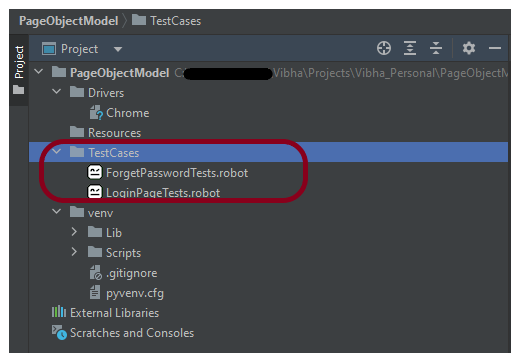
Right-click on the new directory and select New File and provide the name as LoginPageTests.robot and ForgetPasswordTests.robot as shown below:
Below is the code for LoginPageTests.robot
*** Settings ***
Documentation       Tests to login to Login Page
Library     SeleniumLibrary
Test Setup      Open the Browser with URL
Test Teardown   Close Browser Session
Resource       ../Resources/GenericResources.robot
Resource       ../Resources/LoginResources.robot
Resource      ../Resources/DashboardResources.robot

*** Test Cases ***

Validate Unsuccessful Login using invalid credentials

    LoginResources.Fill the login form     ${valid_username}       ${invalid_password}
    LoginResources.Verify the error message is correct


Validate Unsuccessful Login for blank username

     LoginResources.Fill the login form     ${blank_username}       ${valid_password}
     LoginResources.Verify the error message is displayed for username


Validate Unsuccessful Login for blank password

     LoginResources.Fill the login form     ${valid_username}       ${blank_password}
     LoginResources.Verify the error message is displayed for password


Validate successful Login


    LoginResources.Fill the login form     ${valid_username}       ${valid_password}
    DashboardResources.Verify Dashboard page opens
Below is the code for ForgetPasswordTests.robot
*** Settings ***
Documentation       Tests to validate Forgot Your Password Page functionality
Library     SeleniumLibrary
Test Setup      Open the Browser with URL
Test Teardown   Close Browser Session
Resource       ../Resources/GenericResources.robot
Resource       ../Resources/LoginResources.robot
Resource      ../Resources/ForgetPasswordResources.robot


*** Test Cases ***

Validate Reset Password Functionality

    LoginResources.Go to Forgot Your Password Page
    ForgetPasswordResources.Verify Forgot Your Password Page opens
    ForgetPasswordResources.Fill the Forgot Password Page
    ForgetPasswordResources.Verify the message

Validate Cancel Functionality

    LoginResources.Go to Forgot Your Password Page
    ForgetPasswordResources.Verify Forgot Your Password Page opens
    ForgetPasswordResources.Cancel the Reset Password
    ForgetPasswordResources.Verify that Login Page is displayed
Step 7 – Create Resources file for each page
It maintains the files which contain page elements as well as corresponding keywords.
Right-click on the new directory and select New File and provide the name as LoginResources.robot, DashboardResources.robot, GenericResources.robot, and ForgetPasswordResources.robot as shown below:
GenericResources.robot contains the keywords that are common to all the tests, like the opening of the browser or closing of the browser.
*** Settings ***
Documentation    A resource file with reusable keywords and variables.
Library     SeleniumLibrary

*** Variables ***
${valid_username}     Admin
${valid_password}       admin123
${invalid_username}     1234
${invalid_password}     45678
${blank_username}
${blank_password}
${url}      https://opensource-demo.orangehrmlive.com/web/index.php/auth/login
${browser_name}      Chrome

*** Keywords ***

Open the Browser with URL
    Create Webdriver    ${browser_name}  executable_path=/Vibha_Personal/RobotFramework_Demo/drivers/${browser_name}
    Go To       ${url}
    Maximize Browser Window
    Set Selenium Implicit Wait    5

Close Browser Session
    Close Browser
Below is the code for LoginResources.robot
*** Settings ***
Documentation        All the page objects and keywords of landing page
Library     SeleniumLibrary

*** Variables ***
${login_error_message}      css:.oxd-alert-content--error
${dashboard_title}       css:.oxd-topbar-header-breadcrumb-module
${missing_username_error_message}    xpath://*[@class='oxd-form']/div[1]/div/span
${missing_password_error_message}   xpath://*[@class='oxd-form']/div[2]/div/span
${forgot_password_link}   xpath://div[@class='orangehrm-login-forgot']/p

*** Keywords ***

Fill the login form
    [Arguments]    ${username}      ${password}
   Input Text    css:input[name=username]   ${username}
   Input Password    css:input[name=password]   ${password}
   Click Button    css:.orangehrm-login-button


Verify the error message is correct
    Element Text Should Be    ${login_error_message}    Invalid credentials


Verify the error message is displayed for username
     Element Text Should Be    ${missing_username_error_message}      Required

Verify the error message is displayed for password
      Element Text Should Be    ${missing_password_error_message}      Required

Go to Forgot Your Password Page
    Click Element      ${forgot_password_link}
Below is the code for DashboardResources.robot
*** Settings ***
Documentation        All the page objects and keywords of Dashboard page
Library     SeleniumLibrary

*** Variables ***
${dashboard_title}       css:.oxd-topbar-header-breadcrumb-module

*** Keywords ***

Verify Dashboard page opens
    Element Text Should Be    ${dashboard_title}      Dashboard
Below is the code for ForgetPasswordResources.robot
*** Settings ***
Documentation       All the page objects and keywords of Forget Password page
Library     SeleniumLibrary

*** Variables ***
${forgot_page_title}       css:.orangehrm-forgot-password-title
${username}     css:.oxd-input--active
${reset_btn}     css:.orangehrm-forgot-password-button--reset
${cancel_btn}    css:.orangehrm-forgot-password-button--cancel
${reset_message}      xpath://div[@class='orangehrm-card-container']/h6
${login_page_title}   xpath://*[@class='orangehrm-login-slot']/h5

*** Keywords ***

Verify Forgot Your Password Page opens
    Element Text Should Be    ${forgot_page_title}      Reset Password

Fill the Forgot Password Page
   Input Text        ${username}     abc@gmail.com
   Click Button    ${reset_btn}

Verify the message
    Element Text Should Be    ${reset_message}      Reset Password link sent successfully

Cancel the Reset Password
    Click Button    ${cancel_btn}

Verify that Login Page is displayed
    Element Text Should Be    ${login_page_title}       Login
All the below-mentioned keywords are derived from SeleniumLibrary. The functionality of keywords mentioned above:
1. Create Webdriver − The keyword creates an instance of Selenium WebDriver.
2. Go To – This keyword navigates the current browser window to the provided URL.
3. Maximize Browser Window – This keyword maximizes the current browser window.
4. Set Selenium Implicit Wait – This keyword sets the implicit wait value used by Selenium.
5. Input Text − This keyword is used to type the given text in the specified textbox identified by the locator name:username.
6. Input Password – This keyword is used to type the given text in the specified password identified by the locator name:password.
The difference compared to Input Text is that this keyword does not log the given password on the INFO level.
7. Click button – This keyword is used to click the button identified by the locator. In this case, it is “Login” button.
8. Element Text Should Be – This keyword is used to verify that the current page contains the exact text identified by the locator. Here, we are checking the exact text “Invalid Credentials”.
To run this script, go to the command line and go to directory tests.
Step 8 – Split execution to suite files
We need the below command to run the Robot Framework script. This will start all the test suites parallelly. We have 2 test files, so they started parallelly.
pabot .
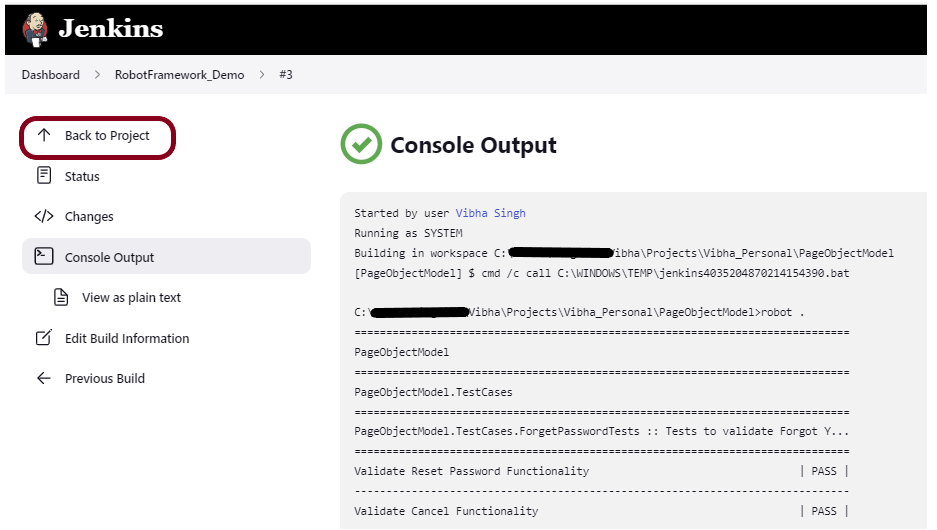
The output of the above program is
Step 9 – View Report and Log
We have the test case passed. The Robot Framework generates log.html, output.xml, and report.html by default.
Let us now see the report and log details.
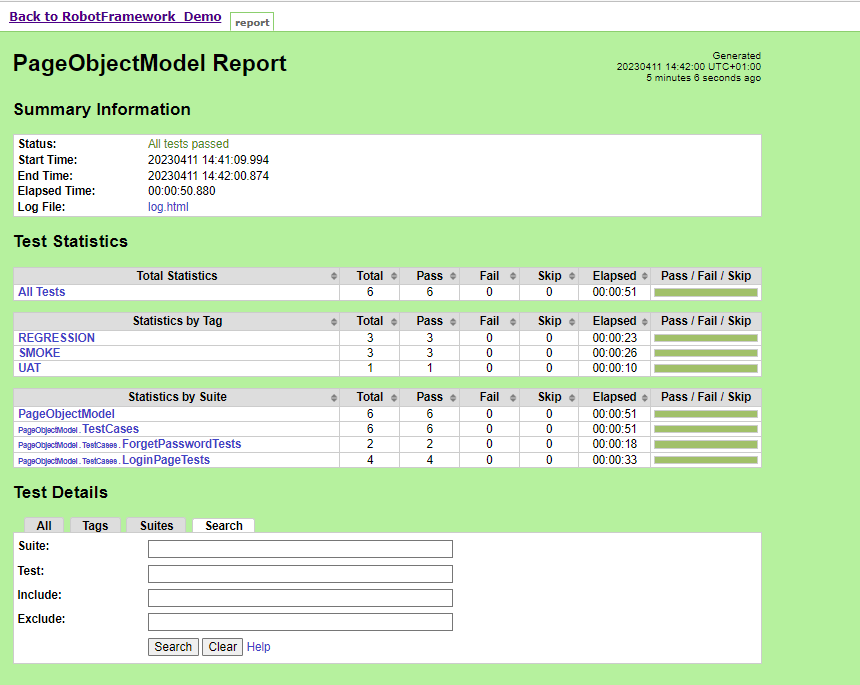
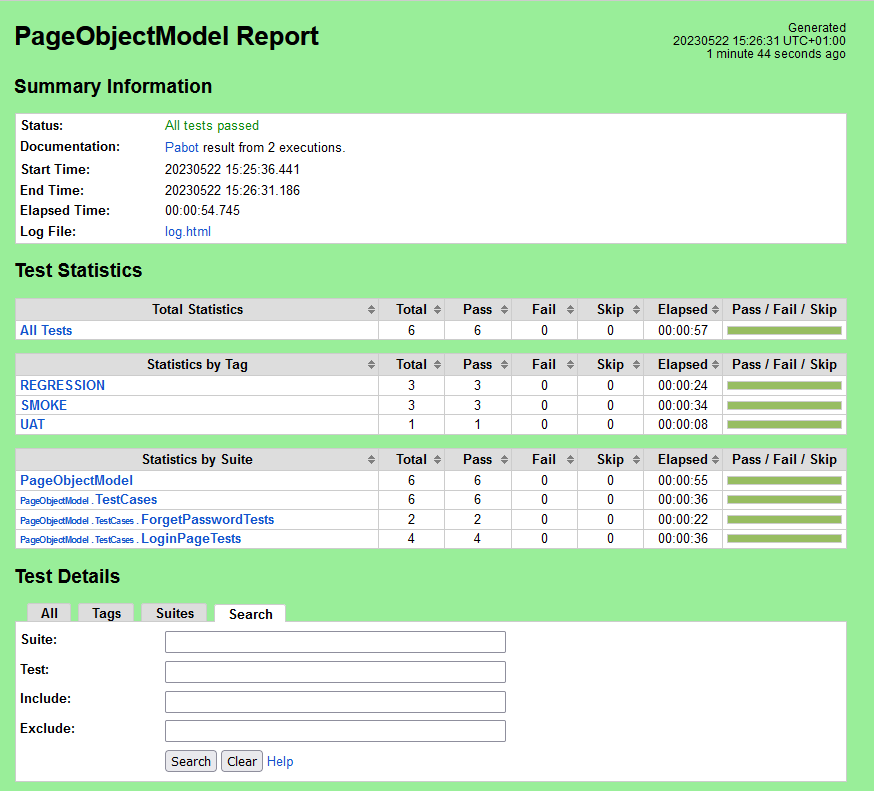
Report
Right-click on report.html. Select Open In->Browser->Chrome(any browser of your wish).
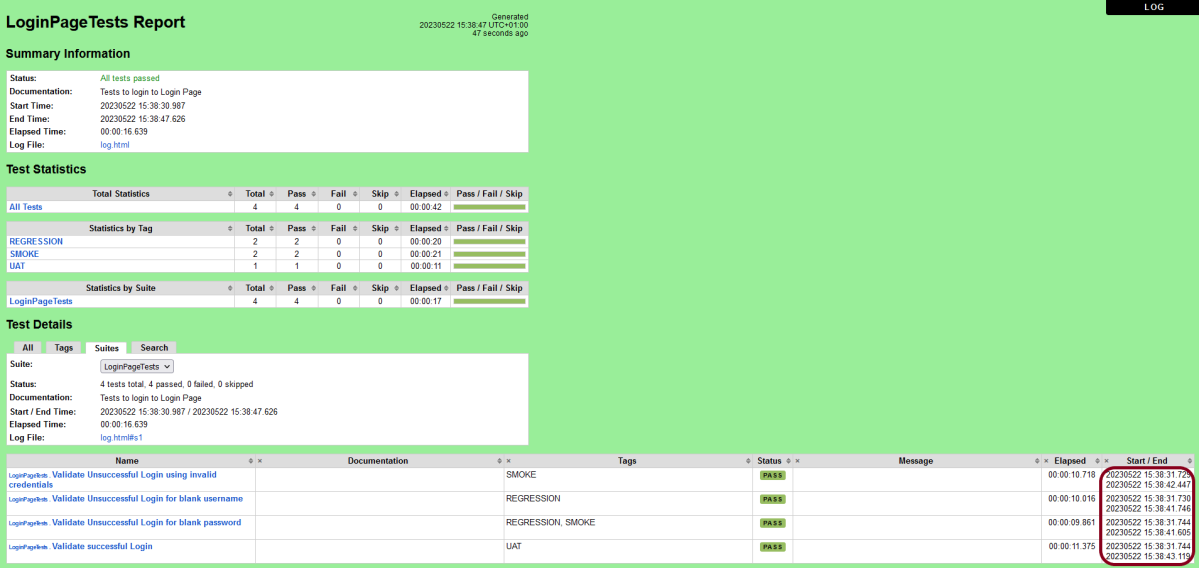
The Report generated by the framework is shown below:
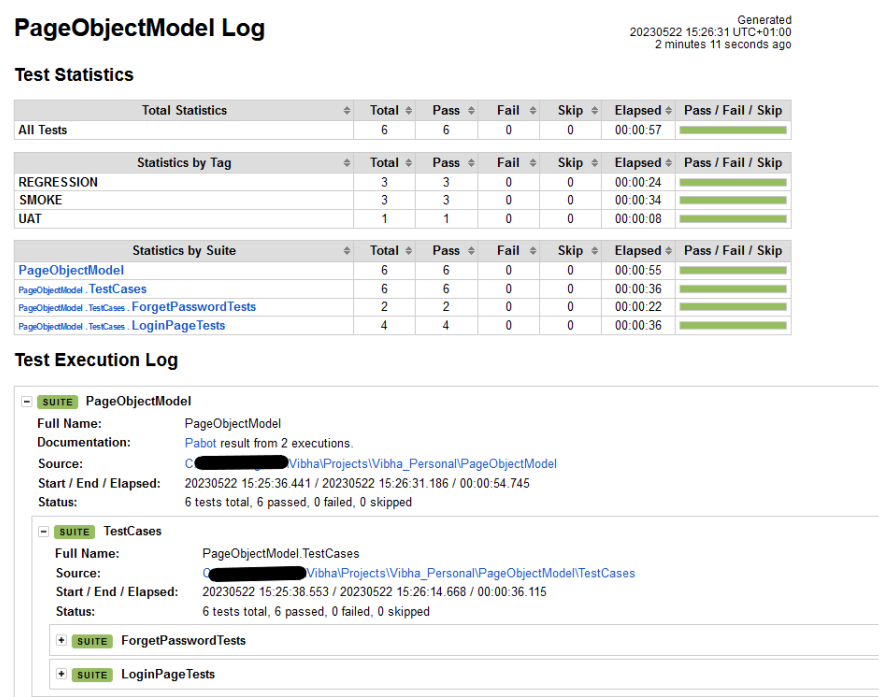
Log
Robot Framework has multiple log levels that control what is shown in the automatically generated log file. The default Robot Framework log level is INFO.
Right-click on log.html. Select Open In->Browser->Chrome(any browser of your wish).
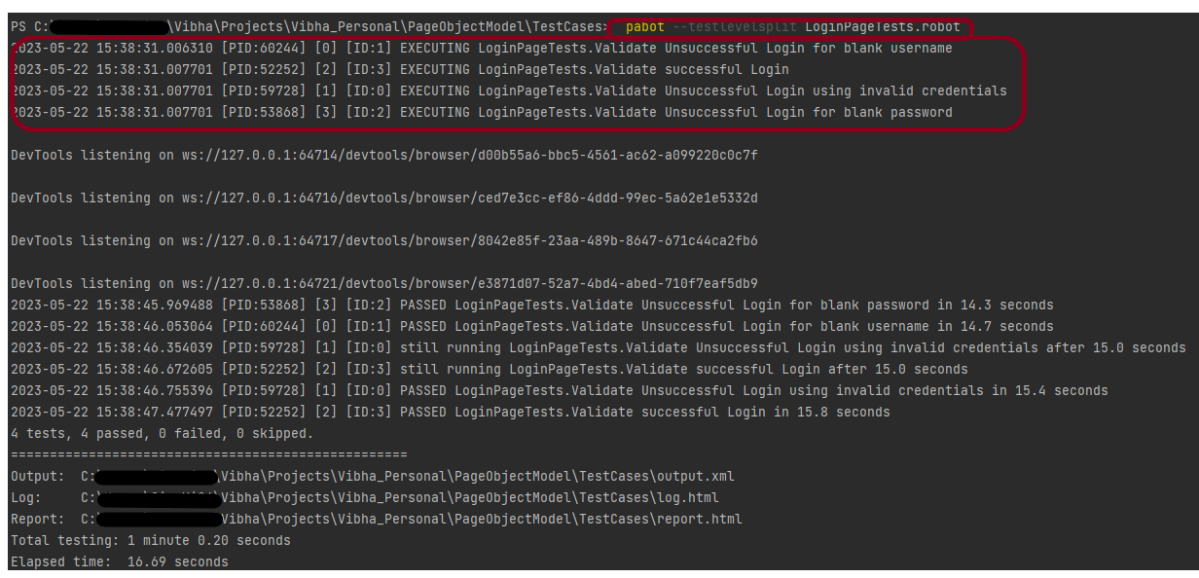
Step 10 – Split execution on test level
In this case, the tests present in a test file will be executed parallelly.
pabot --testlevelsplit LoginPageTests.robot
The below image shows that all the tests present in LoginPageTests.robot file started parallelly.
The below report shows that all the tests are started simultaneously.
That’s it! Congratulations on making it through this tutorial and hope you found it useful! Happy Learning!!
Page Object is a prominent Design Pattern in test automation for improving test maintenance and eliminating code duplication. A page object is an object-oriented class that acts as an interface to your AUT’s page. The methods of this page object class are then used by the tests anytime they need to interact with the UI of that page. The benefit is that if the page’s UI changes, just the code within the page object needs to update, rather not the tests themselves. As a result, all updates to accommodate that new UI are centralized.
Step 1.1 – Open PyCharm and create a new project. Go to File and select New Project from the main menu.
Step 1.2 – Choose the project location. Click the “Browse” button next to the Location field and specify the directory for your project.
Deselect the Create a main.py welcome script checkbox because you will create a new Python file for this tutorial.
Click on the “Create” Button.
Step 1.3 – A new dialog appears asking to open the project using any one of the given options. I have selected New Window as I like to have separate windows for each project.
Below is the image of the new project created in PyCharms.
How to create Page Object Model tests in Robot Framework?
Step 2 – Create 3 new directories in the new project
Right-Click on the project, select New->Directory, and provide the name as TestCases, Drivers, and Resources
Below is the image of the new directories.
Step 3 – Download ChromeBinaries and place in Drivers directory
This directory contains the browser binary in it. As we are using Chrome, will keep chromedriver.exe here.
The tests are going to use the Chrome browser, so we need to download the ChromeBinaries to open a blank browser in Chrome.
This directory contains multiple test case files consisting of test steps.
Right-click on the new directory and select New File and provide the name as LoginPageTests.robot and ForgetPasswordTests.robot as shown below:
Below is the code for LoginPageTests.robot
*** Settings ***
Documentation       Tests to login to Login Page
Library     SeleniumLibrary
Test Setup      Open the Browser with URL
Test Teardown   Close Browser Session
Resource       ../Resources/GenericResources.robot
Resource       ../Resources/LoginResources.robot
Resource      ../Resources/DashboardResources.robot

*** Test Cases ***

Validate Unsuccessful Login using invalid credentials

    LoginResources.Fill the login form     ${valid_username}       ${invalid_password}
    LoginResources.Verify the error message is correct


Validate Unsuccessful Login for blank username

     LoginResources.Fill the login form     ${blank_username}       ${valid_password}
     LoginResources.Verify the error message is displayed for username


Validate Unsuccessful Login for blank password

     LoginResources.Fill the login form     ${valid_username}       ${blank_password}
     LoginResources.Verify the error message is displayed for password


Validate successful Login


    LoginResources.Fill the login form     ${valid_username}       ${valid_password}
    DashboardResources.Verify Dashboard page opens
Below is the code for ForgetPasswordTests.robot
*** Settings ***
Documentation       Tests to validate Forgot Your Password Page functionality
Library     SeleniumLibrary
Test Setup      Open the Browser with URL
Test Teardown   Close Browser Session
Resource       ../Resources/GenericResources.robot
Resource       ../Resources/LoginResources.robot
Resource      ../Resources/ForgetPasswordResources.robot


*** Test Cases ***

Validate Reset Password Functionality

    LoginResources.Go to Forgot Your Password Page
    ForgetPasswordResources.Verify Forgot Your Password Page opens
    ForgetPasswordResources.Fill the Forgot Password Page
    ForgetPasswordResources.Verify the message

Validate Cancel Functionality

    LoginResources.Go to Forgot Your Password Page
    ForgetPasswordResources.Verify Forgot Your Password Page opens
    ForgetPasswordResources.Cancel the Reset Password
    ForgetPasswordResources.Verify that Login Page is displayed
Step 5 – Create Resources file for each page
It maintains the files which contain page elements as well as corresponding keywords.
Right-click on the new directory and select New File and provide the name as LoginResources.robot, DashboardResources.robot, GenericResources.robot, and ForgetPasswordResources.robot as shown below:
GenericResources.robot contains the keywords that are common to all the tests, like the opening of the browser or closing of the browser.
*** Settings ***
Documentation    A resource file with reusable keywords and variables.
Library     SeleniumLibrary

*** Variables ***
${valid_username}     Admin
${valid_password}       admin123
${invalid_username}     1234
${invalid_password}     45678
${blank_username}
${blank_password}
${url}      https://opensource-demo.orangehrmlive.com/web/index.php/auth/login
${browser_name}      Chrome

*** Keywords ***

Open the Browser with URL
    Create Webdriver    ${browser_name}  executable_path=/Vibha_Personal/RobotFramework_Demo/drivers/${browser_name}
    Go To       ${url}
    Maximize Browser Window
    Set Selenium Implicit Wait    5

Close Browser Session
    Close Browser
Below is the code for LoginResources.robot
*** Settings ***
Documentation        All the page objects and keywords of landing page
Library     SeleniumLibrary

*** Variables ***
${login_error_message}      css:.oxd-alert-content--error
${dashboard_title}       css:.oxd-topbar-header-breadcrumb-module
${missing_username_error_message}    xpath://*[@class='oxd-form']/div[1]/div/span
${missing_password_error_message}   xpath://*[@class='oxd-form']/div[2]/div/span
${forgot_password_link}   xpath://div[@class='orangehrm-login-forgot']/p

*** Keywords ***

Fill the login form
    [Arguments]    ${username}      ${password}
   Input Text    css:input[name=username]   ${username}
   Input Password    css:input[name=password]   ${password}
   Click Button    css:.orangehrm-login-button


Verify the error message is correct
    Element Text Should Be    ${login_error_message}    Invalid credentials


Verify the error message is displayed for username
     Element Text Should Be    ${missing_username_error_message}      Required

Verify the error message is displayed for password
      Element Text Should Be    ${missing_password_error_message}      Required

Go to Forgot Your Password Page
    Click Element      ${forgot_password_link}
Below is the code for DashboardResources.robot
*** Settings ***
Documentation        All the page objects and keywords of Dashboard page
Library     SeleniumLibrary

*** Variables ***
${dashboard_title}       css:.oxd-topbar-header-breadcrumb-module

*** Keywords ***

Verify Dashboard page opens
    Element Text Should Be    ${dashboard_title}      Dashboard
Below is the code for ForgetPasswordResources.robot
*** Settings ***
Documentation       All the page objects and keywords of Forget Password page
Library     SeleniumLibrary

*** Variables ***
${forgot_page_title}       css:.orangehrm-forgot-password-title
${username}     css:.oxd-input--active
${reset_btn}     css:.orangehrm-forgot-password-button--reset
${cancel_btn}    css:.orangehrm-forgot-password-button--cancel
${reset_message}      xpath://div[@class='orangehrm-card-container']/h6
${login_page_title}   xpath://*[@class='orangehrm-login-slot']/h5

*** Keywords ***

Verify Forgot Your Password Page opens
    Element Text Should Be    ${forgot_page_title}      Reset Password

Fill the Forgot Password Page
   Input Text        ${username}     abc@gmail.com
   Click Button    ${reset_btn}

Verify the message
    Element Text Should Be    ${reset_message}      Reset Password link sent successfully

Cancel the Reset Password
    Click Button    ${cancel_btn}

Verify that Login Page is displayed
    Element Text Should Be    ${login_page_title}       Login
All the below-mentioned keywords are derived from SeleniumLibrary. The functionality of keywords mentioned above:
1. Create Webdriver − The keyword creates an instance of Selenium WebDriver.
2. Go To – This keyword navigates the current browser window to the provided URL.
3. Maximize Browser Window – This keyword maximizes the current browser window.
4. Set Selenium Implicit Wait – This keyword sets the implicit wait value used by Selenium.
5. Input Text − This keyword is used to type the given text in the specified textbox identified by the locator name:username.
6. Input Password – This keyword is used to type the given text in the specified password identified by the locator name:password.
The difference compared to Input Text is that this keyword does not log the given password on the INFO level.
7. Click button – This keyword is used to click the button identified by the locator. In this case, it is “Login” button.
8. Element Text Should Be – This keyword is used to verify that the current page contains the exact text identified by the locator. Here, we are checking the exact text “Invalid Credentials”.
To run this script, go to the command line and go to directory tests.
Step 6 – Execute the tests
We need the below command to run the Robot Framework script.
robot .
The output of the above program is
Step 7 – View Report and Log
We have the test case passed. The Robot Framework generates log.html, output.xml, and report.html by default.
Let us now see the report and log details.
Report
Right-click on report.html. Select Open In->Browser->Chrome(any browser of your wish).
The Report generated by the framework is shown below:
Log
Robot Framework has multiple log levels that control what is shown in the automatically generated log file. The default Robot Framework log level is INFO.
Right-click on log.html. Select Open In->Browser->Chrome(any browser of your wish).
That’s it! Congratulations on making it through this tutorial and hope you found it useful! Happy Learning!!
Data Driven Testing is a type of software testing in which test data is maintained in table or spreadsheet format. Data-driven testing enables testers to provide a single test script that may perform tests for all test data from a table and expect the test results to be returned to the same table. Table-driven testing is another name for parameterized testing.
Step 1.1 – Open PyCharm and create a new project. Go to File and select New Project from the main menu.
Step 1.2 – Choose the project location. Click the “Browse” button next to the Location field and specify the directory for your project.
Deselect the Create a main.py welcome script checkbox because you will create a new Python file for this tutorial.
Click on the “Create” Button.
Step 1.3 – A new dialog appears asking to open the project using any one of the given options. I have selected New Window as I like to have separate windows for each project.
Below is the image of the new project created in PyCharms.
Step 2 – Add datadriver package to the PyCharms
Go to File->Settings ->Project:RobotFramework_Demo ->Python Interpreter.
Click on the “+” sign and enter datadriver in the search bar. It will show a list of packages. Select the “robotframework-datadriver” package and click on the “Install Package”.
Once the package is installed, it can be seen under the package list as shown below:
Step 3 – Create a new directory in the new project
Right-Click on the project, select New->Directory and provide the name as DataDriven
Below is the image of the new directory.
Right-click on the new directory and select New File and provide the name as DataDrivenTesting_Demo.robot as shown below:
Step 4 – Create a test data file (.csv)
Create a folder with the name of Resources in the DataDriven directory.
Add a data.csv file that contains the test data in it.
Make sure that fields are separated by commas.
Step 5 – Download ChromeBinaries from the below location
The tests are going to use the Chrome browser, so we need to download the ChromeBinaries to open a blank browser in Chrome.
The chromedriver and geckodriver are placed in a folder name drivers in the RobotFramework_Demo project. I have renamed chromedriver to Chrome and geckodriver to Firefox.
Step 6 – Create a Data Driven Test
We are now going to write test cases. The test case details will be as follows :
*** Settings ***
Documentation    To validate the Login Form
Library     SeleniumLibrary
Library    DataDriver       file=Resources/data.csv     encoding=utf_8      dialect=unix
Test Template    Validate Unsuccessful Login

*** Variables ***
${browser_name}     Chrome
${login_btn}        css:.orangehrm-login-button
${login_error_message}      css:.oxd-alert-content--error


*** Test Cases ***
Login to form using ${Username} and ${Password}     abc     123


*** Keywords ***
Validate Unsuccessful Login
    [Arguments]    ${Username}   ${Password}
    Open the Browser with URL
    Fill the login form     ${Username}   ${Password}
    verify error message is correct


Open the Browser with URL
    Create Webdriver    ${browser_name}  executable_path=/Vibha_Personal/RobotFramework_Demo/drivers/${browser_name}
    Go To    https://opensource-demo.orangehrmlive.com/web/index.php/auth/login
    Maximize Browser Window
    Set Selenium Implicit Wait    2

Fill the login form
  [Arguments]        ${Username}       ${Password}
   Input Text        name:username     ${Username}
   Input Password    name:password     ${Password}
   Click Button    ${login_btn}

Verify error message is correct
    Element Text Should Be    ${login_error_message}   Invalid credentials

Close Browser Session
    Close Browser
In the below image, it shows that there are 3 steps to creating a Data-Driven test from an external data source like .csv.
All the below-mentioned keywords are derived from SeleniumLibrary. The functionality of keywords mentioned above:
1. Create Webdriver − The keyword creates an instance of Selenium WebDriver.
2. Go To – This keyword navigates the current browser window to the provided url.
3. Maximize Browser Window – This keyword maximizes the current browser window.
4. Set Selenium Implicit Wait – This keyword sets the implicit wait value used by Selenium.
5. Input Text − This keyword is used to type the given text in the specified textbox identified by the locator name:username.
6. Input Password – This keyword is used to type the given text in the specified password identified by the locator name:password.
The difference compared to Input Text is that this keyword does not log the given password on the INFO level.
7. Click button – This keyword is used to click the button identified by the locator. In this case, it is “Login” button.
8. Element Text Should Be – This keyword is used to verify that the current page contains the exact text identified by the locator. Here, we are checking the exact text “Invalid Credentials”.
To run this script, go to the command line and go to directory tests.
Step 7 – Execute the tests
We need the below command to run the Robot Framework script.
robot ExternalDatDrivenTests_Demo.robot
The output of the above program is
Step 8 – View Report and Log
We have the test case passed. The Robot Framework generates log.html, output.xml, and report.html by default.
Let us now see the report and log details.
Report
Right-click on report.html. Select Open In->Browser->Chrome(any browser of your wish).
The Report generated by the framework is shown below:
Log
Robot Framework has multiple log levels that control what is shown in the automatically generated log file. The default Robot Framework log level is INFO.
Right-click on log.html. Select Open In->Browser->Chrome(any browser of your wish).
That’s it! Congratulations on making it through this tutorial and hope you found it useful! Happy Learning!!
Data Driven Testing is a type of software testing in which test data is maintained in table or spreadsheet format. Data-driven testing enables testers to provide a single test script that may perform tests for all test data from a table and expect the test results to be returned to the same table. Table-driven testing is another name for parameterized testing.
Step 1.1 – Open PyCharm and create a new project. Go to File and select New Project from the main menu.
Step 1.2 – Choose the project location. Click the “Browse” button next to the Location field and specify the directory for your project.
Deselect the Create a main.py welcome script checkbox because you will create a new Python file for this tutorial.
Click on the “Create” Button.
Step 1.3 – A new dialog appears asking to open the project using any one of the given options. I have selected New Window as I like to have separate windows for each project.
Below is the image of the new project created in PyCharms.
Step 2 – Create a new directory in the new project
Right-Click on the project, select New->Directory and provide the name as DataDriven
Below is the image of the new directory.
Right-click on the new directory and select New File and provide the name as DataDrivenTesting_Demo.robot as shown below:
Step 3 – Download ChromeBinaries from the below location
The tests are going to use the Chrome browser, so we need to download the ChromeBinaries to open a blank browser in Chrome.
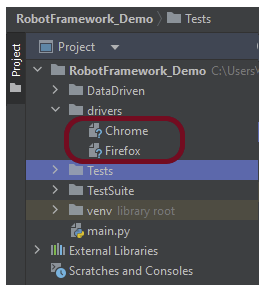
The chromedriver and geckodriver are placed in a folder name drivers in the RobotFramework_Demo project. I have renamed chromedriver to Chrome and geckodriver to Firefox.
Step 4 – Create a Data Driven Test
We are now going to write test cases. The test case details will be as follows :
*** Settings ***
Documentation   To validate the Login form
Library     SeleniumLibrary
Test Teardown   Close Browser
Test Template   Validate UnSuccesful Login
Documentation   To validate the Login form
Library     SeleniumLibrary
Test Template   Validate UnSuccesful Login

*** Variables ***
${browser_name}     Chrome
${login_btn}        css:.orangehrm-login-button
${login_error_message}      css:.oxd-alert-content--error


*** Test Cases ***              username        password
Invalid username                abc             admin123
Invalid password                Admin           abc
Special characters              @#$             %$^&
Invalid username and password   abc             abc123


*** Keywords ***
Validate UnSuccesful Login
    [Arguments]     ${username}     ${password}
    Open the Browser with URL
    Fill the login form         ${username}      ${password}
    Verify the error message is correct
    Close Browser Session

Open the Browser with URL
    Create Webdriver    ${browser_name}  executable_path=/Vibha_Personal/RobotFramework_Demo/drivers/${browser_name}
    Go To    https://opensource-demo.orangehrmlive.com/web/index.php/auth/login
    Maximize Browser Window
    Set Selenium Implicit Wait    2

Fill the login Form
    [arguments]         ${username}          ${password}
    Input Text          name:username        ${username}
    Input Password      name:password        ${password}
    Click Button        ${login_btn}


Verify the error message is correct
   ${result}=   Get Text    ${login_error_message}
   Should Be Equal As Strings     ${result}     Invalid credentials

Close Browser Session
    Close Browser
In the below image, it shows that there are 3 steps to creating a Data-Driven test.
All the below-mentioned keywords are derived from SeleniumLibrary. The functionality of keywords mentioned above:
. Create Webdriver − The keyword creates an instance of Selenium WebDriver.
2. Go To – This keyword navigates the current browser window to the provided url.
3. Maximize Browser Window – This keyword maximizes the current browser window.
4. Set Selenium Implicit Wait – This keyword sets the implicit wait value used by Selenium.
5. Input Text − This keyword is used to type the given text in the specified textbox identified by the locator name:username.
6. Input Password – This keyword is used to type the given text in the specified password identified by the locator name:password.
The difference compared to Input Text is that this keyword does not log the given password on the INFO level.
7. Click button – This keyword is used to click the button identified by the locator. In this case, it is “Login” button.
8. ${result} – This is a variable that holds the text value of the error message that is located by css:.oxd-alert-content–error.
9. Get Text – This keyword returns the text value of the element identified by located by css:.oxd-alert-content–error.
10. Should Be Equal As Strings – This keyword is used from builtIn keyword. This keyword returns false if objects are unequal after converting them to strings.
To run this script, go to the command line and go to directory tests.
Step 5 – Execute the tests
We need the below command to run the Robot Framework script.
robot DataDrivenTesting_Demo.robot
The output of the above program is
Step 6 – View Report and Log
We have the test case passed. The Robot Framework generates log.html, output.xml, and report.html by default.
Let us now see the report and log details.
Report
Right-click on report.html. Select Open In->Browser->Chrome(any browser of your wish).
The Report generated by the framework is shown below:
Log
Robot Framework has multiple log levels that control what is shown in the automatically generated log file. The default Robot Framework log level is INFO.
Right-click on log.html. Select Open In->Browser->Chrome(any browser of your wish).
That’s it! Congratulations on making it through this tutorial and hope you found it useful! Happy Learning!!
Step 1.1 – Open PyCharm and create a new project. Go to File and select “New Project” from the main menu.
Step 1.2 – Choose the project location. Click the “Browse” button next to the Location field and specify the directory for your project.
Deselect the Create a main.py welcome script checkbox because you will create a new Python file for this tutorial.
Click on the “Create” Button.
Step 1.3 – A new dialog will appear asking to Open the project using any one of the given options. I have selected New Window as I like to have separate windows for each project.
Below is the image of the new project created in PyCharms.
How to set variable values from Runtime command?
Step 2 – Create a new directory in the new project
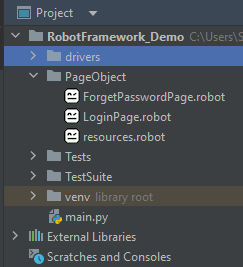
Right-Click on the project, select New->Directory and provide name as PageObject
Below is the image of the new directory.
Right-click on the new directory and select New File and provide the name as LoginPage.robot and ForgetPasswordPage.robot as shown below:
Step 3 – Download ChromeBinaries from the below location
The tests are going to use the Chrome browser, so we need to download the ChromeBinaries to open a blank browser in Chrome.
The chromedriver and geckodriver are placed in a folder name drivers in the RobotFramework_Demo project. I have renamed chromedriver to chrome and geckodriver to firefox.
*** Settings ***
Documentation       Tests to login to Login Page
Library     SeleniumLibrary

*** Variables ***
${valid_username}     Admin
${valid_password}       admin123
${invalid_username}     1234
${invalid_password}     45678
${blank_username}
${blank_password}
${url}      https://opensource-demo.orangehrmlive.com/web/index.php/auth/login
${browser_name}      Chrome
${login_error_message}      css:.oxd-alert-content--error
${dashboard_title}       css:.oxd-topbar-header-breadcrumb-module
${missing_username_error_message}    xpath://*[@class='oxd-form']/div[1]/div/span
${missing_password_error_message}   xpath://*[@class='oxd-form']/div[2]/div/span


*** Test Cases ***

Validate Unsuccessful Login using invalid credentials
    [Tags]    SMOKE
    Open the Browser with URL
    Fill the login form     ${valid_username}       ${invalid_password}
    Verify the error message is correct
    Close Browser Session

Validate Unsuccessful Login for blank username
    [Tags]    REGRESSION
    Open the Browser with URL
    Fill the login form     ${blank_username}       ${valid_password}
    Verify the error message is displayed for username
    Close Browser Session

Validate Unsuccessful Login for blank password
    [Tags]    SMOKE     REGRESSION
    Open the Browser with URL
    Fill the login form     ${valid_username}       ${blank_password}
    Verify the error message is displayed for password
    Close Browser Session

Validate successful Login
    [Tags]    UAT
    Open the Browser with URL
    Fill the login form     ${valid_username}       ${valid_password}
    Verify Dashboard page opens
    Close Browser Session

*** Keywords ***

Open the Browser with URL
    Create Webdriver    ${browser_name}  executable_path=/Vibha_Personal/RobotFramework_Demo/drivers/${browser_name}
    Go To       ${url}
    Maximize Browser Window
    Set Selenium Implicit Wait    5

Fill the login form
   [Arguments]    ${username}      ${password}
   Input Text    css:input[name=username]   ${username}
   Input Password    css:input[name=password]   ${password}
   Click Button    css:.orangehrm-login-button

Verify the error message is correct
    Element Text Should Be    ${login_error_message}    Invalid credentials

Verify Dashboard page opens
    Element Text Should Be    ${dashboard_title}      Dashboard

Verify the error message is displayed for username
     Element Text Should Be    ${missing_username_error_message}      Required

Verify the error message is displayed for password
      Element Text Should Be    ${missing_password_error_message}      Required

Close Browser Session
    Close Browser
ForgetPasswordPage.robot
*** Settings ***
Documentation       Tests to validate Forgot Your Password Page functionality
Library     SeleniumLibrary

*** Variables ***
${forgot_password_link}   xpath://div[@class='orangehrm-login-forgot']/p
${forgot_page_title}       css:.orangehrm-forgot-password-title
${username}     css:.oxd-input--active
${reset_btn}     css:.orangehrm-forgot-password-button--reset
${cancel_btn}    css:.orangehrm-forgot-password-button--cancel
${reset_message}      xpath://div[@class='orangehrm-card-container']/h6
${login_page_title}   xpath://*[@class='orangehrm-login-slot']/h5


*** Test Cases ***

Validate Reset Password Functionality

    Open the Browser with URL
    Go to Forgot Your Password Page
    Verify Forgot Your Password Page opens
    Fill the Forgot Password Page
    Verify the message
    Close Browser Session


Validate Cancel Functionality

    Open the Browser with URL
    Go to Forgot Your Password Page
    Verify Forgot Your Password Page opens
    Cancel the Reset Password
    Verify that Login Page is displayed
    Close Browser Session

*** Keywords ***

Open the Browser with URL
    Create Webdriver    ${browser_name}  executable_path=/Vibha_Personal/RobotFramework_Demo/drivers/${browser_name}
    Go To       ${url}
    Maximize Browser Window
    Set Selenium Implicit Wait    5

Go to Forgot Your Password Page
    Click Element      ${forgot_password_link}

Verify Forgot Your Password Page opens
    Element Text Should Be    ${forgot_page_title}      Reset Password

Fill the Forgot Password Page
   Input Text        ${username}     abc@gmail.com
   Click Button    ${reset_btn}

Verify the message
    Element Text Should Be    ${reset_message}      Reset Password link sent successfully

Cancel the Reset Password
    Click Button    ${cancel_btn}

Verify that Login Page is displayed
    Element Text Should Be    ${login_page_title}       Login

Close Browser Session
    Close Browser
Step 5 – Execute various Commands
5.1. Execute all tests in a Directory
When we want to execute all the tests present in a directory, we can use the below command:
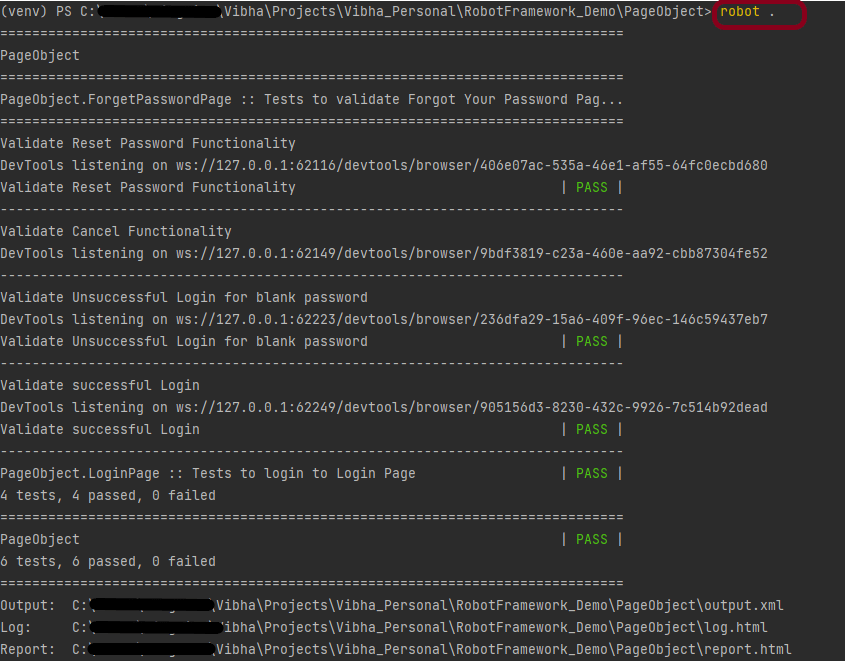
robot .
LoginPage contains 4 tests and ForgetPasswordPage contains 2 tests. The output of the above program is
5.2. Execute a test file
When we want to execute only 1 test file present in the directory, we can use the below command:
robot LoginPage.robot
LoginPage contains 4 tests. The output of the above program executes 4 tests as shown below:
5.3. Execute a test by test name
When we want to execute a test by its name, we can use the below command:
robot -t "Validate successful Login" .
The output of the above program is
5.4. Execute a test by Regular Expression
When we don’t know the complete name of the test case, but a term or functionality, we can use a regular expression to find the test. Here, we have a test with the name “Validate Cancel Functionality” in “ForgetPasswordPage.robot”. So, the regular expression will find this test and will execute.
robot -t "*Cancel*" .
The output of the above program is
That’s it! Congratulations on making it through this tutorial and hope you found it useful! Happy Learning!!
In this tutorial, we will rerun the failed tests in Robot Framework.
We occasionally experience rendering problems, which cause our Test Cases to fail. And we must run our complete Test Suite once more. This will be a major pain if you are working on a complicated project with many suite files or many Test Cases.
Rerunning only failed test cases after completion and providing a single report can alleviate this major pain in Robot Framework.
Robot Framework provides two attributes “–rerunfailed” and “–merge” merge will rerun the failure and merge the different results for a single report.
Step 1.1 – Open PyCharm and create a new project. Go to File and select “New Project” from the main menu.
Step 2 – Choose the project location. Click the “Browse” button next to the Location field and specify the directory for your project.
Deselect the Create a main.py welcome script checkbox because you will create a new Python file for this tutorial.
Click on the “Create” Button.
Step 1.3 – A new dialog will appear asking to Open the project using any one of the given options. I have selected New Window as I like to have separate windows for each project.
Below is the image of the new project created in PyCharms.
Step 2 – Create a new directory in the new project
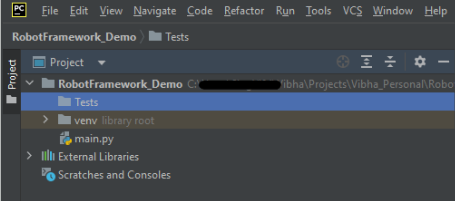
Right-Click on the project, select New->Directory and provide name as Tests
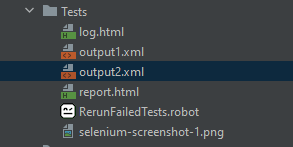
Below is the image of the new directory.
Right-click on the new directory and select New File and provide the name as RerunFailedTests.robot as shown below:
Step 3 – Download ChromeBinaries from the below location
The tests are going to use the Chrome browser, so we need to download the ChromeBinaries to open a blank browser in Chrome.
The chromedriver is placed in a folder name drivers in the RobotFramework_Demo project.
Step 4 – Create a simple Selenium Test
*** Settings ***
Documentation       Tests to login to Login Page
Library     SeleniumLibrary

*** Variables ***
${valid_username}     Admin
${valid_password}       admin123
${invalid_username}     1234
${invalid_password}     45678
${blank_username}
${blank_password}
${url}      https://opensource-demo.orangehrmlive.com/web/index.php/auth/login
${browser_name}      Chrome
${login_error_message}      css:.oxd-alert-content--error
${dashboard_title}       css:.oxd-topbar-header-breadcrumb-module
${missing_username_error_message}    xpath://*[@class='oxd-form']/div[1]/div/span
${missing_password_error_message}   xpath://*[@class='oxd-form']/div[2]/div/span


*** Test Cases ***

Validate Unsuccessful Login using invalid credentials
    [Tags]    SMOKE
    Open the Browser with URL
    Fill the login form     ${valid_username}       ${invalid_password}
    Verify the error message is correct
    Close Browser Session

Validate Unsuccessful Login for blank username
    [Tags]    REGRESSION
    Open the Browser with URL
    Fill the login form     ${blank_username}       ${valid_password}
    Verify the error message is displayed for username
    Close Browser Session

Validate Unsuccessful Login for blank password
    [Tags]    SMOKE     REGRESSION
    Open the Browser with URL
    Fill the login form     ${valid_username}       ${blank_password}
    Verify the error message is displayed for password
    Close Browser Session

Validate successful Login
    [Tags]    UAT
    Open the Browser with URL
    Fill the login form     ${valid_username}       ${valid_password}
    Verify Dashboard page opens
    Close Browser Session

*** Keywords ***

Open the Browser with URL
    Create Webdriver    ${browser_name}  executable_path=/Vibha_Personal/RobotFramework_Demo/drivers/${browser_name}
    Go To       ${url}
    Maximize Browser Window
    Set Selenium Implicit Wait    5

Fill the login form
   [Arguments]    ${username}      ${password}
   Input Text    css:input[name=username]   ${username}
   Input Password    css:input[name=password]   ${password}
   Click Button    css:.orangehrm-login-button

Verify the error message is correct
    Element Text Should Be    ${login_error_message}    Invalid credentials

Verify Dashboard page opens
    Element Text Should Be    ${dashboard_title}      Dashboard

Verify the error message is displayed for username
     Element Text Should Be    ${missing_username_error_message}      Required

Verify the error message is displayed for password
      Element Text Should Be    ${missing_password_error_message}      Required!

Close Browser Session
    Close Browser
Step 5 – Execute the tests
We need the below command to run the Robot Framework script. This is the normal execution of your test suite and save your output in output1.xml
robot --output output1.xml RerunFailedTests.robot
The output of the above program is
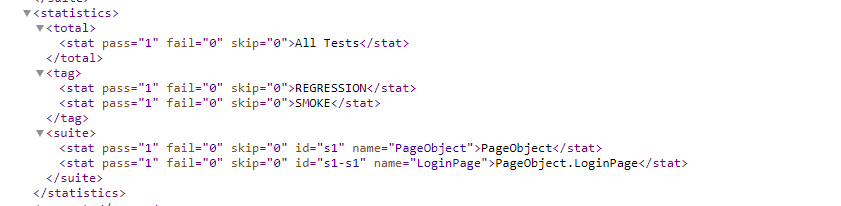
Let us check the output1.xml file.
We can see that Test 3 failed here.
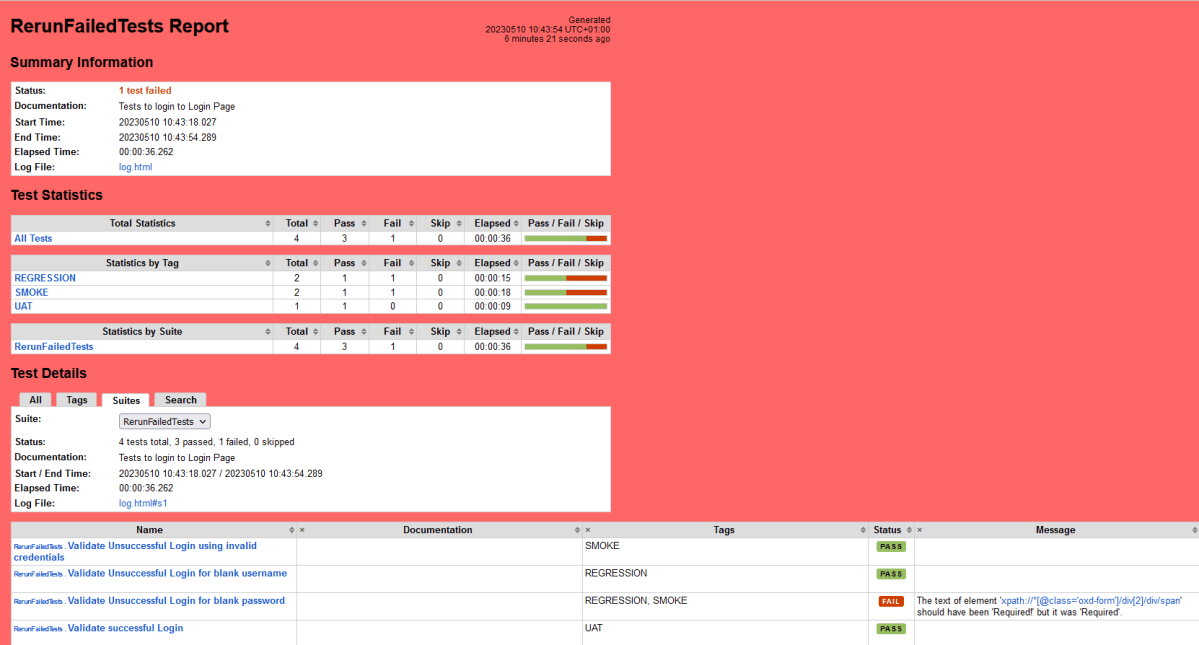
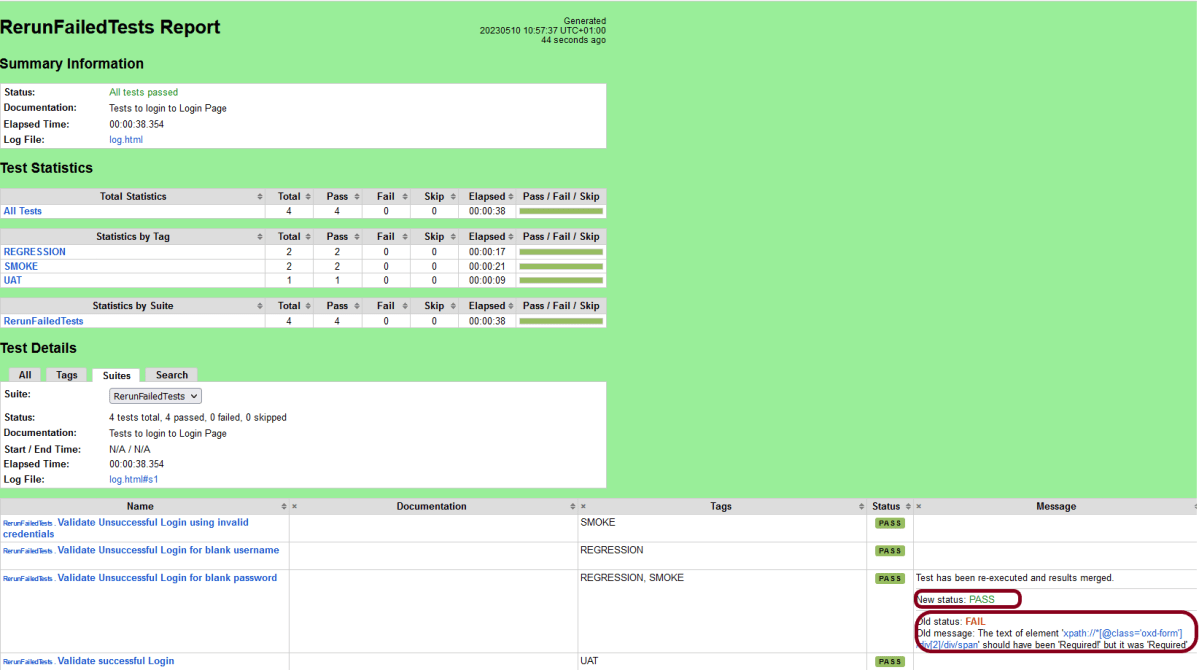
Below is the report generated by the Robot Framework
Step 6 – Rerun the failed tests
Now, let us rerun the failed tests using the below command. I intentionally failed my test in the last run. Inthis run, I will fix the test. I will change the expected result from Required! to Required.This checks the failure results in the output1.xml file and reruns the failures once again and saves the new result in the output2.xml file
In this tutorial, we will create a project in PyCharms and create TAGS in the tests in Robot Framework using Selenium WebDriver.
The use of tags in Robot Framework is a basic yet effective mechanism for classifying test cases. Tags are free words that can be used for at least the following things:
Tags appear in test reports, logs, and, of course, test data, providing metadata to test instances.
Case-by-case statistics (total, passed, failed are automatically collected based on tags).
You can use tags to include or exclude test cases from being run.
You can use tags to indicate which test cases should be skipped.
Step 1.1 – Open PyCharm and create a new project. Go to File and select “New Project” from the main menu.
Step 1.2 – Choose the project location. Click the “Browse” button next to the Location field and specify the directory for your project.
Deselect the Create a main.py welcome script checkbox because you will create a new Python file for this tutorial.
Click on the “Create” Button.
Step 1.3 – A new dialog will appear asking to Open the project using any one of the given options. I have selected New Window as I like to have separate windows for each project.
Below is the image of the new project created in PyCharms.
How to create a tag in the test in Robot Framework?
Step 1 – Create a new directory in the new project
Right-Click on the project, select New->Directory and provide name as Tests
Below is the image of the new directory.
Right-click on the new directory and select New File and provide the name as Test_Demo.robot as shown below:
Step 2 – Download ChromeBinaries from the below location
The tests are going to use the Chrome browser, so we need to download the ChromeBinaries to open a blank browser in Chrome.
The chromedriver is placed in a folder name drivers in the RobotFramework_Demo project.
Step 3 – Create a simple Selenium Test
*** Settings ***
Documentation       Tests to login to Login Page
Library     SeleniumLibrary

*** Variables ***
${valid_username}     Admin
${valid_password}       admin123
${invalid_username}     1234
${invalid_password}     45678
${blank_username}
${blank_password}
${url}      https://opensource-demo.orangehrmlive.com/web/index.php/auth/login
${browser_name}      Chrome
${login_error_message}      css:.oxd-alert-content--error
${dashboard_title}       css:.oxd-topbar-header-breadcrumb-module
${missing_username_error_message}    xpath://*[@class='oxd-form']/div[1]/div/span
${missing_password_error_message}   xpath://*[@class='oxd-form']/div[2]/div/span


*** Test Cases ***

Validate Unsuccessful Login using invalid credentials
    [Tags]    SMOKE
    Open the Browser with URL
    Fill the login form     ${valid_username}       ${invalid_password}
    Verify the error message is correct
    Close Browser Session

Validate Unsuccessful Login for blank username
    [Tags]    REGRESSION
    Open the Browser with URL
    Fill the login form     ${blank_username}       ${valid_password}
    Verify the error message is displayed for username
    Close Browser Session

Validate Unsuccessful Login for blank password
    [Tags]    SMOKE     REGRESSION
    Open the Browser with URL
    Fill the login form     ${valid_username}       ${blank_password}
    Verify the error message is displayed for password
    Close Browser Session

Validate successful Login
    [Tags]    UAT
    Open the Browser with URL
    Fill the login form     ${valid_username}       ${valid_password}
    Verify Dashboard page opens
    Close Browser Session

*** Keywords ***

Open the Browser with URL
    Create Webdriver    ${browser_name}  executable_path=/Vibha_Personal/RobotFramework_Demo/drivers/${browser_ame}
    Go To       ${url}
    Maximize Browser Window
    Set Selenium Implicit Wait    5

Fill the login form
   [Arguments]    ${username}      ${password}
   Input Text    css:input[name=username]   ${username}
   Input Password    css:input[name=password]   ${password}
   Click Button    css:.orangehrm-login-button

Verify the error message is correct
    Element Text Should Be    ${login_error_message}    Invalid credentials

Verify Dashboard page opens
    Element Text Should Be    ${dashboard_title}      Dashboard

Verify the error message is displayed for username
     Element Text Should Be    ${missing_username_error_message}      Required

Verify the error message is displayed for password
      Element Text Should Be    ${missing_password_error_message}      Required

Close Browser Session
    Close Browser
Scenarios
In the above robot test file, we have a total of 4 tests.
Test 1 -> SMOKE
Test 2 -> REGRESSION
Test 3 -> SMOKE, REGRESSION
Test 4 -> UAT
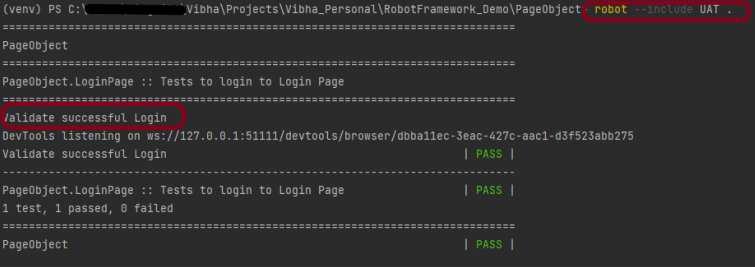
1. To execute the tests tagged with UAT, we have only 1 test, so only 1 test – Test 4 will execute.
robot --include UAT .
The output of the above program is
2. To execute the tests tagged with SMOKE, we have 2 tests, so 2 tests – Test 1 and Test 3 will execute.
robot --include SMOKE .
The output of the above program is
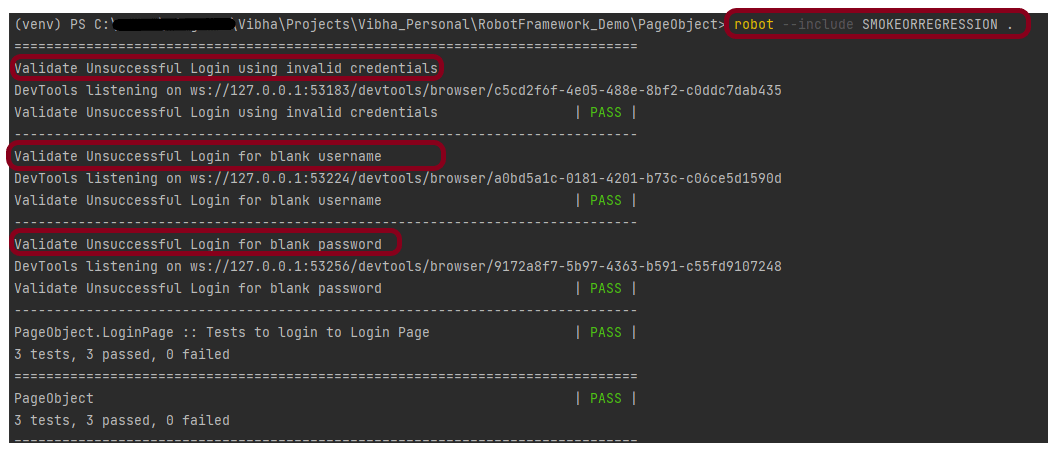
3. To execute the tests tagged with SMOKE OR REGRESSION, we have 3 tests, so 3 tests – Test 1, Test 2, and Test 3 will execute.
robot --include SMOKEORREGRESSION .
The output of the above program is
4. To execute the tests tagged with SMOKE AND REGRESSION, we have only 1 test – Test 3 will execute.
robot --include SMOKEANDREGRESSION .
The output of the above program is
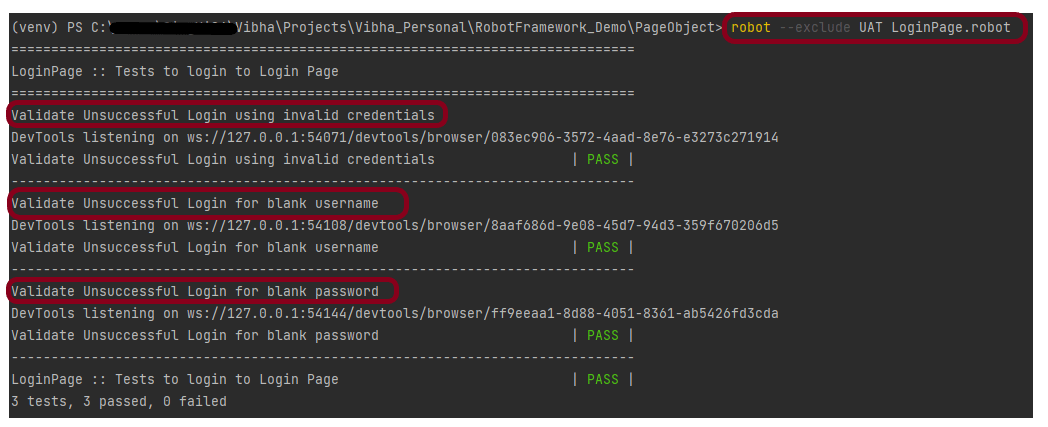
5. To execute the tests tagged with not UAT, we have a total of 4 tests and 1 test is tagged with UAT. So now 3 tests should execute – Test 1, Test 2, and Test 3.
robot --exclude UAT LoginPage.robot
The output of the above program is
That’s it! Congratulations on making it through this tutorial and hope you found it useful! Happy Learning!!
Step 1.1 – Open PyCharm and create a new project. Go to File and select New Project from the main menu.
Step 1.2 – Choose the project location. Click the “Browse” button next to the Location field and specify the directory for your project.
Deselect the Create a main.py welcome script checkbox because you will create a new Python file for this tutorial.
Click on the “Create” Button.
Step 1.3 – A new dialog appears asking to open the project using any one of the given options. I have selected New Window as I like to have separate windows for each project.
Below is the image of the new project created in PyCharms.
How to create a test to automate the switching of the windows in Robot Framework?
Step 2 – Create a new directory in the new project
Right-Click on the project, select New->Directory and provide name as Tests
Below is the image of the new directory.
Right-click on the new directory and select New File and provide the name as SwitchWindow_Demo.robot as shown below:
Step 3 – Download ChromeBinaries from the below location
The tests are going to use the Chrome browser, so we need to download the ChromeBinaries to open a blank browser in Chrome. Similarly, you can use Firefox, edge, safari, and many more browsers.
The chromedriver and geckodriver are placed in a folder name drivers in the RobotFramework_Demo project. I have renamed chromedriver to Chrome and geckodriver to Firefox.
Step 4 – Automate the switching of windows
We are now going to write test cases. The test case details will be as follows −
The below page shows that when we click on “Open New Separate Windows”, then click on the “click” button, a new child window opens – Selenium.dev.
Let us inspect the locator of the NEW Window.
Below is an example of switching windows in Robot Framework.
*** Settings ***
Documentation    To validate the switching of windows
Library     SeleniumLibrary
Test Teardown    Close Browser

*** Variables ***
${mainPageText}    xpath://div[@class='col-sm-8 col-xs-8 col-md-8']/h1

*** Test Cases ***
Switch windows
    Open the Browser with URL
    Select the button to switch to child window
    Verify the child window is opened
    Verify the user is switched back to parent window

*** Keywords ***
Open the Browser with URL
    Create Webdriver    Chrome  executable_path=/Vibha_Personal/RobotFramework/drivers/chromedriver_linux64
    Go To    https://demo.automationtesting.in/Windows.html
    Maximize Browser Window
    Set Selenium Implicit Wait    2

Select the button to switch to child window
    Click Element    xpath://div[@class='tabpane pullleft']/ul/li[2]/a
    Click Button    css:.btn-primary


Verify the child window is opened
    Switch Window    NEW
    Page Should Contain    Selenium automates browsers


Verify the user is switched back to parent window
     Switch Window    MAIN
     Element Text Should Be     ${mainPageText}    Automation Demo Site
All the below-mentioned keywords are derived from SeleniumLibrary. The functionality of keywords mentioned above:
1. Create Webdriver − The keyword creates an instance of Selenium WebDriver.
3. Maximize Browser Window – This keyword maximizes the current browser window.
4. Set Selenium Implicit Wait – This keyword sets the implicit wait value used by Selenium.
5. Click Element − This keyword is used to click the element identified by the locator. In this case, it is “Open new seperate windows” link.
6. Click Button – This keyword is used to click the button identified by the locator. In this case, it is “Click” button.
7. Switch Window NEW – This keyword is used to switch to the latest opened window.
8. Page Should Contain – This keyword is used to verify that the current page contains the text specified. Here, we are checking if the newly opened windows contain the text “Selenium automates browsers”.
9. Switch Window MAIN – This keyword is used to switch to the main window.
10. Element Text Should Be – This keyword is used to verify that the current page contains the exact text identified by the locator. Here, we are checking if we switched back to the main window and the main window contains the exact text “Automation Demo Site”.
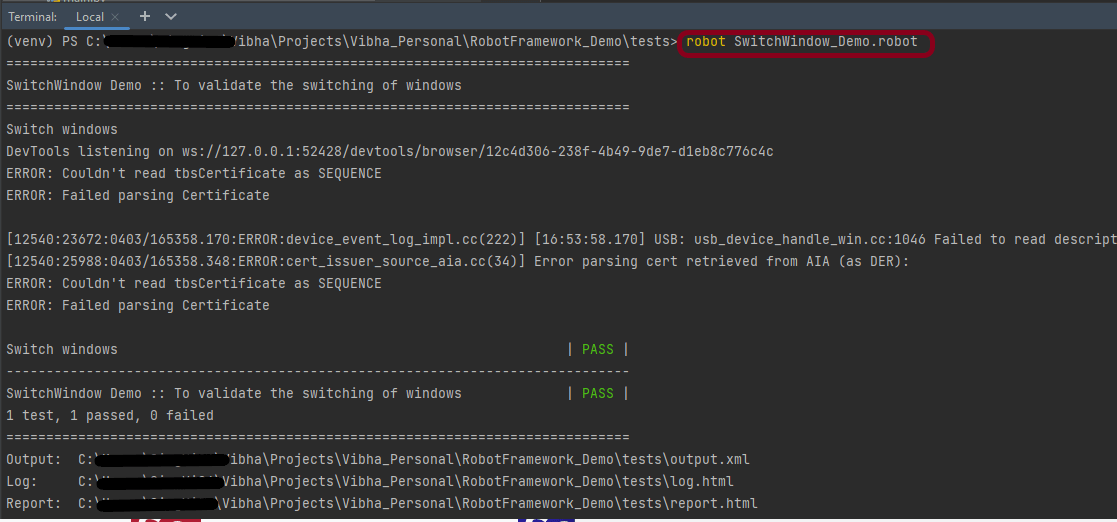
To run this script, go to the command line and go to directory tests. We need the below command to run the Robot Framework script.
robot SwitchWindow_Demo.robot
The output of the above program is
Step 5 – View Report and Log
We have the test case passed. The Robot Framework generates log.html, output.xml, and report.html by default.
Let us now see the report and log details.
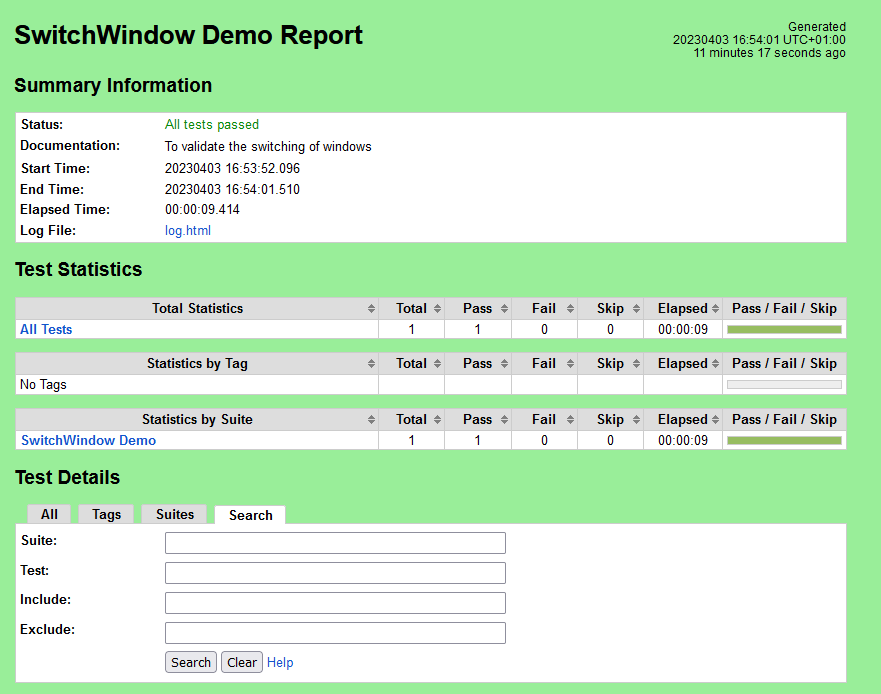
Report
Right-click on report.html. Select Open In->Browser->Chrome(any browser of your wish).
The Report generated by the framework is shown below:
Log
Robot Framework has multiple log levels that control what is shown in the automatically generated log file. The default Robot Framework log level is INFO.
Right-click on log.html. Select Open In->Browser->Chrome(any browser of your wish).
Multiple Window Switch
Selenium WebDriver assigns an alphanumeric id to each window as soon as the WebDriver object is instantiated. This unique alphanumeric id is called a window handle. Selenium uses this unique id to switch control among several windows. In simple terms, each unique window has a unique ID, so that Selenium can differentiate when it is switching controls from one window to the other.
The below page shows that when we click on “Open Separate Multiple Windows”, then click on the “click” button, 2 new child windows open – Selenium.dev and Demo page.
Below is an example of switching between multiple windows.
*** Settings ***
Documentation To validate the switching between multiple windows
Library SeleniumLibrary
Test Teardown Close Browser
*** Variables ***
${mainPageText} xpath://div[@class='col-sm-8 col-xs-8 col-md-8']/h1
*** Test Cases ***
Multiple Windows switch
Open the Browser with URL
Select the button to switch to child window
Verify child windows are opened
Verify user switched back to parent window
*** Keywords ***
Open the Browser with URL
Create Webdriver Chrome executable_path=/Vibha_Personal/RobotFramework/drivers/chromedriver_linux64
Go To https://demo.automationtesting.in/Windows.html
Maximize Browser Window
Set Selenium Implicit Wait 5
Select the button to switch to child window
Click Element xpath://div[@class='tabpane pullleft']/ul/li[3]/a
Click Button xpath:.//*[@id='Multiple']/button
Verify child windows are opened
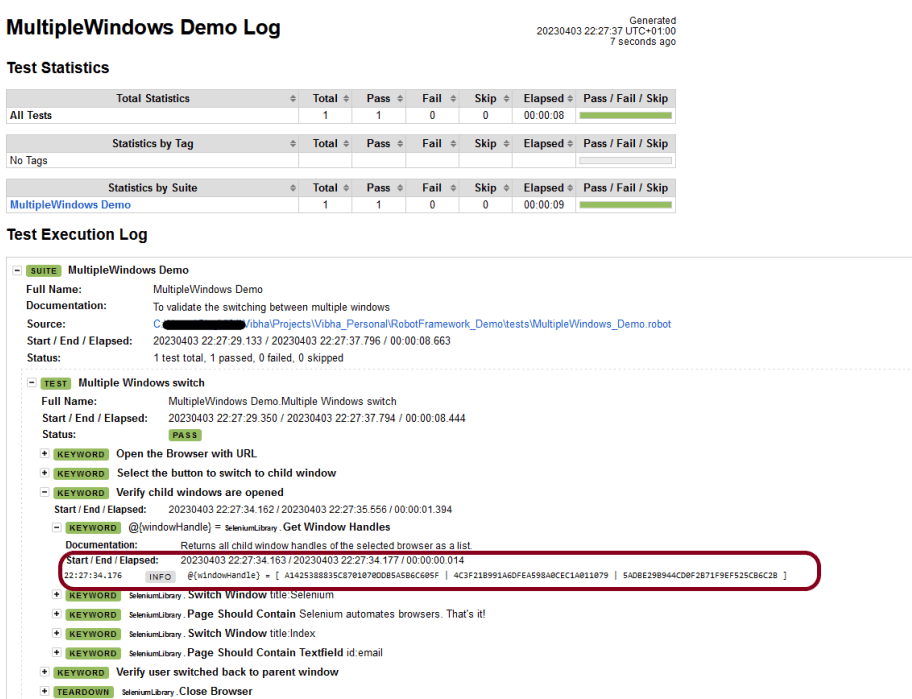
@{windowHandle}= Get Window Handles
Switch Window title:Selenium
Page Should Contain Selenium automates browsers. That's it!
Switch Window title:Index
Page Should Contain Textfield id:email
Verify user switched back to parent window
Switch Window MAIN
Element Text Should Be ${mainPageText} Automation Demo Site
All the below-mentioned keywords are derived from SeleniumLibrary. The functionality of keywords mentioned above:
1. Get Window Handles − The keyword returns all child window handles of the selected browser as a list. Here, it will return 3 window handles.
2. Switch Window title:Selenium – This keyword is used to switch to the window whose title is identified by the locator “Selenium”.
3. Page Should Contain Textfield – This keyword verifies the text field identified by the locator found from the current page.
Step 1 – Execute the tests
We need the below command to run the Robot Framework script.
robot MultipleWindows_Demo.robot
The output of the above program is
Step 2 – View Report and Log
Report
Log
In the log, we can see that Get Window Handles has 3 alphanumeric id.
That’s it! Congratulations on making it through this tutorial and hope you found it useful! Happy Learning!!
Step 1.1 – Open PyCharm and create a new project. Go to File and select New Project from the main menu.
Step 1.2 – Choose the project location. Click the “Browse” button next to the Location field and specify the directory for your project.
Deselect the Create a main.py welcome script checkbox because you will create a new Python file for this tutorial.
Click on the “Create” Button.
Step 1.3 – A new dialog appears asking to open the project using any one of the given options. I have selected New Window as I like to have separate windows for each project.
Below is the image of the new project created in PyCharms.
How to create a test to automate the options of dropdown in Robot Framework?
Step 4 – Create a new directory in the new project
Right-Click on the project, select New->Directory and provide name as Tests
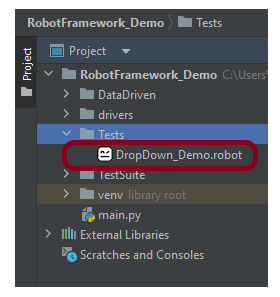
Below is the image of the new directory.
Right-click on the new directory and select New File and provide the name as DropDown_Demo.robot as shown below:
Step 5 – Download ChromeBinaries from the below location
The tests are going to use the Chrome browser, so we need to download the ChromeBinaries to open a blank browser in Chrome.
The chromedriver and geckodriver are placed in a folder name drivers in the RobotFramework_Demo project. I have renamed chromedriver to Chrome and geckodriver to Firefox.
Step 6 – Automate the selection of options for DropDown
We are now going to write test cases. The test case details will be as follows −
The below page shows that we have multiple DropDown options.
Let us inspect the locator of DropDown.
Below is an example of selecting the options in DropDown.
*** Settings ***
Documentation    To validate the selection of DropDown
Library     SeleniumLibrary
Test Teardown    Close Browser

*** Test Cases ***
Select options in DropDown
    Open the Browser with URL
    Select the dropdown options APIs by value
    Select the dropdown options Microsoft Excel by index
    Select the dropdown options CSS by label

*** Keywords ***
Open the Browser with URL
    Create Webdriver    Chrome  executable_path=/Vibha_Personal/RobotFramework/drivers/chromedriver_linux64
    Go To    https://demo.automationtesting.in/Register.html
    Maximize Browser Window
    Set Selenium Implicit Wait    2

Select the dropdown options APIs by value
    Select From List By Value       id:Skills   APIs


Select the dropdown options Microsoft Excel by index
    Select From List By Index        id:Skills   43

Select the dropdown options CSS by label
    Select From List By Label       id:Skills   CSS
All the below-mentioned keywords are derived from SeleniumLibrary except the last one. The functionality of keywords mentioned above:
1. Create Webdriver − The keyword creates an instance of Selenium WebDriver.
To run this script, go to the command line and go to directory tests.
Step 7 – Execute the tests
We need the below command to run the Robot Framework script.
robot DropDown_Demo.robot
The output of the above program is
Step 8 – View Report and Log
We have the test case passed. The Robot Framework generates log.html, output.xml, and report.html by default.
Let us now see the report and log details.
Report
Right-click on report.html. Select Open In->Browser->Chrome(any browser of your wish).
The Report generated by the framework is shown below:
Log
Robot Framework has multiple log levels that control what is shown in the automatically generated log file. The default Robot Framework log level is INFO.
Right-click on log.html. Select Open In->Browser->Chrome(any browser of your wish).
That’s it! Congratulations on making it through this tutorial and hope you found it useful! Happy Learning!!