4. To generate a JUnit Report in Jenkins, we need to download the JUnit Plugin. Please refer to this tutorial to install the plugin – How to install Plugins in Jenkins
Implementation Steps
Step 1: Start the Jenkins server
Start the Jenkins server open the browser and navigate to the below endpoint
In the General section, enter the project description in the Description box.
Select a custom workspace and provide the full path of the project.
Select Source Code Management as None if the project is locally present on the machine
Step 3: Build Steps
In the Build Steps section, select Invoke top-level Maven targets.
The Build Steps window will extend. Mention the below details:-
Maven Version – MAVEN_HOME
Goals – clean test
Click on the Advanced button.
Step 4: Provide the full path to pom.xml
Specify the full path to pom.xml in POM.
Step 5: Select “Publish JUnit test result report” from “Post Build Actions”
Scroll down to “Post Build Actions” and click on the “Add Post Build Actions” drop-down list. Select “Publish JUnit test result report“.
Enter the Result Path as “**/target/surefire-reports/*.xml”.
Click on the Applyand Save buttons.
We have created a new Maven project “JUnitReport_Demo” with the configuration to run the Selenium with JUnit Tests and also to generate JUnit Report after execution using Jenkins.
Step 6: Execute the tests
Let’s execute it now by clicking on the “Build Now” button.
Right-click on Build Number (here in my case it is #2).
Click on Console Output to see the result.
Step 7: View the JUnit Report
Once the execution is completed, we could see a link to view the “Test Report“.
Below is the summary of the Test Execution.
This way, we could generate JUnit Report using Jenkins.
Congratulations on making it through this tutorial and hope you found it useful! Happy Learning!! Cheers!!
For the successful execution of Agile testing requirements, a perfect test automation tool is required. And there are numerous factors to consider when creating a solid automation framework. One such component is reporting, which not only informs you of the success or failure of the project but also assists you in identifying potential bugs. JUnit is another useful framework that can add the ability to generate reports in Selenium. This tutorial explains the steps to generate the JUnit5 Report.
For the successful execution of Agile testing requirements, a perfect test automation tool is required. And there are numerous factors to consider when creating a solid automation framework. One such component is reporting, which not only informs you of the success or failure of the project but also assists you in identifying potential bugs. JUnit is another useful framework that can add the ability to generate reports in Selenium. This tutorial explains the steps to generate the JUnit Report.
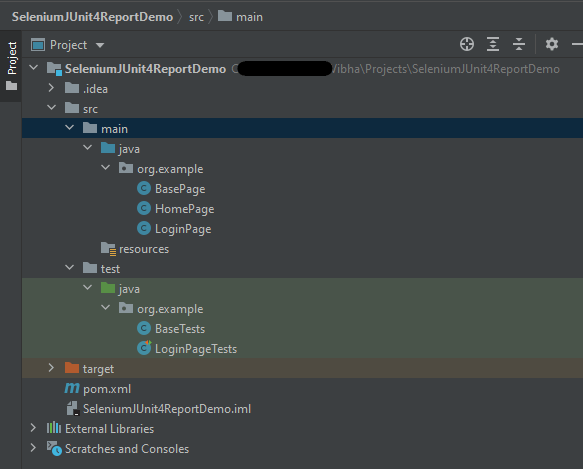
Below is the sample project which uses Selenium and JUnit which is used to generate a JUnit Report.
This is the BaseClass that contains the PageFactory.initElements. The initElements is a static method of PageFactory class that is used to initialize all the web elements located by @FindBy annotation.
import org.openqa.selenium.WebDriver;
import org.openqa.selenium.support.PageFactory;

public class BasePage {

	  public WebDriver driver;

	  public BasePage(WebDriver driver) {
		  this.driver = driver;
		  PageFactory.initElements(driver,this);
	}

}
Below is the code for LoginPage and HomePage.
LoginPage
import org.openqa.selenium.WebDriver;
import org.openqa.selenium.WebElement;
import org.openqa.selenium.support.FindBy;

public class LoginPage extends BasePage{

	 public LoginPage(WebDriver driver) {
		 super(driver);

    }

	@FindBy(name = "username")
    public WebElement userName;

    @FindBy(name = "password")
    public WebElement password;

    @FindBy(xpath = "//*[@id='app']/div[1]/div/div[1]/div/div[2]/div[2]/form/div[1]/div/span")
    public WebElement missingUsernameErrorMessage;

    @FindBy(xpath = "//*[@id='app']/div[1]/div/div[1]/div/div[2]/div[2]/form/div[1]/div/span")
    public WebElement missingPasswordErrorMessage;

    @FindBy(xpath = "//*[@id='app']/div[1]/div/div[1]/div/div[2]/div[2]/form/div[3]/button")
    public WebElement login;

    @FindBy(xpath = "//*[@id='app']/div[1]/div/div[1]/div/div[2]/div[2]/div/div[1]/div[1]/p")
    public  WebElement errorMessage;


    public void login(String strUserName, String strPassword) {

    	userName.sendKeys(strUserName);
    	password.sendKeys(strPassword);
    	login.click();

    }

    public String getMissingUsernameText() {
        return missingUsernameErrorMessage.getText();
    }

    public String getMissingPasswordText() {
        return missingPasswordErrorMessage.getText();
    }

    public String getErrorMessage() {
        return errorMessage.getText();
    }

}
HomePage
import org.openqa.selenium.WebDriver;
import org.openqa.selenium.WebElement;
import org.openqa.selenium.support.FindBy;

public class HomePage extends BasePage {

	public HomePage(WebDriver driver) {
		super(driver);

	}

	  @FindBy(xpath = "//*[@id='app']/div[1]/div[1]/header/div[1]/div[1]/span/h6")
	  public  WebElement homePageUserName;

	  public String getHomePageText() {
	       return homePageUserName.getText();
   }

}
Here, we have BaseTests Class which contains the common methods needed by other test pages.
import java.time.Duration;
import org.junit.After;
import org.junit.Before;
import org.openqa.selenium.WebDriver;
import org.openqa.selenium.chrome.ChromeDriver;
import io.github.bonigarcia.wdm.WebDriverManager;

public class BaseTests {

	public static WebDriver driver;
	public final static int TIMEOUT = 10;

	@Before
    public void setup() {
    	WebDriverManager.chromedriver().setup();
	    driver = new ChromeDriver();
	    driver.manage().window().maximize();
	    driver.get("https://opensource-demo.orangehrmlive.com/");
	    driver.manage().timeouts().implicitlyWait(Duration.ofSeconds(TIMEOUT));

    }

    @After
    public void tearDown() {
        driver.quit();
    }

}
LoginPageTests
import org.junit.Assert;
import org.junit.Test;

public class LoginPageTests extends BaseTests{

    @Test
    public void invalidCredentials() {

        LoginPage objLoginPage = new LoginPage(driver);
        objLoginPage.login("admin$$", "admin123");

        // Verify Error Message
        Assert.assertEquals("Invalid credentials",objLoginPage.getErrorMessage());

    }

    @Test
    public void validLogin() {

        LoginPage objLoginPage = new LoginPage(driver);
        objLoginPage.login("Admin", "admin123");

        HomePage objHomePage = new HomePage(driver);

        // Verify Home Page
        Assert.assertEquals("Dashboard",objHomePage.getHomePageText());

    }

    @Test
    public void missingUsername() {

        LoginPage objLoginPage = new LoginPage(driver);
        objLoginPage.login("", "admin123");

        // Verify Error Message
        Assert.assertEquals("Invalid credentials",objLoginPage.getMissingUsernameText());

    }

}
Step 3 – Run the tests from the Command Line
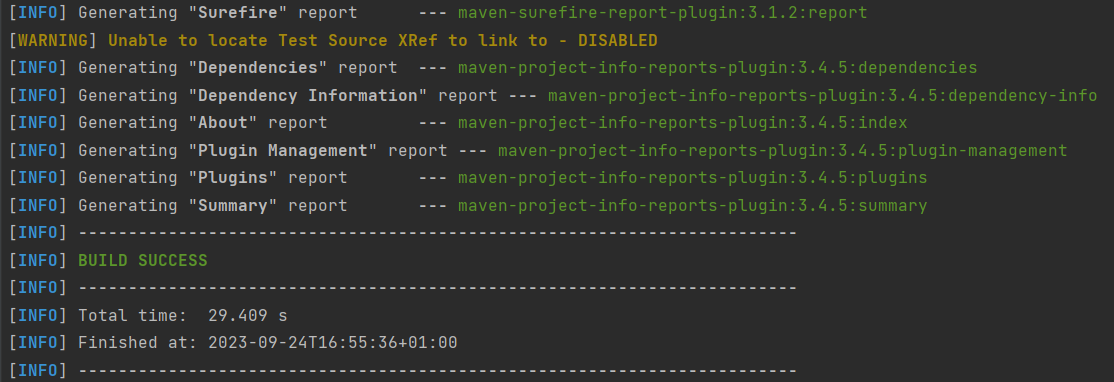
Use the below command to run the tests from the command line
mvn clean test site
The output of the test execution is
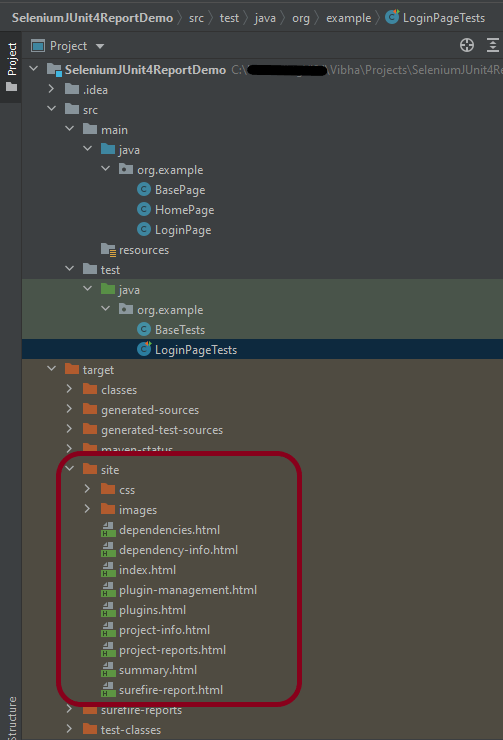
Step 4 – JUnit Report generation
Maven Site Plugin creates a folder – site under the target directory, and the Maven Surefire Report plugin generates the JUnit Reports in the site folder.
Right-click on the surefire-report.html and open it in the browser.
To know about the test failure, go to the Failure Details Section.
Congratulations on making it through this tutorial and hope you found it useful! Happy Learning!! Cheers!!