TestNG was developed by a famous programmer named “Cedric Beust”. It is distributed under Apache Software License and is easily available to download. TestNG requires JDK 7 or higher. TestNG is a testing framework inspired by JUnit and NUnit, but introduces some new functionalities that make it more powerful and easier to use.
Cross-browser testing is a software testing practice that involves evaluating the compatibility and functionality of a website or web application across different web browsers. The goal of cross-browser testing is to ensure that the website or application works consistently and as expected on various browsers, operating systems, and devices.
Since different web browsers (such as Google Chrome, Mozilla Firefox, Microsoft Edge, Safari, etc.) may interpret and render HTML, CSS, and JavaScript code differently, cross-browser testing helps identify and address any discrepancies or issues that might arise. These differences can affect the visual appearance, layout, performance, and functionality of a website or application.
What is Selenium Grid?
Selenium Grid enables the execution of WebDriver scripts on remote machines (virtual or physical) by routing client commands to remote browser instances. Selenium Grid is a component of the Selenium testing framework that allows you to distribute and run tests across multiple browsers, operating systems, and machines simultaneously. It is particularly useful for performing parallel testing and cross-browser testing, helping to speed up the testing process and ensure consistent behavior across different environments.
What is new in Selenium Grid 4?
Grid 4 makes use of a variety of new technologies to enable scaling while allowing for local execution.
Selenium Grid 4 is a new implementation that does not share the previous version’s codebase.
I like how noVNC is packaged with Selenium Grid. In the dashboard, there is a Sessions tab that, when clicked, displays the links to the browser sessions that are now active, along with a video icon. When you click the video icon, you will be prompted to enter the password (“secret”), following which you will be taken to the current browser session where you can view the test live.
If we wanted to observe what was going on inside the browser session, we had to explicitly configure the grid for noVNC viewer in the prior version. From the grid, we just saw the browser icons highlighted, letting us know that the tests were being run in this or that browser.
What is Docker?
Docker is an open platform for developing, shipping, and running applications inside the containers. Containers are lightweight, portable, and self-sufficient units that package an application and its dependencies (such as libraries, frameworks, and runtime environments) together. Docker provides a consistent environment for running applications across different systems, making it easier to ensure that an application behaves the same way in development, testing, and production environments.
CLI Options for Docker
What is Docker Compose?
Docker Compose is a tool provided by Docker that allows you to define and manage multi-container Docker applications. It uses a simple and declarative YAML file to define the services, networks, and volumes that make up your application stack.
Project Structure
How to perform cross browser testing with Selenium Grid and Docker
Docker Desktop does not start automatically after installation. To start Docker Desktop, search for Docker, and select Docker Desktop in the search results. When the whale icon in the status bar stays steady, Docker Desktop is up-and-running, and is accessible from any terminal window.
Creating an instance of the Remote WebDriver and passing the selenium endpoint and chrome options defined in it.
To run a Remote WebDriver client, we first need to connect to the RemoteWebDriver. We do this by pointing the URL to the address of the server running our tests. In order to customize our configuration, we set desired capabilities.
BaseTests
import org.openqa.selenium.WebDriver;
import org.openqa.selenium.chrome.ChromeOptions;
import org.openqa.selenium.edge.EdgeOptions;
import org.openqa.selenium.firefox.FirefoxOptions;
import org.openqa.selenium.remote.RemoteWebDriver;
import org.testng.annotations.AfterMethod;
import org.testng.annotations.BeforeMethod;
import org.testng.annotations.Parameters;
import java.net.URL;
import java.time.Duration;

public class BaseTests {
    protected static ThreadLocal<RemoteWebDriver> driver = new ThreadLocal<RemoteWebDriver>();
    public static String remote_url = "http://localhost:4444";
    public final static int TIMEOUT = 5;

    @BeforeMethod
    @Parameters("browser")
    public void setUp(String browser) throws Exception {
        if(browser.equalsIgnoreCase("chrome")) {

            ChromeOptions options = new ChromeOptions();
            options.addArguments("--start-maximized");
            options.addArguments("--headless=new");
            options.addArguments("--remote-allow-origins=*");
            driver.set(new RemoteWebDriver(new URL(remote_url), options));
            System.out.println("Browser Started :"+ browser);

        } else if (browser.equalsIgnoreCase("firefox")) {
            FirefoxOptions options = new FirefoxOptions();
            options.addArguments("--start-maximized");
            options.addArguments("-headless");
            driver.set(new RemoteWebDriver(new URL(remote_url), options));
            System.out.println("Browser Started :"+ browser);

        } else if (browser.equalsIgnoreCase("edge")) {
            EdgeOptions options = new EdgeOptions();
            options.addArguments("--start-maximized");
            options.addArguments("--headless=new");
            driver.set(new RemoteWebDriver(new URL(remote_url), options));
            System.out.println("Browser Started :"+ browser);

        } else {
            throw new Exception ("Browser is not correct");
        }

        driver.get().get("https://opensource-demo.orangehrmlive.com/");
        driver.get().manage().timeouts().implicitlyWait(Duration.ofSeconds(5));
    }

    public WebDriver getDriver() {
        return driver.get();
    }

    @AfterMethod
    public  void closeBrowser() {
        driver.get().quit();
        driver.remove();
    }

}
LoginPageTests
import org.openqa.selenium.By;
import org.testng.annotations.Test;
import static org.testng.Assert.assertEquals;

public class LoginPageTests extends BaseTests {

    By userName = By.name("username");

    By passWord = By.name("password");

    By loginBtn = By.xpath("//*[@id='app']/div[1]/div/div[1]/div/div[2]/div[2]/form/div[3]/button");

    By errorMessage = By.xpath("//*[@id='app']/div[1]/div/div[1]/div/div[2]/div[2]/div/div[1]/div[1]/p");

    By blankUsername = By.xpath("//*[@id='app']/div[1]/div/div[1]/div/div[2]/div[2]/form/div[1]/div/span");

    By dashboardPage = By.xpath("//*[@id='app']/div[1]/div[1]/header/div[1]/div[1]/span/h6");

    @Test
    public void invalidCredentials()  {

        getDriver().findElement(userName).sendKeys("1234");
        getDriver().findElement(passWord).sendKeys("12342");
        getDriver().findElement(loginBtn).click();
        String actualErrorMessage = getDriver().findElement(errorMessage).getText();
        System.out.println("Actual ErrorMessage :" + actualErrorMessage);
        assertEquals(actualErrorMessage,"Invalid credentials");

    }

    @Test
    public void blankUsername()  {

        getDriver().findElement(userName).sendKeys("");
        getDriver().findElement(passWord).sendKeys("12342");
        getDriver().findElement(loginBtn).click();
        String actualErrorMessage = getDriver().findElement(blankUsername).getText();
        System.out.println("Actual ErrorMessage :" + actualErrorMessage);
        assertEquals(actualErrorMessage,"Required");

    }

    @Test
    public void successfulLogin()  {

        getDriver().findElement(userName).sendKeys("Admin");
        getDriver().findElement(passWord).sendKeys("admin123");
        getDriver().findElement(loginBtn).click();
        String actualMessage = getDriver().findElement(dashboardPage).getText();
        System.out.println("Message :" + actualMessage);
        assertEquals(actualMessage,"Dashboard");

    }
}
6. Create a testng.xml
It is very easy to create testng.xml in the case of Eclipse. Right-click on the project, and select TestNG -> Convert to TestNG. It will create a basic testng.xml structure. In case of IntelliJ, create a new file with the name of testng.xml and copy the code from here. Here, we are running the tests parallelly also.
<?xml version="1.0" encoding="UTF-8"?>
<!DOCTYPE suite SYSTEM "https://testng.org/testng-1.0.dtd">
<suite name="Suite" parallel="tests" thread-count="3">
    <test name="Chrome Test">
        <parameter name="browser" value="chrome"></parameter>
        <classes>
            <class name="com.example.tests.LoginPageTests"/>
        </classes>
    </test> <!-- Test -->

   <test name="Firefox Test">
        <parameter name="browser" value="firefox"></parameter>
        <classes>
            <class name="com.example.tests.LoginPageTests"/>
        </classes>
    </test> <!-- Test -->

    <test name="Edge Test">
        <parameter name="browser" value="edge"></parameter>
        <classes>
            <class name="com.example.tests.LoginPageTests"/>
        </classes>
    </test> <!-- Test -->
</suite> <!-- Suite -->
version: 3. It is the latest version of the docker-compose files.
services(containers): This contains the list of the images and their configurations.
image: It defines which image will be used to spin up container.
ports: Published ports with host:container format.
container_name: You can give name to your containers.
depends_on: This defines the required dependency before spinning up the container. In our docker-compose.yml file, containers Chrome and Firefox are dependent upon container hub to spin up.
SE_NODE_MAX_INSTANCES: This defines how many instances of same version of browser can run over the Remote System.
SE_NODE_MAX_SESSIONS: This defines maximum number of concurrent sessions that will be allowed.
8. Start the Selenium Grid
We have the docker compose file ready with all the configurations required to start the selenium grid.
To start the grid we need to navigate to the folder where our docker compose file is located and run the following command:
docker-compose up
Once the grid is up and running, we can navigate to http://localhost:4444and checkout the instances which are up and running as per the configurations we gave in the docker compose file.
9. Execute the tests
Go to the command line and execute the tests using the below command:
mvn clean test
The output of the above program is shown below:
Checkout the image below, this is how the selenium grid dashboard looks when the tests execution gets started
As mentioned earlier, in selenium grid 4, we have the sessions overview as well. So, when we click on the Session Tab we can see the execution happening live and there are other details as well displayed in the Dashboard like Capabilities, Start time, Duration and Node URI which are useful metrics from the test automation reporting.
We need to click on the video icon beside the browser session to watch the session live and it will ask for password here. The password is “secret”
This is how the test execution in Chrome looks like and its actually executing the tests.
10. View the Reports
TestNG generate the reports. Go to target/surefire-reports as shown in the below image.
Emailable-Report.html
Index.html
11. Stop the Selenium Grid
Once the execution of the tests are finished, it is advisable to stop the Grid. To stop the grid, we can press ctrl+c in the command prompt/terminal and it will instantly stop the containers. To Stop and remove containers, networks, volumes, and images created by docker we can use the following command:
docker-compose down
Congratulations!!. The above steps allow running Selenium tests in Docker seamlessly. Happy Learning.
Cross Browser is a technique in which a web application tests on different browsers and operating systems. Cross Browser testing, make sure that the site rendered the same in every browser.
Suppose, we have to execute 25 tests cases to test a web application on Google Chrome Browser and it takes around 4 hrs to execute these tests. However, we do not know if a user is going to access the web application on which browser. Therefore, now the same set of test cases need to executes on Firefox, Edge, Internet Explorer, Safari and Opera.
Therefore, now we need to execute 25*6=150 test cases and test execution hour changes from 4 to 24 hrs to check that the web application is working as expected. What is the best approach to handle this situation is to automate these tests and perform cross browser testing
Why do we need to perform cross browser testing?
Each website is built by anyone or combination of these technologies – HTML, CSS and Javascript. Each browser uses different rendering engines to compute these technologies. Chrome uses Blink, WebKit on iOS, V8 JavaScript engine, Firefox uses Gecko, Edge uses Chromium-based with Blink and V8 engines, Safari uses Webkit rendering engine, IE uses Trident and so on.
1) Font size, image orientation and alignment mismatch in different browsers
2) Different browser is compatible with different operating systems
3) CSS,HTML validation difference can be there
Lets see an example of Cross Browser testing using Selenium and TestNG.
Step 1 – Add the below dependencies to the POM.xml, in case of Maven project.
We need to specify the values of browser in the TestNG XML file that will pass to the test case file.
<?xml version="1.0" encoding="UTF-8"?>
<!DOCTYPE suite SYSTEM "https://testng.org/testng-1.0.dtd">
<suite name="Suite" parallel="tests" thread-count="3">
  <test name="Chrome Test">
   <parameter name="browser" value="chrome" />
    <classes>
      <class name="com.example.crossbrowser.CrossBrowserTests"/>
    </classes>
  </test> <!-- Test -->

    <test name="firefox Test">
   <parameter name="browser" value="firefox" />
    <classes>
      <class name="com.example.crossbrowser.CrossBrowserTests"/>
    </classes>
  </test> <!-- Test -->

    <test name="Edge Test">
   <parameter name="browser" value="edge" />
    <classes>
      <class name="com.example.crossbrowser.CrossBrowserTests"/>
    </classes>
  </test> <!-- Test -->
</suite> <!-- Suite -->
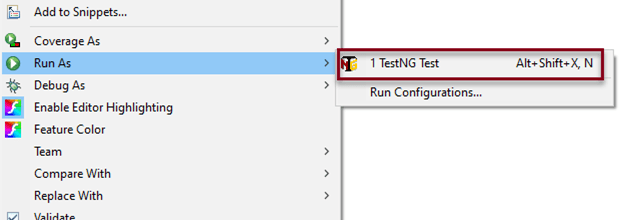
To execute this program, we need to Right click on the program and select Run as – TestNGTest
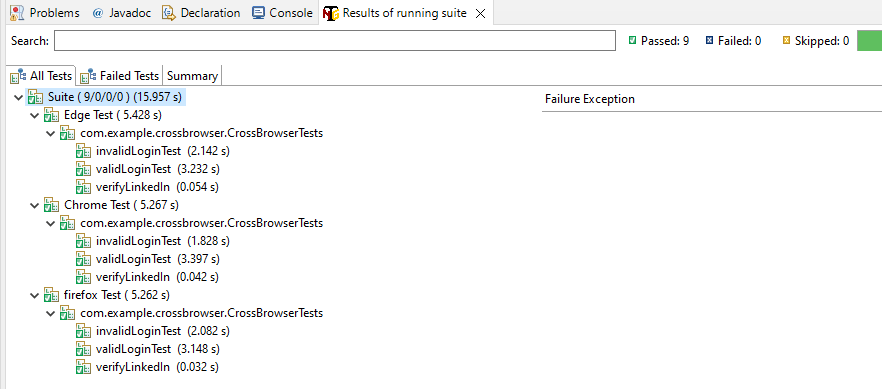
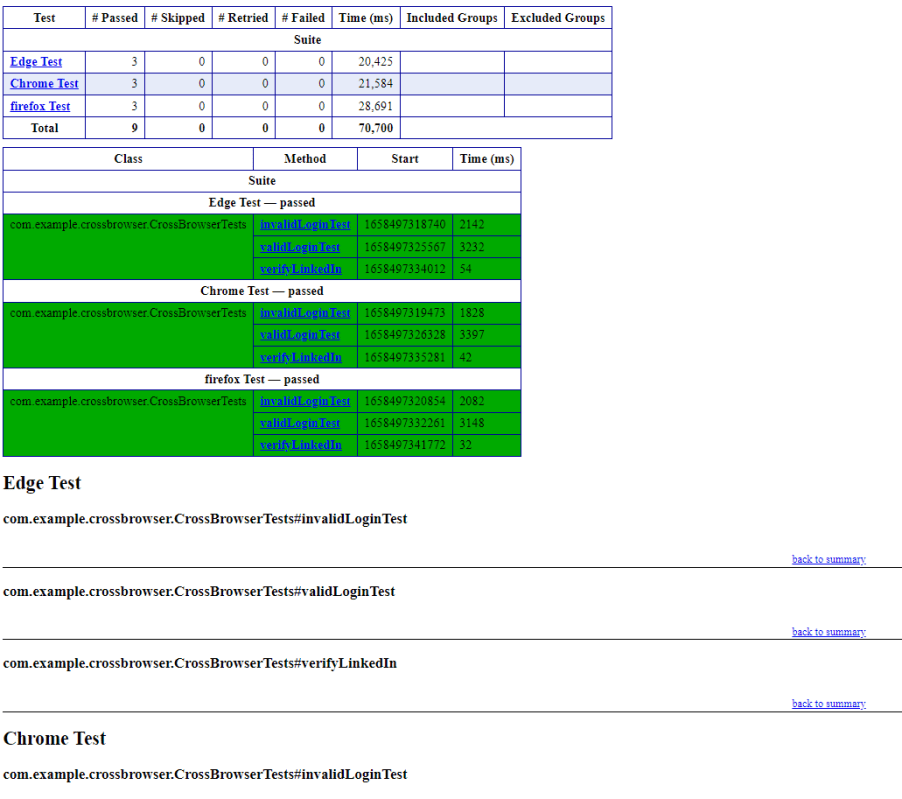
The test execution result looks like as shown below. It shows the test execution status of all the tests. As, in this program, 3 tests are executed and all 3 of them passes. The same result can be depicted from below image.
TestNG Report Generation
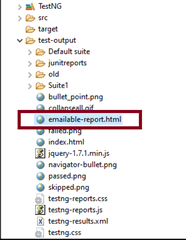
TestNG generates various type of reports under test-output folder like emailable-report.html, index.html, testng-results.xml
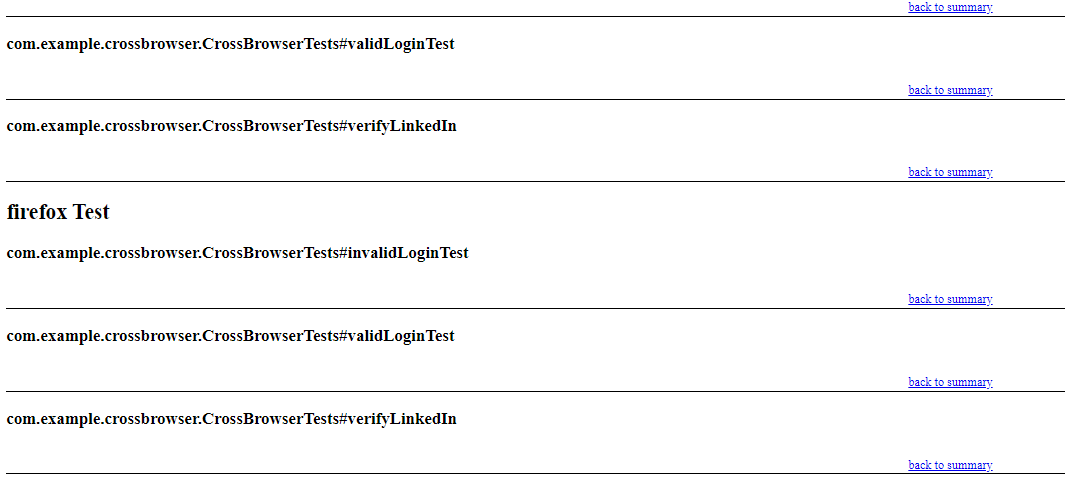
We are interested in ’emailable-report.html’ report. Open ’emailable-report.html’, as this is a html report open it with browser. Below image shows emailable-report.html.
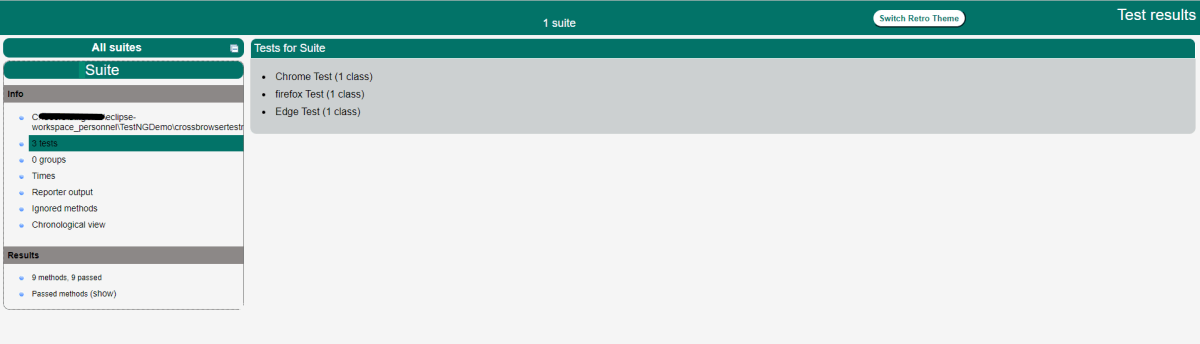
TestNG also produce “index.html” report and it resides under test-output folder. Below image shows index.html report.
We are done! Congratulations on making it through this tutorial and hope you found it useful! Happy Learning!!