Conditional Hooks in Cucumber

HOME

In the previous tutorial, I explained Hooks in Cucumber. In this tutorial, I will explain Condition Hooks in Cucumber.

Hooks can be conditionally selected for execution based on the tags of the scenario. These are called Condition or Tagged Hooks.

Tagged Hooks are much like the scenario hooks, but the only difference is that they are executed before and after the specified tag.

These tagged hooks will be very specific to the particular tags, so these are not common for all scenarios.

So basically, they can also be run in the following two ways:

  • Before (‘tagName’)
  • After (‘tagName’)

Why do we need Tagged Hooks?

Suppose there are 3 different sets of scenarios. The prerequisites of these scenarios are different, like they have to open different browsers. So, we don’t want to have a common hook for all the scenarios. In this case, we can create a tagged hook to satisfy the requirement of each scenario.

In the below example, there are 3 tags – ChromeBrowser, FireFoxBrowser, and EdgeBrowser. I want to run the hook which has the specified tag for that scenario. For Example, I want @After and @Before hooks related to Chrome Browser should be executed for the tag – @ChromeBrowser.

Below is the feature file which has 3 different scenarios.

Feature: Conditional or Tagged Hooks
 
@ChromeBrowser
Scenario: Open Chrome Browser
 
Given I want to open Google Chrome Browser

@FireFoxBrowser
Scenario: Open Firefox Browser
 
Given I want to open Mozilla Firefox Browser

@EdgeBrowser
Scenario: Open Edge Browser
 
Given I want to open Microsoft Edge Browser

Below is the Step Definition for the above feature file.

import io.cucumber.java.en.Given;

public class ConditionalHooksExampleDefinitions {
	
	@Given("I want to open Google Chrome Browser")
	public void chrome() throws Throwable {
	    System.out.println("I want to open Google Chrome Browser");
	}

	@Given("I want to open Mozilla Firefox Browser")
	public void firefox() throws Throwable {
		System.out.println("I want to open Mozilla Firefox Browser");
	}

	@Given("I want to open Microsoft Edge Browser")
	public void edge() throws Throwable {
		System.out.println("I want to open Microsoft Edge Browser");
	}

}

Hooks can be defined in the same class or different. I have defined Hooks in a separate class.

import io.cucumber.java.After;
import io.cucumber.java.AfterStep;
import io.cucumber.java.Before;
import io.cucumber.java.BeforeStep;

public class Hooks {
	
	@BeforeStep
    public void beforeStep(){
        System.out.println("@@@@@@@@@@@@@@@ Before Step @@@@@@@@@@@@@@@@@");
    }
	
	@AfterStep
    public void afterStep(){
        System.out.println("@@@@@@@@@@@@@@@@  After Step @@@@@@@@@@@@@@@@");
    }
	
	@Before("@ChromeBrowser")
    public void beforeGoogle(){
        System.out.println("******* before Chrome *******");
    }
	
	@Before("@FireFoxBrowser")
    public void beforeFirefox(){
        System.out.println("$$$$$$$$$$ before FireFox $$$$$$$$$$");
    }

	@Before("@EdgeBrowser")
    public void beforeEdge(){
		System.out.println("============ before Edge =============");
    }
	
	@After("@ChromeBrowser")
    public void afterGoogle(){
        System.out.println("********* After Google *********");
    }

	@After("@FireFoxBrowser")
    public void afterFireFox(){
		System.out.println("$$$$$$$$$$$ After FireFox $$$$$$$$$$");
    }

	@After("@EdgeBrowser")
    public void afterEdge(){
        System.out.println("============ After Edge ==============");
    }

}

There is no change in the Test Runner Class.

import org.junit.runner.RunWith;
import io.cucumber.junit.Cucumber;
import io.cucumber.junit.CucumberOptions;

@RunWith(Cucumber.class)
@CucumberOptions(monochrome = true, plugin = "pretty", features = "src/test/resources/features/ConditionalHooks.feature", tags = {
		"" })

public class MyRunnerTests {

}

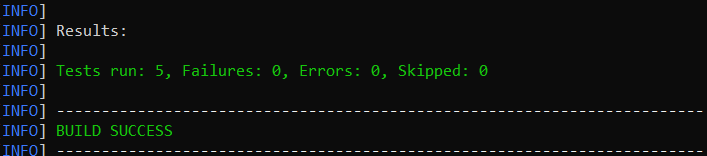
The output of the above execution is

  1. At the start of execution, @Before(“@ChromeBrowser”) {Scenario Hook} is executed.
  2. After that @BeforeStep (Step Hook) hook is executed.
  3. The given statement of the @ChromeBrowser tag is executed in the third step.
  4. The fourth step is to execute @AfterStep.
  5. Now, at last, the @After(“@ChromeBrowser”) hook is executed. Similarly, the same sequence is followed for FireFox and Edge Scenarios.

Congratulations on making it through this tutorial and hope you found it useful! Happy Learning!! Cheers!!

Run Cucumber Test from Maven Command Line

Last Updated on

HOME

To have a successful and effective implementation of a test framework, it is always advisable that the test framework supports test execution in multiple ways.
The most commonly used ways to execute tests in Cucumber Framework are by running the tests using JUnit and TestNG.

To execute tests using JUnit, we need to create a JUnit Test Runner. Whereas, we need a Maven project to execute Cucumber tests from Command-Line.

Create a Maven project and add the below-mentioned dependencies to your Maven project.

<project xmlns="http://maven.apache.org/POM/4.0.0" xmlns:xsi="http://www.w3.org/2001/XMLSchema-instance"
  xsi:schemaLocation="http://maven.apache.org/POM/4.0.0 http://maven.apache.org/xsd/maven-4.0.0.xsd">
  <modelVersion>4.0.0</modelVersion>

  <groupId>com.example</groupId>
  <artifactId>Cucumber_TestNG_Demo</artifactId>
  <version>1.0-SNAPSHOT</version>
  <packaging>jar</packaging>

  <name>Cucumber_TestNG_Demo</name>
  <url>http://maven.apache.org</url>

  <properties>
    <project.build.sourceEncoding>UTF-8</project.build.sourceEncoding>
    <cucumber.version>7.15.0</cucumber.version>
    <selenium.version>4.16.1</selenium.version>
    <testng.version>7.9.0</testng.version>
    <maven.compiler.plugin.version>3.12.1</maven.compiler.plugin.version>
    <maven.surefire.plugin.version>3.2.3</maven.surefire.plugin.version>
    <maven.compiler.source.version>17</maven.compiler.source.version>
    <maven.compiler.target.version>17</maven.compiler.target.version>
  </properties>

  <dependencies>

    <dependency>
      <groupId>io.cucumber</groupId>
      <artifactId>cucumber-java</artifactId>
      <version>${cucumber.version}</version>
    </dependency>

    <dependency>
      <groupId>io.cucumber</groupId>
      <artifactId>cucumber-testng</artifactId>
      <version>${cucumber.version}</version>
      <scope>test</scope>
    </dependency>

    <!-- Selenium -->
    <dependency>
      <groupId>org.seleniumhq.selenium</groupId>
      <artifactId>selenium-java</artifactId>
      <version>${selenium.version}</version>
    </dependency>

    <!-- TestNG -->
    <dependency>
      <groupId>org.testng</groupId>
      <artifactId>testng</artifactId>
      <version>${testng.version}</version>
      <scope>test</scope>
    </dependency>

  </dependencies>
  <build>
    <plugins>
      <plugin>
        <groupId>org.apache.maven.plugins</groupId>
        <artifactId>maven-compiler-plugin</artifactId>
        <version>${maven.compiler.plugin.version}</version>
        <configuration>
          <source>${maven.compiler.source.version}</source>
          <target>${maven.compiler.target.version}</target>
        </configuration>
      </plugin>
      <plugin>
        <groupId>org.apache.maven.plugins</groupId>
        <artifactId>maven-surefire-plugin</artifactId>
        <version>${maven.surefire.plugin.version}</version>
        <configuration>
          <suiteXmlFiles>
            <suiteXmlFile>testng.xml</suiteXmlFile>
          </suiteXmlFiles>
        </configuration>
      </plugin>
    </plugins>
  </build>

</project>

Feature: Login to HRM Application

  Background:
    Given User is on HRMLogin page "https://opensource-demo.orangehrmlive.com/"

  @ValidCredentials
  Scenario: Login with valid credentials

    When User enters username as "Admin" and password as "admin123"
    Then User should be able to login successfully

  @InvalidCredentials
  Scenario Outline: Login with invalid credentials

    When User enters username as "<username>" and password as "<password>"
    Then User should be able to see error message "<errorMessage>"

    Examples:
      | username   | password  | errorMessage                      |
      | Admin      | admin12$$ | Invalid credentials               |
      | admin$$    | admin123  | Invalid credentials               |
      | abc123     | xyz$$     | Invalid credentials               |

Feature: Login to Home

  Background:
    Given User is on HRMLogin page "https://opensource-demo.orangehrmlive.com/"

  @ValidCredentialsHome
  Scenario: Login with valid credentials to got to home page

    When User enters username as "Admin" and password as "admin123"
    Then User should be able to login successfully and new Home page opens

Run Test from Command Line

1. Open the command prompt and change the directory to the project location where pom.xml is present.

C:\Users\Documents\Vibha\Automation\Cucumber_Selenium_TestNG

2. All feature files should be in src/test/resources and create the Cucumber Runner class as CucumberRunnerTest.
Note:- The Runner class name should end with Test to execute the tests from Command Line
Run the following command in the command prompt:

mvn clean test

mvn clean test runs Cucumber Features using Cucumber’s JUnit Runner. The @RunWith (Cucumber.class) annotation on the TestRunner class tells JUnit to start Cucumber. Cucumber runs time parses the command-line options to know what feature to run, where the Glue Code lives, what plugins to use, and so on.

3. The below screenshot shows that CucumberRunnerTest class is triggered.

4. The below screenshot shows the build success output.

Cucumber provides several options that can be passed to on the command line.

2. Running Scenarios using Tags

If you are using Maven and want to run a subset of scenarios tagged with @ValidCredentials.

mvn clean test -Dcucumber.filter.tags="@ValidCredentials"

3. Running a Feature file

Suppose you want to run a single Feature File from the command line, then use the below syntax

mvn clean test -Dcucumber.features="src/test/resources/features/HomePage.feature"

4. Creating Cucumber Report from Command Line

If we want to generate a different report, then we can use the following command and see the HTML report generate at the location mentioned:

mvn clean test -Dcucumber.plugin="html:target/cucumber-reports/cucumberReport.html"

5. Passing multiple Parameters

If we want to pass more than one parameter, then we can use the following command

mvn clean test -Dcucumber.features="src/test/resources/features/LoginPage.feature" -Dcucumber.filter.tags="@ValidCredentials"

6. Running a Scenario without a tag

If we want to run a single Scenario from the command line and no tag is assigned to that scenario, this is how we specify

mvn clean test -Dcucumber.features="src/test/resources/features/LoginPage.feature:7"

That’s it! Congratulations on making it through this tutorial and hope you found it useful! Happy Learning!!

In the next tutorial, I explained to run Cucumber Gradle tests from Command Line.

Cucumber Tutorial – How to setup Cucumber with Eclipse

HOME

In the previous tutorials, we discussed BDD (Behaviour Driven Development) and GherkinCucumber is one such open-source tool, which supports Behaviour Driven Development (BDD). In simple words, Cucumber can be defined as a testing framework, driven by plain English. It serves as documentation, automated tests, and development aid – all in one.

In this tutorial, we will set up Cucumber with Eclipse

Implementation Steps

1. Download and Install Java

Java is a robust programming language. Java is a general-purpose programming language that is concurrent; class-based and object-oriented language. Java follows the concept of “write once and run anywhere (WORA)” which means that compiled Java code can be run on all different platforms that support Java without the need for recompilation. Cucumber supports the Java platform for execution. Click here to know How to install Java.

2. Download and Start Eclipse

Eclipse is an Integrated Development Environment (IDE). It contains a base workspace and an extensible plug-in system for customizing the environment. To download Eclipse, please refer to this tutorial – How to install Eclipse.

3. Maven –  How to install Maven on Windows 

Apache Maven is a software project management and comprehension tool. It uses the concept of a project object model (POM), Maven can manage a project’s build, reporting, and documentation from a central piece of information. MAVEN helps us in creating the project structure and managing and downloading the dependencies. We need to define the required dependencies in pom.xml. To install Maven on Windows, please refer to this tutorial – How to install Maven.

4. Install Cucumber Eclipse Plugin

The Cucumber plugin is an Eclipse plugin that allows eclipse to understand the Gherkin syntax. Cucumber Eclipse Plugin highlights the keywords present in Feature File. To install Cucumber Eclipse Plugin, please refer to this tutorial – How to install Cucumber Eclipse Plugin

5. Configure Cucumber with Maven

Step 1 – Create a new Maven Project.

Click here to know the steps to create a new Maven project –  How to create a Maven project.

Step 2 – Open pom.xml of the project
       

Step 3 − Add dependency for selenium

This will indicate to Maven that Selenium jar files are to download from the central repository to the local repository.                                                                             

Open pom.xml in the edit mode, create dependencies tag (), inside the project tag.                   

 <!-- Selenium -->
 <dependency>
      <groupId>org.seleniumhq.selenium</groupId>
      <artifactId>selenium-java</artifactId>
      <version>4.15.0</version>
 </dependency>

Step 4 –  Add dependency for Cucumber-Java

This will indicate Maven, which Cucumber files are to be downloaded from the central repository to the local repository.  Create one more dependency tag.

<dependency>
    <groupId>io.cucumber</groupId>
    <artifactId>cucumber-java</artifactId>
    <version>7.14.0</version>
</dependency>

Step 5 – Add dependency for Cucumber-JUnit

This will indicate Maven, which Cucumber JUnit files are to download from the central repository to the local repository. Create one more dependency tag. 

<dependency>
    <groupId>io.cucumber</groupId>
    <artifactId>cucumber-junit</artifactId>
    <version>7.14.0</version>
    <scope>test</scope>
</dependency>

Step 6 –  Add dependency for JUnit

This will indicate Maven, which JUnit files are to be downloaded from the central repository to the local repository. Create one more dependency tag.

<dependency>
   <groupId>junit</groupId>
   <artifactId>junit</artifactId>
   <version>4.13.2</version>
   <scope>test</scope>
</dependency>

Below is the screenshot which shows that Maven Project called Cucumber_JUnit4_Demo.

After adding the above mention dependencies, pom.xml looks like the image below

<project xmlns="http://maven.apache.org/POM/4.0.0" xmlns:xsi="http://www.w3.org/2001/XMLSchema-instance"
  xsi:schemaLocation="http://maven.apache.org/POM/4.0.0 http://maven.apache.org/xsd/maven-4.0.0.xsd">
  <modelVersion>4.0.0</modelVersion>

  <groupId>org.example</groupId>
  <artifactId>Cucumber_JUnit4_Demo</artifactId>
  <version>1.0-SNAPSHOT</version>
  <packaging>jar</packaging>

  <name>Cucumber_JUnit4_Demo</name>
  <url>http://maven.apache.org</url>

  <properties>
    <project.build.sourceEncoding>UTF-8</project.build.sourceEncoding>
    <cucumber.version>7.14.0</cucumber.version>
    <selenium.version>4.15.0</selenium.version>
    <junit.version>4.13.2</junit.version>
  </properties>

  <dependencies>

    <dependency>
      <groupId>io.cucumber</groupId>
      <artifactId>cucumber-java</artifactId>
      <version>${cucumber.version}</version>
    </dependency>

    <dependency>
      <groupId>io.cucumber</groupId>
      <artifactId>cucumber-junit</artifactId>
      <version>${cucumber.version}</version>
      <scope>test</scope>
    </dependency>

    <!-- Selenium -->
    <dependency>
      <groupId>org.seleniumhq.selenium</groupId>
      <artifactId>selenium-java</artifactId>
      <version>${selenium.version}</version>
    </dependency>

    <!-- JUnit4 -->
    <dependency>
      <groupId>junit</groupId>
      <artifactId>junit</artifactId>
      <version>${junit.version}</version>
      <scope>test</scope>
    </dependency>
  </dependencies>

</project>

After adding the dependencies and then building the project, the below image shows the entire jar files added to the Maven Dependency.

Congratulations!! We are done with the setup of the Cucumber in Eclipse. Happy Learning.

Cucumber Tutorial – What is Feature File in Cucumber

HOME

In the previous tutorial, we discussed How Cucumber can be setup with Eclipse. In this tutorial, we will discuss the Feature files. 

What is a Feature File?

Cucumber tests are grouped into features. A Feature file is one in which we store a description of the features and scenarios to be tested. It is used to provide a high-level description of test scenarios and group-related scenarios. A Feature File is an entry point to the Cucumber tests.

The first keyword in the Feature file is the Feature keyword, followed by: and short text that describes the feature.

You can add free-form text underneath the Feature to add more description.

These description lines are ignored by Cucumber at runtime, but are available for reporting (They are included by default in HTML reports).

The name and the optional description have no special meaning to Cucumber. Their purpose is to provide a place for you to document important aspects of the feature, such as a brief explanation and a list of business rules (general acceptance criteria).

The free format description for Feature ends when you start a line with the keyword Example or Scenario Outline (or their alias keywords).

You can place tags above Feature to group related features, independent of your file and directory structure.

A simple feature file consists of the following keywords/parts −

  • FeatureFile Name – Name of the feature under test. For example, here is LoginPage.feature
  • Feature − Describe the feature under test, like here “Login to HRM Application”
  • Scenario − What is the test scenario we want to test
  • Given − Prerequisite before the test steps get executed.
  • When − Specific condition that should match to execute the next step.
  • Then − What should happen if the condition mentioned in WHEN is satisfied
  • And/But – If we have several Given’s, When’s, or Then’s, then we can use And /But

Steps to create a Feature file

Step 1 – Create a new Maven project.

<dependency>
      <groupId>io.cucumber</groupId>
      <artifactId>cucumber-java</artifactId>
      <version>7.14.0</version>
</dependency>

Step 3 – It is suggested to create the Feature files in the src/test/resources source folder. By default, this folder is not present. So, first, create a Source Folder named src/test/resources. Right-click on the project, and select New → Source Folder.

Provide the name to the Source Folder and click on the Finish button.

This creates a new Source Folder.

Step 4 –We want all our Feature files to be present inside a folder. So, create a new folder with the name Features in the src/test/resources folder.

Step 5 – Create a Feature file in the features package.

Right-click on the Feature folder, select New ->File and mention the name LoginPage.feature. Click the Finish button. (Remember to add .feature at the end of the file, otherwise, this feature file will be just an ordinary plain text file).

The below image is an example of the new feature file created. This sample feature file gives an idea how what an actual Feature file should look like.

Below is an example of a valid feature file.

@LoginPage
Feature: Login to HRM Application
 
   @ValidCredentials
   Scenario: Login with valid credentials
    
   Given User is on HRMLogin page "https://opensource-demo.orangehrmlive.com/" 
    When User enters username as "Admin" and password as "admin123"
    Then User should be able to login successfully and new page open

Run Cucumber7 with JUnit5 Tests from Maven Command Line

HOME

The previous tutorial will have explained to run Cucumber tests with JUnit4 or TestNG from Command-Line. Cucumber7 with JUnit5 has a lot of new configuration options. This tutorial will cover all the possible options.

To setup a framework with Cusumber7 and JUnit5, please refer to this tutorial – Integration of Cucumber7 with Selenium and JUnit5.

Below is the sample CucumberRunnerTests class for JUnit5.

import static io.cucumber.junit.platform.engine.Constants.GLUE_PROPERTY_NAME;
import org.junit.platform.suite.api.ConfigurationParameter;
import org.junit.platform.suite.api.SelectClasspathResource;
import org.junit.platform.suite.api.Suite;

@Suite
@IncludeEngines("cucumber")
@SelectClasspathResource("com/example")
@SelectClasspathResource("/features")
@ConfigurationParameter(key = GLUE_PROPERTY_NAME, value = "com.example")

public class CucumberRunnerTests  {

}

Run Test from Command Line

1. Open the command prompt and change the directory to the project location where pom.xml is present.

cd C:\Users\Vibha\eclipse-workspace_personnel\Cucumber7JUnit5_Demo

2. All feature files should be in src/test/resources and create the Cucumber Runner class as CucumberRunnerTest.
Note:- The Runner class name should end with Test to execute the tests from Command Line
Run the following command in the command prompt:

mvn clean test

mvn clean test runs Cucumber Features using Cucumber’s JUnit Runner.

3. The below screenshot shows the build success output.

Overriding Cucumber Options

Cucumber provides several options that can be passed to on the command line.

1. Running Scenarios using Tags from Command Line

If you are using Maven and want to run a subset of scenarios tagged with @ValidCredentials.

mvn clean test -Dcucumber.filter.tags="@ValidCredentials"

2. Running a Feature file from Command Line

Suppose you want to run a single Feature File from the command line, then use the below syntax

mvn clean test -Dcucumber.features=src/test/resources/features/LoginPage.feature

3. Passing plugin from Command Line

If we want to pass a plugin, please use the below-specified command:

mvn clean test -Dcucumber.plugin=html:target/cucumber-reports/cucumberReport.html

You can see that the cucumberReport.html is generated by the plugin.

4. Passing multiple Parameter from Command Line

If we want to pass more than one parameter, then we can use the following command

mvn clean test -Dcucumber.features=src/test/resources/features/LoginPage.feature -Dcucumber.filter.tags="@ValidCredentials"

You can see that only 1 test is executed and rest 4 tests are skipped out of total 5 tests as shown in the Report.

5. Running a Scenario without a tag from Command Line

If we want to run a single Scenario from the command line and no tag is assigned to that scenario, this is how we specify

mvn clean test -Dcucumber.features=src/test/resources/features/LoginPage.feature:11

6. Ignoring a subset of scenarios

If we do not want to run any Scenario from the command line, this is how we specify

mvn clean test -Dcucumber.filter.tags="not @ValidCredentials"

There is a total of 5 tests, but only 4 will be executed and 1 will be skipped. The output of the above program is shown below:

7. Pass glue code through command line

If we want to pass glue code from the command line, this is how we specify

mvn clean test -Dcucumber.glue=com.example

8. Pass dry run value through command line

dry-run option can either be set as true or false. If it is set as true, it means that Cucumber will only check that every step mentioned in the Feature File has corresponding code written in the Step Definition file or not. By default, dry-run is False.

mvn clean test -Dcucumber.execution.dry-run=true

This image shows the steps in the feature file that does not have step definitions.

The cucumber report shows that out of 2 tests, 1 is executed and another one is undefined.

9. Pass snippet type value through command line

The default option for snippets is UNDERSCORE. This settings can be used to specify the way code snippets will be created by Cucumber.

mvn clean test -Dcucumber.snippet-type=camelcase

You can see that the code snippet is in camelCase. In the previous example, it underscored.

That’s it! Congratulations on making it through this tutorial and hope you found it useful! Happy Learning!!

Cucumber Tutorial – Cucumber Reports

HOME

The previous tutorial is all about  JUnit Test Runner. In this tutorial, will show you how to generate reports in Cucumber. 

Cucumber with JUnit gives us the capability to generate reports in the form of HTML, XML, JSON & TXT. Cucumber frameworks generate very good and detailed reports, which can be share with all stakeholders. 

Let’s generate the Cucumber Report

Step 1 − Create a Maven project named MyCucumberProject in Eclipse.

Step 2 − Create a feature file named MyHoliday.feature under src/test/resources

Step 3 − Create a StepDefinition named MyHolidayDefinitions.java under src/test/java

Step 4 − Create a TestRunner class under src/test/resources

Step 5 − Run JUnit TestRunner class by right click Run As -> JUnit

Write the following code for Feature File

Feature: Book Flight and Hotel for Vacation

@BookOneWayFlight
Scenario: Book Flight for one way trip

  Given I live in Dublin with 2 adults and 2 kids
  And I want to book one way flight ticket from Dublin to London on 22nd Jan 2020
  When I search online
  Then TripAdvisor should provide me options of flights on 22nd Jan 2020
  And Cost of my flight should not be more than 50 Euro per person
  And Tickets should be refundable
 
@BookHotel
Scenario: Book Hotel for one the trip

  Given I need 1 room with 2 double beds
  And I want to book hotel from 22nd Jan 2020 to 25th Jan 2020
  When I search online
  Then TripAdvisor should provide me options of hotels for time period of 22nd Jan 2020 to 25th Jan 2020
  And Fare of my room should not be more than 200 Euro per night
  And Breakfast should be included in the room fare

Below is the full program, which shows the step definition of above mentioned feature 

import io.cucumber.java.en.And;
import io.cucumber.java.en.Given;
import io.cucumber.java.en.Then;
import io.cucumber.java.en.When;

public class MyHolidayDefinitions {

          @Given("^I live in Dublin with 2 adults and 2 kids$")
          public void needFlight() {
                   System.out.println("I live in Dublin with 2 adults and 2 kids");
          }

          @Given("^I need 1 room with 2 double beds$")
          public void needRoom() {
                   System.out.println("I need 1 room with 2 double beds");
          }

          @When("^I search online$")
          public void onlineSearch() {
                   System.out.println("I search online");
          }

          @Then("^TripAdvisor should provide me options of flights on 22nd Jan 2020$")
          public void searchFlightInTripAdvisor() {
                   System.out.println("TripAdvisor should provide me options of flights on 22nd Jan 2020");
          }

         @Then("^Cost of my flight should not be more than 50 Euro per person$")
          public void flightFare() {
                   System.out.println("Cost of my flight should not be more than 50 Euro per person");
          }

          @Then("^TripAdvisor should provide me options of hotels for time period of 22nd Jan 2020 to 25th Jan 2020")
          public void searchRoomInTripAdvisor() {
                   System.out.println(
                                      "TripAdvisor should provide me options of hotels for time period of 22nd Jan 2020 to 25th Jan 2020");
          }

          @And("^I want to book one way flight ticket from Dublin to London on 22nd Jan 2020$")
          public void ticketType() {
                   System.out.println("I want to book one way flight ticket from Dublin to London on 22nd Jan 2020");
          }

          @And("^I want to book hotel from 22nd Jan 2020 to 25th Jan 2020$")
          public void stayDuration() {
                   System.out.println("I want to book hotel from 22nd Jan 2020 to 25th Jan 2020");
          }

          @And("^Fare of my room should not be more than 200 Euro per night$")
          public void roomFare() {
                   System.out.println("Fare of my room should not be more than 200 Euro per night");
          }

          @And("^Breakfast should be included in the room fare$")
          public void includeBreakfast() {
                   System.out.println("Breakfast should be included in the room fare");
          }

          @And("^Tickets should be refundable$")
          public void refunableTicket() {
                   System.out.println("Tickets should be refundable");
          }
}

Cucumber HTML Reports

For HTML reports, add html:target/cucumber-reports to the @CucumberOptions plugin option.

import org.junit.runner.RunWith;

import io.cucumber.junit.Cucumber;
import io.cucumber.junit.CucumberOptions;

@RunWith(Cucumber.class)
@CucumberOptions(features = "src/test/resources/Feature/MyHoliday.feature", 
plugin = { "pretty","html:target/cucumber-reports" }, tags = { "" })

public class TestRunner {
}

We have specified the path of the Cucumber report, which we want it to generate it under the target folder. This will generate an HTML report at the location mentioned in the formatter

HTML Report Output

Cucumber Json Reports

For Json reports, add json:target/cucumber-reports/Cucumber.json to the @CucumberOptions plugin option.

import org.junit.runner.RunWith;

import io.cucumber.junit.Cucumber;
import io.cucumber.junit.CucumberOptions;

@RunWith(Cucumber.class)
@CucumberOptions(features = "src/test/resources/Feature/MyHoliday.feature", 
plugin = { "pretty","json:target/cucumber-reports/Cucumber.json" }, tags = { "" })

public class TestRunner {
}

JSON Report Output

Cucumber JUNIT XML Report

For JUNIT reports, add junit:targe/cucumber-reports/Cucumber.xml to the @CucumberOptions plugin option.

import org.junit.runner.RunWith;

import io.cucumber.junit.Cucumber;
import io.cucumber.junit.CucumberOptions;

@RunWith(Cucumber.class)
@CucumberOptions(features = "src/test/resources/Feature/MyHoliday.feature", 
plugin = { "pretty","junit:target/cucumber-reports/Cucumber.xml" }, tags = { "" })

public class TestRunner { 
}

Cucumber JUnit XML Report

Cucumber – What is Gherkin

HOME

Feature: Book flight ticket for one-way trip
Scenario:flight ticket for one-way trip from Dublin 

Given I live in Dublin 
And I want to book one way flight ticket from Dublin for 22nd Jan 20
When I search Online 
Then TripAdvisor should provide me options of flight for 22nd Jan 20 
And Cost of my flight should not be more than 50 
And Tickets should be refundable

What is Step Definition?

It is a Java method with an expression, which is used to link it to Gherkin steps. When Cucumber executes a Gherkin step, it will look for a matching step definition to execute.

Feature: Book flight ticket for one-way trip
Scenario: flight ticket for one-way trip from Dublin 
Given  I live in Dublin 
 
@Given ("I live in Dublin") 
public voidVacation()
          {
                   System.out.println("I live in Dublin");
          }

When Cucumber encounters a Gherkin step without a matching step definition, it will print a step definition snippet with a matching Cucumber Expression. We can use this as a starting point for a new step definition.

Scenario: Flight ticket for one-way trip from Dublin 
Given  I live in Dublin

Here, Cucumber didn’t get step definition for the above-mentioned Given step. So, it will provide a snippet as mentioned below:-

@Given ("I live in Dublin")
public void i_live_in_Dublin() {
          // Write code here that turns the phrase above into concrete actions
 
    throw new cucumber.api.PendingException();
}

We are done! Congratulations on making it through this tutorial and hope you found it useful! Happy Learning!!

Introduction of Cucumber Testing Tool (BDD Tool)


In this tutorial, we will discuss about Cucumber Testing Tool. However, before starting with Cucumber, we should know what Behavior Driven Development (BDD) is.

What is Behavioral Driven Development (BDD)?

BDD is a set of practices that helps to reduce the rework caused by misunderstanding or vague requirements, narrow the communication gaps between the development team, testing team, and customers and promote continuous communication among them. In BDD, tests are written in plain descriptive English (Gherkin) and they are more user-focused. As the tests are in plain English, so everyone like Business stakeholders, Business Analyst, QA Team, and Developers can contribute to testing. Cucumber is one such open-source tool, which supports Behavior Driven Development (BDD). In simple words, Cucumber can be defined as a testing framework, driven by plain English. It serves as documentation, automated tests, and development aid – all in one.

How Cucumber works? 

  • Cucumber reads the code written in plain English text (Language Gherkin) in the feature file.
  • It finds the exact match of each step in the step definition.
  • The piece of code to execute can be different software frameworks like Selenium, Ruby on Rails, etc. 
  • This has become the reason for Cucumber’s popularity over other frameworks, like JBehave, JDave, Easyb, etc.

Cucumber supports over a dozen different software platforms like − 

  • Ruby on Rails 
  • Selenium 
  • PicoContainer 
  • Spring Framework 
  • Waitr

Advantages of Cucumber Over other Tools 

  • Cucumber supports different languages like Java.net and Ruby. 
  • It acts as a bridge between the business and technical language. We can accomplish this by creating a test case in plain English text. 
  • It allows the test script to be written without knowledge of any code; it allows the involvement of non-programmers as well. 
  • It serves the purpose of an end-to-end test framework, unlike other tools. 
  • Due to simple test script architecture, Cucumber provides code re-usability.

Example of a Cucumber/BDD test: 

Feature: Book flight ticket for one-way trip
Scenario: Book flight ticket for one-way trip from Dublin to London 

Given I live in Dublin 
And I want to book one way flight ticket from Dublin to London for 23rd Oct 19
When I search Online 
Then TripAdvisor should provide me options of flight for 23rd Oct 19 
And Cost of my flight should not be more than 50 Euro per person 
And Tickets should be refundable

Any Business User or Stakeholder can understand the above-mentioned test case. They can provide their feedback, on if this is expected from the functionality or not or do we need to add other steps too.