A headless browser is like any other browser but without a Head/GUI (Graphical User Interface). A headless browser is used to automate the browser without launching the browser. While the tests are running, we could not see the browser, but we can see the test results coming on the console.
Headless browser testing is generally faster when compared to actual UI testing as it doesn’t wait for the whole page to render before performing any action.
The traditional way is to add –headless, and since version 96, Chrome has a new headless mode that allows users to get the full browser functionality (even run extensions). Between versions 96 to 108 it was –headless=chrome, after version 109, it is –headless=new.
The complete program looks like as shown below:
import org.junit.jupiter.api.Assertions;
import org.junit.jupiter.api.Test;
import org.openqa.selenium.chrome.ChromeDriver;
import org.openqa.selenium.chrome.ChromeOptions;
public class HeadlessChrome_Demo {
public ChromeDriver driver;
@Test
public void test() {
// Create an object of Chrome Options class
ChromeOptions options = new ChromeOptions();
// pass the argument -–headless and maximize to Chrome Options class.
options.addArguments("--start-maximize");
options.addArguments("--headless=new");
// Create an object of Chrome Driver class and pass the Chrome Options object as
// an argument
driver = new ChromeDriver(options);
System.out.println("Executing Chrome Driver in Headless mode..");
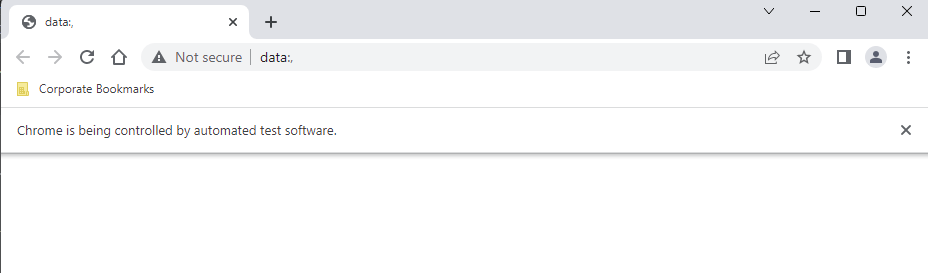
driver.get("https://duckduckgo.com/");
String titlePage = driver.getTitle();
System.out.println("Title of Page :" + titlePage);
Assertions.assertEquals("DuckDuckGo — Privacy, simplified.",titlePage);
// Close the driver
driver.close();
}
}
The output of the above program is
Congratulations!! We are able to run Chrome tests in Selenium in headless mode.
Selenium Version – 4.8.3 has implemented the fix for Chrome Version 111. As per the below changelog, we don’t need to add “–remote-allow-origins=*”, if we are using Selenium Version – 4.8.3.
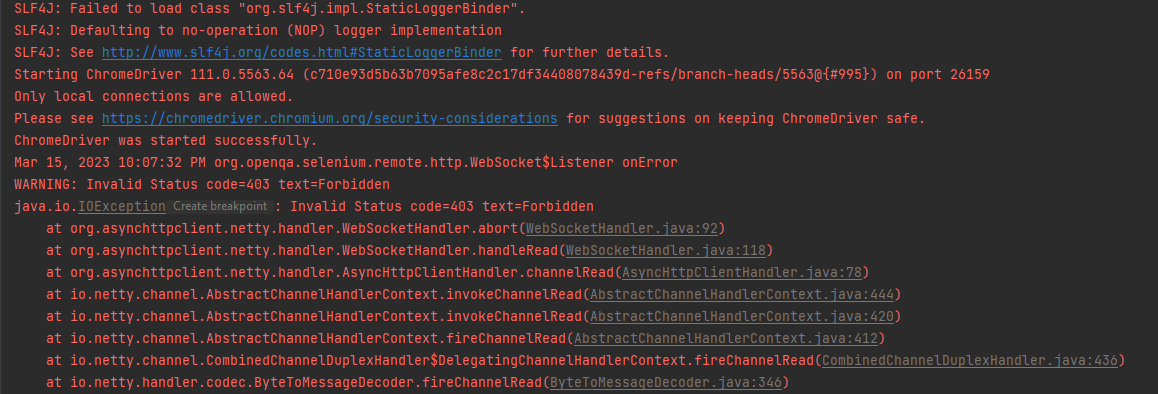
Chrome Version 111 is recently released that has broken the Selenium Tests. In the current scenario, I’m using Selenium 4.8.0. You can see a simple Selenium test where we want to open a Chrome Browser and open Google.com failed.
import io.github.bonigarcia.wdm.WebDriverManager;
import org.openqa.selenium.WebDriver;
import org.openqa.selenium.chrome.ChromeDriver;
import java.time.Duration;
public class ChromeTests {
public static void main(String[] args) {
WebDriverManager.chromedriver().setup();
WebDriver driver = new ChromeDriver();
driver.manage().timeouts().implicitlyWait(Duration.ofSeconds(20));
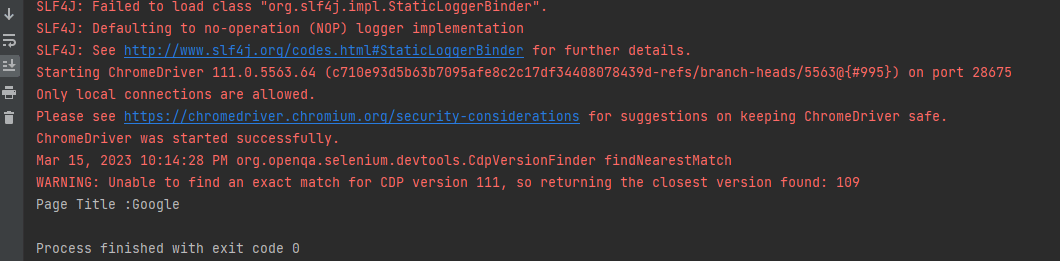
driver.get("https://www.google.com/");
String PageTiltle = driver.getTitle();
System.out.println("Page Title :"+PageTiltle);
driver.close();
}
}
The output of the above program is
Below is the screenshot of the Chrome Browser trying to open Google.com.
One of the solutions is to add “–remote-allow-origins=*” to ChromeOptions. The sample code is shown below:
import io.github.bonigarcia.wdm.WebDriverManager;
import org.openqa.selenium.WebDriver;
import org.openqa.selenium.chrome.ChromeDriver;
import org.openqa.selenium.chrome.ChromeOptions;
import java.time.Duration;

public class ChromeTests {

    public static void main(String[] args) {

        ChromeOptions options = new ChromeOptions();
        options.addArguments("--remote-allow-origins=*");
        WebDriver driver = new ChromeDriver(options);
        driver.manage().timeouts().implicitlyWait(Duration.ofSeconds(20));
        driver.get("https://www.google.com/");
        String PageTiltle = driver.getTitle();
        System.out.println("Page Title :"+PageTiltle);
        driver.close();
    }
}
By default, Selenium 4 is compatible with Chrome v75 and greater.
The output of the above program is
Hopefully, this trick will help you in your automation journey.
The previous tutorial explained running the tests in Selenium4 Grid using the Standalone option. One of the major advantages of Selenium Grid is the ability to run tests parallelly on multiple browsers simultaneously. Parallel testing helps to reduce execution time and efforts and results in a faster time to delivery.
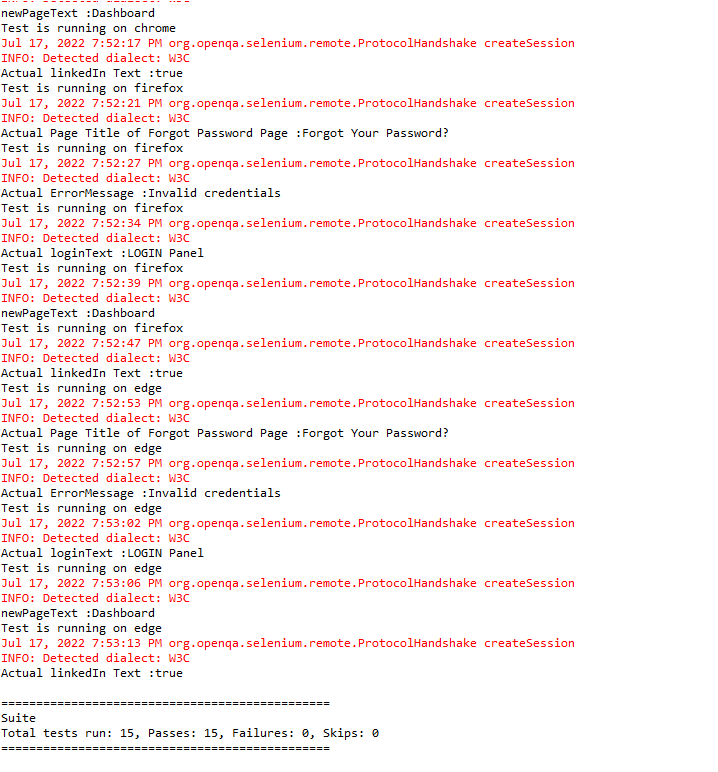
In this tutorial, we will run the same set of tests on Chrome, Firefox, and Edge browsers sequentially initially to confirm that we can perform Cross Browser testing also.
It is very important to construct our tests thread-safe in order to run them in parallel without a problem.
It is recommended to download the exe of various browsers in the same location where the Selenium WebDriver jar file is present. This is because Selenium 4 Alpha has the ability to automatically detect the WebDrivers present on the node machine. For this example, I have downloaded Chrome, Firefox, and edge drivers.
3. Start Selenium Server Jar
Open a command line terminal. Go to the location where these files are present
cd C:/Users/Vibha/Software/SeleniumGrid
Use the below command to run selenium-server standalone jar files.
It’s optional to mention the port number at the end of the command. By default, it will use port 4444. It is good practice to mention the port at the end to avoid any conflict between the ports.
4. Open Selenium Console
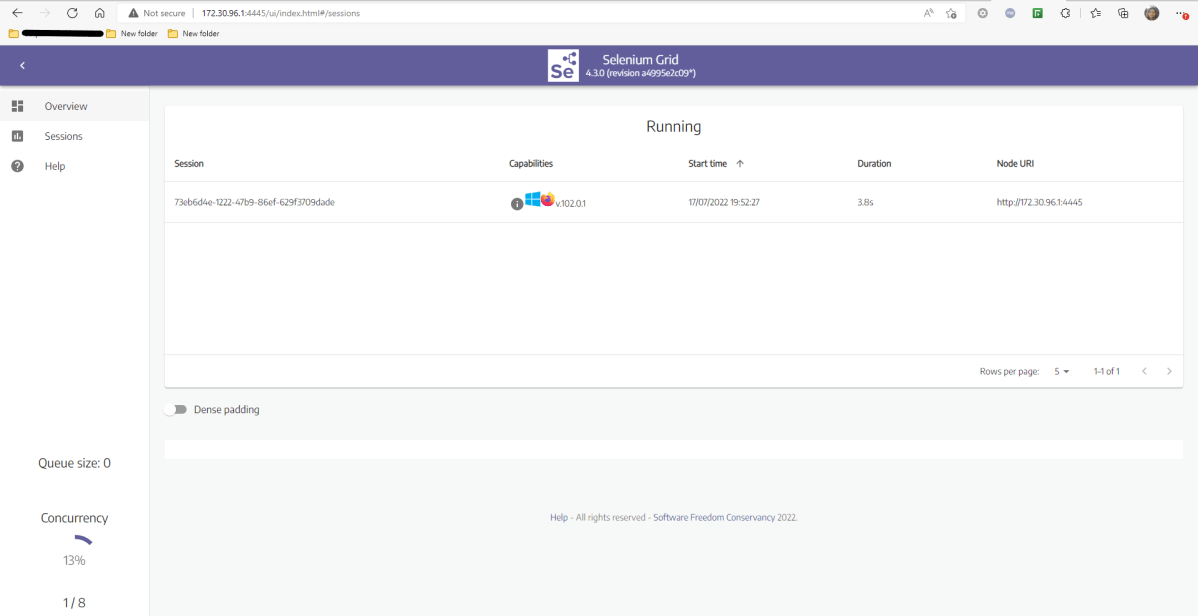
The server is listening on http://172.30.96.1:4445/ui/index.html which is the same as shown in the above image. This is a dynamic address, so make sure to get the address from the logs when Selenium Grid is started.
The Grid automatically identifies that the WebDrivers for Chrome and Firefox are present on the system.
5. Add dependencies to the project
In this example, we are using a Maven project, so are adding the dependencies to the POM.xml.
Creating an instance of the Remote WebDriver and passing the selenium endpoint and chrome options defined in it.
To run a Remote WebDriver client, we first need to connect to the RemoteWebDriver. We do this by pointing the URL to the address of the server running our tests. In order to customize our configuration, we set desired capabilities.
Below is an example of instantiating a remote WebDriver object pointing to our remote web server running our tests on Chrome, Firefox, and Edge. We have used @Parameters Annotation to pass the browser names to the tests.
import org.openqa.selenium.By;
import org.openqa.selenium.Capabilities;
import org.openqa.selenium.WebDriver;
import org.openqa.selenium.chrome.ChromeOptions;
import org.openqa.selenium.edge.EdgeOptions;
import org.openqa.selenium.firefox.FirefoxOptions;
import org.openqa.selenium.remote.RemoteWebDriver;
import org.openqa.selenium.support.ui.ExpectedConditions;
import org.openqa.selenium.support.ui.WebDriverWait;
import org.testng.annotations.AfterMethod;
import org.testng.annotations.BeforeMethod;
import org.testng.annotations.Parameters;
import java.net.MalformedURLException;
import java.net.URL;
import java.time.Duration;

public class BaseTest {


    protected static ThreadLocal<RemoteWebDriver> driver = new ThreadLocal<RemoteWebDriver>();
    public static String remote_url = "http://localhost:4445/";
    public Capabilities capabilities;

    @Parameters({"browser"})
    @BeforeMethod
    public void setDriver(String browser) throws MalformedURLException {

    	System.out.println("Test is running on "+browser);

        if(browser.equals("firefox")) {
            capabilities = new FirefoxOptions();
        } else if (browser.equals("chrome")) {
            capabilities = new ChromeOptions();
        } else if (browser.equals("edge")) {
        	capabilities = new EdgeOptions();
        }

        driver.set(new RemoteWebDriver(new URL(remote_url), capabilities));
        driver.get().get("https://opensource-demo.orangehrmlive.com/");
        driver.get().manage().window().maximize();
        driver.get().manage().timeouts().pageLoadTimeout(Duration.ofSeconds(10));
        WebDriverWait wait = new WebDriverWait(driver.get(), Duration.ofSeconds(10));
        wait.until(ExpectedConditions.visibilityOfElementLocated(By.xpath("//*[@id='divUsername']/span")));
    }

    public WebDriver getDriver() {
        return driver.get();
    }

    @AfterMethod
    public  void closeBrowser() {
        driver.get().quit();
        driver.remove();
    }
}
Selenium4ParallelDemo
This class contains the various tests that need to be executed.
InBaseTest class, I created ThreadLocal <>() webdriver (ThreadLocalMap) for thread-safe test execution
I got the TestNG parameter (browser)with @Parameterannotation.
BaseTest returns browser Capabilities based on browser name.
In BaseTest class, thegetDriver()method returns the created driver.
Selenium4ParallelDemoclass extends TestBase class and comprises their test code.
It is very easy to create testng.xml in the case of Eclipse. Right-click on the project, and select TestNG -> Convert to TestNG. It will create a basic testng.xml structure. We need to add the parameter name and value to it.
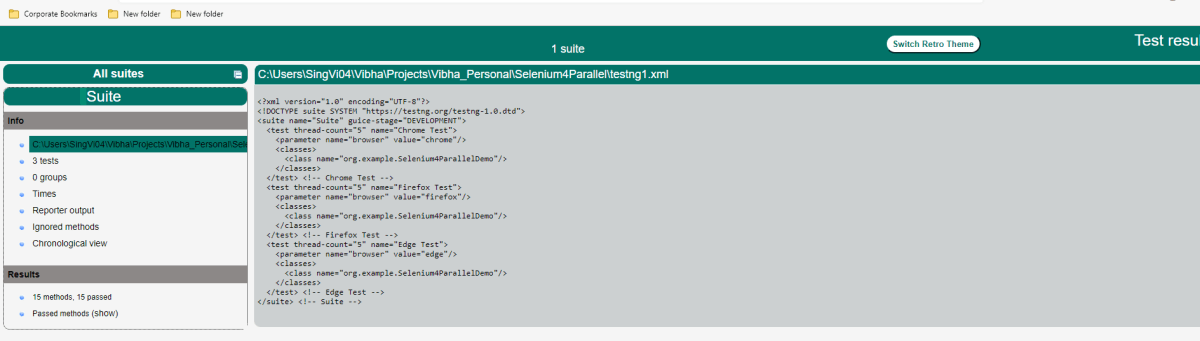
We are planning to run the test on 3 different browsers, so we are passing the name of the browser from this testng.xml using the parameter. This testng.xml will run the test sequentially. There is a minor change needs to be done in testng.xml that will run the tests parallelly.
<?xml version="1.0" encoding="UTF-8"?>
<!DOCTYPE suite SYSTEM "https://testng.org/testng-1.0.dtd">

<suite name="Suite">
  <test thread-count="5" name="Chrome Test">
    <parameter name ="browser" value="chrome"/>
    <classes>
      <class name="org.example.Selenium4ParallelDemo"/>
    </classes>
  </test> <!-- Test -->

   <test thread-count="5" name="Firefox Test">
    <parameter name ="browser" value="firefox"/>
    <classes>
      <class name="org.example.Selenium4ParallelDemo"/>
    </classes>
  </test> <!-- Test -->

   <test thread-count="5" name="Edge Test">
    <parameter name ="browser" value="edge"/>
    <classes>
      <class name="org.example.Selenium4ParallelDemo"/>
    </classes>
  </test> <!-- Test -->
</suite> <!-- Suite -->
8. Run the tests from testng.xml
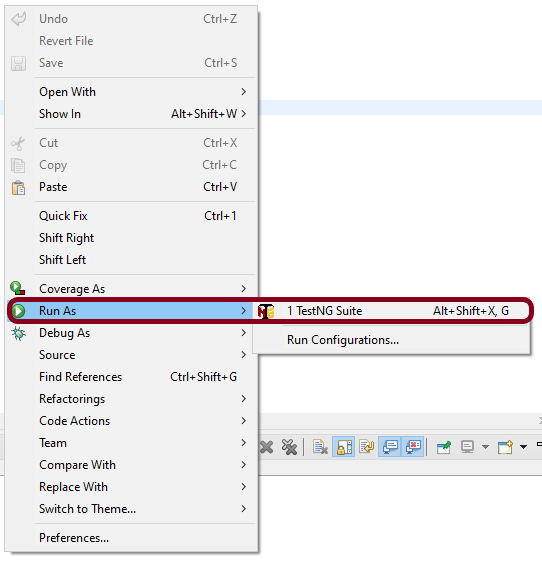
Right-Click on the testng.xml and selectRun As ->TestNG Suite.
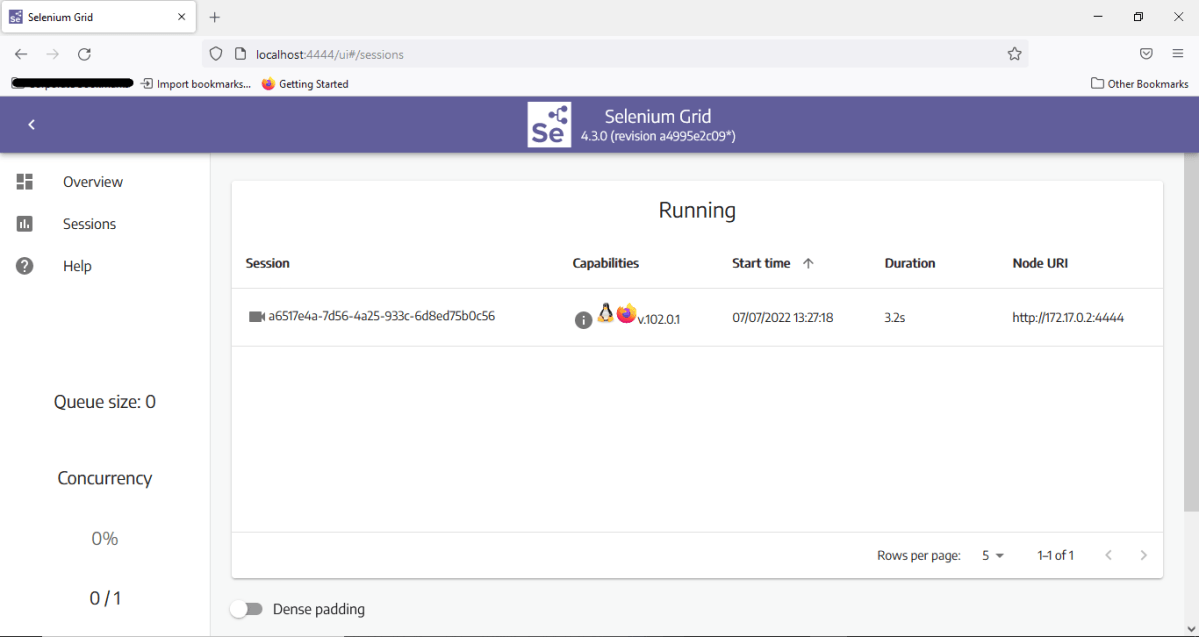
9. Navigate to the sessions tab on the Selenium Grid UI upon running the command
It would reflect an active session.
10. Review the test execution result
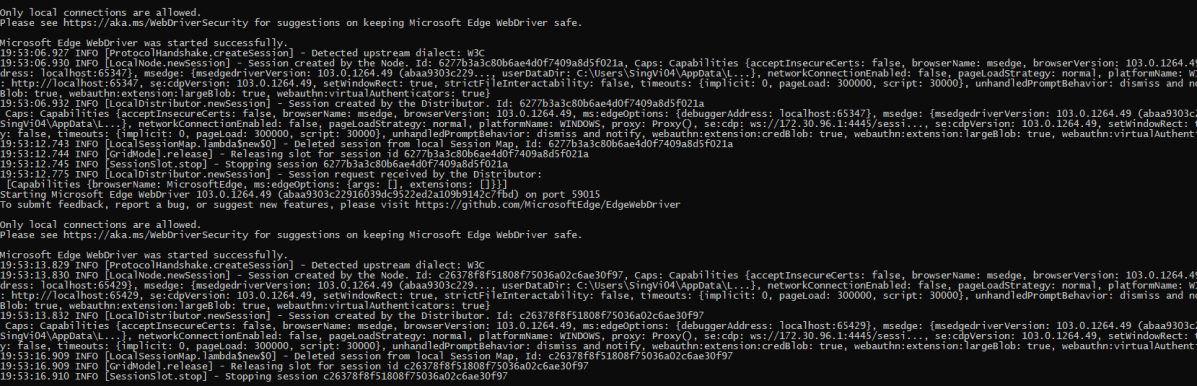
There are 2 ways to see if the tests are getting executed or not. First, we can check in the command line. We can see the logs there as shown below.
The complete test execution result can be found in the console too.
The tests are TestNG ones, so we can also check the “Result of Running Suite“ tab also.
11. TestNG Report Generation
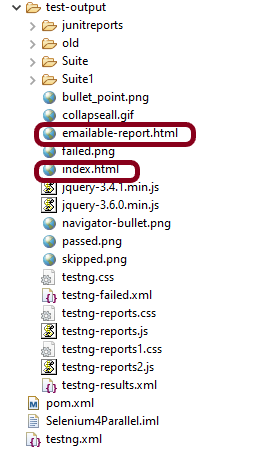
TestNG generates the test reports in the test-output folder.
We are interested in 2 reports – index.html and emailable-report.html.
Index.html
The below image shows that the tests are run sequentially.
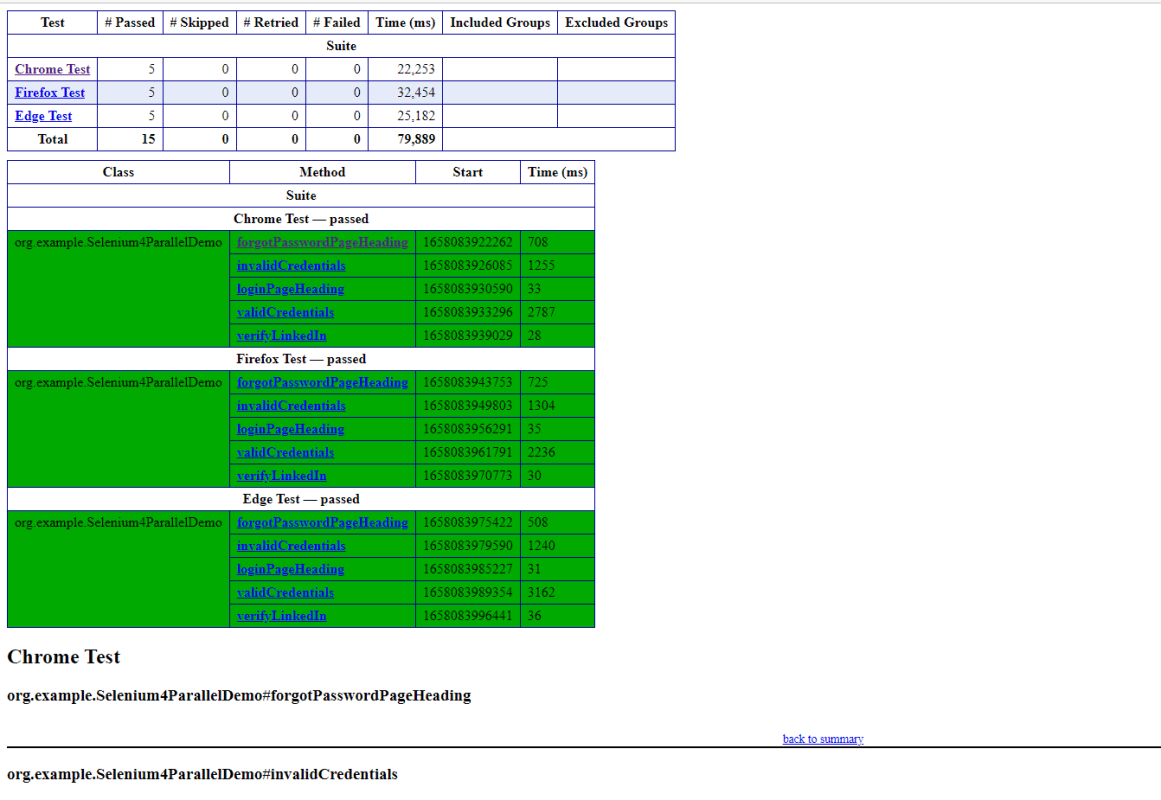
Emailable-Report.html
This report is the summary report. It contains the summary of all the tests executed like, the number of tests passed, skipped, retried, and failed, and the execution time taken by each test.
Parallel Testing
Update the testng.xml for parallel testing. Add parallel=”tests” in the XML.
Updated testng.xml
<?xml version="1.0" encoding="UTF-8"?>
<!DOCTYPE suite SYSTEM "https://testng.org/testng-1.0.dtd">

<suite name="Suite" parallel="tests">
  <test thread-count="5" name="Chrome Test">
    <parameter name ="browser" value="chrome"/>
    <classes>
      <class name="org.example.Selenium4ParallelDemo"/>
    </classes>
  </test> <!-- Test -->

   <test thread-count="5" name="Firefox Test">
    <parameter name ="browser" value="firefox"/>
    <classes>
      <class name="org.example.Selenium4ParallelDemo"/>
    </classes>
  </test> <!-- Test -->

   <test thread-count="5" name="Edge Test">
    <parameter name ="browser" value="edge"/>
    <classes>
      <class name="org.example.Selenium4ParallelDemo"/>
    </classes>
  </test> <!-- Test -->
</suite> <!-- Suite -->
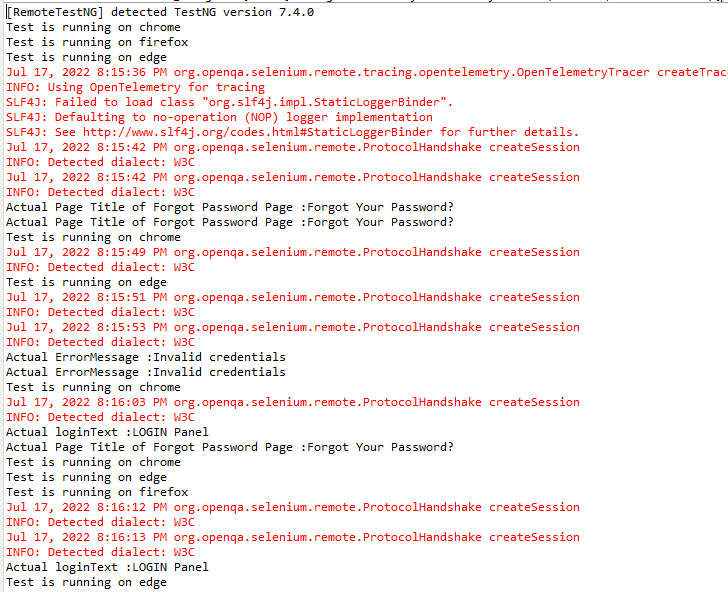
The below image shows that the tests were running on multiple browsers at the same time.
The console also shows that tests were started on all three browsers at the same time.
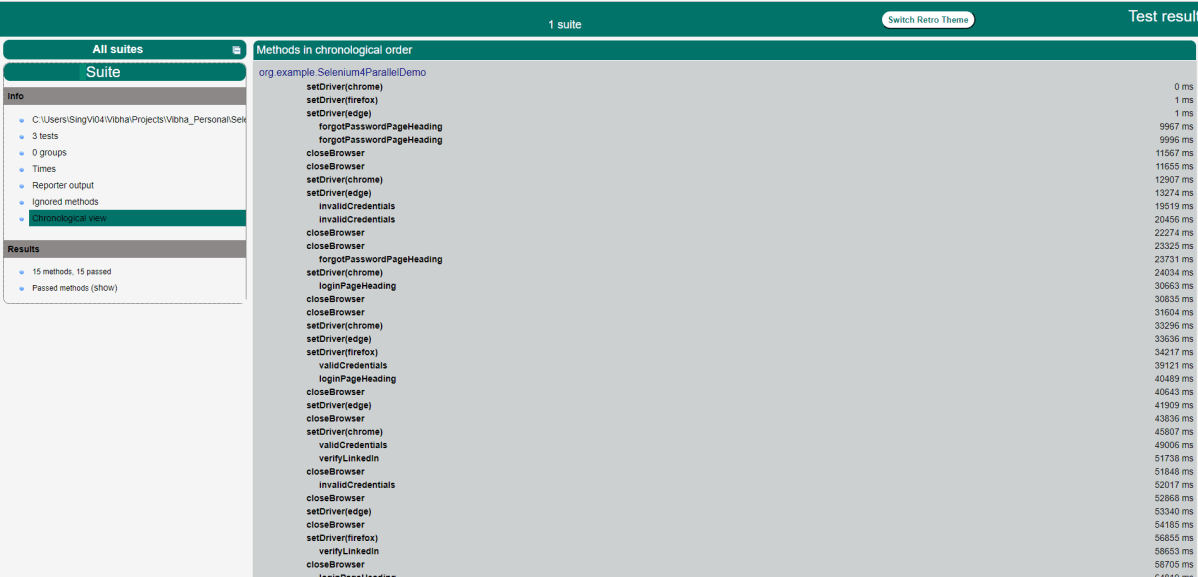
Index.html shows that methods run in chronological order. It can be seen that the setDriver() method for all 3 browsers was the first one to be executed.
Best Practices:
It is advisable to use nodes other than 4444 to run the tests. By using the different port numbers, we prevent the risk that the port is already in use on your system.
It is suggested to use RemoteWebDriver objects, as it is used to set which node (or machine) our test will run against.
Congratulations on making it through this tutorial and hope you found it useful! Happy Learning!! Cheers!!
Selenium Grid routes command received by the client to distant browser instances, allowing WebDriver scripts to be run on remote machines (virtual or real). Its goal is to make running tests in parallel on numerous machines as simple as possible.
Selenium Grid allows us to run tests on numerous workstations in parallel and centrally manage diverse browser versions and setups (instead of in each individual test).
Selenium Grid 4 makes use of a variety of new technologies to make scaling up easier while still allowing for local execution.
Selenium Grid 4 is a brand-new implementation that doesn’t use the same codebase as the previous version.
A Selenium Grid is made up of several components. Using a Grid role, you can start each one individually or all of them at once, depending on your needs.
Imagine we need to run 1000 tests and it takes 20 hrs to run these tests. With the help pf Selenium Grid, we can have 4 different machines (VMs or separate physical machines) to run those tests. We can roughly reduce the execution time to one-fourth, which means the test execution will be finished in 5 hrs.
Grid is also used to support running tests against multiple runtime environments, specifically, against different browsers at the same time. For example, a ‘grid’ of virtual machines can be set up with each supporting a different browser that the application to be tested must support. So, machine 1 has Google Chrome, machine 2, has Edge, and machine 3 has the latest Firefox. When the test suite is run, Selenium-Grid receives each test-browser combination and assigns each test to run against its required browser. Grid makes cross-browser and parallel testing very easy.
Selenium Grid modes
1. Standalone
The term “standalone” refers to the combination of all components that, in the view of the user, operate as if they were one. After launching it in Standalone mode, you’ll have a fully functional Grid of one.
Standalone is also the quickest way to get a Selenium Grid up and running. The server will be listening on http://localhost:4444 by default, and you should use that URL in your RemoteWebDriver tests. The server will look for available drivers in the System PATH and utilize them.
java -jar selenium-server-4.1.2.jar standalone
2. Hub and Nodes
It enables the classic Hub & Node(s) setup. These roles are suitable for small and middle-sized Grids.
Hub – A Hub is the union of the following components:
Router
Distributor
Session Map
New Session Queue
Event Bus
By default, the server will be listening on http://localhost:4444, and that’s the URL you should point your RemoteWebDriver tests.
java -jar selenium-server-4.1.2.jar hub
Node – One or more Nodes can be started in this setup, and the server will detect the available drivers that it can use from the System PATH.
Grid 4 has the ability to start Docker containers on demand, this means that it starts a Docker container in the background for each new session request, the test gets executed there, and when the test completes, the container gets thrown away.
To know the complete implementation of Selenium Grid4 with Docker, please refer to this tutorial – Selenium Grid 4 with Docker.
Implementation of Standalone Selenium Grid
Now, let us see how to run Selenium tests in Selenium Grid using the Standalone option.
Step 1 – Download driver.exe for the browsers
I have downloaded the driver.exe (chrome, gecko) in Downloads.
Step 2 – Download selenium-server jar
Go to Selenium Official website. Navigate to Downloads and it shows that the latest stable version of Selenium Grid is 4.3.0. Click on that and download the jar file. Make sure to keep the browsers.exe and selenium-server jar file in the same folder.
Step 3 – Execute selenium-server jar
Open a command line terminal. Use the below command to run selenium-server standalone jar files.
It’s optional to mention the port number at the end of the command. By default, it will use port 4444. It is good practice to mention the port at the end to avoid any conflict between the ports.
Step 4 – Add dependencies to the Maven project
Let us add the necessary dependencies to the pom.xml in the case of the Maven Project.
Creating an instance of the Remote WebDriver and passing the selenium endpoint and chrome options defined in it.
To run a Remote WebDriver client, we first need to connect to the RemoteWebDriver. We do this by pointing the URL to the address of the server running our tests. In order to customize our configuration, we set desired capabilities. Below is an example of instantiating a remote WebDriver object pointing to our remote web server running our tests on Chrome.
HelperClass
This class contains the initialization of the Remote web driver and the closing of the web driver.
import java.net.MalformedURLException;
import java.net.URL;
import java.time.Duration;
import org.openqa.selenium.By;
import org.openqa.selenium.WebDriver;
import org.openqa.selenium.chrome.ChromeOptions;
import org.openqa.selenium.remote.RemoteWebDriver;
import org.openqa.selenium.support.ui.ExpectedConditions;
import org.openqa.selenium.support.ui.WebDriverWait;
import org.testng.annotations.AfterMethod;
import org.testng.annotations.BeforeMethod;


public class HelperClass {

	protected static ThreadLocal<RemoteWebDriver> driver = new ThreadLocal<RemoteWebDriver>();
    public static String remote_url = "http://localhost:4446";

    @BeforeMethod
    public void setDriver() throws MalformedURLException {

        ChromeOptions options = new ChromeOptions();
        driver.set(new RemoteWebDriver(new URL(remote_url), options));
        driver.get().get("https://opensource-demo.orangehrmlive.com/");
        driver.get().manage().window().maximize();

        driver.get().manage().timeouts().pageLoadTimeout(Duration.ofSeconds(10));
        WebDriverWait wait = new WebDriverWait(driver.get(), Duration.ofSeconds(10));
        wait.until(ExpectedConditions.visibilityOfElementLocated(By.xpath("//*[@id='divUsername']/span")));
    }

    public WebDriver getDriver() {
        return driver.get();
    }

    @AfterMethod
    public  void closeBrowser() {
        driver.get().quit();
        driver.remove();
    }
}
Selenium4GridTest
This class contains all the tests like login test, invalid credential, verify heading of the login page, verify LinkedIn link on the login page, and verify the heading of Forgot Password page.
import static org.testng.Assert.assertEquals;
import static org.testng.Assert.assertTrue;
import org.openqa.selenium.By;
import org.testng.annotations.Test;

public class Selenium4GridTest extends HelperClass{

	    @Test
	    public void invalidCredentials() {

	        getDriver().findElement(By.xpath("//*[@id='txtUsername']")).sendKeys("1234");
	        getDriver().findElement(By.xpath("//*[@id='txtPassword']")).sendKeys("12342");
	        getDriver().findElement(By.xpath("//*[@id='btnLogin']")).click();
	        String actualErrorMessage = getDriver().findElement(By.xpath("//*[@id='spanMessage']")).getText();
	        System.out.println("Actual ErrorMessage :" + actualErrorMessage);
	        assertEquals(actualErrorMessage,"Invalid credentials");

	    }

	    @Test
	    public void loginPageHeading() {

	        String loginText = getDriver().findElement(By.xpath("//*[@id='logInPanelHeading']")).getText();
	        System.out.println("Actual loginText :" + loginText);
	        assertEquals(loginText,"LOGIN Panel");

	    }

	    @Test
	    public void forgotPasswordPageHeading()  {

	        getDriver().findElement(By.xpath("//*[@id='forgotPasswordLink']/a")).click();
	        String forgetPasswordTitle= getDriver().findElement(By.xpath(" //*[@id='content']/div[1]/div[2]/h1")).getText();
	        System.out.println("Actual Page Title of Forgot Password Page :" + forgetPasswordTitle);
	        assertEquals(forgetPasswordTitle,"Forgot Your Password?");
	    }

	    @Test
	    public void verifyLinkedIn() {

	        Boolean linkedInIcon = getDriver().findElement(By.xpath("//*[@id='social-icons']/a[1]/img")).isEnabled();
	        System.out.println("Actual linkedIn Text :" + linkedInIcon);
	        assertTrue(linkedInIcon);

	    }
	}
Step 6 – Create a testng.xml
It is very easy to create testng.xml for Eclipse IDE. Right-click on the project -> TestNG -> Convert to TestNG.
<?xml version="1.0" encoding="UTF-8"?>
<!DOCTYPE suite SYSTEM "https://testng.org/testng-1.0.dtd">
<suite name="Suite">
  <test thread-count="5" name="Test">
    <classes>
      <class name="org.example.Selenium4GridTest"/>
    </classes>
  </test> <!-- Test -->
</suite> <!-- Suite -->
Step 7 – Execute the tests through the command line
To run it from the command prompt, open a command prompt and go to the project and run the following command:
mvn clean test
Step 8 – Execute the tests from testng.xml
We can right-click on testng.xml, and select Run As -> TestNG Suite.
Step 9 – Navigate to the sessions tab on the Selenium Grid UI upon running the command.
It would reflect an active session.
Step 10 – Review the test execution result
The logs can be viewed in the command prompt as shown below:
Step 11 – TestNG Report Generation
TestNG generates the test reports in test-output folder.
We are interested in index.html report. This report contains various information, like time taken by each step in the test, time taken by each test, testng.xml, and number of tests passed or failed.
Emailable-Report.html
The output reports in TestNG reporting look like below as all tests are passed:
Congratulations!! We are able to run Selenium 4 tests on the new Selenium 4 Grid. Happy Learning!!
Docker is an open platform for developing, shipping, and running applications. Docker provides the ability to package and run an application in a loosely isolated environment called a container. A container is a runnable instance of an image. You can create, start, stop, move, or delete a container using the Docker API or CLI. You can connect a container to one or more networks, attach storage to it, or even create a new image based on its current state.
By default, a container is relatively well isolated from other containers and its host machine It contains multiple components such as Docker Daemon, Docker Clients, Docker Registry, and Docker Compose. It works on a client-server architecture. The Docker client communicates with the Docker Daemon handles the complex part of building, running, and distributing the Docker containers.
Docker Desktop is an easy-to-install application for your Mac or Windows environment that enables you to build and share containerized applications and microservices. Docker Desktop includes the Docker daemon (dockerd), the Docker client (docker), Docker Compose, Docker Content Trust, Kubernetes, and Credential Helper.
Why use Selenium with Docker for web application testing
When Selenium is used with Docker, there is no need to install the necessary browsers and browser drivers on the host machine. Overall, it is significantly quicker to get started with Selenium web automation testing using pre-made Docker containers. A range of Docker images (with Selenium) on the Docker Hub can be used by running a few commands on the terminal. Some of these images on the Docker Hub were developed and maintained by Selenium HQ.
One of the most common uses of Docker containers in selenium testing is cross-browser testing. Setting up test setups with all of the Browser-OS combinations gets difficult. These can be set up on the go and taken down once the tests are completed using Docker containers.
Another use of Docker containers in Selenium testing is parallel testing. Because there are so many sorts of tests to conduct, doing them sequentially takes a long time. As a result, parallelizing the testing saves time and provides faster feedback. Parallel testing, on the other hand, necessitates a significant amount of infrastructure setup. This would have a direct bearing on the price. Multiple containers can be launched on a single server using docker containers, making the most of the underlying hardware while also allowing for concurrent testing
Let’s discuss how to set up docker and run Selenium tests on it.
Setting up Window Docker
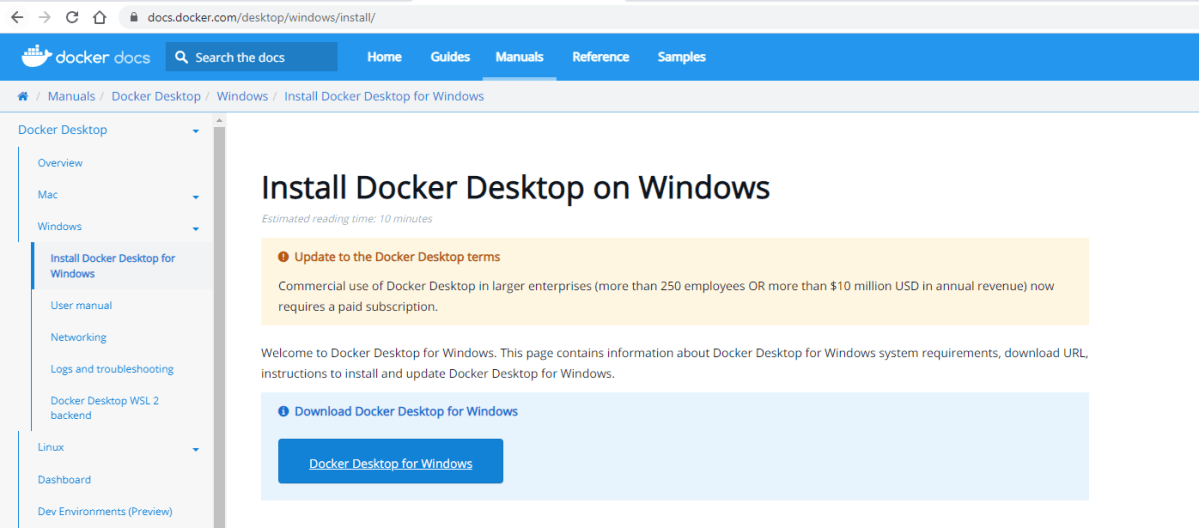
Step 1 – Download the Docker Installer
Docker provides an installer for Windows which can be downloaded from the official docker website.
Step 2 – Install Docker
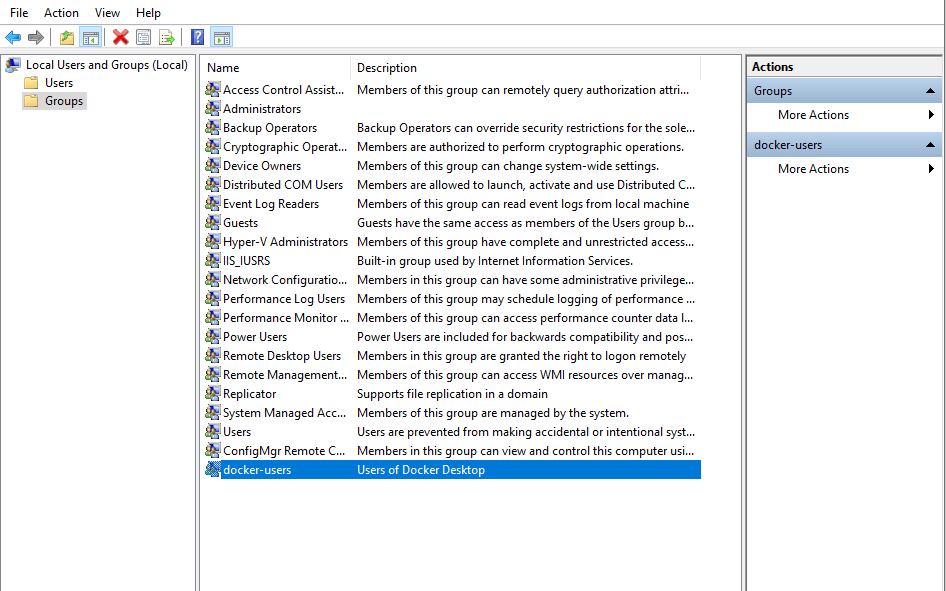
Launch the installer by double-clicking on it. Select the Enable Hyper-V Windows Features option on the configuration page.
If the user account and admin accounts are different, the user account must be added to the docker-users group as shown below:
To do that, you will need to run Computer Management as an administrator and navigate to Local Users and Groups > Groups > docker-users. Then right-click to add the user to the group. You will need to log and log back in for the changes to take effect.
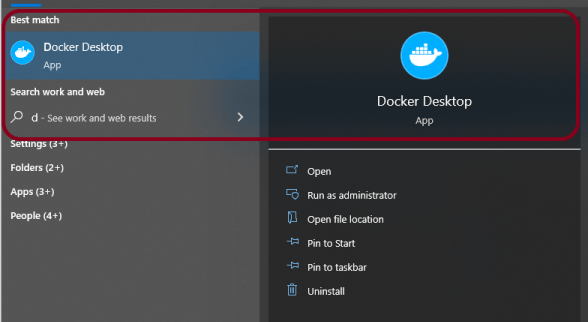
Step 3 – Start Docker Desktop
After the installation process is complete, the tool does not start automatically. To start the Docker tool, search for the tool, and select Docker Desktop in your desktop search results or Docker Desktop can be started from the start menu.
Docker is free for small businesses, personal usage, education, and non-commercial purposes.
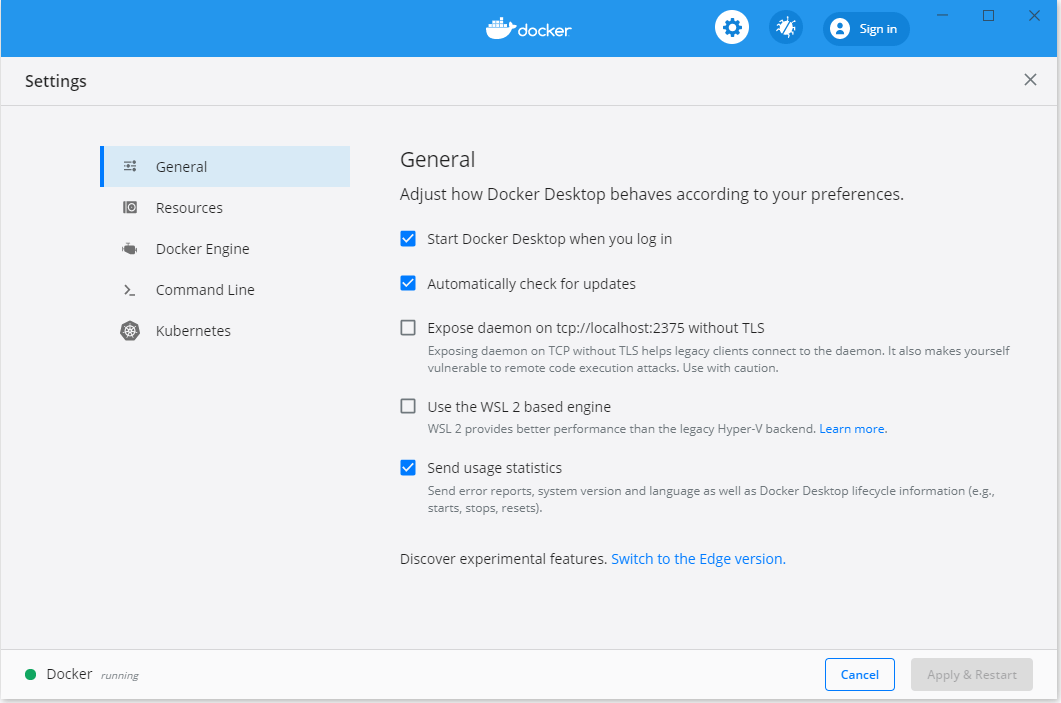
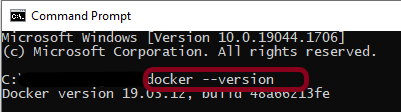
Step 4 – Verify the installation of Desktop Docker
To see if Docker is correctly configured, run the following line in Command Prompt. The version of Docker installed on the system is provided.
docker --version
Running Selenium Tests in Docker
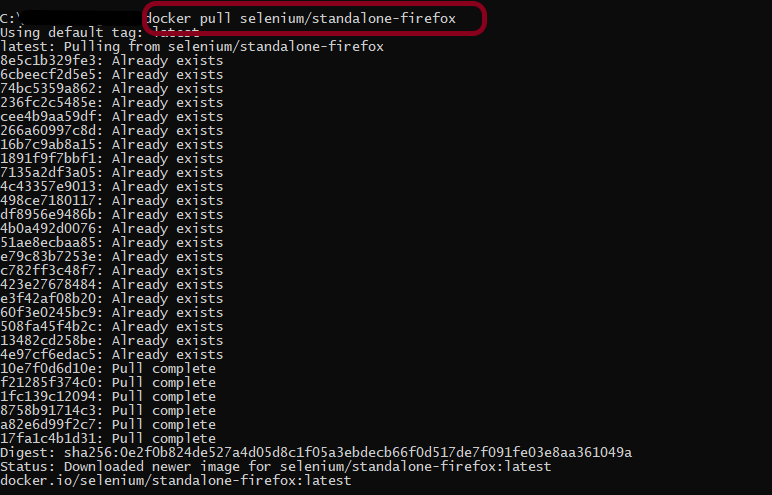
The Docker Desktop can execute a few docker images after it is installed. You can either build a Docker image from the scratch or start with a pre-configured base image from the Docker hub and add to it.
Run the following command to download a copy of the image onto the system.
docker pull selenium/standalone-firefox
Step 2 – Running the Selenium Webdriver Docker container
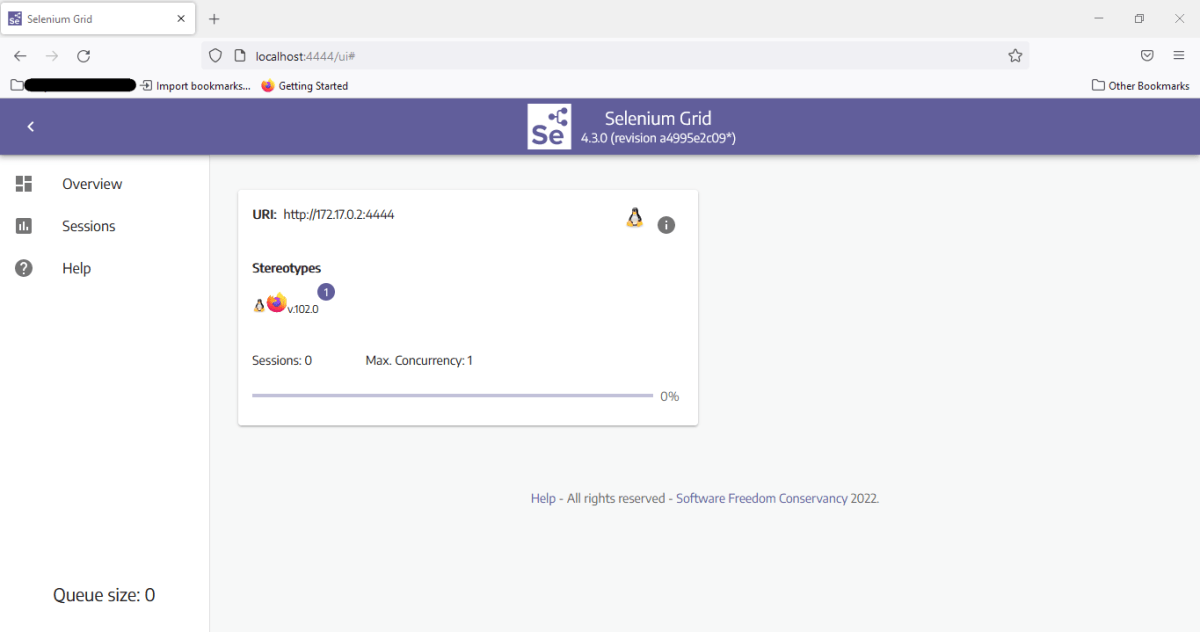
Upon pulling the selenium/standalone-firefox image onto the system, start the container by running the following command:
docker run -d -p 4444:4444 -v /dev/shm:/dev/shm selenium/standalone-firefox
The above command starts a container from the image specified in detached mode (background mode). It also maps Port 4444 on the container to Port 4444 on your local browser.
Open the browser and navigate to http://localhost:4444/. It reflects Selenium Grid UI, as shown below.
I have created a base class where the WebDriver is initialized and at the end is closed.
import io.github.bonigarcia.wdm.WebDriverManager;
import org.junit.After;
import org.junit.Before;
import org.openqa.selenium.WebDriver;
import org.openqa.selenium.firefox.FirefoxOptions;
import org.openqa.selenium.remote.RemoteWebDriver;
import java.net.MalformedURLException;
import java.net.URL;

public class BaseTest {
    protected static ThreadLocal<RemoteWebDriver> driver = new ThreadLocal<>();
    public static String remote_url_firefox = "http://localhost:4444/wd/hub";


    @Before
    public void setDriver() throws MalformedURLException {

        WebDriverManager.firefoxdriver().setup();
        FirefoxOptions options = new FirefoxOptions();
        options.addArguments("window-size=1920,1200");
        driver.set(new RemoteWebDriver(new URL(remote_url_firefox), options));
        driver.get().get("https://opensource-demo.orangehrmlive.com/");

    }

    public WebDriver getDriver() {
        return driver.get();
    }

    @After
    public  void closeBrowser() {
        driver.get().quit();
        driver.remove();
    }
}
The below class contains the various tests. The tests are related to verifying the login to the application, verifying the title of the current page, verifying the error message generated on providing the invalid credentials, verifying the LinkedIn link, and verifying the heading of forgot password page.
Selenium is moved from version 3 to version 4 which is quite a huge step. What does this change mean? It means that a few of the old features of Selenium 3 are depreciated in Selenium 4 as well some new features are added to it also. I’m trying to explain a few of the latest updates done in Selenium 4.
Managing Selenium Grid is now smooth and easy as there will no longer be any need to set up and start hubs and nodes separately. The grid can be deployed in 3 modes:
Standalone – Standalone is the union of all components, and to the user’s eyes, they are executed as one. A fully functional Grid of one is available after starting it in the Standalone mode. By default, the server will be listening on http://localhost:4444, and that’s the URL you should point your RemoteWebDriver tests. The server will detect the available drivers that it can use from the System PATH.
Hub and Node – It enables the classic Hub & Node(s) setup. These roles are suitable for small and middle-sized Grids
Distributed – On Distributed mode, each component needs to be started on its own. This setup is more suitable for large Grids.
Grid will now support IPv6 addresses and one can communicate with the Grid using the HTTPS protocol. In Grid 4, the configuration files used for spinning up the grid instances can be written in TOML (Tom’s Obvious, Minimal Language) which will make it easier for humans to understand.
The new Selenium Grid comes with Docker support. It also supports advanced tools like AWS, Azure, and much more, useful in the DevOps process. Now Grid has a more user-friendly UI and contains relevant information related to the session, running, capacity, etc.
2. Simplification to open a new Windows browser and Tabs
There are a number of scenarios where you would want to open a new browser (or tab) and perform a certain set of actions in the newly opened window/tab. In Selenium 3, you have to create a new Web Driver object and then switch to the new window (or tab) using its unique WindowHandle to perform subsequent actions in that window (or tab).
Selenium 4 provides a new API new Window that lets you create a new window (or tab) and automatically switch to it. Since the new window or tab is created in the same session, it avoids creating a new WebDriver object. For switching to the new tab, pass WindowType.TAB to newWindow() method and for creating a new window, pass WindowType.WINDOW to newWindow() method.
public class NewWindowDemo {

	public static void main(String[] args) {
		System.setProperty("webdriver.chrome.driver",
				"C:\\Users\\Vibha\\Software\\chromedriver_win32_93.0.4577.15\\chromedriver.exe");
		WebDriver driver = new ChromeDriver();
		driver.manage().window().maximize();

		driver.get("https://www.bing.com/");
		System.out.println("New Page - Bing is opened");

		// Opens a new window and switches to new window
		driver.switchTo().newWindow(WindowType.WINDOW);

		// Opens duckduckgo homepage in the new opened window
		driver.navigate().to("https://www.duckduckgo.com/");

		System.out.println("New Page - DuckDuckGo is opened");

		driver.quit();
	}
}
Open a new Tab in Selenium 4
public class NewTabDemo {

	public static void main(String[] args) {

		System.setProperty("webdriver.chrome.driver",
				"C:\\Users\\Vibha\\Software\\chromedriver_win32_93.0.4577.15\\chromedriver.exe");

		WebDriver driver = new ChromeDriver();
		driver.manage().window().maximize();

		driver.get("https://www.bing.com/");
		System.out.println("New Page - Bing is opened");

		// Opens a new window and switches to new window
		driver.switchTo().newWindow(WindowType.TAB);

		// Opens duckduckgo homepage in the new opened window
		driver.navigate().to("https://www.duckduckgo.com/");

		System.out.println("New Tab is opened with DuckDuckGo");
		driver.quit();
	}
}
3. Relative Locators
Selenium 4 brings Relative Locators which are previously called as Friendly Locators. This functionality was added to help you locate elements that are nearby other elements. The Available Relative Locators are:
above below toLeftOf toRightOf near
findElement method now accepts a new method withTagName() which returns a RelativeLocator.
In Selenium 3, there was a provision to capture a screenshot of the entire web page. Selenium 4 onwards, there is a new option to capture screenshots of a particular WebElement. Hence, there is no need to use third-party tools like Shutterbug, Ashot, etc. (like in Selenium 3) for capturing a screenshot of WebElement.
The newly introduced method in Selenium 4 captures the screenshot of an element for the current browsing context. The screenshot returned by the WebDriver endpoint is encoded in the Base64 format.
This is how you can capture WebElement Screenshot in Selenium 4 (for Java):
import io.github.bonigarcia.wdm.WebDriverManager;
import org.apache.commons.io.FileUtils;
import org.openqa.selenium.By;
import org.openqa.selenium.OutputType;
import org.openqa.selenium.TakesScreenshot;
import org.openqa.selenium.WebDriver;
import org.openqa.selenium.WebElement;
import org.openqa.selenium.chrome.ChromeDriver;
import org.openqa.selenium.firefox.FirefoxDriver;
public class ScreenshotDemo {
public static void main(String[] args) {
WebDriverManager.chromedriver().setup();
WebDriver driver = new ChromeDriver();
driver.manage().window().maximize();
driver.get("https://www.selenium.dev/");
try {
WebElement logo = driver.findElement(By.xpath("//*[@id='td-cover-block-0']/div/div/div/div/h1"));
File source = ((TakesScreenshot) logo).getScreenshotAs(OutputType.FILE);
FileUtils.copyFile(source, new File("./Screenshots/logo" + System.currentTimeMillis() + ".png"));
} catch (Exception e) {
System.out.println(e.getMessage());
}
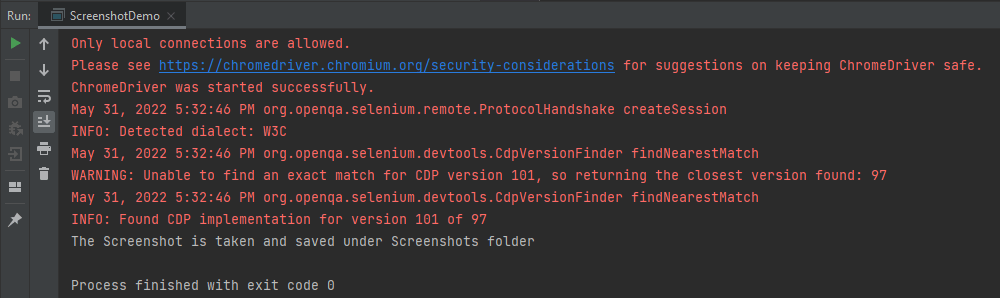
System.out.println("The Screenshot is taken and saved under Screenshots folder");
driver.quit();
}
}
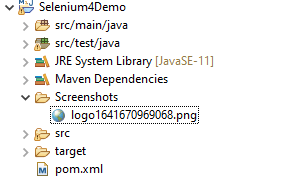
The output of the above program is
The picture will be saved in the Screenshots folder as shown below:
Below is the image of the screenshots.
5. New additions to the Actions Class
Actions Class in Selenium provides several methods for performing a single action or a series of actions on the WebElements present in the DOM. Mouse actions (e.g., click, double click, etc.) and Keyboard actions (e.g., keyUp, keyDown, sendKeys) are the two broad categories of Actions. For demonstration, we will post the examples demonstrated in the Action class in the Selenium blog from Selenium 3 to Selenium 4.
With Selenium 4, new methods are added to the Actions class, which replaces the classes under the org.openqa.selenium.interactions package.
click(WebElement) is the new method added to the Actions class and it serves as the replacement of moveToElement(onElement).click() method.
Like the method in the versions before Selenium 4, click(WebElement) is used for clicking a web element.
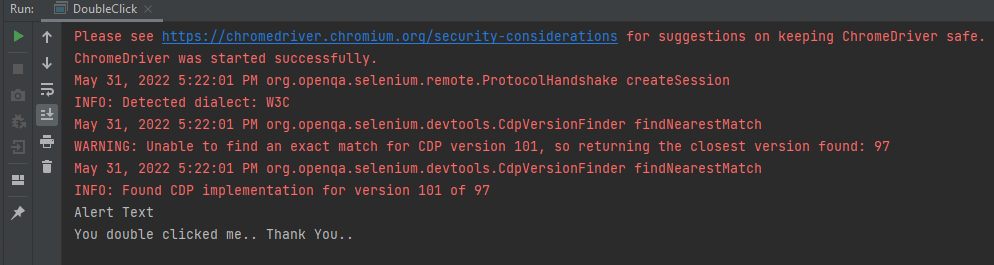
doubleClick(WebElement)
This method is added to replace moveToElement(element).doubleClick(). It will perform a double-click on an element.
import io.github.bonigarcia.wdm.WebDriverManager;
import org.openqa.selenium.Alert;
import org.openqa.selenium.By;
import org.openqa.selenium.WebDriver;
import org.openqa.selenium.WebElement;
import org.openqa.selenium.chrome.ChromeDriver;
import org.openqa.selenium.interactions.Actions;

public class DoubleClick {
    public static void main(String[] args) {

        WebDriverManager.chromedriver().setup();
        WebDriver driver = new ChromeDriver();

        // Navigate to Url
        driver.get("https://demo.guru99.com/test/simple_context_menu.html");

        // Store 'doubleClickButton' button web element
        WebElement doubleClickButton = driver.findElement(By.xpath("//*[@id='authentication']/button"));
        Actions actionProvider = new Actions(driver);

        // Perform double-click action on the element
        actionProvider.doubleClick(doubleClickButton).build().perform();
        Alert alert = driver.switchTo().alert();
        System.out.println("Alert Text\n" +alert.getText());
        alert.accept();

        driver.close();
    }
}
The output of the above program is
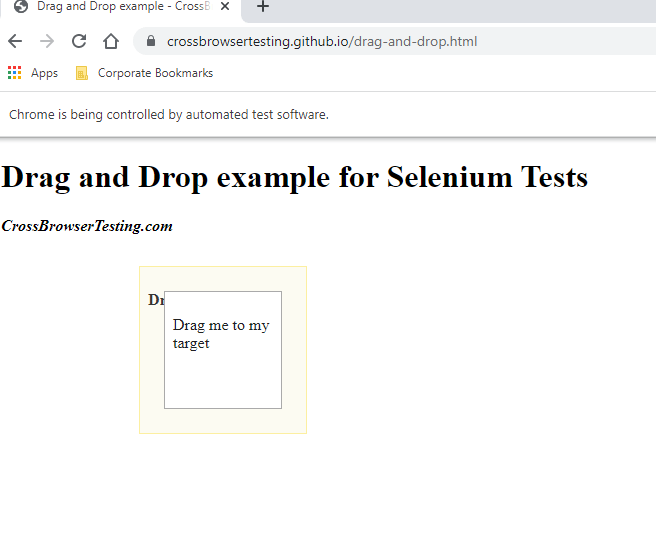
clickAndHold(WebElement)
This method will replace the moveToElement(onElement).clickAndHold(). It is used to click on an element without releasing the click.
contextClick(WebElement)
This method will replace moveToElement(onElement).contextClick(). It will perform the right-click operation.
release()
This method (user for releasing the pressed mouse button) was initially a part of org.openqa.selenium.interactions.ButtonReleaseAction class. Now with the updated version of Selenium, it has been moved to the Actions class.
import io.github.bonigarcia.wdm.WebDriverManager;
import org.openqa.selenium.By;
import org.openqa.selenium.WebDriver;
import org.openqa.selenium.WebElement;
import org.openqa.selenium.chrome.ChromeDriver;
import org.openqa.selenium.interactions.Actions;

public class clickAndHold {
    public static void main(String[] args) {

        WebDriverManager.chromedriver().setup();
        WebDriver driver = new ChromeDriver();

        // Navigate to Url
        driver.get("https://crossbrowsertesting.github.io/drag-and-drop.html");
        driver.manage().window().maximize();

        // Find element xpath which we need to drag
        WebElement from = driver.findElement(By.id("draggable"));

        // Find element xpath where we need to drop
        WebElement to = driver.findElement(By.id("droppable"));

        Actions actionProvider = new Actions(driver);

        // Perform click-and-hold action on the element
        actionProvider.clickAndHold(from).build().perform();

       // Move to drop Webelement
        actionProvider.clickAndHold(to).build().perform();

        //Release drop element
        actionProvider.release(to).build().perform();
    }
}
The output of the above program is
6. Deprecation of Desired Capabilities
In Selenium 3, desired Capabilities were primarily used in the test scripts to define the test environment (browser name, version, operating system) for execution on the Selenium Grid.
In Selenium 4, capabilities objects are replaced with Options. This means testers now need to create an Options object, set test requirements, and pass the object to the Driver constructor.
Listed below are the Options objects to be used going forward for defining browser-specific capabilities:
Firefox – FirefoxOptions Chrome – ChromeOptions Internet Explorer (IE) – InternetExplorerOptions Microsoft Edge – EdgeOptions Safari – SafariOptions
Below is an example of Options
import org.openqa.selenium.WebDriver;
import org.openqa.selenium.chrome.ChromeDriver;
import org.openqa.selenium.chrome.ChromeOptions;
import io.github.bonigarcia.wdm.WebDriverManager;
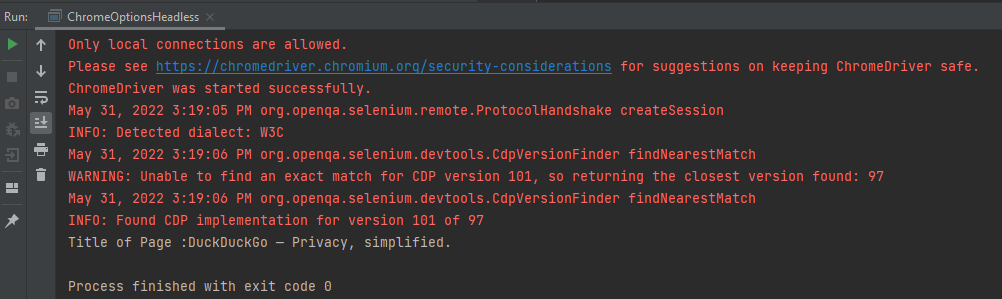
public class ChromeOptionsHeadless {
public static void main(String[] args) {
WebDriverManager.chromedriver().setup();
ChromeOptions chromeOptions = new ChromeOptions();
chromeOptions.setBrowserVersion("100");
chromeOptions.setPlatformName("Windows 10");
WebDriver driver = new ChromeDriver(chromeOptions);
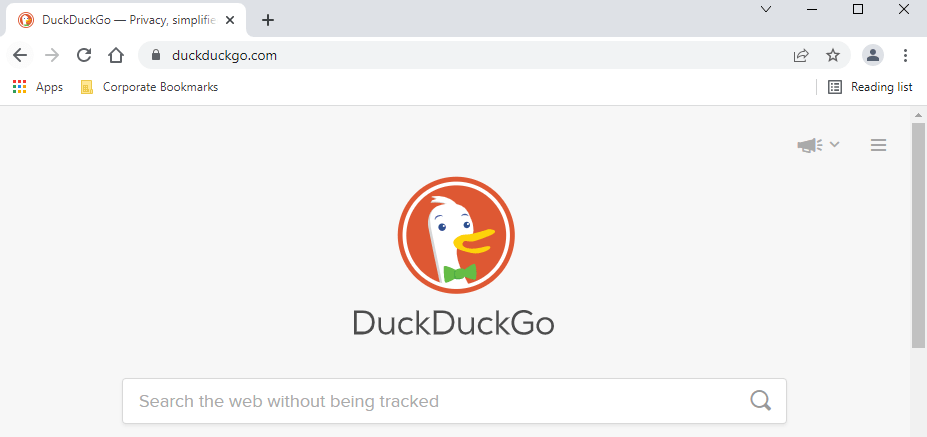
driver.get("https://duckduckgo.com/");
System.out.println("Title of Page :" + driver.getTitle());
// Close the driver
driver.close();
}
}
The output of the above program is
Similarly, we can create the action class for other browsers like Firefox.
FirefoxOptions options = new FirefoxOptions();

// Create an object of WebDriver class and pass the Firefox Options object as an argument
WebDriver driver = new FirefoxDriver(options);
7. Chrome Dev Tools
In the new version of Selenium, they have made some internal changes in the API. Earlier in Selenium 3, the Chrome driver extends directly to the Remote Web Driver class. But now in Selenium 4, the Chrome driver class extends to Chromium Driver. Chromium Driver class has some predefined methods to access the dev tool.
Note: Chromium Driver extends the Remote Web driver class.
By using the API, we can perform the following operations:
This tutorial explains the steps to disable infobar warning generated by Selenium for running tests in Chrome. Selenium tests run on Chrome shows a warning message – “Chrome is being controlled by automated test software as shown in the below image.“
We want to run the Selenium tests on Chrome, but without the above-shown warning message. This can be achieved by using excludeSwitches.
import java.util.Arrays;

import org.openqa.selenium.WebDriver;
import org.openqa.selenium.chrome.ChromeDriver;
import org.openqa.selenium.chrome.ChromeOptions;

import io.github.bonigarcia.wdm.WebDriverManager;

public class ChromeDisableInfobars {

	public static void main(String[] args) {

		WebDriverManager.chromedriver().setup();

		// Create an object of Chrome Options class
		ChromeOptions chromeOptions = new ChromeOptions();

		// prevents Chrome from displaying the notification 'Chrome is being controlled
		// by automated software'
        options.addArguments("--disable-infobars");
		chromeOptions.setExperimentalOption("excludeSwitches", Arrays.asList("enable-automation"));

		// Create an object of WebDriver class and pass the Chrome Options object as an
		// argument
		WebDriver driver = new ChromeDriver(chromeOptions);

		driver.get("https://duckduckgo.com/");

		System.out.println("Title of Page :" + driver.getTitle());

		// close the browser
		driver.quit();

	}
}
Internet Explorer is going away in near future. But still it is a browser which holds around 1% of browser market share. When anyone refers to automated browser testing, it somehow means that the testing will be performed on the latest browsers like Chrome, Firefox, etc. But along with these browsers, it is also expected to work on Internet Explorer (IE).
The Internet Explorer driver that is used by Selenium Tests can be downloaded from here.
In order to run the Selenium Tests on IE, it is needed to set the %PATH%.
How to add %PATH%
Go To -> View Advanced System Settings -> Environment Variables ->Clicks on the Path and add the path where IE binary is located on the machine.
How to run tests using Selenium IE driver in Selenium Java?
import org.junit.After;
import org.junit.Assert;
import org.junit.Before;
import org.junit.Test;
import org.openqa.selenium.WebDriver;
import org.openqa.selenium.ie.InternetExplorerDriver;
public class IEDemo {
public WebDriver driver;
@Before
public void setUp() {
System.setProperty("webdriver.ie.driver",
"C:\\Users\\Vibha\\Software\\IEDriverServer_x64_2.39.0\\IEDriverServer.exe");
driver = new InternetExplorerDriver();
}
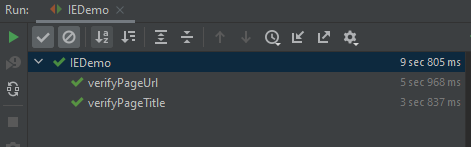
@Test
public void verifyPageTitle() {
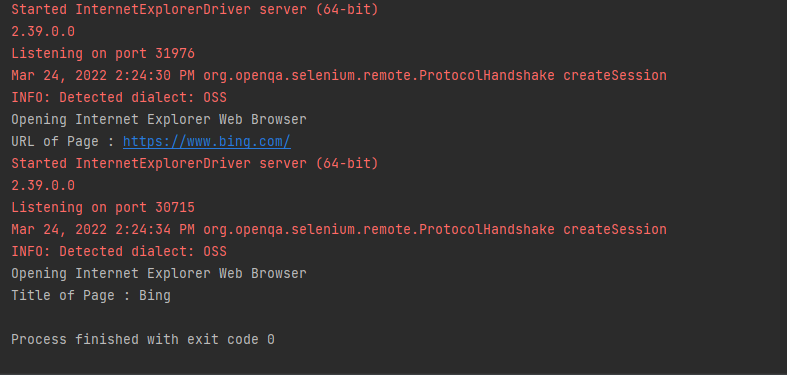
System.out.println("Opening Internet Explorer Web Browser");
driver.get("https://www.bing.com/");
System.out.println("Title of Page : " + driver.getTitle());
Assert.assertEquals(driver.getTitle(), "Bing");
}
@Test
public void verifyPageUrl() {
System.out.println("Opening Internet Explorer Web Browser");
driver.get("https://www.bing.com/");
System.out.println("URL of Page : " + driver.getCurrentUrl());
Assert.assertEquals(driver.getCurrentUrl(), "https://www.bing.com/");
}
@After
public void tearDown() {
// Close the driver
driver.close();
}
}
Execution
The string webdriver.ie.driver is set to the location which contains the Selenium IE driver. The InternetExplorerDriver method is used for instantiating the IE driver class.
The test method is implemented under the @Test annotation.
In the tearDown method, the resources held by IE driver are freed using the close() method in Selenium.
Congratulations!! We are able to open an Internet Explorer browser and perform tests. Happy Learning!!
Page Object Model(POM) is an object design pattern in Selenium webdriver which tells how to organize the object repository. In this case, we refer to web elements as Objects. Page Object Model(POM) is not a Test Framework.
In the Page Object Model (POM), each web page is represented as a separate class. For example, consider HRM website. It has many web pages like Login , Dashboard , Assign Leave, Leave List, Timesheets, etc. Under this model, for each web page in the application, there should be a corresponding Page Class. This Page class will identify the WebElements of that web page and also contains Page methods that perform operations on those WebElements.
If a new web element is added or an existing web element is updated, then you can add or update that web element in object repository by navigating to class which has same name as webpage.
The object repository is independent of test cases, so we can use the same object repository for a different purpose with different tools. For example, we can integrate Page Object Model in Selenium with TestNG/JUnit for functional Testing and at the same time with JBehave/Cucumber for acceptance testing.
POM enhances test maintenance, readability and reducing code duplication.
In this tutorial, I’m creating a project using Page Object Model as Design Pattern and TestNG as the Test Automation Framework.
Steps to create a Page Object Model Project
Download and Install Java on system
Download and setup Eclipse IDE on system
Setup Maven
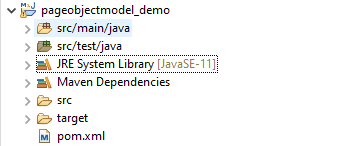
Create a new Maven Project
Add dependencies to pom.xml
Create Page Class for each page – LoginPage.Java and DashboardPage.java
Create tests for each Page – BaseTests, LoginTests and DashboardTests
Create a TestNG.XML
Run the tests from TestNG.xml
TestNG Report Generation
Step 1- Download and Install Java
Click here to know How to install Java. To check if Java is already installed on your machine, use the below command in the command line. This command will show the version of Java installed on your machine.
java -version
Step 2 – Download and setup Eclipse IDE on system
The Eclipse IDE (integrated development environment) provides strong support for Java developer. The Eclipse IDE for Java Developers distribution is designed to support standard Java development. It includes support for the Maven and Gradle build system and support for the Git version control system. Click here to know How to install Eclipse.
Step 3 – Setup Maven
To build a test framework, we need to add a number of dependencies to the project. It is very tedious and cumbersome process to add each dependency manually. So, to overcome this problem, we use a build management tool. Maven is a build management tool which is used to define project structure, dependencies, build, and test management. Click here to know How to install Maven.
To know if Maven is already installed or not on your machine, type this command in the command line. This command will show the version of Maven installed on your machine.
Step 6 – Create Page Class for each page – LoginPage.Java and DashboardPage.java
I want to test 2 pages – Login and Dashboard. So, I’m creating 2 seperate class. Each class will contain its web elements and methods of that page.
LoginPage.Java
import org.openqa.selenium.By;
import org.openqa.selenium.WebDriver;

public class LoginPage {

	WebDriver driver;

	By userName = By.name("txtUsername");

	By password = By.name("txtPassword");

	By titleText = By.id("logInPanelHeading");

	By login = By.id("btnLogin");

	public LoginPage(WebDriver driver) {
		this.driver = driver;
	}

	// Set user name in textbox
	public void setUserName(String strUserName) {
		driver.findElement(userName).sendKeys(strUserName);
	}

	// Set password in password textbox
	public void setPassword(String strPassword) {
		driver.findElement(password).sendKeys(strPassword);
	}

	// Click on login button
	public void clickLogin() {
		driver.findElement(login).click();
	}

	// Get the title of Login Page
	public String getLoginTitle() {
		return driver.findElement(titleText).getText();
	}

	public void login(String strUserName, String strPasword) {

		// Fill user name
		this.setUserName(strUserName);

		// Fill password
		this.setPassword(strPasword);

		// Click Login button
		this.clickLogin();
	}
}
DashboardPage.java
import org.openqa.selenium.By;
import org.openqa.selenium.WebDriver;

public class DashboardPage {

	WebDriver driver;

	By homePageUserName = By.id("welcome");

	public DashboardPage(WebDriver driver) {
		this.driver = driver;

	}

	// Get the User name from Home Page
	public String getHomePageText() {
		return driver.findElement(homePageUserName).getText();
	}

}
Step 7 – Create tests for each Page – BaseTests, LoginTests and DashboardTests
Here, I have created 3 classes. BaseTest class to contain startUp and tearDown methods. These methods will run once before the after of every class. LoginTests and DashboardTests classes contain the tests related to LoginPage and DashboardPage respectively.
BaseTest
import java.util.concurrent.TimeUnit;

import org.openqa.selenium.WebDriver;
import org.openqa.selenium.firefox.FirefoxDriver;
import org.testng.annotations.AfterClass;
import org.testng.annotations.BeforeClass;

import com.example.pageobjectmodel_demo.pages.DashboardPage;
import com.example.pageobjectmodel_demo.pages.LoginPage;

public class BaseTest {

	public static WebDriver driver;
	LoginPage objLogin;
	DashboardPage objDashboardPage;

	@BeforeClass
	public void setup() {
		System.setProperty("webdriver.gecko.driver",
				"C:\\Users\\Vibha\\Software\\geckodriver-v0.26.0-win64\\geckodriver.exe");
		driver = new FirefoxDriver();
		driver.manage().window().maximize();
		driver.manage().timeouts().implicitlyWait(10, TimeUnit.SECONDS);
		driver.get("https://opensource-demo.orangehrmlive.com/");
	}

	@AfterClass
	public void close() {
		driver.close();
	}
}
LoginTests
import org.testng.Assert;
import org.testng.annotations.Test;

import com.example.pageobjectmodel_demo.pages.DashboardPage;
import com.example.pageobjectmodel_demo.pages.LoginPage;

public class LoginTests extends BaseTest {

	LoginPage objLogin;
	DashboardPage objDashboardPage;

	@Test(priority = 0)
	public void loginTest() {

		// Create Login Page object
		objLogin = new LoginPage(driver);

		// Verify login page text
		String loginPageTitle = objLogin.getLoginTitle();
		Assert.assertTrue(loginPageTitle.contains("LOGIN Panel"));
	}

}
DashboardTests
import org.testng.Assert;
import org.testng.annotations.Test;

import com.example.pageobjectmodel_demo.pages.DashboardPage;
import com.example.pageobjectmodel_demo.pages.LoginPage;

public class DashboardTests extends BaseTest {

	LoginPage objLogin;
	DashboardPage objDashboardPage;

	@Test(priority = 0)
	public void DasboardTest() {

		objLogin = new LoginPage(driver);

		// login to application
		objLogin.login("Admin", "admin123");

		// go the dashboard page
		objDashboardPage = new DashboardPage(driver);

		// Verify dashboard page
		Assert.assertTrue(objDashboardPage.getHomePageText().contains("Welcome"));
	}

}
Step 8 – Create a TestNG.XML
Here, I have mentioned 2 test classes. So, when I will run the tests from TestNG.xml, it will run the tests of both the classes. If will mention any one class, then the test of that particular class will be executed.
<?xml version = "1.0"encoding = "UTF-8"?>
<!DOCTYPE suite SYSTEM "http://testng.org/testng-1.0.dtd">
<suite name = "PageObjectModel">
  <test name = "PageObjectModel Tests">
    <classes>
          <class name = "com.example.pageobjectmodel_demo.tests.LoginTests"/>
          <class name = "com.example.pageobjectmodel_demo.tests.DashboardTests"/>
     </classes>
   </test>
</suite>
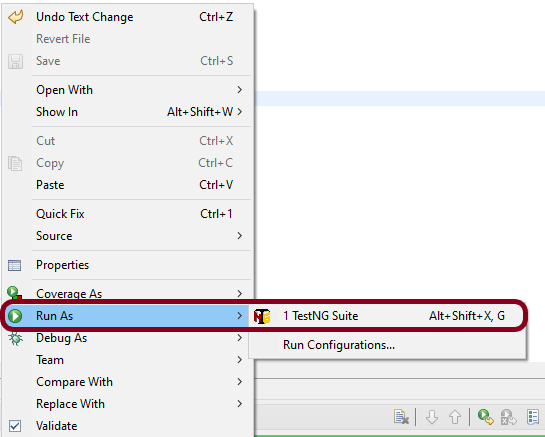
Step 9 – Run the tests from TestNG.xml
Right click on TestNG.xml and select Run As TestNG Suite.
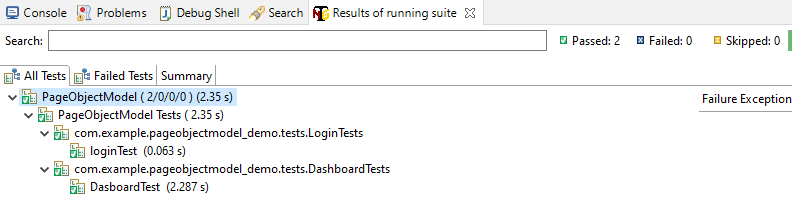
The execution status looks like as shown below.
Step 10 – TestNG Report Generation
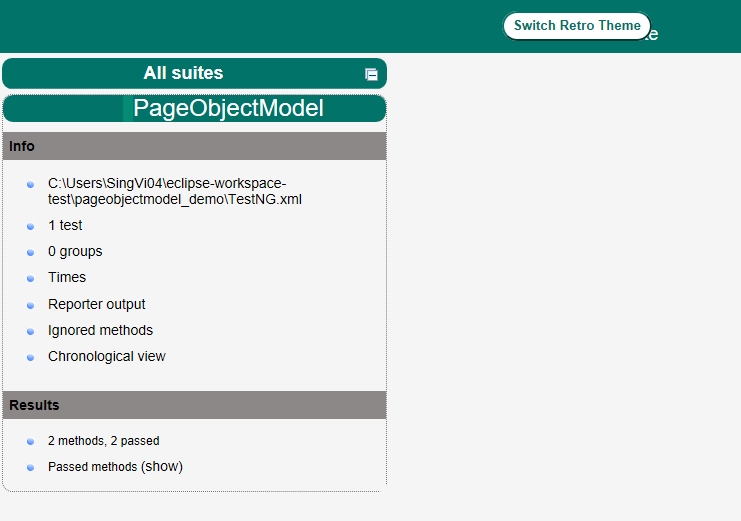
Once the execution is finished, refresh the project. It will create a test-output folder containing various reports generated by TestNG. Below is the screenshot of the report folder.
Image of Index.html report
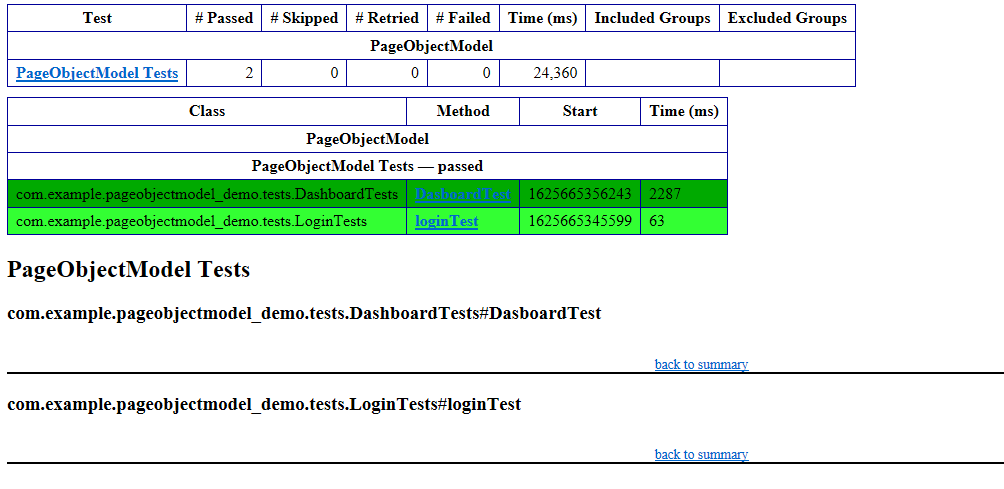
Image of emailable-report.html
Cheers! Congratulations on making it through this tutorial and hope you found it useful! Happy Learning!!
Page Object model is an object design pattern in Selenium, where web pages are represented as classes, and the various elements on the page are defined as variables in the class and all possible user interactions can then be implemented as methods in the class.
The benefit is that if there is any change in the UI for the page, the tests themselves don’t need to change, only the code within the page object needs to change. Subsequently all changes to support that new UI are located in one place.
Advantages:
1. Readable – There is a clean separation between test code and page specific code such as locators and methods.
2. Maintainability – In this model, separate classes are created for different pages of a web application like login page, the home page, employee detail page, change password page, etc. So, if there is any change in any element of a website then we only need to make changes in one class, and not in all classes.
3. Reusable – If multiple test scripts use the same web elements, then we need not write code to handle the web element in every test script. Placing it in a separate page class makes it reusable by making it accessible by any test script.
4. Easy project Structure– Its project structure is quite easy and understandable.
5. PageFactory – It can use PageFactory in the page object model in order to initialize the web element and store elements in the cache.
In case there are lots of web elements on a page, then the object repository class for a page can be separated from the class that includes methods for the corresponding page.
Example: If the New Customer page has many input fields. In that case, there can be 2 different classes. One class called NewCustomerObjects.java that forms the object repository for the UI elements on the register accounts page.
A separate class file NewCustomerMethods.java extending or inheriting NewCustomerObjects that includes all the methods performing different actions on the page could be created.
Consider the below script to login to an application and navigate to home page.
This is a small script. Therefore, script maintenance and readability looks very easy.
Imagine there are 50 different tests present in this script. In that case, the readability of the script decreases as well as maintenance become very difficult.
Scenario
Launch the Firefox browser.
The demo website opens in the browser.
Verify the Login Page
Enter username and Password and login to the demo site.
PageFactory is a way of implementing the “Page Object Model”. Here, we follow the principle of separation of Page Object Repository and Test Methods. It is an inbuilt concept of Page Object Model which is very optimized.
1. The annotation @FindBy is used in Pagefactory to identify an element while POM without Pagefactory uses the driver.findElement() method to locate an element.
2. The second statement for Pagefactory after @FindBy is assigning an <element name> of type WebElement class that works exactly similar to the assignment of an element name of type WebElement class as a return type of the method driver.findElement() that is used in usual POM (userName in this example).
3. Below is a code snippet of non PageFactory Mode to set Firefox driver path. A WebDriver instance is created with the name driver and the FirefoxDriver is assigned to the ‘driver’. The same driver object is then used to launch the demo website, locate the webelements and to perform various operations
Basically, here the driver instance is created initially and every web element is freshly initialized each time when there is a call to that web element using driver.findElement() or driver.findElements().
ChromeOptions options = new ChromeOptions();
driver = new ChromeDriver(options);
driver.manage().window().maximize();
driver.manage().timeouts().implicitlyWait(10, TimeUnit.SECONDS);
driver.get("https://opensource-demo.orangehrmlive.com/");
But with POM with PageFactory approach, all the elements are initialized with initElements() without explicitly initializing each web element.
The initElementsis a static method of PageFactory class which is used to initialize all the web elements located by @FindBy annotation. Thus, instantiating the Page classes easily. It is used to initialize the WebElements declared, using driver instance from the main class. In other words, WebElements are created using the driver instance. Only after the WebElements are initialized, they can be used in the methods to perform actions.
public Login(WebDriver driver) {
           this.driver = driver;
           // This initElements method will create all WebElements
           PageFactory.initElements(driver, this);
     }
3.2 Create methods for actions performed on WebElements.
Below actions are performed on WebElements in Login Page:
Get Text on Login Page
Type action on the Username field.
Type action in the Password field.
Click action on the Login Button
Note: A constructor has to be created in each of the class in the Page Layer, in order to get the driver instance from the Main class in Test Layer and also to initialize WebElements(Page Objects) declared in the page class using PageFactory.InitElement().
BaseClass
package com.example.pages;

import org.openqa.selenium.WebDriver;
import org.openqa.selenium.support.PageFactory;

public class BasePage {
    public WebDriver driver;

    public BasePage(WebDriver driver) {
        this.driver = driver;
        PageFactory.initElements(driver,this);
    }

}
Login Page
package com.example.pages;

import org.openqa.selenium.WebDriver;
import org.openqa.selenium.WebElement;
import org.openqa.selenium.support.FindBy;

public class LoginPage extends BasePage{

    public LoginPage(WebDriver driver) {
        super(driver);

    }

    @FindBy(name = "username")
    public WebElement userName;

    @FindBy(name = "password")
    public WebElement password;

    @FindBy(xpath = "//*[@class='oxd-form']/div[3]/button")
    public WebElement login;

    @FindBy(xpath = "//*[@id='app']/div[1]/div/div[1]/div/div[2]/div[2]/div/div[1]/div[1]/p")
    public  WebElement errorMessage;


    public void login(String strUserName, String strPassword) {

        userName.sendKeys(strUserName);
        password.sendKeys(strPassword);
        login.click();

    }

    public String getErrorMessage() {
        return errorMessage.getText();
    }


}
HomePage. java
package com.example.pages;

import org.openqa.selenium.WebDriver;
import org.openqa.selenium.WebElement;
import org.openqa.selenium.support.FindBy;

public class HomePage extends BasePage {

    public HomePage(WebDriver driver) {
        super(driver);

    }

    @FindBy(xpath = "//*[@id='app']/div[1]/div[1]/header/div[1]/div[1]/span/h6")
    public  WebElement homePageUserName;

    public String getHomePageText() {
        return homePageUserName.getText();
    }

}
Step 4 – Create test class for the tests of these pages
BaseTests
package com.example.tests;

import org.openqa.selenium.WebDriver;
import org.openqa.selenium.chrome.ChromeDriver;
import org.openqa.selenium.chrome.ChromeOptions;
import org.testng.annotations.AfterMethod;
import org.testng.annotations.BeforeMethod;

import java.time.Duration;

public class BaseTests {

    public static WebDriver driver;
    public final static int TIMEOUT = 10;

    @BeforeMethod
    public void setup() {

        ChromeOptions options = new ChromeOptions();
        options.addArguments("--remote-allow-origins=*");
        options.addArguments("--no-sandbox");
        options.addArguments("--disable-dev-shm-usage");
        options.addArguments("--headless");
        driver = new ChromeDriver(options);
        driver.manage().window().maximize();
        driver.get("https://opensource-demo.orangehrmlive.com/");
        driver.manage().timeouts().implicitlyWait(Duration.ofSeconds(TIMEOUT));

    }

    @AfterMethod
    public void tearDown() {
        driver.quit();
    }

}
LoginPageTests.java
package com.example.tests;

import com.example.pages.HomePage;
import com.example.pages.LoginPage;
import org.testng.Assert;
import org.testng.annotations.Test;

public class LoginPageTests extends BaseTests{

    String actualResponse;

    @Test
    public void invalidCredentials()  {

        LoginPage objLoginPage = new LoginPage(driver);
        objLoginPage.login("admin", "admin");
        actualResponse = objLoginPage.getErrorMessage();
        Assert.assertEquals(actualResponse,"Invalid credentials");
    }

    @Test
    public void validCredentials() {

        LoginPage objLoginPage = new LoginPage(driver);
        objLoginPage.login("Admin", "admin123");
        HomePage objHomePage = new HomePage(driver);
        actualResponse = objHomePage.getHomePageText();
        Assert.assertEquals(actualResponse,"Dashboard");

    }

}
Step 5 – Execute the tests
To run the test, right click and select as Run As and then select TestNG Test (Eclipse).
Right-click on the LoginPageTests and select Run ‘LoginPageTests’ (IntelliJ)
Step 6 – Create TestNG.xml
You can add TestNG.xml and run the tests from there also.
<?xml version = "1.0"encoding = "UTF-8"?>
<!DOCTYPE suite SYSTEM "http://testng.org/testng-1.0.dtd">
<suite name = "PageObjectModel">
    <test name = "PageObjectModel Tests">
        <classes>
            <class name ="com.example.tests.LoginPageTests"/>
        </classes>
    </test>
</suite>
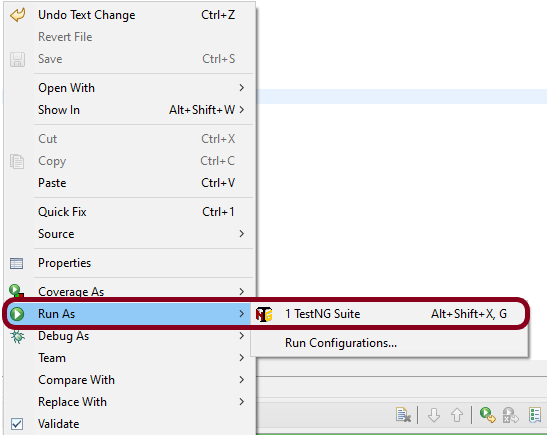
Step 7 – Run the tests from TestNG.xml
Right click on TestNG.xml and select Run As TestNG Suite.
The execution status looks like as shown below.
Step 8 -TestNG Report Generation
Once the execution is finished, refresh the project. It will create a test-output folder containing various reports generated by TestNG. Below is the screenshot of the report folder.
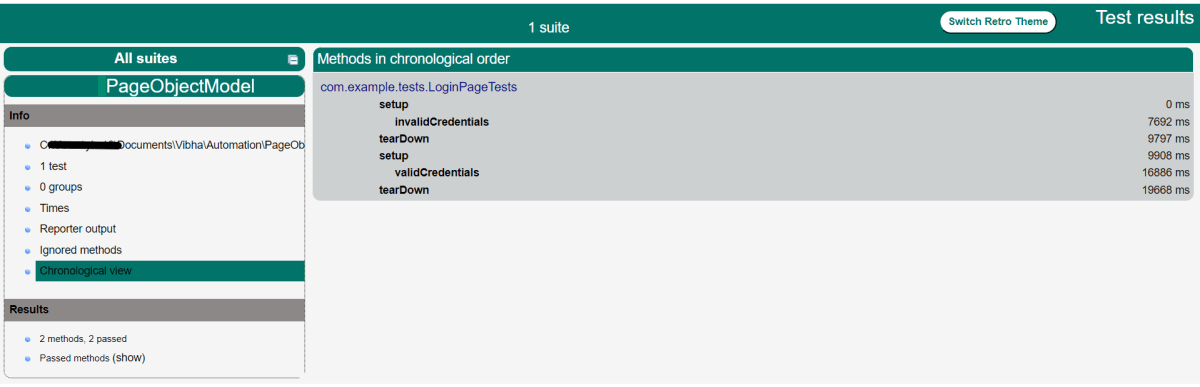
Index.html
emailable-report.html
Step 9 – Execute the tests through command line
We can run the tests through command line. Use the below command: