Last Updated On
In this tutorial, I will explain how to Integrate Allure Report 3 with Playwright, Java Cucumber, and JUnit5.
Before starting, make sure to install Allure on your machine. Refer to this tutorial to install allure – What is Allure Report?.
Why Combine Playwright, Cucumber, JUnit5 and Allure?
- Playwright provides modern, robust automation for testing web apps across Chromium, Firefox, and WebKit.
- Cucumber enables BDD, allowing tests to be written in a natural language format using Gherkin syntax.
- Allure Report generates easy-to-understand and aesthetically pleasing test reports, enhancing the feedback loop.
- JUnit 5 provides powerful features like parameterized tests, extensions, and a modular architecture for organized and manageable test suites, parallel execution
Together, they empower teams to write readable tests, run them across multiple browsers, and analyze results visually.
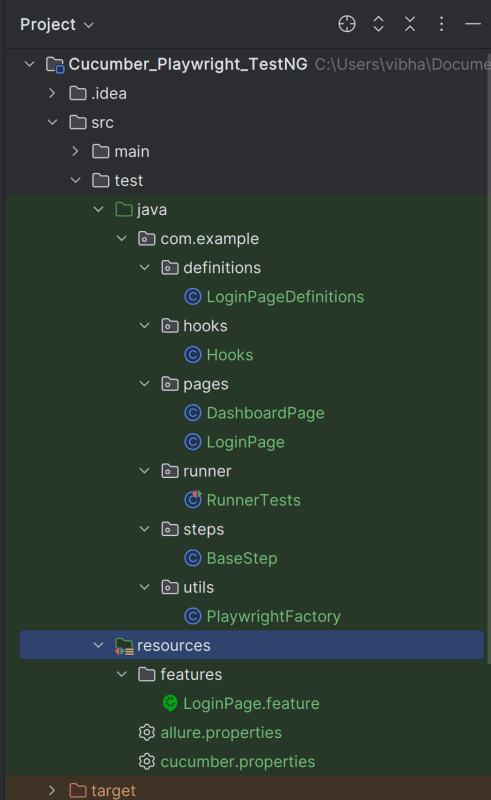
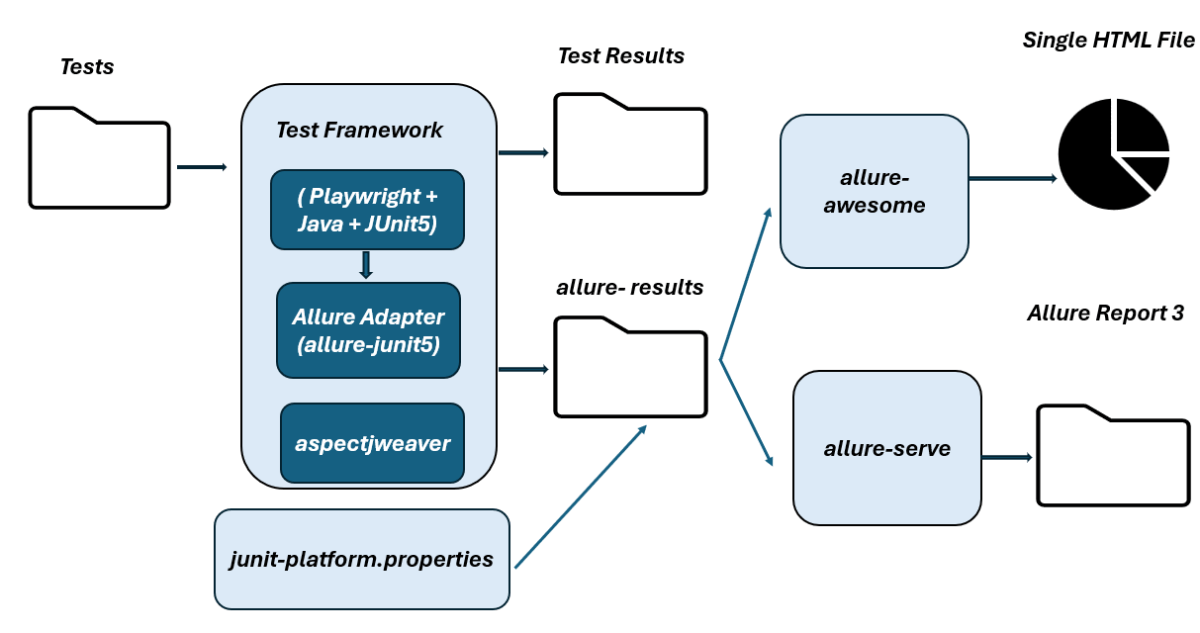
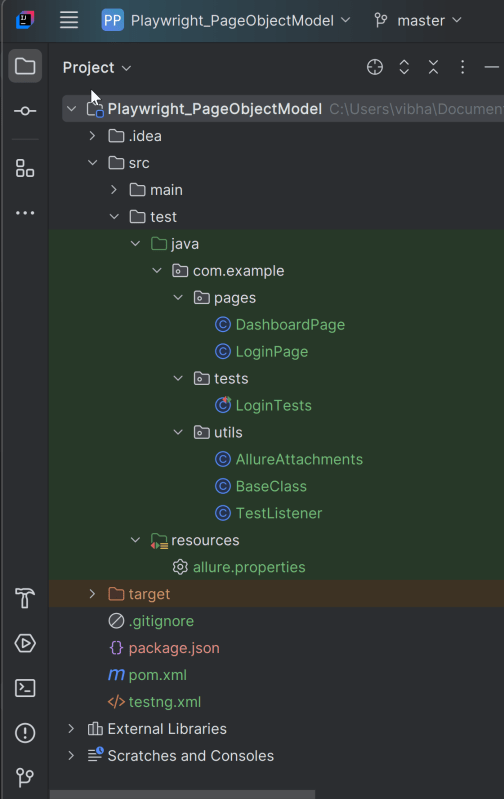
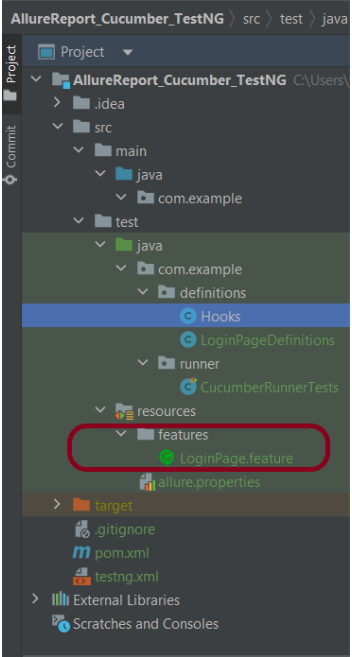
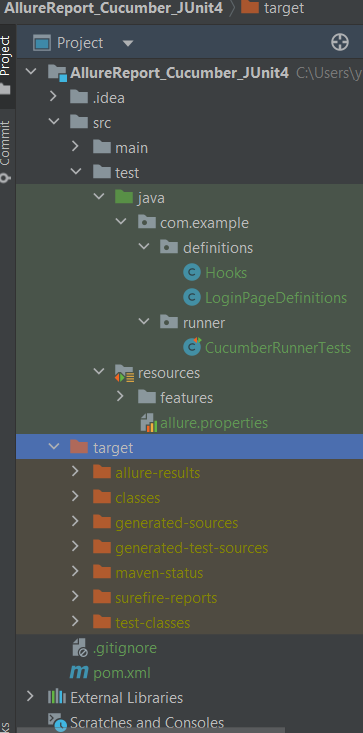
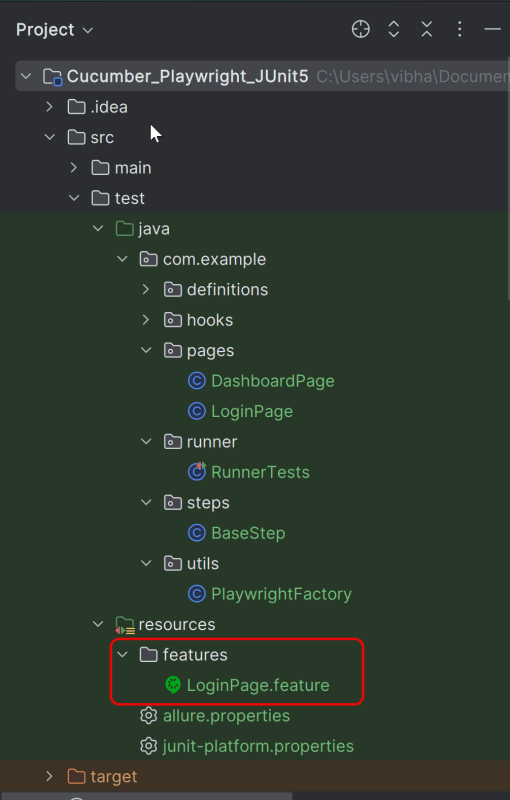
Project Structure
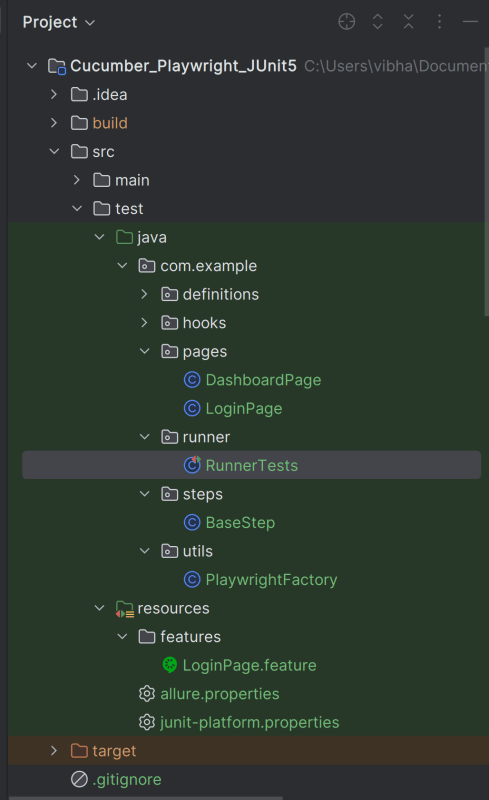
Table of Contents
- Why Combine Playwright, Cucumber, JUnit5 and Allure?
- Project Structure
- System requirements
- Dependency List
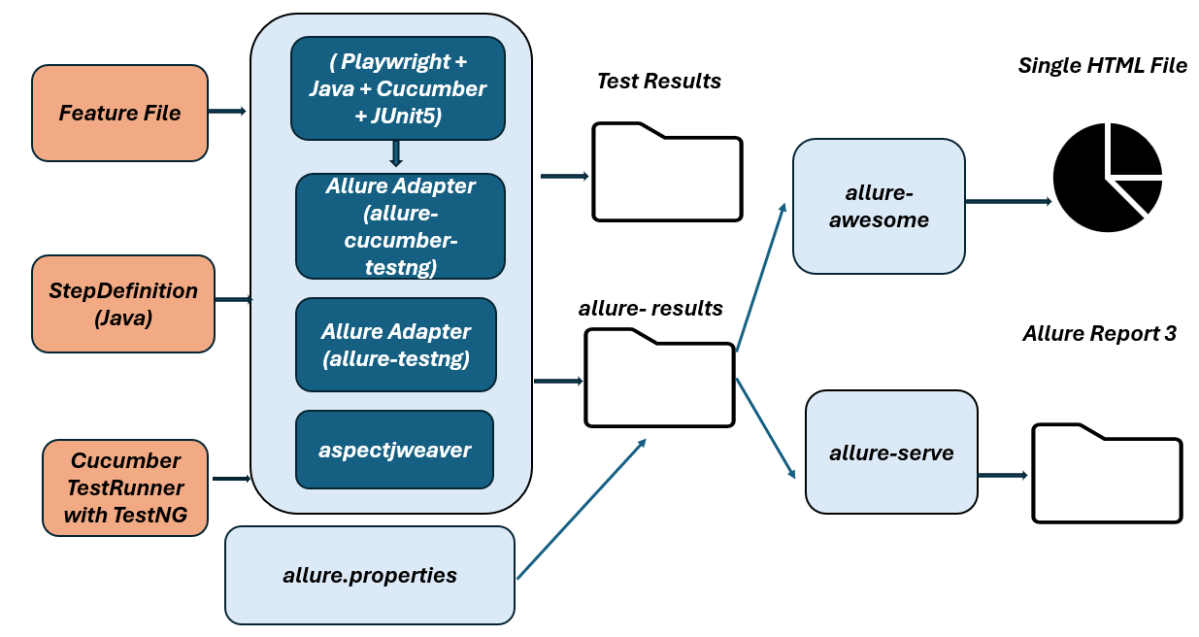
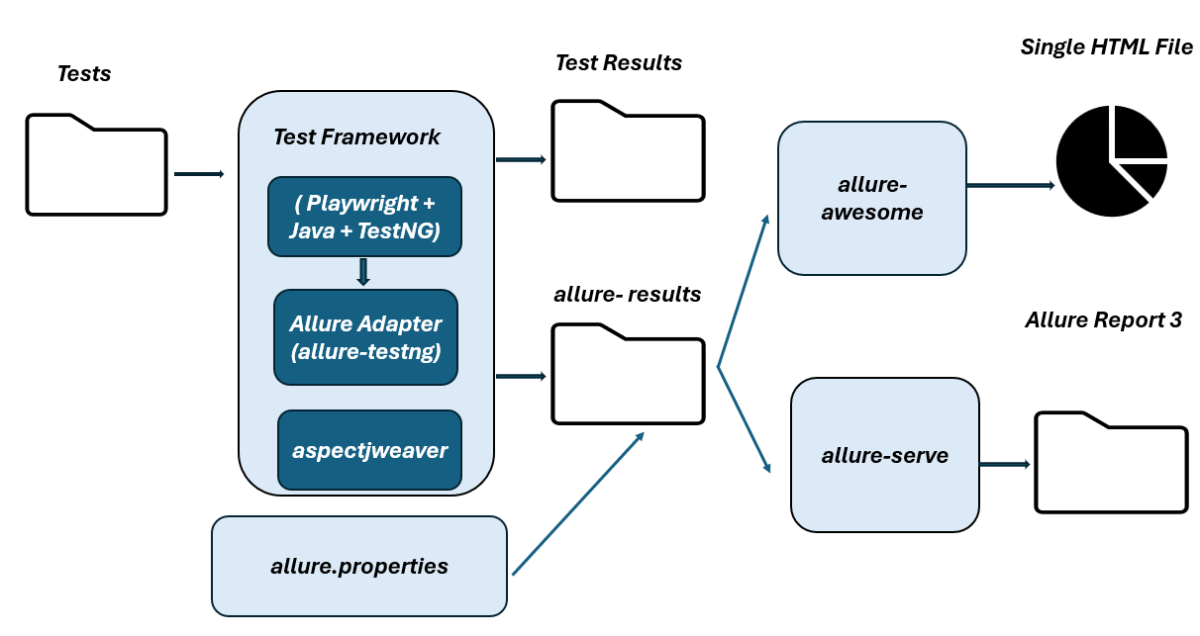
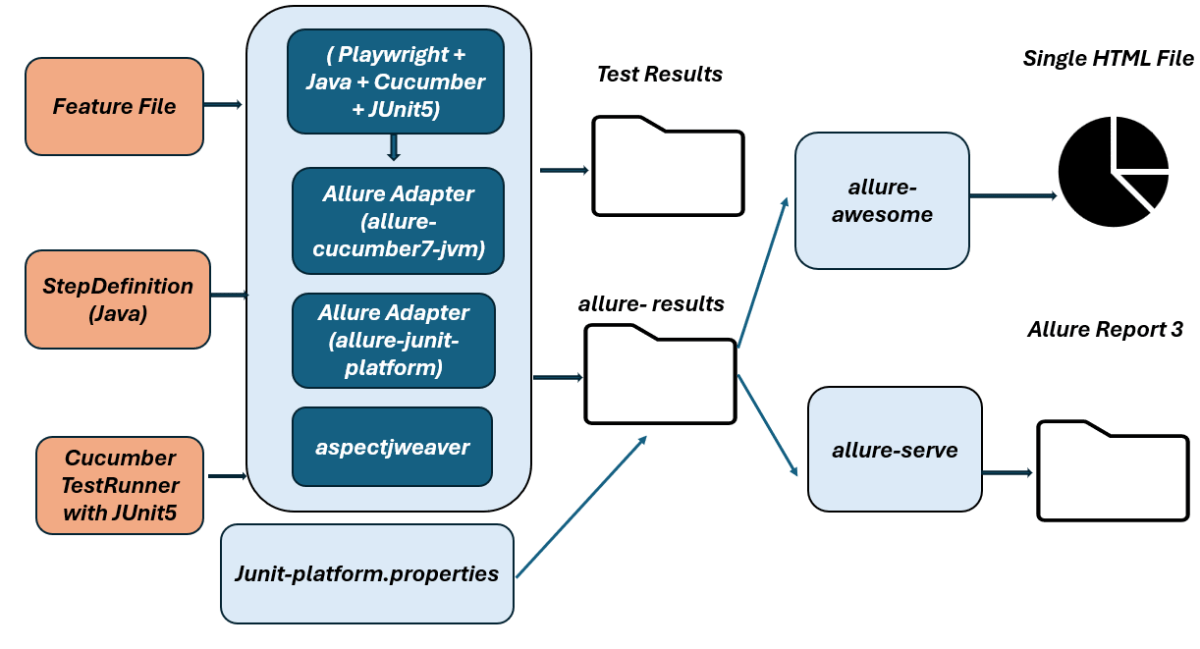
- High-Level Execution Flow
- Implementation Steps
- Set Up the Environment
- Create a Feature file
- Create the utility package in src/test/java
- Create the hooks package in src/test/java
- Create the pages package in src/test/java
- Create the step package in src/test/java
- Create the step definition class in src/test/java
- Create a JUnit Cucumber Runner class
- Specify Allure Plugin in junit-platform.properties
- Specifying Allure Results location
- Run the Test and Generate Allure Report
- How to Generate a Report
- How to View a Report
- Summary
System requirements
- Java 17 installed
- Maven installed
- Eclipse or IntelliJ installed
- Allure installed
- Browsers on which tests need to be run, like Chrome, Firefox, etc.
Dependency List
- Playwright – 1.57.0
- Java 17
- Cucumber – 7.33.0
- Maven – 3.9.6
- Allure Report – 2.32.0
- Allure Maven – 2.12.0
- Aspectj – 1.9.25.1
- Maven Compiler Plugin – 3.13.1
- Maven Surefire Plugin – 3.5.4
High-Level Execution Flow
Implementation Steps
1. Set Up the Environment
Step 1 – Update the Properties section in Maven pom.xml
<properties>
        <project.build.sourceEncoding>UTF-8</project.build.sourceEncoding>
        <java.version>17</java.version>
        <cucumber.version>7.33.0</cucumber.version>
        <playwright.version>1.57.0</playwright.version>
        <lombok.version>1.18.30</lombok.version>
        <junit.platform.version>6.1.0-M1</junit.platform.version>
        <junit.jupiter.api.version>6.1.0-M1</junit.jupiter.api.version>
        <junit.jupiter.params.version>6.1.0-M1</junit.jupiter.params.version>
        <junit.platform.launcher.version>6.1.0-M1</junit.platform.launcher.version>
        <maven.compiler.plugin.version>3.14.1</maven.compiler.plugin.version>
        <maven.compiler.source.version>17</maven.compiler.source.version>
        <maven.compiler.target.version>17</maven.compiler.target.version>
        <maven.surefire.plugin.version>3.5.4</maven.surefire.plugin.version>
        <allure.version>2.32.0</allure.version>
        <aspectj.version>1.9.25.1</aspectj.version>
</properties>
Step 2 – Add dependencies to pom.xml
Add Cucumber, JUnit Platform, Allure-Cucumber, and Allure-JUnit-Platform dependencies to pom.xml (Maven Project).
 <!-- Add allure-bom to dependency management to ensure correct versions of all the dependencies are used -->
    <dependencyManagement>
        <dependencies>
            <dependency>
                <groupId>io.qameta.allure</groupId>
                <artifactId>allure-bom</artifactId>
                <version>${allure.version}</version>
                <type>pom</type>
                <scope>import</scope>
            </dependency>
        </dependencies>
    </dependencyManagement>

    <dependencies>
        <dependency>
            <groupId>com.microsoft.playwright</groupId>
            <artifactId>playwright</artifactId>
            <version>${playwright.version}</version>
        </dependency>

        <!-- JUnit 5 -->
        <dependency>
            <groupId>org.junit.jupiter</groupId>
            <artifactId>junit-jupiter-api</artifactId>
            <version>${junit.jupiter.api.version}</version>
            <scope>test</scope>
        </dependency>

        <dependency>
            <groupId>org.junit.jupiter</groupId>
            <artifactId>junit-jupiter-params</artifactId>
            <version>${junit.jupiter.params.version}</version>
            <scope>test</scope>
        </dependency>

        <dependency>
            <groupId>org.junit.platform</groupId>
            <artifactId>junit-platform-launcher</artifactId>
            <version>${junit.platform.launcher.version}</version>
            <scope>test</scope>
        </dependency>

        <!-- Cucumber with Java -->
        <dependency>
            <groupId>io.cucumber</groupId>
            <artifactId>cucumber-java</artifactId>
            <version>${cucumber.version}</version>
            <scope>test</scope>
        </dependency>

        <!-- Cucumber with Junit5 -->
        <dependency>
            <groupId>io.cucumber</groupId>
            <artifactId>cucumber-junit-platform-engine</artifactId>
            <version>${cucumber.version}</version>
        </dependency>

        <!-- JUnit Platform -->
        <dependency>
            <groupId>org.junit.platform</groupId>
            <artifactId>junit-platform-suite</artifactId>
            <version>${junit.platform.version}</version>
            <scope>test</scope>
        </dependency>

        <dependency>
            <groupId>io.qameta.allure</groupId>
            <artifactId>allure-cucumber7-jvm</artifactId>
            <scope>test</scope>
        </dependency>

        <dependency>
            <groupId>io.qameta.allure</groupId>
            <artifactId>allure-junit-platform</artifactId>
            <scope>test</scope>
        </dependency>

    </dependencies>
Step 3 – Update the Build Section of pom.xml in the Allure Report Project
<build>
        <plugins>
            <plugin>
                <groupId>org.apache.maven.plugins</groupId>
                <artifactId>maven-compiler-plugin</artifactId>
                <version>${maven.compiler.plugin.version}</version>
                <configuration>
                    <source>${maven.compiler.source.version}</source>
                    <target>${maven.compiler.target.version}</target>
                </configuration>
            </plugin>

            <plugin>
                <groupId>org.apache.maven.plugins</groupId>
                <artifactId>maven-surefire-plugin</artifactId>
                <version>${maven.surefire.plugin.version}</version>
                <configuration>
                    <argLine>
                        -javaagent:"${settings.localRepository}/org/aspectj/aspectjweaver/${aspectj.version}/aspectjweaver-${aspectj.version}.jar"
                    </argLine>
                </configuration>
                <dependencies>
                    <dependency>
                        <groupId>org.aspectj</groupId>
                        <artifactId>aspectjweaver</artifactId>
                        <version>${aspectj.version}</version>
                    </dependency>
                </dependencies>
            </plugin>
        </plugins>
    </build>
The entire pom.xml is
<project xmlns="http://maven.apache.org/POM/4.0.0" xmlns:xsi="http://www.w3.org/2001/XMLSchema-instance"
         xsi:schemaLocation="http://maven.apache.org/POM/4.0.0 http://maven.apache.org/xsd/maven-4.0.0.xsd">
    <modelVersion>4.0.0</modelVersion>

    <groupId>com.example</groupId>
    <artifactId>Cucumber_Playwright_JUnit5</artifactId>
    <version>1.0-SNAPSHOT</version>
    <packaging>jar</packaging>

    <name>Cucumber_Playwright_JUnit5</name>
    <url>http://maven.apache.org</url>

    <properties>
        <project.build.sourceEncoding>UTF-8</project.build.sourceEncoding>
        <java.version>17</java.version>
        <cucumber.version>7.33.0</cucumber.version>
        <playwright.version>1.57.0</playwright.version>
        <lombok.version>1.18.30</lombok.version>
        <junit.platform.version>6.1.0-M1</junit.platform.version>
        <junit.jupiter.api.version>6.1.0-M1</junit.jupiter.api.version>
        <junit.jupiter.params.version>6.1.0-M1</junit.jupiter.params.version>
        <junit.platform.launcher.version>6.1.0-M1</junit.platform.launcher.version>
        <maven.compiler.plugin.version>3.14.1</maven.compiler.plugin.version>
        <maven.compiler.source.version>17</maven.compiler.source.version>
        <maven.compiler.target.version>17</maven.compiler.target.version>
        <maven.surefire.plugin.version>3.5.4</maven.surefire.plugin.version>
        <allure.version>2.32.0</allure.version>
        <aspectj.version>1.9.25.1</aspectj.version>
    </properties>

    <!-- Add allure-bom to dependency management to ensure correct versions of all the dependencies are used -->
    <dependencyManagement>
        <dependencies>
            <dependency>
                <groupId>io.qameta.allure</groupId>
                <artifactId>allure-bom</artifactId>
                <version>${allure.version}</version>
                <type>pom</type>
                <scope>import</scope>
            </dependency>
        </dependencies>
    </dependencyManagement>

    <dependencies>
        <dependency>
            <groupId>com.microsoft.playwright</groupId>
            <artifactId>playwright</artifactId>
            <version>${playwright.version}</version>
        </dependency>

        <!-- JUnit 5 -->
        <dependency>
            <groupId>org.junit.jupiter</groupId>
            <artifactId>junit-jupiter-api</artifactId>
            <version>${junit.jupiter.api.version}</version>
            <scope>test</scope>
        </dependency>

        <dependency>
            <groupId>org.junit.jupiter</groupId>
            <artifactId>junit-jupiter-params</artifactId>
            <version>${junit.jupiter.params.version}</version>
            <scope>test</scope>
        </dependency>

        <dependency>
            <groupId>org.junit.platform</groupId>
            <artifactId>junit-platform-launcher</artifactId>
            <version>${junit.platform.launcher.version}</version>
            <scope>test</scope>
        </dependency>

        <!-- Cucumber with Java -->
        <dependency>
            <groupId>io.cucumber</groupId>
            <artifactId>cucumber-java</artifactId>
            <version>${cucumber.version}</version>
            <scope>test</scope>
        </dependency>

        <!-- Cucumber with Junit5 -->
        <dependency>
            <groupId>io.cucumber</groupId>
            <artifactId>cucumber-junit-platform-engine</artifactId>
            <version>${cucumber.version}</version>
        </dependency>

        <!-- JUnit Platform -->
        <dependency>
            <groupId>org.junit.platform</groupId>
            <artifactId>junit-platform-suite</artifactId>
            <version>${junit.platform.version}</version>
            <scope>test</scope>
        </dependency>

        <dependency>
            <groupId>io.qameta.allure</groupId>
            <artifactId>allure-cucumber7-jvm</artifactId>
            <scope>test</scope>
        </dependency>

        <dependency>
            <groupId>io.qameta.allure</groupId>
            <artifactId>allure-junit-platform</artifactId>
            <scope>test</scope>
        </dependency>

    </dependencies>

    <build>
        <plugins>
            <plugin>
                <groupId>org.apache.maven.plugins</groupId>
                <artifactId>maven-compiler-plugin</artifactId>
                <version>${maven.compiler.plugin.version}</version>
                <configuration>
                    <source>${maven.compiler.source.version}</source>
                    <target>${maven.compiler.target.version}</target>
                </configuration>
            </plugin>

            <plugin>
                <groupId>org.apache.maven.plugins</groupId>
                <artifactId>maven-surefire-plugin</artifactId>
                <version>${maven.surefire.plugin.version}</version>
                <configuration>
                    <argLine>
                        -javaagent:"${settings.localRepository}/org/aspectj/aspectjweaver/${aspectj.version}/aspectjweaver-${aspectj.version}.jar"
                    </argLine>
                </configuration>
                <dependencies>
                    <dependency>
                        <groupId>org.aspectj</groupId>
                        <artifactId>aspectjweaver</artifactId>
                        <version>${aspectj.version}</version>
                    </dependency>
                </dependencies>
            </plugin>
        </plugins>
    </build>
</project>
2. Create a Feature file
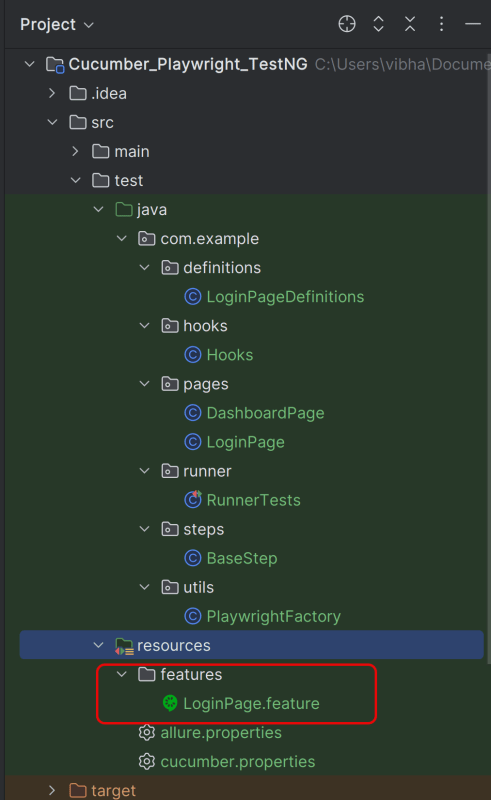
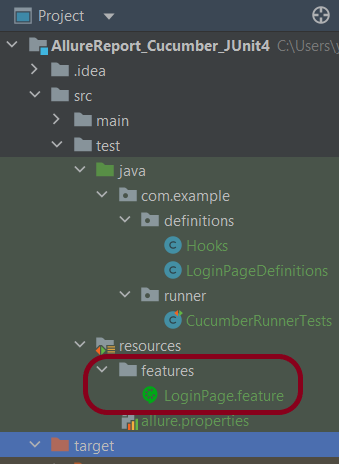
Create a folder – features within src/test/resources to create test scenarios in the Feature file.
Feature file should be saved as an extension of .feature. Add the test scenarios in this feature file. I have added sample test scenarios. In this feature file. The test scenarios are written in Gherkins language.
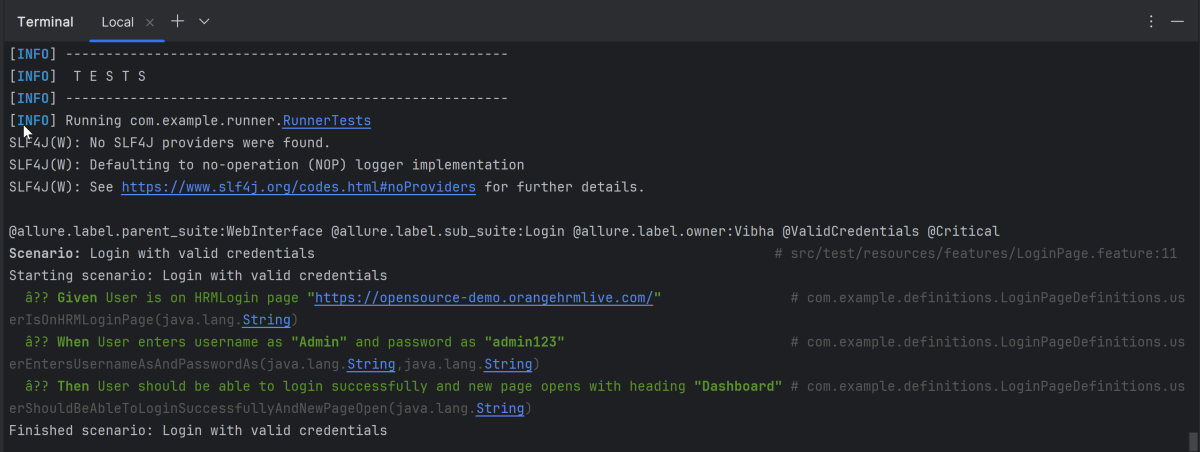
@allure.label.parent_suite:WebInterface
@allure.label.sub_suite:Login Page
@allure.label.owner:Vibha
Feature: Login to HRM Application
Background:
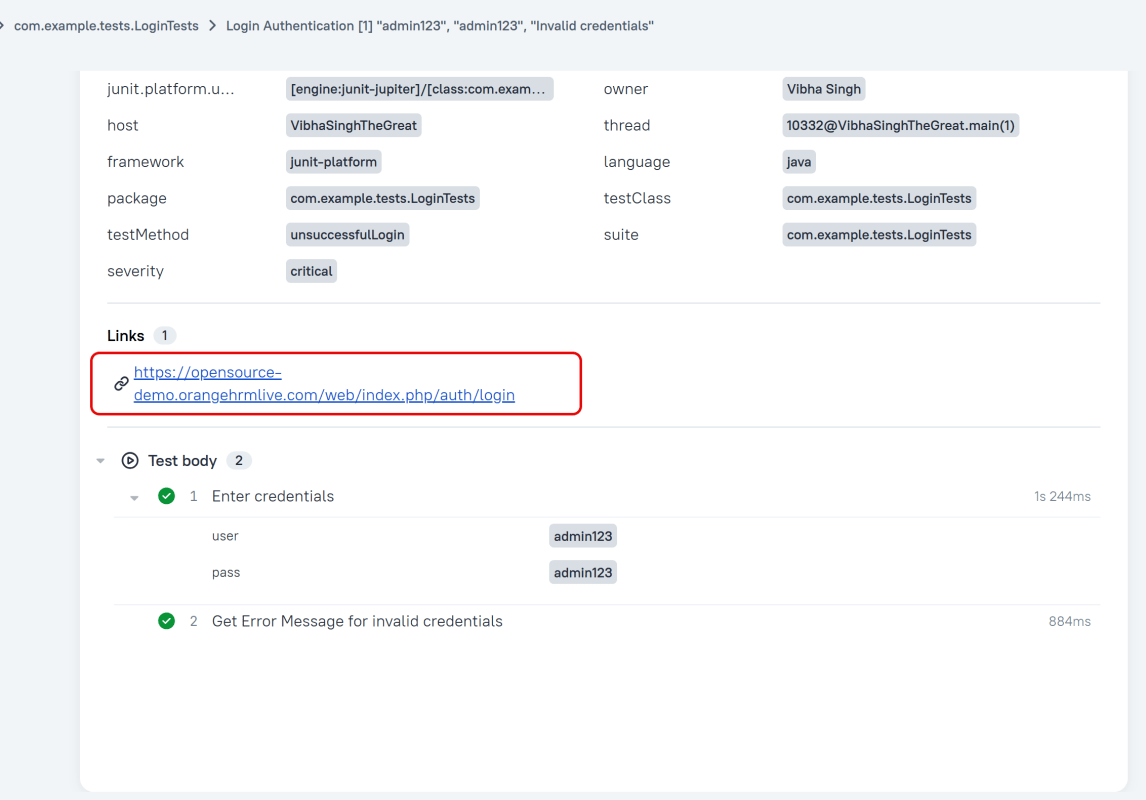
Given User is on HRMLogin page "https://opensource-demo.orangehrmlive.com/"
@ValidCredentials @Critical
Scenario: Login with valid credentials
When User enters username as "Admin" and password as "admin123"
Then User should be able to login successfully and new page opens with heading "Dashboard"
@InvalidCredentials @High
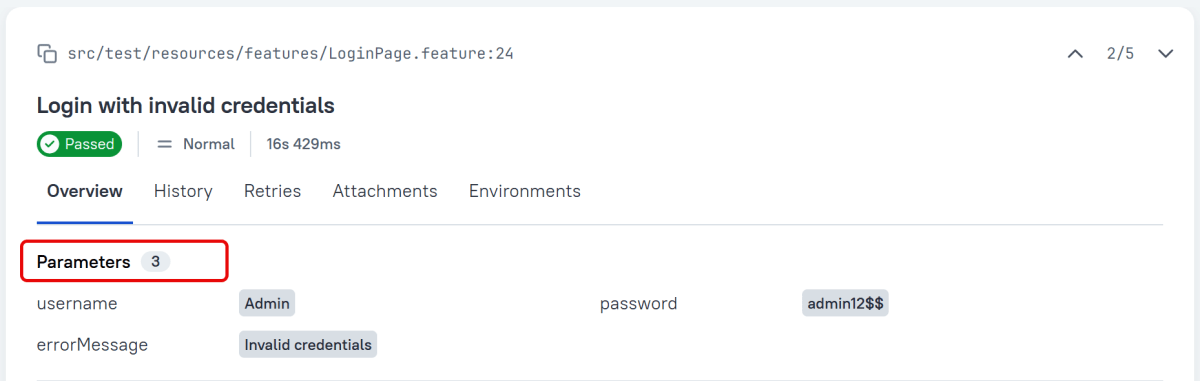
Scenario Outline: Login with invalid credentials
When User enters username as "<username>" and password as "<password>"
Then User should be able to see error message "<errorMessage>"
Examples:
| username | password | errorMessage |
| Admin | admin12$$ | Invalid credentials |
| admin$$ | admin123 | Invalid credentials |
| abc123 | xyz$$ | Invalid credentials |
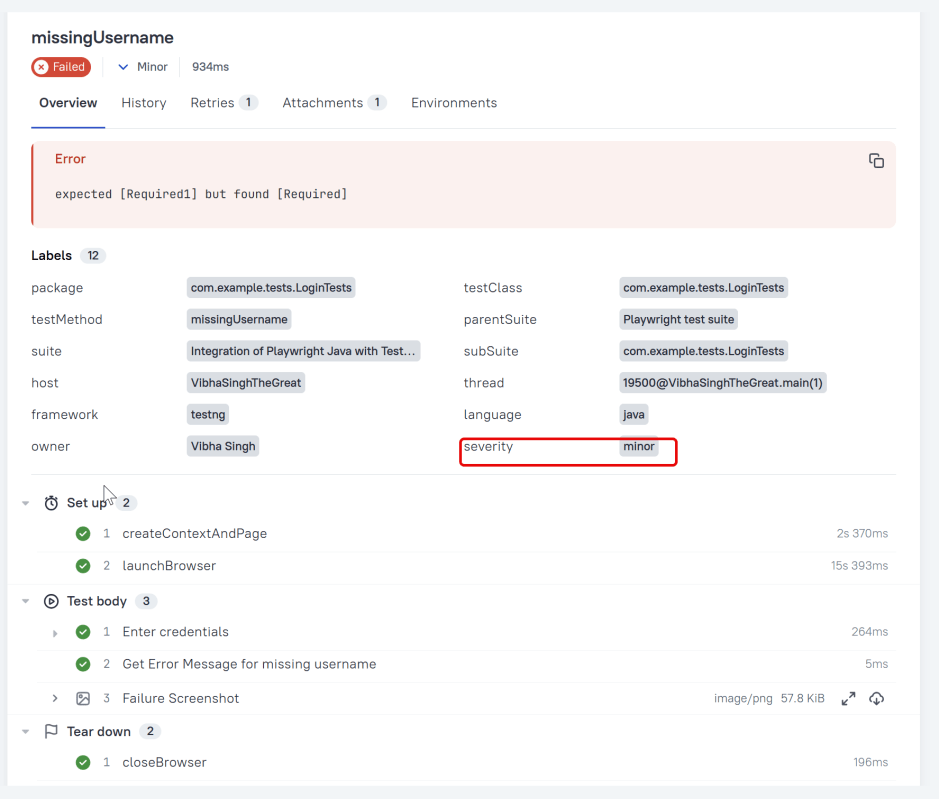
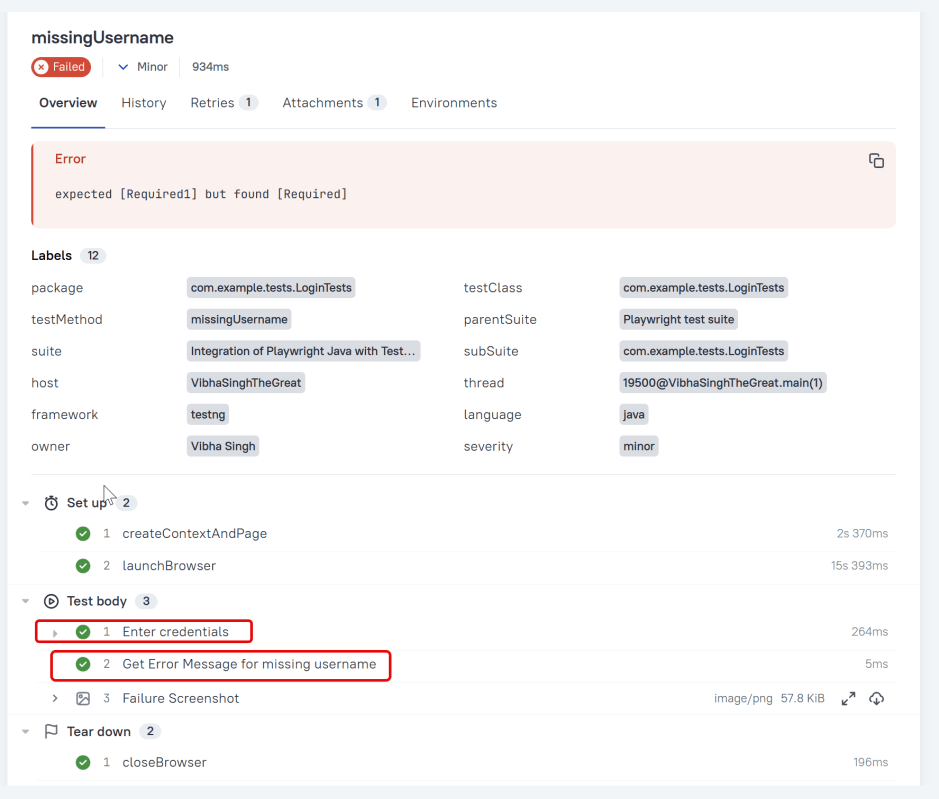
@MissingUsername @Medium
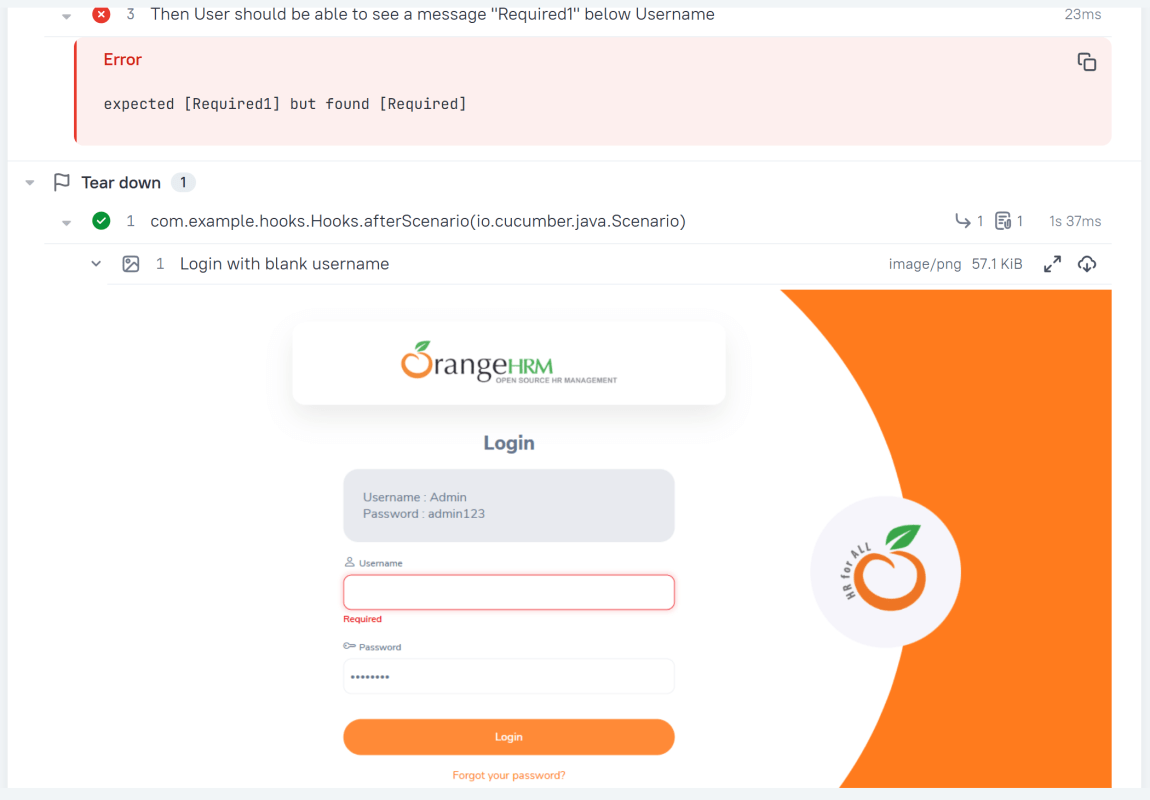
Scenario: Login with blank username
When User enters username as " " and password as "admin123"
Then User should be able to see a message "Required1" below Username
Please refer to this tutorial – Integration of Playwright with Java, Cucumber and JUnit5 to get the details about Step 3, 4, 5, 6,7
3. Create the utility package in src/test/java
4. Create the hooks package in src/test/java
5. Create the pages package in src/test/java
6. Create the step package in src/test/java
7. Create the step definition class in src/test/java
8. Create a JUnit Cucumber Runner class
This JUnit 5 runner configures and launches Cucumber scenarios by selecting feature files, defining glue code packages, and executing them via the Cucumber engine on the JUnit Platform.
Add Allure Report plugin in the Test Runner to generate the Allure Report.
import static io.cucumber.junit.platform.engine.Constants.GLUE_PROPERTY_NAME;

import org.junit.platform.suite.api.ConfigurationParameter;
import org.junit.platform.suite.api.IncludeEngines;
import org.junit.platform.suite.api.SelectClasspathResource;
import org.junit.platform.suite.api.Suite;

@Suite
@IncludeEngines("cucumber")
@SelectClasspathResource("features")
@ConfigurationParameter(
        key = GLUE_PROPERTY_NAME,
        value = "com.example"
)


public class RunnerTests {
}
1. @Suite – Marks this class as a JUnit 5 test suite. Acts as the entry point for test execution
2. @IncludeEngines(“cucumber”) – Tells JUnit Platform to use the Cucumber engine
3. @SelectClasspathResource(“features”) – Specifies the location of feature file
4. @ConfigurationParameter – Tells Cucumber where to find step definitions and hooks
9. Specify Allure Plugin in junit-platform.properties
Specify the allure plugin in junit-platform.properties which should be placed in src/test/resources:
cucumber.publish.enabled=true
cucumber.plugin=io.qameta.allure.cucumber7jvm.AllureCucumber7Jvm
10. Specifying Allure Results location
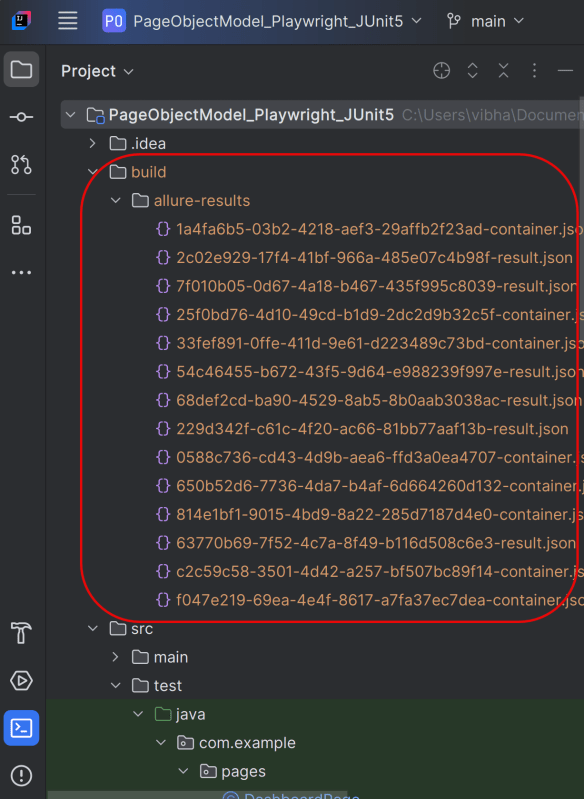
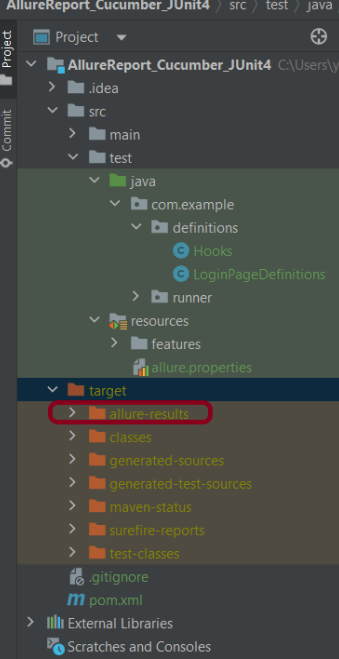
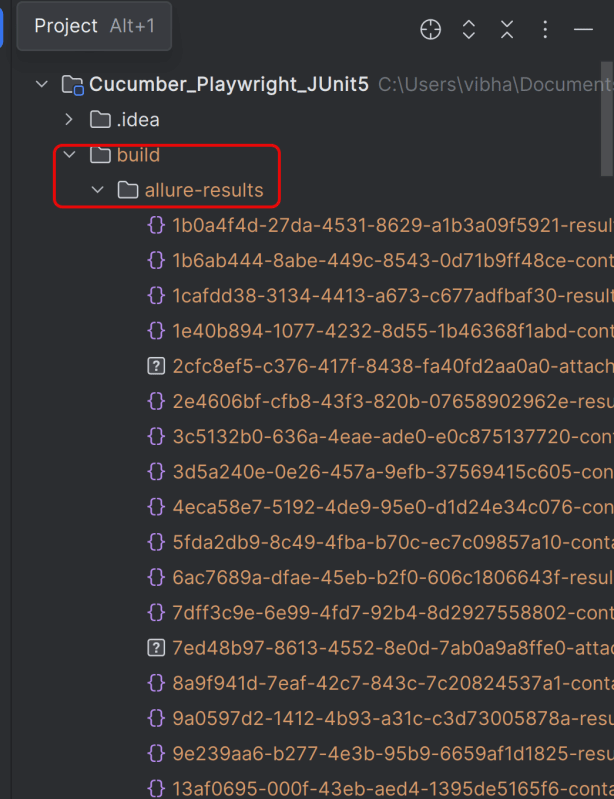
Allure, by default, saves test results in the project’s root directory. However, it is recommended to store your test results in the build output directory.
To configure this, create an allure.properties file and place it in the test resources directory of your project, which is typically located at src/test/resources:
#allure.properties
allure.results.directory=build/allure-results
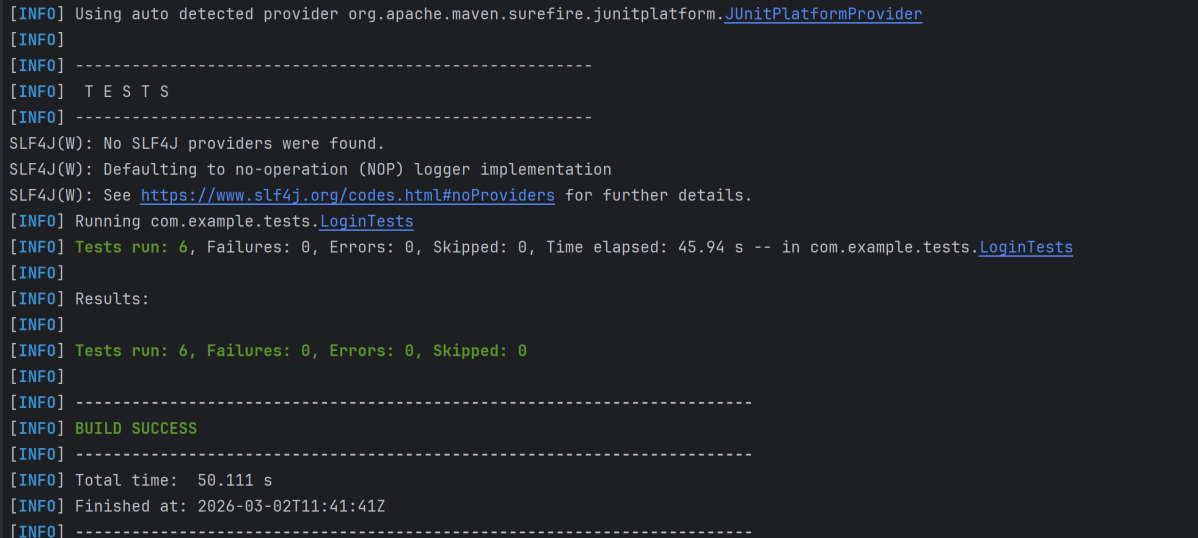
11. Run the Test and Generate Allure Report
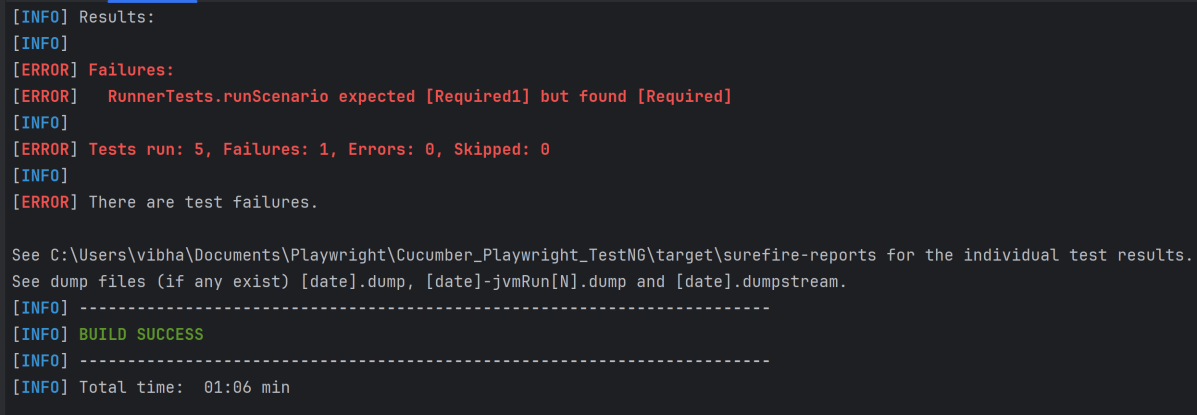
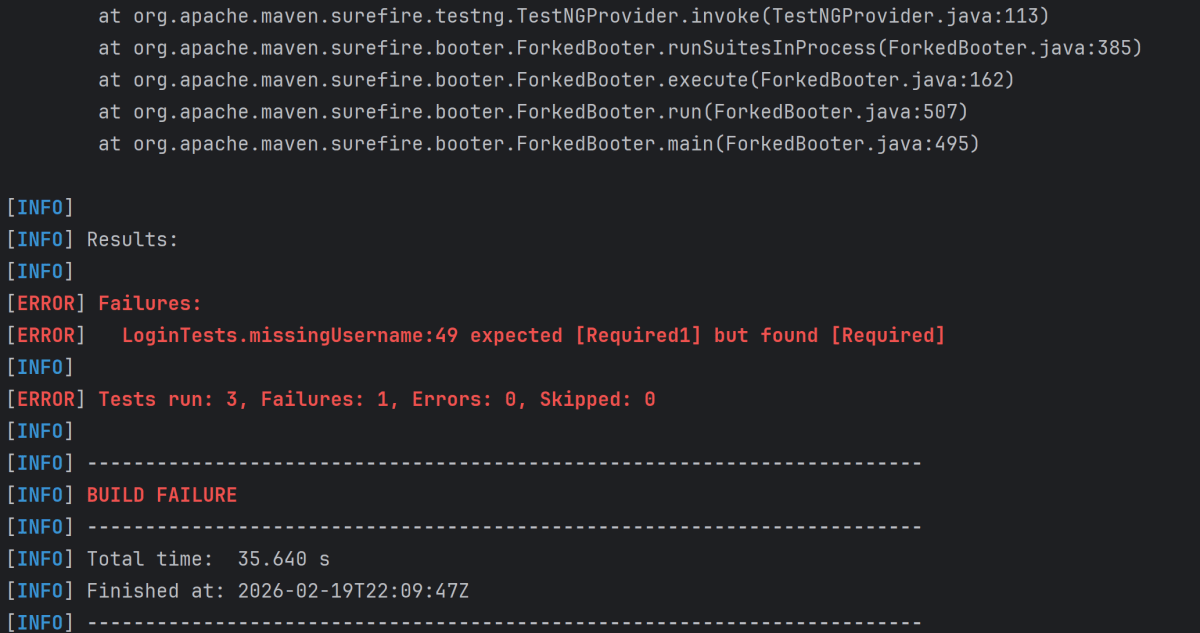
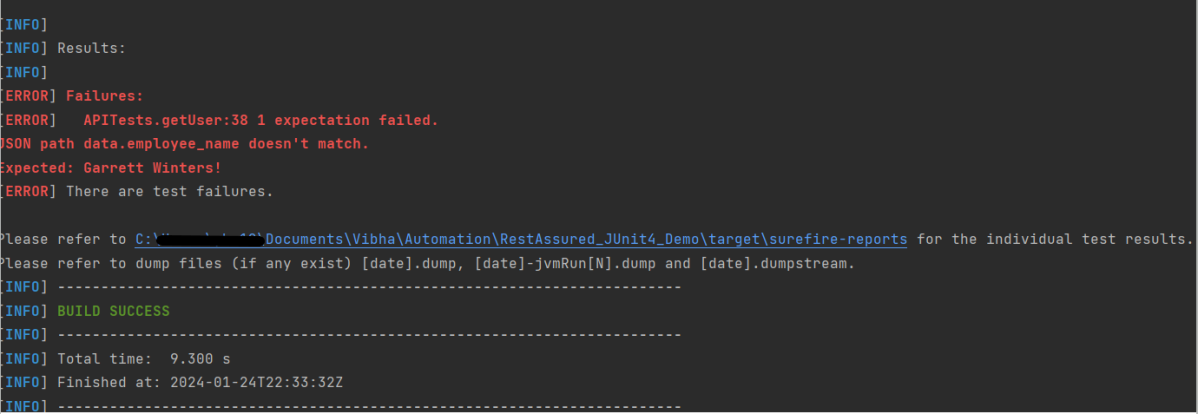
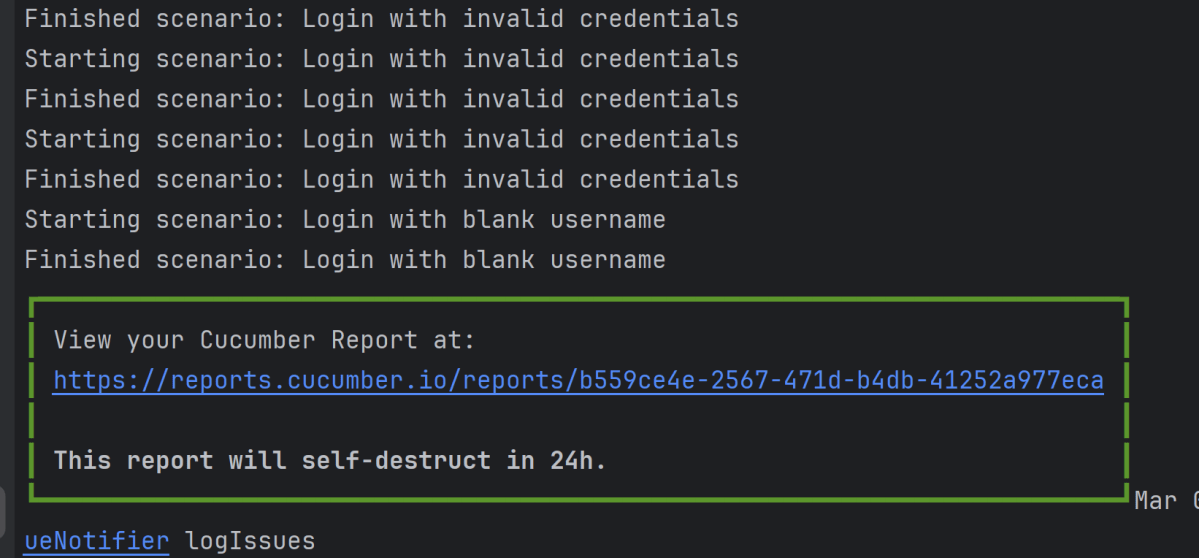
To run the tests, use the below command
mvn clean test
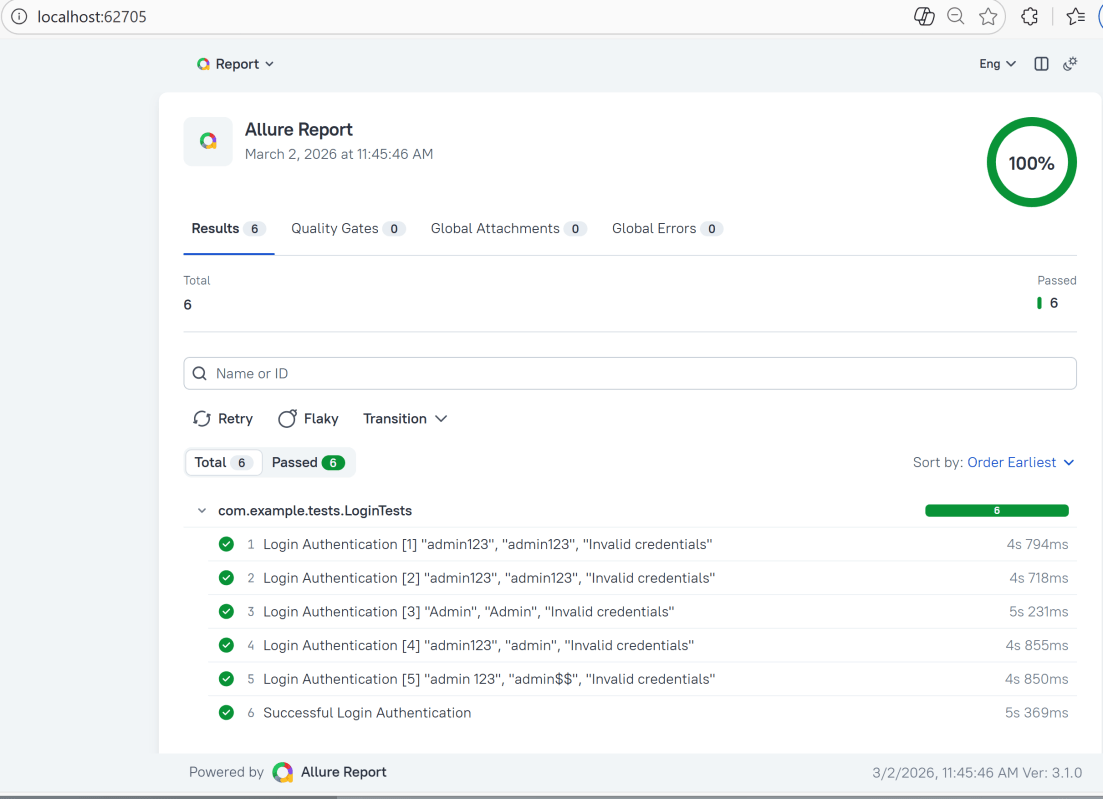
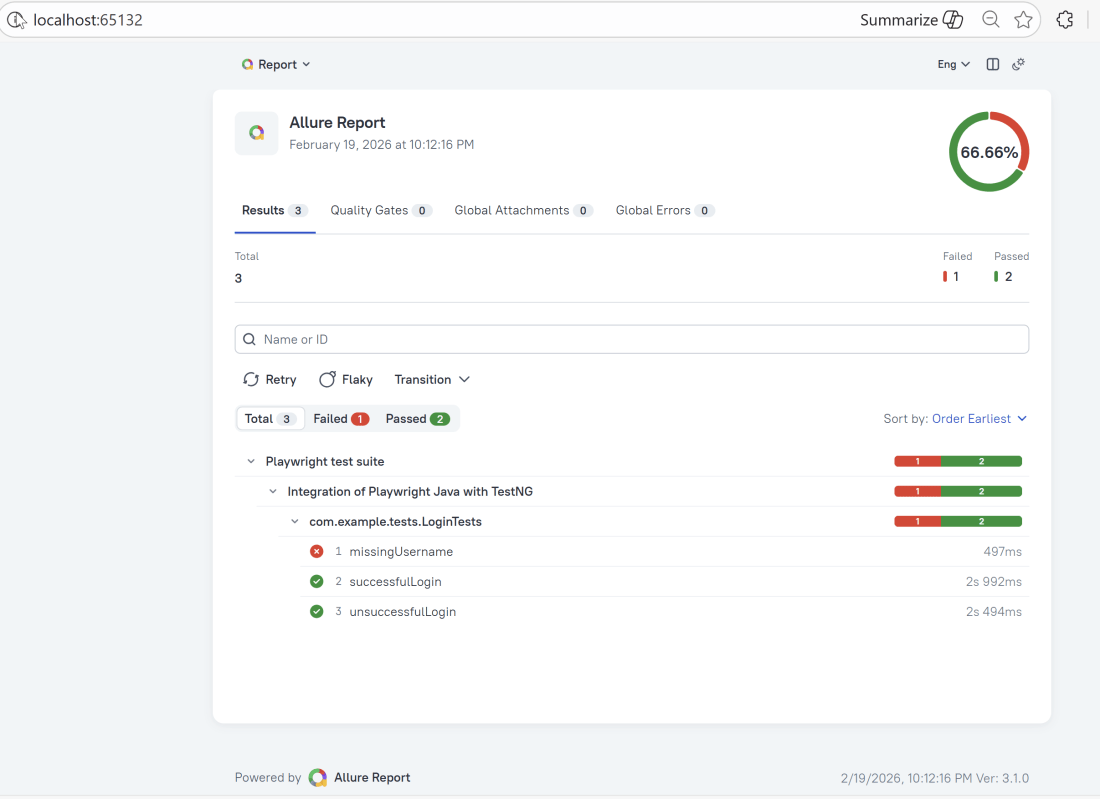
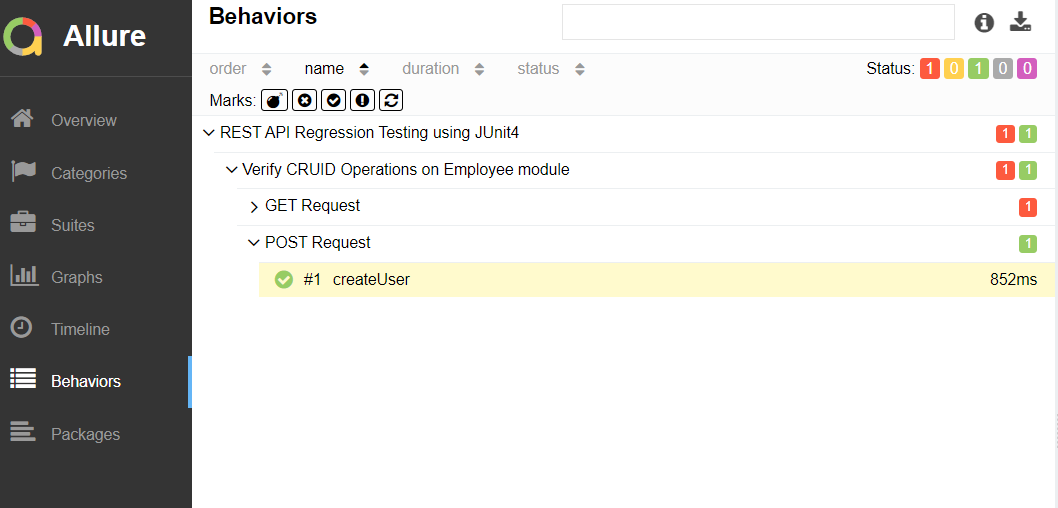
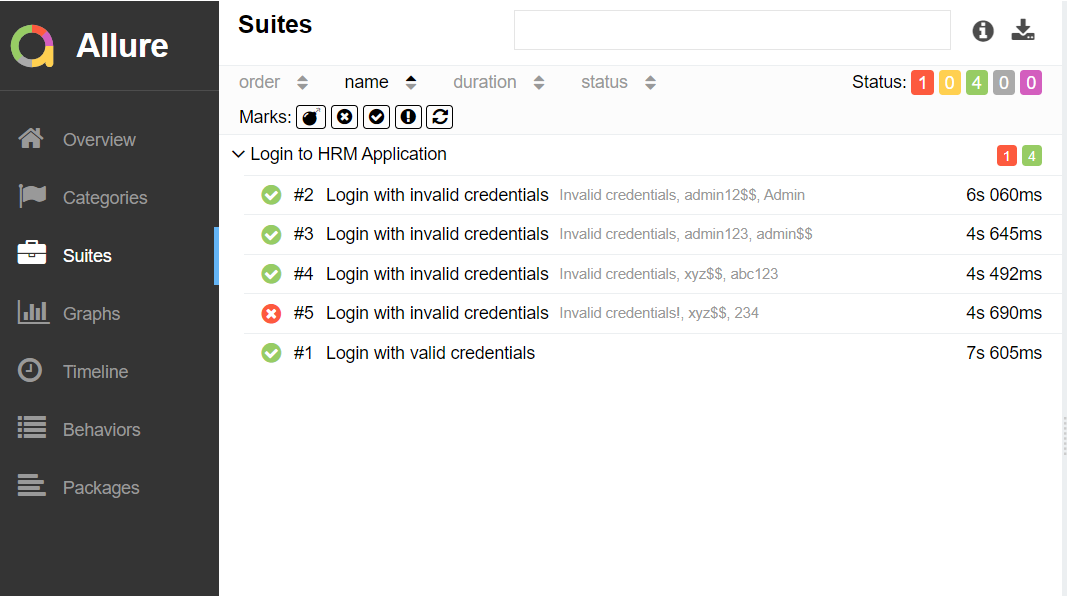
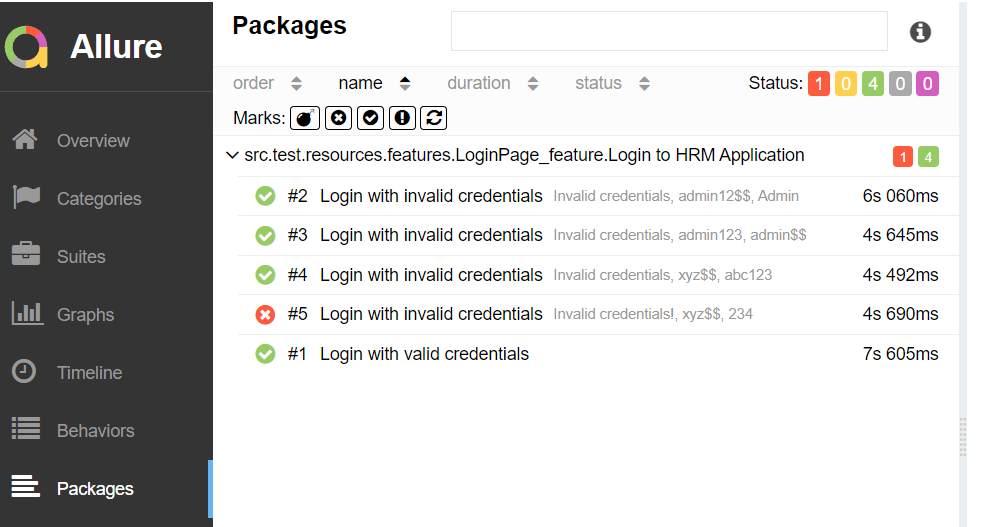
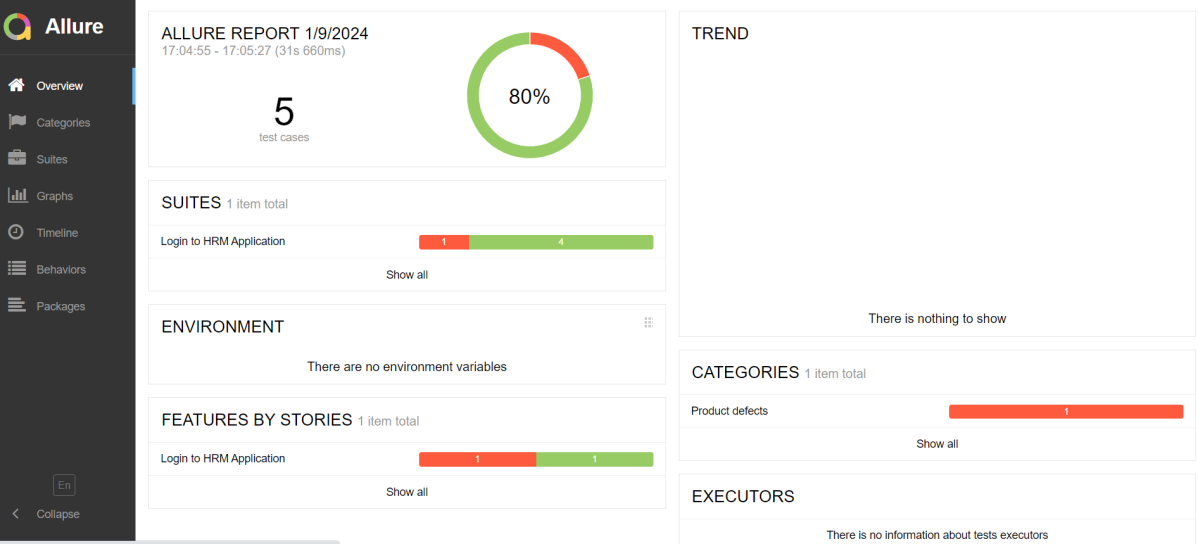
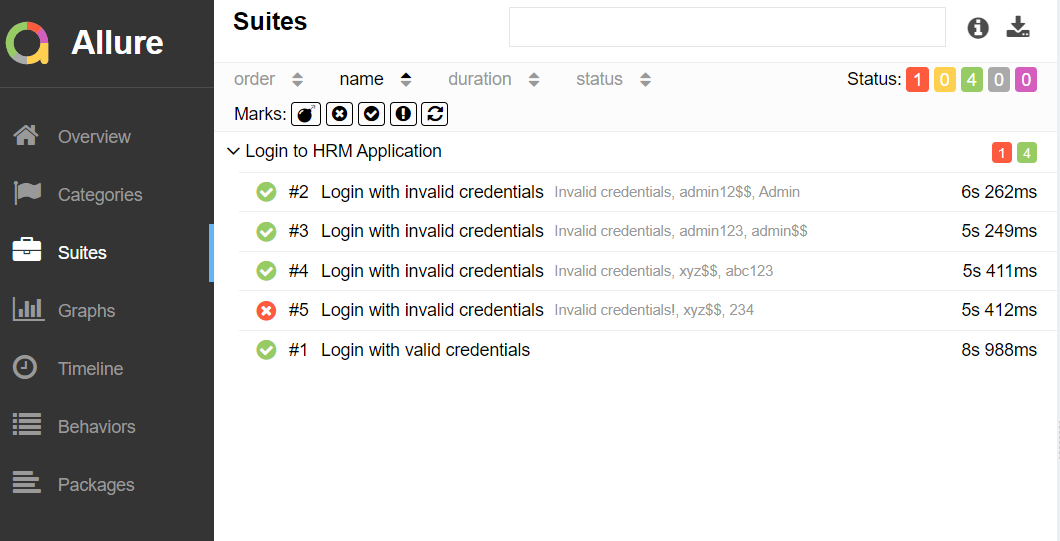
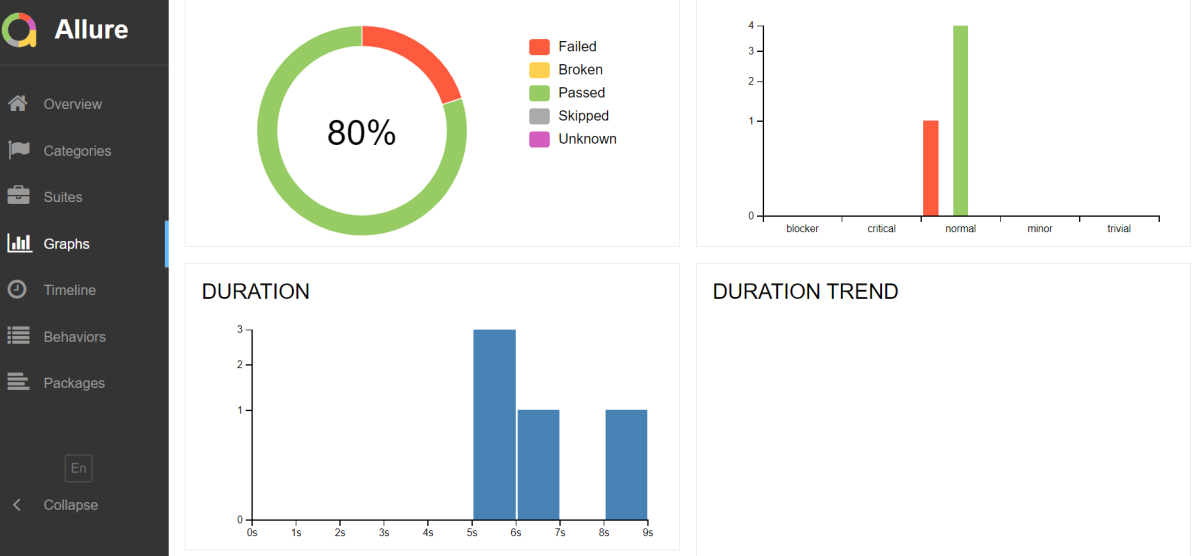
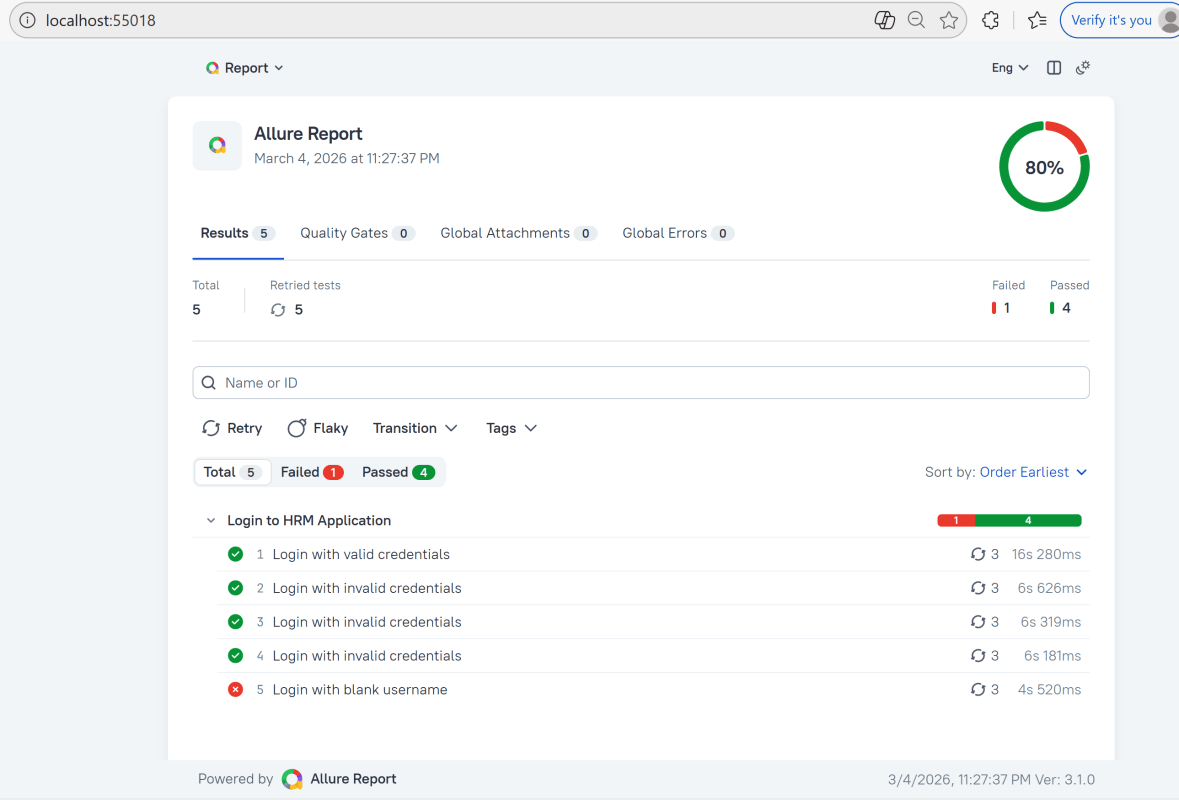
In the image below, we can see that one test failed and four passed out of five tests.
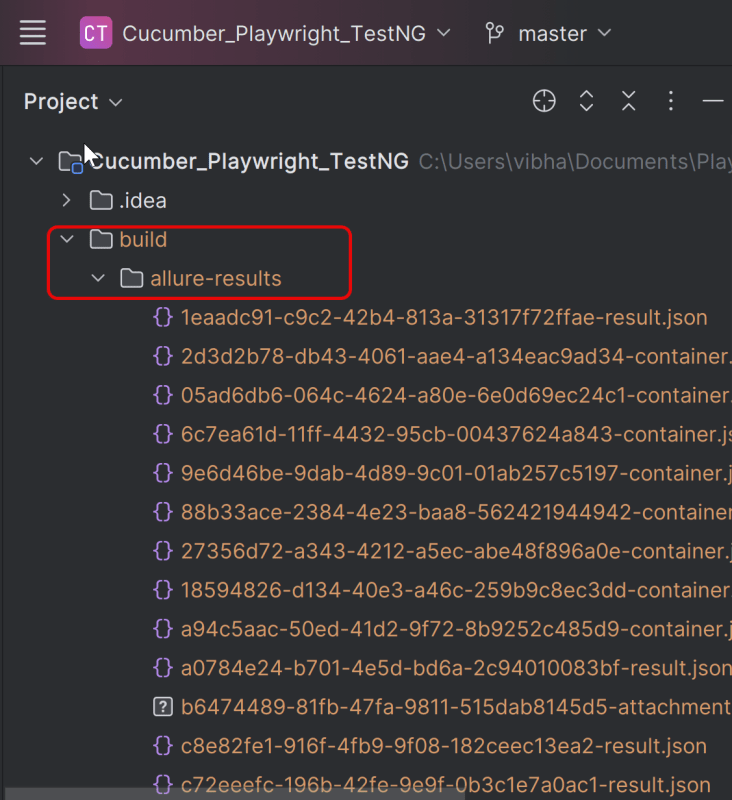
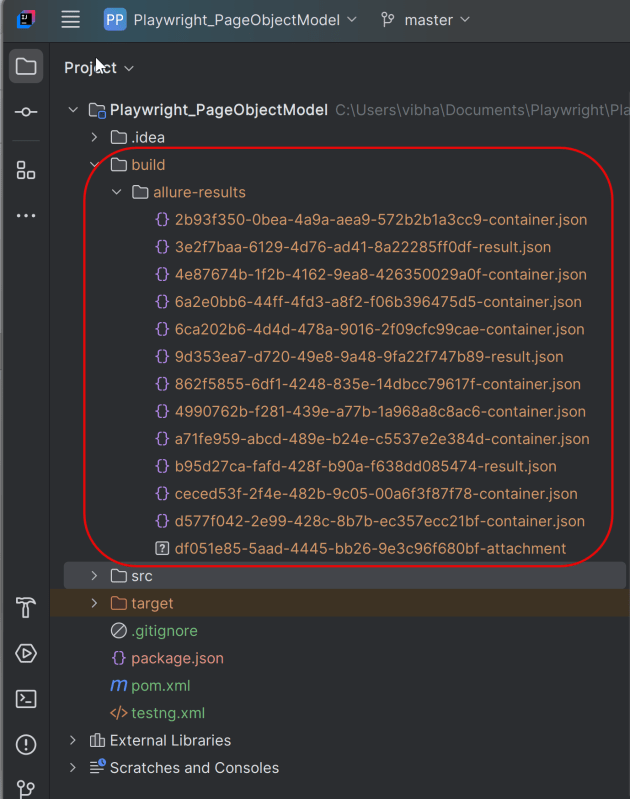
This will create the allure-results folder with all the test reports within build folder. These files will be used to generate Allure Report.
12. How to Generate a Report
allure generate processes the test results and saves an HTML report into the allure-report directory. To view the report, use the allure open command.
allure serve creates the same report as allure generate, then automatically opens the main page of the report in a web browser.
Use the command below to generate the Allure Report
allure serve build/allure-results

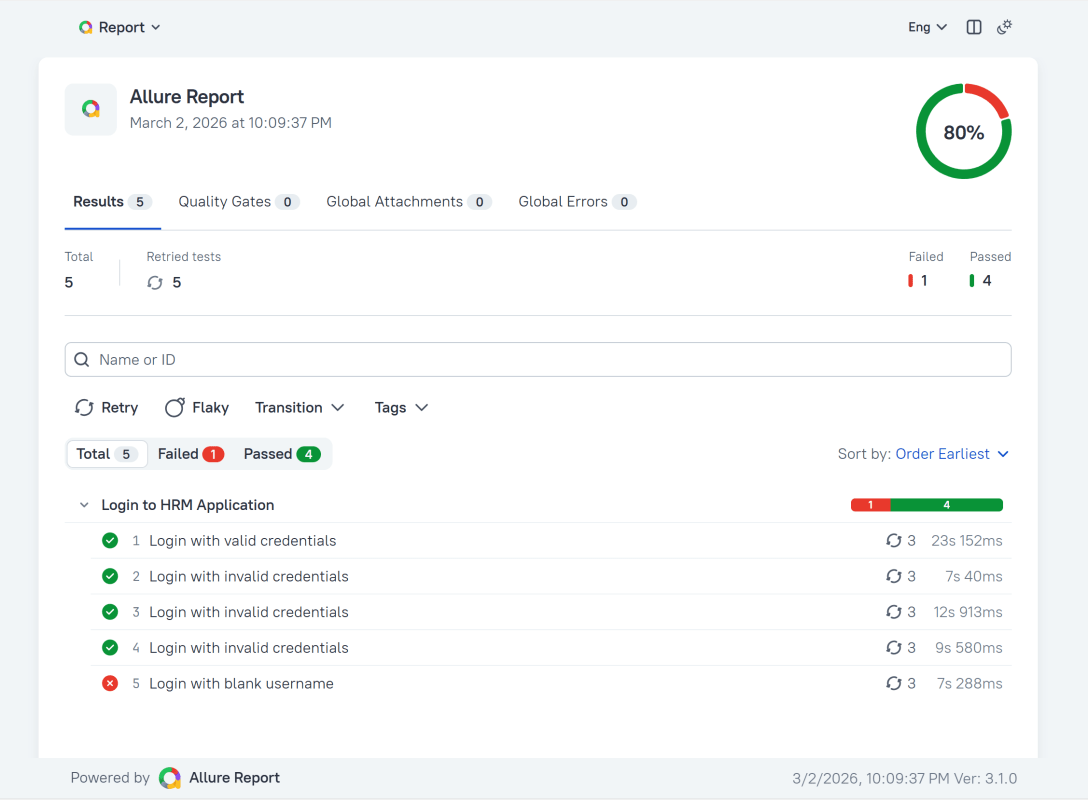
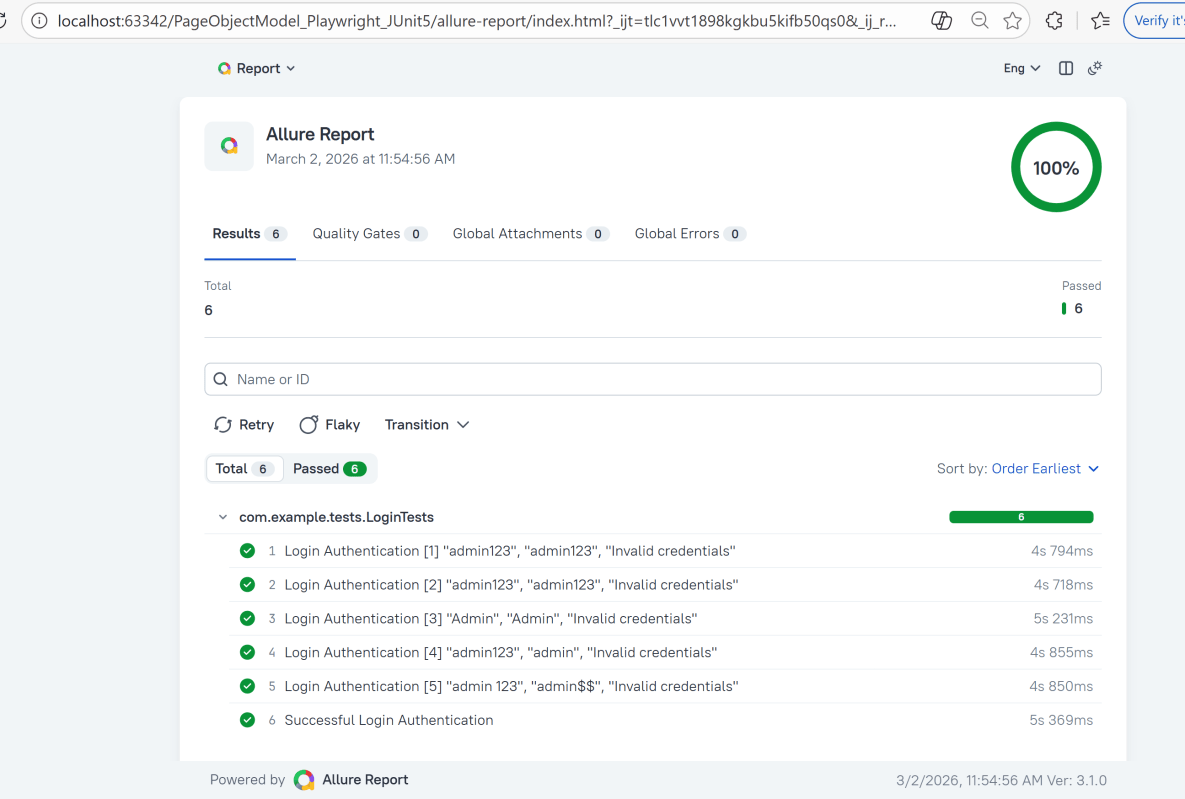
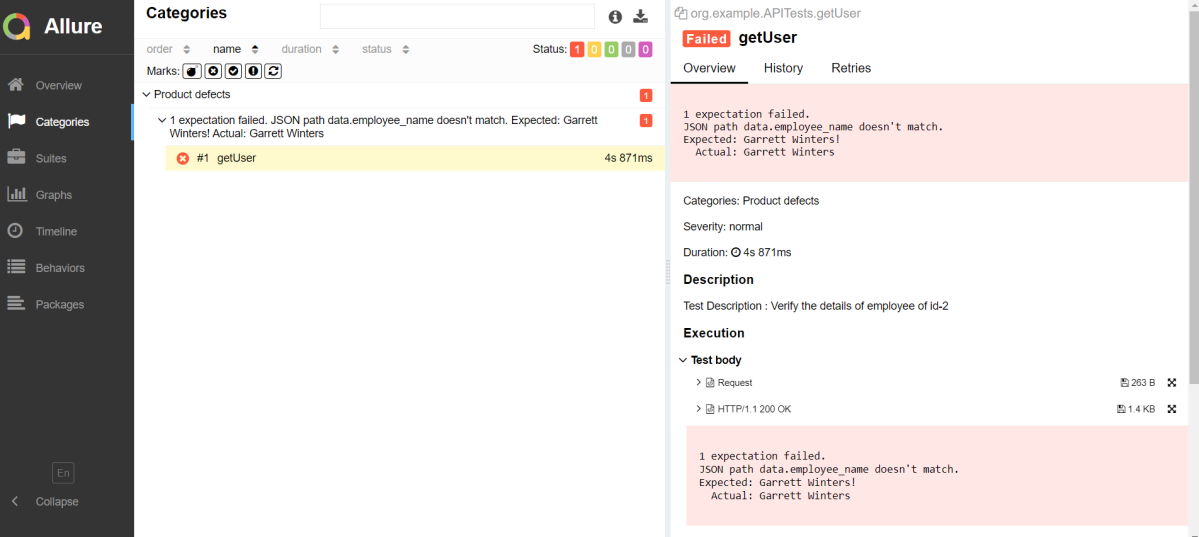
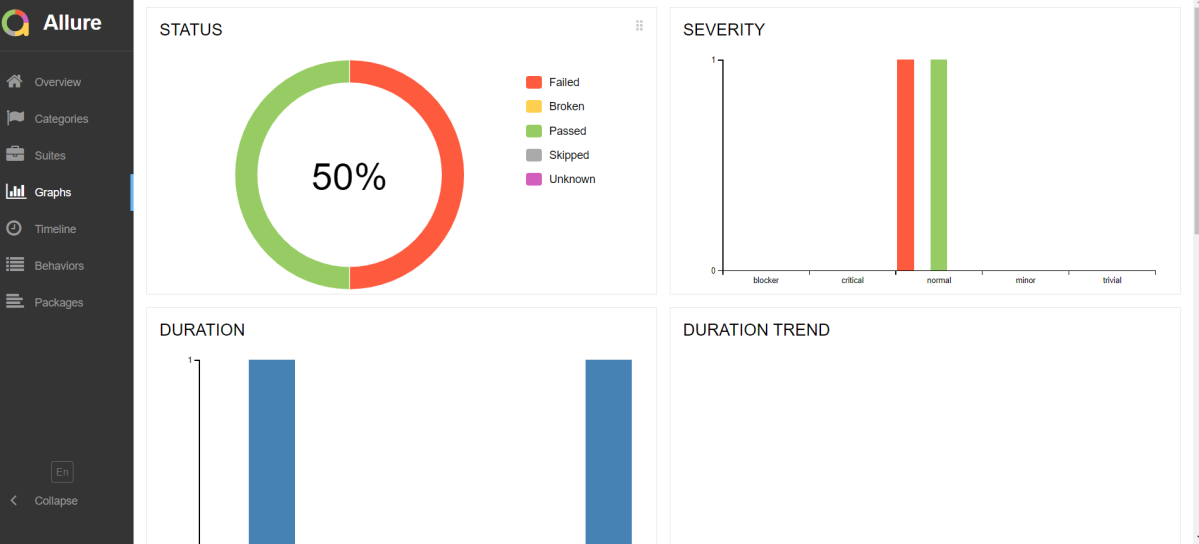
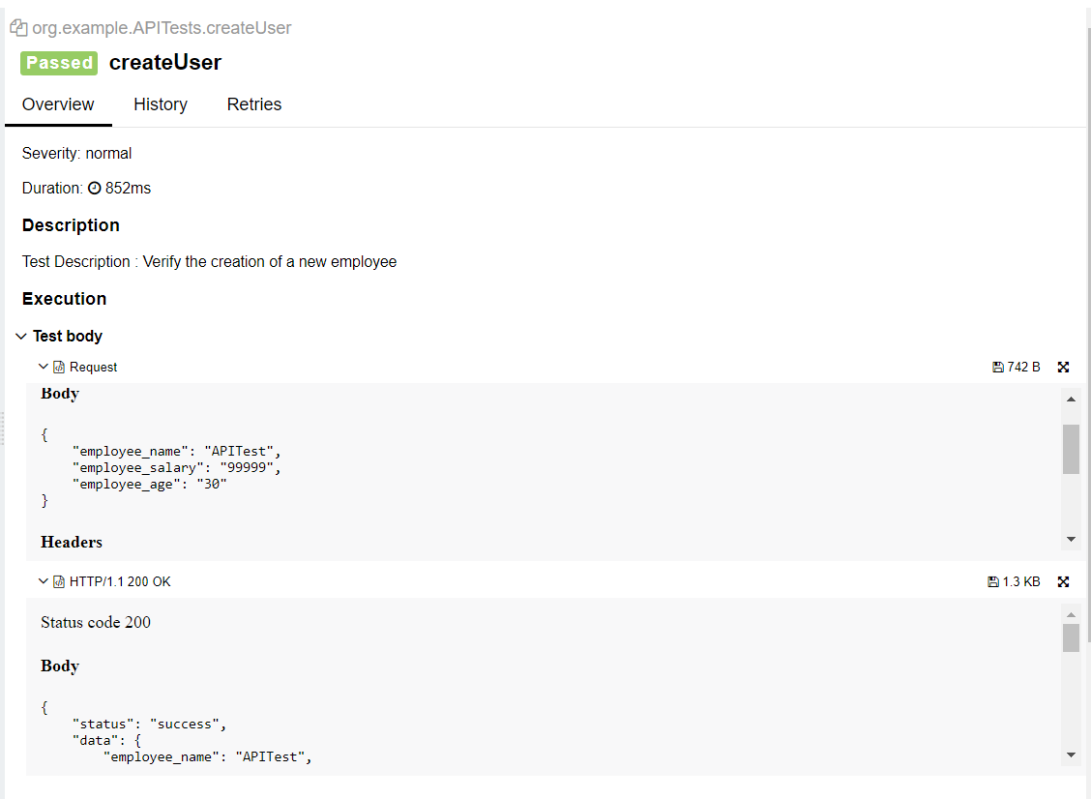
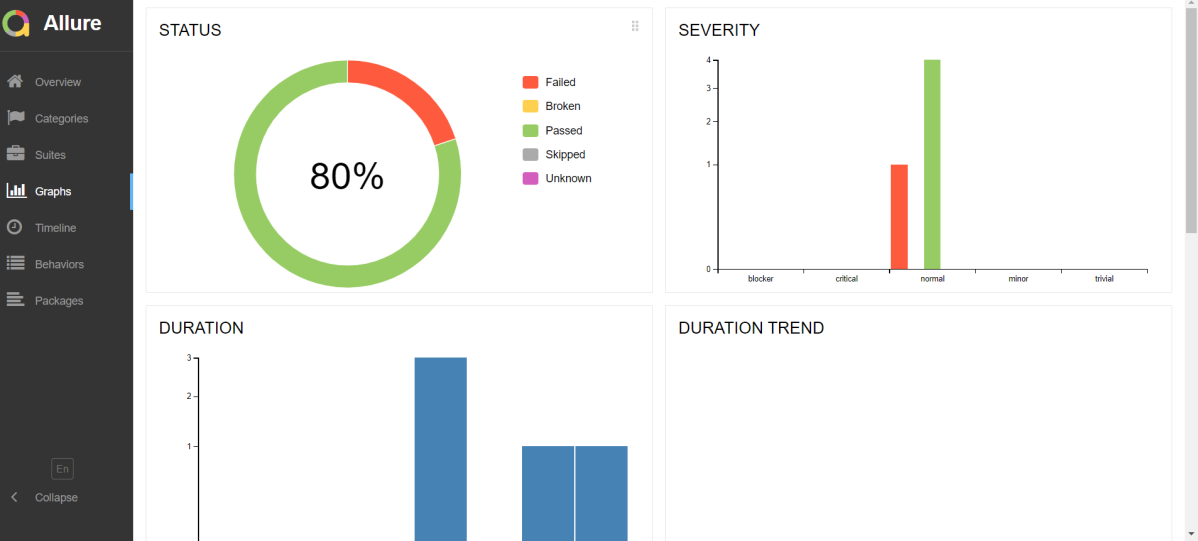
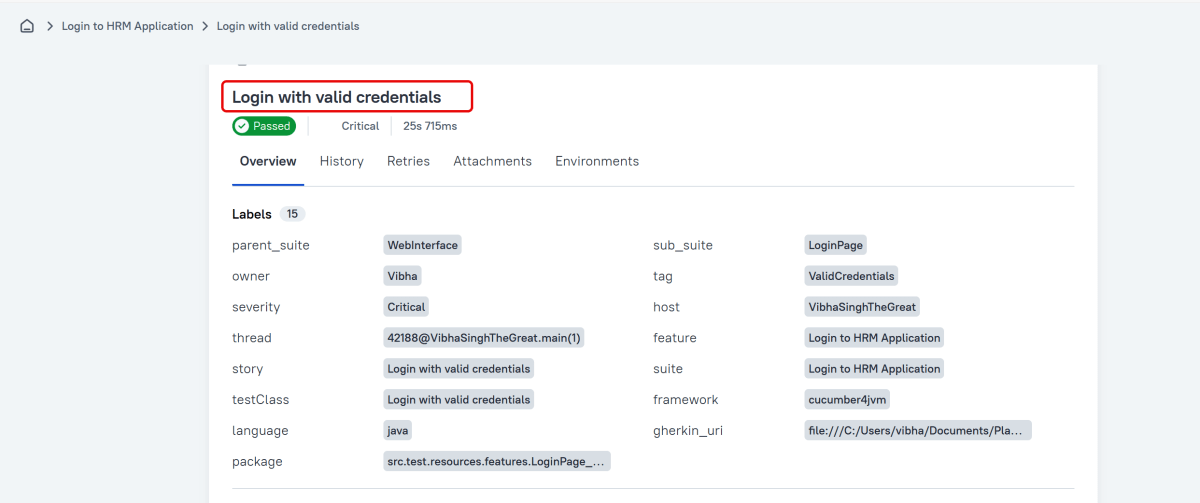
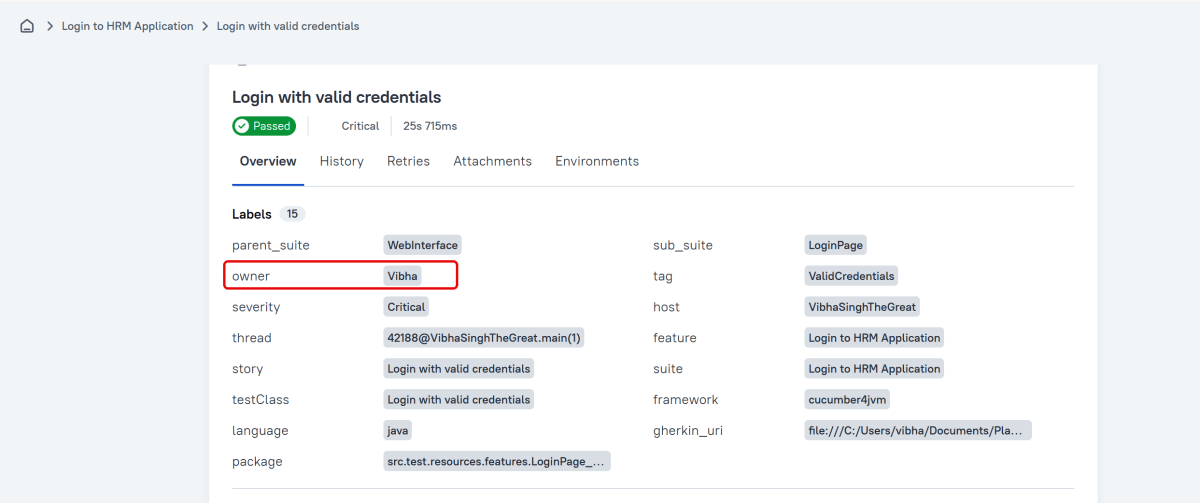
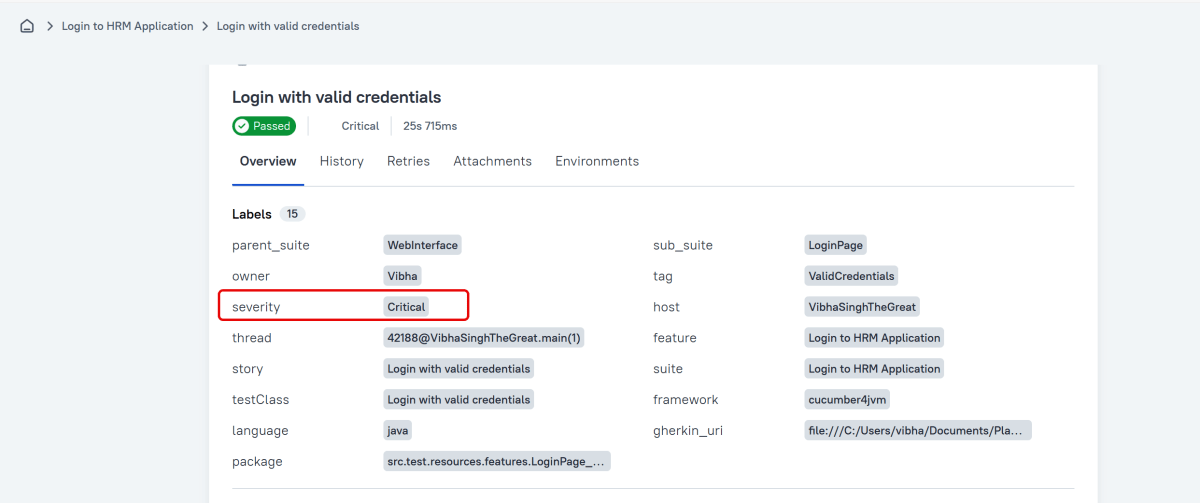
This will generate the beautiful Allure Test Report as shown below.
13. How to View a Report
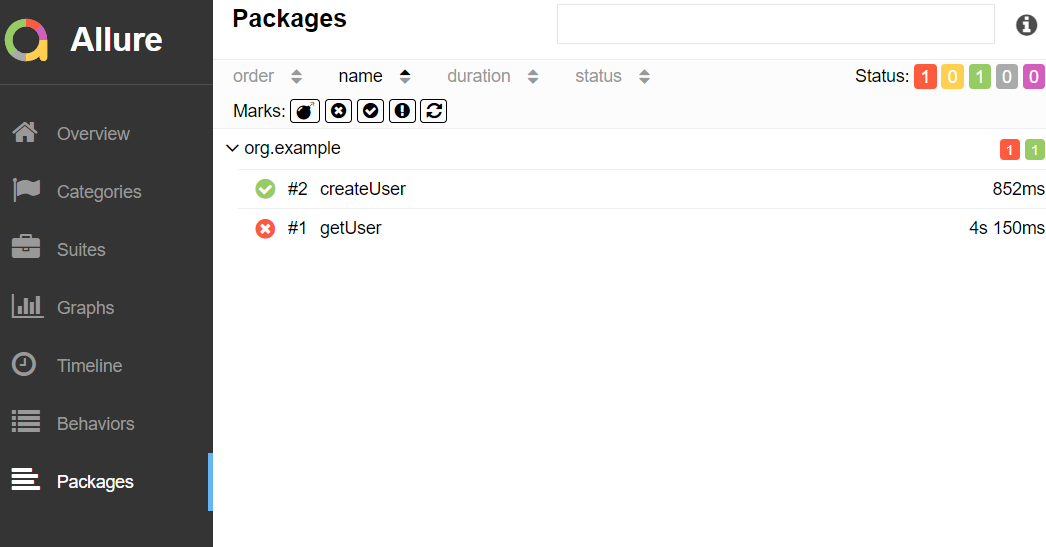
Test reports generated with Allure Report are basically small HTML websites intended to be viewed in a web browser.
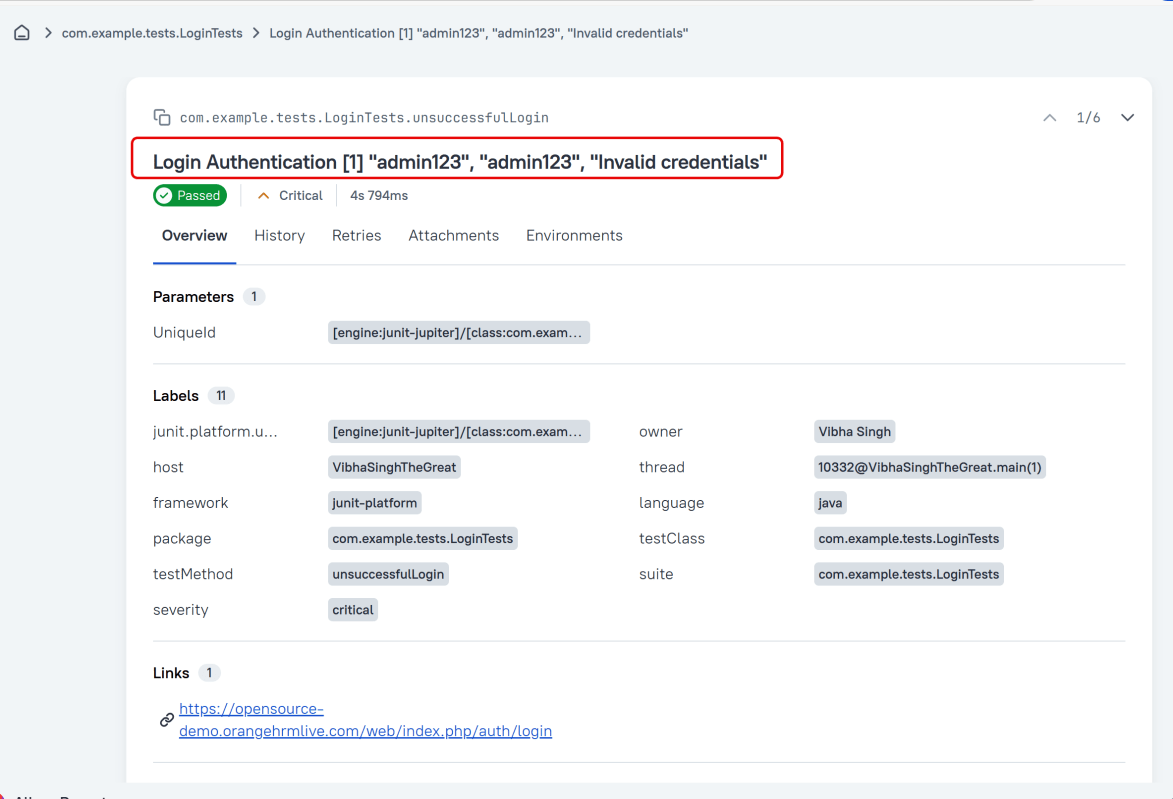
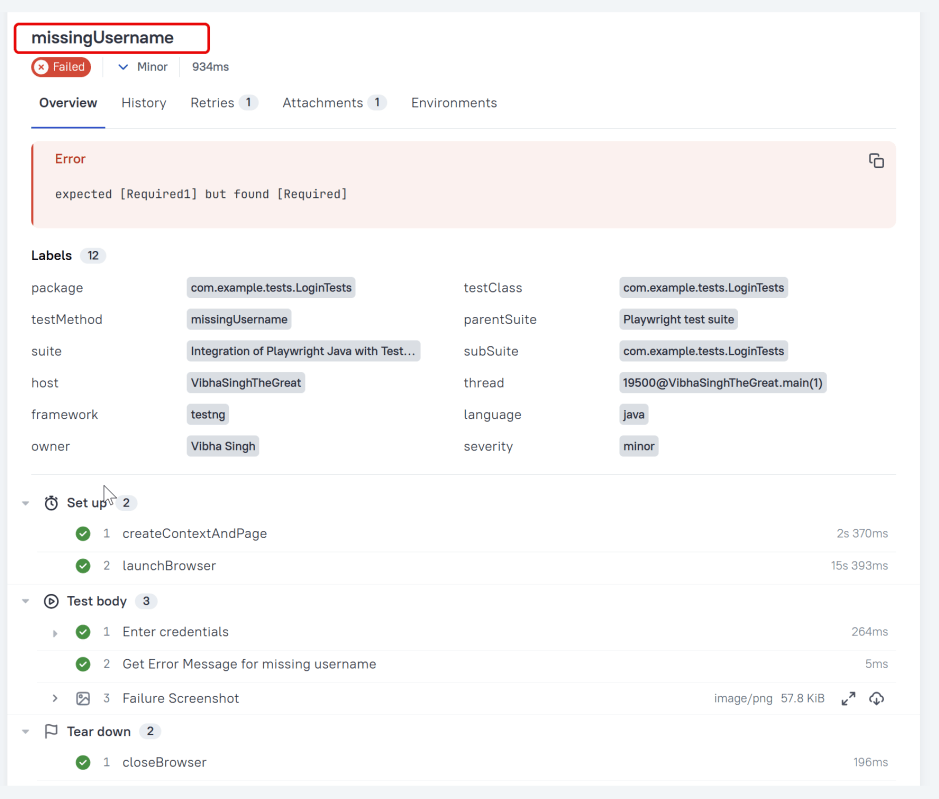
Title
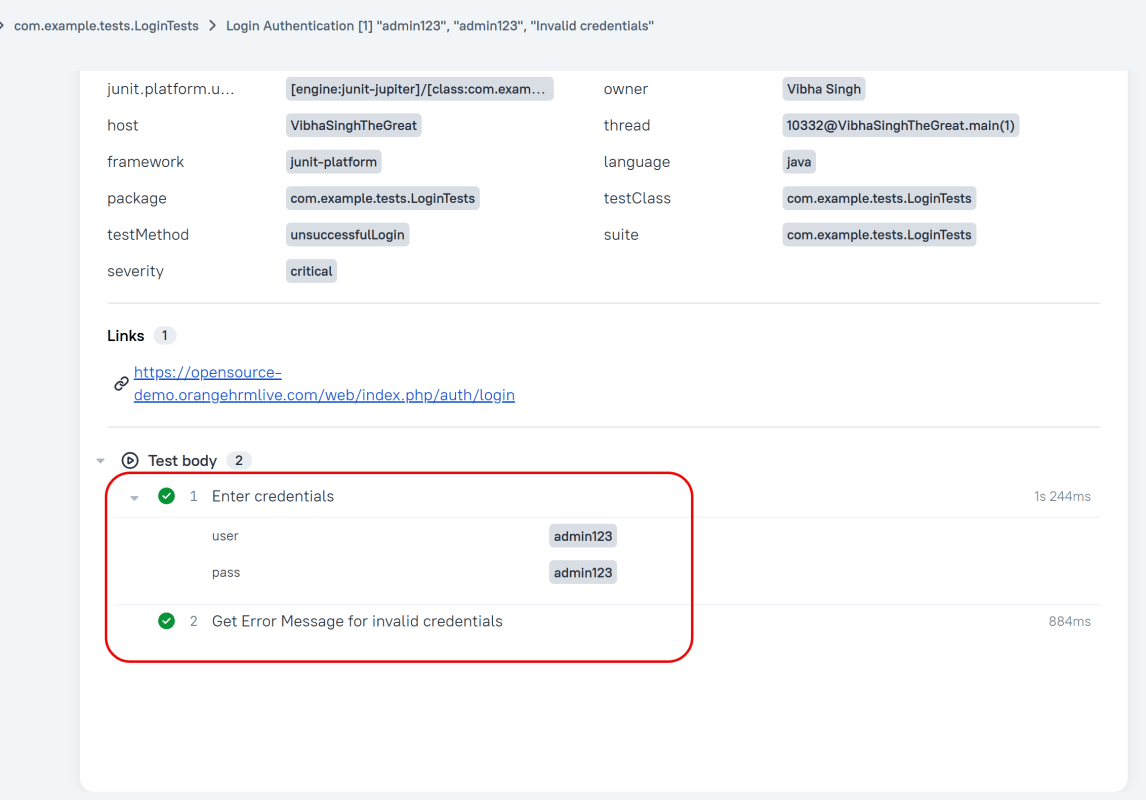
A human-readable title of the test. If not provided, the function name is used instead.
Tags
Any number of short terms the test is related to. Usually it’s a good idea to list relevant features that are being tested. Tags can then be used for filtering.

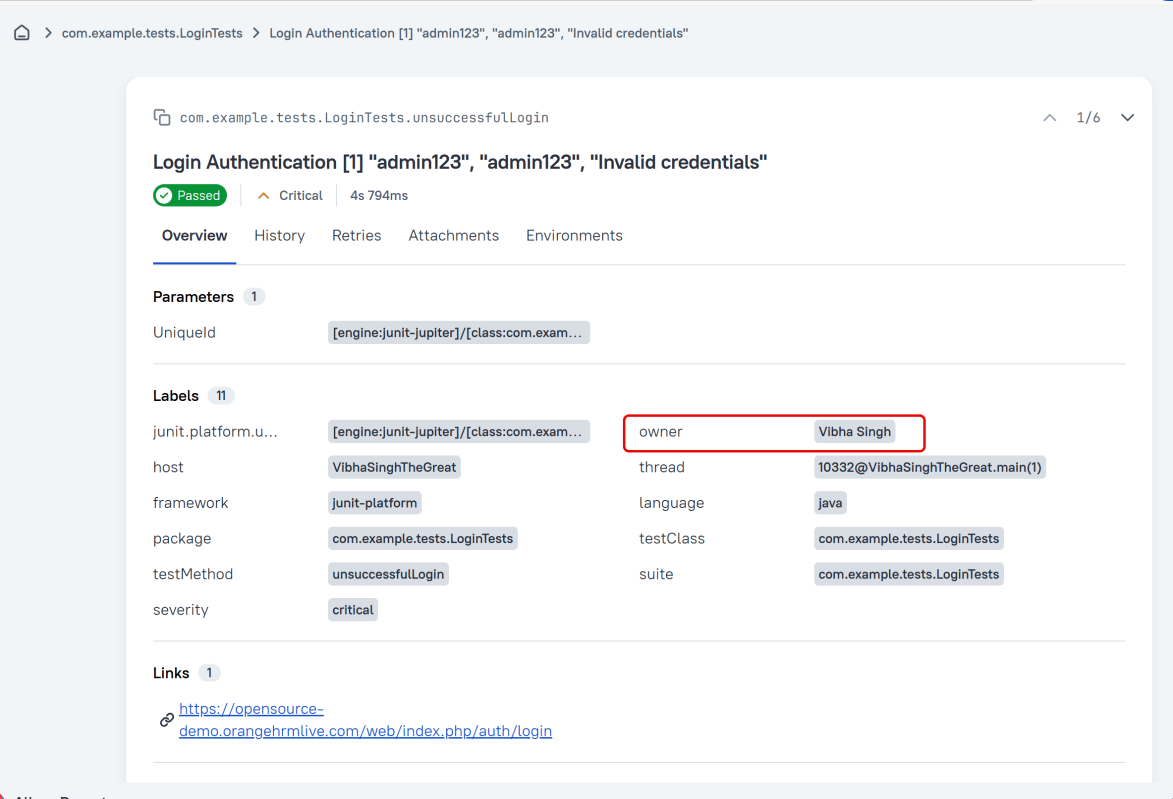
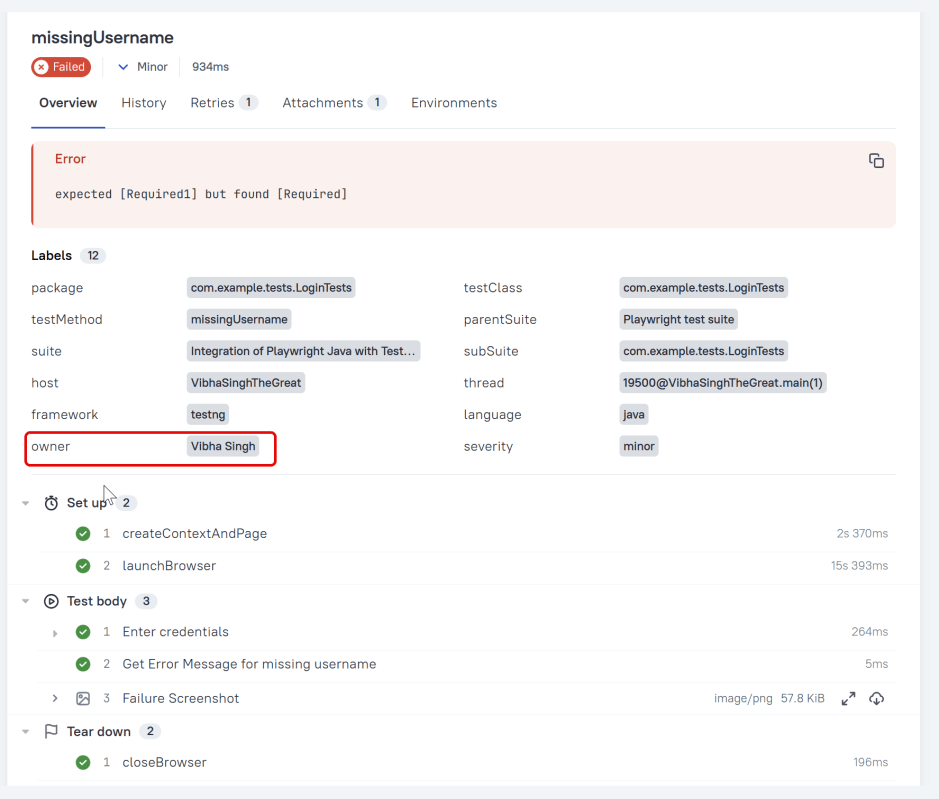
Owner
The team member who is responsible for the test’s stability. For example, this can be the test’s author, the leading developer of the feature being tested, etc.
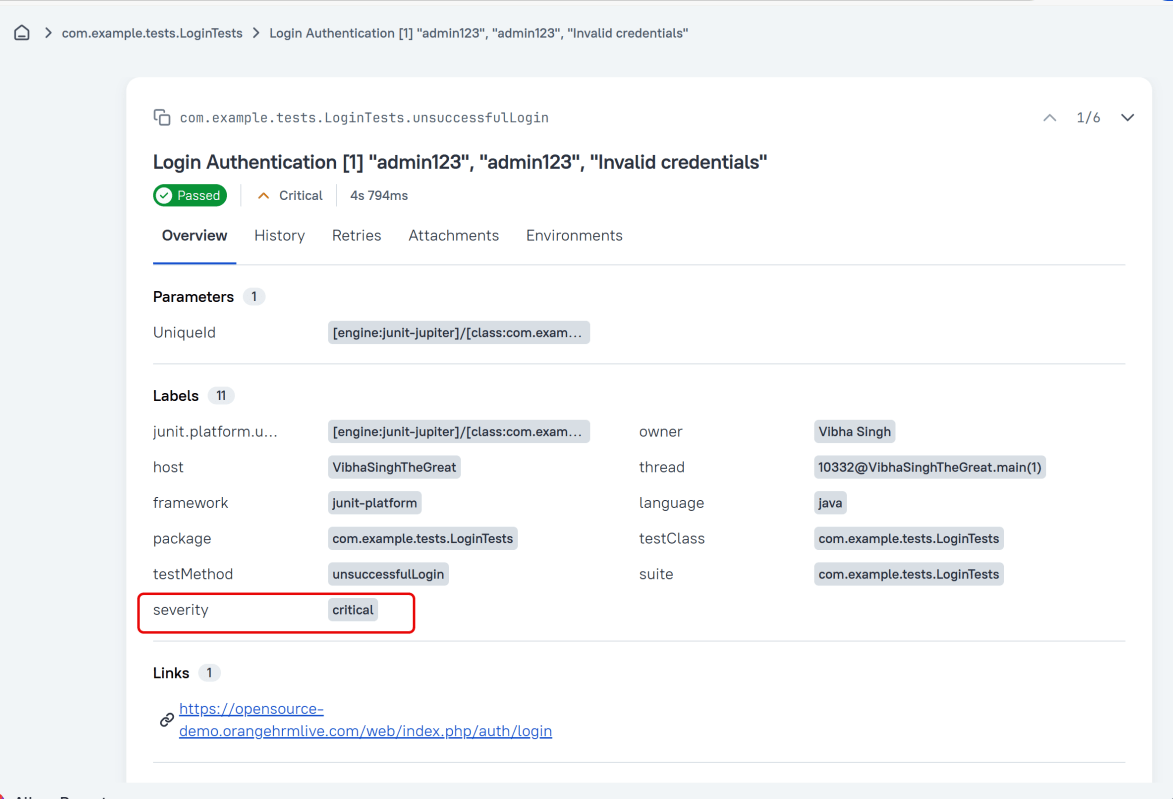
Severity
A value indicating how important the test is. This may give the future reader an idea of how to prioritize the investigations of different test failures.
Allowed values are: “trivial”, “minor”, “normal”, “critical”, and “blocker”.
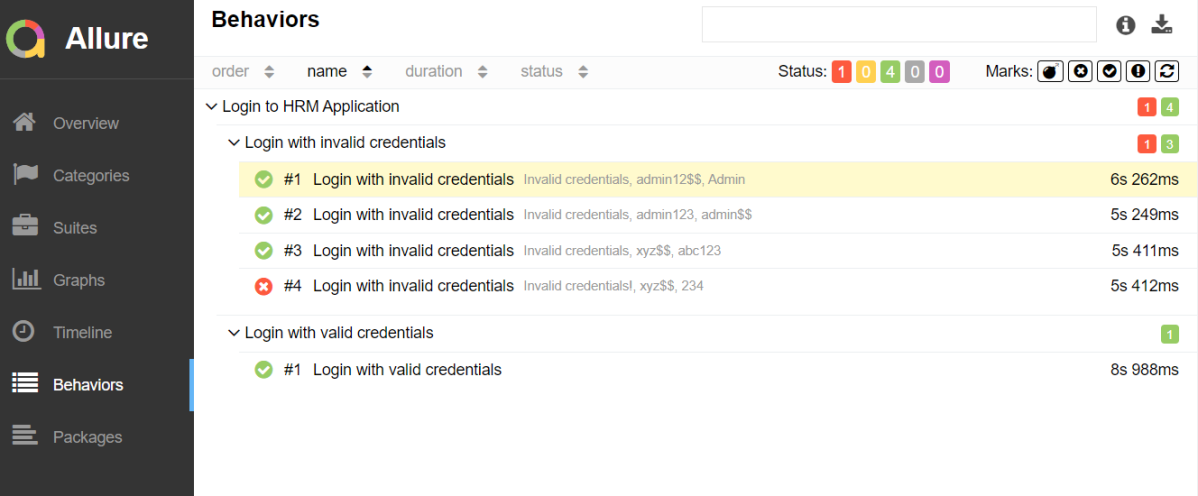
Support for Scenario Outlines
Allure Cucumber-JVM provides complete support for Scenario Outlines, a feature of Cucumber-JVM that allows for parametrized tests. No special setup is needed to take advantage of this capability within Allure.
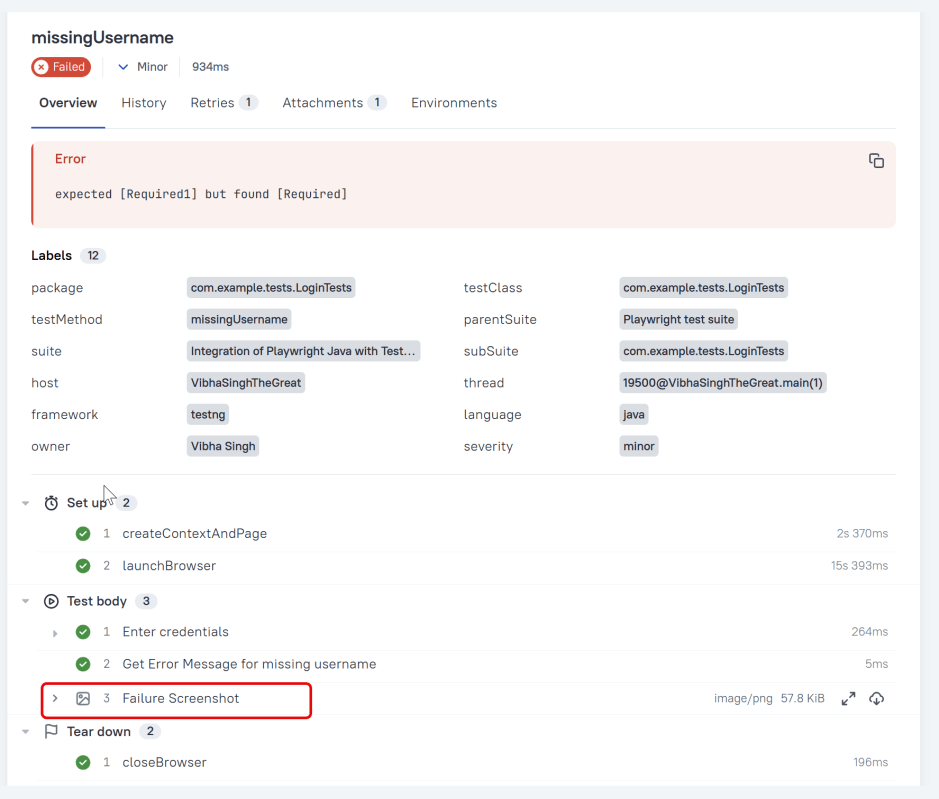
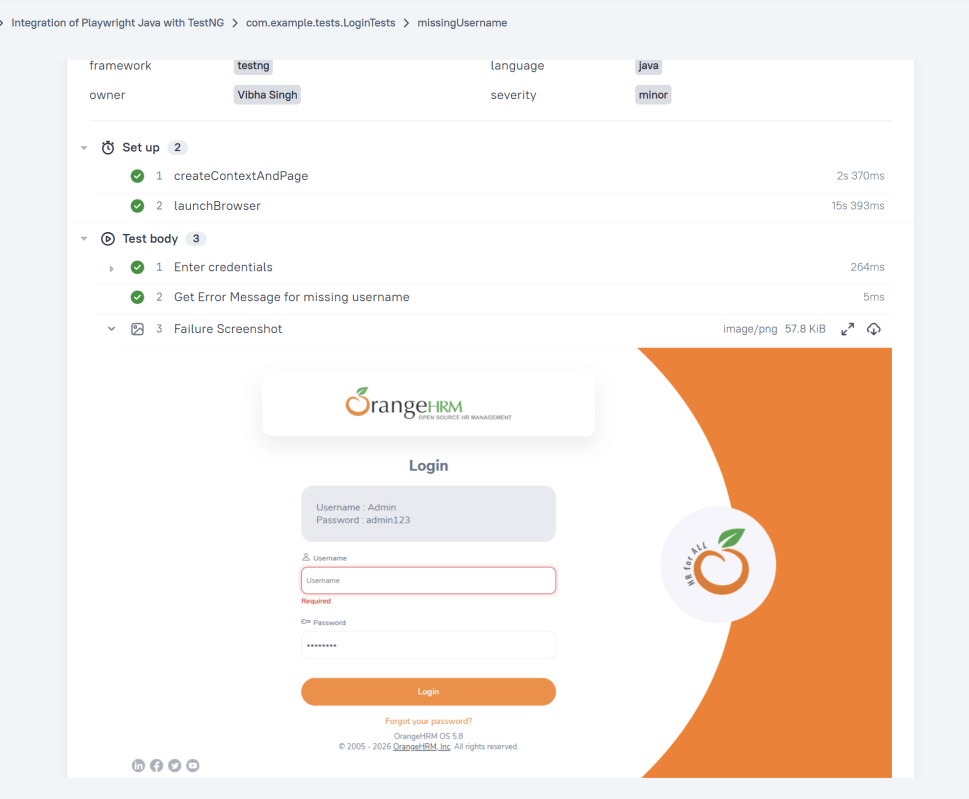
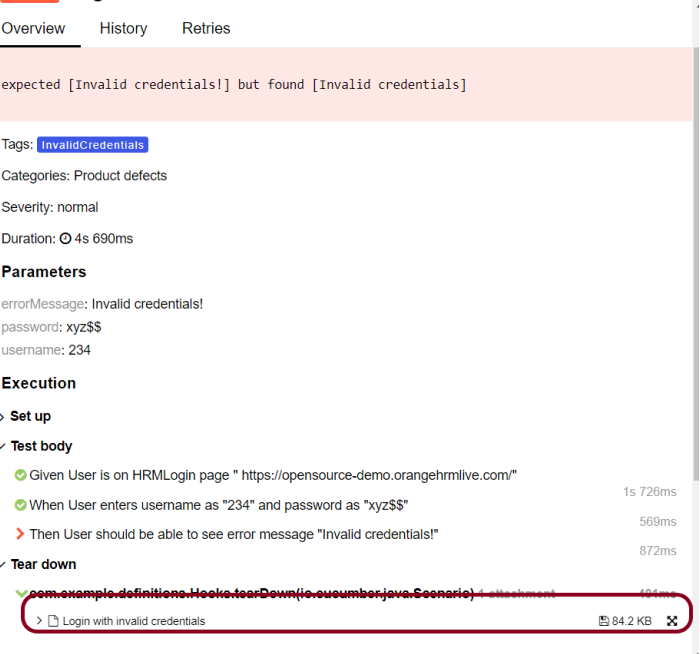
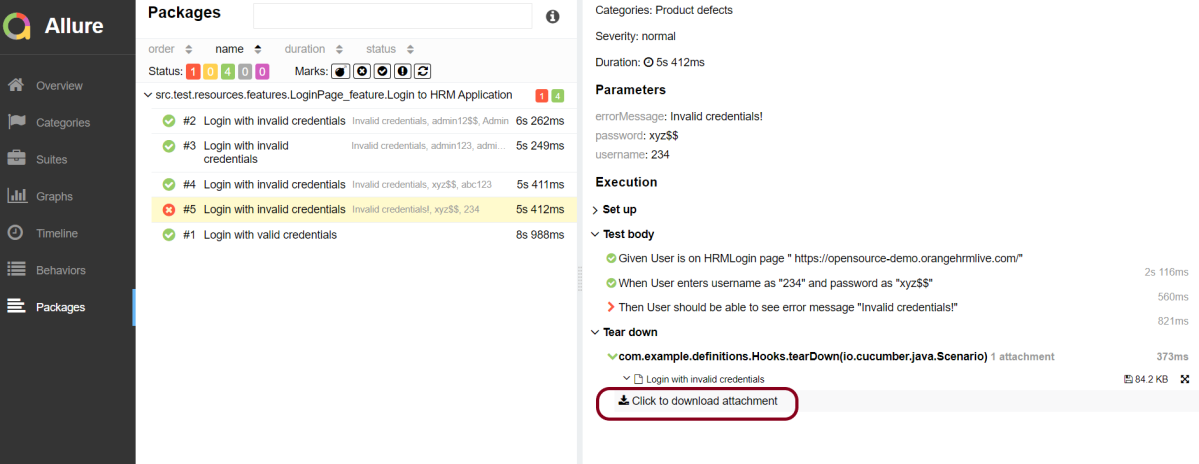
Attachment
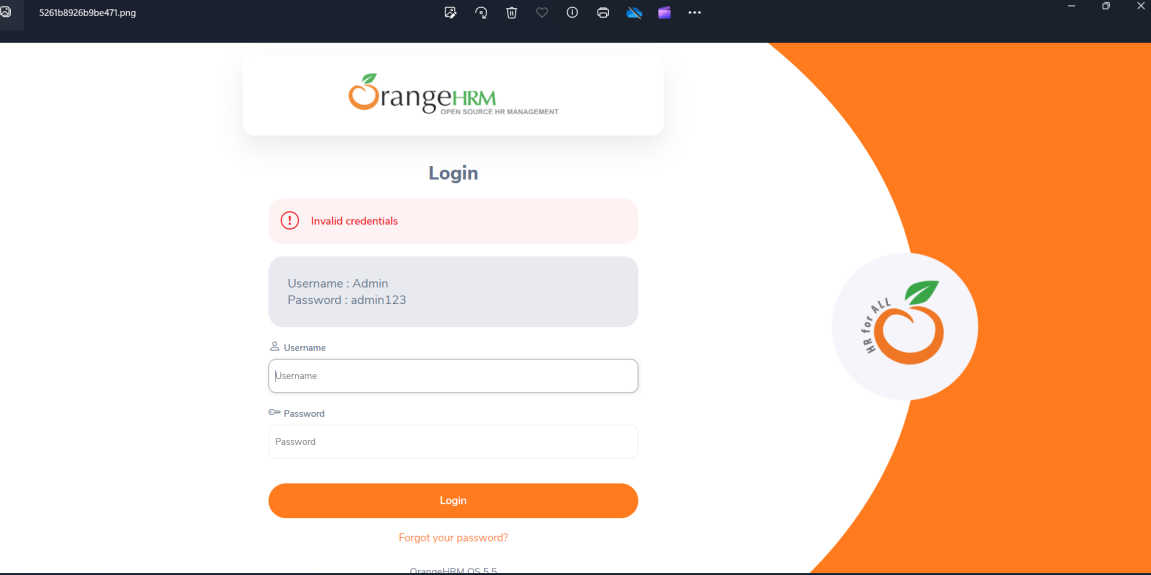
In Allure reports, you have the ability to attach various types of files, which can greatly enhance the comprehensibility of the report. A common practice is to attach screenshots that capture the state of the user interface at specific moments during test execution.
Allure Cucumber-JVM offers multiple methods for creating attachments, whether from pre-existing files or from content generated on-the-fly.
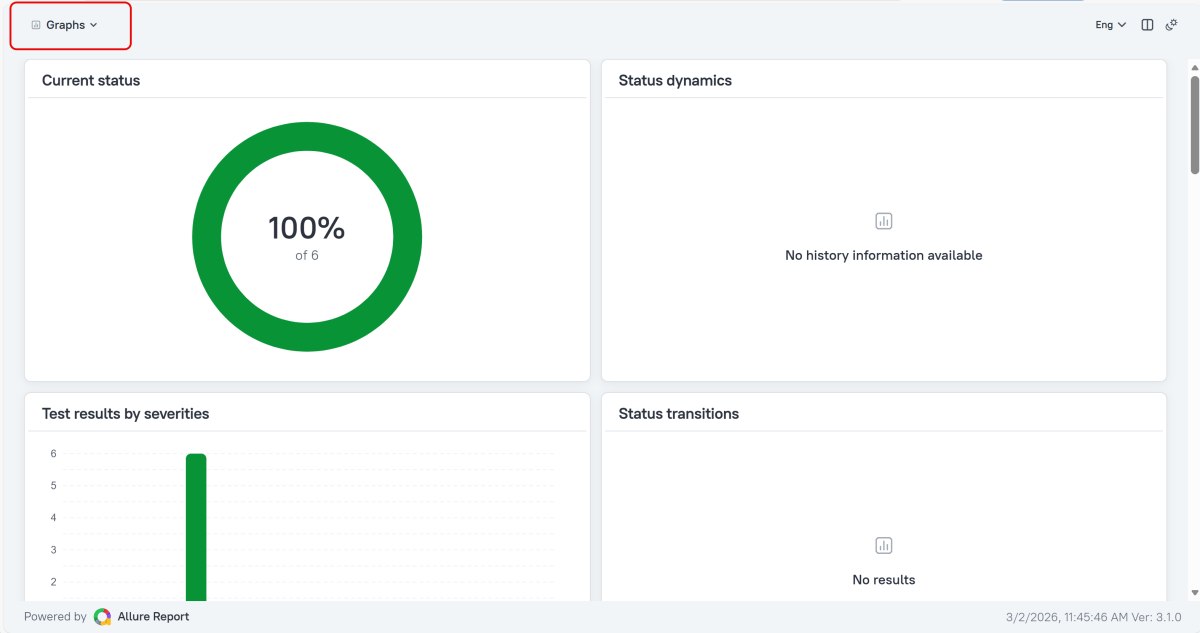
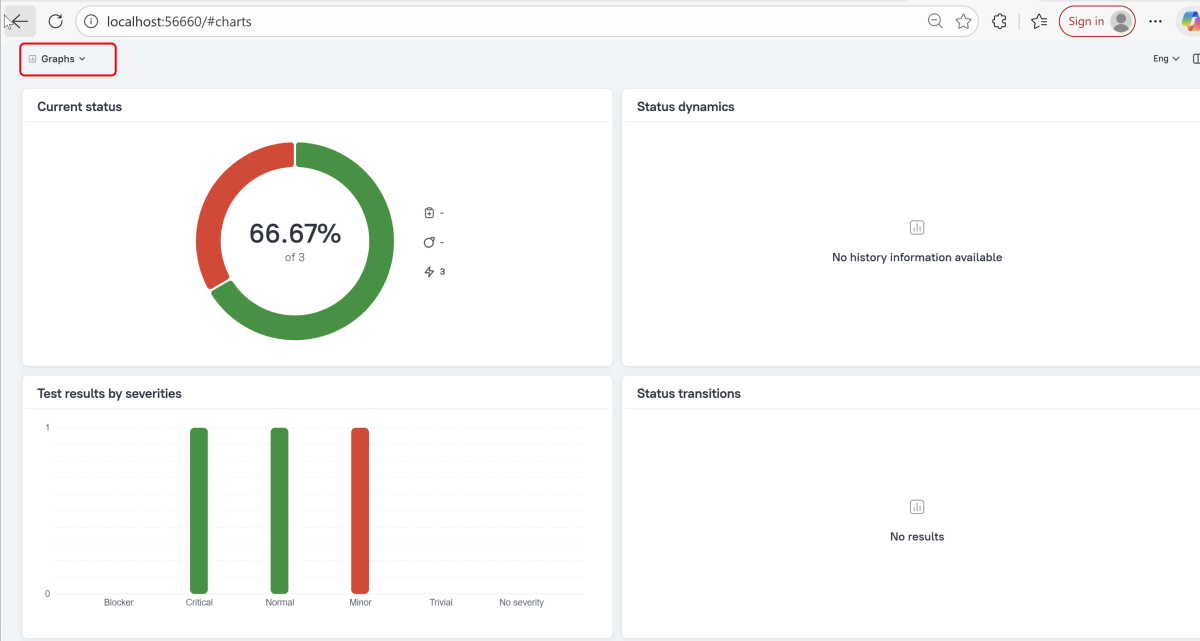
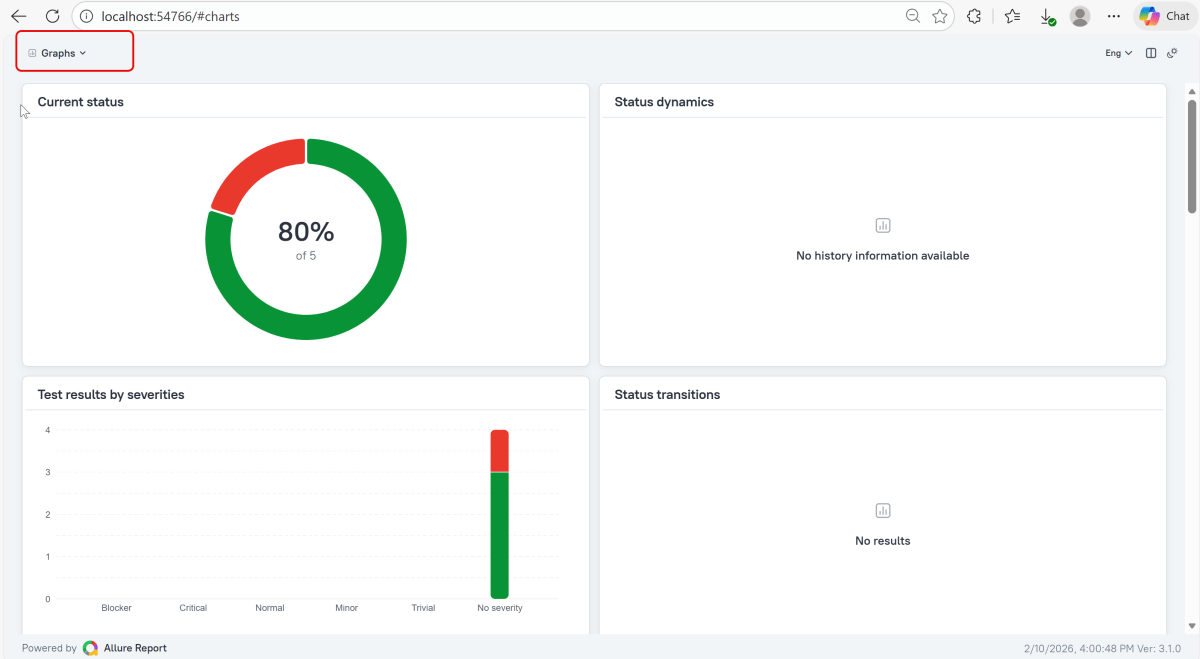
Graphs in Allure Report
Graphs allow you to see different statistics collected from the test data: status breakdown or severity and duration diagrams.
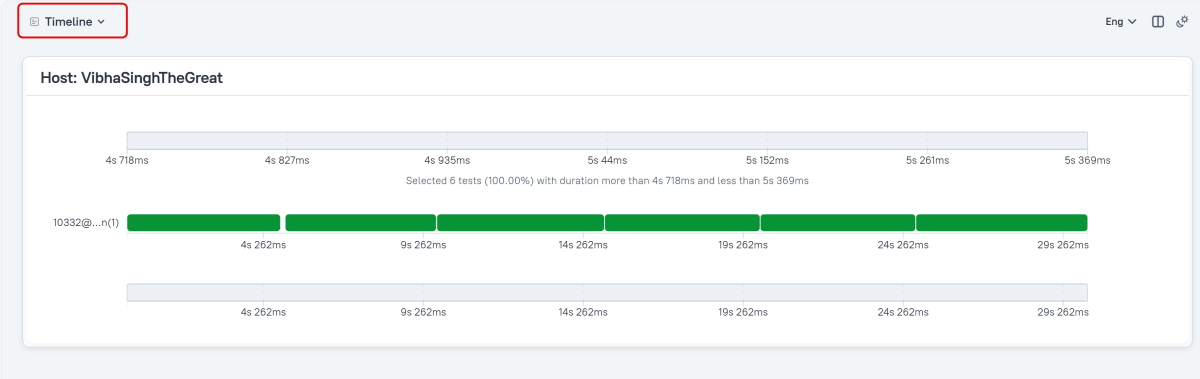
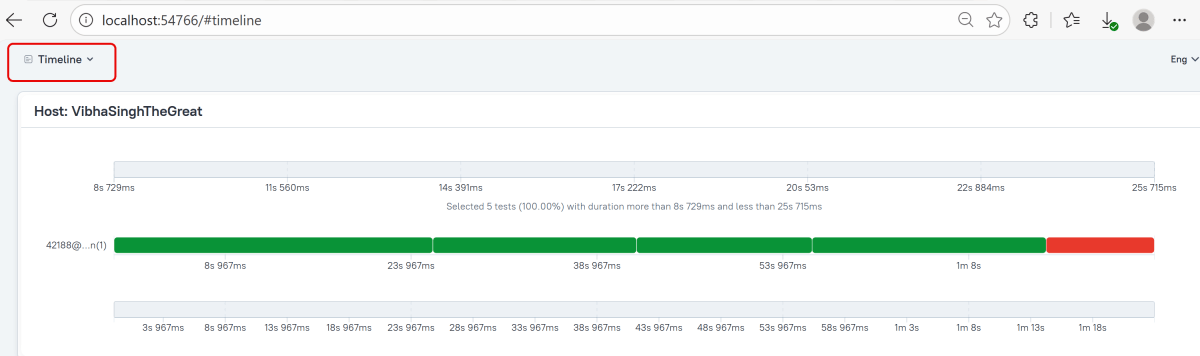
Timeline in Allure Report
The timeline tab visualizes retrospective test execution, allure adaptors collect precise timings of tests, and here on this tab, they are arranged accordingly to their sequential or parallel timing structure.
Generate Reports with the Allure Awesome Plugin
Allure 3 Report also features an advanced report generator plugin – Allure Awesome. It supports additional configuration options, such as generating the report as a single HTML file, setting the theme, custom branding and language of the generated report, and taking known issues into account.
To manually generate a customized Allure Awesome report, use the awesome command:
allure awesome build/allure-results

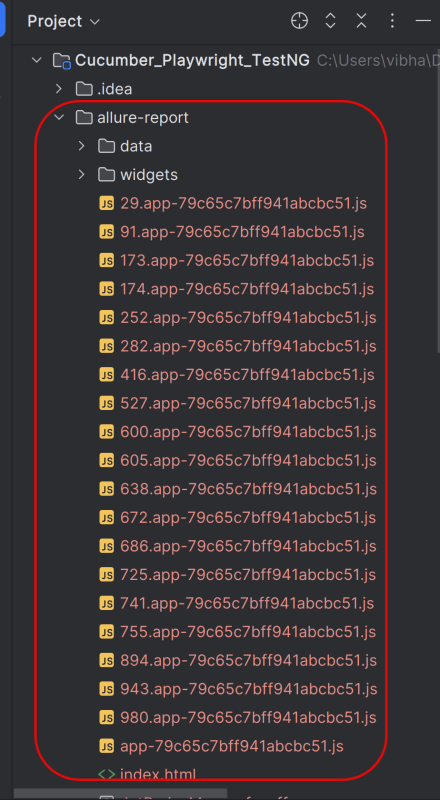
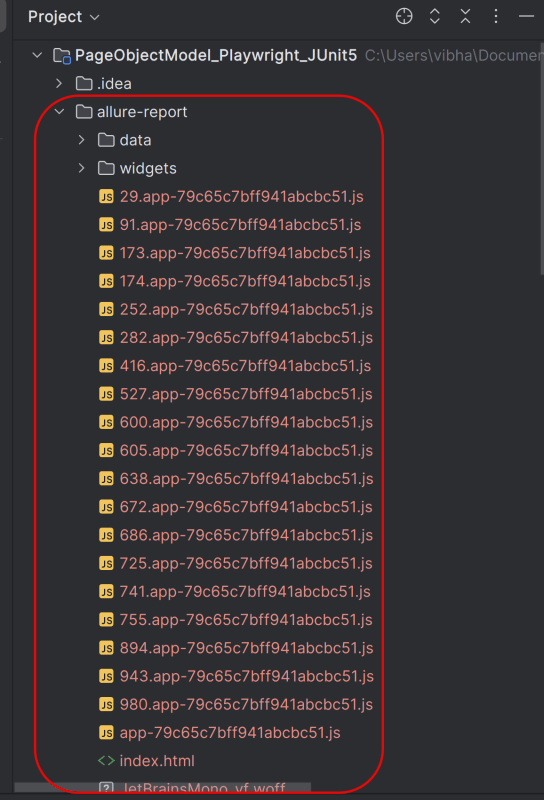
This will create the allure-report folder with all the test files and index.html report.
Open “index.html“, as this is an HTML report, and open it with the browser. The below image shows index.html.
Right click on index.html->Open In ->Browser ->Edge( any browser).

Summary:
1.Add required dependencies – Include Playwright, JUnit 5, and Allure JUnit5 in pom.xml, and configure the Allure Maven plugin.
2. Write Cucumber Scenarios in Feature File – Define the feature files using Gherkin syntax (.feature) and place them in the appropriate directory (src/test/resources/features).
3. Implement Step Definitions – Create step definitions in Java to connect the Gherkin scenarios to Playwright actions. Ensure these are correctly annotated with Cucumber’s annotations.
4. Create Test Runner – Setup a TestNG runner that combines Cucumber options and ensures Allure configurations are included.
5. Configure Allure Reporting – Utilize Allure annotations like @AllureFeature and @AllureStory within your tests to categorize and logically group test cases. Create an allure.properties file in src/test/resources with necessary configurations like resultsDirectory and linkPattern.
6. Execute Tests and Generate Reports – Execute mvn clean test, then run allure serve allure-results to build and open the HTML report.
Congratulations!! We have integrated an allure report with Playwright, Java Cucumber, and TestNG. I hope this tutorial is useful to you.
Additional Tutorials on Allure Reports
Integration of Allure Report with Selenium and JUnit4
Integration of Allure Report with Selenium and TestNG
Gradle – Allure Report for Selenium and JUnit4
Gradle – Allure Report for Cucumber, Selenium and TestNG
Integration of Allure Report with Rest Assured and JUnit4