In the previous tutorial, we have discussed How to Download and Install TestNG in Eclipse. In the this tutorial, we are going to discuss about the various annotations available in TestNG. Below is the list of annotations:-
@Test – This marks a class or a method as a part of the test.
@BeforeSuite – The @BeforeSuite method in TestNG runs before the execution of all other test methods. It will run only once before all tests in the suite have to run.
@AfterSuite – The @AfterSuite method in TestNG runs after the execution of all other test methods. It will run only once after all tests in the suite have run.
@BeforeTest – The @BeforeTest method in TestNG runs before the execution of first @Test method. It runs only once per class.
@AfterTest – The @AfterTest method in TestNG executes after the execution of all the test methods that are inside that folder.
@BeforeClass – The @BeforeClass method in TestNG will run before the first method invokes of the current class.
@AfterClass – The @AfterClass method in TestNG will execute after all the test methods of the current class execute.
@BeforeMethod – The @BeforeMethod method in TestNG will execute before each test method.
@AfterMethod – The @AfterMethod method in TestNG will run after each test method is executed.
@BeforeGroups – The @BeforeGroups method in TestNG run before the test cases of that group execute. It executes just once.
@AfterGroups– The @AfterGroups method in TestNG run after the test cases of that group execute. It executes only once.
@Parameters –This annotation is used to pass parameters to test methods.
@DataProvider– If we use @DataProvider annotation for any method that means you are using that method as a data supplier. The configuration of @DataProvider annotated method must be like it always return Object[][] which we can use in @Test annotated method. The @Test method that wants to receive data from this DataProvider needs to use a dataProvider name equals to the name of this annotation.
@Factory – Marks a method as a factory that returns objects that will be used by TestNG as Test classes. The method must return Object[ ].
@Listeners– This annotation is used with test class. It helps in writing logs and results.
Lets see a program to understand the sequence in which these annotations run in the program.
import org.testng.annotations.*;

public class AnnotationsExample {

    @BeforeTest
    public void init(){
        System.out.println("---------------- Before Test ------------- ");
        //open the browser
    }

    @AfterTest
    public void quit(){
        System.out.println("---------------- After Test ------------- ");
        //close the browser
    }

    @BeforeMethod
    public void beforeMethod() {
        System.out.println("############# Before Method ############# ");
        //Initialize the Report
    }

    @AfterMethod
    public void afterMethod() {
        System.out.println("############ After Method ##############");
        //Finalize the Report
    }

    @BeforeClass
    public void beforeClass() {
        System.out.println("************* Before Class *************");
    }

    @AfterClass
    public void afterClass() {
        System.out.println("************* After Class ***************");
    }

    @BeforeSuite
    public void beforeSuite() {
        System.out.println("This will execute Before Suite");
    }

    @AfterSuite
    public void afterSuite() {
        System.out.println("This will execute After Suite");
    }

    @Test
    public void loginTest(){
        System.out.println("Login the application ");

    }

    @Test
    public void logout(){
        System.out.println("Logout the application ");

    }

}
Execution process is as follows:
First of all, beforeSuite() method is executed only once.
2. Lastly, theafterSuite() method executes only once.
3. @BeforeMethod and @AfterMethod are executed twice, one for Test Case 1 and again for Test Case 2.
4. MethodsbeforeTest(), beforeClass(), afterClass(), and afterTest() methods are executed only once.
5. To execute this program, we need to Right click and select Run as -> TestNG or Run testng.xml.
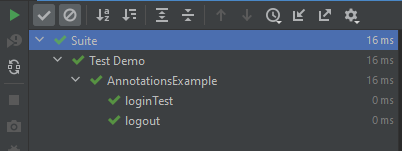
The test execution result will look like something shown below
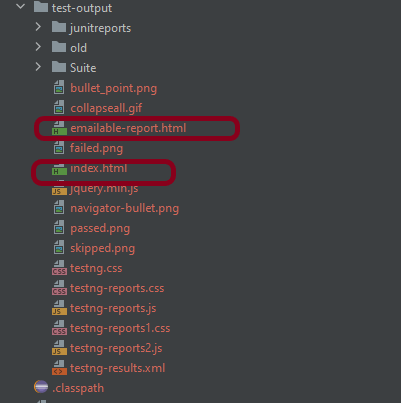
TestNG generates various type of reports under test-output folder.
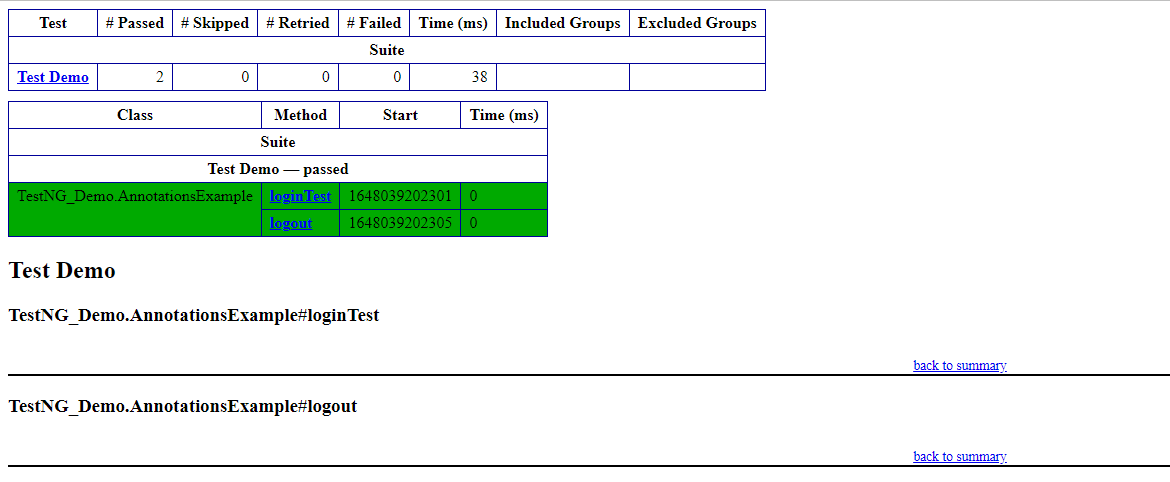
Open ‘emailable-report.html‘, as this is a html report open it with browser. It will look like something below.
TestNG also produce “index.html” report and it resides under test-output folder.
In the previous tutorial, I explained Apache JMeter. This tutorial explains how to download and install JMeter.
JMeter is a 100% pure Java application, it requires Java installed on your machine.
I’m going to download JMeter Version 5.6 which needs Java 8 and above.
1) Install Java
Verify whether Javais installed on your machine or not.
Open a Command-Line console by clicking on the start menu then type cmd, and type the below command.
java -version
If you don’t see the Java version, then you need to download and install the latest version of Java SE Development Kit. Download Java Platform (JDK) from here.
2) Download Apache JMeter
The latest version of JMeter is Apache JMeter 5.6 now. You can download it here. Choose the Binaries file (either zip or tgz) to download as shown in the figure below.
3) Install JMeter
We don’t need to install JMeter, just unzip the JMeter downloaded folder. Go to the path where JMeter was downloaded and unzip the folder.
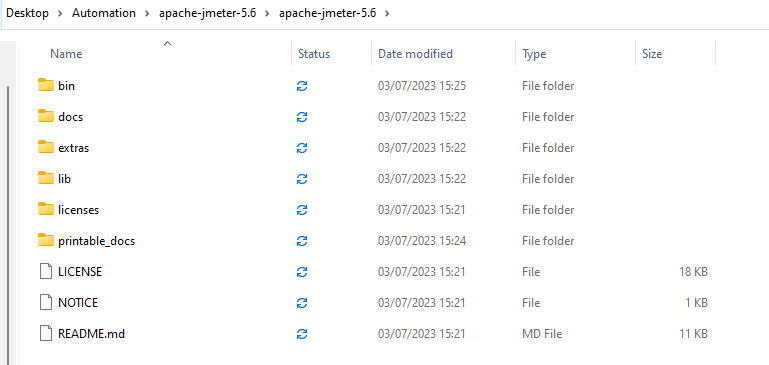
You should see the following files within the apache-jmeter-XX folder:
bin: contains the executable files to launch JMeter, and configuration files to tweak JMeter settings,
docs: JMeter’s documentation in HTML format,
extras: some useful side tools like excel sheets to compute graphs from JTL result files,
lib: JMeter’s libraries, which are mostly Java JAR files,
printable_docs: documentation in printable format.
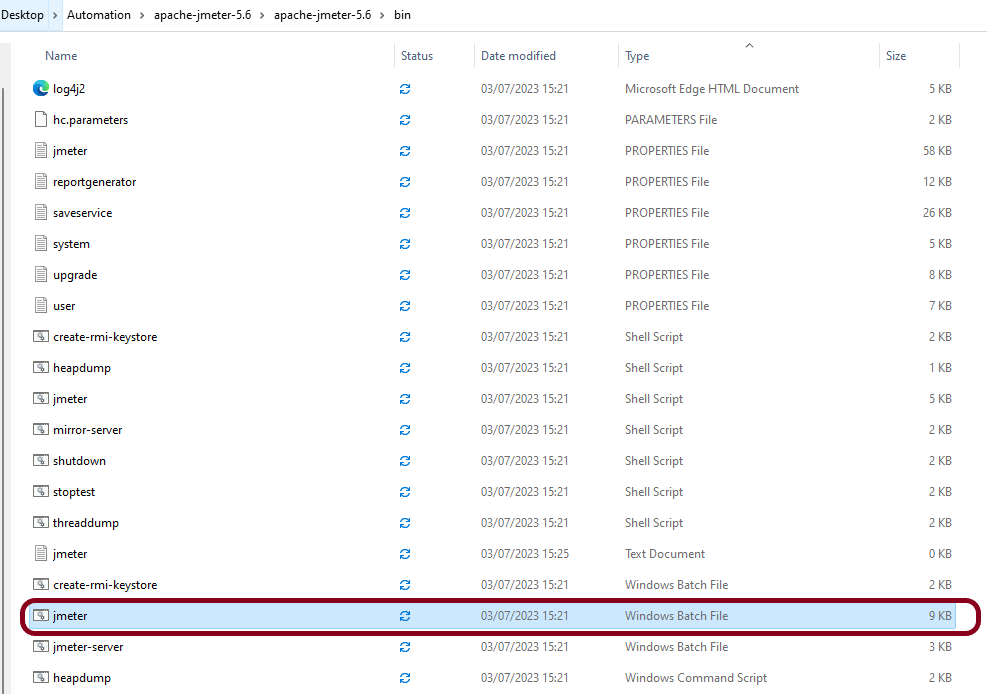
4) Launch JMeter
Double-click on jmeter-bat.
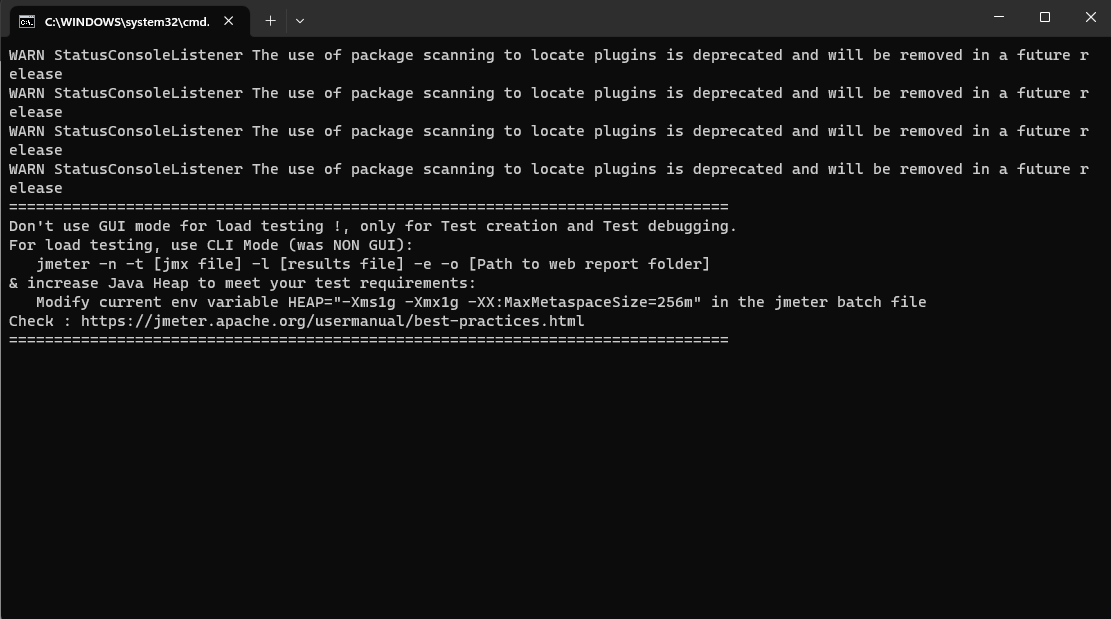
It will open a command terminal as shown below.
The following image shows the various components in the JMeter GUI
5) Upgrading JMeter
When a new JMeter version is available, the new JMeter version must be installed in a fresh new folder.
Please do not unzip a new JMeter version over a previous one.
Simply repeat the steps above to install a new version.
The Apache JMeter™ application is open-source software, a 100% pure Java application designed to load test functional behaviour and measure performance. JMeter is mainly used for testing Web applications or FTP applications but currently, it is applicable in functional testing, JDBC database connections, Web services, generic TCP connections, and OS native processes. You can perform various testing activities like Performance, Load, Stress, Regression, and Functional testing, in order to get accurate performance metrics against your web server.
JMeter is not a browser, it works at the protocol level. As far as web services and remote services are concerned, JMeter looks like a browser (or rather, multiple browsers); however, JMeter does not perform all the actions supported by browsers. In particular, JMeter does not execute the JavaScript found in HTML pages. Nor does it render the HTML pages as a browser does (it’s possible to view the response as HTML etc., but the timings are not included in any samples, and only one sample in one thread is ever displayed at a time). More detail about JMeter can be found here.
Apache JMeter features include:
Open Source– JMeter is a 100% pure Java desktop application
Platform independent -JMeter is written and developed using Java, so it can run on any environment/workstation that accepts a Java virtual machine, for example – Windows, Linux, Mac, etc.
Supports cross platform –JMeter has unlimited testing capabilities allowing you to work both with local and server-based instances. The only thing you need to get started is Java (JRE) installed on the host.
Simulation – JMeter can simulate multiple users by using virtual users or unique users in order to generate a heavy load against the web application under test.
Supports Concurrency – Full multi-threading framework allows concurrent sampling by many threads and simultaneous sampling of different functions by separate thread groups.
Easy to Use – On Linux/Unix, JMeter can be invoked by clicking on JMeter shell script. On Windows, it can be invoked by starting the jmeter.bat file.
Test Result Visualization – JMeter has a set of tools for collecting and displaying results, like table, graph, tree, and reports. The results can be saved in CSV, XML, HTML etc.
Support various server types – JMeter is highly extensible and capable to load the performance test in different server types: HTTP, HTTPS, SOAP, JDBC, LDAP, JMS, POP3
Works great even without UI – Test cases are executable in the command line which allows for their full integration into CI tools’ cases.
JMeter Workflow
JMeter sends requests to a target server by simulating a group of users. Server process the requests. Subsequently, data is collected to calculate statistics and display performance metrics of the target server through various formats.
Congratulations on making it through this tutorial and hope you found it useful! Happy Learning!! Cheers!!
In this tutorial, will see how to upload a document in Selenium.
We often face the problem where we have to upload a file in Web Application. This can be easily achieved in Selenium. We are using sendKeys() method to set the value of the file to upload.
Implementation
Setting up WebDriver:
This includes setting the browser for ChromeDriver and navigate to the web page that contains the upload button.
 ChromeOptions options = new ChromeOptions();
WebDriver driver = new ChromeDriver(options);
driver.manage().window().maximize();
driver.get("https://demoqa.com/upload-download");
Locating the File Input Element:
Locate the download link using XPath and click on it to start the download.
In the previous tutorials, I have explained how we can take screenshots in Selenium using FileUtils or FileHandler. In this tutorial, I will explain how to capture screenshots of Failed Test Cases in Selenium.
We are going to use TestNG to capture screenshot of failed test cases.
We will be using below mentioned features of TestNG
1) ITestResult – This Interface will provide us the result of test case execution. @AfterMethod method can declare a parameter of type ITestResult, which will reflect the result of the test method that was just run.
2) @AfterMethod – The annotated method will be run after each test method. Any @AfterMethod can declare a parameter of type java.lang.reflect.Method. This parameter will receive the test method that will be called once this after the method as run.
3) result.getName() – will return name of test case so that screenshot name will be same as test case name
4) @BeforeTest – The annotated method will be run before any test method belonging to the classes inside the tag is run.
5) @AfterTest – The annotated method will be run after all the test methods belonging to the classes inside the tag have run.
We are executing 2 test cases. One of the Test Case will pass and another will fail. This program will only capture the screenshot of failed test case, not the passed one as we have used condition
if (ITestResult.FAILURE == result.getStatus())
Let see this as a program.
import java.io.File;
import org.apache.commons.io.FileUtils;
import org.openqa.selenium.By;
import org.openqa.selenium.OutputType;
import org.openqa.selenium.TakesScreenshot;
import org.openqa.selenium.WebDriver;
import org.openqa.selenium.firefox.FirefoxDriver;
import org.testng.Assert;
import org.testng.ITestResult;
import org.testng.annotations.AfterMethod;
import org.testng.annotations.AfterTest;
import org.testng.annotations.BeforeTest;
import org.testng.annotations.Test;
public class ScreenshotFailedCases {
static WebDriver driver;
@BeforeTest
public static void init() {
System.setProperty("webdriver.gecko.driver", "src\\test\\resources\\webdrivers\\window\\geckodriver.exe");
// Initiate Firefox browser
driver = new FirefoxDriver();
// Maximize the browser
driver.manage().window().maximize();
// Pass application url
driver.get("https://duckduckgo.com/");
System.out.println("BeforeTest");
}
@Test
public void captureCorrectScreenMethod() throws Exception {
String Text = driver.findElement(By.xpath("//*[@id='logo_homepage_link']")).getText();
// Verify the text on the landing page
Assert.assertTrue(Text.contains("About DuckDuckGo"));
}
@Test
public void captureIncorrectScreenMethod() throws Exception {
// Fail test by using incorrect XPath to find the search box
driver.findElement(By.xpath("//*[@name='qe']")).sendKeys("agile");
}
@AfterTest
public static void exit() {
// Close the WebPage
driver.quit();
}
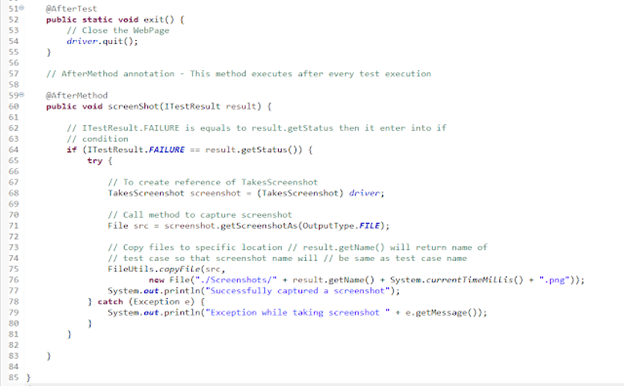
// AfterMethod annotation - This method executes after every test execution
@AfterMethod
public void screenShot(ITestResult result) {
// ITestResult.FAILURE is equals to result.getStatus then it enter into
// if condition
if (ITestResult.FAILURE == result.getStatus()) {
try {
// To create reference of TakesScreenshot
TakesScreenshot screenshot = (TakesScreenshot) driver;
// Call method to capture screenshot
File src = screenshot.getScreenshotAs(OutputType.FILE);
// Copy files to specific location result.getName() will
// return name of test case so that screenshot name will be same as test case name
FileUtils.copyFile(src, new File("./Screenshots/" + result.getName() + System.currentTimeMillis() + ".png"));
System.out.println("Successfully captured a screenshot");
} catch (Exception e) {
System.out.println("Exception while taking screenshot " + e.getMessage());
}
}
}
}
A folder with name Screenshots is created and the screenshot is placed in that folder as you can see the image below
Execution Status as shown below
TestNG Report – Go to test-output folder and open emailable-report.html
FileHandler is new Class in Selenium which help us to store screenshots, create directory and so on. You can get full documentation of FileHandler here.
Step 1- Import the new package which is
import org.openqa.selenium.io.FileHandler;
Step 2 – To capture a screenshot in Selenium, we can make use of an interface, called TakesScreenshot. This method indicates the driver, that it can capture a screenshot and store it in different ways
TakesScreenshot ts = (TakesScreenshot) driver;
Step 3 – In order to capture screenshot and store it in a particular location, there is a method called “getScreenshotAs“, where OutputType defines the output type for a screenshot.
Step 4- Call copy method of FileHandler Class which is static method and will ask two argument First is src and another is destination. Code will look like
FileHandler.copy(source, new File("/Screenshots/SeleniumScreenshot" + System.currentTimeMillis() + ".png"));
Let’s see this in a Selenium program:-
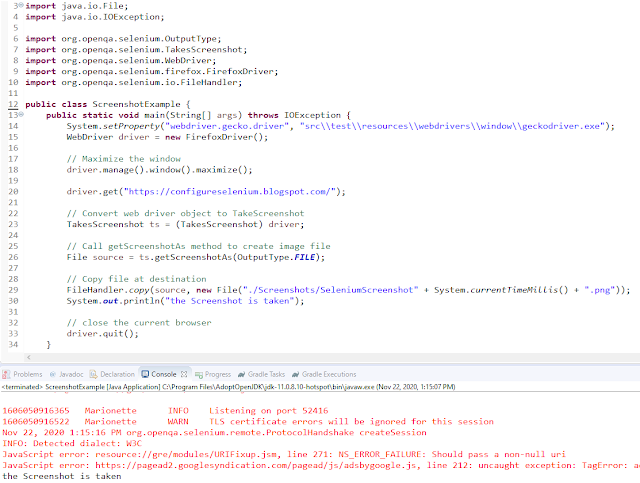
import java.io.File;

import java.io.IOException;
import org.openqa.selenium.OutputType;
import org.openqa.selenium.TakesScreenshot;
import org.openqa.selenium.WebDriver;
import org.openqa.selenium.firefox.FirefoxDriver;
import org.openqa.selenium.io.FileHandler;

public class ScreenshotExample {
      public static void main(String[] args) throws IOException {

            System.setProperty("webdriver.gecko.driver", "src\\test\\resources\\webdrivers\\window\\geckodriver.exe");
            WebDriver driver = new FirefoxDriver();

            // Maximize the window
            driver.manage().window().maximize();
            driver.get("https://configureselenium.blogspot.com/");

            // Convert web driver object to TakeScreenshot
            TakesScreenshot ts = (TakesScreenshot) driver;

            // Call getScreenshotAs method to create image file
            File source = ts.getScreenshotAs(OutputType.FILE);

            // Copy file at destination
            FileHandler.copy(source, new File("./Screenshots/SeleniumScreenshot" + System.currentTimeMillis() + ".png"));
            System.out.println("the Screenshot is taken");

            // close the current browser
            driver.quit();
      }

}
A folder with name “Screenshots” created and the screenshot placed in that folder as you can see the image below
The Screenshot looks like something as shown below
In Automation, it is advisable to take screenshots of failed test cases for further analysis and proof of failure. Selenium provides the capability to take screenshot. But, before we see how to capture Screenshot in Selenium, we need to add a dependency in the Maven project.
Recently Selenium has done some changes in recent version so if you are using Selenium 3.6.0 then you need to add below jar to project or if you are using then you can provide below dependency in project.
To capture a screenshot in Selenium, we can make use of an interface, called TakesScreenshot. This method indicates the driver, that it can capture a screenshot and store it in different ways
TakesScreenshot ts = (TakesScreenshot) driver;
In order to capture screenshot and store it in a particular location, there is a method called “getScreenshotAs“, where OutputType defines the output type for a screenshot.
The Java Development Kit(JDK) allows you to code and run Java programs. The JDK is essentially a toolkit that provides the necessary components to write, compile, and run Java programs. It includes the Java Runtime Environment (JRE), compilers, and various tools such as debuggers and documentation generators.In this tutorial, we show you how to install Java 11 on Windows and set up the environment variable JAVA_HOME
1. Refer to the link to download JDK11. Here, I have a 64-bit system and windows operating system, so I selected – jdk-11.0.16.1_windows-x64_bin.exe
2. Click on the name – jdk-11.0.816.1_windows-x64_bin.exe, and a dialog box as shown below will appear.
3. If you do not have an Oracle account, then go to the AdoptOpenJDK link . AdoptOpenJDK uses infrastructure, build and test scripts to produce prebuilt binaries from OpenJDK™ class libraries and a choice of either OpenJDK or the Eclipse OpenJ9 VM. All AdoptOpenJDK binaries and scripts are open sources licensed and available free.
Select appropriate version and JVM.
Here, I have selected Version – OpenJDK 11 and JVM as HotSpot. Click on the blue download button. It will take you to the new location.
4. Select the appropriate Operating System, Architecture, Package Type & Version. I have selected OS as Windows, Architecture as x64, Package Type as JDK, and Version as 11. Select the .zip extension and download the exe.
5. Once the file is downloaded, Right-click and extract the files to the desired location. I have placed it in C: driver under Program Files.
How to set Java JDK 11 Path in Windows 10?
1. Type – “View Advance” in the search option and we will see the option – View Advanced system setting.
2. In System Properties dialog, select Advanced tab and click on the Environment Variables button.
3. In “Environment variables” dialog, system variables. Click on the New button. Add a JAVA_HOME variable and specify the variable value. Mention the path where the Java folder is located.
4. Update System Path. In the “Environment Variables” window, go to “System variables.” Select Path and click Edit. Add the path of Java with bin.
Verify installation of Java
To verify, if JAVA is installed properly or not, open command prompt and type
java - version
To verify, if JAVA_HOME is configured properly or not, open command prompt and type
echo %JAVA_HOME%
We are done! Congratulations on making it through this tutorial and hope you found it useful! Happy Learning!!
In the previous tutorial, I explained the various types of Reports available in Cucumber. In this tutorial, I will explain how we can do Data-Driven Testing in Cucumber. Cucumber inherently supports Data-Driven testing by the use of the Scenario Outline and Examples section. Using these keywords, Cucumber allows for easy Data-Driven testing to be complete where no changes need to be made to the Java file (StepDefinition file).
Pre-Requisite
Cucumber – 6.10.4
Java – 11
Selenium – 3.141.59
Junit – 4.13.2 ( You can use TestNG also)
Cucumber JUnit – 6.10.4 (If using TestNG, then replace this with Cucumber TestNG)
The project folder structure and code should be in the below state.
In case, the project uses Maven, we need to add the below dependencies to the project.
Below is an example of Scenarios with a different set of data (no Scenario Outline).
  @InvalidCredentials1
  Scenario: Login with invalid username and password

    Given User is on Home page
    When User enters username as "Admin1" and password as "admin1"
    Then User should be able to see an "Invalid credentials"

  @InvalidCredentials2
  Scenario: Login with blank username

    Given User is on Home page
    When User enters username as "" and password as "admin123"
    Then User should be able to see an "Username cannot be empty"

  @InvalidCredentials3
  Scenario: Login with invalid credentials

    Given User is on Home page
    When User enters username as "Admin" and password as ""
    Then User should be able to see an "Password cannot be empty"
The stepdefinition corresponding to the above feature file is
import io.cucumber.java.en.Given;
import io.cucumber.java.en.Then;
import io.cucumber.java.en.When;
import org.junit.Assert;
import org.openqa.selenium.By;
import org.openqa.selenium.WebDriver;
import org.openqa.selenium.chrome.ChromeDriver;

public class ScenarioOutlineDefinitions {

    WebDriver driver;

    @Given("User is on Home page")
    public void userOnHomePage() {

        System.setProperty("webdriver.chrome.driver",
                "C:\\Users\\Vibha\\Software\\chromedriver_win32\\chromedriver.exe");

        driver = new ChromeDriver();
        driver.manage().window().maximize();
        driver.get("https://opensource-demo.orangehrmlive.com/");
    }

    @When("User enters username as {string} and password as {string}")
    public void entersCredentials(String userName, String passWord) throws InterruptedException {

        System.out.println("Username Entered");
        driver.findElement(By.name("txtUsername")).sendKeys(userName);

        System.out.println("Password Entered");
        driver.findElement(By.name("txtPassword")).sendKeys(passWord);

        driver.findElement(By.id("btnLogin")).submit();

    }

    @Then("User should be able to see an {string}")
    public void verifyErrorMessage(String expectedErrorMessage) throws InterruptedException {

        String actualErrorMessage = driver.findElement(By.id("spanMessage")).getText();
        System.out.println("Error Message :" + actualErrorMessage);
        Assert.assertEquals(actualErrorMessage,expectedErrorMessage);

        //close the browser
        driver.quit();

    }
}
TestRunner Class
Run the test by Right Click on TestRunner class and Click Run As > JUnit Test Application.
import io.cucumber.junit.Cucumber;
import io.cucumber.junit.CucumberOptions;
import org.junit.runner.RunWith;

@RunWith(Cucumber.class)
@CucumberOptions(monochrome = true, plugin = "pretty", features = "src/test/resources/Features/ScenarioOutline.feature",
        glue = "definitions")

public class CucumberRunnerTest {
}
Below is the output of the above program:
Data Driven Testing using Scenario Outline
Scenario Outline – It is used to repeat the same tests by passing different values or arguments to Step Definition
Examples – All scenario outlines have to be followed with the Examples section. This contains the data that has to be passed on to the scenario in Feature File.
We can repeatedly do something like the above and check for each parameter that we want to test, but that will make tests hard to maintain with many repetitions. Instead, we can use a Scenario Outline to add different inputs or arguments to the same scenario. We can re-write it like this:
Feature:  Example of Scenario Outline

  @InvalidCredentials
  Scenario Outline: Login with invalid credentials

    Given User is on Home page
    When User enters username as "<username>" and password as "<password>"
    Then User should be able to see an "<errorMessage>"

    Examples:
      | username   | password | errorMessage             |
      | Admin1     | admin1   | Invalid credentials      |
      |            | admin123 | Username cannot be empty |
      | Admin      |          | Password cannot be empty |
Note:- The table must have a header row corresponding to the variables in the Scenario Outline steps.
The Example’s section is a table where each argument variable represents a column in the table, separated by “|”. Each line below the header represents an individual run of the test case with the respective data. As a result, if there are 2 lines below the header in the Examples table, the script will run 2 times with its respective data.
When Cucumber starts to run this program, first, it will map parameters from the data table to placeholders like, and soon in the Feature File. The corresponding StepDefinition of Feature file is mentioned above. The steps can use delimited parameters that reference headers in the examples table. The cucumber will replace these parameters with values from the table before it tries to match the step against a step definition. There is no change in the StepDefinition as mentioned in the above example.
import io.cucumber.java.en.Given;
import io.cucumber.java.en.Then;
import io.cucumber.java.en.When;
import org.junit.Assert;
import org.openqa.selenium.By;
import org.openqa.selenium.WebDriver;
import org.openqa.selenium.chrome.ChromeDriver;

public class ScenarioOutlineDefinitions {

    WebDriver driver;

    @Given("User is on Home page")
    public void userOnHomePage() {

        System.setProperty("webdriver.chrome.driver",
                "C:\\Users\\Vibha\\Software\\chromedriver_win32\\chromedriver.exe");

        driver = new ChromeDriver();
        driver.manage().window().maximize();
        driver.get("https://opensource-demo.orangehrmlive.com/");
    }

    @When("User enters username as {string} and password as {string}")
    public void entersCredentials(String userName, String passWord) throws InterruptedException {

        System.out.println("Username Entered");
        driver.findElement(By.name("txtUsername")).sendKeys(userName);

        System.out.println("Password Entered");
        driver.findElement(By.name("txtPassword")).sendKeys(passWord);

        driver.findElement(By.id("btnLogin")).submit();

    }

    @Then("User should be able to see an {string}")
    public void verifyErrorMessage(String expectedErrorMessage) throws InterruptedException {

        String actualErrorMessage = driver.findElement(By.id("spanMessage")).getText();
        System.out.println("Error Message :" + actualErrorMessage);
        Assert.assertEquals(actualErrorMessage,expectedErrorMessage);

        //close the browser
        driver.quit();

    }
}
TestRunner Class
There are no changes in TestRunner class also.
import io.cucumber.junit.Cucumber;
import io.cucumber.junit.CucumberOptions;
import org.junit.runner.RunWith;

@RunWith(Cucumber.class)
@CucumberOptions(monochrome = true, plugin = "pretty", features = "src/test/resources/Features/ScenarioOutline.feature",
        glue = "definitions")

public class CucumberRunnerTest {
}
Below is the output in Console:
Congratulations. We have seen an example of Scenario Outline. I hope this is helpful. Happy Learning!!
The previous tutorial is all about JUnit Test Runner. In this tutorial, will show you how to generate reports in Cucumber.
Cucumber with JUnit gives us the capability to generate reports in the form of HTML, XML, JSON & TXT. Cucumber frameworks generate very good and detailed reports, which can be share with all stakeholders.
Let’s generate the Cucumber Report
Step 1 − Create a Maven project named MyCucumberProject in Eclipse.
Step 2 − Create a feature file named MyHoliday.feature under src/test/resources
Step 3 − Create a StepDefinition named MyHolidayDefinitions.java under src/test/java
Step 4 − Create a TestRunner class under src/test/resources
Step 5 − Run JUnit TestRunner class by right click Run As -> JUnit
Write the following code for Feature File
Feature: Book Flight and Hotel for Vacation

@BookOneWayFlight
Scenario: Book Flight for one way trip

  Given I live in Dublin with 2 adults and 2 kids
  And I want to book one way flight ticket from Dublin to London on 22nd Jan 2020
  When I search online
  Then TripAdvisor should provide me options of flights on 22nd Jan 2020
  And Cost of my flight should not be more than 50 Euro per person
  And Tickets should be refundable

@BookHotel
Scenario: Book Hotel for one the trip

  Given I need 1 room with 2 double beds
  And I want to book hotel from 22nd Jan 2020 to 25th Jan 2020
  When I search online
  Then TripAdvisor should provide me options of hotels for time period of 22nd Jan 2020 to 25th Jan 2020
  And Fare of my room should not be more than 200 Euro per night
  And Breakfast should be included in the room fare
Below is the full program, which shows the step definition of above mentioned feature
import io.cucumber.java.en.And;
import io.cucumber.java.en.Given;
import io.cucumber.java.en.Then;
import io.cucumber.java.en.When;

public class MyHolidayDefinitions {

          @Given("^I live in Dublin with 2 adults and 2 kids$")
          public void needFlight() {
                   System.out.println("I live in Dublin with 2 adults and 2 kids");
          }

          @Given("^I need 1 room with 2 double beds$")
          public void needRoom() {
                   System.out.println("I need 1 room with 2 double beds");
          }

          @When("^I search online$")
          public void onlineSearch() {
                   System.out.println("I search online");
          }

          @Then("^TripAdvisor should provide me options of flights on 22nd Jan 2020$")
          public void searchFlightInTripAdvisor() {
                   System.out.println("TripAdvisor should provide me options of flights on 22nd Jan 2020");
          }

         @Then("^Cost of my flight should not be more than 50 Euro per person$")
          public void flightFare() {
                   System.out.println("Cost of my flight should not be more than 50 Euro per person");
          }

          @Then("^TripAdvisor should provide me options of hotels for time period of 22nd Jan 2020 to 25th Jan 2020")
          public void searchRoomInTripAdvisor() {
                   System.out.println(
                                      "TripAdvisor should provide me options of hotels for time period of 22nd Jan 2020 to 25th Jan 2020");
          }

          @And("^I want to book one way flight ticket from Dublin to London on 22nd Jan 2020$")
          public void ticketType() {
                   System.out.println("I want to book one way flight ticket from Dublin to London on 22nd Jan 2020");
          }

          @And("^I want to book hotel from 22nd Jan 2020 to 25th Jan 2020$")
          public void stayDuration() {
                   System.out.println("I want to book hotel from 22nd Jan 2020 to 25th Jan 2020");
          }

          @And("^Fare of my room should not be more than 200 Euro per night$")
          public void roomFare() {
                   System.out.println("Fare of my room should not be more than 200 Euro per night");
          }

          @And("^Breakfast should be included in the room fare$")
          public void includeBreakfast() {
                   System.out.println("Breakfast should be included in the room fare");
          }

          @And("^Tickets should be refundable$")
          public void refunableTicket() {
                   System.out.println("Tickets should be refundable");
          }
}
Cucumber HTML Reports
For HTML reports, add html:target/cucumber-reports to the @CucumberOptions plugin option.
We have specified the path of the Cucumber report, which we want it to generate it under the target folder. This will generate an HTML report at the location mentioned in the formatter
HTML Report Output
Cucumber Json Reports
For Json reports, add json:target/cucumber-reports/Cucumber.json to the @CucumberOptions plugin option.