Extent Reports Version 5 for Cucumber7 and JUnit5

HOME

The previous tutorial explained the steps to generate ExtentReports Version for Cucumber7 with TestNG. This tutorial explains the steps needed to be followed to generate an ExtentReports Version5 for Cucumber 7 with JUnit5.

Prerequisite:

  • Java 17
  • Maven or Gradle
  • JAVA IDE (like Eclipse, IntelliJ, or so on)
  • Cucumber Eclipse plugin (in case using Eclipse)

Project Structure
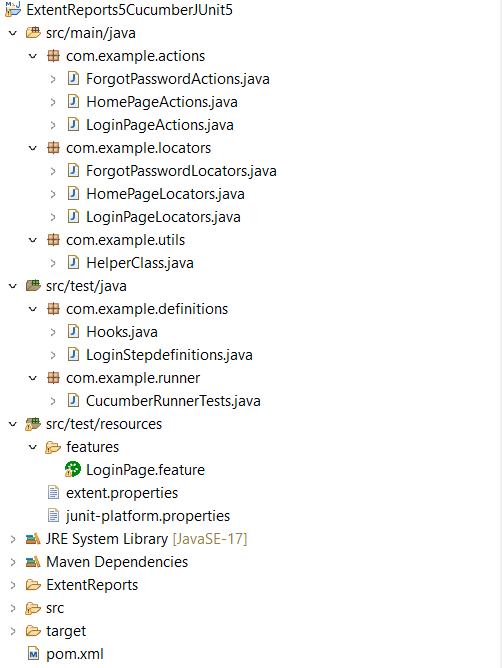
There is a tutorial that explains the steps to integrate Cucumber 7 with JUnit5. Please refer to this tutorial – Integration of Cucumber7 with Selenium and JUnit5.

Now, let us add the extra steps needed to generate the ExtentRport Version5.

New Features in ExtentReports Version 5

Report Attachments 

To add attachments, like screen images, two settings need to be added to the extent.properties. Firstly property, named screenshot.dir, is the directory where the attachments are stored. Secondly is screenshot.rel.path, which is the relative path from the report file to the screenshot directory.

extent.reporter.spark.out=Reports/Spark.html
 
screenshot.dir=/Screenshots/
screenshot.rel.path=../Screenshots/

Extent PDF Reporter

The PDF reporter summarizes the test run results in a dashboard and other sections with the feature, scenario, and, step details. The PDF report needs to be enabled in the extent.properties file.

#PDF Report
extent.reporter.pdf.start=true
extent.reporter.pdf.out=PdfReport/ExtentPdf.pdf 

Ported HTML Reporter

The original HTML Extent Reporter was deprecated in 4.1.3 and removed in 5.0.0. The HTML report available in the adapter is based on the same code base and is similar in appearance. The major changes are in the Freemarker template code which has been modified to work with the Extent Reports version 5. The HTML report needs to be enabled in the extent.properties file.

#HTML Report
extent.reporter.html.start=true
extent.reporter.html.out=HtmlReport/ExtentHtml.html

Customized Report Folder Name

To enable the report folder name with date and\or time details, two settings need to be added to the extent.properties. These are basefolder.name and basefolder.datetimepattern. These will be merged to create the base folder name, inside which the reports will be generated.

#FolderName
basefolder.name=ExtentReports/SparkReport_
basefolder.datetimepattern=d_MMM_YY HH_mm_ss

Attach Image as Base64 String

This feature can be used to attach images to the Spark report by setting the src attribute of the img tag to a Base64 encoded string of the image. When this feature is used, no physical file is created. There is no need to modify any step definition code to use this. To enable this, use the below settings in extent.properties, which is false by default.

extent.reporter.spark.base64imagesrc=true

Environment or System Info Properties

 It is now possible to add environment or system info properties in the extent.properties or pass them in the maven command line. 

#System Info
systeminfo.os=windows
systeminfo.version=10

Step 1 – Add Maven dependencies to the POM

Add ExtentReport dependency

<dependency>
    <groupId>com.aventstack</groupId>
    <artifactId>extentreports</artifactId>
    <version>5.1.1</version>
</dependency>

Add tech grasshopper maven dependency for Cucumber.

<dependency>
    <groupId>tech.grasshopper</groupId>
    <artifactId>extentreports-cucumber7-adapter</artifactId>
    <version>1.14.0</version>
</dependency>

The complete POM.xml will look like as shown below with other Selenium and JUnit5 dependencies.

<?xml version="1.0" encoding="UTF-8"?>

<project xmlns="http://maven.apache.org/POM/4.0.0" xmlns:xsi="http://www.w3.org/2001/XMLSchema-instance"
  xsi:schemaLocation="http://maven.apache.org/POM/4.0.0 http://maven.apache.org/xsd/maven-4.0.0.xsd">
  <modelVersion>4.0.0</modelVersion>

  <groupId>com.example</groupId>
  <artifactId>ExtentReports5CucumberJUnit5</artifactId>
  <version>0.0.1-SNAPSHOT</version>

  <name>ExtentReports5CucumberJUnit5</name>
  <!-- FIXME change it to the project's website -->
  <url>http://www.example.com</url>

 <properties>
        <project.build.sourceEncoding>UTF-8</project.build.sourceEncoding>
        <cucumber.version>7.14.0</cucumber.version>
        <selenium.version>4.15.0</selenium.version>
        <junit.jupiter.version>5.10.1</junit.jupiter.version>
        <extentreports.cucumber7.adapter.version>1.14.0</extentreports.cucumber7.adapter.version>
        <extentreports.version>5.1.1</extentreports.version>
        <maven.compiler.plugin.version>3.11.0</maven.compiler.plugin.version>
        <maven.surefire.plugin.version>3.2.1</maven.surefire.plugin.version>
        <maven.compiler.source.version>17</maven.compiler.source.version>
        <maven.compiler.target.version>17</maven.compiler.target.version>
    </properties>
 
    <dependencyManagement>
        <dependencies>
            <dependency>
                <groupId>io.cucumber</groupId>
                <artifactId>cucumber-bom</artifactId>
                <version>${cucumber.version}</version>
                <type>pom</type>
                <scope>import</scope>
            </dependency>
            <dependency>
                <groupId>org.junit</groupId>
                <artifactId>junit-bom</artifactId>
                <version>${junit.jupiter.version}</version>
                <type>pom</type>
                <scope>import</scope>
            </dependency>
        </dependencies>
    </dependencyManagement>
 
    <dependencies>
 
        <dependency>
            <groupId>io.cucumber</groupId>
            <artifactId>cucumber-java</artifactId>
            <scope>test</scope>
        </dependency>
 
        <dependency>
            <groupId>io.cucumber</groupId>
            <artifactId>cucumber-junit-platform-engine</artifactId>
            <scope>test</scope>
        </dependency>
 
        <!-- JUnit Platform -->
        <dependency>
            <groupId>org.junit.platform</groupId>
            <artifactId>junit-platform-suite</artifactId>
            <scope>test</scope>
        </dependency>
 
        <dependency>
            <groupId>org.junit.jupiter</groupId>
            <artifactId>junit-jupiter-engine</artifactId>
            <scope>test</scope>
        </dependency>
 
        <!-- Selenium -->
        <dependency>
            <groupId>org.seleniumhq.selenium</groupId>
            <artifactId>selenium-java</artifactId>
            <version>${selenium.version}</version>
        </dependency>
        
          <!-- Cucumber ExtentReport Adapter -->
        <dependency>
            <groupId>tech.grasshopper</groupId>
            <artifactId>extentreports-cucumber7-adapter</artifactId>
            <version>${extentreports.cucumber7.adapter.version}</version>
        </dependency>
 
        <!-- Extent Report -->
        <dependency>
            <groupId>com.aventstack</groupId>
            <artifactId>extentreports</artifactId>
            <version>${extentreports.version}</version>
        </dependency>
 
    </dependencies>
 
    <build>
        <plugins>
            <plugin>
                <groupId>org.apache.maven.plugins</groupId>
                <artifactId>maven-compiler-plugin</artifactId>
                <version>${maven.compiler.plugin.version}</version>
                <configuration>
                    <source>${maven.compiler.source.version}</source>
                    <target>${maven.compiler.target.version}</target>
                </configuration>
            </plugin>
            <plugin>
                <groupId>org.apache.maven.plugins</groupId>
                <artifactId>maven-surefire-plugin</artifactId>
                <version>${maven.surefire.plugin.version}</version>
                <dependencies>
                    <dependency>
                        <groupId>org.junit.jupiter</groupId>
                        <artifactId>junit-jupiter-engine</artifactId>
                        <version>${junit.jupiter.version}</version>
                    </dependency>
                </dependencies>
            </plugin>
 
        </plugins>
    </build>
</project>

Step 2 – Create extent.properties file in src/test/resources

We need to create the extent.properties file in the src/test/resources folder for the grasshopper extent report adapter to recognize it. Using a property file for reporting is quite helpful if you want to define several different properties.

#Extent Report
extent.reporter.spark.start=true
extent.reporter.spark.out=Reports/Spark.html
 
#PDF Report
extent.reporter.pdf.start=true
extent.reporter.pdf.out=PdfReport/ExtentPdf.pdf
 
#HTML Report
extent.reporter.html.start=true
extent.reporter.html.out=HtmlReport/ExtentHtml.html
 
#FolderName
basefolder.name=ExtentReports/SparkReport_
basefolder.datetimepattern=d_MMM_YY HH_mm_ss
 
#Screenshot
screenshot.dir=/Screenshots/
screenshot.rel.path=../Screenshots/
 
#Base64
extent.reporter.spark.base64imagesrc=true
 
#System Info
systeminfo.os=windows
systeminfo.version=10

Step 3 – Create a Cucumber Test Runner class in src/test/java

Add the extent report cucumber adapter to the runner class.

import static io.cucumber.junit.platform.engine.Constants.GLUE_PROPERTY_NAME;
import static io.cucumber.junit.platform.engine.Constants.PLUGIN_PROPERTY_NAME;
import org.junit.platform.suite.api.ConfigurationParameter;
import org.junit.platform.suite.api.IncludeEngines;
import org.junit.platform.suite.api.SelectClasspathResource;
import org.junit.platform.suite.api.Suite;

@Suite
@IncludeEngines("cucumber")
@SelectClasspathResource("features")
@SelectClasspathResource("com.example")
@ConfigurationParameter(key = PLUGIN_PROPERTY_NAME, value = "com.aventstack.extentreports.cucumber.adapter.ExtentCucumberAdapter:") 
@ConfigurationParameter(key = GLUE_PROPERTY_NAME, value = "com.example")
 
public class CucumberRunnerTests  {
 
}

Step 4 – Execute the code

To execute the code, run the tests from the command line by using the below command

mvn clean test

Step 5 – View ExtentReport

Refresh the project and will see a new folder – SparkReport_ which further contains 4 folders – HtmlReport, PdfReport, Reports, and Screenshots.
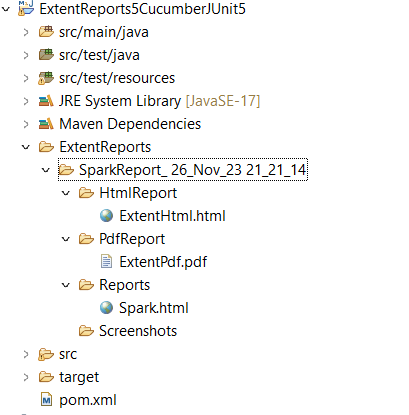
The ExtentReport will be present in the Reports folder with the name Spark.html. PDF Report is present in the PdfReport folder and HTML Report is present in the HtmlReport folder. We can see that the Screenshots folder is empty because we have used the base64imagesrc feature which resulted in no physical screenshots. The screenshots are embedded in the reports.

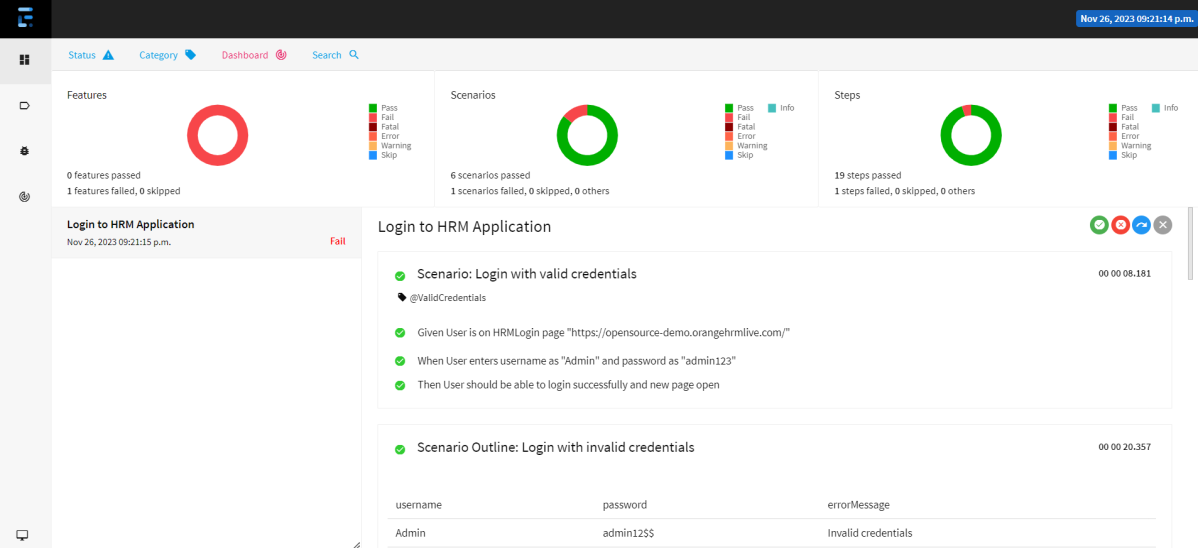
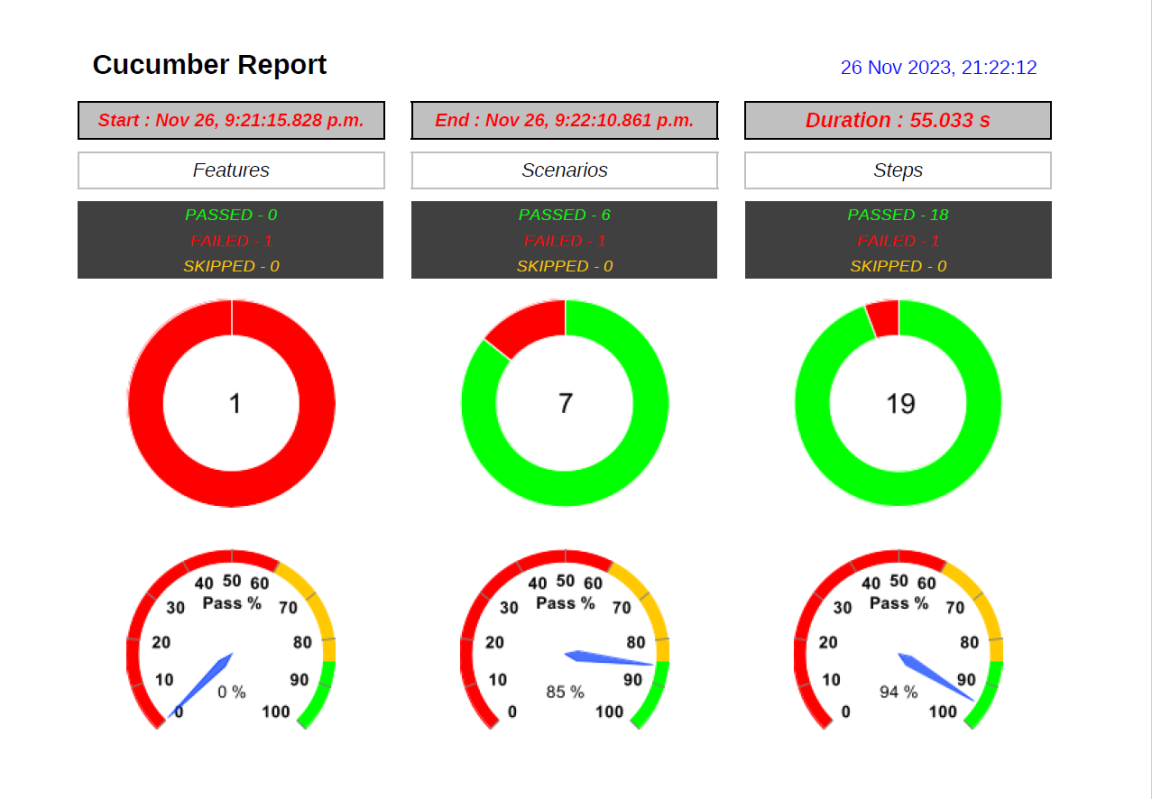
Right-click and open the ExtentHtml.html report with Web Browser. The report also has a summary section that displays the summary of the execution. The summary includes the overview of the pass/fail using a pictogram, start time, end time, and pass/fail details of features as shown in the image below.

ExtentHtml

This is the image of the Dashboard of the ExtentReport.
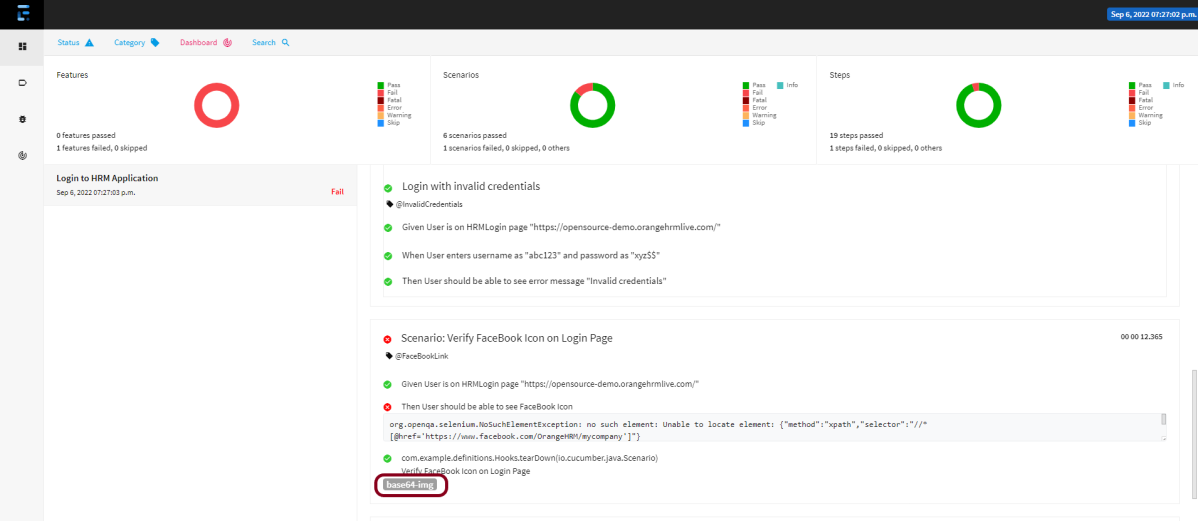
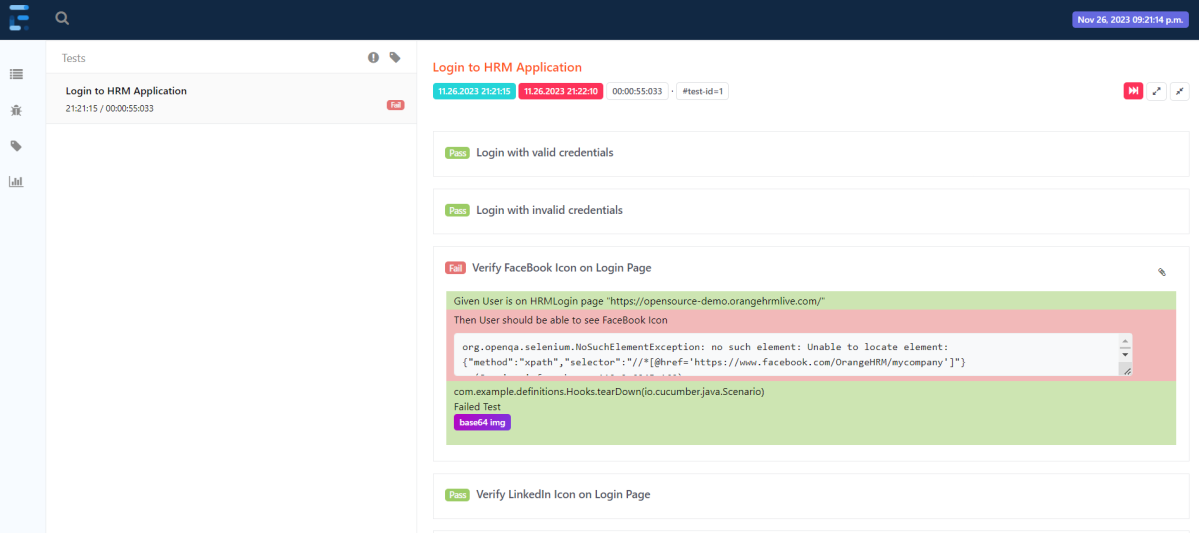
The failed test has a screenshot embedded in it. Double-click on base64 image and it will open the screenshot in full screen.
PDF Report
Spark Report

Right-click and open the Spark.html report with Web Browser.
We are done! Congratulations on making it through this tutorial and hope you found it useful! Happy Learning!!

Log4j 2 Tutorials

HOME

How to save Log4j 2 logs in output file using XML Configuration

HOME

<project xmlns="http://maven.apache.org/POM/4.0.0" xmlns:xsi="http://www.w3.org/2001/XMLSchema-instance"
  xsi:schemaLocation="http://maven.apache.org/POM/4.0.0 http://maven.apache.org/xsd/maven-4.0.0.xsd">
  <modelVersion>4.0.0</modelVersion>

  <groupId>com.example</groupId>
  <artifactId>Log4j2_Demo</artifactId>
  <version>1.0-SNAPSHOT</version>
  <packaging>jar</packaging>

  <name>Log4j2_Demo</name>
  <url>http://maven.apache.org</url>

  <properties>
    <selenium.version>4.15.0</selenium.version>
    <testng.version>7.8.0</testng.version>
    <log4j.version>3.0.0-alpha1</log4j.version>
    <maven.compiler.version>3.11.0</maven.compiler.version>
    <project.build.sourceEncoding>UTF-8</project.build.sourceEncoding>
    <maven.surefire.failsafe.version>3.1.2</maven.surefire.failsafe.version>
    <maven.compiler.source>17</maven.compiler.source>
    <maven.compiler.target>17</maven.compiler.target>
  </properties>

  <dependencies>

    <!-- TestNG Dependency -->
    <dependency>
      <groupId>org.testng</groupId>
      <artifactId>testng</artifactId>
      <version>${testng.version}</version>
      <scope>test</scope>
    </dependency>


    <!-- Log4j Dependency -->
    <dependency>
      <groupId>org.apache.logging.log4j</groupId>
      <artifactId>log4j-core</artifactId>
      <version>${log4j.version}</version>
    </dependency>

    <!-- Selenium Dependency -->
    <dependency>
      <groupId>org.seleniumhq.selenium</groupId>
      <artifactId>selenium-java</artifactId>
      <version>${selenium.version}</version>
    </dependency>

  </dependencies>

  <build>

    <plugins>
      <plugin>
        <groupId>org.apache.maven.plugins</groupId>
        <artifactId>maven-surefire-plugin</artifactId>
        <version>${maven.surefire.failsafe.version}</version>
        <configuration>
          <skipTests>false</skipTests>
          <skip>false</skip>
          <testFailureIgnore>true</testFailureIgnore>
        </configuration>
      </plugin>

      <plugin>
        <groupId>org.apache.maven.plugins</groupId>
        <artifactId>maven-compiler-plugin</artifactId>
        <version>${maven.compiler.version}</version>
        <configuration>
          <source>${maven.compiler.source}</source>
          <target>${maven.compiler.target}</target>
          <fork>true</fork>
        </configuration>
      </plugin>
    </plugins>

  </build>

</project>

<?xml version="1.0" encoding="UTF-8"?>
<Configuration status="WARN">
    <Appenders>
        <Console name="LogToConsole" target="SYSTEM_OUT">
            <PatternLayout pattern="%d{HH:mm:ss.SSS} [%t] %-5level %logger{36} - %msg%n"/>
        </Console>
        <File name="LogToFile" fileName="logs/app.log">
            <PatternLayout>
                <Pattern>%d %p %c{1.} [%t] %m%n</Pattern>
            </PatternLayout>
        </File>
    </Appenders>
    <Loggers>
        <Logger name="com.example" level="debug" additivity="false">
            <AppenderRef ref="LogToFile"/>
            <AppenderRef ref="LogToConsole"/>
        </Logger>
        <Root level="error">
            <AppenderRef ref="LogToFile"/>
            <AppenderRef ref="LogToConsole"/>
        </Root>
    </Loggers>
</Configuration>

<Pattern>%d %p %c{1.} [%t] %m%n</Pattern>
<Configuration status="WARN">

import org.apache.logging.log4j.LogManager;
import org.apache.logging.log4j.Logger;

private static Logger logger = LogManager.getLogger();

import io.github.bonigarcia.wdm.WebDriverManager;
import org.apache.logging.log4j.LogManager;
import org.apache.logging.log4j.Logger;
import org.openqa.selenium.By;
import org.openqa.selenium.WebDriver;
import org.openqa.selenium.chrome.ChromeDriver;
import org.openqa.selenium.chrome.ChromeOptions;
import org.testng.Assert;
import org.testng.annotations.AfterMethod;
import org.testng.annotations.BeforeMethod;
import org.testng.annotations.Test;
import java.util.concurrent.TimeUnit;

public class Log4j_XML_Example {
    
    WebDriver driver;

    By userName = By.name("username");
    By passWord = By.name("password");
    By loginBtn = By.xpath("//*[@id='app']/div[1]/div/div[1]/div/div[2]/div[2]/form/div[3]/button");
    By loginTitle = By.xpath("//*[@id='app']/div[1]/div/div[1]/div/div[2]/h5");
    By dashboardPage = By.xpath("//*[@id='app']/div[1]/div[1]/header/div[1]/div[1]/span/h6");

    // Creating a logger
    private static Logger logger = LogManager.getLogger();

    @BeforeMethod
    public void setUp() {

        logger.info("Open a Chrome Web Browser");
        ChromeOptions options=new ChromeOptions();
        options.addArguments("--start-maximized");
        driver=new ChromeDriver(options);
        driver.manage().timeouts().implicitlyWait(10, TimeUnit.SECONDS);
        driver.get("https://opensource-demo.orangehrmlive.com/");
        logger.info("Open the application");
    }

    @Test(description = "This test validates title of login functionality", priority = 0)
    public void verifyLoginPageTitle() {

        logger.info("Verify the Login page title");
        String expectedTitle = driver.findElement(loginTitle).getText();

        logger.info("Actual Title :" + expectedTitle);
        Assert.assertTrue(expectedTitle.equalsIgnoreCase("Login"));
    }

    @Test(description = "This test validates  successful login to Home page", priority = 1)
    public void verifyloginPage() {

        logger.info("Enter Username");
        driver.findElement(userName).sendKeys("Admin");

        logger.info("Enter Password");
        driver.findElement(passWord).sendKeys("admin123");

        driver.findElement(loginBtn).submit();

        logger.info("New page - Dashboard is opened");
        String newPageText = driver.findElement(dashboardPage).getText();

        logger.info("Heading of new page :" + newPageText);
        Assert.assertTrue(newPageText.contains("Dashboard"));

    }

    @AfterMethod
    public void teardown() {

        logger.info("Close the webpage");
        driver.quit();
    }

}

WebDriver Navigation Commands – Navigate, Forward, Back, Refresh in Selenium WebDriver

HOME

1) Navigate

This command loads a new web page in the current window as mentioned in the argument. This command accepts a string parameter and returns nothing.

This command performs the same action as the get() command.

Syntax:

to(String arg0):void

Command:

driver.navigate().to(URL);

2) Forward

This command acts as the same as clicking on the Forward button of any web browser. This command does not require any parameter, and void means return nothing. 

Syntax:

forward(): void 

Command:

driver.navigate().forward();

3) Back

This command acts the same as clicking on the Back button of any web browser. This command does not require any parameter, and void means return nothing. 

Syntax:

back(): void

Command:

driver.navigate().back();

4) Refresh

This command refreshes the current page. This command does not require any parameter, and void means return nothing. 

Syntax:

 refresh(): void 

Command:

driver.navigate().refresh();

How to use Navigation Commands in Selenium WebDriver:

  • Create an instance of ChromeDriver() to handle Navigation commands.
  • Wait until Page Load.
  • Navigate to URL – https://selenium.dev
  • Navigate to another URL.
  • Navigate to the back page.
  • Navigate to the forward page.
  • Refresh the current page.
  • Close the browser

import java.time.Duration;
import org.openqa.selenium.By;
import org.openqa.selenium.WebDriver;
import org.openqa.selenium.chrome.ChromeDriver;
import org.openqa.selenium.chrome.ChromeOptions;

public class navigationCommandsDemo {
	
	public static void main(String[] args) throws InterruptedException {

		ChromeOptions options = new ChromeOptions();
		options.addArguments("--start-maximized");
		options.setImplicitWaitTimeout(Duration.ofSeconds(10));
		
		WebDriver driver = new ChromeDriver(options);
        driver.navigate().to("https://selenium.dev");
        
        //Get the Title of web page
        String PageTitle= driver.getTitle();
        System.out.println("Title of Page 1 is : " + PageTitle);    
        
        Thread.sleep(2000);
        System.out.println("Navigate to New Page 2");
        driver.findElement(By.xpath("//*[@id='main_navbar']/ul/li[4]/a/span")).click();

        Thread.sleep(2000); 
        System.out.println("Navigate back to Old Page 1");
        driver.navigate().back();
 
        Thread.sleep(2000);
        System.out.println("Navigate forward to New Page 2");    
        driver.navigate().forward();
    
        Thread.sleep(2000);
        System.out.println("Refresh the existing page");    
        driver.navigate().refresh();
        
        //quit the browser
        driver.quit();
	}

}

Cucumber Tutorial – How to setup Cucumber with Eclipse

HOME

In the previous tutorials, we discussed BDD (Behaviour Driven Development) and Gherkin. Cucumber is one such open-source tool, which supports Behaviour Driven Development (BDD). In simple words, Cucumber can be defined as a testing framework, driven by plain English. It serves as documentation, automated tests, and development aid – all in one.

In this tutorial, we will set up Cucumber with Eclipse. 

Implementation Steps

1. Download and Install Java

Java is a robust programming language. Java is a general-purpose programming language that is concurrent; class-based and object-oriented language. Java follows the concept of “write once and run anywhere (WORA)” which means that compiled Java code can be run on all different platforms that support Java without the need for recompilation. Cucumber supports the Java platform for execution. Click here to know How to install Java.

2. Download and Start Eclipse

Eclipse is an Integrated Development Environment (IDE). It contains a base workspace and an extensible plug-in system for customizing the environment. To download Eclipse, please refer to this tutorial – How to install Eclipse.

3. Maven –  How to install Maven on Windows 

Apache Maven is a software project management and comprehension tool. It uses the concept of a project object model (POM), Maven can manage a project’s build, reporting, and documentation from a central piece of information. MAVEN helps us in creating the project structure and managing and downloading the dependencies. We need to define the required dependencies in pom.xml. To install Maven on Windows, please refer to this tutorial – How to install Maven.

4. Install Cucumber Eclipse Plugin

The Cucumber plugin is an Eclipse plugin that allows eclipse to understand the Gherkin syntax. Cucumber Eclipse Plugin highlights the keywords present in Feature File. To install Cucumber Eclipse Plugin, please refer to this tutorial – How to install Cucumber Eclipse Plugin

5. Configure Cucumber with Maven

Step 1 – Create a new Maven Project.

Click here to know the steps to create a new Maven project –  How to create a Maven project.

Step 2 – Open pom.xml of the project
       

Step 3 − Add dependency for selenium

This will indicate to Maven that Selenium jar files are to download from the central repository to the local repository.                                                                             

Open pom.xml in the edit mode, create dependencies tag (), inside the project tag.                   

 <!-- Selenium -->
 <dependency>
      <groupId>org.seleniumhq.selenium</groupId>
      <artifactId>selenium-java</artifactId>
      <version>4.15.0</version>
 </dependency>

Step 4 –  Add dependency for Cucumber-Java

This will indicate Maven, which Cucumber files are to be downloaded from the central repository to the local repository.  Create one more dependency tag.

<dependency>
    <groupId>io.cucumber</groupId>
    <artifactId>cucumber-java</artifactId>
    <version>7.14.0</version>
</dependency>

Step 5 – Add dependency for Cucumber-JUnit

This will indicate Maven, which Cucumber JUnit files are to download from the central repository to the local repository. Create one more dependency tag. 

<dependency>
    <groupId>io.cucumber</groupId>
    <artifactId>cucumber-junit</artifactId>
    <version>7.14.0</version>
    <scope>test</scope>
</dependency>

Step 6 –  Add dependency for JUnit

This will indicate Maven, which JUnit files are to be downloaded from the central repository to the local repository. Create one more dependency tag.

<dependency>
   <groupId>junit</groupId>
   <artifactId>junit</artifactId>
   <version>4.13.2</version>
   <scope>test</scope>
</dependency>

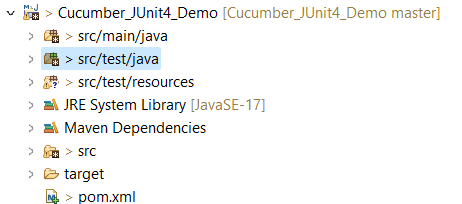
Below is the screenshot which shows that Maven Project called Cucumber_JUnit4_Demo.

After adding the above mention dependencies, pom.xml looks like the image below

<project xmlns="http://maven.apache.org/POM/4.0.0" xmlns:xsi="http://www.w3.org/2001/XMLSchema-instance"
  xsi:schemaLocation="http://maven.apache.org/POM/4.0.0 http://maven.apache.org/xsd/maven-4.0.0.xsd">
  <modelVersion>4.0.0</modelVersion>

  <groupId>org.example</groupId>
  <artifactId>Cucumber_JUnit4_Demo</artifactId>
  <version>1.0-SNAPSHOT</version>
  <packaging>jar</packaging>

  <name>Cucumber_JUnit4_Demo</name>
  <url>http://maven.apache.org</url>

  <properties>
    <project.build.sourceEncoding>UTF-8</project.build.sourceEncoding>
    <cucumber.version>7.14.0</cucumber.version>
    <selenium.version>4.15.0</selenium.version>
    <junit.version>4.13.2</junit.version>
  </properties>

  <dependencies>

    <dependency>
      <groupId>io.cucumber</groupId>
      <artifactId>cucumber-java</artifactId>
      <version>${cucumber.version}</version>
    </dependency>

    <dependency>
      <groupId>io.cucumber</groupId>
      <artifactId>cucumber-junit</artifactId>
      <version>${cucumber.version}</version>
      <scope>test</scope>
    </dependency>

    <!-- Selenium -->
    <dependency>
      <groupId>org.seleniumhq.selenium</groupId>
      <artifactId>selenium-java</artifactId>
      <version>${selenium.version}</version>
    </dependency>

    <!-- JUnit4 -->
    <dependency>
      <groupId>junit</groupId>
      <artifactId>junit</artifactId>
      <version>${junit.version}</version>
      <scope>test</scope>
    </dependency>
  </dependencies>

</project>

After adding the dependencies and then building the project, the below image shows the entire jar files added to the Maven Dependency.

Congratulations!! We are done with the setup of the Cucumber in Eclipse. Happy Learning.

Integration Testing of Springboot with Cucumber and JUnit4

Last Updated On

HOME

In this tutorial, I am going to build an automation framework to test the Springboot application with Cucumber, Rest Assured, and JUnit4.

Table of Contents

  1. What is Springboot?
  2. What is Cucumber?
  3. Dependency List
  4. Test Automation Framework Implementation
    1. Add SpringbootTest, Rest-Assured, and Cucumber dependencies to the project
    2. Create a directory src/test/resources and create a feature file under src/test/resources
    3. Create the Step Definition class or Glue Code for the Test Scenario under src/test/java
    4. Create a Cucumber Runner class under src/test/java
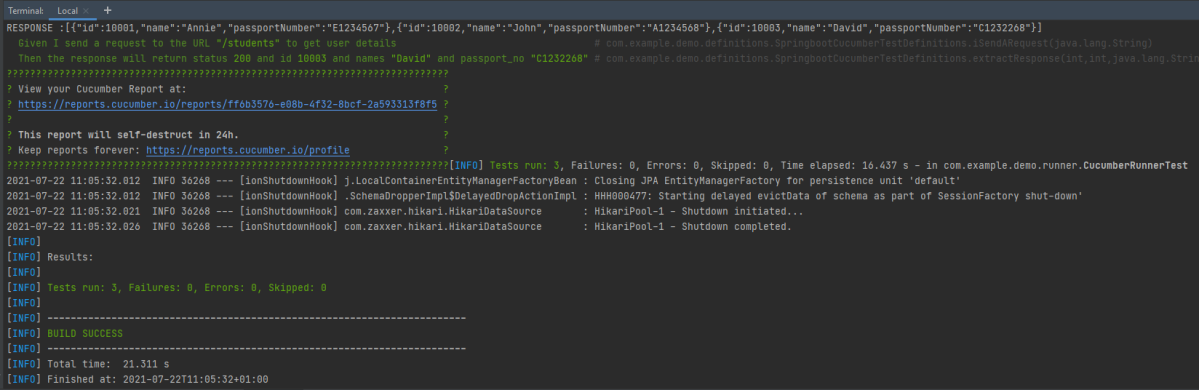
    5. Run the tests from JUnit
    6. Run the tests from Command Line
    7. Cucumber Report Generation

What is Springboot?

Spring Boot is an open-source micro framework maintained by a company called Pivotal. It provides Java developers with a platform to get started with an auto-configurable production-grade Spring application. With it, developers can get started quickly without losing time on preparing and configuring their Spring application.

What is Cucumber?

A cucumber is a software tool that supports behavior-driven development (BDD). Cucumber can be defined as a testing framework, driven by plain English. It serves as documentation, automated tests, and development aid – all in one.

Dependency List

  1. Springboot – 2.5.2
  2. Cucumber – 6.10.4
  3. Java 11
  4. JUnit – 4.13.2
  5. Maven – 3.8.1
  6. RestAssured – 4.3.3
  7. JUnit Vintage Engine (To run the tests through command line)

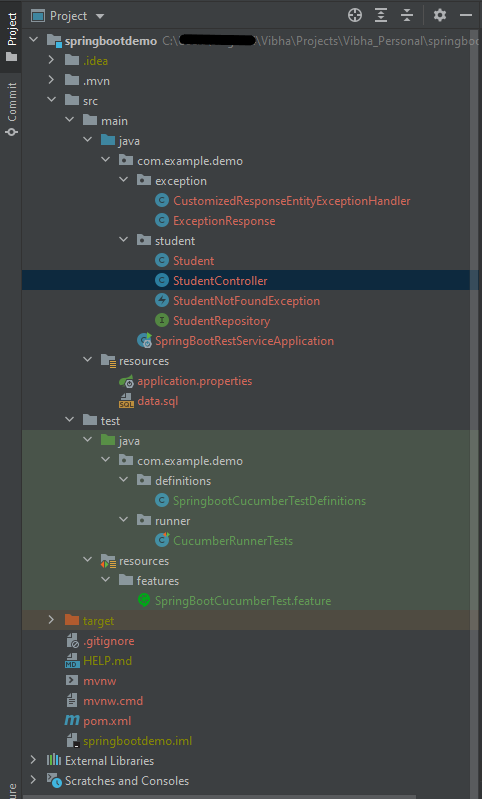
Below is the structure of a SpringBoot application project.

Below are various Java classes present in a SpringBoot REST Application.

  • SpringBootRestServiceApplication.java – The Spring Boot Application class is generated with Spring Initializer. This class acts as the launching point for the application.
  • pom.xml – This contains all the dependencies needed to build this project. 
  • Student.java – This is JPA Entity for Student class
  • StudentRepository.java – This is JPA Repository for Student. This is created using Spring Data JpaRepository.
  • StudentController.java – Spring Rest Controller exposing all services on the student resource.
  • CustomizedExceptionHandler.java – This implements global exception handling and customizes the responses based on the exception type.
  • ErrorDetails.java – Response Bean to use when exceptions are thrown from API.
  • StudentNotFoundException.java – Exception thrown from resources when the student is not found.
  • data.sql –  Data is loaded from data.sql into the Student table. Spring Boot would execute this script after the tables are created from the entities.
  • application.properties – Spring Boot automatically loads the application.properties whenever it starts up. You can de-reference values from the property file in the Java code through the environment.

Student.java

import javax.persistence.Entity;
import javax.persistence.GeneratedValue;
import javax.persistence.Id;
import javax.validation.constraints.NotBlank;
import javax.validation.constraints.NotNull;
import javax.validation.constraints.Size;

@Entity
public class Student {
    @Id
    @GeneratedValue
    private Long id;

    @NotNull
    @Size(min = 4, message = "Name should have atleast 4 characters")
    private String name;

    @NotBlank(message = "passportNumber is mandatory")
    private String passportNumber;

    public Student() {
        super();
    }

    public Student(Long id, String name, String passportNumber) {
        super();
        this.id = id;
        this.name = name;
        this.passportNumber = passportNumber;
    }

    public Long getId() {
        return id;
    }

    public void setId(Long id) {
        this.id = id;
    }

    public String getName() {
        return name;
    }

    public void setName(String name) {
        this.name = name;
    }

    public String getPassportNumber() {
        return passportNumber;
    }

    public void setPassportNumber(String passportNumber) {
        this.passportNumber = passportNumber;
    }
}

StudentController

import static org.springframework.hateoas.server.mvc.WebMvcLinkBuilder.linkTo;
import static org.springframework.hateoas.server.mvc.WebMvcLinkBuilder.methodOn;
import java.net.URI;
import java.util.List;
import java.util.Optional;
import javax.validation.Valid;
import org.springframework.beans.factory.annotation.Autowired;
import org.springframework.hateoas.EntityModel;
import org.springframework.hateoas.server.mvc.WebMvcLinkBuilder;
import org.springframework.http.ResponseEntity;
import org.springframework.web.bind.annotation.GetMapping;
import org.springframework.web.bind.annotation.PathVariable;
import org.springframework.web.bind.annotation.RequestBody;
import org.springframework.web.bind.annotation.RestController;
import org.springframework.web.servlet.support.ServletUriComponentsBuilder;

@RestController
public class StudentController {

    @Autowired
    private StudentRepository studentRepository;

    @GetMapping("/students/{id}")
    public EntityModel<Student> retrieveStudent(@PathVariable long id) {
        Optional<Student> student = studentRepository.findById(id);

        if (!student.isPresent())
            throw new StudentNotFoundException("id-" + id);

        EntityModel<Student> resource = EntityModel.of(student.get());

        WebMvcLinkBuilder linkTo = linkTo(methodOn(this.getClass()).retrieveAllStudents());

        resource.add(linkTo.withRel("all-students"));

        return resource;
    }
}

StudentRepository

import org.springframework.data.jpa.repository.JpaRepository;
import org.springframework.stereotype.Repository;

@Repository
public interface StudentRepository extends JpaRepository<Student, Long>{

}

SpringBootRestServiceApplication

import org.springframework.boot.SpringApplication;
import org.springframework.boot.autoconfigure.SpringBootApplication;

@SpringBootApplication
public class SpringBootRestServiceApplication {

    public static void main(String[] args) {

        SpringApplication.run(SpringBootRestServiceApplication.class, args);
    }

}

application.properties

spring.jpa.defer-datasource-initialization=true

data.sql

insert into student values(10001,'Annie', 'E1234567');
insert into student values(10002,'John', 'A1234568');
insert into student values(10003,'David','C1232268');

Test Automation Framework Implementation

Step 1 – Add SpringbootTest, Rest-Assured, and Cucumber dependencies to the project

To Test a SpringBoot Application, we are using SpringBoot Test, JUnit, Cucumber, and Rest Assured. Below mentioned dependencies are added in POM.xml

        <dependency>
            <groupId>org.springframework.boot</groupId>
            <artifactId>spring-boot-starter-test</artifactId>
            <scope>test</scope>
        </dependency>

        <dependency>
            <groupId>junit</groupId>
            <artifactId>junit</artifactId>
            <version>4.13.2</version>
        </dependency>

        <dependency>
            <groupId>io.rest-assured</groupId>
            <artifactId>rest-assured</artifactId>
            <version>4.3.3</version>
            <scope>test</scope>
        </dependency>

        <dependency>
            <groupId>io.cucumber</groupId>
            <artifactId>cucumber-java</artifactId>
            <version>6.10.4</version>
        </dependency>

        <dependency>
            <groupId>io.cucumber</groupId>
            <artifactId>cucumber-junit</artifactId>
            <version>6.10.4</version>
            <scope>test</scope>
        </dependency>

        <dependency>
            <groupId>io.cucumber</groupId>
            <artifactId>cucumber-spring</artifactId>
            <version>6.10.4</version>
            <scope>test</scope>
        </dependency>

Step 2 – Create a directory src/test/resources and create a feature file under src/test/resources

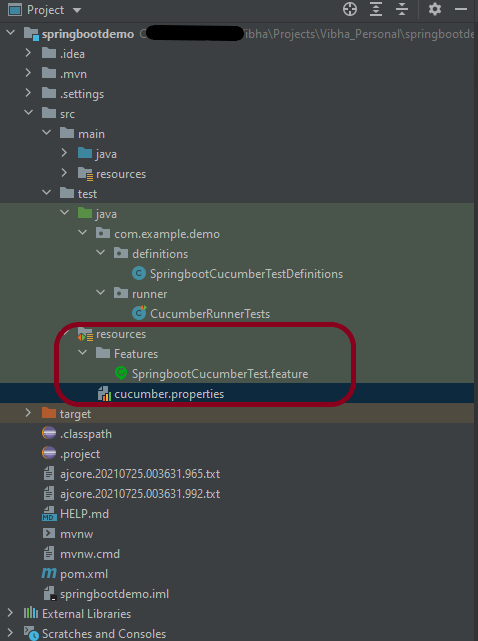
By default, the Maven project has src/test/java directory only. Create a new directory under src/test with the name of resources. Create a folder name as Features within src/test/resources directory.

Create a feature file to test the Springboot application.

Below is a sample feature file.

Feature: Verify springboot application using Cucumber

@ReceiveUserDetails
Scenario Outline: Send a valid Request to get user details
Given I send a request to the URL "/students" to get user details
Then the response will return status 200 and id <studentID> and names "<studentNames>" and passport_no "<studentPassportNo>"

Examples:
|studentID    |studentNames  |studentPassportNo|
|10001        |Annie         |E1234567         |
|10002        |John          |A1234568         |
|10003        |David         |C1232268         |

Step 3 – Create the Step Definition class or Glue Code for the Test Scenario under src/test/java

The corresponding step definition file of the above feature file is shown below.

import io.cucumber.java.en.Given;
import io.cucumber.java.en.Then;
import io.cucumber.spring.CucumberContextConfiguration;
import io.restassured.RestAssured;
import io.restassured.http.ContentType;
import io.restassured.response.ValidatableResponse;
import io.restassured.specification.RequestSpecification;
import org.springframework.boot.test.context.SpringBootTest;
import org.springframework.boot.web.server.LocalServerPort;
import static io.restassured.RestAssured.given;
import static org.hamcrest.Matchers.*;

@CucumberContextConfiguration
@SpringBootTest(webEnvironment = SpringBootTest.WebEnvironment.RANDOM_PORT)
public class SpringbootCucumberTestDefinitions {

    private final static String BASE_URI = "http://localhost";

    @LocalServerPort
    private int port;

    private ValidatableResponse validatableResponse;

    private void configureRestAssured() {
        RestAssured.baseURI = BASE_URI;
        RestAssured.port = port;
    }

    protected RequestSpecification requestSpecification() {
        configureRestAssured();
        return given();
    }

    @Given("I send a request to the URL {string} to get user details")
    public void iSendARequest(String endpoint) throws Throwable {
        validatableResponse = requestSpecification().contentType(ContentType.JSON)
                .when().get(endpoint).then();
        System.out.println("RESPONSE :"+validatableResponse.extract().asString());
    }

    @Then("the response will return status {int} and id {int} and names {string} and passport_no {string}")
    public void extractResponse(int status, int id, String studentName,String passportNo) {
        validatableResponse.assertThat().statusCode(equalTo(status))
                .body("id",hasItem(id)).body(containsString(studentName))
                .body(containsString(passportNo));

    }

}

The @CucumberContextConfiguration annotation tells Cucumber to use this class as the test context configuration for Spring. It is imported from:-

import io.cucumber.spring.CucumberContextConfiguration;

With the @SpringBootTest annotation, Spring Boot provides a convenient way to start up an application context to be used in a test.  It is imported from package:-

import org.springframework.boot.test.context.SpringBootTest;

By default, @SpringBootTest does not start the webEnvironment to refine further how your tests run. It has several options: MOCK(default), RANDOM_PORT, DEFINED_PORT, NONE.

RANDOM_PORT loads a WebServerApplicationContext and provides a real web environment. The embedded server is started and listens on a random port. LocalServerPort is imported from package:-

import org.springframework.boot.web.server.LocalServerPort;

The assertions are imported from the Hamcrest package:-

import static org.hamcrest.Matchers.*;

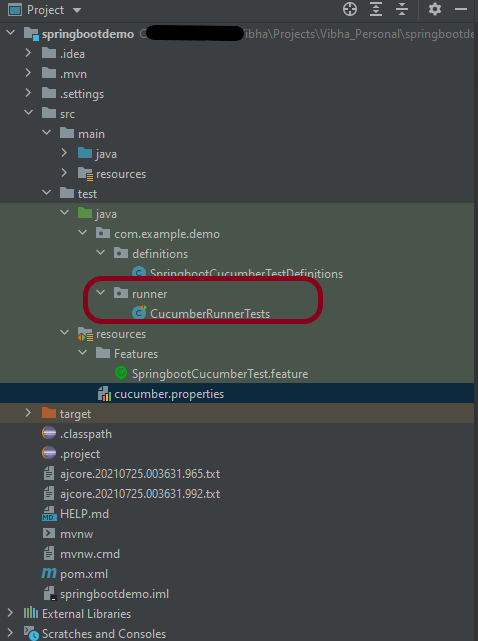
Step 4 – Create a Cucumber Runner class under src/test/java

A runner will help us to run the feature file and act as an interlink between the feature file and StepDefinition Class. To know more about Runner, refer to this link. The TestRunner should be created within the directory src/test/java.

import org.junit.runner.RunWith;
import io.cucumber.junit.Cucumber;
import io.cucumber.junit.CucumberOptions;

@RunWith(Cucumber.class)
@CucumberOptions(plugin = "pretty", features = {"src/test/resources/Features"}, glue = { "com.example.demo.definitions"})

public class CucumberRunnerTests {
}

The @CucumberOptions annotation is responsible for pointing to the right feature package, configuring the plugin for a better reporting of tests in the console output, and specifying the package where extra glue classes may be found. We use it to load configurations and classes that are shared between tests.

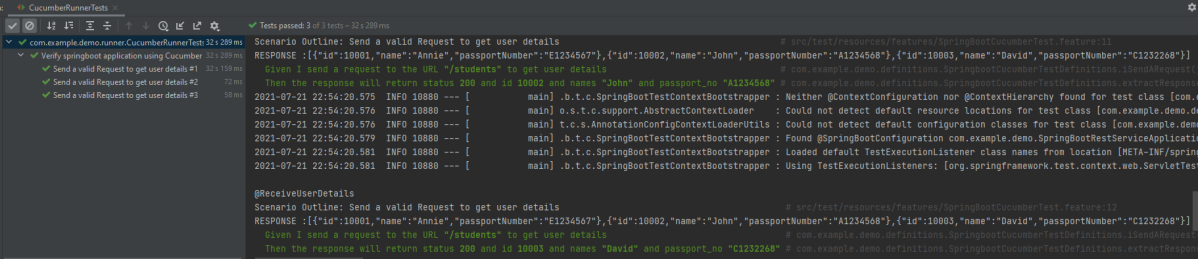
Step 5 – Run the tests from JUnit

You can execute the test script by right-clicking on TestRunner class -> Run As JUnit in Eclipse.

In case you are using IntelliJ, select “Run CucumberRunnerTests“.

SpringBootTest creates an application context containing all the objects we need for the Integration Testing It, starts the embedded server, creates a web environment, and then enables methods to do Integration testing.

Step 6 – Run the tests from the Command Line

To run the tests from the command line, we need to add junit-vintage-engine dependency. Starting with Spring Boot 2.4, JUnit 5’s vintage engine has been removed from the spring-boot-starter-test. If we still want to write tests using JUnit 4, we need to add the following Maven dependency:

        <dependency>
            <groupId>org.junit.vintage</groupId>
            <artifactId>junit-vintage-engine</artifactId>
            <scope>test</scope>
        </dependency>

Use the below command to run the tests:-

mvn clean test

Step 7 – Cucumber Report Generation

To get Cucumber Test Reports, add cucumber.properties under src/test/resources and add the below instruction in the file. To know more about Cucumber Report Service, refer to this tutorial.

cucumber.publish.enabled=true

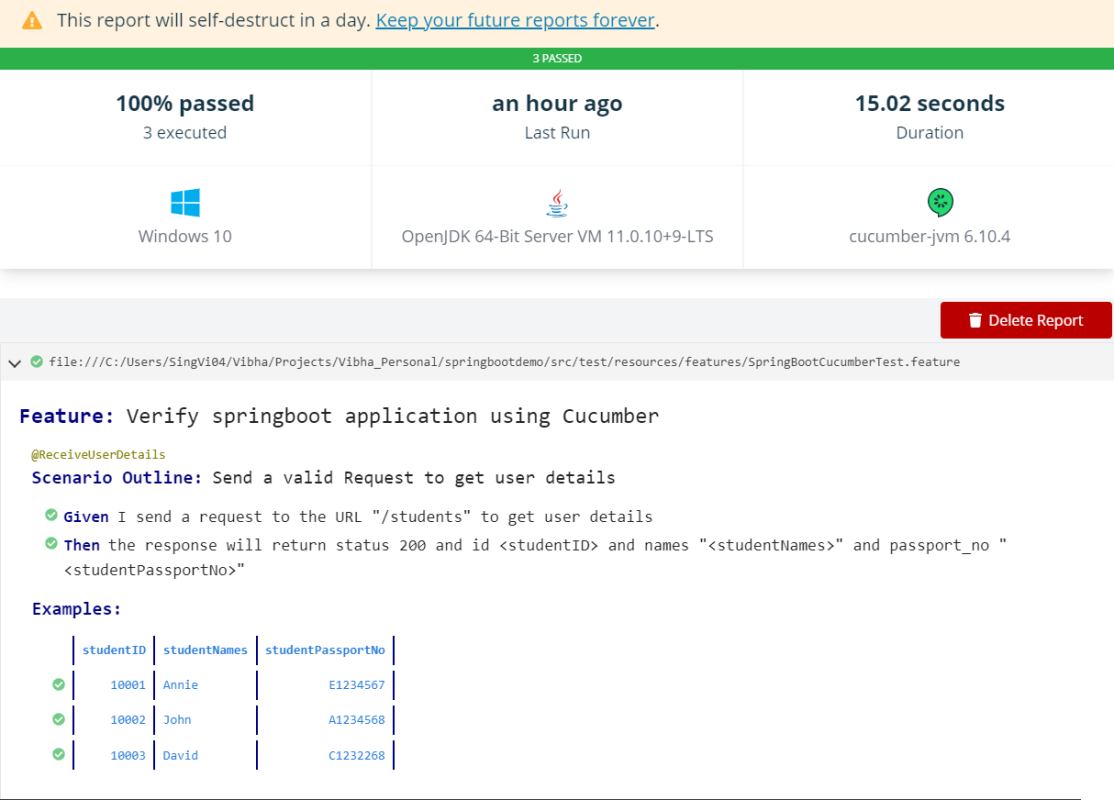
Below is the image of the report generated after the completion of the execution. This report can be saved on GitHub for future use.

That’s it! Congratulations on making it through this tutorial and hope you found it useful! Happy Learning!!

SpringBoot WireMock
SpringBoot Dependency Injection using Autowired
 Testing of Gradle SpringBoot Application with Serenity, Cucumber and JUnit4
Testing of SpringBoot Application with Serenity BDD, Cucumber and JUnit5 
 How to run SpringBoot tests with GitHub Actions

How to connect to SQL Server using Java

HOME

jdbc:<driver protocol>:<driver connection details>
MS MySql Server - jdbc:odbc:DemoDSN
MySQL - jdbc:mysql://localhost:3306/demodb
Oracle - jdbc:orac;e:thin@myserver:1521:demodb

String dbUrl = "jdbc:mysql://localhost:3306/demo";
String username = "student";
String password = "student";

Connection conn = DriverManager.getConnection(dbUrl,username,password)
Statement stmt = conn.createStatement();

ResultSet result = stmt.executeQuery("select * from employee");

 java.sql and javax.sql
<dependency>
      <groupId>com.mysql</groupId>
      <artifactId>mysql-connector-j</artifactId>
      <version>8.2.0</version>
</dependency>

import java.sql.*;

public class JdbcTest {

    public static void main(String[] args) throws SQLException {

        Connection conn;
        Statement stmt = null;
        ResultSet result = null;

        String dbUrl = "jdbc:mysql://localhost:3306/demo";
        String username = "student";
        String password = "student1$";

        try {
            //Get a connection to database
            conn = DriverManager.getConnection(dbUrl, username, password);

            System.out.println("Database connection is successful\n");

            //Create a statement
            stmt = conn.createStatement();

            //Execute the SQL Query
            result = stmt.executeQuery("Select * from employees");

            //Process the result set
            while (result.next()) {
                System.out.println("First_Name :" + result.getString("first_name") + " , " + ("Last_Name :" + result.getString("last_name")));

            }

        } catch (Exception e) {
            e.printStackTrace();
        }
    }
}

create database if not exists demo;

use demo;

drop table if exists employees;

CREATE TABLE `employees` (
  `id` int(11) NOT NULL AUTO_INCREMENT,
  `last_name` varchar(64) DEFAULT NULL,
  `first_name` varchar(64) DEFAULT NULL,
  `email` varchar(64) DEFAULT NULL,
  `department` varchar(64) DEFAULT NULL,
  `salary` DECIMAL(10,2) DEFAULT NULL,
  PRIMARY KEY (`id`)
) ENGINE=InnoDB AUTO_INCREMENT=1 DEFAULT CHARSET=latin1;

INSERT INTO `employees` (`id`,`last_name`,`first_name`,`email`, `department`, `salary`) VALUES (1,'Doe','John','john.doe@foo.com', 'HR', 55000.00);
INSERT INTO `employees` (`id`,`last_name`,`first_name`,`email`, `department`, `salary`) VALUES (2,'Public','Mary','mary.public@foo.com', 'Engineering', 75000.00);
INSERT INTO `employees` (`id`,`last_name`,`first_name`,`email`, `department`, `salary`) VALUES (3,'Queue','Susan','susan.queue@foo.com', 'Legal', 130000.00);

INSERT INTO `employees` (`id`,`last_name`,`first_name`,`email`, `department`, `salary`) VALUES (4,'Williams','David','david.williams@foo.com', 'HR', 120000.00);
INSERT INTO `employees` (`id`,`last_name`,`first_name`,`email`, `department`, `salary`) VALUES (5,'Johnson','Lisa','lisa.johnson@foo.com', 'Engineering', 50000.00);
INSERT INTO `employees` (`id`,`last_name`,`first_name`,`email`, `department`, `salary`) VALUES (6,'Smith','Paul','paul.smith@foo.com', 'Legal', 100000.00);

INSERT INTO `employees` (`id`,`last_name`,`first_name`,`email`, `department`, `salary`) VALUES (7,'Adams','Carl','carl.adams@foo.com', 'HR', 50000.00);
INSERT INTO `employees` (`id`,`last_name`,`first_name`,`email`, `department`, `salary`) VALUES (8,'Brown','Bill','bill.brown@foo.com', 'Engineering', 50000.00);
INSERT INTO `employees` (`id`,`last_name`,`first_name`,`email`, `department`, `salary`) VALUES (9,'Thomas','Susan','susan.thomas@foo.com', 'Legal', 80000.00);

INSERT INTO `employees` (`id`,`last_name`,`first_name`,`email`, `department`, `salary`) VALUES (10,'Davis','John','john.davis@foo.com', 'HR', 45000.00);
INSERT INTO `employees` (`id`,`last_name`,`first_name`,`email`, `department`, `salary`) VALUES (11,'Fowler','Mary','mary.fowler@foo.com', 'Engineering', 65000.00);
INSERT INTO `employees` (`id`,`last_name`,`first_name`,`email`, `department`, `salary`) VALUES (12,'Waters','David','david.waters@foo.com', 'Legal', 90000.00);

select * from demo.employees;

How to handle Alerts in Selenium WebDriver

HOME

driver.switchTo().alert()

Below is a perfect example that shows how to handle Simple Alert with Selenium

import org.openqa.selenium.Alert;
import org.openqa.selenium.By;
import org.openqa.selenium.chrome.ChromeDriver;
import org.openqa.selenium.chrome.ChromeOptions;

import java.time.Duration;

public class SimpleAlert_Demo {
    public static void main(String[] args) throws InterruptedException {

        ChromeOptions options = new ChromeOptions();
        options.setImplicitWaitTimeout(Duration.ofSeconds(10));
        options.addArguments("start-maximized");
        ChromeDriver driver = new ChromeDriver(options);
        driver.navigate().to("https://the-internet.herokuapp.com/javascript_alerts");

        //Click on button to open Confirmation Box
        driver.findElement(By.xpath("//button[@onclick='jsAlert()']")).click();


        // accepting javascript alert
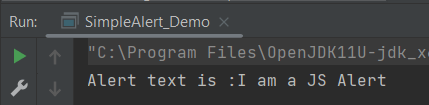
        Alert simpleAlert = driver.switchTo().alert();
        String alertText = simpleAlert.getText();

        //Print the message mentioned on the AlertBox
        System.out.println("Alert text is :" + alertText);

        //This step is only for demonstration purpose to show the alert box
        Thread.sleep(2000);
        simpleAlert.accept();

        //Close the current page
        driver.quit();
    }
}

2) Confirmation Alert

This alert comes with an option to accept or dismiss the alert. To accept the alert we can use Alert.accept() and to dismiss we can use the Alert.dismiss(). 

Below is an example that shows how to handle Confirmation Alert with Selenium.

import org.openqa.selenium.Alert;
import org.openqa.selenium.By;
import org.openqa.selenium.chrome.ChromeDriver;
import org.openqa.selenium.chrome.ChromeOptions;
import org.openqa.selenium.support.ui.ExpectedConditions;
import org.openqa.selenium.support.ui.WebDriverWait;
import java.time.Duration;

public class ConfirmationAlert_Demo {
    public static void main(String[] args) throws InterruptedException {

        ChromeOptions options = new ChromeOptions();
        options.setImplicitWaitTimeout(Duration.ofSeconds(10));
        options.addArguments("start-maximized");
        ChromeDriver driver = new ChromeDriver(options);
        driver.navigate().to("https://the-internet.herokuapp.com/javascript_alerts");

        //Click on button to open Confirmation Box
        driver.findElement(By.xpath("//button[@onclick='jsConfirm()']")).click();

        // accepting javascript alert
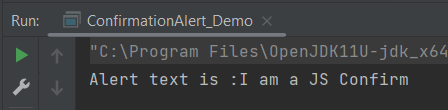
        Alert ConfirmationAlert = driver.switchTo().alert();
        String alertText = ConfirmationAlert.getText();
        System.out.println("Alert text is :" + alertText);
        ConfirmationAlert.accept();

        //Close the page
        driver.quit();
    }
}

3) Prompt Alert

In the prompt alert, we get an option to add text to the alert box. This is used when some input is required from the user. We will use the sendKeys() method to type something in the Prompt alert box. 

Below is an example that illustrates how to handle Prompt Alert using Selenium WebDriver.

import org.openqa.selenium.Alert;
import org.openqa.selenium.By;
import org.openqa.selenium.chrome.ChromeDriver;
import org.openqa.selenium.chrome.ChromeOptions;
import org.openqa.selenium.support.ui.ExpectedConditions;
import org.openqa.selenium.support.ui.WebDriverWait;

import java.time.Duration;

public class PromptAlert_Demo {
    public static void main(String[] args) throws InterruptedException {

        ChromeOptions options = new ChromeOptions();
        options.setImplicitWaitTimeout(Duration.ofSeconds(10));
        options.addArguments("start-maximized");
        ChromeDriver driver = new ChromeDriver(options);
        driver.navigate().to("https://the-internet.herokuapp.com/javascript_alerts");

        //Click on button to open Prompt Box
        driver.findElement(By.xpath("//button[@onclick='jsPrompt()']")).click();
        Alert promptAlert = driver.switchTo().alert();

        //Enter message in Alert Box
        promptAlert.sendKeys("Welcome to Selenium 4");
        promptAlert.accept();

        //This sleep is not necessary, just for demonstration
        Thread.sleep(2000);

        System.out.println("Prompt Alert text is :" + driver.findElement(By.id("result")).getText());

        //Close the current page
        driver.quit();
    }

}

That’s it! Congratulations on making it through this tutorial and hope you found it useful! Happy Learning!!

How to handle browser cookies in Selenium WebDriver

HOME

driver.manage().addCookie(arg0); 

driver.manage().getCookieNamed(arg0);    

driver.manage().getCookies();     

driver.manage().deleteCookieNamed(arg0); 

driver.manage().deleteAllCookies();    

import org.openqa.selenium.Cookie;
import org.openqa.selenium.chrome.ChromeDriver;
import org.openqa.selenium.chrome.ChromeOptions;
import org.openqa.selenium.firefox.FirefoxDriver;
import java.util.Set;

public class Cookie_Demo {

    public static void main(String[] args) {

        ChromeOptions options = new ChromeOptions();
        options.addArguments("--start-maximize");

        ChromeDriver driver = new ChromeDriver(options);
        String URL = "http://google.com/";
        driver.navigate().to(URL);

        // Add the cookies into current browser context
        driver.manage().addCookie(new Cookie("mycookie1", "123456789123"));
        driver.manage().addCookie(new Cookie("mycookie2", "we34rf125ty6"));
        Cookie cookie1 = new Cookie("mycookie3", "ABCDEFGH");
        driver.manage().addCookie(cookie1);


        // Get All available cookies
        System.out.println("List of Cookies");
        Set<Cookie> cookiesList = driver.manage().getCookies();
        for (Cookie getcookies : cookiesList) {
            System.out.println(getcookies);
        }

        // Get cookie details with named cookie 'foo'
        System.out.println("Get detail of 2nd cookie");
        Cookie cookie2 = driver.manage().getCookieNamed("mycookie2");
        System.out.println(cookie2);

        // delete a cookie with name 'mycookie2'
        System.out.println("Delete 2nd cookie");
        driver.manage().deleteCookieNamed("mycookie2");

        // deletes all cookies
        System.out.println("Delete all cookies");
        driver.manage().deleteAllCookies();

        driver.quit();

    }
}

Actions Class in Selenium WebDriver

HOME

import org.openqa.selenium.interactions.Actions;
import org.openqa.selenium.interactions.Action;

How to get an instance of Actions class?

We can create an instance of Actions class simply, by passing current webDriver instance. Now, using the action instance, we can call any of the methods provided in Actions class.

WebDriver driver = new ChromeDriver();
Actions builder = new Actions(driver);

How to see all the supported methods by Actions class?

In order to see all the supported methods by Actions class, press control + space after, Action object (builder)

There is a large number of methods available in Actions class. The below screenshot represents some of those methods

Methods in Actions class of Selenium

There are many methods in this class, which can categorized into four main categories:

Different Methods for performing Keyboard Events:

1) keyDown(java.lang.CharSequence key) – Performs a modifier key press 

2) keyUp(java.lang.CharSequence key) – Performs a modifier key release

3) sendKeys(java.lang.CharSequence… keys) – Sends keys to the active element.

Different Methods for performing Mouse Events:

1) click() – Clicks at the current mouse location.

2) clickAndHold() – Clicks (without releasing) in the middle of the given element.

3) contextClick() – Performs a context-click at middle of the given element.

4) doubleClick() – Performs a double-click at the current mouse location.

7) dragAndDrop(WebElement source, WebElement target) – A convenience method that performs click-and-hold at the location of the source element, moves to the location of the target element, then releases the mouse.

8) dragAndDropBy(WebElement source, int xOffset, int yOffset) – A convenience method that performs click-and-hold at the location of the source element, moves by a given offset, then releases the mouse.

9) moveByOffset(int xOffset, int yOffset) – Moves the mouse from its current position or (0,0) by the given offset.

10) MoveToElement(WebElement target) – Moves the mouse to the middle of the element.