In this tutorial, we will change the remote repository URL of a project.
Imagine we have our project repository codebase in a specific hosting provider like GitLab. Our management has decided to migrate to another hosting provider like GitHub. In that case, we need to change the remote repository URL.
Steps to Follow:
1. Navigate to the local repository directory where you want to update the remote URL.
2. Open your terminal or command prompt.
3. Use the following command to view the current remote URLs associated with your repository:
git remote -v
4. Identify the name of the remote repository for which you want to change the URL (e.g., origin). Here, I want to push the code to GitHub. So, will change the URL to GitHub one.
5. To change the URL, use the “git remote set-url” command followed by: – The name of the remote repository. – The new URL that you want to set.
GitHub serves as a collaborative platform that supports version control, code collaboration, automated testing, and issue tracking, all of which are crucial elements in the software testing process. It promotes transparency, collaboration, and efficiency in the development and testing workflows.
CI/CD pipelines have contributed to the success of the DevOps cycle in all software development projects. This is a holistic process that bridges development and operations. Continuous integration helps development teams deploy code efficiently, and continuous delivery automates code deployment.
Implementation Steps
Step 1 – Create GitHub Actions and Workflows
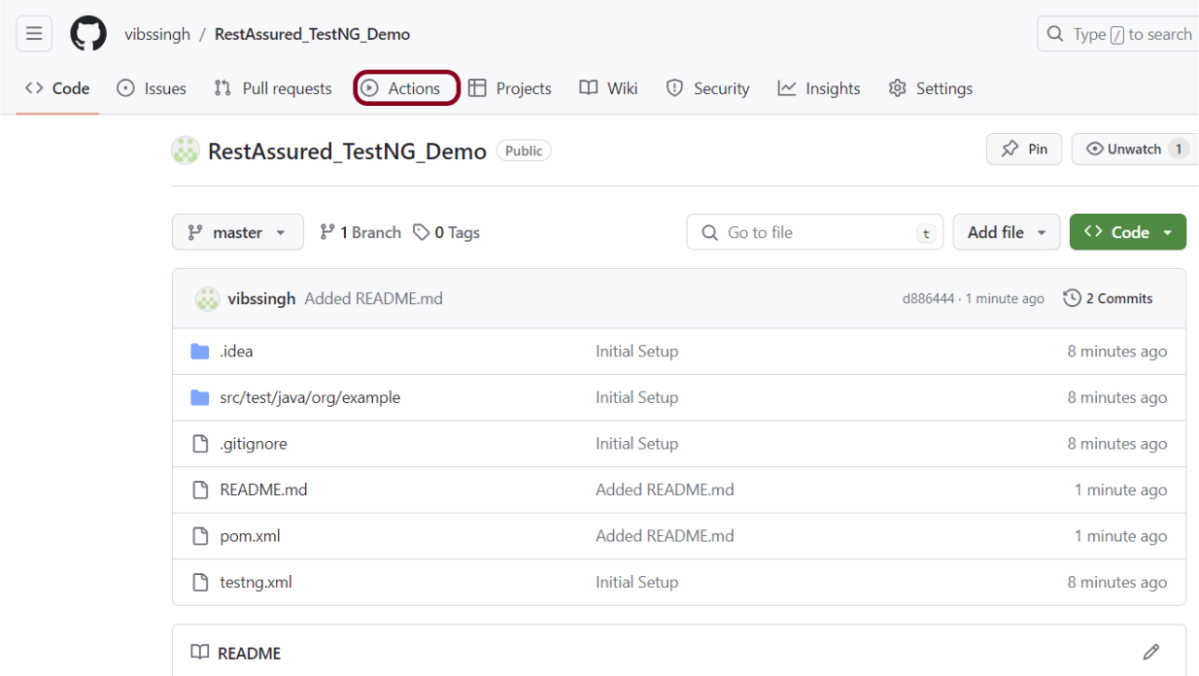
I have a repository available in GitHub – RestAssured_TestNG_Demo as shown in the below image. Go to the “Actions” tab. Click on the “Actions” tab.
Step 2 – Select the type of Actions
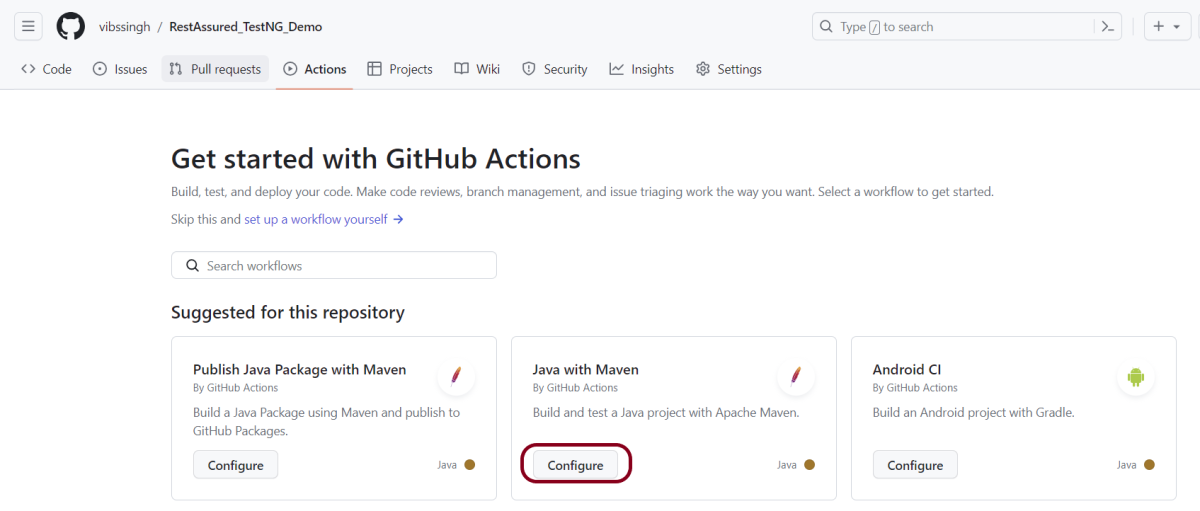
You will see that GitHub recommends Actions depending on the project. In our case, it is recommending actions suitable for a Java project. I have selected the “Java with Maven” option as my project is built in Maven.
Step 3 – Generation of Sample pipeline
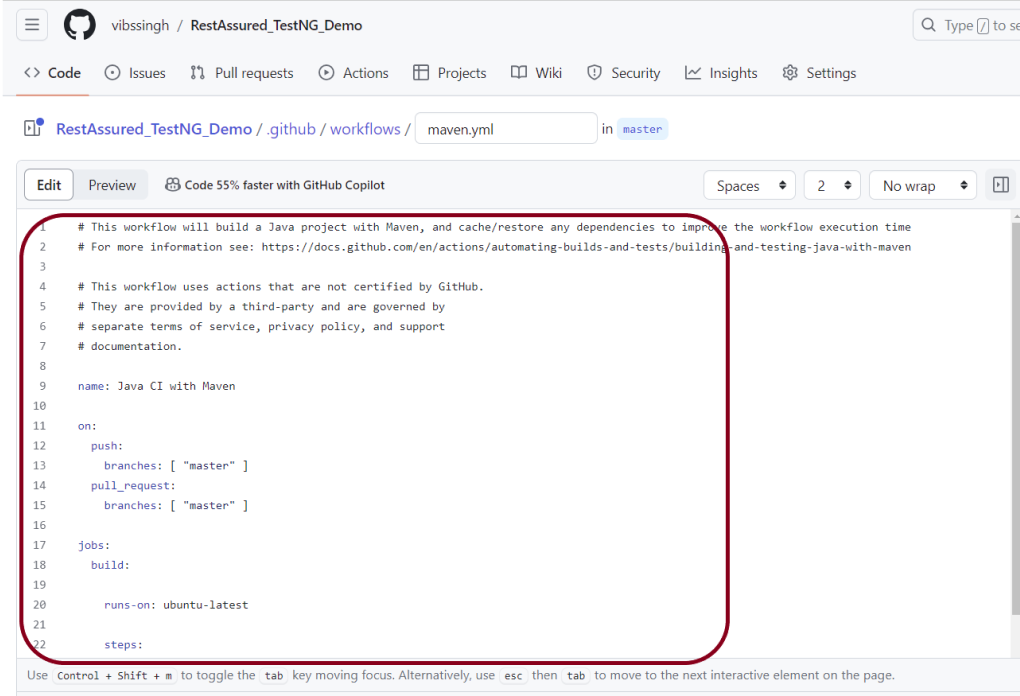
If you choose an existing option, it will automatically generate a .yaml for the project as shown below.
We will replace the current workflow with the following yml file as shown below:
name: Rest API Tests using Rest Assured with TestNG

on:
  push:
    branches: [ "main" ]
  pull_request:
    branches: [ "main" ]

jobs:
  build:

    runs-on: ubuntu-latest

    steps:
    - uses: actions/checkout@v4
    - name: Set up JDK 17
      uses: actions/setup-java@v4
      with:
        java-version: '17'
        distribution: 'temurin'
        cache: maven

    - name: Test Execution
      run: mvn clean test

    - name: Test Report Generation
      uses: actions/upload-artifact@v4
      if: success() || failure()
      with:
          name: TestNG Report                 # Name of the folder
          path: target/surefire-reports/      # Path to test results
Step 4 – Commit the changes
After the changes, hit the “Start Commit” button.
This will give the option to add a description for the commit. It will also enable the user to commit either to the main branch or commit to any other branch that exists in the project. Click on the “Commit new file” button to set up the workflow file.
It will create a maven.yml file as shown below in the project.
Step 5 – Verify that the workflow is running
Next, head over to the “Actions” tab, and you will see your YAML workflow file present under the tab. The yellow sign represents that the job is in the queue.
In Progress – When the job starts building and running, you will see the status change from “Queued” to “in progress”.
Passed – If the build is successful, you will see a green tick mark.
Below is the execution log.
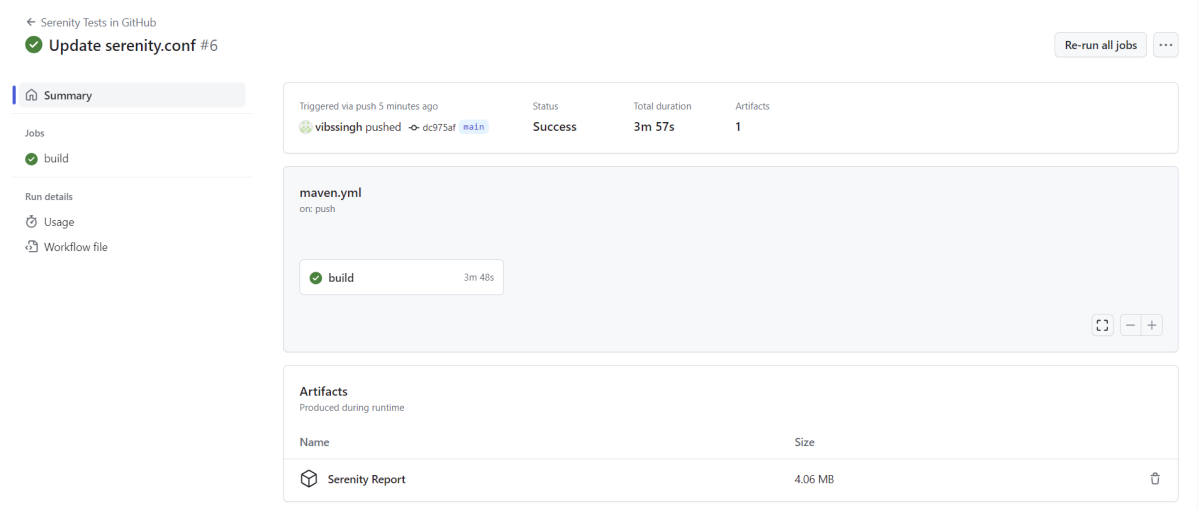
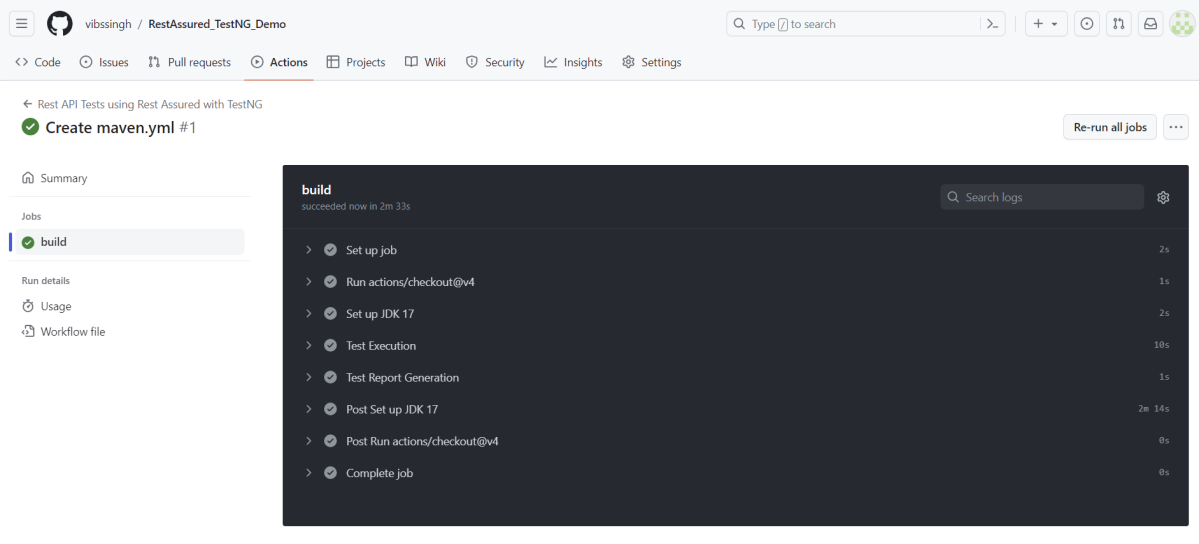
Click on the workflow and the below screen is displayed. It shows the status of the run of the workflow, the total time taken to run the workflow, and the name of the .yml file.
Below shows all the steps of the workflow.
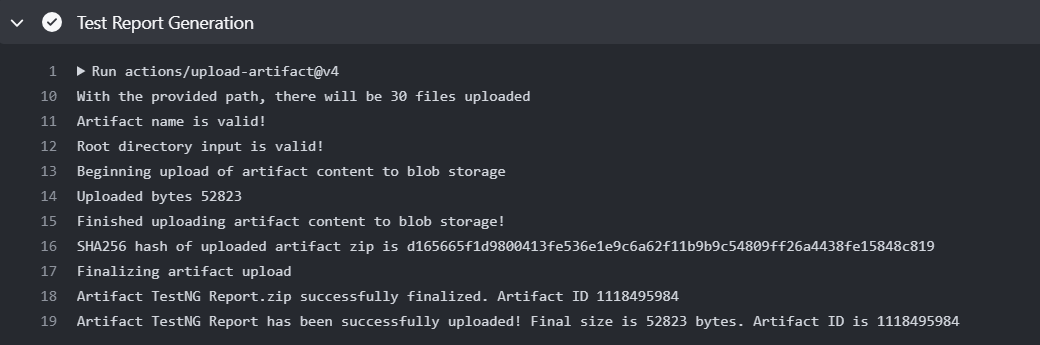
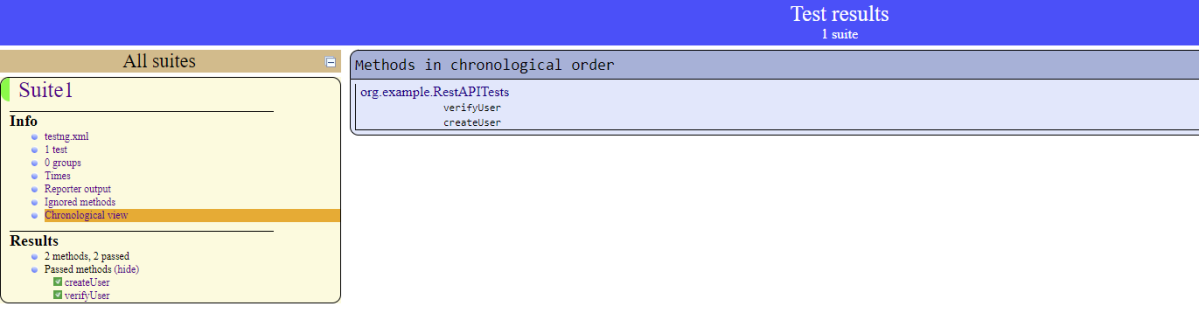
Step 6 – Published TestNG Report on GitHub
From the logs of the Workflow, you can see that the Test Report step was executed successfully.
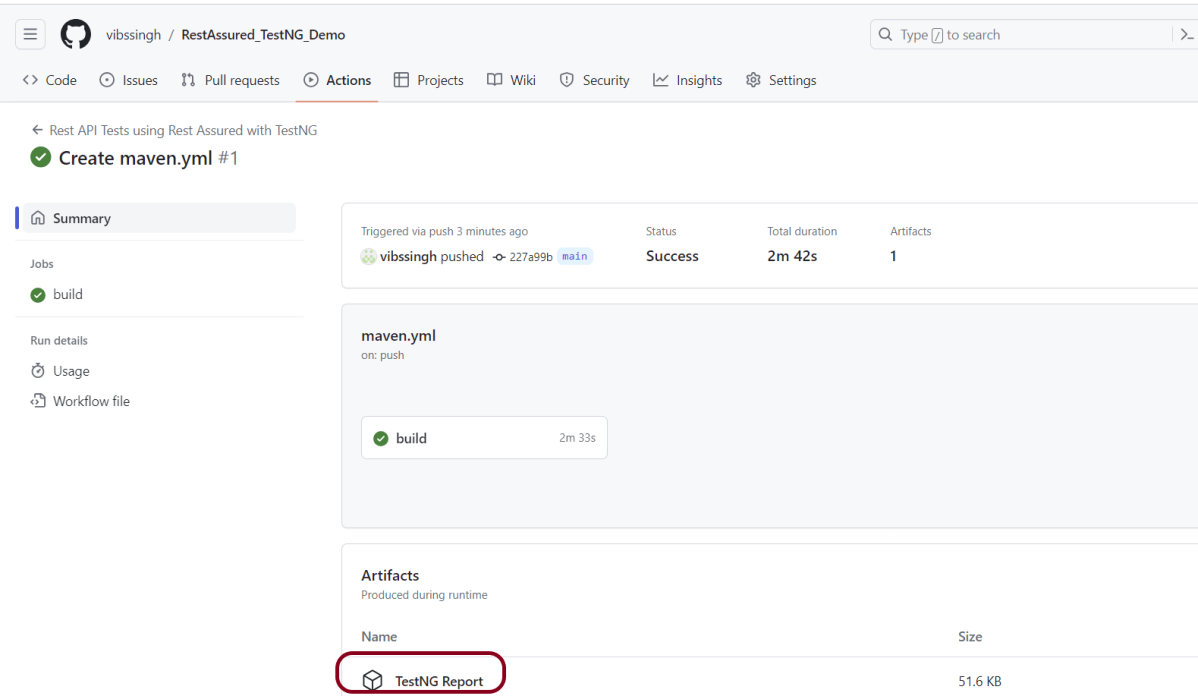
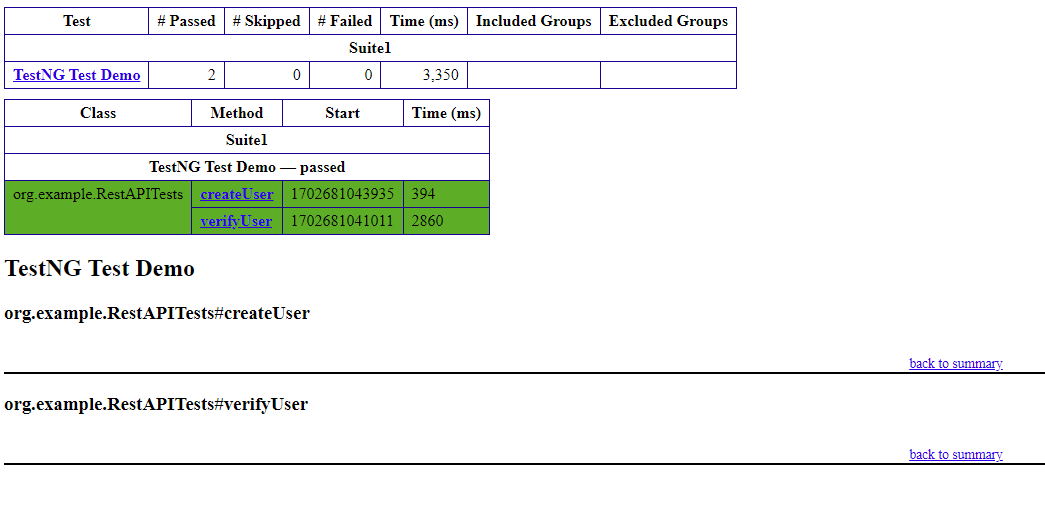
Once the pipeline run, a TestNG Report folder will be generated as shown in the below image:
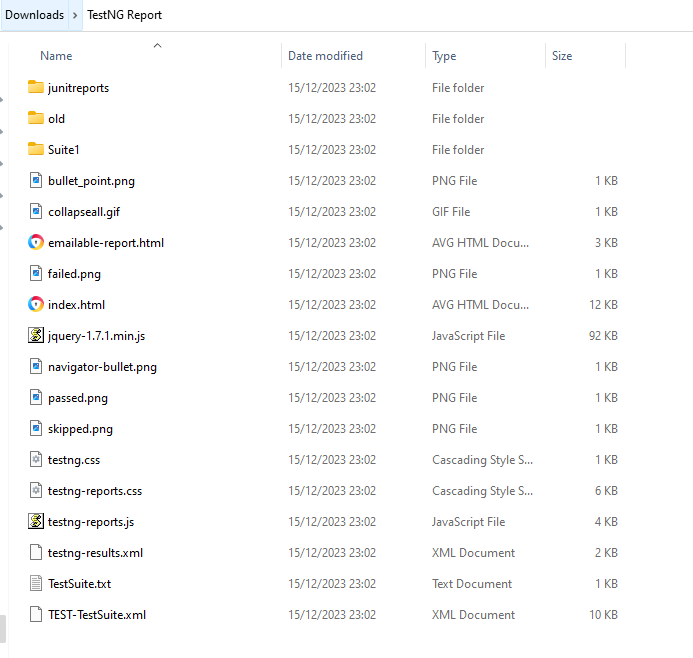
When we click on the folder TestNG Report, a zipped file will be downloaded, and we can extract it to see all the files contained within it.
The flexible aspects of Selenium WebDrivers and GitHub Actions enable users to create powerful, fast, and efficient automated testing workflows in CI/CD environments.
CI/CD pipelines have contributed to the success of the DevOps cycle in all software development projects. This is a holistic process that bridges development and operations. Continuous integration helps development teams deploy code efficiently, and continuous delivery automates code deployment.
Important points
1. The Serenity Web tests need to run in the headless mode. As we are using Chrome browser, use the below code in the serenity.config:
headless.mode = true
2. Install Chrome browser in ubuntu. Use the below code:
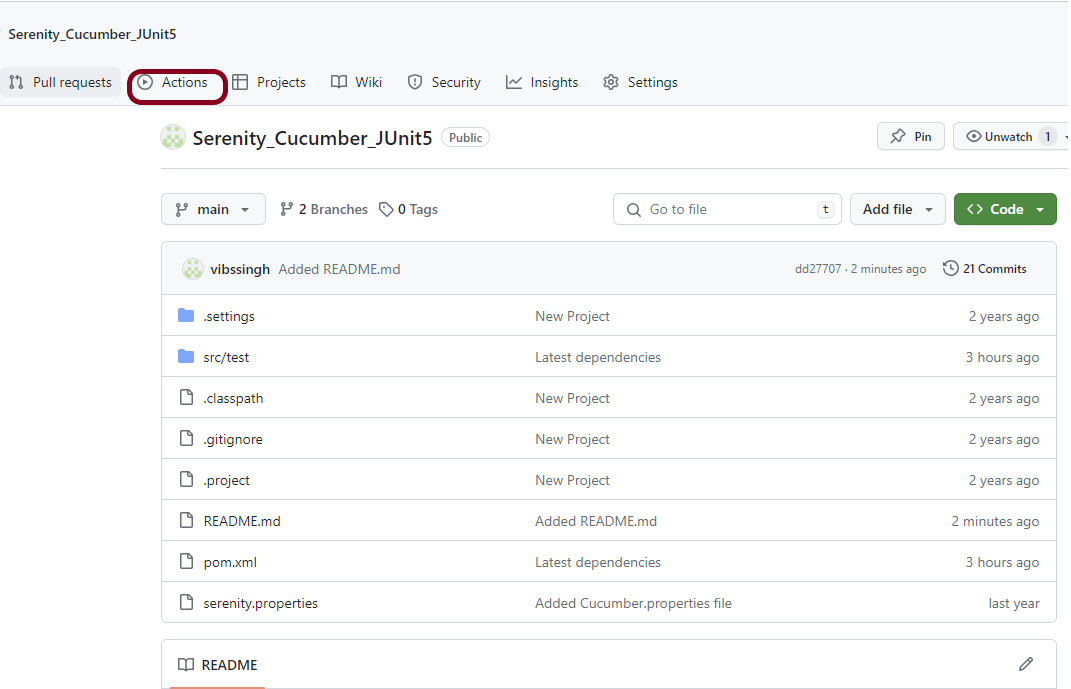
I have a repository available in GitHub – Serenity_Cucumber-JUnit5 as shown in the below image. Go to the “Actions” tab. Click on the “Actions” tab.
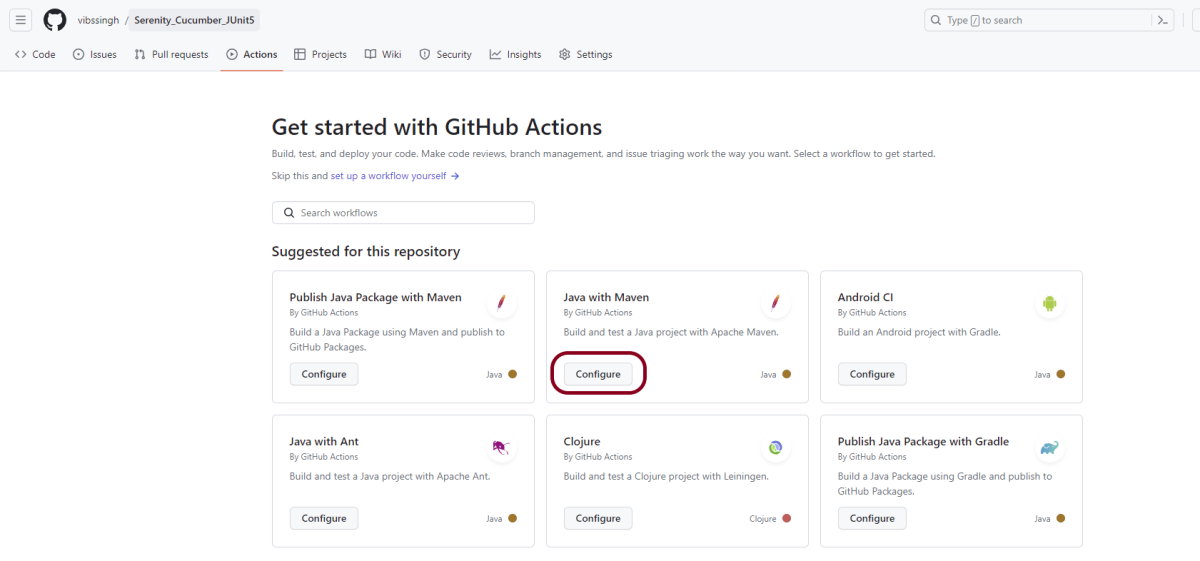
Step 2 – Select the type of Actions
You will see that GitHub recommends Actions depending on the project. In our case, it is recommending actions suitable for a Java project. I have selected the “Java with Maven” option as my project is built in Maven.
Step 3 – Generation of Sample pipeline
If you choose an existing option, it will automatically generate a .yaml for the project as shown below.
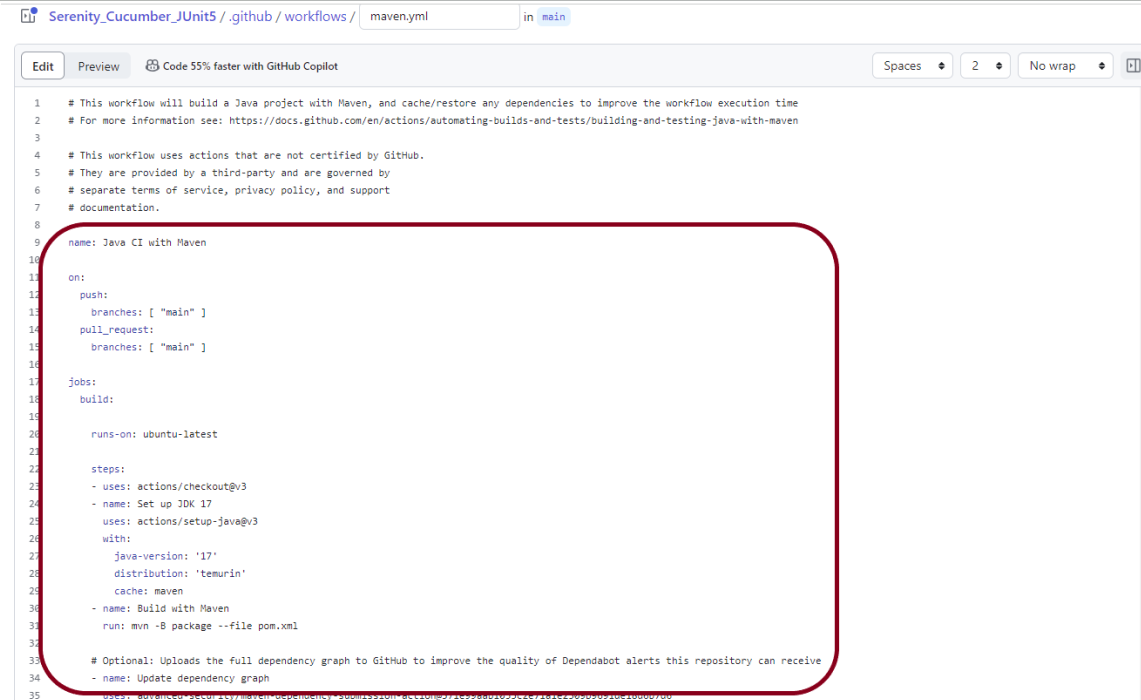
We will replace the current workflow with the following yml file as shown below:
name: Serenity Tests in GitHub
on:
push:
branches: [ "main" ]
pull_request:
branches: [ "main" ]
jobs:
build:
runs-on: ubuntu-latest
steps:
- uses: actions/checkout@v4
- name: Set up JDK 17
uses: actions/setup-java@v4
with:
java-version: '17'
distribution: 'temurin'
cache: maven
    - uses: browser-actions/setup-chrome@latest
    - run: chrome --version
- name: Build with Maven
run: mvn clean verify
- name: Test Report Generation
uses: actions/upload-artifact@v4
if: success() || failure()
with:
name: Serenity Report # Name of the folder
path: target/site/serenity/ # Path to test results
Step 4 – Commit the changes
After the changes, hit the “Start Commit” button.
This will give the option to add a description for the commit. It will also enable the user to commit either to the main branch or commit to any other branch that exists in the project. Click on the “Commit new file” button to set up the workflow file.
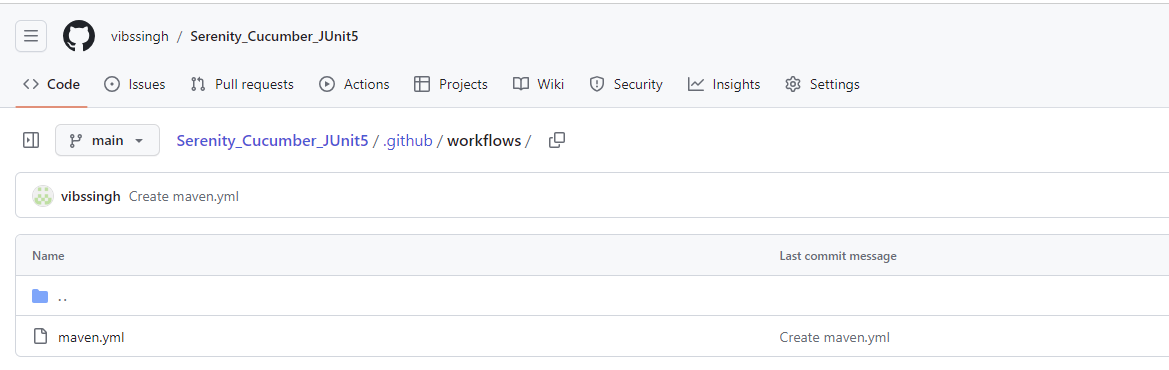
It will create a maven.yml file as shown below in the project.
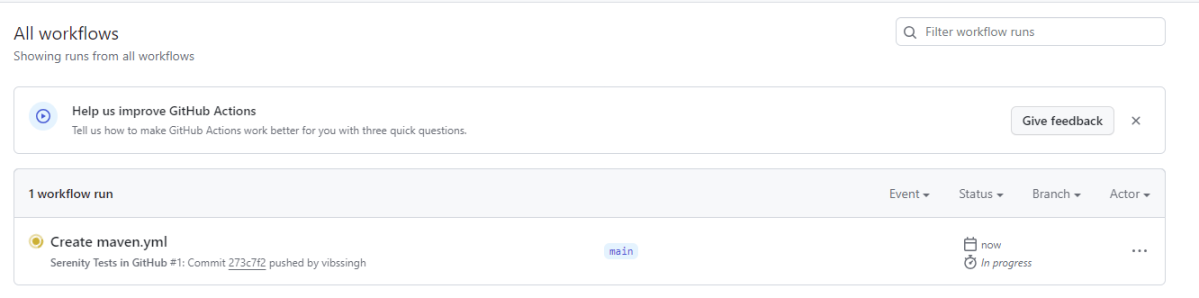
Step 5 – Verify that the workflow is running
Next, head over to the “Actions” tab, and you will see your YAML workflow file present under the tab. The yellow sign represents that the job is in the queue.
In Progress – When the job starts building and running, you will see the status change from “Queued” to “in progress”.
Passed – If the build is successful, you will see a green tick mark.
Click on the workflow and the below screen is displayed. It shows the status of the run of the workflow, the total time taken to run the workflow, and the name of the .yml file.
Below shows all the steps of the workflow.
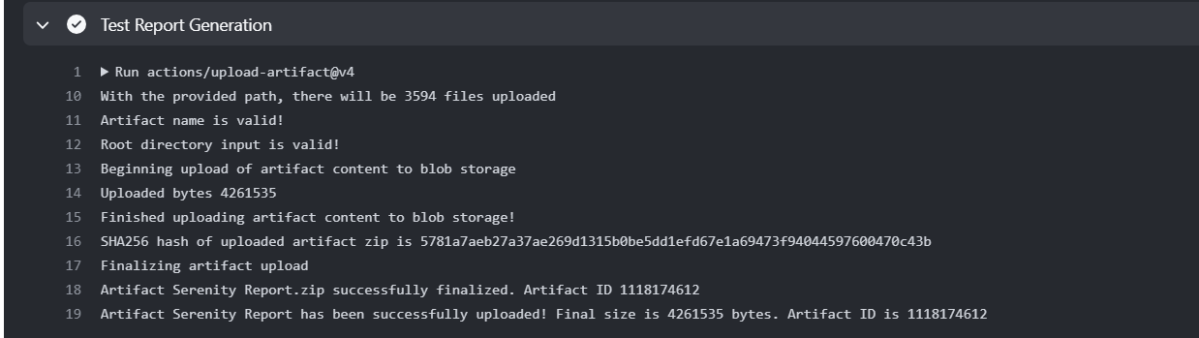
Step 6 – Published Serenity Report on GitHub
From the logs of the Workflow, you can see that the Test Report step was executed successfully.
Once the pipeline run, a Serenity Report folder will be generated as shown in the below image:
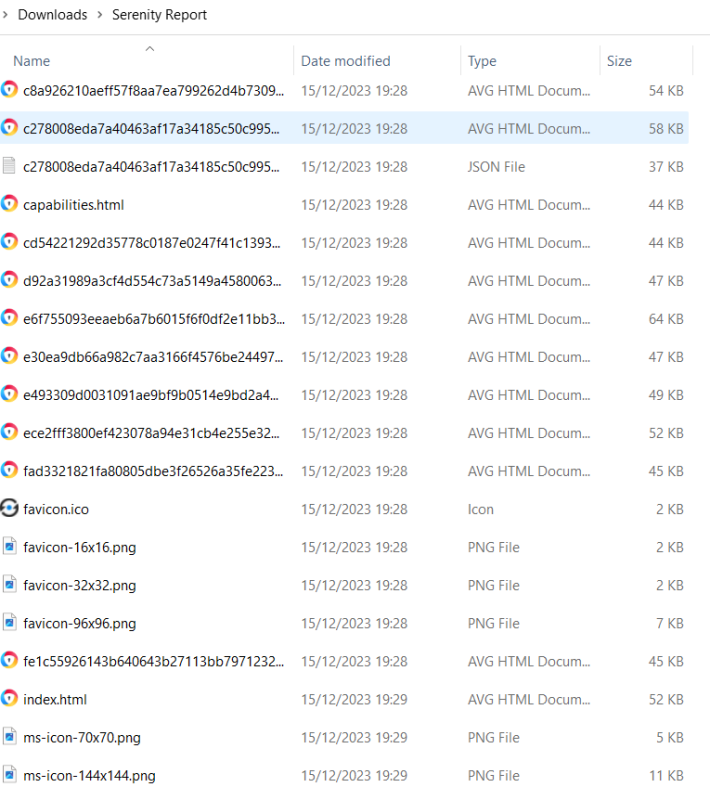
When we click on the folder Serenity Report, a zipped file will be downloaded, and we can extract it to see all the files contained within it.
Open the folder and we will see all the files including index.html and others.
In REST API development, blacklisting headers refers to explicitly disallowing or filtering out certain headers from being used or processed.
Starting from REST Assured version 4.2.0, a new feature has been introduced that allows you to blacklist specific headers in order to prevent them from appearing in request or response logs. Instead of displaying the actual header value, it will be replaced with “[ BLACKLISTED ]”. This feature can be enabled on a per-header basis using LogConfig.
Here is an example of how you can enable this feature for a specific header using LogConfig:
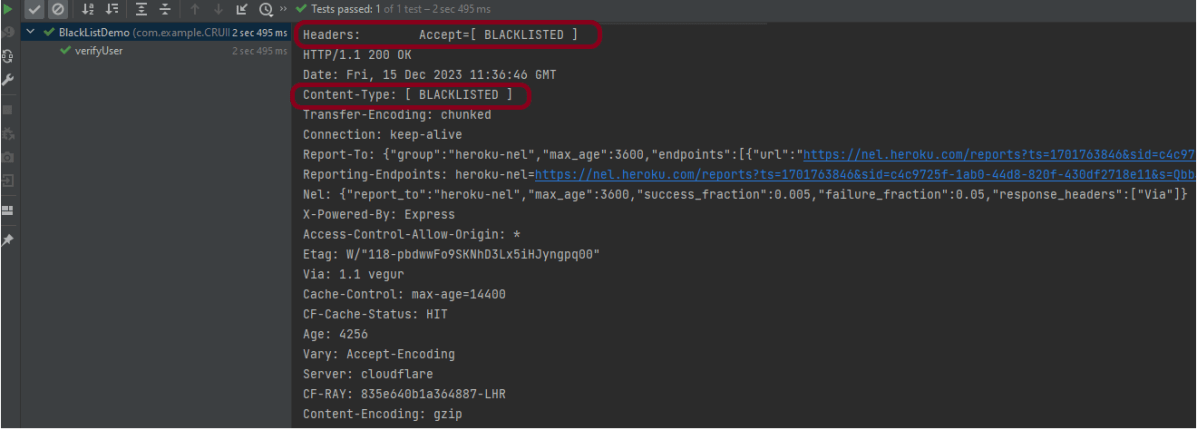
In the below code snippet, the “Accept” header will be blacklisted. Once this configuration is set, any requests or responses containing this header will have its value replaced with “[ BLACKLISTED ]” in the logs.
Blacklist single header
blacklistHeader – It blacklists one or more headers. If these headers show up during logging, they will be replaced with ‘BLACKLISTED ‘. The purpose of a blacklist is to prevent sensitive information to be included in the log.
import io.restassured.RestAssured;
import io.restassured.config.LogConfig;
import org.junit.Test;
import java.util.ArrayList;
import java.util.List;
import static io.restassured.RestAssured.given;
import static org.hamcrest.CoreMatchers.equalTo;

public class BlackListDemo {

    @Test
    public void verifyUser() {

        // Given
        given()

                .config(RestAssured.config().logConfig(LogConfig.logConfig().blacklistHeader("Accept")))
                .log().headers()

                // When
                .when()
                .get("https://reqres.in/api/users/2")

                // Then
                .then()
                .statusCode(200).statusLine("HTTP/1.1 200 OK")
                .body("data.email", equalTo("janet.weaver@reqres.in"))
                .body("data.first_name", equalTo("Janet"))
                .body("data.last_name", equalTo("Weaver")).log().all();
    }
The output of the above program is
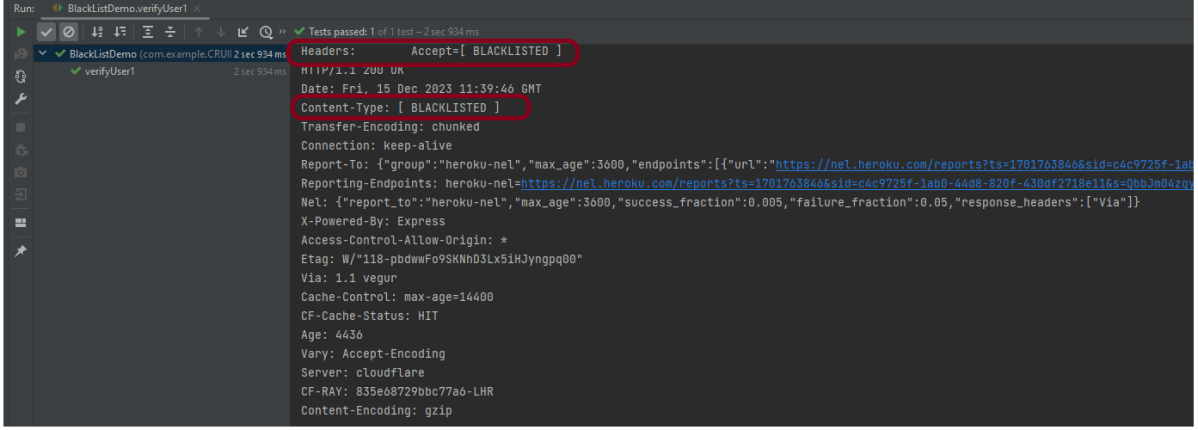
Blacklist multiple headers
In the below example, we want to blacklist “Accept” as well as “Content-Type”. This can be achieved by the below-mentioned example:
import io.restassured.RestAssured;
import io.restassured.config.LogConfig;
import org.junit.Test;
import java.util.ArrayList;
import java.util.List;
import static io.restassured.RestAssured.given;
import static org.hamcrest.CoreMatchers.equalTo;

public class BlackListDemo {

    @Test
    public void verifyUser() {

        // Given
        given()

              .config(RestAssured.config().logConfig(LogConfig.logConfig().blacklistHeader("Accept","Content-Type")))
                .log().headers()

                // When
                .when()
                .get("https://reqres.in/api/users/2")

                // Then
                .then()
                .statusCode(200).statusLine("HTTP/1.1 200 OK")
                .body("data.email", equalTo("janet.weaver@reqres.in"))
                .body("data.first_name", equalTo("Janet"))
                .body("data.last_name", equalTo("Weaver")).log().all();
    }
The output of the above program is
BlackList Request and Response using collection
import io.restassured.RestAssured;
import io.restassured.config.LogConfig;
import org.junit.Test;
import java.util.ArrayList;
import java.util.List;
import static io.restassured.RestAssured.given;
import static org.hamcrest.CoreMatchers.equalTo;

public class BlackListDemo {

    @Test
    public void verifyUser1() {

        List headers = new ArrayList<String>();
        headers.add("Accept");
        headers.add("Content-Type");

        // Given
        given()
                .config(RestAssured.config().logConfig(LogConfig.logConfig().blacklistHeader(headers.toArray(new String[0]))))
                .log().headers()

                // When
                .when()
                .get("https://reqres.in/api/users/2")

                // Then
                .then()
                .statusCode(200).statusLine("HTTP/1.1 200 OK")

                // To verify booking id at index 3
                .body("data.email", equalTo("janet.weaver@reqres.in"))
                .body("data.first_name", equalTo("Janet"))
                .body("data.last_name", equalTo("Weaver")).log().all();
    }

}
The output of the above program is
Congratulations on making it through this tutorial and hope you found it useful! Happy Learning!!
There are two modes, strict and non-strict in JSONAssert. In most cases, you will probably want to set strict to false, since that will make the tests less brittle. Strict tests require all the elements requested to be returned, and only those elements (ie, the tests are non-extensible). Arrays of elements must be returned to the same order as expected.
In Lenient mode, extensibility will be allowed, and no strict ordering will be checked. Let’s see example programs for comparing JSON Arrays.
Comparing two Exact same JSON Arrays – LENIENT Mode
import org.json.JSONArray;
import org.junit.Test;
import org.skyscreamer.jsonassert.JSONAssert;
import org.skyscreamer.jsonassert.JSONCompareMode;

public class JsonArrayAssertDemo {

    @Test
    public void sameArray() {

        // same no of elements, values and in same order
        String jsonArray1 = "[\"Vibha\",\"Abha\",\"Nysha\"]";
        String jsonArray2 = "[\"Vibha\",\"Abha\",\"Nysha\"]";

        JSONAssert.assertEquals(jsonArray1, jsonArray2, JSONCompareMode.LENIENT);
   }
}
The output of the above program is
Comparing two JSON Arrays with the same fields but different in order – Lenient
    @Test
    public void sameArrayDifferentOrder() {

        // Same no of elements but different order
        String jsonArray1 = "[\"Vibha\",\"Abha\",\"Nysha\"]";
        String jsonArray2 = "[\"Nysha\",\"Vibha\",\"Abha\"]";

        JSONAssert.assertEquals(jsonArray1, jsonArray2, JSONCompareMode.LENIENT);
    }
The output of the above program is
LENIENT mode does not care about the order of the fields in the JSON.
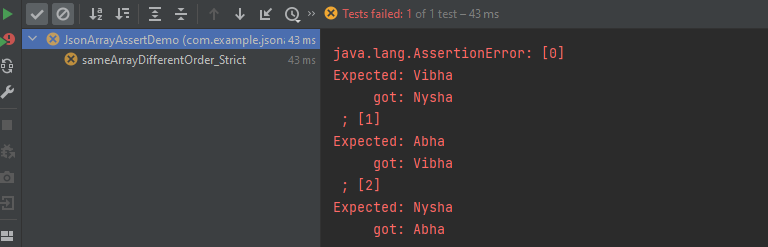
Comparing two JSON Arrays with the same fields but different in order – Strict
    @Test
    public void sameArrayDifferentOrder_Strict() {

        // same no of elements, values and in same order
        String jsonArray1 = "[\"Vibha\",\"Abha\",\"Nysha\"]";
        String jsonArray2 = "[\"Nysha\",\"Vibha\",\"Abha\"]";

        JSONAssert.assertEquals(jsonArray1, jsonArray2, JSONCompareMode.STRICT);
    }
The output of the above program is
STRICT mode cares about the order of the fields in the JSON Array.
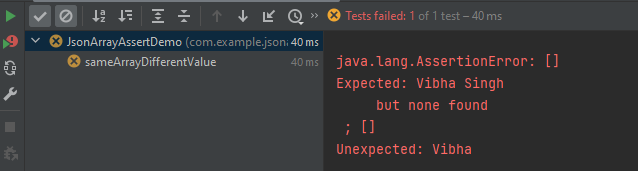
Comparing two JSON Arrays with the same fields but different values
    @Test
    public void sameArrayDifferentValue() {

        // Same no of elements but different values
        String jsonArray1 = "[\"Vibha Singh\",\"Abha\",\"Nysha\"]";
        String jsonArray2 = "[\"Vibha\",\"Abha\",\"Nysha\"]";

        JSONAssert.assertEquals(jsonArray1, jsonArray2, JSONCompareMode.LENIENT);
    }
The output of the above program is
In this scenario assertEquals() will fail as a value is not matching.
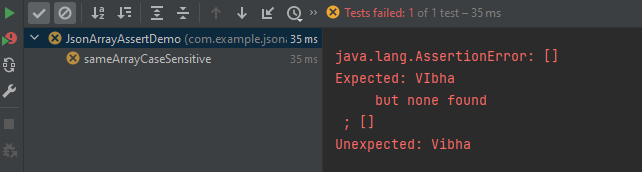
Comparing two JSON Arrays with the case sensitivity
   @Test
    public void sameArrayCaseSensitive() {

        // case sensitive
        String jsonArray1 = "[\"VIbha\",\"Abha\",\"Nysha\"]";
        String jsonArray2 = "[\"Vibha\",\"Abha\",\"Nysha\"]";

        JSONAssert.assertEquals(jsonArray1, jsonArray2, JSONCompareMode.LENIENT);
    }
The output of the above program is
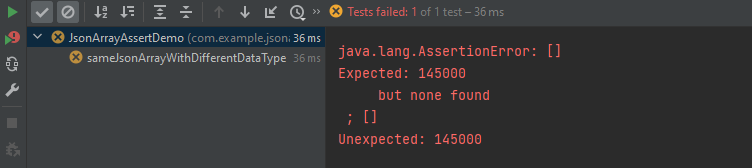
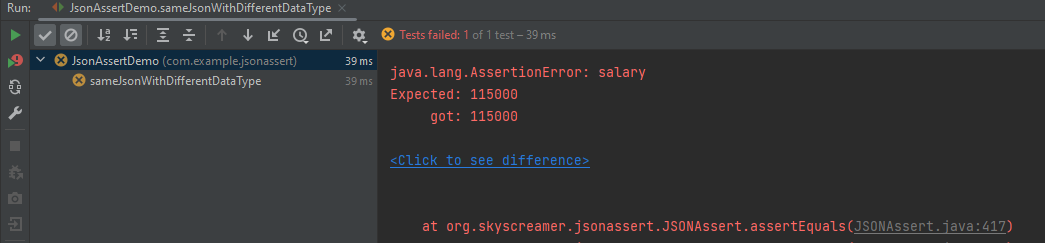
Comparing two JSON Arrays with the same fields but different datatype of values
Here, both the JSON Arrays have the same structure, but we have added one more attribute to the second one. In this case, the assertion fails as it counts the number of items in the arrays.
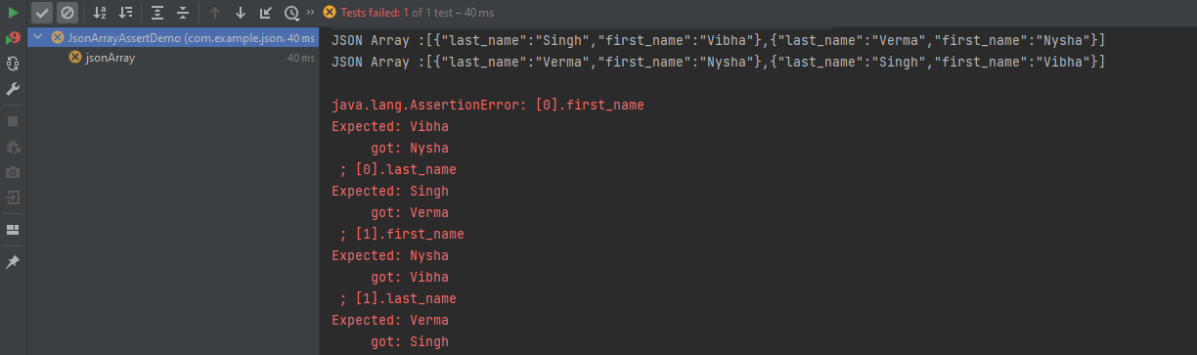
Comparing two JSON Arrays with the addition – STRICT mode
The compare mode can also be defined by using an overloaded method that takes boolean instead of JSONCompareMode where LENIENT = false and STRICT = true.
There are two modes, strict and non-strict in JSONAssert. In most cases, you will probably want to set strict to false, since that will make the tests less brittle. Strict tests require all the elements requested to be returned, and only those elements (ie, the tests are non-extensible). Arrays of elements must be returned to the same order as expected.
In Lenient mode extensibility will be allowed and no strict ordering will be checked. Let’s see example programs for comparing JSONs.
Comparing two Exact same JSON Objects – LENIENT Mode
Here, both the JSONs have the same structure, but we have added one more attribute to the second one. In this case, the assertion matches the first string with the second one and it looks the same. So, the test passes.
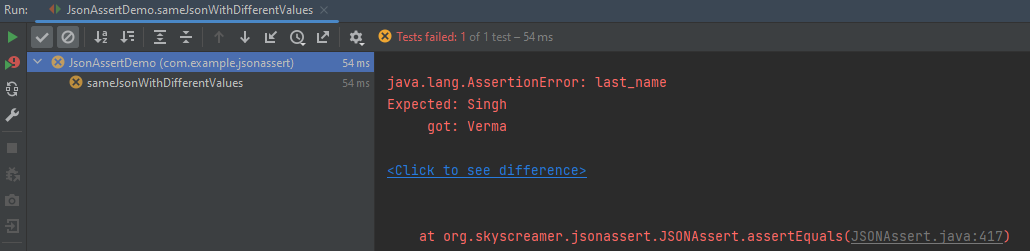
Let us reverse the assertion now. We are comparing the jsonObject2 which has 3 attributes with jsonObject1 which has 2 attributes. So, salary is not present in jsonObject1. In this case, the test fails.
The compare mode can also be defined by using an overloaded method that takes boolean instead of JSONCompareMode where LENIENT = false and STRICT = true.
Maven is a powerful and widely used build automation and project management tool primarily used for Java projects. It simplifies the process of managing a software project by providing a standard way to build, manage dependencies, and generate documentation.
In the previous tutorial, we have discussed about How to install Maven on Windows. In this tutorial, we will see How To Create Selenium Maven Project in Eclipse IDE.
Prerequisite:
Maven Installed on machine
Java installed on machine
Integrated Development Environment (IDE) like IntelliJ IDEA or Eclipse is installed
Steps to follow:
Step 1 – To create a new project – Click on the New and then select – Project option.
Step 2 – Select the Maven Projectand click on the “Next” button.
Step 3 – You can select the default workplace or mention the location where you want to save the project.
Click the “Next“ button.
Step 4 – Select maven-archetype-quickstart option as shown below and click on the “Next” button.
Step 5 – Provide the Group Id, Artifact Id details and click the “Finish” button.
Group Id : com.example
Artifact Id : SeleniumMaven_Demo
Step 6 – The structure of the project looks as shown in the below image.
Step 7 – POM file will look like below image
<?xml version="1.0" encoding="UTF-8"?>

<project xmlns="http://maven.apache.org/POM/4.0.0" xmlns:xsi="http://www.w3.org/2001/XMLSchema-instance"
  xsi:schemaLocation="http://maven.apache.org/POM/4.0.0 http://maven.apache.org/xsd/maven-4.0.0.xsd">
  <modelVersion>4.0.0</modelVersion>

  <groupId>com.example</groupId>
  <artifactId>SeleniumMaven_Demo</artifactId>
  <version>0.0.1-SNAPSHOT</version>

  <name>SeleniumMaven_Demo</name>
  <!-- FIXME change it to the project's website -->
  <url>http://www.example.com</url>

  <properties>
    <project.build.sourceEncoding>UTF-8</project.build.sourceEncoding>
    <maven.compiler.source>1.7</maven.compiler.source>
    <maven.compiler.target>1.7</maven.compiler.target>
  </properties>

  <dependencies>
    <dependency>
      <groupId>junit</groupId>
      <artifactId>junit</artifactId>
      <version>4.11</version>
      <scope>test</scope>
    </dependency>
  </dependencies>

  <build>
    <pluginManagement><!-- lock down plugins versions to avoid using Maven defaults (may be moved to parent pom) -->
      <plugins>
        <!-- clean lifecycle, see https://maven.apache.org/ref/current/maven-core/lifecycles.html#clean_Lifecycle -->
        <plugin>
          <artifactId>maven-clean-plugin</artifactId>
          <version>3.1.0</version>
        </plugin>
        <!-- default lifecycle, jar packaging: see https://maven.apache.org/ref/current/maven-core/default-bindings.html#Plugin_bindings_for_jar_packaging -->
        <plugin>
          <artifactId>maven-resources-plugin</artifactId>
          <version>3.0.2</version>
        </plugin>
        <plugin>
          <artifactId>maven-compiler-plugin</artifactId>
          <version>3.8.0</version>
        </plugin>
        <plugin>
          <artifactId>maven-surefire-plugin</artifactId>
          <version>2.22.1</version>
        </plugin>
        <plugin>
          <artifactId>maven-jar-plugin</artifactId>
          <version>3.0.2</version>
        </plugin>
        <plugin>
          <artifactId>maven-install-plugin</artifactId>
          <version>2.5.2</version>
        </plugin>
        <plugin>
          <artifactId>maven-deploy-plugin</artifactId>
          <version>2.8.2</version>
        </plugin>
        <!-- site lifecycle, see https://maven.apache.org/ref/current/maven-core/lifecycles.html#site_Lifecycle -->
        <plugin>
          <artifactId>maven-site-plugin</artifactId>
          <version>3.7.1</version>
        </plugin>
        <plugin>
          <artifactId>maven-project-info-reports-plugin</artifactId>
          <version>3.0.0</version>
        </plugin>
      </plugins>
    </pluginManagement>
  </build>
</project>
To validate a JSON schema in Java, you can use libraries that provide support for JSON schema validation. JsonSchemaValidator is a Hamcrest matcher that can be used to validate that a JSON document matches a given JSON schema.
Add the following dependency in pom.xml. You can check the latest Maven dependency from here.
Query parameters are a way to pass information to an API flexibly and simply. They are added to the end of the API endpoint URL as a series of key-value pairs. To append query params to the end of a URL, a ‘?’ Is added followed immediately by a query parameter.
Query Param Example
https://reqres.in/api/users?page=2
Below is an example of Query Param.
import org.junit.Test;
import static io.restassured.RestAssured.given;
import static org.hamcrest.CoreMatchers.equalTo;
public class ParamDemo {
@Test
public void verifyQueryParam() {
String endpoint = "https://reqres.in/api/";
// Given
given()
.queryParam("page", "2")
// When
.when()
.get(endpoint + "users/")
// Then
.then()
// To verify the response body
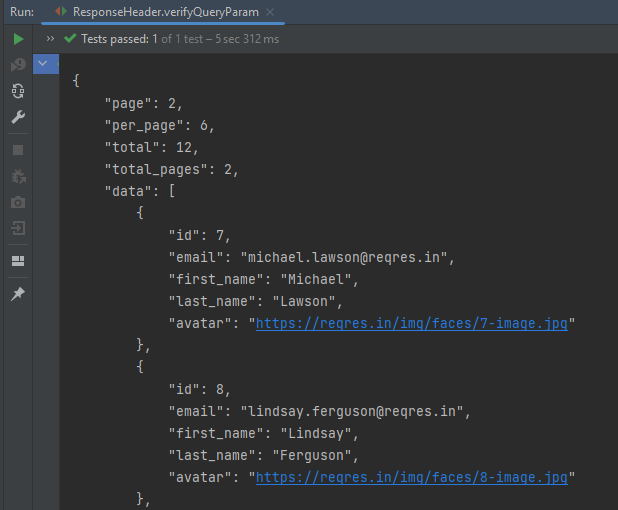
.body("page", equalTo(2))
.body("per_page", equalTo(6))
.body("total_pages", equalTo(2));
}
}
The output of the above program is
.param() or queryParam(): If you don’t specify which, REST Assured will assume GET params are query params and POST params are form params.
Congratulations on making it through this tutorial and hope you found it useful! Happy Learning!!