In this article, we’ll see an overview of the differences between the two versions of the library.
Table of Contents
- Architecture
- JDK Version
- Imports
- Assertions
- Assumptions
- Conditional Test Execution
- Extending JUnit
- Non-public Test Methods are Allowed
- Repeat Tests
- Parameterized Tests
1. Architecture
JUnit 4 has everything bundled into a single jar file whereas JUnit 5 is composed of 3 sub-projects i.e. JUnit Platform, JUnit Jupiter, and JUnit Vintage.
JUnit4
<dependency>
    <groupId>junit</groupId>
    <artifactId>junit</artifactId>
    <version>4.13.2</version>
    <scope>test</scope>
</dependency>
JUnit Platform: It defines the TestEngine API for developing new testing frameworks that run on the platform.
JUnit Jupiter: It has all new JUnit annotations and TestEngine implementation to run tests written with these annotations.
JUnit Vintage: To support running JUnit 3 and JUnit 4 written tests on the JUnit 5 platform.
JUnit5
<dependency>
    <groupId>org.junit.jupiter</groupId>
    <artifactId>junit-jupiter-engine</artifactId>
    <version>5.9.0-M1</version>
    <scope>test</scope>
</dependency>

<dependency>
    <groupId>org.junit.jupiter</groupId>
    <artifactId>junit-jupiter-api</artifactId>
    <version>5.9.0-M1</version>
    <scope>test</scope>
</dependency>

<dependency>
    <groupId>org.junit.vintage</groupId>
    <artifactId>junit-vintage-engine</artifactId>
    <version>5.9.0-M1</version>
    <scope>test</scope>
</dependency>
2. JDK Version
JUnit 4 requires Java 5 (or higher) whereas JUnit 5 requires Java 8 (or higher).
3. Imports
JUnit 5 uses the org.JUnit package for its annotations and classes whereas JUnit 5 uses the new org.JUnit.jupiter package for its annotations and classes. For example, org.JUnit.Test becomes org.JUnit.jupiter.api.Test.
@Before annotation of JUnit4 is renamed to @BeforeEach in JUnit5
@After annotation of JUnit4 is renamed to @AfterEach in JUnit5
@BeforeClass annotation of JUnit4 is renamed to @BeforeAll in JUnit5
@AfterClass annotation of JUnit4 is renamed to @AfterAll in JUnit5
4. Assertions
JUnit 5 assertions are now in org.JUnit.jupiter.api.Assertions whereas JUnit4 assertions are in org.JUnit.Assert. Most of the common assertions, like assertEquals() and assertNotNull() look the same as before, but there are a few key differences:
- The error message is now the last argument, for example, assertEquals(“my message”, 1, 2) would be assertEquals(1, 2, “my message”)
- Most assertions now accept a lambda that constructs the error message, which is only called when the assertion fails.
Below is an example of the same.
    @Test
    void nullNegative() {
        String str = "Summer";

        Assertions.assertNull(str, () -> "The string should be null");
    }
The output of the above program is

- assertTimeout() and assertTimeoutPreemptively() have replaced the @Timeout annotation (note that there is a @Timeout annotation in JUnit 5, but it works differently than JUnit 4).
- There are several new assertions in JUnit5- assertAll(), assertIterableEquals(), assertLinesMatch(), assertThrows() and assertDoesNotThrow(). To know more about assertions in JUnit5, please refer to this tutorial – JUnit5 Assertions Example
5. Assumptions
In Junit 4, org.junit.Assume contains methods for stating assumptions about the conditions in which a test is meaningful. It has the following five methods:
- assumeFalse()
- assumeNoException()
- assumeNotNull()
- assumeThat()
- assumeTrue()
JUnit5 has the following three methods:
- assumeFalse()
- assumingThat()
- assumeTrue()
Below is an example of assumeThat() annotation in JUnit5.
    @Test
    void assumingThatTest() {
        System.setProperty("ENV", "UAT");
        assumingThat(
                "UAT".equals(System.getProperty("ENV")),
                () -> {
                    // Since the condition is true, this assertion will get executed
                    System.out.println("Assuming that executable executed");
                    assertEquals((num1+num2),num4,"The product of "+ num1 +" and "+ num2 +" is not equal to "+num4);
                });

        System.out.println("Loop outside");
        assertEquals((num5-num2),num6,"The difference of "+ num5 +" and "+num2+" is not equal to " + num6);
    }
The output of the above program is

6. Conditional Test Execution
In JUnit4, @Ignore is used to skip the execution of a test whereas @Disabled or one of the other built-in execution conditions is used to skip the execution of the test in JUnit5. To know more about skipping the tests in JUnit5, please refer to this tutorial – How to disable tests in JUnit5 – @Disabled.
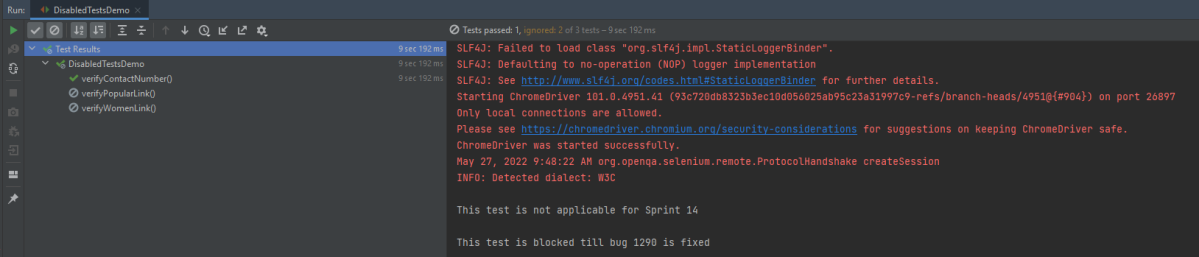
Below is an example of @Disabled in JUnit5.
import io.github.bonigarcia.wdm.WebDriverManager;
import org.junit.jupiter.api.*;
import org.openqa.selenium.By;
import org.openqa.selenium.WebDriver;
import org.openqa.selenium.WebElement;
import org.openqa.selenium.chrome.ChromeDriver;
import org.openqa.selenium.chrome.ChromeOptions;
import static org.junit.jupiter.api.Assertions.*;

class DisabledTestsDemo {

    WebDriver driver;

    @BeforeEach
    public void setUp() {

        WebDriverManager.chromedriver().setup();
        ChromeOptions chromeOptions = new ChromeOptions();
        driver = new ChromeDriver(chromeOptions);
        driver.manage().window().fullscreen();
        driver.get("http://automationpractice.com/index.php");

    }

    @Disabled("This test is not applicable for Sprint 14")
    @Test
    void verifyPopularLink() {

        boolean displayed = driver.findElement(By.xpath("//*[@id='home-page-tabs']/li[1]/a")).isDisplayed();
        assertTrue(displayed);
    }

    @Test
    void verifyContactNumber() {

        String contactDetail = driver.findElement(By.xpath("//span[@class='shop-phone']/strong")).getText();
        assertEquals("0123-456-789", contactDetail);
    }

    @Disabled("This test is blocked till bug 1290 is fixed")
    @Test
    void verifyWomenLink() {

        boolean enabled = driver.findElement(By.xpath("//*[@id='block_top_menu']/ul/li[1]/a")).isEnabled();
        assertTrue(enabled);
    }

    @AfterEach
    public void tearDown() {
        driver.close();
    }
}
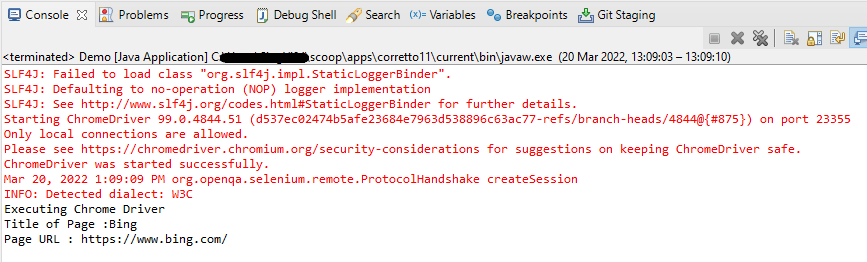
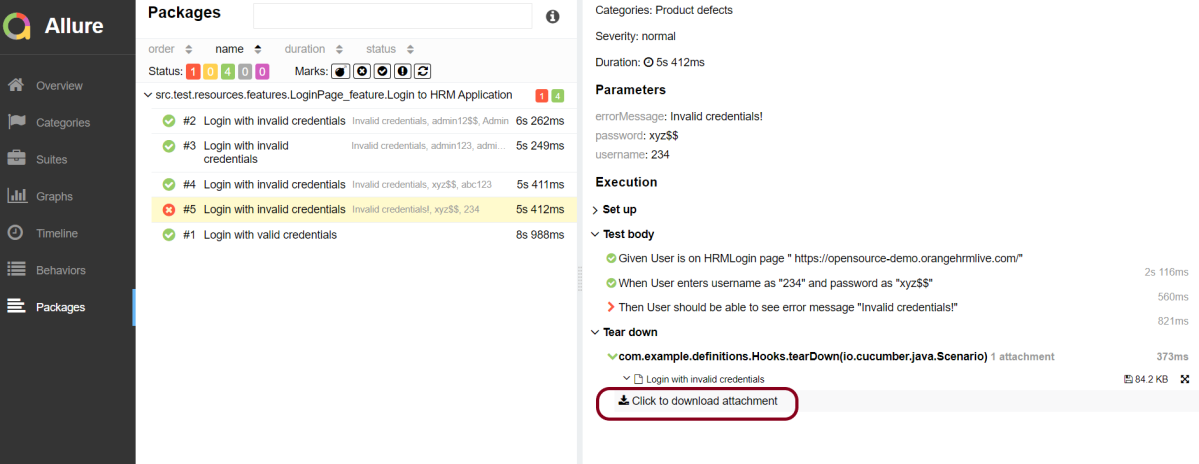
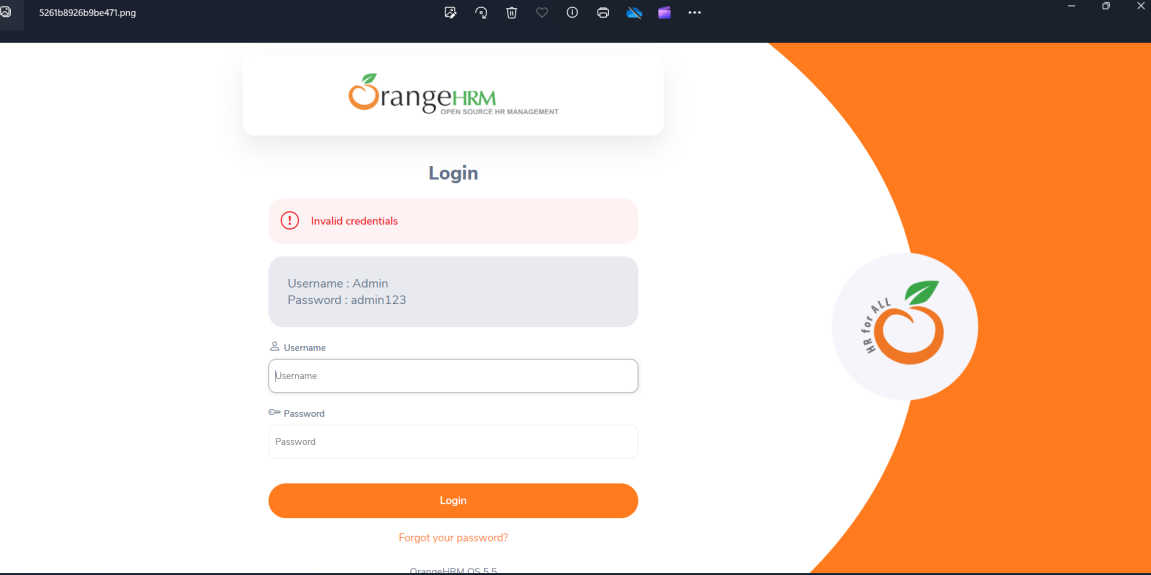
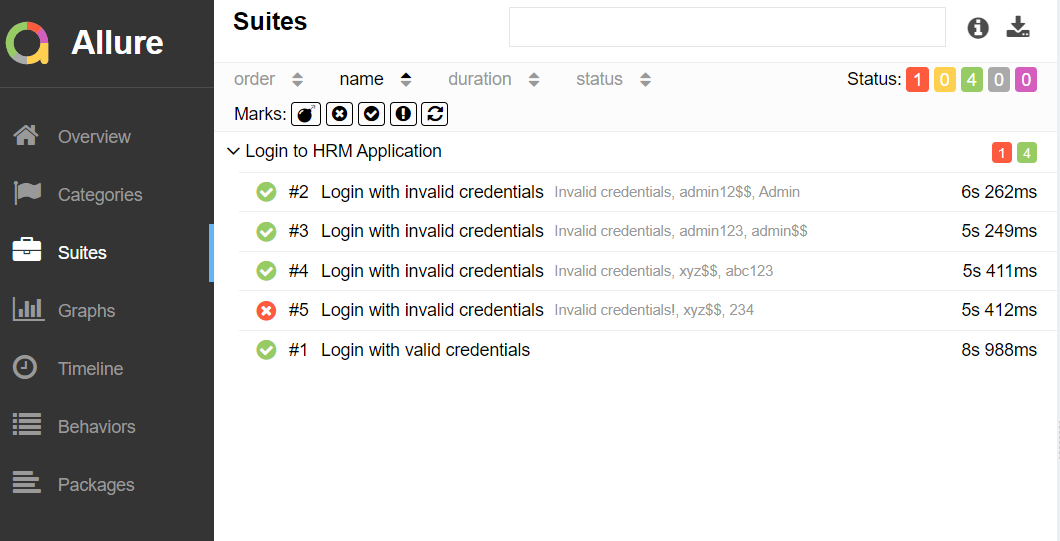
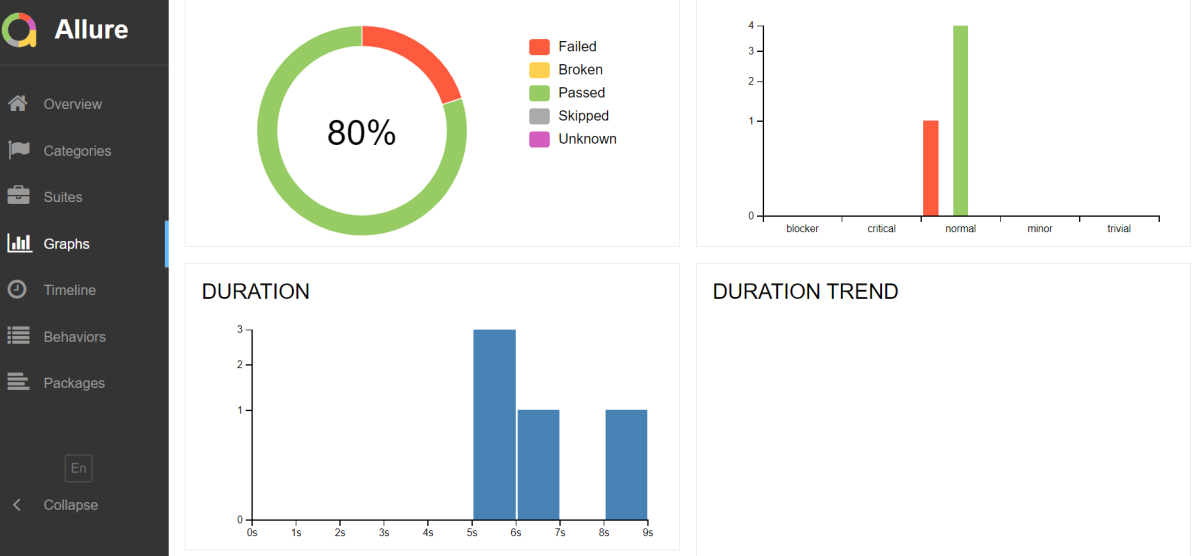
The output of the above program is
JUnit 5 provides the ExecutionCondition extension API to enable or disable a test or container (test class) conditionally. This is like using @Disabled on a test but it can define custom conditions. There are multiple built-in conditions, such as:
- @EnabledOnOs and @DisabledOnOs: Enables a test only on specified operating systems.
- @EnabledOnJre and @DisabledOnJre: Specifies the test should be enabled or disabled for specific versions of Java.
- @EnabledIfSystemProperty: Enables a test based on the value of a JVM system property.
- @EnabledIf: Uses scripted logic to enable a test if scripted conditions are met.
7. Extending JUnit
@RunWith no longer exists; superseded by @ExtendWith in JUnit5.
In JUnit 4, customizing the framework generally meant using a @RunWith annotation to specify a custom runner. Using multiple runners was problematic, and usually required chaining or using a @Rule. This has been simplified and improved in JUnit 5 using extensions.
import net.serenitybdd.core.Serenity;
import net.serenitybdd.junit5.SerenityJUnit5Extension;
import net.thucydides.core.annotations.Managed;
import net.thucydides.core.annotations.Steps;
import net.thucydides.core.annotations.Title;
import org.junit.jupiter.api.Test;
import org.junit.jupiter.api.extension.ExtendWith;
import org.openqa.selenium.WebDriver;
import static org.assertj.core.api.Assertions.assertThat;

 @ExtendWith(SerenityJUnit5Extension.class)
 class ApplicationLoginJUnit5Tests {

        @Managed
        WebDriver driver;

        @Steps
        NavigateAction navigateAction;

        @Steps
        StepLoginPage loginPage;

        @Test
        @Title("Login to application with valid credentials navigates to DashBoard page")

         void successfulLogin() {

            navigateAction.toTheHomePage();

            // When
            loginPage.inputUserName("Admin");
            loginPage.inputPassword("admin123");
            loginPage.clickLogin();

            // Then
            Serenity.reportThat("Passing valid credentials navigates to DashBoard page",
                    () -> assertThat(dashboardPage.getHeading()).isEqualToIgnoringCase("DashBoard"));
        }
    }
8. Non-public Test Methods are Allowed
JUnit 5 test classes and test methods are not required to be public. We can now make them package protected.
JUnit internally uses reflection to find test classes and test methods. Reflection can discover them even if they have limited visibility, so there is no need for them to be public.
9. Repeat Tests
JUnit Jupiter provides the ability to repeat a test a specified number of times by annotating a method with @RepeatedTest and specifying the total number of repetitions desired. To know more about RepestedTest, please refer to this tutorial – How to Retry Test in JUnit5 – @RepeatedTest
Below is the example of @RepeatedTest in JUnit5.
    @RepeatedTest(3)
    void repeatedTestWithRepetitionInfo1(RepetitionInfo repetitionInfo) {
        assertEquals(3, repetitionInfo.getTotalRepetitions());
    }
The output of the above program is

10. Parameterized Tests
Test parameterization existed in JUnit 4 with built-in libraries like JUnit4Parameterized or third-party libraries like JUnitParams. In JUnit 5, parameterized tests are completely built-in and adopt some of the best features from JUnit4Parameterized and JUnitParams. To know more about the parameterized tests in JUnit5, please refer to this tutorial – How to parameterized Tests in JUnit5.
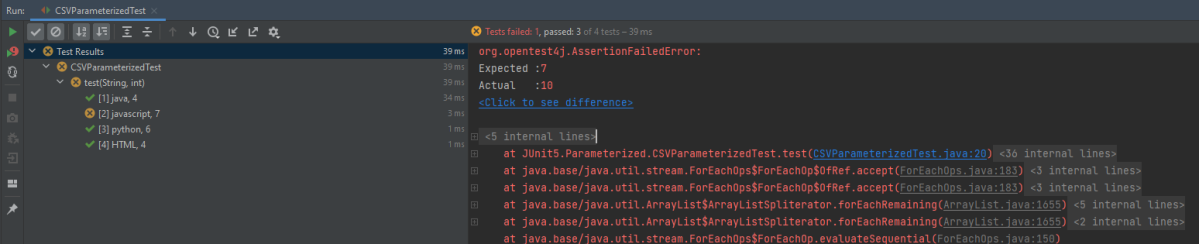
Below is an example of parameterized Test in JUnit5.
public class CSVParameterizedTest {

    @ParameterizedTest
    @CsvSource({
            "java,      4",
            "javascript,   7",
            "python,    6",
            "HTML,    4",
    })


    void test(String str, int length) {
        assertEquals(length, str.length());
    }
}
The output of the above program is
Congratulations. We have gone through the differences between JUnit4 and JUnit5. Happy Learning!!