Cucumber Interview Questions and Answers 2025

Last Updated On

HOME

1. What is BDD? Why do we use BDD?

BDD (behavior-driven development ) is an Agile software development process that encourages collaboration among developers, QA, and business participants in a software project.

Why do we use BDD
BDD increases and improves collaboration between various teams involved in the project to easily engage with the product development cycle. We use a simple English language called Gherkins to write test scenarios.


2. What is Cucumber? What are the advantages of Cucumber?

Cucumber is an open-source tool that supports Behavior Driven Development (BDD). It is written in Rugby Language. Cucumber reads executable specification written in plain English language (Gherkins) and validates that the software act as per the executable specifications.

Advantages of Cucumber

  • Cucumber supports different languages like Java.net and Ruby. 
  • It acts as a bridge between the business and technical language. We can accomplish this by creating a test case in plain English text. 
  • It allows the test script to be written without knowledge of any code; it allows the involvement of non-programmers as well. 
  • It serves the purpose of an end-to-end test framework, unlike other tools. 
  • Due to simple test script architecture, Cucumber provides code re-usability.

Please refer to this tutorial for more details – Introduction of Cucumber Testing Tool (BDD Tool)


3. What is the programming language used by Cucumber?

The cucumber tool provides support for multiple programming languages such as Java, .Net, Ruby, etc. It can also be integrated with multiple tools such as Selenium, Capybara, etc.

Please refer to this tutorial for more details – Introduction of Cucumber Testing Tool (BDD Tool)


4. What is Gherkin?

Gherkin is a set of grammar rules that makes plain text structured enough for Cucumber to understand. 

Gherkin serves multiple purposes:-

  • Unambiguous executable specification
  • Automated testing using Cucumber
  • Document how the system actually behaves

Please refer to this tutorial for more details – Cucumber – What is Gherkin.


5. What are the files required to execute a Cucumber test scenario?

Features
Step Definition
Test Runner


6. What is a Feature File?

A Feature File is a file in which we store features, descriptions of the features and scenarios to be tested. The first line of the feature file must start with the keyword ‘Feature’ followed by the description of the application under test. A feature file may include multiple scenarios within the same file. A feature file has the extension .feature. Below is an example of the Feature file.

Feature: Login to HRM Application 
 
   @ValidCredentials
   Scenario: Login with valid credentials
     
    Given User is on Home page
    When User enters username as "Admin"
    And User enters password as "admin123"
    Then User should be able to login sucessfully

Please refer to this tutorial for more details –  Cucumber – What is Feature File in Cucumber.


7. What are the various keywords that are used in Cucumber for writing a scenario?

Below mentioned are the keywords used for writing a scenario:

  1. Given – It is used to describe the initial context of the scenario.  When the Given step is executed, it will configure the system to a well-defined state, such as creating & configuring objects or adding data to a test database.
  2. When – It is used to describe an event or action. This can be a person interacting with the system or it can be an event triggered by another system.
  3. Then – It is used to describe the expected outcome of the scenario
  4. And/But – If we have several Given’s, When’s, or Then’s, then we can use And /But.

Please refer to this tutorial for more details – Cucumber – What is Feature File in Cucumber.


8. What is the purpose of the Step Definition file in Cucumber?

It is a Java method with an expression, which is used to link it to Gherkin steps. When Cucumber executes a Gherkin step, it will look for a matching step definition to execute. Step definitions can be written in many programming languages.

Feature: Book flight ticket for one-way trip
Scenario: flight ticket for one-way trip from Dublin 
Given  I live in Dublin 
  
@Given ("I live in Dublin") 
public voidVacation()
   {
        System.out.println("I live in Dublin");
   }

Please refer to this tutorial for more details – Step Definition in Cucumber


9. What is the use of the Background keyword in Cucumber?

Background keyword is used to group multiple given statements into a single group. This is generally used when the same set of given statements is repeated in each scenario in the feature file. For example, you need to pass the bearer token in every test. So, this can be done by defining the Given statement as background.

Please refer to this tutorial for more details – Background in Cucumber


10. What is the purpose of the Cucumber Options tag?

The cucumber Options tag is used to provide a link between the feature files and step definition files. Each step of the feature file is mapped to a corresponding method on the step definition file.

Below is the syntax of the Cucumber Options tag:

@CucumberOptions(features="src/test/resources/features/MyHoliday.feature",tags = { "@BookOneWayFlight"})

11. What is TestRunner class in Cucumber?

It is the starting point for JUnit to start executing the tests. TestRunner class is used to provide the link between the feature file and the step definition file.

Below is an example of TestRunner class.

import org.junit.runner.RunWith;
import io.cucumber.junit.Cucumber;
import io.cucumber.junit.CucumberOptions;
 
@RunWith(Cucumber.class)
@CucumberOptions(features = "src/test/resources/Feature/MyHoliday.feature", tags = { "@BookOneWayFlight"})
 
public classTestRunner { 
}

Please refer to this tutorial for more details – Cucumber – JUnit Test Runner Class.


12. What is a profile in cucumber?

You can create Cucumber profiles to run a set of features and step definitions. Use the following command to execute a cucumber profile.

Syntax:

cucumber features -p <profile_name>

Example:

cucumber features -p Integration

13. What are hooks in Cucumber?

Hooks are blocks of code that can run at various points in the Cucumber execution cycle

1- Before: executes before the feature file execution.
2- After: executes after the feature file execution.
3- BeforeStep: executes before each step execution.
4- AfterStep: executes after each step execution.

Below is an example of hooks.

public class CucumberHooksExampleDefinitions {
 
    WebDriver driver;
 
    @Before
    public void setup() {
 
        System.out.println("---------------------Before Executing----------------------");
        ChromeOptions chromeOptions = new ChromeOptions();
        chromeOptions.addArguments("--start-maximized");
        driver = new ChromeDriver(chromeOptions);
        driver.manage().timeouts().implicitlyWait(5, TimeUnit.SECONDS);
    }
 
    @BeforeStep
    public void beforeStepTest() {
        System.out.println("--------------BeforeStep Executing---------------");
    }
 
    @Given("User is on Home page")
    public void userOnHomePage() {
 
        System.out.println("Open Website");
        driver.get("https://opensource-demo.orangehrmlive.com/");
    }
 
    @When("User enters username as {string}")
    public void entersUsername(String userName) throws InterruptedException {
 
        System.out.println("Enter userName");
        driver.findElement(By.name("txtUsername")).sendKeys(userName);
 
    }
 
    @When("User enters password as {string}")
    public void entersPassword(String passWord) throws InterruptedException {
 
        System.out.println("Enter passWord");
        driver.findElement(By.name("txtPassword")).sendKeys(passWord);
 
        driver.findElement(By.id("btnLogin")).submit();
    }
 
    @Then("User should be able to login sucessfully")
    public void sucessfullLogin() throws InterruptedException {
 
        String newPageText = driver.findElement(By.id("welcome")).getText();
        System.out.println("newPageText:" + newPageText);
        assertThat(newPageText, containsString("Welcome"));
 
    }
 
    @AfterStep
    public void afterStepTest() {
        System.out.println("--------------------AfterStep Executing---------------------");
    }
 
    @After
    public void close() {
        driver.close();
        System.out.println("--------------------After Executing----------------------");
    }
}

Please refer to this tutorial for more details – Hooks in Cucumber


14. What are cucumber tags?

Tags are a great way to organize Features and Scenarios. Cucumber tags help in filtering the scenarios. We can tag the scenarios and then run them based on tags.

Below is an example of the tag.

Feature: Sample use of Tags in Cucumber
 
  @ValidCredentials
  Scenario: Login with valid credentials
    
   Given User is on Home page
   When User enters username as "Admin"
   And User enters password as "admin123"
   Then User should be able to login sucessfully

Here, @ValidCredentials is the Tag.

Please refer to this tutorial for more details – Tags in Cucumber.


15. What is the use of features property under the Cucumber Options tag?

Feature property under Cucumber option tag lets Cucumber know the location of Feature Files. As in the below example, the location of the feature file is under src/test/resources/features.

@CucumberOptions(features = "src/test/resources/Feature/MyHoliday.feature")

Please refer to this tutorial for more details – Cucumber – What is Feature File in Cucumber.


16. What is the use of glue property under the Cucumber Options tag?

The glue property lets Cucumber know the location of the Step Definition file. As in the below example, the location of the step definition is “com.cucumber.demo.definitions”.

@CucumberOptions(features = { "src/test/resources/features/MyHoliday.feature" }, glue = {"com.cucumber.demo.definitions" }

17. What is the Scenario Outline in the feature file?

Scenario outline is a way of parameterization of scenarios in Cucumber. It is used to repeat the same tests by passing different values or arguments to Step Definition. Scenario Outline must be followed by the keyword ‘Examples’, which specifies the set of values for each parameter.

Scenario Outline: Book Flight for one-way trip
   
  Given I live in Dublin with adults and kids
  And I want to book one way flight ticket from Dublin to London on 
  When I search online
  Then TripAdvisor should provide me options of flights on 
  And Cost of my flight should not be more than Euro per person
 And Tickets should be refundable
   
 Examples:
  |noOfAdults         |noOfKids         |travelDate    |flightFare    |
  |2                  |  2              |22-Jan-2020   |100           |
  |1                  |  0              |12-Mar-2020   |50            |

Please refer to this tutorial for more details – Data Driven Testing using Scenario Outline in Cucumber


18. What is the purpose of the Examples keyword in Cucumber?

Examples – All scenario outlines have to be followed by the Examples section. This contains the data that has to be passed on to the scenario in Feature File. Scenario Outline must be followed by the keyword ‘Examples’, which specifies the set of values for each parameter.

The example is shown in the previous example.

Please refer to this tutorial for more details – Data Driven Testing using Scenario Outline in Cucumber


19. Should any code be written within the TestRunner class?

No code should be written under the TestRunner class. It should include the tags @RunWith and @CucumberOptions.


20. What is the purpose of a cucumber dry-run?

We use to compile the cucumber feature files and step definitions. If there occur any compilation errors, then it shows them on the console.

@RunWith(Cucumber.class)
@CucumberOptions(dryRun=true)
public class RunCucumberTest {
}

21. List out some of the main differences between Jbehave and Cucumber?

1- Jbehave is Java-based and Cucumber is Ruby-based.
2- Jbehave is story-driven whereas the Cucumber is feature-driven.


22. What are the steps to generate a report in Cucumber?

We run the following command to produce HTML reports.

@RunWith(Cucumber.class)
@CucumberOptions(plugin = {"pretty", "html:target/cucumber"})
public class RunCucumberTest {
}

Cucumber Version 6.7.0 and above we can create a Cucumber Report by adding a cucumber.properties file in src/test/resources and mention the below instruction in it.

cucumber.publish.enabled=true

Please refer to this tutorial for more details – Cucumber Report Service


23. Does Cucumber comes with an assertion library?

No, Cucumber does not come with an assertion library. It uses assertion from unit testing tools like JUnit, TestNG, JavaScript, RSpec.


24. How to run a Cucumber test using tags in Command-Line?

mvn test -Dcucumber.filter.tags="@BookOneWayFlight"

mvn test -Dcucumber.options="@BookOneWayFlight"

Please refer to this tutorial for more details – Run Cucumber Test from Command Line.


25. Can we use Selenium with Cucumber?

Yes, we can use Selenium with Cucumber to test a Web Application. Cucumber makes the tests readable for business also. To know more about the Integration of Selenium with Cucumber, refer to this tutorial – Integration of Cucumber with Selenium and JUnit


26. What is DataTable in Cucumber?

Data Tables in Cucumber are used to add multiple parameters in Step Definition in a tabular form rather than putting all the parameters in the Gherkin statement. This is much easier to read and multiple rows of data can be passed in the same step. Data tables from Gherkin can be accessed by using the DataTable object as the last parameter in a Step Definition. Below is an example of DataTable.

Feature: Login to HRM Application 
  
   @ValidCredentials
   Scenario: Login with valid credentials
      
    Given User is on HRMLogin page
    When User enters valid credentials
    |Admin|admin123|
    Then User should be able to login sucessfully and new page open

Please refer to this tutorial for more details – DataTables in Cucumber


27. What is the difference between Scenario Outline and DataTables in Cucumber?

Scenario Outline

  1. The Scenario Outline keyword is used to run the same Scenario multiple times, with different combinations of data.
  2. Cucumber automatically runs the complete test the number of times equal to the number of data in the Test Set.
  3. Example tables always have a header row, because the compiler needs to match the header columns to the placeholders in the Scenario Outline’s steps.
Scenario Outline: Book Flight for one-way trip
   
  Given I live in Dublin with adults and kids
  And I want to book one way flight ticket from Dublin to London on 
  When I search online
  Then TripAdvisor should provide me options of flights on 
  And Cost of my flight should not be more than Euro per person
 And Tickets should be refundable
   
 Examples:
  |noOfAdults         |noOfKids         |travelDate    |flightFare    |
  |2                  |  2              |22-Jan-2020   |100           |
  |1                  |  0              |12-Mar-2020   |50            |

DataTable

  1. No keyword is used to define the test data
  2. This works only for the single step, below which it is defined
  3. Data tables are passed wholesale to the step definitions, and it’s up to the user to interpret them. They don’t necessarily have a header row.
Feature: Login to HRM Application 
  
   @ValidCredentials
   Scenario: Login with valid credentials
      
    Given User is on HRMLogin page
    When User enters valid credentials
    |Admin|admin123|
    Then User should be able to login sucessfully and new page open

28. Can we run Cucumber tests parallelly?

Yes, we can run Cucumber tests parallelly. Cucumber-JVM allows parallel execution across multiple threads since version 4.0.0.

Cucumber Scenarios can be executed in parallel using the JUnit Platform

Cucumber can be executed in parallel using JUnit and Maven test execution plugins. 

Cucumber can be executed in parallel using TestNG and Maven test execution plugins.

Please refer to this tutorial for more details – Parallel Testing in Cucumber with TestNG.


29. Can we use Cucumber with Rest Assured?

Cucumber is not an API automation tool, but it works well with other API automation tools, like Rest Assured.

Please refer to this tutorial for more details – Rest API Test in Cucumber BDD.

This tutorial gives an idea of various questions that can be asked in an interview. Hope this helps you in the preparation of the Interview.

CSS Selectors in Selenium Webdriver

HOME

(By.cssSelector("input#email"))
(By.cssSelector("#email"))
  • HTML tag – HTML tag of the element being accessed
  • # – The hash sign is use to symbolize ID attribute. It is mandatory to use hash sign if ID attribute is use to create CSS Selector.
  • Value of ID attribute – It is the value of an ID attribute that access. A hash sign always precedes the value of ID.

If two or more web elements have the same HTML tag and attribute value, the first element marked in the page source will identify.

2) Located by Class

Syntax

(By.cssSelector("input.inputtext"))
  • HTML tag = HTML tag of the element being accessed
  • . = the dot sign should always be present when using CSS with class
  • class = class of the element being accessed

3) Located by Attribute

(By.cssSelector("input[type='email']"))
  • HTML tag = HTML tag of the element being accessed
  • [ and ] = square brackets within which a specific attribute and its corresponding value will be placed
  • attribute = attribute to be used, preferable unique to the element
  • value = corresponding value of the chosen attribute.

4) Located by  ID/Class and attribute

(By.cssSelector("input.inputtext[name='email']")
  • HTML tag = HTML tag of the element being accessed
  • . = the dot sign should always be present when using a CSS with class
  • class = class of the element being accessed
  • [ and ] = square brackets within which a specific attribute and its corresponding value will be placed
  • attribute = attribute to be used, preferable unique to the element
  • value = corresponding value of the chosen attribute.

5) Located by Sub String Matches

CSS in Selenium has an interesting feature of allowing partial string matches using ^, $, and *.

a) Starts with (^): To select the element, we would use ^ which means ‘starts with’.

(By.cssSelector("input[name^='em']"))
  • ^– Symbolic notation to match a string using prefix.

Prefix – It is the string based on which match operation is performed. The likely string is expected to start with the specified string

b) Ends with ($): To select the element, we would use $ which means ‘ends with’.

Syntax

(By.cssSelector("input[name$='il']"))
  • $ – Symbolic notation to match a string using suffix.
  • The suffix – It is the string based on which match operation is perform. The likely string is expect to ends with the specified string.

c) Contains (*): To select the element, we would use * which means ‘sub-string’.

Syntax

(By.cssSelector("input[name*='rst']"))
 
(By.cssSelector("input:contains('rst')")

* – This is used to match the sub-string

6) Locating child element

Here, id =”content” is the parent locator. It will go to first div as child or sub child, then again div as child or sub child, and third div as child or sub child. Then it will go to div class _4bl7 _m-_ which further go to div class _ihd _3ma mbs _6n _6s _6v.

Syntax

(By.cssSelector("#content>div>div>div>div._4bl7._m-_>div._ihd._3ma.mbs._6n._6s._6v"))

Locating nth Child:

To locate the element with text ‘Female’, we use nth type css.

Syntax

(By.cssSelector("#u_0_13 > span:nth-child(1) > label"))

To select the last child element, i.e. ‘Male’, we can use.

Syntax

(By.cssSelector("#u_0_13 > span:last-child> label"))

Now, let’s write a small program to show the use of CSS Selectors. This program is it we have done for XPath , the only difference is the use of CSS Selectors to identify the web elements.

import org.openqa.selenium.By;
import org.openqa.selenium.WebDriver;
import org.openqa.selenium.chrome.ChromeDriver;
import org.openqa.selenium.chrome.ChromeOptions;
import java.time.Duration;

public class Selenium_Demo {

    protected static WebDriver driver;

    public static void main(String[] args) {

        ChromeOptions options = new ChromeOptions();
        options.addArguments("--start-maximized");
        driver = new ChromeDriver(options);
        driver.manage().timeouts().implicitlyWait(Duration.ofSeconds(2));
        driver.get("https://opensource-demo.orangehrmlive.com/");
        driver.manage().window().maximize();

        //CSS Selectors for TextBox
        driver.findElement(By.cssSelector("input.oxd-input[name='username'")).sendKeys("Admin");

        driver.findElement(By.cssSelector("input.oxd-input[name='password'")).sendKeys("admin123");

        driver.findElement(By.cssSelector("button[type='submit'")).click();
        
        driver.close();
    }
}

Testing of Web Application using Serenity with JUnit5

Last Updated On

HOME

In the previous tutorial, I explained about the Testing of Web Application using Serenity with JUnit4. In this tutorial, I’ll explain the Integration of Serenity BDD with JUnit5.

Table Of Contents

  1. Prerequisite
  2. Dependency List
  3. Structure of Project
  4. Implementation Steps
    1. Update Properties section in Maven pom.xml
    2. Add Serenity and JUnit dependencies to POM.xml
    3. Update Build Section of pom.xml
    4. Create Test Class sunder src/test/java folder
    5. Create serenity.conf file under src/test/resources
    6. Create serenity.properties file at the root of the project
    7. Run the tests through the command line
    8. Serenity Report Generation

Prerequisite

  1. Java 17 installed
  2. Maven installed
  3. Eclipse or IntelliJ installed

Dependency List:

  1. Java 17
  2. Maven – 3.9.9
  3. Serenity – 4.0.30
  4. Serenity JUnit5 – 4.0.30
  5. JUnit5 – 5.11.0
  6. Maven Surefire Plugin – 3.5.0
  7. Maven Failsafe Plugin – 3.5.0
  8. Maven Compiler Plugin – 3.13.0

Structure of Project

Implementation Steps

Step 1 – Update Properties section in Maven pom.xml

<properties>
    <project.build.sourceEncoding>UTF-8</project.build.sourceEncoding>
    <serenity.version>4.0.30</serenity.version>
    <junit5.version>5.11.0</junit5.version>
    <maven.surefire.plugin.version>3.5.0</maven.surefire.plugin.version>
    <maven.failsafe.plugin.version>3.5.0</maven.failsafe.plugin.version>
    <maven.compiler.plugin.version>3.13.0</maven.compiler.plugin.version>
    <maven.compiler.source>17</maven.compiler.source>
    <maven.compiler.target>17</maven.compiler.target>
    <encoding>UTF-8</encoding>
    <tags></tags>
    <webdriver.base.url></webdriver.base.url>
</properties>

Step 2 – Add Serenity and JUnit dependencies to POM.xml

<dependencies>

    <dependency>
      <groupId>net.serenity-bdd</groupId>
      <artifactId>serenity-core</artifactId>
      <version>${serenity.version}</version>
      <scope>test</scope>
    </dependency>

    <dependency>
      <groupId>net.serenity-bdd</groupId>
      <artifactId>serenity-junit5</artifactId>
      <version>${serenity.version}</version>
      <scope>test</scope>
    </dependency>

    <!-- JUNIT 5 DEPENDENCY-->
    <dependency>
      <groupId>org.junit.jupiter</groupId>
      <artifactId>junit-jupiter-api</artifactId>
      <version>${junit5.version}</version>
      <scope>test</scope>
    </dependency>

    <dependency>
      <groupId>org.junit.jupiter</groupId>
      <artifactId>junit-jupiter-engine</artifactId>
      <version>${junit5.version}</version>
      <scope>test</scope>
    </dependency>

    <!-- Assertj -->
    <dependency>
      <groupId>org.assertj</groupId>
      <artifactId>assertj-core</artifactId>
      <version>${assertj.version}</version>
      <scope>test</scope>
    </dependency>
    
</dependencies>

Step 3 – Update Build Section of pom.xml

 <build>
    <plugins>
      <plugin>
        <groupId>org.apache.maven.plugins</groupId>
        <artifactId>maven-surefire-plugin</artifactId>
        <version>${maven.surefire.plugin.version}</version>
        <configuration>
          <skip>false</skip>
        </configuration>
      </plugin>
      <plugin>
        <artifactId>maven-failsafe-plugin</artifactId>
        <version>${maven.failsafe.plugin.version}</version>
        <configuration>
          <includes>
            <include>**/*Test.java</include>
            <include>**/Tests.java</include>
            <include>**/*TestSuite.java</include>
            <include>**/When*.java</include>
          </includes>
          <systemPropertyVariables>
            <webdriver.base.url>${webdriver.base.url}</webdriver.base.url>
            <junit.jupiter.extensions.autodetection.enabled>true</junit.jupiter.extensions.autodetection.enabled>
          </systemPropertyVariables>
        </configuration>
        <executions>
          <execution>
            <goals>
              <goal>integration-test</goal>
              <goal>verify</goal>
            </goals>
          </execution>
        </executions>
      </plugin>
      <plugin>
        <groupId>org.apache.maven.plugins</groupId>
        <artifactId>maven-compiler-plugin</artifactId>
        <version>${maven.compiler.plugin.version}</version>
        <configuration>
          <source>${maven.compiler.source}</source>
          <target>${maven.compiler.target}</target>
        </configuration>
      </plugin>
      <plugin>
        <groupId>net.serenity-bdd.maven.plugins</groupId>
        <artifactId>serenity-maven-plugin</artifactId>
        <version>${serenity.version}</version>
        <configuration>
          <tags>${tags}</tags>
          <reports>single-page-html</reports>
        </configuration>
        <executions>
          <execution>
            <id>serenity-reports</id>
            <phase>post-integration-test</phase>
            <goals>
              <goal>aggregate</goal>
            </goals>
          </execution>
        </executions>
        <dependencies>
          <dependency>
            <groupId>net.serenity-bdd</groupId>
            <artifactId>serenity-single-page-report</artifactId>
            <version>${serenity.version}</version>
          </dependency>
        </dependencies>
      </plugin>
    </plugins>
  </build>

Step 4 – Create the Test Class sunder src/test/java folder

ApplicationLoginJUnit5Tests.java

import com.example.steps.StepDashboardPage;
import com.example.steps.StepForgetPasswordPage;
import com.example.steps.StepLoginPage;
import net.serenitybdd.annotations.Steps;
import net.serenitybdd.annotations.Title;
import net.serenitybdd.core.Serenity;
import net.serenitybdd.junit5.SerenityJUnit5Extension;
import org.junit.jupiter.api.Test;
import org.junit.jupiter.api.extension.ExtendWith;

import static org.assertj.core.api.Assertions.assertThat;

@ExtendWith(SerenityJUnit5Extension.class)
public class ApplicationLoginTests {

    @Steps
    NavigateActions navigate;

    @Steps
    StepLoginPage loginPage;

    @Steps
    StepDashboardPage dashboardPage;

    @Steps
    StepForgetPasswordPage forgetPasswordPage;

    @Test
    @Title("Login to application with valid credentials navigates to DashBoard page")

    public void successfulLogin() {

        navigate.toTheHomePage();

        // When
        loginPage.inputUserName("Admin");
        loginPage.inputPassword("admin123");
        loginPage.clickLogin();

        // Then
        Serenity.reportThat("Passing valid credentials navigates to DashBoard page",
                () -> assertThat(dashboardPage.getHeading()).isEqualToIgnoringCase("Dashboard"));
    }

    @Test
    @Title("Login to application with invalid credential generates error message")
    void unsuccessfulLogin() {

        navigate.toTheHomePage();

        // When
        loginPage.inputUserName("Admin");
        loginPage.inputPassword("admin1232");
        loginPage.clickLogin();

        // Then
        Serenity.reportThat("Passing invalid credentials generates error message",
                () -> assertThat(loginPage.loginPageErrorMessage()).isEqualToIgnoringCase("Invalid credentials"));
    }

    @Test
    @Title("Verify Forgot your password link")
    void clickForgetPasswordLink() {

        // Given
        navigate.toTheHomePage();

        // When
        loginPage.clickForgetPasswordLink();

        // Then
        Serenity.reportThat("Open Forget Password Page after clicking forget password link",
                () -> assertThat(forgetPasswordPage.getHeadingForgetPasswordPage())
                        .isEqualToIgnoringCase("Reset Password"));
    }
}

To run a JUnit5 test with Serenity BDD, simply add the annotation @net.serenitybdd.junit5.SerenityTest (instead of @org.junit.runner.RunWith(net.serenitybdd.junit.runners.SerenityRunner.class) for JUnit4.

@ExtendWith(SerenityJUnit5Extension.class)

@Test is imported from package:-

import org.junit.jupiter.api.Test;

StepDashboardPage

import net.serenitybdd.annotations.Step;

import net.serenitybdd.core.pages.PageObject;
import net.serenitybdd.core.pages.WebElementFacade;
import org.openqa.selenium.support.FindBy;

public class StepDashboardPage extends PageObject {

    @FindBy(xpath = "//*[@class='oxd-topbar-header-breadcrumb']/h6")
    WebElementFacade dashboardPageTitle;

    @Step("Heading of DashBoard Page")
    public String getHeading() {
        return dashboardPageTitle.getText();
    }
}

StepForgetPasswordPage

import net.serenitybdd.annotations.Step;

import net.serenitybdd.core.pages.PageObject;
import net.serenitybdd.core.pages.WebElementFacade;
import org.openqa.selenium.support.FindBy;

public class StepForgetPasswordPage extends PageObject {

    @FindBy(xpath = "//*[@class='oxd-form']/h6")
    WebElementFacade forgetLink;

    @Step("Verify Forget Password Page ")
    public String getHeadingForgetPasswordPage() {
        return forgetLink.getText();
    }
}

StepLoginPage

package com.example.steps;

import net.serenitybdd.annotations.Step;

import net.serenitybdd.core.pages.PageObject;
import net.serenitybdd.core.pages.WebElementFacade;
import org.openqa.selenium.support.FindBy;

public class StepLoginPage extends PageObject {

    @FindBy(name = "username")
    WebElementFacade username;

    @FindBy(name = "password")
    WebElementFacade password;

    @FindBy(xpath = "//*[@class='oxd-form']/div[3]/button")
    WebElementFacade submitButton;

    @FindBy(xpath = "//*[@class='orangehrm-login-error']/div/div/p")
    WebElementFacade errorMessage;

    @FindBy(xpath = "//*[@class='orangehrm-login-forgot']/p")
    WebElementFacade forgotPasswordLinkText;

    @Step("Enter Username")
    public void inputUserName(String userName) {
        username.sendKeys(userName);
    }

    @Step("Enter Password")
    public void inputPassword(String passWord) {
        password.sendKeys(passWord);
    }

    @Step("Click Submit Button")
    public void clickLogin() {
        submitButton.click();
    }

    @Step("Error Message on unsuccessful login")
    public String loginPageErrorMessage() {
        return errorMessage.getText();
    }

    @Step("Click Forget Password Link")
    public void clickForgetPasswordLink() {
        forgotPasswordLinkText.click();
    }
}

The WebElementFacade class contains a convenient fluent API for dealing with web elements, providing some commonly-used extra features that are not provided out-of-the-box by the WebDriver API. WebElementFacades are largely interchangeable with WebElements: you just declare a variable of type WebElementFacade instead of type WebElement

The @Steps annotation marks a Serenity step library.
Create the test following the Given/When/Then pattern and using step methods from the step library.
The @Title annotation lets you provide your own title for this test in the test reports. Serenity @Title is considered for the Serenity report. Consistently with Junit4, the @Title annotation does not influence the name in the Junit report.

The JUnit Serenity integration provides some special support for Serenity Page Objects. In particular, Serenity will automatically instantiate any PageObject fields in your JUnit test.

Junit5 @Disabled annotation can be used on test and step methods(same as @Ignore in JUnit4).

import net.serenitybdd.annotations.Step;
import net.serenitybdd.core.steps.UIInteractionSteps;

public class NavigateAction extends UIInteractionSteps {

    @Step
    public void toTheHomePage() {
        openPageNamed("loginForm");
       
    }
}

Step 5 – Create serenity.conf file under src/test/resources

serenity.conf file is used to specify various features like the type of web driver used, various test environments, run tests in headless mode, and many more options.

pages{
   loginForm ="https://opensource-demo.orangehrmlive.com/"
   }

webdriver {
  driver = chrome
  capabilities {
    browserName = "chrome"
    acceptInsecureCerts = true
    "goog:chromeOptions" {
      args = ["remote-allow-origins=*","test-type", "no-sandbox", "ignore-certificate-errors", "--window-size=1920,1080",
        "incognito", "disable-infobars", "disable-gpu", "disable-default-apps", "disable-popup-blocking",
        "disable-dev-shm-usage", "disable-extensions", "disable-web-security", "disable-translate", "disable-logging"]
    }
  }
}

Step 6 – Create serenity.properties file at the root of the project

serenity.project.name = Serenity and JUnit5 Demo

Step 7 – Run the tests through the command line

Execute the tests through the command line by using the below command

mvn clean verify

The output of the above test execution is

Step 8 – Serenity Report Generation

The path of Serenity’s reports is mentioned in the image. The reports are generated under /target/site/serenity/.

Index.html

The detailed steps of the tests can also be viewed in the Serenity Report. It shows the execution time of all the steps in a Test.

Serenity-Summary.html

We are done! Congratulations on making it through this tutorial and hope you found it useful! Happy Learning!!

Additional Tutorials:

 Serenity BDD with Cucumber for Web Application
Serenity BDD with Cucumber for SpringBoot Application
Serenity BDD with Cucumber and Rest Assured
Testing of SpringBoot REST Application using Rest Assured for GET Method
Serenity Report for Web Application with Cucumber6 and Junit
How to manage screenshots in Serenity Report

How to parse XML in Java

HOME

<?xml version = "1.0"?>
<department>
    <employee id = "10001">
        <firstname>Tom</firstname>
        <lastname>Mathew</lastname>
        <salary>25000</salary>
        <age>21</age>
    </employee>

    <employee id = "20001">
        <firstname>Katherine</firstname>
        <lastname>Jason</lastname>
        <salary>15000</salary>
        <age>20</age>
    </employee>

    <employee id = "30001">
        <firstname>David</firstname>
        <lastname>Mathew</lastname>
        <salary>35000</salary>
        <age>25</age>
    </employee>

    <employee id = "40001">
        <firstname>Berry</firstname>
        <lastname>Brian</lastname>
        <salary>50000</salary>
        <age>30</age>
    </employee>
</department>
DocumentBuilderFactory dbFactory = DocumentBuilderFactory.newInstance();
DocumentBuilder dBuilder = dbFactory.newDocumentBuilder();
Document doc = dBuilder.parse(inputFile);
doc.getDocumentElement().normalize();
NodeList nodeList = doc.getElementsByTagName("employee");
System.out.println("Node Length :" + nodeList.getLength());
for (int temp = 0; temp < nodeList.getLength(); temp++) {

        Node node = nodeList.item(temp);
        System.out.println("\nCurrent Element :" + node.getNodeName());

        if (node.getNodeType() == Node.ELEMENT_NODE) {
            Element eElement = (Element) node;

             //returns specific attribute
              System.out.println("Employee Id : " + eElement.getAttribute("id"));

            //returns a list of subelements of specified name
             System.out.println("First Name: " + eElement.getElementsByTagName("firstname").item(0).getTextContent());
             System.out.println("Last Name: " + eElement.getElementsByTagName("lastname").item(0).getTextContent());
             System.out.println("Salary: " + eElement.getElementsByTagName("salary").item(0).getTextContent());
             System.out.println("Age: " + eElement.getElementsByTagName("age").item(0).getTextContent());

    }

import org.w3c.dom.Document;
import org.w3c.dom.Element;
import org.w3c.dom.Node;
import org.w3c.dom.NodeList;
import org.xml.sax.SAXException;

import javax.xml.parsers.DocumentBuilder;
import javax.xml.parsers.DocumentBuilderFactory;
import javax.xml.parsers.ParserConfigurationException;
import java.io.File;
import java.io.IOException;

public class XMLParser {

    public static void main(String[] args) {

        try {

            //Create a DocumentBuilder
            File inputFile = new File("src/test/resources/testData/test.xml");
            System.out.println("Request :" + inputFile);
            DocumentBuilderFactory dbFactory = DocumentBuilderFactory.newInstance();
            DocumentBuilder dBuilder = dbFactory.newDocumentBuilder();
            Document doc = dBuilder.parse(inputFile);
            doc.getDocumentElement().normalize();

            //Extract the root element
            System.out.println("Root element :" + doc.getDocumentElement().getNodeName());

            NodeList nodeList = doc.getElementsByTagName("employee");
            System.out.println("Node Length :" + nodeList.getLength());

            for (int temp = 0; temp < nodeList.getLength(); temp++) {

                Node node = nodeList.item(temp);
                System.out.println("\nCurrent Element :" + node.getNodeName());

                if (node.getNodeType() == Node.ELEMENT_NODE) {
                    Element eElement = (Element) node;

                    //returns specific attribute
                    System.out.println("Employee Id : " + eElement.getAttribute("id"));

                    //returns a list of subelements of specified name
                    System.out.println("First Name: " + eElement.getElementsByTagName("firstname").item(0).getTextContent());
                    System.out.println("Last Name: " + eElement.getElementsByTagName("lastname").item(0).getTextContent());
                    System.out.println("Salary: " + eElement.getElementsByTagName("salary").item(0).getTextContent());
                    System.out.println("Age: " + eElement.getElementsByTagName("age").item(0).getTextContent());

                }
            }

        } catch (ParserConfigurationException | SAXException | IOException e) {
            e.printStackTrace();
        }
    }

}

<?xml version = "1.0"?>
<cars>
    <sportscar company = "Porsce">
        <carname type = "formula one">Porsche 718 Boxster</carname>
        <carname type = "sports car">Porsche 718 Cayman</carname>
        <carname type = "sports car">2024 Porsche Panamera</carname>
    </sportscar>

    <supercars company = "Lamborgini">
        <carname>Lamborghini Aventador</carname>
        <carname>Lamborghini Reventon</carname>
        <carname>Lamborghini Gallardo</carname>
    </supercars>

    <supercars company = "Audi">
        <carname>Audi R8</carname>
        <carname>Audi Q8</carname>
        <carname>Audi Q6 e-tron</carname>
    </supercars>
</cars>

package com.example.XML;

import org.w3c.dom.Document;
import org.w3c.dom.Element;
import org.w3c.dom.Node;
import org.w3c.dom.NodeList;
import org.xml.sax.SAXException;

import javax.xml.parsers.DocumentBuilder;
import javax.xml.parsers.DocumentBuilderFactory;
import javax.xml.parsers.ParserConfigurationException;
import java.io.File;
import java.io.IOException;

public class ComplexXMLParser {

    public static void main(String[] args) {

        try {

            //Create a DocumentBuilder
            File inputFile = new File("src/test/resources/testData/test4.xml");
            System.out.println("Request :" + inputFile);
            DocumentBuilderFactory dbFactory = DocumentBuilderFactory.newInstance();
            DocumentBuilder dBuilder = dbFactory.newDocumentBuilder();
            Document doc = dBuilder.parse(inputFile);
            doc.getDocumentElement().normalize();

            //Extract the root element
            System.out.println("Root element :" + doc.getDocumentElement().getNodeName());

            NodeList sportscarNodeList = doc.getElementsByTagName("sportscar");
           // System.out.println("Node Length :" + nodeList.getLength());

            for (int temp = 0; temp < sportscarNodeList.getLength(); temp++) {

                Node node = sportscarNodeList.item(temp);
                System.out.println("\nCurrent Element :" + node.getNodeName());

                if (node.getNodeType() == Node.ELEMENT_NODE) {
                    Element eElement = (Element) node;

                    //returns specific attribute
                    System.out.println("sportscar : " + eElement.getAttribute("company"));

                    NodeList sportcarNameList = eElement.getElementsByTagName("carname");

                    for (int count = 0; count < sportcarNameList.getLength(); count++) {
                        Node node1 = sportcarNameList.item(count);

                        if (node1.getNodeType() == node1.ELEMENT_NODE) {
                            Element car = (Element) node1;

                            System.out.print("\ncar type : " + car.getAttribute("type"));
                            System.out.print("\ncar name : " + car.getTextContent());

                        }
                    }
                }

            }

            System.out.println("\n====================================================");
            NodeList supercarsNodeList = doc.getElementsByTagName("supercars");
            // System.out.println("Node Length :" + nodeList.getLength());

            for (int temp = 0; temp < supercarsNodeList.getLength(); temp++) {

                Node node1 = supercarsNodeList.item(temp);
                System.out.println("\nCurrent Element :" + node1.getNodeName());

                if (node1.getNodeType() == Node.ELEMENT_NODE) {
                    Element eElement = (Element) node1;

                    //returns specific attribute
                    System.out.println("supercars : " + eElement.getAttribute("company"));

                    NodeList supercarsNameList = eElement.getElementsByTagName("carname");

                    for (int count = 0; count < supercarsNameList.getLength(); count++) {
                        Node node2 = supercarsNameList.item(count);

                        if (node1.getNodeType() == node2.ELEMENT_NODE) {
                            Element car = (Element) node2;

                            System.out.print("car name : " + car.getTextContent()+"\n");

                        }
                    }
                }

            }

        } catch (ParserConfigurationException | SAXException | IOException e) {
            e.printStackTrace();
        }
    }

}

Testing of Web Application using Serenity with JUnit4

HOME

In the previous tutorial, I explained Serenity BDD with Cucumber for Web Application. In this tutorial, I will explain the Integration of Serenity with JUnit4. This tutorial gives an idea of how to set up a new project where we like to use Serenity as BDD Framework and JUnit as a Testing framework.

Prerequisite

  1. Java 17 installed
  2. Maven installed
  3. Eclipse or IntelliJ installed

Dependency List:

  1. Java 17
  2. Maven – 3.9.9
  3. Serenity – 4.0.30
  4. JUnit – 4.13.2
  5. Maven Surefire Plugin – 3.2.3
  6. Maven Failsafe Plugin – 3.2.3
  7. Maven Compiler Plugin – 3.12.1

Project Structure

This project consists of various classes – ApplicationLoginTests (This is the Test Class which is going to contain all the tests). NavigationActions is the Action class that is used to open the webpage or application. StepLoginPage, StepDashboardPage, and StepForgotPasswordPage are the Page Object classes that contain multiple functionalities of that page and that help to keep the code clean.

Step 1 – Update the Properties section

 <properties>
    <project.build.sourceEncoding>UTF-8</project.build.sourceEncoding>
    <serenity.version>4.0.30</serenity.version>
    <junit.version>4.13.2</junit.version>
    <maven.compiler.plugin.version>3.12.1</maven.compiler.plugin.version>
    <maven.surefire.plugin.version>3.2.3</maven.surefire.plugin.version>
    <maven.failsafe.plugin.version>3.2.3</maven.failsafe.plugin.version>
    <maven.compiler.source.version>17</maven.compiler.source.version>
    <maven.compiler.target.version>17</maven.compiler.target.version>
    <tags></tags>
    <parallel.tests></parallel.tests>
    <webdriver.base.url></webdriver.base.url>
  </properties>

Step 2 – Add dependencies to POM.xml

<dependencies>
   <dependency>
            <groupId>net.serenity-bdd</groupId>
            <artifactId>serenity-core</artifactId>
            <version>${serenity.version}</version>
            <scope>test</scope>
        </dependency>
        <dependency>
            <groupId>net.serenity-bdd</groupId>
            <artifactId>serenity-junit</artifactId>
            <version>${serenity.version}</version>
            <scope>test</scope>
        </dependency>
      
        <dependency>
            <groupId>net.serenity-bdd</groupId>
            <artifactId>serenity-screenplay</artifactId>
            <version>${serenity.version}</version>
            <scope>test</scope>
        </dependency>
      
        <dependency>
            <groupId>net.serenity-bdd</groupId>
            <artifactId>serenity-screenplay-webdriver</artifactId>
            <version>${serenity.version}</version>
            <scope>test</scope>
        </dependency>

        <dependency>
            <groupId>junit</groupId>
            <artifactId>junit</artifactId>
            <version>${junit.version}</version>
            <scope>test</scope>
        </dependency>      
</dependencies>

Step 3 – Update the Build Section of pom.xml

<build>
        <plugins>
            <plugin>
                <groupId>org.apache.maven.plugins</groupId>
                <artifactId>maven-surefire-plugin</artifactId>
                <version>${maven.surefire.plugin.version}</version>
                <configuration>
                    <skip>true</skip>
                </configuration>
            </plugin>
            <plugin>
                <artifactId>maven-failsafe-plugin</artifactId>
                <version>${maven.failsafe.plugin.version}</version>
                <configuration>
                    <includes>
                        <include>**/*.java</include>
                    </includes>
                    <parallel>methods</parallel>
                    <useUnlimitedThreads>true</useUnlimitedThreads>
                </configuration>
                <executions>
                    <execution>
                        <goals>
                            <goal>integration-test</goal>
                            <goal>verify</goal>
                        </goals>
                    </execution>
                </executions>
            </plugin>
            <plugin>
                <groupId>org.apache.maven.plugins</groupId>
                <artifactId>maven-compiler-plugin</artifactId>
                <version>${maven.compiler.plugin.version}</version>
                <configuration>
                    <source>${maven.compiler.source}</source>
                    <target>${maven.compiler.target}</target>
                </configuration>
            </plugin>
           <plugin>
               <groupId>net.serenity-bdd.maven.plugins</groupId>
               <artifactId>serenity-maven-plugin</artifactId>
               <version>${serenity.version}</version>
               <dependencies> 
                  <dependency>
                       <groupId>net.serenity-bdd</groupId>
                       <artifactId>serenity-single-page-report</artifactId>
                       <version>${serenity.version}</version>
                  </dependency>                
               </dependencies>
               <configuration>
                   <tags>${tags}</tags>
                   <reports>single-page-html</reports> 
               </configuration>
               <executions>
                  <execution>
                      <id>serenity-reports</id>
                      <phase>post-integration-test</phase>
                      <goals>
                          <goal>aggregate</goal>
                      </goals>
                   </execution>
               </executions>
           </plugin>
        </plugins>
    </build>
</project>

Step 4 – Create the Test Class

package org.example.tests;

import net.serenitybdd.annotations.Pending;
import net.serenitybdd.annotations.Steps;
import net.serenitybdd.annotations.Title;
import net.serenitybdd.core.Serenity;
import net.serenitybdd.junit.runners.SerenityRunner;
import org.example.steps.StepDashBoardPage;
import org.example.steps.StepForgotPasswordPage;
import org.example.steps.StepLoginPage;
import org.junit.Test;
import org.junit.runner.RunWith;

import static org.junit.Assert.assertTrue;

@RunWith(SerenityRunner.class)
public class ApplicationLoginTests {

    @Steps
    NavigateActions navigate;

    @Steps
    StepLoginPage loginPage;

    @Steps
    StepDashBoardPage dashboardPage;

    @Steps
    StepForgotPasswordPage forgetPasswordPage;


    @Test
    @Title("Login to application with invalid credential generates error message")
    public void invalidCredentials() {

        // Given
        navigate.toTheHomePage();

        // When
        loginPage.inputUserName("Admin");
        loginPage.inputPassword("admin");
        loginPage.clickLogin();

        // Then
        Serenity.reportThat("Passing invalid credentials generates error message",
                () -> assertTrue(loginPage.errorMessage().equalsIgnoreCase("Invalid Credentials")));

    }

    @Test
    @Title("Login to application with valid credentials navigates to DashBoard page")
    public void successfulLogin() {

        navigate.toTheHomePage();
        // loginPage.open();

        // When
        loginPage.inputUserName("Admin");
        loginPage.inputPassword("admin123");
        loginPage.clickLogin();

        // Then
        Serenity.reportThat("Passing valid credentials navigates to DashBoard page",
                () -> assertTrue(dashboardPage.getHeading().equalsIgnoreCase("DashBoard")));
    }


    @Test
    @Pending
    @Title("Verify Forgot your password link")
    public void clickForgetPasswordLink() {

        // Given
        navigate.toTheHomePage();

        // When
        loginPage.clickForgetPasswordLink();

        // Then
        Serenity.reportThat("Open Forget Password Page after clicking forget password link",
                () -> assertTrue(forgetPasswordPage.getHeadingForgetPasswordPage().equalsIgnoreCase("Reset Password")));

    }

}
  1. The tests run using the Serenity test runner – @RunWith(SerenityRunner.class).
  2. The @Steps annotation marks a Serenity step library.
  3. Create the test following the Given/When/Then pattern and using step methods from the step library.
  4. The @Title annotation lets you provide your own title for this test in the test reports.

Step 5 – Create the Action class

Create NavigateActions class under src/test/java. This class is used to open a web browser with the URL specified. This class is extended from UIInteractionSteps.

openPageNamed() method opens an environment-specific page defined in the serenity.conf file under the pages section. The value of loginForm is derived from serenity.config:

package org.example.tests;

import net.serenitybdd.annotations.Step;
import net.serenitybdd.core.steps.UIInteractionSteps;

public class NavigateActions extends UIInteractionSteps {

    @Step
    public void toTheHomePage() {
        // openUrl("https://opensource-demo.orangehrmlive.com/");

        openPageNamed("loginForm");
    }
}

serenity.conf (partial config file)

pages{
  loginForm = "https://opensource-demo.orangehrmlive.com/"
  }

Step 6 – Create the Page Object Classes

StepLoginPage

package org.example.steps;

import net.serenitybdd.annotations.Step;
import net.serenitybdd.core.pages.PageObject;
import net.serenitybdd.core.pages.WebElementFacade;
import org.openqa.selenium.support.FindBy;

public class StepLoginPage extends PageObject {

    @FindBy(name = "username")
    WebElementFacade username;

    @FindBy(name = "password")
    WebElementFacade password;

    @FindBy(xpath = "//*[@class='oxd-form']/div[3]/button")
    WebElementFacade submitButton;

    @FindBy(xpath = "//*[@class='orangehrm-login-error']/div/div/p")
    WebElementFacade errorMessage;

    @FindBy(xpath = "//*[@class='orangehrm-login-forgot']/p")
    WebElementFacade linkText;

    @Step("Enter Username")
    public void inputUserName(String userName) {
        username.sendKeys(userName);
    }

    @Step("Enter Password")
    public void inputPassword(String passWord) {
        password.sendKeys(passWord);
    }

    @Step("Click Submit Button")
    public void clickLogin() {
        submitButton.click();
    }

    @Step("Error Message on unsuccessful login")
    public String errorMessage() {
        String actualErrorMessage = errorMessage.getText();
        return actualErrorMessage;
    }

    @Step("Click Forget Password Link")
    public void clickForgetPasswordLink() {
        linkText.click();

        System.out.println("Clicked on Forgot Password Link");
    }

}

StepDashBoardPage

package org.example.steps;

import net.serenitybdd.annotations.Step;
import net.serenitybdd.core.pages.PageObject;
import net.serenitybdd.core.pages.WebElementFacade;
import org.openqa.selenium.support.FindBy;

public class StepDashBoardPage extends PageObject {

    @FindBy(xpath = "//*[@class='oxd-topbar-header-breadcrumb']/h6")
    WebElementFacade dashboardPageTitle;

    @Step("Heading of DashBoard Page")
    public String getHeading() {
        return dashboardPageTitle.getText();


    }
}

StepForgetPasswordPage

package org.example.steps;

import net.serenitybdd.annotations.Step;
import net.serenitybdd.core.pages.PageObject;
import net.serenitybdd.core.pages.WebElementFacade;
import org.openqa.selenium.support.FindBy;

public class StepForgotPasswordPage extends PageObject {

    @FindBy(xpath = "//*[@class='oxd-form']/h6")
    WebElementFacade forgetLink;


    @Step("Verify Forget Password Page ")
    public String getHeadingForgetPasswordPage() {

        return forgetLink.getText();
    }
}

Keep in mind to use @FindBy annotation from:

import org.openqa.selenium.support.FindBy;

PageObject class is imported from:

import net.thucydides.core.pages.PageObject;

The JUnit Serenity integration provides some special support for Serenity Page Objects. In particular, Serenity will automatically instantiate any PageObject fields in the JUnit test. When a field of type StepLoginPage is declared in the test, Serenity instantiates it for you. The page is automatically instantiated and ready to be used.

@Managed                                                                
WebDriver driver;

@Managed declares a WebDriver instance that will be managed by Serenity. The WebDriver instance will be initialized automatically.

The driver parameter lets you define what WebDriver driver you want to run these tests in. Possible values include Firefox, chrome, iexplorer, phantomjs, appium, safari, edge, and htmlunit.  The default browser in Serenity is Firefox. There are multiple ways to configure webDriver. One of the ways is to mention with @Managed as shown below:

@Managed(driver="chrome")

Step 7 – Create the serenity.conf file

Serenity.conf file is used to specify various features like the type of webdriver used, various test environments, run test in headless mode, and many more options. Serenity.conf can also contain settings like start size, disable sandbox, disable gpu, and others that need to be added to chrome.switches setting. Create serenity.conf file under src/test/resources.

headless.mode = false
pages{
   loginForm ="https://opensource-demo.orangehrmlive.com/"
   }

webdriver {
  driver = chrome
  capabilities {
    browserName = "chrome"
    acceptInsecureCerts = true
    "goog:chromeOptions" {
      args = ["remote-allow-origins=*","test-type", "no-sandbox", "ignore-certificate-errors", "--window-size=1920,1080",
        "incognito", "disable-infobars", "disable-gpu", "disable-default-apps", "disable-popup-blocking",
        "disable-dev-shm-usage", "disable-extensions", "disable-web-security", "disable-translate", "disable-logging"]
    }
  }
}

Step 8 – Create a serenity.properties file

serenity.project.name = Serenity and Junit4 Demo

Step 9 – Run the tests through the command

Open the command line and go to the location where the pom.xml of the project is present and type the below command.

mvn clean verify

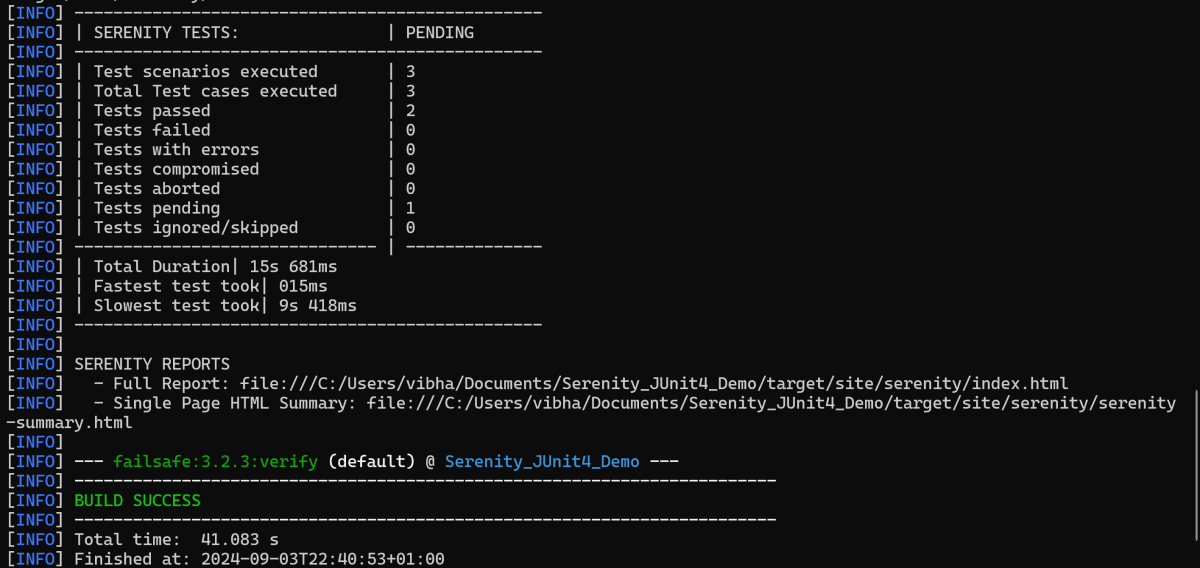
Below is the execution status.

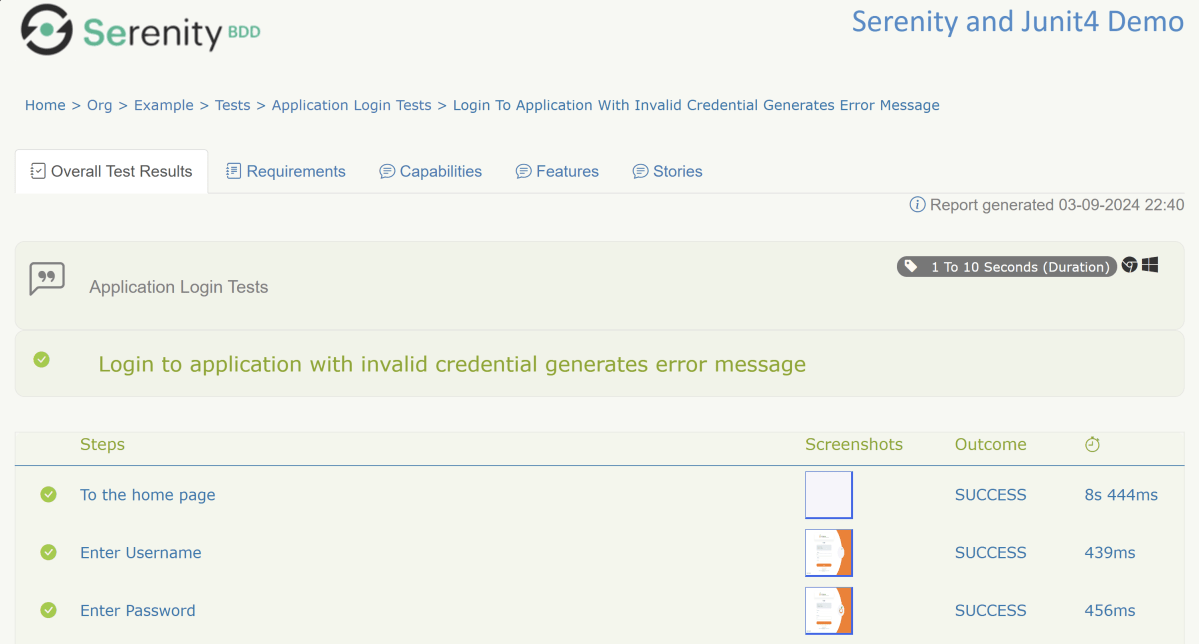
There are 2 types of reports are generated – Index.html and Serenity-Summary.html.

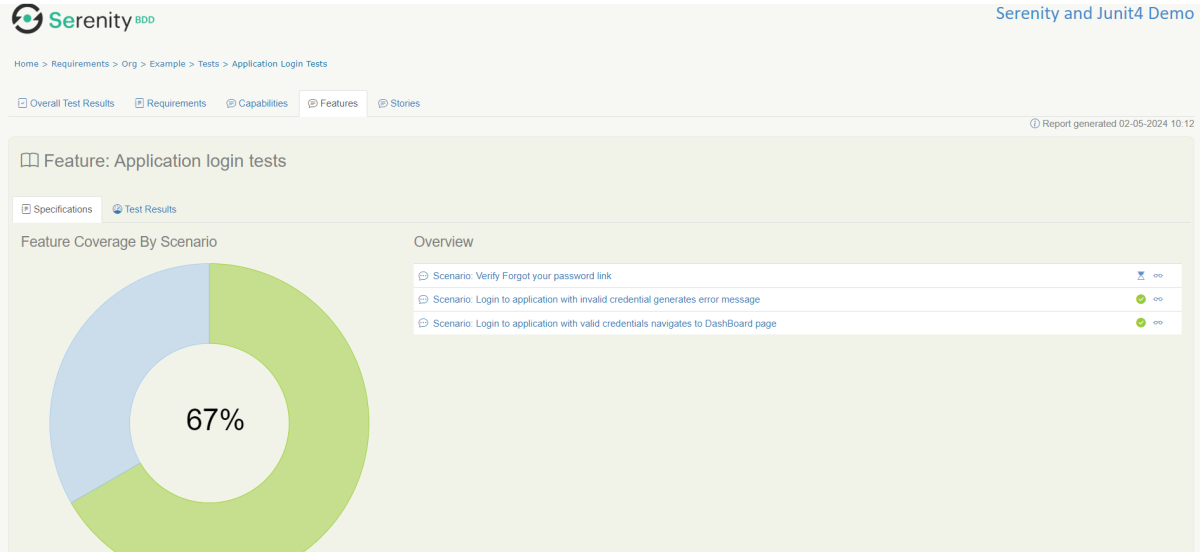
Index.html

 We can see the value of the @Title annotation, ‘Login to the application with valid credentials navigates to DashBoard page’, added as the heading. The value of @Step annotation, ‘Enter Username’, and ‘Enter Password’ is added to the Report as various steps.

This report contains a screenshot of each step also.

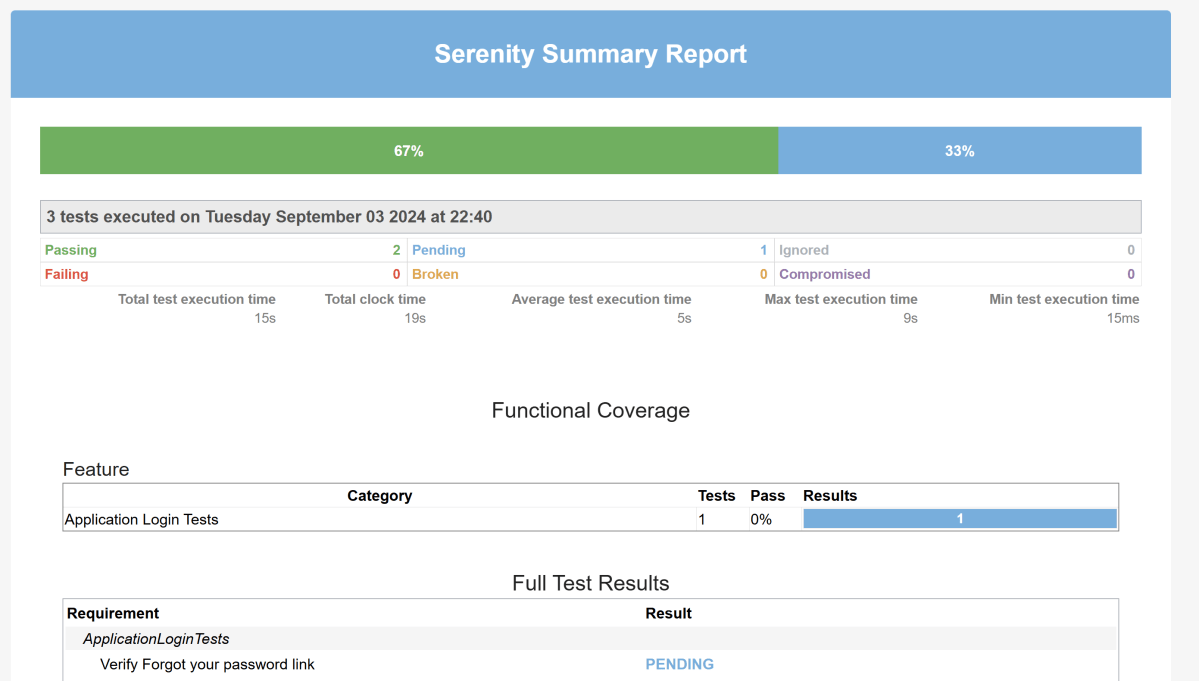
Emailable Report (Serenity-Summary.html)

These reports are present under /target/site/serenity.

Skipping the tests

In Serenity, you use the @Pending annotation, either for a test or for a @Step-annotated method, to indicate that the scenario is still being implemented and that the results are not available yet. These tests appear as ‘Pending’ (shown in blue) in the test reports.

    @Test
	@Pending
	@Title("Verify Forgot your password link")
	public void clickForgetPasswordLink() {

		// Given
		loginPage.open();

		// When
		loginPage.clickForgetPasswordLink();

		// Then
		Assert.assertTrue(forgetpasswordPage.ForgetPasswordPage());
	}

Tests marked with @Ignore will appear as ‘Ignored’ (from JUnit) and appears as grey in the test reports.

We are done! Congratulations on making it through this tutorial and hope you found it useful! Happy Learning!!

How to run PyTest Framework in GitHub Actions

Last Updated On

HOME

This tutorial explains the steps to create a GitHub Action for the PyTest Framework. It also guides you on how to execute the tests in that workflow.
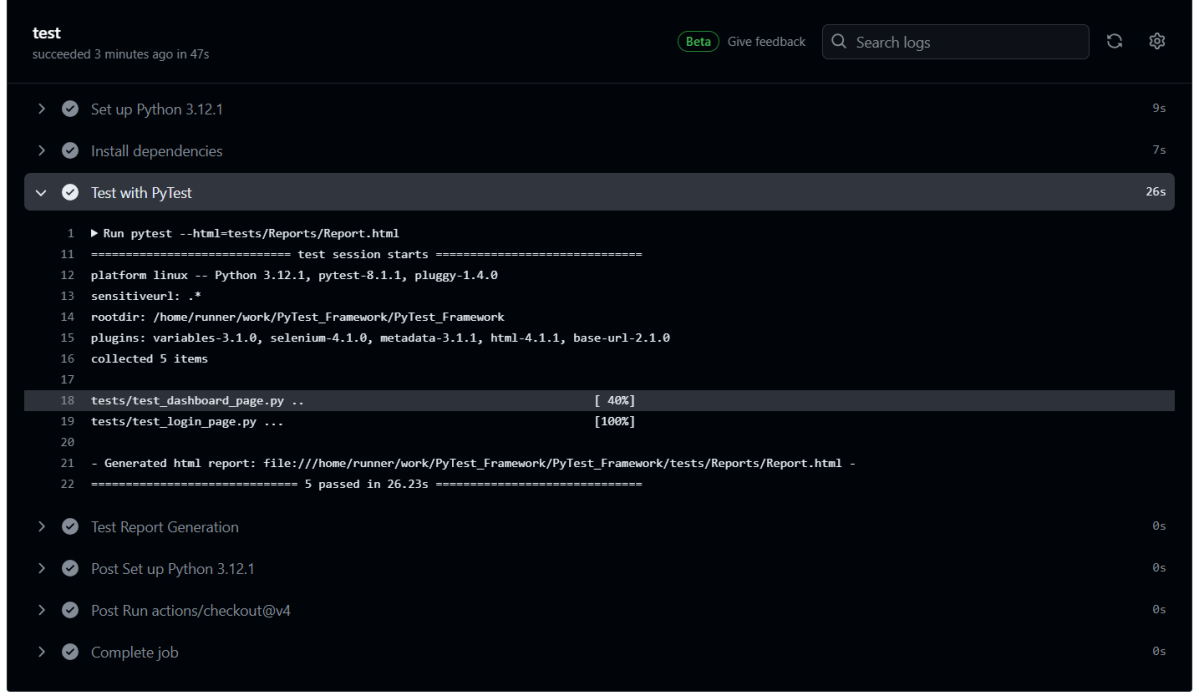
Table of Contents

Why GitHub?

GitHub is a collaborative platform. It supports version control and code collaboration. Automated testing and issue tracking are also supported. These are crucial elements in the software testing process. It promotes transparency, collaboration, and efficiency in the development and testing workflows.

CI/CD pipelines have contributed to the success of the DevOps cycle in all software development projects. This is a holistic process that bridges development and operations. Continuous integration helps development teams deploy code efficiently, and continuous delivery automates code deployment.

Implementation Steps

Step 1 – Create GitHub Actions and Workflows

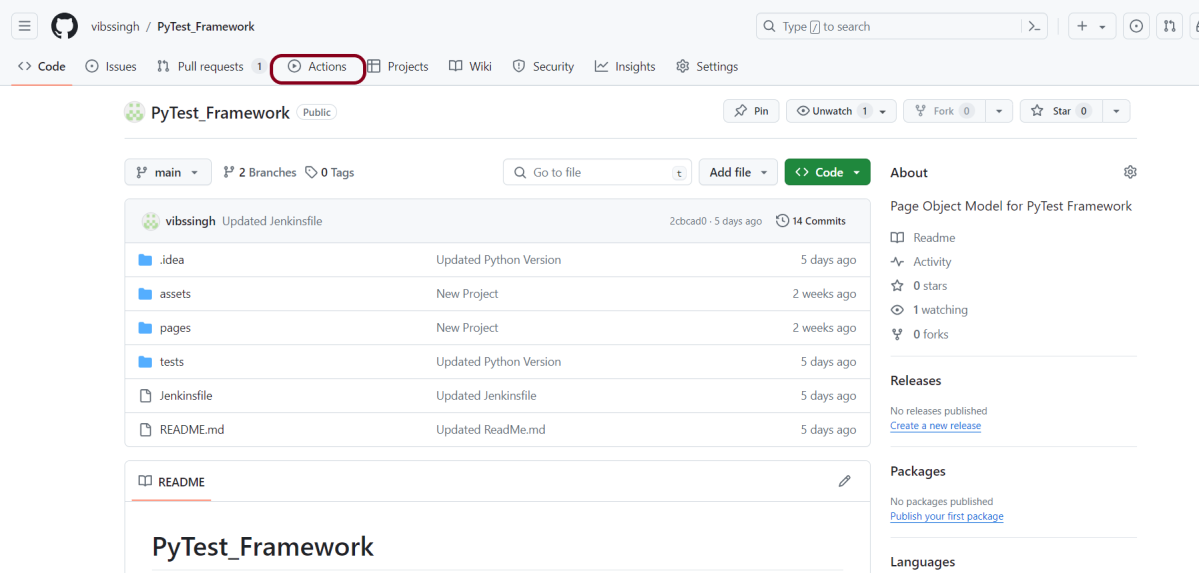
I have a repository available in GitHub – “PyTest_Framework” as shown in the below image. Go to the “Actions” tab.  Click on the “Actions” tab.

Step 2 – Select the type of Actions

You will see that GitHub recommends Actions depending on the project. In our case, it is recommending actions suitable for a Java project. I have selected the “Python application” option as my project is built in Maven.

Step 3 – Generation of Sample pipeline

If you choose an existing option, it will automatically generate a .yaml for the project as shown below.

We will replace the current workflow with the following yml file as shown below:

name: PyTest Framework - Python
on:
  push:
    branches: [ "main" ]
  pull_request:
    branches: [ "main" ]

permissions:
  contents: read

jobs:
  test:
    runs-on: ubuntu-latest

    steps:
      - uses: actions/checkout@v4
      - name: Set up Python 3.12.1
        uses: actions/setup-python@v4
        with:
          python-version: 3.12.1

      - name: Install dependencies
        run: |
          python -m pip install --upgrade pip
          pip install pytest
          pip install pytest-selenium
   
      - name: Test with PyTest
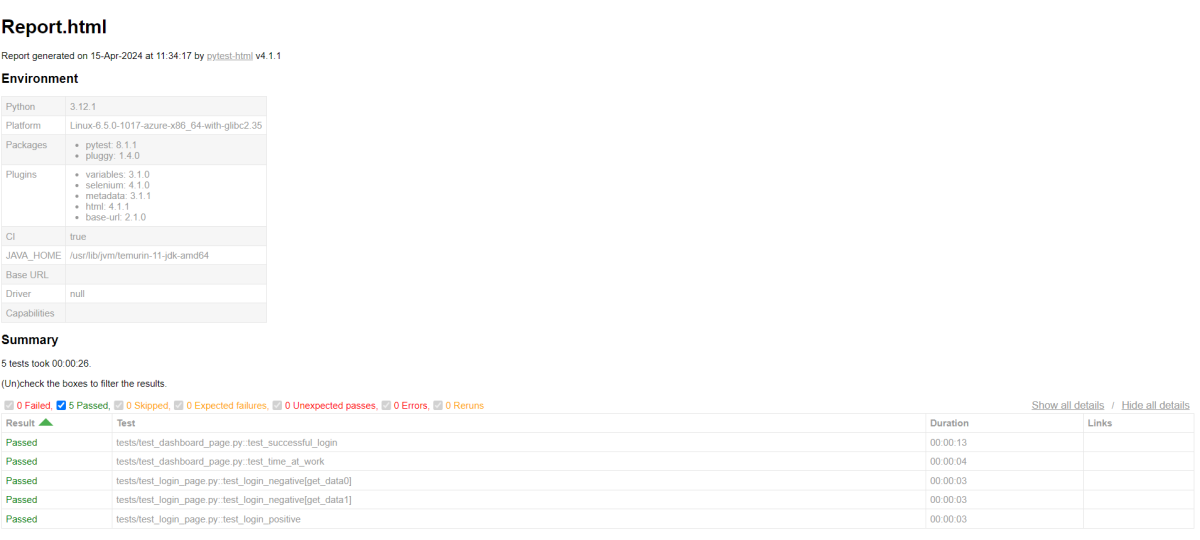
        run: pytest --html=tests/Reports/Report.html  

      - name: Test Report Generation
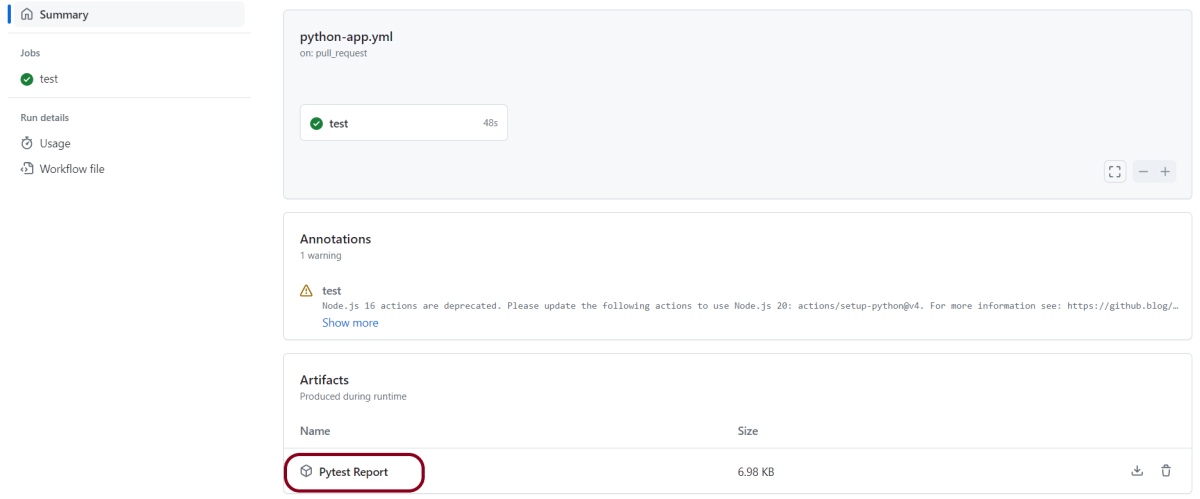
        uses: actions/upload-artifact@v4
        if: success() || failure()
        with:
          name: Pytest Report           # Name of the folder
          path: tests/Reports           # Path to test results

python -m pip install --upgrade pip

pip install pytest
pip install pytest-selenium

  - name: Test with PyTest
    run: pytest --html=tests/Reports/Report.html  

Step 4 – Commit the changes

After the changes, hit the “Start Commit” button.

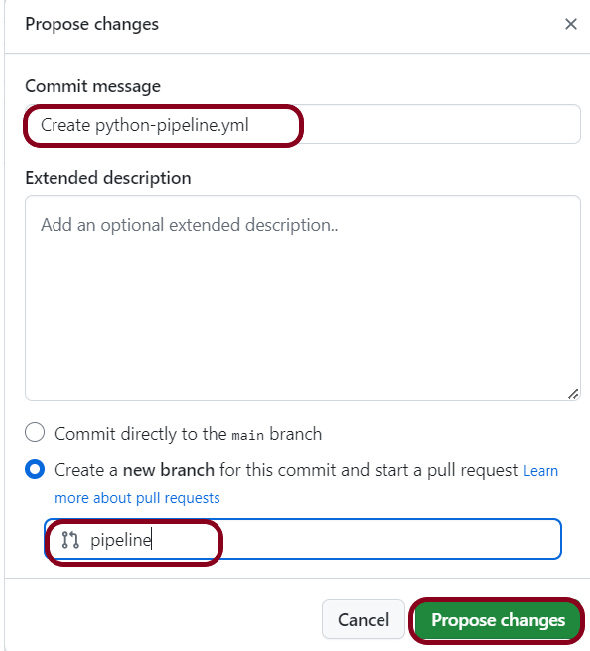
This will give the option to add a description for the commit. It will also enable the user to commit either to the main branch or commit to any other branch that exists in the project. My personal prefernece is to create a new branch like shown below and then commit the changes in that new branch.

Step 5 – Verify that the workflow is running

Next, head over to the “Actions” tab, and you will see your YAML workflow file present under the tab. The yellow sign represents that the job is in the queue.

In Progress – When the job starts building and running, you will see the status change from “Queued” to “In progress”.

Passed – If the build is successful, you will see a green tick mark. 

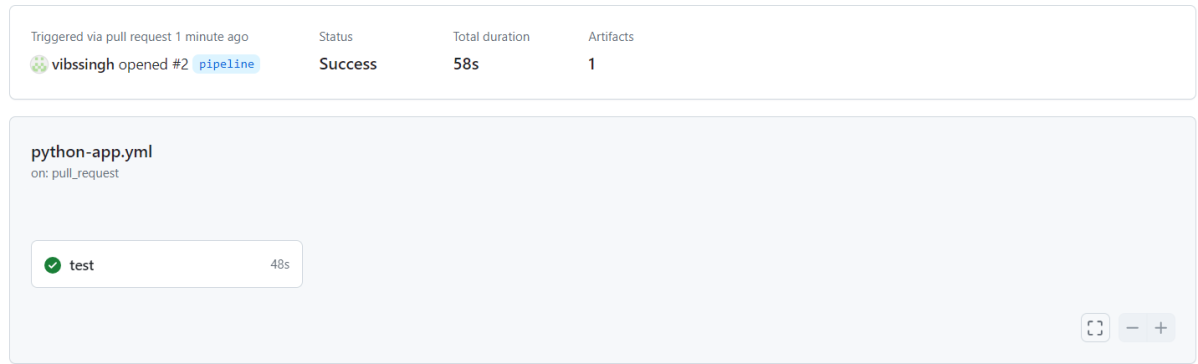
Click on the workflow and the below screen is displayed. It shows the status of the run of the workflow, the total time taken to run the workflow, and the name of the .yml file.

Below shows all the steps of the workflow.

The complete code can be found here on GitHub – vibssingh/PyTest_Framework.

Congratulations! We just created our CI workflow for running our Python Robot Framework.

How to retrieve XML Child Nodes in Java

HOME

<?xml version = "1.0"?>
<department>
    <employee>
        <firstname>Tom</firstname>
        <lastname>Mathew</lastname>
        <salary>25000</salary>
        <age>21</age>
    </employee>
</department>
DocumentBuilderFactory dbFactory = DocumentBuilderFactory.newInstance();
DocumentBuilder dBuilder = dbFactory.newDocumentBuilder();
Document doc = dBuilder.parse(inputFile);
doc.getDocumentElement().normalize();
NodeList nodeList = doc.getElementsByTagName("employee");
System.out.println("Node Length :" + nodeList.getLength());
for (int temp = 0; temp < nodeList.getLength(); temp++) {
                Node node = nodeList.item(temp);
                System.out.println("\nCurrent Element :" + node.getNodeName());
  NodeList childNodes = node.getChildNodes();
                for (int i = 0; i < childNodes.getLength(); i++) {
                    Node childNode = childNodes.item(i);
                    if (childNode.getNodeType() == Node.ELEMENT_NODE) {
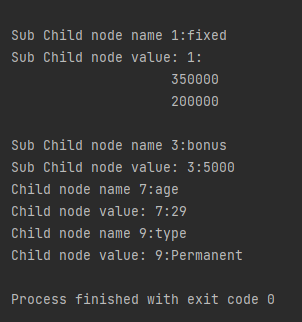
                        System.out.println("Child node name " + i + ":" + childNode.getNodeName());
                        System.out.println("Child node value: " + i + ":" + childNode.getTextContent());

                    }
                }

package com.example.XML;

import org.w3c.dom.Document;
import org.w3c.dom.Element;
import org.w3c.dom.Node;
import org.w3c.dom.NodeList;
import org.xml.sax.SAXException;

import javax.xml.parsers.DocumentBuilder;
import javax.xml.parsers.DocumentBuilderFactory;
import javax.xml.parsers.ParserConfigurationException;
import java.io.File;
import java.io.IOException;

public class ChildNodes {

    public static void main(String[] args) {

        try {
            //Create a DocumentBuilder
            File inputFile = new File("src/test/resources/testData/test1.xml");
            DocumentBuilderFactory dbFactory = DocumentBuilderFactory.newInstance();
            DocumentBuilder dBuilder = dbFactory.newDocumentBuilder();
            Document doc = dBuilder.parse(inputFile);
            doc.getDocumentElement().normalize();

            //Extract the root element
            System.out.println("Root element :" + doc.getDocumentElement().getNodeName());

            NodeList nodeList = doc.getElementsByTagName("employee");
            System.out.println("Node Length :" + nodeList.getLength());

            for (int temp = 0; temp < nodeList.getLength(); temp++) {
                Node node = nodeList.item(temp);
                System.out.println("\nCurrent Element :" + node.getNodeName());

                NodeList childNodes = node.getChildNodes();
                for (int i = 0; i < childNodes.getLength(); i++) {
                    Node childNode = childNodes.item(i);
                    if (childNode.getNodeType() == Node.ELEMENT_NODE) {
                        System.out.println("Child node name " + i + ":" + childNode.getNodeName());
                        System.out.println("Child node value: " + i + ":" + childNode.getTextContent());

                    }
                }
            }
        } catch (ParserConfigurationException | SAXException | IOException e) {
            e.printStackTrace();
        }

    }
}

<?xml version = "1.0"?>
<department>
    <employee>
        <firstname>Tom</firstname>
        <lastname>Mathew</lastname>
        <salary>25000</salary>
        <age>21</age>
    </employee>

    <employee id = "429">
        <firstname>Erika</firstname>
        <lastname>David</lastname>
        <salary>
                <fixed>
                    <fixed1>350000</fixed1>
                    <fixed2>200000</fixed2>
                </fixed>
                <bonus>5000</bonus>
        </salary>
        <age>29</age>
        <type>Permanent</type>
    </employee>
</department>

package com.example.XML;

import org.w3c.dom.Document;
import org.w3c.dom.Node;
import org.w3c.dom.NodeList;
import org.xml.sax.SAXException;

import javax.xml.parsers.DocumentBuilder;
import javax.xml.parsers.DocumentBuilderFactory;
import javax.xml.parsers.ParserConfigurationException;
import java.io.File;
import java.io.IOException;

public class ComplexChildNodes {

    public static void main(String[] args) {

        try {
            //Create a DocumentBuilder
            File inputFile = new File("src/test/resources/testData/test2.xml");
            DocumentBuilderFactory dbFactory = DocumentBuilderFactory.newInstance();
            DocumentBuilder dBuilder = dbFactory.newDocumentBuilder();
            Document doc = dBuilder.parse(inputFile);
            doc.getDocumentElement().normalize();

            //Extract the root element
            System.out.println("Root element :" + doc.getDocumentElement().getNodeName());

            NodeList nodeList = doc.getElementsByTagName("employee");
            System.out.println("Node Length :" + nodeList.getLength());

            for (int temp = 0; temp < nodeList.getLength(); temp++) {
                Node node = nodeList.item(temp);
                System.out.println("\nCurrent Element :" + node.getNodeName());

                NodeList childNodes = node.getChildNodes();
                for (int i = 0; i < childNodes.getLength(); i++) {
                    Node childNode = childNodes.item(i);

                    if (childNode.getNodeType() == Node.ELEMENT_NODE) {
                        System.out.println("Child node name " + i + ":" + childNode.getNodeName());
                        System.out.println("Child node value: " + i + ":" + childNode.getTextContent());

                        for (int j = 0; j < childNode.getChildNodes().getLength(); j++) {
                            Node subChildNode = childNode.getChildNodes().item(j);
                            if (subChildNode.getNodeType() == Node.ELEMENT_NODE) {
                                {
                                    System.out.println("Sub Child node name " + j + ":" + subChildNode.getNodeName());
                                    System.out.println("Sub Child node value: " + j + ":" + subChildNode.getTextContent());
                                }
                            }
                        }
                    }

                }
            }

        } catch (ParserConfigurationException | SAXException | IOException e) {
            e.printStackTrace();
        }

    }
}

Integration of Allure Report with PyTest

Last Updated on

HOME

In this tutorial, we will discuss the Integration of Allure Report with the PyTest.

Table of Contents:

  1. What is an Allure Report?
  2. Prerequisite
  3. Implementation Steps
    1. Install allure-pytest plugin
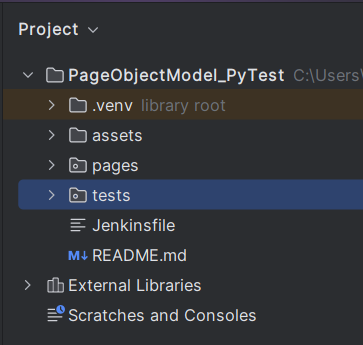
    2. Create a new project folder and open it in PyCharm
    3. Add the allure-pytest package to the PyCharms
    4. Create the test code
    5. Execute the tests
    6. Generation of allure-results folder
    7. Generate the Allure Report
    8. Allure Report Dashboard
      1. Categories in Allure Report
      2. Suites in Allure Report
      3. Graphs in Allure Report
      4. Timeline in Allure Report
      5. Behaviours of Allure Report
      6. Packages in Allure Report

What is an Allure Report?

Allure Framework is a flexible lightweight multi-language test report tool that not only shows a very concise representation of what has been tested in a neat web report form but allows everyone participating in the development process to extract maximum useful information from everyday execution of tests.

From the dev/qa perspective, Allure reports shorten common defect lifecycle: test failures can be divided into bugs and broken tests, also logs, steps, fixtures, attachments, timings, history, and integrations with TMS and bug-tracking systems can be configured, so the responsible developers and testers will have all information at hand.

Prerequisite:

    Implementation Steps:

    Step 1 – Install allure-pytest plugin

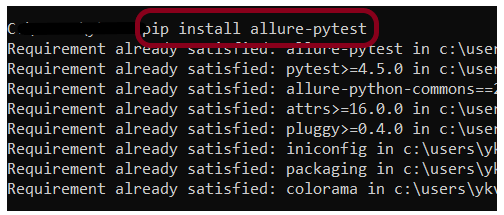
    Go to the command prompt and run the below-mentioned command to download the plugin:

    pip install allure-pytest
    

    The below image shows that the plugin is installed successfully.

    Step 3 – Add the allure-pytest package to the PyCharms

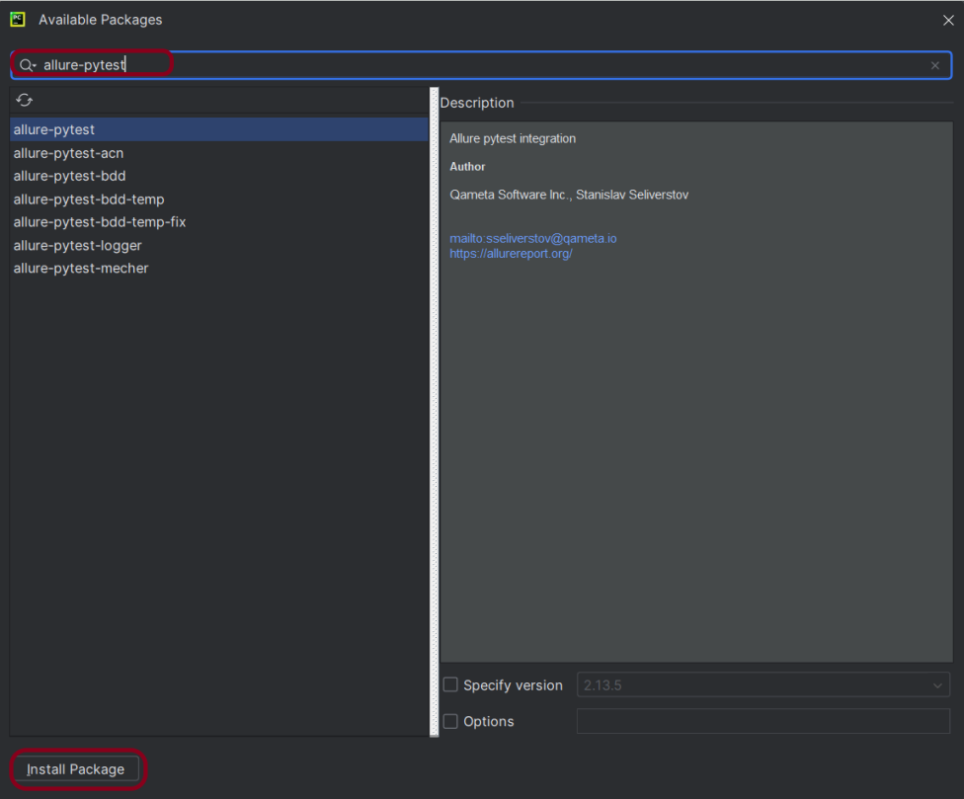
    Go to File->Settings ->Project:PageObjectModel_Pytest->Python Interpreter.

    Click on the “+” sign and enter allure-pytest in the search bar. It will show a list of packages. Select the “allure-pytest” package and click on the “Install Package”.

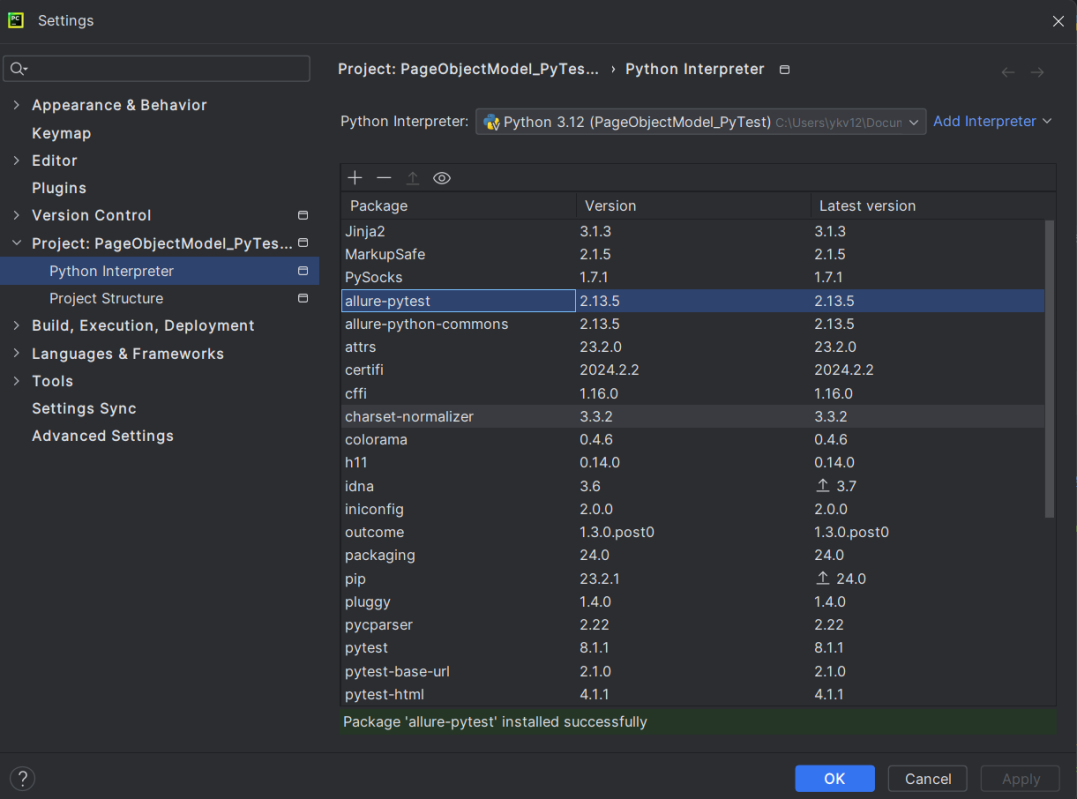
    Once the package is installed, we will see the message that the package is installed successfully, and it can be seen under the package list as shown below:

    Step 4 – Create the test code

    The complete PyTest framework can be found here – Page Object Model Implementation of Python with Selenium – PyTest.

    Step 5 – Execute the tests

    We need the below command to run the PyTest Framework script using the Allure listener.

    pytest --alluredir allure-results
    

    The output of the above program is

    Step 6 – Generation of allure-results folder

    We have the test case passed. It will generate an allure-results folder in the tests directory. This folder contains all the files needed to generate the Allure Report.

    Step 7 – Generate the Allure Report

    To create Allure Report, use the below command

    allure serve allure-results
    

    This will generate the beautiful Allure Test Report as shown below.

    Step 8 – Allure Report Dashboard

    The overview page hosts several default widgets representing the basic characteristics of your project and test environment.

    1. Statistics – overall report statistics.
    2. Launches – if this report represents several test launches, statistics per launch will be shown here.
    3. Behaviours – information on results aggregated according to stories and features.
    4. Executors – information on test executors that were used to run the tests.
    5. History Trend – if tests accumulated some historical data, it’s trend will be calculated and shown on the graph.
    6. Environment – information on the test environment.

    Categories in Allure Report

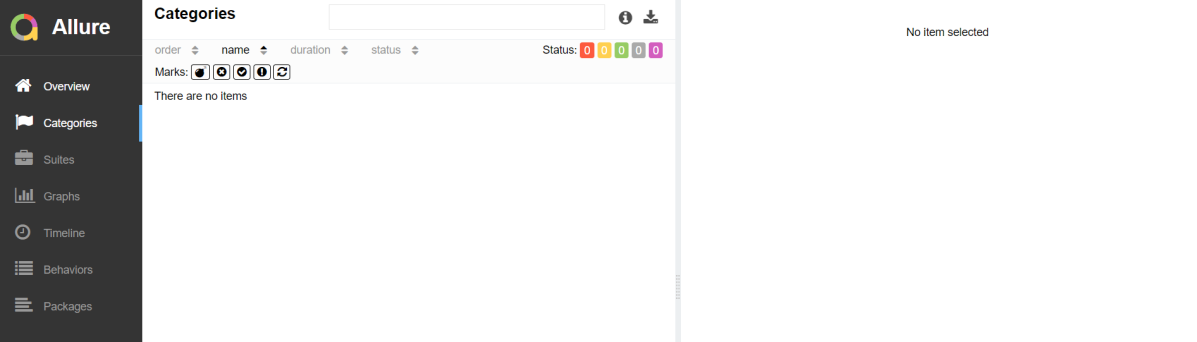
    The categories tab gives you a way to create custom defect classifications to apply for test results. There are two categories of defects – Product Defects (failed tests) and Test Defects (broken tests).

    Suites in Allure Report

    On the Suites tab a standard structural representation of executed tests, grouped by suites and classes can be found.

    Graphs in Allure Report

    Graphs allow you to see different statistics collected from the test data: statuses breakdown or severity and duration diagrams.

    Timeline in Allure Report

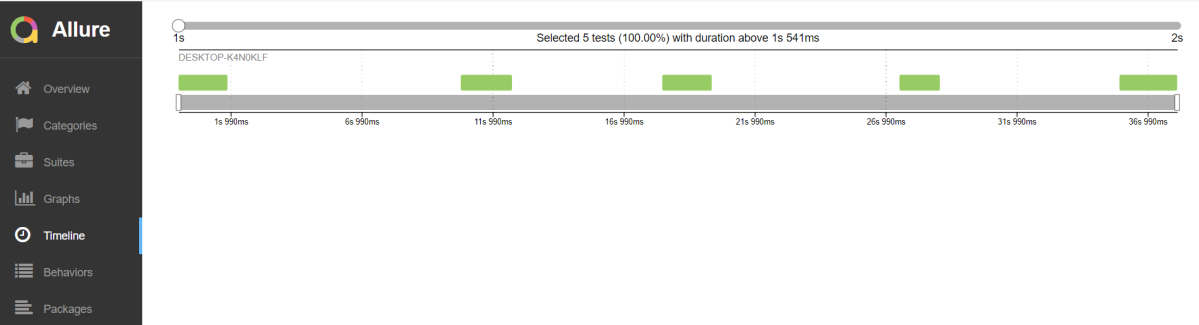
    The timeline tab visualizes retrospective of tests execution, allure adaptors collect precise timings of tests, and here on this tab, they are arranged accordingly to their sequential or parallel timing structure.

    Behaviours of Allure Report

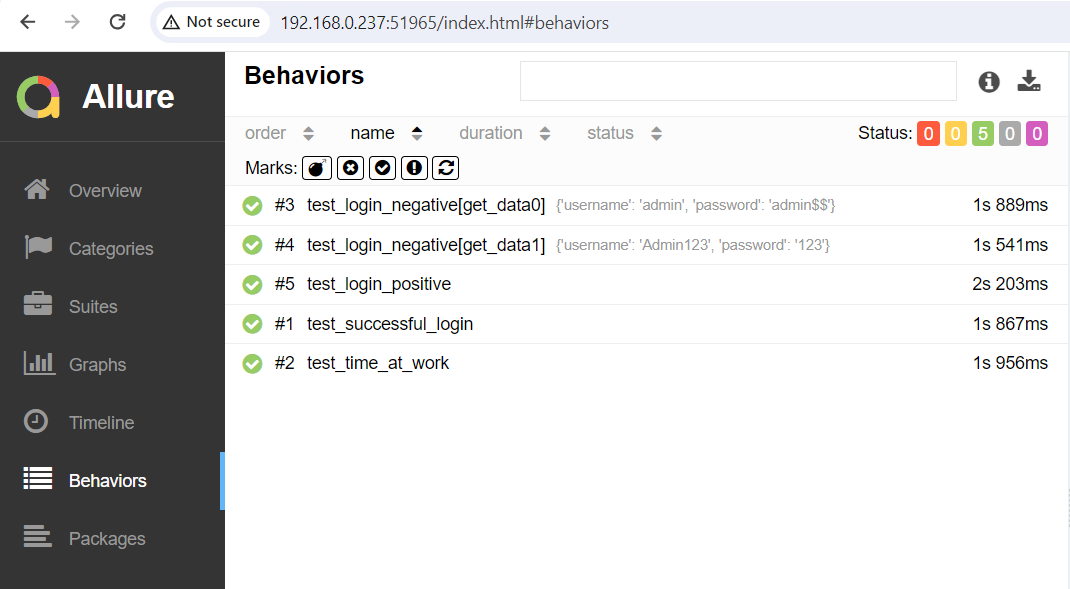
    This tab groups test results according to Epic, Feature, and Story tags.

    Packages in Allure Report

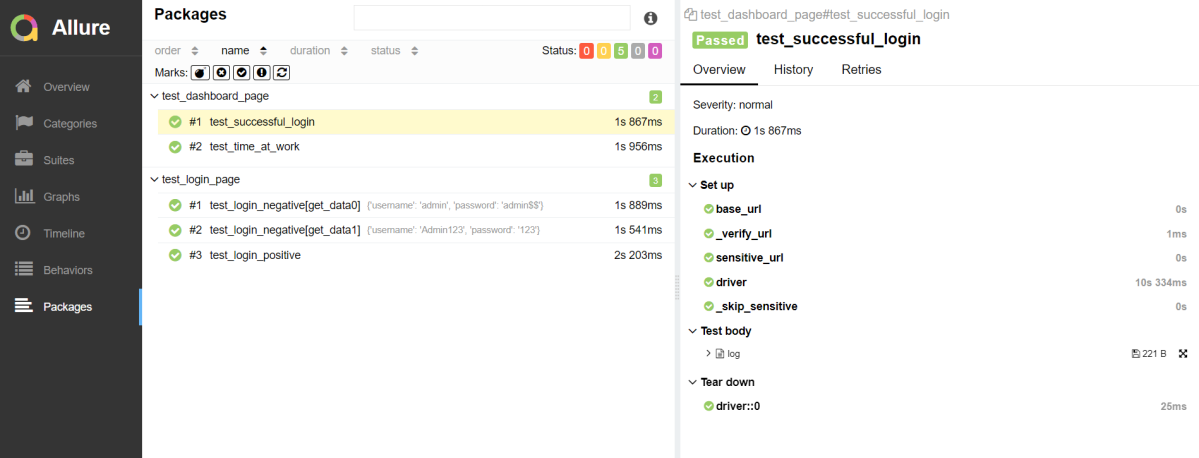
    The packages tab represents a tree-like layout of test results, grouped by different packages.

    That’s it! Congratulations on making it through this tutorial and hope you found it useful! Happy Learning!!

    Cross Browser Testing in PyTest

    HOME

    import pytest
    from selenium import webdriver
    
    
    def pytest_addoption(parser):
        """Custom Pytest command line options"""
        parser.addoption(
            "--browser_name", action="store", default="chrome"
        )
    
    
    @pytest.fixture(scope="class")
    def driver(request):
    
        browser_name = request.config.getoption("browser_name")
    
        if browser_name == "chrome":
            options = webdriver.ChromeOptions()
            driver = webdriver.Chrome(options)
            print("Chrome Browser is opened")
        elif browser_name == "firefox":
            options = webdriver.FirefoxOptions()
            driver = webdriver.Firefox(options)
            print("Firefox Browser is opened")
        elif browser_name == "edge":
            options = webdriver.EdgeOptions()
            driver = webdriver.Edge(options)
            print("Edge Browser is opened")
        else:
            print("No browser is selected")
        driver.get("https://opensource-demo.orangehrmlive.com/")
        driver.maximize_window()
        driver.implicitly_wait(5)
        yield driver
        driver.close()
    
    
    from selenium.webdriver.common.by import By
    
    
    class Test_Login:
    
        def test_login(self,driver):
            driver.find_element(By.NAME, "username").send_keys("Admin")
            driver.find_element(By.NAME, "password").send_keys("admin123")
            driver.find_element(By.XPATH, "//*[@class='oxd-form']/div[3]/button").click()
            print("Successful login to the application")
            homePageTitle = driver.find_element(By.XPATH, "//*[@class='oxd-topbar-header-breadcrumb']/h6").text
            print("Heading of DashBoard Page: ", homePageTitle)
            assert homePageTitle == "Dashboard", "Heading is different"
    
    
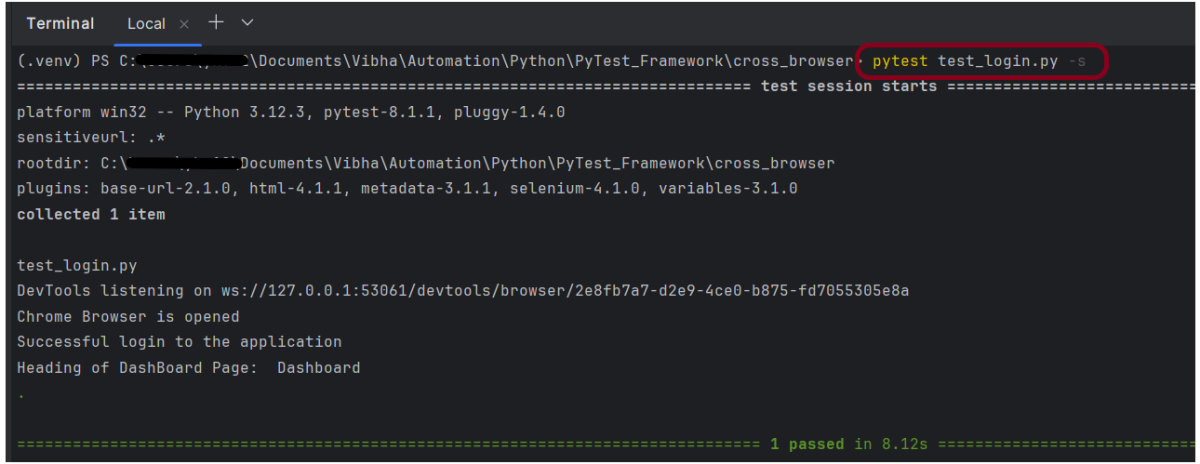
    pytest test_login.py -s
    

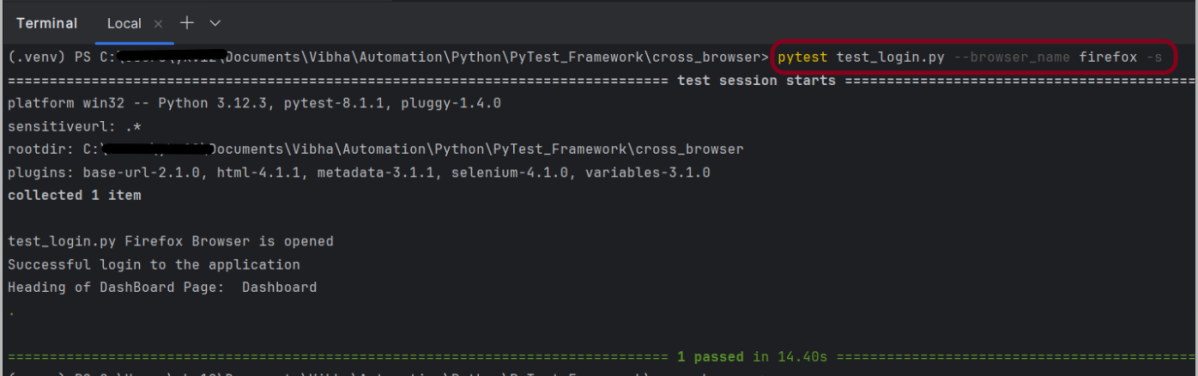
     pytest test_login.py --browser_name firefox -s
    

    Cucumber Tutorial – JUnit Test Runner Class

    HOME

    In the previous tutorial, we showed you What is Feature File in Cucumber is. This tutorial will show you how to run this feature file. 

    Once the Feature file is created, we need to create a class called Runner class to run the tests. This class will use the JUnit annotation @RunWith(), which tells JUnit what is the test runner class.

    We cannot run a Feature file on its own in a cucumber-based framework. We need to create a Java class, which will run the Feature File. It is the starting point for JUnit to start executing the tests. TestRunner class is created under src/test/java. In this tutorial, Cucumber uses the JUnit framework to run the tests. Apart from JUnit, we can also use the TestNG Test Runner class to run the cucumber tests. 

    JUnit Test Runner Class

    First, we need to add the below dependencies to the POM.xml (in the case of the Maven project).

    <dependencies>
      
      <dependency>
        <groupId>io.cucumber</groupId>
        <artifactId>cucumber-java</artifactId>
        <version>7.16.1</version>
      </dependency>
    
      <dependency>
        <groupId>io.cucumber</groupId>
        <artifactId>cucumber-junit</artifactId>
        <version>7.16.1</version>
        <scope>test</scope>
      </dependency>
        
      <dependency>
          <groupId>junit</groupId>
          <artifactId>junit</artifactId>
          <version>4.13.2</version>
          <scope>test</scope>
      </dependency>
        
    </dependencies>
    

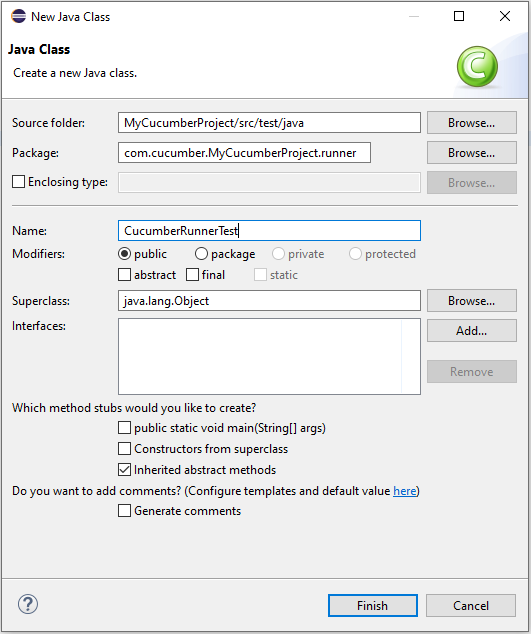
    Create a new runner class file called CucumberRunnerTest. 

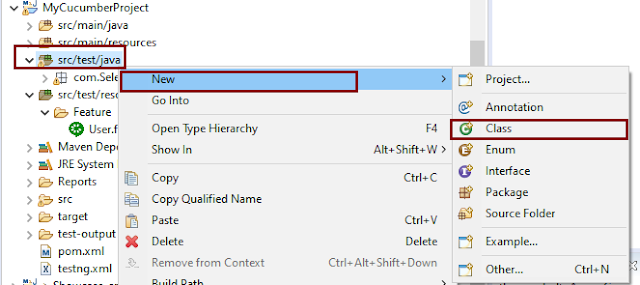
    Select and Right-Click on the package outline. Click on the New→Class.

    Provide the Java class a name, such as CucumberRunnerTest, and click the Finish button.

    Import Statements

    1) @RunWith annotation tells JUnit that tests should run using the Cucumber class.

    import org.junit.runner.RunWith;
    

    2) Cucumber.class is imported from:

    import io.cucumber.junit.Cucumber;
    

    3) @CucumberOptions annotation tells Cucumber where to look for feature files, what reporting system to use, and some other things also. But as of now, in the above test, we have just told it for the Feature file folder. It is imported from:

    import io.cucumber.junit.CucumberOptions;
    

    The CucumberRunnerTest class looks like shown below:

    import org.junit.runner.RunWith;
    import io.cucumber.junit.Cucumber;
    import io.cucumber.junit.CucumberOptions;
    
    @RunWith(Cucumber.class)
    @CucumberOptions(plugin = "pretty", features = "src/test/resources/Features/MyHoliday.feature", tags = "@BookOneWayFlight")
    
    public class CucumberRunnerTest {
    
    }


    The first parameter, called features, provides the location of the feature file. Similarly, the second parameter, called tags, provides the tag name (scenario) which needs to run. Apart from these, we can use plugins, and glue, in the CucumberOptions.

    The feature file is placed under src/test/resources, so it is added as the path for the Feature file.

    Run the Cucumber Test

    As we know, the Feature file is already created in the previous tutorial. TestRunner class is created to run the Cucumber Tests.

    Right Click on CucumberRunnerTest class and Click Run As  > JUnit Test Application

    The output of the Test Execution looks as shown below image.

    This output shows that the Feature file is created, and Test Runner is able to run the Feature File. But this error shows that we should implement these methods so that the Steps mentioned in the Feature file can be traced to Java methods, which can be executed while executing the feature file. Don’t worry about this error. We will see how to create step definitions in the next tutorial.

    Congratulations on making it through this tutorial and hope you found it useful! Happy Learning!! Cheers!!