Selenium Multiple Choice Answers – MCQ1

HOME


WebDriver driver = new ChromeDriver();

// Initialize ChromeDriver
WebDriver driver = new ChromeDriver();


driver.navigate().to("https://www.qaautomation.expert");
driver.get("https://www.qaautomation.expert");

i. navigate().to("url") - driver.navigate().to("https://www.qaautomation.expert");
ii. open("url") - driver.get("https://www.qaautomation.expert");

// Locate the text box element
WebElement textBox = driver.findElement(By.id("textboxId"));

// Enter text into the text box
textBox.sendKeys("Sample text");


API Automation with REST Assured, Cucumber and TestNG

HOME

Cucumber is not an API automation tool, but it works well with other API automation tools.

There are 2 most commonly used Automation Tools for JVM to test API – Rest-Assured and Karate. In this tutorial, I will use RestAssured with Cucumber and TestNG for API Testing.

What is Rest Assured?

REST Assured is a Java library that provides a domain-specific language (DSL) for writing powerful, maintainable tests for RESTful APIs. REST Assured can be used easily in combination with existing unit testing frameworks, such as JUnit and TestNG. Rest assured, no matter how complex the JSON structures are, Rest Assured has methods to retrieve data from almost every part of the request and response.

What is Cucumber?

Cucumber is one such open-source tool, which supports Behaviour Driven Development(BDD). In simple words, Cucumber can be defined as a testing framework, driven by plain English. It serves as documentation, automated tests, and development aid – all in one.

Each scenario is a set of steps that the Cucumber must complete. Cucumber validates the software’s compliance with the specification and generates a report indicating success or failure for each scenario.

The cucumber must adhere to some basic syntax rules known as Gherkin to comprehend the scenarios.

In this tutorial, I will explain creating a framework for the testing of Rest API in Cucumber BDD.

Dependency List

  1. Cucumber – 7.18.0
  2. Java 17
  3. TestNG – 7.10.2
  4. Maven – 3.9.6
  5. Rest Assured – 5.4.0
  6. Maven Compiler – 3.13.0
  7. Maven Surefire – 3.2.5

Project Structure

Step 1 – Download and Install Java

Cucumber and Rest-Assured need Java to be installed on the system to run the tests. Click here to learn How to install Java.

Step 2 – Download and setup Eclipse IDE on the system

The Eclipse IDE (integrated development environment) provides strong support for Java developers. Click here to learn How to install Eclipse.

Step 3 – Setup Maven

To build a test framework, we need to add several dependencies to the project. Click here to learn How to install Maven.

Step 4 – Create a new Maven Project

File -> New Project-> Maven-> Maven project-> Next -> Enter Group ID & Artifact ID -> Finish

Click here to learn How to create a Maven project

Step 5 – Install the Cucumber Eclipse plugin for the Eclipse project (Eclipse Only)

The Cucumber plugin is an Eclipse plugin that allows Eclipse to understand the Gherkin syntax. Cucumber Eclipse Plugin highlights the keywords present in the Feature File. To install Cucumber Eclipse Plugin, please refer to this tutorial – How to install Cucumber Eclipse Plugin.

Step 6 – Create source folder src/test/resources

A new Maven Project is created with 2 folders – src/main/java and src/test/java. To create test scenarios, we need a new source folder called – src/test/resources. To create this folder, right-click on your Maven project ->select New ->Java, and then Source Folder.

Mention the source folder name as src/test/resources and click the Next button. This will create a source folder under your new Maven project.

Step 7 – Add dependencies to the project

<properties>
    <project.build.sourceEncoding>UTF-8</project.build.sourceEncoding>
    <rest.assured.version>5.4.0</rest.assured.version>
    <cucumber.version>7.18.0</cucumber.version>
    <testng.version>7.10.2</testng.version>
    <maven.compiler.plugin.version>3.13.0</maven.compiler.plugin.version>
    <maven.compiler.source>17</maven.compiler.source>
    <maven.compiler.target>17</maven.compiler.target>
    <maven.surefire.plugin.version>3.2.5</maven.surefire.plugin.version>
  </properties>

  <dependencies>

    <!-- Rest Assured -->
    <dependency>
      <groupId>io.rest-assured</groupId>
      <artifactId>rest-assured</artifactId>
      <version>${rest.assured.version}</version>
      <scope>test</scope>
    </dependency>

    <!-- Cucumber with TestNG -->
    <dependency>
      <groupId>io.cucumber</groupId>
      <artifactId>cucumber-testng</artifactId>
      <version>${cucumber.version}</version>
    </dependency>

    <!-- Cucumber with Java -->
    <dependency>
      <groupId>io.cucumber</groupId>
      <artifactId>cucumber-java</artifactId>
      <version>${cucumber.version}</version>
    </dependency>

    <!-- TestNG -->
    <dependency>
      <groupId>org.testng</groupId>
      <artifactId>testng</artifactId>
      <version>${testng.version}</version>
      <scope>test</scope>
    </dependency>

  </dependencies>

Step 8 – Add Maven Compiler Plugin and Surefire Plugin

The compiler plugin is used to compile the source code of a Maven project. This plugin has two goals, which are already bound to specific phases of the default lifecycle:

  • compile – compile main source files
  • testCompile – compile test source files
 <build>
    <plugins>
      <plugin>
        <groupId>org.apache.maven.plugins</groupId>
        <artifactId>maven-compiler-plugin</artifactId>
        <version>${maven.compiler.plugin.version}</version>
        <configuration>
          <source>${maven.compiler.source}</source>
          <target>${maven.compiler.target}</target>
        </configuration>
      </plugin>

      <plugin>
        <groupId>org.apache.maven.plugins</groupId>
        <artifactId>maven-surefire-plugin</artifactId>
        <version>${maven.surefire.plugin.version}</version>
        <configuration>
          <suiteXmlFiles>
            <suiteXmlFile>testng.xml</suiteXmlFile>
          </suiteXmlFiles>
        </configuration>
      </plugin>
    </plugins>
  </build>

The complete POM.xml will look like something below:

<project xmlns="http://maven.apache.org/POM/4.0.0" xmlns:xsi="http://www.w3.org/2001/XMLSchema-instance"
  xsi:schemaLocation="http://maven.apache.org/POM/4.0.0 http://maven.apache.org/xsd/maven-4.0.0.xsd">
  <modelVersion>4.0.0</modelVersion>

  <groupId>com.example</groupId>
  <artifactId>RestAPI_Cucumber_TestNG_Demo</artifactId>
  <version>1.0-SNAPSHOT</version>
  <packaging>jar</packaging>

  <name>RestAPI_Cucumber_TestNG_Demo</name>
  <url>http://maven.apache.org</url>

  <properties>
    <project.build.sourceEncoding>UTF-8</project.build.sourceEncoding>
    <rest.assured.version>5.4.0</rest.assured.version>
    <cucumber.version>7.18.0</cucumber.version>
    <testng.version>7.10.2</testng.version>
    <maven.compiler.plugin.version>3.13.0</maven.compiler.plugin.version>
    <maven.compiler.source>17</maven.compiler.source>
    <maven.compiler.target>17</maven.compiler.target>
    <maven.surefire.plugin.version>3.2.5</maven.surefire.plugin.version>
  </properties>

  <dependencies>

    <!-- Rest Assured -->
    <dependency>
      <groupId>io.rest-assured</groupId>
      <artifactId>rest-assured</artifactId>
      <version>${rest.assured.version}</version>
      <scope>test</scope>
    </dependency>

    <!-- Cucumber with TestNG -->
    <dependency>
      <groupId>io.cucumber</groupId>
      <artifactId>cucumber-testng</artifactId>
      <version>${cucumber.version}</version>
    </dependency>

    <!-- Cucumber with Java -->
    <dependency>
      <groupId>io.cucumber</groupId>
      <artifactId>cucumber-java</artifactId>
      <version>${cucumber.version}</version>
    </dependency>

    <!-- TestNG -->
    <dependency>
      <groupId>org.testng</groupId>
      <artifactId>testng</artifactId>
      <version>${testng.version}</version>
      <scope>test</scope>
    </dependency>

  </dependencies>

  <build>
    <plugins>
      <plugin>
        <groupId>org.apache.maven.plugins</groupId>
        <artifactId>maven-compiler-plugin</artifactId>
        <version>${maven.compiler.plugin.version}</version>
        <configuration>
          <source>${maven.compiler.source}</source>
          <target>${maven.compiler.target}</target>
        </configuration>
      </plugin>

      <plugin>
        <groupId>org.apache.maven.plugins</groupId>
        <artifactId>maven-surefire-plugin</artifactId>
        <version>${maven.surefire.plugin.version}</version>
        <configuration>
          <suiteXmlFiles>
            <suiteXmlFile>testng.xml</suiteXmlFile>
          </suiteXmlFiles>
        </configuration>
      </plugin>
    </plugins>
  </build>
</project>

Step 9 – Create a feature file under src/test/resources

Create a folder with name features. Now, create the feature file in this folder. The feature file should be saved with the extension .feature. This feature file contains the test scenarios created to test the application. The Test Scenarios are written in Gherkins language in the format of Given, When, Then, And, But.

Below is an example of a Test Scenario where we are using the GET method to get the information from the API.

Feature: Validation of get method

  @GetUserDetails
  Scenario Outline: Send a valid Request to get user details

    Given I send a request to the URL to get user details
    Then the response will return status <statusCode> and id <id> and email "<employee_email>" and first name "<employee_firstname>" and last name "<employee_lastname>"

    Examples:
    | statusCode | id  | employee_email          | employee_firstname | employee_lastname |
    | 200        | 2   | janet.weaver@reqres.in  | Janet              | Weaver            |

Step 10 – Create the Step Definition class or Glue Code

StepDefinition acts as an intermediate to your runner and feature file. It stores the mapping between each step of the scenario in the Feature file. So when you run the scenario, it will scan the step definition file to check the matched glue or test code.

import io.cucumber.java.en.Given;
import io.cucumber.java.en.Then;
import io.restassured.http.ContentType;
import io.restassured.response.ValidatableResponse;

import static io.restassured.RestAssured.given;
import static org.hamcrest.Matchers.equalTo;

public class APIDemoDefinitions {

    private ValidatableResponse validatableResponse;
    private String endpoint = "https://reqres.in/api/users/2";

    @Given("I send a request to the URL to get user details")
    public void sendRequest(){
        validatableResponse = given().contentType(ContentType.JSON)
                .when().get(endpoint).then();

        System.out.println("Response :"+validatableResponse.extract().asPrettyString());
    }

    @Then("the response will return status {int} and id {int} and email {string} and first name {string} and last name {string}")
    public void verifyStatus(int expectedStatusCode, int expectedId, String expectedEmail, String expectedFirstName, String expectedLastName){

        validatableResponse.assertThat().statusCode(expectedStatusCode).body("data.id",equalTo(expectedId)).and()
                .body("data.email",equalTo(expectedEmail)).body("data.first_name",equalTo(expectedFirstName))
                .body("data.last_name",equalTo(expectedLastName));

    }
}

To use REST assured effectively it’s recommended to statically import methods from the following classes:

io.restassured.RestAssured.*
io.restassured.matcher.RestAssuredMatchers.*
org.hamcrest.Matchers.*

Step 11 – Create a TestNG Cucumber Runner class

A runner will help us run the feature file and act as an interlink between the feature file and the StepDefinition Class.

import io.cucumber.testng.AbstractTestNGCucumberTests;
import io.cucumber.testng.CucumberOptions;

@CucumberOptions(tags = "", features = {"src/test/resources/features"}, glue = {"com.example.stepdefinitions"},
        plugin = {})
public class CucumberRunnerTests extends AbstractTestNGCucumberTests {

}

Note:- The name of the Runner class should end with Test otherwise we can’t run the tests using Command-Line.

<?xml version="1.0" encoding="UTF-8"?>
<!DOCTYPE suite SYSTEM "https://testng.org/testng-1.0.dtd">
<suite name="Suite">
    <test  name="Rest Assured, Cucumber with TestNG Test">
        <classes>
            <class name="com.example.runner.CucumberRunnerTests"/>
        </classes>
    </test> <!-- Test -->
</suite> <!-- Suite -->

Step 13 – Run the tests from TestNG

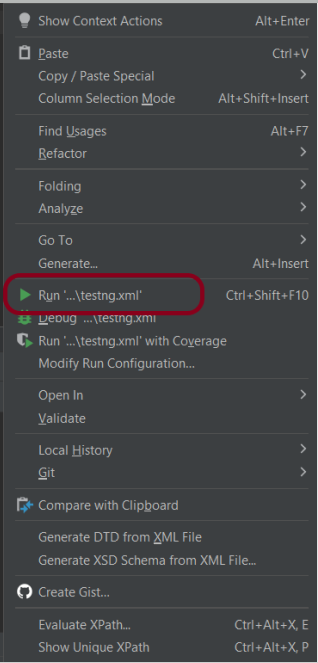
You can execute the test script by right-clicking on TestRunner class -> Run As TestNG (Eclipse).

Step 16 – Run the tests from the Command Line

Run the below command in the command prompt to run the tests and to get the test execution report.

mvn clean test

Step 17 – Cucumber Report Generation

To get Cucumber Test Reports, add cucumber.properties under src/test/resources and add the below instruction in the file.

cucumber.publish.enabled=true

We are done! Congratulations on making it through this tutorial and hope you found it useful! Happy Learning!!

How to pass Access token generated by OAuth2 to a request in API Testing

HOME


public class AbstractHelper {
    
   String token;
   String accessToken;
   JsonPath jsonPath;

    public String generateToken() throws IOException {

        token = given().auth().preemptive()
                .basic(username, password)
                .contentType("application/x-www-form-urlencoded")
                .formParam("grant_type", "client_credentials")
                .when().post("https://example.com/accesstoken").asString();

        System.out.println("Token :" + token);

        jsonPath = new JsonPath(token);
        accessToken = jsonPath.getString("access_token");
        System.out.println("Access Token :" + accessToken);
        return accessToken;
    }

}

JsonPath jsonPath = new JsonPath(token);
accessToken = jsonPath.getString("access_token");
import java.io.IOException;

public class AccessToken_Example extends AbstractHelper {

    Response response;
    
   @Test
    public void testRequest() throws IOException {

        response = RestAssured.given()
                .auth().oauth2(generateToken())
                .when().get("https://localhost/8080/coreid").then()
                .extract()
                .response();

        System.out.println("Response :" + response.asString());
        int statusCode = response.getStatusCode();

        Assert.assertEquals(200,statusCode);
    }
}

What is Allure Report?

HOME

Allure Framework is a flexible lightweight multi-language test report tool that not only shows a very concise representation of what has been tested in a neat web report form but allows everyone participating in the development process to extract the maximum useful information from the everyday execution of tests.

How Allure Report is generated?

Allure is based on standard xUnit results output but adds some supplementary data. Any report is generated in two steps. During test execution (first step), a small library called adapter attached to the testing framework saves information about executed tests to XML files. We already provide adapters for popular Java, PHP, Ruby, Python, Scala, and C# test frameworks. During report generation (second step), the XML files are transformed into an HTML report. This can be done with a command line tool, a plugin for CI, or a build tool.

Similarly, when we run our tests, every popular test framework generates junit-style XML report or testng style which will be used by Allure to generate HTML report.

In the below example, we use the maven surefire plugin which automatically generates xml test reports and stores them in target/surefire-reports. And these XML files are transformed into an HTML report by Allure.

Allure reports have provided adapters for Java, PHP, Ruby, Python, Scala, and C# test frameworks.

Allure report has the below-mentioned annotation.

@Epic
@Features
@Stories/@Story

We can add Epic, Feature, and Stories annotations to the test to describe the behaviour of the test.

@Severity(SeverityLevel.BLOCKER) – @Severity annotation is used in order to prioritize test methods by severity.

@Description(“Regression Testing”) – We can add a detailed description for each test method. To add such a description, use the @Description annotation.

@Step – In order to define steps in Java code, you need to annotate the respective methods with @Step annotation. When not specified, the step name is equal to the annotated method name.

@Attachment – An attachment in Java code is simply a method annotated with @Attachment that returns either a String or byte[], which should be added to the report.

@Link – We can link the tests to Defect Tracker or JIRA Ticket.

Below is an example that shows how to use various Allure Annotations in the Test.

@Epic("Web Application Regression Testing")
@Feature("Login Page Tests")
@Listeners(TestExecutionListener.class)
public class LoginTests extends BaseTest {

	LoginPage objLogin;
	DashboardPage objDashboardPage;

	@Severity(SeverityLevel.NORMAL)
	@Test(priority = 0, description = "Verify Login Page")
	@Description("Test Description : Verify the title of Login Page")
	@Story("Title of Login Page")
	public void verifyLoginPage() {

		// Create Login Page object
		objLogin = new LoginPage(driver);

		// Verify login page text
		objLogin.verifyPageTitle();
	}
}

Install Allure

For Windows, Allure is available from the Scoop command line installer.

Set-ExecutionPolicy RemoteSigned -scope CurrentUser

Invoke-Expression (New-Object System.Net.WebClient).DownloadString('https://get.scoop.sh')

To install Allure, download and install Scoop, and then execute in the Powershell:

scoop install allure

I have Allure installed, so I’m getting a message – ‘allure’ (2.14.0) is already installed.

To check if you have Allure installed or not, please use the below command in the command line or PowerShell.

allure --version

Sample Allure Report

You can find more information on Allure documentation.

Additional Tutorials on Allure Reports

Congratulations on making it through this tutorial and hope you found it useful! Happy Learning!! 

How to run parameterized Selenium test using JUnit5

HOME

The previous tutorial has shown the various parameterized tests in JUnit5. This tutorial shows how to run a Selenium test multiple times with a different set of data. This helps to reduce the duplication of code. This is a very common scenario in any testing. Imagine, we want to test the requirement for a login page that uses a username and password to log in to the application. Username and password must satisfy some conditions like username can be only alphabets and no numeric and special characters. There could be multiple sets of data that can be used to test this requirement.

Prerequisite:

  1. Selenium – 4.21.0
  2. Maven – 3.9.6
  3. Java 17
  4. JUnit Jupiter Engine – 5.11.0-M2
  5. JUnit Jupiter API – 5.11.0-M2

JUnit5 provides a lot of ways to parameterize a test – @ValueSource, @EnumSource, @MethodSource, @CsvSource, @CsvFileSource, and @ArgumentsSource.

Let us see an example where the test is not parameterized. In the below example, we want to verify the different error messages generated by passing incorrect values to username and password.

This is the base class – Login, which contains the test method that uses a different set of test data.

package com.example.parameterized;

import org.openqa.selenium.WebDriver;
import org.openqa.selenium.WebElement;
import org.openqa.selenium.support.FindBy;
import org.openqa.selenium.support.PageFactory;

public class LoginPage {

    WebDriver driver ;

    @FindBy(name="username")
    WebElement username;

    @FindBy(name="password")
    WebElement password;

    @FindBy(xpath="//*[@class='oxd-form']/div[3]/button")
    WebElement loginButton;

    @FindBy(xpath="//*[@class='orangehrm-login-error']/div[1]/div[1]/p")
    WebElement actualErrorMessage;


    public LoginPage(WebDriver driver) {

        this.driver = driver;

        // This initElements method will create all WebElements
        PageFactory.initElements(driver, this);
    }

    public void setUserName(String strUserName) {
        username.sendKeys(strUserName);
    }

    // Set password in password textbox
    public void setPassword(String strPassword) {
        password.sendKeys(strPassword);
    }

    // Click on login button
    public void clickLogin() {
        loginButton.click();
    }

    // Get the error message
    public String getErrorMessage() {
        return actualErrorMessage.getText();
    }

    public void login(String strUserName, String strPasword) {

        // Fill user name
        this.setUserName(strUserName);

        // Fill password
        this.setPassword(strPasword);

        // Click Login button
        this.clickLogin();
    }

}

The example below shows 4 tests using a common test with 4 different sets of data.

import org.junit.jupiter.api.AfterEach;
import org.junit.jupiter.api.BeforeEach;
import org.junit.jupiter.api.Test;
import org.openqa.selenium.WebDriver;
import org.openqa.selenium.chrome.ChromeDriver;
import org.openqa.selenium.chrome.ChromeOptions;

import java.time.Duration;

import static org.junit.jupiter.api.Assertions.assertEquals;

public class NonParameterizedLoginTest {

    WebDriver driver;
    LoginPage login;

    @BeforeEach
    void setUp() {

        ChromeOptions chromeOptions = new ChromeOptions();
        driver = new ChromeDriver(chromeOptions);
        driver.manage().window().maximize();
        driver.get("https://opensource-demo.orangehrmlive.com/");
        driver.manage().timeouts().implicitlyWait(Duration.ofSeconds(5));

    }

    @Test
    void invalidCredentials1() {

        login = new LoginPage(driver);
        login.login("Admin","Admin");
        String actualErrorMessage = login.getErrorMessage();
        assertEquals("Invalid credentials", actualErrorMessage);

    }

    @Test
    void invalidCredentials2() {

        login = new LoginPage(driver);
        login.login("admin","Admin");
        String actualErrorMessage = login.getErrorMessage();
        assertEquals("Invalid credentials", actualErrorMessage);

    }

    @Test
    void invalidCredentials3() {

        login = new LoginPage(driver);
        login.login("Admin","123");
        String actualErrorMessage = login.getErrorMessage();
        assertEquals("Invalid credentials", actualErrorMessage);

    }

    @Test
    void invalidCredentials4() {

        login = new LoginPage(driver);
        login.login("admin123","3456admin");
        String actualErrorMessage = login.getErrorMessage();
        assertEquals("Invalid credentials", actualErrorMessage);

    }

    @AfterEach
    void tearDown() {
        if (driver != null) {
            driver.close();
        }
    }

}

We can see that the same method is called multiple times. This is a duplication of code. The output of the above program is

Now, we will parameterize the same test. To do so, we need to add a dependency to the POM.xml.

<project xmlns="http://maven.apache.org/POM/4.0.0" xmlns:xsi="http://www.w3.org/2001/XMLSchema-instance"
  xsi:schemaLocation="http://maven.apache.org/POM/4.0.0 http://maven.apache.org/xsd/maven-4.0.0.xsd">
  <modelVersion>4.0.0</modelVersion>

  <groupId>com.example</groupId>
  <artifactId>JUnit5_Examples</artifactId>
  <version>1.0-SNAPSHOT</version>
  <packaging>jar</packaging>

  <name>JUnit5_Examples</name>
  <url>http://maven.apache.org</url>

  <properties>
    <project.build.sourceEncoding>UTF-8</project.build.sourceEncoding>
    <selenium.version>4.21.0</selenium.version>
    <junit.jupiter.engine.version>5.11.0-M2</junit.jupiter.engine.version>
    <junit.jupiter.api.version>5.11.0-M2</junit.jupiter.api.version>
    <junit.jupiter.params.version>5.11.0-M2</junit.jupiter.params.version>
    <maven.compiler.plugin.version>3.13.0</maven.compiler.plugin.version>
    <maven.compiler.source.version>17</maven.compiler.source.version>
    <maven.compiler.target.version>17</maven.compiler.target.version>
    <maven.surefire.plugin.version>3.2.5</maven.surefire.plugin.version>
    <maven.compiler.source>17</maven.compiler.source>
    <maven.compiler.target>17</maven.compiler.target>
  </properties>

  <dependencies>

    <dependency>
      <groupId>org.seleniumhq.selenium</groupId>
      <artifactId>selenium-java</artifactId>
      <version>${selenium.version}</version>
    </dependency>

    <dependency>
      <groupId>org.junit.jupiter</groupId>
      <artifactId>junit-jupiter-engine</artifactId>
      <version>${junit.jupiter.engine.version}</version>
      <scope>test</scope>
    </dependency>

    <dependency>
      <groupId>org.junit.jupiter</groupId>
      <artifactId>junit-jupiter-api</artifactId>
      <version>${junit.jupiter.api.version}</version>
      <scope>test</scope>
    </dependency>

    <dependency>
      <groupId>org.seleniumhq.selenium</groupId>
      <artifactId>selenium-java</artifactId>
      <version>${selenium.version}</version>
    </dependency>

    <dependency>
      <groupId>org.junit.jupiter</groupId>
      <artifactId>junit-jupiter-params</artifactId>
      <version>${junit.jupiter.params.version}</version>
      <scope>test</scope>
    </dependency>

  </dependencies>

  <build>
    <plugins>

      <plugin>
        <groupId>org.apache.maven.plugins</groupId>
        <artifactId>maven-surefire-plugin</artifactId>
        <version>${maven.surefire.plugin.version}</version>

        <dependencies>
          <dependency>
            <groupId>org.junit.jupiter</groupId>
            <artifactId>junit-jupiter-engine</artifactId>
            <version>${junit.jupiter.engine.version}</version>
          </dependency>
        </dependencies>
      </plugin>
    </plugins>
  </build>

</project>

There are multiple ways to parameterize the test. To start with:

  1. Replace the @Test annotation with the @ParameterizedTest annotation provided by the JUnit5 framework.
  2. Add parameters to the loginTest() method. In this example, we will add a username and a password parameter.
  3. Add the parameters source. In this example, we will use the @CsvFileSource annotation.

To know all the different types of parameterization methods, please refer to this tutorial. This tutorial will show the 2 most common ways to parameterize tests in JUnit5.

1.@CsvSource

@CsvSource allows us to express argument lists as comma-separated values (i.e., CSV String literals). Each string provided via the value attribute in @CsvSource represents a CSV record and results in one invocation of the parameterized test. An empty, quoted value (”) results in an empty String. This can be seen in the example below.

import org.junit.jupiter.api.AfterEach;
import org.junit.jupiter.api.BeforeEach;
import org.junit.jupiter.params.ParameterizedTest;
import org.junit.jupiter.params.provider.CsvSource;
import org.openqa.selenium.WebDriver;
import org.openqa.selenium.chrome.ChromeDriver;
import org.openqa.selenium.chrome.ChromeOptions;

import java.time.Duration;

import static org.junit.jupiter.api.Assertions.assertEquals;

public class ParameterizedSourceTest {

    WebDriver driver;

    LoginPage loginPage;

    @BeforeEach
    void setUp() {

        ChromeOptions chromeOptions = new ChromeOptions();
        driver = new ChromeDriver(chromeOptions);
        driver.manage().window().maximize();
        driver.get("https://opensource-demo.orangehrmlive.com/");
        driver.manage().timeouts().implicitlyWait(Duration.ofSeconds(6));

    }

    @ParameterizedTest
    @CsvSource({
            "admin123,admin123,Invalid credentials",
            "admin,admin12,Invalid credentials",
            "Admin,1234,Invalid credentials",
            "12345,%^$£56,Invalid credentials"
    })

    void invalidCredentials1(String username, String password, String errorMessage) {

        loginPage = new LoginPage(driver);
        loginPage.login(username,password);
        String actualErrorMessage = loginPage.getErrorMessage();
        assertEquals(errorMessage, actualErrorMessage);

    }

    @AfterEach
    void tearDown() {
        driver.close();
    }
}

The output of the above program is

2. @CsvFileSource

@CsvFileSource lets us use comma-separated value (CSV) files from the classpath or the local file system.

We can see in the example below that we have skipped the first line from the credentials.csv file as it is the heading of the file. invalidCredentials() method got 4 different set of the test data from CSV file using parameterization. JUnit5 ignores the headers via the numLinesToSkip attribute.

In @CsvFileSource, an empty, quoted value (“”) results in an empty String in JUnit5.

package com.example.parameterized;

import org.junit.jupiter.api.AfterEach;
import org.junit.jupiter.api.BeforeEach;
import org.junit.jupiter.params.ParameterizedTest;
import org.junit.jupiter.params.provider.CsvFileSource;
import org.junit.jupiter.params.provider.CsvSource;
import org.openqa.selenium.WebDriver;
import org.openqa.selenium.chrome.ChromeDriver;
import org.openqa.selenium.chrome.ChromeOptions;

import java.time.Duration;

import static org.junit.jupiter.api.Assertions.assertEquals;

public class ParameterizedFileTest {

    WebDriver driver;

    LoginPage loginPage;

    @BeforeEach
    void setUp() {

        ChromeOptions chromeOptions = new ChromeOptions();
        driver = new ChromeDriver(chromeOptions);
        driver.manage().window().maximize();
        driver.get("https://opensource-demo.orangehrmlive.com/");
        driver.manage().timeouts().implicitlyWait(Duration.ofSeconds(6));

    }

    @ParameterizedTest
    @CsvFileSource(files = "src/test/resources/credentials.csv", numLinesToSkip = 1)
    void invalidCredentials1(String username, String password, String errorMessage) {

        loginPage = new LoginPage(driver);
        loginPage.login(username,password);
        String actualErrorMessage = loginPage.getErrorMessage();
        assertEquals(errorMessage, actualErrorMessage);

    }

    @AfterEach
    void tearDown() {
        driver.close();
    }
}

The result of the above program is

Congratulations!! We have seen how Selenium tests are parameterized in JUnit5. Happy Learning.

How to Retry Test in JUnit5 – @RepeatedTest

HOME

In JUnit5, JUnit Jupiter provides the ability to repeat a test a specified number of times by annotating a method with @RepeatedTest. We can specify the repetition frequency as a parameter to the @RepeatedTest annotation.

When do we use the Repeated Test?

Imagine, we are testing an online shopping website. In the process of placing an order, we need to pay for the product. But the payment gateway is a third-party service, and we cannot control the connectivity between our website and the payment gateway. We know that clicking on the ‘Payment’ link sometime shows “Exception: Page cannot be displayed”. This is an intermittent issue. So, we don’t want to fail the test if this payment link does not work. We can configure it to click this payment link multiple times, before marking the test case failed. Here comes the Repeated Test in the picture.

A few points to keep in mind for @RepeatedTest are as follows:

  1. The methods annotated with @RepeatedTest cannot be static, otherwise, the test cannot be found.
  2. The methods annotated with @RepeatedTest cannot be private, otherwise, the test cannot be found.
  3. The return type of the method annotated with @RepeatedTest must be void only, otherwise, the test cannot be found.

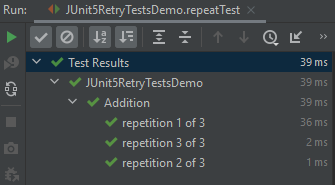
The below example will run the test 5 times.

 @DisplayName("Addition")
 @RepeatedTest(3)
 void repeatTest(){
    int a = 4;
    int b = 6;
    assertEquals(10, a+b,"Incorrect sum of numbers");
 }

The output of the above test:

Each invocation of a repeated test behaves like the execution of a regular @Test method, with full support for the same lifecycle callbacks and extensions.

It means that @BeforeEach and @AfterEach annotated lifecycle methods will be invoked for each invocation of the test.

@BeforeEach annotation is used to signal that the annotated method should be executed before each invocation of the @Test, @RepeatedTest, @ParameterizedTest, or @TestFactory method in the current class. This is the replacement of the @Before Method in JUnit4.

TestInfo is used to inject information about the current test or container into @Test, @RepeatedTest, @ParameterizedTest, @TestFactory, @BeforeEach, @AfterEach, @BeforeAll, and @AfterAll methods.
If a method parameter is of type TestInfo, JUnit will supply an instance of TestInfo corresponding to the current test or container as the value for the parameter.

RepetitionInfo is used to inject information about the current repetition of a repeated test into the @RepeatedTest, @BeforeEach, and @AfterEach methods.
If a method parameter is of type RepetitionInfo, JUnit will supply an instance of RepetitionInfo corresponding to the current repeated test as the value for the parameter.

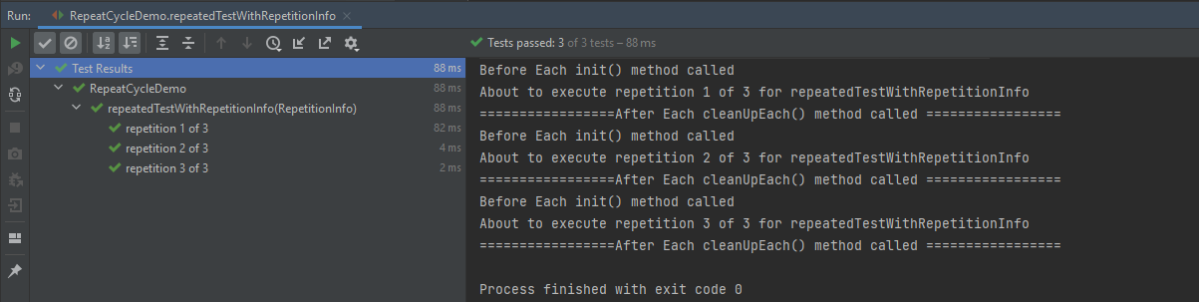
In the below example, @BeforeEach will get executed before each repetition of each repeated test. By having the TestInfo and RepetitionInfo injected into the method, we see that it’s possible to obtain information about the currently executing repeated test.

import org.junit.jupiter.api.*;
import static org.junit.jupiter.api.Assertions.*;

public class RepeatCycleDemo {

    @BeforeEach
    void init(TestInfo testInfo, RepetitionInfo repetitionInfo) {
      System.out.println("Before Each init() method called");
      int currentRepetition = repetitionInfo.getCurrentRepetition();
      int totalRepetitions = repetitionInfo.getTotalRepetitions();
      String methodName = testInfo.getTestMethod().get().getName();
      System.out.println(String.format("About to execute repetition %d of %d for %s", currentRepetition, totalRepetitions, methodName));
     }

    @RepeatedTest(3)
    void repeatedTestWithRepetitionInfo(RepetitionInfo repetitionInfo) {
      int a = 4;
      int b = 6;
      assertEquals(10, a+b, repetitionInfo.getTotalRepetitions());
    }

    @AfterEach
    public void cleanUpEach(){
      System.out.println("=================After Each cleanUpEach() method called =================");
    }
}

The output of the above test:

Custom Display Name

In addition to specifying the number of repetitions, a custom display name can be configured for each repetition via the name attribute of the @RepeatedTest annotation.

The display name can be a pattern composed of a combination of static text and dynamic placeholders. The following placeholders are currently supported.

  1. {displayName}: display name of the @RepeatedTest method
  2. {currentRepetition}: the current repetition count
  3. {totalRepetitions}: the total number of repetitions

    @BeforeEach
    void init(TestInfo testInfo, RepetitionInfo repetitionInfo) {
        System.out.println("Before Each init() method called");
        int currentRepetition = repetitionInfo.getCurrentRepetition();
        int totalRepetitions = repetitionInfo.getTotalRepetitions();
        String methodName = testInfo.getTestMethod().get().getName();
        System.out.println(String.format("About to execute repetition %d of %d for %s", //
                currentRepetition, totalRepetitions, methodName));
    }

   //Custom Display  
    @RepeatedTest(value = 2, name = "{displayName} {currentRepetition}/{totalRepetitions}")
    @DisplayName("Repeat JUnit5 Test")
    void customDisplayName(TestInfo testInfo) {
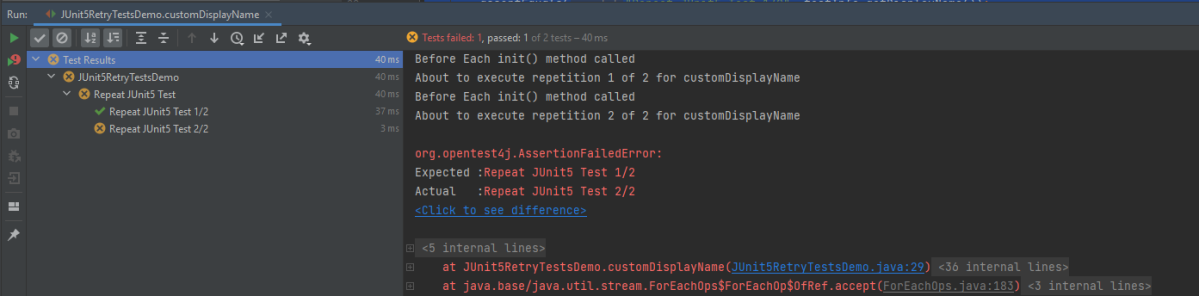
        assertEquals("Repeat JUnit5 Test 1/2", testInfo.getDisplayName());
    }

The output of the above test:

The default display name for a given repetition is generated based on the following pattern: “repetition {currentRepetition} of {totalRepetitions}”. Thus, the display names for individual repetitions of the previous repeatedTest() example would be repetition 1 of 10, and repetition 2 of 10.

We can use one of two predefined formats for displaying the name – LONG_DISPLAY_NAME and SHORT_DISPLAY_NAME. The latter is the default format if none is specified.

  1. RepeatedTest.LONG_DISPLAY_NAME – {displayName} :: repetition {currentRepetition} of {totalRepetitions}
  2. RepeatedTest.SHORT_DISPLAY_NAME – repetition {currentRepetition} of {totalRepetitions}

Below is an example of SHORT_DISPLAY_NAME

    @RepeatedTest(value = 3, name = RepeatedTest.SHORT_DISPLAY_NAME)
    @DisplayName("Multiplication")
    void customDisplayNameWithShortPattern() {
        assertEquals(8, 6*5);
 }

In this case, the name is displayed as Multiplication repetition 1 of 3, repetition 2 of 3, and soon.

The output of the above test:

Below is an example of LONG_DISPLAY_NAME

  @RepeatedTest(value = 3, name = RepeatedTest.LONG_DISPLAY_NAME)
    @DisplayName("Addition")
    void customDisplayNameWithLongPattern(TestInfo testInfo) {
        System.out.println("Display Name :"+ testInfo.getDisplayName());
        System.out.println("Test Class Name :"+ testInfo.getTestClass());
        System.out.println("Test Method :"+ testInfo.getTestMethod());
        assertEquals(8, 3+7);
    }

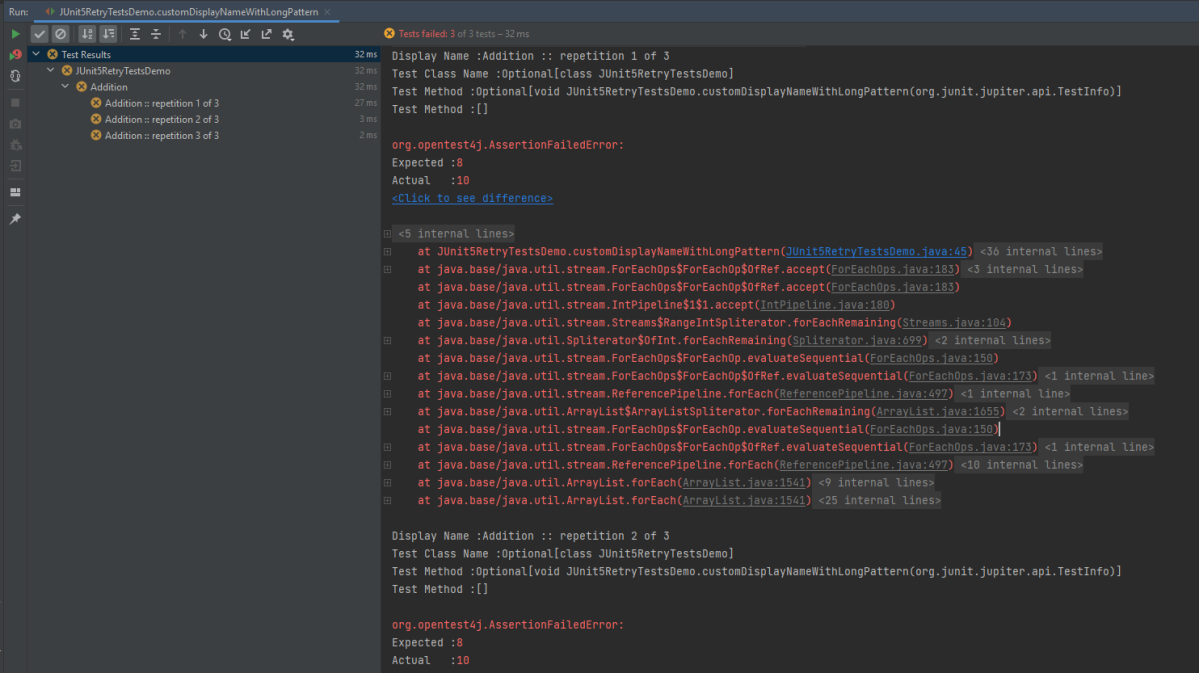
The output of the above test:

As we can see in the example, we have used @DisplayName(“Addition”), but as it is name = RepeatedTest.LONG_DISPLAY_NAME, so the name of the tests are now Addition :: repetition 1 of 3, Addition :: repetition 2 of 3 and soon.

Congratulations. We are able to execute the tests multiple times by using the @RepeatedTest annotation. Happy Learning!!

How to disable tests in JUnit5 – @Disabled

HOME

JUnit5 also provides the support to exclude/disable the tests. The @Disabled annotation in JUnit5 is used to exclude the test methods from the test suite. This annotation can be applied over a test class as well as over individual test methods. This annotation accepts only one optional parameter where we can mention the reason to skip the tests. @Disabled annotation can be used without providing any reason but its always good to provide a reason why this particular test case has been disabled, or issue tracker id for better understanding.

1.Disable Test Methods

In the below example, I have annotated 2 test methods out of 5 test methods as @Disabled with a parameter which specify the reason for disabling the test that means these 2 test methods should not be executed.

import org.junit.jupiter.api.AfterEach;
import org.junit.jupiter.api.BeforeEach;
import org.junit.jupiter.api.Disabled;
import org.junit.jupiter.api.Test;
import org.openqa.selenium.By;
import org.openqa.selenium.WebDriver;
import org.openqa.selenium.chrome.ChromeDriver;
import org.openqa.selenium.chrome.ChromeOptions;
import static org.junit.jupiter.api.Assertions.assertEquals;
import static org.junit.jupiter.api.Assertions.assertTrue;

public class DisabledTestsDemo {

    WebDriver driver;

    @BeforeEach
    public void setUp() {

        ChromeOptions chromeOptions = new ChromeOptions();
        chromeOptions.addArguments("--start-maximized");
        driver = new ChromeDriver(chromeOptions);
        driver.get("https://duckduckgo.com/");

    }

    @Disabled("This test is blocked till bug 1290 is fixed")
    @Test
    void verifyBrowserText() {
        boolean displayed = driver.findElement(By.xpath("//section[@class='homepage-cta-section_ctaSection__o_ioD']/h2")).isDisplayed();
        assertTrue(displayed);

    }

    @Test
    void verifyPageTitle() {

        String pageTitle = driver.getTitle();
        assertEquals("DuckDuckGo — Privacy, simplified.", pageTitle);

    }

    @Test
    void verifyDownloadBrowserButton() {

        boolean downloadBrowserBtn = driver.findElement(By.xpath("//*[@id=\"features\"]/div[1]/section[1]/div/div[1]/div[1]/div[2]/div[1]/a/span")).isDisplayed();
        assertTrue(downloadBrowserBtn);
    }

    @Test
    void displaySearchBox() {

        boolean searchBoxDisplayed = driver.findElement(By.xpath("//*[@id=\"searchbox_input\"]")).isEnabled();
        assertTrue(searchBoxDisplayed);
    }

    @Disabled("This test is not applicable for Sprint 14")
    @Test
    void verifyDefaultSearchButtonText() {

        String defaultSearchBtnText = driver.findElement(By.xpath("//*[@id=\"features\"]/div[1]/section[1]/div/div[1]/div[1]/div[2]/div[1]/h2")).getText();
        assertEquals("Free. Fast. Private. Get our browser on all your devices.",(defaultSearchBtnText));
    }

    @AfterEach
    public void tearDown() {
        driver.close();
    }
}

The output of the above test shows, the 2 tests that are annotated with @Disabled are not executed.

2. Disable Test Class

When we annotate a class as @Disabled, then all the test methods present within that test class will not be executed.

In the below example, there are 2 test classes – Demo and DisabledTestsDemo. Demo class contains 1 test method whereas DisabledTestsDemo contains 5 test methods. I have annotated DisabledTestsDemo class as @Disabled which means all 5 tests present within it will not be executed.

In the below example, there is a base class that contains the initialization of webDriver as well as closing of the same.

import org.junit.jupiter.api.AfterEach;
import org.junit.jupiter.api.BeforeEach;
import org.openqa.selenium.WebDriver;
import org.openqa.selenium.chrome.ChromeDriver;
import org.openqa.selenium.chrome.ChromeOptions;

public class Base {

    static WebDriver driver=null;

    @BeforeEach
    public void setUp() {

        ChromeOptions chromeOptions = new ChromeOptions();
        chromeOptions.addArguments("--start-maximized");
        driver = new ChromeDriver(chromeOptions);
        driver.get("https://duckduckgo.com/");

    }

    @AfterEach
    public void tearDown() {
        driver.close();
    }
}

Class 1 – Demo

import org.junit.jupiter.api.Test;
import static org.junit.jupiter.api.Assertions.assertEquals;

public class NonDisabledClass extends Base {

    @Test
    void verifyPageTitle() {

        String pageTitle = driver.getTitle();
        assertEquals("DuckDuckGo — Privacy, simplified.", pageTitle);

    }
}

Class 2 – DisabledTestsDemo

import org.junit.jupiter.api.Disabled;
import org.junit.jupiter.api.Test;
import org.openqa.selenium.By;
import static org.junit.jupiter.api.Assertions.assertEquals;
import static org.junit.jupiter.api.Assertions.assertTrue;

@Disabled
public class DisabledClassDemo extends Base {

    @Test
    void verifyBrowserText() {
        boolean displayed = driver.findElement(By.xpath("//section[@class='homepage-cta-section_ctaSection__o_ioD']/h2")).isDisplayed();
        assertTrue(displayed);

    }

    @Test
    void verifyDownloadBrowserButton() {

        boolean downloadBrowserBtn = driver.findElement(By.xpath("//*[@id=\"features\"]/div[1]/section[1]/div/div[1]/div[1]/div[2]/div[1]/a/span")).isDisplayed();
        assertTrue(downloadBrowserBtn);
    }

    @Test
    void displaySearchBox() {

        boolean searchBoxDisplayed = driver.findElement(By.xpath("//*[@id=\"searchbox_input\"]")).isEnabled();
        assertTrue(searchBoxDisplayed);
    }

    @Test
    void verifyDefaultSearchButtonText() {

        String defaultSearchBtnText = driver.findElement(By.xpath("//*[@id=\"features\"]/div[1]/section[1]/div/div[1]/div[1]/div[2]/div[1]/h2")).getText();
        assertEquals("Free. Fast. Private. Get our browser on all your devices.",(defaultSearchBtnText));
    }
}

The output of the above test shows, all the test methods present in the class that is annotated with @Disabled are not executed.

Congratulations. We are able to understand the usage of @Disabled annotation in JUnit5. Happy Learning!!

TestNG Framework: How to run Parallel Tests in Selenium with TestNG

HOME

To start with, add the below mentioned dependencies to POM.xml (Maven project)

<project xmlns="http://maven.apache.org/POM/4.0.0" xmlns:xsi="http://www.w3.org/2001/XMLSchema-instance"
         xsi:schemaLocation="http://maven.apache.org/POM/4.0.0 http://maven.apache.org/xsd/maven-4.0.0.xsd">
    <modelVersion>4.0.0</modelVersion>

    <groupId>com.example</groupId>
    <artifactId>ParallelTestsTestNG</artifactId>
    <version>1.0-SNAPSHOT</version>
    <packaging>jar</packaging>

    <name>ParallelTestsTestNG</name>
    <url>http://maven.apache.org</url>

    <properties>
        <project.build.sourceEncoding>UTF-8</project.build.sourceEncoding>
        <selenium.version>4.21.0</selenium.version>
        <testng.version>7.10.2</testng.version>
        <maven.compiler.plugin.version>3.13.0</maven.compiler.plugin.version>
        <maven.compiler.source.version>17</maven.compiler.source.version>
        <maven.compiler.target.version>17</maven.compiler.target.version>
        <maven.surefire.plugin.version>3.2.5</maven.surefire.plugin.version>
        <java.version>17</java.version>
    </properties>

    <dependencies>

        <dependency>
            <groupId>org.seleniumhq.selenium</groupId>
            <artifactId>selenium-java</artifactId>
            <version>${selenium.version}</version>
        </dependency>

        <dependency>
            <groupId>org.testng</groupId>
            <artifactId>testng</artifactId>
            <version>${testng.version}</version>
            <scope>test</scope>
        </dependency>

    </dependencies>

    <build>
        <plugins>
            <plugin>
                <groupId>org.apache.maven.plugins</groupId>
                <artifactId>maven-surefire-plugin</artifactId>
                <version>${maven.surefire.plugin.version}</version>
                <configuration>
                    <suiteXmlFiles>
                        <suiteXmlFile>testng.xml</suiteXmlFile>
                    </suiteXmlFiles>
                </configuration>
                <dependencies>
                    <dependency>
                        <groupId>org.apache.maven.surefire</groupId>
                        <artifactId>surefire-testng</artifactId>
                        <version>${maven.surefire.plugin.version}</version>
                    </dependency>
                </dependencies>
            </plugin>

            <plugin>
                <groupId>org.apache.maven.plugins</groupId>
                <artifactId>maven-compiler-plugin</artifactId>
                <version>${maven.compiler.plugin.version}</version>
                <configuration>
                    <source>${maven.compiler.source.version}</source>
                    <target>${maven.compiler.target.version}</target>
                </configuration>
            </plugin>
        </plugins>
    </build>
</project>

Let us create a class with multiple tests. In the below Example, we have created three test cases or methods . We want to run these methods parallelly. To achieve this, we need to add the below command in testng.xml

parallel="methods"
import org.openqa.selenium.By;
import org.openqa.selenium.WebDriver;
import org.openqa.selenium.chrome.ChromeDriver;
import org.openqa.selenium.chrome.ChromeOptions;
import org.testng.Assert;
import org.testng.annotations.*;

import java.time.Duration;

public class ParallelTestsExample1 {


    @Test
    public void invalidLoginTest() {

        System.out.println("Test Case 1 with Thread Id - "+Thread.currentThread().getId());
        ChromeOptions options = new ChromeOptions();
        options.addArguments("--start-maximized");
        WebDriver driver = new ChromeDriver(options);
        driver.manage().timeouts().implicitlyWait(Duration.ofSeconds(5));
        driver.get("https://opensource-demo.orangehrmlive.com/web/index.php/auth/login");
        driver.findElement(By.name("username")).sendKeys("admin123123");
        driver.findElement(By.name("password")).sendKeys("adm");
        driver.findElement(By.xpath("//*[@class='oxd-form']/div[3]/button")).click();
        String expectedError = driver.findElement(By.xpath("//*[@class='orangehrm-login-error']/div[1]/div[1]/p")).getText();
        Assert.assertTrue(expectedError.contains("Invalid credentials"));

    }

    @Test
    public void validLoginTest() throws InterruptedException {

        System.out.println("Test Case 2 with Thread Id - "+Thread.currentThread().getId());
        ChromeOptions options = new ChromeOptions();
        options.addArguments("--start-maximized");
        WebDriver driver = new ChromeDriver(options);
        driver.manage().timeouts().implicitlyWait(Duration.ofSeconds(5));
        driver.get("https://opensource-demo.orangehrmlive.com/web/index.php/auth/login");
        driver.findElement(By.name("username")).sendKeys("Admin");
        driver.findElement(By.name("password")).sendKeys("admin123");
        driver.findElement(By.xpath("//*[@class='oxd-form']/div[3]/button")).click();
        String expectedTitle = driver.findElement(By.xpath("//*[@class='oxd-topbar-header-breadcrumb']/h6")).getText();
        Assert.assertTrue(expectedTitle.contains("Dashboard"));
    }

    @Test
    public void forgotLinkTest() {

        System.out.println("Test Case 3 with Thread Id - "+Thread.currentThread().getId());
        ChromeOptions options = new ChromeOptions();
        options.addArguments("--start-maximized");
        WebDriver driver = new ChromeDriver(options);
        driver.manage().timeouts().implicitlyWait(Duration.ofSeconds(5));
        driver.get("https://opensource-demo.orangehrmlive.com/web/index.php/auth/login");

        String expectedLink = driver.findElement(By.className("orangehrm-login-forgot-header")).getText();
        Assert.assertTrue(expectedLink.contains("Forgot your password?"));
    }


}

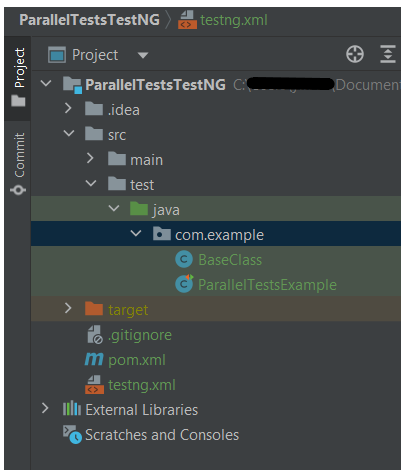
Now, let us create a testng.xml. Right click on the project and select TestNG -> Convert to TestNG.

The attribute thread-count allows you to specify how many threads should be allocated for this execution.

parallel = “methods” means that the methods will run parallel

The parallel attribute can be extended for multiple values, as below:

·         Methods: Helps run methods in separate threads

·         Tests: Help to run all methods belonging to the same tag in the same thread, means tests will run sequentially

·         Classes: Helps to run all methods belonging to a class in a single thread

·         Instances: Helps run all methods in the same instance in the same thread

testng.xml

<?xml version="1.0" encoding="UTF-8"?>
<!DOCTYPE suite SYSTEM "https://testng.org/testng-1.0.dtd">
<suite name="Suite">
  <test name="Parallel Tests" parallel = "methods" thread-count="3">
    <classes>
      <class name="com.example.parallel.ParallelTestsExample"/>
    </classes>
  </test> <!-- Test -->
</suite> <!-- Suite -->

How to run the tests?

Right-click on testng.xml and select Run AS -> TestNG Suite. If you will run the Test Class – ParallelTestDemo.java as Right click and then Run As TestNG Tests, then the methods will run sequentially.

Execution

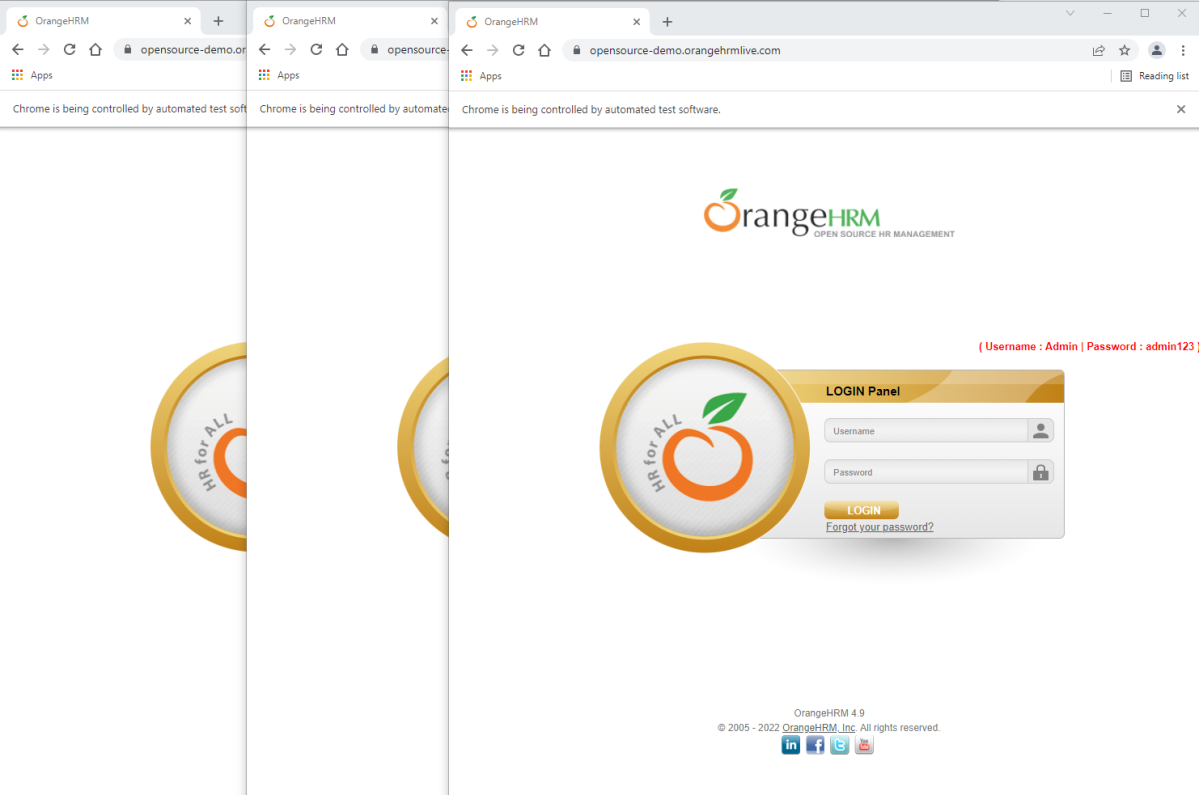
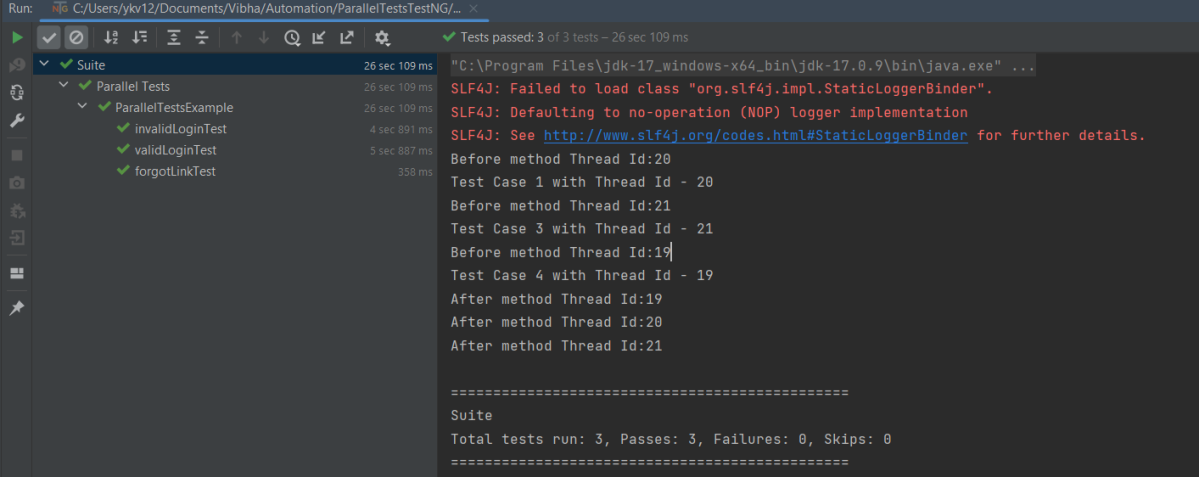
Here it can be seen that 3 tests were running on thread no – 19, 20 and 21. Out of all 3 tests, browser for only 1 test is closed and rest 2 browsers are left open.

First thread initialized a browser and set a value to static WebDriver reference. Second thread initialized another browser and set a new value to the same static WebDriver reference and this will impact value set by first thread as it is a static. All threads wanted to close same browser that is the reason there is one configuration method failure as one browser is closed another threads will not find sessions to close the browsers. Browser was closed already so last 2 tests did not able to close the browser.

To overcome this issue, will use ThreadLocal<WebDriver>. The complete program looks like as below:

First, I will create a HelperClass which contains the initialization of driver and closing the driver. I like to keep the tests only in Test Class. This is not mandatory. You can combine the code of both classes in one also.

HelperClass

import org.openqa.selenium.WebDriver;
import org.openqa.selenium.chrome.ChromeDriver;
import org.openqa.selenium.chrome.ChromeOptions;
import org.testng.annotations.AfterMethod;
import org.testng.annotations.BeforeMethod;

import java.time.Duration;

public class BaseClass {

    private static final ThreadLocal<WebDriver> driver = new ThreadLocal<WebDriver>();

    @BeforeMethod
    public void setDriver()  {
        
        ChromeOptions options = new ChromeOptions();
        options.addArguments("--start-maximized");
        driver.set(new ChromeDriver(options));
        driver.get().manage().timeouts().implicitlyWait(Duration.ofSeconds(5));
        driver.get().get("https://opensource-demo.orangehrmlive.com/web/index.php/auth/login");
        System.out.println("Before method Thread Id:" + Thread.currentThread().getId());

    }

    public WebDriver getDriver() {
        return driver.get();
    }
    
    @AfterMethod
    public  void closeBrowser() {
        System.out.println("After method Thread Id:" + Thread.currentThread().getId());
        driver.get().quit();
        driver.remove();
    }
}

ParallelTestsExample

import org.openqa.selenium.By;
import org.testng.Assert;
import org.testng.annotations.Test;

public class ParallelTestsExample extends BaseClass{

    @Test
    public void invalidLoginTest() {

        System.out.println("Test Case 1 with Thread Id - "+Thread.currentThread().getId());

        getDriver().findElement(By.name("username")).sendKeys("admin123123");
        getDriver().findElement(By.name("password")).sendKeys("adm");
        getDriver().findElement(By.xpath("//*[@class='oxd-form']/div[3]/button")).click();
        String expectedError = getDriver().findElement(By.xpath("//*[@class='orangehrm-login-error']/div[1]/div[1]/p")).getText();
        Assert.assertTrue(expectedError.contains("Invalid credentials"));

    }

    @Test
    public void validLoginTest() throws InterruptedException {

        System.out.println("Test Case 2 with Thread Id - "+Thread.currentThread().getId());

        getDriver().findElement(By.name("username")).sendKeys("Admin");
        getDriver().findElement(By.name("password")).sendKeys("admin123");
        getDriver().findElement(By.xpath("//*[@class='oxd-form']/div[3]/button")).click();
        Thread.sleep(5000);
        String expectedTitle = getDriver().findElement(By.xpath("//*[@class='oxd-topbar-header-breadcrumb']/h6")).getText();
        Assert.assertTrue(expectedTitle.contains("Dashboard"));
    }

    @Test
    public void forgotLinkTest() {

        System.out.println("Test Case 3 with Thread Id - "+Thread.currentThread().getId());

        String expectedLink = getDriver().findElement(By.className("orangehrm-login-forgot-header")).getText();
        Assert.assertTrue(expectedLink.contains("Forgot your password?"));
    }

}

The output of the above program is

Report Generation

TestNG generates 2 reports – emailable-report.html and index.html

Emailable-Report.html

Go to test-output folder and open emailable-report.html

This report gives a summary of all the tests executed, passed, failed, skipped and retried with their respective execution time.

Index.html

This report provides the detailed description of the tests like no of tests present, no of methods, time taken by each step, total time taken by each steps, testng.xml data and soon.

Run Tests Sequentially

If you will run the Test Class – ParallelTestDemo.java as Right click and then Run As TestNG Tests, then the methods will run sequentially. Here all tests are run with Thread 1 whereas with parallel execution tests were run with different threads.

We can make parallel = none, if don’t want to run them parallel. It is shown below that all the tests are running on Thread 1 that means once a test ends then another test starts on that thread.

<suite name="TestSuite" thread-count="3" parallel="none" >

Congratulations. We are able to run methods parallelly using TestNG.

How to compare ArrayLists – containsAll method?

HOME

package com.example;

import java.util.ArrayList;
import java.util.Arrays;

public class ContainsAll_ArrayList {

    public static void main(String[] args) {

        ArrayList<String> list1 = new ArrayList<String>();

        list1.add("Java");
        list1.add("Python");
        list1.add("PHP");
        list1.add("JavaScript");
        list1.add("Ruby");


        ArrayList<String> list2 = new ArrayList<>(Arrays.asList("Python", "Ruby"));
        ArrayList<String> list3 = new ArrayList<>(Arrays.asList("Python", "Java", "Ruby", "PHP", "JavaScript"));

        System.out.println("ArrayList1:" + list1);
        System.out.println("ArrayList2:" + list2);

        // check if ArrayList 1 contains ArrayList 2 (ArrayList 2 is subset of ArrayList 1)
        System.out.println("Check arrayList1 containsAll arrayList2 :" + list1.containsAll(list2));

        // check if ArrayList 2 contains ArrayList 1 (ArrayList 2 is subset of ArrayList 1)
        System.out.println("Check arrayList1 containsAll arrayList2 :" + list2.containsAll(list1));

        // check if ArrayList 1 contains ArrayList 3 (different sequence)
        System.out.println("Check arrayList1 containsAll arrayList3 :" + list1.containsAll(list3));

        }
}

list1.containsAll(list2));
list2.containsAll(list1));
list1.containsAll(list3));

Advanced Selenium Interview Questions and Answers 2026

HOME

Number of Tests * Average Test Time / Number of Nodes = Total Execution Time
 
15      *       45s        /        1        =      11m 15s   // Without Grid
15      *       45s        /        5        =      2m 15s    // Grid with 5 Nodes
15      *       45s        /        15       =      45s       // Grid with 15 Nodes

To know more about the steps to configure Selenium4, please refer to Selenium 4 Grid – Parallel Testing.

(//parentElement/*)[n]

import org.openqa.selenium.Proxy;
import org.openqa.selenium.WebDriver;
import org.openqa.selenium.chrome.ChromeDriver;
import org.openqa.selenium.chrome.ChromeOptions;
 
public class ProxyDemo {
 
    public static void main(String[] args) {
 
        // Set the proxy server details
        String proxyAddress = "localhost";
        int proxyPort = 8080;
 
        // Create a Proxy object and set the HTTP proxy details
        Proxy proxy = new Proxy();
        proxy.setHttpProxy(proxyAddress + ":" + proxyPort);
 
        // Configure Chrome options with the Proxy object
        ChromeOptions options = new ChromeOptions();
        options.setProxy(proxy);
        options.addArguments("start-maximized");
 
        // Instantiate ChromeDriver with the configured options
        WebDriver driver = new ChromeDriver(options);
 
 
        // Perform your browsing actions using the driver
        driver.get("https://www.google.com");
        System.out.println("Page Title :" + driver.getTitle());
 
        // Close the browser session
        driver.quit();
    }
}

WebDriver driver = new ChromeDriver(); // For Chrome

WebDriver driver = new FirefoxDriver(); // For Firefox

WebDriver driver = new EdgeDriver(); // For Edge